

Page 1

WIFI Hidden Camera
USER MANUAL
APP:HDMiniCam
Page 2

TIPS:
1. Please insert a micro SD card if you want a recording. You can
playback the video from Micro SD card on the APP.
2. P2P Mode: Blue light is always on, Red light is flashing slowly
-1-
Page 3

Router Mode: Blue light is always on, Red light is also always on. If
the router mode is set up unsuccessfully, the Blue light is always on,
the Red light is flashing quickly. Then you have to reset the
camera,when the red light is flashing slowly,please connect the
camera WIFI again.
3. Reset Function: Please press the “reset” button till all indicated lights
are off , which mean the camera reset successfully.
II. Get started(iPhone Version)
Step1: Before APP Download & Installation
Make sure your device is connected with Wi-Fi.
The camera is compatible with Wi-Fi 2.4 GHz only, but not 5.0 GHz.
(The camera does not work with the public network needed to be
authorized on website.)
Step2: Download the App named “HDMiniCam”
.
Download and install the App named HDMiniCam from Google
Play Store (for Android) or Apple Store (for iOS).
Step3: Plug the camera into outlet.
Please wait two minutes till the camera WIFI signal named “CM...”
appears on your devices WIFI list.(Photo-1)
-2-
Page 4
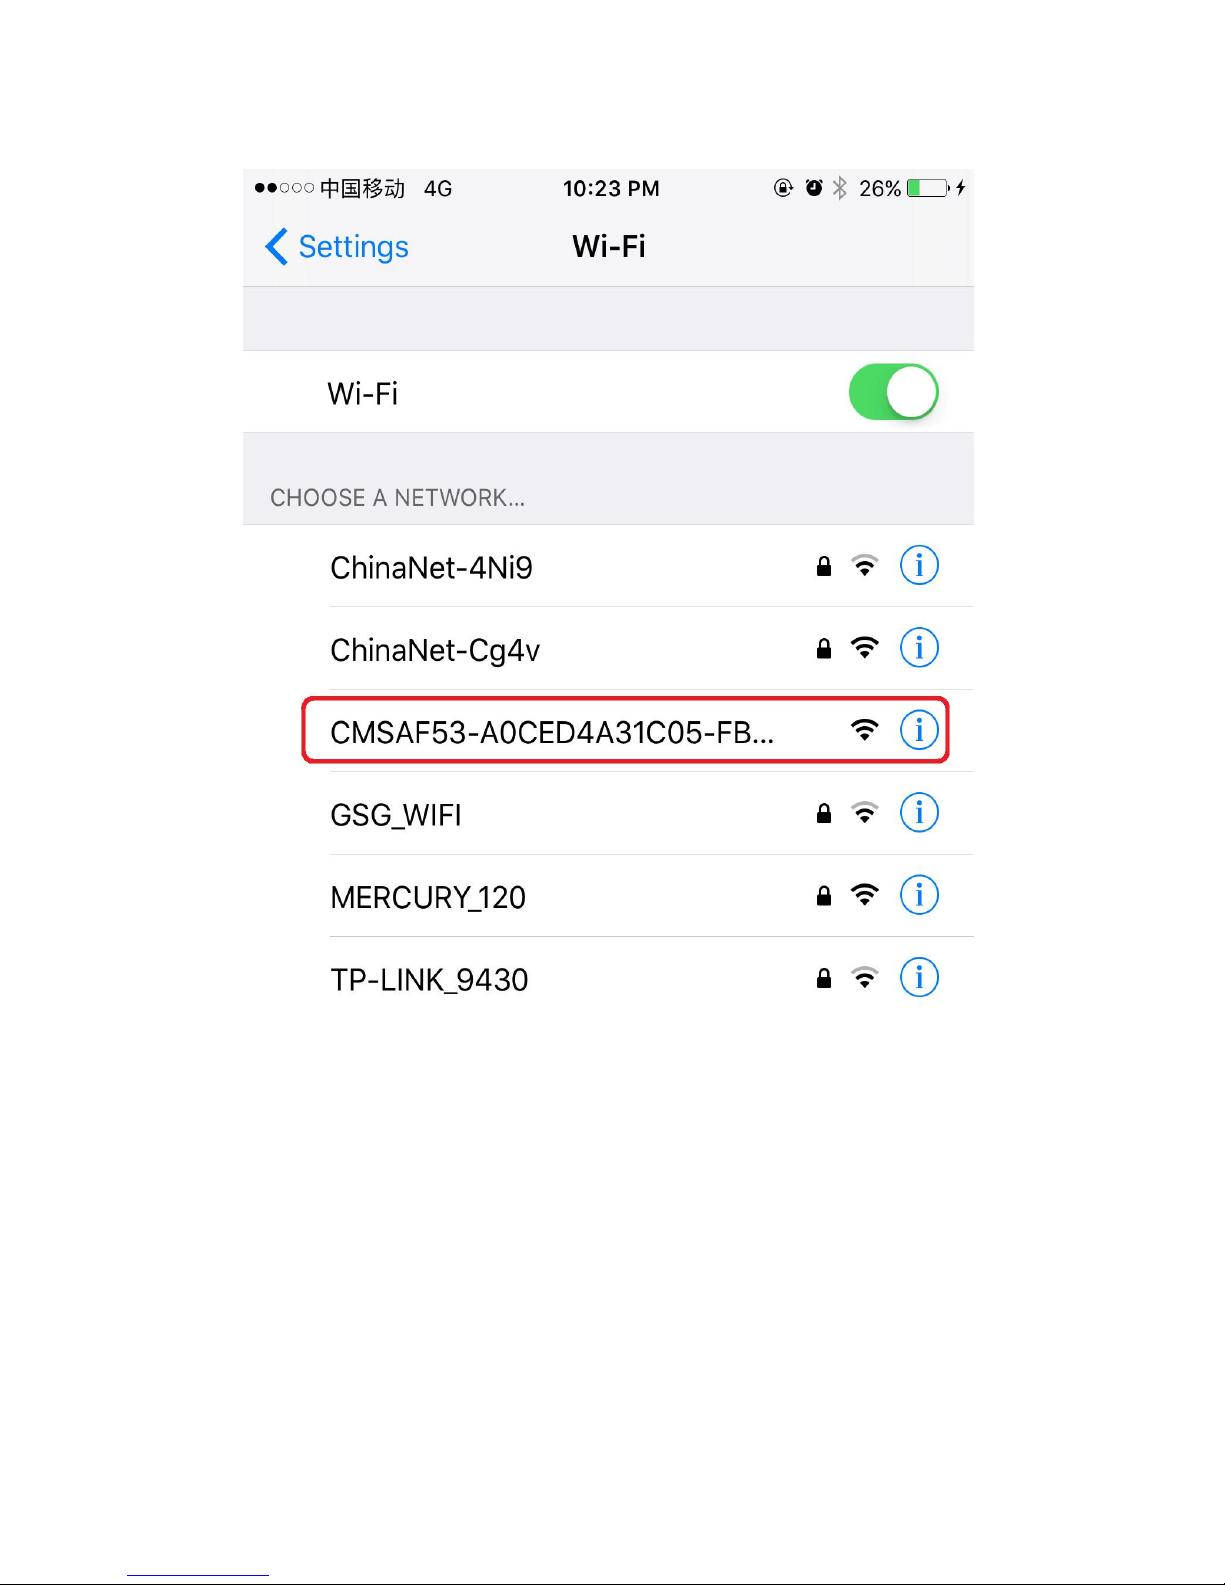
(Photo-1)
If you can’t search the camera WIFI on your device WIFI list,please
reset the camera (you have to stab the “reset” button with pin till all
lights are off).when the red light is flashing slowly,search the camera
WIFI again.
Step4:How to operte the app (iPhone Version)
After connecting camera WIFI successfully,please enter the app,the
-3-
Page 5
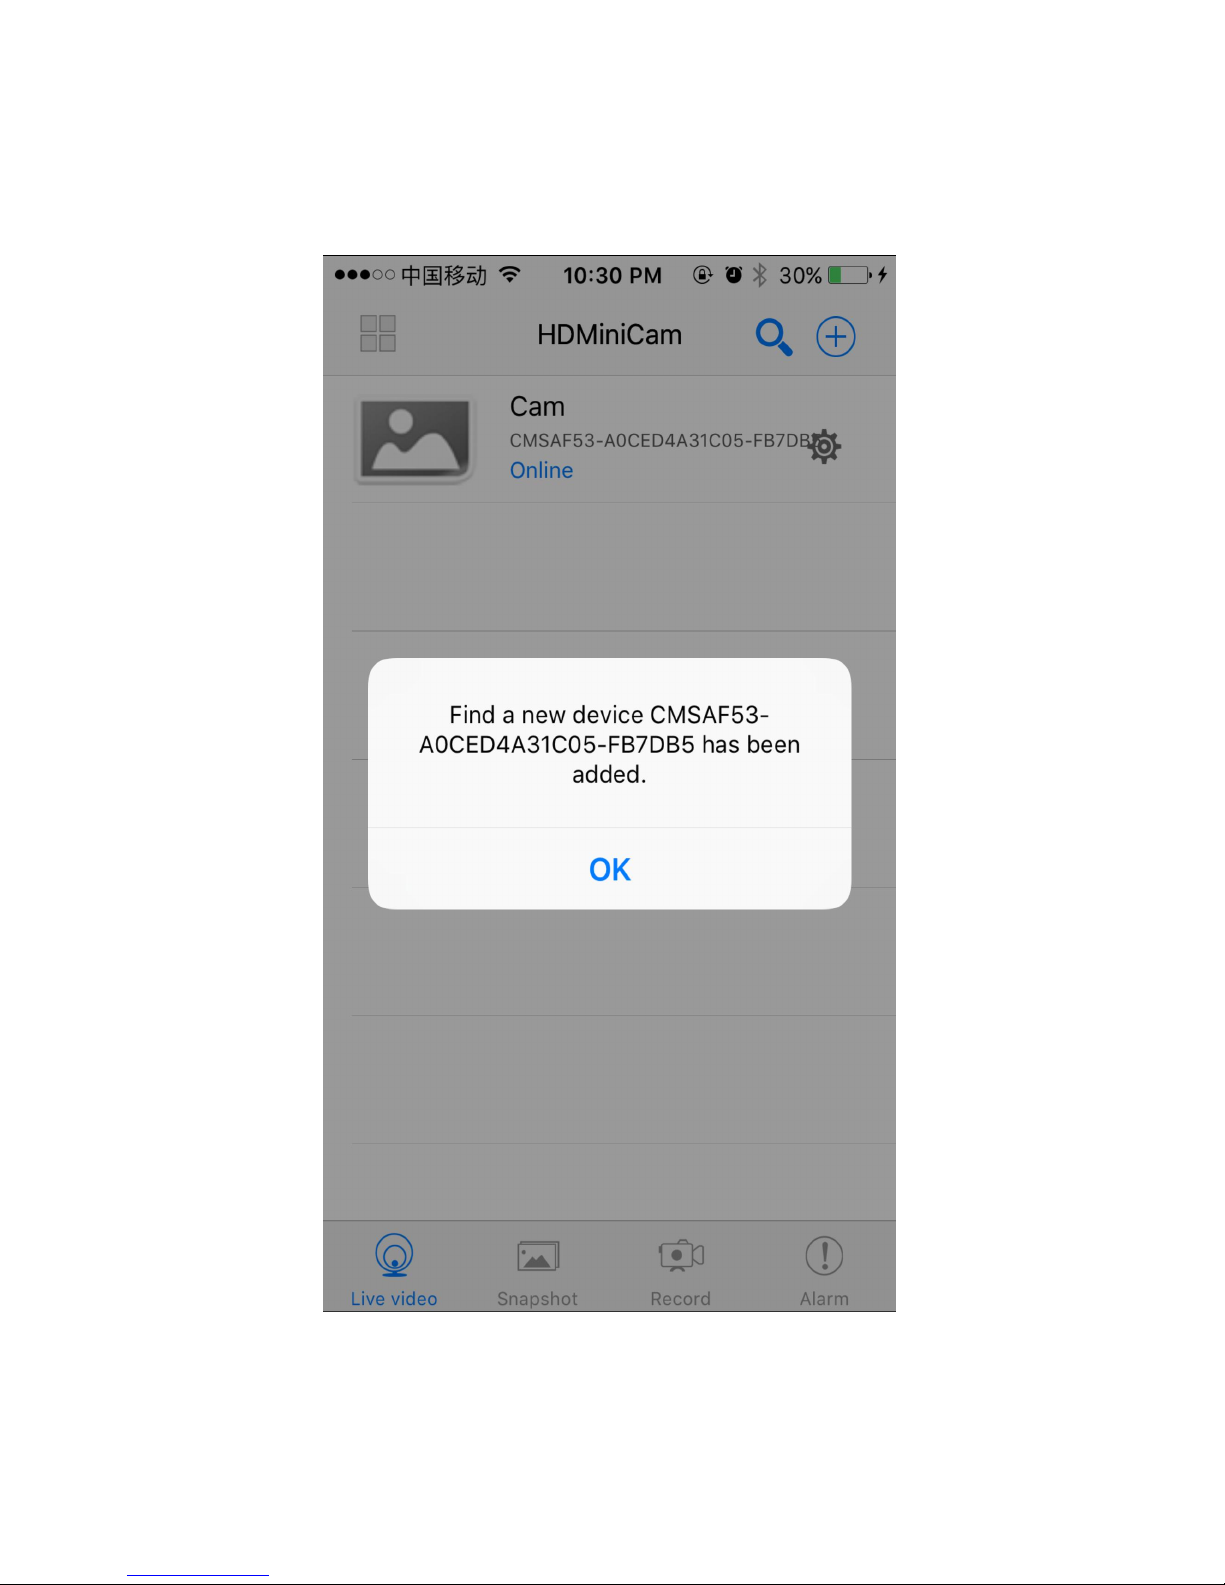
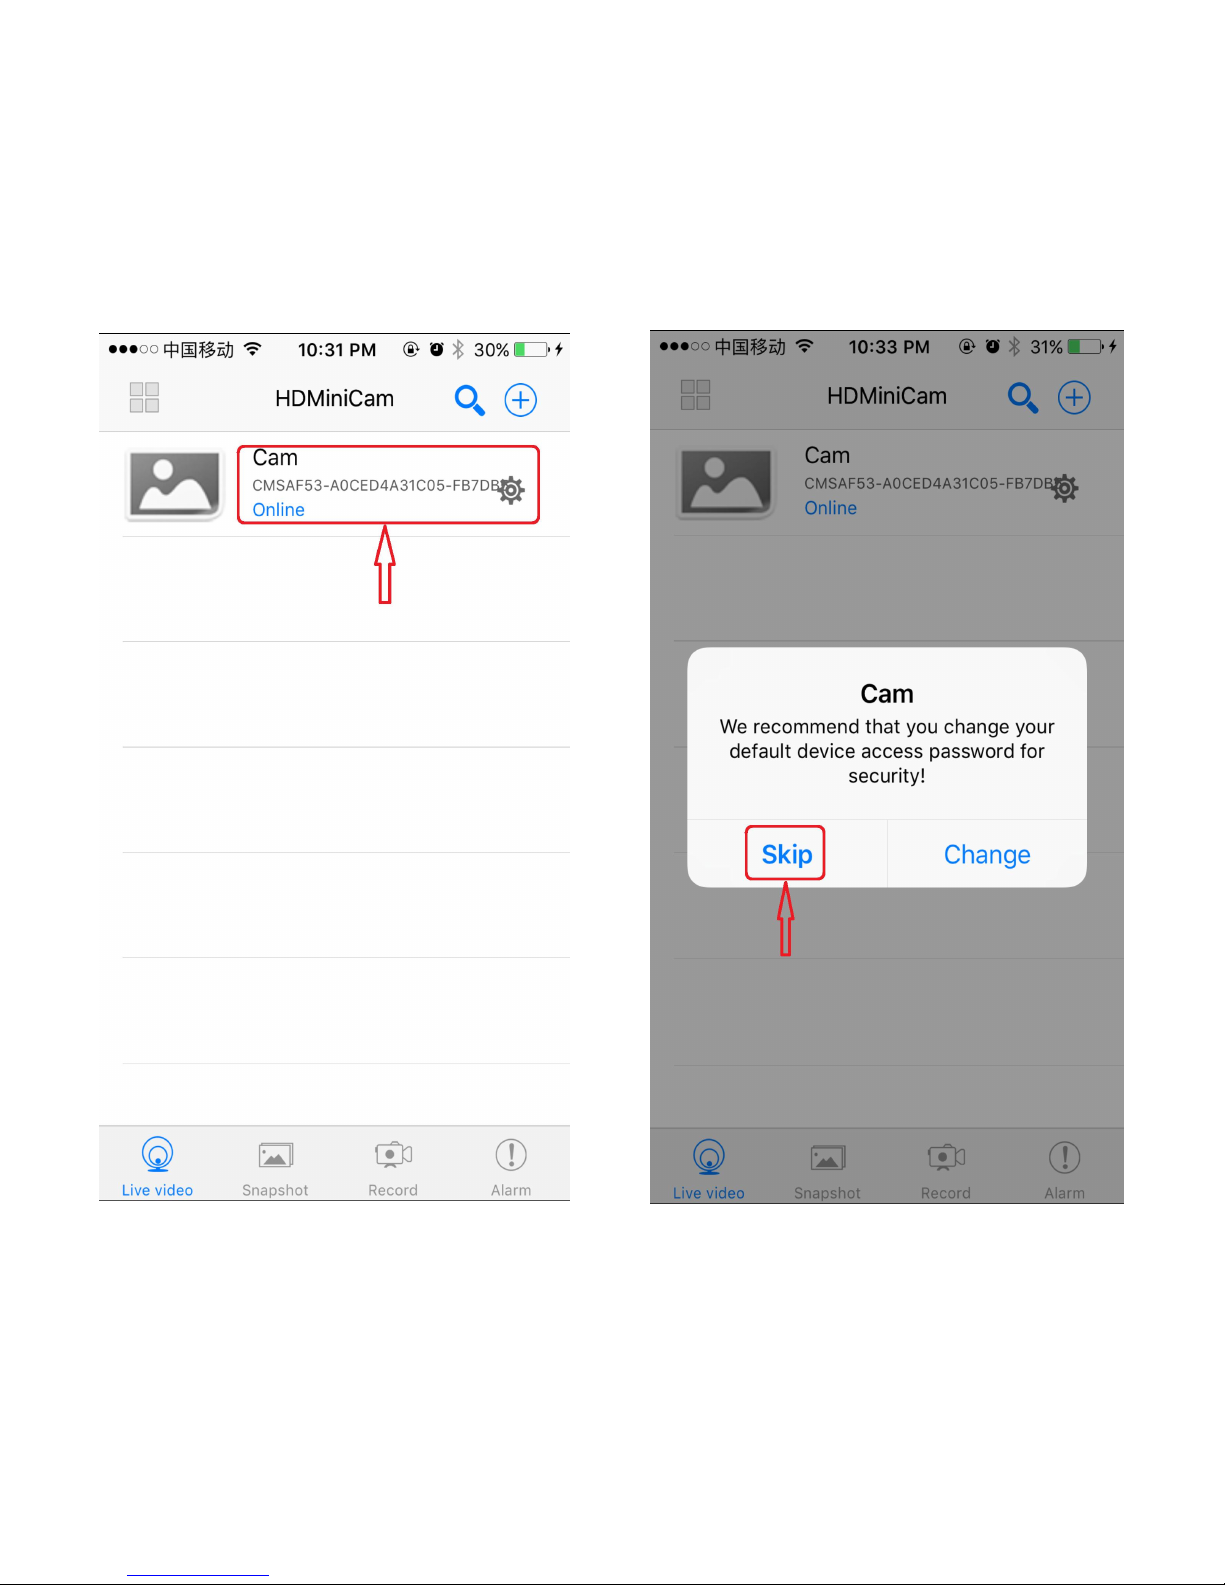
camera will be added on the app main page automatically(Photo-2),Then
press “OK”button.
(Photo-2)
If not,please quit the app,then turn on the app again.
-4-
Page 6
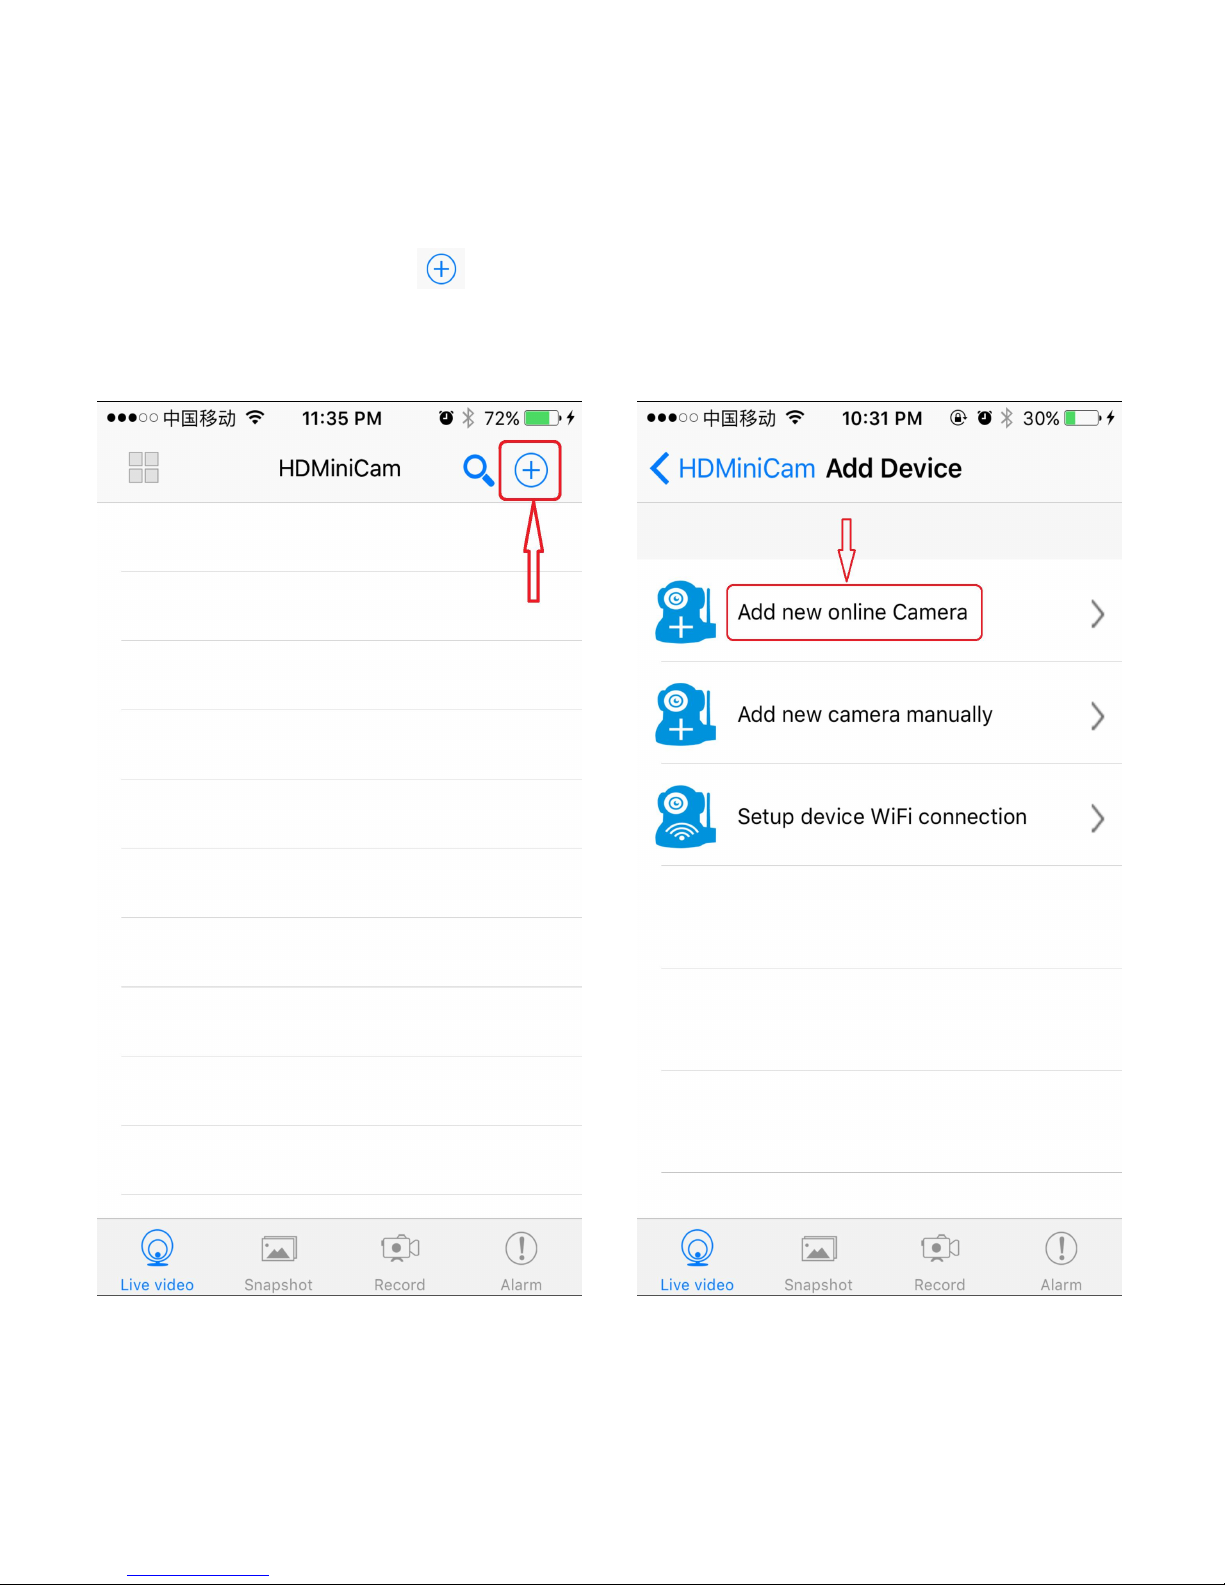
Or you can press “ ”>>press”Add new online Camera”>>press
camera IP address.(Photo-3 to Photo-6)
(Photo-3) (Photo-4)
-5-
Page 7
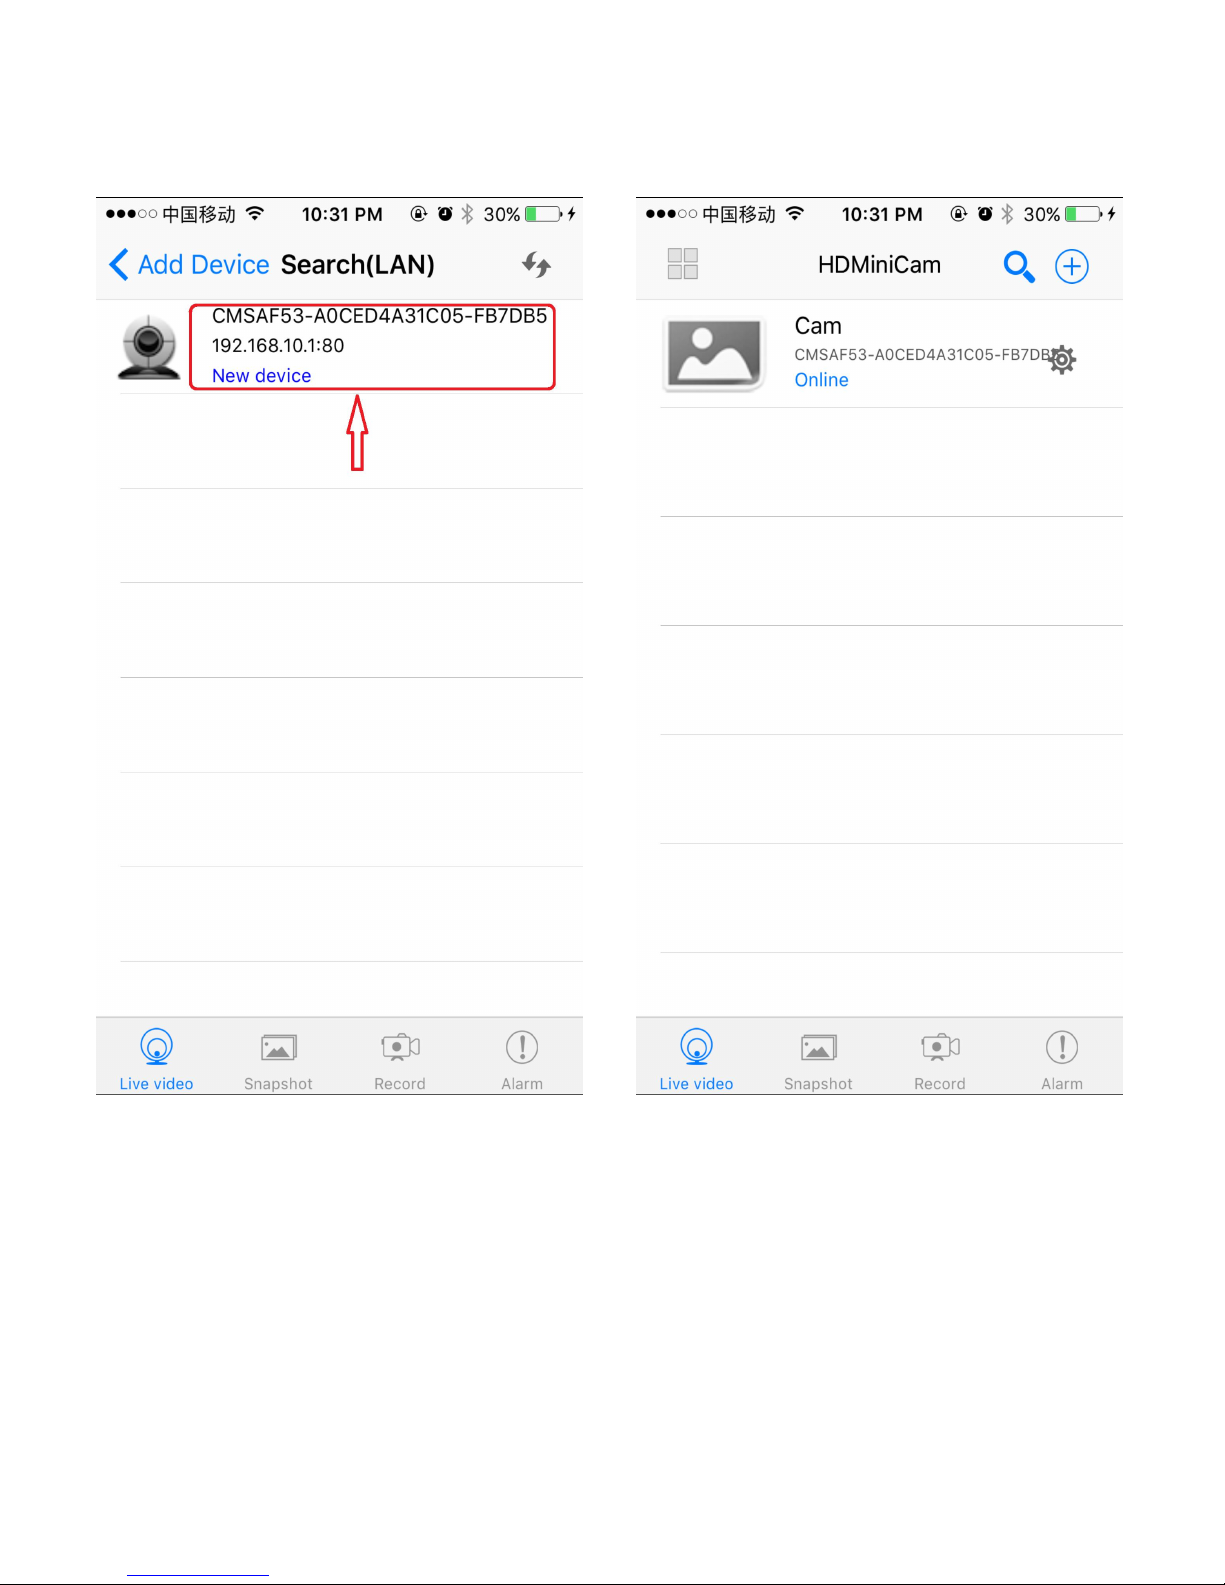
(Photo-5) (Photo-6)
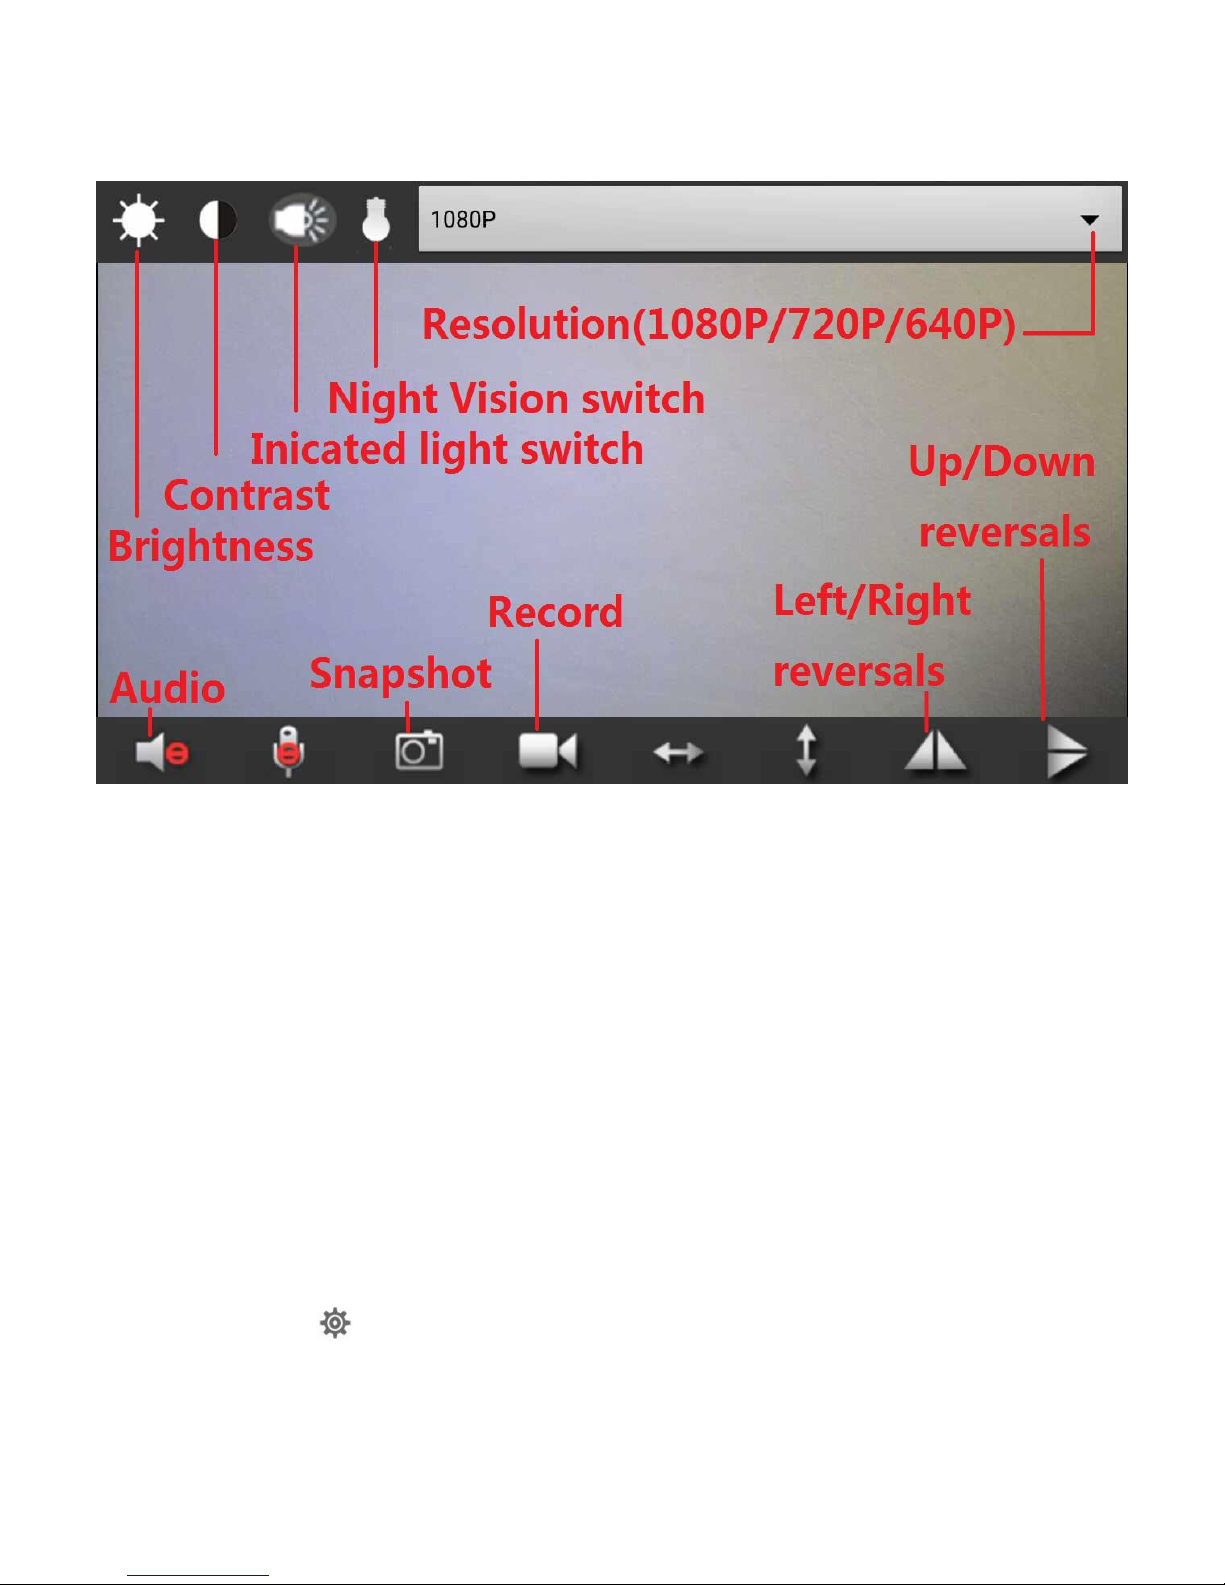
TIPS: This is the P2P mode, which you can view live video without
any network. Till now, you have completed the Mode One, you can
click the online camera to view the video within about 5
Meters.(Photo7 to Photo-9).
-6-
Page 8
(Photo-7) (Photo-8)
-7-
Page 9
(Photo-9)
Note: the camera is no night vision function,so even if you open
the “night vision”button at night,you don’t record anything.
But when you leave from the camera, the camera will be
offline.
Dear, Please don’t worry it. We can take the next steps again.
Step7: Internet Mode Configuration
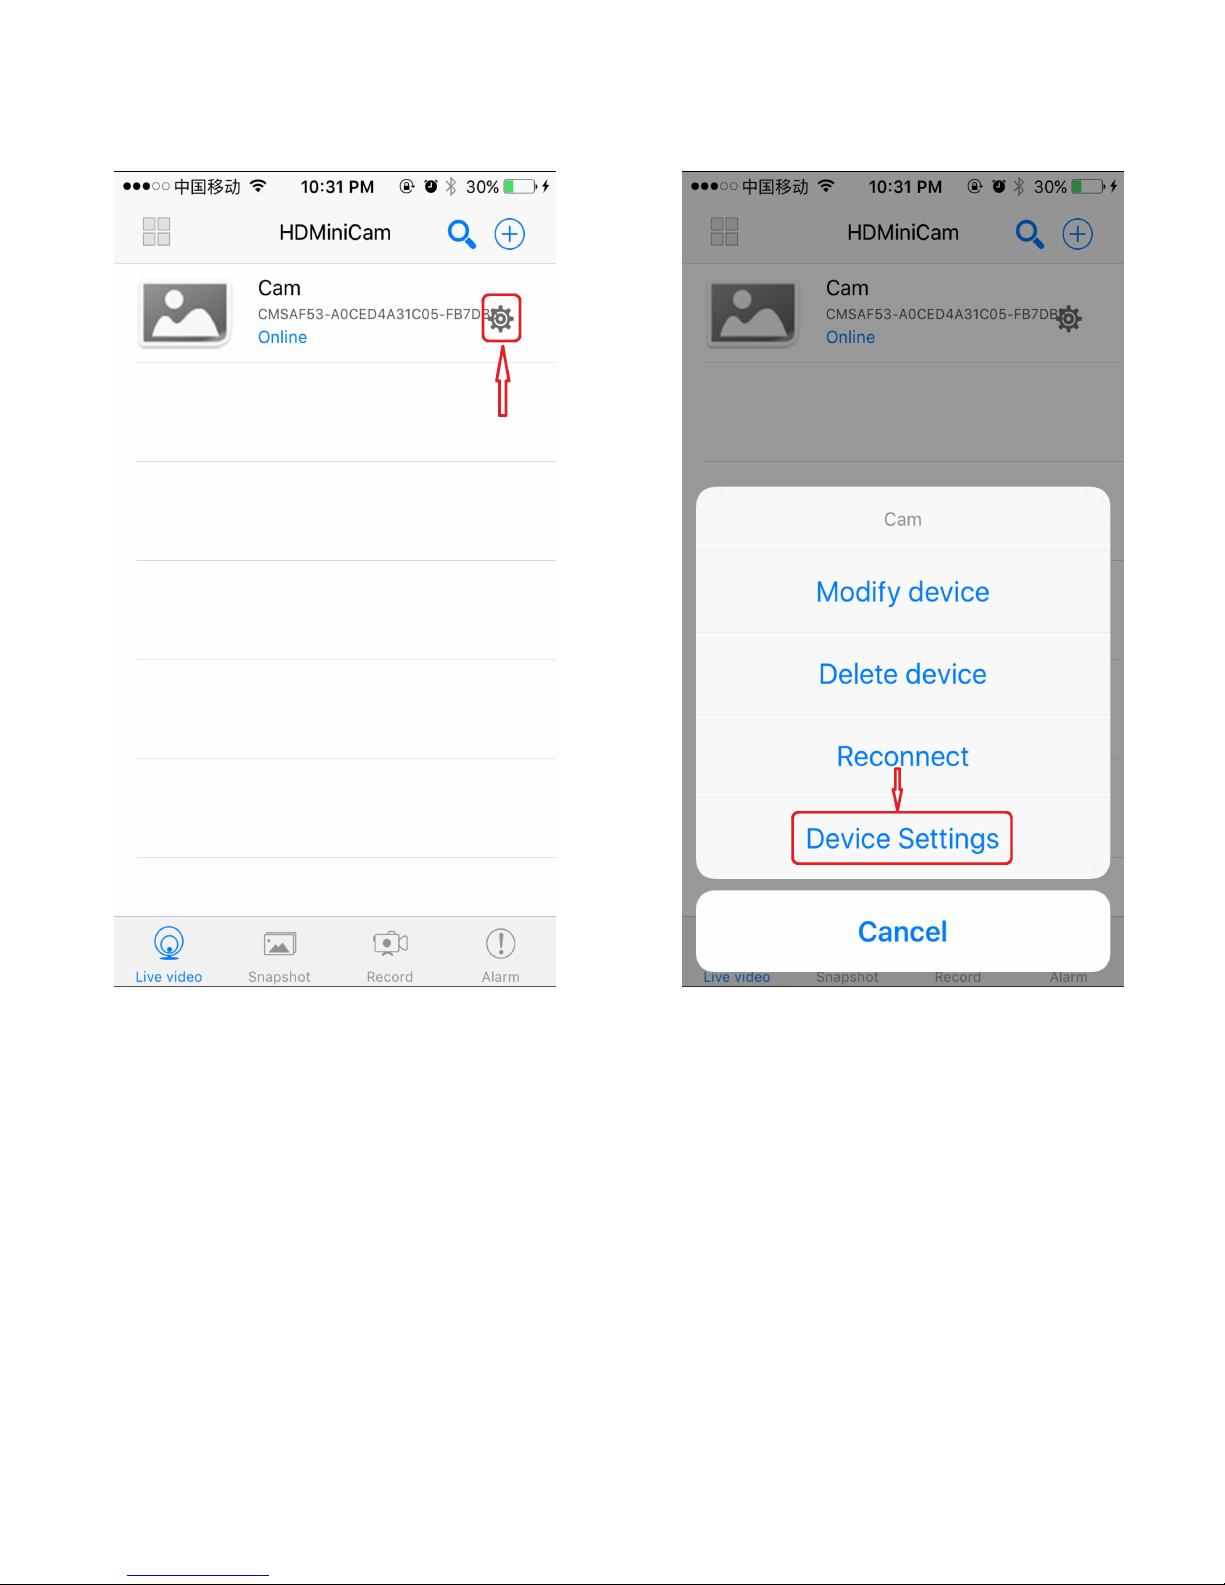
Now Press“ ”icon , a list will pop up, choose “Device Settings”
and continue.(Photo-10 to Photo-11)
-8-
Page 10
(Photo-10) (Photo-11)
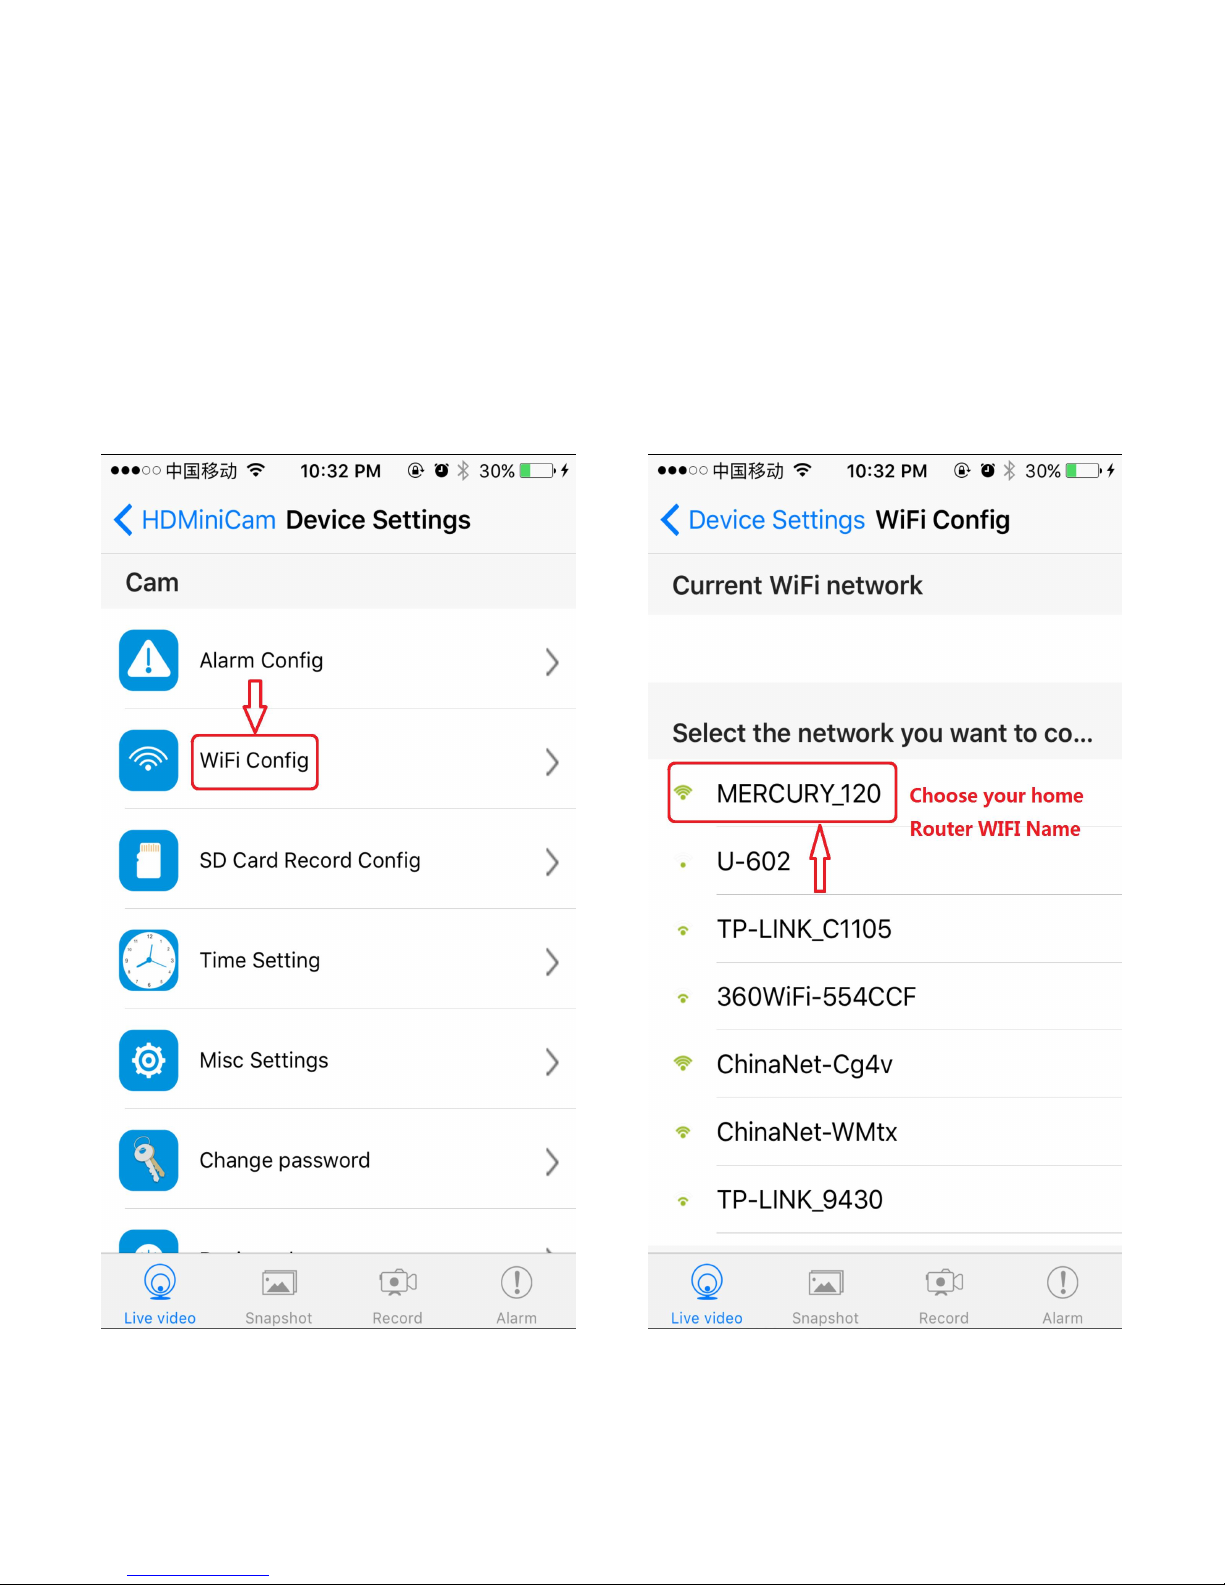
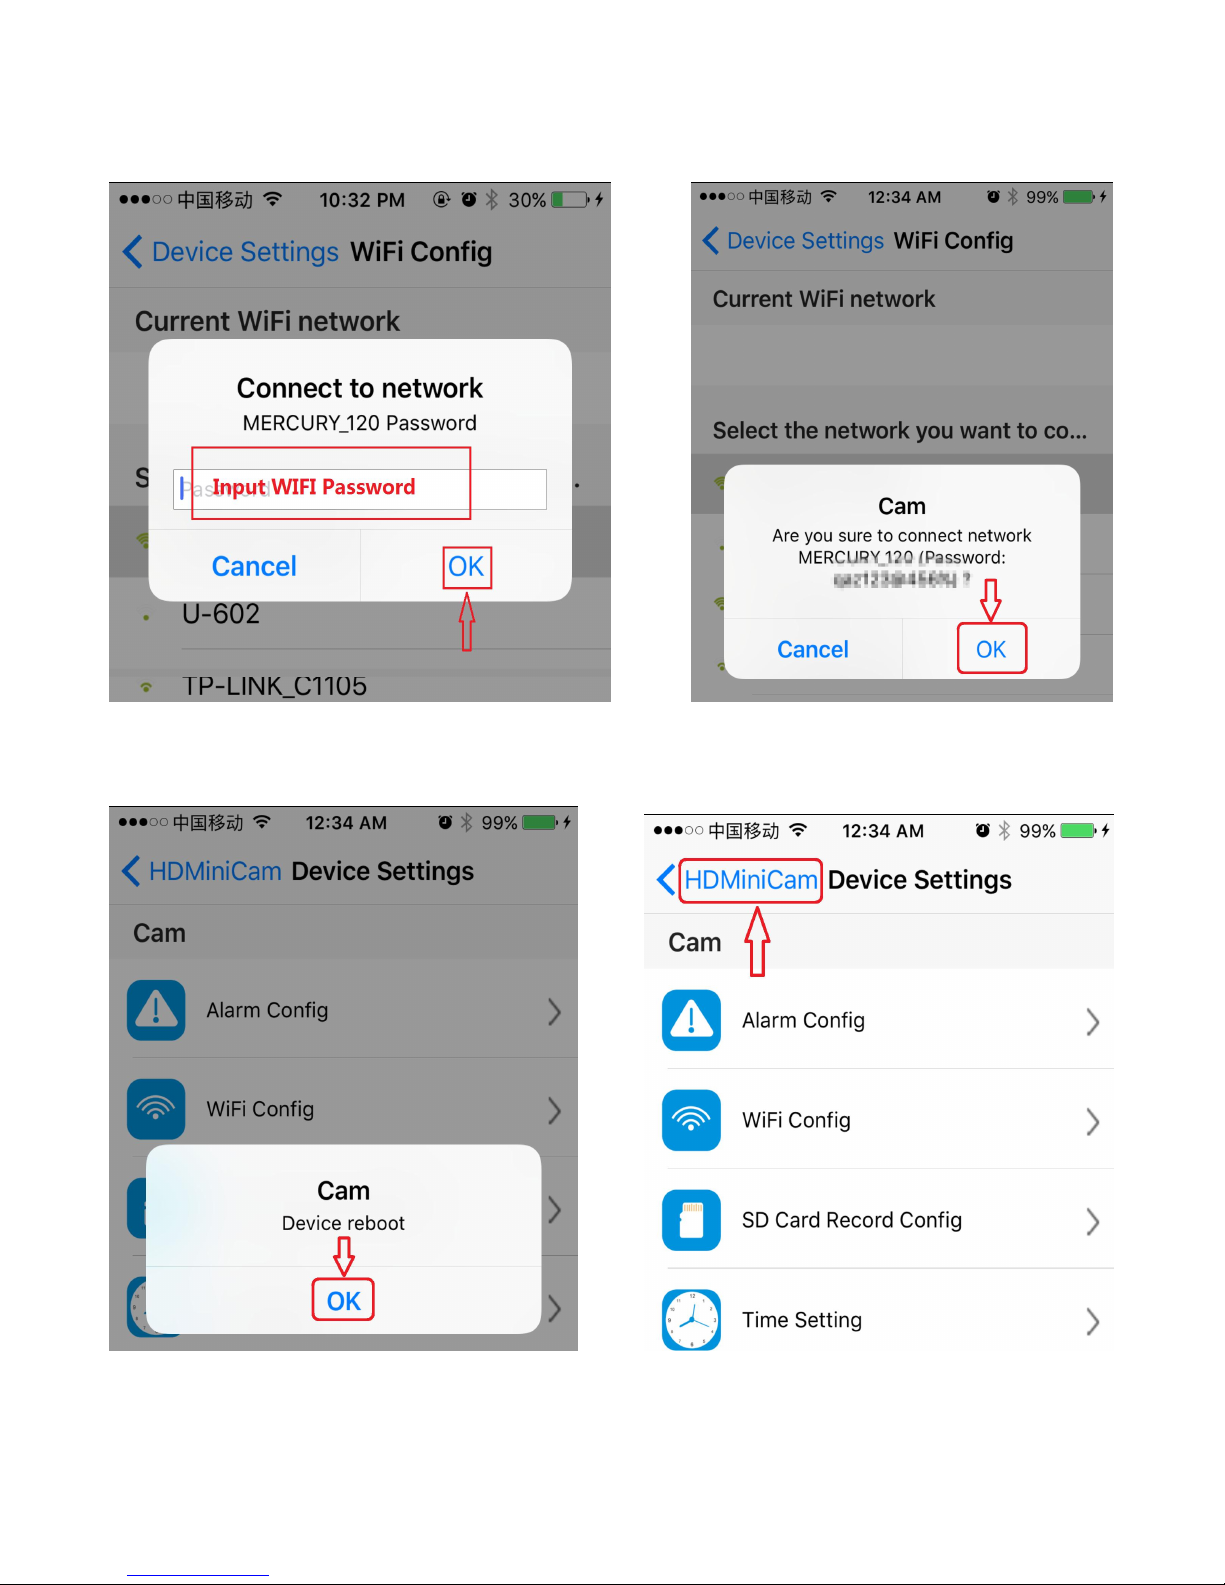
Here comes another page, please select “WIFI
Config”(Photo-12).Select your home router WIFI for
connection.(Photo-13).Input WIFI password and press
“OK”(Photo-14).Finally return back the app main page (Photo 15 to
Photo-19)
The camera will restart and ready in another 3mins.You will see the
-9-
Page 11
camera changing the status,logging in,request service,connecting.
When you see the camera 'Online', the WIFI is set successfully. You
can remote view video now when you are out.
(Photo-12) (Photo-13)
-10-
Page 12
(Photo-14) (Photo-15)
(Photo-16) (Photo-17)
-11-
Page 13

(Photo-18) (Photo-19)
You can add more cameras in your camera list in the same
way.(Follow Step1 to Step7)
III. Alarm Configuration
Tap to enter Settings>Device Settings
Motion detection sensitivity: When motion detection is enabled, the
device will send you an alarm automatically if motion is detected.
You can choose a sensitivity level for Motion detection. It has 7
levels. When you choose “disabled”, motion detection will be
closed.
Alarm schedule: You can set a time period only in which it sends
alarm information to you.
Warming Tone: After enabling motion detection (Motion detection
-12-
Page 14

sensitivity is not set to “disabled”), you can enable the camera to
send out alarm sound or not. This function applies to certain types.
For some types, if smoke/gas detection is available, the alarm also
can be triggered. When it sounds an alarm, you can tap the icon to
stop it.
Alarm interval: After enabling motion detection, if motion is
detected, the camera will perform alarm. You can type in an Arabic
number between 30 with 300 to set the time interval between two
alarms.
Push notifications: You can enable or disable this functionality. If
you enable it, it will send you alarm information even if exit the App
in iOS-powered devices, or run the App in background in
Android-powered devices.
On-Screen Display: If you enable this functionality, it will display
current time in the app.
Certain types with smoke/ gas detection functionality have a more
item to enable or disable smoke/ gas detection alarm. After setting,
please tap “OK” to save it.
IV. SD Card Record Configuration
Record: If you want to record all the time, please choose “All day”.
If you choose “On alarm”, you need to enable motion detection. You
can also choose “Timing Record” to set a time only in which it
records videos into Micro SD card.
Resolution: You can choose the resolution of video recorded in the
Micro SD card (not live video).
File length (minute): It creates a file every 3 minutes by default (that
means it will automatically generate a video file every 3 minutes and
-13-
Page 15

continue recording). You can type in a number to set file length
between 1 and 20 minutes.
Record sound: When you enable this functionality, it will record
sound while recording video.
Loop recording: Turn ON: the micro SD card will be overwritten
after its space is full.
Note:
Please Plug the camera when insert or remove the micro SD card.
If a micro SD card is not recognized or cannot format when inserted
into slot, please remove and insert again.
Must format micro SD card:
For brand new micro SD card, please format before use.
The micro SD card capacity is not detected.
The micro SD card can NOT be formatted when it is recording,
please select “Close”, then click “OK”.
V. Time Setting
You can select the time
mode(Year/Month/Day;Day/Month/Year;Month/Day/Year).
Select Time Zone according to your local time zone.
Finally click “Sync with App Time”, then the camera time will be in
sync with your device time.
VI. Set camera name and private code
Modify name: Press the camera, select “Modify device”, then
you can modify the name.
Modify password: Click the camera and select “Change”. Please
input new password and confirm password. Current Password is 8888.
-14-
Page 16

Note:when you forget the password you modified,please reset the
camera.
VI. Add Camera to PC(Windows system)
NOTE: Camera must be connected to network using mobile device first.
(the camera and the PC should connect the same router.)
Run “IPCMultiViewSetupSig V1.7” in CD’s Windows folder and install
on your PC.
The Username is “admin” with NO password, then log in.
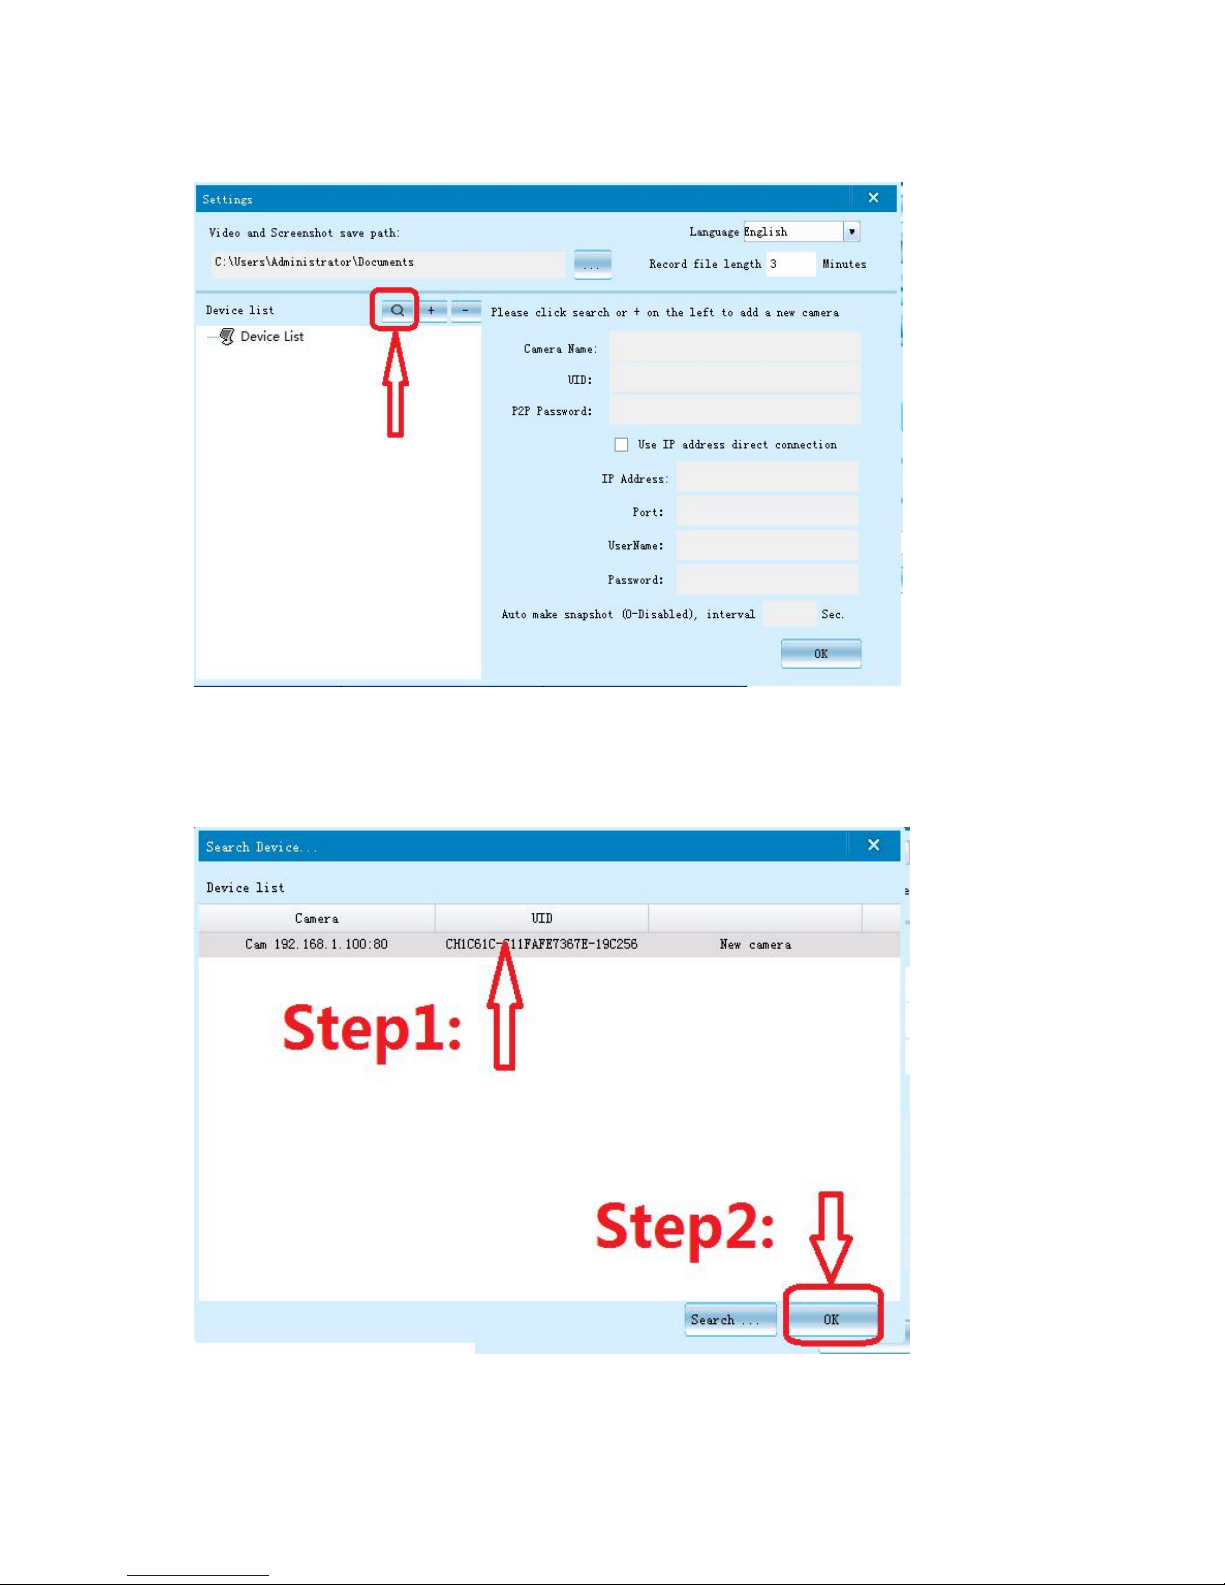
Click “ ” to add camera to PC.(Photo-20)
(Photo-20)
Then click “ ”(Photo-21)
-15-
Page 17
(Photo-21)
Click the camera IP address,then click “OK”(Photo-22)
(Photo-22)
-16-
Page 18
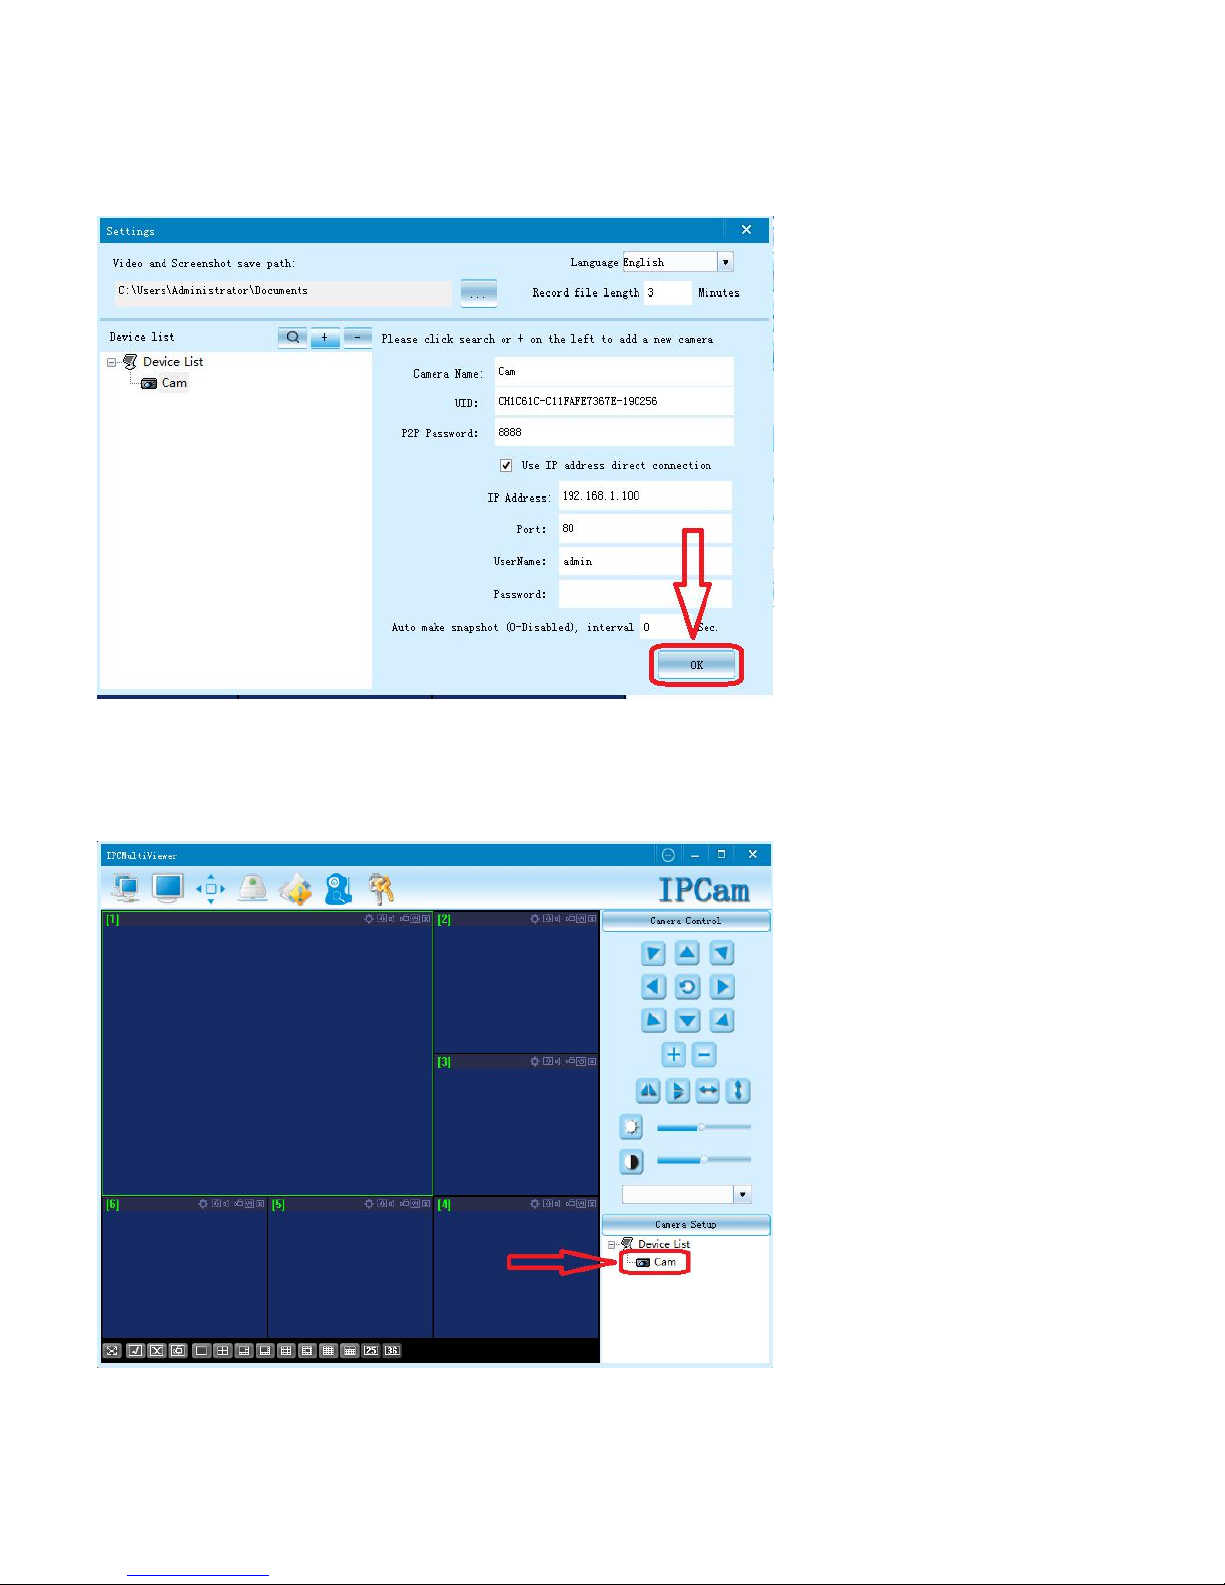
Click”OK”,then return the client main page.(Photo-23)
(Photo-23)
Double click”Cam”button,(Photo-24).then the image will be
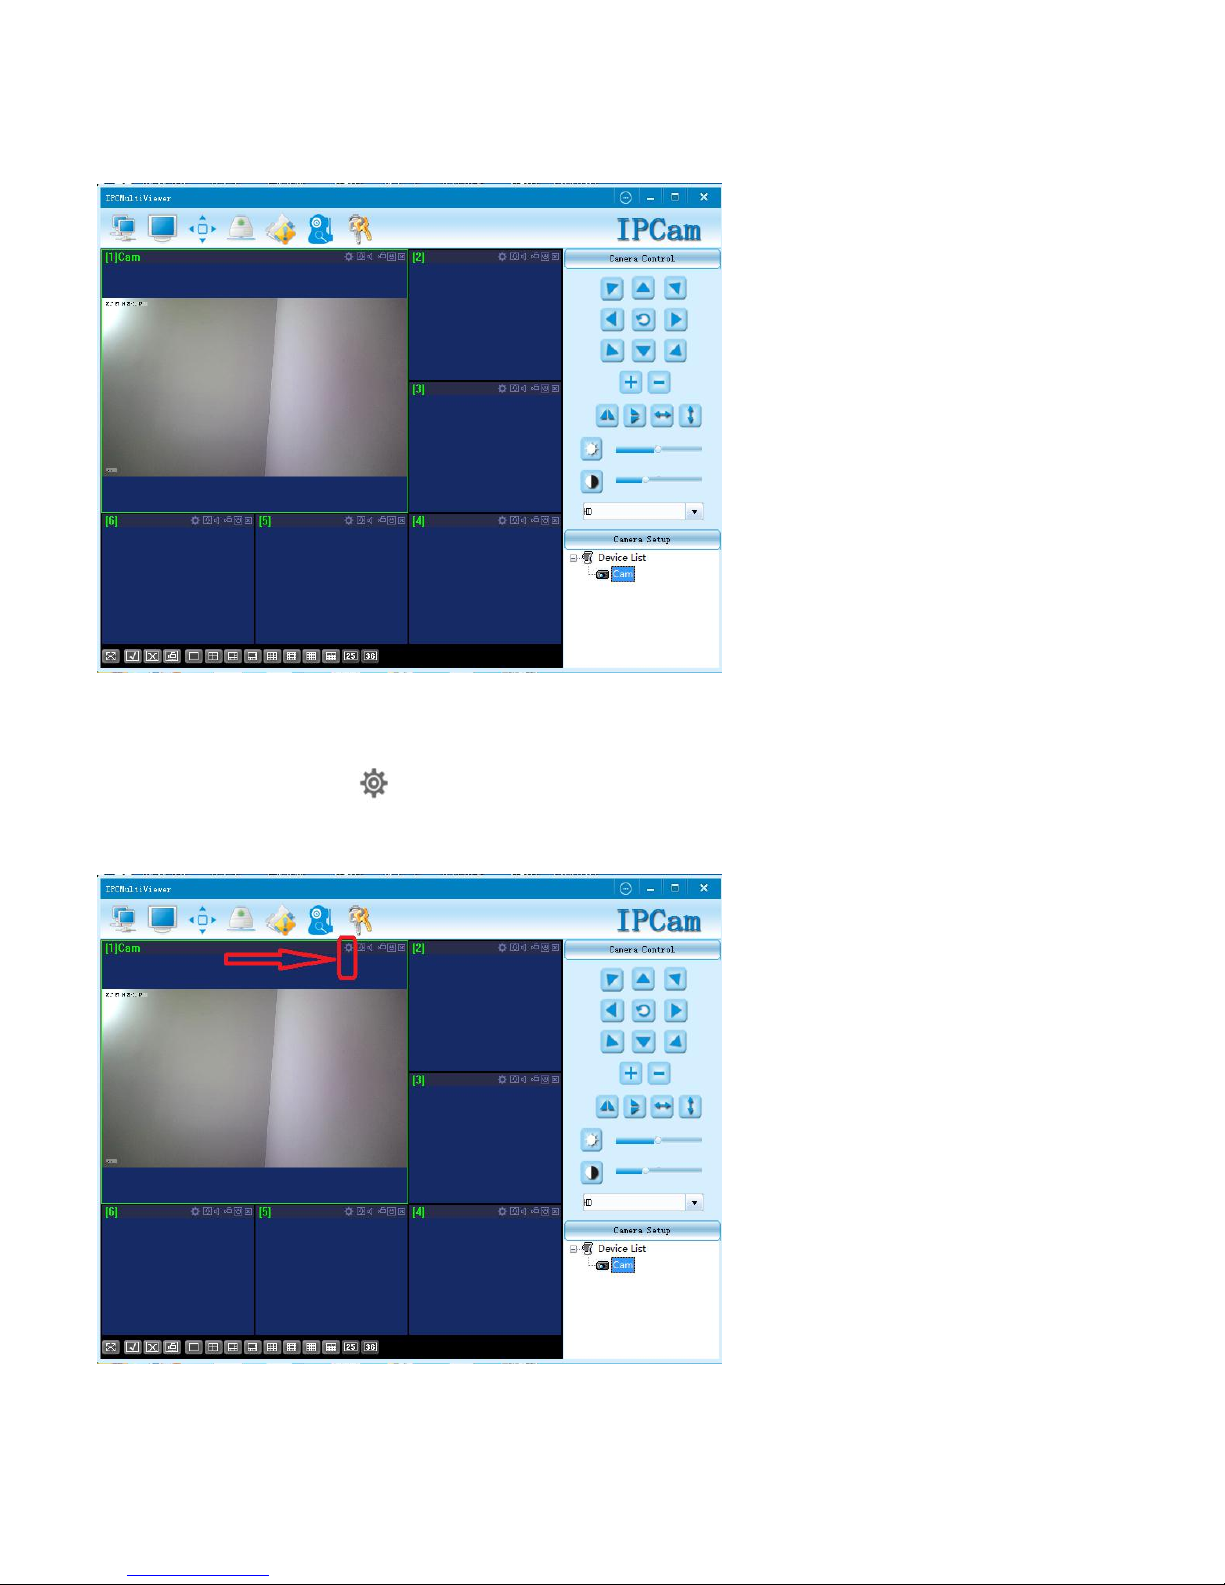
appeared on the main page.(Photo-25)
(Photo-24)
-17-
Page 19
(Photo-25)
PC Client Setting
Please click the “ ” on the main page(Photo-26).Then you can set the
camera according to your request.(Photo-27)
(Photo-26)
-18-
Page 20
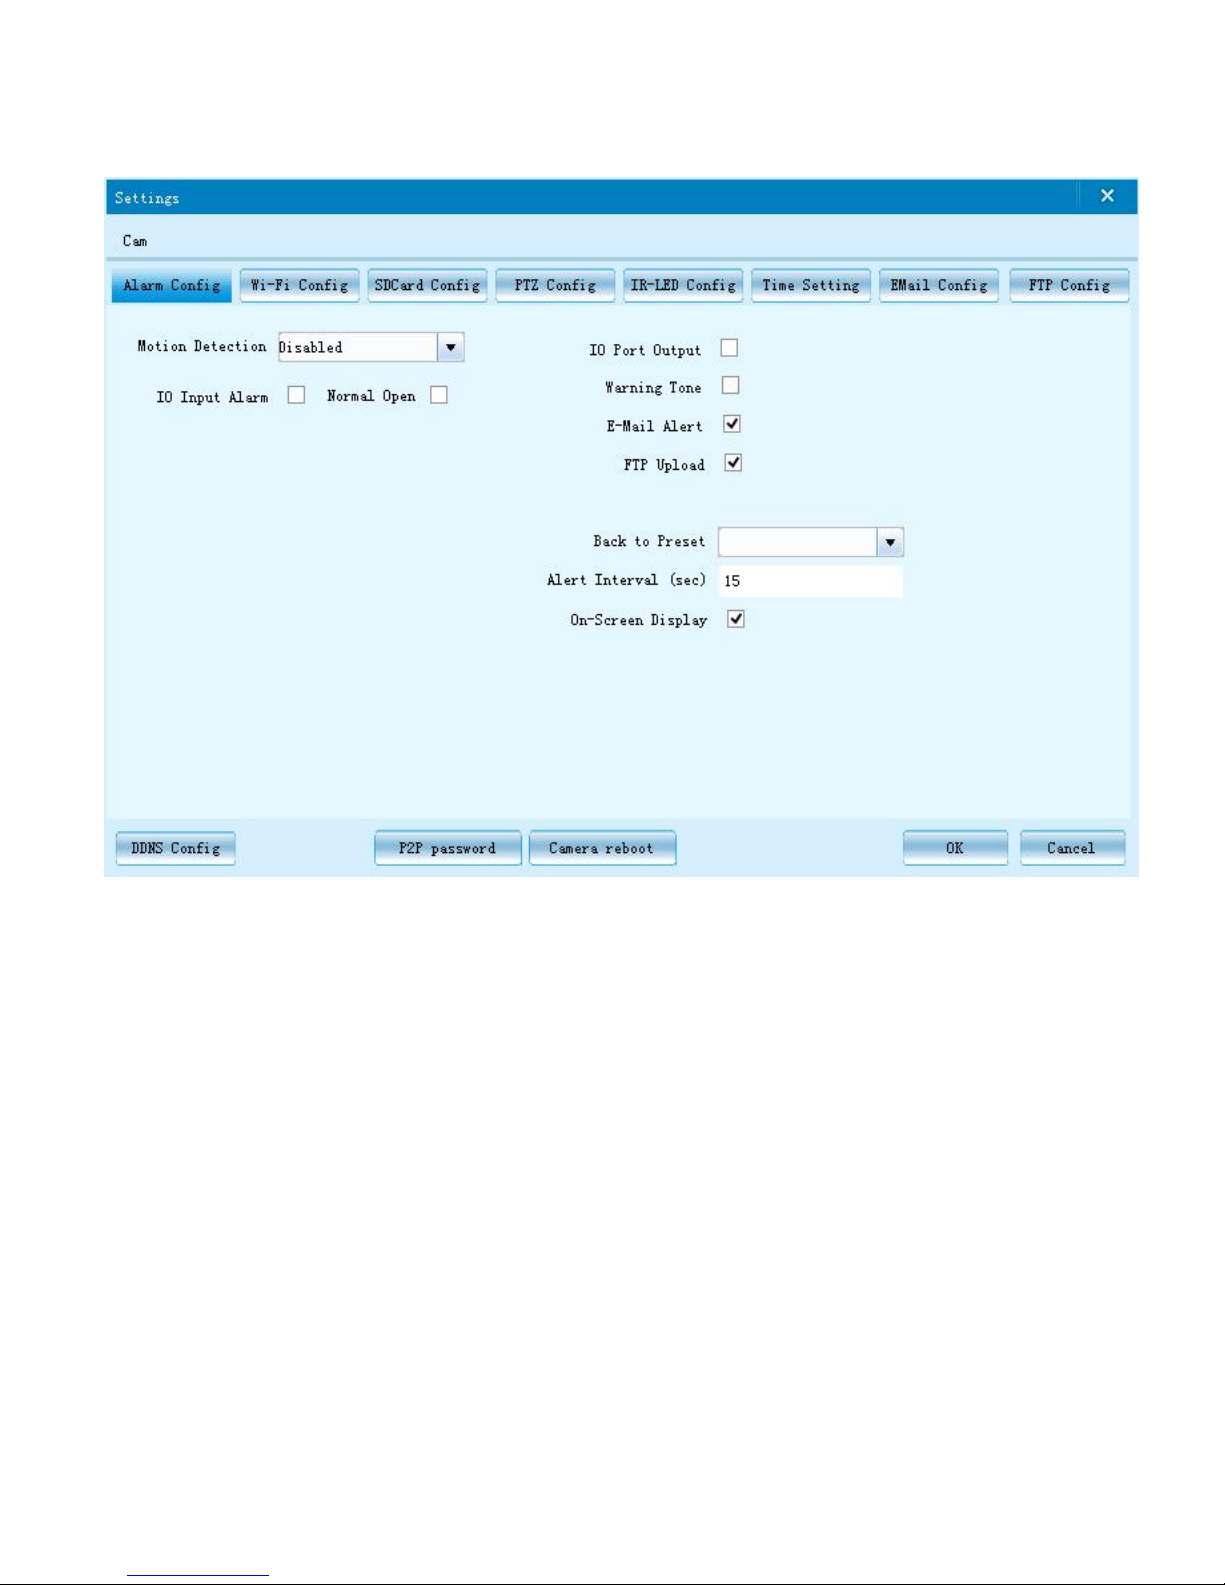
(Photo-27)
*NOTE : Please remember the UID and its password if you want to
watch it remotely.
VII. View in Web Browser
Run IP Camera Search Tool in CD’s Windows (MAC OS) folder. Click
Search and double click the camera item listed in the camera list.
The Username is “admin” and no password is required.
You can visit camera only in the local area network (LAN) on Mac.
Make sure the Mac and camera are connected with the same Wi-Fi.
Click “IP Camera Search Tool” icon.
Click “IP address” and then click “Open”.
-19-
Page 21
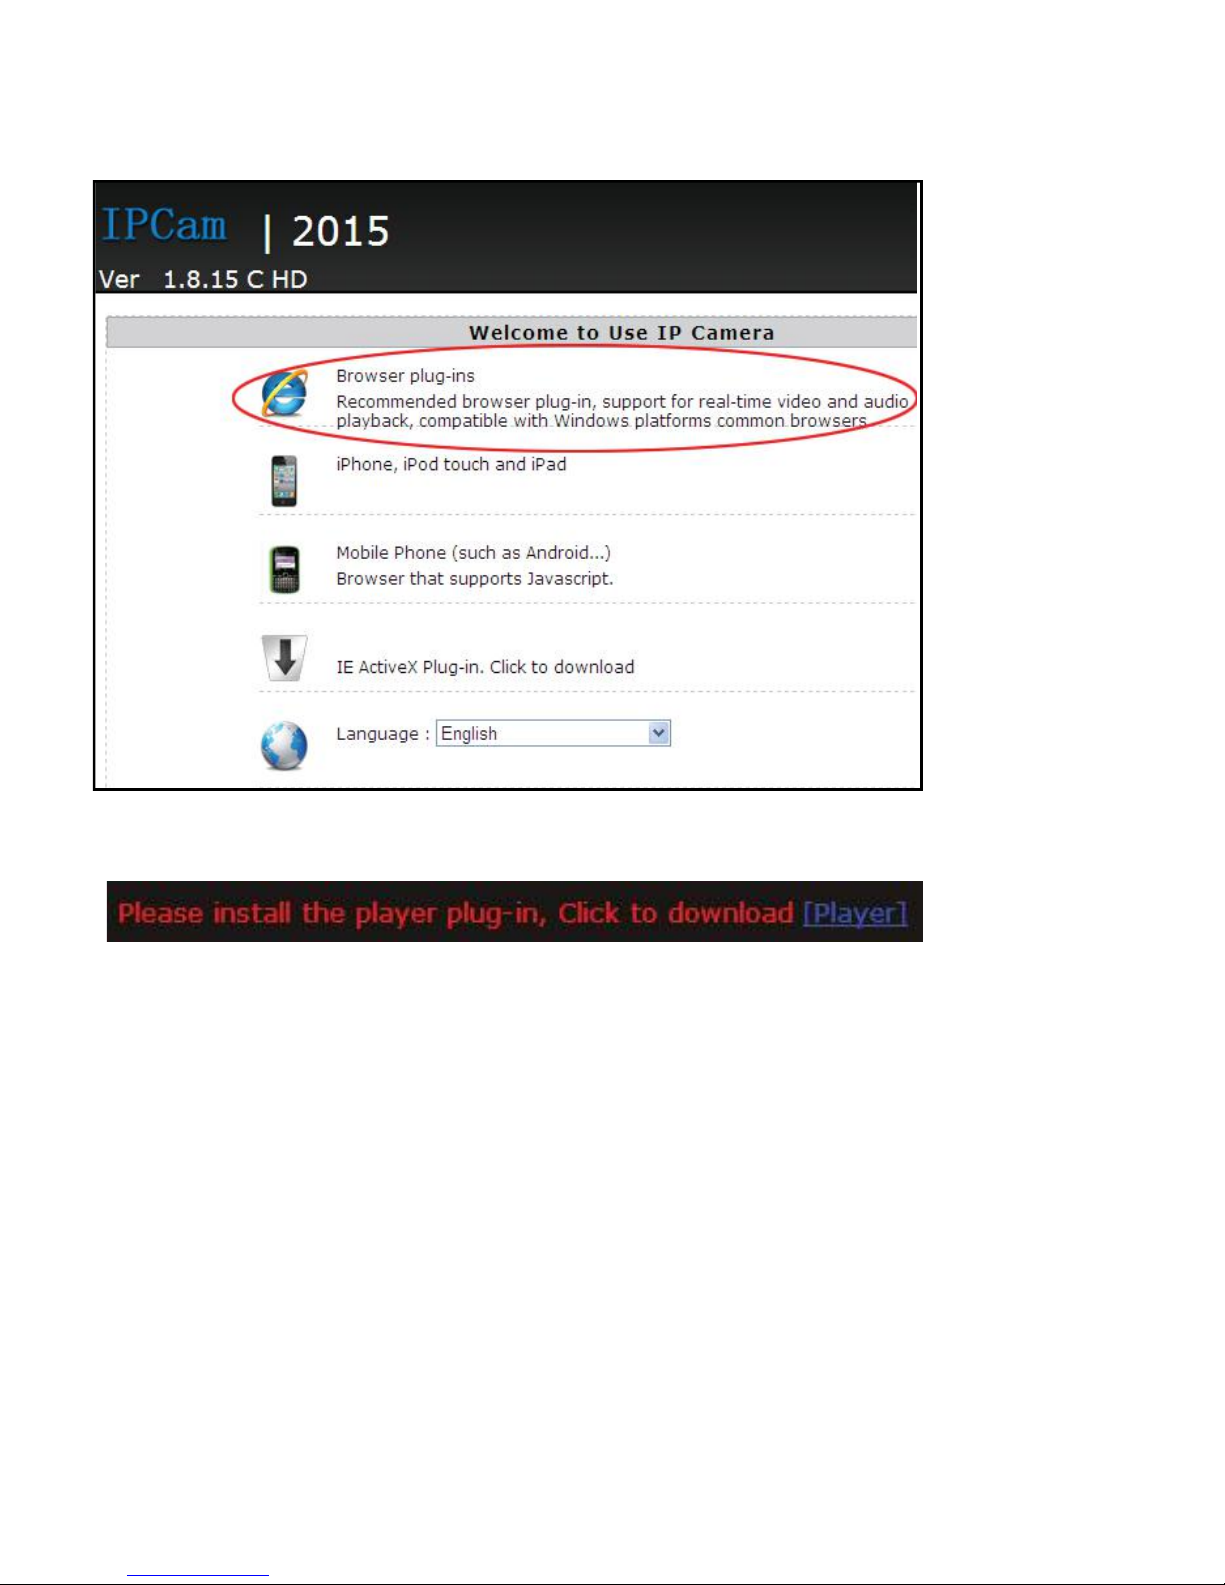
Click “Brower plug-ins”
If your PC does not install the player plug-in, please click to download
and install.
After install the player plug-in, you can view the camera real-time video
in Mac by Website.
You can also click the settings icon to finish settings.
Time Settings
Time Zone: select your Time Zone, click “OK” to save changes.
Change Password
The default password is 8888, the new password can be set up to 15
-20-
Page 22

characters, which you can use letter and number as password.
Ⅸ. Q&A
Q: How Can I Reset My Camera?
A: Please press and hold the “reset” for about 5 Sec, the blue light and
red light will be off. Then wait for 15 Sec, the blue light and red light
will be flashing together, and then the reset is done.
Note. After reset, the camera will recover its factory settings.
Q: How to operate the camera when fail to connect and forget
password.
A: You can reset it, then operate the camera again.
Q: What is Micro SD Card Required for Recording? Why I Can’t
Use My Micro SD Card for Recording?
A: The camera supports up to 64 GB Micro SD card. You must
format the Micro SD card following the Format instruction. If a SD
card is not recognized when inserted into camera, please remove and
insert again.
Q: Do I have to constantly have my phone connected to the camera
for the alarms to work? Or do I set it up once and disconnect?
A: You don't need to connect the phone to the camera all the time,
just need to have the app run in the background, you can still receive
alarms.
Q: Why does my computer or security software say the software is
dangerous and it is a virus?
A: The software will detect device in your network, and it seems like
a virus. Please ignore the warning and continue.
Q: Can’t get device Wi-Fi signal? (Three solutions FYI.)
A: 1). Close camera, open the camera again
2). Press reset it. ( Please view “How Can I Reset My Camera?”)
-21-
Page 23

3). Turn off smart phone Wi-Fi for a while, then turn on to
searcher again.
Q: Why the camera can’t go online?
A: 1. Check if your Wi-Fi setting is correct or not, proper password
may be needed.
2. Check if your router is working properly or not.
3. Check your signal, your device may don’t connect to Wi-Fi
due to weak Wi-Fi signal.
Q: How can I record videos when not connecting the device to a
wireless network?
A: You can record videos in the Micro SD card.
Q: Will the record straight to a cell phone?
A: Yes, it can record in APP from cell phone, but you should open
the “button” from App.
Q: Live video not smooth and clear?
A: Select suitable resolution according to the real time network
environment.
Honorable Buyers:
Please feel free to ask our client servers online if you got any
problem, thank you for reading.
Hope you have a good time with our product.
Your suggestion and satisfaction will be precious treasure for
us.
Best regards,
-22-
Page 24

 Loading...