

Page 1
Ed : 02/17
INSTRUCTION
Rev: 0000
Page 2

1
CONTENT
CONTENT -------------------------------------------------------------------------------------------------------------------------------------------1
IMPORTANT SAFETY PRECAUTIONS
-------------------------------------------------------------------------------- 2
ASSEMBLY INSTRUCTIONS ----------------------------------------------------------------------------------------- 3
FOLDING & UNFOLDING INSTRUCTIONS
------------------------------------------------------------------------- 6
GROUNDING METHODS ---------------------------------------------------------------------------------------------- 7
OPERATION GUIDE ----------------------------------------------------------------------------------------------------------------------------- 8
GETTING STARTED GUIDE ---------------------------------------------------------------------------------------- 14
SAFETY EXERCISES
-------------------------------------------------------------------------------------------------------- 15
WARM-UP EXERCISES
----------------------------------------------------------------------------------------------------- 16
MAINTENANCE INSTRUCTIONS
--------------------------------------------------------------------------------------- 17
BELT ADJUSTMENT --------------------------------------------------------------------------------------------------------------------------- 18
EXPLODED DRAWING ----------------------------------------------------------------------------------------------- 1
9
PARTS LIST -------------------------------------------------------------------------------------------------------------------------------------- 20
ERROR CODE AND SIGNIFICANCE
--------------------------------------------------------------------------------- 22
Page 3
3
ASSEMBLY INSTRUCTIONS
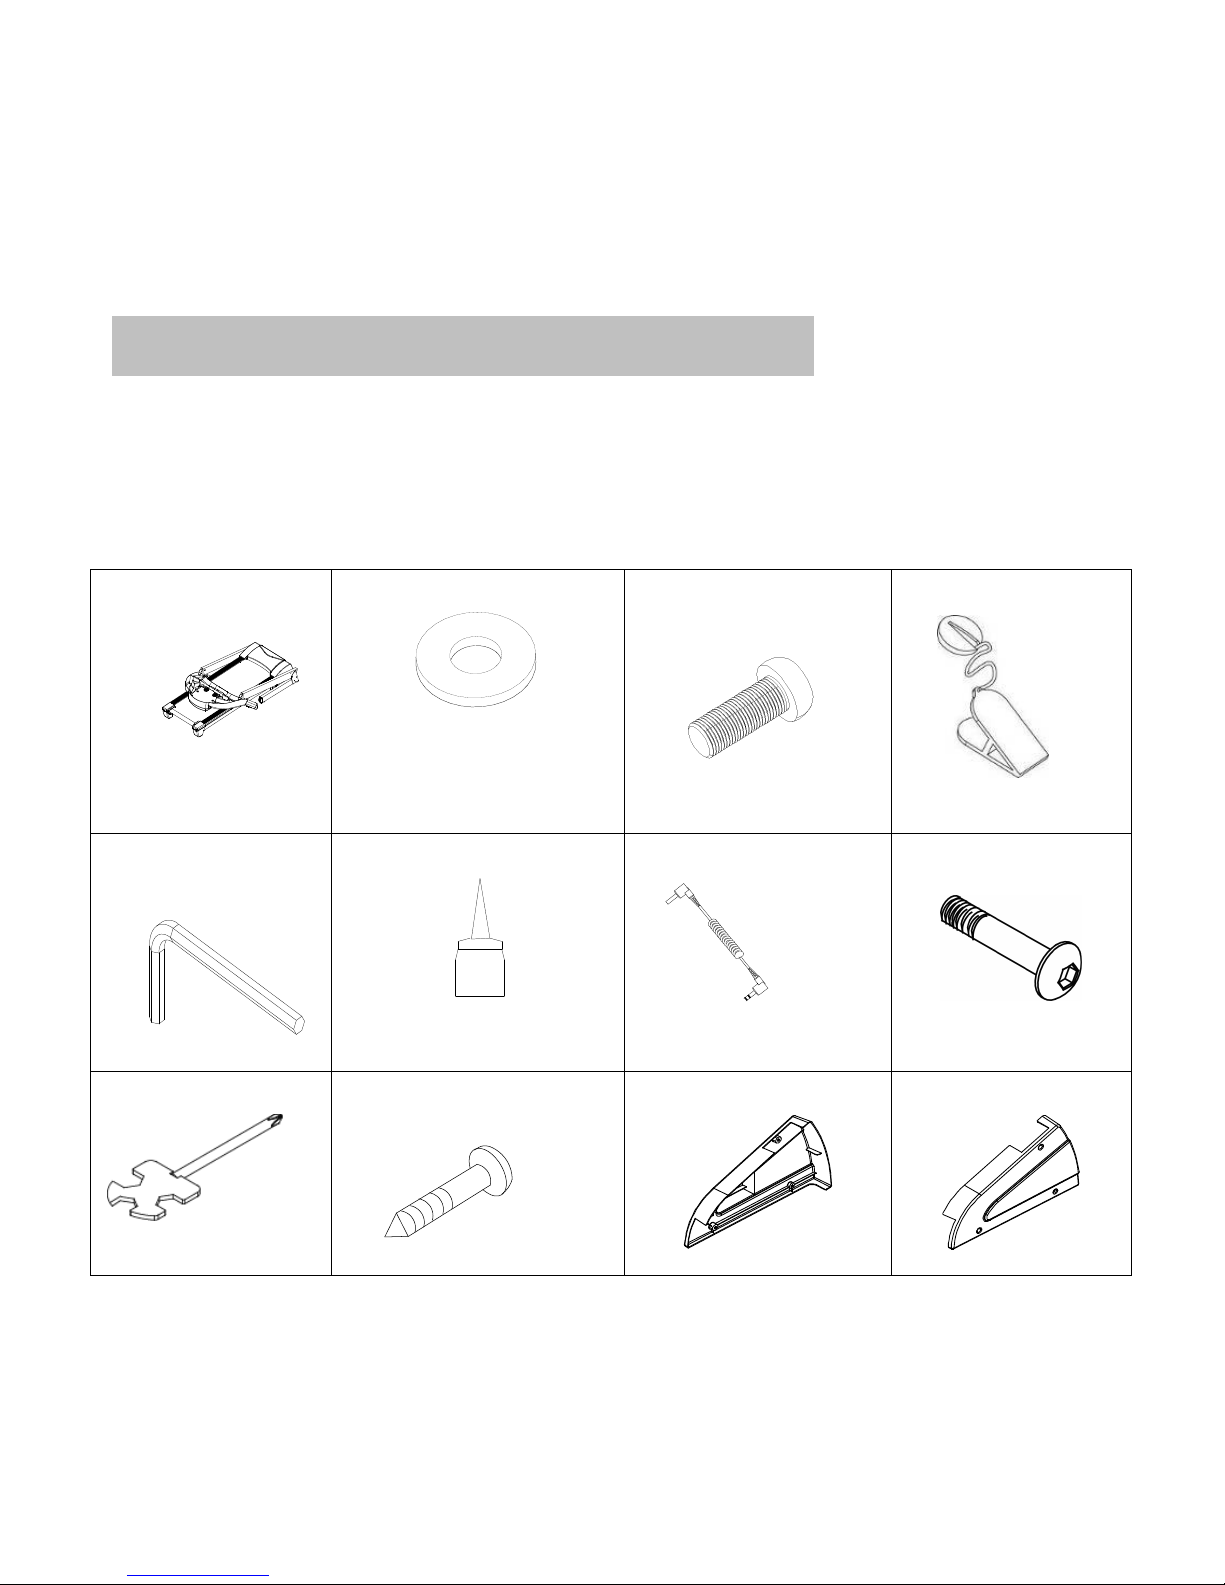
WHEN YOU OPEN THE CARTON, YOU WILL FIND THE BELOW SPARE PARTS:
1 Main frame 1set D26 Inner washer 8 pcs D23 Bolt M10*15
4 pcs
C15 Safety key 1set
D36 Allen wrench T6
1 pc
B6 Silicon oil 1 pc C26 MP3 line 1 pc D24 Bolt 10*55 4 pcs
D41 Screw driver 1pc
D40 Screw�4.2*25 6 pcs
B26 Left front cover
1 pc
B27 Right front cover 1
pc
Page 4
4
S
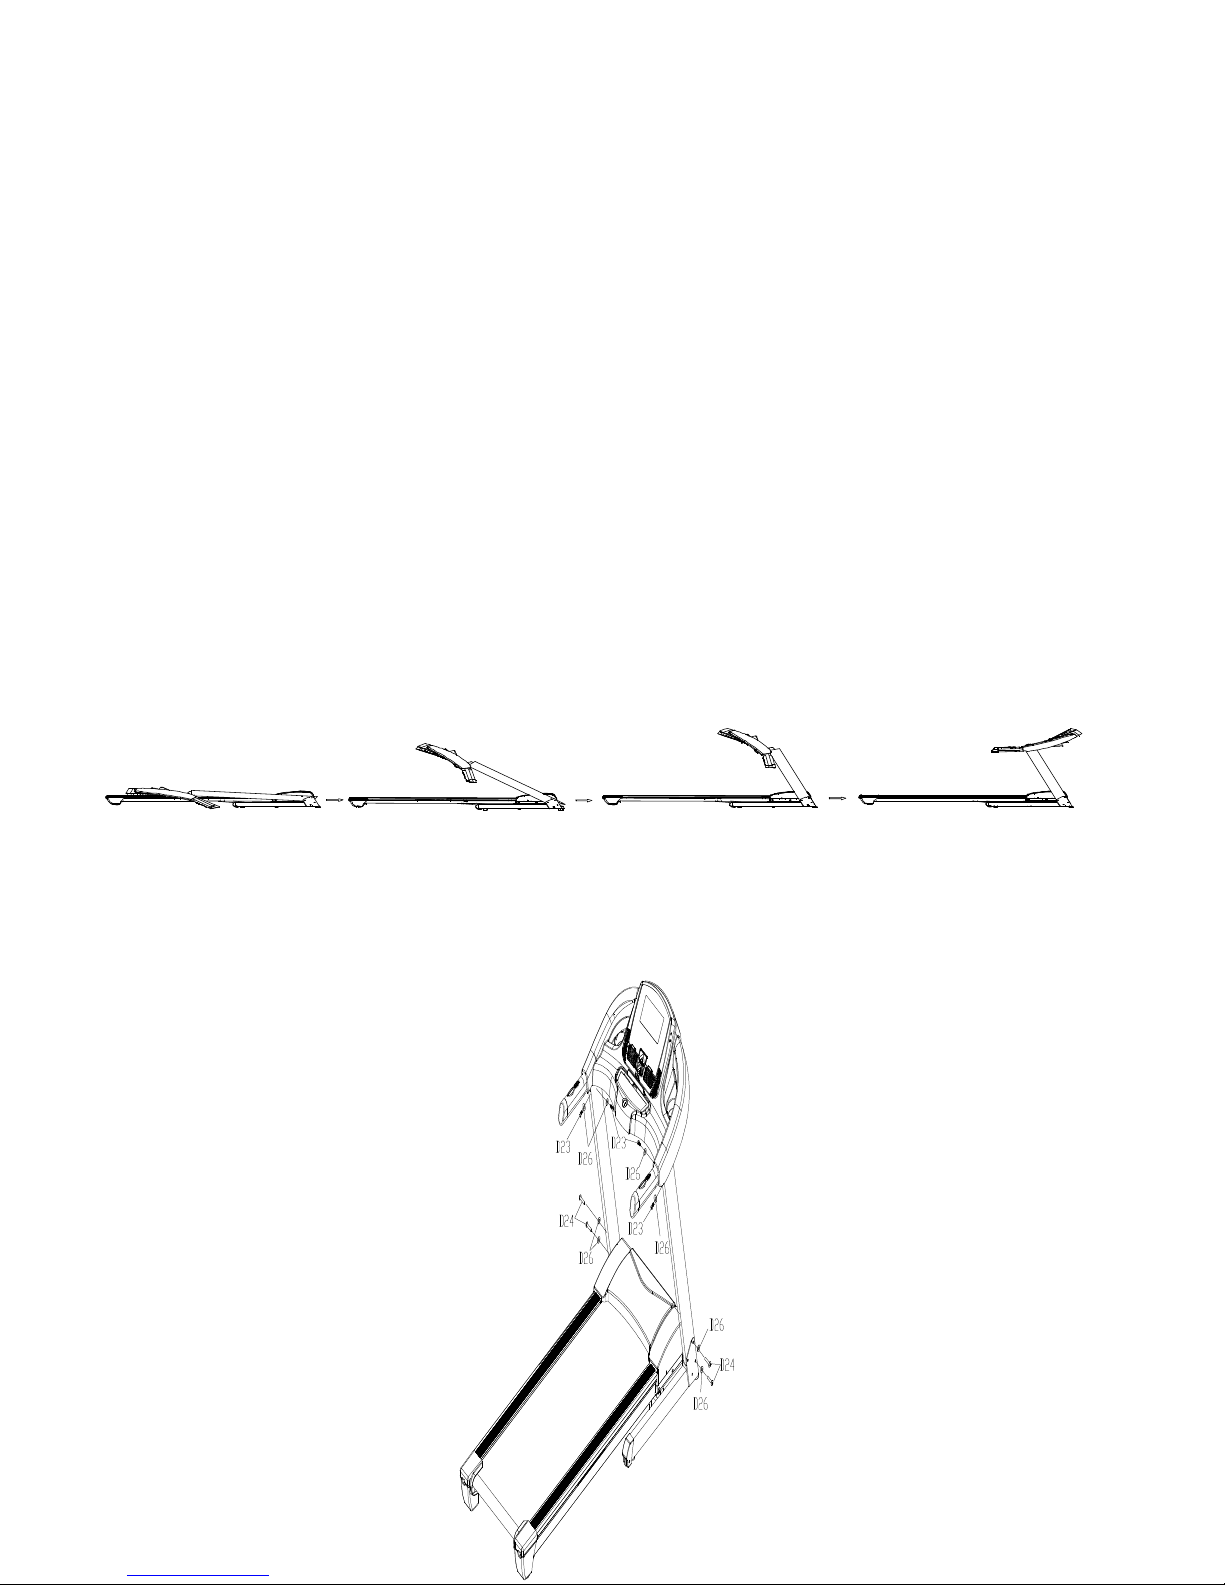
TEP 1
:
According to the following steps to lift up the computer bracket. Be careful not press the line when folding
STEP 2
:
Lock the treadmill with bolt
M10*55(D24), M10*15(D23) with
Washer (D26).
Page 5
6
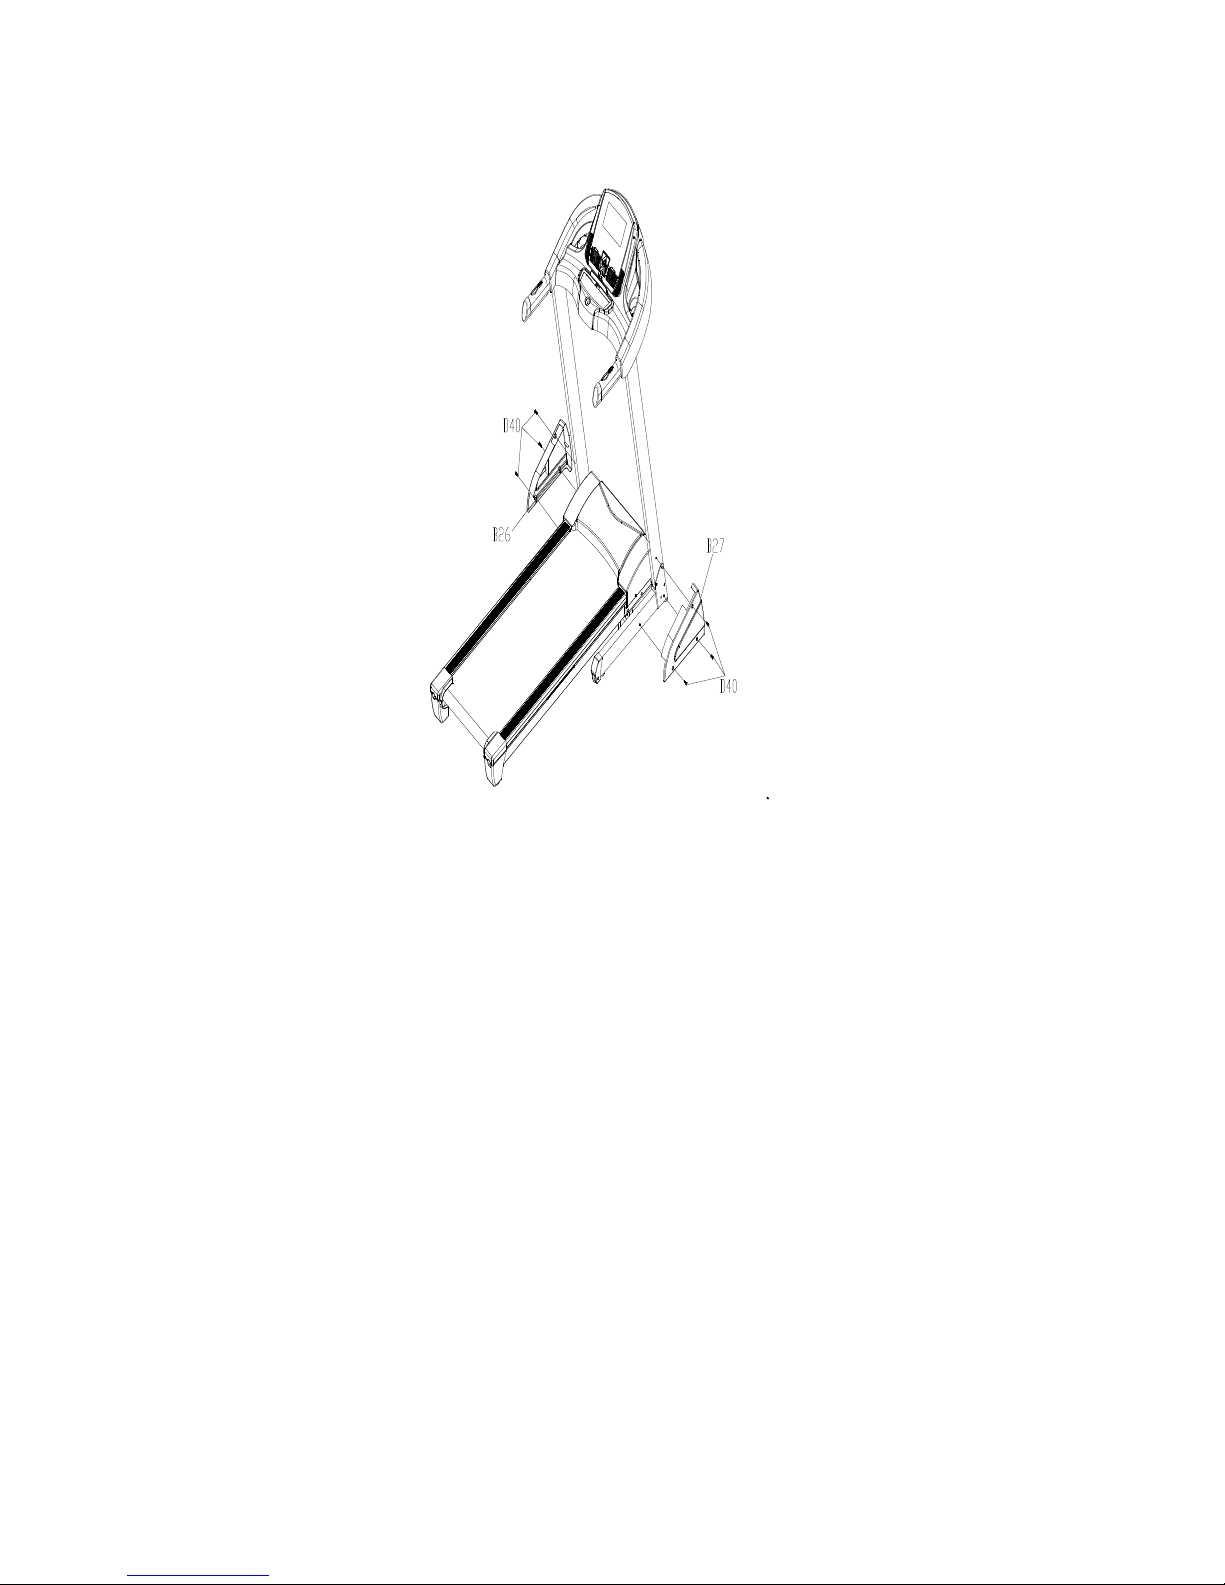
S
tep 3: Put the Safety key (C15) and MP3 line (C26) on the computer, then lock the Left front cover (B26) and Right
front cover (B27) on the upright tube and base frame with Bolt (D40).
ATTENTION: Must confirm complete assembly as the required above and lock all bolts.
Do the following operations after checking everything is OK. Before you use the treadmill,
please read the instructions carefully.
Page 6

7
FOLDING INSTRUCTION
Lift up the machine and force to
pull up until you heard "click" that
made by safety casing stuck the
pneumatic cylinder.
UNFOLDING INSTRUCTION
Kick the safety sleeve lightly
and pull down the machine at
the same time as the arrow
direction. Then the machine
will fall down smoothly.
GROUND METHODS
Page 7

8
This product must be grounded. If it should malfunction or breakdown, grounding provides
a path of least resistance for electric current to reduce the risk of electric shock. This
product is equipped with a cord having an equipment-grounding conductor and a
grounding plug. The plug must be plugged into an appropriate outlet that is properly
installed and grounded in accordance with all local codes and ordinances.
DANGER – Improper connection of the equipment-grounding conductor can result in a
risk of electric shock. Check with a qualified electrician or serviceman if you are in doubt
as to whether the product is properly grounded. Do not modify the plug provided with the
product – if it will not fit the outlet, Please find a proper outlet installed by a qualified
electrician.
. This product is for use on a nominal 220V circuit and has a grounding plug . Make that
the product is connected to an outlet having the same configuration as the plug. No
adapter should be used with this product.
Page 8
9
OPERATION GUIDE
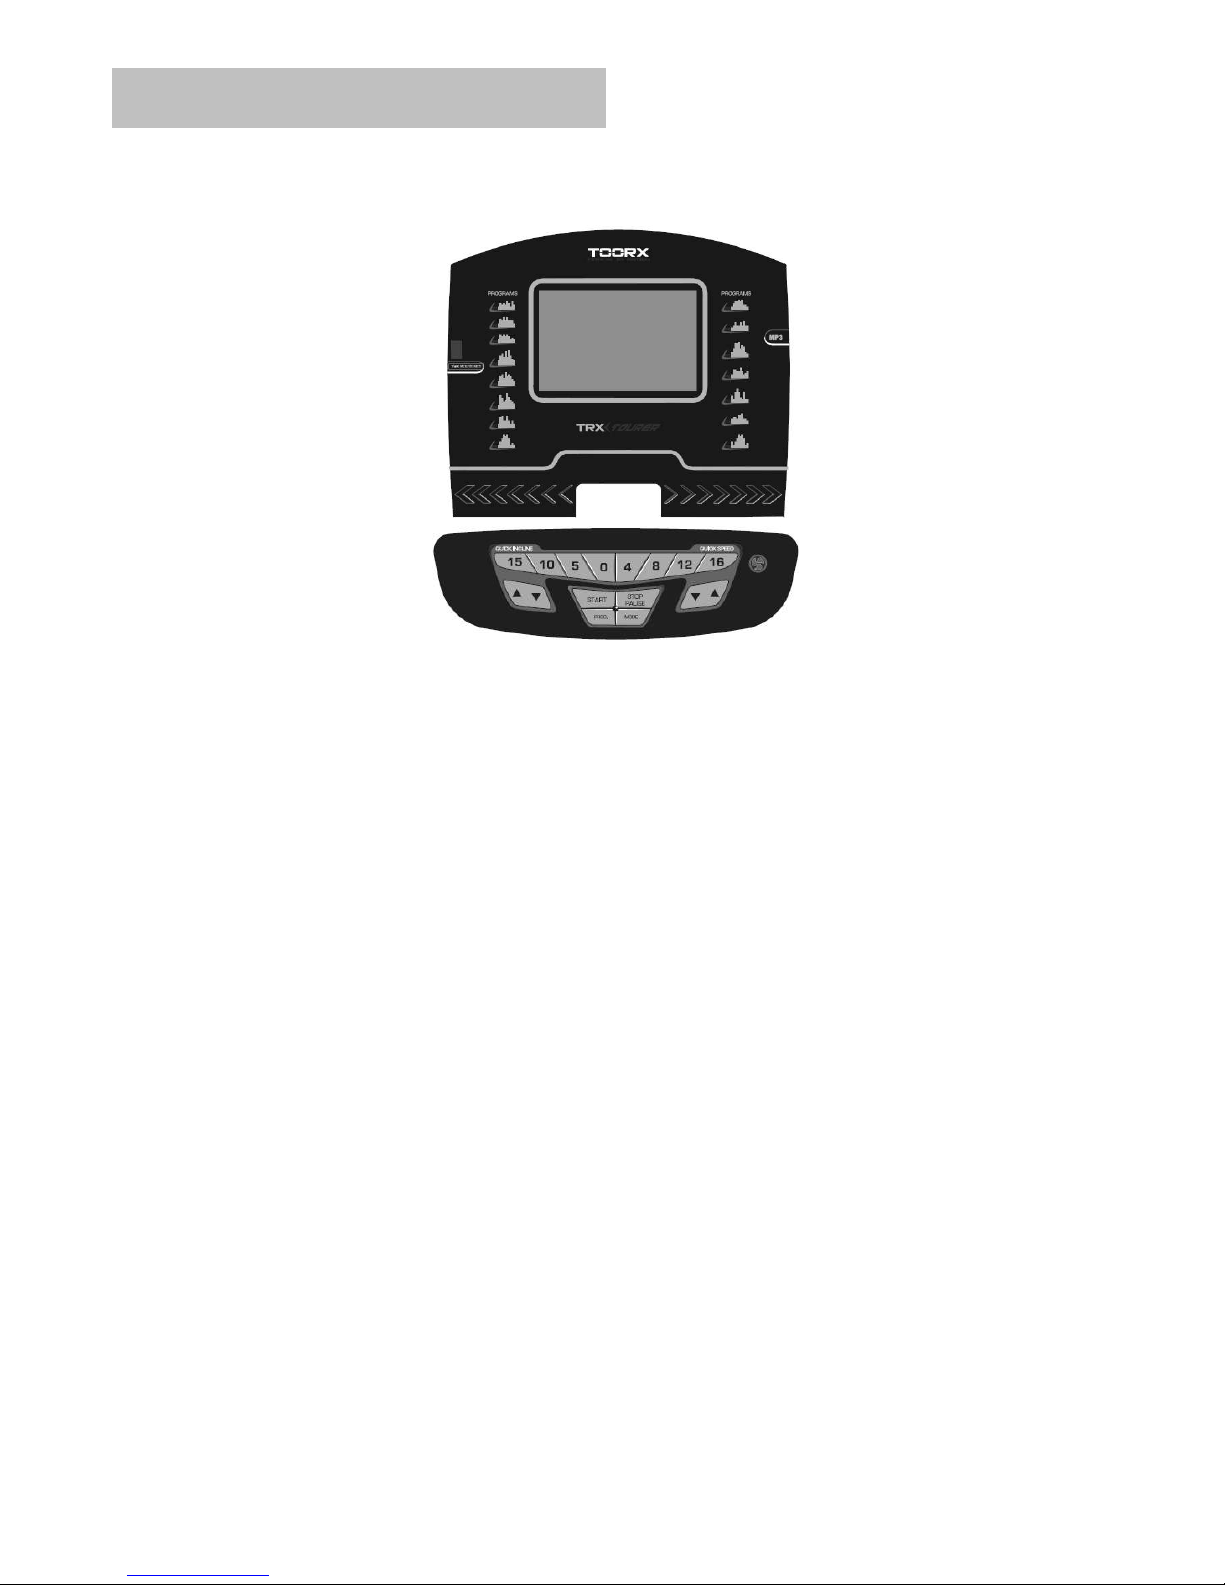
1.1. WINDOW DISPLAY
1.2. START
1
.1. Normal start after 5 seconds countdown
1.3 PROGRAM
1.2. 1 manual mode,15 pre-set programs, 3Users,1 body fat program ,3 HRC.
1.4. SAFETY LOCK FUNCTION
1.3. The window shows"---" when take away the safety lock and the treadmill will stop quickly with
"didi"
1.4. alarm noise. And put the safety lock on, the computer will display for 2 seconds and the date count
1.5. down to “0”
1.5.BUTTON FUNCTION
1.5.1. START/STOP
“START”--When the treadmill is not running, press this button to start, speed is “0.8”.
“STOP/PAUSE”--
1.Press STOP/PAUSE button to stop the workout session and save the data for 10 minutes
2.Press START button to re-start the workout session. The saved data will appear if the button has been
pressed within 10 minutes.
3.Press STOP/PAUSE button for at least 3 seconds to reset the workout session and data
Page 9

10
1
.5.2 “PROGRAM” BUTTON
When the treadmill is not running, press this button can circle choose from manual mode to pre-set
mode P1-P15,U1-U3, Fat, H1-H3.
1.5.3 “MODE” BUTTON
When the treadmill is not running, press this button to choose countdown
modes:”H-1”,”H-2”,”H-3”;:H-1” is the time countdown mode, and “H-2” is the distance countdown
mode, “H-3” is the calorie countdown mode; press the “SPEED+/-” or “INCLINE+/-“button to adjust
the data. After that, press the “START” button to start this treadmill
1.5.4 “SPEED +/- “BUTTON
SPEED +/– --Adjust speed when treadmill start, the increment is 0.1km/time in kilometer. Press the button
more than 2 seconds, and it will be up or down automatically.
1.6. 1.5.5 SPEED QUICK BUTTON
Press the speed quick button 4km/h,8km/h,12km/h,16km/h to adjust the speed directly when the treadmill
is running
1.5.6 “INCLINE+/-” BUTTON
INCLINE +/ – --Adjust incline when treadmill start; the increment is 1 level/time. Press the button
more than 2 seconds, and it will be up or down automatically.
1.5.7 INCLINE QUICK BUTTON
Press the incline quick button 0,5,10,15 to adjust the incline directly when the treadmill is running
1.5.8 Fan key
Fan can be controlled by the User at any program; when it’s running, the defaulted status is OFF,
after press the RESET, then back to defaulted data.
1.6. DISPLAY FUNCTION
1.6.1 SPEED
Display running speed
1.6.2 TIME
Display the running time or countdown time
1.6.3 DISTANCE
Display the running total distance or distance countdown.
1.6.4 CALORIE
Display the calorie or calorie countdown
1.6.5 INCLINE
Page 10
11
Display the incline
1.6.6 PULSE
Display pulse data
1.6.7 ALL WINDOW DISPLAY DATA RANGE
TIME:0:00 – 99.59(MIN)
DISTANCE: 0.00 – 99.9(KM)
CALORIES: 0.0 – 999 (C)
SPEED: 0.8-20.0(km/h)
PULSE: 50 – 200 (BPM)
INCLINE:0 – 15
1.7 PULSE FUNCTION
When the treadmill is running, hold the hand pulse about 5 seconds, it will display pulse data. The pulse data
range is
50-200
times/ minute. It has heart-shaped graphics when testing pulse. This data is only for
reference, can not be as medical data.
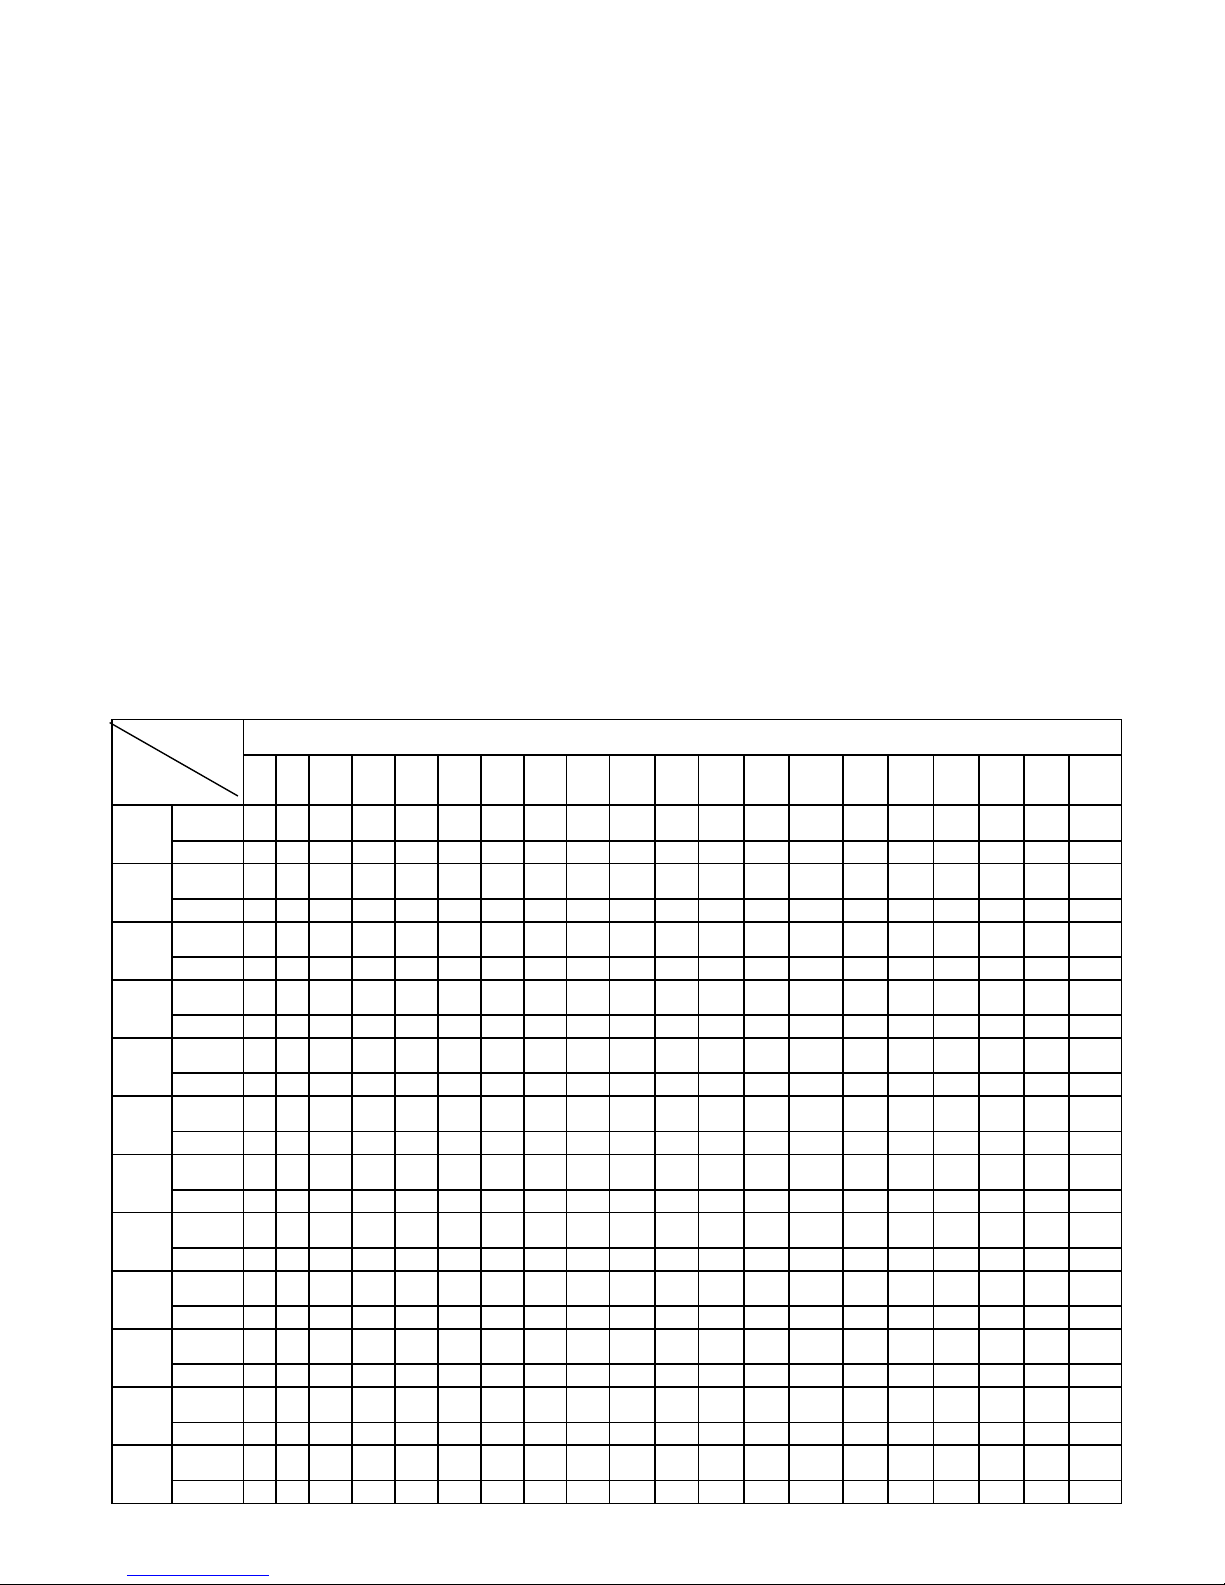
1.8 PROGRAM EXERCISE CHART
TIME
MODE
SET TIME / 20 = EVERY GRADE TIME
1 2 3 4 5 6 7 8 9 10 11 12 13 14 15 16 17 18 19 20
P1
SPD 2 2 4 4 3 3 4 4 3 3 5 5 4 4 2 2 5 5 3 3
INC
1 1 2 2 3 3 3 3 1 1 2 2 2 2 3 3 2 2 2 2
P2
SPD 2 2 5 5 4 4 6 6 4 4 6 6 4 4 2 2 4 4 2 2
INC
1 1 2 2 3 3 3 3 2 2 2 2 3 3 4 4 2 2 2 2
P3
SPD 2 2 5 5 4 4 5 5 4 4 5 5 4 4 2 2 3 3 2 2
INC
1 1 2 2 2 2 3 3 1 1 2 2 2 2 2 2 2 2 1 1
P4
SPD 3 3 6 6 7 7 5 5 8 8 5 5 9 9 6 6 4 4 3 3
INC
2 2 2 2 3 3 3 3 2 2 2 2 4 4 6 6 2 2 2 2
P5
SPD 3 3 6 6 7 7 5 5 8 8 6 6 7 7 6 6 4 4 3 3
INC
1 1 2 2 4 4 3 3 2 2 2 2 4 4 5 5 2 2 1 1
P6
SPD 2 2 8 8 6 6 4 4 5 5 9 9 7 7 5 5 4 4 3 3
INC
2 2 2 2 6 6 2 2 3 3 4 4 2 2 2 2 2 2 1 1
P7
SPD 2 2 6 6 7 7 4 4 4 4 7 7 4 4 2 2 4 4 2 2
INC
4 4 5 5 6 6 6 6 9 9 9 9 10 10 12 12 6 6 3 3
P8
SPD 2 2 4 4 6 6 8 8 7 7 8 8 6 6 2 2 3 3 2 2
INC
3 3 5 5 4 4 4 4 3 3 4 4 4 4 3 3 3 3 2 2
P9
SPD 2 2 4 4 5 5 5 5 6 6 5 5 6 6 3 3 3 3 2 2
INC
3 3 5 5 3 3 4 4 2 2 3 3 4 4 2 2 3 3 2 2
P10
SPD 2 2 3 3 5 5 3 3 3 3 5 5 3 3 6 6 3 3 3 3
INC
4 4 4 4 3 3 6 6 7 7 8 8 8 8 6 6 3 3 3 3
P11
SPD
3 3 5 5 8 8 8 8 9 9 5 5 7 7 6 6 3 3 2 2
INC
4 4 5 5 6 6 6 6 9 9 9 9 10 10 12 12 6 6 3 3
P12
SPD 2 2 5 5 5 5 4 4 4 4 6 6 4 4 2 2 3 3 4 4
INC
3 3 5 5 6 6 7 7 12 12 9 9 11 11 11 11 6 6 3 3
Page 11

12
P13
SPD 4 4 2 2 6 6 8 8 6 6 3 3 2 2 6 6 2 2 2 2
INC
3 3 4 4 6 6 2 2 3 3 7 7 9 9 5 5 2 2 2 2
P14
SPD 3 3 4 4 4 4 3 3 5 5 5 5 6 6 3 3 3 3 2 2
INC 3 3 5 5 4 4 4 4 3 3 4 4 3 3 2 2 2 2 4 4
P15
SPD 4 4 2 2 4 4 6 6 8 8 7 7 8 8 6 6 2 2 3 3
INC 4 4 3 3 4 4 4 4 3 3 4 4 2 2 3 3 2 2 5 5
1.9 Manual model operation
1.9.1 Press start key, time count down 5 seconds, then treadmill will start to work with initial speed 0.8km/h
1.9.2 Press speed +/-, you can adjust the speed
1.9.3 Press incline+/-, you can adjust the incline
1.9.4 Press stop, you can stop treadmill at working state
1.9.5 Press quick speed key, you can quickly adjust the speed you want
1.9.6 Press quick incline key, you can quickly adjust the incline you want.
1.10 3 COUNTDOWN FUNCTION PARAMETER DATA
Countdown time initial setting 15: 00 minutes,setting range 5: 00---99: 00 minutes , each step 1: 00.
Countdown calorie initial setting 50therm, setting range 10---990 term,each step 1.
Countdown distance initial setting 0.8km,setting range 0.5---99.9 km,each step 0.1
Cycle switch order is: manual, time, distance, calories.
1.11 BODY TESTER(FAT
)
At the beginning state, press “ PROGRAM” continually to enter “FAT“ body fat test,window display “FAT”.
Press “MODE” to enter (F1 SEX, F2 AGE, F3 HEIGHT, F4 WEIGHT). Press “SPEED+”,
“SPEED-” to set. After setting, the computer will display F5 and grasp the hand pulse, the window will
display your body quality index.
The body quality index is to test the relation between height and weight not the body scale.
The body FAT suits for any male and female to adjust the weight according together with other
body quality index. The ideal FAT should be between 20-25, if under 19, it means too thin. If
between 25 and 29, it means overweight, if over 30, it means obesity. (The data is just for
reference and can not be as medicinal data)
01 Sex 01 Male 02 Female
02 Age 10------99
03 Height 100----200
Page 12

13
04 Weight 20-----150
05 FAT ≤19 Under weight
FAT = (20---25) Normal weight
FAT = (25---29) Over weight
FAT ≥30 Obesity
1.12 User Program
Besides 12 pre-set programs, there have 3 user-defined programs, each user program has 16 segments,
and the running time of each user’s program is equal. The user can set the desired speed and incline before
exercise.
User circle choose the data “TIME”—“SPEED” segment 1….segment 20,
And user can choose incline from “INCLINE” segment 1……segment 20 at the same,
And display the defaulted data for User’s revise; press "SPEED+" and "SPEED-" to adjust
speed. Press” INCLINE+” and “INCLINE-“ to adjust incline. Press "MODE" button and your
choice will be set. Press “STOP” key to return to last segment setting any time.
1.13 Heart rate control (HRC) program
There are 3 HRC prgrams. HRC60,HRC70,HRC80. The related T.H.R is(220-AGE)× 60%(70% /
80%).The parameter data setting order is『TIME』→『AGE』→『THR』,You can adjust the data by
pressing Speed+/- Key or Incline +/-Key, then press Mode key for confirmation.
If 『HR<THR-15』,then SPEED and INCLINE will adjust itself to make your heart rate close to the default
pulse automatically in every 15secs,SPEED automatically increase by 0.8KM every step,INCLINE
automatically increase by1 level every step until the data reached the max..
If 『THR-5 > HR≥ THR-15』,then SPEED and I NCLINE will adjust itself to make your pulse close to the
default pulse automatically in every 15secs,SPEED automatically increase by 0.4KM and INCLINE
automatically increase by1 level until the data reached the max..
If『THR+5 ≥ HR≥ THR-5』,then SPEED and INCLINE will not change
If『THR+15≥HR>THR+5』, then SPEED and INCLINE adjust itself to make your pulse close to the default
pulse automatically in every 15 secs, SPEED automatically decrease by 0.4K and INCLINE automatically
decrease by1 level until the data reached the min..
Page 13

14
If『HR>THR+15』, then each 15secs SPEED and INCLINE adjust itself to make your pulse close
to the default pulse automatically in every 15 secs, SPEED automatically decreased by 0.8KM and
INCLINE automatically decrease by 2 level until the data reached the min
. .
1.14 OTHERS
1.14.1 The system will enter into power saving mode automatically if there is no any action within 10
minutes under IDLE MODE and there is no display and backlit on the computer. Press any key to resume
the system.
1.14.2 MP3 audio function: Insert the MP3 line in the input hole of the right side in the computer.
1.14.3 Countdown time, countdown calorie and countdown distance, you just can set one of them at one time,
press last item to set running, the setting parameter is countdown, others display normal data
1.14.4 On display – Distance covered, Calories burnt, Pulse reading, Body Fat test shown is only
for indicative purpose and may vary from machine to machine. Do not compare these readings to
a medical instrument.
1.14.5 Speed control: acceleration at 0.5km/s; deceleration at 0.5km/s.
Page 14
18
MAINTENANCE INSTRUCTION
WARNING:Please make sure pull out the treadmill's power plug before cleaning or
maintaining the product.
CLEANSING:General cleaning or the unit will greatly prolong the treadmill's life.
Keep treadmill clean by dusting regularly. Be sure to clean the exposed part of the deck on either side of the walking
belt and also the side rails. This reduces the build up of foreign material underneath the walking belt. Make sure the
shoes are clean. The top of the belt may be cleaned with a wet soapy cloth. Be careful to keep liquid away from inside
the motorized treadmill frame or from underneath the belt.
WARNING:Always unplug the treadmill from the electrical outlet before removing the motor
cover. At least once a year remove the motor cover and vacuum under the motor cover.
This treadmill's walking belt and deck are equipped with a pre-lubricated, low maintenance
deck system. The belt/ deck friction may play a major role in the function and life of your
treadmill, thus requiring periodic lubrication. We recommend a periodic inspection of the
deck.
We recommend lubrication of the deck according to the following timetable:
Light user (less than 3 hours/ week) Every 60 days
Medium user (3-5 hours/ week) Every 45 days
Heavy user (more than 5 hours/ week) Every 30 days
We suggest you buy lubricating oil from local distributors or contact our company directly.
Pay attention, any other maintains please ask professionals for help.
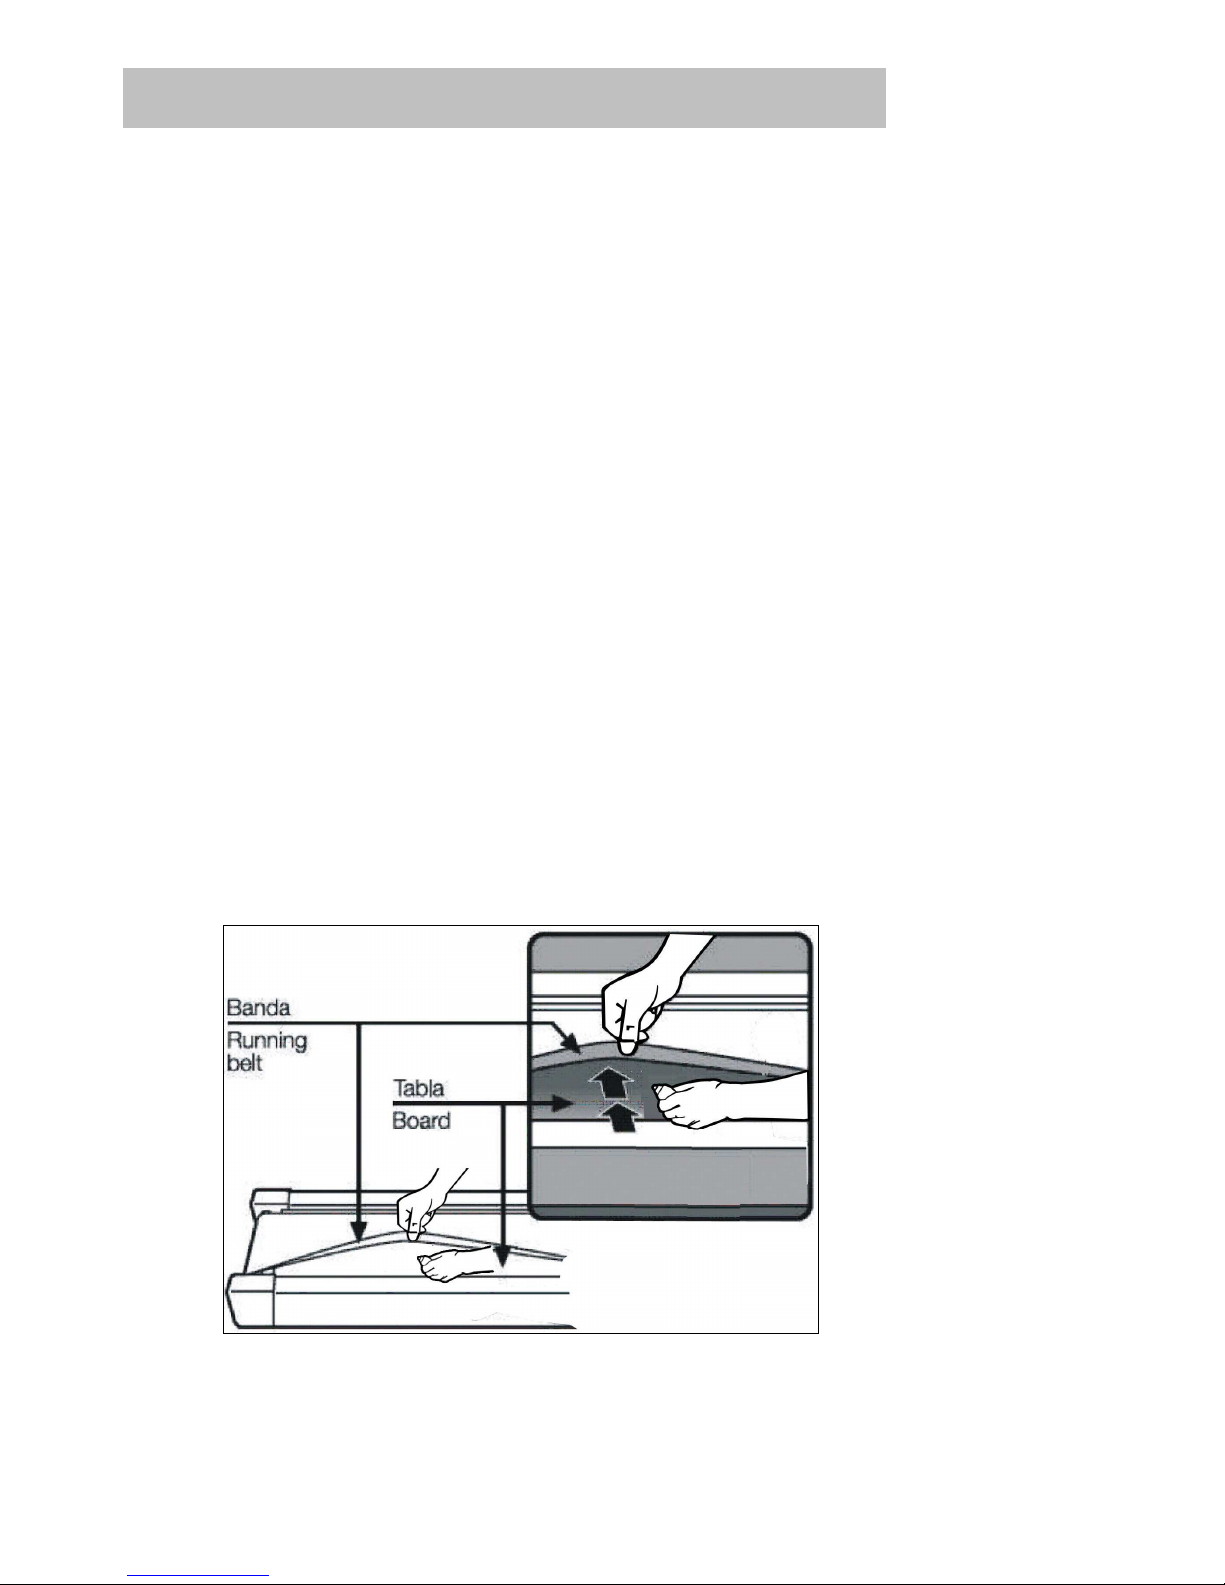
Place treadmill on a level surface. Make treadmill run at approximately 6-8 km/h, observe the
running belt deviate condition.
Page 15
19
BELT ADJUSTMENT
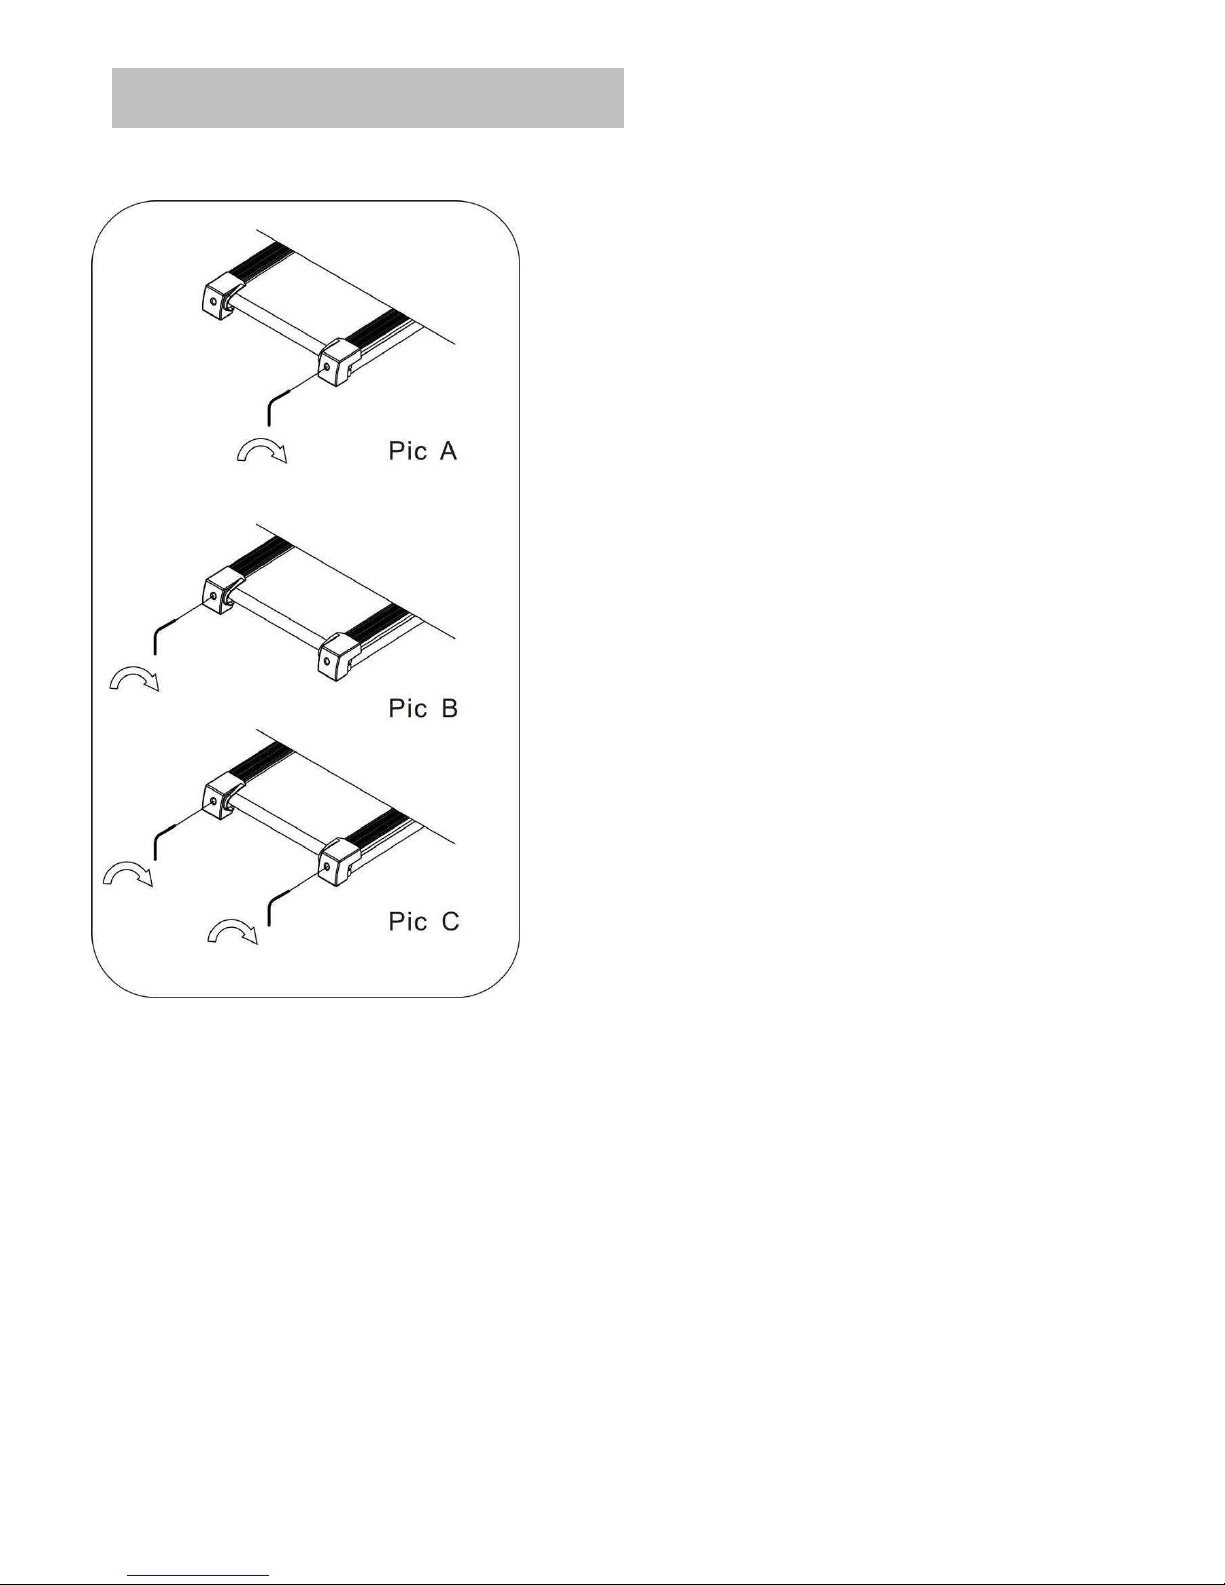
If the belt has drifted to the right, unplug the
safety lock and power switch, and turn the
right adjusting bolt 1/4 turn clockwise, then
insert the power switch and safety lock, make
the treadmill running, observe the running belt
deviate condition. Repeat above steps until
the running belt be placed in the middle. See
picture A
Once the treadmill belt swerving to the left,
u
nplug the safety lock, turn off the power, then
with the left adjusting bolt clockwise rotation 1
/ 4 laps, and turn on the safety lock and power
to make treadmill running, checking the
deviation of the treadmill belt. Repeat the
above steps until the belt centered. See
picture B
The treadmill belt will gradually relax after
above steps or after a period of time using,
unplug the safety lock, and turn off the power,
with the two adjusting bolt clockwise rotation 1
/ 4 laps, and turn on the safety lock and power
to make treadmill running, then standing on
the belt to confirm the tightness. Repeat the
above steps until the belt moderate tightness.
See picture C
Page 16
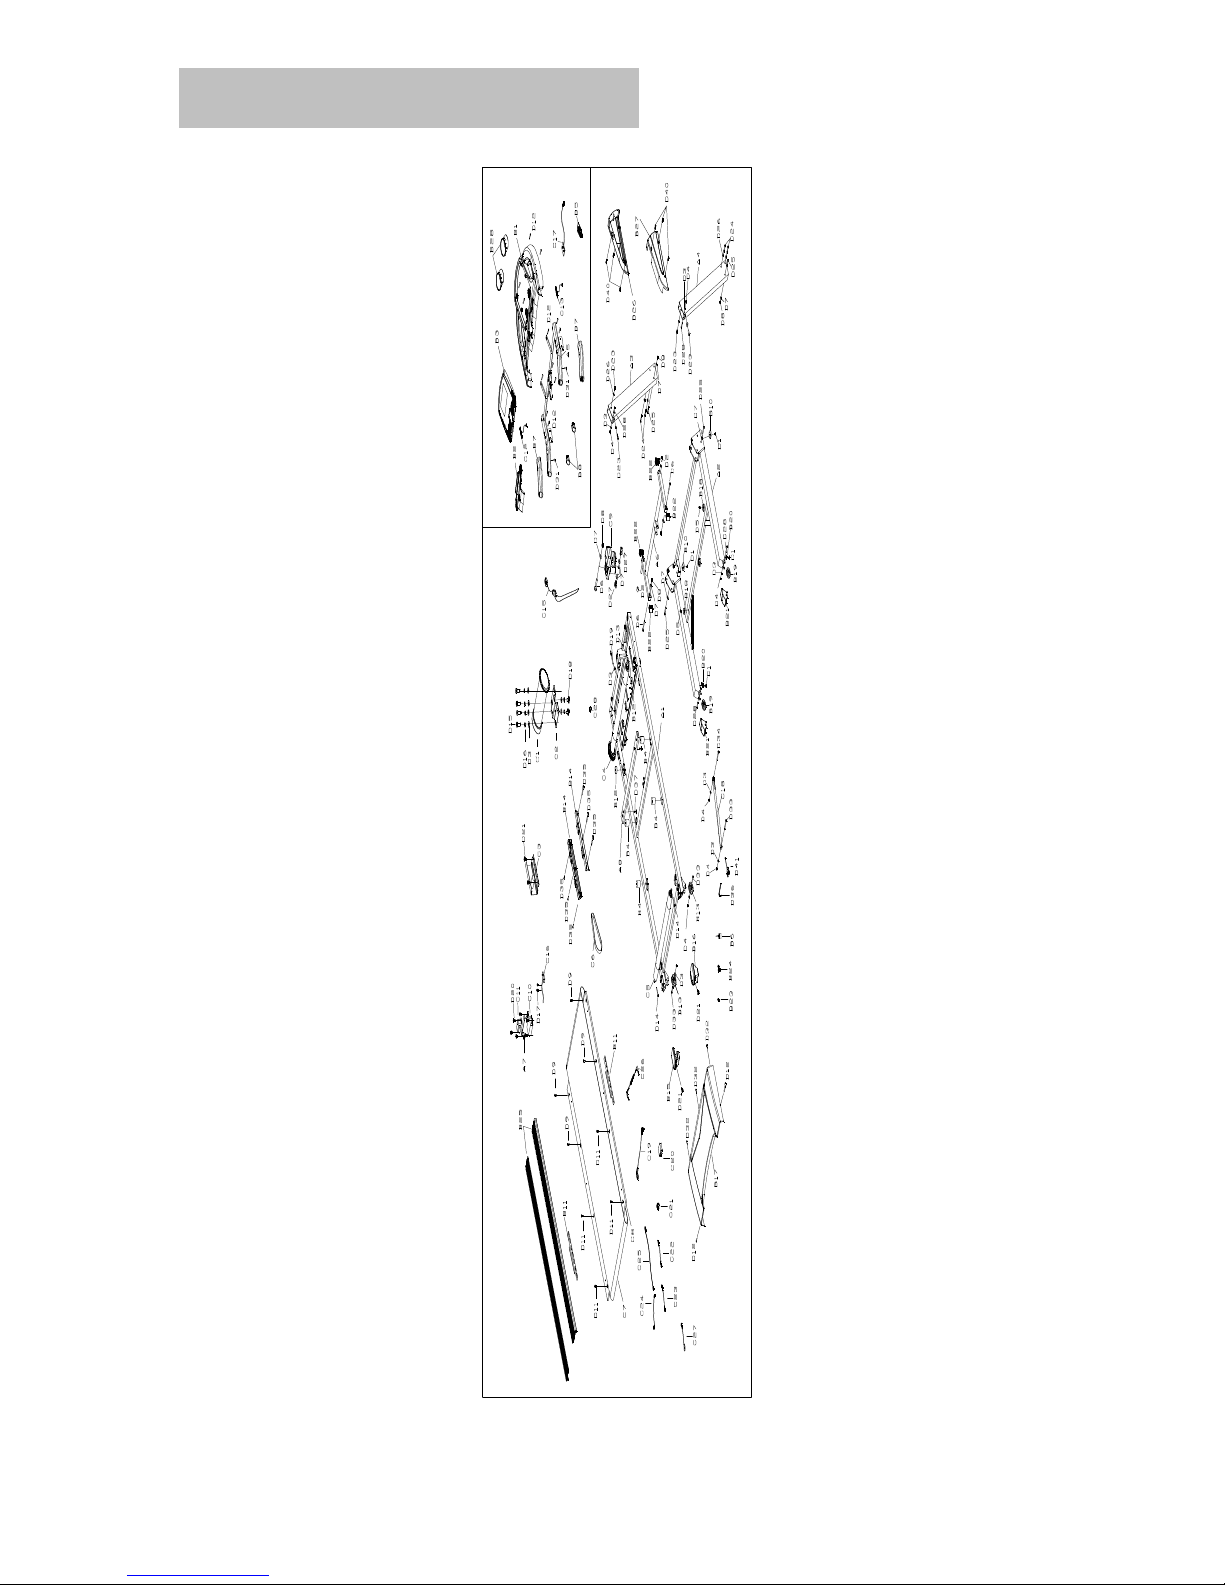
20
EExxppllooddeedd DDrraaw
wiinngg
Page 17

21
PART LIST
A. Welding parts
No. Description QTY
No. Description QTY
A1
Main frame
1
A5
Computer bracket
1
A2
Base frame
1
A6
Incline bracket
1
A3
Left upright tube
1
A7
Filter bracket
1
A4
Right upright tube
1
A8
Reinforce frame
1
B. Plastic parts
No.
Description QTY
No.
Description
QTY
B1
Computer cover 1
B15
Left rear cover 1
B2
Safety key panel 1
B16
Right rear cover 1
B3 Computer panel 1 B17
Motor cover 1
B4 Cushion 4
B18
Limited cushion 2
B5 Cell phone pad 1 B19
Transport wheel 2
B6 Silicon oil 1 B20 Foot pad 2
B7
Foam 2
B21 Transport wheel plug 2
B8
Inner plug 2
B22
Inner plug 4
B9
Overlay 1
B23 Round protect ring 2
B10 Foot pad 2 B24 Power buckle
1
B11
Shock absorber 2
B25 Side rail
1
B12
Cushion 2
B26 Left front cover
1
B13
Adjust wheel 2
B27 Right front cover
1
C Electrical and Drive parts
No.
Description QTY
No.
Description
QTY
C1
DC motor 1
C14 Console 1
C2
Motor bracket 1
C15
Safety key 1
C3
Controller 1
C16
Magnetic inductor 1
C4
Front roller 1
C17
Safety key inductor 1
C5
Rear roller 1
C18
Cylinder 1
C6
Motor belt 1
C19
Power line 1
C7
Running belt 1
C20
Overload protector 1
C8
Running board 1
C21
Power switch 1
C9
Incline motor 1
C22 Single line 3
C10
Filter 1
C23 Single line 1
C11
Inductor 1
C26 MP3 line
1
C12 Left short keys
1
C27 Single line
1
C13 Right short keys
1
C28 Magnetic ring
1
D. Hardware part
s
No.
Description QTY
No.
Description
QTY
D1
Bolt M5*20 mm 4
D21
Bolt M5*10 mm
5
D2
Sleeve 2
D23
Bolt M10*15 mm 4
D3
Washer M8 15
D24
Bolt M10*55 mm 4
D4
Nut M8 9
D25
Bolt M10*60 mm 4
D5
Bolt M6*10 mm 2
D26 Washer M10 10
D6
Bolt M10*45 mm 3
D27
Bolt M10*20 mm 2
D7
Washer M10 8
D28
Bolt M8*50 mm 2
D8
Nut M10 6
D29
Screw ST4.2*40
4
Page 18

22
D
9 Bolt M6*40
2
D30
Screw ST4.2*50
4
D10 Bolt M6*65
2
D31
Screw ST4.2*50
2
D11 Bolt M6*25
2
D32
Bolt M5*15 mm 3
D12
Screw ST4.2*16 24
D33
Bolt M8*40 mm 3
D13
Bolt M8*55 mm 1
D34
BoltM8*30 mm 1
D14
Bolt M8*60 mm 2
D35
Screw ST4.2*19
8
D15
Bolt M8*20 mm 4
D36 Allen wrench 1
D16 Spring washer M8 6
D37
Screw ST4.2*30 2
D17 Screw ST2.9*16 6
D38 Bolt M6*45 2
D18 Bolt M8*10 mm 2
D39 Screw ST3*10 2
D19 Bolt M8*80 mm 1
D40 Screw ST4.2*25 6
D20
Bolt M8*80 mm 6
D41 Screw driver 1
Page 19

GARLANDO SPA
Via Regione Piemonte, 32 - Zona Industriale D1
15068 - Pozzolo Formigaro (AL) - Italy
www.toorx.it - [email protected]
 Loading...