


Ed : 03/17 Rev : 00
INSTRUCTION

2
EXPLOSIVE VIEW

3
PARTS LIST
PART NO.
DESCRIPTION QTY
1 Computer 1 PC
2 Bottle cage 1 PC
3 Screw M5x20 2 PCS
4 Handlebar 1 PC
5 Handlebar post 1 PC
6 Brake knob 1 PC
7 Brake cover 1 PC
8 Hexagon Nut M8 2 PCS
9 Brake bar 1 PC
10 Spring 1 PC
11 Square nut 1 PC
12
Brake bushing φ16
1 PC
13
Stopper φ11.5
2 PCS
14 Sensor cable 1 PC
15 Seat 1 PC
16 Slider 1 PC
17 Seat post 1 PC
18
Washer φ10xφ38x4T
2 PCS
19 Knob M10 2 PCS
20 Seat post clamp 2 PCS
21 Lock pin M16 2 PCS
22 Sensor 1 PC
23 Pedal(L+R) 1 SET
24 Crank plug 1 SET
25 Nylon nut M10x1.25 2 PCS
26 Crank(L+R) 1 SET

4
27 Alex bushing 1 PC
28 Hexagon Nut M20 2 PCS
29 Bearing 6004 2 PCS
30
Pipe φ25xφ20x44.1L
1 PC
31 Foot pad 4 PCS
32 Rear tube 1 PC
33 Chain cover(inner) 1 PC
34 Screw M4x20 6 PCS
35
Washer φ20xφ25x2T
1 PC
36 Nylon nut M8 4 PCS
37 Washer 4 PCS
38 Belt pulley 1 PC
39 Axle 1 PC
40 Hexagon screw M8x12 4 PCS
41 Belt 1 PC
42 Chain cover(outer) 1 PC
43 Screw M4.2x19 4 PCS
44 End cap 4 PCS
45 Front tube 1 PC
46
Washer φ8xφ19x1.5T
2 PCS
47 Moving wheel 2 PCS
48 Hexagon nut M8x38 2 PCS
49 Main frame 1 PC
50 Step screw 4 PCS
51 Brake pad 1 PC
52 Brake shrapnel 1 PC
53 Screw M5x12 2 PCS
54 Cap nut M8 1 PC
55 Hexagon nut 2 PCS

5
56 Nylon nut M6 2 PCS
57 Board 2 PCS
58
Adjuster φ12
2 PCS
59
Flywheel axle φ12
1 PC
60 Flywheel 18kg 1 PC
61 Bearing 6001 2 PCS
62 Hexagon nut M12 1 PC
63
Washer φ12xφ18x2t
1 PC
64 Flange nut M12 1 PC
65 Screw M4x10 4 PCS
66 Flywheel trim cover 1 PC
67 Socket wrench 1 PC
68 Harpoon wrench 1 PC
69 Hexagon wrench 1 PC
6
ASSEMBLY INSTRUCTION
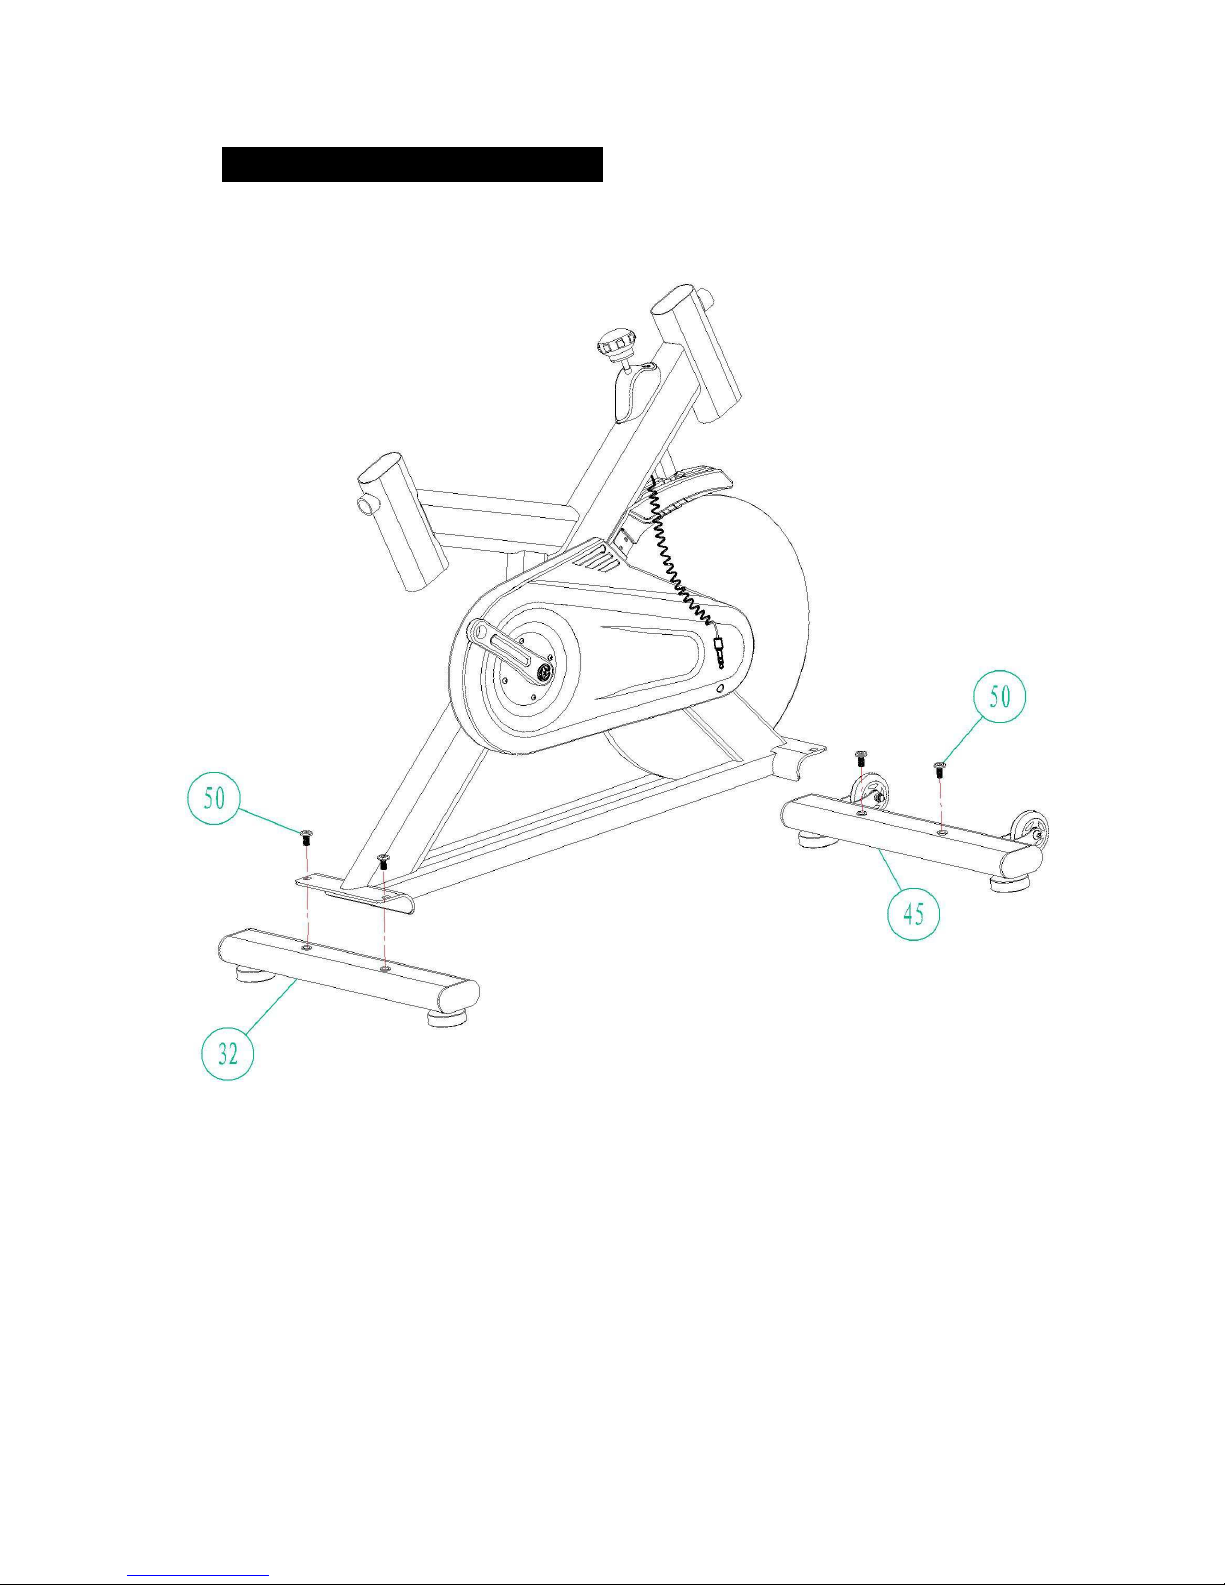
STEP 1
Attach the rear tube (32) to the main frame using two step screws(50).
Attach the front tube (45) to the main frame same as the rear tube.
7
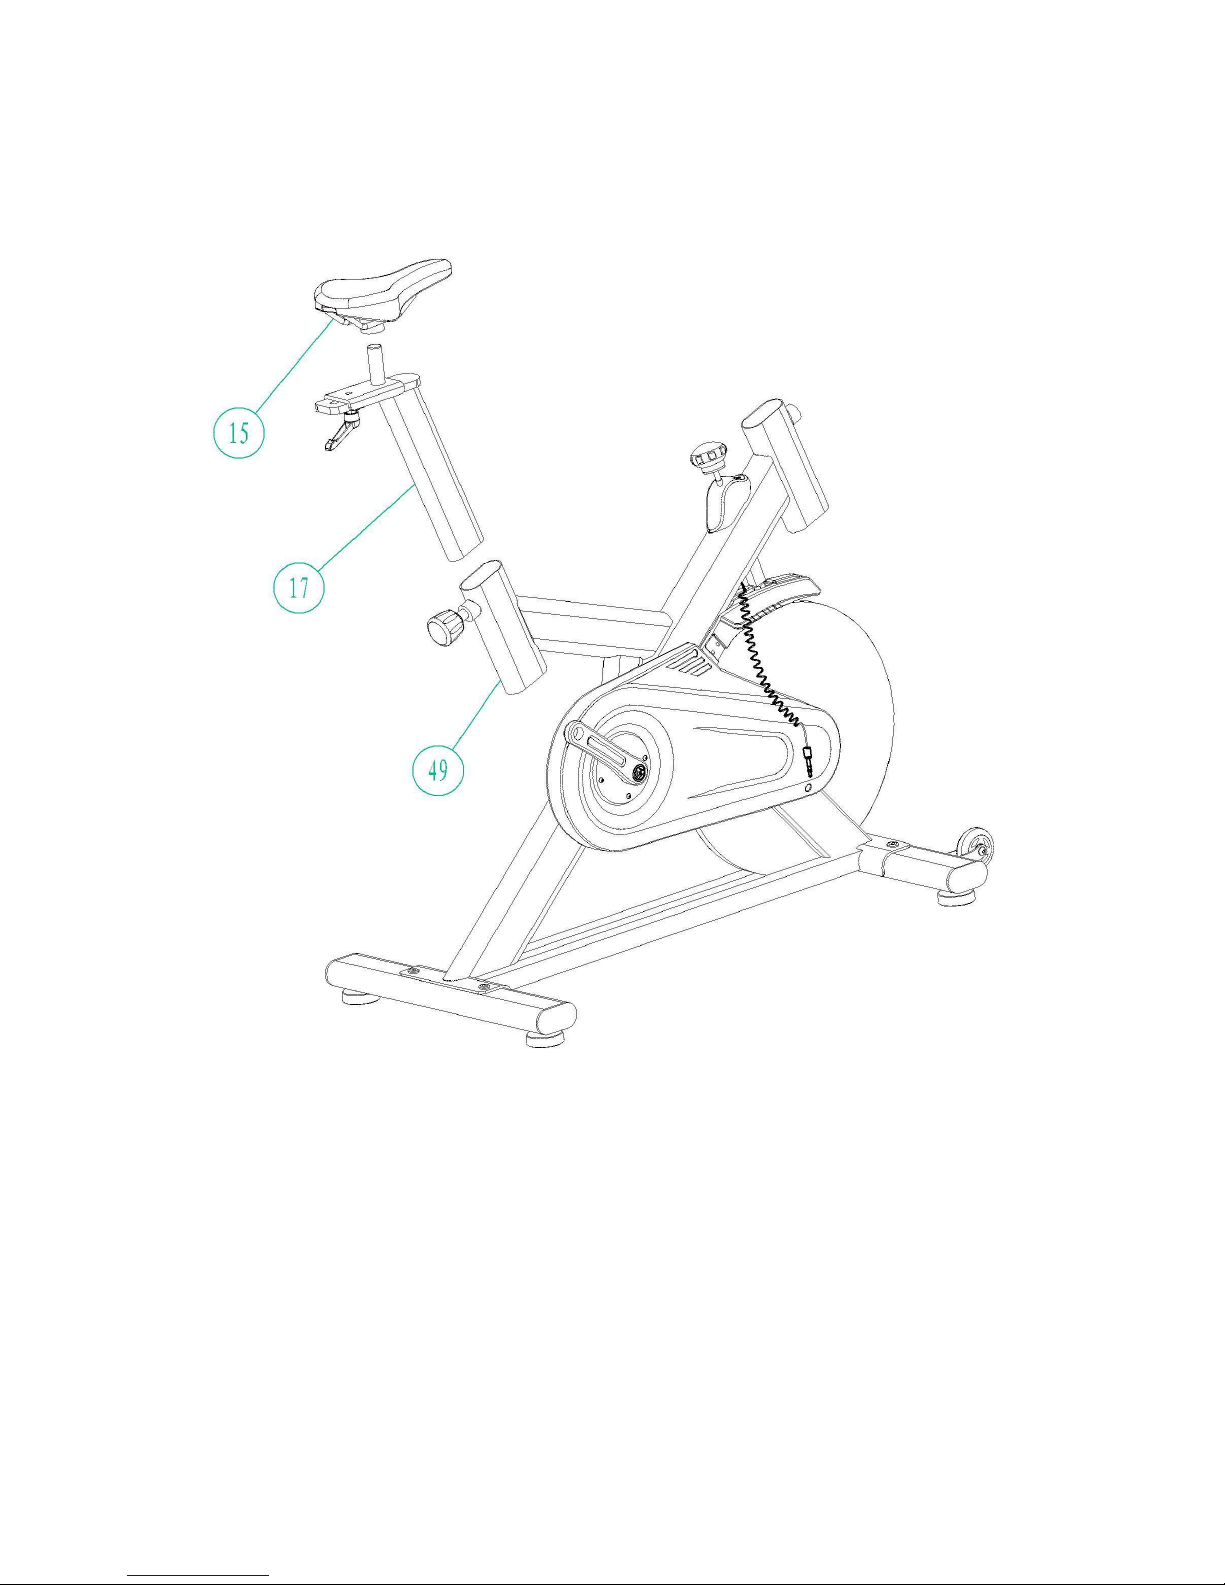
STEP 2
Put seat post (17) insert main frame(49) with lock pin and then adjust height.
Fix seat(15) on the slider.

8
STEP 3
The pedals (23L and 23R) are marked “L” and “R”-left and right.
Connect them to their appropriate crank set. The right crank set is on the right
hand side of the cycle as you sit on it.
Note that the Right pedal should be threaded on clockwise and the left pedal
on anti-clockwise.
9
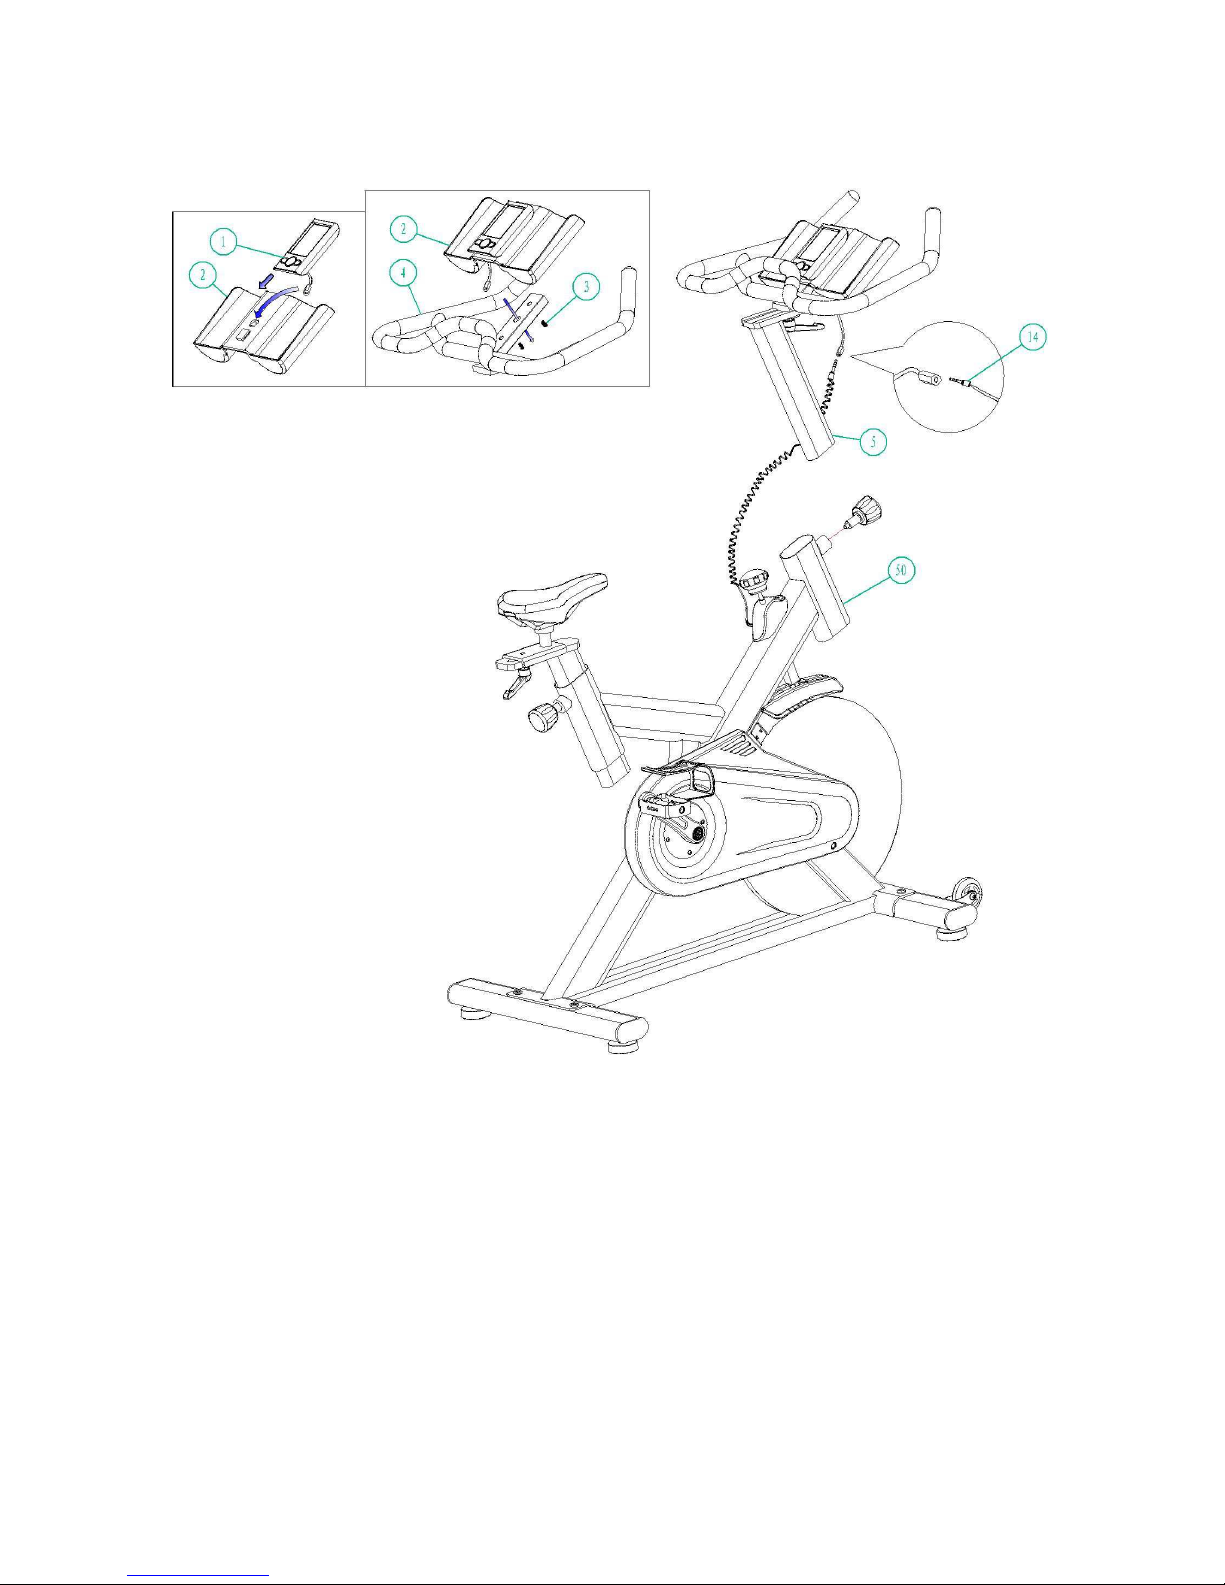
STEP 4
Put handlebar post(5) insert main frame with lock pin and then adjust height.
Fix handlebar(4) on handlebar post(5) using washer and knob.
And fix the computer holder(2) on the handlebar(4),put computer(1) into
computer holder(2),then insert the sensor plug (14) into the sensor joint of
computer.
Now your spinning bike is finished for use.

12
EXERCISE MONITOR INSTRUCTION MANUAL
FRONT VIEW
HOW TO REMOVE BATTERY:
1. Pull off the battery cover and place one of CR2032 3V battery into
battery housing on back of monitor, please refer to below
illustrations.
2. Insure batteries are correctly positioned and battery springs are in
proper contact with batteries.
3. Replace battery cover and insure it is tightly closed.
4. Battery life is approx. 1 year under normal usage.
5. If the display is illegible or only partial segments appear, remove
batteries and wait 15 seconds before reinstalling.
6. Removing the batteries will erase computer memory.

13
KEY GUIDE
ENTER:
1. Press this button to enter setting mode.
Normal→Time→DIST→CAL→T.H.R
2. Press this button to confirm the setting values
3. Hold 3 seconds to reset all of the values to zero.
UP: Increase the setting value of the following functions.
Time→DIST→CAL→T.H.R
DOWN: Decrease the setting value of the following functions.
Time→DIST→CAL→T.H.R
FUNCTIONS AND OPERATIONS
AUTO ON/OFF
The monitor will wake up automatically if the exercise machine is in motion. If stop
exercising for over 4 minutes, monitor will turn off and reset all function values to
zero.
TIME:
press the button of ENTER to TIME function and press the UP or DOWN button to
enter the value you want.
Count up:
Without setting the time value, the monitor will count up the time from 00:00~99:59.
Count down:
Setting the exercise time from 1:00~99:00 minutes, the monitor will count down from
your setting values. Once reach setting value, monitor will alarm.
SPEED:
Displays your workout speed in M/KM per hour .The monitor will display the current
speed from 0.00 ~ 99.9 Km or Mile per hour.
RPM:
Displays your workout RPM. The monitor will display the current RPM from 15 ~ 999
DISTANCE:
press the button of ENTER to DIS function and press the UP or DOWN button to
enter the value you want.
Count up:
Without setting the distance value, the monitor will count up the distance from
0.1~999.0Km or Mile
Count down:
Setting the exercise time from 1.0~999 Km or Mile, the monitor will count down
from your setting values. Once reach setting value, monitor will alarm.

14
CALORIE:
press the button of ENTER to CAL function and press the UP or DOWN button to
enter the value you want.
Count up:
Without setting the distance value, the monitor will count up the distance from 0.1~999.0.
Count down:
Setting the exercise calorie from 1.0~999, the monitor will count down from your
setting values. Once reach setting value, monitor will alarm.
PULSE (Target Heart Rate):
press the button of ENTER to T.H.R function and press the UP or DOWN button to
enter the value you want
Pulse Limit:
Setting the value of pulse limit between 60 to 220, the monitor will measure your heartbeats. Once
reach setting value, monitor will flash until your heartbeats under your setting value.
Place the palms of your hands on the both of the contact pads and the monitor will show up your
heartbeat rate in beat per minute (BPM) on the LCD display.
NOTE:
If no pulse signal input within 16 seconds, the display will indicate “P”. It is a power
saving device. Customer can press key to restart Pulse function.
CAUTION:
Operating temperature: 0℃ - +50℃.
Storage temperature: -10℃ - +60℃.

GARLANDO SPA
Via Regione Piemonte, 32 - Zona Industriale D1
15068 - Pozzolo Formigaro (AL) - Italy
www.toorx.it - info@toorx.it
 Loading...