

Page 1

241-9796
You will need this manual for safety instructions, operating procedures and warranty.
Put it and the original sales receipt in a safe dry place for future reference.
DETAIL/FINISH SANDER
Operator’s Manual
SAVE THIS MANUAL
Page 2

2
IMPORTANT SAFETY INSTRUCTIONS
!
WARNING
:When using electric tools, machines or equipment, basic safety pre-
cautions should always be followed to reduce the risk of re, electric shock,
and personal injury.
READ ALL
1.
KEEP WORK AREA CLEAN.
2.
CONSIDER WORK AREA ENVIRONMENT.
INSTRUCTIONS BEFORE USING THIS TOOL
Cluttered areas can cause injuries.
Don’t use power tools in damp,
wet, or poorly lit locations. Don’t expose tools to the rain. Keep the work area
well lit. Don’t use tools in the presence of ammable gases or liquids.
KEEP CHILDREN AND BYSTANDERS AWAY.
3.
All children should be kept
away from the work area. Don’t let them handle machines, tools or extension
Bystanders can be a distraction and can be injured.
cords.
4.
GROUNDED TOOLS must be plugged into an outlet that is properly
installed and grounded. Grounding provides a low-resistance path to carry
electricity to the ground away from the operator, should the tool malfunction electrically. Do not remove the grounding prong from the plug or alter the plug in
any way. If in doubt as to whether the outlet is properly grounded according
to code, check with a qualied electrician.
OBSERVE PROPER PRECAUTIONS REGARDING DOUBLE INSULA
5.
TION.
This tool is double insulated. It is equipped with a polarized plug.
One blade is wider than the other, so it will t into a polarized outlet only one
way. If you have difculty inserting the plug, try reversing it. If it still doesn’t
t , do not alter the plug; have a qualied electrician install a polarized outlet.
6.
GUARD AGAINST ELECTRIC SHOCK.
Prevent body contact with grounded
surfaces: pipes, radiators, ranges, and refrigerator enclosures. When your
body is grounded the risk of electric shock increases. When working wher
ever “live” electrical wires may be encountered, try to ascertain whether
there is a danger of shock. DO NOT TOUCH ANY METAL PARTS
OF THE TOOL while using it. Hold the tool only by the plastic grip to prevent
electric shock if you contact a live wire.
7.
DO NOT MISUSE THE CORD.
Never carry your tools by the cord or pull on
the cord to unplug it. Protect the cord from potential sources of damage:
heat, oil & solvents, sharp edges, or moving parts. Replace damaged cords
immediately.
WHEN WORKING OUTDOORS, USE AN OUTDOOR-RATED EXTENSION
8.
CORD.
An extension cord rated for outdoor use must be marked “W-A” or
“W”.
DO NOT EXPOSE ELECTRICAL POWER TOOLS TO MOISTURE.
9.
wet conditions
ENSURE THE EXTENSION CORD YOU USE IS OF SUFFICIENT GAUGE
10.
can cause water to enter the tool and lead to electric shock.
Rain or
FOR ITS LENGTH.
Recommended Minimum Wire Gauge for Extension Cords
150’ length
Amps
from
Tool Nameplate 25’ length
0-5 amps
5.1-8 amps
8.1-12 amps
12.1-15 amps
15.1-20 amps
100’ length
14 ga.
12 ga.
10 ga.
10 ga.
Do Not Use
75’ length
50’ length
16 ga.
16 ga.
14 ga.
12 ga.
10 ga.
16 ga.
16 ga.
14 ga.
12 ga.
10 ga.
16 ga.
14 ga.
12 ga.
10 ga.
10 ga.
12 ga.
10 ga.
Do Not Use
Do Not Use
Do Not Use
-
-
-
200’ length
12 ga.
Do Not Use
Do Not Use
Do Not Use
Do Not Use
11. STORE IDLE EQUIPMENT. Store equipment in a dry area to inhibit rust.
Equipment also should be in a high location or locked up to keep out of
reach of children.
12. DON’T FORCE THE TOOL. It will do the job better and more safely at the
rate for which it was intended.
13. USE THE RIGHT TOOL. Don’t force a small tool or attachment to do the
work of a larger industrial tool. Don’t use a tool for a purpose for which it was
not intended.
14. DRESS PROPERLY. Don’t wear loose clothing or jewelry; they can be
caught in moving parts. Protective, non-electrically conductive gloves, protective
eyewear and non-skid footwear are recommended. Wear protective hair
covering to contain long hair and keep yourself from harm.
Page 3

IMPORTANT SAFETY INSTRUCTIONS
!
if the work you’re doing
USE EYE PROTECTION.
15.
produces metal lings, dust or wood chips. Goggles are acceptable in other
situations. Wear a clean dust mask if the work involves creating a lot of ne
or coarse dust.
SECURE WORK.
16.
hands to operate the tool.
17. DON’T OVERREACH. Keep proper footing and balance at all times. Do not
reach over or across machines that are running.
MAINTAIN TOOLS.
18.
performance. Follow instructions for lubricating and changing accessories.
For safe performance. Keep handles dry, clean and free from oil and grease.
19.
AVOID UNINTENTIONAL STARTING. Be sure the switch is in the
tion before plugging in.
20. ALWAYS CHECK AND MAKE SURE TO REMOVE ANY ADJUSTING KEYS
OR WRENCHES
off a moving part and result in injury.
DO NOT USE THE TOOL IF IT CANNOT BE SWITCHED ON OR OFF.
21.
Have your tool repaired before using it.
22.
DISCONNNECT THE PLUG FROM THE POWER SOURCE BEFORE MAKING
ANY ADJUSTMENTS.
if the tool could accidentally start.
STAY ALERT.
23.
any tool when you are tired.
CHECK FOR DAMAGED PARTS.
24.
damaged should be carefully checked to determine that it will operate prop
erly and perform its intended function. Check for alignment of moving parts,
binding of moving parts, breakage of parts, mountings, and other conditions
that may affect its operation. Inspect screws and tighten any ones that are
loose. Any part that is damaged should be properly repaired or replaced by
an authorized service center unless otherwise indicated elsewhere in the in
struction manual. Have defective switches replaced by an authorized service
center. Don’t use the tool if switch does not turn it on and off properly.
REPLACEMENT PARTS.
25.
parts.
26.
SERVICE AND REPAIRS
an authorized repair center. Improperly repaired tools could cause serious
shock or injury.
Use clamps or a vise to hold the work, this frees both
before turning the tool on. Left attached, these parts can y
Watch what you are doing & use common sense. Don’t operate
Use a full-face mask
Keep tools sharp and clean for better and safer
Changing attachments or accessories can be dangerous
Before using this tool, any part that is
When servicing, use only identical replacement
should be made by qualied repair technicians at
-
posi
OFF
-
-
SAFETY PRECAUTIONS FOR DETAIL
SANDER
• Always follow instructions for fitting and changing sandpaper
• Do not put undue pressure on the sander such that it slows down.
• After switching off, always wait until the sander has stopped before putting it
down.
• Do not expose this tool to water or liquids. The abrasive pads, steel wool pad,
and polishing pad are not intended for wet use.
3
Page 4

SPECIFICATIONS
!
!
!
=
Voltage: 120 Volts AC, 60Hz
Current Rating: 0.8 amps
=
=
No load speed: 12,000 OPM
=
Dust-sealed front rocker switch
Sanding sheet size: 5-1/2” X 5-1/2” X 3-1/8”
=
=
Includes 3 pcs. sanding paper(80,120,180)
FUNCTIONAL DESCRIPTION
1.
Dust-sealed on/off switch
2. Sanding base
3.
Dust bag
1
2
OPERATING PROCEDURES
INSTALLING SANDPAPER
WARNING:
The Detail Sander comes complete with a 5 hole hook and loop style mounting
system. The palm sanders sanding sheets will be affixed to the sanders
base without the use of clamps.
Connect the sanding sheet to the sanding plate:
Turn the tool upside down. Next, align the sanding sheet with the sander’s base
and press the sanding sheet rmly into place. Conrm that the holes punched in
the sanding sheet match the dust holes in the sanding plate. Holes must match for
the dust system to work properly.
To remove the sanding sheet, carefully peel the sanding sheet away from the
sanding plate.
NOTE:
RUNNING THE TOOL
1. Identify the item you wish to sand or polish and choose the proper grit sandpaper or abrasive pad best suited for the job. If preparing wood for painting or
removing paint, use a course grit sanding sheet. Use a fine grit for finishing
work.
2. Secure the item to be sanded. Make sure that the sanding sheet is firmly
fixed to the sander.
3. With the sander not in contact with the workpiece, press the Switch to the “ON”
position.
4. Carefully place the palm Sander onto the workpiece and begin sanding.
WARNING: Do not sand any area to heavily or for more than a few seconds at a
time. Apply even pressure in a random pattern over the entire surface.
Unplug the sander before replacing sandpaper.
Check the sandpaper regularly for tears, cracking, and other damage.
Damaged paper can allow the pad beneath to be damaged.
Because of the operator vigilance required, the pad is considered a
consumable part and is not covered under warranty.
3
5. To sand down proiles and grooves, use the point or edge of the sander base.
6. Every few minutes, check the condition and wear of the sanding sheet. Re-
place if necessary.
4
Page 5

OPERATING PROCEDURES
!
WARNING: Do not use torn or severely worn sandpaper. You may damage your
work surface or suffer physical injury.
7.
When you are done sanding the desired area, remove the sander from the
work surface before turning the sander OFF.
CONTROL THE DUST IN THE WORKPLACE.
For dust collection to work, the five dust extraction holes must be aligned properly
between the sanding sheets and sanding pad. Using the dust extraction feature of
the sander also helps prevent the sandpaper from loading quickly with sawdust.
At the back of your sander, you can attach a dust bag with a 1-1/4” ID hose.
SANDING
Use a grade of sandpaper that will make ner marks than those already on the
surface. Too coarse a grade will not make the surface smoother while too ne a
grade will remove scratches too slowly, or not at all. Continue using ner grades of
sandpaper until you obtain the desired nish.
When removing old paint, determine how much paint really needs to be removed.
Consider that old paint may well be toxic and will have to be treated with the
respect due any toxic material both on the part of the tool operator and environment.
Wear appropriate breathing protection and dispose carefully of dust or chips
left after sanding.
MAINTENANCE
1. Keep the vents clear of dust and debris. This will help prevent possible electrical shorts and ensure proper cooling.
2. Keep the tool housing clean and free of oil and grease by using mild soap and a
damp (not wet) cloth.
3.
Inspect the cord regularly and have it replaced by an authorized repair facility if
it is damaged.
Lubrication for this tool is done at the factory and should not be necessary
4.
again under normal use.
5.
An authorized repair center should do any repairs, modification, or mainte
nance that involves disassembling the tool.
Any damage to the tool should be corrected at an authorized repair center.
6.
CLEANING
Use mild soap and a damp cloth to clean the sander. Do not use petrol, turpentine,
lacquer, paint thinners which could damage the plastic casing. Do not allow liquids
to get inside the sander. Never immerse the sander in liquid.
-
5
Page 6
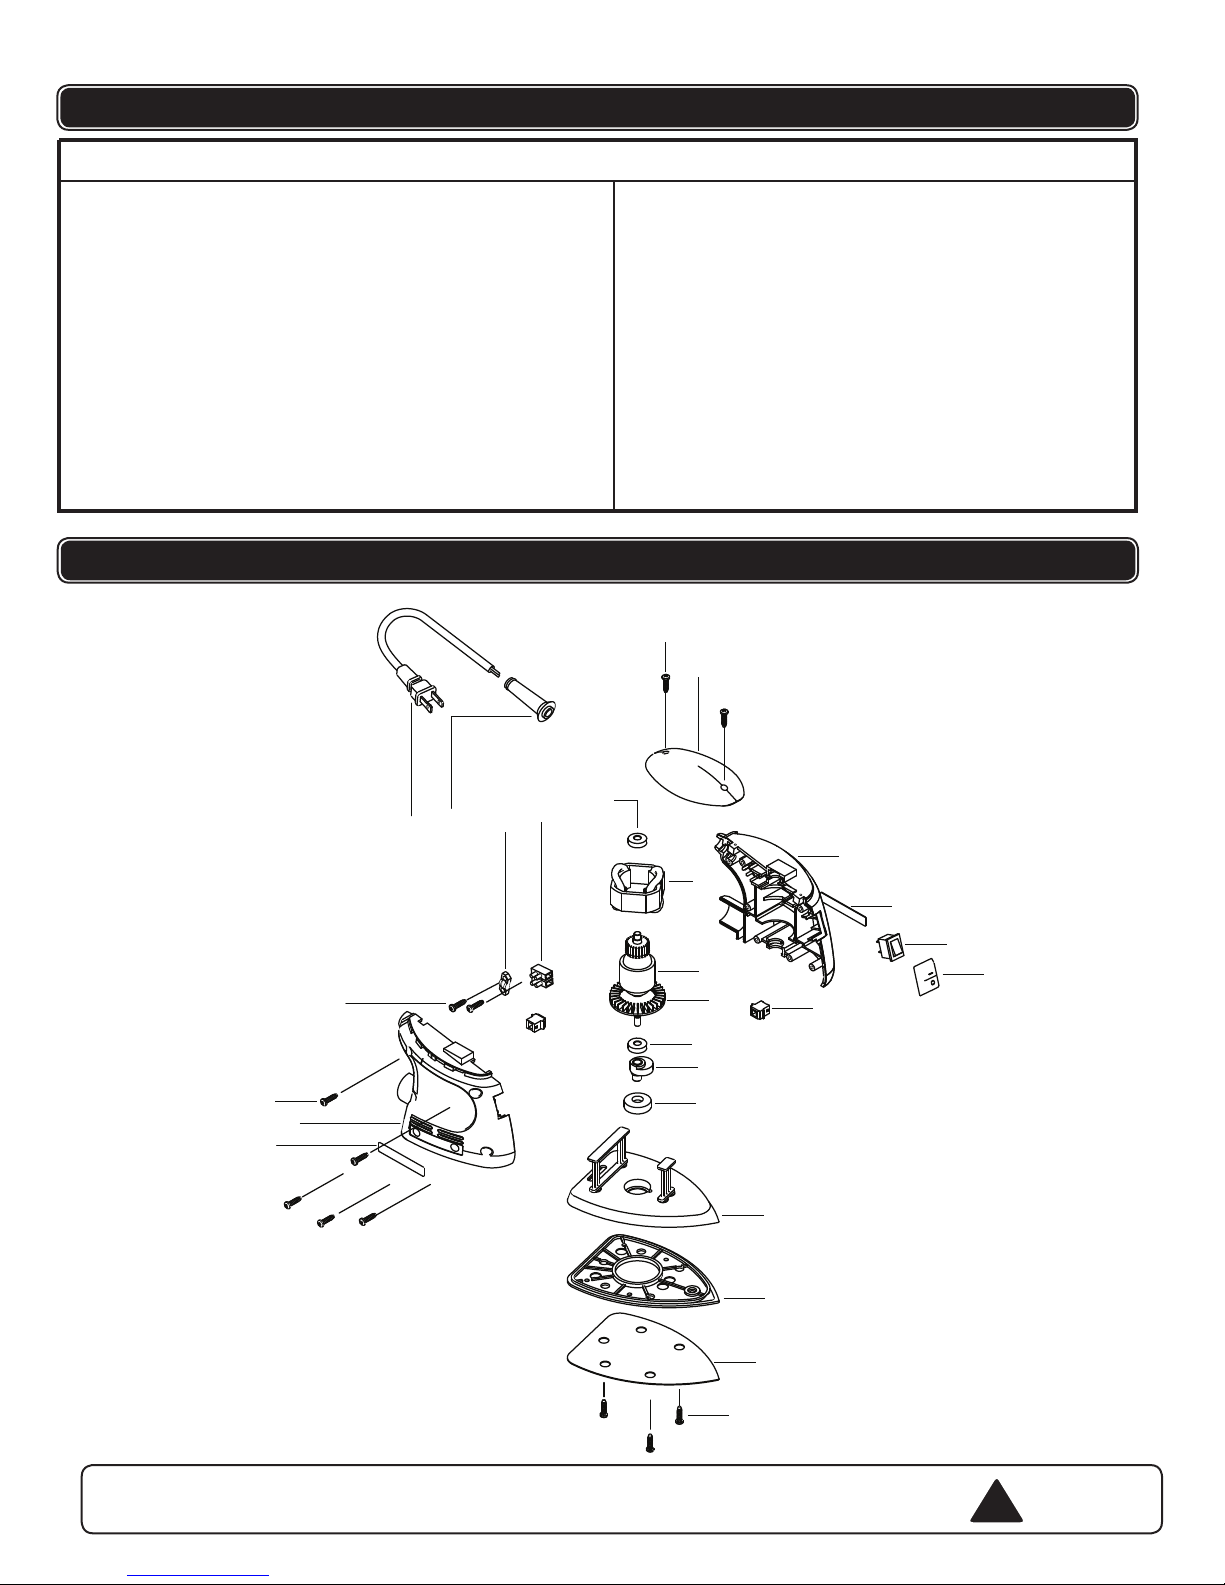
6
PARTS LIST
1
2
3
4
5
6
7
8
9
10
11
12
13
14
15
16
17
18
19
20
21
22
23
24
25
26
20 Cord clamp
Description
Screw
Sand paper
Sanding plate
Bearing
Bushing
Bearing
Fan
Rotor
Stator
Brush holder
Switch cover
No.
1
2
3
4 Base support 17 Screw
5
6
7
8
9
10
11
12
13 Switch
No.
14
15
16
18
19
21
22
23
24
25
26
Description
Label
Left housing
Rubber cover
Bearing
Terminal block
Cord guard
Power cord
Screw
Screw
Right housing
Label
SCHEMATIC DRAWING
WARNING Repairs should be made by an authorized repair center. Do not
open or disassemble
for questions regarding this power tool.
this power tool
. Contact at
1-866-915-8626
!
 Loading...