

Page 1

208-2196
34° CLIPPED-HEAD 3-1/2"
FRAMING NAILER
You will need this manual for safety instructions, operating procedures and warranty.
Put it and the original sales receipt in a safe dry place for future reference.
For questions about this product, Please call 1-866-915-8626
Operator’s Manual
SAVE THIS MANUAL
Page 2

IMPORTANT SAFETY INSTRUCTIONS
INSTRUCTIONS PERTAINING TO A RISK OF FIRE, OR INJURY TO PERSONS.
WARNING! When using tools, basic precautions should always be followed, including
the following.
WORK AREA
Keep the work area clean and well lit. Cluttered benches and dark areas
increase the risk of electric shock, fire, and injury to persons.
Do not operate the tool in explosive atmospheres, such as in the presence of
flammable liquids, gases, or dust. Be careful not to nail on top of another nail,as
this can create sparks, resulting in the ignition of dust or fumes.
Keep bystanders, children, and visitors away while operating the tool. Distractions
may result in personal injury and/or the injury of others.
PERSONAL SAFETY
Always wear eye protection. Operator and others in the work area should always
wear ANSI-approved safety goggles with side shields. Eye protection is used to
guard against flying fasteners and debris, which may cause severe eye injury.
Always wear hearing protection when using the tool. Extended exposure to high
intensity noise may cause hearing loss.
Use safety equipment. A dust mask, non-skid safety shoes and a hard hat must be
used for the applicable conditions.
Do not wear loose fitting clothing or jewelry.Use a helmet for long hair.These items
can get caught in moving parts,causing serious personal injury.
Stay alert, watch what you are doing and use common sense when operating the
tool while tired or under the influence of drugs, alcohol, or medication. A moment
of inattention while operating the tool increase the risk of injury to persons.
Avoid unintentional firing. Keep fingers away from trigger when not driving
fasteners, especially when connecting the tool to the air supply.Be sure the
hammer cap is off before connecting to the air supply. Do not carry the tool with
your finger on the hammer cap or connect the tool to the air supply with the trigger
on.
Keep proper footing and balance at all times. Do not overreach. Do not use on a
ladder or unstable support. Proper footing and balance enable better control of the
tool in unexpected situation.
Make sure the hose is free of obstructions or snags. Entangled or snarled hoses
can cause loss of balance or footing and may become damaged, resulting in
possible injury.
Do not attach the hose or tool to your body. Attach the hose to the structure to
reduce the risk of loss of balance if the hose shifts.
Always assume that the tool contains fasteners. Do not point the tool toward
yourself or anyone whether it contains fasteners or not.
Wash hands after handling. This product or its power cord may contain chemicals
to cause cancer and birth defects or other reproductive harm.
!
WARNING! Do not fire a nail on top of another nail. This may cause the nail to be
deflected and hit someone, or cause the tool to react which may result in a risk of
injury to persons.
2
!
Page 3
IMPORTANT SAFETY INSTRUCTIONS
WARNING! Remove finger from the trigger when not driving fasteners. Never carry
!
!
the tool with finger on trigger, the tool may fire a fastener.
TOOL USE AND CARE
Know this tool. Read manual carefully, learn its application and limitations, as well
as the specific potential hazards related to this tool.
Use only fasteners listed in the Accessories section of this manual. Fasteners not
identified for use with this tool by the tool manufacturer may result in a risk of injury
to persons or tool damage when use in this tool.
WARNING! Disconnect the tool from the air source before making adjustments,
doing tool maintenance, clearing jams, leaving work area, or unloading the tool. Such
precautionary measures reduce the risk of injury to persons.
Check for misalignment or binding of moving parts, breakage of parts, and any
other condition that may affect the tool’s operation. If damaged, have the tool
serviced before using. Many accidents are caused by poorly maintained
tools.There is a risk of bursting if the tool is damaged.
Maintain the tools with care. Keep a cutting tool sharp and clean. A properly
maintained tool, with sharp cutting edges reduces the risk of binding and is easier
to control.
Store the tools,in a secure place,when not in use and out of reach of children and
other untrained persons. A tool is dangerous in the hands of untrained users.
Do not use the tool if the hammer cap does not turn the tool on or off. Any tool that
cannot be controlled with the hammer cap is dangerous and must be repaired.
Do not force tool. Use the correct tool for your application. The correct tool will do
the job better and safer at the rate for which it is designed.
Use clamps or another practical way to secure and support the workpiece to a
stable platform. Holding a tool by hand or against the body is unstable and may
lead to loss of control.
Keep the tool and its handle dry, clean and free from oil and grease. Always use a
clean cloth when cleaning. Never use brake fluids, gasoline, petroleum-based
products, or any strong solvents to clean your tool.
Do not use the tool as a hammer.
Never use this tool in a manner that could cause a fastener to be directed toward
anything other than the workpiece.
Never use gasoline or other flammable liquids to clean the tool. Never use the tool
in the presence of flammable liquids or gases. Vapours could ignite by a spark and
cause an explosion which will result in death or serious personal injury.
Do not remove, tamper with, or otherwise cause the trigger lock or trigger to
become inoperable. Do not operate any tool which has been modified in a like
fashion. Death or serious personal injury could result.
Do not touch the trigger unless driving fasteners. Never attach air line to tool or
carry tool while touching the trigger. The tool could eject a fastener which will result
in death or serious personal injury. Also actuate the trigger lock to the safe position
when not in use.
Always fit tool with a fitting or hose coupling on or near the tool in such a manner
that all compressed air in the tool is discharged at the time the fitting or hose
coupling is disconnected. Do not use a heck valve or any other fitting which allows
air to remain in the tool. Death or serious personal injury could occur.
Never place hands or any other body parts in the fastener discharge area of the
tool. The tool might eject a fastener and could result in death or serious personal
injury.
Never carry the tool by the air hose or pull the hose to move the tool away from a
compressor. Keep hoses away from heat, oil and sharp edges. Replace any hose
that is damaged, weak or worn. Personal injury or tool damage could occur.
3
Page 4

IMPORTANT SAFETY INSTRUCTIONS
Always assume the tool contains fasteners. Respect the tool as a working
implement; no horseplay. Always keep others at a safe distance from the work
area in case of accidental discharge of fasteners. Do not point the tool toward
yourself or anyone whether it contains fasteners or not. Accidental triggering of the
tool could result in death or serious personal injury.
Do not drop or throw the tool. Dropping or throwing the tool can result in damage
that will make the tool unusable or unsafe. If the tool has been dropped or thrown,
examine the tool closely for bent, cracked or broken parts and air leaks. Stop and
repair before using, or serious injury could occur.
Avoid using the tool when the magazine is empty. Accelerated wear on the tool
may occur.
Clean and check all air supply hoses and fittings before connecting the tool to an
air supply. Replace any damaged or worn hoses or fittings. Tool performance or
durability may be reduced.
Do not use the tool if it leaks air or does not function properly.
Do not operate the tool if it does not contain a legible warning label.
TOOL SERVICE
Use only accessories that are identified by the manufacturer for the specific tool
model.
When servicing a tool, use only identical replacement parts. Use only authorized
parts.
Use only the lubricants supplied with the tool or specified by the manufacturer.
Tool service must be performed only by qualified repair personnel.
OPERATION
Do not drive fasteners near edge of material. The workpiece may split causing the
fastener to ricochet, injuring you or others around you.
Do not carry the tool from place to place holding the trigger. Accidental discharge
could result. Choice of triggering method is important. Check manual for triggering
options.
During normal use the tool will recoil immediately after driving a fastener. This is a
normal function of the tool. Do not attempt to prevent the recoil by holding the tool
against the work. Restriction to the recoil can result in a second fastener being
driven from the tool. Grip the handle firmly and let the tool do the work. Failure to
heed this warning can result in serious personal injury.
Do not drive fasteners on top of other fasteners or with the tool at an overly steep
angle as this may cause deflection of fasteners which could cause injury.
Do not actuate the tool unless you intend to drive a fastener into the workpiece.
Always handle the tool with care:
a. Respect the tool as a working implement.
b. Never engage in horseplay.
c. Never pull the trigger unless nose is directed toward the work.
d. Keep others a safe distance from the tool while tool is in operation as accidental
actuation may occur, possibly causing injury.
AIR SUPPLY AND CONNECTIONS
The air supply connection must not hold pressure when air supply is disconnected.
If an incorrect fitting is used, the tool can remain charged with air after
disconnecting and thus will be able to drive a fastener even after the air line is
disconnected, possibly causing injury.
Do not use any type of reactive gases, including, but not limited to, oxygen carbon
dioxide and combustible gases, as a power source. Use filtered, lubricated,
regulated compressed air only. Use of a reactive gas instead of compressed air
may cause the tool to explode which will cause death or serious personal injury.
4
Page 5

IMPORTANT SAFETY INSTRUCTIONS
Use only a pressure-regulated compressed air source to limit the air pressure
supplied to the tool. The regulated pressure must not exceed 110 PSI. If the
regulator fails, the pressure delivered to the tool must not exceed 120 PSI. The
tool could explode which will cause death or serious personal injury.
Always disconnect air resource:
a) Before making adjustments.
b) When servicing the tool.
c) When clearing a jam.
d) When tool is not in use.
e) When moving to a different work area, as accidental actuation may occur,
causing injury.
Never connect tool to an air source that may exceed 180 PSI. Over pressurizing
the tool may result in bursting, abnormal operation, breakage of the tool or
serious injury to persons. Use only clean, dry, regulated compressed air at the
rated pressure or within the rated pressure range as marked on the tool. Always
verify prior to using the tool that the air source has been adjusted to the rated air
pressure or within the rated air-pressure range.
SPECIFICATIONS
The framing nailer is designed to install Grip Fast framing nails of
0.113” to 0.131” (2.87-3.33 mm) diameter, 2" to 3-1/2" (50mm to 90mm)
long with a fastener collation angle of 34 degrees.
Min Max
Operating pressure: 70-100 PSI (120 Max.)
Magazine capacity: 75 nails
Air inlet: 1/4” (6 mm)NPT
Padded hand grip
ACCESSORIES
3 Hex Keys
Combination Wrench
Oil Bottle
®
0.266"
(6.8mm)
0.28"
(7.1mm)
0
34
.113
(2.87mm)
min. 2" (50 mm)
.131
(3.33mm)
max. 3-1/2 "(90 mm)
FUNCTIONAL DESCRIPTION
Figure 1 names the major components of the TOOL SHOP 34° Framing
A
F
B
G
E
C
D
Fig.1
Nailer.
A. Deflector
B. Body
C. Non-marring rubber tip
D. Pusher
E. Magazine
F. Air plug
G. Trigger
5
Page 6
OPERATING PROCEDURES
SETUP
AIR SOURCE
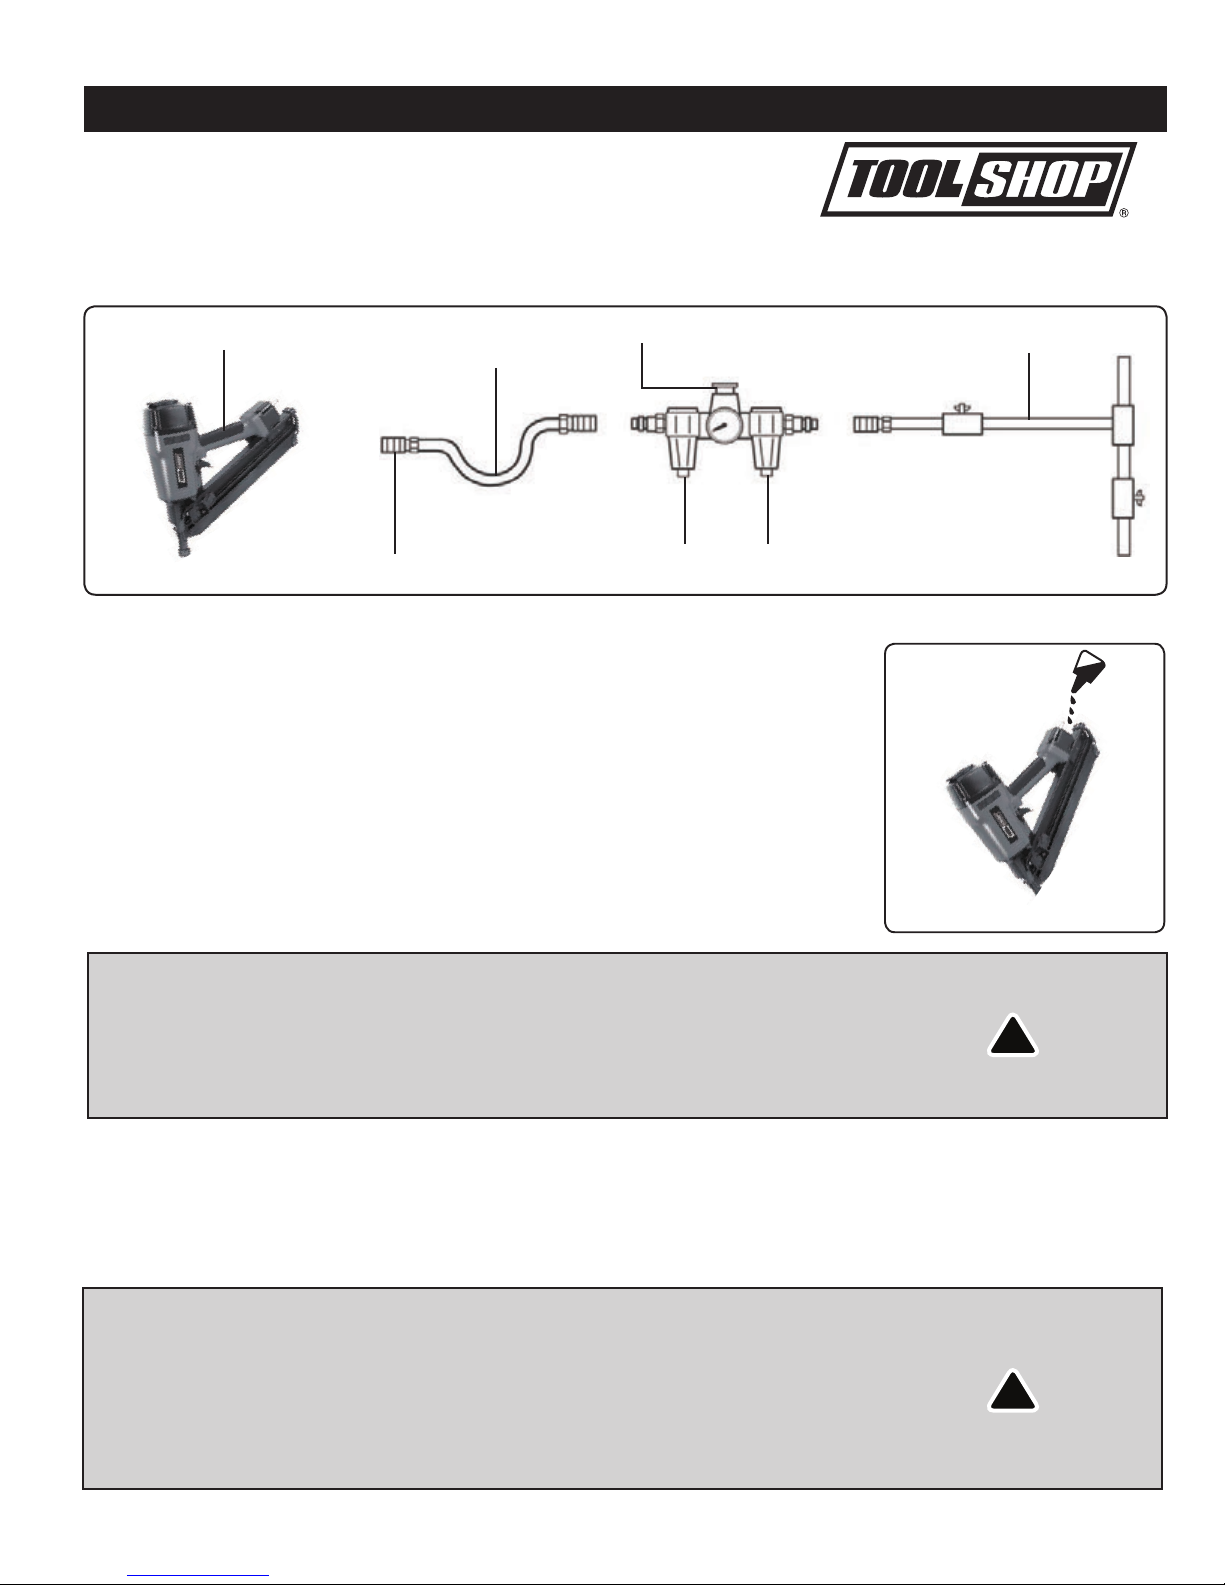
The TOOL SHOP 34° framing nailer is designed to operate on clean, dry,
compressed air, regulated at 70-100 PSI (120 Max.) The preferred system would include a filter,
a pressure regulator, and an automatic oiler located as close to the tool as possible.
Within 15 feet (5 m) is ideal. Do not use bottled air or gases. Please see below:
34o framing nailer
Air hose
Quick coupling
All compressed air contains moisture and other contaminants that can harm the
internal components of the tool. An air line filter will remove most of these and
significantly extend the life of the tool. Ensure the in-line oiler has sufficient oil. If
an in-line oiler is not available, place 2 drops of oil into the tool’s air inlet at the
beginning of each workday. More than this will be expelled from the tool’s exhaust
during firing.
Air fitting: The framing nailer should be equipped with a 1/4” NPT male ‘quick
connector’. To prevent accidental cycling even though disconnected, the tool must
always be connected to the air supply in such a way that all air pressure in it is
released when the coupling is disconnected.
Regulator
Oiler
Filter
Air connector
Fig.2
CAUTION:
All air line components (including hoses, pipe, connectors, filters, & regulators,
etc.) must be rated for a minimum working pressure of 150 PSI or 150% of the
maximum system pressure, whichever is greater.
Disconnect the tool from the air supply before performing maintenance, clearing a
jammed fastener, leaving the work area, moving the tool to another location, or
handing it to another person.
PREPARING THE TOOL
1. After reading and understanding this entire manual, connect tool to the air
supply.
2. Turn on the air compressor and adjust the regulator to the proper pressure for the
fastener size you are using.
CAUTION:
Keep tool pointed away from yourself and others at all times.
Always disconnect tool to air supply before loading fasteners.
Do not load fasteners with trigger or safety pressed.
Always wear approved safety glasses, and hearing protection when preparing
or operating the tool.
Never use a tool that leaks air or needs repair.
Fig.3
!
!
6
Page 7

OPERATING PROCEDURES
LOADING NAILS
1. Insert strip of nails into rear of magazine. Slide nail strip towards the front
of the magazine, making sure strip is past the nail stop.(Fig.4)
!
Nail stop
Fig.4
Fig.5
CAUTION: Do not load with contact safety mechanism or trigger depressed.
2. Pull feeder shoe completely behind the nail strip.(Fig.5)
3. Release the latch and the nail strip will be pushed to the front of the
magazine.(Fig.6 & Fig.7)
Fig.6
Fig.7
USING THE TOOL
Complete all the steps in PREPARING THE TOOL before using. This tool drives nails
in two different ways:
Intermittent operation (Trigger fire ). This mode will drive a nail each time the
trigger is pressed and the contact mechanism is in contact with the nailing surface.
1. Set the bump/sequential switch to Intermittent operation (Trigger fire ). Push
switch in and then down.
2. Position the nail outlet on the workpiece with finger off the trigger.
3. Depress the contact mechanism firmly until it is completely depressed, then pull
the trigger to drive a nail.
4. After each nail is driven, completely release the trigger and lift the nailer off the
workpiece. To drive another nail, move the nailer along the workpiece and
repeat this procedure.
Continuous Operation (Bump Fire ). This mode will drive a nail each time the contact
mechanism is pushed while the trigger is pulled and held.
1. Set the bump/sequential switch to Continuous operation(Bump Fire ). Push switch
in and then up.
2. Pull trigger with nailer off workpiece.
3. Depress the contact mechanism firmly until it is completely depressed to drive a nail.
4. Move the nailer along the workpiece in a bouncing motion.
5. Each time the contact mechanism is fully depressed a nail will be driven.
7
Page 8

OPERATING PROCEDURES
CAUTION:
Never attempt to drive a fastener into material that is too hard, at too steep an
angle, or near the edge of the work piece. The fastener can ricochet causing
personal injury.
Carefully check for proper operation of the trigger and safety.
Do not use the tool unless both the trigger and the safety mechanism are
functional, or if the tool is leaking air or needs any other repair.
ADJUSTING FASTENER DEPTH
The depth to which a fastener is driven is controlled by the depth adjustment (Fig.8).
The depth drive is adjusted to the maximum setting by the factory.
1. Fire a fastener into a scrap work piece to check depth.
2. Using wrench provided, adjust the safety element to achieve desired depth.
3. Fire another fastener in a scrap work piece and check the depth.
4. REPEAT AS NECESSARY UNTIL DESIRED DEPTH IS ACHIEVED. The amount
of air pressure required will vary depending on the size of the setting.
!
Fig.8
CAUTION: Disconnect tool from the air supply before removing or installing the
contact tip.
MAINTENANCE
r, reassemble in reverse order.
REGULAR MAINTENANCE
Clean and inspect the tool daily. Make sure the tool is disconnected from the air
supply.
Blow the tool clean with compressed air and inspect for wear or damage.
Use
necessary. DO NOT SOAK tool with cleaning solutions. Such solutions can
damage internal parts.
Inspect the trigger and the safety mechanism to assure the system is complete
and functional. Check for loose or missing parts, and any parts that may be
sticking.
Keep all the screws tight. Loose screws may cause personal injury
Place two or three drops of pneumatic oil (included) into the air inlet of the tool
daily.
.
!
8
Page 9

TROUBLESHOOTING
PROBLEM CAUSE SOLUTION
Air leak at trigger area O-ring in trigger valve
damaged or cracked
Trigger valve head damaged Check and replace trigger valve head
Trigger valve stem, seal, or
O-ring damaged
Air leak between body and
front plate
Air leak between body and
cylinder cap
Tool driving fasteners too
deeply
Tool runs slowly or has power
loss
Tool skips fasteners Worn bumper or damaged
Fasteners jam in tool or in
magazine
Tool will not drive fasteners
down tight
Piston O-ring or bumper
damaged
Screw loose Tighten screws
Damaged seal Check and replace seal
Worn bumper Replace bumper
Air pressure too high Adjust air pressure at regulator
Insufficient lubrication Add oil as instructed
Insufficient air supply Check air supply
Broken spring in cylinder cap Replace spring
Exhaust port in cylinder head
is blocked
spring
Dirt in front plate Clean drive channel in front plate
Inadequate airflow to tool Check hose and compressor fittings
Worn or dry O-ring on piston Replace or lubricate O-ring
Damaged O-ring on trigger
valve
Cylinder cap is leaking Replace seal
Joint guide is worn Replace joint guide
Fasteners in tool are the
wrong size or damaged
Magazine screws or front
plate clamp are loose
Blade in piston assembly is
damaged
Worn blade in piston
assembly
Lack of power Adjust regulator to adequate pressure
Slow cycling and loss of
power
Check and replace O-ring
Check and replace trigger valve stem
Check and replace O-ring or bumper
Replace damaged internal parts
Replace bumper or pusher spring
Replace O-ring
Use only recommended fasteners
Tighten all
Replace piston assembly
Replace piston assembly
Check cylinder cap spring for broken coils, reduced
length, or if exhaust port is blocked
9
Page 10

PARTS LIST
Part Description Part Description Part Description
1
SCREW 5*16 4
2
WASHER
3
O-RING 16*1.7
4
EXHAUST DEFLECTOR
5
WASHER
6
SCREW 6*35
7
WASHER
8
CAP
9
GASKET
10
WASHER
11
PISTON RETAINER
12
SPRING
13
O-RING 40*2.65
14
O-RING 56.7*2.9
15
PISTON HEAD
16
O-RING 42.9*4.8
17
PISTON HEAD
18
DRIVER BLADE
19
SEAL,AIR
20
O-RING 58*2
21
CYLINDER
22
BUMPER(A)
23
BUMPER(B)
24
O-RING16*1.8
25
O-RING19*2.3
26
HOUSING LOWER REMOTE
27
O-RING5.6*1.8
28
O-RING8*1.8
29
REMOTE HOUSING
30
O-RING 2.3*1.4
31
CONICAL SPRING
32
REMOTE CORE
33
SEAL,AIR
34
RELEASING BLADE
35
TRIGGER
36
SCREW 5*18
37
WASHER
38
BUSHING
39
NYLON NUT M5
40
PIN 3*14
41
SPRING
42
SPRING PIN 3*16
43
TRIGGER
44
SAFETY COVER
45
SPRING PIN 3*32
46
CATCH SUPPORT(B)
47
SCREW 5*12
48
CATCH SUPPORT(A)
49
NO MAR PAD
50
SPRING PAD RETAINER
51
O-RING 89*2.9
52
SPACER
53
GRIP
54
WASHER
55
BODY
56
O-RING 62.5*2
57
GUIDE BODY
58
SPRING
59
SCREW 5*25
60
WASHER
61
TAIL COVER
62
GASKET
63
SCREW 5*18
64
FEEDER SHOE STOP
65
SCREW 8*25
66
RIVET
67
MAGAZINE SUPPORT
68
RIVET
69
TAIL COVER
70
RELEASING BLADE
71
PIN
72
FEEDER CLIP
73
MAGAZINE
74
MAGAZINE GASKET
75
STEEL BAR
76
STOPPER
77
SPRING
78
PUSHER
79
ROLLER
80
SPRING
81
PIN
82
SPRING
83
SCREW 4*8
84
AIR PLUG
85
COLLAR
86
WASHER
10
Page 11

SCHEMATIC DRAWING
WARNING Repairs should be made by an authorized repair center.Do not open or
!
disassemble this power tool.
11
Page 12

1-YEAR LIMITED WARRANTY:
Notwithstanding the foregoing, this
limited warranty does not cover any damage that has resulted from abuse or
misuse of the merchandise. This warranty: (1) excludes expendable parts
including but not limited to connectors, o-rings, driver blades, air hoses, gaskets,
etc. (2) shall be void if this tool is used for commercial and/or rental purposes;
and (3) does not cover any losses, injuries to persons/property or costs. This
warranty does give you specific legal rights and you may have other rights,
which vary from state to state. Be careful, tools are dangerous if improperly
used or maintained. Seller’s employees are not qualified to advise you on the
use of this merchandise. Any oral representation(s) made will not be binding
on seller or its employees. The rights under this limited warranty are to the
original purchaser of the merchandise and may not be transferred to any
subsequent ow
ner. This limited warranty is in lieu of all warranties,
expressed or implied including warranties or merchantability and fitness for a
particular purpose. Seller shall not be liable for any special, incidental, or
consequential damages. The sole exclusive remedy against the seller will be
for the replacement of any defects as provided herein, as long as the seller is
willing or able to replace this product or is willing to refund the purchase price
as provided above.
For insurance purposes, seller is not allowed to
demonstrate any of these power tools for you.
For questions / comments, technical assistance or repair parts –
Please call toll free at: 1-866-915-8626
(M-F 8am – 5pm EST)
SAVE YOUR RECEIPTS.
THIS WARRANTY IS VOID WITHOUT THEM.
9
34°CLIPPED HEAD 3-1/2" FRAMING NAILER WARRANTY
This TOOL SHOP® brand power tool carries a 1-Year Limited Warranty
to the original purchaser. If, during normal use, this TOOL SHOP® tool
fails due to a defect in material or workmanship within one (1) year from
the date of purchase, simply bring this tool with your original sales receipt
back to your nearest MENARDS® retail store. At its discretion, TOOL SHOP®
agrees to have the tool replaced with the same or similar TOOL SHOP® product
free of charge, within the stated warranty period, when returned by the original
purchaser with original sales receipt.
 Loading...