

Page 1
Page 2

1 2
WARRANTY
This product is guaranteed against defects for a period of 12 months from date of
purchase. This warranty is provided by Super Cheap Auto Pty Ltd ACN 085 395 124
(Supercheap Auto) of 751 Gympie Rd Lawnton QLD 4501 Ph (07) 3482 7500. Supercheap
Auto will offer a repair, replacement product or store credit if the product is assessed as
being defective during the warranty period.
To claim under this warranty, take this product to the Front Service Desk of your nearest
Supercheap Auto store. For store locations, visit www.supercheapauto.com.au (AUS)
or www.supercheapauto.co.nz (NZ). You will need your receipt or proof of purchase.
Additional information may be requested of you to process your claim. Should you not
be able to provide proof of purchase with a receipt or a bank statement, identification
showing your name, address and signature may be required to process your claim.
This product may need to be sent to the manufacturer to assess the defect before
determining any claim. Faults or defects caused by product modification, misuse and
abuse, normal wear and tear or failure to follow user instructions are not covered under
this warranty.
Our goods come with guarantees that cannot be excluded under the Australian Consumer
Law. You are entitled to a replacement or refund for a major failure and for compensation
for any other reasonably foreseeable loss or damage. You are also entitled to have the
goods repaired or replaced if the goods fail to be of acceptable quality and the failure
does not amount to a major failure.
Any expenses incurred relating to the return of this product to store will normally have
to be paid by you. For more information contact your nearest Supercheap Auto store.
The benefits to the consumer given by this warranty are in addition to other rights and
remedies of the Australian Consumer Law in relation to the goods and services to which
this warranty relates.
IMPORTANT SAFEGUARDS
When using an electrical appliance,basic precautions should always be followed,including
the following:
READ ALL INSTRUCTION BEFORE USING THIS VACUUM CLEANER
WARNING
To reduce the risk of fire, electric shock, or injury:
• Do not use outdoors.
• Do not leave vacuum cleaner when plugged in. Turn off the switch and unplug the
electrical cord when not in using and before servicing.
• Do not allow to be used as a toy. Close attention is necessary when used by or near
children.
• Use only as this manual described. Use only manufacturer’s recommended attachments.
• Do not use with damaged power cord or plug.
• Do not pull or carry by cord, use a cord as a handle, close door on cord, or pull cord
around sharp edges and corners. Do not run this item over cord. Keep the cord away
from heated surface.
• Do not use extension cords or outlets with inadequate current carrying capacity.
Turn off all controls before unplug.
• Do not unplug by pulling on cord. To unplug, grasp the plug, not the cord.
• Do not handle plug or vacuum cleaner with wet hands or operate without shoes.
• Do not put any object into openings. Do not use with any opening blocked; Keep free
of dust, lint, hair, and anything that may reduce airflow.
• This vacuum cleaner creates suction. Keep hair, loose clothing, fingers, and all parts of
body away from openings and moving parts.
• Do not pick up anything that is burning or smoking, such as cigarettes, matches, or hot
ashes.
• Do not use without dust bag or filter in place.
• Use extra care when cleaning on stairs.
• Do not use to pick up flammable or combustible liquids such as gasoline, or use in
areas where they may be present.
• Store your cleaner indoors in a cool, dry area.
• Ensure you turn the unit off at the very minimum every 15 minutes (for 1 minute) to let
the motor cool down - failure to do so may cause motor failure.
• Do not use this unit for more than 4 hours (including rest breaks) on any given day.
• If the supply cord is damaged, it must be replaced by the manufacturer.
• This cleaner must be operated in accordance with these instructions. This cleaner is
not designed for industrial applications and should not be used for collection of cement
dust, fiberglass dust, excessive or frequent sand or body fillers as these will be harmful
to your motor and void the manufacturers warranty.
Page 3
3 4
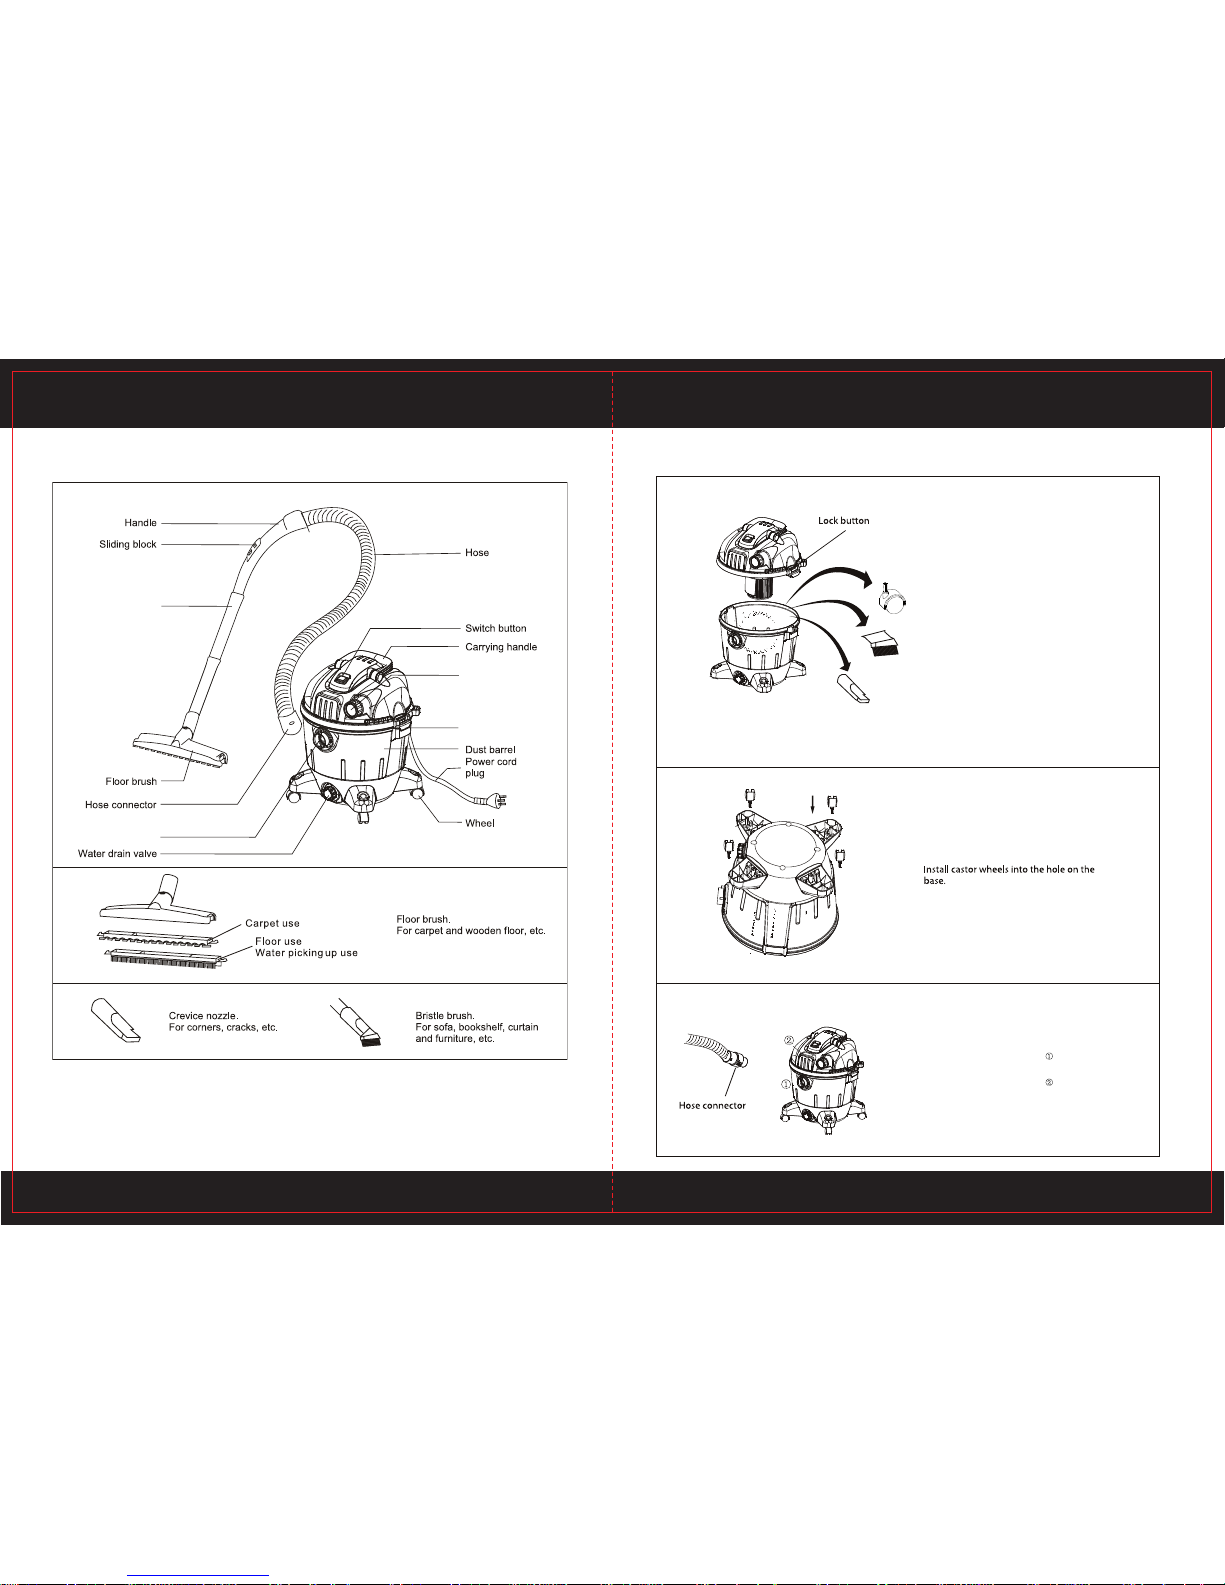
OPERATION METHODPARTS NAME
Blower port
Latch
vacuum port
1
2
3
Release the latch to open the housing, take out
wheels and accessories
Put the hose connector into , the vacuum port
is available.
Put the hose connector into , the blower port
is available.
Extension
tube
Page 4
5 6
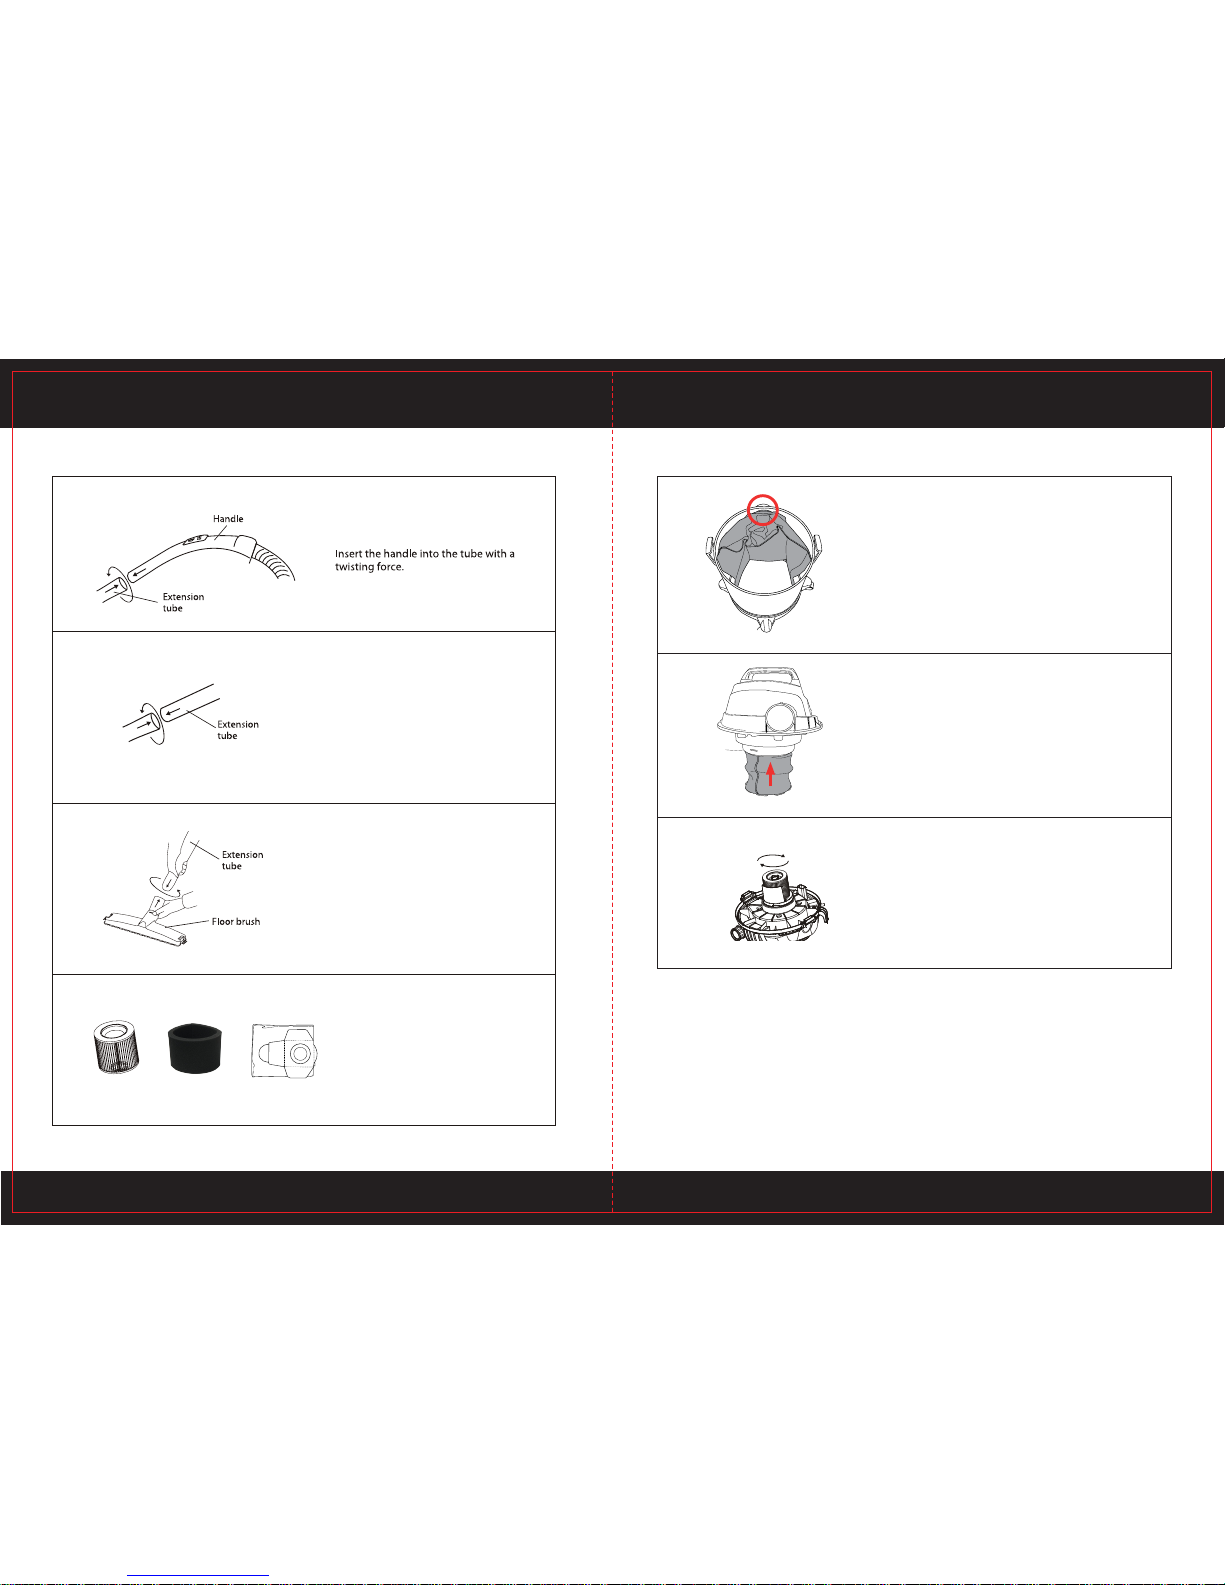
OPERATION METHOD
HEPA filter Foam Filter
Using HEPA filter and dust bag for dry
vacuuming.
Using foam filter for wet vacuuming, always
dry the foam filter after using.
Never use the machine without filters.
Never use the dust bag for wet vacuuming.
4
5
6
7
OPERATION METHOD
Fitting the dust bag:
Slip the dust bag over the vacuum inlet to fit
the dust bag.
Fitting the foam filter:
For wet-vacuuming, slip the foam filter over
the filter basket.
Fitting the HEPA filter:
Put the HEPA filter over the filter
basket and twist the locking knob with
a clockwise force to fit the HEPA filter.
8
9
Dust Bag
10
Push tubes together with a
twisting force
Connect the floor tool with a
twisting force
Page 5
7 8
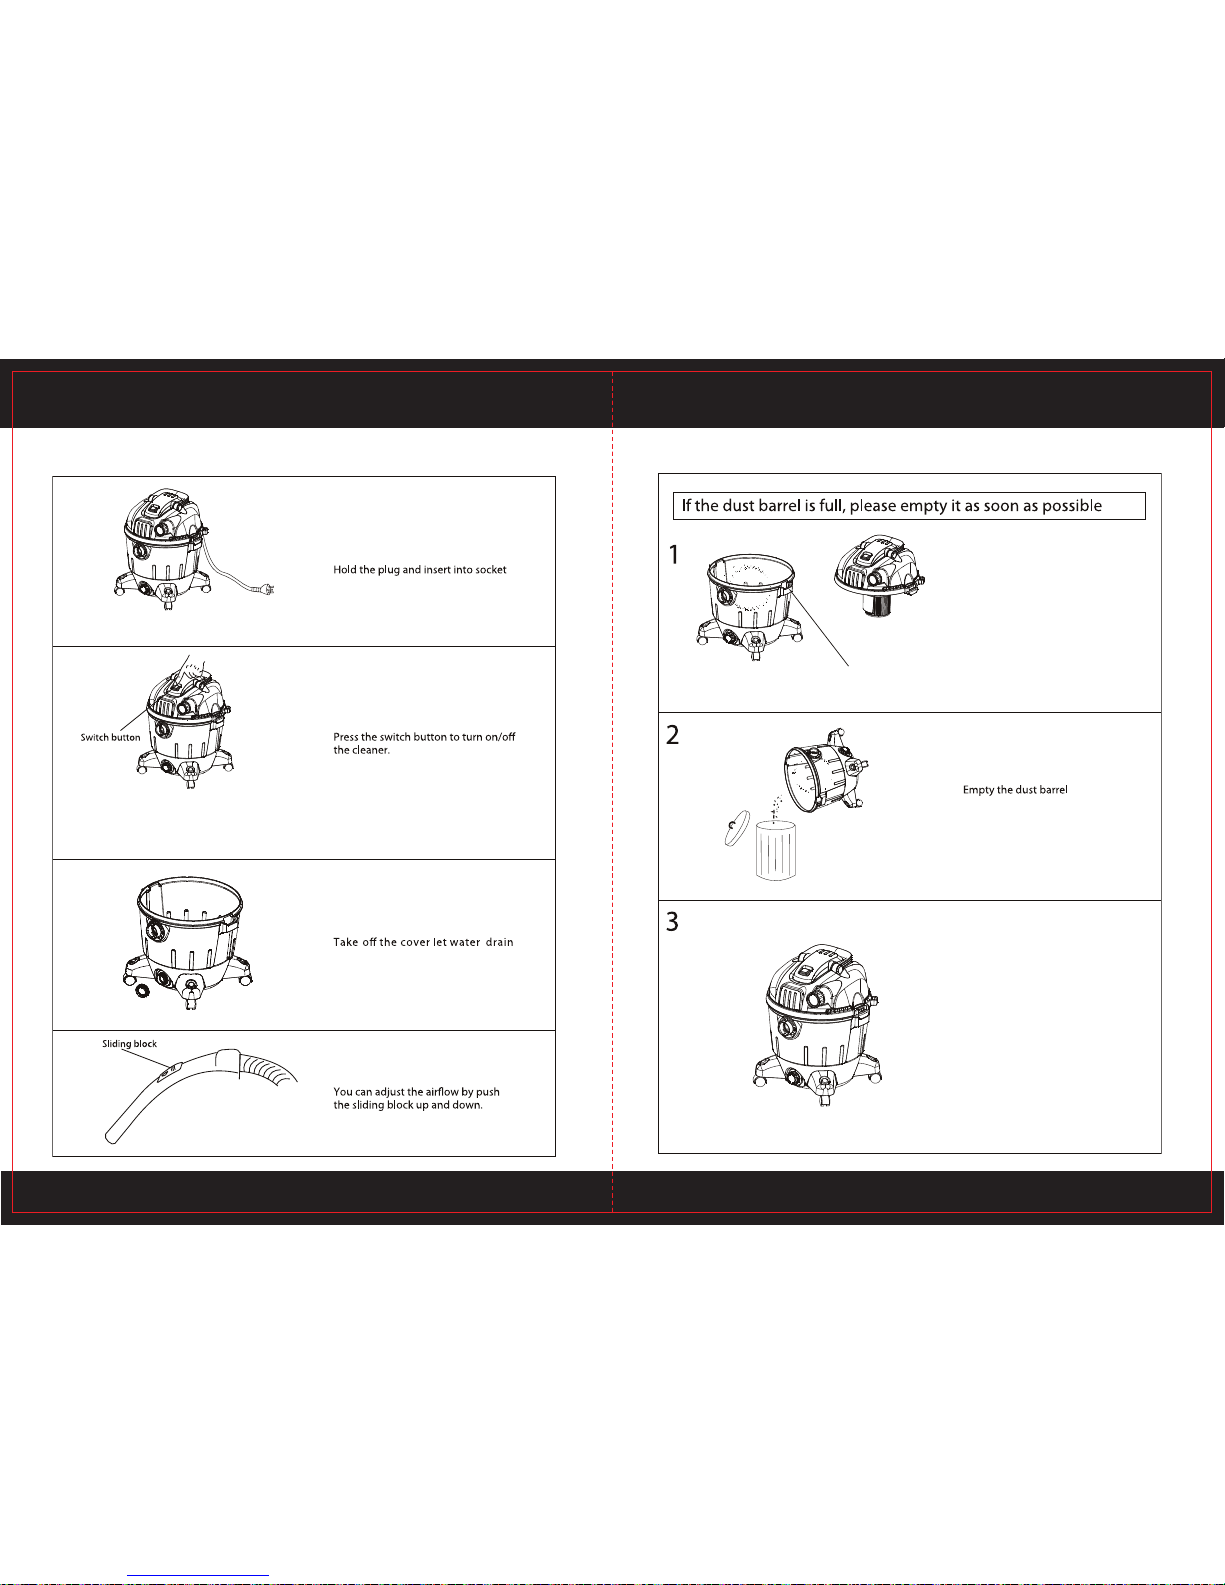
OPERATION METHOD TO CLEAN DUST BARREL
11
12
13
14
To be safe there is a water-proof switch cover. Please replace the
water-proof cover if damaged.
Release the latch to open the housing
Latch
Reassemble the housing and fasten the
latch
Page 6
9
10
MAINTENANCE SPECIFICATION
Rated voltage: 220V-240V ~ 50Hz
Rated input power: 1200W
Airflow: 1.8 m3/min
Vacuum pressure: 16 Kpa
Noise: 76 dB(A)
Capacity: 35L
Cable length: 4.5M
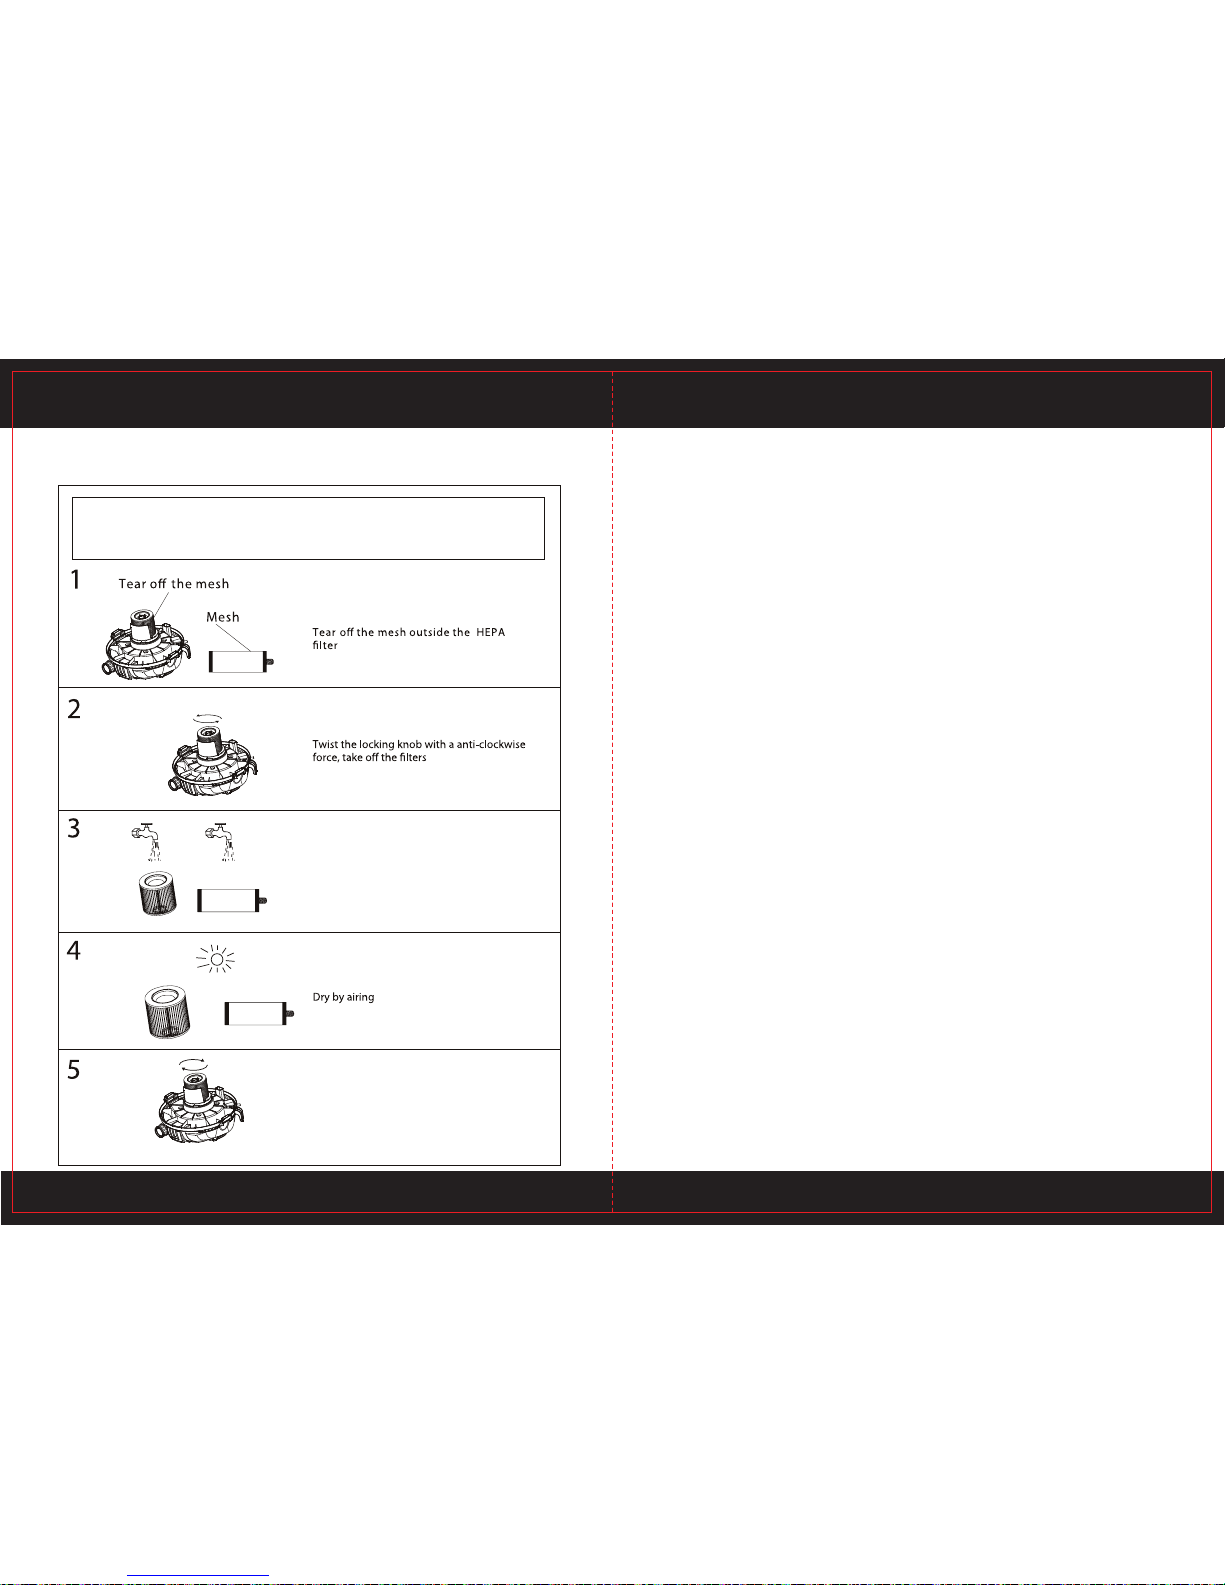
Warning: when the filters are obviously filled with dust or suction decreases considerably,
please clean it promptly, which can improve the working efficiency and extend the life of the
cleaner.
Never use the appliance without the filter.
Gently wash the filter using mild soap and water
Rinse thoroughly
Reinstall the filter
 Loading...