

Page 1

INSTRUCTION MANUAL
www.toolex.com.au
511182, 511163 & 511165
PROCRAFT & TOOLEX CONCRETE
MIXER 3.5CU/FT
Page 2

Page 2
GENERAL SAFETY RULES
WARNING!Read all instructions Failure to follow all instructions listed below may result in electric
shock,re and/or serious injury.The term“powertool” in all of the warningslisted below refers to your
mains-operated(corded)powertool or battery-operated(cordless)powertool.
SAVE THESE INSTRUCTIONS
1)Work area
a) Keep work area clean and well lit.Cluttered and dark areas invite accidents.
b)Do not operate power tools in explosive atmospheres,such as in the presence of ammable
liquid
s,gasesor dust.Power tools createsparkswhich may ignite the dust or fumes.
c)Keep children and bystandersaway while operatinga powertool.Distractions can cause you to lose
control.
2)Electrical safety
a)Power tool plugs must match the o utlet.Never modify the plug in any way.Do not use any adapter
plugs with earthed (grounded) powertools.Unmodied plugs and matching outlets will reduce risk of
electric shock.
b)Avoid body contact w ith earthed or grounded surfaces such as pipes,radiators,ranges
and
refrigerators.There is an increased risk of electric shock if your body is earthedor grounded.
c)Do not expose power tools to rain or wet conditions.Water entering a power tool will increase the
risk of electric shock.
d)Do not abuse the cord.Never use the cord for carrying,pulling or unplugging the power tool.Keep
cord awayfrom heat,oil,sharp edgesor moving parts.Damaged or entangledcords increase the risk of
electric shock.
e)When operatinga power tool outdoors,usean extension cord suitabl
e for outdoor use.Use of a cord
suitable for outdooruse reduces the risk of electric shock.
f)If operating a power tool in a damp location is unavoidable,use a residual current
device(RCD)protected supply.Use of an RCD reducesthe risk of electric shock.
3)Personal safety
a)Stay alert,watch what you are doing and use common sense when operating a power tool.Do not
use a powertool while you are tired or under the inuence of drugs,alcoholor medication.A moment
of inattention while operatingpowertools may result i
n serious p e rsonal injury.
b)Use safety equipment.Always wear eye protection.Safety equipment such as dust mask,non-skid
safety shoes,hard hat,or hearing protecition used for appropriate conditions will reduce personal
injuries.
c)Avoid accidental starting.Ensure the switch is in the o-position before pluggingin.Carrying power
tools with your nger on the switch or plugging in power tools that have the switch on invite
accidents.
d)Remove any adjusting key or wrench before turing the power tool on.A wr
ench or a key left
attached to a rotating part of the powertool may result in personalinjury.
Page 3

Page 3
e)Do not overreach.Keepproper footing and balance at all times.
This enablesbetter control of the powertool in unexpected situations.
f)Dress properly.Do not wear loose clothing or jewellery.Keep your hair,clothing and gloves away from
moving parts.Loose clothes,jewelleryor longhair can be caught in moving parts.
g)If devices are provided for the connection of dust extraction and collection facilities,ensure these
are connected and properlyused.Use of these devices can reduce dust related hazards.
h
)The ap pliance is not intended for use by persons(including children) with reduced physical,sensory
or mental capabilities,or lack of experience and knowledge,unlessthey have been given supervision or
instruction concerning use of the applianceby a personresponsiblefor their safety.
i)Children should be supervisedto ensure that they do not play with the appliance.
4)Power tool use and care
a)Do not force the power tool.Use the correct power tool for your application.The correct p owertool
will do the job better and safer a
t the rate for which it wasdesigned.
b)Do not use the powertool if the switch does not turn it on and o.Any power tool that cannot be
controlled with the switch is dangerousand must be repaired.
c)Disconect the plug from the power source and/or the b attery pack from the power tool before
making any adjustments,changingaccessories,or storing power tools.Such preventive safety measures
reduce the risk of starting the powertool accidentally.
d)Store idle powertools out of reach of children and do not allow
persons unfamiliar with the power
tool or these instructions to operate the power tool.Power tools are dangerous in the hands of
untrained users.
e)Maintain power tools.Check for misalignment or binding of moving parts,breakageof parts and any
other condition that may aect the power tools operation.If damaged,havethe power tool repaired
beforeuse.Many accidents are caused by poorlymaintained powertools.
f)Keep cutting tools sharp and clean.Properly maintained cutting tools with sharp cutting edges ar
e
less likely to bind and are easier to control.
g)Use the power tool,accessories and tool bits etc.in accordance with these instructions and in the
manner intended for the particular type of power tool,taking into account the working conditions
and the work to be performed.Use of the power tool for operations dierent from those intended
could result in a hazardous situation.
h)Hold power tool by insulated gripping surfaces,when performing an operation where the cutting
accessory may contact hidden wiring or its own cord.Cu
tting accessory contacting a “live”wire may
make exposedmetal parts of the powertool “live”and could give the operator an electric shock.
5)Service
a)Have your power tool serviced by a qualied repair person using only identical replacement
parts.This will ensurethat the safety of the powertool is maintained.
ADDITIONAL SAFETY RULES
●Read and understand the owner’s manual and labels axed to the mixer.Learn its application and
Page 4

Page 4
limitations as well as the specic potential hazards particular to it.
●Do not operate the mixer while under the inuence of drugs,alcohol or any medication that could
aect your ability to use it properly.
●Check your mixer before turing it on.Keep guards in place and in working order.Form a habit of
checking to see that keys and adjusting wrenches are removed from tool area before turing it
on .Replace damaged,missingor failed parts before using it.
●Always wear safety goggles and/or face shields,Any mixe
r may throw foreign objects into the
eyes.Everydayeyeglasseshaveonly impact resistant lenses.They are not safety glasses.
●Improper use of extension cords may cause inecient operation of the mixer which can result in
overheating.Be sure the section of extension cord is enough to allow sucient current ow to the
motor.Avoid use of free and inadequately insulated connections.Connections must be made with
protectedmaterial suitable for outdoor use.
●Check that the electric circuit is adequately protected and th
at it corresponds with the
power,voltage and frequency of the motor.Check that there is a ground connection.Prevent body
contact with grounded surfaces:pipes,radiators,ranges and refrigerator enclosures.Make sure your
ngers do not touch the plugs metal prongswhen pluggingor unpluggingthe mixer.
●The mixer is not to be towed by any vehicle.It will do a better and safer job at its design rate.Don’t
use the mixer for any purposefor which it wasnot intended.
●Do not attempt to load or unload the ma
terials until the mixer has stopped.Keep hands out of the
wayof all movingparts.
●Keep children and inrm people awayfrom the machine when it is connectedto the powersupply.
●Check the powercord.Never use a faulty or damagedpowercord.
●If the cordset is damaged,takethe cement mixer to an authorized service centre for repair of parts
replacement.
●Never attempt any repairesyourself,always take it to an authorized service centre for repair or parts
replacement.
●Keep the cement mixer and
your workplaceclean of debris and any unnecessaryobjects.
●Keep the areafree of tripping hazards.
●Personsworking with the machine should not be distracted.
●Periodically,check that all nuts,bolts and other xings areproperly tightened.
●Adjustments,measurements and cleaning jobs are only to be performed when the motor is switched
o and the mains plug is removed.
●Before you switch o the machine,check that all wrenches and adjustment tools have been
removed.
●When you leave your workplac
e ,s witch o the motor and pull out the power plug.
●It is imperative to observe the accident prevention regulations in force in your area as well as all
other generally recognizedrules of safety.
●Never use the cord for any purposeother than that for which it is intended.
Page 5
Page 5
●Unless otherwise stated in these instructions,damaged safety devices and parts must be repaired or
replacedby an authorized service facility.
●Have damagedswitches replaced by an authorized service facility.
●This tool complies with the pertinent safety regulations.
●Repairs are to be carried out only by qualied electricians at authorized service facilities,using
original replacement parts.The user may suer an accident of this condition is not observed.
●Always switch the mixer on when the drum is empty,b
eforeloading the unit with mixing material.
●Do not p lace the shovelinto rotating drum while it is rotating.
INSTRUCTIONS for Assembly
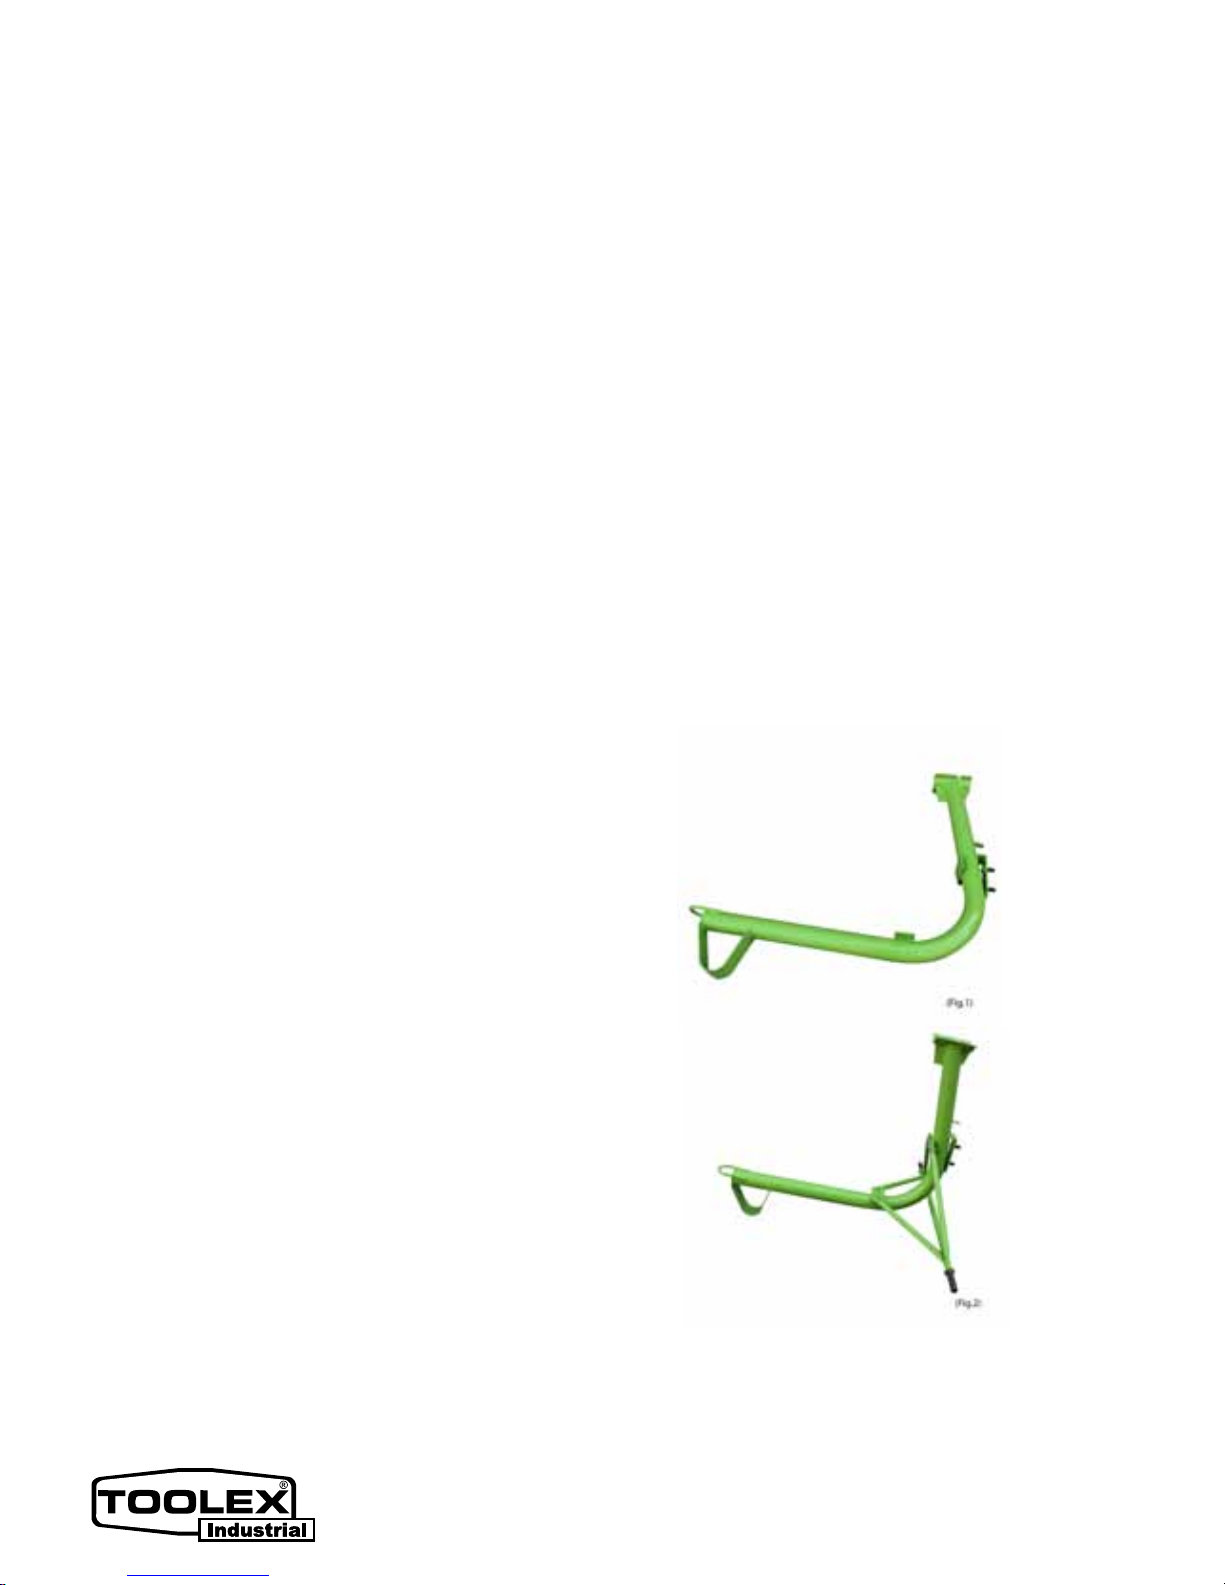
1. Lay#1 Main Frame Assembly on a clean plain
ground(Fig.1),put #2 Wheel Stand Assembly through
# 1(Fig.2),and x with 4 M 10× 30 Bolts # 22 from
one side,and the other side with 10 mm Flat
Washer#23 ,and M 10 Hex Nut #25,tighten all.
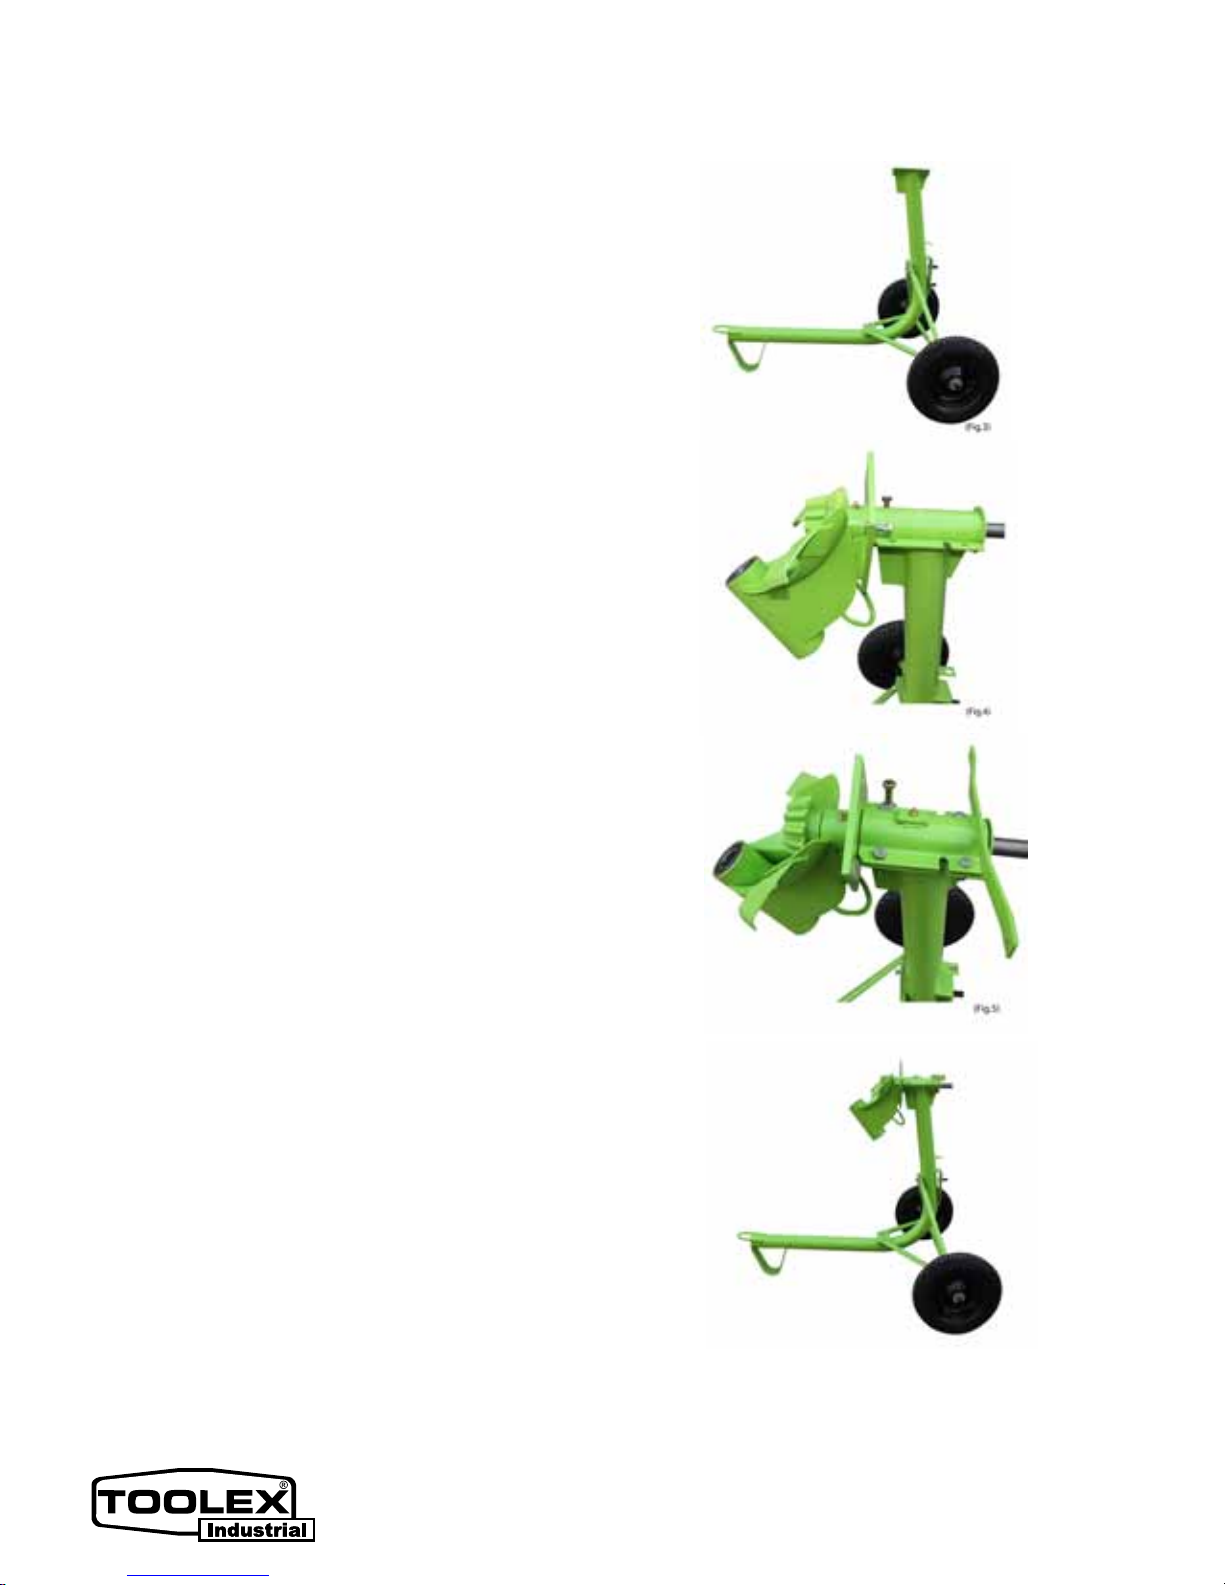
2. Put Wheel #3 to the shaft. Note-the valve should be
outward. Then put Stop Washer # 4 and x with 5×
40 Split Pin # 26(Fig.3)
3. One person put Drum Support Assembly #15 onto the
lower s
haft cover on the top of frame # 1(Fig.4),with
the help of another,put Shaft Cover/upper#13 onto
the #15(Fig.5).Lock with 4 M10 × 25 Bolt #44 from
upside,then the other side with 10mm Flat Washer
#23 and M10 Self-Lock Nut # 45.ATTENTION:do not
511182 Procraft Specictaions
Voltage: 240V - 50Hz
Power Input: 750W/1HP
Capacity : 3.5cu/ft
Gross drum volume: 180 Litres
Unmixed Dry: 145 Litres
Mixed Wet: 100 Ltres
Drum mouth diameter: 450mm
Weight: 111KG
511163 Toolex Specictaions
Voltage: 240V - 50Hz
Power Input: CMG 750W/1HP
Capacity : 3.5cu/ft
Gross drum volume: 180 Litres
Unmixed Dry: 145 Litres
Mixed Wet: 100 Ltres
Drum mouth diameter: 450mm
Weight: 106KG
511165 Procraft Specictaions
Petrol Engine: 3.5HP (2.6kW)
Power Output: 3.5HP
Capacity : 3.5cu/ft
Gross drum volume: 180 Litres
Unmixed Dry: 145 Litres
Mixed Wet: 100 Ltres
Drum mouth diameter: 450mm
Weight: 132KG
Page 6
Page 6
x too tight as the shalf has to be left turning freely.
4. Put Pulley Cover/Inside #12 throught Shaft #16,x with
2 M6× 20 Hex Bolt # 43,6mm Flat Washer #29 from
one side,then 6mm Flat Washer #29,and M6 Hex Nut #
31 and tighten well (Fig.7).Put 1 M 6× 20 Bolt # 39 with
6mm Flat Washer # 40 through the hole on the
bottom #12 and the hole on Main Frame #1,from the
other side lock with 6 mm Flat Washer #
40 and Hex Nut 42 # ,tighten.
5. Put 8× 60 Key Way #51 onto the shaft #16,Pulley #10
onto the shaft #16, w ith the pin hole side outward
(Fig.8),with 8× 20 #32 Hex bolt tighte
n . Then ,put the
Belt #11 onto the Pulley #10.
6. Put Motor Stand Assembly #5 to Main Frame Assembly
# 1.One personholds Mo to r Stand A s s embly # 5,align
with the bolts on Frame # 1,tight with 16mm Flat
Washer and M16 Hex Self-lock Nut # 27.Do not tighten
nuts till Motor #7 is xed and the tension of Belt #11 is
adjusted well(Fig.9).
7. Hold Drum #20 which is xed with at washerwe ll.
with the help of another personassemblethe Drum
support #15 (Fig. 10).
8. Lock drum shaft with Stop Washer #18 and 6× 50
Spring Pin # 50(Fig.11)Then Cover#17
9. Assemble Handle #14 wit
h 2 M10× 30 Hex Bolt #49 from
one end, and 10 mm Flat Washer #23,M 10 Hex Nut
#25.Then tighten all (Fig.12)
10. Put Motor #7 into Motor Stand Assembly #5(Fig 13 )
and make sure Motor Pulley #8 aligns with Pulley #10.
Fix Motor #7 with 4 M8 × 20 Hex Bolt #32,8mm Flat
Page 7

Page 7
Page 8

Page 8
Page 9
Page 9
Page 10

Page 10
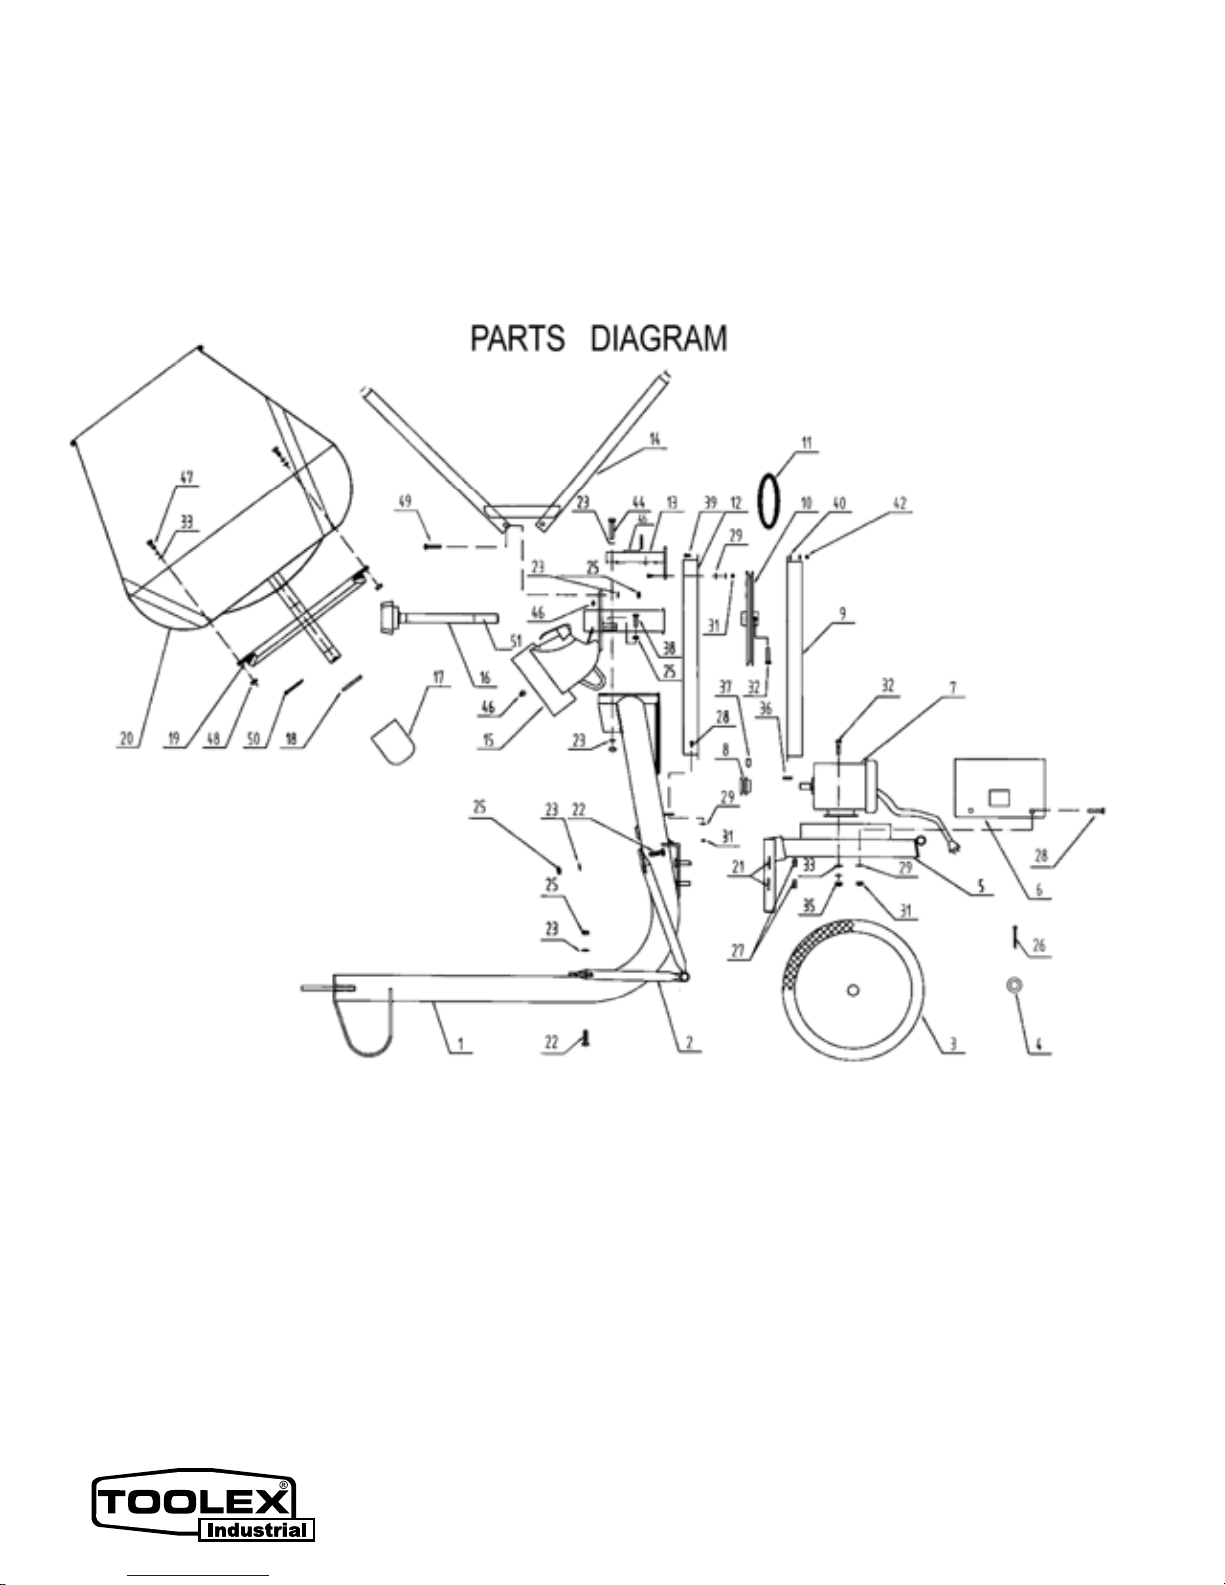
21
Lock Plate∮16
2
22 Hex Bolt M10X30 4
23 Flat Washer 10mm 10
25 Hex Nut M10 10
26 Split Pin 5X40 2
27 Hex Selock Nut M 16 2
28 Hex Bolt M6X20 7
29 Flat Washer 6mm 14
31 Selock Nut M 6 7
32 Hex Bolt M8x20 6
33 Flat Washer 8mm 8
35 Hex Nut M8 4
36 Flat Key 5x35 1
37 Inner Hex Lock Pin M8x16 1
38 Hex Bolt M12x50 1
39 Cross Head Bolt M4x10 7
40 Flat Washer 4mm 14
42 Hex Nut M 4 7
44 Hex Bolt M10X30 4
46 Oil Cup 3
47 Hex Bolt M10X25 8
48 Hex Selock Nut M 10 8
49 Hex Bolt M10X30 2
50 Split Pin6X50 1
51 Key Way 8MMX60 1
Page 11
Page 11
Page 12

Page 12
Warranty Against Defect
Toolex Industrial & Gasweld Tool Centre this product for a full
replacement or refund for:12 months
from date of purchase.
This guarantee covers material and workmanship defects only.
In order for the guarantee to be acted on,the consumer must use the products strictly in accordance with
their operating manual and for the purpose for which they are intended to be used.This guarantee does
not apply to defects arising from abuse,alteration,unauthorized or unreasonable use,nor does it cover
general deterioration due to usage.
We will replace the product or provide a refund to the value of the purchase price if a defect is found in
the product during
the
guarantee period of 12 months,subject to verification of the defect and the
date,proof of purchase and purchase price.Furthermore,in order for the guarantee to be claimed,the
defective goods must be returned to the point of purchase promptly from the point in time that the
consumer becomes aware of the defect in the goods and in any case within 7 business days.
The procedure for the consumer to claim the guarantee is that the product must be returned to the point
of purchase within 7 business days of the consumer becoming aware of the defect in the product and
subject to the point of purchase being satisfied that it is a genuine claim within the time limit
s prescribed
above,then the retailer will contact the wholesaler for review and determination as to whether a full
refund is to be provided in relation to the product or whether the product is to be repaired and
returned.The wholesaler reserves the right to reject the guarantee claim if it can be proved that the goods
have not been used in accordance with their intended purpose or in accordance with the manual.
The benefits of this guarantee are additional to any other rights and remedies you may have under law.
Once we have received the product and you have complied with the guarantee requiremen
ts,our costs
associated with the guarantee claim will be borne by us.
No responsibility will be taken for products lost,damaged or mislaid whilst in transit.
To the extent permitted by law,our total liability for loss or damage of every kind related to the product
in any way whatsoever is limited to the amount paid to the retailer by you for the product or the value of
the product.
Our goods come with guarantees that cannot be excluded under the Australian Consumer Law.You are
entitled to a replacement or refund for a major failure and for compensations for any other reasonably
foreseeable loss or damage.You are also entitled to have the goods repaired or rep
laced if the goods fail
to be of acceptable quality and the failure does not amount to a major failure.
These terms and conditions supersede and exclude all former and other representations and
arrangements relating to any guarantees on this product.This includes any representations not made by
us relating to the performance of the product or the result that should to be expected from using the
product.
Address for the return of products:The Point of Purchase
Importer and organization providing warranty
Toolex Industrial
55 Griffiths Road
Lambton NSW 2299
Telephone: 0249067700
 Loading...