


WIFI SPEED DOME IP CAMERA
INSTRUCTION MANUAL
Statement:
The manual will be updated from time to time. If you use this manual have not encountered problems, please
contact our technical support department or product vendor. The company has the right without prior notice.
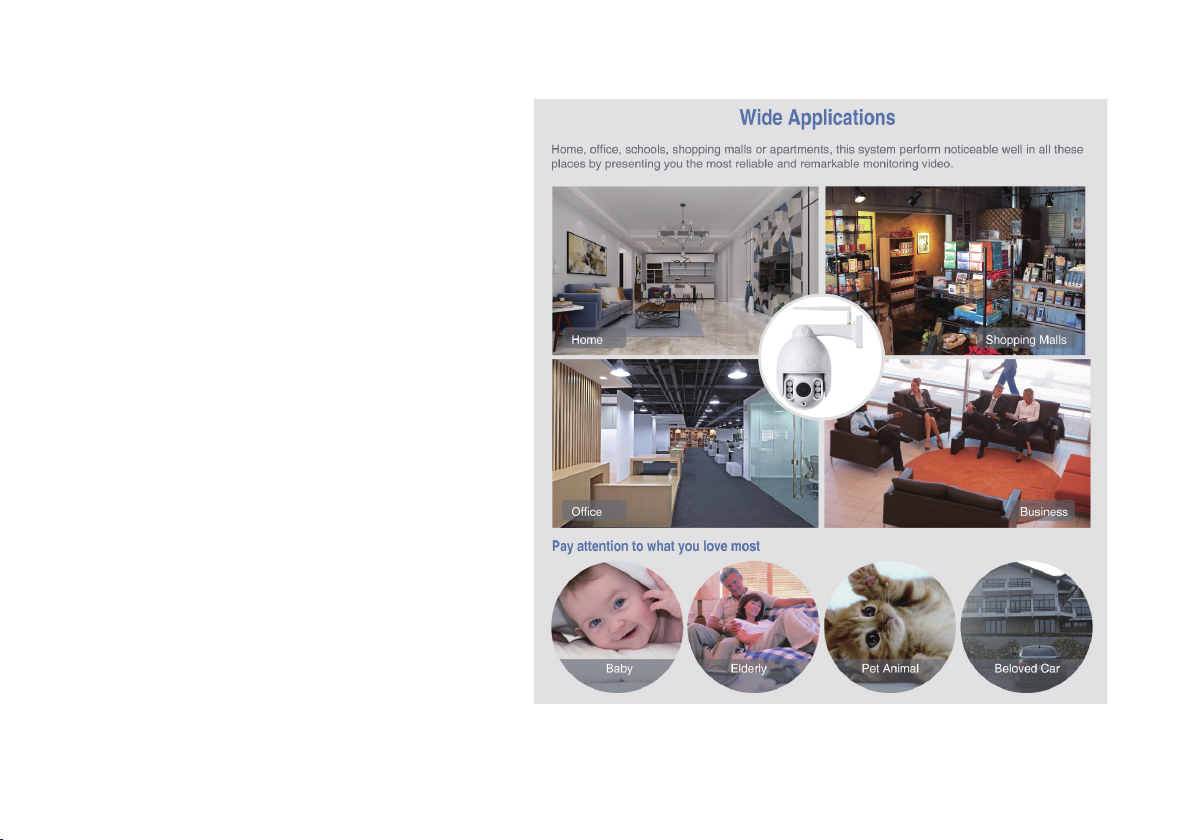
Introduction
The IP Camera combines a high quality
digital video camera with network
connectivity and a powerful web
server to bring clear video to your
desktop from anywhere on your
local network or over the Internet.
Notice:
This product may cause interferences with
other wireless equipment that operates at
2.4GHz ISM band. Please turn off one of the
equipments to eliminate the interference.
- 2 -

Product Assurance
This camera will emit electromagnetic wave, just like other wireless products, but its transmitting power is
less than other wireless products such as mobile phones. The 2.4GHz wireless camera meets wireless
frequency security standards and recommended indexes while working. These standards and indexes
are certificated by academic organization and represent the cogitative research of the scientific workers
who continuously explore and annotate the involved fields. So we believe that our products are safe for
customers.
Restrictions
1. DO NOT use this product to violate one's privacy. Monitoring one's activities without consent is illegal
and this product is not designed and manufactured for such purpose.
2. DO NOT put this product near any medical equipment. Radio waves might potentially cause
breakdown of electrical medical equipment.
3. This product should be placed at least 1 foot away from any heart pacemaker. Radio waves might
potentially influence heart pacemaker.
4. DO NOT use this product for any illegal activities. It is the user’s responsibility to ensure that the
usage of this camera is of a legal nature.
- 3 -
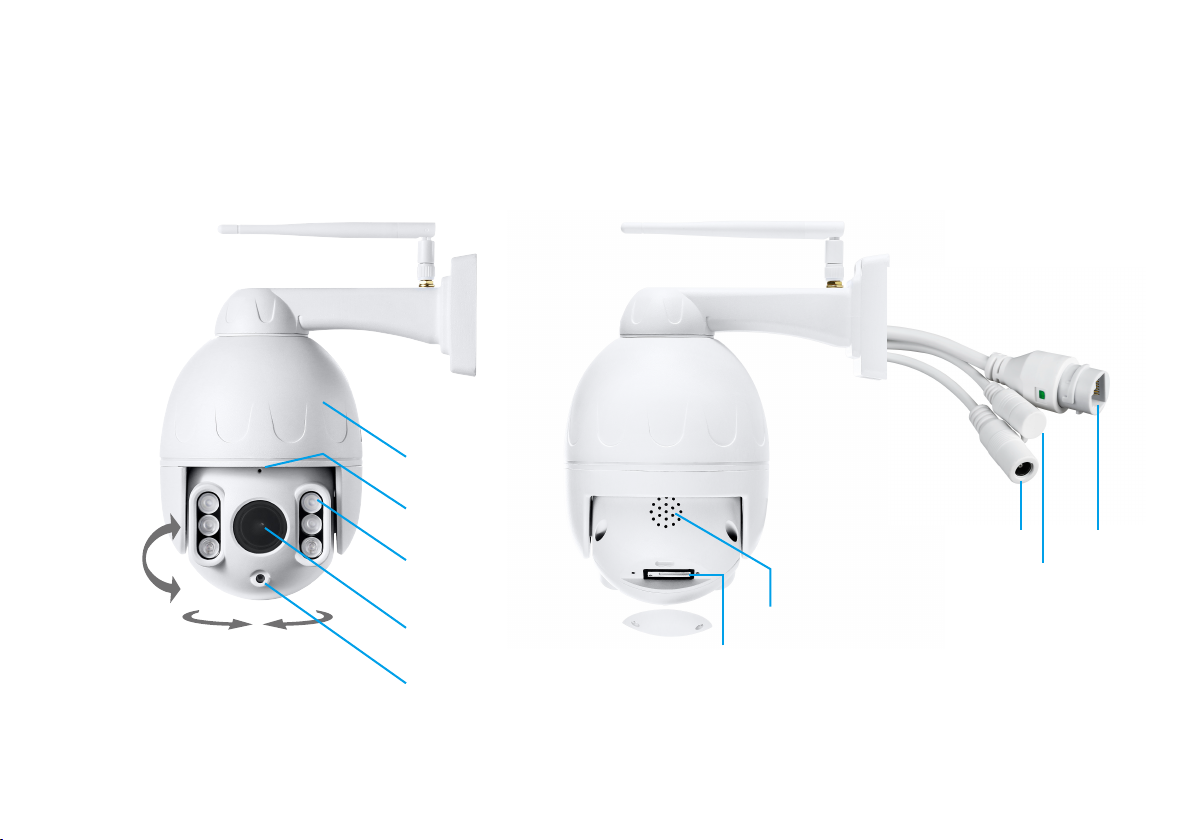
Appearance and interface
IP66
Metal Housing
Microphone
Vertical:
0°~120°
Horizon: 0°~355°
6PCS
IR LED Array
Lens
See Wider Angle
Photoresistor
DC12V Input LAN Port
Reset Button
Speaker (Waterproof)
Micro SD Card Slot
Built-in, Waterproof
- 4 -
Mobile APP view quick guide
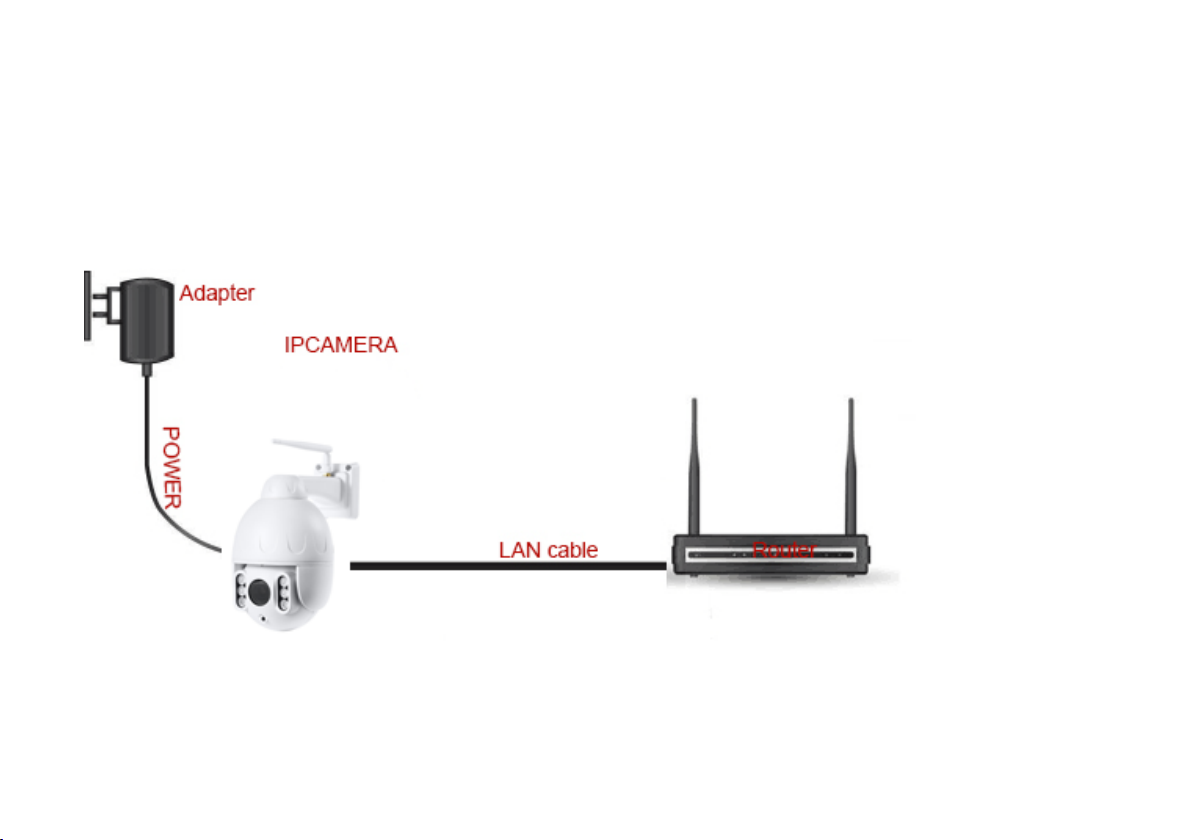
Wired network connection
1. Connect network cable to camera, Plug in the power adapter.
- 5 -
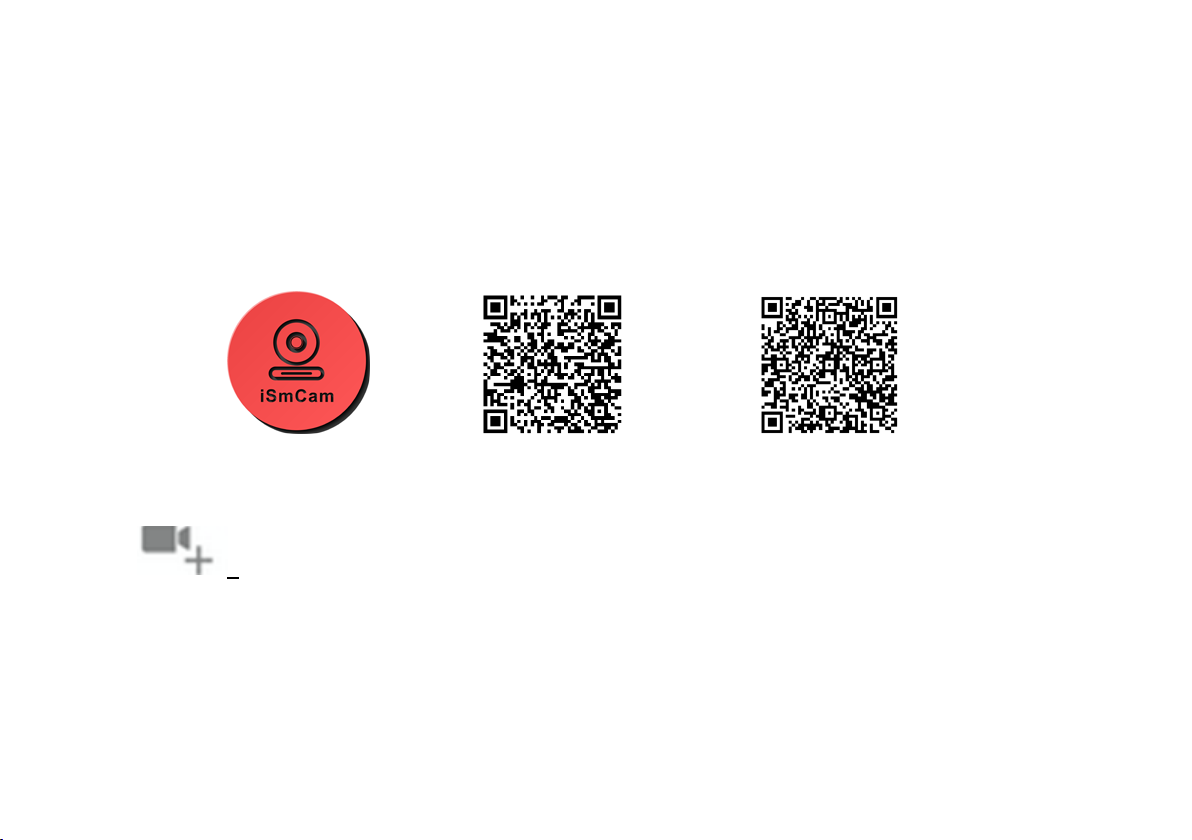
2. The IP Camera and phone are in the same LAN, Connect your phone to a WiFi network,
Monitoring software download.
Install App:
① Open the Google Play & App Store .
② Search for “ iSmCam ”.
③ Tap INSTALL APP to downloa d and insta ll.
iSmCam Android iSmCam App iOS iSmCam App
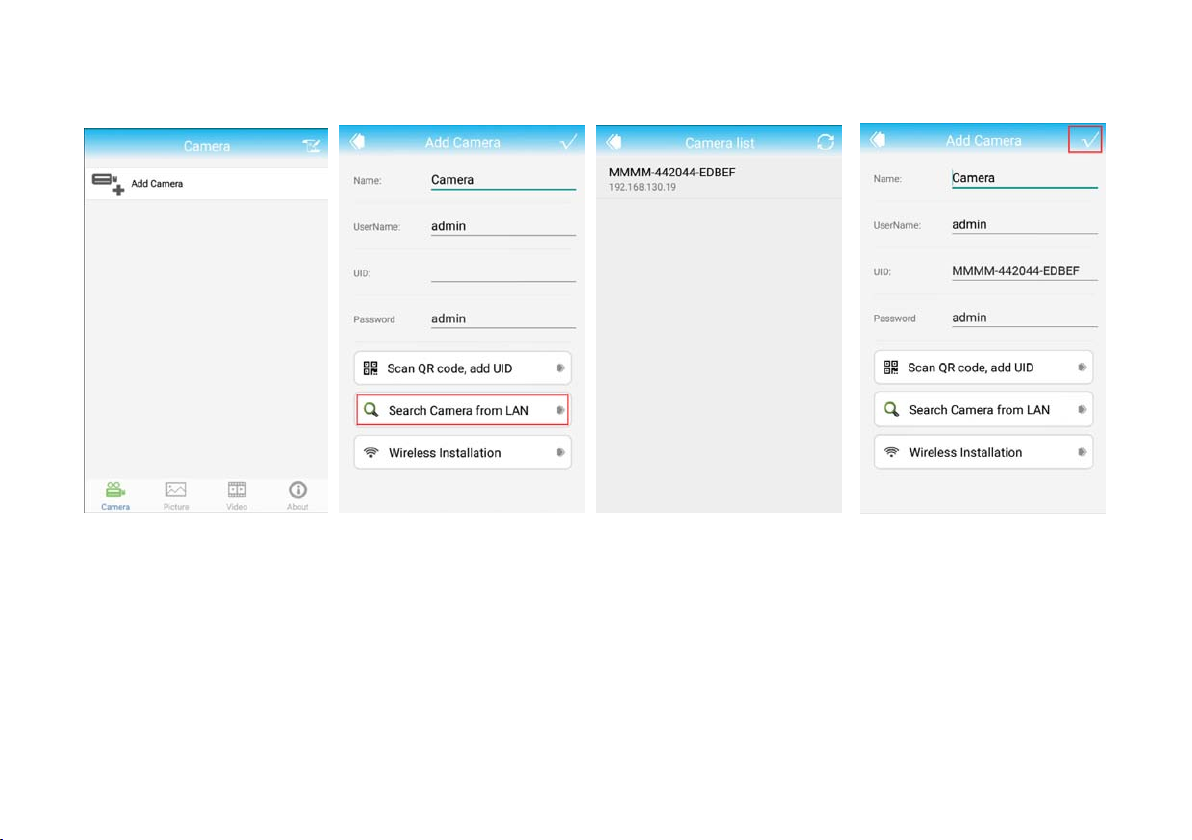
3. Open the phone monitoring software, select “Press add camera”.
Click to add camera, enter into add camera interface.
3.1 Search: click LAN Search button, search the network camera in the mobile phone wireless
network; Select the UID
3.2 Enter the camera password (default password is admin).
3.3 Click Finish on the upper right corner.
- 6 -
- 7 -
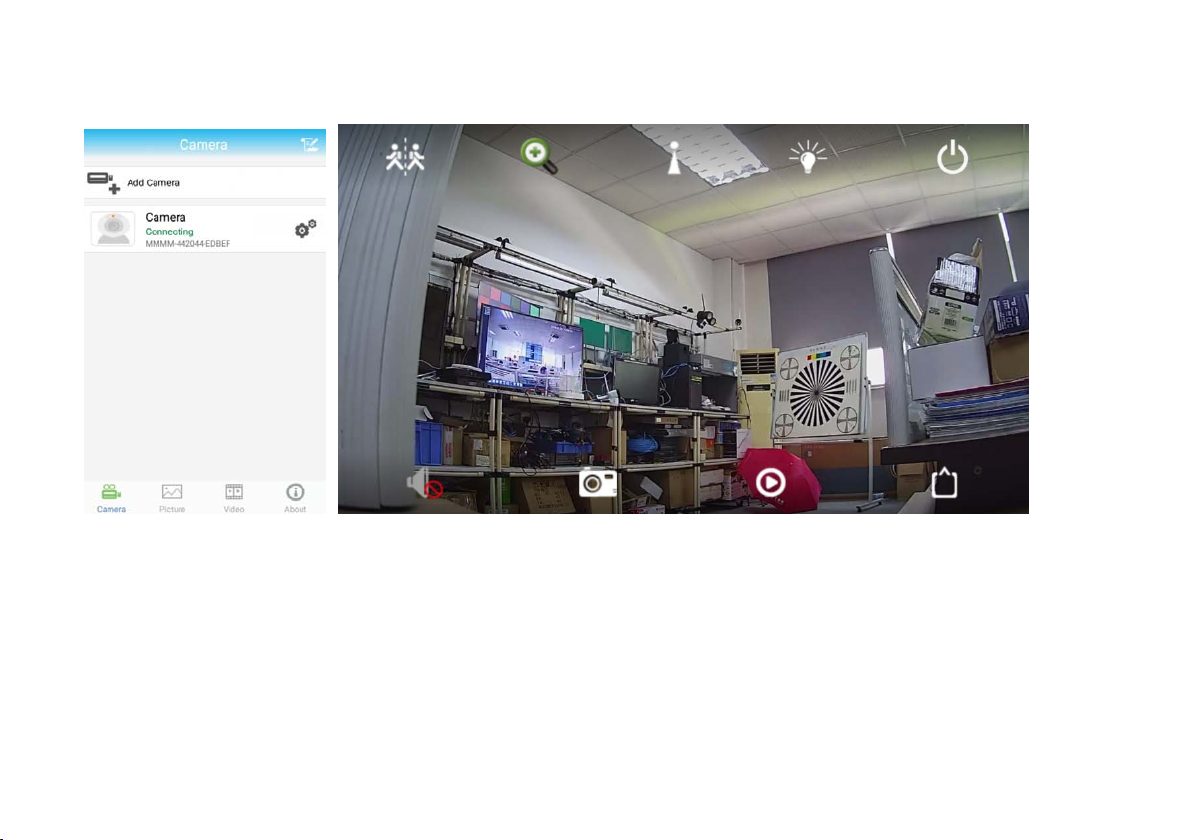
4. Click the camera icon to open real-time monitoring screen
- 8 -
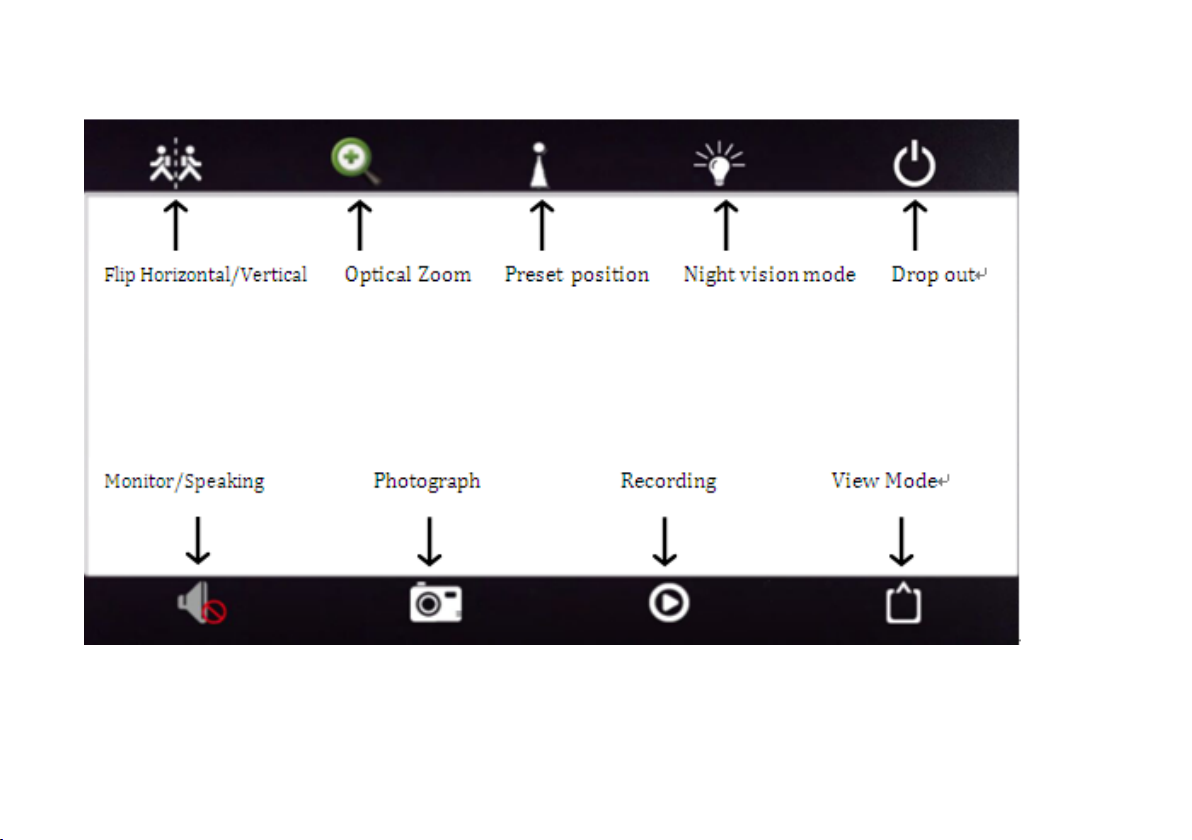
4.1 Monitor screen buttons Introduction
- 9 -
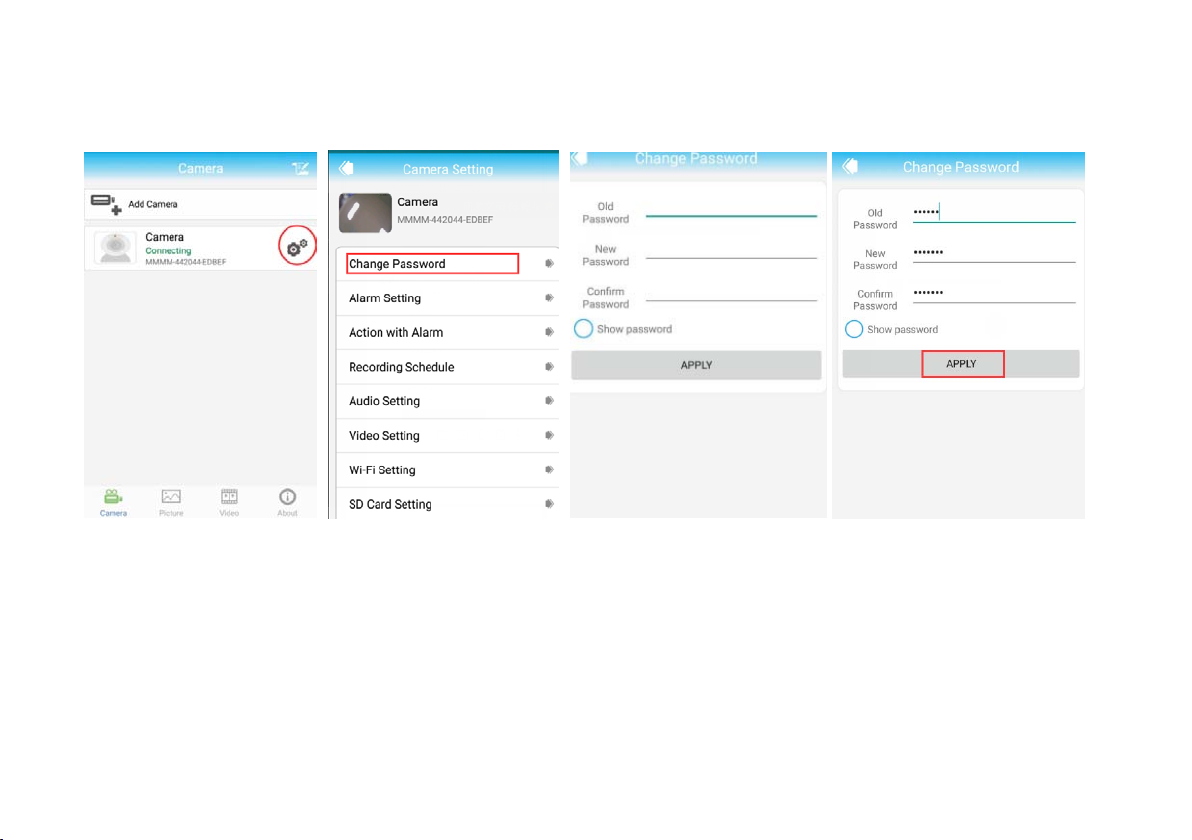
5. Change password
Can change the access password of camera (Default password: admin)
- 10 -
6. Alarm Settings:
You need the cameras settings, click the Settings button in the rear of the camera
- 11 -
7. Action with Alarm: Alarm Push: open your phone can receive alarm information tips;
Alarm Notifications
Click ON,open alarm Notifications
SD Card record while alarm
Choose on, means the alarm video will save to SD Card;
Email alarm and send pi ctur es
Choose on, means it will send pictures to specified mailbox when alarm
- 12 -
8. Recording Schedule
Video file length: 15-900seconds can be set , default is 600seconds
whether video on: on off can be set, default is off
- 13 -

9. Audio Setting
Input type
Linear input and microphone input can be set
when audio input type is microphone input, the input volume and output volume is 80 and 95;
when audio input type is linear input, the input volume and output volume is 15 and 95;
- 14 -

10. Video settings
Code rate
The device code rate of first stream and second stream can be self-define; scope range
32kbps-6144kbps
Frame rate
The device frame rate of first stream and second stream can be self-defined;
Video coding level
1-6 can be set, default is 1; the smaller the value, the better the image level, the big the stream
Video system
50HZ and 60HZ can be set
- 15 -

- 16 -

11. WIFI setting
Find WIFI setting at bottom of page in the advance setting page
- 17 -

Click Wi-Fi manager button then set wif i ssid; Choose router’s ssid
Ty pe WIFI passw or d
Camera will successfully connect wif(user need unplug power plug and
network cable first then plug power again)
- 18 -

12. SD Card setting
Can obtain the total space of the SD card and the size of the available space, can format
SD card
- 19 -
13. Time setting
①The device time can synchronization mobile phone time
②can set device time zone, after setting successfully, the device will restart
- 20 -

14.
Email Setting
Eg: sending mailbox is hotmail mailbox
Smtp server:smtp.live.com
Server port:465
Secure connection:SSL
user name and password is hotmail account and
password
Receive
address
: the mailbox that receive alarm
pictures
Send address: sender’s mailbox address, if it is gmail
mailbox, need to fill the hotmail mailbox address (the
same as user name)
Theme and information can be filled in casually After
completed, click Apply; then click test to know whether
can send alarm email
- 21 -
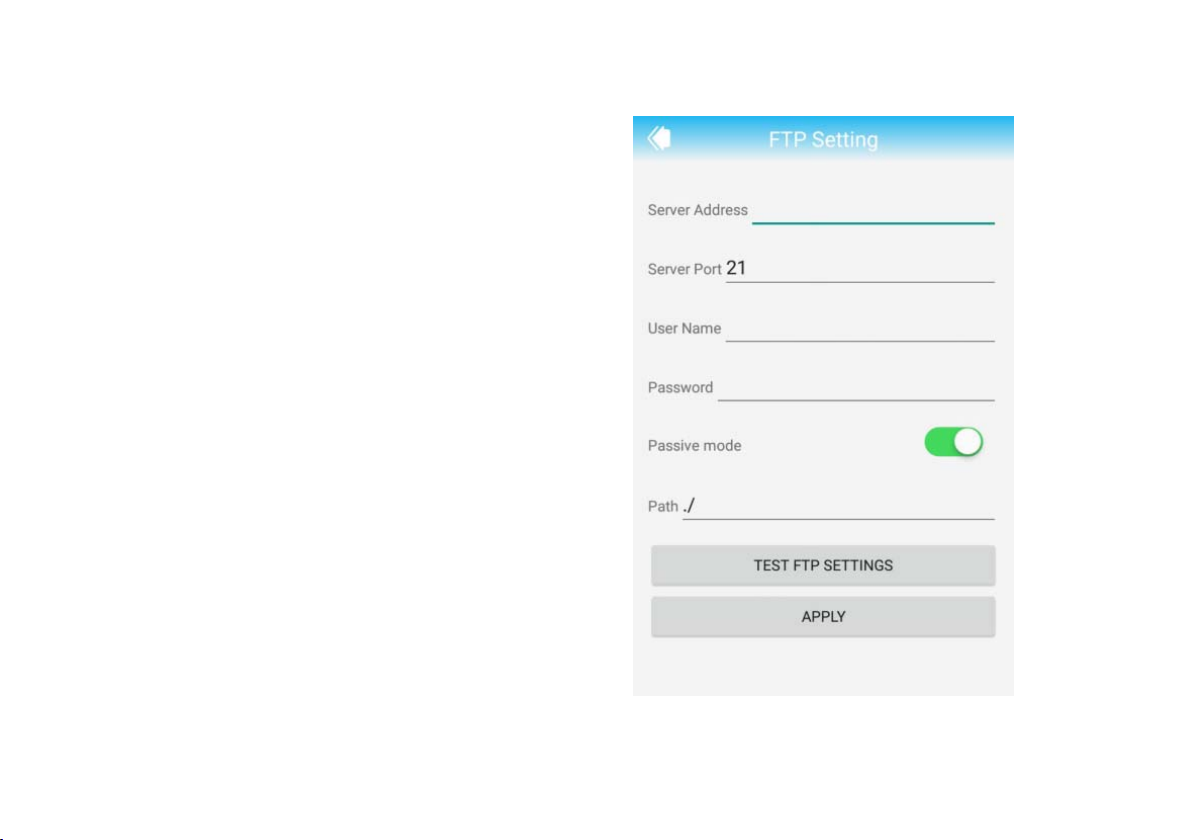
15. FTP Setting
FTP server: fill in the FTP address
Server port:fill in FTP port;
fill in the user name and password setted on
FTP server
after completed, click Apply; then click test
to know whether can send pictures to
FTP
server
- 22 -

16. System Setting
Restart the camera and restore the factory Settings
- 23 -

17. Device information
You can obtain device information: including network status, user connection number, IP
address, Subnet mask, gateway, DNS and so on.
- 24 -

18. Local pictures
Click , enter into playback interface
① Local pictures are saved by ID
② Long press one picture can delete it
- 25 -
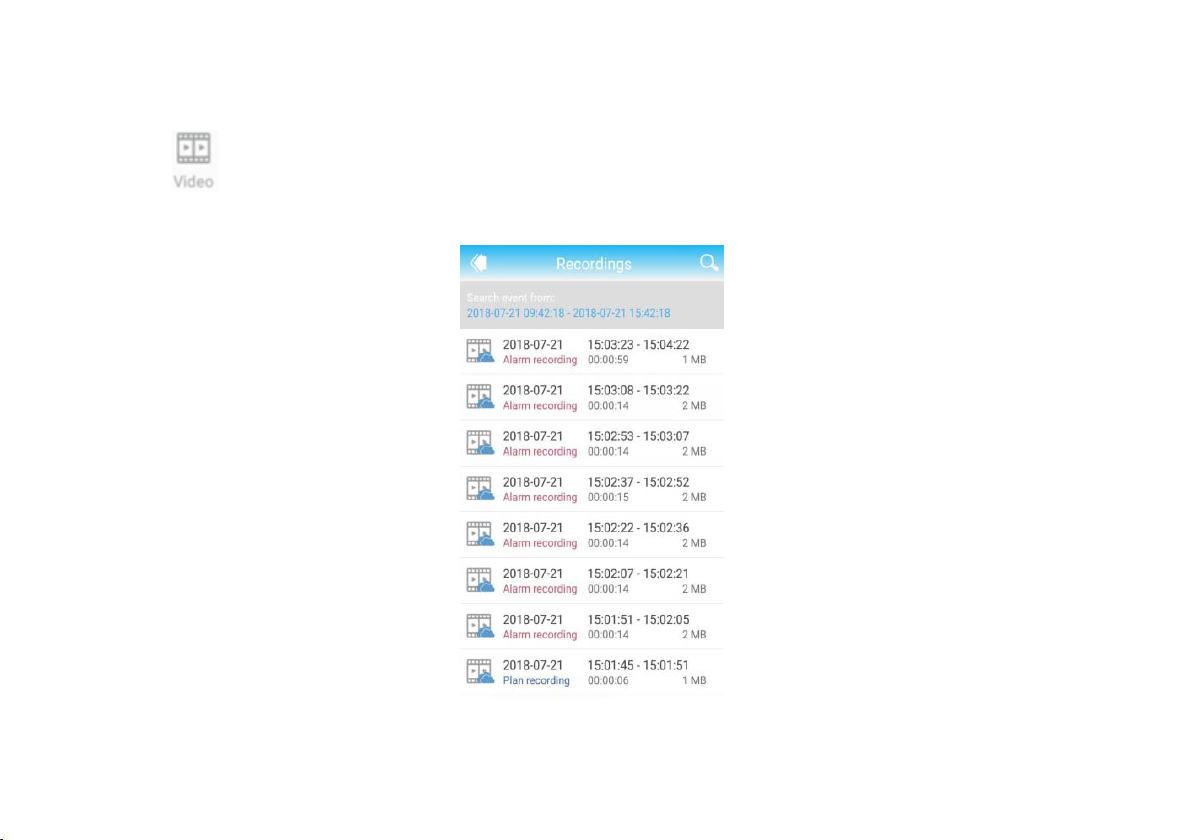
19. Watch the video
Click , enter into watching interface
You can playback the videos in SD Card, including timing video and alarm video.
- 26 -

The instructions of WIFI configuration in AP mode
- 27 -

1. Please connect power supply, do not connect network cable(The AP mode will disappear
after the network wire is connected to the network.)
2. Wait around one minute, through the mobile phone WIFI Settings, search out the camera AP
SSID;
3. The SSID format is the six number of IPCAM - UID.Password is 01234567. For example,
the six number of IPCAM - UID is 158213 SSID is IPCAM - 158213; Mobile phone connection
the SSID is ok;
4. As show n in t he pi ct ure o n the rig ht, t he mo bil e phon e has be en c onnect ed t o t he ca mer a AP.
5. Open the mobil e ph one APP ; add t he ca mera; click on th e LAN t o search d ev ice ID ; ent er the
camera password admin
6. After adding the camera, enter into the camera Settings, select the WIFI Settings, configure
7. The camera WIFI; wait a few seconds, the device can be connected to the WIFI.
- 28 -

The specific operations as shown in below picture:
- 29 -

- 30 -

Tip: After WIFI configuration in AP mode successfully, AP mode will disappear. If you want to use
the AP mode, need to restore the camera to factory Settings; please press the RESET button in
the equipment base for 10s.
- 31 -

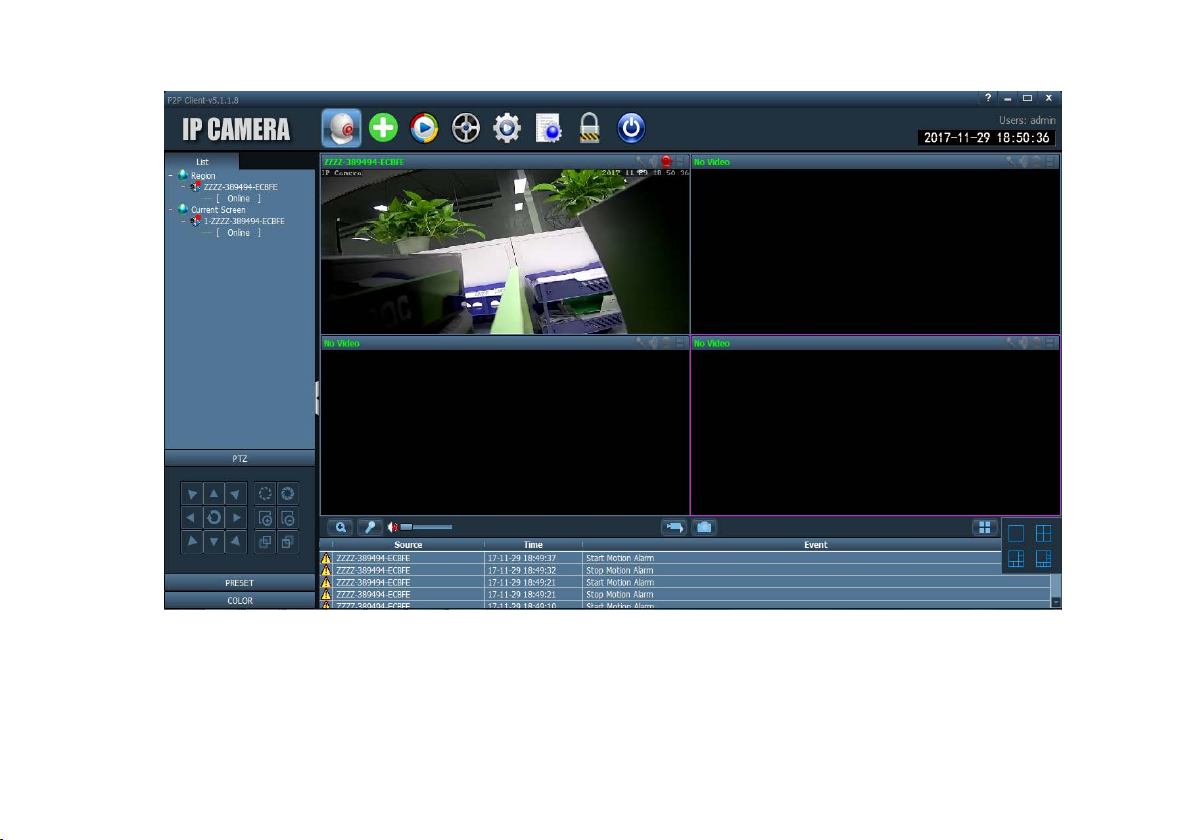
PC CMS view quick guide
You can also use the computer monitor;
The first step: Open the CD and select the (iP2P client) software
Step 2: Click on the icon monitor i ng software installation is co mplete, run the monitoring software
- 32 -

Click on the icon to enter the settings interface,
Add the camera as follows:
- 33 -

The third step: enter the setup interface Follow these steps to complete the installation:
① click “search:
② Check the left to search for the camera and the right area:
③ Click “Add”
Complete the installation
Step Four: Watch the monitor screen
Click the icon Enter the monitoring interface;
Click the icon play monitor screen:
- 34 -
- 35 -

Tonton Security
Address: Room 101, Building 28, Jindi Dynamic Port
Business Park, No.29 Xianggong Road, Zhuhai, China
Tel: +1 (213) 443-6766
Tonton security
Email: service@tontonsecurity.com
Service website://www.tontonsecurity.com
 Loading...