

Tongdy F08-PSB-A User Manual
1
C
BACnet FCU Thermostat
UUsseerr’’ss MMaannuuaal
l
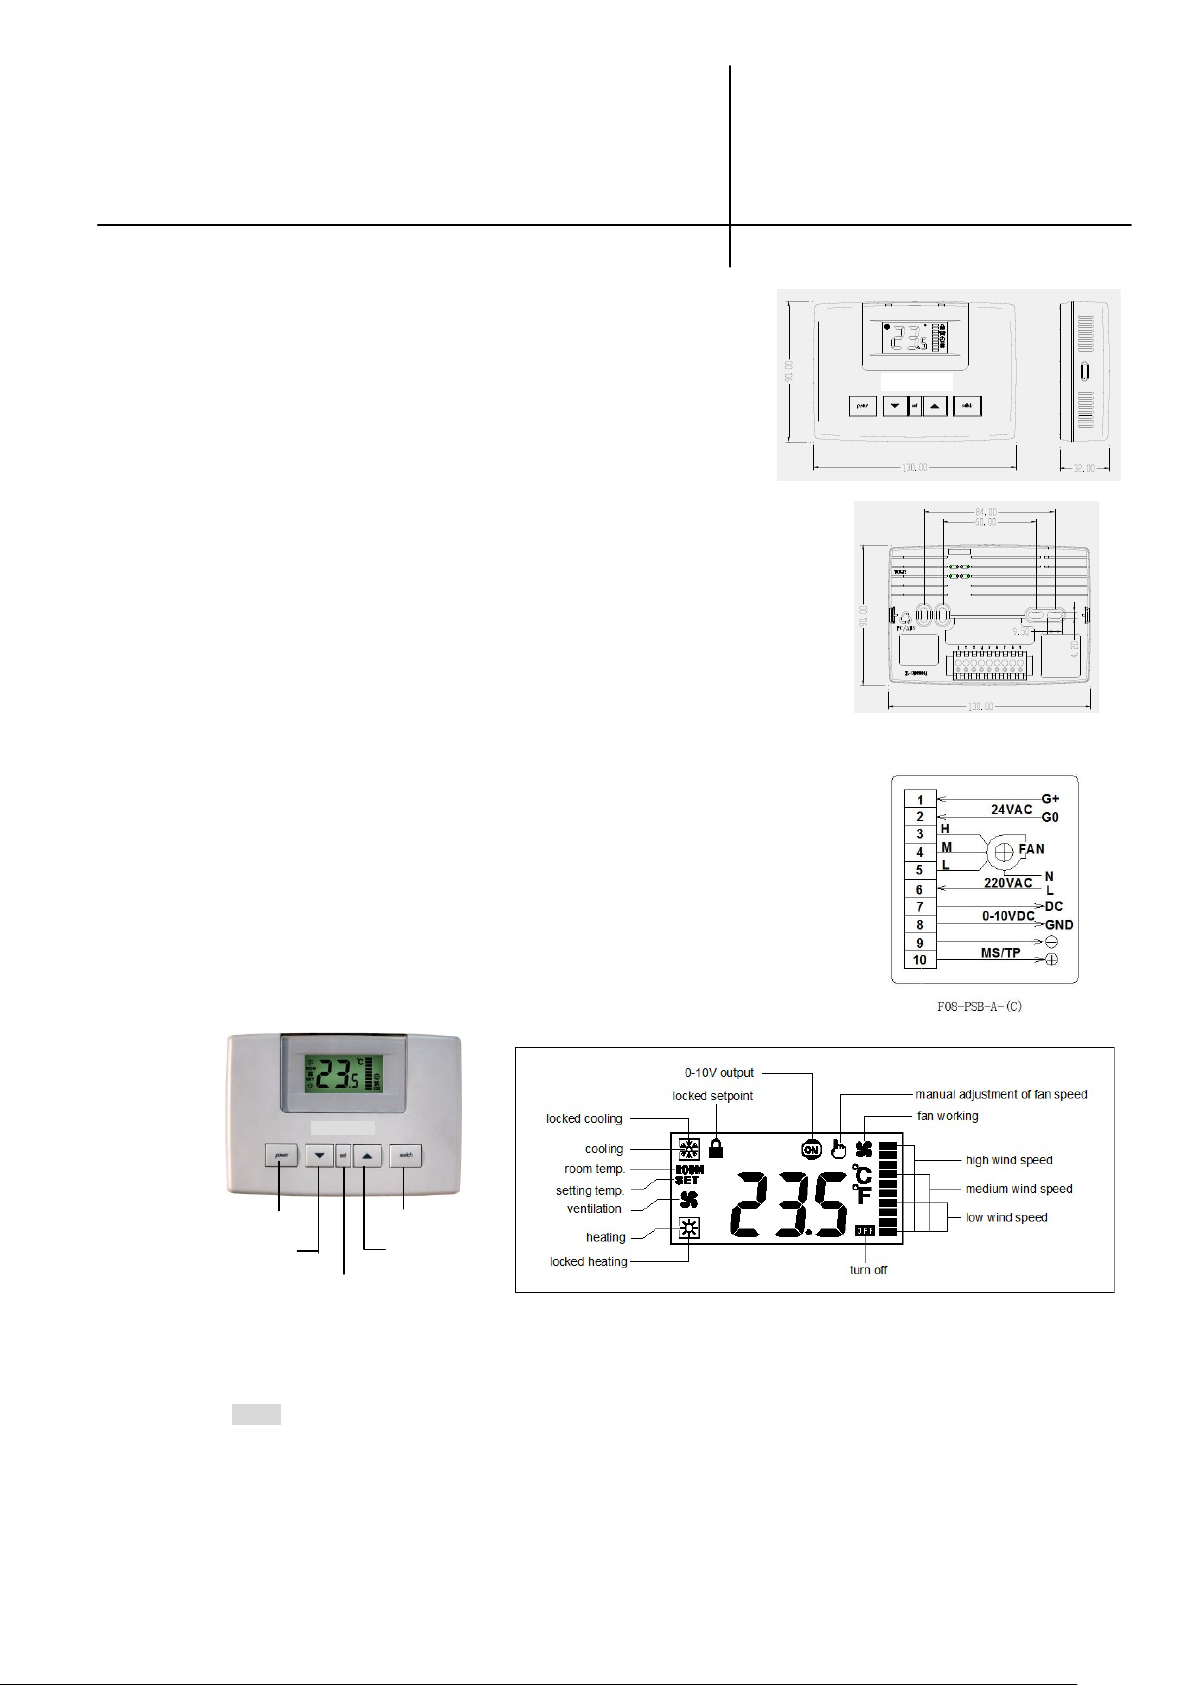
Figure.1 (base part)
Figure2 Wiring Diagram
Figure1
With modulating (0-10V) & 3-speed fan
Model:F08-PSB-A
Important safety information Warning
Always turn off power before mounting, removing, cleaning the thermostat.
Read all the information in this manual before mounting the thermostat.
Notice of the supply power voltage of the thermostat is 24VAC. Do not use it on
voltages higher than marked in thermostat.
Mounting and Wiring Diagram
To open the thermostat, simultaneously depress the 2 clips on either of the sides
of the thermostat gently with your nails or other unships tools. Move the main part
(face part) from the base part.
Mount the base part first: mark placement of mounting holes. See Fig 1.
There are two usable dimensions.
Connect wires to terminal strips. See figure 2 wiring diagrams. Make sure wiring connections
are correct and secure.
Cover the face part on the base part.
Mount thermostat on the wall, 1.2-1.4 meter above the floor. Do not behind a door,
in a corner, near diffuser, in direct sunlight, or near any heat or steam generating
fixtures.
Note: when electrify, do not touch the circuit plate and other parts directly in order to
avoid human injury.
Buttons and LCD Display
turn on/off mode switch
decrease increase
manual / auto adjusting fan speed
Operation
1. After electrifying, OFF displays on the right-down corner of LCD, which means that thermostat is turning- off.
2. Press power key to turn on the thermostat. Measurement temperature appears on the LCD with ROOM symbol
on the left of LCD.
3. Setting temperature: Press▼or▲ with SET symbol appearing on the left of LCD, which means it is in the
condition of setting temperature. When adjusting, the symbol of temperature blinking, which means that the
setting is not be confirmed until the symbol not blinking after 6 seconds and returning back to room temperature
display with ROOM symbol appearing. So the set point temperature is confirmed.

2
4. Locking set point temperature: After set point temperature is confirmed. Press▼▲at the same time for more than 6
item
LCD
Parameter
Setting range
Default
1
A
DEVICE INSTANCE high position
0~999
9
2
B
DEVICE INSTANCE low position
0~999
1
3
C
MS/TP Master communication address
0~128 Auto find MS/TP Master Address
1
4
D
Communication rate selection
1-9600bps; 2-19200bps;
3-38400bps; 4-76800bps
3
ON
ON
seconds, then symbol appears on the top right of LCD and the temperature is locked. Later on the thermostat
returns back to normal display (displaying room temperature with ROOM symbol). After that, you cannot adjust
room temperature by pressing▼▲.
5. Unlocking set point temperature: When appears at the right top of LCD, indicating the temperature is locked.
Then press▼▲at the same time for about 6 seconds until disappears and the temperature is unlocked. Later
on the thermostat returns back to normal display with ROOM symbol.
6. Selecting the working mode: Press switch key and cooling →ventilating → heating is displayed in
circles. When selecting working mode, the corresponding symbol blinks and SET symbol appears on the left of LCD,
you must confirm it by waiting for 6 seconds up to the mode symbol will not be blinked.
7. Locking the cooling/heating/ventilating mode: Press switch to change to cooling/heating/ventilating mode, then press
switch for about 6 seconds until appears on the right down of LCD and cooling/heating/ventilating mode is locked.
After that, you cannot change mode by pressing switch.
8. Unlocking the cooling/heating/ventilating mode: when appears on the right down of LCD, indicating the
cooling/heating/ventilating mode is locked. Then press switch for about 6 seconds until disappears and the
cooling/heating/ventilating is unlocked.
9. Fan speed adjusting: you can adjust the fan speed manually or automatically. If you want to adjust fan speed
manually, press set key with symbol appearing on the top right corner, then you can adjust the fan speed by next
pressing set key ( icon–low speed, icon–middle speed, icon–high speed). Then press set key again with
symbol disappearing, then the fan speed can be adjusted automatically.
10. symbol appears when analog output above 0, and disappears when analog output is 0.
11. Working period setting: in normal operation, press set for more than 2 seconds until ―——― displaying on the middle
of LCD, then you can set the working period. Then press set again to set the working period from 0.5 hour to 9.5
hours and 0.5 hour will be changed each time. When time is set to zero with ―——― displaying next to o.5 hour
setting, it indicates that the working time setting un-effective. If you set 3.0 hour working period, that means the
thermostat will be turned off automatically after 3.0 hours and the thermostat begin to count down.
After finish setting, press set again for more than 2 seconds until the thermostat return back to normal operation.
In normal operation, you may press set for more than 2 seconds to check the left working time.
12. appears when pre-set the low temperature protection(please see follows parameter setup).
Parameter Setup (V.090901)
Cut off the power firstly, simultaneously depress the 2 clips on either of the sides of the thermostat gently with your
nails or other unships tools to open the thermostat. Move the main part (face part) from the base part.
There are four Dip switches X1-X4 on the up left of the circuit board. Put them up to ON, down to OFF.
X1: ON —set the parameter OFF— normal use (leave factory: OFF)
X2: ON —Fahrenheit OFF—Celsius (leave factory: OFF)
X3: un-efficacy for the model (leave factory: OFF)
X4: un-efficacy for the model (leave factory: OFF)
When DIPX1=ON, press switch key to select the parameters and press▲or▼key to set values. The parameters guiding
symbol will display on the upper line of LCD
 Loading...