

Page 1

RAYBLASTER
Reference MANUAL
Page 2
Legal Notice
The license included with this product is a single user license for an installation on a single
computer. Please contact our support team if you need additional licenses.
This product is copy protected and uses audio watermarks.
Please note that Tone2 will deactivate licenses of users who share our software without
permission. Violators will be excluded from customer resources, services and updates.
Under the DMCA, copying and sharing copyrighted materials without a license is illegal,
violations to copyright law may carry heavy civil and criminal penalties.
Support & Development credits
If you have any difficulties installing or using Rayblaster, please contact us by visiting our
website at http://www.tone2.com and clicking the Support button.
User Forum: http://www.tone2.org/forum/index.php
Support Address: support@tone2.com
YouTube: http://www.youtube.com/user/Tone2Audiosoftware
Facebook http://www.facebook.com/Tone2Audiosoftware
Twitter https://twitter.com/Tone2Audio
Google+: https://plus.google.com/b/117394698401069212106
Development: Markus Krause (formerly Feil), Bastiaan van Noord
Programming & Graphics: Markus Krause
Manual: Bastiaan van Noord, Jay Levzi, Markus Krause
Sound design: Ingo Weidner (IW), Ed Ten Eyck (EDT), Himalaya (H), Massimo Bosco
(MxS), Satya Choudhury (sT), Marco Scherer (MAS), Stephen Krajewski (SK), George
Zondagh (GZ), Rob Fabrie (RF), Sami Rabia (AZ), Jamie Docwra (JD), Reinhard
Reschner (RR), SupremeJA (SJA), Jay Levzi (JL), Bastiaan van Noord (BN), Markus
Krause (MF)
Thanks go to: Anna Krause, family and friends, and all Tone2 customers for their
continued support
Page 3
TABLE OF CONTENTS
1 Introduction........................................................................................................
1.1 Welcome to Rayblaster ….........................................................................
1.2 What is Impulse Modeling Synthesis (IMS)...............................................
2 Installation and Authorization..........................................................................
2.1 Automatic installation for Mac & PC..........................................................
2.2 Manual installation for PC...........................................................................
2.3 Manual installation for Mac.........................................................................
3 Rayblaster Interface controls...........................................................................
4 The Rayblaster User Interface..........................................................................
4.1 The patch browser....................................................................................
4.2 Oscillator section......................................................................................
4.3 Envelopes................................................................................................
4.4 LFOs........................................................................................................
4.5 The Modulation Matrix.............................................................................
4.6 Arpeggiator & Gate.................................................................................
4.7 Effects sections & Boost..........................................................................
5 Modulation Matrix: value modifiers................................................................
6 Rayblaster CPU usage .....................................................................................
7 Creating your own custom Rayblaster filter impulse responses ................
8 How to extract & use waveforms in Rayblaster ............................................
9 Tone2 Audiosoftware Catalog .........................................................................
Page 4

1. Introduction
1.1 Welcome to Rayblaster.
Thank you for buying Rayblaster synthesizer. Rayblaster uses Tone2's latest synthesis
technology called Impulse Modeling Synthesis.
Impulse Modeling Synthesis (IMS) goes beyond conventional synthesis, offering a
completely new world of sounds for you to explore and unlimited creative potential for
any style of music.
Whether you're a professional producer, synthesizer enthusiast or playing live, with the
new cutting edge IMS engine, psychoacoustic processing and carefully designed signal
processing, unique high quality sounds are just a key press away.
1.2 What is Impulse Modeling Synthesis (IMS)
Conventional synthesizers use a looped waveform as their oscillator source, which is then
filtered to create your sound, this is known as substractive synthesis.
RayBlaster uses a completely new approach to sound generation, creating its sound from
many short bursts of energy and combining these bursts to form its characterful sound.
This innovative and unique approach to synthesis is very close to what happens within
the human inner ear, sounds more authentic and gives you access to a whole new range
of sounds.
Rayblaster can take two cross blend-able samples, loops, waveforms or even an impulse
response of any filter, to use as source for its IMS oscillators.
The oscillators play back these short samples in rhythmic or chaotic order to create an
audible sound. Pitch, formant frequency, impulse order, mix, pulse width and the
harmonics of oscillators can be adjusted independently, which allows for a very large
amount of possibilities to morph your sound in real time.
The oscillators have an very wide pitch range, ranging from lower than 0.5 Hz up to 22kHz
and are capable of playing at extremely low frequency rates where rhythmical and tonal
parts of a sound start to smear.
For rhythmical sounds, Rayblaster can be synchronized to the host's BPM tempo which for
example allows you to beat-slice a drum loop accurately. Very low oscillator pitch rates
also allow the creation of granular sounds and loops where playback speed and pitch can
be controlled independently.
Where's my filter?
IMS works in a way that does not need a separate filter section, its oscillators can
authentically mimic the filter sound of other synthesizers, using one of the factory impulse
presets or by simply importing one of your own impulses.
Not only is RayBlaster capable of modeling the sound of existing filters – it's also possible
to create completely new artificial 'fantasy' filters exclusive to Rayblaster, making its filter
capabilities virtually unlimited. Your own custom Rayblaster filter impulse responses can
be created very easily, you'll find a step-by-step description in “Chapter 7 - Create your
own custom Rayblaster filter impulse response' of this manual.
Page 5
2. Installation & authorization procedure
Together with the download links from Share-it you have received attached to the product
delivery email a keyfile called 'Rayblaster.t2k', this file contains your personal serial
number & your name and is used to unlock the full version.
Please note:we recommend for installations on Windows7 & Vista to be done with admin.
rights using 'Run as Administrator' for both the Rayblaster installer and host program.
2.1 Automatic Installation (recommended) for PC & Mac
1. Close your host (Logic, Live, Cubase, etc.)
2. Install the full version of the plugin. Note: the demo version can not be unlocked
3. Open your host program
4. Do a plugin rescan in the host if it does not list Rayblaster as plugin. Detailed
instructions on how to perform a rescan can be found in your host's manual
5. Open Rayblaster
6. Click on the registration box in the middle
7. Select your keyfile 'Rayblaster.t2k' to activate the full version
8. Restart the plugin. Note that some hosts programs (Live, Logic,..) may require a
complete restart.
Click inside the activation screen to browse – select your Rayblaster keyfile (Rayblaster.t2k)
Page 6

2.2 Manual installation for PC
1. Close your host (Cubase, Sonar, Samplitude, Live, etc.)
2. Install the full version of the plugin. Note: the demo version can not be unlocked.
3. Copy 'Rayblaster.t2k' to the VST directory. Steinberg hosts often use C:\Program
files\Steinberg\VSTplugins as the default plugin path. You can also take a look at
your host's folder configuration.Note that the 'Rayblaster .t2k' keyfile should be
inside the same folder the Rayblaster.dll is.
4. Open your host program.
5. Do a plugin rescan in the host if it does not list Rayblaster as plugin. Detailed
instructions on how to do a plugin rescan are found in your host's manual.
6. Open Rayblaster. Now the normal user interface appears. If this is not the case
close your host and go back to step 3 as most likely you did not copy the keyfile to
the right place.
2.3 Manual installation for Mac
1. Close your host (Logic, Digital Performer, Live, Cubase, etc.)
2. Install the full version of the plugin. Note: the demo version can not be unlocked.
3. Copy 'Rayblaster.t2k' to 'Library/Audio/Plug-ins'. The correct path for the file is:
'/Library/Audio/Plug-ins/Rayblaster.t2k'.
4. Open the host.
5. Do a plugin rescan in the host if it does not list Rayblaster as plugin. Detailed
instructions on how to do a plugin rescans are found in your host's manual.
6. Open Rayblaster. Now the normal user interface appears. If this is not the case
close your host and go back to step 3 as most likely you did not copy the keyfile to
the right place.
Page 7
3. Rayblaster Interface controls
Buttons
There are two types of toggle buttons in Rayblaster,
one where clicking a button cycles between all options
available, a good example of this are the LFO waveform
selectors where clicking on the Wave button will cycle
through the available LFO wavetypes.
The other type is the toggle on/off buttons, clicking on
these will either enable or disable the feature.
Examples of these are the BPM, Drift and Sync buttons
in the Oscillator section.
Rotary Knobs
The rotary knob control increments a parameter value
linearly from a minimum threshold value to a maximum
threshold value.
To increase a knob’s setting value, turn it clockwise:
click-and-hold the knob with your mouse and then move
it up and/or to the right. To decrease, move down and/or
to the left, or anti-clockwise.
If you press the Shift key on your keyboard and then click-and-hold the left mouse button
on a knob, you will have fine control.
There are two type of value ranges for the rotary knobs, depending on the parameter the
knob is controlling. There is the unipolar knob – that goes from zero to a positive value or
the bipolar knob – that goes from a minus value to through zero and then to a positive
amount.
Bipolar values are useful for setting modulation amounts (which can be positive or
negative) or pan where zero is the center.
Page 8

Context Menus
The small LCD-style screens contain some parameters that are actually context menus.
Click on a parameter to show a context menu of options. Click on the desired setting to
select and close the menu. The display changes to show the current value.
In the example pictured above clicking on 'Load Wave1' will open the Waveform menu,
from here you can choose either a factory Wave to open, or load an external Wave from
disk.
Previous/Next
In Rayblaster, the left and right arrows in it’s patch browser (the orange section in the
middle) are used to select the previous and next patches (program) or category (bank)
Click the program back arrow (<) to select the previous patch in the current category, click
the program forward (>) arrow to select the next patch in the current category. The browser
display changes to shows the newly selected patch.
Click the bank back arrow (<) to select the previous patch category, click the bank forward
(>) arrow to select the next patch category. The browser display changes to show the
current selected patch category.
Page 9

4. The Rayblaster User Interface
The Rayblaster GUI is split up in to various sections, these include:
1: Oscillator Section.
This is the area where you can select the waveform and adjust it's various parameters.
There are two oscillators to choose from.
2: Oscillator Controls.
These are the various controls (Formant, Tune, Sync,...) that can be used to manipulate
the oscillators.
3: Main Amplifier, Glide, Drive, + Unison Controls.
Here you will find the main amp envelope for Rayblaster, along with the unison & spread,
pan, glide (Portamento) and drive controls.
4: Main Preset Window & Options.
Here you can find the various options for loading banks and presets for Rayblaster. Also,
you can save presets and export waveforms, copy oscillators, initialize Rayblaster, the
matrix or the arpeggiator/gate.
The help option brings up this manual, and you also have the option to visit the Tone2
website to purchase additional sounds for Rayblaster.
Page 10

5: Arp/Gate, Effects, Setup and Modulation Matrix
Here you have access to the arpeggiator and trance gate for Rayblaster. The second tab
takes you into Rayblaster's powerful effects section. The next three tabs access any one
of the three Modulation Matrices available.
6: LFO (Low Frequency Oscillator) Section
This section contains the controls for both of Rayblaster's LFOs. In here you set the
waveform type used for the LFO, the frequency the LFO runs at, synchronize it to the
host's tempo and adjust it's phase. The LFOs can be assigned from the mod. matrix.
7: Envelope Section.
Rayblaster comes complete with two additional ADSR (Attack, Decay, Sustain, Release)
envelopes. Their structure and shape can be altered in this section, and they can be
assigned from the mod matrix.
8: Pitch Wheel & Mod Wheel.
Here you see a graphical representation of the Pitch and Mod Wheels you normally find on
a hardware synthesizer or MIDI controller. They can be manipulated with your mouse.
Just click & hold to move them up and down, their parameters can be set in the mod.
matrix.
9 : Keyboard
This part of the interface has the keyboard display, which fully playable using a mouse.
Page 11
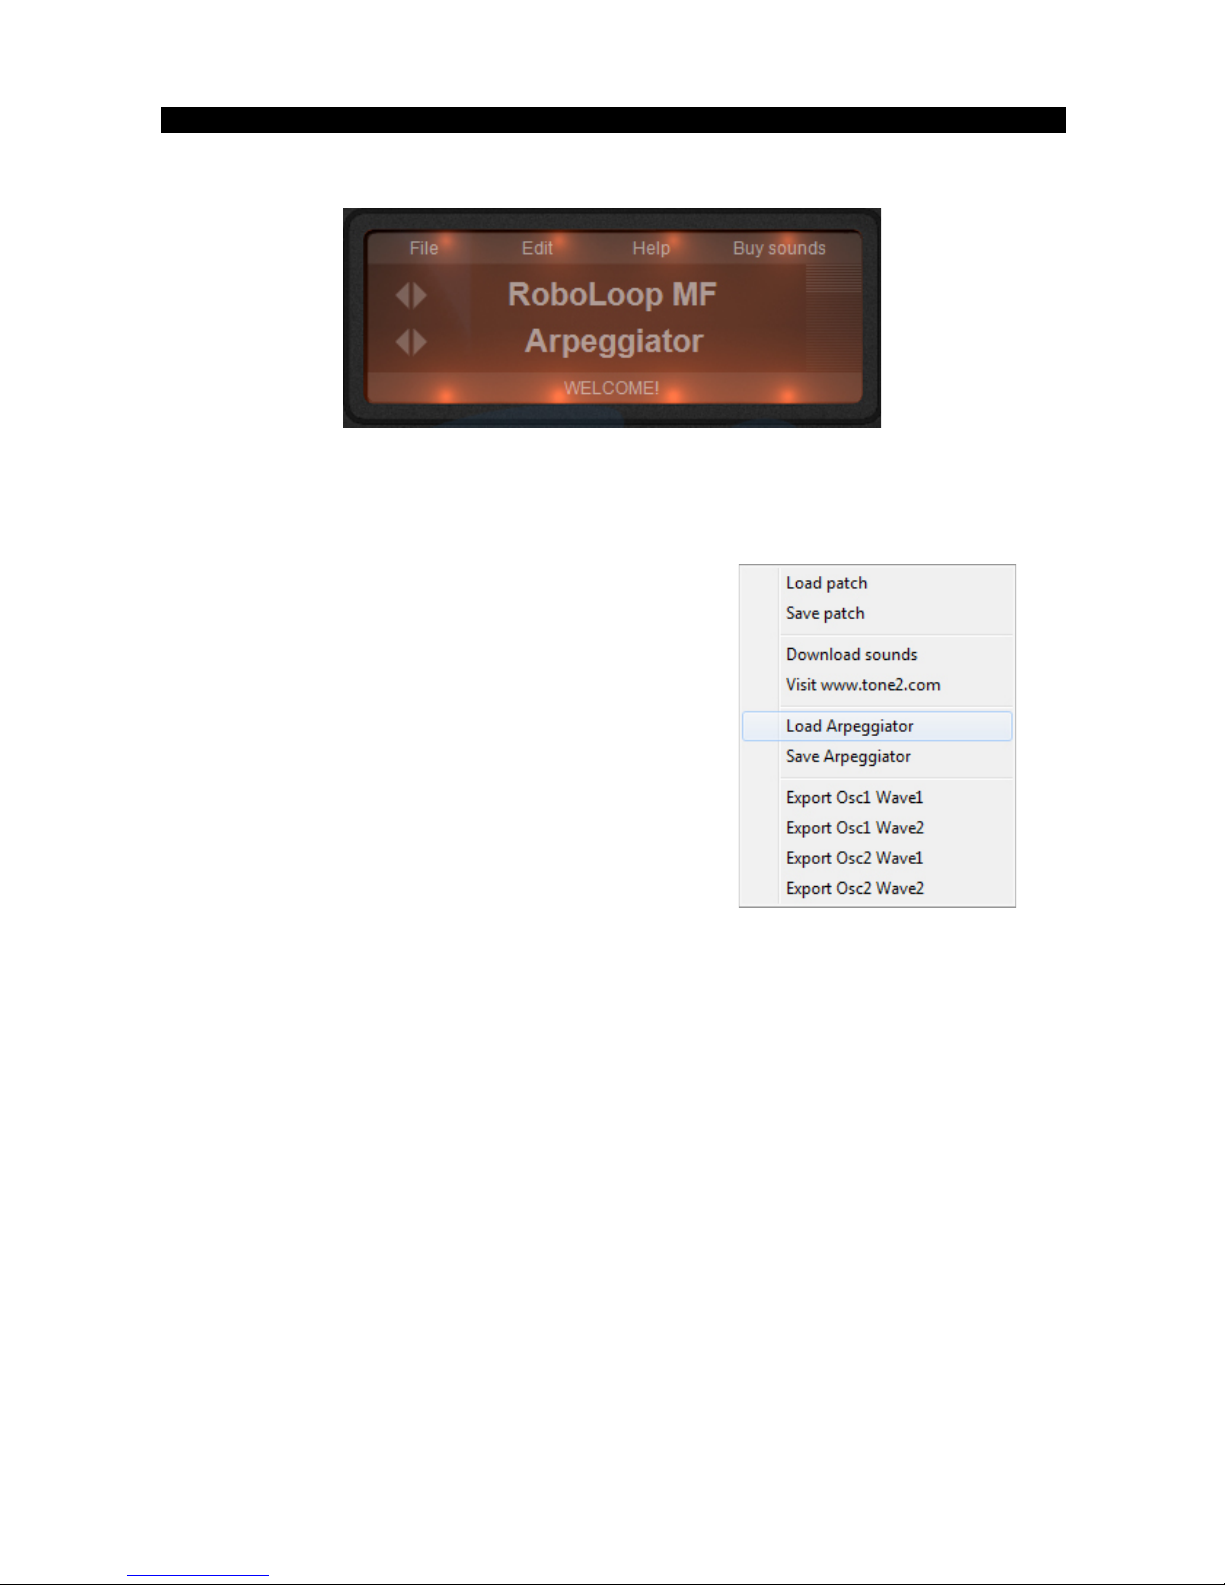
4.1 The Patch browser
The patch browser offers loading, saving and general patch management functionality.
The orange colored Patch browser has 4 rows of information. The top row contains the
File, Edit, Help menu and Buy Sounds link.
The File menu
Load patch: Loads a patch from disk into Rayblaster
Save patch: Saves the current patch to disk
Download sounds: Opens the Rayblaster sound section
on the Tone2 website
Visit Tone2.com: Opens the Tone2 website in your
browser
Load Arpeggiator: Loads a custom arpeggiator pattern
from disk into Rayblaster
Save Arpeggiator: Saves the current arpeggiator pattern to disk
Export Osc1 Wave1: Exports the waveform from Oscillator1-Wave1 as .wav file to disk
Export Osc1 Wave2: Exports the waveform from Oscillator1-Wave2 as .wav file to disk
:
Export Osc2 Wave1: Exports the waveform from Oscillator2-Wave1 as .wav file to disk
Export Osc2 Wave2: Exports the waveform from Oscillator2-Wave2 as .wav file to disk
Resynthesis: Opens the Quick Resynthesis importer. This is used to quick import &
automatically configure the synth to use your sample.
Loop Resynthesis: Opens the Quick Loop Resynthesis importer, This is used to quick
import & automatically configure the synth to use your drumloop. Note that you'll get the
best results with correctly looped files (e.g. 4 full measures)
Page 12
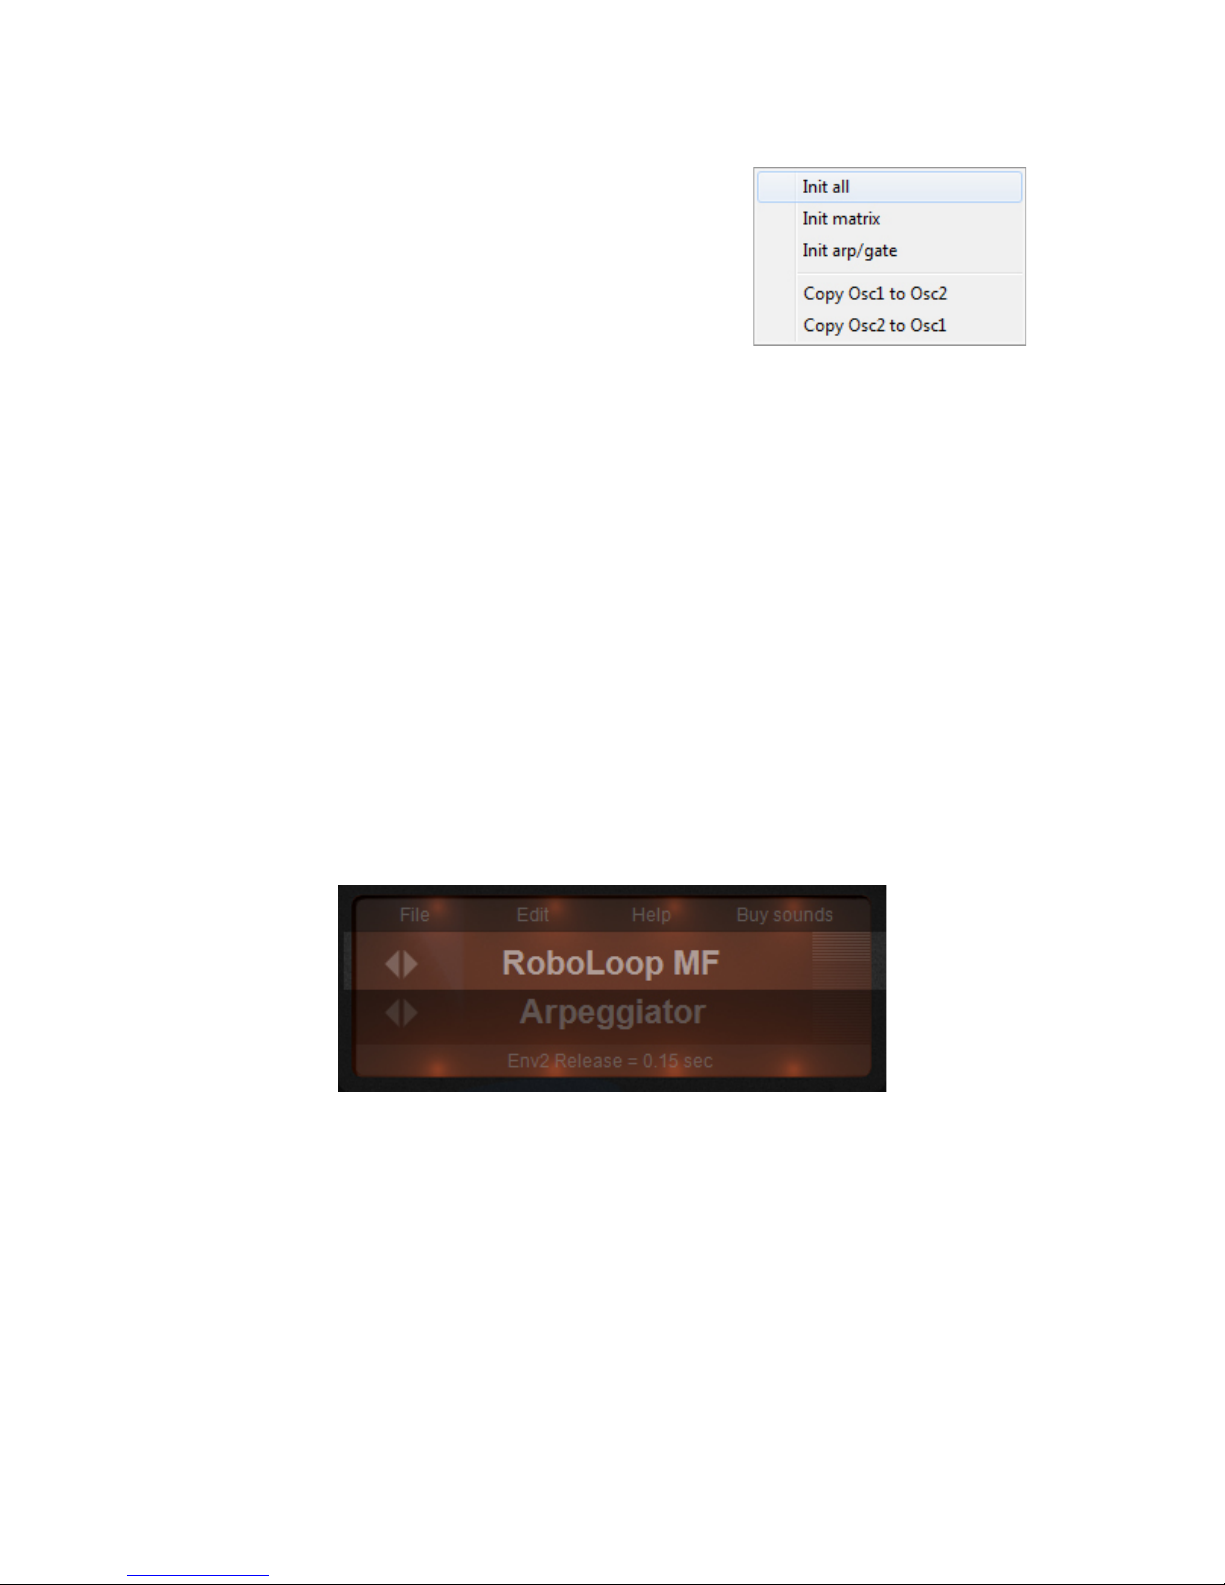
The Edit menu
Init All: Initializes Rayblaster (oscillators, arpeggiator, fx,..)
to the default initialized settings.
Init Matrix: Initializes the Modulation Matrix to the default
initialized setting.
Init Arp /Gate: Initializes the Arpeggiator & Gate to the default initialized settings.
Copy Osc1 to Osc2: Copies Oscillator1 settings to Oscillator2
Copy Osc2 to Osc1: Copies Oscillator2 settings to Oscillator1
Help
Clicking on the Help link opens the Rayblaster manual.
Buy Sounds
Opens the Rayblaster sound section of Tone2 website
The second row (highlighted in the picture above) shows the currently loaded patch.
If you click on the patch name, a drop-down list will appear from which you can select
any patch in the current category. The left and right arrows next to the patch name are
used to select the previous and next patches (program)
Page 13

The third row (highlighted in the picture above) shows the selected patch category. If
you click on the bank name, a drop-down list will appear from which you can select
any other category installed on your system.
These will include the standard categories, additional expansions bought from Tone2
or categories you created yourself. The left and right arrows next to the category name are
used to select the previous and next category.
The bottom line of the browser window (highlighted in the picture above) serves as an
active parameter indicator. If you alter any parameter in Rayblaster’s interface, the
parameter name and its current value will be displayed here.
Page 14

4.2 The oscillator section
Rayblaster's oscillator section is divided into two oscillator Wave displays from which
waves can be loaded and further manipulated, and a main section containing the more
common oscillator controls like Tune, Volume, Ring, etc...
Osc parameters (blue display)
Inside the blue Wave displays you'll find the following controls:
Load Wave1/Wave2:
Loads a wave (WAV) file to oscillator 1/2. This can be a single cycle waveform (we
recommend a zero crossing at the sample start of the waveform), a short sample or
a wave file containing the impulse response of a filter.
If you import a short vocal sample (where the length is around 1 second) or a drum-loop
for beat slicing / granular playback you should set 'Formant' and 'Tune' to a very low value
and 'Harmonic' to a negative value. The waves are stored in the Rayblaster_waves
directory.
Note: in Rayblaster's File menu you'll find two quick import options, these will help
you load your sample & automatically configure Rayblaster to use the sample
Example Patches in Patch manager >Tutorial category: FakeAnalogFilter, Drumline,
WavetableSynthesis,Granular.
Wave 1/2 Mix:
Rayblaster can use two different waves per oscillator. The Mix control is used to crossblend between wave1 and wave2.
This allows for wavetable style sounds, cross-blending between samples or morphing
between filter characteristics.
Example Patches in Patch manager >Tutorial category: WavetableSynthesis
Page 15

Osc Window:
There are several window types available, each with its own
preferred use or way to influence the sound.
The cosine window is the softest sounding one, it is a general
purpose window and will be preferred especially on granular
types of sounds.
Soft Saw, Exponential, Saw Down and Off are suitable for
modeling the behavior of filters or beat slicing drum-loops.
For synced sounds use Off/Square or Saw Down together with
the SYNC button.
Example Patches in Patch manager >Tutorial category:
HardSync, BpmSyncOsc, BpmSyncPad, BeatSlice.
Harmonic:
Harmonic controls the harmonic content of the oscillator. When it is set to a value above 1
the waveform within the window is repeated for several times so it will sound more bright
and harsh.
When negative values are used it will result mostly in a darker sound, since only a smaller
part of the waveform will be part of the window.
The Start value defines the start offset of the waveform or the waveform's phase within the
window function.
The Start value is for example used when you want to play granular or beat sliced sounds,
where only a part of the sample is played back. If harmonic is set to a negative value the
Start parameter can be used to scan forward or backward through a sample.
With these types of sounds usually a sawtooth LFO is routed to Osc Start Phase, this will
allow the synth to scan-play though the sample in real time.
Example Patches in Patch manager >Tutorial category: Granular, Drumline,
BPMSyncOsc, BPMSyncPad, WavetableSynthesis
Page 16
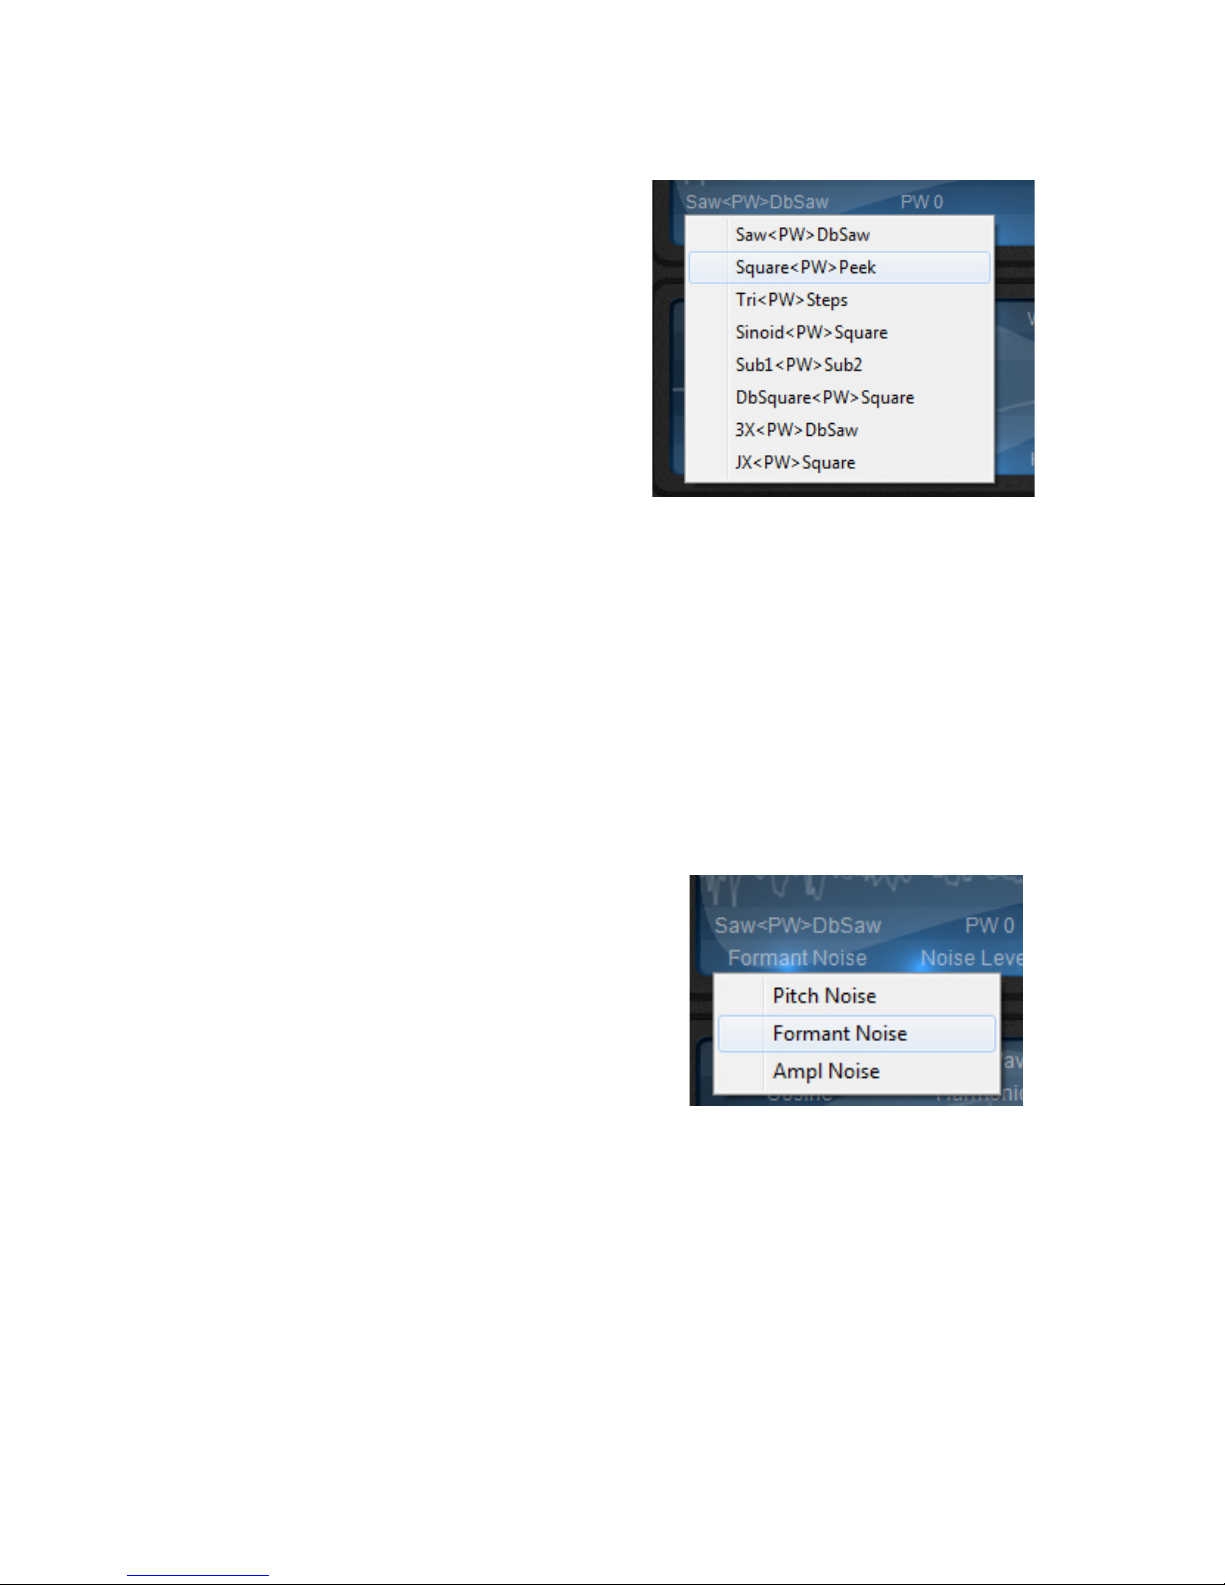
Osc PW Sequence:
Here you can choose between 8 different
impulse sequences. Every impulse sequence
can be morphed in real time with the PW value to
add movement to the sound.
The impulse sequences drastically change a
sound, this ranges from Sawtooth style sounds,
Squarewave style sounds, Organ style sounds to
SubOscillator style sounds ...
Example Patches in Patch manager >Tutorial
category: PWM, FakeFilterSquare
PW:
Found directly next to the PW Sequence menu is the PW (PulseWidth control) This
controls the pulse width of the impulse sequence.
Every sound can be morphed with PW in real time by routing a modulation source (LFO,
ENV...) to one of the PW destinations in the Modulation Matrix
Example Patches in Patch manager >Tutorial category: PWM
Noise type:
Here you can choose between 3 different types of noise to add to the oscillator's sound
Pitch and Formant noise are useful to create a
breathy/silky sound, to simulate filter instabilities,
or to add rhythmic chaos to granular sounds.
Amplitude noise adds a more dynamic type of
oscillator instability.
Example Patches in Patch manager >Tutorial
category: FakeAnalogFilter
Noise level:
Defines how much noise is applied to the sound. Every oscillator waveform can smoothly
morph to noise in real-time.
Example Patches in Patch manager >Tutorial category: FakeAnalogFilter
Page 17
High Boost:
Boosts high formant frequencies, this boost can provide some additional punch to sounds
when a decaying envelope is routed to Formant.
Example Patches in Patch manager >Tutorial category: FakeFilterSquare
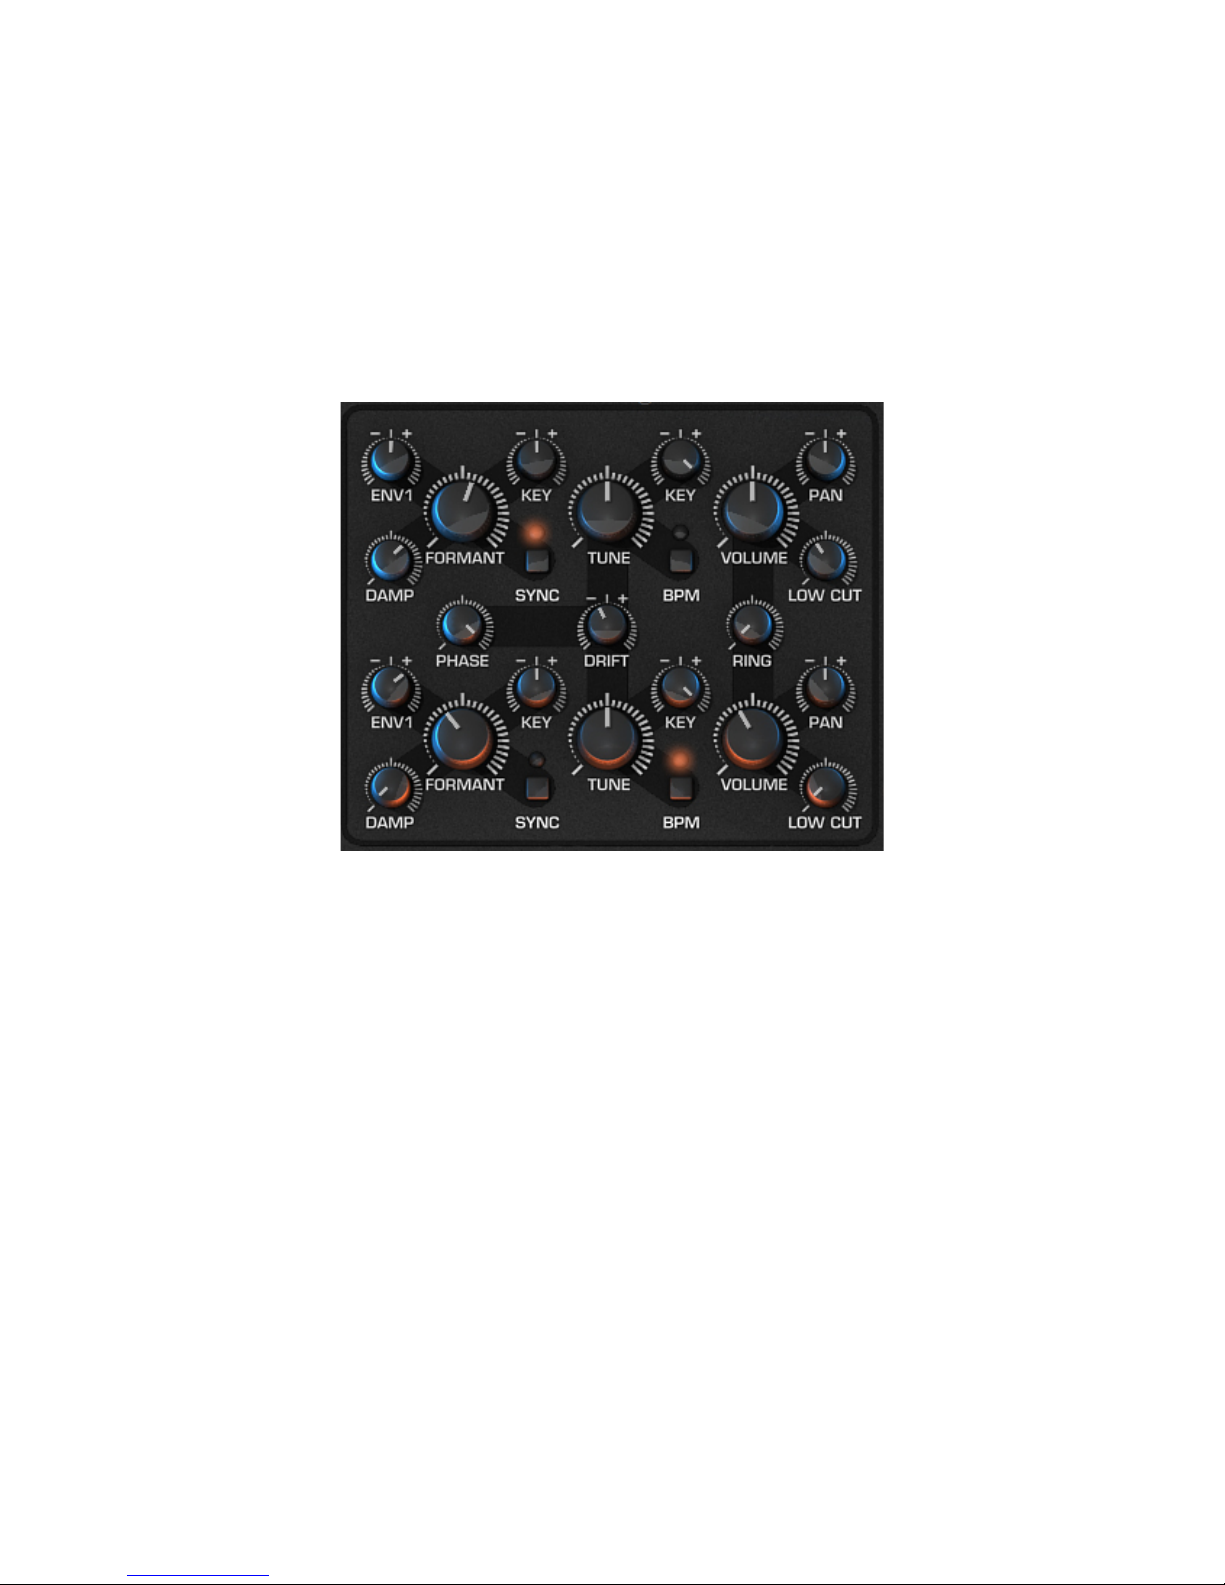
Oscillator section parameters (knobs and buttons)
Inside the Main oscillator section you'll find the following controls:
Formant:
This is the most important parameter of Rayblaster. Formant controls the formant
frequency, the cutoff of the filter impulse responses, the pitch of granular sounds or
in general the brightness of your sound.
When Formant key follow is set to a value of 100, Formant values lower than 0 will
result in a low-pass-style characteristic, Formant values higher than 0 will result in a
bandpass-style characteristic.
Example Patches in Patch manager >Tutorial category: FakeAnalogFilter, MonoBass,
FormantSynthesis.
Damp:
Damp is also a very important parameter, it is used to dampen/darken the sound. You
use the damp control if an oscillator sounds too sharp or aggressive in tone.
Example Patches in Patch manager >Tutorial category: Damped Square
Page 18

Formant Key Follow:
When the Formant key follow is set to a higher positive value and you play a higher key
it will result in a higher formant frequency, if you play a low key the sound will have a lower
formant frequency.
If you want to create classic wavetable synthesis types of sounds, set Formant key follow
to 100 and Formant to 0.
Example Patches in Patch manager >Tutorial category: FakeAnalogFilter,
WavetableSynthesis, FormantSynthesis
Sync:
Switches the oscillator to another type of playback mode, this sounds more aggressive
and can for example be used to create the classic synced sound.
To create the classic synced sound set Sync to On and the Formant frequency to a
positive value. Use Off or Saw Down as Osc Window function for best results.
Example Patches in Patch manager >Tutorial category: HardSync
Tune:
Sets the harmonic or rhythmic relationship of the oscillator which can range from -3
octaves below, up to +2 Octaves higher.
Other tunings provided, which are not in octave-steps like 8/3 are useful to create
organ sounds or chords.
When Osc BPM Sync is On Tune controls the rhythmic speed of the oscillator.
Example Patches in Patch manager >Tutorial category: BeatSlice, WavetableSynthesis
Oscillator Key:
When Oscillator key follow is set to a higher positive value and you play a higher key
it will result in a higher pitch, if you play a low key the sound will have a lower pitch.
Usually you will use a standard key value of 100 here. If you do granular sounds a value
around 0 is preferred.
Example Patches in Patch manager >Tutorial category: Drumline, Granular
Page 19

BPM:
When Osc BPM Sync is On the oscillator switches to another type of playback mode
which will behave similar to an arpeggiator.
It plays back the oscillator with an very low frequency which is synced to your host's bpm
rate. This mode is useful especially for beat sliced sounds or to add rhythmic patterns to a
sound.
In this playback mode the Tune knob controls the rhythmic speed of the oscillator. Note
that you might need to tweak Harmonic, Formant and Formant Key Follow a bit to get the
desired results with BPM synced mode.
Example Patches in Patch manager >Tutorial category: BeatSlice, BPMSycOsc,
BPMSyncPad
Volume:
Controls the oscillator volume
Oscillator Pan:
Rayblaster features a real stereo architecture, this allows the synth to have an individual
pan setting for each oscillator.
For example the Vocoder Effect needs the modulator sample panned to left and the
carrier oscillator panned to the right.
Example Patches in Patch manager >Tutorial category: Vocoder
Low Cut:
The Low Cut control removes low frequencies from the oscillator's output. Use for
example Low Cut to remove lower frequency rumble from sounds.
Example Patches in Patch manager >Tutorial category: FakeAnalog, MonoBass
Drift:
Drift is a very subtle parameter only audible when both oscillator1 and oscillator2 are used
at the same time.
When Drift is set to a value below 0 the oscillators will apply Oscillator pitch drift similar to
those found on old synthesizers.
A drift value larger than 0 will fine tune oscillator 1 up and oscillator 2 down.
Example Patches in Patch manager >Tutorial category: FakeAnalog, FakeSubstractive
Page 20

Phase:
Phase is also a very subtle parameter only audible when both oscillator1 and oscillator2
are used at the same time, or when you play short-attack bass sounds.
A value of 0 switches the oscillators to always running, this is behavior is known from
analog synthesizers and provides a more lively type of sound.
When you set Phase to a value above 0 it will re-trigger oscillator1 and oscialltor2 with
the current phase amount each time a new note is played.
Example Patches in Patch manager >Tutorial category: FakeSubstractive
Ring:
Ring modulates oscillator1 and oscillator2. This creates additional mid/high-range
harmonics which pulsate in a frequency depending on the de-tuning amount of the
oscillators. Note that you might need to tweak Tune and Drift to get the best results.
Example Patches in Patch manager >Tutorial category: RingMod
Page 21

4.3 Envelopes
There is one envelope in Rayblaster directly tied in to the relevant section it appears in,
which is the Amp Envelope in the global section, this envelope is used to control Volume
characteristics like volume Attack, Decay, Sustain and Release.
But Rayblaster also offers two auxilary envelopes called ENV1 & ENV2. These aux. Envs.
can be used to control various parameters by assigning them through the modulation
matrix.
Inside the Oscillator section you'll find two ENV1 send knobs; one for each of the two
oscillators. These ENV send knobs determine how much Envelope1 should affect the
Formant function.
What is an Envelope?
An envelope generator allows a synthesizer to mimic acoustic instruments’ properties of
changing volume and timbre over time. Traditionally, an envelope generator produced a
control voltage that varied over time which could be used to automatically change the filter
cut off or amplifier volume.There are many different types of envelopes but the most common
one is known as an ADSR which is an acronym for Attack, Decay, Sustain and Release which
describes the four controls of the envelope.
Attack – Is a time value which states how long it takes for the envelope to go from zero to
maximum peak when a key is pressed.
Decay – is a time value which states how long it takes for the envelope to drop to the
sustain level.
Sustain – Is a level value which states the highest value while the key is being held down
after the Attack, Hold and Decay stages.
Release – Is a time value which states how long it takes for the the envelope to drop back
down to zero after the key has been released.
Page 22

4.4 LFOs
There are two LFO's available within Rayblaster. Both are freely assignable from within the
modulation matrix and can be used for basically anything from modulating the Formant to
modulating an oscillator's harmonics or pulse-width.
LFO WAVEFORM BUTTON – This cycles the waveform for the LFO to be used. The
available waveforms are :
I) Sine
II) Triangle
III) Square
IV) Saw
V) Sample & Hold
VI) Ramped Noise
Note: Additional LFO waveforms (Like a sinoid or smoothed versions) can be created by using
the filter (X) function in the matrix.
FREQ. - This controls at which frequency the LFO runs; the LFO speed
BPM – This will synchronize the LFO's frequency to the host.
PHASE – This will adjust the starting position of the LFO's waveform, when the knob is
turned completely to the left it the LFO will be free running.
Page 23

4.5 Modulation Matrix
The MOD MATRIX or Modulation Matrix is a system that allows you to flexibly assign
different modulators (such as LFOs or envelopes) to different destinations (such as the
filter, amplifier or even other modulators).
There are three modulation matrix pages available, each page offering 5 different
assignable modulation slots.
To use the mod matrix the procedure is very simple:
1. Choose a modulator (modulation source) in the drop-down menu. This is what
causes the modulation or changing effect
2. Choose a target (destination) in the drop-down menu. This is what gets affected
by the modulation or changing effect.
3. Drag the slider in the center of the bar left or right in a negative (left) or positive
(right) direction to increase or decrease the values.
Source menu options:
Off : Default matrix source is set to off
Vol Env : The Volume envelope will be used as
modulation source
Env1 : The Auxilary 1 envelope will be used as
modulation source
Env2 : The Auxilary 2 envelope will be used as
modulation source
LFO1+- : LFO1 in bipolar mode as modulation source,
this uses LFO1's negative and positive values
LFO2+- : LFO2 in bipolar mode as modulation source,
this uses LFO1's negative and positive values
LFO1+ : LFO1 in unipolar mode as modulation source,
only uses LFO1's positive values
Page 24

LFO2+ : LFO1 in unipolar mode as modulation source, only uses LFO1's positive values
Arp/Step+ : Applies the arp's velocity steps as modulation source using only positive values
Arp/Step+- : Applies the arp's velocity steps as modulation source using both positive and
negative values
Key Pressed : Applies a On/Off Gate modulation; i.e, on key press its value is 1, on release it's 0
Key Pressed - : Applies a Off/On Gate modulation; i.e, on key press its value is 0, on release its 1
VoiceOut : Applies the amount of active Voices value to modulate
Constant: Applies a constant value to modulate, the amount is set by the value slider
Random : A random value will be used to modulate
Flipflop : An on/off value will be used as modulation source; could for example be used to pan
from left to right on keypress
WhiteNoise : Uses white noise as modulation source
PinkNoise : Uses pink noise as modulation source
Key : Uses the played note value as modulation source
Velocity+ : Uses the positive Velocity values to modulate
Velocity+- : Uses both the positive and negative Velocity values to modulate
Modwheel : Uses the Modulation Wheel as modulation source
Pitchwheel : Uses the Pitch Wheel as modulation source to modulate
Aftertouch : Uses the keyboard's incoming after-touch values to modulate
Foot : Responds to Foot switch controller as modulation source
MainVol : Responds to Main Volume controller (CC#7) as modulation source
Express : Responds to Expression controller (CC#11) as modulation source
Hold : Responds to Hold pedal (sustain) on/off (CC#69) as modulation source
CC16 > CC 19 : Responds to CC#16 to CC#19 (continuous controllers) as modulation source
X*X : Uses the X multiplied by X value modifier as modulation source
Sqrt (X) : Uses Squareroot X value modifier as modulation source
Filter (X) : Uses the filter X value modifier as modulation source
Page 25

Limit (X) : Uses the Limit X value modifier as modulation source
Impulse : A short impulse is used as modulation source; could for example be applied to sharpen
the attack portion of a sound
Decay4ms > Decay16s : Decay will use an internal envelope to modulate, options are envelopes
that run from 4 milliseconds to 16 seconds.
Sine 1/8Hz > Sine 256Hz : Uses a sine shape as modulation source, the amount of Hz denotes
the modulation speed used.
Destination menu options:
Off - The default selection; no modulation
destination is selected
Volume - Selects the Master Volume control
as destination
Pan – Selects the Master Panning control as
destination
Spread – Selects the Unison Spread control
as modulation destination
Drive - Selects the Drive control as modulation
destination
OSC1 Formant : Selects the OSC1 Formant
control as modulation destination
OSC1 Tune : Selects OSC1's Tune control as
destination
OSC1 Volume : Selects Osc1's volume control
as destination
OSC1 Damp : Selects Osc1's volume control
as destination
OSC1 PW : Selects Osc1's Pulse-width control as destination
OSC1 Wave1/2 Mix : Selects Osc1's Wave1/2 mix control as destination
OSC1 Harmonic : Selects Osc1's Harmonic control as destination
OSC1 Startphase : Selects Osc1's start phase as destination
OSC1 Pan : Selects Osc1's Panning control as destination
Page 26

OSC1 Low Cut : Selects Osc1's Low Cut control as destination
OSC1 Noise Level : Selects Osc1's Noise Level control as destination
OSC1 Env Send : Selects Osc1's ENV send as destination
OSC1 Tune Key : Selects Osc1's Tune Key follow as destination
OSC1 Formant Key : Selects Osc1's Formant Key follow as destination
OSC1 HighF Boost : Selects Osc1's HighF Boost follower as destination
OSC1 Fine : Selects OSC1's Fine tune control as destination
OSC1 Semi : Selects OSC1's Semi notes control as destination
OSC1 Oct : Selects OSC1's Octave as destination
OSC1 Pitch : Selects OSC1's Pitch control as destination
OSC2 Formant : Selects the OSC2 Formant control as modulation destination
OSC2 Tune : Selects OSC2's Tune control as destination
OSC2 Volume : Selects Osc2's volume control as destination
OSC2 Damp : Selects Osc2's volume control as destination
OSC2 PW : Selects Osc2's Pulse-width control as destination
OSC2 Wave1/2 Mix : Selects Osc2's Wave1/2 mix control as destination
OSC2 Harmonic : Selects Osc2's Harmonic control as destination
OSC2 Startphase : Selects Osc2's start phase as destination
OSC2 Pan : Selects Osc2's Panning control as destination
OSC2 Low Cut : Selects Osc2's Low Cut control as destination
OSC2 Noise Level : Selects Osc2's Noise Level control as destination
OSC2 Env Send : Selects Osc2's ENV send as destination
OSC2 Tune Key : Selects Osc2's Tune Key follow as destination
OSC2 Formant Key : Selects Osc2's Formant Key follow as destination
OSC2 HighF Boost : Selects Osc2's HighF Boost follower as destination
OSC2 Fine : Selects OSC2's Fine tune control as destination
Page 27

OSC2 Semi : Selects OSC2's Semi notes control as destination
OSC2 Oct : Selects OSC2's Octave as destination
OSC2 Pitch : Selects OSC2's Pitch control as destination
OSC Drift/Detune : Selects the OSC Drift/Detune control as destination
OSC Ring : Selects the OSC Ring modulation control as destination
OSC Fine : Selects the Master OSC Fine control as destination
OSC Semi : Selects the Master OSC Semi control as destination
OSC Oct : Selects the Master OSC Octave as destination
OSC Pitch : Selects the Master Pitch as destination
LFO1 Speed : Selects LFO1's Frequency control as destination
LFO2 Speed : Selects LFO2's Frequency control as destination
Vol A : Selects the Volume Envelope's Attack control as destination
Vol D : Selects the Volume Envelope's Decay control as destination
Vol S : Selects the Volume Envelope's Sustain control as destination
Vol R : Selects the Volume Envelope's Release control as destination
Env1 A : Selects the Auxiliary1 Envelope's Attack control as destination
Env1 D : Selects the Auxiliary1 Envelope's Decay control as destination
Env1 S : Selects the Auxiliary1 Envelope's Sustain control as destination
Env1 R : Selects the Auxiliary1 Envelope's Release control as destination
Env2 A : Selects the Auxiliary2 Envelope's Attack control as destination
Env2 D : Selects the Auxiliary2 Envelope's Decay control as destination
Env2 S : Selects the Auxiliary2 Envelope's Sustain control as destination
Env2 R : Selects the Auxiliary2 Envelope's Release control as destination
X:=Value : Selects the X:=Value destination
Matrix1 -> Matrix15 : Sets the modulation destination to matrix position 1 through 15
Page 28

4.6 Arpeggiator & Gate
Rayblaster also features a dedicated Gate which can be used to modulate volume or any
other option within Rayblaster's modulation system.
When the Arp/Gate menu is switched to one of the Gate modes the steps will function as
a modulation value provider, meaning that each step will output a specific value, these
values can then be routed within the Modulation Matrix to setup a Trance gate or drive
other types of modulation.
The step values can be edited by click-holding one of the small rectangle shaped steps
and dragging them up or down to in/decrease their value.
Note that when in Arp mode these same steps can still be used for Gate and/or modulation
purposes, the main difference between the Arp and Gate mode is that in Arp mode the
Arpeggiator is also active.
Rayblaster ships with some very good Trance and modulation gate presets, just open the
patch manager and browse to the Gate category to hear some examples.
Page 29

Arpeggiator
Rayblaster has an incredibly powerful arpeggiator with several unique features like the
ability to program chord steps, release steps, step velocity and many other ways to
program the perfect arp sequence.
A description of all arpeggiator menu options is found below:
ARP/ GATE mode menu - This menu is used to set the Arpeggiator / Gate mode
• Arp Sync: Enables the arp; synchronized to song
• Arp Trigger: Enables the arp; retriggers on key press
• Gate Sync: Disables the arp and uses the gate only; synchronized to song
• GateTrigger: Disables the arp and uses the gate only; retriggers the gate on key press
BPM menu - (Default 1BPM) The tempo function sets the speed for the arpeggiator in
multiples of the tempo of your host program. Whole divisions of the tempo (default is 1
BPM – the ARPEGGIATOR's tempo which is the same as the host's tempo). 2 BPM is
twice the host's tempo. 8 BPM is eight times the host's tempo, etc. Divisions of the tempo
e.g. 2/3 BPM is two thirds of the hosts' s tempo.
Page 30

ARP Range menu - The ARP Range menu is used to set the range of notes used by
the arp. When set to normal it will default to playing the current played note only, other
settings will generate additional notes based on the menu's current setting and which
notes are played.
Note Order menu - This menu is used to set the preferred note order
• . - no note is played
• +1 - Plays one note higher
• +2 - Plays two notes higher
• +3 - Plays three notes higher
• -1 - Plays one note lower
• -2 - Plays two notes lower
• -3 - three three notes lower
• ? - Plays a random higher/lower note
• 2x - Doubles the note for that step
• +2x - Doubles the note for that step and plays two higher
• -2x - Doubles the note for that step and plays two lower
• 3x - Triples the note for that step
• +3x - Triples the note for that step and plays three higher
• -3x - Triples the note for that step and plays three lower
• All - Plays all current held notes on this step
• SL - Restart note reorder from lowest key
• SH - Restart note reorder from highest key
• S? - Restart note reorder from random key
• R - Triggers the envelope's release phase
• L - Run arp sequence till here and loop
• LE - Run arp sequence till here and stop (one shot)
Note menu - The Note menu is used to set which note should be played on this step,
a dot (.) denotes that the currently played note should be used, all other choices in this
menu denote semi notes up/down.
Page 31

Swing menu - The Swing menu is used to set the amount of swing used in the arp
playback (Default Straight)
To create a more 'human' feel to the arpeggiator, you can increase the amount of 'swing'
from 0 (no swing) to 99 (full swing). The swing feature alternately delays and rushes the
arpeggiator steps to add feel.
Velocity / Gate menu - The Velocity/Gate section consists of a step sequencer that
you can use to set the amount of velocity per step. This is used in conjunction with the
Modulation Matrix in which the velocity should be assigned to the preferred modulation
target.
Page 32

4.7 Effects
Rayblaster contains a series of internal effects that influence the whole sound. By clicking
on the effect name, you can open a drop down list of all the effects, then select one to load
it into Rayblaster. There are 2 effect slots to choose from. The effects are :
Reverb Hall - A large Reverb simulating a Hall designed for general purpose use.
Size: Adjusts the size of the simulated space.
Damp: Sets the amount of time between the direct signal and the reverberated signal.
Diffuse: Controls how diffused the reverb reflections are.
Predelay: Sets the amount of time between the direct signal and the reverberated
signal.
Reverb Cathedral – Modelling a huge space of a Cathedral with dense reflections.
Size: Adjusts the size of the simulated space.
Damp: Controls the amount of attenuation of the high frequencies of the reverb signal.
Diffuse: Controls how diffused the reverb reflections are.
Predelay: Sets the amount of time between the direct signal and the reverberated
signal.
Reverb Room – Simulating a small room with a small number of reflections.
Size: Adjusts the size of the simulated space.
Damp: Sets the amount of time between the direct signal and the reverberated signal.
Diffuse: Controls how diffused the reverb reflections are.
Predelay: Sets the amount of time between the direct signal and the reverberated
signal.
Page 33

Delay – Stereo delay which is synced to your host's tempo.
Time: Sets the delay time. The delay time is set to either divisions or multiples of your
host's tempo e.g. 2/3 is two thirds of your host's tempo.
Feedback: Sets the amount of the delay signal that is fed back into the delay's input.
Damp: Sets how much of the high frequencies are attenuated.
Detune: Sets how much of the feedback signal is de-tuned.
Delay Band – Filtered stereo delay which is synced to your host's tempo. The
frequency bandwith gets more and more narrow over time. Useful for classic
psychedelic sounds from the 60's.
Time: Sets the delay time. The delay time is set to either divisions or multiples of your
host's tempo e.g. 2/3 is two thirds of your host's tempo.
Feedback: Sets the amount of the delay signal that is fed back into the delay's input.
Frequency: Sets the frequency used by the delay band's filter.
Detune: Sets how much of the feedback signal is de-tuned.
Delay Pingpong – Tempo synced delay which alternatively pans from left to right.
Time: Sets the delay time. The delay time is set to either divisions or multiples of your
host's tempo e.g. 2/3 is two thirds of your host's tempo.
Feedback: Sets the amount of the delay signal that is fed back into the delay's input.
Damp: Sets how much of the high frequencies are attenuated.
Detune: Sets how much of the feedback signal is de-tuned.
Page 34

Multitap – Very powerful multistage delay with rhythmic beats. Also includes a number of
pingpong types and a reverse delay.
Time: Sets the delay time. The delay time is set to either divisions or multiples of your
host's tempo e.g. 2/3 is two thirds of your host's tempo.
Feedback: Sets the amount of the delay signal that is fed back into the delay's input.
Mode: This sets the pattern mode of the multitap delay.
The choices are:
• C_C_ : Taps play as – Center, space, Center, space. This pattern repeats for a
time dependent on the Feedback setting.
• C_R_C_L : Taps play as – Center, space, Right, space, Center, space, Left. This
pattern repeats for a time dependent on the Feedback setting.
• C_CC : Taps play as – Center, space, center, center. This pattern repeats for a
time dependent on the Feedback setting.
• C_LR : Taps play as – Center, space, Left, Right. This pattern repeats for a time
dependent on the Feedback setting.
• CCC_ : Taps play as – Center, Center, Center, space. This pattern repeats for a
time dependent on the Feedback setting.
• CLR_ : Taps play as – Center, Left, Right, space. This pattern repeats for a time
dependent on the Feedback setting.
• C__C : Taps play as – Center, space, space, Center. This pattern repeats for a
time dependent on the Feedback setting.
• L__R : Taps play as – Left, space, space, Right. This pattern repeats for a time
dependent on the Feedback setting.
• Dotted 1 : The taps play as a dotted rhythm.
• Dotted 2 : The taps play as a dotted rhythm as a variation of Dotted 1.
• Fall : The taps make a 'falling' style of echo.
• Fall LR : A falling echo on the left immediately followed by a falling echo on the
right.
• Fall and Rise : A falling echo immediately followed by a reversed, rising echo.
• Rise and Fall : A rising echo immediately followed by a falling echo.
• Reverse : A reversed echo.
Page 35

• Pan 1 : A panning delay.
• Pan 2 : A panning delay as a variation of Pan 1.
• Pingpong 1 : A pingpong echo.
• Pingpong 2 : A pingpong echo as a variation of Pingpong 1.
• Chaos : Chaotic reflections.
Detune: Sets how much of the feedback signal is detuned.
Chorus – A warm stereo chorus with a rich sound.
Speed: This sets the LFO speed used to modulate the frequencies of the chorus effect.
Depth: How much the LFO modulates the frequency changes.
Ensemble – Simulates a large number of de-tuned voices playing at the same time.
Adds richness and movement to sounds.
Speed: This sets the LFO speed used to modulate the frequencies of the ensemble
effect.
Depth: How much the LFO modulates the frequency changes.
Phaser – Creates a series of peaks and troughs in the frequency spectrum. The
position of the peaks and troughs is modulated so that they vary over time creating a
sweeping effect.
Speed: This sets the LFO speed used to modulate the frequency of the peaks and
troughs.
Depth: How much the LFO modulates the frequency changes.
Stages: This sets how many filters are used to create the phasing effect.
Center: This sets the average frequency of the phaser stages.
Flanger – Peaks and notches are produced in the resultant frequency spectrum related to
each other in a linear harmonic series. Creates a sweeping effect.
Rotary – Simulates a rotary speaker/Doppler effect which was made famous by the
Hammond organ.
Page 36

Compressor – Boosts the volume of lower volume notes, while capping the louder
ones giving a more even level of volume.
Threshold : The level above which the signal is reduced & compression is applied
Attack : The time it takes to start compressing after the threshold has been reached
Release : Amount of time used to return after the input signal has fallen below threshold
Ratio : Difference between the signal increase into the compressor and increase at
output level
Amp sim – Simulates a guitar amplifier.
Drive : Amount of distortion
Postamp : Controls the output volume
Equalizer – Parametric 3-band equalizer.
Low gain : Low gain (250 Hz)
High gain : High gain (3 kHz)
Surround encode – Dolby Prologic II compatible surround encoder. It is also useful to
add a more spatial effect to your stereo recordings. If you encode to ‘Back’ the channel will
come from the rear speaker if you play your song on a surround system. The sound
remains fully stereo compatible.
Settings:
To which speaker the signal is encoded on dolby prologic II compatible surround
systems. If you select 'Center' and play back your song on a surround system the sound
will come from the center speaker.
Vocoder – 10 Band Vocoder. Modulator signal/Voice/Drum loop must be routed to the left
channel, carrier/synthesizer must be routed to the right channel.
Formant : Formant shift of the vocoder. If you set it to 100% you'll get a child's voice.
-100% will result in a very low male voice. A female voice is on 30%.
Stereo : The bands of the vocoder can be spread in a wide stereo filed. Stereo controls
the degree of spreading. 0% results in a mono signal.
Page 37

Trancegate - Adds a rhythmic gate pattern to the sound.
Smooth : The grade of 'softness' applied on the shape of the trancegate
Speed : The speed of the trancegate synced to BPM
Offset : The offset or beat of the first step of the trancegate
4.8 Setup menu
Upon clicking the setup tab, a list of options as to how Rayblaster will be setup and how it
plays back the sound. These include
POLYPHONY : This determines the total polyphony (Number of maximum notes that can
be played at once) that Rayblaster can play back. Also includes Monophonic and Legato
modes and Multi Mono modes. (?)
BOOST MODES:
These are various modes that will enhance various frequency ranges of the sound. You
should always select a boost mode which 'fits to your current patch'. They include :
No Boost: With this one you're always on the safe side. It does - errrm - nothing.
Psychoacoustic: Equalizes non-linearities of the human ear. It makes the patch sound
fatter and louder without raising the overall volume too much.
Bass Boost: Equalizes non-linearities of the human ear. This one is suitable for most
bass sounds and adds some additional low end.
High Boost: It adds some high-end and removes a bit of sharpness from the sounds. This
mode is useful for leads and pads.
Loudness: Boost low and high frequencies to make the sound more fat. In most cases
you might prefer the more advanced Psychoacoustic mode to this classic Loudness known
from car-radios and hi-fi systems.
Ultrahigh Cut:
Removes frequencies above 10Khz from the signal. Use this mode if you want to do
analog-style sounds.
Page 38

GLIDE MODE :
These are the various modes that Rayblaster can employ for the glide between notes.
They include :
Modern Glide: A linear ramping between notes. This is the most 'musically useful' mode.
Vintage Glide: Logarithmic ramping between notes. This is the behavior of analog
hardware synths.
Variable Glide: The longer the distance between two notes is the longer it will take to
glide. This mode is useful for hoovers and effect sounds.
QUALITY : This determines the overall quality of sound that Rayblaster produces at the
expense of CPU consumption. Options are :
High Quality : The highest possible quality of sound, using higher CPU values.
Low CPU : This is the lowest possible CPU consumption that Rayblaster can use, at the
expense of overall quality.
SHOW KEYBOARD : Here you can opt to show or hide the keyboard under Rayblaster.
Page 39

5. Modulation Matrix: value modifiers
Similar to our Saurus Analog Synthesizer, Rayblaster has the option to use a modifier on
the modulation source value, this allows for a smoother control over the original source
which sometimes gives better results then using direct modulation.
This new modifier approach uses four new modulation sources called: Filter(X), X*X,
Sqrt(X) and Limit(X) X=Value, as well as a new destination target called X=Value
As an example, let's say we want to use LFO1 to modulate the Formant for Oscillator1,
however instead of the more direct LFO1> OSC1 Formant option we'll use a modifier to
do our modulating:
Let's start by initializing Rayblaster to its default values, go to the Edit menu found in the
orange section and choose Init all, this will reset all controls on the instrument leaving us
with a standard Saw sound.
1. Go into the mod-matrix and on the first line assign LFO1+- to the destination
X=Value, set the slider for this to +60
2. Next we'll assign one of our modifiers to oscillator 1's Formant; on the second
matrix line assign Filter(X) to OSC1 Formant and set its slider to +70.
You may have to increase the LFO rate a bit but you should now hear the LFO
filtering the Formant by using our Filter(X) modifier.
What Filter(X) in this case does is apply a low pass filter to the value of X, in other
words in the first line we declared that the LFO1+- function was X and on the
second line we told Rayblaster to use the Filter(X) modifier to further modify X's
value.
There are currently four modifiers available:
• Filter(X) - Filters values, very handy to use with for example trance gates to shape
the type of volume gate used.
• X*X - Can be used to further shape modify envelopes, for punchier envelopes for
example.
• Sqrt(X) - Also very good to further shape modify envelopes with.
• Limit(X) - Can be used to limit a the amount of modulation by clipping its value
within a certain range set with the value slider.
Page 40

Another example would be to use the X:=Value modifier to program/adjust a Trancegate.
Next to the usual Gate > Volume Modulation Matrix way of setting up a Trancegate
Rayblaster also includes the option to use a value modifier on your Trancegate.
The advantage of using a modifier in this case is that it will allow you to manipulate the
type of gate, e.g. use a smoother or harder type volume cut on your gated signal.
The following steps will describe how to set this up:
1. Open Rayblaster
2. In the Edit menu select INIT ALL to reset all synth features to their default state
3. The first thing we want to do is to setup our Gate, Inside the ARP-GATE section
click on the Arp/Gate label to show the arp and gate, at the bottom left of this
section click on the off label to open the menu; in this menu select Gate Trigger,
what this does is use the Gate section triggered on key press.
The Gate section itself is made up of 16 steps, each step (currently set at -100)
represents a value that can be adjusted from -100 to +100 and used to modulate
whatever is linked to the Arp/Step+- and Arp/Step+ inside of the Modulation Matrix
sources.
For this example let's go for a classic type of gate, you can see the gate's layout in
the picture below, you'll also note I've set the amount of BPM to 2, no particular
reason it just sounds better to me.
Next we'll setup the Modulation Matrix:
4. Click on the Matrix1 label to display page 1 of the Mod-Matrix
5. Let's begin by routing our modulation source to the X:=Value modifier, on line 1
select Arp/Step+- as our modulation source, for our modulation destination we
select X:=Value, set the value slider to 100+
6. The next thing to do is to assign a type of modifier to the intended destination, in our
case that would be the Volume. Go to line 2 of the matrix, select Filter(X) as the
mod source and Volume as the destination, set this slider to 100+.
Page 41

Play a note on your keyboard and you should now hear the volume being gated, the nice
thing about the modifier being in between the Gate and Volume is that we can use the
modifier's value slider to adjust our gate, give it a try by moving the second slider from left
to right and you'll notice that the gate will change from a hard volume cut to a smoother
volume cut.
What the Filter(X) in this case does is apply low-pass filtering to the values used for the
gate.
Below you'll see a picture of the Matrix setup used in the Trancegate example:
6. Rayblaster CPU usage
Even with Rayblaster's extended use of low-level optimized code, CPU usage depends
heavily on what you do in the instrument. Like with most virtual instruments a lot
calculations are required whenever dealing with more complex patch setups.
The following are some tips to reduce CPU usage if a preset has a high(er) CPU load:
1. Use the Ensemble or Chorus effect instead of the 4x unison.
2. Go to the Setup tab and reduce the number of voices used. For most sounds Poly8
will suffice.
3. Reduce release time in the volume envelope. Use the Delay effect for Pads instead.
4. Avoid very low formant frequencies since this increases the amount of calculations
and
the CPU load heavily j
5. Go to the Setup tab and select a lower quality mode
6. Set Wave 1/2 mix to 0. Otherwise both waveforms have to be calculated, especially
if one of the waveforms isn't used or really audible that's just a waste of perfectly
good CPU cycles ;-)
7. A very high pitch can also increase the CPU
Page 42

7. Creating your own custom Rayblaster filter impulse response
1) Open any synth
2) Play a low pitch sawtooth (around 50 Hz) with any filter (cutoff around 1kHz, you
can add some resonance if you want)
3) Record and save this static sound to a wav.
4) Cut edit this wav into a single-cycle waveform.
5) Load it into one of Rayblaster's oscillator.
When you edit the sample it is important to have a zero-crossing at the beginning and end
of the wave. You can also adjust this in Rayblaster with Osc. Start Offset, but it is more
easy if you do it in the source file before importing it into Rayblaster.
Lowpass type is with formant lower than 0 and bandpass type with values above 0. There
are some example Impulse responses included in the Wave library (OSC>Load Wave
menu) like the LpSaurusReso. As window function use OFF, Soft Saw or Exponential.
An example patch can be found in the Tutorial category > FakeAnalogFilter.
Filter types
The advantage of importing filter impulse responses is that it allows you to create both
existing filter types as well as as new types of filters. Below is a list of some example
filter types and how to set them up.
32 dB FIR low-pass
1. Init all
2. Harmonic: -9
3. Start Offset: 30
4. Window mode: Sinc
72 (!) dB resonant FIR low-pass
1. Init all
2. Harmonic: -9
3. Start Offset: 30
4. Window mode: Sync BP3
Low-pass Comb Filter
1. Init All
2. Harmonic: -9
3. Start Offset: 30
4. Window mode: Comb 2x
Page 43

Wide Band-pass Filter
1. Init all
2. Harmonic: -9
3. Start Offset: 30
4. Window mode: Sine 4x
Tight Bandpass Filter
1. Init all
2. Harmonic: -9
3. Start Offset: 30
4. Window mode: Sine 8x
All-pass Filter
1. Init all
2. Harmonic: -9
3. Start Offset: 30
4. Window mode: Sweep2
Lowpass with FM Filter
1. Init all
2. Harmonic: -9
3. Start Offset: 30
4. Window mode: FM2
6dB high Shelf Filter
1. Init all
2. Harmonic: -9
3. Start Offset: 30
4. Window mode: Exponential1
Page 44

8. How to extract & use waveforms in Rayblaster
A lot of instruments can be emulated by extracting a waveform from the original source,
e.g., brass, woodwind and string instruments. Rayblaster is very good in modeling these
instruments especially if the original waveform is used as its building block.
The following step-by-step describes how to do this:
1. Play a very low note on the instrument you want to extract a sample of
2. Sample the instruments
3. Extract/edit a single-cycle waveform from your sample, note that there should be a
zero-crossing at the start & end of the single-cycle.
The maximum amount of energy (largest amplitude) should be as far to the start of
as possible.
4. Save your single-cycle wav and import it into one of Rayblaster's oscillators
Note that the File menu in Rayblaster offers two Quick import options, these will guide you
through importing your sample/drumloop and configure Rayblaster to use the imported file.
Page 45

9. Tone2 Audiosoftware Catalog
Be sure to take a look at some of our other effect & synthesizer plugins, the following
pages will provide a short overview of part of our product line.
For more information on our products, MP3s and product demos please visit our website
at http://www.tone2.com
Saurus Analog Synthesizer
True analog sound with state of art functionality!
Saurus takes the high regarded analog sound from the past into the unlimited digital realm,
fusing them together with a user interface that invites to tweak and a multitude of unique
sound sculpting tools exclusive to Saurus. All without placing heavy demands on your CPU
or budget.
It has been the aim of developers the world over to bring the best “Virtual Analog” synths
possible to re-create the sound of classic hardware.
However, unlike many competitors who sell 'Virtual Analog Synthesizers' which are at best
mere approximations of what happens in the real world, we set out to create not just
another synthesizer with character, but one that truly represents the sound of analog
hardware.
We carefully measured and modeled the circuits of many classic performance
synthesizers, even including single capacitors and resistors to provide an extremely
accurate analog model, faithfully capturing the spirit and character of these old machines.
Page 46

What are the advantages that Saurus offers?
• True Analog Modelling Technology™
• High-end sound quality
• Saurus replaces a large number of expensive analog synthesizers
• Low CPU and high reliability
• Low price
• Free personal support and updates
• Easy-to-use interface
• Unique sounds which no other synthesizer can create
• Huge sonic range
• Flexibility, expandability
• Ships with 563 outstanding presets from 21 top sound designers
Features
• Covers all important aspects of traditional analog synths
• Mono, Legato & Polyphonic modes employing analog voice management
• Two Syncable Oscillators and two Sub Oscillators
• Not just standard waveforms but also a large number of exotic ones
• Pulse Width Modulation and Oscillator Sync applicable to every waveform
• Oscillator Drift, Phase and Noise Modulation controls
• Noise FM, AM and Ring Modulation for Oscillators
• Analog filter with self-oscillation, nonlinearity, 6 filter types, FM and feedback
• LFOs and modulation capable of running at audio-rate
• Powerful Arpeggiator with extensive configuration possibilities
• Flexible Modulation Matrix with new features, including a filter
• Programmable gate
• 4x Stereo Unison modes with spread and panning control
• Analog modeled Distortion and Tube amp
• Optional Psycho-Acoustic processing
• High-end quality Effects
For more information: http://www.tone2.com/html/saurus_synthesizer__vst_au.html
Page 47

ElectraX synthesizer
ElectraX! Explore the vast musical universe of multi-synthesis oscillators, analog modeled
filters, chaotic fractals, samples, psychoacoustic processing, flexible modulation and an
immense sonic range.
Combine multiple polyphonic or monophonic synthesizers and 13 different synthesis
methods to create incredible results while the well-designed preset management system
provides access to a large library of sounds carefully crafted by professional designers.
Features - summary
• Four synthesizers in one interface
• High-end sound quality
• Huge sonic range
• High flexibility
• 13 different synthesis methods which can be combined
• Psychoacoustic processing
• Low CPU, multicore processor support
• Easy to use
• 4x multitimbral, 4x stereo unison
• Over 1000 sounds in 575 presets by professional sound designers
• 32 exclusive analog modeled filter types
• 45 oscillator types
• 18 effect types; Master effect section with Equalizer
• More than 1000 waveforms
• 64x4 voices
• Midi learn
• Customizable user interface with 4 skins
• Expandability
• Standalone version for PC
• Flexible preset management
Page 48

Features per synthesizer (4 synthesizers available)
• Several playmodes: Monophonic, legato, polyphonic, glide
• 3 multi-synthesis oscillators
• Dual multimode filters
• Dual multimode distortion/waveshaper
• 3 LFOs (global or per voice) and a Step LFO, BPM syncable
• Four Envelope generators
• Arpeggiator
• Insert effect, BPM syncable
• Flexible modulation
• Key splitting
Synthesis methods & OSC features
• Virtual analog
• FM
• Sample playback and import of own samples with loop/sustain loop support
• Wavetables with resynthesis function and the ability to load own waveforms
• Ultrasaw (up to 18 detuned oscillators per voice)
• Fractal (a completely new synthesis method)
• Phase distortion
• Waveshaping
• Exclusive oscillator types
• PWM
• Sync
• Noise
• Ringmod
• Vocoder
• Analog oscillator drift modeling
• Fat tuning
18 warm sounding effect types
• Reverbs: Hall, Cathedral, Room
• Delays: Delay, Delay band, Ping Pong, Multitap
• Chorus, Ensemble, Phaser, Flanger, Rotary
• Trancegate, Compressor, Ampsim, Equalizer, Surround Encode
• Vocoder
23 exclusive filter types
• 11 analog modeled filters with self oscillation: Lowpass/Highpass/Bandpass
• 12dB/18dB/24dB, Moog, Filter-FM
• High precision digital filters: Lowpass, Highpass, Bandpass, Notch
• Equalizers: LowShelf, HighShelf, Peak, Wide
• Special types: Phaser, Comb+, Comb-, Vocals, Aliaser, Ringmod
• Exclusive fractal filters
For more information: http://www.tone2.com/html/electrax_synthesizer__vst_au.html
Page 49

Gladiator2 Synthesizer
The award winning Gladiator gives you a groundbreaking approach to sound generation.
Its exclusive HCM synthesis technique covers new and unique aural territory, only possible
with Gladiator. The innovative synthesis, design and unmatched sound quality, make this
not only the perfect instrument, but also the best virtual synthesizer and go-to instrument
for all those looking for the ultimate creative tool.
Synthesis types supported by Gladiator 2 are:
• Tone2's award winning Harmonic Content Morphing synthesis (HCM)
• Frequency Modulation (FM) & Amplitude Modulation (AM)
• Pulse Width Modulation (PWM)
• Analog osciallators
• Resynthesized instruments
• Vocoder sounds
• Oscillator sync
• Phase Distortion
• Phase Modulation
• Waveshaping
• Super-saw
• Additive synthesis
• Sample playback
Page 50

Filters
The analog modeled filter section uses high-end quality stereo filters, most of which are
exclusive to Tone2 products.
Gladiator 2 ships with 40 different filter types: Moog, Low Pass, High Pass, Band Pass,
Vocals, Comb, EQ, FM, AM,
Phaser, Resample, Analog, ...
Sounds
Gladiator 2 ships with an inspiring library of 1105 outstanding presets from top sound
designers. Besides that a variety of expansion banks is available to further expand
Gladiator's features and preset library. All sounds are arranged into categories for easy
access to the sound you require.
Modulation
Gladiator 2 has a powerful and flexible modulation section which is easy to setup. The
analog modeled envelopes sound punchy. LFOs offer 22 different waveforms and can be
synced to BPM. The Step LFO's design was inspired by the old analog step sequencers
and can be used to create rhythmic sequences and trance gates.
With 'midi-learn' you can assign your hardware controller with a single mouse click.
Psychoacoustic processing
The exclusive IQM algorithm (Intelligent Microtuning) makes the synthesizer sound fatter
and cleaner by automatically detuning notes for lush chords.
The innovative phase modulator module in the OSC section is based on the latest
knowledge in phonetic science. It makes a digital spectrum sound warm, silky and
analogue.
A special post-processing module in Gladiator mimics effects of the human ear. It creates
deeper basses and more transparency.
• True high-end quality: Analog, warm, crystal clear, rich sound
• New synthesis method (HCM)
• New unique sounds which no other synthesizer can create
• Huge sonic range
• Boundless possibilities
• Psychoacoustic processing
• Different synthesis methods can be combined freely
• Flexibility, expandability
• Easy to use
• Low CPU and high reliability
• 1135 professional preset sounds included
For more information: http://www.tone2.com/html/gladiator_2_vsti_au_synthesize.html
Page 51

Warmverb Multi Effect
Warmverb is a multi-effect unit which gives you the flexibility to create unique sounding
custom effects with a mouse click. Not only can it do classic effects with pristine sound
quality - it can do crazy stuff like a 'distorted-reverb-phaser-feedback-vocoder'!
Equipped with the high quality reverb technology which can be found in our Gladiator
synthesizer, Warmverb improves upon it by including an ultra version of the reverb.
With an easy to use interface, an intelligent randomize function and over 150 presets,
Warmverb gives you instant access to a large selection of essential effects and inspiring
new sounds.
Effect modules
• 3 high-end quality Reverbs
• Vocoder and Vocoder L-R
• Delay, Ping pong delay, Filtered Ping pong
• Chorus, Ensemble
• Flanger, Stereo Flanger
• Superstrings
• Phaser, Stereo phaser
• LFO Low pass, Band pass and High pass
• Talkbox
• Tubeamp, Transistor, Presence, Hardclip
• Bitcrush, Waveshape
• Rotary
• Dolby Prologic II surround encoding
• Tremelo
• Autopanning
• Stereo enhancing
• Stereoizer
• Equalizer
• Ringmod
• Trancegate
• Early reflections (3 different types)
• Pitch shifter
• Feedback module
For more information: http://www.tone2.com/html/warmverb_vst_au_effect_synthes.html
Page 52

AkustiX Enhancer Effect
Tone2 AkustiX is a collection of six essential enhancement tools combined into one
intuitive user interface. Ideal for tracks as well as full mixes AkustiX features six powerful
effects: Psycho EQ, Ultra Stereo, Phase Enhance, Multi Exciter, Smart Filter and Stereo
Width.
Each effect is based on the latest developments in research and offers multiple ways to
enhance the sound of your recordings drastically by using psycho-acoustic processing.
Unlike competing enhancers AkustiX is easy to use and works well with nearly all kinds of
material. It's a one-click solution to make your mix sound professional without knowing
about mastering-voodoo.
• Six essential effects to complement your track and mastering process
• Add brightness, transparency, fatness, vibrancy and depth to your mix
• Restore and revitalize old recordings
• Drastically enhances stereo mixes
• Exclusive new technology based on the latest in psychoacoustics research
• Elegant and intuitive user interface
• High-end quality processing
• Powerful spectrum analyzer & phase meter to visualize imaging and phase
• Suitable for mix, mastering and signal restoration purposes
• Ships with professional presets for a broad range of mix & mastering tasks
For more information: http://tone2.com/html/akustix_enhancer_vst_au_effect.html
Page 53

Filterbank 3 Effect
Tone2 FilterBank3 is more than an analog modeled filter plugin - it is a complete VST synthesizer
and a flexible multi-effect unit. The modular design and flexible modulation routing give you nearly
unlimited possibilities. With self-oscillating filters, oscillators and feedback it can create complete
sequences and textures. FilterBank sounds impressive and unique. The built-in step sequencer
can create rhythmic sequences with some mouse clicks.
• 58 different high-end quality dual-stereo filters
• Outstanding sound quality
• Flexible, semi - modular architecture and routing
• Virtual-analog OSCs/LFOs
• FM, AM, feedback
• 20 Delay types, Reverb, 12 Distortion types
• 320 presets included
• Can be loaded as synthesizer as well as effect
• Vocal filtering, equalizing, phasing, flanging, compressing, envelope following
• 303-like step sequencer
• Midi learn
• Syncable to BPM
• Realtime frequency display
• Dolby Prologic II compatible
• Easy to use
For more information: http://www.tone2.com/html/filterbank3_vsti_vst_au_synthe.html
Page 54

 Loading...