

Page 1
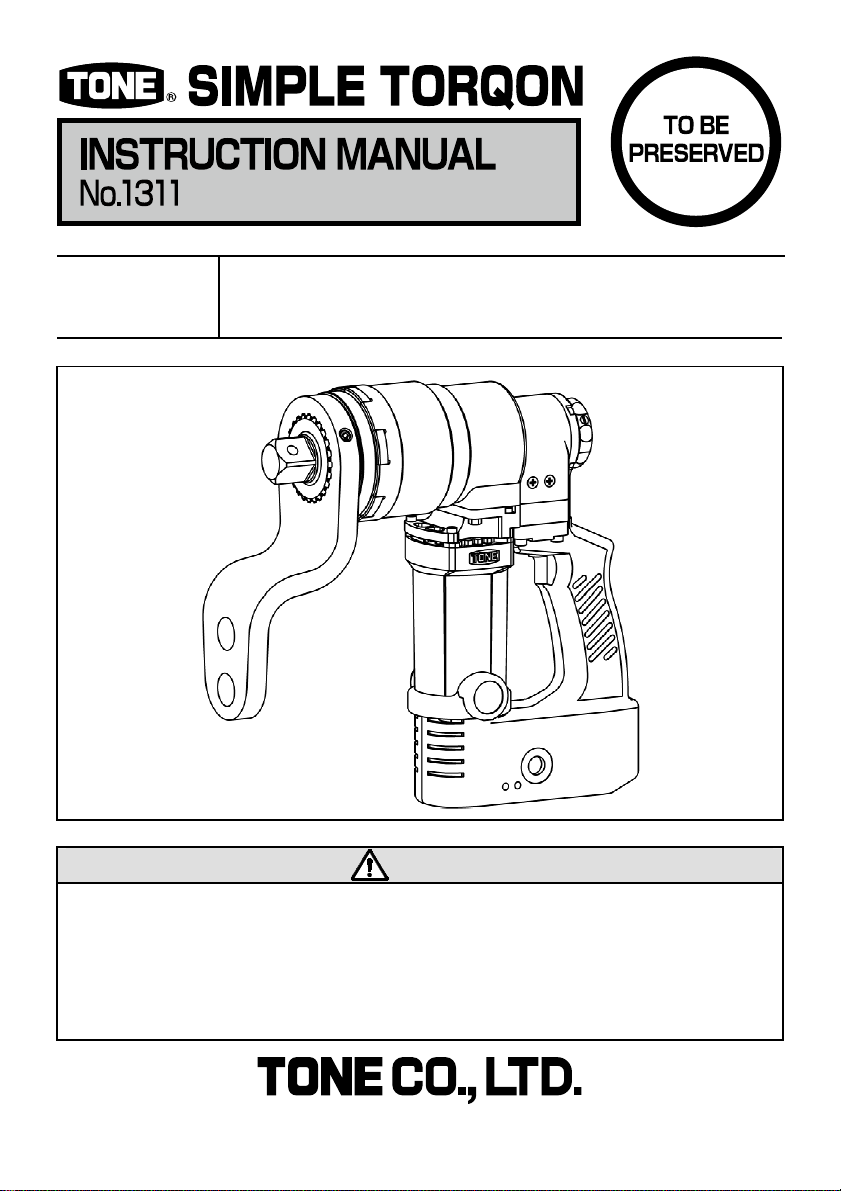
MODEL STC
Read and fully understand all the instructions before use.
Keep this manual in designated place for easy and quick reference.
The models mentioned on this manual are designed for use outside Japan.
Warranty shall be void if above mentioned models are use in Japan.
STC50
50AE
STCSTC
5050
CAUTION
CAUTION
CAUTIONCAUTION
AE //// STC
AEAE
STC50
STCSTC
50TE
TE
5050
TETE
Page 2
PREFACE
PREFACE
PREFACEPREFACE
Thank you for purchasing .
■ Upon receipt, check and confirm the following:
- Check any transport damages.
- Check for any loose or lost screws and bolts.
- Check the model as per order.
- Check all the accessories are contained.
If any problems are found, contact your distributor.
■ Read this instruction manual carefully before use.
Full understanding of manual is essential to prevent personal injury or
malfunction.
■ Keep this manual in a bag attached to the back of metal case lid for easy
and quick reference.
■ If manual or warning label is lost or becomes illegible, or if additional
manual is required, contact your distributor.
If you have any questions about the products or the contents of this instruction
manual, contact your distributor.
■ This manual is only applicable to outside Japan.
- 1 -
Page 3
SAFETY INSTRUCTION
SAFETY INSTRUCTION
SAFETY INSTRUCTIONSAFETY INSTRUCTION
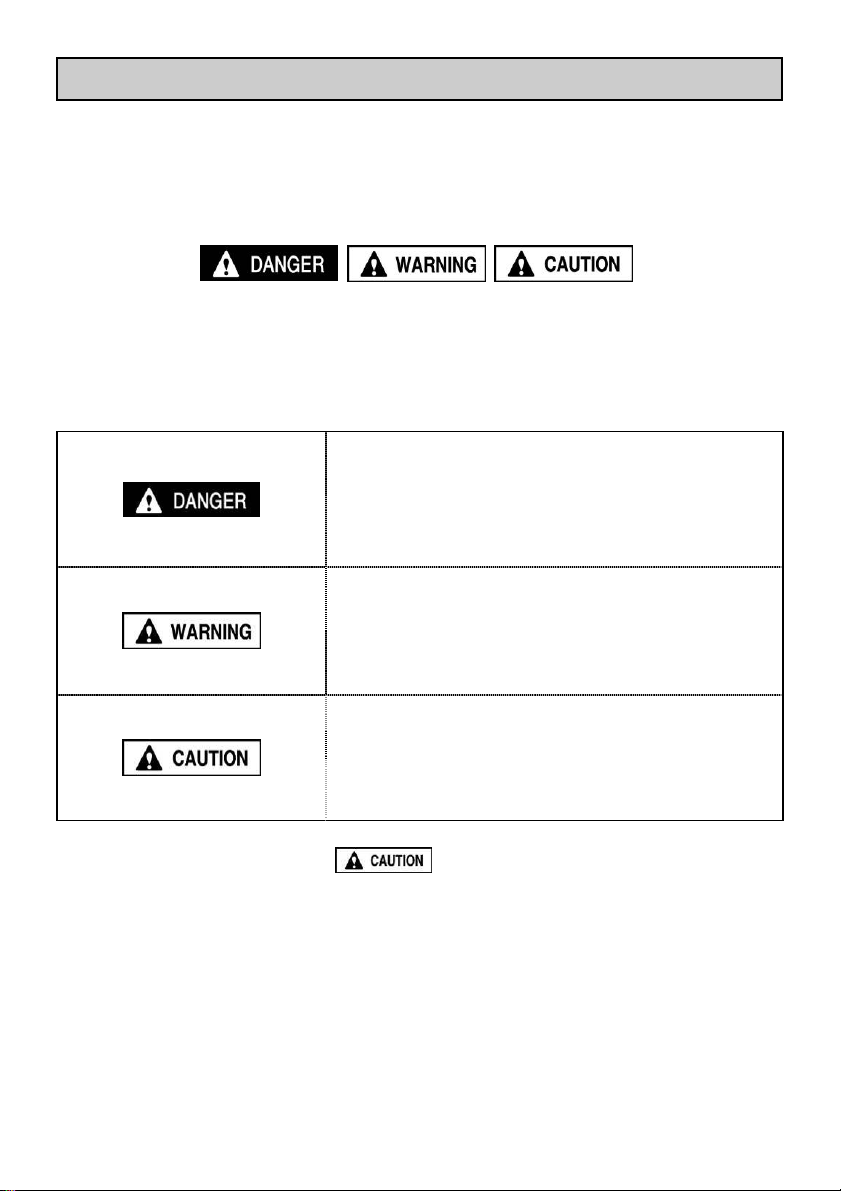
This manual specifies three (3) basic safety instructions:
■ Instructions are classified by degree of risk and described as follows:
Danger is used to indicate threatening
dangerous or unsafe practices which could
immediately result in severe personal injury
or death in the worst case.
Warning is used to indicate hazardous or
unsafe practices which could result in severe
personal injury or death in the worst
occasion.
Caution is used to indicate hazardous or
unsafe practices which could result in
Even if the risk is classified as , risk could become more serious result
depending on conditions. Make sure to follow all instructions when using.
personal injury or product or property
damage.
- 2 -
Page 4
TABLE OF CONTENTS
TABLE OF CONTENTS
TABLE OF CONTENTSTABLE OF CONTENTS
1.GENERAL SAFETY INSTRUCTIONS ・・・・・・ 4
2.APPLICATION ・・・・・・・・・・・・・・・・・・・・・・・・ 7
3. PRECAUTIONS FOR USE ・・・・・・・・・・・・ 7
4.PART NAME, EXTERNAL DIMENSIONS ・・・ 14
5.BEFORE USE ・・・・・・・・・・・・・・・・・・・・・・・ 15
6.CHANGING ACCESSORIES ・・・・・・・・・・・・・ 16
7.OPERATING PROCEDURE ・・・・・・・・・・・ 17
8.METHOD OF TORQUE SETTING ・・・・・・・ 19
9.EXPLANATION ON LED INDICATIONS ・・・・ 22
10.INSPECTION & MAINTENANCE ・・・・・・・・ 24
11.SPECIFICATIONS ・・・・・・・・・・・・・・・・・・ 25
12.AFTERSALES SERVICE ・・・・・・・・・・・ 26
- 3 -
Page 5
1.
1. GENERAL SAFETY INSTRUCTIONS
GENERAL SAFETY INSTRUCTIONS
1.1.
GENERAL SAFETY INSTRUCTIONS GENERAL SAFETY INSTRUCTIONS
WARNING
WARNING
WARNINGWARNING
When using electric tools, basic safety precautions, including the following,
should always be followed to reduce the risk of fire, electric shock and personal
injury.
Read all these instructions before operating this product and keep these
instructions.
SAVE
SAVE THESE
SAVESAVE
1)
1) Work area
Work area
1)1)
Work areaWork area
a) Keep work area clean and well lit. Cluttered and dark areas invite accidents.
b) Do not operate power tools in explosive atmospheres, such as in
the presence of flammable liquids, gases or dust. Power tools create
sparks which may ignite the dust of fumes.
c) Keep children and bystanders away while operating a power tool.
Distractions can cause you to lose control.
2)
2) Electrical safety
Electrical safety
2)2)
Electrical safetyElectrical safety
a) Power tool plugs must match the outlet. Never modify the plug in any way.
Do not use any adapter plugs with earthed (grounded) power tools.
Unmodified plugs and matching outlets will reduce risk of electric shock.
b) Avoid body contact with earthed or grounded surfaces such as pipes,
radiators, ranges and refrigerators. There is an increased risk of electric
shock if your body is earthed or grounded.
c) Do not expose power tools to rain or wet conditions. Water entering
a power tool will increase the risk of electric shock.
d) Do not abuse the cord. Never use the cord for carrying, pulling or
unplugging the power tool. Keep cord away from heat, oil, sharp
edges or moving parts. Damaged or entangled cords increase
the risk of electric shock.
THESE INSTRUCTIONS
THESETHESE
INSTRUCTIONS
INSTRUCTIONSINSTRUCTIONS
e) When operating a power tool outdoors, use an extension cord
- 4 -
Page 6

suitable for outdoor use. Use of a cord suitable for outdoor use reduces
the risk of electric shock.
3)
3) Personal safety
Personal safety
3)3)
Personal safetyPersonal safety
a) Stay alert, watch what you are doing and use common sense
when operating a power tool. Do not use a power tool while you are tired
or under the influence of drugs, alcohol or medication.
A moment of inattention while operating power tools may result in serious
personal injury.
b) Use safety equipment. Always wear eye protection. Safety equipment
such as dust mask, non-skid safety shoes, hard hat, or hearing
protection used for appropriate conditions will reduce personal injuries.
c) Avoid accidental starting. Ensure the switch is in the off position
before plugging in. Carrying power tools with your finger on the switch
or plugging in power tools that have the switch on invites accidents.
d) Remove any adjusting key or wrench before turning the power tool on.
A wrench or a key left attached to a rotating part of the power tool may
result in personal injury.
e) Do not overreach. Keep proper footing and balance at all times.
This enables better control of the power tool in unexpected situations.
f) Dress properly. Do not wear loose clothing or jewelry. Keep your hair,
clothing and gloves away from moving parts. Loose clothes, jewelry or
long hair can be caught in moving parts.
g) If devices are provided for the connection of dust extraction and collection
facilities, ensure these are connected and properly used. Use of these devices
can reduce dust related hazards.
4)
4) Power tool use and care
Power tool use and care
4)4)
Power tool use and carePower tool use and care
a) Do not force the power tool. Use the correct power tool for your
application. The correct power tool will do the job better and safer at the rate
for which it was designed.
b) Do not use the power tool if the switch does not turn it on and off.
Any power tool that cannot be controlled with the switch is dangerous and
must be repaired.
- 5 -
Page 7

c) Disconnect the plug from the power source before making any adjustments,
changing accessories, or storing power tools. Such preventive safety
measures reduce the risk of starting the power tool accidentally.
d) Store idle power tools out of the reach of children and do not allow persons
unfamiliar with the power tool or these instructions to operate the power tool.
Power tools are dangerous in the hands of untrained users.
e) Maintain power tools. Check for misalignment or binding of moving parts,
breakage of parts and any other condition that may affect the power tools
operation. If damaged, have the power tool repaired before use.
Many accidents are caused by poorly maintained power tools.
f) Keep cutting tools sharp and clean. Properly maintained cutting tools with
sharp cutting edges are less likely to bind and are easier to control.
g) Use the power tool, accessories and tool bits etc., in accordance with these
instructions and in the manner intended for the particular type of
power tool, taking into account the working conditions and the work to be
performed. Use of the power tool for operations different from intended
could result in a hazardous situation.
5)
5) Service
Service
5)5)
ServiceService
a) Have your power tool serviced by a qualified repair person using
only identical replacement parts. This will ensure that the safety of the
power tool is maintained.
.
- 6 -
Page 8
2. APPLICATION
2. APPLICATION
2. APPLICATION2. APPLICATION
■ TONE SIMPLE TORQON is an electric tool for tightening hexagonal bolts.
3333. PRECOUTIONS FOR USE
■ To prevent accidents, personal injury and etc, read and follow all instructions
● Beware of electric s
PRECOUTIONS FOR USE
PRECOUTIONS FOR USEPRECOUTIONS FOR USE
listed below.
DANGER
DANGER
DANGERDANGER
Beware of electric shock when operating at high place.
Beware of electric sBeware of electric s
○
Failure to follow this instruction may result in fall down accidents.
hock when operating at high place.
hock when operating at high place.hock when operating at high place.
- 7 -
Page 9
DANGER
DANGER
DANGERDANGER
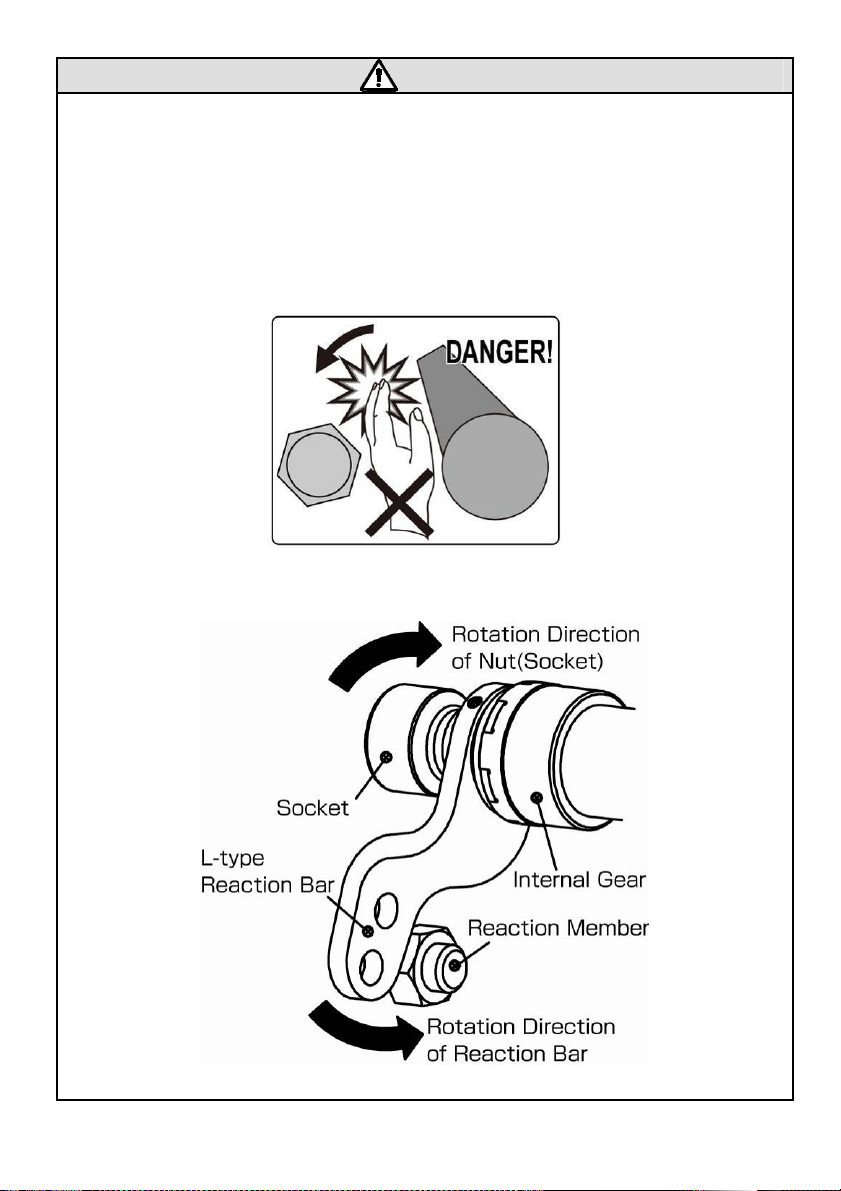
● Never put hand in the turning circle of reaction bar
Never put hand in the turning circle of reaction bar during
Never put hand in the turning circle of reaction barNever put hand in the turning circle of reaction bar
operation.
operation. The reaction bar rotates in the reverse direction.
operation.operation.
○ If the wrench is started, the reaction bar will turn in the direction opposite
to the rotation of nut. There is a risk that finger might be pinched by
reaction bar and reaction-member.
Negligence might cause accidents or injury.
The reaction bar rotates in the reverse direction.
The reaction bar rotates in the reverse direction.The reaction bar rotates in the reverse direction.
during
during during
- 8 -
Page 10
WARNING
WARNING
WARNINGWARNING
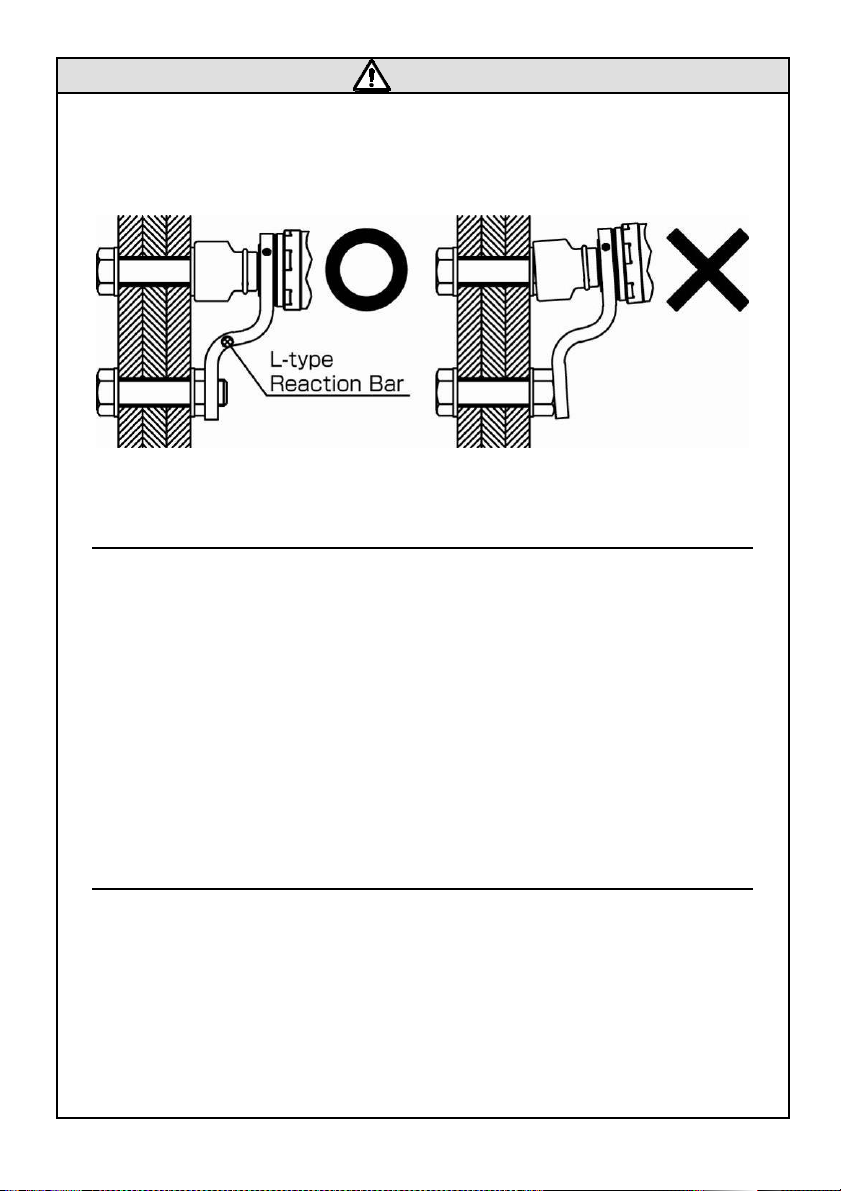
● Insert socket secure
Insert socket securely to the depth of nut
Insert socket secureInsert socket secure
○ If insufficient, it might damage socket and cause personal injury
ly to the depth of nut.
ly to the depth of nutly to the depth of nut
Negligence might cause accident, breakage or injury.
● Beware of electric
Beware of electric shock
Beware of electricBeware of electric
○ Never use wrench in damp or wet place or in rainy or snowy condition.
○ Might cause electric-shock, fire or electricity leakage.
shock....
shockshock
● Hold the wrench and grip of firmly when in operation.
Hold the wrench and grip of firmly when in operation.
Hold the wrench and grip of firmly when in operation.Hold the wrench and grip of firmly when in operation.
○ TN Wrenches stop automatically with huge reaction force just after
tightening bolts completely.
Failure to follow this instruction may result in personal injury.
● Electric cord must be regularly inspected.
Electric cord must be regularly inspected.
Electric cord must be regularly inspected.Electric cord must be regularly inspected.
○ If there is damage on electric cord, please ask your distributor for repair.
Failure to follow this instruction may result in electric shock or electric
leakage.
- 9 -
Page 11
WARNING
WARNING
WARNINGWARNING
● Never use the wrench around the place where gasoline, gas,
Never use the wrench around the place where gasoline, gas,
Never use the wrench around the place where gasoline, gas, Never use the wrench around the place where gasoline, gas,
thinner, benzene, etc., are stored.
thinner, benzene, etc., are stored.
thinner, benzene, etc., are stored.thinner, benzene, etc., are stored.
○ Do not use the wrench around flammable substances to avoid the
accidental fire caused by the spark out of the electric motor.
● Beware of fall
Beware of fall down accidents when working at a high place.
Beware of fallBeware of fall
○ Wear safety belt
○ Provide safety net or canvas as safe guarding against falling items.
○ Confirm that no one is underneath the working site before operation.
○ Stop operation when physically or mentally tired.
Failure to follow these instructions may result in fall down accidents.
● Avoid overloading.
Avoid overloading.
Avoid overloading.Avoid overloading.
○ Use the wrench and its accessories within the rated specifications.
Overloaded wrench and its accessories may result in malfunction of the
wrenches, accidents or personal injury.
down accidents when working at a high place.
down accidents when working at a high place. down accidents when working at a high place.
● Properly install sockets and reaction bars as described in this
Properly install sockets and reaction bars as described in this
Properly install sockets and reaction bars as described in this Properly install sockets and reaction bars as described in this
manual.
manual.
manual. manual.
○ Incomplete installation may result in accidents and personal injury. See
“CHANGING ACCESSORIES” on page 21.
● Avoid accidental Starting.
Avoid accidental Starting.
Avoid accidental Starting.Avoid accidental Starting.
○ Ensure that the switch is in the off-position before plugging into power
source.
○ Never carrying the wrench with your fingers on the switch when the plug
is connected to power source.
- 10 -
Page 12
WARNING
WARNING
WARNINGWARNING
● Disconnect the plug from the power source when:
Disconnect the plug from the power source when:
Disconnect the plug from the power source when: Disconnect the plug from the power source when:
○ Not in use.
○ Changing accessories.
○ Inspection and maintenance.
○ Or other danger is foreseen.
Failure to follow these instructions may result in accidental starting and
personal injury.
● Do not disassemble or modify the wrench.
Do not disassemble or modify the wrench.
Do not disassemble or modify the wrench. Do not disassemble or modify the wrench.
○ Disassembly or modification made by unauthorized personnel may result in
malfunction or personal injury.
○ Disassembly & Re-assembly work is permitted for the following
expendables: Sockets, O-Ring, Pin, Reaction Bar, Set Screws, and Carbon
Brushes.
● Store wrench in the metal case and keep it at the designated
Store wrench in the metal case and keep it at the designated
Store wrench in the metal case and keep it at the designated Store wrench in the metal case and keep it at the designated
place when not in use.
place when not in use.
place when not in use.place when not in use.
○ Store wrench in lockable dry location to keep any unauthorized personnel
away.
Failure to follow this instruction may result in malfunction or accidents.
● Immediately stop using the wrench and disconnect the plug when
Immediately stop using the wrench and disconnect the plug when
Immediately stop using the wrench and disconnect the plug when Immediately stop using the wrench and disconnect the plug when
unusual
unusual sound, vibration or smell is detect
unusualunusual
○ Contact your distributor immediately.
Failure to follow this instruction may result in serious injury.
- 11 -
sound, vibration or smell is detected.
sound, vibration or smell is detect sound, vibration or smell is detect
ed.
ed. ed.
Page 13
WARNING
WARNING
WARNINGWARNING
● Contact your distributor for repair service.
Contact your distributor for repair service.
Contact your distributor for repair service. Contact your distributor for repair service.
○ Repair work should only be carried out by a qualified serviceman.
○ Repair work done by an inexperienced person may cause accidents,
injury or malfunction.
● Check the following items before operation.
Check the following items before operation.
Check the following items before operation.Check the following items before operation.
○ Check for any deformation, crack or damage on the wrench body,
sockets, electric cord, plug and etc
○ Do not use the wrench if any problems are found on items listed above.
○ Make sure that socket assembly is correctly installed on the wrench.
○ Make sure that set screws are securely fastened. Loose installation may
result in accidents and personal injury.
● Use appropriate power source as indicated on the ratin
Use appropriate power source as indicated on the rating plate.
Use appropriate power source as indicated on the ratinUse appropriate power source as indicated on the ratin
Failure to follow this instruction may result in fire or burn accidents.
g plate.
g plate.g plate.
● Immediately check the wrench when it is dropped down or banged.
Immediately check the wrench when it is dropped down or banged.
Immediately check the wrench when it is dropped down or banged.Immediately check the wrench when it is dropped down or banged.
○ Check for deformation, crack, damage and other abnormality. Stop using
the wrench if any abnormality is found.
Continued use of fault wrench may result in accidents and personal injury.
- 12 -
Page 14
WARNING
WARNING
WARNINGWARNING
● Check if leakage breaker is available together with earth
Check if leakage breaker is available together with earth
Check if leakage breaker is available together with earth Check if leakage breaker is available together with earth
connection.
connection.
connection.connection.
○ Recommended leakage breaker: Rating capacity at 15mA and acting time
below 0.1sec.
Failure to follow this instruction may result in electric shock or fire.
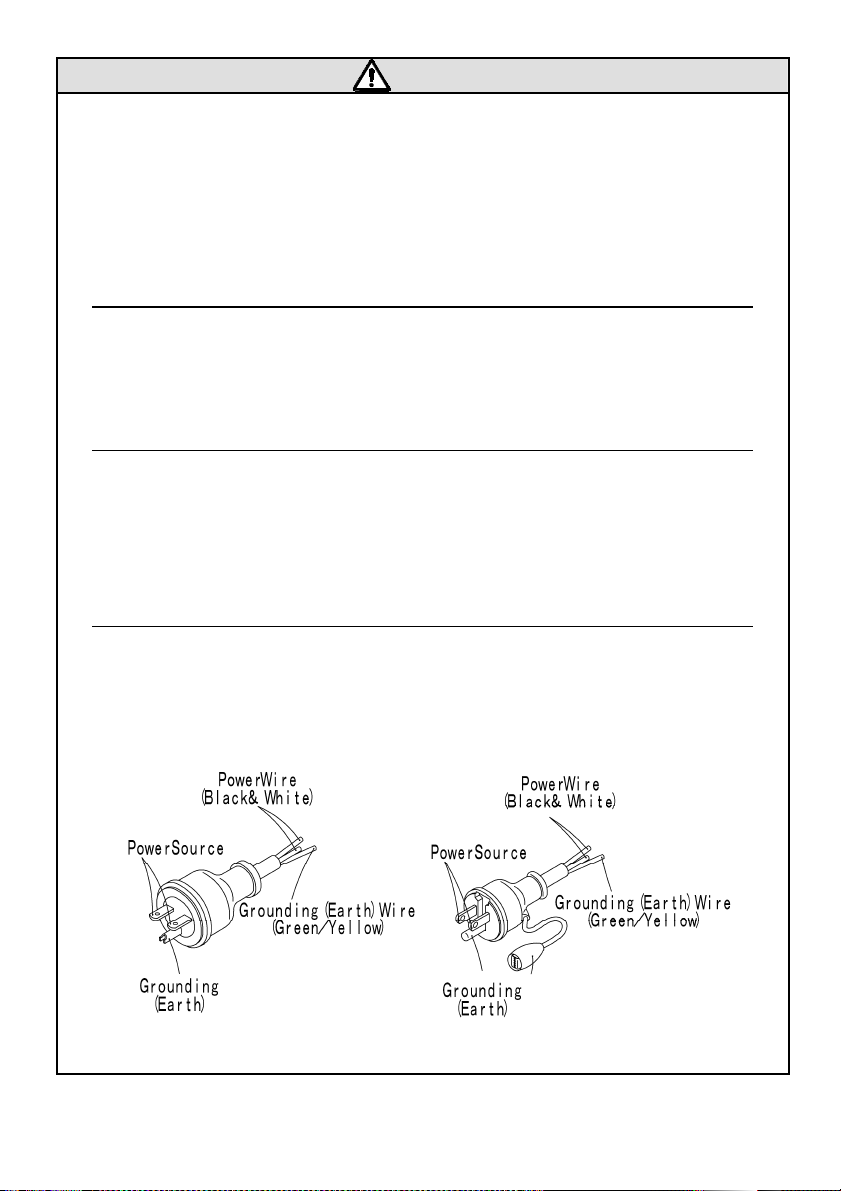
● Grounding required during operation.
Grounding required during operation.
Grounding required during operation.Grounding required during operation.
○ Failure to follow this instruction may result in increasing the risk of
electric shock or fire if the wrench breaks down during operation.
● Do not connect earth
Do not connect earth leads to gas pipe.
Do not connect earthDo not connect earth
○ Negligence might cause explosion or fire which might lead to serious
injury or death.
● If extension cable is used, apply those with earth and 3
If extension cable is used, apply those with earth and 3----P cable.
If extension cable is used, apply those with earth and 3If extension cable is used, apply those with earth and 3
leads to gas pipe.
leads to gas pipe. leads to gas pipe.
P cable.
P cable.P cable.
○ Use one of leads for earth and connect to earth on TN wrench side.
- 13 -
Page 15
CAUTION
CAUTION
CAUTIONCAUTION
● Follow the instructions below when using generators.
Follow the instructions below when using generators.
Follow the instructions below when using generators. Follow the instructions below when using generators.
○ Use 50-60Hz sinusoidal power supply without high harmonic wave.
Power supply including high harmonic wave may cause malfunction or
breakage of the wrench.
○ Use high capacity generators.
Almost 2kW (2kVA) is required per one wrench.
○ The operating voltage must remain within +/-10% of the rated voltage at
all times.
○ Do not use inverter generators.
Inverter generators may cause malfunction or breakage of the wrench.
(Inverter Generator: The engine rpm will speed up and slow down
automatically due to the wattage being pulled from the generator.)
○ Do not use welder generators.
○ Welder generators may cause malfunction or breakage of the control
base installed in Simple Torqon. Some welder generators produce
electrical noise which may make Simple Torqon out of control.
○ Do not use welders along with Simple Torqon.
Simple Torqon may be out of control due to extraordinary electrical
noise even if welders are connected to other generators that Simple
Torqon is not connected to.
- 14 -
Page 16
CAUTION
CAUTION
CAUTIONCAUTION
● Use commercial power supply.
Use commercial power supply.
Use commercial power supply.Use commercial power supply.
● Keep work area clean.
Keep work area clean.
Keep work area clean.Keep work area clean.
○ Cluttered areas and benches invite accidents.
● Keep children away.
Keep children away.
Keep children away.Keep children away.
○ Do not let children touch TN wrenches and electric cord.
○ All visitors should be kept away from work area.
● Secure work area.
Secure work area.
Secure work area.Secure work area.
○ Keep body stance balanced and firmed.
○ Never wrap the electric cord around something.
○ Keep work area well lit.
● Use
Use suitable model for each application.
suitable model for each application.
UseUse
suitable model for each application. suitable model for each application.
○ Do not use Simple Torqon beyond their rated specifications.
○ Do not use Simple Torqon for purpose not intended.
● Dress properly.
Dress properly.
Dress properly.Dress properly.
○ Always wear gloves and non-skid footwear when operating outdoor.
○ Always wear safety helmet.
- 15 -
Page 17
CAUTION
CAUTION
CAUTIONCAUTION
● Use genuine accessories or attachments manufactured by Maeda
Use genuine accessories or attachments manufactured by Maeda
Use genuine accessories or attachments manufactured by Maeda Use genuine accessories or attachments manufactured by Maeda
Metal Industries, Ltd.
Metal Industries, Ltd.
Metal Industries, Ltd.Metal Industries, Ltd.
● Do not abuse the electric co
Do not abuse the electric cord.
Do not abuse the electric coDo not abuse the electric co
○ Never use the electric cord for carrying, pulling, or unplugging the power.
○ Keep the electric cord away from heat, oil, sharp edges or moving parts.
● Keep electric motor well ventilated.
Keep electric motor well ventilated.
Keep electric motor well ventilated. Keep electric motor well ventilated.
○ Do not put any foreign materials into the vent.
○ Do not block exhaust vent.
rd.
rd.rd.
● Maintain wrench.
Maintain wrench.
Maintain wrench.Maintain wrench.
○ Keep wrench handle clean, dry and free of oil or grease.
● Do not connect multiple plugs to a single outlet by using multiple
Do not connect multiple plugs to a single outlet by using multiple
Do not connect multiple plugs to a single outlet by using multiple Do not connect multiple plugs to a single outlet by using multiple
outlet adaptors.
outlet adaptors.
outlet adaptors.outlet adaptors.
○ Over current may cause fire, accidents or malfunction.
● Provide leakage breaker as a
Provide leakage breaker as a shock guard for each wrench.
Provide leakage breaker as aProvide leakage breaker as a
shock guard for each wrench.
shock guard for each wrench. shock guard for each wrench.
- 16 -
Page 18
CAUTION
CAUTION
CAUTIONCAUTION
● When using an extension cord, make sure that voltage remains
When using an extension cord, make sure that voltage remains
When using an extension cord, make sure that voltage remains When using an extension cord, make sure that voltage remains
within +/
within +/---- 10% of the rated voltage at all times.
within +/within +/
10% of the rated voltage at all times.
10% of the rated voltage at all times. 10% of the rated voltage at all times.
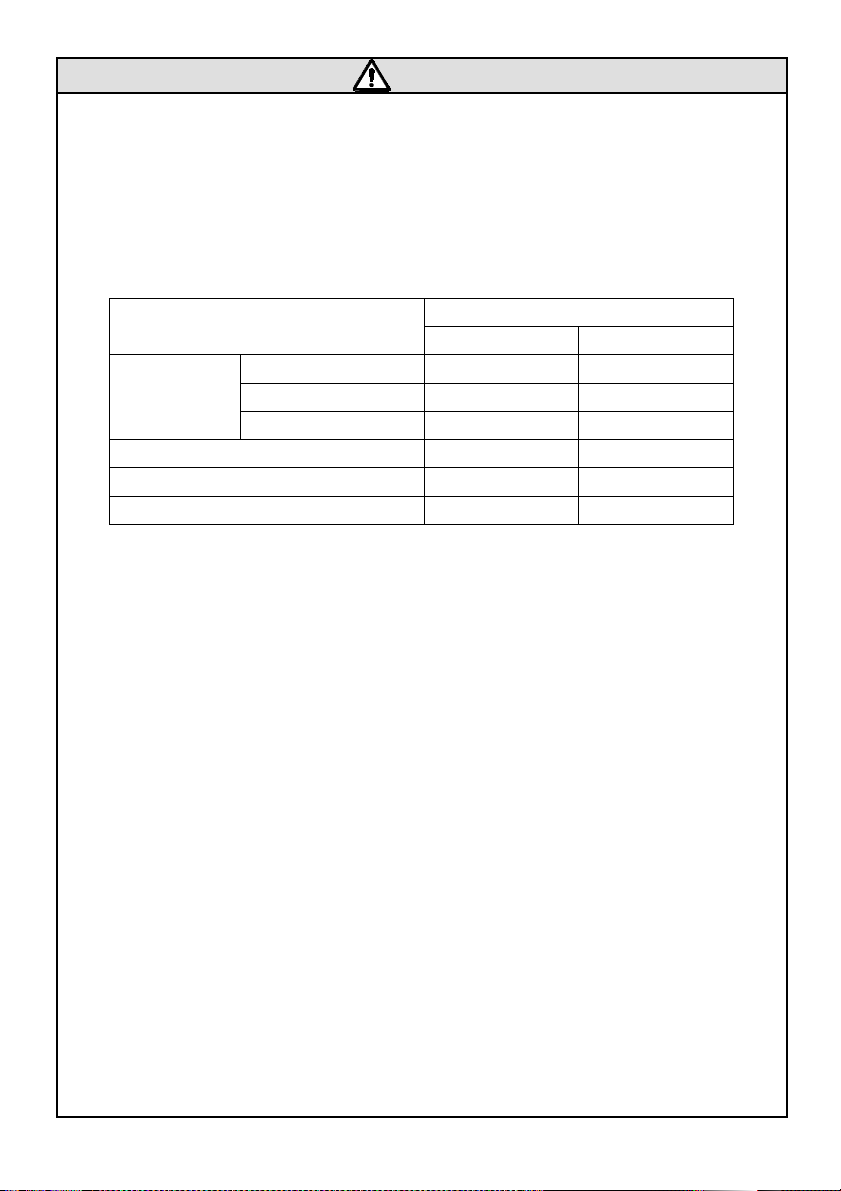
● When applying extension cord, select shorter extension units than
When applying extension cord, select shorter extension units than
When applying extension cord, select shorter extension units than When applying extension cord, select shorter extension units than
specified below depending on the cross se
specified below depending on the cross section.
specified below depending on the cross sespecified below depending on the cross se
cable cross section
1.25 mm2 10 m 20
H07RN-F
○ Using extension cord more than Maximum Length may result in
malfunction or breakdown due to performance drop of the wrench.
● Observe local
Observe local laws and rules concerning noise level.
Observe local Observe local
2.0 mm2 15 m 30
3.5 mm2 30 m 60
AWG 14 50ft(15m) 100ft(30m)
AWG 12 80ft(25m) 160ft(50m)
AWG 10 130ft(40m) 260ft(80m)
laws and rules concerning noise level.
laws and rules concerning noise level. laws and rules concerning noise level.
110-120 V 110-120 V
ction.
ction.ction.
Max Length Nominal conducting
- 17 -
Page 19
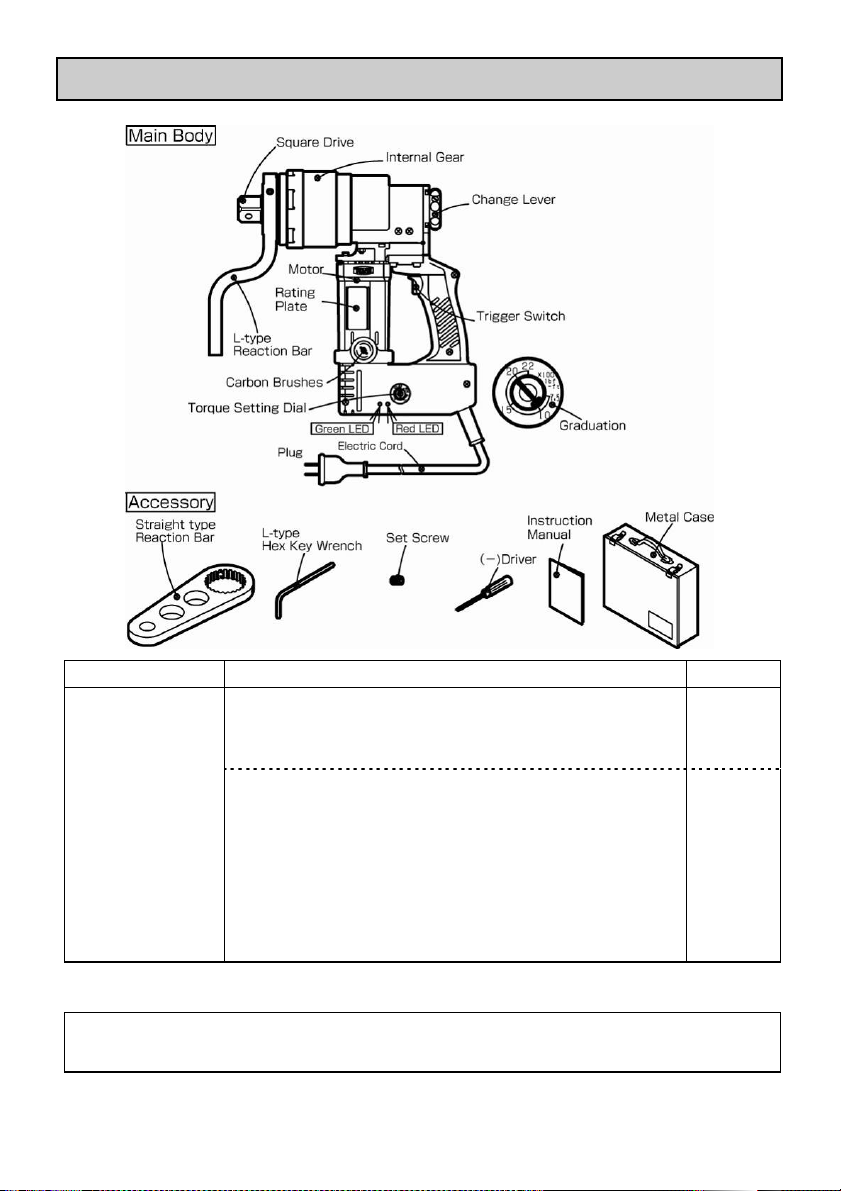
4444....PARTS
PARTS NAME, EXTERNAL DIMENSIONS
PARTSPARTS
NAME, EXTERNAL DIMENSIONS
NAME, EXTERNAL DIMENSIONS NAME, EXTERNAL DIMENSIONS
MODEL ACCESSORIES QTY
○L-type Reaction Bar * 1
○Set Screw * 2
* Mounted on Main Body
○Straight type Reaction Bar 1
STC50AE
STC50TE
○Set Screw (for Spare) 2
○L-type Hex Key Wrench 1
○(-)Driver 1
○Metal Case 1
○Instruction Manual 1
○Connector(220-230V only) 1
Optional Accessories
○Impact Socket 12AD-Series
○Lifting Device
● Contact your distributor for these optional accessories above.
- 18 -
Page 20
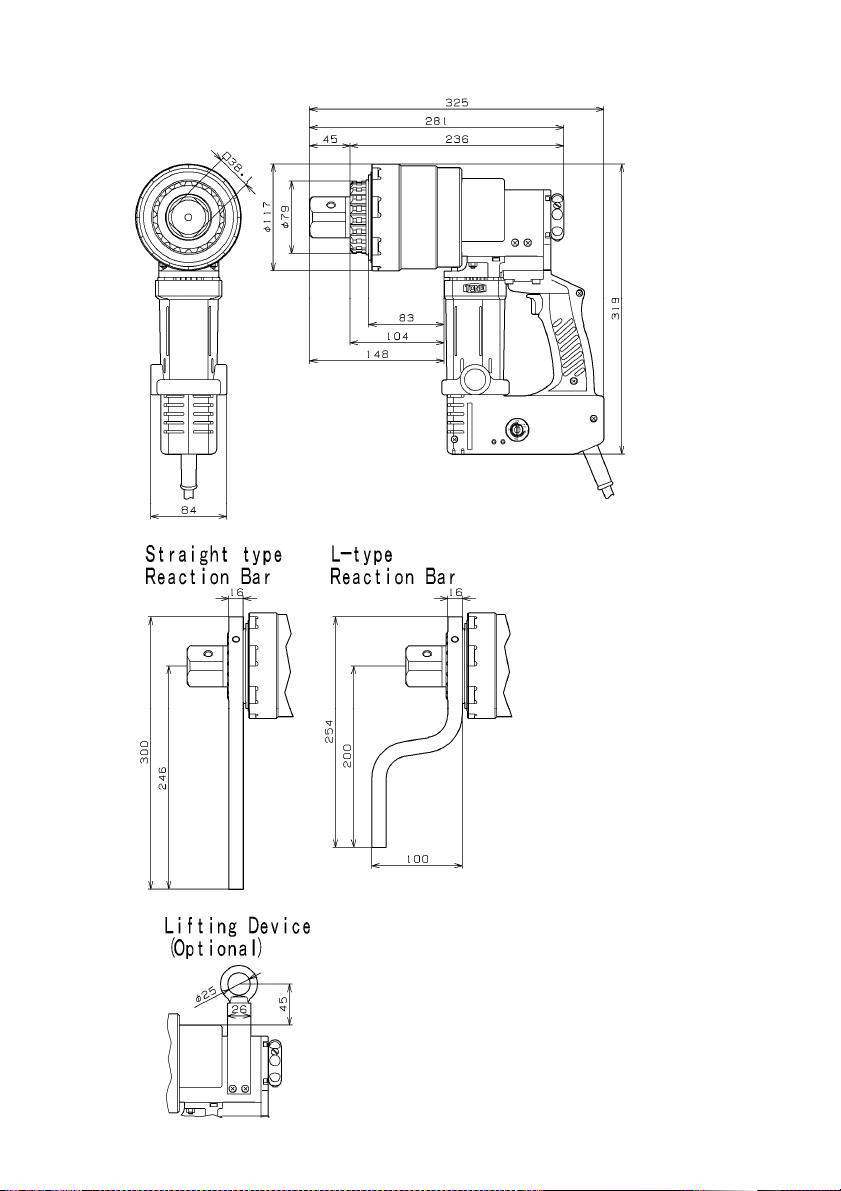
External Dimensions
- 19 -
Page 21
5555....BEFORE USE
BEFORE USE
BEFORE USEBEFORE USE
WARNING
WARNING
WARNINGWARNING
● Check followings before
Check followings before connecting
Check followings before Check followings before
○ Accidental starting invites personal injury.
1. Check for any deformation, crack or damage on wrench body, socket, electric
cord, etc. Do not use wrench if any problem is found on items listed above.
Make sure that set screws are securely fastened.
Loose installation may result in accidents and personal injury.
See “CHANGING ACCESSORIES” on page 21.
2. Make sure to use commercial power supply.
Use appropriate power source as indicated on the rating plate.
3. Choose proper impact socket suitable for tightened bolt.
connecting the plug into power source.
connectingconnecting
the plug into power source.
the plug into power source. the plug into power source.
4. Make sure that impact socket is correctly installed on the wrench.
Loose installation may result in accidents and personal injury.
See “CHANGING ACCESSORIES” on page 21.
CAUTION
CAUTION
CAUTIONCAUTION
● Implement exercise procedure before operation.
Implement exercise procedure before operation.
Implement exercise procedure before operation.Implement exercise procedure before operation.
○ Exercise procedure with no-load should be carried out at least 5
minutes before operation.
- 20 -
Page 22
6. CHANGING ACCESSORIES
6. CHANGING ACCESSORIES
6. CHANGING ACCESSORIES6. CHANGING ACCESSORIES
WARNING
WARNING
WARNINGWARNING
● Do not connect the plug to power source when changing
Do not connect the plug to power source when changing
Do not connect the plug to power source when changing Do not connect the plug to power source when changing
accessories.
accessories.
accessories. accessories.
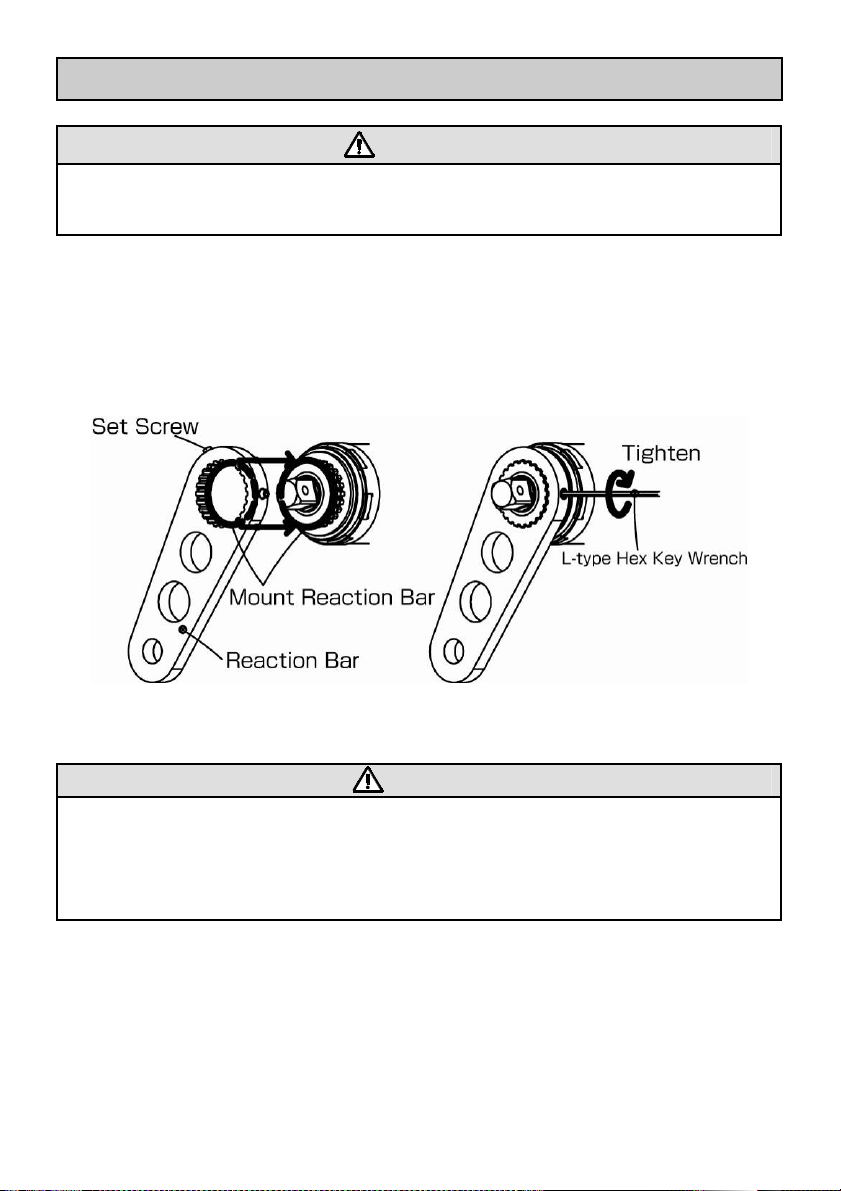
1.CHANGING REACTION BARS
○ Detach the impact socket before changing reaction bars.
① Unscrew set screws at two position on the reaction bar and mount the
reaction bar on the wrench.
② Fasten the set screws only after gap is completely removed.
Confirm if the reaction bar is mounted securely by pulling the reaction bar.
WARNING
WARNING
WARNINGWARNING
● Do not modify reaction bars.
Do not modify reaction bars.
Do not modify reaction bars.Do not modify reaction bars.
○ Failure to follow this instruction may result in lack of tightening torque,
breakage of bolts/nuts, malfunction and personal injury.
■ Contact your distributor for customized reaction bars.
- 21 -
Page 23
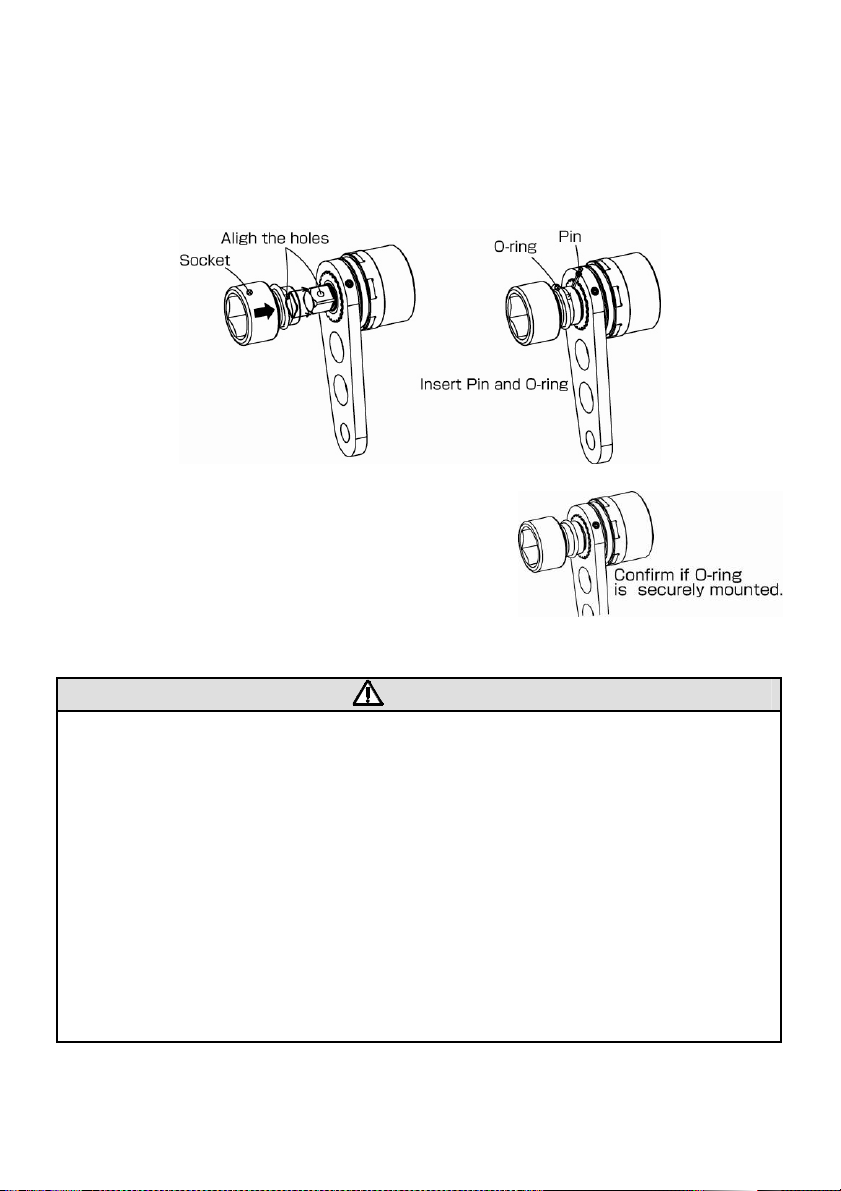
2.CHANGING IMPACT SOCKETS
① Confirm that the reaction bar is securely mounted.
② Prepare a adequate impact socket equipping 25.4mm female square drive.
③ To mount the impact socket, align the hole in the impact socket and the square
drive and insert pin in the hole, then mount the O-ring over the socket.
Confirm if both the O-ring and the impact socket
are securely mounted.
WARNING
WARNING
WARNINGWARNING
● Confirm if there is no crack, wear or deformation
Confirm if there is no crack, wear or deformation on the impact
Confirm if there is no crack, wear or deformationConfirm if there is no crack, wear or deformation
socket
socket.
socketsocket
shattered.
shattered.
shattered.shattered.
● Confirm if there is no deformation
Confirm if there is no deformation with O
Confirm if there is no deformationConfirm if there is no deformation
with pin.
with pin. If somethin
with pin. with pin.
new one.
new one. Personal injury m
new one.new one.
down.
down.
down.down.
● Confirm if
Confirm if the impact
Confirm if Confirm if
socket.
socket.
socket.socket.
also cause injury or breakage.
also cause injury or breakage.
also cause injury or breakage.also cause injury or breakage.
. Personal injury
Personal injury might
. .
Personal injury Personal injury
If something wrong with pin or O
If somethinIf somethin
Personal injury might
Personal injury m Personal injury m
the impact socket is securely mounted by pulling the
the impact the impact
Inadequate mounti
Inadequate mounting might reduce socket
Inadequate mountiInadequate mounti
g wrong with pin or O----ring, replace them
g wrong with pin or Og wrong with pin or O
- 22 -
on the impact
on the impact on the impact
might be invited
be invited if
mightmight
be invited be invited
with O----ring and bend or crack
with O with O
ight be invited if the socket falls
be invited if the socket falls
ightight
be invited if the socket falls be invited if the socket falls
socket is securely mounted by pulling the
socket is securely mounted by pulling the socket is securely mounted by pulling the
ng might reduce socket’’’’s durability,
ng might reduce socketng might reduce socket
if the
the socket is
if if
socket is
the the
socket is socket is
ring and bend or crack
ring and bend or crack ring and bend or crack
ring, replace them to
ring, replace themring, replace them
s durability,
s durability, s durability,
to
to to
Page 24
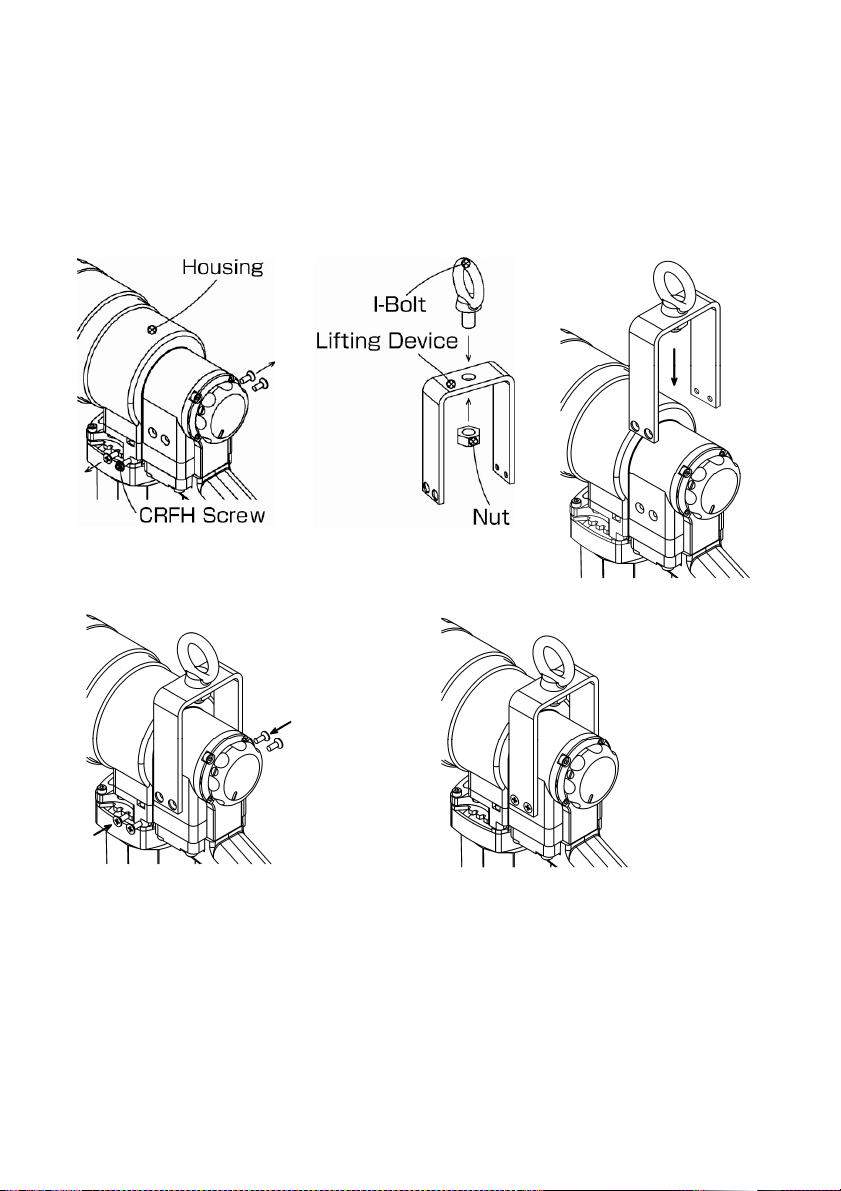
3.Mounting Lifting Device (Optional)
① Unscrew CRFH Screw (4pcs) on the Housing.
② Install I-bolt in the lifting device and securely tighten by nut.
③ Set the lifting device over the Housing.
④ Securely tighten CRFH Screw (4pcs) again.
①
②
③
④
Mounting Lifting Device is done.
- 23 -
Page 25
7777....OPERATING PROCEDURE
OPERATING PROCEDURE
OPERATING PROCEDUREOPERATING PROCEDURE
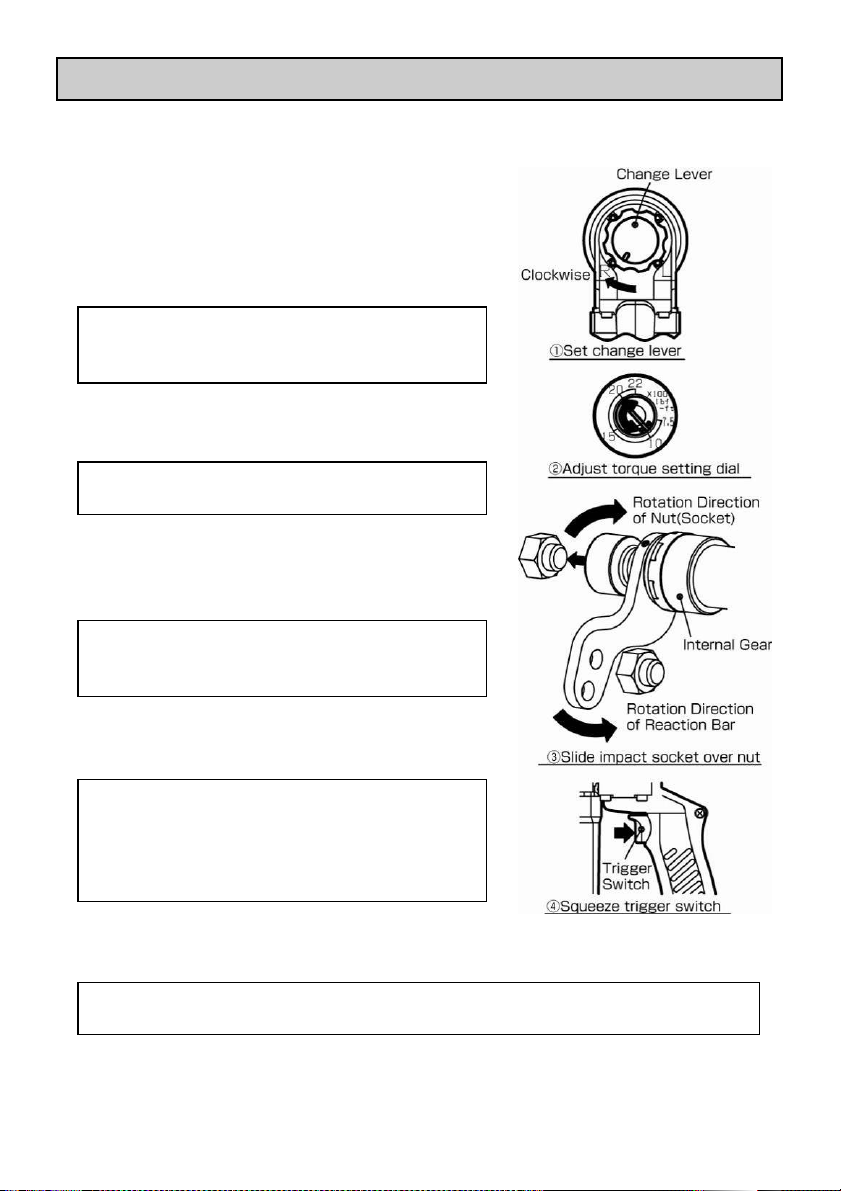
1.Tightening Operation
① Set the change lever to “R” (clockwise)
position.
② Adjust torque setting dial to target torque
with attached (-) driver.
※ Graduations are just a guidance.
When minute torque control is necessary, confirm
torque with torque wrench.
③ Slide impact socket over nut completely
by turning internal gear.
※ When the wrench starts, reaction bar turns in the
direction opposite to the rotation of nut.
④ Squeeze trigger switch to start.
Reaction bar stops at adjacent material
and tightening starts.
※ GREEN LED keeps going ON and OFF after
beginning of tightening operation until automatic
shut-off.
⑤ When the target torque is reached,
the wrench shuts off automatically.
※ After normal-end, GREEN LED remains ON and
the wrench remains READY for next operation
※ Do not release the trigger switch during
tightening operation. The target torque is not
reached.
※ In case that RED LED goes ON and OFF during tightening operation ④&⑤ above, any
troubles happen on the wrench. (See Page 29)
- 24 -
Page 26
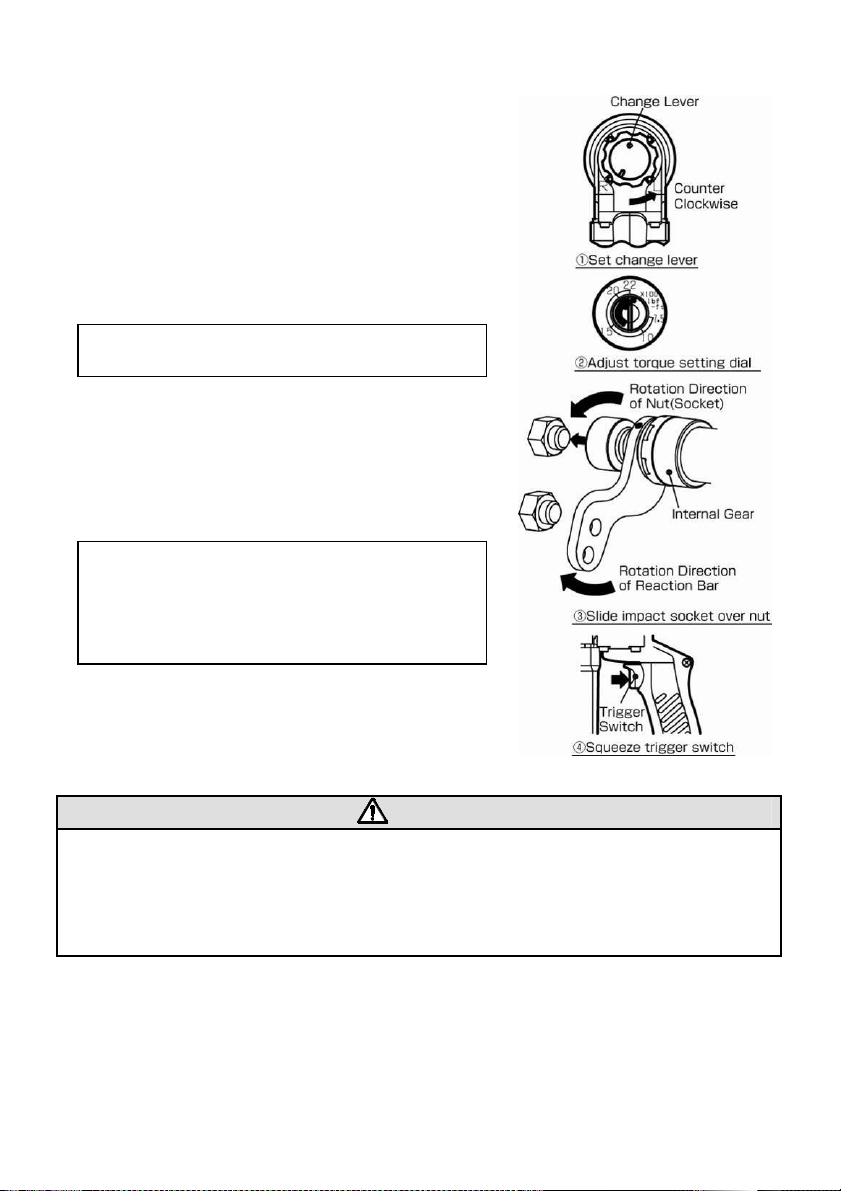
2.Loosening Operation
① Set the change lever to “L”
(counterclockwise) position.
② Adjust torque setting dial to the
maximum torque with attached (-) driver.
③ Insert impact socket into nut completely
by turning internal gear.
※ When the wrench starts, reaction bar turns in the
direction opposite to the rotation of nut.
④ Squeeze trigger switch to start.
Reaction bar stops at adjacent material
and loosening starts.
When loosening operation is done, release
the trigger switch to stop the wrench.
※ In case that the nut is not loosened, stop the
operation immediately since the nut is tightened
by higher torque than that of the wrench.
Failure to follow this instruction may result in
malfunction.
● Never put hand in the turning circle of reaction bar
Never put hand in the turning circle of reaction bar during
Never put hand in the turning circle of reaction barNever put hand in the turning circle of reaction bar
operation.
operation. The reaction bar rotates in the reverse direction.
operation.operation.
Negligence might cause accidents or injury.
- 25 -
The reaction bar rotates in the reverse direction.
The reaction bar rotates in the reverse direction.The reaction bar rotates in the reverse direction.
DANGER
DANGER
DANGERDANGER
during
during during
Page 27
● Confirm
Confirm the po
ConfirmConfirm
tightening or loosening operation.
tightening or loosening operation.
tightening or loosening operation.tightening or loosening operation.
● Set
Set target torque
Set Set
motor is stopping.
motor is stopping.
motor is stopping. motor is stopping.
the position of the change lever
the po the po
target torque as well as
target torque target torque
sition of the change lever before
sition of the change leversition of the change lever
as well as the
as well asas well as
WARNING
WARNING
WARNINGWARNING
before starting
before before
the change lever while electric
change lever while electric
the the
change lever while electric change lever while electric
starting
starting starting
Failure to follow this instruction may result in accidents or injury.
● In order to prevent malfunction as well as over torque, never
In order to prevent malfunction as well as over torque, never
In order to prevent malfunction as well as over torque, never In order to prevent malfunction as well as over torque, never
tightening the same bolts/nuts twice.
tightening the same bolts/nuts twice.
tightening the same bolts/nuts twice.tightening the same bolts/nuts twice.
CAUTION
CAUTION
CAUTIONCAUTION
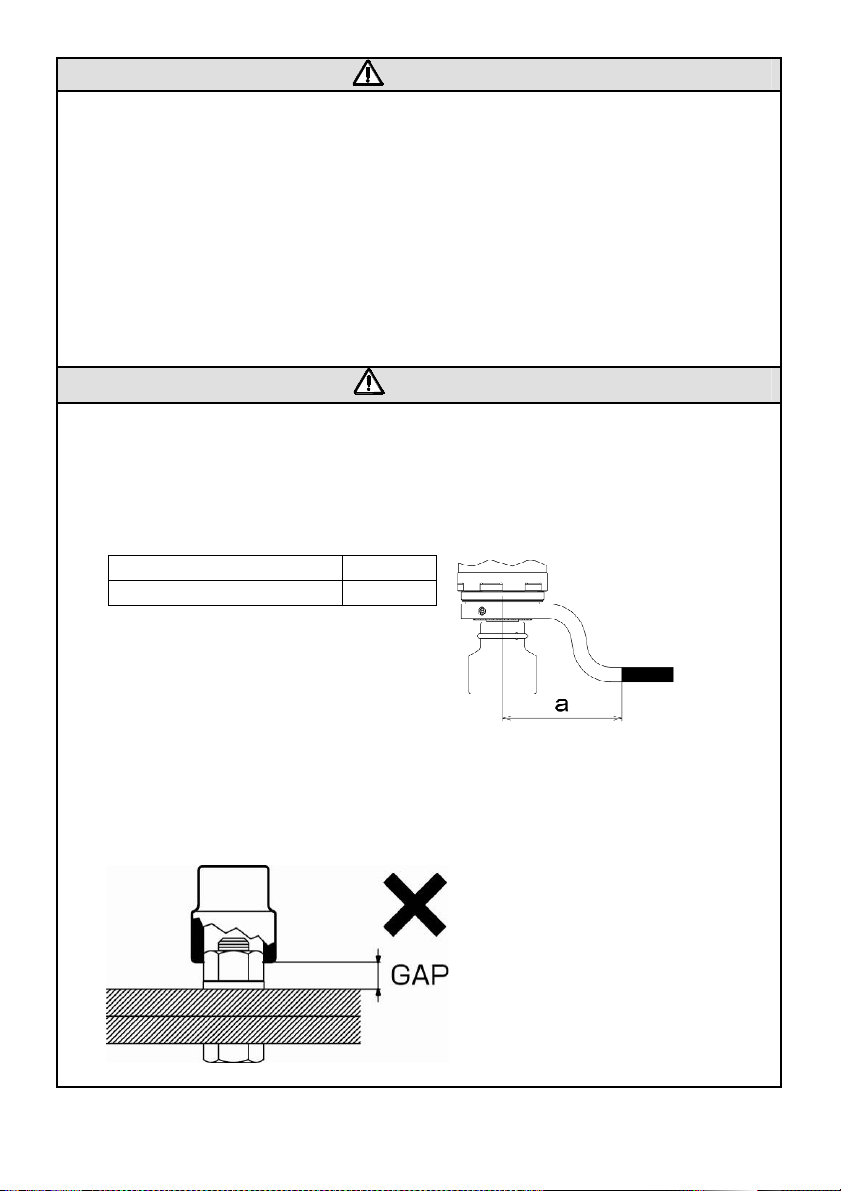
● Reaction force must be taken by area beyond
Reaction force must be taken by area beyond ““““aaaa”””” dimension when
Reaction force must be taken by area beyond Reaction force must be taken by area beyond
LLLL----type reaction bar is used. See table below.
type reaction bar is used. See table below.
type reaction bar is used. See table below.type reaction bar is used. See table below.
Failure to follow this instruction may result in malfunction and insufficient
performance.
MODEL a(mm)
STC50AE / STC50TE 135
● There should be no gap between
There should be no gap between the impact socket and the grip.
There should be no gap between There should be no gap between
The gap invites accidents or breakage of sockets or the wrench body.
the impact socket and the grip.
the impact socket and the grip.the impact socket and the grip.
dimension when
dimension when dimension when
- 26 -
Page 28
8888....METHOD of TORQUE SETTING
METHOD of TORQUE SETTING
METHOD of TORQUE SETTINGMETHOD of TORQUE SETTING
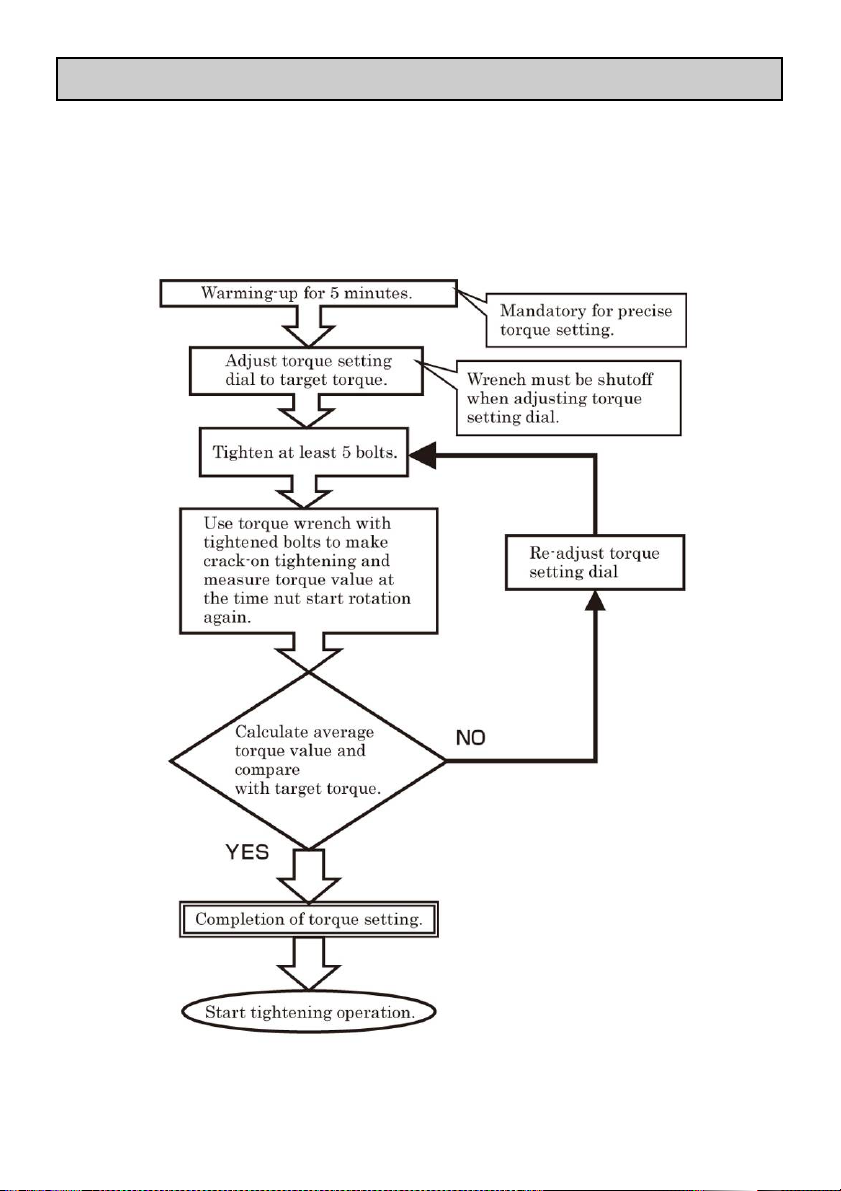
1.Adjust tightening torque
○ Graduations of the torque setting dial are just a guidance. Use dial type
torque wrench to adjust torque setting dial if minute torque control is
necessary.
- 27 -
Page 29

○ Tightening Torque may differ by conditions.
Torque setting has to be done daily before operation and when tightening
conditions change.
○ Make sure the tightening direction of SIMPLE TORQON when tightening
reverse thread bolts/nuts.
○ In order to prevent malfunction as well as over torque, never tightening the
same bolts/nuts twice.
2.Tendencies that tightening torque may differ
Tightening torque varies depending on tightening conditions.
Tendency shown as below.
Factors at Tightening Conditions Possibility
- When connection is soft (gasket, rubber, glass & etc in
between the steels)
- When bolt length is extremely long,
- When bolt grades are under 8.8 or 10.9
- When friction coefficient of the bolt is high
- When bolt or washer is stripped during tightening
- When voltage is higher than rated voltage of the wrench
- When connection is hard
- When bolt diameter is large
- When bolt length is short
- When water or oil is adhered on the bolt
- When tightened bolt is tightened again (over tightened)
- When voltage is lower than rated voltage of the wrench
Tightening
Torque
Becomes Low
Tightening
Torque
becomes High
- When gaps between the connection is large
- When Tightening bolts/nuts from tilt position
- 28 -
Result in
imprecise
tightening
Page 30
9999.... E
EXPLANATION ON LED INDICATION
XPLANATION ON LED INDICATION
E E
XPLANATION ON LED INDICATIONXPLANATION ON LED INDICATION
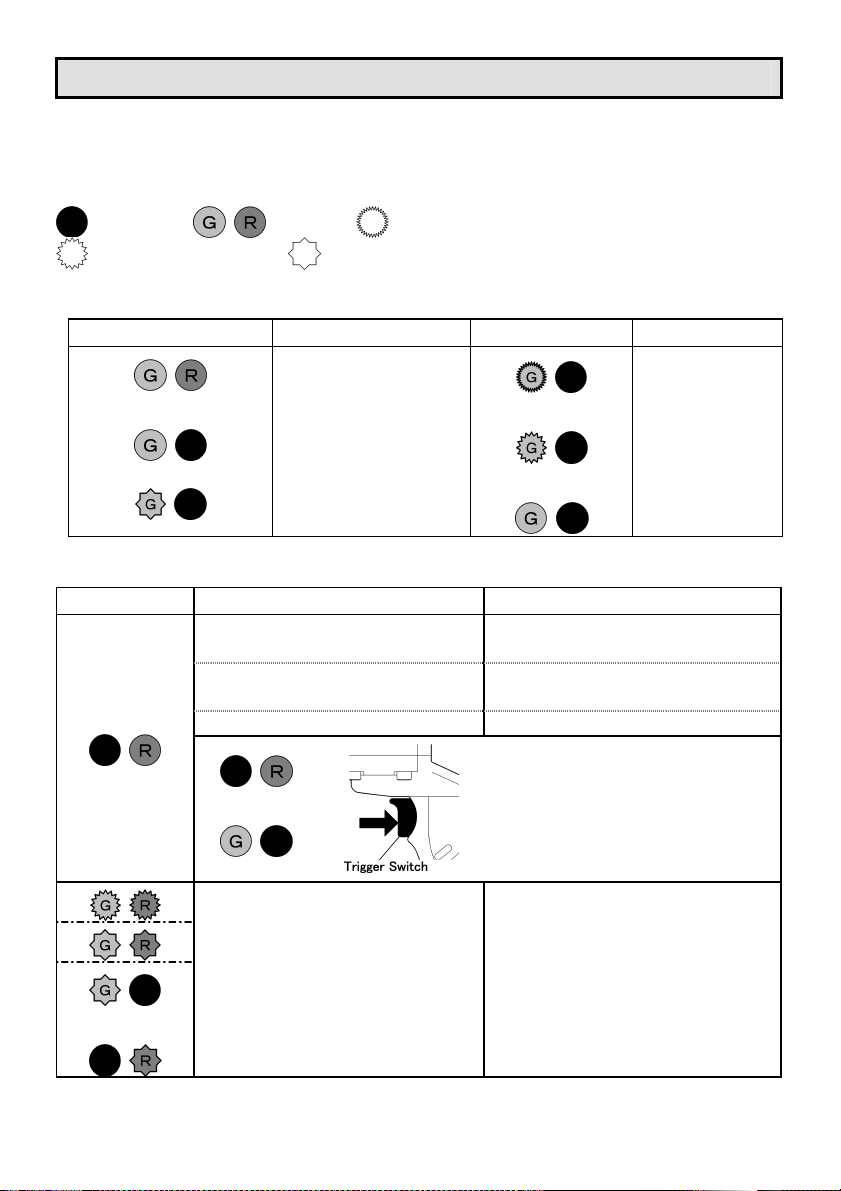
■ The SIMPLE TORQON is provided with GREEN and RED LED that indicate
whether the tightening operation has been successfully completed or not, or
any trouble has occurred or not.
: Lights Out
: On & Off (2 times/sec)
: Light On
: Slow On & Off (1 times/sec)
: Quick On & Off (5 times/sec)
Normal Condition
Indication LED Meaning Indication LED Meaning
After 1 sec.
After 1 sec.
After 1 sec.After 1 sec.
↓↓↓↓
80% Mode
100% Mode
Power ON
↓
“Ready””
↓↓↓↓
Start Tightening
Start Tightening
Start TighteningStart Tightening
↓↓↓↓
Complete Tightening
Complete Tightening
Complete TighteningComplete Tightening
No-load
operation
↓
Tightening
operation
↓
Tightening
Finished
Trouble Detected
Indication LED Meaning Remedy
・ Tightening is not completed
correctly.
・ Release the trigger switch before
tightening is completed.
・ Tighten the same bolt twice. ・ Never tighten the same bolt twice.
↓↓↓↓
Ready
Ready
ReadyReady
Reset
Reset
ResetReset
・ Check the bolt and nut to be
tightened already.
・ Do not release the trigger switch
during tightening operation.
<Method of Reset>
* To reset the wrench, squeeze
the trigger switch once.
And then, the wrench is now ready.
Alternation
Alternation
Alternation Alternation
↕↕↕↕
Troubles happen on the wrench.
- 29 -
Need to repair.
Contact your distributor.
Page 31
10
10....INSPECTION & MAINTENANCE
INSPECTION & MAINTENANCE
1010
INSPECTION & MAINTENANCEINSPECTION & MAINTENANCE
WARNING
WARNING
WARNINGWARNING
● Disconnect plug from power source before inspection and
Disconnect plug from power source before inspection and
Disconnect plug from power source before inspection and Disconnect plug from power source before inspection and
maintenance.
maintenance.
maintenance. maintenance.
○ Accidental starting invites serious injury.
① Clean dust and debris from impact socket and square drive periodically.
② Use only a damp cloth to clean your SIMPLE TORQON and impact sockets
since certain cleaning agents and solvents are harmful to those parts. Some
of these include: benzene, thinner, gasoline and etc.
③ Never put solvents into the exhaust vent.
④ Store SIMPLE TORQON in the metal case after operation and keep it dry.
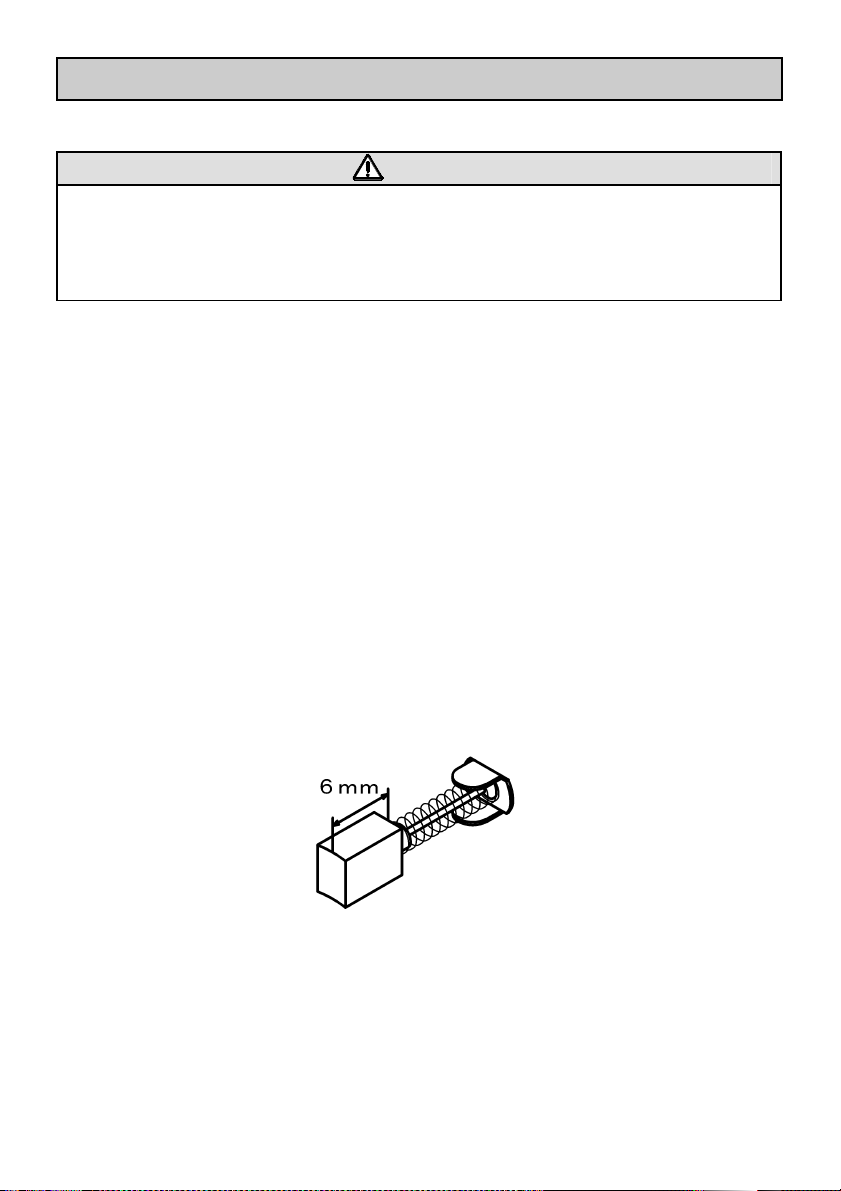
⑤ Carbon-brush must be regularly inspected and replaced with the new
genuine carbon brush when brush length become less than 6mm.
*Carbon brushes are placed in two positions.
*Indicate the wrench model when carbon-brushes are needed because carbon-brush
differs from model to model.
- 30 -
Page 32
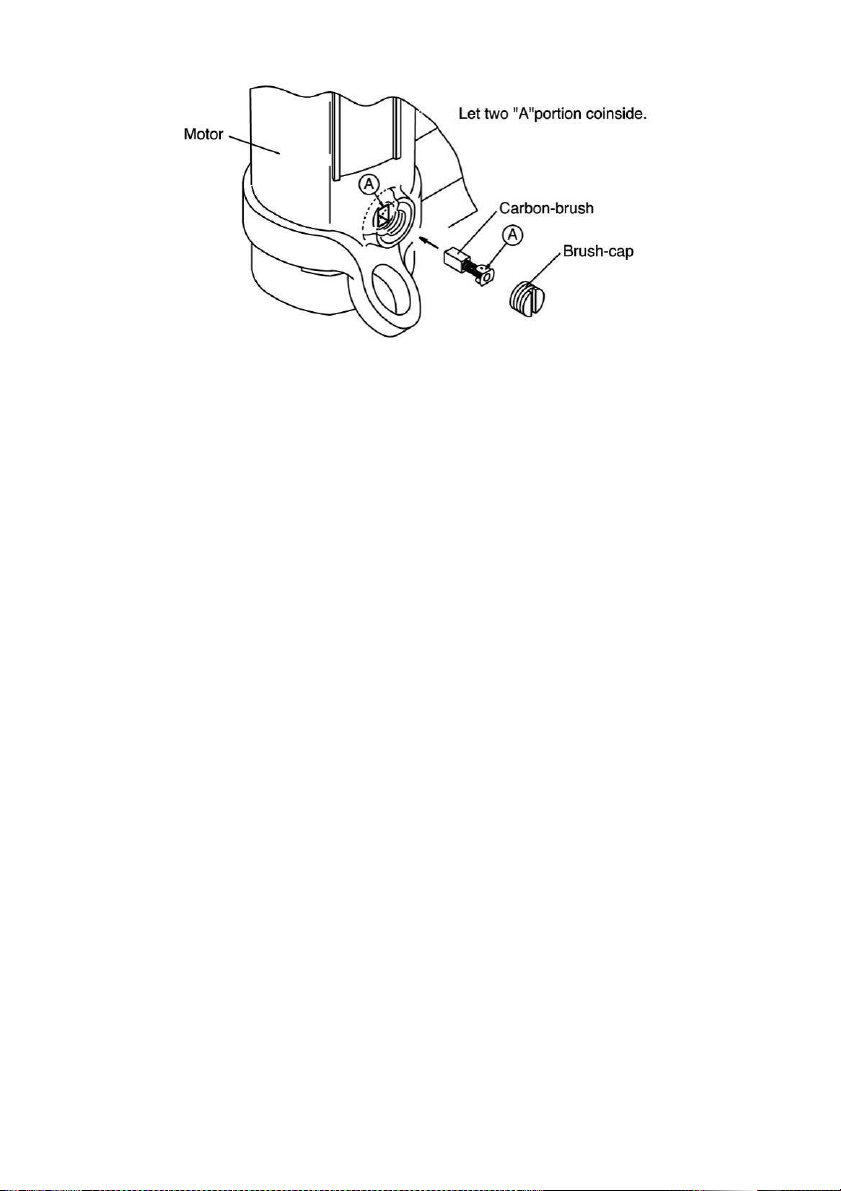
⑥ Replace carbon brush as shown in the following figure.
⑦ Overhaul must be carried out every 6 months or 30,000 tightening,
whichever comes first. Contact your distributor for overhaul.
- 31 -
Page 33
11
11....SPECIFICATIONS
SPECIFICATIONS
1111
SPECIFICATIONSSPECIFICATIONS
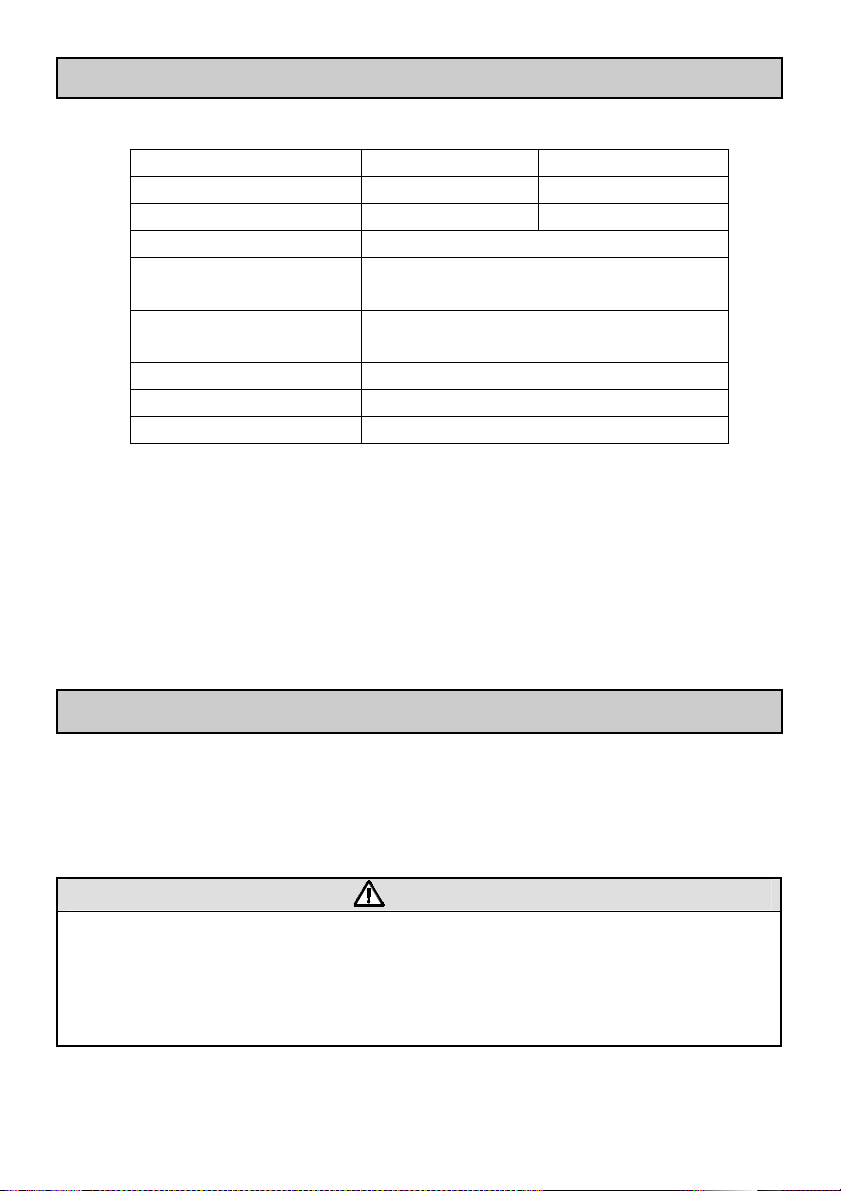
Model STC50AE STC50TE
Voltage(Single Phase) 115V 220V
Max Current (A) 12A 6A
Max Power (W) 1350W
Rated Max Torque
(lbf.ft)
Controllable Torque
Range
Repeated Accuracy ±5%※
No-load Speed 2.0min-1(rpm)
Main Body Weight (kg) 12.5kg
※+/- 5% of repeated accuracy is obtained with adequate operating procedure
on page 24~26.
●Commutator motor is used on the wrench.
●Control base is used on the wrench.
●Weight excludes socket and cord.
5000 N・m (3700lbf.ft)
2000~5000 N・m (1500~3700lbf.ft)
12
12....AFTERSALES SERVICE
AFTERSALES SERVICE
1212
AFTERSALES SERVICEAFTERSALES SERVICE
■ Contact your distributor for available services.
■ Provide model, serial number, date of purchase and details of failure when
contacting your distributor.
CAUTION
CAUTION
CAUTIONCAUTION
● Do not use SIMPLE TORQON when malfunction, deficiency in
Do not use SIMPLE TORQON when malfunction, deficiency in
Do not use SIMPLE TORQON when malfunction, deficiency in Do not use SIMPLE TORQON when malfunction, deficiency in
wrenches
wrenches’’’’ performance, personal injury or property loss is
wrencheswrenches
foreseen.
foreseen.
foreseen.foreseen.
If possible, prepare backup wrenches beforehand.
- 32 -
performance, personal injury or property loss is
performance, personal injury or property loss is performance, personal injury or property loss is
Page 34

MEMO
- 33 -
Page 35

MEMO
- 34 -
Page 36

IMKA050
 Loading...