

Page 1

CLASSIC
Page 2

CLASSIC
WARRANTY TABLE
PHONE/E-MAIL
THE DEALER’S STAMP
AND SIGNITURE
OWNER’S NAME
ADDRESS
MODEL/TIP
VIN NO.
YEAR OF PRODUCTION
DATE OF DELIVERY
DEALER’S NAME
DEALER’S ADDRESS
All claims made within the warranty preiod should be submitted to an
authorised service workshop, along with the warranty itself.
Page 3

DATE
SERVICE
DATE
SERVICE
DATE
SERVICE
DATE
SERVICE
DATE
SERVICE
KM
months
1.000
2
3.000
6
10.000
12
15.000
18
20.000
24
RECORD OF RECOMENDED SERVICE INSPECTIONS (The cost of service inspection wll be borne to custumer)
Page 4

1
TOMOS
USER’S MANUAL
CLASSIC
Page 5

2
CONTENTS
Warnings 3
Riding Safety Tips 3
Technical Specification 4-5
Technical Description 6-8
Vehicle operation 9
Fuel 9
Engine Starting 9
Riding 11
Engine Running-In 11
Maintenance 12
Maintenance Operations 12
Lubricants 12
Gearbox Oil change 12
Cleaning 13
Fuel System Cleaning 13
Exhaust System Cleaning 14
Vehicle Cleaning 15
Checks and Adjustments 15
Engine Oil Level Check 15
Bowden Adjustment 15
Transmission Chain Adjustment 16
Bolt and Nut Tightness 16
Maintenance Schedule 17
Troubleshooting 18
Fuel System Troubles 18
Ignition System Troubles 18
Troubles Causing Reduced Engine Power 18
Gearbox Troubles 19
Tomos warranty condidions 20
Page 6

3
WARNINGS
Prior to operating the vehicle, carefully read this User’s Manual in order
to get acquainted with its operational characteristics and safe and
proper operation.
1. Fuel is extremely flammable and explosive; therefore it requires
special handling precautions:
- Stop the engine prior to refilling the tank;
- Fill the tank outdoors; never approach the tank with a lit cigarette,
open flame or sparks; and
- Thoroughly wipe off any spilled fuel
2. The engine should not be run in an enclosed space or nearby
entrances to lower-level areas (cellars etc.). Engine exhaust gases are
toxic and denser than normal atmospheric air.
3. When starting or running the engine, never touch the ignition coil,
high voltage cable, ignition spark plug cap or other parts of the
electrical system.
4. The vehicle is equipped with a catalysts exhaust system causing high
temperatures. When the engine is running and for some time after
it has stopped do not touch its hot parts: the cylinder, the cylinder
head, exhaust silencer. Do not touch the brake components too.
5. When the engine is running beware of the engine’s rotating parts.
No modification of the vehicle, stripping-off any parts or installing
non-original spare parts is permitted. The vehicle owner is specifically
warned that any modification to the exhaust system can only result in
the vehicle’s deteriorated operation, without any positive effects on
engine performance and causes higher air pollution.
RIDING SAFETY TIPS
Riding a twowheeler is simple, yet it requires some skills and experience
which can only be accumulated progressively. Prior to each ride,
observe the following rules:
1. Check the proper functioning of all vehicle assemblies.
2. When riding, wear light-colored, preferably light-reflective clothes;
ride with your lights on; avoid riding in other drivers “blind spots” to
prevent danger of other drivers “overlooking” you.
3. Abide by all traffic regulations; above all, adjust your riding speed to
the road conditions and your skill level.
4. Do not hand the vehicle over to any inexperience riders.
5. Prior to changing lanes, always check that this can be done safely,
and signal your intention in time Be careful when riding trough road
crossings or passing other vehicles (including parked vehicles)..
6. Always ride with your helmet on, be properly dressed and wear
boots.
7. Pay due the attention to what is going on in front of you and behind
you (rear mirror) and try to anticipate events
8. The braking affects the loading on each wheel: the front braking
increases; whereas braking with the rear brake only increases the
braking distance while also reducing vehicle stability; hence use the
rear brake with caution.
Page 7

4
TECHNICAL SPECIFICATIONS
Model Classic
Variants A34B – 45km/h
A34C – 30km/h
A34D – 25km/h
A34E – 20km/h
Engine Type single-cylinder, two-stroke
air-cooled
Displacement 49 cm
3
Cylinder bore diameter 38 mm
Piston stroke 43 mm
VARIANT A34B:
Compression ratio 10 : 1
Engine power 1,7 kW at 4800 min-1
Torque 3,6 Nm at 3500 min-1
Maximum speed 45 km/h
Fuel consumption 1,8/100km
VARIANT A34C:
Compression ratio 6 : 1
Engine power 1,0 kW at 3500 min-1
Torque 3,1 Nm at 2500 min-1
Maximum speed 30 km/h
Fuel consumption 2,2/100km
VARIANT A34D:
Compression ratio 6 : 1
Engine power 1,0 kW at 3500 min-1
Torque 3,1 Nm at 2500 min-1
Maximum speed 25 km/h
Fuel consumption 2,5/100km
VARIANT A34E:
Compression ratio 6 : 1
Engine power 1,0 kW at 3500 min-1
Torque 3,1 Nm at 2500 min-1
Maximum speed 20 km/h
Fuel consumption 2,8/100km
Starter Kick-starter or pedals
Page 8

5
Fuel Tank capacity 4 l (incl.0,5 l reserve)
Engine oil reservoir 1 l
Suspension Front forks travel 70 mm
Rear shock absorber travel 35 mm
Wheels Front tire dimensions 2 ¼ -16
Rear tire dimensions 2 ¼ -16
Front tire inflation pressure 2,2 bar
Rear tire inflation pressure 2,2 bar
Electrical Magneto 12V 80W
system Spark advance preset
Spark plug-A24B Bosna F75, BOSCH-W7AC
Spark plug-A24C, A24D,
A24E Bosna F75, Champion-L86
Spark plug electrode clear. 0,8 mm
Headlight 12V 25W
Tail light 12V 5W
Stop light 12V 15W
Speedometer illumination 12V 2W
Oil level signal light 12V 1,5W
Dimensions Wheelbase 1.080 mm
And weights
Total length of vehicle 1.640 mm
Vehicle mass (empty fuel tank) 60 +3 kg
Maximum permitted total weight 160 kg
Page 9

6
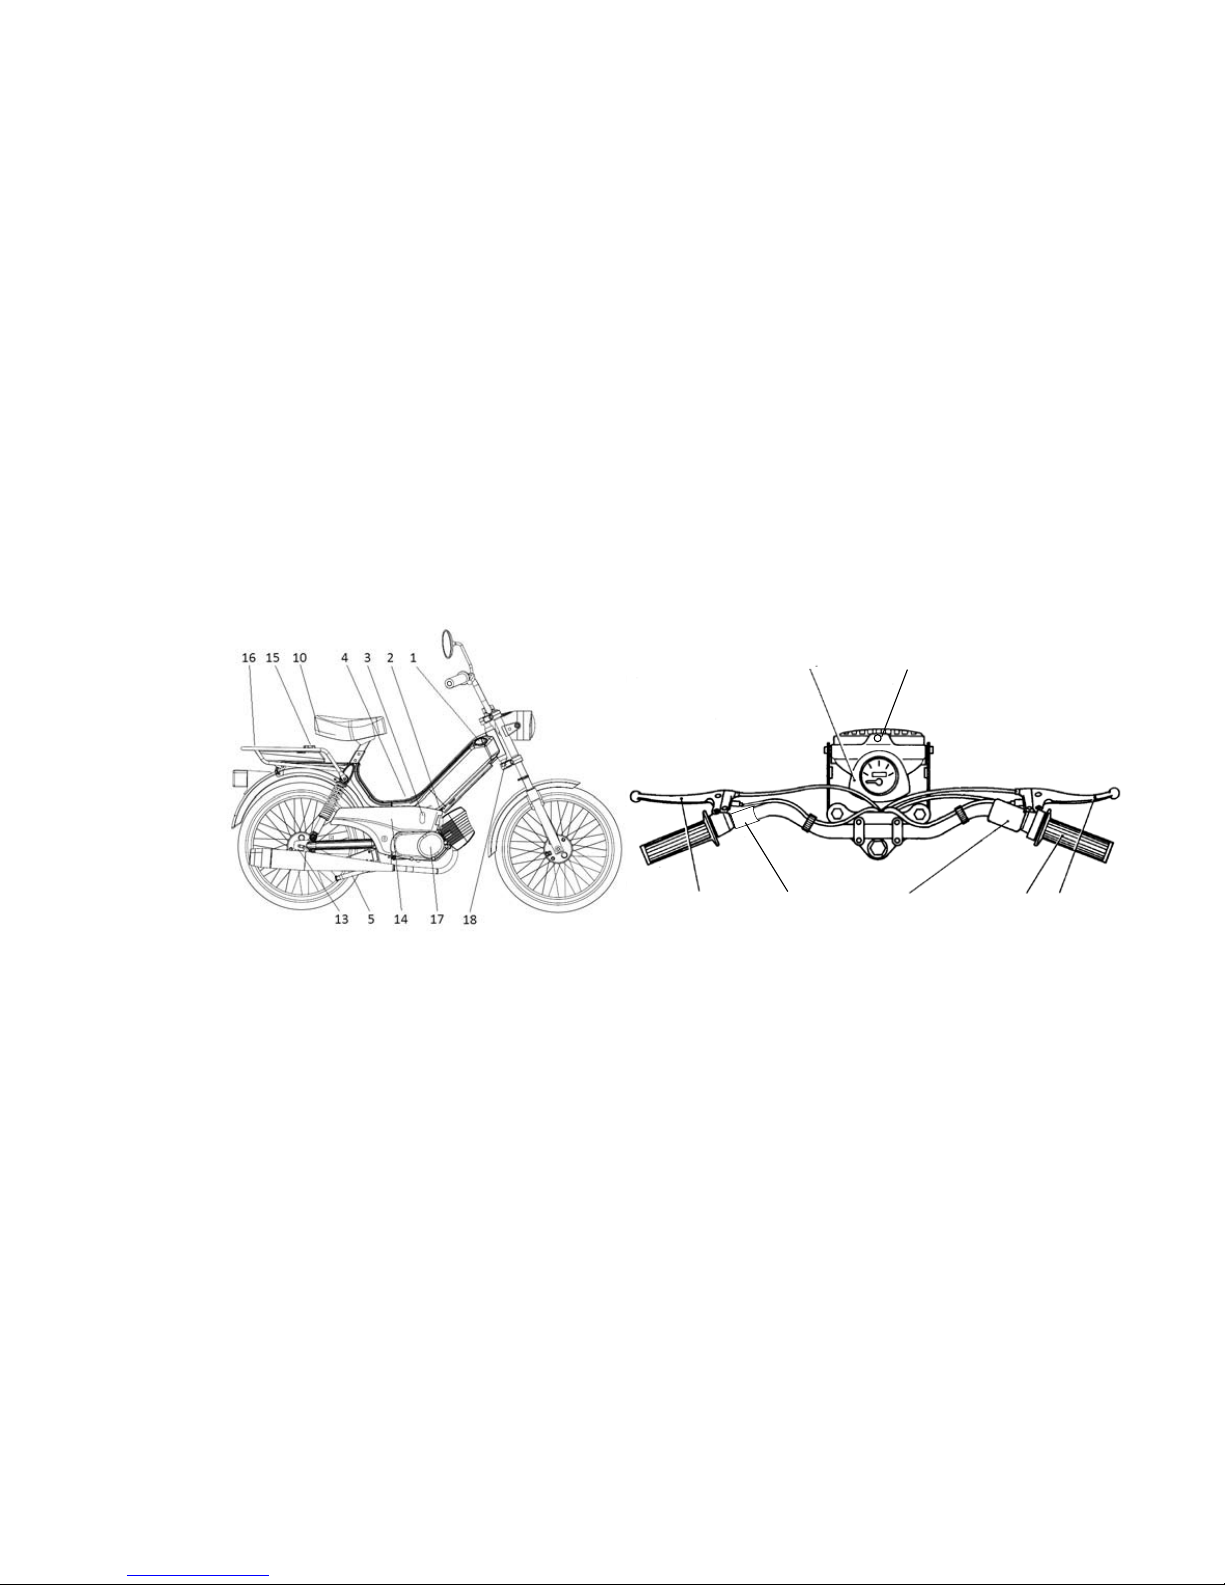
TECHNICAL DESCRIPTION
1. Fuel tank cap
2. Fuel petcock
3. Carburetor, choke
4. Kick starter lever or pedals
5. Prop stand
6. Rear brake lever
7. Front brake lever Electric start pushbutton (version)
8. Throttle lever
9. Horn switch
9a. STOP switch
10. Tool bag
11. Speedometer
12. Oil level signal light
13. Chain tension adjuster
14. Air filter
15. Engine oil reservoir, cap
16. Luggage carrier
17. Oil pump
18. Steering lock
Page 10
7
Fig. 1 Fig. 2
11
6
9 9a
8
7
12
Page 11
8
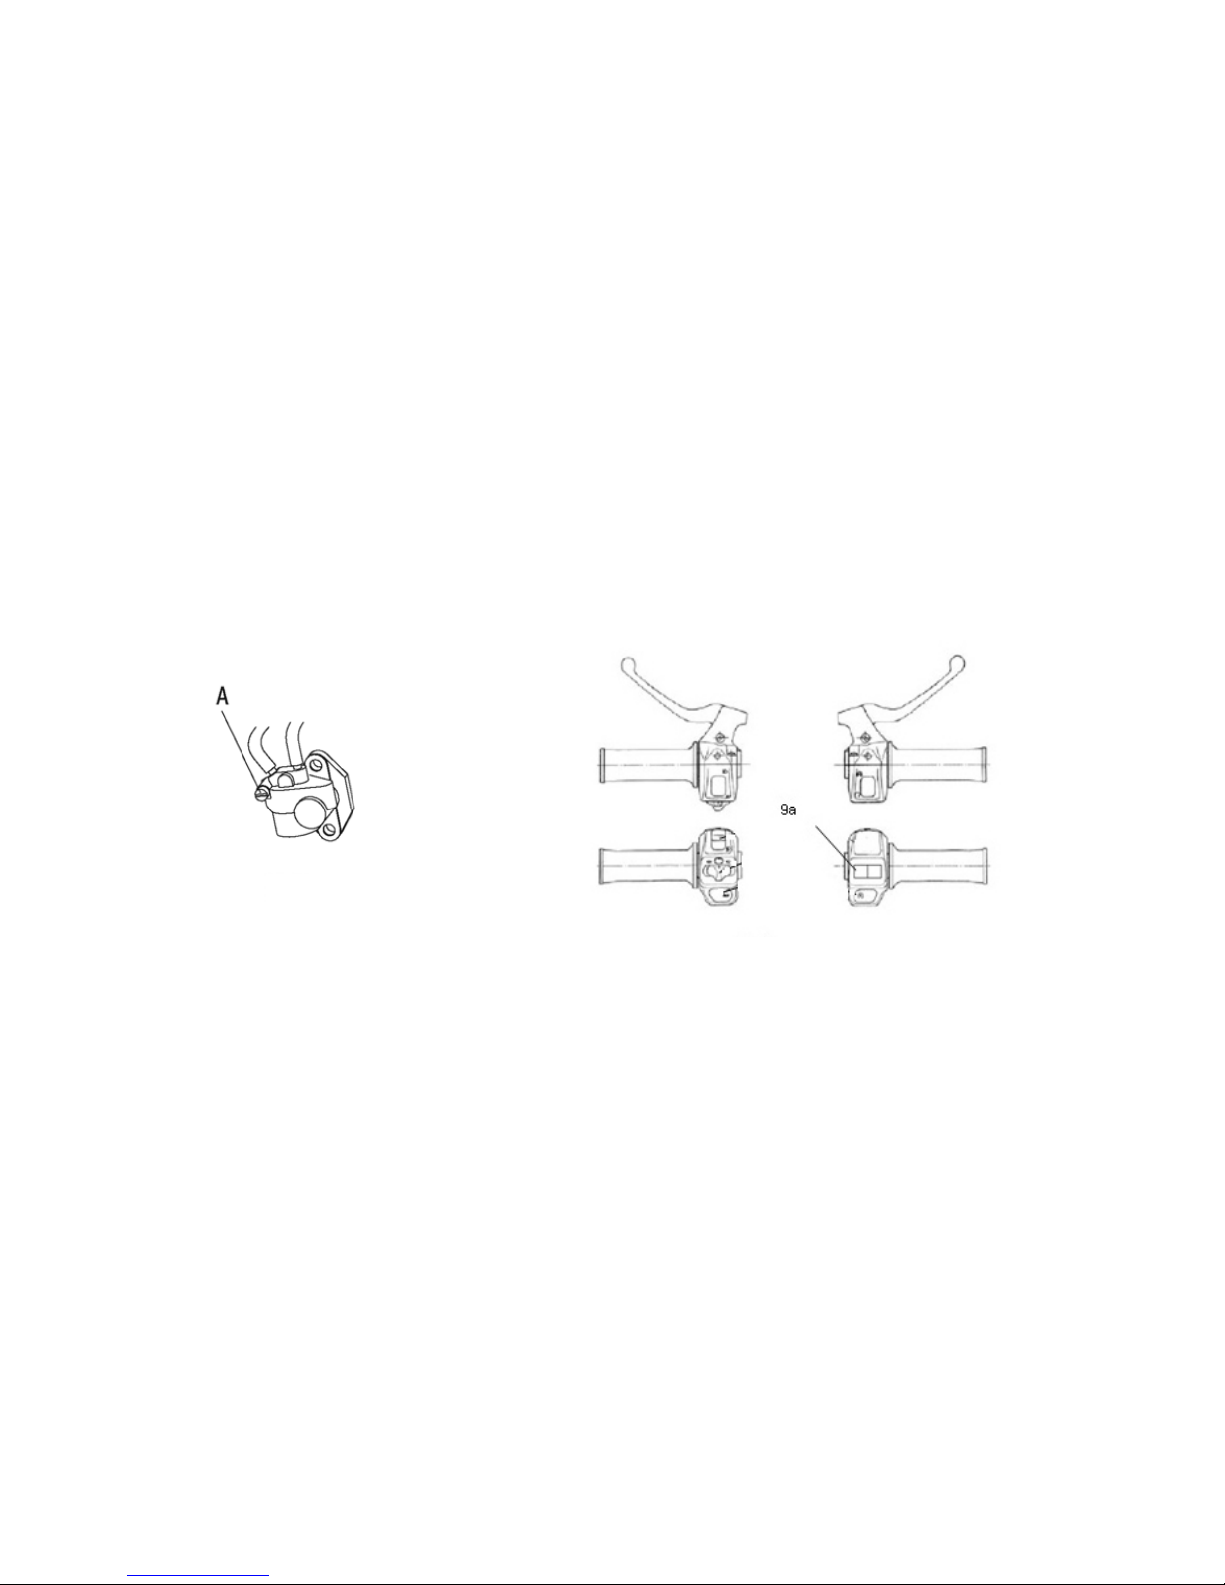
Fig. 3
Fig. 4
Page 12

9
VEHICLE OPERATION
Fuel
EUROSUPER 95 and two-stroke engine oil.
Your vehicle is equipped with an oil pump, which adds a specified
amount of oil to the petrol (approx. 2%). Pour two-stroke oil into the
separate oil reservoir (15, Fig. 1) - approximately 1 liter.
CAUTION!
See the Warning sticker for the max. oil level near to the oil reservoir.
Use only high quality fully synthetic two-stroke oil.
CAUTION!
Prior to starting the engine for the first time, fill the fuel tank (1, Fig. 1)
with approx. 1 liter mixture of two-stroke oil and gasoline in the ratio of
1:50 (2%), then start the engine and let it run for at least 8 minutes in
order to allow the oil pump to fill the suction pipe.
Before this take off the oil pump cover (17, Fig. 1) and unscrew the bolt
on oil pump (A, Fig. 3) and wait till oil comes from reservoir. Tighten the
bolt.
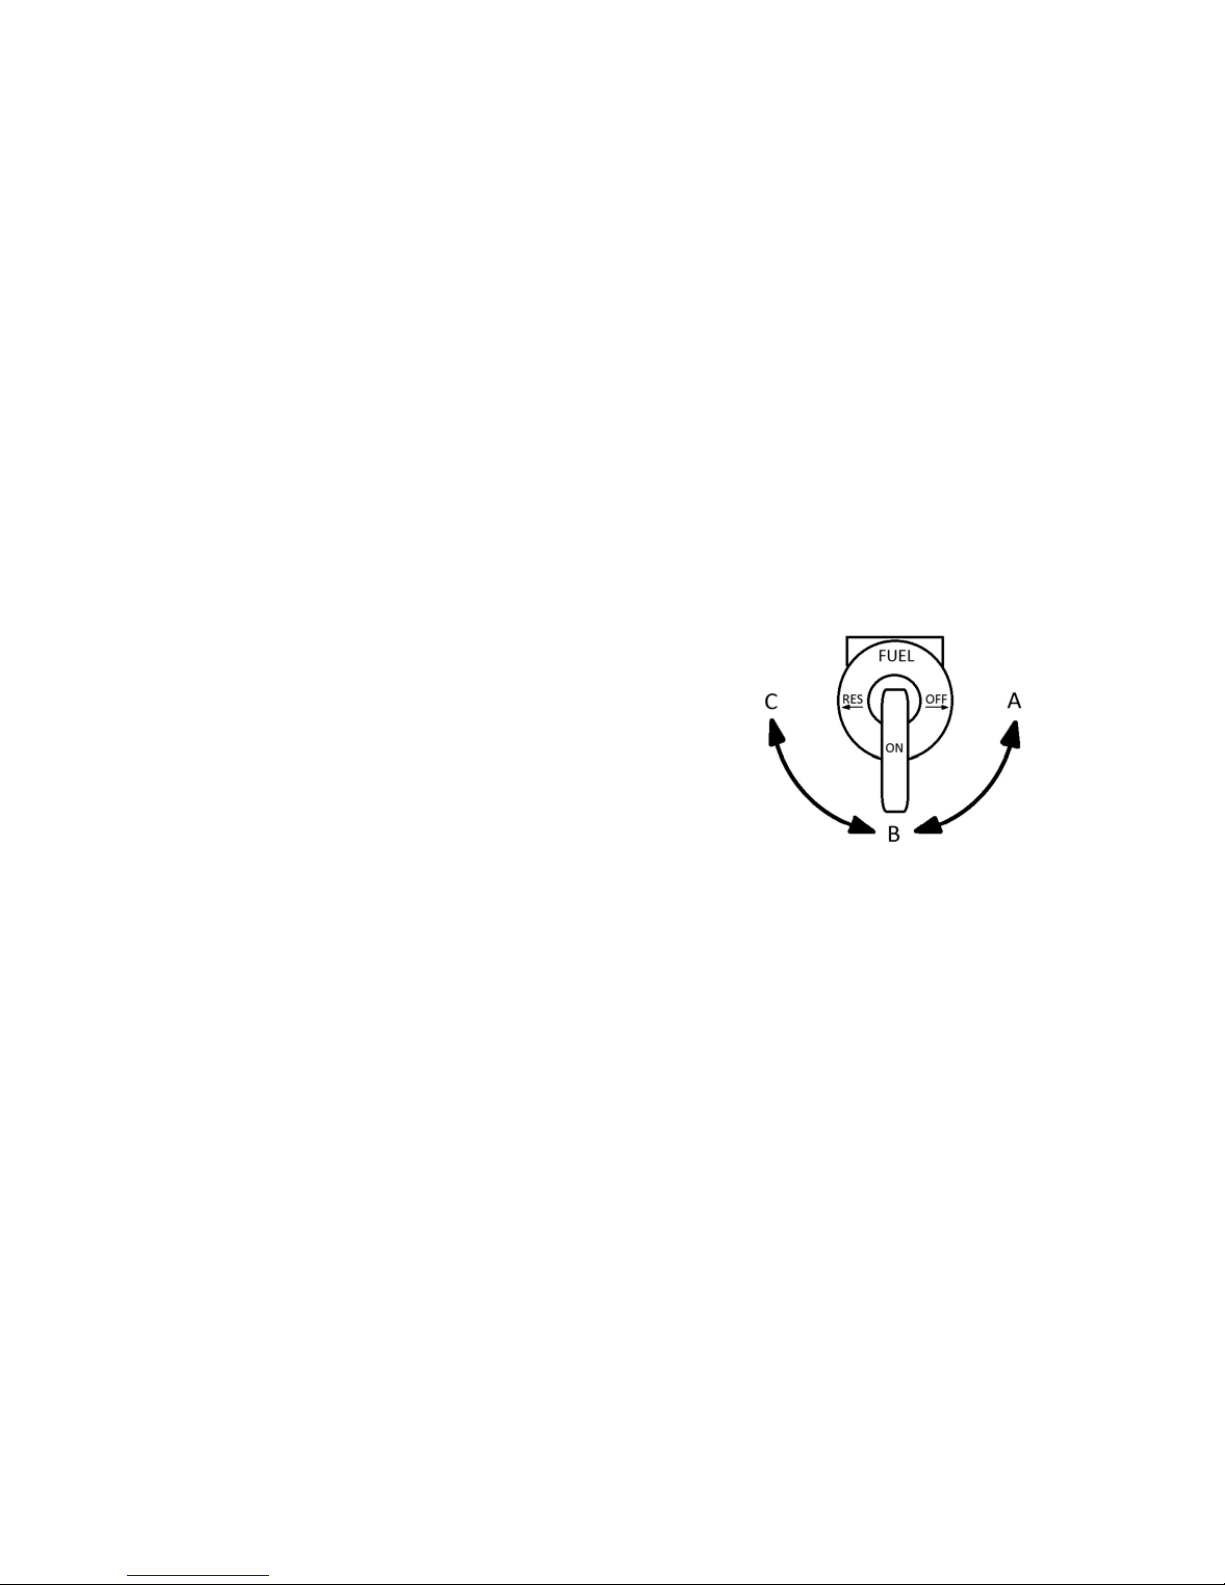
Engine starting
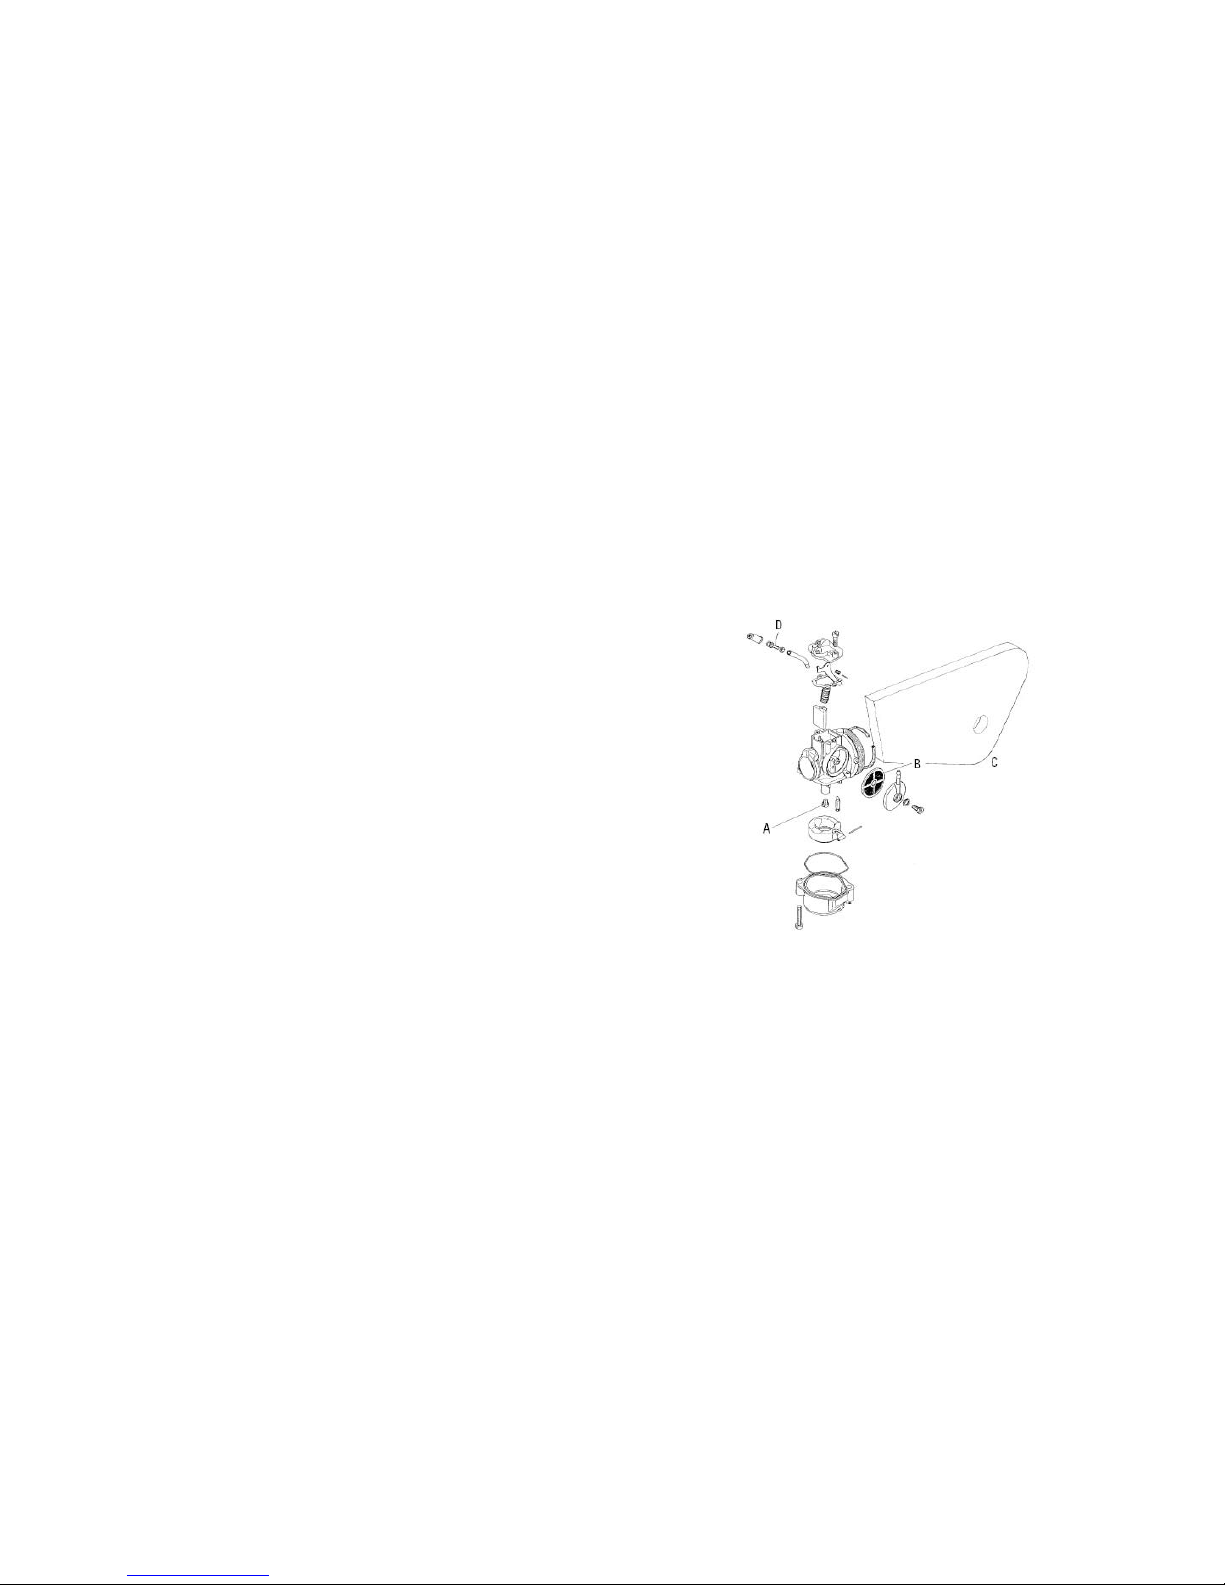
Open the fuel cock (Fig. 5). Note: A – fuel supply shot, B – fuel supply
on, C - reserve.
If the engine is cold, press the cold start lever (B, Fig. 6).
Kick start version:
With the throttle fully closed, press the rear brake lever and press the
kick-starter lever (4, Fig. 1) – without opening the throttle.
If starting the engine when it is still warm, the throttle must be fully
opened.
Pedal version:
With the throttle fully closed, press the rear brake lever and press the
pedals (4, Fig. 1) backwards – without opening the throttle.
If starting the engine when it is still warm, the throttle must be fully
opened.
Page 13
10
When using the choke, allow the engine to run for 10 to 20 seconds
without opening the throttle. The choke start lever disengages
automatically when the throttle is opened.
In the case the engine is hot do not use the choke lever.
Fig. 5
Page 14

11
Riding
The speed is controlled by the throttle lever (8, Fig. 2).
Engaging the first or second gear is done by opening or closing the
throttle. Avoid switching too frequently between first and second
gears. In such situation you should instead reduce the throttle opening
and keep the vehicle in first gear. When descending a slope, shortly
open the throttle from time to time in order to improve lubrication and
headlight operation. The vehicle is shut down by closing the throttle
lever and switching the STOP button to the position off (9a, Fig. 4). Then
close the fuel cock (position A, Fig. 5)!
If the vehicle is to stay out of operation for a longer period (e.g. during
winter), draining of the fuel from the carburetor cup in the following way
is recommended: close the fuel cock and, by opening the throttle lever,
let the engine run out automatically.
Engine Running-in
Do not run the engine at full throttle during the initial 100 km. Later
increase the engine loading progressively.
Fig. 5
Page 15
12
MAINTENANCE
Maintenance Operations
The vehicle is easy to maintain, yet maintenance is imperative for
perfect performance. Particularly important operations include regular
lubrication of individual assemblies, gearbox oil changes, cleaning
of parts affecting engine operation (spark plug, exhaust system,
fuel system) and checking of safety-related riding components (tire
pressure, operation of lights and brakes, tightness of bolts and nuts).
The maintenance table defines maintenance works in certain intervals in
km and months - consider whichever comes first - for the period up to
20.000 km or 24 months.
Lubricants
For the gearbox apply the automatic gearbox oil: ATF A or ATF F.
For lubrication of other vehicle components (see the maintenance
schedule), application of SAE 30 grade engine oil and LIS 2 grease is
recommended.
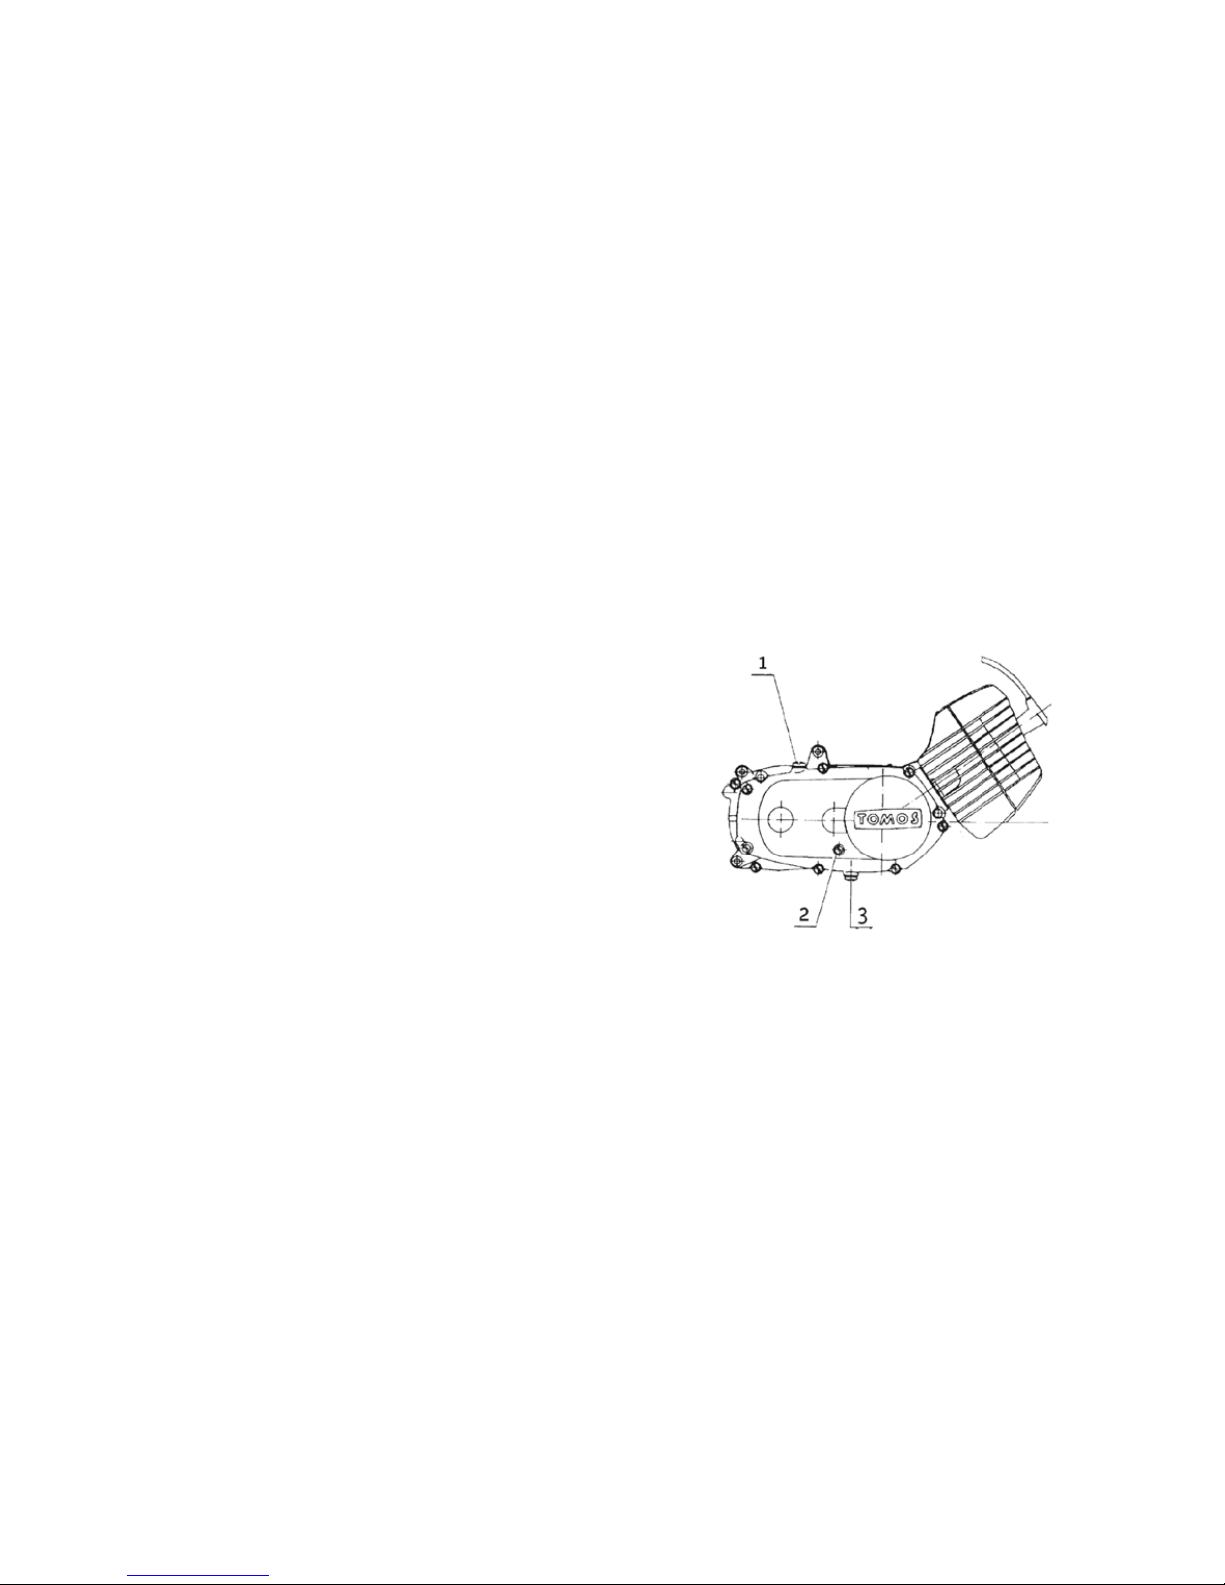
Gearbox Oil Change
Oil should be changed when the engine is still warm. Remove the right
side shield; release three threaded plugs (1, 2, 3, Fig. 7) on the right
side of the engine casing, and let the oil drain completely. Retighten oil
draining plug (3, Fig. 7) and pour approx. 300 cm
3
of oil through the
refilling opening (1, Fig. 7), so that oil level reaches the control opening
(2, Fig. 7). Then, retighten the oil refilling and control opening plugs.
Fig. 7
Page 16
13
CLEANING
Fuel System Cleaning (Fig. 8)
As regards the fuel system, periodic cleaning of the main jet, air filter
and fuel petcock filter is required. Do not use metal objects to clean the
main jet; clean it with an air jet.
Filter – sponge should be washed thoroughly in gasoline. After washing,
squeeze gasoline from the sponge (do not brush it) and dry the sponge
in a dry air jet.
Fig. 8
Page 17
14
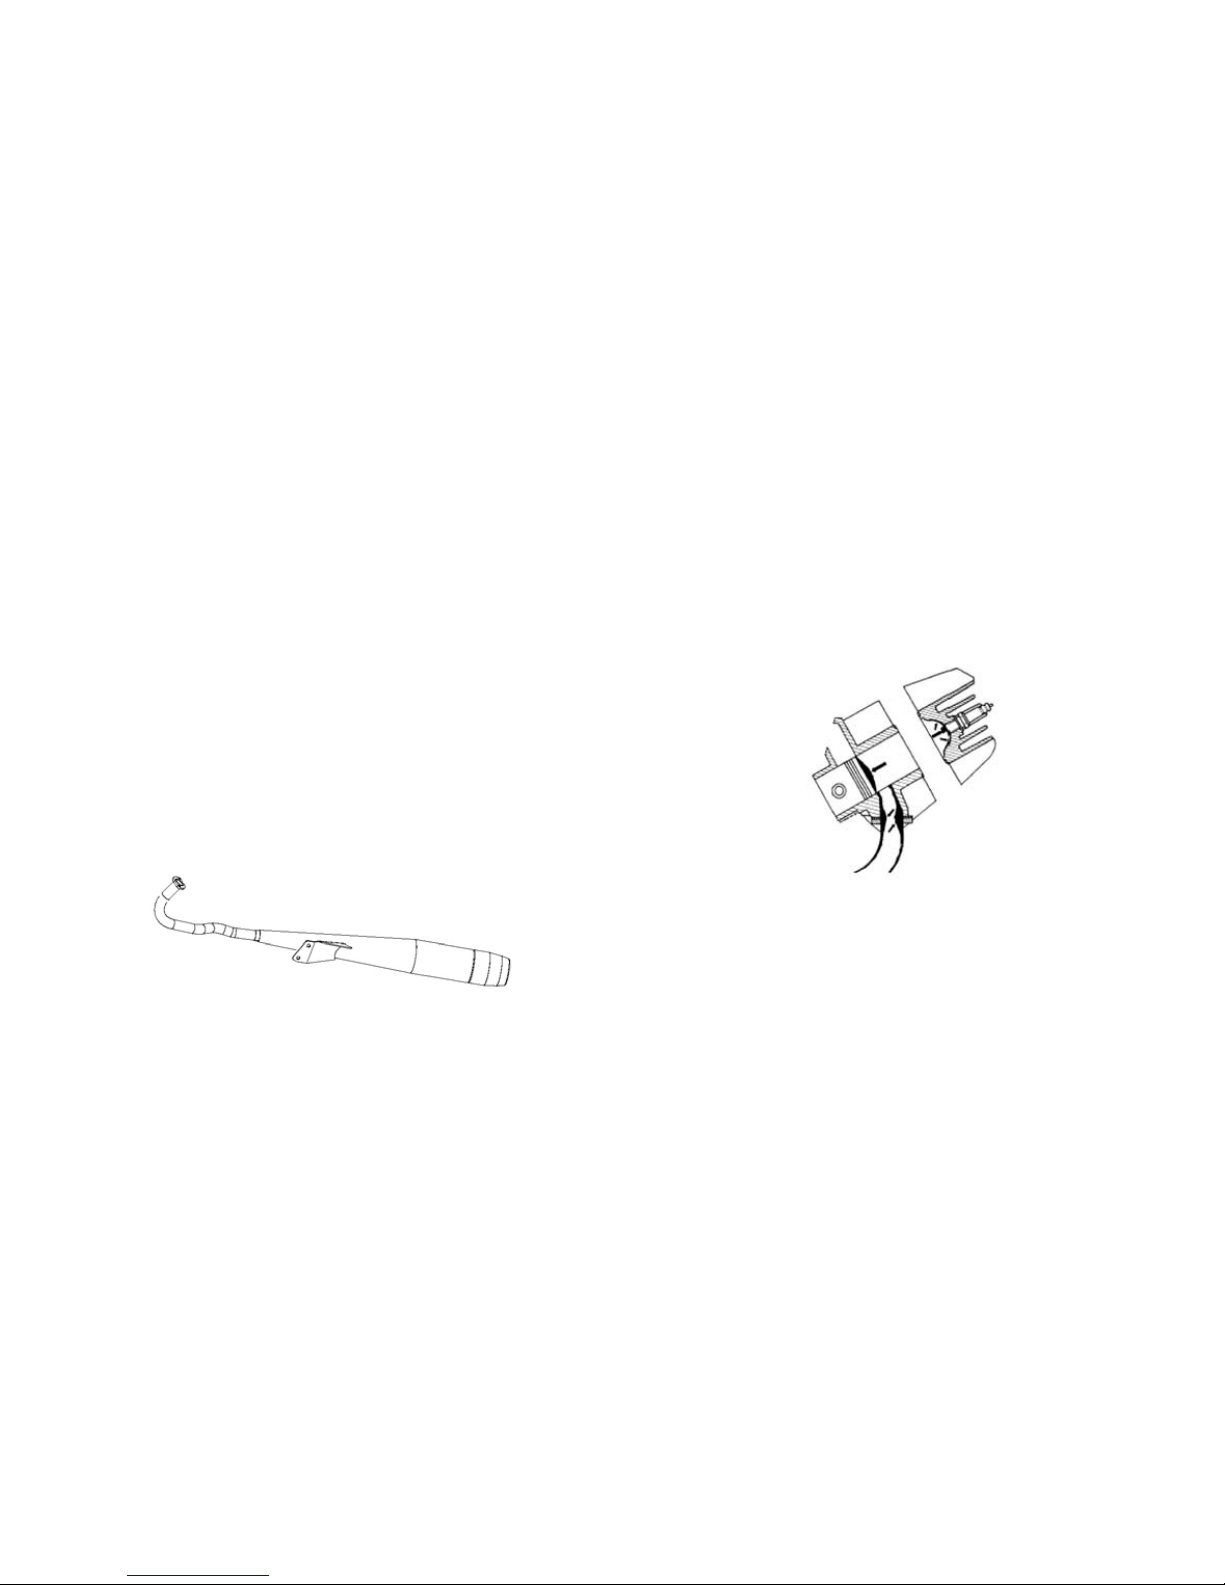
Exhaust system cleaning (Fig. 9)
The build up of soot in the exhaust system obstructs the free passage
of exhaust gas and thereby reduces engine power.
Periodically, clean the cylinder exhaust duct, exhaust pipe inlet opening,
piston crown and cylinder compression chamber (Fig.10).
Caution: exhaust system is equipped with catalysts, so do not enter into
the exhaust pipe with any tools, wires, do not pour in any fluid, etc. Any
such intervention can cause damage of the catalysts.
We strongly suggest making exhaust system cleaning by an authorized
service agent.
Fig. 10
Fig. 9
Page 18
15
Vehicle cleaning
Vehicle exterior cleaning is also part of regular maintenance. After washing, wipe the vehicle dry. Protect painted surfaces with paint protection
agents. After cleaning, check the operation of the engine, the lights and
brakes.
CHECK AND ADJUSTMENTS
Engine Oil Level Check
Check regularly the oil level in the oil tank. Top up as required. Should
the warning light fail to extinguish after starting the engine, this means
the oil level is low and immediate topping up is required.
Caution:
Kick-starter and pedals version: the warning light lights few seconds
after starting the engine. If does not, the fault should be remedied.
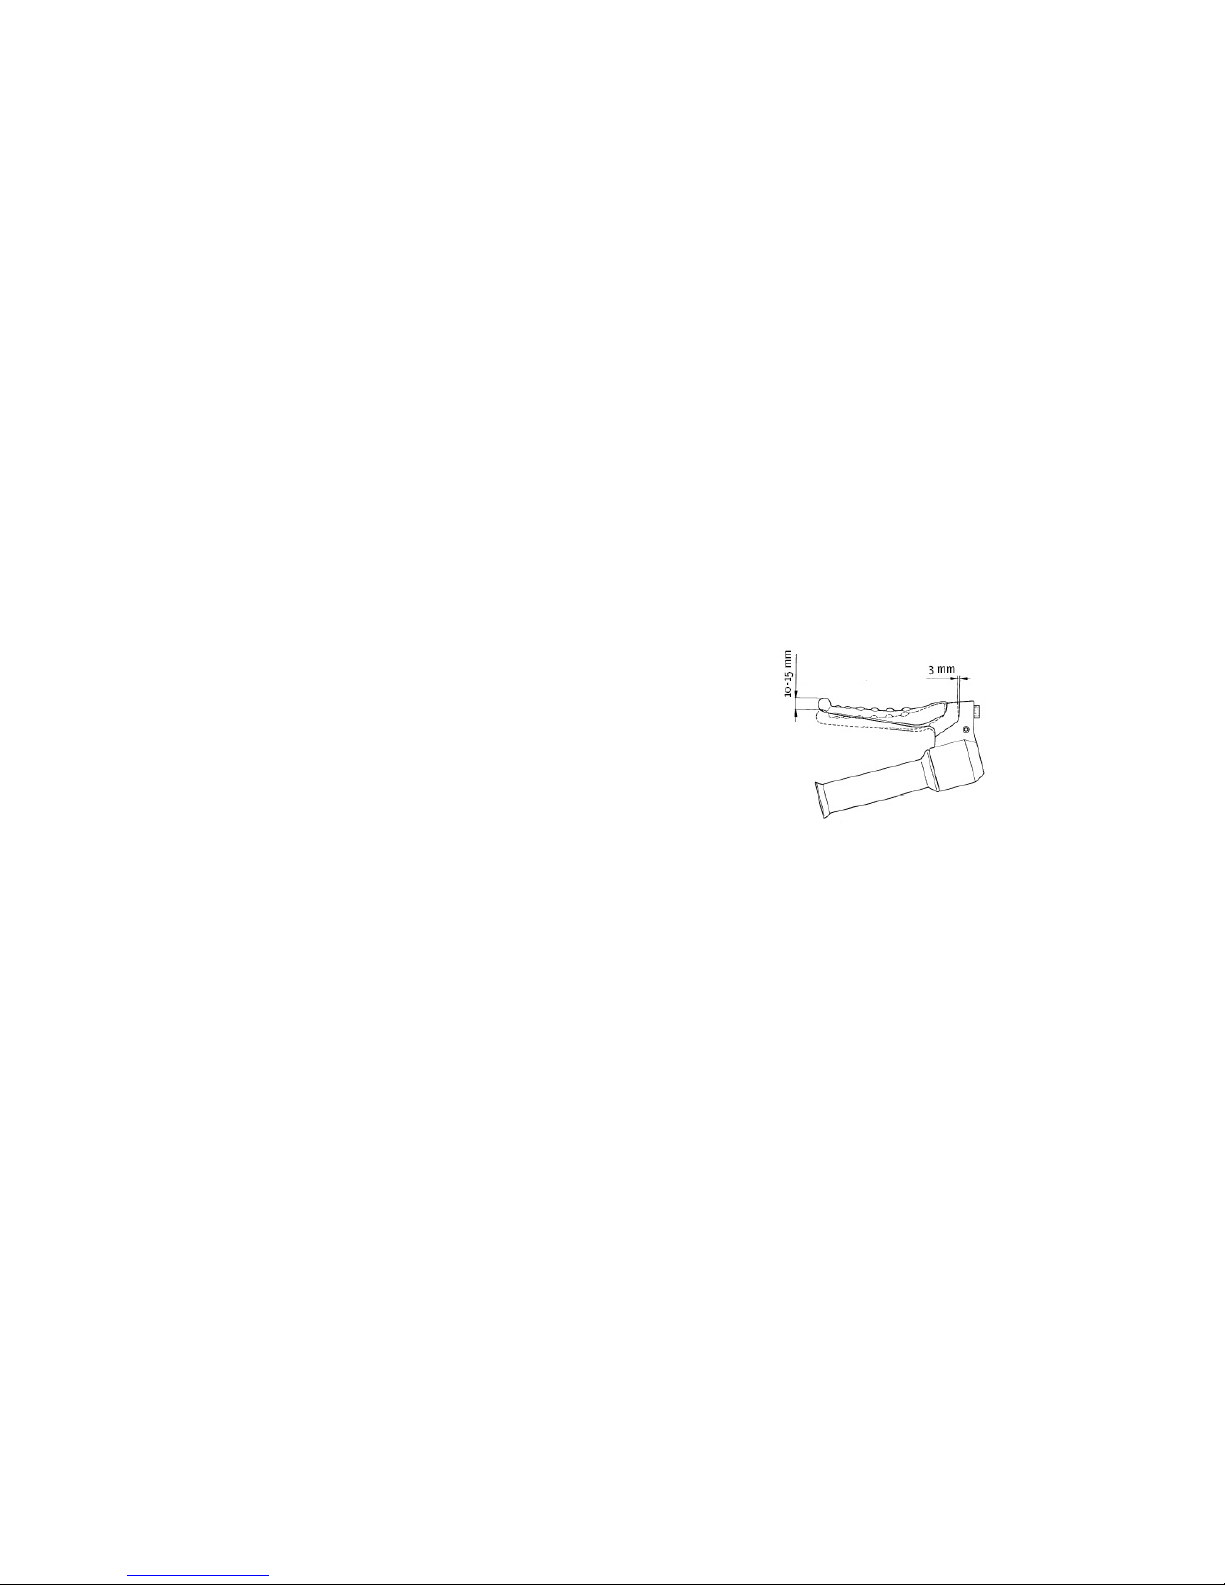
Bowden Adjustment
Bowden brakes are adjusted by means of the bolts on the wheels hubs.
The Bowden is properly set when the brake lever free travel is 10-15
mm and the sleeve – lever gap is approx. 3 mm (Fig. 11). After adjusting,
make sure the jam nut is retightened.
Fig. 11
Page 19

16
Transmission Chain Adjustment
The chain tension should be adjusted so that the chain yields 10 mm up
or down under pressure (Fig. 12). Adjust the chain tension by spinning
the chain tension adjuster (13, Fig. 1) on the rear wheel axle. After the
adjustment, retighten the nuts on the both side of axle that were party
released for the adjusting.
Bolt and Nut Tightness
Periodically check and retighten as necessary the bolts and nuts of the
main vehicle components (wheels, handlebar, shock absorber, rear fork
axis, engine to frame bolts, gearbox oil drain plug).
Fig. 12
Page 20

17
MAINTENANCE SCHEDULE
Interval (km)
Interval (months)
1.000
2
3.000
6
10.000,
15.000,
20.000
12, 18, 24
Oil lubrication
1. Gearbox oil change • • •
2. Bowdens (internal cables) As necessary
3. Chain • • •
Greasing
4. Rear fork bearing bushes As necessary
5. Steering bearings •
Cleaning
6. Spark plug As necessary
7. Air filter (oiling) • •
8. Cylinder head, piston head,
exhaust duct
• •
9. Cylinder and exhaust pipe • •
Interval (km)
Interval (months)
1.000
2
3.000
6
10.000,
15.000,
20.000
12, 18, 24
Checks and adjustments
10. Gearbox oil level • • •
11. Horn and lights • • •
12.
Spark plug electrode
clearance
• • •
13. Brake operation check
and adj.
• • •
14. Steering bearing clearance • • •
15. Wheel bearing clearance • • •
16. Wheel track • • •
17.
Tire pressure
(front and rear 2,2 bar)
• • •
18. Chain tension • • •
19. Idle run and throttle • • •
20. Bolt and nut tightness • • •
Page 21

18
TROUBLESHOOTING
Fuel System Troubles
Possible causes of the engine failing to start or stopping during a ride
Include, but are not limited to:
- Fuel is not supplied to the carburetor:
Check the fuel tank level and the position of the fuel cock.
- Clogged fuel strainers:
Blow the strainers clean.
- Clogged carburetor main jet:
Remove and blow clean.
- Improper use of the choke lever:
Use the lever in accordance with the engine start instructions.
- Low engine idle speed setting:
Using the adjustment bolt (A, Fig. 6), increase the engine speed
Ignition System Troubles
Check the spark. Possible causes of the ignition spark plug failing to
produce a spark include:
- Wet spark or electrodes in a short circuit:
- Spark plug electrodes frequently in a short circuit:
Clean soot build-up from the cylinder head and piston head.
- Spark plug electrodes are worn out:
Adjust the electrode clearance according to the specifications, or
Replace the spark plug with a new one.
- Spark plug cap improperly mounted or short-circuiting to the
Ground mass:
Properly mount the cap on the spark plug or replace with a new cap.
- Ignition coil:
Have the trouble examined and remedied by an authorized service
agent.
Troubles Causing Reduced Engine Power
Possible causes of reduced engine power and reduced vehicle road
performance include:
- Inadequate spark plug or cylinder head tightness:
Tighten the spark plug or the cylinder head nuts.
- Clogged air cleaner on the carburetor:
Wash in gasoline, blow dry and oil lightly.
- Clogged exhaust system: clean.
Page 22

19
Gearbox Troubles
- Following the start, the engine runs at idle speed. If opening the
throttle fails to engage the clutch:
Release the throttle and attempt to start the vehicle again (the oil
is still cold and thicker). When riding, open the throttle gradually to
prevent engine jerks. If the problem is frequent, have it repaired by an
authorized service agent.
- The clutch slides (particularly in cold weather):
Improper oil type in the gearbox - change with the specified oil.
- The clutch takes excessively long to switch to the second gear or
does not switch at all:
Reduced engine power - clean the exhaust silencer;
The clutch is stuck - try to activate the clutch at higher engine revs,
with the vehicle propped up on a stand;
Excessive amount of oil in the gearbox - check the oil level.
- After engaging the second gear, the clutch jerks:
Chain is too loose - adjust the chain? tension;
Low gearbox oil level - top up to the specified level.
- With the engine shut down, it is difficult to move the vehicle forwardsbackwards:
Have the trouble examined by an authorized service agent.
Page 23

20
TOMOS WARRANTY CONDITIONS
Tomos d. o. o., motoindustrija guarantees the buyer:
- That the product shall operate fault-free during the warranty period, provided that the
user follows the enclosed technical instructions;
- That the product has the required characteristics in terms of quality, as is defined in the
instructions;
- That it will settle any and all repair costs arising from a defect in the material or from an
error in assembly;
- That it will replace the product with a new one if, during the warranty period, the
authorized service workshop fails to address the problem in 45 days from the date of
notification;
- That the warranty period shall be extended for the entire duration of the repair period;
- That it will provide service and spare parts for at least 4/7* years after the date of pur-
chase.
The warranty period shall cover 12/24* months from the date of sale.
This warranty shall not apply:
- In cases of defects caused by the owner, defects due to improper maintenance and
The TOMOS warranty shall not apply if proven that the defects have been caused by:
• Improper motorcycle maintenance and disregarding the instructions provided in the
TOMOS overhaul manual;
• Fitting parts on the motorcycle, or modications or adaptations prohibited by TOMOS;
• Motorcycle repairs performed by a workshop not authorized by TOMOS;
• Improper use of the motorcycle (for example: participation in races, overload, non-use of
the motorcycle for extended periods of time);
• In case the vehicle is damaged to the extent where its repairs or mending to a full work-
ing order would amount to more than 15 % of the factory sale price.
• Normal wear of parts.
The warranty does not cover parts with normal wear, such as: Tires, wiring, spark plugs,
graphics (stickers), fuel tank cap, lights, chains, brackets, brake pads, air and oil filters,
saddles and exhaust pipes (internal inspection); the same applies for the motorcycle
frame, piston holes, yellowing of chrome plating, damage due to improper adjustments,
bad oil/fuel mixture or low oil level, which is also not covered by this warranty.
Vehicle parts with limited warranty period (6 months)
- battery;
- footrests;
- stands.
This contract warranty does not cover the following expenses: costs of normal repair
works, oil, grease etc., emergency repair costs, motorcycle immobilization costs, and
costs of removal and damages of carried goods.
Warranty rights
The buyer can exercise their warranty rights on the basis of a duly filled in warranty certificate, verified by an authorized dealer and a confirmed coupon of a pre-delivery service by
an authorized service workshop.
WARNING: If it is found that a silencer or an air filter was used that is not an original part
of the motorcycle, or if the original parts were modified in any way in order to increase the
motorcycle noise level, the warranty is cancelled. In addition, the abovementioned adjustments that increase the noise level, power and speed of the motorcycle are under total
responsibility of the owner.
NOTE: In case of damage occurring in any of the neighboring countries, please present
the warranty claim to your dealer, together with the relevant invoices for any defective
parts.
*Depends on market
Page 24

21
TOMOS
Bedienings- en onderhoudshandleiding
CLASSIC
Page 25

22
INHOUD
Aanwijzingen 23
Tips voor veilig rijden 23
Technische gegegevens 25
Technische beschrijving 27
Ingebruikname van de brom- snorfiets 30
Brandstof 30
Starten 31
Het rijden 32
Het inrijden van de brom- snorfiets 32
Onderhoud 33
Onderhoudswerkzaamheden 33
Smeermiddelen 33
Het verversen van de versnellingsbakolie 33
Reinigen 34
Reiniging van het brandstoftoevoersysteem 34
Reiniging van het uitlaatsysteem 35
Reiniging van de brom- of snorfiets 36
Controle en afstellingen 36
Controle versnellingsbakolie niveau 36
Afstellen van de remkabels 36
Ketting spannen 37
Het natrekken van bouten en moeren 37
Onderhoudstabel 38
Storingen en hoe deze te verhelpen 39
Storingen in het brandstoftoevoersysteem 39
Storingen in het ontstekingssysteem 39
Storingen die het motorvermogen beïnvloeden 39
Storingen in de versnellingsbak 40
Page 26

23
AANWIJZINGEN
Lees voor het gebruik van de brom- of snorfiets deze handleiding
aandachtig door.
Zo raakt U vertrouwd met zijn kenmerken en leert U hem juist en veilig
te gebruiken.
1. brandstof is licht ontvlambaar en explosief, neem daarom de
volgende veiligheidsmaatregelen in acht:
• zorg ervoor dat tijdens het vullen van de brandstoftank de motor
niet loopt,
• vul de tank buiten, rook niet en kom nooit in de buurt van de tank
met open vuur of een vonk,
• eventueel gemorste brandstof zorgvuldig met een doek afvegen,
ook om lakschade of schade aan stickers te voorkomen,
• gebruik benzine nooit als schoonmaakmiddel voor enig deel van de
brom- of snorfiets,
2. laat de motor nooit lopen in een afgesloten ruimte of kelder,
uitlaatgassen zijn schadelijk en zwaarder dan lucht, waardoor laag
boven de grond een te hoge concentratie van deze gassen kan
ontstaan.
3. raak tijdens het starten en draaien van de motor de bougiekabel de
bougiedop en de overige onderdelen van het elektrische systeem niet
aan.
4. raak tijdens het draaien van de motor en nog enige tijd na het
stopzetten, de hete onderdelen niet aan: de cilinder, de cilinderkop,
de uitlaat en de remmen.
5. pas tijdens het draaien van de motor op voor de draaiende
onderdelen.
TIPS VOOR VEILIG RIJDEN
Het berijden van de brom- of snorfiets is niet moeilijk, hoewel het enige
kennis en ervaring vereist
die door de berijder in toenemende mate zal worden verkregen door
gebruik van de brom- of snorfiets.
Besteed voor elke rit aandacht aan de volgende punten:
Controleer de werking van de essentiële delen van de brom- of snorfiets
zoals:
• remmen
• verlichting
• banden en bandenspanning
• stuurinrichting.
Rijd bij voorkeur in licht gekleurde of reflekterende kleding.
Vermijd het rijden in de “dode hoeken” van het zichtveld van de overige
verkeersdeelnemers, om te voorkomen dat U over het hoofd wordt
gezien.
Houdt U aan alle verkeersregels.
Pas de snelheid aan de verkeersomstandigheden en vooral uw ervaring
aan.
Laat de brom- of snorfiets nooit door een onervaren iemand gebruiken.
Geef verandering van rij –richting tijdig aan.
Let vooral op bij kruisingen en bij het voorbij rijden van andere,
langzaam rijdende of stilstaande voertuigen.
Let goed op de verkeersomstandigheden voor en achter U en probeer
altijd op mogelijke gebeurtenissen te anticiperen.
Page 27

24
Tijdens het remmen verandert de belasting van de wielen:
• het remeffect is groter bij gebruik van de voorrem,
• de remafstand is langer bij gebruik van de achterrem,
• bij gebruik van de achterrem alleen, vermindert de stabiliteit van
de brom- of snorfiets, maak dus altijd beheerst en gecontroleerd
gebruik van de achterrem.
• bij gecombineerd gebruik van zowel voor- als achterrem ontstaat
een veilige en betere remwerking.
Vermijd krachtig remmen tijdens het nemen van een bocht. Verlaag de
snelheid altijd voldoende alvorens de bocht in te sturen.
Rijden bij slecht weer en vooral bij nat weer vereist extra
voorzichtigheid. De remafstand bij regen is tweemaal zo groot. Geverfde
delen op het wegdek, putdeksels en vettige weggedeelten kunnen
bijzonder glad zijn.
Bevestig geen grote of zware voorwerpen aan het stuur. Dit kan leiden
tot onvoorspelbare stuurreacties.
Houd zoveel mogelijk beide handen aan het stuur en plaats de voeten
op de daarvoor bestemde voetsteunen.
Laat de juiste werking van de brom- of snorfiets controleren door een
erkend dealer alvorens verder te rijden na een ongeluk/ aanrijding/
omvallen/ beschadiging e.d.
Het aanbrengen van wijzigingen aan de brom- of snorfiets of het
motorblok en/of het verwijderen van oorspronkelijk aangebrachte
onderdelen kan de brom- of snorfiets onveilig of onwettig maken.
Het gebruik van niet-originele onderdelen en accessoires betekent dat
de fabrikant geen directe controle heeft op de kwaliteit of geschiktheid
van deze delen.
Wij raden U daarom met klem aan uitsluitend originele TOMOS
onderdelen en accessoires te gebruiken.
De verantwoordelijkheid voor alle mogelijke gevolgen van het monteren
van niet- originele onderdelen blijft te allen tijde bij uzelf.
Een belangrijk onderdeel van het defensief rijden is de persoonlijke
bescherming. Draag bij voorkeur stevig gesloten schoenen en vooral
geen losse of wijde kleding die aan de bedieningselementen kan blijven
hangen.
Om verwondingen aan uw ogen, veroorzaakt door insecten, zand of
opgeworpen steentjes te voorkomen verdient het aanbeveling met een
stofbril of een helm met vizier te rijden.
Page 28

25
TECHNISCHE SPECIFICATIE
Model Classic
Varianten A34B – 45km/h
A34D – 25km/h
A34E – 20km/h
Motor Type eencilinder-tweetaktmotor,
luchtgekoeld
Cilinderinhoud 49 cm3
Clinderboring 38 mm
Zuigerslag 43 mm
VARIANT A34B:
Compressieverhouding 10 : 1
Motorvermogen 1,7 kW at 4800 min-1
Koppel 3,6 Nm at 3500 min-1
Maximum snelheid 45 km/h
Verbruik 1,8/100km (meest gunstige
omstandigheden)
VARIANT A34D:
Compressieverhouding 6 : 1
Motorvermogen 1,0 kW at 3500 min-1
Koppel 3,1 Nm at 2500 min-1
Maximum snelheid 25 km/h
Verbruik 2,5/100km (meest gunstige
omstandigheden)
VARIANT A34E:
Compressieverhouding 6 : 1
Motorvermogen 1,0 kW at 3500 min-1
Koppel 3,1 Nm at 2500 min-1
Maximum snelheid 20 km/h
Verbruik 2,8/100km (meest gunstige
omstandigheden)
Starter Kick-starter of pedalen
Brandstof Tank inhoud 4 l (incl.0,5 l reserve)
Olietank 1 l
Verinng Voorvorkvering 70 mm
Achtervering 35 mm
Wielen Bandenmaat voor 2 ¼ -16
Bandenmaat achter 2 ¼ -16
Bandenspanning voor 2,2 bar
Bandenspanning achter 2,2 bar
Page 29

26
Elektrische Magneetontsteking 12V 80W
uitrusting Voorontsteking preset
Bougie-A24B Bosna F75, BOSCH-W7AC
Bougie- A24D, A24E Bosna F75, Champion-L86
Afstand tussen bougie 0,8 mm
elektroden
Koplamp 12V 25W
Achterlicht 12V 5W
Remlicht 12V 15W
Snelheidsmeter verlichting 12V 2W
Indicator verlichting 12V 1,5W
Maten en Wielbasis 1.080 mm
gewichten totale lengte voertuig 1.640 mm
Rijklaargewicht 63 kg
Toegestaan maximaal totaal gewicht (inclusief berijder) 160 kg
Page 30

27
TECHNISCHE BESCHRIJVING
1. Vulopening brandstoftank
2. Benzinekraan
3. Carburateur, choke
4. (Kickstart)pedaal
5. Middenstandaard
6. Achterremhandel
7. Voorremhandel
8. Gashandvat
9. Schakelaar voor de claxon
9a. Startonderbreker
10. Gereedschapsbak
11. Snelheidsmeter
12. Olieniveau controlelampje
13. Kettingspanner
14. Luchtfilter
15. Vulopening tweetaktolie tank
16. Bagagedrager
17. Oliepomp
18. Stuurslot
Page 31

28
Fig. 1 Fig. 2
11
6
9 9a
8
7
12
Page 32

29
Fig. 3
Fig. 4
Page 33

30
Ingebruikname van de brom- of snorfiets
BRANDSTOF
Indien uw brom- of snorfiets niet is uitgerust met een gescheiden
smeersysteem,
in dat geval ontbreekt een olietank, dient als brandstof een mengsel van
tweetakt olie en ongelode benzine (minimaal octaangehalte 95) in de
verhouding van 1:50 (2%), te worden gebruikt.
WAARSCHUWING
Let goed op de maximum te vullen hoeveelheid te vullen olie
aangegeven op de sticker bij de olietank.
Het verdient absoluut de aanbeveling om indien U zelf mengt,
altijd gebruik te maken van volsynthetische tweetakt olie. Deze olie
verbrandt vollediger, waardoor de verbrandingsruimte en het
uitlaatsysteem aanmerkelijk schoner blijven en langer meegaan. Nog
belangrijker, de uitstoot van
schadelijke stofdeeltjes daalt aanzienlijk door het gebruik van VOL
SYNTHETISCHE tweetaktolie..
LET OP!
Ontluchting van het oliepompje
Dit is noodzakelijk bij ingebruikneming van de brom- of snorfiets,
wanneer het oliepompje
gedemonteerd is geweest en wanneer de olietank geheel leeg geweest
is. De volgende handelingen dienen dan uitgevoerd te worden; de
brandstoftank leegmaken en vullen met ca. 1 liter van een
mengsel bestaand uit tweetaktolie en benzine in de verhouding 1:50
(2 %). De olie tank vullen met EUROL TTX tweetakt olie of olie met
vergelijkbare specificaties. De motor starten en stationair laten
lopen.
Vraag uw TOMOS dealer steeds om EUROL smeermiddelen en bedenk
dat het gebruik van in aanschaf misschien goedkopere tweetaktolie de
noodzaak tot het laten ontkolen van uitlaat en
verbrandingsgedeelte van de motor mogelijk versneld, het geen het
eventuele beoogde directe financiële voordeel teniet doet gaan.
Page 34

31
Starten van de brom- of snorfiets
Open de brandstofkraan (Fig. 5). LET OP: A – kraan dicht, B – kraan
open, C - reserve.
Als de motor koud is dient u de choke hevel in te drukken en de motor
gedurende 1 minuut warm te laten draaien (B, Fig. 6).
Kick start versie:
Trap de motor aan door het kickstart pedaal krachtig naar beneden
te trappen, houd hierbij het gashandvat gesloten en de achterrem
aangetrokken
Hetzelfde geldt als de motor warm is alleen dient dan het gashandvat
geheel geopend te worden.
Pedaal versie:
Trap de motor aan door het pedaal krachtig naar beneden te trappen,
houd hierbij het gashandvat gesloten en de achterrem aangetrokken
Hetzelfde geldt als de motor warm is alleen dient dan het gashandvat
geheel geopend te worden.
Als de choke bediend wordt, de motor 10 tot 20 seconden laten lopen
zonder het gashandvat te bedienen. De chokehevel gaat er automatisch
af wanneer u het gashandvat bediend.
Als de motor op temperatuur is gelieve de choke niet te gebruiken.
Fig. 5
Page 35

32
HET RIJDEN
De snelheid wordt met het gashandvat geregeld (8, Fig. 2).
Het schakelen in de eerste of tweede versnelling gebeurt door gas
te geven of terug te nemen. Het wordt niet aanbevolen om onnodig
vaak in een hogere of lagere versnelling te schakelen. Neem liever wat
gas terug en rijd in een lagere versnelling. Geef tijdens het rijden naar
beneden enige malen gas om de smering van de motor en de kwaliteit
van de verlichting te verbeteren.
U stopt de brom- of snorfiets door gas te minderen en bij stilstand de
startonderbreker(9a, Fig.4). Daarna draait u de brandstofkraan dicht.
(position A, Fig. 5)!
Wanneer u de brom- of snorfiets langere tijd niet gebruikt(bijvoorbeeld
in de winter) wordt het aanbevolen om de brandstof uit de carburateur
te verwijderen, dit doet u door de motor te starten, de brandstofkraan
dicht te draaien en iets gas te geven totdat de motor vanzelf stopt.
Het inrijden van de brom- of snorfiets
Belast de brom- of snorfiets de eerste 100 km door afwisselend met
gematigd en volgas te rijden. U kunt het volgas rijden geleidelijk
uitbreiden.
Fig. 6
Page 36

33
ONDERHOUD
Onderhoudswerkzaamheden
Het onderhoud van de brom- of snorfiets is eenvoudig maar
noodzakelijk voor een probleemloze werking. Vooral belangrijk is het
smeren van de afzonderlijke scharnierpunten, het verversen van de
olie in de versnellingsbak, het reinigen van de onderdelen die
de werking van de motor beïnvloeden (de bougie, de uitlaat, de
brandstoftoevoer) en de controle van die onderdelen, die de rijveiligheid
beïnvloeden (de bandenspanning, het werken van de verlichting,
goed aangedraaide bouten en moeren). De onderhoudstabel schrijft
onderhoudswerkzaamheden voor met bepaalde tussenpozen.
SMEERMIDDELEN
Voor de versnellingsbak dient uitsluitend speciale
automatische transmissie vloeistof (ATF olie) te worden
gebruikt. Bruikbaar zijn bijv:
- Eurol ATF D2
- Of olie met een gelijkwaardige specificatie
Voor het smeren van alle overige delen kunt U een multigrade
motorolie gebruiken, voor de met vet te smeren punten kunt
U EUROL EP2 of vet met gelijkwaardige specificaties gebruiken.
Het verversen van de versnellingsbakolie
Ververs de olie bij een warme motor.Verwijder het rechter zijscherm,
schroef alle drie de pluggen los (1, 2, 3, Fig. 7) uit het koppelingsdeksel
en laat de olie volledig uit het motorblok lopen. Draai de aftapplug(3,
Fig. 7) en voeg ca. 220 cm
3
olie toe of vul de motor tot de rand van de
controle opening(2, Fig. 7). Draai vervolgens de vulplug(1, Fig. 7) en de
niveaucontroleplug weer aan.
Fig. 7
Page 37

34
REINIGING
Reiniging van het brandstoftoevoersysteem (Fig. 8)
In het brandstoftoevoersysteem moeten van tijd tot tijd de
hoofdsproeier(pos. A), de zeef(pos. B)
onder de toevoeraansluiting van de carburateur, het luchtfilter(pos. C)
en het zeefje in het brandstofkraantje worden gereinigd. Gebruik voor
het reinigen van de hoofdsproeier geen metalen voorwerpen maar blaas
hem alleen maar door.
Fig. 8
Page 38

35
Reiniging van het uitlaatsysteem (Fig. 9)
Koolvorming in het uitlaatsysteem zal de doorlaat van de uitlaatgassen
en daardoor de motorprestaties van uw brom- of snorfiets verminderen.
Regelmatige reiniging van de uitlaat opening, cilinderkop, cilinder
en zuiger zoals aangegeven op afbeelding 10 kunt U het beste laten
uitvoeren door uw TOMOS dealer.
Let op! : De uitlaat is voorzien van een katalysator, Het binnendringen
van de uitlaat met enig gereedschap, of het ingieten van
reinigingsvloeistof zal de katalysator ernstig beschadigen en de werking
ervan vernietigen.
Fig. 10
Fig. 9
Page 39

36
Reiniging van de bromfiets
Ook wassen en poetsen van uw brom- of snorfiets maakt deel uit van
goed onderhoud.
Vermijd afspuiten met een te krachtige waterstraal of hogedrukspuit om
te voorkomen dat er water binnendringt in de remmen, carburateur of
elektrische installatie.
Nadat de brom- of snorfiets gewassen en gedroogd is, wordt
aangeraden de gelakte delen te voorzien van een waslaagje.
Ongelakte delen kunt dient U te voorzien van een laagje vaseline,
chroomdelen behandelen met siliconenspray. Controleer na het wassen
van de brom- of snorfiets de werking van de motor,
verlichting en de remmen, omdat deze delen tijdens het wassen
mogelijk nat zijn geworden.
Natte remmen worden gedroogd door met de brom- of snorfiets een
paar minuten zachtjes te rijden en voortdurend licht te remmen zodat de
remmen warm worden en daardoor drogen. Vergeet niet na het wassen
de ketting te smeren. Raadpleeg voor de juiste beschermingsmiddelen
uw dealer.
CONTROLE EN AFSTELLINGEN
Controle van het tweetakt/mengsmering olieniveau
Controleer het olieniveau in de tank onder het zadel of achterspatbord
regelmatig en vul het tijdig bij.
Als onder het rijden Of direct na het starten, het controle lampje
constant gaat branden of regelmatig knippert. Is dit een teken dat het
olie niveau te laag is en zo snel mogelijk bijgevuld moet worden.
LET OP!!
Bij het starten van de brom- of snorfietsen dient het
waarschuwingslampje altijd even te gaan branden, mocht dit niet
gebeuren het probleem direct bij de dealer laten verhelpen.
Afstelling van de remkabel
De remmen worden afgesteld met behulp van de schroeven op de
remankerplaat in de wielnaaf. De remmen zijn correct afgesteld als de
vrijeslag van de remhevel 10-15 mm is en de ruimte tussen hevel en
huis ongeveer 3 mm (Fig. 11) is. Verzeker u ervan dat de borgmoer is
vastgezet na afstelling.
Fig. 11
Page 40

37
KETTING SPANNEN
De vrije slag van de ketting dient 20 mm te zijn(Fig. 12). De
kettingspanning wordt aangepast door de kettingspanners te
verdraaien(13, Fig. 1)op de achteras. Na afstelling dienen de
achterasmoeren de los gedraaid moeten worden weer vastgezet
worden.
Het natrekken van de bouten en moeren
Het goed vastzitten van alle bouten en moeren dient U regelmatig te
controleren.
Belangrijk zijn vooral de wielmoeren, stuurbevestigingsbouten en
motorophangingbouten.
Vergeet ook niet de olie aftapplug te controleren.
Fig. 12
Page 41

38
ONDERHOUDSTABEL
Interval (km)
Interval (maanden)
1.000
2
3.000
6
10.000,
15.000,
20.000
12, 18, 24
Olie, smering
1. vervangen versnellingsbakolie
• • •
2. smering remkabels Naar behoefte
3. smeren ketting • • •
Smeren
4. Achtervork lagerbussen Naar behoefte
5. Balhoofdlagers •
Reinigen
6. Bougie Naar behoefte
7. Luchtfilter (olieen) • •
8. cilinderkop, zuiger,
uitlaatpoort
• •
9. cilinder en uitlaat • •
Interval (km)
Interval (maanden)
1.000
2
3.000
6
10.000,
15.000,
20.000
12, 18, 24
Controle en afstellen
10. Versnellingsbak olie niveau • • •
11. Claxon en verlichting • • •
12. Bougie elektrode afstand • • •
13. remsysteem controle en
afstelling.
• • •
14. Balhoofdlager speling • • •
15. Wiellager speling • • •
16. banden profiel • • •
17.
bandenspanning
(voor en achter 2,2 bar)
• • •
18. Kettingspanning • • •
19. Stationair toerental en
gashandvat
• • •
20. bouten/moeren natrekken • • •
Page 42

39
STORINGEN EN HOE DEZE TE VERHELPEN ZIJN
Storingen in het brandstoftoevoersysteem
Als de motor niet aanslaat of stopt tijdens het rijden, kan dit veroorzaakt
worden doordat:
• er geen brandstof in de carburateur stroomt:
controleer of er voldoende brandstof in de tank zit en of het kraantje
open staat;
• het zeefje voor de brandstof verstopt zit:
blaas het door;
• de hoofdsproeier in de carburateur verstopt zit: draai hem los en
blaas hem door;
• U de chokehevel niet op de juiste wijze gebruikt:
gebruik de hevel overeenkomstig de aanwijzingen voor het starten
van de motor;
• het stationair toerental te laag is afgesteld:
met de afstelschroef A afbeelding 6 verhoogt U het toerental;
• onjuiste werking van het inlaatmembraan:
laat de fout bij een erkende dealer verhelpen;
Storingen in het ontstekingssysteem
Kijk of de bougie wel vonkt. Om dit te controleren dient U de bougie uit
de cilinderkop te draaien en daarna in de bougiedop te plaatsen. Let
op dat er zich geen koolaanslag tussen de elektroden van de bougie
bevindt. Laat nu het metalen gedeelte van de bougie contact maken
met motorblok en start de motor. Wanneer het ontstekingssysteem
goed functioneert, dan springt ertussen de elektroden van de bougie
een blauwe vonk over. Is dit niet het geval raadpleeg dan uw TOMOS
dealer. Let er op, dat bij het controleren van het vonken van de bougie,
U deze niet te dicht bij het bougiegat in de motor houdt, daar de
brandstofdamp binnenin de cilinder hierdoor kan ontvlammen. Zorg bij
deze controle voor een goede massaverbinding met de cilinderkop.
Storingen, die het vermogen van de motor beïnvloeden
Als de motor niet genoeg kracht heeft en slecht trekt, kan dit de
volgende oorzaken hebben:
• de bougie dicht niet af:
draai de bougie vast;
• het luchtlter is verstopt:
reinig het met onbrandbaar reinigingsmiddel.
Blaas het door en olie het filter licht in met luchtfilterolie;
• het uitlaatsysteem is verstopt:
reinig het;
• de remmen van de wielen ontspannen zich niet (lopen aan):
indien de remklauw van de voorrem blijft hangen dient U onmiddellijk
uw TOMOS dealer te raadplegen.
indien de achterrem aanloopt kunt U de remkabel oliën en afstellen,
mochten de problemen aanhouden uw TOMOS dealer raadplegen
• versleten of gebroken zuigerveren:
laat deze door de TOMOS dealer vervangen.
Page 43

40
Storingen in de versnellingbak
• Na het starten loopt de motor stationair. Als de versnelling niet door
gas te geven ingeschakeld
wordt: gas terug nemen en nogmaals proberen beginnen te rijden (de
olie is nog koud en dikker).
geef bij het rijden geleidelijk gas, om schokken te verminderen. Indien
deze storingen vaker optreden,
de fout bij de erkende dealer laten verhelpen;
• De versnelling slipt (vooral bij koud weer)
verkeerde olie in de versnellingsbak - vervang deze door de
voorgeschreven olie.
• De versnelling schakelt lange tijd niet in de tweede versnelling of
schakelt helemaal niet:
de motor is te zwak - reinig de uitlaat;
• De versnelling schakelt niet van de 1e naar de 2e versnelling:
probeer de versnelling te activeren bij een hoger toerental terwijl de
bromfiets op de standaard
staat; te veel olie in de versnellingsbak - controleer het niveau.
• De achterrem ontspant niet - olie de remkabel.
• Bij het schakelen in een hogere versnelling trilt de versnelling:
de ketting is te slap gespannen - stel de kettingspanning bij;
te weinig olie in de versnellingsbak - olie bijvullen tot het
voorgeschreven niveau.
• Bij een uitgeschakelde motor beweegt de bromets zwaar voor- en
achteruit: laat de fout bij een erkende dealer verhelpen.
OPMERKING
Wij raden U aan om contact op te nemen met uw TOMOS dealer,
alvorens U tracht zelf een oplossing te vinden voor ontstane problemen.
Als de garantieperiode nog niet is verstreken is dit van groot belang
daar het zelf uitvoeren van reparaties het einde van uw garantie kan
betekenen.
Page 44

41
GARANTIEBEWIJS
TOMOS NEDERLAND B.V. garandeert deze brom- of snorfiets voor
de periode van 12 maanden (met een maximum van 10.000 km) na
aankoop. De garantie omvat het beschikbaar stellen of repareren van
die delen die door konstruktie-, fabrikage- en of materiaalfouten defekt
zijn geraakt alsmede een door TOMOS NEDERLAND B.V. vastgestelde
bijdrage voor de gemaakte kosten i.v.m montage en demontage van
deze delen. De garantie geldt slechts voor de 1e eigenaar en is niet
overdraagbaar. Wanneer een onderdeel binnen de garantietermijn is
vervangen of gerepareerd, dan eindigt de garantie van dit vervangen
of gerepareerde onderdeel op hetzelfde tijdstip als de oorspronkelijke
garantie. Eventuele reis- en verblijfkosten, vrachtkosten en verdere
indirecte kosten worden niet vergoed. De onder garantie vervangen
onderdelen gaan over in eigendom van TOMOS NEDERLAND B.V.
Bij iedere aanspraak op garantie dient dit garantiebewijs aan de dealer
getoond te worden. De dealer dient het vervangen onderdeel voorzien
van het framenummer en volledig ingevuld garantie claimformulier binnen 1 maand na reparatie, ter inspectie bij TOMOS NEDERLAND B.V.
aan te bieden.
Framenummer
Kleur
Aankoopdatum
Page 45

42
Er is geen sprake van garantie in geval van o.a.:
- het de aankoopmelding,
- noodzakelijke reparaties die het gevolg zijn van het niet, te laat of
onvoldoende uitvoeren van de in het instructieboekje voorgeschreven
controles, service -en reparatiewerkzaamheden,
- noodzakelijke reparaties indien er wijzigingen zijn aangebracht die niet
door TOMOS NEDERLAND B.V. zijn aanbevolen of goedgekeurd,
- noodzakelijke reparaties tengevolge van het gebruik of montage van
niet –originele onderdelen en/of accessoires,
- reparaties uitgevoerd door niet erkende reparateurs of ondeskundigen
en reparaties
voortkomend uit ondeskundige service en onderhoud,
- noodzakelijke reparaties tengevolge van het niet of foutief gebruiken
van smeermiddelen,
- noodzakelijke reparaties tengevolge van het gebruik van de brom- of
snorfiets op een manier
waarvan de gebruiker redelijkerwijs kan weten dat dit schadelijk is
voor de brom- of snorfiets,
- noodzakelijke reparaties die het gevolg zijn van het niet of te laat
uitvoeren of laten
uitvoeren van de door de fabrikant voorgeschreven modificaties,
- het vervangen van lampen, bougies, pakkingen, rem -en koppelings-
voeringen, bedieningskabels en smeermiddelen.
- normale slijtage door gebruik van de brom- of snorfiets
- commercieel gebruik van de brom- of snorfiets of gebruik bij even-
ementen met een competitief element
NB. : bovenstaande uitzonderingen of andere garantievoorwaarden
vermeldt in deze handleiding
laten uw wettelijk recht op garantie betreffende verkoop van consumptiegoederen onverlet.
WAARSCHUWING
Met nadruk wordt er op gewezen dat iedere aanspraak op garantie op
een TOMOS product vervalt zodra er wijzigingen zijn aangebracht en/of
delen zijn ge(de)monteerd, ongeacht herkomst, welke resulteren in een
verhoging van de maximumsnelheid en/of het door de motor ontwikkelde vermogen.
Met name niet – originele cilinders, zuigers en uitlaten (specifiek expansie uitlaten) kunnen onder bepaalde omstandigheden een dermate
funeste invloed hebben dat zelfs framebreuk of andere grote schades
kunnen optreden.
Wij adviseren u alle in deze handleiding beschreven technische onderhoud-, controle- en reparatiewerkzaamheden te laten verrichten door
uw TOMOS dealer, daar deze over de vereiste ervaring en vakkennis
beschikt.
Deze TOMOS brom- of snorfiets is typegoedgekeurd voor gebruik in de
landen behorend tot de Europese Unie.
Page 46

43
TOMOS
MANUEL D’UTILISATION
CLASSIC
Page 47

44
SOMMAIRE
Recommandations 45
Règles de sécurité 45
Caractéristiques 46
Description 48
Mise en route 51
Carburant 51
Démarrage 51
Utilisation 53
Rodage 53
Entretien 54
Opérations d’entretien 54
Lubrification 54
Remplacement de l’huile de transmission 54
Nettoyage 55
Nettoyage du circuit d’alimentation 55
Nettoyage de l’échappement 56
Nettoyage du véhicule 57
Contrôles et réglages 57
Contrôle du niveau d’huile moteur 57
Réglage des freins 57
Réglage de la chaîne de transmission 58
Serrage des vis et écrous 58
Programme d’entretien 59
Recherche d’incidents 60
Anomalies du circuit d’alimentation 60
Anomalies du système d’allumage 60
Anomalies causant une perte de puissance 60
Anomalies de la transmission 60
Page 48

45
RECOMMANDATIONS
Lire attentivement ce manuel avant d’utiliser le véhicule afin de connaître
parfaitement ses caractéristiques de fonctionnement et les règles de sécurité
à appliquer.
1. Le carburant est extrêmement inflammable et explosif. Par conséquent, il
convient de prendre des précautions particulières lors de sa manipulation:
- Arrêter le moteur avant le remplissage du réservoir ;
- Effectuer le ravitaillement à l’extérieur, ne jamais approcher du réservoir
une cigarette allumée, une flamme nue ou des étincelles ; et
- Essuyer soigneusement toute projection de carburant
2. Ne pas laisser le moteur tourner dans un endroit clos ou à proximité de
l’accès à un sous-sol (ex. : cave). Les gaz d’échappement sont toxiques et
plus denses que l’air ambiant.
3. Lors du démarrage ou du fonctionnement du moteur, ne jamais toucher
la bobine d’allumage, le câble haute tension, le capuchon de la bougie
d’allumage ou d’autres pièces du circuit électrique.
4. Le véhicule est équipé d’un système d’échappement à pot catalytique qui
peut atteindre une température très élevée. Lors du fonctionnement du
moteur et pendant un certain temps après l’arrêt de ce dernier, ne pas
toucher les pièces dont la température est élevée, à savoir le cylindre, la
culasse et le silencieux d’échappement. Eviter également tout contact avec
les composants des freins.
5. Lors du fonctionnement du moteur, faire attention aux pièces rotatives de
ce dernier.
Aucune modification du véhicule, suppression de pièces ou installation
de pièces de rechange autres que celles d’origine n’est autorisée. Le
propriétaire du véhicule est clairement averti que toute modification du
système d’échappement ne peut que détériorer le fonctionnement du
véhicule et accroître les rejets polluants, sans pour autant avoir un effet
positif sur les performances du moteur.
REGLES DE SECURITE
La conduite d’un deux roues est simple, mais requiert néanmoins des
aptitudes et une certaine expérience qui ne peuvent s’acquérir que
progressivement. Avant chaque utilisation du véhicule, observer les règles
suivantes :
1. Vérifier le fonctionnement de tous les organes du véhicule.
2. En conduite, porter des vêtements colorés, de préférence avec bande
réfléchissante ; rouler avec le phare allumé et éviter de se placer dans les
zones d’angle mort des autres usagers afin d’être facilement visible.
3. Respecter toutes les règles du code de la route et adapter la vitesse du
véhicule aux conditions de circulation et à votre expérience de la conduite.
4. Ne pas prêter le véhicule à des conducteurs inexpérimentés.
5. Avant de changer de voie de circulation, vérifier systématiquement que
cela ne présente aucun danger et avertir les autres usagers de votre
intention en temps utile. Redoubler de prudence aux intersections et
lors du dépassement d’autres véhicules (notamment des véhicules en
stationnement).
6. En conduite, porter systématiquement un casque, des vêtements adaptés et
des bottes.
7. Etre attentif à ce qui se passe devant et derrière le véhicule (usage des
rétroviseurs) et essayer d’anticiper les évènements.
8. Le freinage modifie la charge exercée sur chaque roue : le frein avant
augmente l’efficacité du freinage, tandis que l’utilisation du seul frein arrière
allonge la distance de freinage tout en réduisant la stabilité du véhicule. Le
frein arrière doit donc être utilisé avec précaution.
Page 49

46
CARACTERISTIQUES
Modèle Classic
Version A34B – 45 km/h
Moteur Type monocylindre, deux
temps
à refroidissement par air
Cylindrée 49 cm
3
Diamètre d’alésage du cylindre 38 mm
Course du piston 43 mm
VERSION A34B:
Taux de compression 10/1
Puissance 1,7 kW à 4800 tr/min
Couple 3,6 Nm à 3500 tr/min
Vitesse maxi 45 km/h
Consommation 1,8 l/100 km
Démarreur A kick
Contenances Réservoir de carburant 4 l (dont 0,5 l de
réserve)
Réservoir d’huile moteur 1 l
Suspension Course de la fourche avant 70 mm
Course de l’amortisseur arrière 35 mm
Roues Dimensions du pneu avant 2 ¼ -16
Dimensions du pneu arrière 2 ¼ -16
Pression gonflage pneu avant 2,2 bar
Pression gonflage pneu arrière 2,2 bar
Circuit Magnéto 12 V 80 W
électrique Avance à l’allumage préréglée
Bougie d’allumage-A24B Bosna F75,
BOSCH-W7AC
Bougie d’allumage-A24C,
A24D, A24E Bosna F75,
Champion-L86
Page 50

47
Ecart. électro. bougie allum. 0,8 mm
Projecteur 12 V 25 W
Feu arrière 12 V 5 W
Feu stop 12 V 15 W
Eclairage de l’indicateur de vitesse 12 V 2 W
Témoin d’alerte de niveau d’huile 12 V 1,5 W
Dimensions Empattement 1080 mm
et poids Longueur hors-tout du véhicule 1640 mm
Poids du véhicule
(réservoir de carburant vide) 60 +3 kg
Poids total maximum autorisé 160 kg
Page 51

48
DESCRIPTION
1. Bouchon du réservoir de carburant
2. Robinet d’alimentation
3. Carburateur, starter
4. Levier de démarreur à kick ou pédales
5. Béquille
6. Levier de frein arrière
7. Levier de frein avant
8. Poignée d’accélérateur
9. Commutateur d’avertisseur
9a. Commutateur STOP
10. Trousse à outils
11. Indicateur de vitesse
12. Témoin d’alerte de niveau d’huile
13. Tendeur de chaîne
14. Filtre à air
15. Bouchon du réservoir d’huile moteur
16. Porte-bagages
17. Pompe à huile
18. Verrou de direction
Page 52

49
Fig. 1 Fig. 2
11
6
9 9a
8
7
12
Page 53

50
Fig. 3
Fig. 4
Page 54

51
MISE EN ROUTE
Carburant
EUROSUPER 95 et huile pour moteur deux temps.
Votre véhicule est équipé d’une pompe à huile qui mélange une quantité
d’huile donnée à l’essence (environ 2 %). Verser environ 1 litre d’huile
pour moteur deux temps dans le réservoir d’huile (15, Fig. 1).
ATTENTION !
Pour le niveau d’huile maximum, se reporter à l’autocollant
d’avertissement apposé à proximité du réservoir d’huile.
Utiliser exclusivement de l’huile pour moteur deux temps haute qualité
totalement synthétique.
ATTENTION !
Avant le premier démarrage du moteur, remplir le réservoir de carburant
(1, Fig. 1) avec environ 1 litre de mélange d’huile pour moteur deux
temps et d’essence selon un rapport de 1 pour 50 (soit 2 % d’huile),
puis démarrer le moteur et le laisser tourner pendant au moins 8 minutes afin que la pompe à huile remplisse la tuyauterie d’aspiration.
Avant cela, retirer le couvercle de pompe à huile (17, Fig. 1), dévisser
la vis de pompe à huile (A, Fig. 3) et attendre que de l’huile s’écoule du
réservoir. Resserrer la vis.
Démarrage
Ouvrir le robinet d’alimentation (Fig. 5). Nota : A – alimentation coupée,
B – alimentation ouverte, C - réserve.
Si le moteur est froid, actionner le levier de démarrage à froid (B, Fig. 6).
Version à pédales:
Avec l’accélérateur totalement fermé, serrer le levier de frein arrière et donner un coup de pédale (4, Fig. 1) en arrière – sans ouvrir
l’accélérateur.
Si le moteur est démarré alors qu’il est encore chaud, l’accélérateur doit
être ouvert à fond.
Page 55

52
Lors de l’utilisation du starter, laisser le moteur tourner pendant 10 à 20
secondes sans ouvrir l’accélérateur. Le levier de démarrage du starter
se désengage automatiquement lorsque l’accélérateur est ouvert.
Si le moteur est chaud, ne pas utiliser le levier de starter.
Fig. 5
Page 56

53
Utilisation
La vitesse est contrôlée au moyen de la poignée d’accélérateur
(8, Fig. 2).
L’engagement du premier ou du deuxième rapport s’effectue en ouvrant
ou en fermant l’accélérateur. Eviter de passer trop souvent de première
en deuxième et inversement. Il est préférable de réduire l’ouverture de
l’accélérateur et de maintenir le véhicule en première. En descente,
ouvrir brièvement l’accélérateur de temps en temps afin d’améliorer la
lubrification et le fonctionnement du projecteur. Pour arrêter le véhicule,
relâcher la poignée d’accélérateur et amener le bouton STOP en position OFF (9a, Fig. 4). Puis fermer le robinet d’alimentation (position A,
Fig. 5).
Si le véhicule ne sera pas utilisé pendant une période prolongée (par
ex., en hiver), il est recommandé de vidanger le carburant de la cuve du
carburateur en procédant comme suit : fermer le robinet d’alimentation
et, tout en actionnant la poignée d’accélérateur, laisser le moteur
tourner jusqu’à ce qu’il s’arrête automatiquement.
Rodage
Ne pas faire tourner le moteur à pleins gaz pendant les 100 premiers
kilomètres. Augmenter ensuite la charge moteur progressivement.
Fig. 5
Page 57

54
ENTRETIEN
Opérations d’entretien
L’entretien de votre véhicule est simple mais indispensable à son bon
fonctionnement. Certaines opérations d’entretien sont particulièrement
importantes, parmi lesquelles la lubrification régulière des différents
organes, les vidanges d’huile de transmission, le nettoyage des pièces
affectant le fonctionnement du moteur (bougie d’allumage, système
d’échappement, circuit d’alimentation) et le contrôle des éléments
influant sur la sécurité de conduite (pression des pneus, fonctionnement
de l’éclairage et des freins, serrage des vis et écrous). Le tableau
d’entretien indique quelles sont les opérations à effectuer à des périodicités données exprimées en km et en mois - selon première échéance
- au cours des 20 000 premiers kilomètres ou des 24 premiers mois
d’utilisation du véhicule.
Lubrifiants
Pour la transmission, utiliser de l’huile de transmission automatique ATF
A ou ATF F. Pour la lubrification des autres composants du véhicule
(voir le programme d’entretien), il est recommandé d’utiliser de l’huile
moteur de grade SAE 30 et de la graisse LIS 2.
Remplacement de l’huile de transmission
L’huile doit être remplacée lorsque le moteur est chaud. Déposer le
carter côté droit, desserrer les trois bouchons filetés (1, 2, 3, Fig. 7)
situés sur le couvercle du moteur côté droit, et laisser l’huile s’écouler
totalement. Resserrer le bouchon de vidange d’huile (3, Fig. 7) et verser
environ 300 cm
3
d’huile par l’orifice de remplissage (1, Fig. 7), de sorte
que le niveau d’huile atteigne l’orifice de contrôle de niveau (2, Fig. 7).
Puis resserrer les bouchons des orifices de remplissage d’huile et de
contrôle de niveau.
Fig. 7
Page 58

55
NETTOYAGE
Nettoyage du circuit d’alimentation (Fig. 8)
Concernant le circuit d’alimentation, il est nécessaire de nettoyer
régulièrement le gicleur principal, le filtre à air et le filtre du robinet
d’alimentation. Ne pas utiliser d’objets métalliques pour nettoyer le
gicleur principal, employer plutôt une soufflette d’air.
L’éponge du filtre doit être nettoyée soigneusement avec de l’essence.
Une fois l’éponge nettoyée, la presser afin d’éliminer l’essence (ne pas
la brosser) et la sécher au moyen d’une soufflette d’air sec.
Fig. 8
Page 59

56
Nettoyage du système d’échappement (Fig. 9)
L’accumulation de suie dans le système d’échappement obstrue le passage des gaz d’échappement et réduit ainsi la puissance du moteur.
Nettoyer régulièrement le conduit d’échappement du cylindre, l’entrée
de la tuyauterie d’échappement, la tête de piston et la chambre de combustion (Fig.10).
Attention : le système d’échappement intègre un pot catalytique,
il ne faut donc pas insérer d’outil ou de câble, ni verser de liquide,
etc. dans la tuyauterie d’échappement. Une telle opération risquerait
d’endommager le pot catalytique.
Il est fortement recommandé de confier le nettoyage du système
d’échappement à un réparateur agréé.
Fig. 10
Fig. 9
Page 60

57
Nettoyage du véhicule
Le nettoyage de l’extérieur du véhicule fait également partie de son
entretien régulier. Après l’avoir lavé, essuyer le véhicule afin de le
sécher. Protéger les surfaces peintes à l’aide d’agents de protection de
peinture. Une fois le nettoyage terminé, vérifier le fonctionnement du
moteur, de l’éclairage et des freins.
CONTROLES ET REGLAGES
Contrôle du niveau d’huile moteur
Vérifier régulièrement le niveau du réservoir d’huile. Faire l’appoint si
nécessaire. Si le témoin d’alerte ne s’éteint pas après le démarrage du
moteur, cela indique que le niveau d’huile est bas. Il convient alors de
faire l’appoint immédiatement.
Attention :
Version à démarreur à kick et à pédales : le témoin d’alerte s’allume
pendant quelques secondes après le démarrage du moteur. Si ce n’est
pas le cas, il convient de remédier à cette anomalie.
Réglage des freins
Les freins se règlent au moyen des vis des moyeux de roue. Ils sont
correctement réglés lorsque la garde du levier de frein s’établit entre 10
et 15 mm et que l’écartement entre la cocotte et le levier atteint environ
3 mm (Fig. 11). Une fois le réglage effectué, veiller à resserrer le contreécrou.
Fig. 11
Page 61

58
Réglage de la chaîne de transmission
La tension de la chaîne doit être réglée de sorte qu’elle puisse être
abaissée ou soulevée de 10 mm en exerçant une pression (Fig. 12).
Régler la tension de la chaîne en tournant le tendeur de chaîne (13,
Fig. 1) de l’axe de roue arrière. Une fois le réglage effectué, resserrer les
écrous situés de chaque côté de l’axe, précédemment desserrés pour
le réglage.
Serrage des vis et écrous
Vérifier régulièrement et resserrer si nécessaire les vis et écrous des
principaux composants du véhicule (roues, guidon, amortisseur, axe de
bras oscillant arrière, vis de fixation du moteur au berceau, bouchon de
vidange de l’huile de transmission).
Fig. 12
Page 62

59
PROGRAMME D’ENTRETIEN
Périodicité (km)
Périodicité (mois)
1.000
2
3.000
6
10.000,
15.000,
20.000
12, 18, 24
Lubrification
1.
Remplac. huile transmission
• • •
2. Freins (câbles) Si nécessaire
3. Chaîne • • •
Graissage
4. Bagues de roulement de
fourchette arrière
Si nécessaire
5. Roulements de direction •
Nettoyage
6. Bougie d’allumage Si nécessaire
7. Filtre à air (lubrification) • •
8.
Culasse, tête de piston,
conduit d’échappement
• •
9.
Cylindre et tuyauterie
d’échappement
• •
Périodicité (km)
Périodicité (mois)
1.000
2
3.000
6
10.000,
15.000,
20.000
12, 18, 24
Contrôles et réglages
10. Niveau huile transmission • • •
11. Avertisseur et éclairage • • •
12.
Ecart. électrodes bougie
allum.
• • •
13. Contrôle et réglage des
freins
• • •
14. Jeu des roulements de
direction
• • •
15.
Jeu des roulements de roue
• • •
16. Alignement des roues • • •
17.
Pression des pneus
(avant et arrière 2,2 bar)
• • •
18. Tension de la chaîne • • •
19. Ralenti et accélérateur • • •
20. Serrage des vis et écrous • • •
Page 63

60
RECHERCHE D’INCIDENTS
Anomalies du circuit d’alimentation
Tout défaut de démarrage ou arrêt du moteur en conduite
peut être dû, entre autres, à l’une des raisons suivantes :
- Défaut d’arrivée du carburant au carburateur :
Vérifier le niveau du réservoir de carburant et la position du robinet
d’alimentation.
- Filtres à carburant colmatés :
Souffler de l’air sur les filtres afin de les nettoyer.
- Gicleur principal du carburateur colmaté :
Le déposer et souffler de l’air dessus pour le nettoyer.
- Utilisation inappropriée du levier de starter :
Utiliser le levier conformément aux instructions de démarrage du
moteur.
- Régime de ralenti trop faible :
Augmenter le régime moteur à l’aide de la vis de réglage (A, Fig. 6).
Anomalies du système d’allumage
Contrôler l’étincelle. Tout défaut de production d’une étincelle par
la bougie d’allumage peut être dû, entre autres, à l’une des raisons
suivantes :
- Bougie d’allumage humide ou électrodes en court-circuit :
- Electrodes de bougie d’allumage fréquemment en court-circuit :
Eliminer la calamine accumulée au niveau de la culasse et de la tête
de piston.
- Electrodes de bougie d’allumage usées :
Régler l’écartement des électrodes conformément aux spécifications,
ou remplacer la bougie d’allumage.
- Capuchon de bougie d’allumage installé de manière incorrecte ou en
court-circuit à la masse :
Installer correctement le capuchon sur la bougie d’allumage ou le
remplacer.
- Bobine d’allumage :
Faire contrôler et corriger l’anomalie par un réparateur agréé.
Anomalies causant une perte de puissance
Toute perte de puissance ou de performances peut être due, entre
autres, à l’une des raisons suivantes :
- Serrage inapproprié de la bougie d’allumage ou de la culasse :
Serrer la bougie d’allumage ou les écrous de la culasse.
- Filtre à air du carburateur colmaté :
Le nettoyer avec de l’essence, le sécher en soufflant de l’air dessus
et le lubrifier légèrement.
- Système d’échappement colmaté : le nettoyer.
Page 64

61
Anomalies de la transmission
- Une fois démarré, le moteur tourne au ralenti. Si l’ouverture de
l’accélérateur ne provoque pas l’engagement de l’embrayage :
Relâcher l’accélérateur et essayer de redémarrer le véhicule (l’huile
est toujours froide et plus épaisse). En conduite, ouvrir progressivement l’accélérateur afin d’empêcher tout à-coup du moteur. Si le
problème se répète, faire réparer le véhicule par un réparateur agréé.
- L’embrayage patine (notamment par temps froid) :
Huile inappropriée dans la transmission - la remplacer par l’huile
spécifiée.
- L’embrayage n’engage pas le deuxième rapport ou bien après un
temps extrêmement long :
Puissance moteur réduite - nettoyer le silencieux d’échappement.
L’embrayage est grippé - essayer d’activer l’embrayage à régime
élevé avec le véhicule garé sur sa béquille.
Excès d’huile dans la transmission - vérifier le niveau d’huile.
- A-coups de l’embrayage après l’engagement du deuxième rapport :
chaîne pas assez tendue - régler la tension de la chaîne.
Niveau d’huile de transmission trop bas - faire l’appoint jusqu’au
niveau spécifié.
- Lorsque le moteur est arrêté, il est difficile de déplacer le véhicule
vers l’avant ou vers l’arrière :
faire contrôler l’anomalie par un réparateur agréé.
Page 65

62
Page 66

63
TOMOS
CLASSIC
HANDBUCH
Page 67

64
Vorwort
Vielen Dank, dass Sie sich für dieses Fahrzeug entschieden haben!
In diesem Handbuch wird die korrekte Handhabung Ihres neuen Motorrollers beschrieben. Um möglichst lange Freude an diesem zu haben,
befolgen Sie bitte alle Hinweise und Erklärungen dieses Handbuches.
Aufgrund ständiger Überarbeitung der Technik, kann es zwischen Ihrem
Fahrzeug und den Beschreibungen in diesem Handbuch eventuell zu
leichten optischen und/oder technischen Abweichungen kommen.
Reparaturen und Wartungsarbeiten dürfen nur von qualifiziertem Fachpersonal durchgeführt werden.
Es dürfen ausschließlich Originalteile und -zubehör verwendet werden.
Inhalt
Sicherheitshinweise 65
Technische Daten 66
Fahrzeugkomponenten 68
Bedienung des Fahrzeugs 71
Einstellungen 77
Wartungsplan 79
Page 68

65
SICHERHEITSHINWEISE
Beachten Sie stets die örtlichen Gesetze und Bestimmungen bei der
Fahrt.
Üben Sie vor der Fahrt
Bevor Sie das Fahrzeug zum ersten Mal im Verkehr bewegen,
sollten Sie zuerst ausreichend auf einem verkehrsfreien Platz (z. B.
Verkehrsübungsgelände) üben, um sich so mit dem Fahrzeug vertraut
zu machen.
Geschwindigkeitsbegrenzungen beachten
Beachten Sie stets Geschwindigkeitsbegrenzungen. Fahren Sie stets
mit angemessener und an die Verkehrs- und Straßenbedingungen
angepasster Geschwindigkeit.
Fahren bei nasser Fahrbahn
Bei feuchter oder nasser Fahrbahn (z. B. durch Regen) ist, aufgrund von
Rutschgefahr und schlechterer Sicht, besondere Vorsicht beim Fahren
gefordert.
Helm
Tragen Sie beim Fahren stets einen Helm.
Sicherheitskleidung
Es wird empfohlen, beim Fahren stets Sicherheitskleidung in Form von
speziellen Motorradjacken mit Reflektoren, sowie Handschuhe und
festes Schuhwerk zu tragen.
Wichtige Inspektionen
Die folgenden Prüfungen des Fahrzeugs sind unumgänglich:
• Prüfung vor jeder Fahrt
• Regelmäßige Inspektionen durch eine autorisierte Servicewerkstätte
gemäß Scheckheft. Beachten Sie hierzu den Inspektionsplan in
diesem Handbuch.
Hitze
Während der Fahrt werden einzelne Komponenten des Fahrzeugs, z. B.
der Auspuff, heiß. Berühren Sie diese Komponenten nicht, da dies zu
Verbrennungen führen kann.
Halten Sie das Fahrzeug fern von leicht entzündlichen Materialien.
Modifizierungen
Nehmen Sie keine Modifizierungen am Fahrzeug vor, da dies gegen das
Gesetz verstößt und zum Verlust der Fahrsicherheit, sowie der Garantie
führt.
Weitere Sicherheitshinweise
1. Benzin ist leicht entflammbar. Schalten Sie vor dem Tanken Zündung
und Motor vollständig aus. Entfernen Sie Benzinrückstände.
2. Lassen Sie den Motor nicht in geschlossenen Räumen laufen, es
besteht sonst Vergiftungsgefahr durch Abgase.
3. Berühren Sie niemals Zündspule, Kabel, Zündkerze oder andere Teile
des elektrischen Systems.
Page 69

66
TECHNISCHE DATEN
Modell Classic
Varianten A34B - 45 km/h
A34D - 25 km/h
A34E - 20 km/h
Motor Art 1-Zylinder, 2-Takt, luftgekühlt
Hubraum 49 cm3
Bohrung x Hub 38 x 43 mm
Variante A34B Verdichtung 10:1
Leistung
1,7 kW bei 4.800 U/Min.
Drehmoment 3,6 Nm bei 3.500 U/Min.
Höchstgeschwindigkeit 45 km/h
Verbrauch (ca.) 1,8 / 100 km
Variante A34D Verdichtung 6:1
Leistung 1,0 kW bei 3.500 U/Min.
Drehmoment 3,1 Nm bei 2.500 U/Min.
Höchstgeschwindigkeit 25 km/h
Verbrauch (ca.) 2,5 / 100 km
Variante A34E Verdichtung 6:1
Leistung 1,0 kW bei 3.500 U/Min.
Drehmoment 3,1 Nm bei 2.500 U/Min.
Höchstgeschwindigkeit 20 km/h
Verbrauch (ca.) 2,8 / 100 km
Starter Kickstarter oder Pedale
Kraftstoff Tankkapazität 4 L (inkl. 0,5 L Reserve)
Motorölbehälter 1 L
Aufhängung Stoßdämpfer vorne 70 mm
Stoßdämpfer hinten 35 mm
Reifen Vorne 2,25 - 16
Hinten 2,25 - 16
Reifendruck vorne 2,2 bar
Reifendruck hinten 2,2 bar
Elektrik Zündmagnet 12V 80W
Zündkerze A24B Bosna F75, BOSCH-W7/AC
Zündkerze A24D, A24E Bosna F75, Champion-L86
Zündkerzenelektrodenabstand 0,8 mm
Scheinwerfer 12V 25W
Rücklicht 12V 5W
Page 70

67
Bremslicht 12V 15W
Tachobeleuchtung 12V 2W
Ölwanleuchte 12V 1,5W
Maße Radstand 1.080 mm
und Gewichte Gesamtlänge 1.640 mm
Leergewicht 60 + 3 kg
Max. zul. Gesamtgewicht 160 kg
Technische und optische Änderungen vorbehalten.
Vorrangig gelten die Angaben aus der COC.
Page 71

68
FAHRZEUGKOMPONENTEN
1. Benzintankdeckel
2. Benzinhahn
3. Vergaser, Choke
4. Kickstarterhebel oder Pedale
5. Ständer
6. Hebel für Hinterradbremse
7. Hebel für Vorderradbremse
8. Gashebel
9. Hupe
a. Stop-Schalter
10. Werkzeugtasche
11. Tachometer
12. Ölwarnleuchte
13. Einsteller für Kettenspannung
14. Luftfilter
15. Motorölbehälter
16. Gepäckträger
17. Ölpumpe
18. Lenkerschloss
Page 72

69
Abb. 1 Abb. 2
11
6
9 9a
8
7
12
Page 73

70
Abb. 3
Abb. 4
Page 74

71
BEDIENUNG DES FAHRZEUGS
Kraftstoff
Super Bleifrei 95 + 2-Takt-Motorenöl
Ihr Fahrzeug verfügt über eine Ölpumpe, die dem Kraft•stoff einen
bestimmten Anteil Öl zusetzt (ca. 2%). Füllen Sie etwa 1 Liter hochwertiges 2-Takt-Motorenöl in den Ölbehälter (15, Abb. 1).
ACHTUNG!
Beachten Sie den Warnaufkleber nahe dem Ölbehälter bezüglich der
maximalen Einfüllmenge. Verwenden Sie ausschließlich hochwertiges
2-Takt-Motorenöl.
ACHTUNG!
Wenn Sie das Fahrzeug zum ersten Mal starten, befüllen Sie den Kraftstofftank mit 1 Liter einer Mischung aus 2-Takt-Motorenöl und Benzin
im Verhältnis 1:50 (2%). Starten Sie dann den Motor und lassen diesen
mindestens acht Minuten laufen.
Öffnen Sie zuvor die Ölpumpenkappe und die Ventilationsschraube
(A, Abb. 3) und warten Sie, bis Öl aus dem Behälter tropft. Bringen Sie
danach die Schraube wieder an.
Befüllen Sie den Benzintank mit Kraftstoff und versichern Sie sich gleichzeitig, dass der Ölstand nicht unter den Mindestpegel fällt.
Versichern Sie sich, dass der Ölschlauch nicht abgeknickt wird.
Starten des Motors
Öffnen Sie den Benzinhahn.
A - Benzinhahn geschlossen
B - Benzinhahn geöffnet
C - Reserve
Drücken Sie bei kaltem Motor den Kaltstarthebel (B, Abb. 6).
Kickstarter
Halten Sie die Hinterradbremse gezogen und treten Sie das Kickstarterpedal nach unten, ohne den Gashebel zu bedienen.
Pedalversion
Halten Sie die Hinterradbremse gezogen und treten Sie das Pedal nach
unten, ohne den Gashebel zu bedienen.
Page 75

72
Lassen Sie bei Verwendung des Chokes den Motor 10 bis 20 Sekunden
lang laufen, ohne den Gashebel zu betätigen. Der Choke-Hebel springt
bei Betätigung des Gashebels automatisch zurück in seine Ausgangsposition.
Verwenden Sie bei heißem Motor nicht den Choke.
Fig. 5
Page 76

73
Fahren
Die Geschwindigkeit wird mit dem Gashebel geregelt.
Einlegen des ersten oder zweiten Gangs wird durch das Öffnen
und Schließen des Gashebels gesteuert. Vermeiden Sie zu häufiges
Schalten zwischen den Gängen.
Motor ausschalten
Schalten Sie den Motor aus, indem Sie den Gashebel loslassen und den
Stop-Schalter auf OFF stellen.
Schließen Sie dann den Benzinhahn.
Wenn das Fahrzeug längere Zeit still steht (z. B. im Winter), so wird
empfohlen, den Kraftstoff aus dem Vergaser wie folgt abzulassen:
Schließen Sie den Benzinhahn und betätigen Sie den Gashebel bis der
Motor von alleine ausgeht.
Fig. 5
Page 77

74
Einfahrperiode
Während der ersten 100 km darf der Motor nicht überbe•ansprucht
werden. Geben Sie während der ersten 100 km nicht Vollgas und bedienen Sie den Gashebel nur zur Hälfte.
Wartung
Eine regelmäßige Wartung des Fahrzeugs ist notwendig, um einen
einwandfreien Betrieb zu ermöglichen. Halten Sie daher den Inspektionsplan in diesem Handbuch ein.
Schmierung
Verwenden Sie für die Getriebebox ATF A oder ATF F Automatiköl.
Verwenden Sie für die Schmierung anderer Komponen•ten Motoröl der
Sorte SAE 30 und Fett der Sorte LIS 2.
Ölwechsel Getriebebox - Automatikmodell
Wechseln Sie das Öl bei warmem Motor (ausgeschaltet). Lösen Sie
die Schrauben 1, 2, 3 am rechten Motorrahmen und lassen Sie das Öl
komplett abtropfen.
Bringen Sie die Ölablassschraube 3 wieder an und füllen Sie etwa 300
cm3 Öl durch den Einfüllstutzen 1 ein. Der Pegel darf die Maximalmarkierung in der Kontrollöffnung 2 nicht übersteigen.
Bringen Sie alle Schrauben wieder an.
Fig. 7
Page 78

75
REINIGEN
Reinigen des Benzinsystems
Es ist notwendig, Hauptdüse, Luftfilter und Benzinhahn regelmäßig zu
reinigen.
Verwenden Sie hierfür keine metallischen Gegenstände oder aggressive
Reinigungsmittel.
Filter - Der Schwamm sollte regelmäßig mit Benzin ausgewaschen
werden. Wringen Sie das Benzin danach aus (nicht bürsten) und trocknen Sie den Schwamm dann.
Reinigen des Abgassystems
Rußablagerungen behindern die einwandfreie Funktion des Abgsasystems und damit die Funktion des Motors.
Wartungs- und Reinigungsarbeiten am Abgassystem sollten nur von
qualifizierten Fachkräften durchgeführt werden.
Fig. 8
Page 79

76
Reinigung und Lagerung des Fahrzgeugs
1. Decken Sie Auspuff und Luftfiltereinlass mit einer geeigneten Plane
ab.
2. Entfernen Sie Schmutz und Rückstände vom Motor (Achtung: Der
Motor muss hierzu kalt sein).
3. Reinigen Sie das Fahrzeug mit klarem Wasser und einem sanften
Reinigungsmittel. Spülen Sie dieses dann wieder mit klarem Wasser
ab.
4. Trocknen Sie das Fahrzeug sorgfältig und vollständig ab, damit es
nicht zu Rostbildung kommt. Achten Sie beim Trocknen darauf, dass
keine Fusselrückstände am Fahrzeug haften bleiben.
5. Trocknen Sie die Kette und fetten Sie diese mit einem geeigneten
Schmiermittel.
6. Wenn das Fahrzeug trocken ist, nehmen Sie die Abdeckungen von
Luftfiltereinlass und Auspuff ab. Starten Sie den Motor und lassen
Sie diesen einige Minuten im Leerlauf laufen. Bringen Sie die Abdeckungen dann wieder dann.
Achtung: Verwenden Sie keine Hochdruckreiniger zum reinigen des
Fahrzeugs, da Teile beschädigt werden können.
Fig. 10
Fig. 9
Page 80

77
Wenn Sie das Fahrzeug für einen längeren Zeitraum einlagern möchten,
gehen Sie folgendermaßen vor:
1. Reinigen Sie das Fahrzeug wie oben beschrieben.
2. Lassen Sie das Benzin aus dem Benzintank und dem Vergaser ab.
3. Entfernen Sie die Zündkerze und tropfen Sie ein paar Tropfen Öl auf
den Zylinder.
Ersetzen Sie die Zündkerze und starten Sie den Motor einige Male
anhand des Kickstarters, wobei der Zündschalter ausgeschaltet
(OFF) sein sollte. So weren die internen Oberflächen des Zylinders
geschmiert.
4. Fetten Sie alle Bewegtteile und Kabel.
5. Stellen Sie das Fahrzeug erhaben auf, sodass die Räder nicht den
Boden berühren.
6. Bringen Sie eine geeignete Plastikabdeckung am Auspuff an.
7. Benetzen Sie alle nicht lackierten Metallteile mit einer dünnen
Schicht Motoröl.
8. Decken Sie das Fahrzeug mit einer geeigneten Plane ab.
EINSTELLUNGEN
Prüfen des Motorölstands
Prüfen Sie regelmäßig den Motorölstand und füllen Sie ggf. geeignetes
Öl nach. Wenn nach dem Motorstart die Ölwarnleuchte nicht ausgeht,
so ist der Ölstand zu niedrig und es muss unbedingt Öl nachgefüllt
werden.
Hinweis:
Bei Modellen mit Kickstarter oder Pedalen leuchtet die ölwarnlampe
nach Motorstart für einige Sekunden. Sollte dies nicht der Fall sein, so
ist möglicherweise die Lampe defekt und muss ersetzt werden.
Fig. 11
Page 81

78
Bowdenzüge
Stellen Sie den Bowdenzug der Bremsen an der Radnabe ein.
Der Bowdenzug ist korrekt eingestellt, wenn das freie Spiel 10 - 15 mm
und der Abstand zwischen Bremshebel und Befestigung 3 mm beträgt.
Der Gaszug kann mit den Einstellschrauben an Gashebel und Vergaser
eingestellt werden. Versichern Sie sich, dass nach der Einstellung wieder alle Schrauben korrekt angebracht sind.
Schrauben
Prüfen Sie regelmäßig den korrekten Sitz aller Schrauben und Befestigungen.
Einstellen der Antriebskette
Die Spannung der Kette sollte so justiert sein, dass sich die Kette 10
mm nach oben und nach unten bewegen kann.
Stellen Sie die Kette anhand der Einstellschraube an der vorderen Befestigungsschraube der Halterung des Hinterrades ein. Ziehen Sie nach
der Einstellung alle Schrauben wieder fest an.
Fig. 12
Page 82

79
WARTUNGSPLAN
km 1.000 5.000 10.000 15.000 20.000
Monate 2 6 12 18 24
Schmiersystem
Getriebeölwechsel x x x x x
Bowdenzüge falls notwendig falls notwendig falls notwendig falls notwendig falls notwendig
Kette schmieren x x x x x
Lenkerkugellager x x x
Reinigen
Zündkerze x x x x
Luftfilter x x x x
Zylinderkopf, Kolben, Abgaskanal x x x
Auspuff x x x
Komponenten und Einstellungen
Getriebeöl x x x x x
Hupe und Lichtanlage x x x x x
Elektrodenabstand der Zündkerze x x x x x
Brems- und Kupplungseinstellungen x x x x x
Freies Spiel Lenkerkugellager x x x x x
Freies Spiel der Radkugellager x x x x x
Reifendruck x x x x x
Kettenspannung x x x x x
Schrauben, Muttern x x x x x
Page 83

80
Page 84

CLASSIC
TABLEAU
DE MAINTENANCE
TEL./E-MAIL
CACHET ET SIGNATURE DU
DISTRIBUTEUR AGRÉÉ
NOM ET PRÉNOM DU PROPRIÉTAIRE
ADRESSE
MODELE/TYPE
NUMÉRO DE SÉRIE:
ANNÉE DE PRODUCTION:
DATE DE LIVRAISON:
NOM DU DISTRIBUTEUR
ADRESSE DU DISTRIBUTEUR AGREE
Les travaux de garantie doivent être effectués sous la responsabilité et dans les
ateliers d’un distributeur agréé.
Page 85

DATE
SERVICE
DATE
SERVICE
DATE
SERVICE
DATE
SERVICE
DATE
SERVICE
KM
months
1.000
2
3.000
6
10.000
12
15.000
18
20.000
24
JUSTIFICATIF DES OPERATIONS DE MAINTENANCE PRECONISEES PAR LE CONSTRUCTEUR (à la charge du client)
Page 86

Printed by: Tiskarna Vek, Koper 01/2011
237317
Tomos d.o.o., motoindustrija
Šmarska 4, 6000 Koper, Slovenija
Tel.: 00386 (0)5 6684 400, fax: 00386 (0)5 6684 410
info@tomos.si; www.tomos.si
 Loading...