

Page 1

US
closer to nature®
perfect prep™ machine
INSTRUCTIONS FOR USE
CAUTION - TO PROTECT AGAINST ELECTRICAL SHOCK DO NOT IMMERSE CORD OR PLUGS OR
PERFECT PREP™ MACHINE IN WATER OR OTHER LIQUID
READ ALL INSTRUCTIONS
IMPORTANT SAFEGUARDS
FOR HOUSEHOLD USE
When using electrical appliances, basic safety
precautions should also be followed including the
following:
CAUTION: TO ENSURE
CONTINUED PROTECTION
AGAINST RISK OF ELECTRIC
SHOCK, CONNECT TO PROPERLY
GROUNDED OUTLETS ONLY.
Keep all components not in use out of reach of
children.
Never place items on top of the perfect prep™
machine.
If the appliance is of the grounded type, the
extension cord should be a grounding-type 3-wire
cord.
Do not place on or near a hot gas or electric burner
or in a heated oven.
Do not use outdoors.
Always use on a flat heat resistant surface.
When in use the perfect prep™ machine contains hot
water and steam.
Extreme caution must be used when moving an
appliance containing hot oil or other hot liquids.
Do not touch hot surfaces, use handles and knobs.
Always keep the perfect prep™ machine and its plug
out of reach of small children.
Before plugging in the perfect prep™ machine for the
first time ensure the voltage is compatible with your
electricity supply by checking the label on the base of
the unit.
Always attach the plug to the unit first, and then plug
into the wall outlet. To disconnect turn any control
“off” then remove the plug from the wall outlet.
Ensure water has been added to the unit before
switching the unit on.
Always unplug the unit from the electrical outlet
when not in use and before cleaning. Allow to cool
before putting on or taking off any parts.
Close supervision is necessary when any appliance is
use by or near children.
The product has been fitted with a cord wind on the
rear of the unit to allow you to adjust the length of
the cord safely. It is recommended that the cord be
kept as short as possible.
Do not let the cord hang over the edge of a table or
counter or touch hot surfaces.
Do not operate any appliance with a damaged cord or
plug after the product appliance malfunctions or has
been damaged in any manner. User maintenance other
than cleaning, descaling or changing the filter is not
required for this product. Return appliance to the
nearest authorized service facility for examination,
repair or adjustment.
The use of accessory attachments is not
recommended by the appliance manufacturer. This
may result in fire, electric shock or injury to persons.
Do not use appliance for anything other than intended
This appliance is not intended for use by persons
(including children) with reduced physical, sensory or
mental capabilities, or lack of experience and
knowledge, unless they have been given supervision or
instruction concerning use of the appliance by a
person responsible for their safety.
ADDITIONAL INFORMATION
A short power-supply cord (or detachable
power-supply cord) should be used to reduce the risk
resulting from becoming entangled in or tripping over a
longer cord.
Longer detachable power-supply cords are available
and may be used if care is exercised in their use.
If a longer detachable power-supply cord or extension
is used: 1) The marked electrical rating of the cord set
or extension cord should be at least as great as the
electrical rating of the appliance 2) the cord should be
arranged so that it will not drape over the countertop
or tabletop where it can be pulled on by children or
tripped over unintentionally.
SAVE THESE INSTRUCTIONS.
DO’S & DON’TS
Do’s
✔ Before first use clean the unit following points
1 to 15 in the set up and cleaning section.
✔ Always ensure good hygiene by washing your
hands and work surfaces before handling the
water filter.
✔ This product is intended for use with tommee
tippee closer to nature water filters which
are available from all perfect prep™ machine
maker stockists. Use of any other water filter
with this product could put your child’s health
at risk.
✔ A static red light will indicate when the filter
has enough life to filter 8 gallons of water,
when the change filter light flashes red the
filter must be changed immediately for your
child’s safety and health.
✔ Always adjust the height of the bottle stand
to ensure that the bottle neck is close to the
dispenser outlet to maintain the
temperature of the water and avoid any
splashes.
✔ Dispose of the filter in general household
waste.
✔ Only use potable water (drinking water).
✔ To clean the outside of the unit wipe with
clean damp cloth.
✔ For your child’s safety always check food
temperature before feeding by testing on a
sensitive part of your skin.
✔ Be careful when handling boiling water.
Don’ts
✘ Do not allow the water tank to be contaminated.
The inside of the unit should only be cleaned by
following the cleaning process in steps 1-15 in the
set up and cleaning section of this leaflet.
✘ Do not clean with solvents or harsh chemicals.
✘ This appliance is intended for use in a kitchen
and not suitable for a nursery.
✘ This unit makes very hot water keep hands
and other body parts away from the dispenser
outlet.
✘ Use cold water only. Do not use water that is
over 77°F other than when cleaning the unit
using the set up and cleaning process. If water
over 77°F is used, the unit will automatically
turn itself off. If this happens allow the unit to
cool and then restart.
✘ Do not overfill past the max mark on the
water basin.
✘ Do not pour water down the back of the unit.
✘ Do not pour water directly into the water tank.
The water must go into the water basin.
Leaflet No. 0522280
Mayborn USA Inc.,
PO Box 5003, Westport,
Made in China
CT 06881-5003
Page 2
closer to nature®
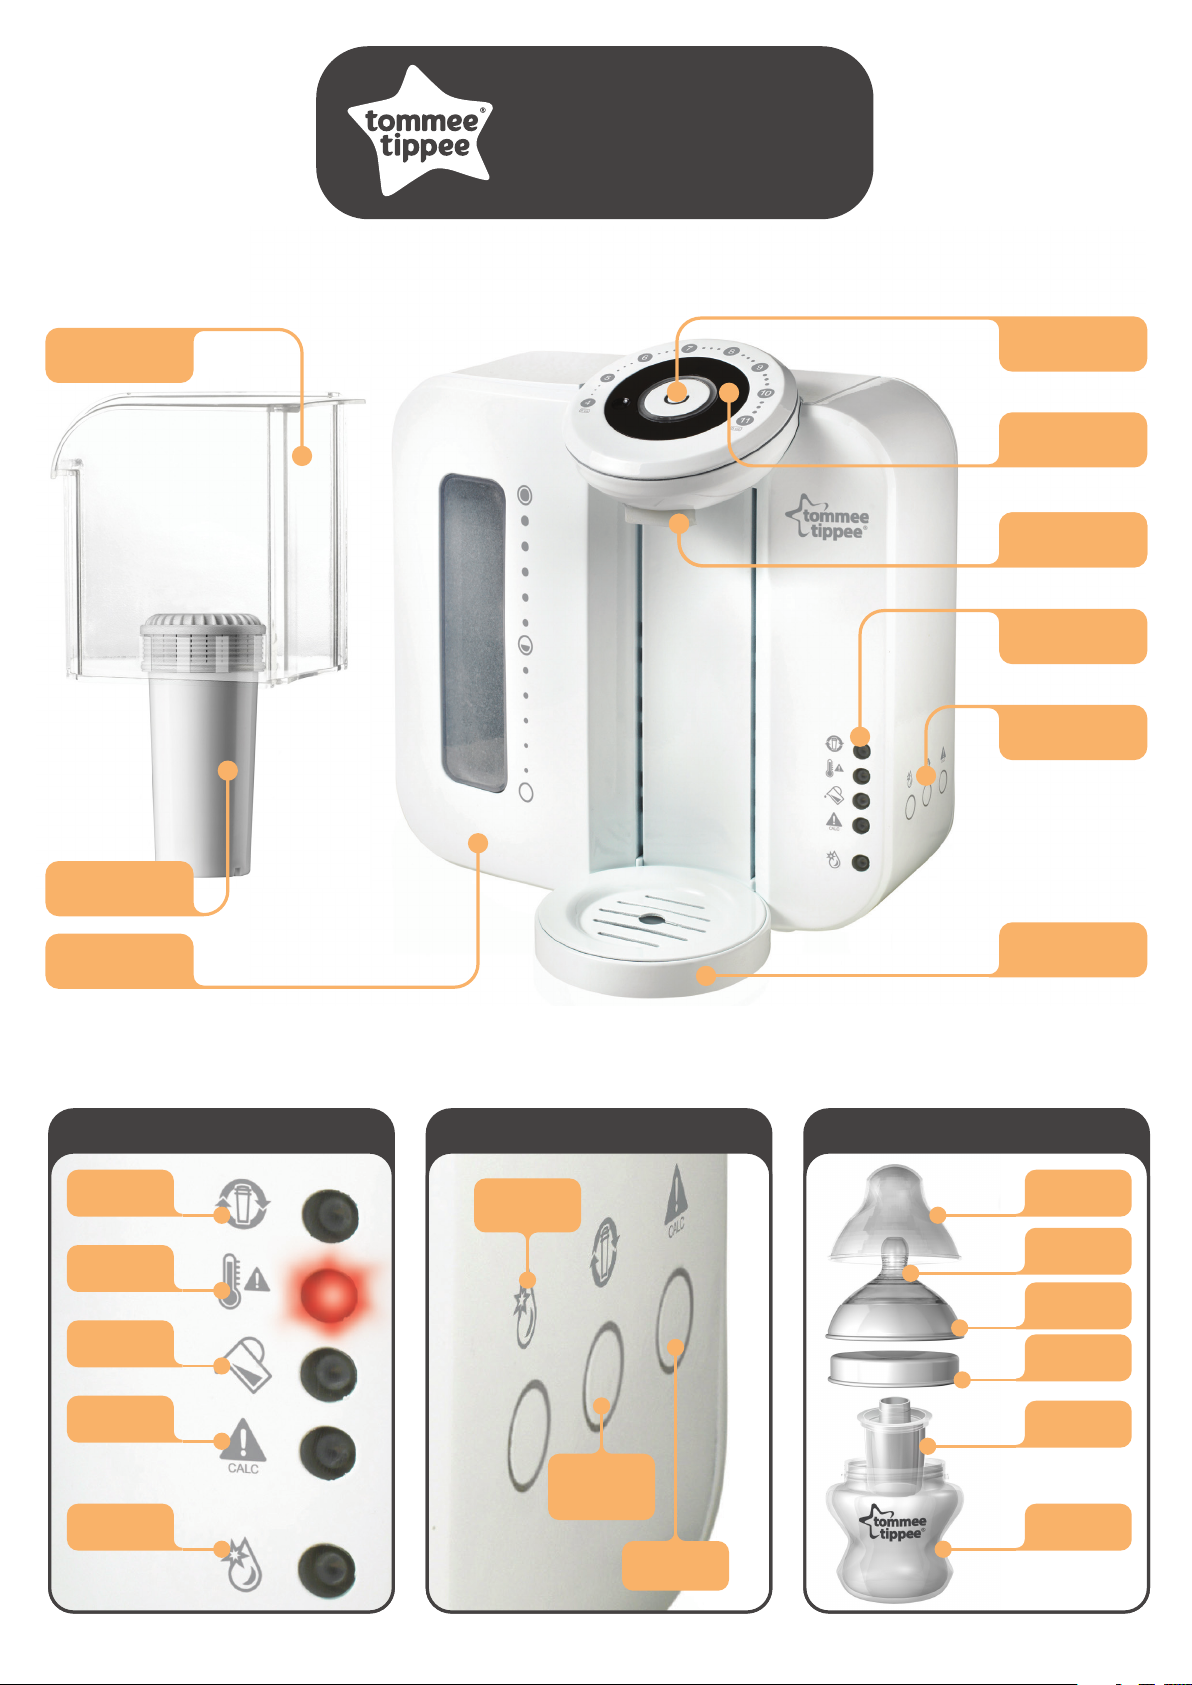
WATE R
BASIN
perfect prep™ machine
INSTRUCTIONS FOR USE
START / STOP
BUTTON
SETTING
DIAL
DISPENSER
DISPENSER
OUTLET
OUTLET
WARNING
LIGHTS
WATE R
FILTER
WATE R
TANK
WARNING LIGHTS ACTION BUTTONS ALSO INCLUDED IN THIS PACK:
CHANGE
FILTER
WATER TANK
HOT
WATER LEVEL
LOW
CLEANING
MODE
ACTION
BUTTONS
BOTTLE
STAND
BOTTLE
HOOD
SLOW FLOW
NIPPLE
SCREW
RING
MILK
STORAGE LID
DE-CALC/
DE-SCALE
CLEANING
MODE
FILTER
VOLUME
RESET
MILK POWDER
DISPENSER
1X 5fl oz
BOTTLE
DE-CALC/
DE-SCALE
Page 3

1. SET UP AND
CLEANING
Before first use you need to run a cleaning cycle – which should take approximately 10 minutes. You should clean your
unit as part of the set up and again whenever you replace your filter. For hygiene and safety
reasons you should always clean your unit if it has been unused or in storage for longer than 2 weeks.
1
Place a container (should have a
capacity of about 2 pints) under the
unit dispenser outlet to capture the
water used to clean the system.
2 3 4
Plug in the unit, the tank empty
warning light will illuminate.
With the water basin in place (but
not the filter) fill the container with
about 2 pints of freshly boiled water
-
5 6 7 8
Wait for the tank empty warning
light to go out. The water tank hot
light will illuminate.
Press the cleaning mode button and
hold for 2 seconds. The cleaning
mode light will illuminate.
Wait whilst the boiled water is
emptied from the tank, through the
dispenser, into the container you
placed under the outlet in step 1.
9a 9b
*Handling the filter cartridge by the top only:
• Remove the filter cartridge from packaging
• Remove sticker from the top of filter
• Fill a bowl with potable (drinking) water
• Fully submerge the cartridge in the water
• Gently agitate until the bubbles cease
12
The tank empty warning light will
illuminate once the water has
flushed through the system.
Discard the water captured in your
container and replace it under the
dispenser.
10 11
Remove the water hopper and
fit the filter* Replace in the
water tank.
Fill the basin with cold water. Wait for the tank empty warning
light to go out.
13 14 15
Press the start/stop button. A red
light will flash.
The appliance will dispense an
amount of hot water.
Press the start/stop button again.
A green light will flash and an
amount of water will be dispensed
to finish the cycle.
Discard dispensed water.
YOUR SYSTEM IS NOW
READY TO USE.
Page 4

2. USAGE
Before each use, you must ensure that your water tank is above the minimum fill mark.
Water to fill the unit must come from the cold faucet.
Check the water level and top up if
necessary. When filling the tank, you
must always fill the basin and as the
water passes through the filter you
can regularly top it up.
4 5
1
Select the bottle size you require on
the setting dial (4fl oz – 11fl oz).
2
Position your sterilized bottle under
the dispenser. Adjust bottle stand if
necessary (bottle neck should sit close
to the outlet).
6
3
Press the start/stop button.
A red light will flash and a volume
of hot water is dispensed into your
bottle.
7
The light will change to solid red and
there will be a double beep to
indicate the end of the first stage.
You will need to make up your feed
within 2 minutes.
8 9
Remove the milk storage lid and
replace your bottle onto the bottle
stand.
12
Carefully remove the bottle from
the stand and measure the correct
number of formula scoops into the
bottle.
Press the start/stop button again.
The red light will go out and the
green light will flash. If this button is
not pressed within 2 minutes of the
hot water being dispensed a long
beep will sound. If the alarm sounds
you should discard the feed and
repeat the process from step 1.
13
Screw the sterilized milk storage lid
on to the bottle and ensure that the
lid is tight. Be careful when handling
hot liquid.
10
Wait whilst the remainder of water
is dispensed. Once completed there
will be a double beep and the green
light will change to solid.
HOW TO STOP THE
PERFECT PREP™ MACHINE
Shake well until the formula powder
has dissolved.
11
Always check that the amount
dispensed is consistent with the size
of feed you have selected on the dial.
Add the sterilized nipple, screw ring
and hood and shake.
For your child’s safety always check
food temperature before feeding by
testing on a sensitive part of your
skin.
If at any point you need to stop the perfect prep™ machine you
can do so by pressing the start/stop button. The pump may
continue to run for a few seconds and the green light will
illuminate to show that the process has ended. Should you have to
stop the perfect prep™ machine please discard of any feed.
Your bottle is now ready to serve.
Make sure you discard any unwanted
feed as per the formula manufacturers recommendation.
Page 5
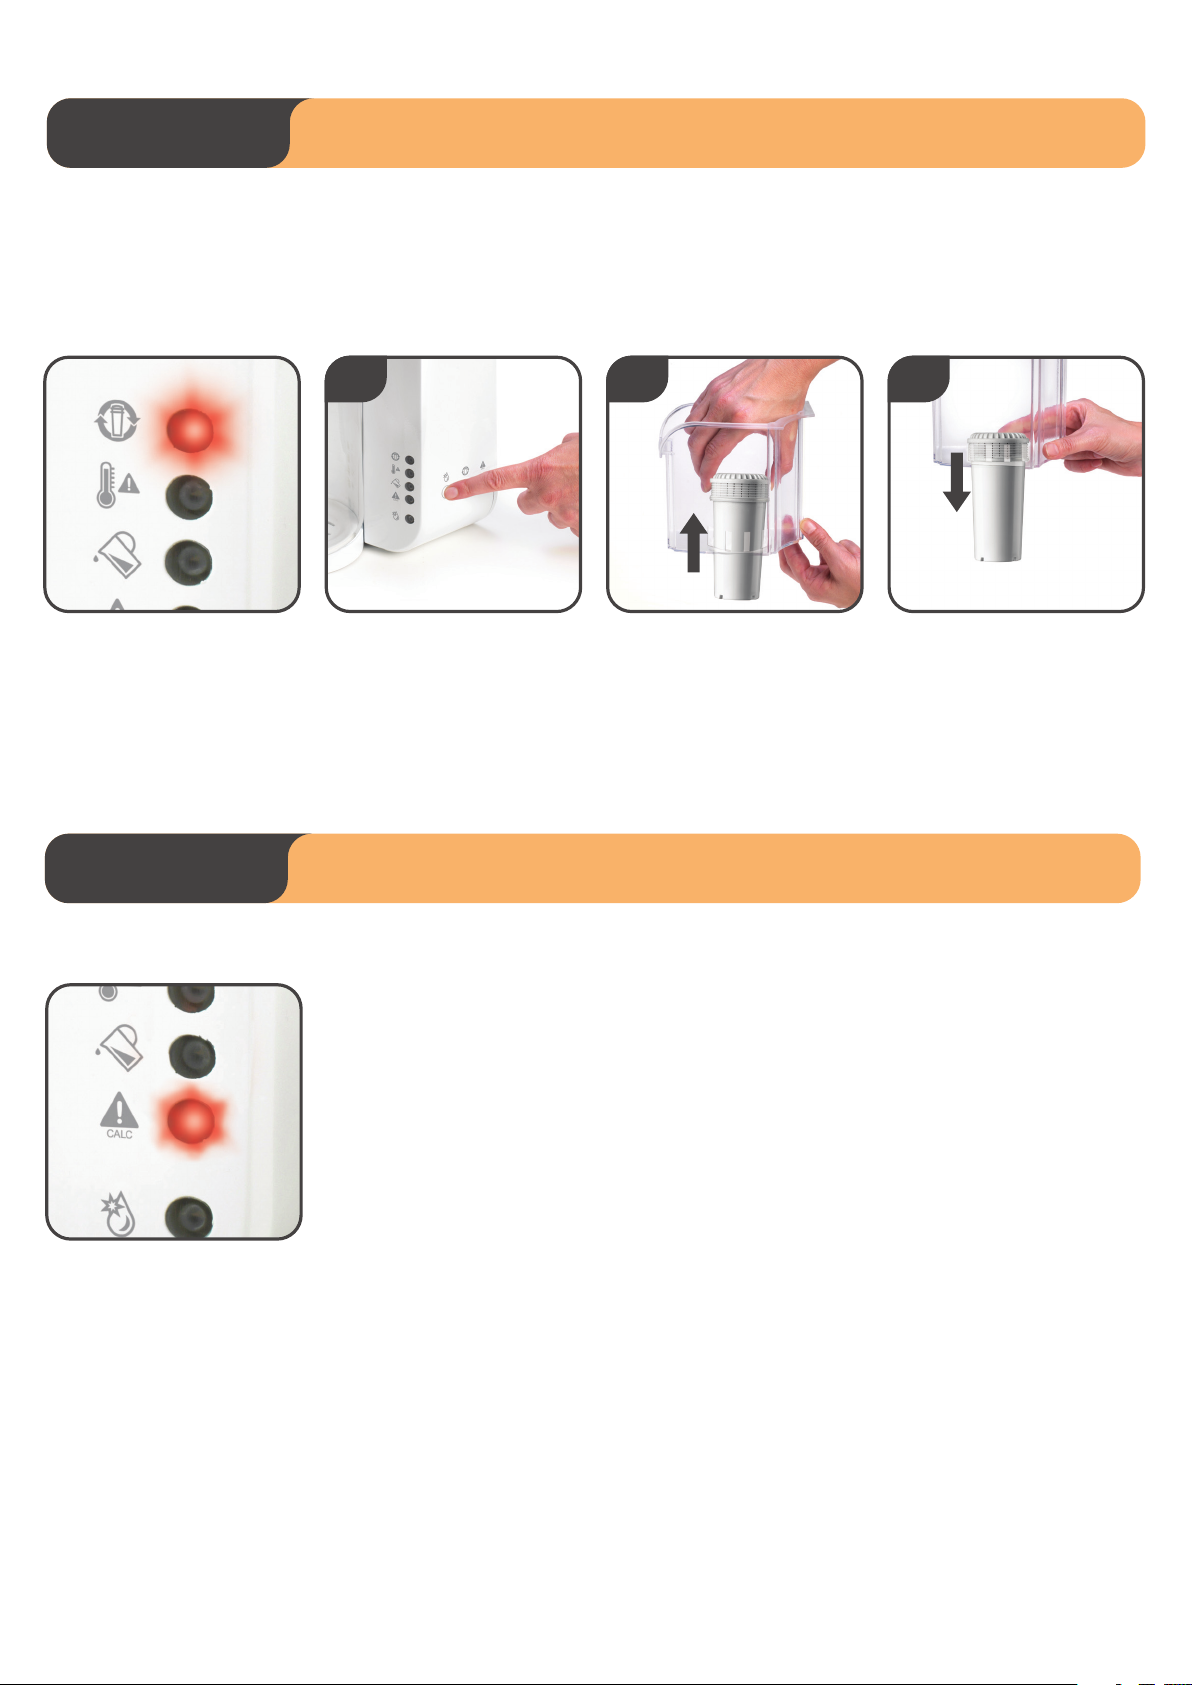
3. MAINTENANCE
Replacing your filter.
YOUR UNIT COMES WITH A WATER FILTER WHICH LASTS 40 GALLONS (APPROXIMATELY 3 MONTHS).
REPLACEMENT FILTERS ARE AVAILABLE FROM ALL CLOSER TO NATURE PERFECT PREP™ MACHINE RETAILERS.
21 3
A red change filter warning light will
illuminate when the filter needs
replacing soon. If this light flashes,
the filter must be changed immediately.
4. DESCALING
Press the cleaning mode button for 2
seconds to empty the tank (ensure a
suitably sized receptacle is under the
dispenser outlet to collect the
water). Then press the filter volume
reset button for 2 seconds to clear
the memory.
The descaling process will remove deposits of calcium and other minerals in the system
Remove the old filter from the water
basin and discard. Replace the basin
(without filter).
that may affect its performance.
Follow the cleaning cycle steps as
per set up – fitting your new filter at
stage 9.
A RED WARNING LIGHT WILL INDICATE WHEN THE UNIT REQUIRES DESCALING
SOON.IF THE LIGHT FLASHES, YOU SHOULD DESCALE IMMEDIATELY.
1. Remove the filter.
2. Fill the water tank with 1 pint of distilled white vinegar (4 or 5%).
3. Place a jug under the dispenser outlet.
4. Press the descale button for 2 seconds and the system will run a descale process. During the
descale process the red descale light will continue to flash.
5. At the end of the descale process an alarm will sound and the descale LED will switch off.
6. The red cleaning mode light will flash.
7. Fill the tank with 2 pints of freshly boiled water.
8. Follow the cleaning cycle steps as per stages 5-15 of the set up and cleaning process.
9. Again, fill the tank with 2 pints of freshly boiled water.
10. Repeat the cleaning cycle steps as per stages 5-15 of the set up and cleaning process.
11. Replace filter.
Page 6

ES
closer to nature®
máquina perfect prep™
INSTRUCCIONES DE USO
PRECAUCIÓN - PARA EVITAR DESCARGAS ELÉCTRICAS NO SUMERJA NUNCA EL CABLE,
LOS ENCHUFES NILA PERFECT PREP™ MACHINE EN AGUA U OTROS LÍQUIDOS.
LEA CUIDADOSAMENTE
LAS INSTRUCCIONES DE
SEGURIDAD PARA EL
USO DOMÉSTICO
Cuando use dispositivos eléctricos, también deberá
tomar precauciones básicas de seguridad,
incluyendo las siguientes:
CUIDADO: A FIN DE GARANTIZAR
UNA PROTECCIÓN CONSTANTE
CONTRA EL RIESGO DE
ELECTROCHOQUE, CONECTAR
ÚNICAMENTE CON
TOMACORRIENTES QUE TENGAN
UNA TOMA A TIERRA ADECUADA.
Mantenga todos los componentes que no estén en
uso fuera del alcance de los niños.
Nunca coloque artículos encima de la perfect prep™
machine.
Si el dispositivo es del tipo con toma a tierra, el
cable de extensión debe ser un cable de 3 hilos con
toma a tierra.
No colocar la unidad sobre quemadores de gas o
eléctricos calientes ni cerca de ellos ni dentro de un
horno caliente.
No usar al aire libre.
Usar siempre sobre una superficie plana resistente
al calor.
Cuando la perfect prep™ machine está en uso,
contiene agua caliente y vapor.
Debe tenerse sumo cuidado al desplazar un
dispositivo que contenga aceite caliente u otros
líquidos calientes.
No tocar las superficies calientes, use las asas y
perillas.
Mantenga siempre la perfect prep™ machine y su
enchufe fuera del alcance de los niños pequeños.
Antes de enchufar la perfect prep™ machine por
primera vez, asegúrese de que el voltaje es
compatible con su suministro eléctrico checando la
etiqueta de la base de la unidad.
Siempre conecte el enchufe en la unidad primero y
luego enchúfela al tomacorriente de la pared. Para
desconectar, apague cualquier control (posición
“off”) y luego quite el enchufe del tomacorriente de
la pared.
Compruebe que se haya agregado agua a la unidad
antes de encenderla.
Siempre desenchufe la unidad del tomacorriente
eléctrico cuando no se está usando y antes de
limpiarla. Deje enfriar antes de agregarle o quitarle
componentes.
Es necesario vigilar minuciosamente cuando se usa
cualquier dispositivo con niños o cerca de ellos.
El producto contiene un soporte para enrollar el
cable en la parte trasera de la unidad que le permite
ajustar el largo del cable en forma segura. Se
recomienda mantener el cable lo más corto posible.
No deje que el cable sobresalga del borde de una mesa
o mesada ni que haga contacto con superficies
calientes.
No haga funcionar ningún dispositivo que tenga un
cable o enchufe dañados después de que el producto
haya tenido un funcionamiento incorrecto o haya sido
dañado de alguna forma.
Este producto no requiere más mantenimiento por
parte del usuario aparte de la limpieza, la eliminación
de sarro o el cambio del filtro. Regrese el dispositivo al
centro autorizado de servicio técnico más cercano
para que lo examinen, arreglen o ajusten .
El fabricante del dispositivo recomienda no conectar
accesorios, ya que pueden causar fuego, electrochoque
o pueden provocar heridas a las personas.
No usar el aparato para ningún otro uso que el uso
original para el que ha sido diseñado.
Este aparato no es apto para ser usado por personas
(incluyéndose a los niños) que tengan alguna
disminución de las capacidades físicas, sensoriales o
mentales, o que carezcan de la experiencia y los
conocimientos necesarios, a no ser que sean
supervisadas por una persona responsable de su
seguridad o que tal persona les enseñe cómo usarlo.
QUÉ HACER Y QUÉ NO HACER
Acciones recomendadas
✔
Antes de usar la unidad por primera vez, limpie
la unidad siguiendo los pasos comprendidos
entre el 1 y el 15 de la sección de preparación y
limpieza.
✔
Conserve siempre unas buenas condiciones de
higiene lavándose las manos y las superficies de
trabajo antes de manipular el filtro de agua.
✔
Este producto está diseñado para ser usado con
filtros de agua tommee tippee closer to nature
que puede obtener de cualquiera de los
distribuidores de perfect prep™ machine. Si usa
algún otro filtro de agua con este producto
podría poner en peligro la salud de su hijo.
✔
Una luz roja constante indicará que el filtro tiene
suficiente vida útil como para filtrar 8 galones de
agua. Cuando la luz roja indicadora de cambio de
filtro parpadea, debe cambiar el filtro de
inmediato por la seguridad y salud de su hijo.
✔
Ajuste siempre la altura del soporte del biberón
para asegurarse de que la boca del biberón esté
cerca de la salida de dispensación de agua a fin
de mantener la temperatura del agua y evitar
que se produzcan salpicaduras.
✔
Deseche el filtro con la basura doméstica
normal.
✔
Sólo use agua potable (apta para beber).
✔
Para limpiar el exterior de la unidad, pase un
trapo húmedo y limpio.
✔
Por la seguridad de su hijo, compruebe siempre
la temperatura de los alimentos antes de
ofrecérselos, haciendo una prueba en alguna
parte sensible de la piel.
✔
Tenga cuidado al manipular agua hirviendo.
GUARDE ESTAS INSTRUCCIONES.
Debe usarse un cable eléctrico corto (o un cable
eléctrico desmontable) para reducir el peligro que
se genera al engancharse o tropezar con un cable
más largo.
Se encuentran a su disposición cables eléctricos
desmontables más largos, los que pueden ser
usados si se tiene el debido cuidado.
En caso de usar un cable eléctrico desmontable
más largo o una extensión: 1) la capacidad eléctrica
marcada del cable o la extensión debe ser por lo
menos igual a la capacidad eléctrica del dispositivo,
2) el cable debe colocarse de modo que no caiga
del borde de la mesa o mesada, ya que los niños
pueden arrastrarlo o tropezarse con el cable
accidentalmente.
Fabricado en China
Nº de Ref.: 0522280
Mayborn USA Inc., PO Box 5003,
Westport, CT 06881-5003, EE.UU.
Acciones que deben evitarse
✘
No permita que el depósito de agua se
contamine. El interior de la unidad debe
limpiarse siguiendo el proceso de limpieza de
los pasos comprendidos entre el 1 y el 15 de la
sección de preparación y limpieza de este
folleto.
✘
No limpie la unidad con solventes ni sustancias
químicas agresivas.
✘
Este dispositivo ha sido diseñado únicamente
para usarse en una cocina y no es adecuado para
usarse en el cuarto de los niños.
✘
Esta unidad produce agua muy caliente.
Mantenga las manos y el resto del cuerpo
alejados de la salida de dispensación de agua.
✘
Use únicamente agua fría. No use agua a más de
77ºF salvo para limpiar la unidad de acuerdo con
el proceso de preparación y limpieza. Si se utiliza
agua a más de 77ªF, la unidad se apagará
automáticamente. Si esto sucede, deje enfriar la
unidad y luego vuelva a encenderla.
✘
No llene el receptáculo de agua por encima de la
marca de capacidad máxima.
✘
No deje que caiga agua por la parte trasera de la
unidad.
✘
No eche el agua directamente en el depósito de
agua. El agua debe ir primero al interior del
receptáculo de agua.
Page 7

ES
closer to nature®
máquina perfect prep™
INSTRUCCIONES DE USO
RECEPTÁCULO
DE AGUA
FILTRO
DE AGUA
BOTÓN DE
ENCENDIDO/
APAGADO
SELECTOR
DE TAMAÑOS
DISPENSER
SALIDA DE
OUTLET
DISPENSACIÓN
LUCES
INDICADORAS
BOTONES
DE ACCIONES
DEPÓSITO
DE AGUA
SOPORTE
DEL BIBERÓN
LUCES INDICADORAS BOTONES DE ACCIONES ESTE PAQUETE TAMBIÉN INCLUYE:
CAMBIO
DE FILTRO
DEPÓSITO DE
AGUA CALIENTE
NIVEL DE
AGUA BAJO
ELIMINAR
SARRO
MODO DE
LIMPIEZA
MODO DE
LIMPIEZA
RESET
REAJUSTAR
VOLUMEN
DEL FILTRO
FLUJO LENTO
TAPA DE
ALMACENAMIENTO
DE LA LECHE
DISPENSADOR
ELIMINAR
SARRO
TAPA PARA
EL BIBERÓN
TETINA DE
ROSCA
DE LECHE
EN POLVO
1 BIBERÓN
DE 150 ML
Page 8

1. PREPARACIÓN
Y LIMPIEZA
Antes de usar la unidad por primera vez deberá llevar a cabo un ciclo de limpieza, que debería llevar unos 10 minutos.
Debe limpiar su unidad como parte de la preparación y siempre que cambie el filtro. Por motivos de higiene y
seguridad, siempre debe limpiar su unidad si no ha sido usada o si ha estado guardada por más de 2 semanas.
1
Coloque un recipiente (de 1 litro de
capacidad como mínimo) debajo de
la salida de dispensación de agua
para recoger el agua usada para
limpiar el sistema.
2 3 4
Enchufe la unidad, se encenderá la
luz indicadora de depósito vacío.
Con el receptáculo de agua en su
lugar (pero sin el filtro), llene el
receptáculo con 1 litro de agua
recién hervida -
5 6 7 8
Espere hasta que la luz indicadora
de depósito vacío se apague. Se
encenderá la luz de depósito de
agua caliente.
Pulse el botón de modo de limpieza
y manténgalo pulsado durante 2
segundos. Se encenderá la luz de
modo de limpieza.
Espere mientras se vacía el agua
hervida del depósito, por la salida de
dispensación, al interior del
recipiente que colocó debajo de la
salida en el paso 1.
9a 9b
* Quite el cartucho de filtro del embalaje
sujetándolo únicamente por su parte
superior, quite la etiqueta adherida a la
parte superior del filtro, lene un tazón con
agua potable (apta para beber), sumerja
completamente el cartucho en el agua y
agítelo ligeramente hasta que ya no salgan
más burbujas.
Quite el receptáculo de agua y
coloque el filtro*. Vuelva a
colocarlo en el depósito de agua.
12
La luz indicadora de depósito vacío
se encenderá una vez que el agua
haya enjuagado el sistema.
Deseche el agua recogida en su
recipiente y vuelva a ponerlo bajo
la salida de dispensación.
10 11
Llene el receptáculo con agua fría. Espere hasta que la luz indicadora
de depósito vacío se apague.
13 14 15
Pulse el botón de encendido/apagado. Parpadeará una luz roja.
El dispositivo dispensará una
cantidad de agua caliente.
Vuelva a pulsar el botón de
encendido/apagado. Parpadeará
una luz verde y se dispensará un
poco de agua para terminar el
ciclo.
Deseche el agua que se ha
dispensado.
SU SISTEMA SE
ENCUENTRA LISTO
PARA USA.
Page 9

2. USO
Antes de cada uso, debe asegurarse de que el depósito de agua esté lleno por encima de la marca mínima.
El agua para llenar la unidad debe provenir del grifo de agua fría.
Compruebe el nivel de agua y agregue más
agua si es necesario. Cuando llene el
depósito, siempre debe llenar el receptáculo
de agua y a medida que el agua va pasando
por el filtro, puede ir agregando más agua.
4 5
1
Gire el selector para elegir el tamaño de
biberón que requiere (entre 118 y 325 ml,
es decir entre 4 y 11 onzas fluidas).
2
Ubique su biberón esterilizado bajo la
salida de dispensación. Ajuste el soporte
del biberón si es necesario. (La boca del
biberón debería quedar cerca de la
salida).
6 7
3
Pulse el botón de encendido /apagado.
Una luz roja parpadeará y se dispensará
un volumen de agua caliente en el
interior del biberón.
La luz cambiará a rojo constante y se oirá
un pitido dos veces para indicar el final de
la primera etapa. Deberá preparar el
biberón en un plazo de 2 minutos.
Quite el biberón con cuidado del soporte,
mida la cantidad correcta de fórmula de
leche y póngala en el biberón.
8 9
Quite la tapa de almacenamiento de la
leche y vuelva a colocar el biberón en el
soporte del biberón.
Vuelva a pulsar el botón de encendido/apagado. La luz roja se apagará y la luz
verde parpadeará. Si este botón no se
pulsa dentro de los 2 minutos a partir del
momento en que se dispensa el agua
caliente, sonará un pitido largo. Si suena
la alarma, deberá desechar la comida que
estaba preparando y volver a repetir el
proceso a partir del paso 1.
12 13
Enrosque la tapa de almacenamiento de la
leche en el biberón y compruebe que esté
bien ajustada. Tenga cuidado almanipular
líquido caliente.
10 11
Espere mientras se dispensa el resto del
agua. Una vez completado este paso, se
oirán dos pitidos y la luz verde se
iluminará constantemente.
CÓMO DETENER LA PERFECT PREP™
Verifique siempre que la cantidad
dispensada concuerde con el tamaño de
biberón que ha elegido en el selector.
Coloque la tetina esterilizada, la rosca y la
tapa y sacuda el biberón.
Sacuda bien hasta que el polvo de la
fórmula se haya disuelto.
Por la seguridad de su hijo, compruebe
siempre la temperatura de las comidas
antes de ofrecérselas, haciendo una
prueba en alguna parte sensible de la piel.
Si en algún momento necesita detener la perfect prep™ machine,
puede hacerlo pulsando el botón de encendido/apagado. Es posible
que la bomba siga funcionando unos segundos. La luz verde se
encenderá para indicar que el proceso ha terminado. Si tuviera que
detener la perfect prep™ machine, deseche la leche que estaba en
preparación.
Su biberón ya está listo. Asegúrese de
desechar cualquier resto que no necesite
de acuerdo con las recomendaciones de
los fabricantes de la fórmula de leche.
Page 10

3. MANTENIMIENTO
Cómo cambiar su filtro.
SU UNIDAD CONTIENE UN FILTRO DE AGUA QUE TIENE UNA VIDA ÚTIL DE 150 LITROS
(DURA APROXIMADAMENTE 3 MESES). TODOS LOS DISTRIBUIDORES DE CLOSER TO NATURE PERFECT PREP™
MACHINE DISPONEN DE FILTROS DE REPUESTO.
21 3
Una luz roja indicadora de cambio de
filtro se encenderá cuando deba
cambiar el filtro dentro de poco. Si
esta luz parpadea, debe cambiar el
filtro de inmediato.
4. ELIMINACIÓN
DE SARRO
Pulse el botón de modo de limpieza
durante 2 segundos para vaciar el
depósito (asegúrese de que haya un
recipiente de tamaño adecuado
debajo de la salida de dispensación
para recoger el agua).
El proceso de eliminación de sarro quitará los depósitos de calcio y otros minerales acumulados en el
sistema que pueden afectar su funcionamiento.
Quite el filtro usado del receptáculo
y deséchelo. Vuelva a colocar el
receptáculo (sin filtro).
Siga los pasos del ciclo de limpieza
que se explican en la sección sobre
PREPARACIÓN, colocando el nuevo
filtro en el paso 9.
SE ENCENDERÁ UNA LUZ INDICADORA ROJA CUANDO LA UNIDAD REQUIERA QUE SE
ELIMINE EL SARRO DENTRO DE POCO.SI LA LUZ PARPADEA, DEBE ELIMINAR EL SARRO
DE INMEDIATO.
1. Quite el filtro.
2. Llene el depósito de agua con medio litro (0,5 l) de vinagre blanco destilado (al 4%).
3. Coloque un jarro debajo de la salida de dispensación de agua.
4. Pulse el botón de eliminación de sarro durante 2 segundos y el sistema realizará un proceso de eliminación de
sarro. Durante el proceso de eliminación de sarro, la luz roja de eliminación de sarro seguirá parpadeando.
5. Cuando el proceso de eliminación de sarro haya terminado, sonará una alarma y el LED de eliminación de sarro se
apagará.
6. La luz roja indicadora de modo de limpieza parpadeará.
7. Llene el depósito con 1 litro de agua recién hervida.
8. Siga los pasos del ciclo de limpieza comprendidos entre el 5 y el 15 del proceso de preparación y limpieza.
9. Llene el depósito con 1 litro de agua recién hervida.
10. Siga los pasos del ciclo de limpieza comprendidos entre el 5 y el 15 del proceso de preparación y limpieza.
11. Puede volver a colocar el filtro que actualmente está en uso.
Page 11

FR
closer to nature®
perfect prep™
MODE D’EMPLOI
MODE D’EMPLOI
AVERTISSEMENT - POUR LIMITER LES RISQUES DE CHOCS ÉLECTRIQUES, ÉVITER D’IMMERGER
LE CORDON, LA FICHE OU LA MACHINE PERFECT PREP™ DANS DE L’EAU OU DANS UN AUTRE LIQUIDE
LIRE TOUTES LES DIRECTIVES
MESURES DE SÉCURITÉ
IMPORTANTES LIÉES À
L’USAGE DOMESTIQUE
Des consignes de sécurité élémentaires devraient
être respectées lors de l’utilisation d’appareils
électriques, y compris les suivantes:
AVERTISSEMENT : POUR ASSURER UNE
PROTECTION CONTINUE CONTRE LES
CHOCS ÉLECTRIQUES, BRANCHER
L’APPAREIL DANS DES PRISES
CORRECTEMENT MISES À LA TERRE
UNIQUEMENT.
Garder toutes les pièces non utilisées hors de la
portée des enfants.
Ne jamais placer d’article sur le dessus de la
machine perfect prep™.
Lorsque l’appareil est de type mis à la terre, la
rallonge doit être de type mis à la terre à trois
broches.
Ne pas placer l’appareil à proximité des plaques
chauffantes ou des brûleurs à gaz chauds de la
cuisinière, ou sur ceux-ci, ni dans le four chaud.
Ne pas utiliser à l’extérieur.
Toujours utiliser sur une surface plane résistant à la
chaleur.
Lorsqu’elle est utilisée, la machine perfect prep™
contient de l’eau chaude et de la vapeur.
Faire preuve d’une grande prudence lors de
l’utilisation ou du déplacement d’un appareil
contenant de l’huile chaude ou tout autre liquide
chaud.
Ne pas toucher les surface chaudes; utiliser les
poignées.
Toujours garder la machine perfect prep™ et le
cordon d’alimentation hors de la portée des petits
enfants.
Avant de brancher la machine perfect prep™ pour
la première fois, s’assurer que la tension est
compatible avec l’alimentation électrique en
vérifiant sur l’étiquette apposée sur la base de
l’appareil.
Toujours brancher d’abord le cordon d’alimentation
dans la machine, puis dans la prise de courant. Pour
débrancher, placer toutes les commandes en
position d’arrêt, puis retirer la fiche de la prise
murale.
S’assurer de remplir le compartiment à eau avant
de mettre l’appareil en marche.
Toujours débrancher l’appareil de la prise de
courant lorsqu’il n’est pas utilisé ou avant de le
nettoyer. Le laisser refroidir avant d’ajouter ou
d’enlever des pièces.
L’utilisation de l’appareil par des enfants, ou
lorsque ceux-ci se trouvent à proximité, nécessite
une surveillance attentive.
Le produit est pourvu d’un dispositif d’enroulement
du cordon à l’arrière de l’appareil afin de permettre
d’ajuster la longueur du cordon de façon
sécuritaire. Il est recommandé de maintenir le
cordon à la plus courte longueur possible.
Éviter de laisser le cordon d’alimentation pendre à
l’extrémité de la table ou du comptoir ou toucher des
surfaces chaudes.
N’utiliser aucun appareil dont la fiche ou le cordon
d’alimentation est endommagé ou après avoir constaté
que l’appareil était le moindrement abîmé ou ne
fonctionnait pas bien. Aucun entretien, autre que le
nettoyage, le détartrage et le changement du filtre,
n’est nécessaire pour cet appareil. Retourner l’appareil
au centre de service agréé le plus proche pour un
examen, une réparation ou un réglage.
Le fabricant recommande de ne pas utiliser
d’accessoires avec cet appareil. Cela pourrait présenter
un risque d’incendie, de choc électrique ou de blessure.
Ne pas utiliser l’appareil à des fins autres que l’usage
pour lequel il a été conçu.
Cet appareil ne doit pas être utilisé par des personnes
(y compris les enfants) ayant des capacités physiques,
sensorielles ou mentales réduites ou manquant
d’expérience ou de connaissances, sauf si elles ont pu
bénéficier d’une surveillance ou d’instructions
préalables concernant l’utilisation de l’appareil par
l’entremise d’une personne responsable de leur sécurité.
CHOSES À FAIRE ET À NE PAS FAIRE
CHOSES À FAIRE
✔
Avant la première utilisation, nettoyer l’appareil
conformément aux étapes 1 à 15 de la section
portant sur le réglage et le nettoyage.
✔
Veiller toujours à garantir une bonne hygiène. Se
laver les mains ainsi que les surfaces de travail
avant de manipuler le filtre à eau.
✔
Ce produit est conçu pour être utilisé avec les
filtres à eau closer to nature de tommee tippee,
disponibles chez tous les détaillants de machine
perfect prep™. L’utilisation de tout autre filtre à
eau pourrait mettre en danger la santé de
l’enfant.
✔
Lorsque le témoin d’avertissement rouge du
filtre s’allume, cela signifie que le filtre peut
encore filtrer 30 litres (8 gallons) d’eau; lorsqu’il
clignote cela signifie que le filtre doit être
remplacé immédiatement pour ne pas nuire à la
sécurité et la santé de l’enfant.
✔
Toujours ajuster la hauteur du support pour
biberon de manière à ce que le goulot se trouve
près de l’orifice de sortie du distributeur, ce qui
préservera la température de l’eau et permettra
d’éviter les éclaboussures.
✔
Jeter les filtres usés avec les déchets
domestiques.
✔
Utiliser uniquement de l’eau potable.
✔
Pour nettoyer l’extérieur de l’appareil, il suffit de
l’essuyer avec un chiffon humide propre.
✔
Pour la sécurité de l’enfant, toujours vérifier la
température de la nourriture sur une partie
sensible de la peau avant de la lui donner.
✔
Manipuler l’eau bouillante avec une très grande
prudence.
CONSERVER CES INSTRUCTIONS.
Un cordon d’alimentation court (ou un cordon
d’alimentation amovible) devrait être utilisé afin de
réduire les risques associés au fait de s’emmêler dans
un long fil ou de trébucher à cause de celui-ci.
Des cordons d’alimentation amovibles plus longs sont
disponibles et peuvent être utilisés, à condition de
faire preuve de prudence lors de leur utilisation.
Si un cordon d’alimentation amovible plus long ou une
rallonge est utilisé: 1) Les caractéristiques électriques
indiquées sur le cordon amovible ou la rallonge
devraient être au moins aussi élevées que les
caractéristiques électriques de l’appareil 2) Le cordon
devrait être placé de façon qu’il ne pende pas du
comptoir ou de la table où il pourrait être tiré par des
enfants ou faire trébucher quelqu’un par accident.
Fabriqué en Chine
Livret d’instructions no 0522280
Mayborn USA Inc., PO BOX 5003,
Westport, CT ÉTATS-UNIS 06881-5003
CHOSES À NE PAS FAIRE
✘
Ne pas laisser le réservoir d’eau être
contaminé. L’intérieur de l’appareil devrait
uniquement être nettoyé conformément aux
étapes 1 à 15 du processus de nettoyage
indiquées à la section portant sur le réglage et
le nettoyage du présent livret.
✘
Ne pas utiliser de solvant ou de produit chimique
puissant.
✘
Cet appareil est conçu pour être utilisé dans une
cuisine et non dans une chambre de bébé.
✘
Cet appareil fait chauffer l’eau à une température
très élevée; garder les mains et toute autre partie
du corps éloignées de l’orifice de sortie du
distributeur.
✘
Utiliser uniquement de l’eau froide. Ne pas utiliser
de l’eau dont la température est supérieure à 25°C
(77°F) autrement que pour nettoyer l’appareil
conformément au processus de réglage et de
nettoyage. Si de l’eau dont la température est
supérieure à 25 °C (77 °F) est utilisée, l’appareil
s’éteindra automatiquement. Si cela se produit,
laisser l’appareil refroidir avant de le redémarrer.
✘
Ne pas remplir le compartiment à eau au-delà de
la marque maximale.
✘
Ne pas verser l’eau par l’arrière de l’appareil.
✘
Ne pas verser l’eau directement dans le réservoir
d’eau. Elle doit plutôt être versée dans le
compartiment à eau.
Page 12

COMPARTIMENT
À EAU
FR
closer to nature®
perfect prep™
MODE D’EMPLOI
BOUTON DE
MARCHE ET
D’ARRÊT
CADRAN DE
RÉGLAGE
ORIFICE DE SORTIE
DISPENSER
DU DISTRIBUTEUR
OUTLET
TÉMOINS
D’AVERTISSEMENT
FILTRE
À EAU
RÉSERVOIR
D’EAU
TÉMOINS D’AVERTISSEMENT BOUTONS D’ACTION
CHANGER
LE FILTRE
RÉSERVOIR
D’EAU CHAUD
NIVEAU DE
L’EAU BAS
DÉTARTRAGE
MODE DE
NETTOYAGE
MODE DE
NETTOYAGE
RÉINITIALISATION
DU VOLUME
DU FILTRE
DÉTARTRAGE
BOUTONS
D’ACTION
SUPPORT
POUR BIBERON
AUSSI COMPRIS DANS L’EMBALLAGE:
CAPUCHON
DE BIBERON
TÉTINE À
DÉBIT LENT
BAGUE DE
SERRAGE
COUVERCLE DE
CONSERVATION
DU LAIT
DISTRIBUTEUR
DE LAIT
EN POUDRE
1 BIBERON
DE 150 ML
(5 OZ LIQ.)
Page 13

1. RÉGLAGE ET
NETTOYAGE
Avant la première utilisation, il est nécessaire de réaliser un cycle de nettoyage – ce qui devrait prendre environ 10
minutes. Il faut nettoyer l’appareil dans le cadre du réglage et lors de chaque remplacement du filtre. Pour des raisons
de sécurité et d’hygiène, il est recommandé de toujours nettoyer le produit lorsqu’il n’a pas été.
1
Placer un récipient (d’une capacité
d’environ 946 ml (2 pintes)) sous
l’orifice de sortie du distributeur
pour recueillir l’eau utilisée pour
nettoyer l’appareil.
2 3 4
Brancher l’appareil; le témoin
d’avertissement indiquant que le
réservoir est vide s’allumera.
Avec le compartiment à eau en
place (mais non le filtre), remplir le
réservoir d’environ 946 ml (2 pintes)
d’eau fraîchement bouillie -
5 6 7 8
Attendre que le témoin d’avertissement indiquant que le réservoir est
vide s’éteigne. Le témoin indiquant
que le réservoir d’eau est chaud
s’allumera.
Appuyer sur le bouton du mode de
nettoyage et tenir enfoncé pendant 2
secondes. Le témoin du mode de
nettoyage s’allumera.
Attendre jusqu’à ce que toute l’eau
du réservoir s’écoule par l’orifice de
sortie du distributeur, dans le
récipient placé dessous à l’étape 1.
9a 9b
* Prendre la cartouche filtrante par le haut
uniquement, la retirer de l’emballage et
enlever le papier collant sur le dessus de la
boîte du filtre. Remplir un bol d’eau
(potable) et immerger entièrement la
cartouche dedans, puis agiter doucement
jusqu’à ce qu’il n’y ait plus de bulles.
12
Le témoin indiquant que le réservoir
est vide s’allumera une fois que
toute l’eau aura passé dans le
système.
Jeter l’eau recueillie dans le récipient
avant de replacer ce dernier sous
l’orifice du distributeur.
10 11
Retirer le compartiment à eau et y
insérer le filtre*. Remettre le
compartiment en place dans le
réservoir.
Remplir le compartiment d’eau
froide.
Attendre que le témoin d’avertissement indiquant que le réservoir est
vide s’éteigne.
13 14 15
Appuyer sur le bouton de marche et
d’arrêt. Un témoin rouge clignotera.
L’appareil distribuera une certaine
quantité d’eau chaude.
Appuyer de nouveau sur le bouton
de marche et d’arrêt. Un témoin
vert clignotera et une autre petite
quantité d’eau sera distribuée pour
terminer le cycle.
Jeter l’eau recueillie.
LE SYSTÈME EST
MAINTENANT PRÊT À
L’EMPLOI.
Page 14

2. UTILISATION
Avant chaque utilisation, vérifier que l’eau contenue dans le réservoir dépasse la marque minimale.
L’eau servant à remplir l’appareil doit provenir du robinet d’eau froide.
Vérifier le niveau d’eau et en ajouter
si nécessaire. Lors du remplissage du
réservoir, il faut verser l’eau dans le
compartiment à eau à mesure que
l’eau passe dans le filtre pour qu’il
soit ensuite possible de le remplir
régulièrement.
4 5
1
Sélectionner la taille de biberon
appropriée sur le cadran de réglage
(118 ml à 325 ml (4 oz liq. à 11 oz
liq.).
2
Placer le biberon stérilisé sous le
distributeur. Ajuster le support à
biberon si nécessaire (le goulot
devrait se trouver près de l’orifice de
sortie).
6 7
3
Appuyer sur le bouton de marche
et d’arrêt. Un témoin rouge
clignotera et une quantité
appropriée d’eau chaude sera
versée dans le biberon.
Le témoin rouge s’allumera en
continu et un signal sonore double
sera émis pour indiquer la fin de la
première étape. Il faudra ajouter la
préparation dans les 2 minutes
suivantes.
8 9
Retirer le couvercle de conservation
du lait et replacer le biberon sur le
support.
Retirer prudemment le biberon du
support et y ajouter la bonne
quantité de préparation.
Appuyer de nouveau sur le bouton de
marche et d’arrêt. Le témoin rouge
s’éteindra et le témoin vert clignotera.
Si le bouton n’est pas pressé dans les
2 minutes suivant la distribution de la
première quantité d’eau chaude, un
long signal sonore sera émis. Si cette
alarme retentit, il faut jeter le lait et
recommencer le processus à partir de
l’étape 1.
Visser le couvercle de conservation
du lait stérilisé sur le biberon et
vérifier qu’il est bien serré. Faire
preuve d’une grande prudence lors
de la manipulation du liquide chaud.
Bien agiter jusqu’à ce que la
préparation en poudre soit dissoute.
10 11
Attendre jusqu’à ce que le reste de
l’eau soit distribuée. Une fois cette
étape terminée, un signal sonore
double retentira et le témoin vert
s’allumera en continu.
Toujours vérifier que la quantité
d’eau distribuée est appropriée au
volume de lait choisi sur le cadran de
réglage. Ajouter la tétine stérilisée, la
bague de serrage et le capuchon et
agiter.
12 13
Pour la sécurité de l’enfant, toujours
vérifier la température de la
nourriture sur une partie sensible de
la peau avant de la lui donner.
Le biberon peut maintenant être donné
à l’enfant. Veiller à jeter toute quantité
de lait non utilisée, tel que recommandé par les fabricants de la
préparation pour nourrissons.
COMMENT ÉTEINDRE LA
MACHINE PERFECT PREP™
Si, à tout moment, il est nécessaire d’éteindre la machine
perfect prep™, il suffit d’appuyer sur le bouton de marche et
d’arrêt. La pompe pourrait continuer à fonctionner pendant
quelques secondes, et le témoin vert s’allumera pour indiquer
que le processus est terminé. S’il est nécessaire d’arrêter la
machine perfect prep™, jeter toute quantité de lait dont la
préparation n’est pas terminée.
Page 15

3. ENTRETIEN
Remplacer le filtre.
L’APPAREIL EST MUNI D’UN FILTRE À EAU CAPABLE DE FILTRER ENVIRON 151 LITRES (40 GALLONS) D’EAU
(ENVIRON 3 MOIS D’UTILISATION). LES FILTRES DE REMPLACEMENT PEUVENT ÊTRE ACHETÉS CHEZ TOUS LES
DÉTAILLANTS DE LA MACHINE CLOSER TO NATURE PERFECT PREP™.
21 3
Un témoin d’avertissement lumineux
rouge s’allumera sur l’appareil pour
indiquer que le filtre doit être changé
sous peu. Si ce témoin clignote, cela
signifie que le filtre doit être changé
immédiatement.
4. DÉTARTRAGE
Appuyer pendant 2 secondes sur le
bouton du mode de nettoyage pour
vider le réservoir (vérifier qu’un
contenant de taille appropriée se
trouve sous l’orifice de sortie du
distributeur pour recueillir l’eau).
Le processus de détartrage fera partir les dépôts de calcium et de tous autres minéraux
qui nuisent parfois au rendement de l’appareil.
Retirer le filtre usé du compartiment
à eau et le jeter. Remettre le
compartiment en place (sans le
filtre).
Suivre les étapes du cycle du
nettoyage telles qu’indiquées à la
section RÉGLAGE - étape 9 (insérer
le nouveau filtre).
UN TÉMOIN D’AVERTISSEMENT LUMINEUX ROUGE S’ALLUMERA POUR INDIQUER
QUE L’APPAREIL DOIT BIENTÔT ÊTRE DÉTARTRÉ. SI CE TÉMOIN CLIGNOTE, CELA
SIGNIFIE QUE LE DÉTARTRAGE DOIT ÊTRE RÉALISÉ IMMÉDIATEMENT.
1. Retirer le filtre.
2. Remplir le compartiment à eau de 473 ml (1 pinte) de vinaigre blanc distillé (à 4 %).
3. Placer un récipient sous l’orifice de sortie du distributeur.
4. Appuyer sur le bouton de détartrage pendant 2 secondes et le système enclenchera le processus. Pendant le
détartrage, le témoin rouge correspondant continuera de clignoter.
5. Lorsque le détartrage sera terminé, un signal sonore sera émis et le témoin DEL correspondant s’éteindra.
6. Le témoin rouge du mode de nettoyage clignotera alors.
7. Remplir le réservoir de 946 ml (2 pintes) d’eau fraîchement bouillie.
 Loading...