

Tom Logic Sniffter100 Quick Start Manual
Sniffter Quick Start Guide
Page 1
Triangles Indicate Actions
Example of Scrolling Text
Main Menu
The display uses solid triangles to indicate what will happen if the user
presses any of the buttons. When there is more information than can fit on
the screen, the Sniffter places up and/or down triangles on the right side of
the screen indicating that scrolling in that direction will display more text.
Menus are similar to scrolling text, but have an additional right triangle in
the left column pointing to the selected menu option. Use the up and
down buttons to move the triangle through the menu options and scroll.
Use the right button to accept the selected menu option. Use the left
button to exit to the previous screen.
Quickly Testing An Ethernet Jack
Turn the Sniffter on. Press the right arrow twice to go to the Main Menu and then Auto-Test Internet.
Disconnect an Ethernet cable from the back of a PC and connect it to the Sniffter’s Ethernet port, or use
the blue Ethernet cable to connect the Sniffter to any Ethernet jack.
Once connected you’ll soon learn whether you have a working network connection and what the up and
download speeds are. Press the right arrow to continue, and then select any of the other network tests
for additional information on the connection.
Have questions or need help? Call Tom Collins at 707-265-6622 or email him at tom@tomlogic.com.
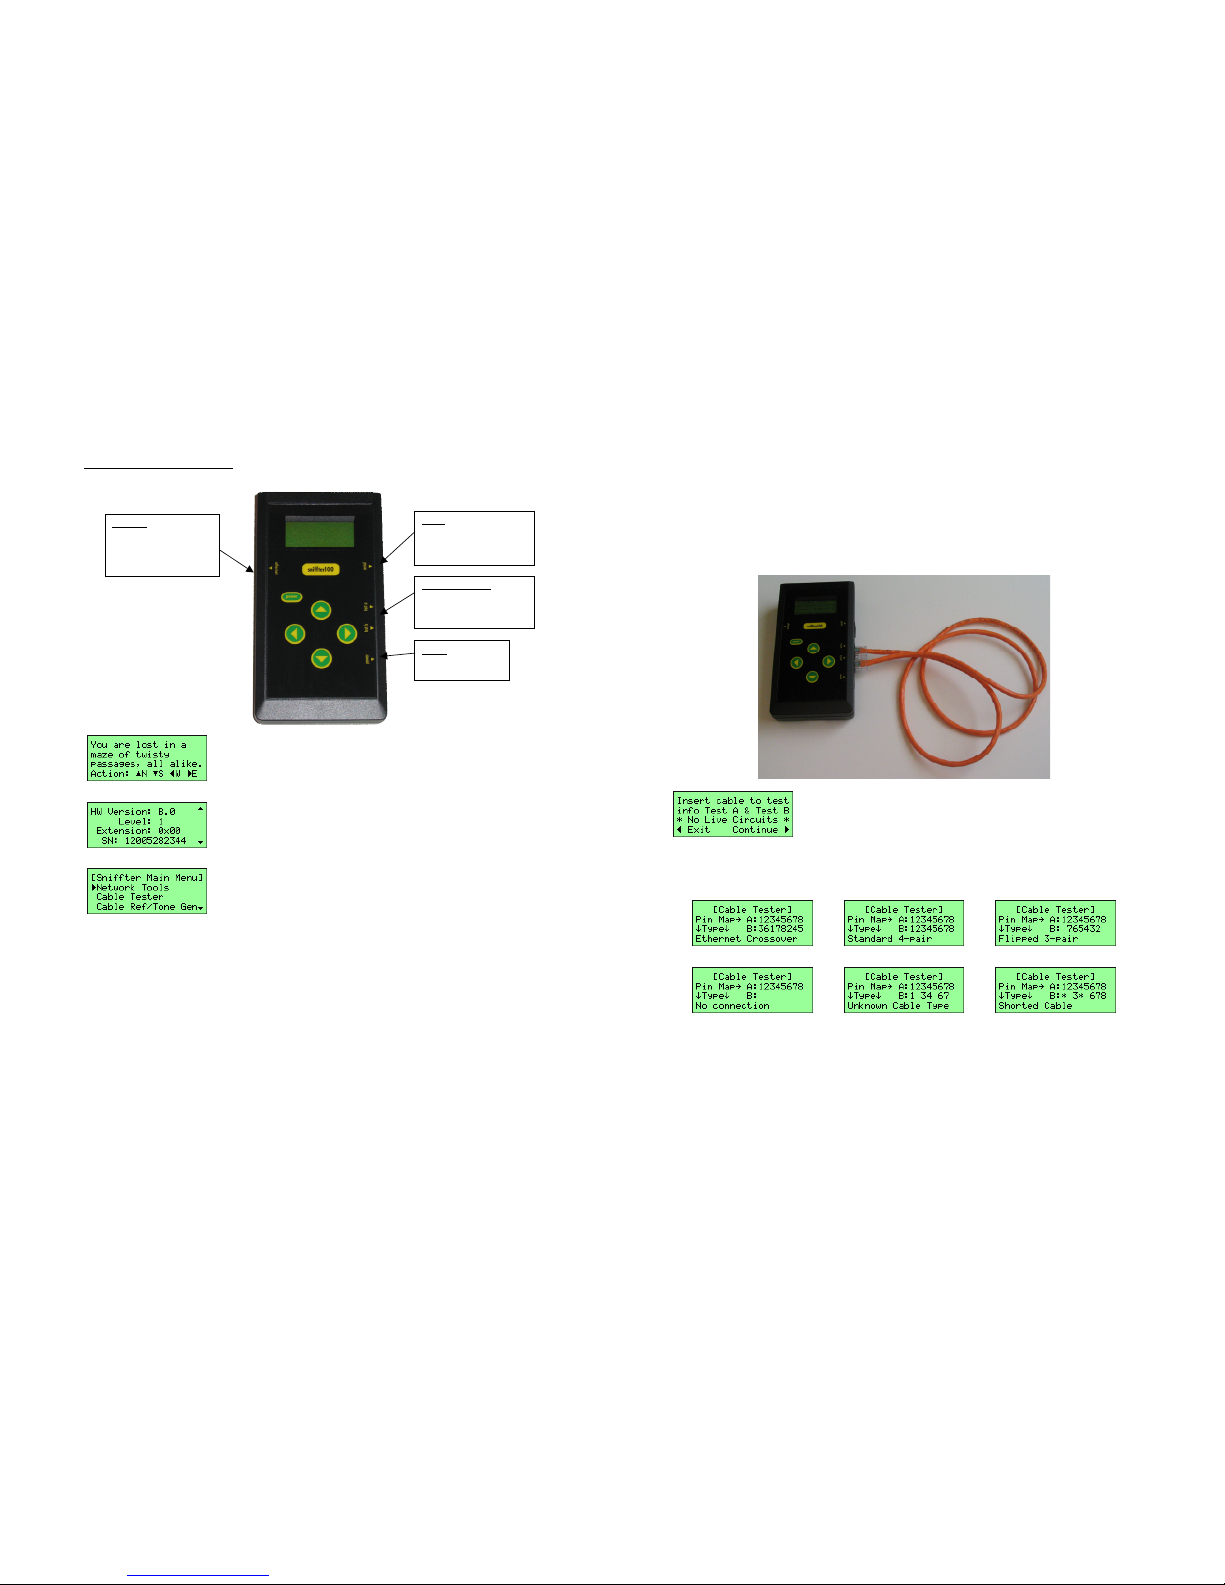
Ethernet
Shielded RJ45 connector
for 10-BaseT TCP/IP
networks. Yellow link
and green activity LEDs.
Serial
Serial port for interfacing to
serial devices and installing
software updates.
Test A and Test B
Dual RJ45 connectors for
testing cables and tone
generation.
Power
A 5.5mm power
connector, 5-9VDC.
The Sniffter displays information
on a 20-character wide, 4-line,
backlit LCD display. Press and
release the power button to turn
the Sniffter on. To turn the
backlight on or off, hold the
power button down for 3 seconds
(until the backlight changes) and
then release.
Full Documentation online at http://sniffter.com/support.html
Page 2
Cable Testing
Note that the Sniffter is only testing cable continuity (whether a signal reaches the other end of the
cable). It cannot detect split pairs or cross-talk on a cable.
To begin a test, insert a cable into the Sniffter’s Test A and Test B jacks.
You can test in-wall wiring by plugging long cables (that have already
been tested) into each wall jack and connecting them to the Sniffter.
The following screen shots show examples for various cable types. The pin map provides a detailed pinout of the cable. The paired numbers (A above B) represent a connection. For example, in the Ethernet
Crossover shot, the first pair of numbers tell you that “pin 1 on Test A goes to pin 2 on Test B”.
Special Cable Type “Straight Through” cable “Flipped” Cable
Nothing connected to tester Open Pins Shorted Pins (pins 1 and 4 on A
go to multiple pins on B)
Sniffter Quick Start Guide
Page 3
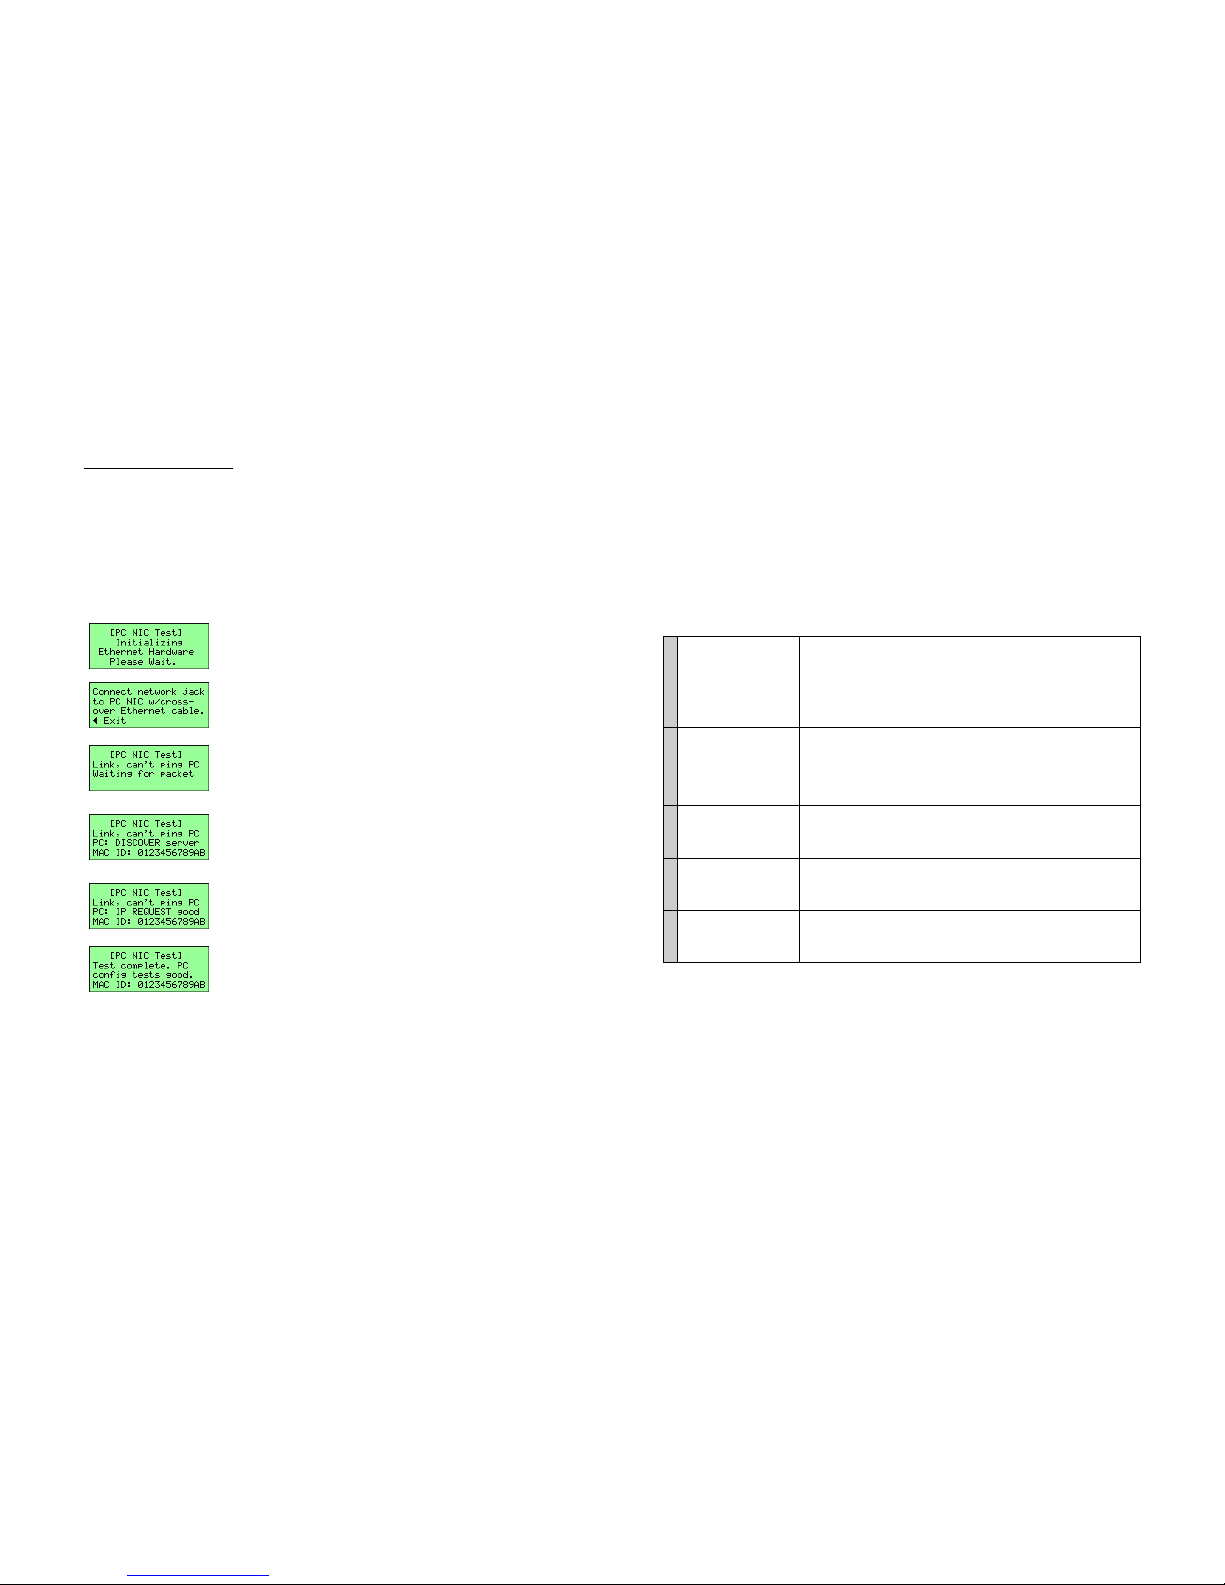
Test PC NIC
In addition to testing the network, it is possible to use the Sniffter to test a computer’s NIC (network
interface card). With the Test PC NIC menu option, you can check for a network link to the PC, see if the
PC attempts to dynamically acquire an IP address with DHCP, and find out whether the PC responds to
ping packets.
Note that this test will not work if the computer is configured to use a static IP address instead of DHCP.
It may be necessary to connect the cables and start the PC NIC Test on the Sniffter before turning on the
computer to test.
The Sniffter requires about 5 seconds to set itself up the first time you
run the PC NIC Test.
The Sniffter displays this screen until there is a physical connection to a
functional, powered PC NIC. Use a crossover Ethernet cable (like the
orange one that ships with the Sniffter) to connect the Sniffter’s network
jack directly to the Ethernet port on the PC’s NIC.
Once link is established (Link), the Sniffter waits for the PC to ask for
an IP address via DHCP (the Dynamic Host Configuration Protocol). It
will continue to display can’t ping PC until the PC responds to the
Sniffter’s ping packets.
The PC will initially broadcast a “DISCOVER” message, asking for an
IP address from any available DHCP server. The Sniffter emulates a
DHCP server and responds with an offer of 10.0.0.10. When the
Sniffter receives packets from the PC, it will show the PC’s 12character MAC address on the last line of the display.
If the PC accepts the DHCP server’s offer, it will request the address.
This screen shows the PC accepting the Sniffter’s offer and requesting
the address. If the display reads IP REQUEST bad, then the PC is asking
for a different, incorrect, IP address.
If the PC successfully configures itself with the IP address and starts
responding to the Sniffter’s ping packets, the display will show PC config
tests good. The test is complete and the PC should work fine on a
DHCP-based network.
Full Documentation online at http://sniffter.com/support.html
Page 4
Troubleshooting during the PC NIC Test
During the PC NIC Test, the Sniffter will attempt to ping the PC. For additional confirmation, you can
try pinging the Sniffter from the PC. On a Windows PC, bring up a command-line or DOS prompt and
type “ping 10.0.0.2”. If the PC receives responses from the Sniffter (i.e., the pings don’t time out), the
PC’s NIC and Internet (TCP/IP) configuration are good.
You can also try using the winipcfg and ipconfig utilities on Windows PCs to check the status of the
NIC and Internet (TCP/IP) settings.
Symptom
Explanation/Additional Troubleshooting Steps
1
Computer is on but
Sniffter is stuck on the
“Connect network jack”
screen (no link).
Make sure the crossover cable is wired properly (using Sniffter’s Cable
Test).
Make sure the crossover cable connects the Sniffter’s Network jack
(silver, left-hand side of tester) to the PC’s network jack.
Reboot the PC.
Reinstall the PC NIC drivers on the PC.
If possible, try installing a different type of NIC in the PC.
2
Testing doesn’t get past
Waiting for packet.
Make sure the crossover cable is wired properly (using Sniffter’s Cable
Test).
Reboot the PC.
Check the Internet (TCP/IP) settings on the computer to confirm that it is
configured for DHCP (sometimes referred to as “Acquire an IP address
automatically”).
3
The PC has an IP
address starting with
169.254 (e.g.,
169.254.17.237).
When a computer set with DHCP is unable to contact a DHCP server, it
will default to an IP address on the 169.254.0.0 subnet. Any time a PC
has an address in this range, it has NOT connected to a DHCP server.
Try the troubleshooting steps for Symptom #1.
4
Sniffter displays IP
REQUEST bad.
For some reason, the PC is not accepting the Sniffter’s DHCP offers.
Reboot the PC.
If the test never shows IP REQUEST good, then there is a problem with the
PC.
5
Sniffter displays IP
REQUEST good, but the
ping test fails (can’t ping
PC).
The PC might have firewall software installed that blocks ping requests.
Try temporarily disabling the firewall software.
If you can ping the Sniffter from the PC (see instructions above), the PC
configuration is OK.
When the test is complete, turn off the Sniffter, reboot the PC, and reconnect it to the network. If the
network and PC have tested good, the PC should acquire an IP address from network DHCP servers and
be able to connect to your home page and other Internet servers.
 Loading...