

Page 1
ISDN Console
Setup Utility
User’s Guide
Page 2

Page 3

Contents
Introduction ............................1
System Requirements....................1
README.TXT file ......................1
Connecting the PC to the 2260d Console .........1
Using the Setup Utility ......................2
Starting the Program ....................2
Changing Com and Printer Ports ..............2
Online Help .........................2
Status Bar ..........................2
Menus ............................3
Selecting and Editing ....................4
Exiting the Program .....................4
File and Console Operations ...................5
Creating a New Database..................5
Loading a Database from Disk ...............6
Saving a Database to Disk.................7
Loading a Database from the Console ...........8
Sending a Database to the Console ............8
Name Database .........................9
Viewing the Name Database ................9
Editing an Existing Entry ..................9
Adding a New Name Entry.................10
Deleting a Name Entry...................11
Deleting All Name Entries .................11
Saving Changes to the Name Database .........11
Console Setup .........................12
Factory Default Settings ..................12
PDN and SPID Numbers .................12
Button Mapping ......................14
Queue Assignments ....................15
Timers ...........................17
Loop Usage ........................18
Tone Commander ISDN Console Setup Utility i
Page 4

Error Logs ............................19
Viewing an Error Log ...................19
Clearing an Error Log ...................19
Console Usage Statistics ....................20
Viewing Statistics .....................20
Clearing Statistics .....................21
Printing Reports .........................22
Console Program Updates ...................23
Menu Selections ........................24
File Menu .........................24
Names Menu .......................26
Setup Menu ........................26
Errors Menu ........................27
Statistics Menu ......................28
ii Tone Commander ISDN Console Setup Utility
Page 5

Introduction
The ISDN Console Setup Utility allows you to easily
configure a Tone Commander 2260d or 40d120 console
from an IBM-compatible PC. Console setups can be
saved to disk and reloaded or modified at any time.
Creating or editing a large name database is much
easier and faster using this program than with the dial
pad on the console.
Console setups, name databases, error logs, and usage
statistics can be printed from this utility. It also allows the
installation of console program updates.
System Requirements
DOS 3.2 or higher
·
· 575 KB minimum free RAM
· serial communication port
(57600 baud minimum speed)
README.TXT file
A README.TXT file may be included on the program
disk. This file will contain new information that was not
available when this manual was printed. Please read this
file before installing or running the ISDN Console Setup
Utility. Use any text viewer or editor, or enter the
following command:
type readme.txt <Enter>
Connecting the PC to the Console
A serial cable for console-to-PC interconnection is
supplied with the console. Plug one end into the 9 pin
connector on the back panel of the console. Plug the
other end into a PC serial port; use the 9 or 25 pin
connector as appropriate. Refer to Changing Com and
Printer Ports on page 2.
Make a note of the com port you are using (usually Com
2). This will be helpful when the program asks you to
select the com port that the console is connected to.
Tone Commander ISDN Console Setup Utility 1
Page 6

Using the Setup Utility
Starting the Program
This program should be run from the floppy disk only.
Insert the ISDN Console Setup Utility disk into the
floppy drive of your PC (usually drive A or B), log onto
the drive, then run the program by typing:
a: (or b: if the disk is in drive B) <Enter>
consutil <Enter>
Changing Com and Printer Ports
Com port 2 and printer port 1 are used by default. If
you need to change either port setting, select
Configure Ports from the File menu, then choose
Select Console Port or Select Printer Port from the
submenu. The currently selected port will be
highlighted in the next submenu. Any changes you
make to the port settings are immediately saved to
disk, and will be used the next time the program is run.
Online Help
Quick help for the currently available options is always
shown in the hint bar at the bottom of the screen.
More extensive help for any menu or dialog box item
can be displayed by pressing the F1 key while the item
is highlighted. Close the help window by pressing the
Esc or Enter key.
Status Bar
The current file name, switch type, and console type
are shown in the status bar at the upper right of the
screen.
2 Tone Commander ISDN Console Setup Utility
Page 7
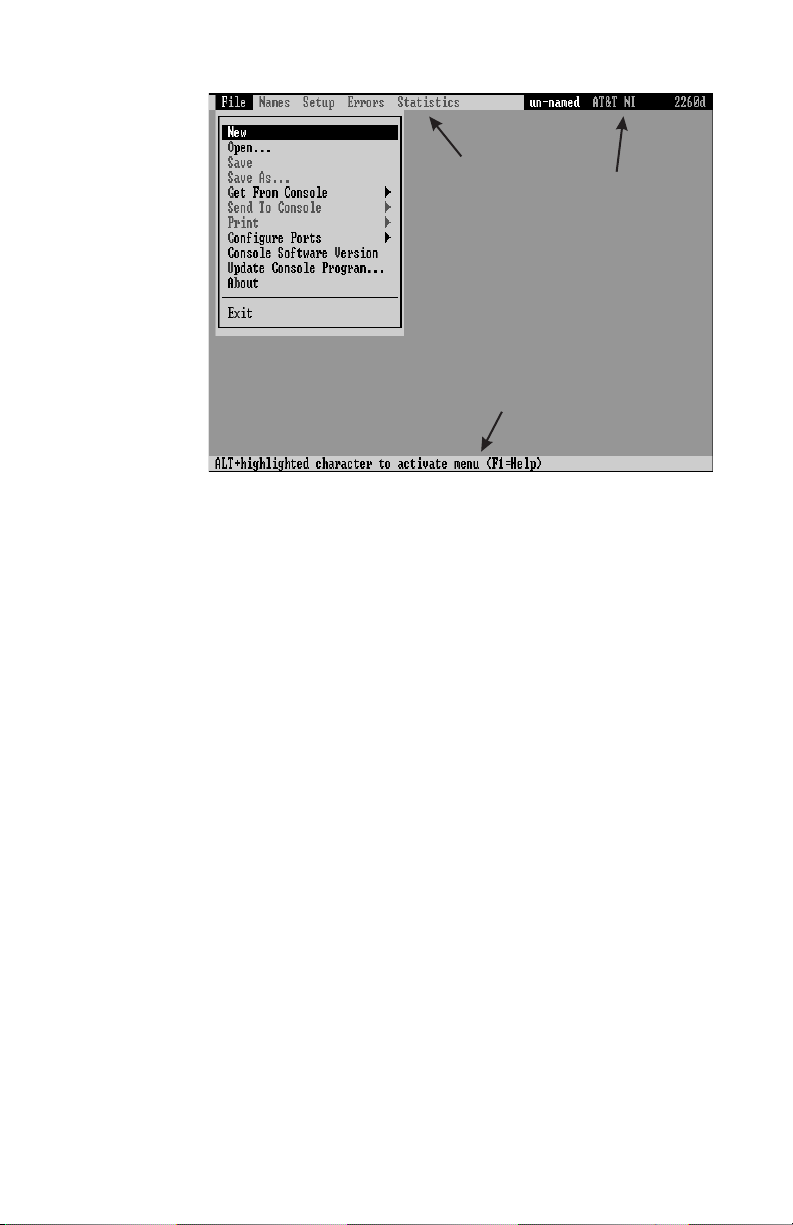
Menus
Menus
Hint Bar
Status Ba
r
Drop-down menus are used to select the various
functions in the Setup Utility.
Press the Alt key to activate the menus. Select the
desired menu with the left or right cursor (arrow) key,
then press the Enter key or up/down cursor key. An item
in the selected menu can be selected by moving to the
item with the up or down cursor key, then pressing the
Enter key. Any menu or menu item can also be selected
by pressing the appropriate highlighted (red) letter key.
For example, Alt-F-O selects File Open.
Menus can be closed without selecting an item by
pressing the Esc key.
You may need to press the Esc key to clear the screen
and cancel the current operation, such as name
database display, before menus can be activated.
A description of each menu item is included at the end of
this manual.
Tone Commander ISDN Console Setup Utility 3
Page 8

Selecting and Editing
The currently selected field in a dialog box or edit box is
shown in reverse (white text on a black background in
dialog boxes, gray text on a black background in lists
such as the name database). You can move to the next
field by pressing the cursor down key or, in some areas,
the Tab key. The cursor up key or Shift-Tab moves to the
previous field.
An editable field, such as a file path or name entry, can
be edited by moving the cursor to the desired location
and typing. Characters will be inserted or will overwrite
the existing text, depending upon the current editing
mode. The editing mode, Insert or Overtype, is shown
in the right side of the hint bar. You can change the
editing mode by pressing the Insert key.
To delete characters in a field, use the Delete key
(deletes characters to the right of the cursor) or the
Backspace key (deletes to the left).
Most list displays or edit/dialog box operations can be
aborted by selecting Cancel or pressing the Esc key.
Exiting the Program
· Select Exit from the File menu (Alt-F-X).
If you have made any changes to names or
console setup, be sure to save these changes
to disk or to a console before exiting.
4 Tone Commander ISDN Console Setup Utility
Page 9

File and Console Operations
Name/number entries and console setup parameters
can be saved to disk, and recalled later for viewing or
modification. Console usage statistics and error logs, if
currently in the PC memory, are also saved. Saved
configurations provide a convenient backup, useful if you
need to reprogram or replace a console.
All disk and console operations are accessed from the
File menu.
The term “database” is used in this manual to refer to all
name/number entries and console setup parameters for
a given console configuration.
Creating a New Database
If you have made any changes to an existing
database, select Save, Save As, or Send To
Console before using the New option, otherwise
all changes will be lost.
· Select New from the File menu to clear any loaded
information from the PC before creating a new
database. Console setup parameters, such as
button assignments and timer values, will be set to
the factory defaults.
· First, you will be prompted to select the ISDN
version that is in use at the telco central office.
Press the space bar to change the version in the
highlighted (reversed) field, then press the Enter
key. This setting determines the available
configuration features.
The ISDN version can be changed later in the
SPID/PDN dialog box - see page 12.
·
Next, press the space bar to select the console
type (2260d or 40d), then press the Enter key.
“un-named” will be shown in the status bar until the
database has been saved to disk.
Tone Commander ISDN Console Setup Utility 5
Page 10

You can then add name entries, make changes to
·
console setup parameters, and save your changes
to disk or to a console. To add names, select any of
the sort options from the Names menu. You will
then be prompted to type in a name entry. Name
entry is explained on pages 9-11.
Loading a Database from Disk
If you have made any changes to an existing
database, select Save, Save As, or Send To
Console before using the Open option,
otherwise all changes will be lost.
Select Open from the file menu. The Open File
·
dialog box will be shown. Available console
database files on the floppy disk will be shown in
the Available Files list.
· Press the Tab key to move to the available files list,
then select a file with the cursor keys; or, type the
file name in the File Name box.
· Press the Enter key.
You will see a warning message if the console
setup file is not found. The program will use the
factory default settings for console setup.
You can now add name entries, make changes to
console setup parameters, and save your changes
to disk or to a console.
6 Tone Commander ISDN Console Setup Utility
Page 11

Saving a Database to Disk
Select Save from the File menu. If this is a
·
database that was loaded from disk, it will be
saved with the same file name; existing files will be
overwritten.
The Save As dialog box will appear when saving a
new database or one loaded from a console. Save
As can be selected from the File menu to save an
existing database to the floppy disk using a new file
name.
In the File Name field, enter the new file name to
·
use for the current name database, console setup,
statistics, and error logs. The name must not
exceed 8 characters. Do not include a file
extension; extensions will be added automatically.
You can also select a name in the Available Files
list to replace an existing file.
· When you are ready to save the files, press the
Enter key.
Tone Commander ISDN Console Setup Utility 7
Page 12

Loading a Database from the Console
Make sure that the console is connected to the PC with
the serial cable, and the correct com port has been
selected.
Use the New option to clear the database and
·
select the switch and console type - see page 5.
Select Get From Console from the File menu.
·
From the submenu, you can choose to load into PC
memory the Name Database, Console Setup, Error
Log, Console Statistics; or All to select all four
items.
A warning message will appear if an error
occurred while trying to communicate with the
console. Select Retry to resend the information
or Cancel to stop communication with the
console.
If an error occurs again, check the connections
between the console and the PC, then power
cycle the console (unplug the Line/Power cord
for a few seconds).
“un-named” will be shown in the status bar until the
database has been saved to disk.
Sending a Database to the Console
· Make sure that the console type is set correctly!
·
Select Send To Console from the File menu. From
the submenus, you can choose to send the name
database, all console setup parameters, or
selected setup parameters to the console.
Unsuccessful communication with the console will
result in the warning message described above.
When sending some individual setup items, a
warning will be displayed if the console is set to
a different ISDN version or console type than
the current program setting. You will first need
to send the SPID/PDN to the console, or
change the ISDN version at the console.
8 Tone Commander ISDN Console Setup Utility
Page 13

Name Database
A 1000 name database in the console identifies callers
by name when only directory number information is sent
from the central office. Name/number entries may also
be assigned to DSS keys to simplify call transferring and
station dialing.
Spare DSS keys may be programmed to autodial up to
18 digits, including 0-9, *, #. Use this option for one
button dialing of frequently-dialed numbers.
Viewing the Name Database
To view or edit an existing database, first load
the database from disk (page 6) or from the
console (page 8).
· From the Names menu, select the way you would
like the name list displayed: Sort By DSS Button,
User Name, Directory Number, DSS Number,or
Call Appearance. Sort By User Name has two
submenu sorting options: First, then Last, and
Last, then First.
If there are no names currently loaded, you will be
given the option to add new name entries.
Editing an Existing Entry
·
Move through the name list with the up/down
cursor keys or Page Up/Page Down keys. Press
the Enter key to edit the highlighted name entry.
An edit box with seven fields will be displayed.
Move between the fields with the up/down cursor
keys or the Tab key.
·
Enter up to 18 characters in the Name field. Upper
and lower case letters may be used.
·
Enter the full phone number as sent by the telc
incoming call name lookup in the Phone Number
field. Hyphens may be used for visual clarity; do
not include spaces or other punctuation.
·
Enter the exact number to be dialed
Number field. Leave the field blank if the name
entry will only be used for calling name display.
Tone Commander ISDN Console Setup Utility 9
in the DSS
o for
Page 14

Enter the optional voice mailbox number in the
·
Voice Mail Number field. Seven digits are allowed,
including a P to pause dialing. Please refer to the
Key Mapping section in the Installation Instructions
for a complete description of the voice mail feature.
In the DSS Key field, enter the number of the DSS
·
button to be assigned to this entry. Leave the field
blank if no DSS button is assigned; the name entry
will only be used for calling name display.
DSS buttons are numbered top to bottom, left to
right, starting with the upper left button. The Shift
button accesses the lower entries on the DSS
buttons.
Busy lamp call appearances default to the
·
same-numbered DSS key positions. Call
appearances can be remapped by changing the
Busy Lamp SPID and Busy Lamp Call Appearance
entries. Please refer to the Names/Autodial
Programming section in the Installation
Instructions.
The Busy Lamp SPID field is not used with the
2260d console, which has all busy lamps on a
single SPID.
· When finished editing the name entry, press the
F10 key to return to the name list and save any
changes made, or press the Esc key to exit without
saving.
Adding a New Name Entry
·
Press the Insert key to add a new name entry. Edit
the new entry as described above.
10 Tone Commander ISDN Console Setup Utility
Page 15

Deleting a Name Entry
Press the Delete key to remove the highlighted
·
name entry from the list.
Deleting All Name Entries
To delete all name entries, exit the name list by
·
pressing the F10 key, then select Clear Names
from the Names menu.
Saving Changes to the Name Database
When finished viewing or editing the name list,
·
press the F10 key. Any changes made can then be
saved to disk and/or sent to the console – see
pages 7 and 8.
Tone Commander ISDN Console Setup Utility 11
Page 16

Console Setup
Several network and console operation parameters are
programmable, allowing compatibility with a wide variety
of central office features. Console options are
pre-programmed at the factory; many installations will
require few changes to these values. Programming is
retained in the console memory when console power is
disconnected.
A parameter or feature may be altered at any time
without reprogramming the entire system.
In the following setup procedures, any changes
that you make are saved in the PC memory by
pressing the F10 key. You must save the new
setup to disk or to the console before exiting the
program, or all changes will be lost.
Factory Default Settings
· Select Clear Setups from the Setup menu to
restore all setup parameters to the default values.
This will not change the settings in the console until
Send To Console is selected.
PDN and SPID Numbers
ISDN lines may be configured for either multipoint or
point-to-point operation. Multipoint lines can have
multiple terminal devices connected to the same ISDN
line. Point-to-point lines can have only one terminal
device connected to the line.
2260d consoles must be connected to a multipoint ISDN
line.
40d consoles may be connected to either a point-to-point
or a multipoint ISDN line.
120d consoles configured for 60 stations may use either
a point-to-point or a multipoint ISDN line; a multipoint
line must be used if configuring more than 60 stations
per 120d console.
Consoles must be programmed with the appropriate
Service Profile Identifier (SPID) numbers obtained from
12 Tone Commander ISDN Console Setup Utility
Page 17

your local telephone company. The SPID uniquely
identifies the console when it is connected to the
network. Each 2260d has two SPIDs; one for attendant
call appearances, and one for the DSS/BLF. The 40d
has one SPID. Each 120d may have one or two SPIDs;
two are required for more than 60 stations. In the latter
case, the 120d appears as two distinct ISDN terminals to
the network, each having 60 call appearances.
Additionally, the 2260d and 40d consoles must be
programmed with a Primary Directory Number (PDN).
120d SPIDs must be entered at the console. Please
refer to the System Programming section in the 40d120
Installation Instructions.
Select SPID from the Setup menu. An edit box will
·
be shown. Any currently programmed SPID or
PDN entries will be displayed for all consoles.
Press the space bar in the first field if you need to
·
change the ISDN version.
· In the PDN field, enter the full 10-digit Primary
Directory Number for the 2260d or 40d console.
Use numbers only; do not include spaces or
punctuation.
· Enter the console SPID numbers in the remaining
fields.
· When finished, press the F10 key to exit
SPID/PDN entry and save any changes made, or
press the Esc key to exit without saving.
Tone Commander ISDN Console Setup Utility 13
Page 18

Button Mapping
Most call processing functions can be assigned to any
console button, except the MAINT, VOL, SHIFT, Hold
Loop, and DSS buttons.
The factory default button layout can be
recalled by pressing the F8 key.
Ring Delay and network features must be assigned to
buttons with indicator lamps.
Select Keys from the Setup menu. A graphical
·
representation of the console button layout will be
displayed.
Use the cursor keys to move the highlight to the
·
button you want to change.
Press the Enter key to change the button
·
assignment.
· Press the space bar until the desired button
function is shown.
Network functions
entry. Move to the NETWORK BUTTON field with
the cursor down key, then enter the network feature
code required by the central office. For National
ISDN only, feature codes are required for the
Conference, Drop, and Connect keys.
Enter the dial-up page number if using the optional
Page
Two keys may be defined as Voice Mail
These keys require a dial-up entry, 24 digits
maximum. Please refer to the Key Mapping
section in the Installation Instructions for a
complete description of the voice mail feature.
For National ISDN only, the Call Forward
an additional field for the forward-to number. Enter
up to 18 digits.
The console can have up to four Intercom
For National ISDN only, select a call appearance
number for each intercom key. Intercom call
appearances are excluded from the call answering
queues. Lucent Custom ISDN requires only a
network button entry for intercom keys.
also require a feature code
key. Up to 15 digits are allowed.
keys.
key has
keys.
14 Tone Commander ISDN Console Setup Utility
Page 19

After selecting the button function and feature
·
code, press the F10 key to save any changes
made, or press the Esc key to return to the button
layout without saving.
When finished with all button changes, press the
·
F10 key to exit the button layout and save any
changes made, or press the Esc key to exit without
saving.
Queue Assignments
Incoming ringing calls are prioritized for answering,
based on either the incoming call identifier (ICI) field sent
by the network, or the call appearance loop that the call
is ringing on. The identifier determines which one of
eight call queues the call is initially placed in. Calls in
queues with a lower number (higher priority) will be
displayed for answering first. After a timeout period has
expired, the call may be moved to another queue
designated as the Timeout Queue (usually a higher
priority queue).
· Select Queue Assignments from the Setup menu,
then select Incoming Call Identification or Call
Appearance Identification from the submenu.
Editing procedures are explained below.
· When finished, press the F10 key to exit the ICI or
Call Appearance list and save any changes made,
or press the Esc key to exit without saving.
Editing ICI Entries
·
Use the up or down cursor key to move the
highlight to the call identifier entry you want to
change.
·
Press the Enter key to edit a call identifier entry. An
edit box with five fields will be shown.
·
In the Translation field, enter the text string
(translation) that will be displayed on the console to
identify the call type shown in the ICI field.
? “wildcard” characters may be included in the
translation string. The character received in the
last “wildcard” position of the ICI field will
Tone Commander ISDN Console Setup Utility 15
Page 20

replace any ? character in the translation string
during call display.
In the Timeout field, enter the timeout period in
·
seconds for this call type. The call will move from
the initial queue to the Timeout Queue after the
timeout period.
Enter the initial queue for this call type in the
·
Queue field. Queues with a higher number have a
lower priority.
In the Timeout Queue field, enter the queue the
·
call will move to after the timeout period, if the call
is still ringing. Set this field to the same number as
Queue if calls of this type are to remain in the
same queue after the timeout period.
When finished editing all fields for this call type,
·
press the F10 key to save any changes made, or
press the Esc key to return to the ICI list without
saving.
Inserting ICI Entries
· Press the Insert key to add a new custom call
identifier. In addition to the fields explained above,
you can also edit the ICI field.
A ? may be entered as a “wildcard” character. It
will match any incoming character in its
position.
Deleting ICI Entries
·
Press the Delete key to remove a call identifier
from the list.
Predefined ICIs cannot be removed. The Delete
option affects only custom ICIs that you have
added.
Editing Call Appearance Entries
Each of the 22 call appearance entries can be edited in
the much the same manner as ICIs. Assign a call
appearance to a queue if you want all calls to the listed
directory number to be prioritized or identified with
custom display text. This will override ICIs for all calls to
that number.
16 Tone Commander ISDN Console Setup Utility
Page 21

Timers
To use ICIs for a call appearance (the factory
·
default), press Delete after highlighting the call
appearance in the list.
Call appearances dedicated for emergency use
can be assigned to queues 0-3
queues have highest priority and will be displayed
immediately.
Calls on hold will recall the console after a timeout
period. Separate timers are provided for ring delays and
four types of recalls: Hold, Page, Call Back (Lucent
Custom ISDN only), and NXF (incomplete transfer).
The Ring Delay timer allows a backup console to ring
only when calls have not been answered at the primary
console. Loops must be optioned Terminate (inbound
calls only) to use Ring Delay.
For systems with only one answering position,
do not use Ring Delays. The default Ring
Delay value is 0 (disabled). One ring is
approximately equal to 6 seconds.
Each timer can be set to expire after 1-999 seconds, or
disabled.
. Calls in these
· Select Timer Values from the Setup menu.
·
Use the up or down cursor key to move the
highlight to the timer you want to change.
·
Enter the new timeout period. Enter 0 to disable a
timer.
·
When finished, press the F10 key to exit Timers
and save any changes made, or press the Esc key
to exit without saving.
Tone Commander ISDN Console Setup Utility 17
Page 22

Loop Usage
Each call appearance loop can be set to Not Reserved
(in or out), Terminate (in only), Originate (out only),
Priority,orInactive (not connected).
Select Loop Usage from the Setup menu. Settings
·
for all loops will be displayed.
Use the up or down cursor key to move the
·
highlight to the loop you want to change.
Press the space bar until the desired loop usage is
·
shown. The ISDN call appearances must be set at
the central office with the same usage type. Set all
unused loops to Inactive.
Loops using Ring Delay at a backup console must
be set to Terminate.
· When finished, press the F10 key to exit Loop
Usage and save any changes made, or press the
Esc key to exit without saving.
Call appearances assigned to Intercom keys
cannot be changed here – see page 14.
18 Tone Commander ISDN Console Setup Utility
Page 23

Error Logs
Communication and operation errors encountered during
operation are recorded by the console.
Error logs and statistics are saved when saving the
console setup.
Viewing an Error Log
From the Errors menu, choose to display the
·
console error log sorted by type, severity, or time of
occurrence. All of these items will then be listed on
the screen.
If the currently loaded data was retrieved from a
disk file, the error log from the file will be displayed.
To view the most recent console error logs, first
select the Get From Console option in the File
menu.
· To view detailed information about an error, press
the Enter key after moving the cursor highlight to
an error record.
Clearing an Error Log
· To clear a console’s error log from the console and
the PC, select Clear Error Log from the Errors
menu.
Tone Commander ISDN Console Setup Utility 19
Page 24

Console Usage Statistics
Console statistics such as average length of calls,
response time for call answering, and number of
recalls are recorded by the console. All statistics can
be viewed and reset at the console or by this program.
Statistics and error logs are saved when saving the
console setup.
Viewing Statistics
Select View Statistics from the Statistics menu.
·
If the currently loaded data was retrieved from a
disk file, the statistics from the file will be displayed.
To view the most recent console statistics, first
select the Get From Console option in the File
menu.
Below are the items shown in a statistics display.
CALL HANDLING
Abandoned Calls – the number of calls that were
disconnected by the caller before being answered. Calls
that were ringing for less than 10 seconds before
disconnecting are not counted in this statistic.
Hold Recalls – the number of calls on hold that recalled
the console after the timeout period expired.
Calls Answered After xx Sec – the number of calls that
were answered after a selected time threshold. To
change the time period used for this statistic, select
STATS from the console’s Maintenance main menu,
select EDIT when this statistic is displayed, then enter
the new time in seconds with the dial pad.
CALL VOLUME
Inbound Calls – the number of incoming (ringing) calls,
not including transfers, processed at the console.
Outbound Calls – the number of outgoing calls, not
including transfers, processed at the console.
20 Tone Commander ISDN Console Setup Utility
Page 25

TIME
Active Time – the total amount of time that the console
was active on calls.
Elapsed Time – the interval since the last Clear
Statistics operation.
Average Call Time – the average length of a call.
Average Hold Time – the average time that calls were
on hold.
Average Response Time – the average time a call was
ringing at the console before it was answered.
Clearing Statistics
To clear the usage statistics from the console and
·
the PC, select Clear Statistics from the Statistics
menu.
Tone Commander ISDN Console Setup Utility 21
Page 26

Printing Reports
The ISDN Console Setup Utility can produce hardcopy
reports listing all name/number entries, setup
parameters, usage statistics, and console error logs.
Printed output is formatted for standard 8.5" x 11" paper,
portrait orientation.
Ensure that the printer is turned on and properly
connected to the port selected in the Configure Ports
submenu.
Select Print from the File menu.
·
Select Name Database, Console Setup, Console
·
Statistics, or Error Log from the submenu.
If you selected Name Database or Error Log, another
submenu will allow you to choose a sort order.
22 Tone Commander ISDN Console Setup Utility
Page 27

Console Program Updates
In the event that you receive an updated console
program disk from Tone Commander Customer Service,
use the Setup Utility to load the console with the new
code.
To display the version of software currently
loaded in the attached consoles, select
Console Software Version from the File menu.
Plug the serial cable from the PC into the console
·
that you want to load with the new code.
Set the switch on the back of the console to MON.
·
Power cycle the console (unplug the Line/Power
·
cord for a few seconds).
· Insert the floppy disk with the program update files
into the PC drive.
· Select Update Console Program from the File
menu. An Open File dialog box will appear.
· Available console update files on the floppy disk
will be shown in the Available Files list.
· Type the file name in the File Name box.
· Press the Enter key.
You will see a warning message if the console
update file is not found.
Sending the update takes a short time. Progress is
displayed during the process.
·
Set the console switch back to RUN when finished.
See the Console Software Update Guide supplied with the update
floppy disk for more in-depth instructions regarding upgrading the
console operational software.
Tone Commander ISDN Console Setup Utility 23
Page 28

Menu Selections
A summary of each menu item is listed in this section.
File Menu
New
Clears the current name database, console setup,
statistics, and error log from the PC memory.
Select this option before creating a new database.
Open
Selects and loads a name database file. Files containing
console setup parameters, usage statistics, and the error
log will also be loaded if available.
You can then view or print the loaded information.
Names and setup information can be modified and
saved to disk or sent to the console where it will be
retained in the console’s memory.
Save
Saves the current name database, console setup,
statistics, and error log to disk. Files will be saved with
the same file name that was loaded from disk.
If this is a newly-created database or one loaded from a
console, you will be asked to type in a file name.
Save As
Saves the current name database, console setup,
statistics, and error log to disk, using a new file name
and/or directory.
Get From Console
Reads the name database, console setup, statistics,
and/or error log from the console via the serial cable.
Send to Console
Writes the currently loaded name database or console
setup parameters to the console via the serial cable.
24 Tone Commander ISDN Console Setup Utility
Page 29

Print
Prints the current name database, console setup,
statistics, or error log.
Output will be sent to the printer port selected during
installation. You can change the printer port with the
Configure Ports...Select Printer Port option.
Configure Ports
Selects the serial com port for communication with the
consoles, or the printer port used for printed reports.
Ports are initially set during program installation. The
currently selected ports will be highlighted in the Select
Console Port and Select Printer Port submenus.
Console Software Version
Displays the version of software currently loaded in the
console.
Update Console Program
If you have received updated console program files, use
this option to load the consoles with the new code.
About
Displays Setup Utility version and copyright information.
Exit
Exits the Setup Utility.
Be sure to save to disk or to the consoles any changes
you have made before exiting this program.
Tone Commander ISDN Console Setup Utility 25
Page 30

Names Menu
Lists the currently loaded name database. You can
modify or delete any entry from the list, or add new
entries.
Sort By DSS Key
Displays the name database sorted by DSS key number.
Sort By User Name
Displays the name database sorted by first or last name.
Sort By Directory Number
Displays the name database sorted by phone number.
Sort By DSS Number
Displays the name database sorted by DSS number
(station directory number).
Sort By Call Appearance
Displays the name database sorted by Call Appearance
number.
Clear Names
Clears all name entries from the database.
Setup Menu
SPID
Allows entry of the console Primary Directory Number
(PDN) and Service Profile Identifiers (SPIDs). These
entries are required for proper console operation.
The ISDN version can also be changed here.
Keys
Selects functions for the programmable buttons on the
console.
You can choose from a list of predefined console
functions or assign network features to buttons.
26 Tone Commander ISDN Console Setup Utility
Page 31

Queue Assignments
Sets queue assignments for incoming call identifiers (call
types) and call appearances (lines).
Queues determine the call answering priority. A call can
be moved to a queue with a different priority after a
timeout period.
Custom call types may be added to the list of predefined
types. The text string displayed on the console for each
call type or call appearance may be modified.
Timer Values
Sets timeout periods for hold recalls, page recalls,
automatic callbacks, incomplete transfer recalls, and
backup console ring delays.
Loop Usage
Selects the usage type for each call appearance loop:
Not Reserved, Terminate, Originate, Priority, or Inactive.
Clear Setups
Restores all setup parameters to the factory defaults.
Errors Menu
Lists all recorded errors from the console. Detailed
information is available for each listed error.
Sort Errors By Type
Displays the error log with errors sorted by type.
Sort Errors By Severity
Displays the error log with errors sorted by severity.
Sort Errors By Time
Displays the error log with errors sorted by time of
occurrence.
Clear Error Log
Clears the error log from the console and the PC.
Tone Commander ISDN Console Setup Utility 27
Page 32

Statistics Menu
View Statistics
Displays the currently loaded console usage statistics.
Use the Get From Console option to retrieve the most
recent console statistics.
Statistics and the console error log are saved when
saving the name database and console setup. If the
currently loaded data was retrieved from a disk file, the
statistics from the file will be displayed.
Clear Statistics
Clears the usage statistics from the console and the PC.
28 Tone Commander ISDN Console Setup Utility
Page 33

Page 34

14-280177 Rev. C
©2000
11609 49th Place West
Mukilteo, WA 98275-4255
(800) 524-0024 (425) 349-1000
Fax: (425) 349-1010
www.tonecommander.com
 Loading...