

Page 1
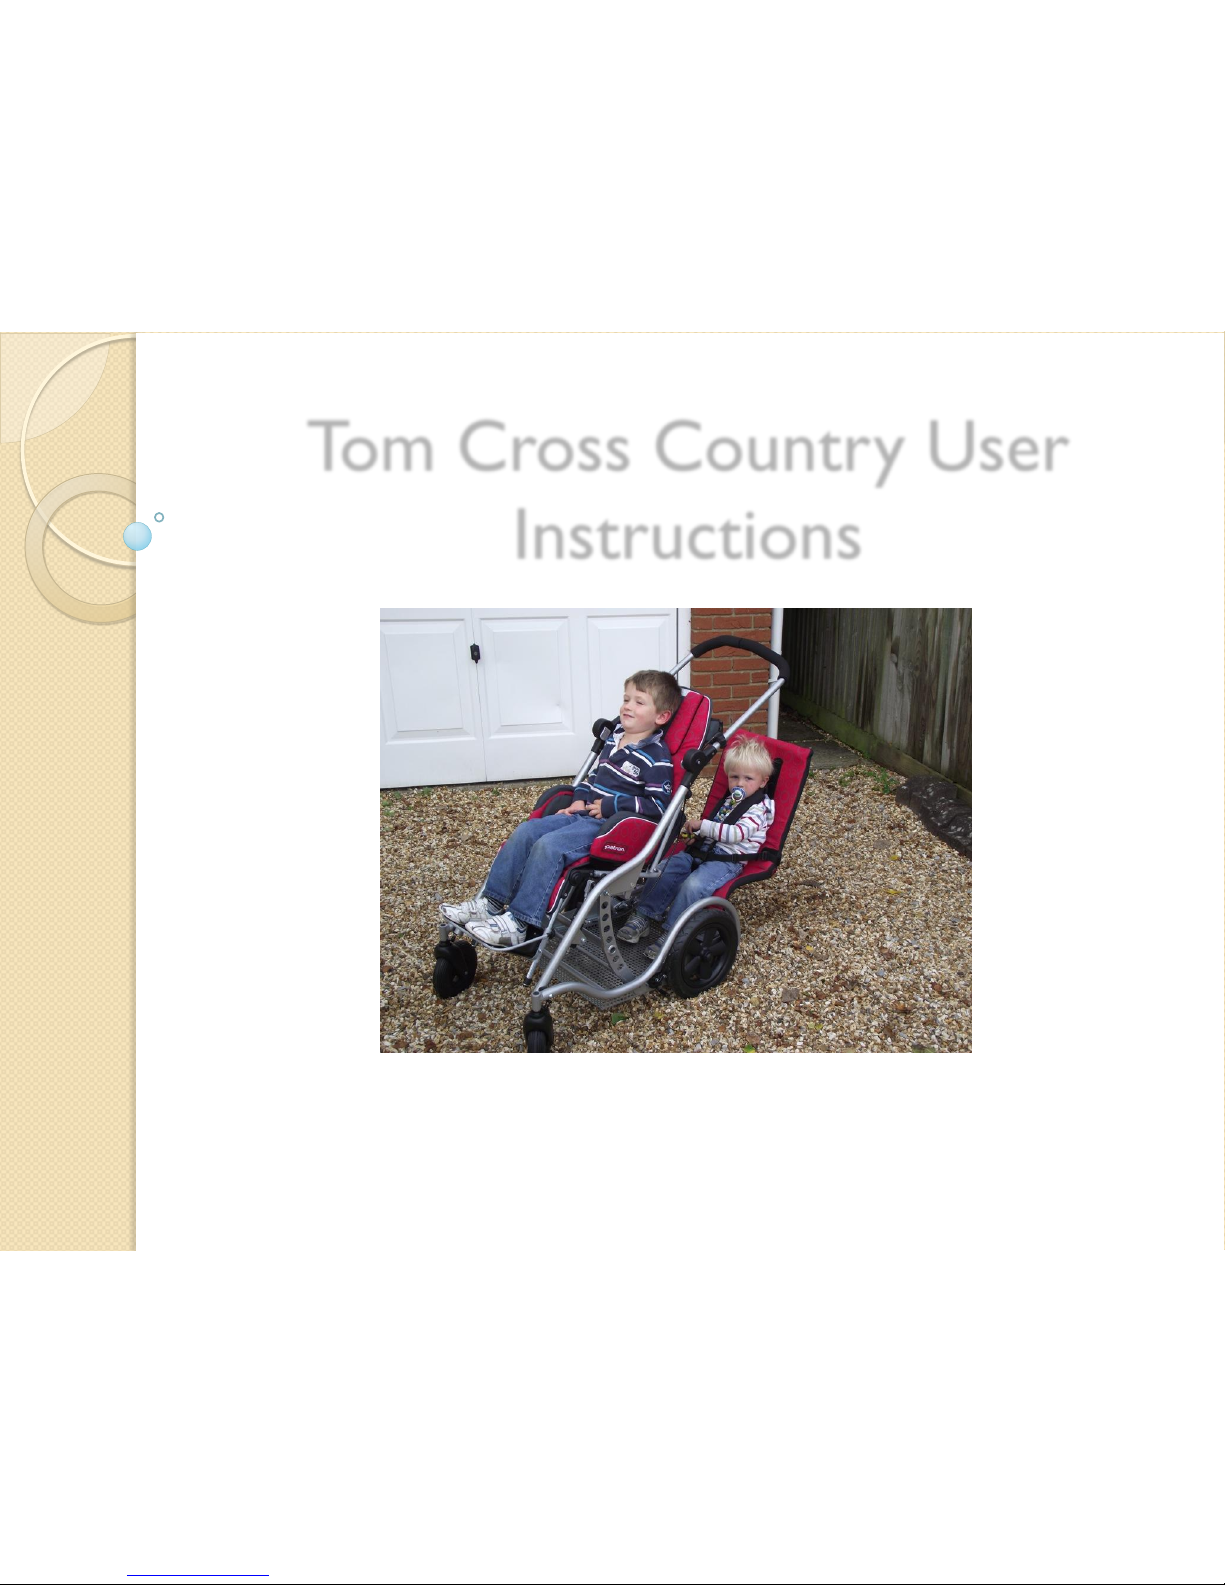
Tom Cross Country User
Instructions
Issued 1st September 2011
Page 2
Tom Cross Country Buggy
The Tom Cross Country offers Tilt in Space and recline, with the advantage of
having been crash tested for occupied transport.
Please read this user guide through to make sure you understand the functions of
the buggy and keep the details available for other users.
The following data relates to the user weight for the Tom Cross Country Stroller –
including use in transport
Stroller Size
Mini
STD
Maxi
User Weight
35kg
35kg
50kg
Page 3
Safety notes – please do read these!
Please read this user guide fully before using your stroller.
Expert medical advice must be sought before using your stroller. If you have any doubt about this speak to your Occupational Therapist.
Before using the stroller it is essential to check that the Frame Catch is locked, and that the Tilt-in-space mechanism and the seat recline are
tightened.
Each attendant should be familiar with the operation of the stroller. If there is any doubt they should read this User Guide.
Before setting off, ensure that the occupant is comfortable, and that clothes and rugs are tucked in, so that they do not cat ch on the wheels.
Always apply the parking brake when the stroller is stationary and when getting in and out of the stroller.
Never tip the stroller forward when going down a kerb.
If the stroller is going to be used for transport in a vehicle you should carefully read the Transport Section of this User Guide.
The attendant must take precautions against fire risk. In buildings, check the locations of fire exits and make sure the emergency procedures are
understood.
Do not let children play with, or hang on the stroller.
Do not use your stroller in a manner for which it is not designed.
Ensure that children are clear of moving parts before making adjustments.
Patron Bohemia, Activate, and your dealer, cannot accept responsibility for the use of accessories other than those supplied by them.
Full concentration must be maintained during travel to avoid collisions or other dangerous situations.
Make sure that the stroller brakes are applied while adjusting the recline or the tilt of the seat. This will leave both hands free to operate these
features, avoiding sudden movements which will cause discomfort to the occupant.
The seat base attachment must not be released while the stroller is occupied. Make sure that the seat is empty before removing the seat or changing
its direction of travel.
Do not overload the stroller. Other children should not ride on the back of the stroller, or loads attached to the frame other than on the approved
accessories.
Ensure that the occupant has the appropriate harness attached and adjusted to prevent them from falling out of the stroller while travelling. The
attendant should know how to fit, adjust, and release these features.
Do not stand on the footrest. The footrest should be folded whilst loading.
Never leave the child unattended in the stroller, even for the shortest time.
At all times when operating the stroller, be aware of the danger of injury to yourself, the occupant or any other person, especially when going
through doorways.
Patron Bohemia, Activate, and your dealer, cannot accept responsibility for any loss, damage or injury resulting from the incorrect operation of your
stroller.
Page 4
Operating the Tilt Function
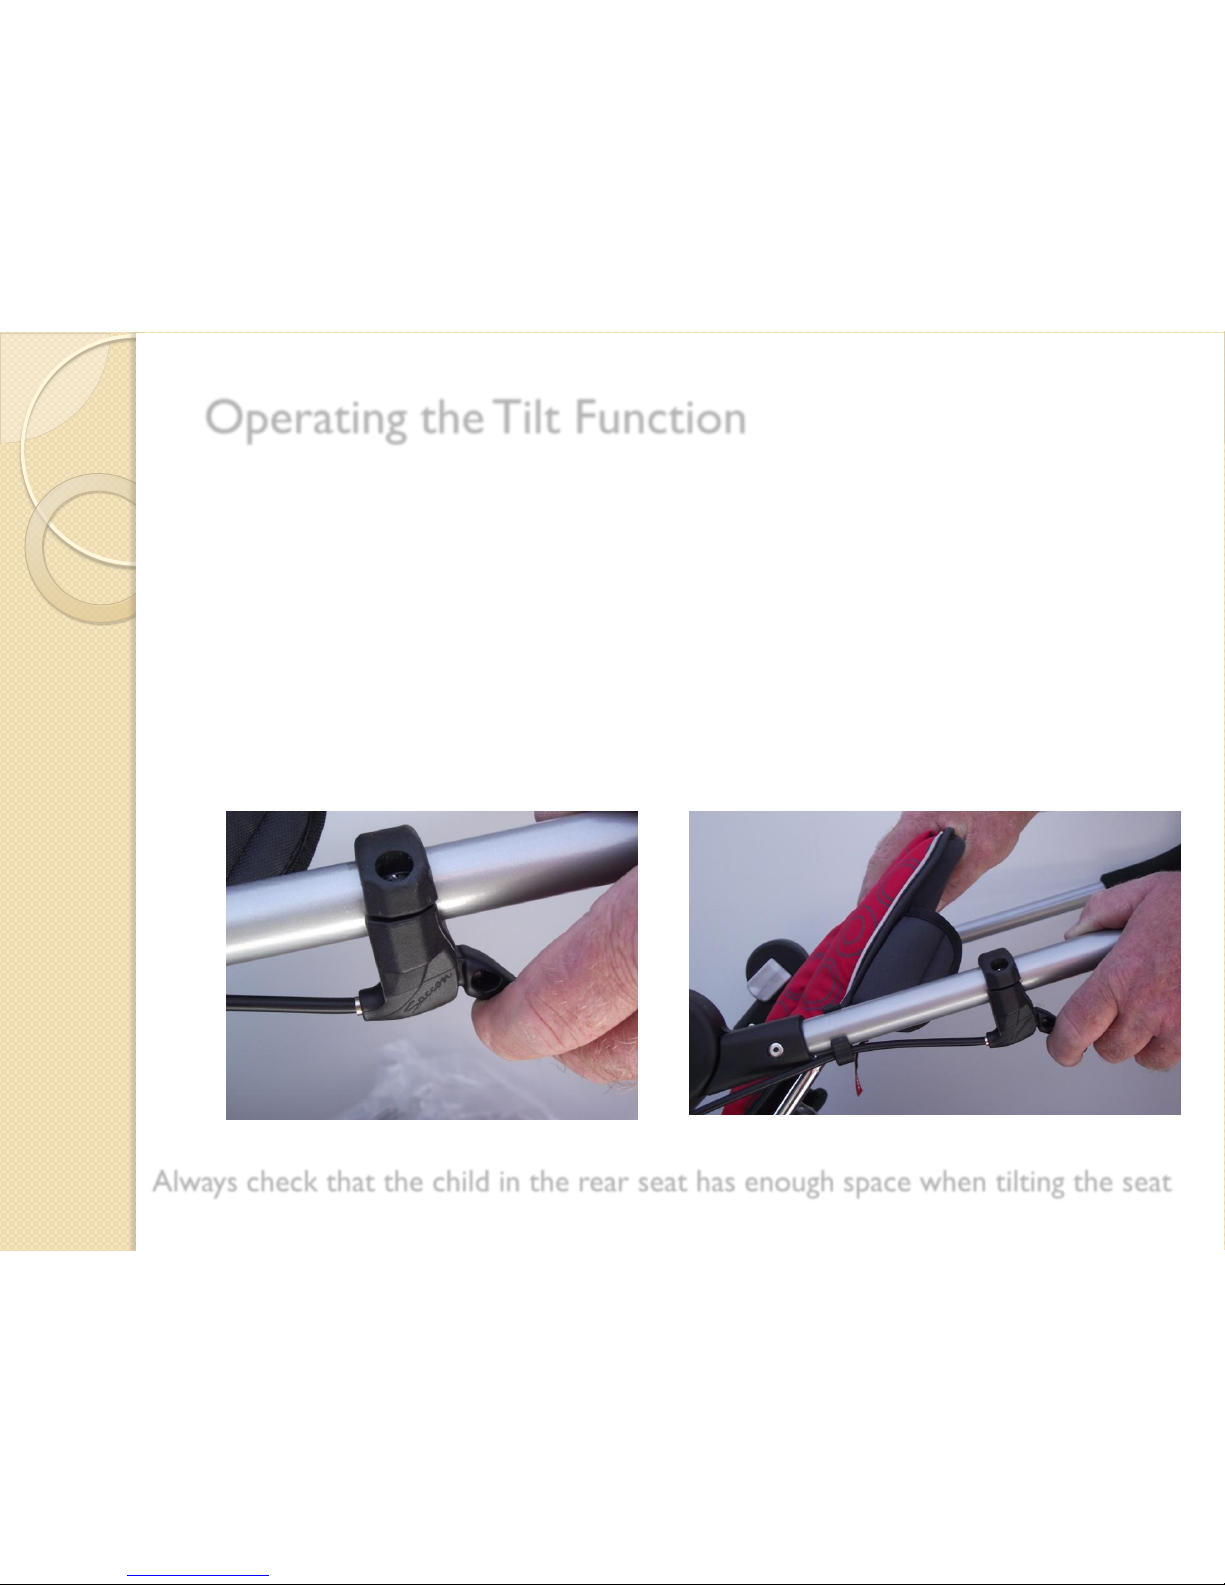
The angle of the seat unit is altered by
releasing the tilt lever indicated on our main
picture.
The backrest of the seat should be held with
one hand while releasing the lever with the
other hand. Re-position the seat angle and let
go of the lever, checking that the seat is secure
in the new position.
Always check that the child in the rear seat has enough space when tilting the seat
Page 5
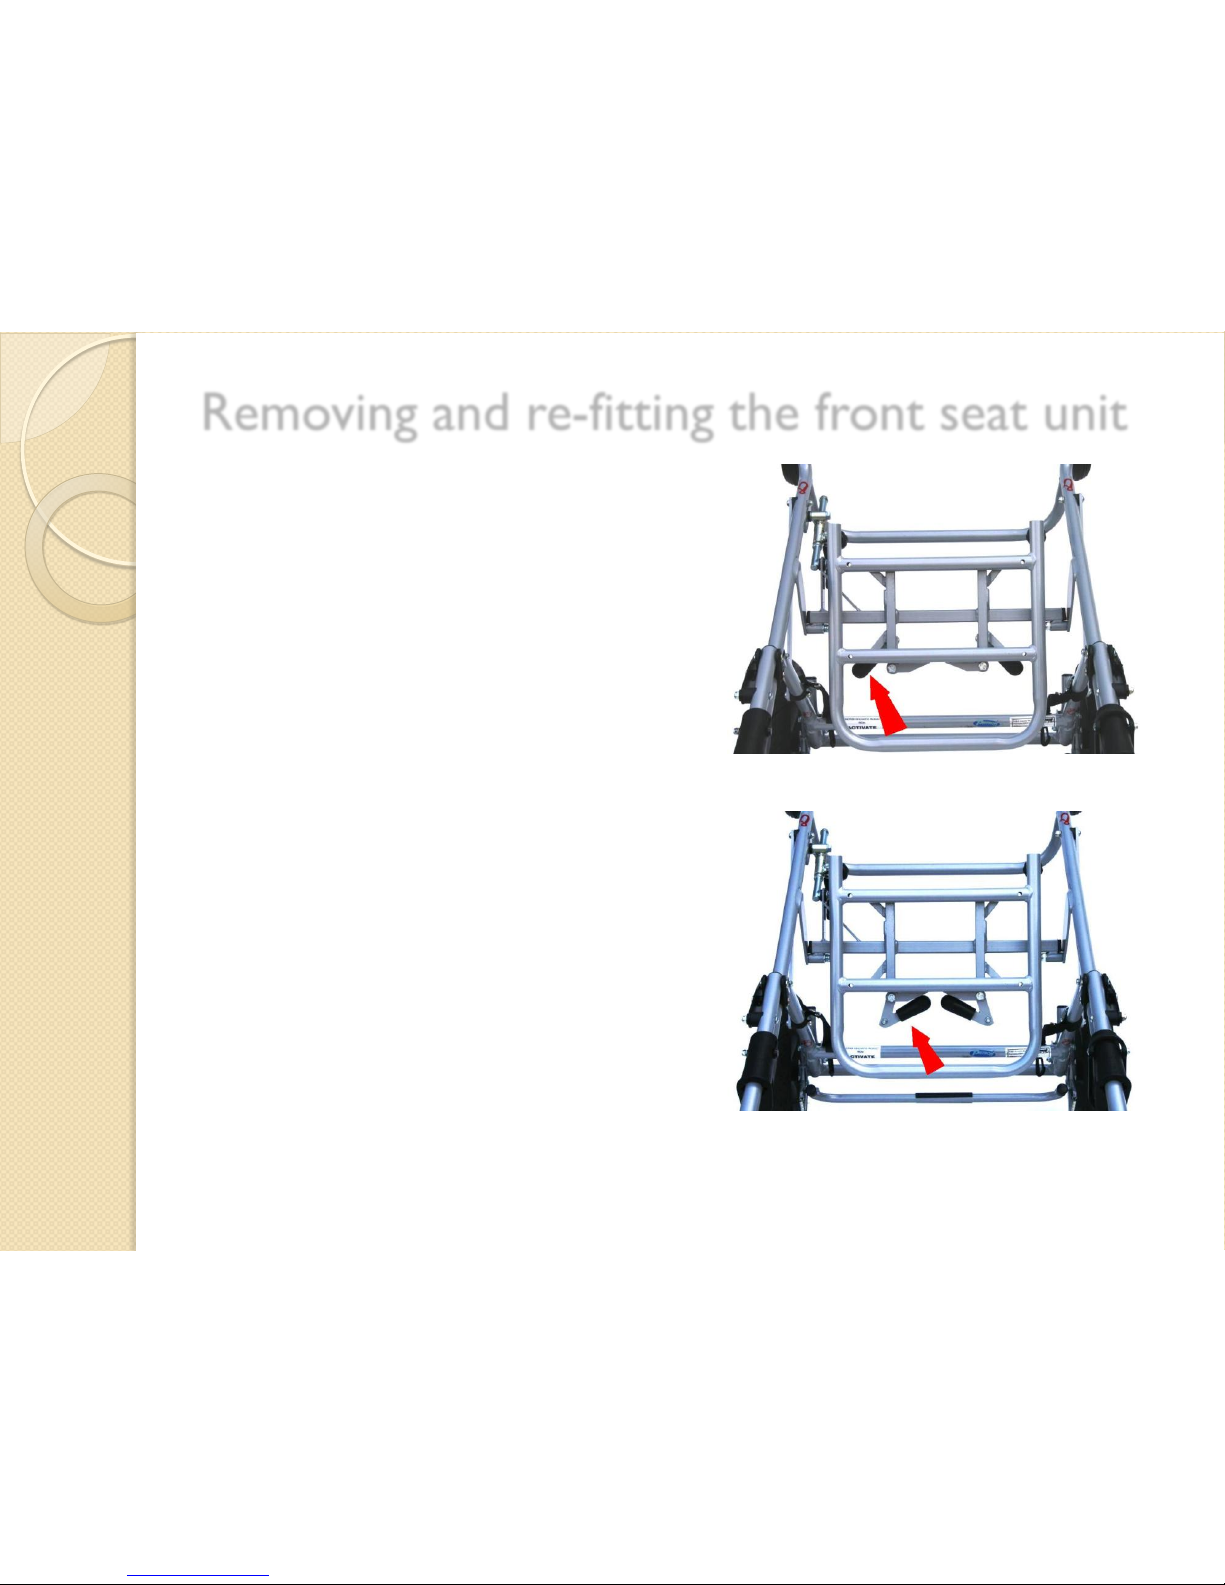
Removing and re-fitting the front seat unit
The Seat unit should be removed to
allow the frame to fold.
The seat is secured by two levers
under the seat unit at the rear as
indicated in our first picture (you are
looking down form above, with only a
seat frame mounted on the chassis)
These levers should be opened by
pulling the pop-pins out and swinging
the levers backwards as shown
The seat unit then tips forward and is
lifted off the interface.
Make sure that the Seat carriage is
placed in a level position for folding
Page 6
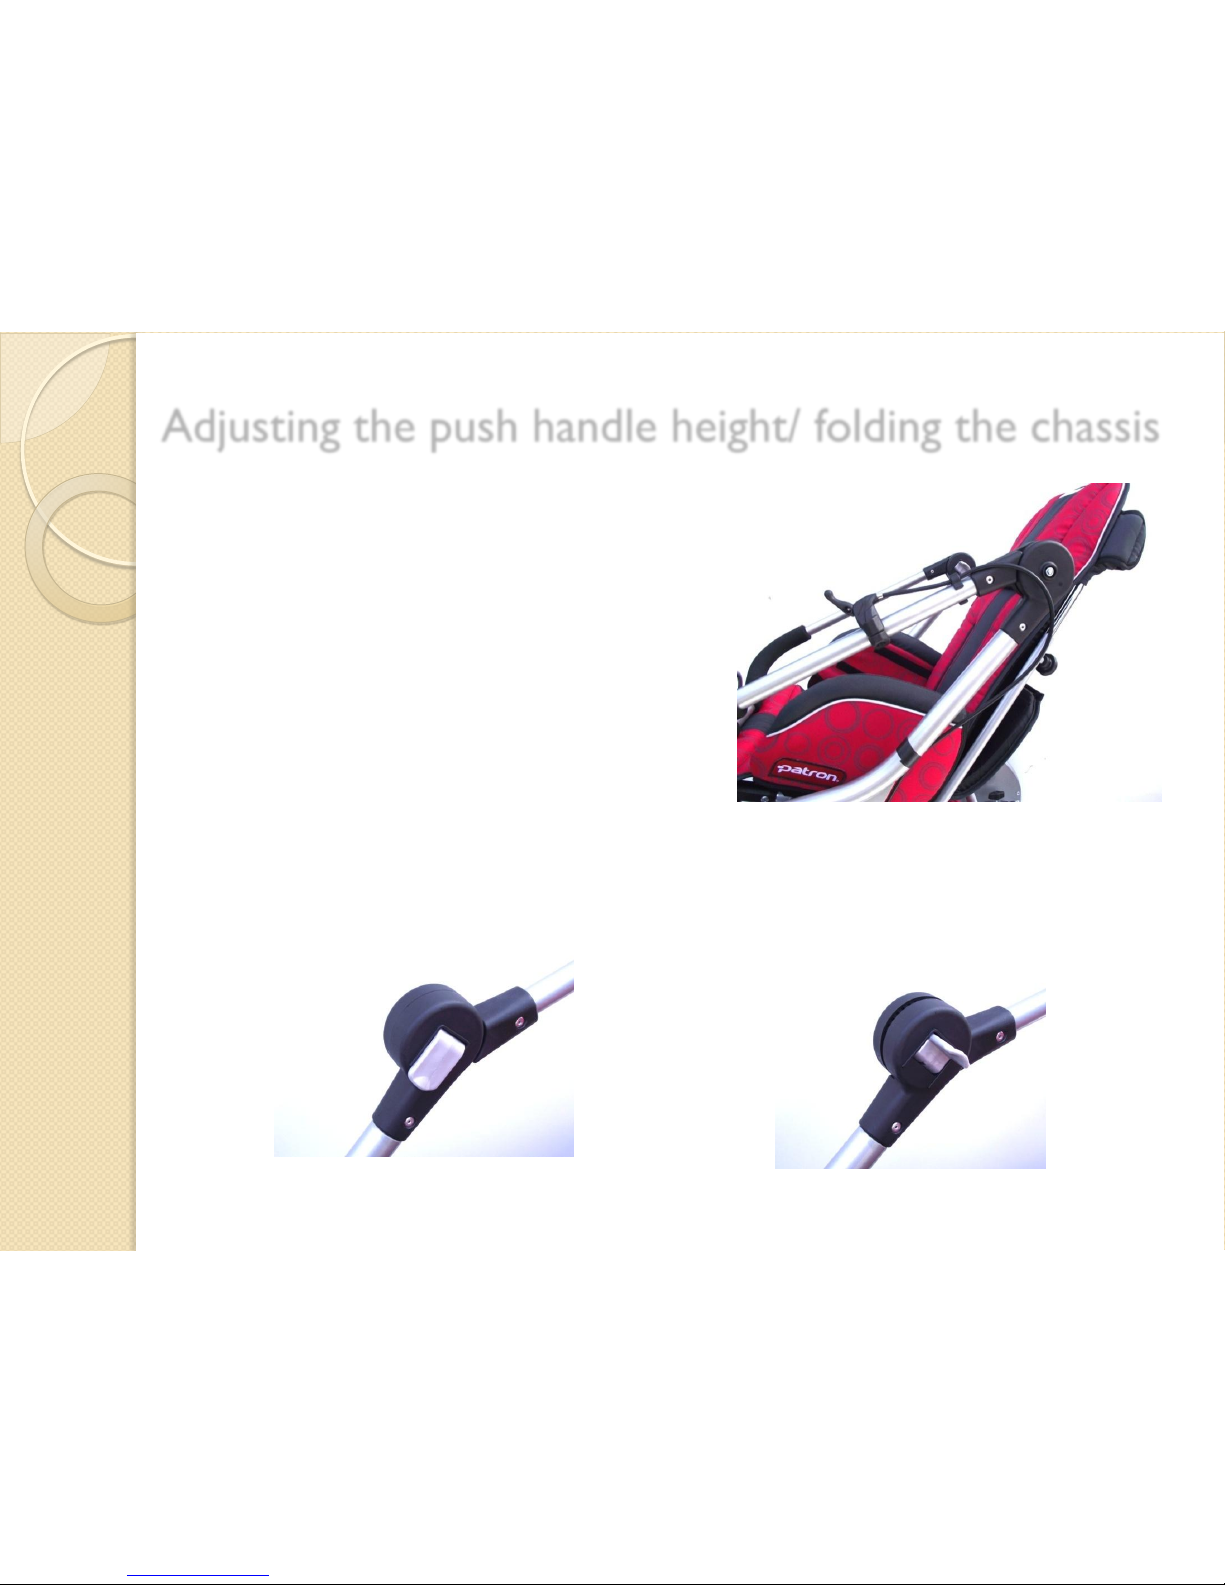
Adjusting the push handle height/ folding the chassis
The height of the pushing handle is
adjustable, and this also enables the
handle to be folded away for storage of
the complete buggy – or when folding
the frame
The lever on the adjuster should be
opened, which allows the gears to
disengage. The handle can then be
moved to the required position and
the lever closed to secure the adjuster.
Adjuster Closed Adjuster Open
Page 7
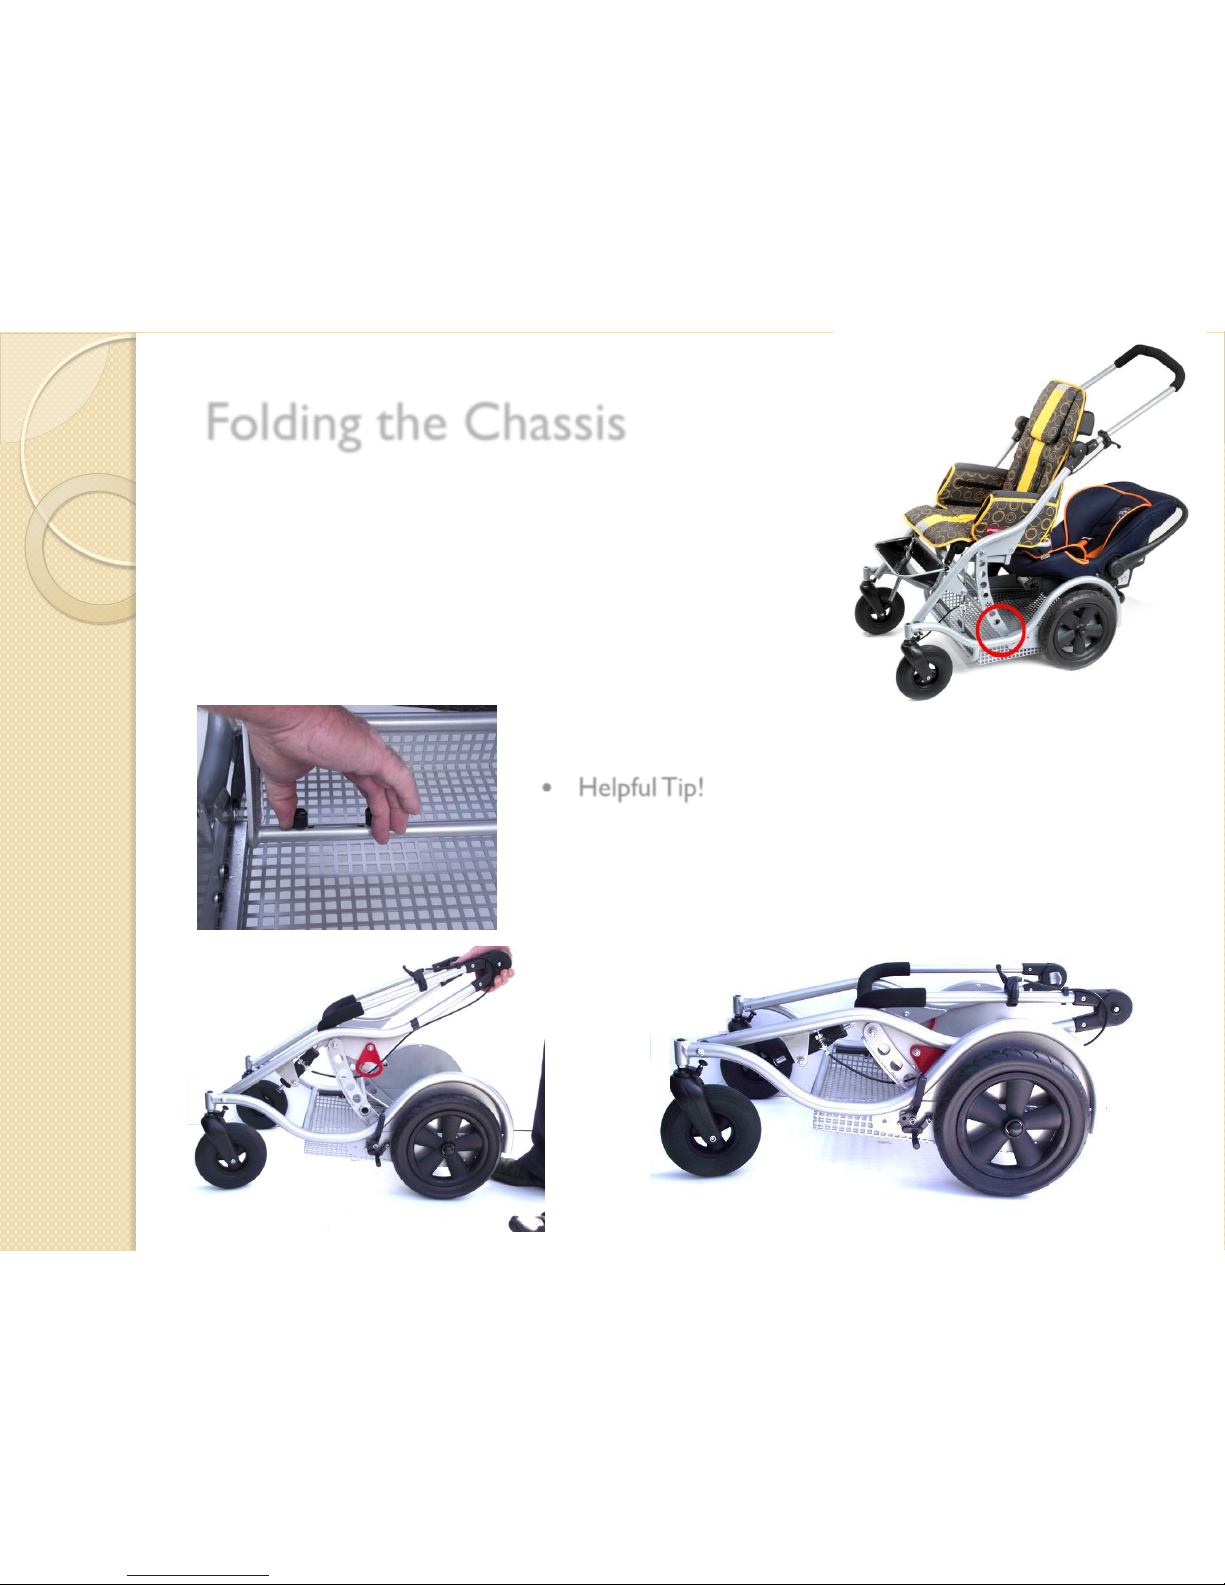
Folding the Chassis
The chassis is folded very simply by pressing the
release handles together as shown
Make sure that you have supported the handle frame,
otherwise the chassis will fold on top of you!
You will find that the chassis fits into most car boots,
as it is short enough and shallow enough once folded.
Helpful Tip! – lock the direction on the front castors
by lifting and turning the pin and locating it into the
castor housing. This will hold the castors in line while
it is folded, making it easier to stow away.
Page 8
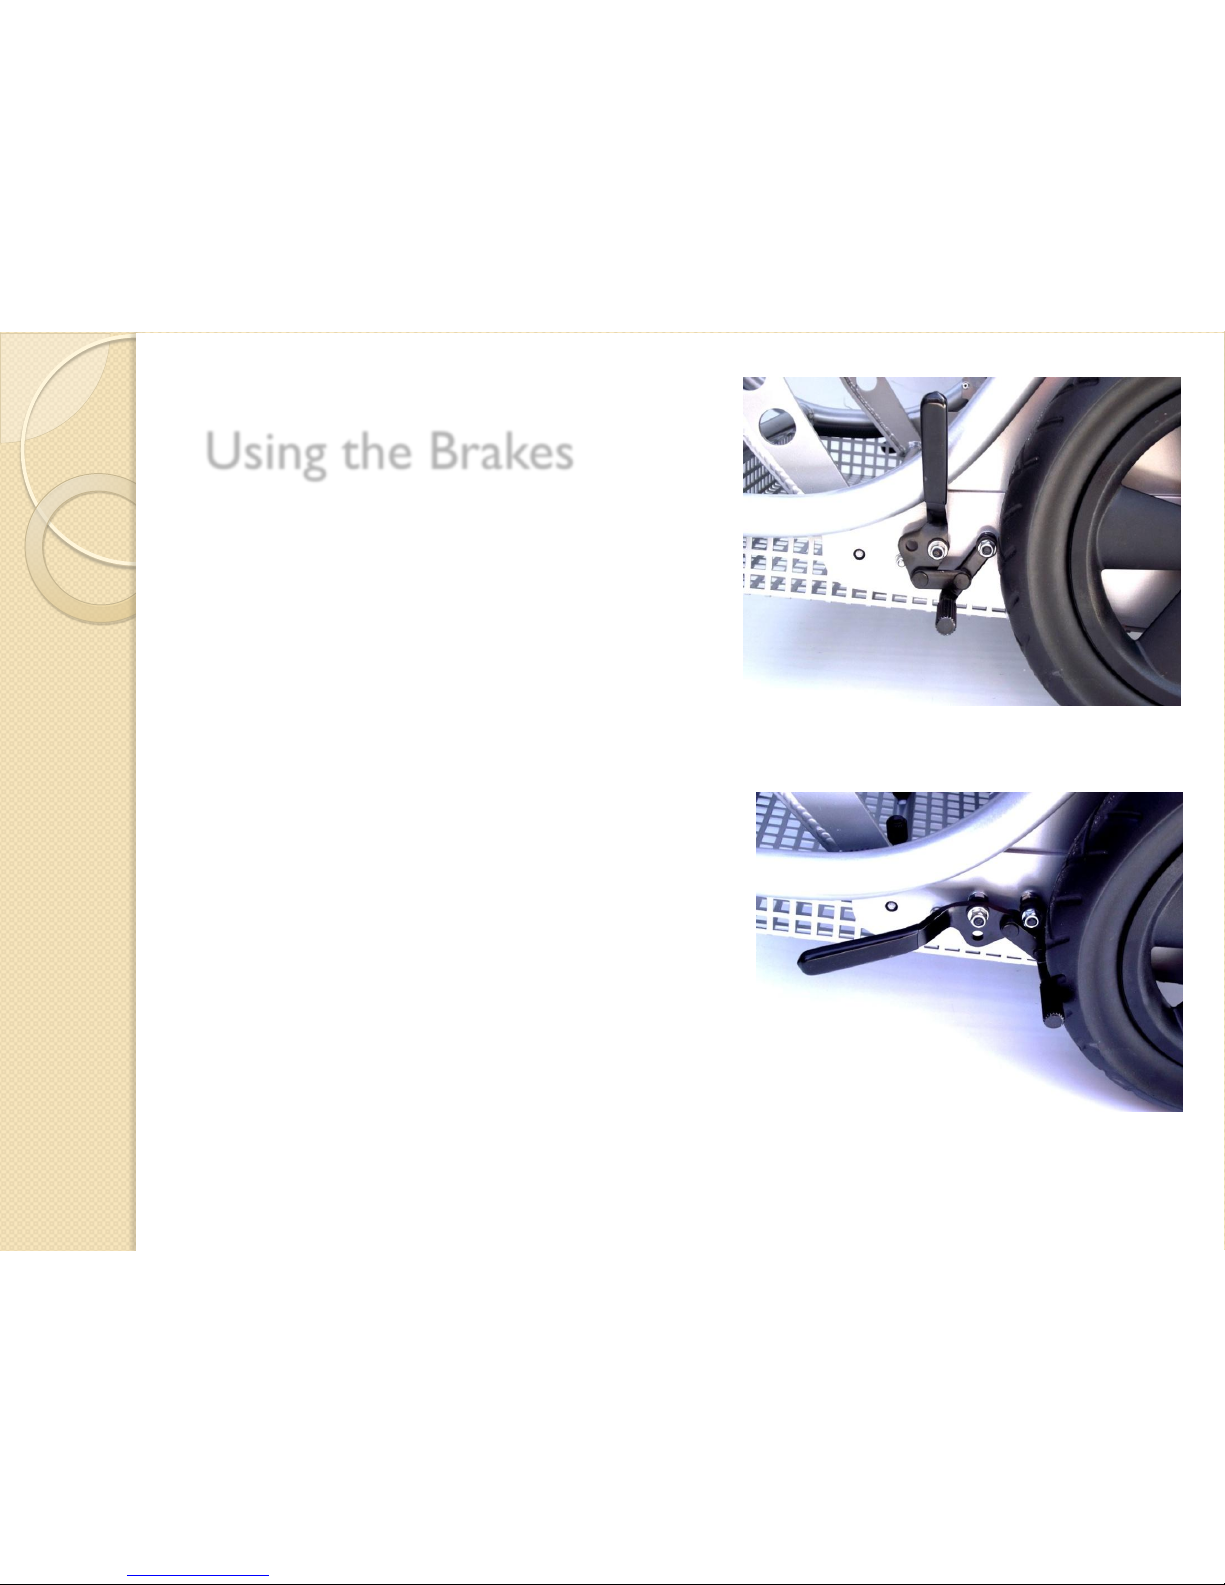
Using the Brakes
The brakes are fitted on either side
of the Tandem Buggy, and both
brakes should be applied while the
buggy is being loaded or unloaded.
Always make sure that the brakes
are gripping the wheels sufficiently –
especially when parking the buggy
on slopes.
Brake off
Brake applied
Page 9
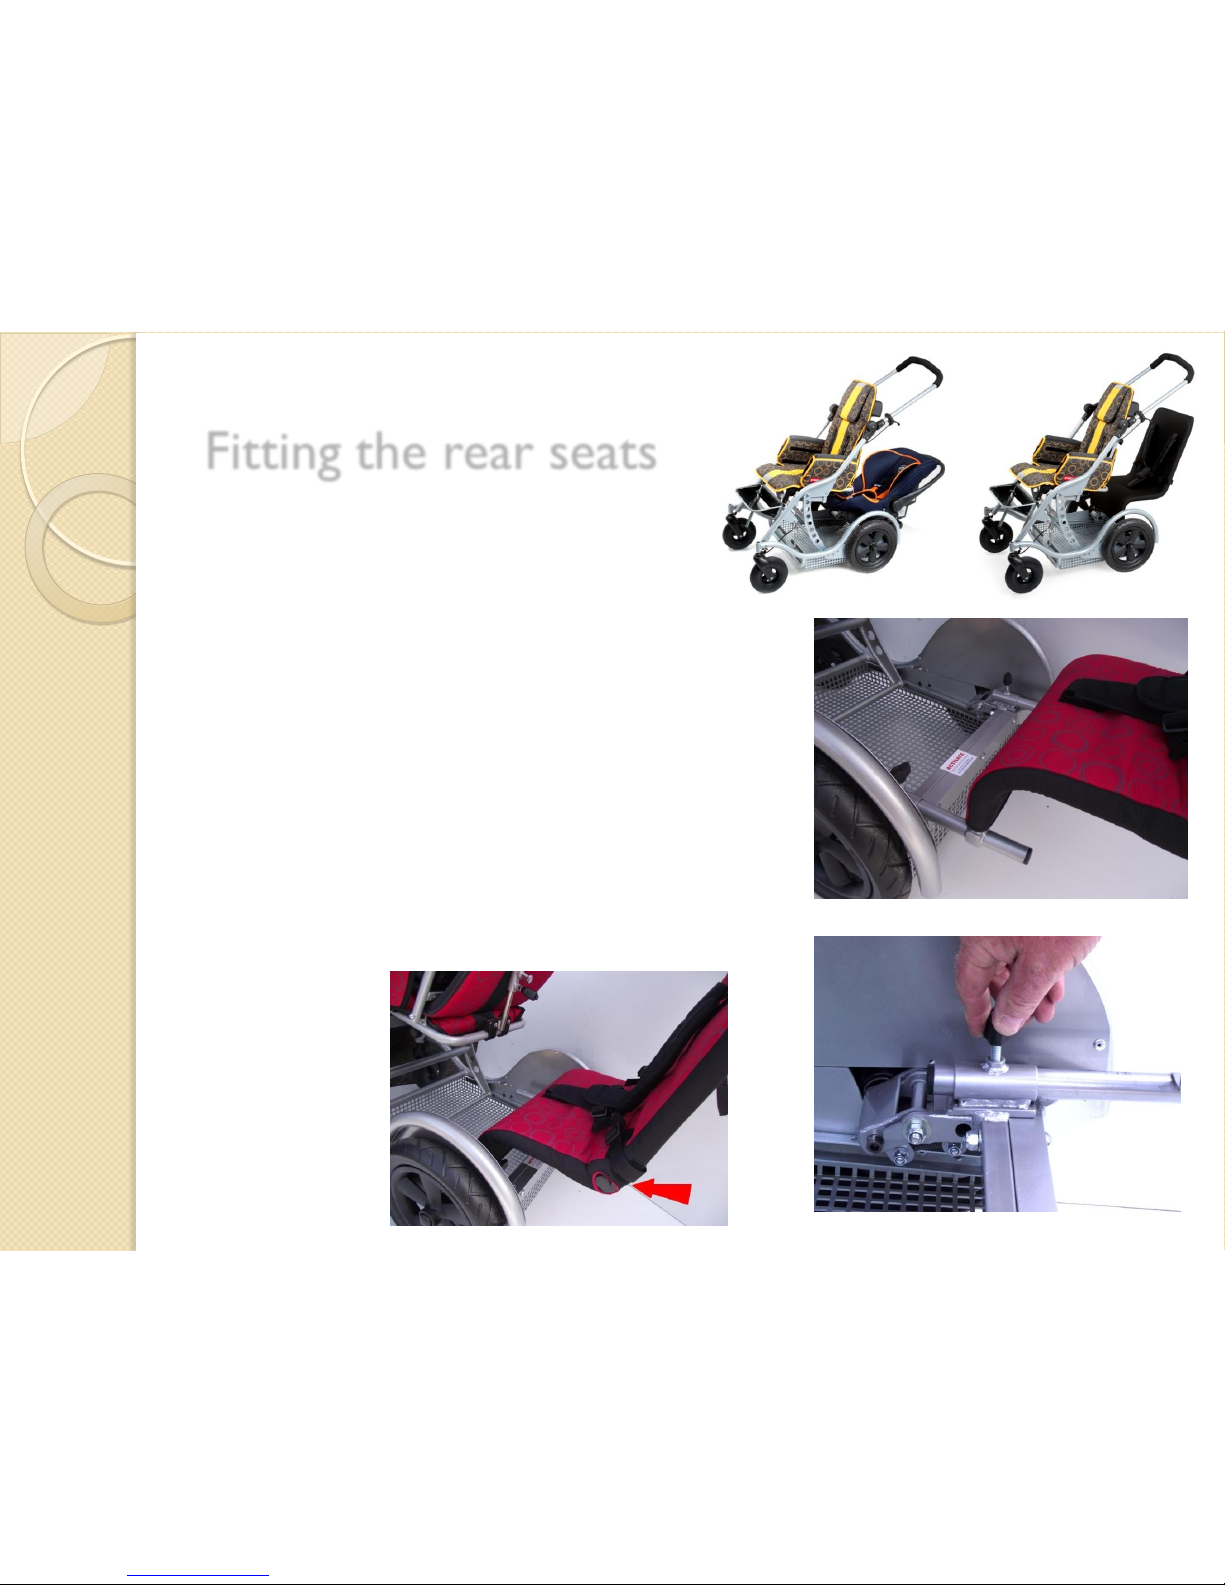
Fitting the rear seats
The Tandem buggy is designed to
receive both a baby car seat that is
suitable from birth to 9 months old,
and a sibling seat with takes a child
form 9 months up till 3-4 years old.
The Carrying Frame for the Baby Car Seat and
the Sibling seat fit into the receivers on the rear
of the Tandem as shown
The handwheels are tightened to secure the
frame in position
The backrest angle on the sibling seat is adjusted
by pressing the button on both side of the seat
Page 10
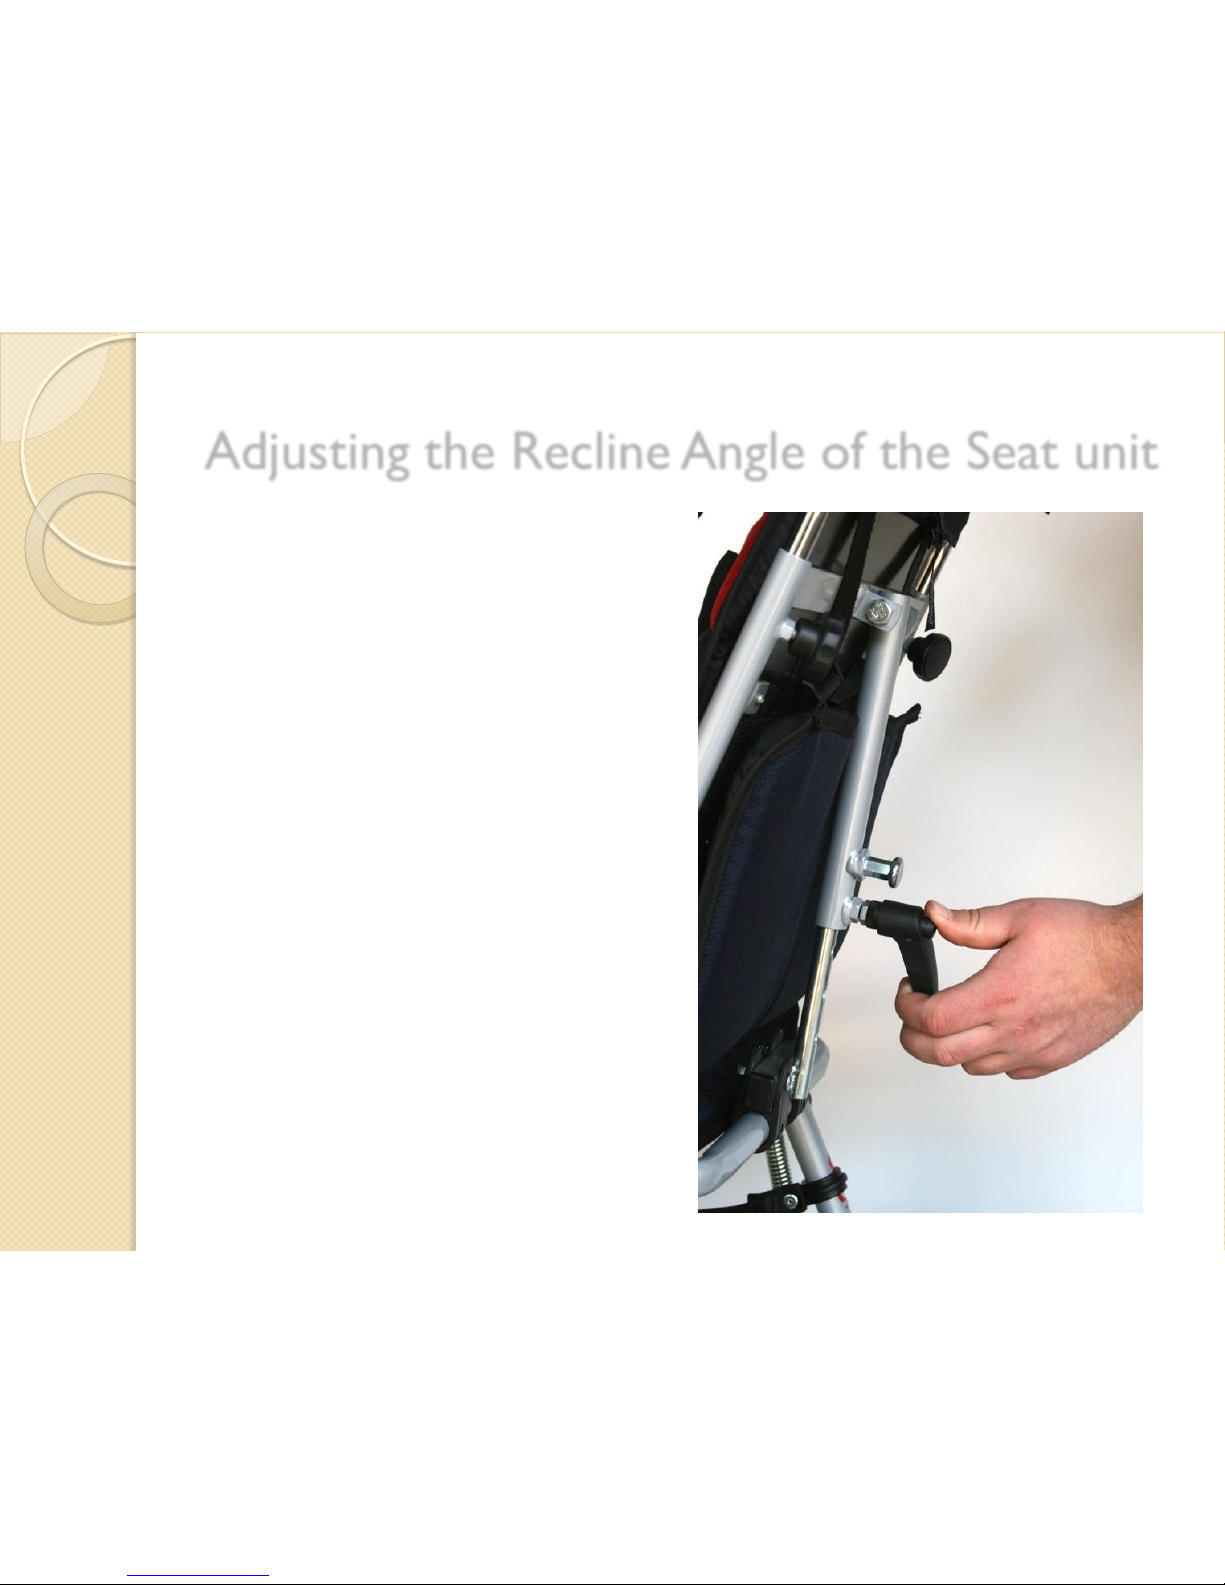
Adjusting the Recline Angle of the Seat unit
You should be aware of the way
this movement could affect the
user of the rear seat.
To release the position undo the
lever handle as show, then pull on
the pop-pin while supporting the
weight of the backrest. Reposition
and release the pop-pin to locate
into the closest hole and re-secure
the handwheel.
Page 11
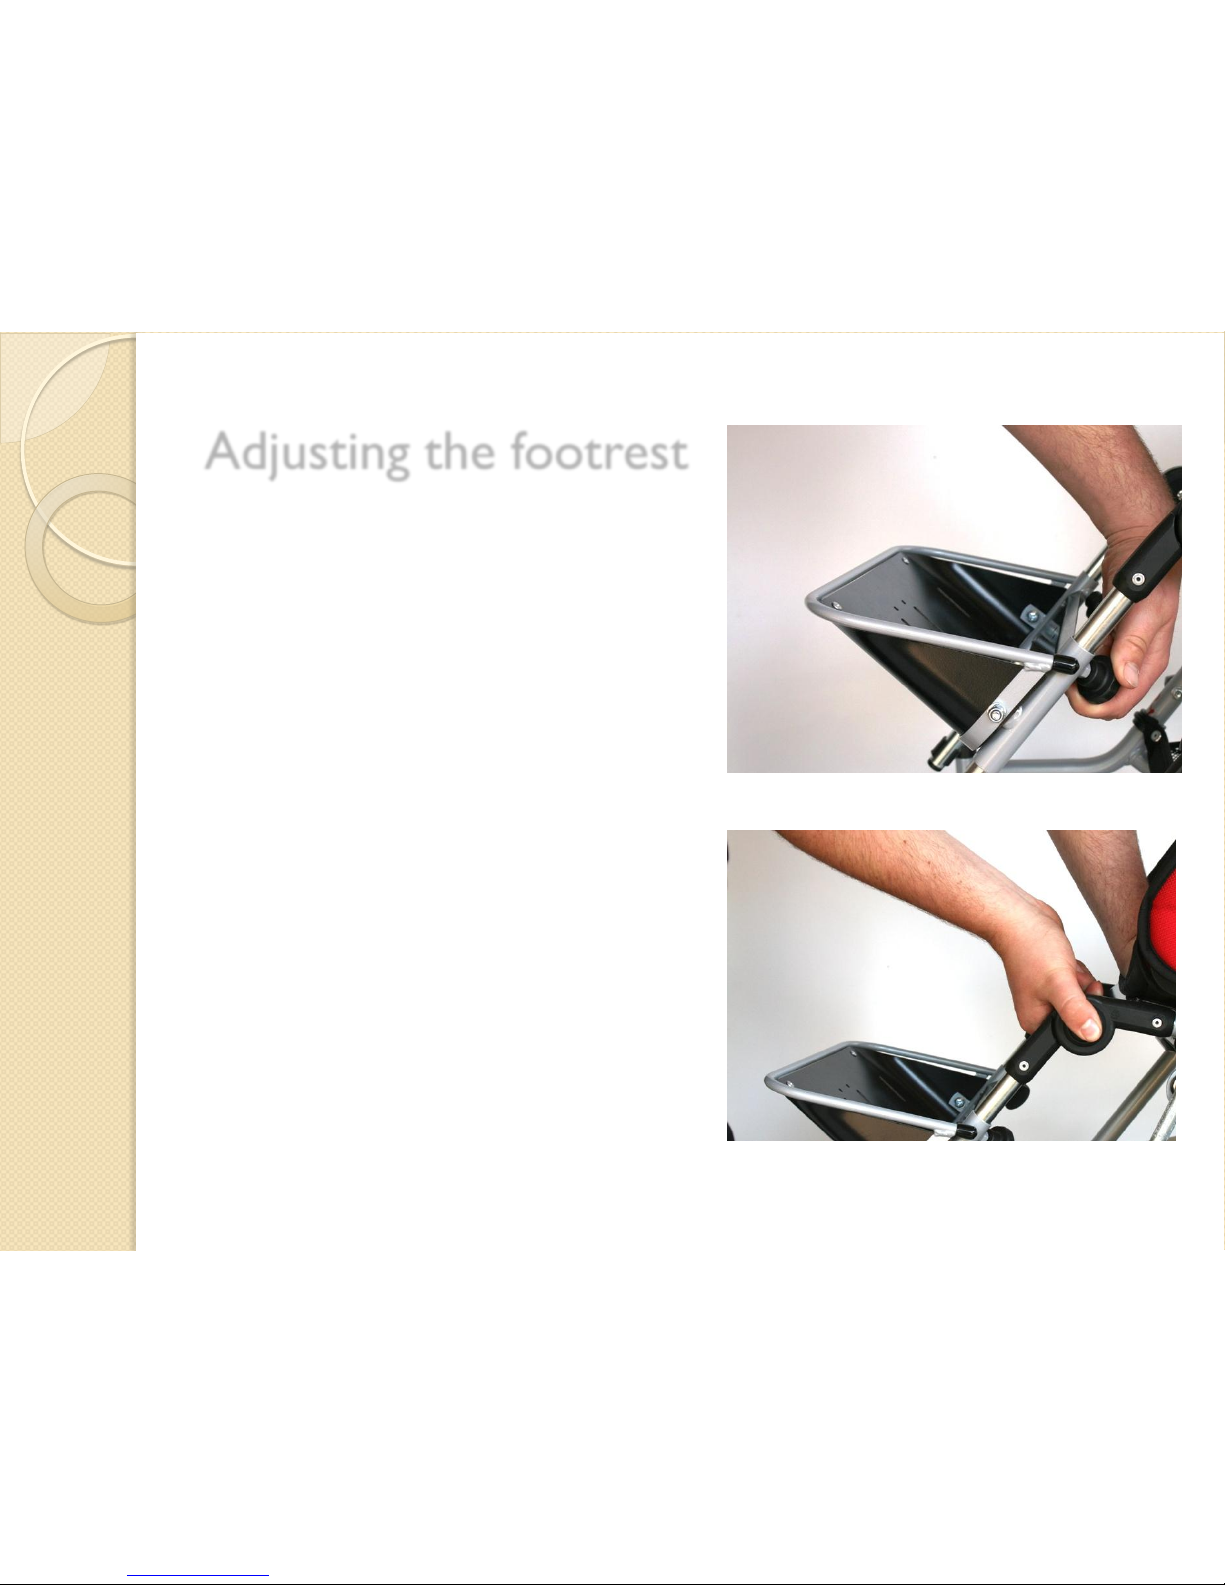
Adjusting the footrest
The footrest is adjusted in height by
releasing the handwheel as shown,
the footplate is re-positioned and the
handwheel is tighteneed to secure
the new position
The footrest is adjusted in angle by
pressing the button as shown – on
both side of the stroller. The desired
angle is then set and the buttons
released. This feature is also used
when the seat is removed and folded.
Page 12
Using the Tandem Buggy
GETTING INTO THE STROLLER
Make sure that the parking brake is on. Fold the footrest out of the way and recline the
footrest rails as far back as possible. Either ask another helper to steady the stroller by holding
the handle, or place the handle up against a wall to minimise the risk of tipping. Place the child in
the stroller, fasten the harnesses, attach the occupant bar, and adjust the footrest.
The child should always feel comfortable and secure in the stroller.
GETTING OUT OF THE STROLLER
Make sure that the parking brake is on. Reverse the procedure for getting into the stroller.
NEGOTIATING A KERB OR SINGLE STEP
To go down a kerb, approach the kerb until the front castors are near the edge. Grip the handle
firmly and tip the stroller backwards to balance on the rear wheels. Lower the castors over the
kerb on the rear wheels, returning the front castors to the ground when you have reached the
lower level.
To go up a kerb, reverse the procedure. Do not approach the kerb with the front castors. This
may seem easier, but puts more strain on the stroller and also on you.
Never tip a stroller forwards at a kerb.
Always make use of ramps and lifts if they are available.
Do not attempt to mount a flight of stairs or steps.
Page 13
OCCUPIED TRANSPORT OF A TANDEM
BUGGY IN A SUITABLY MODIFIED VEHICLE
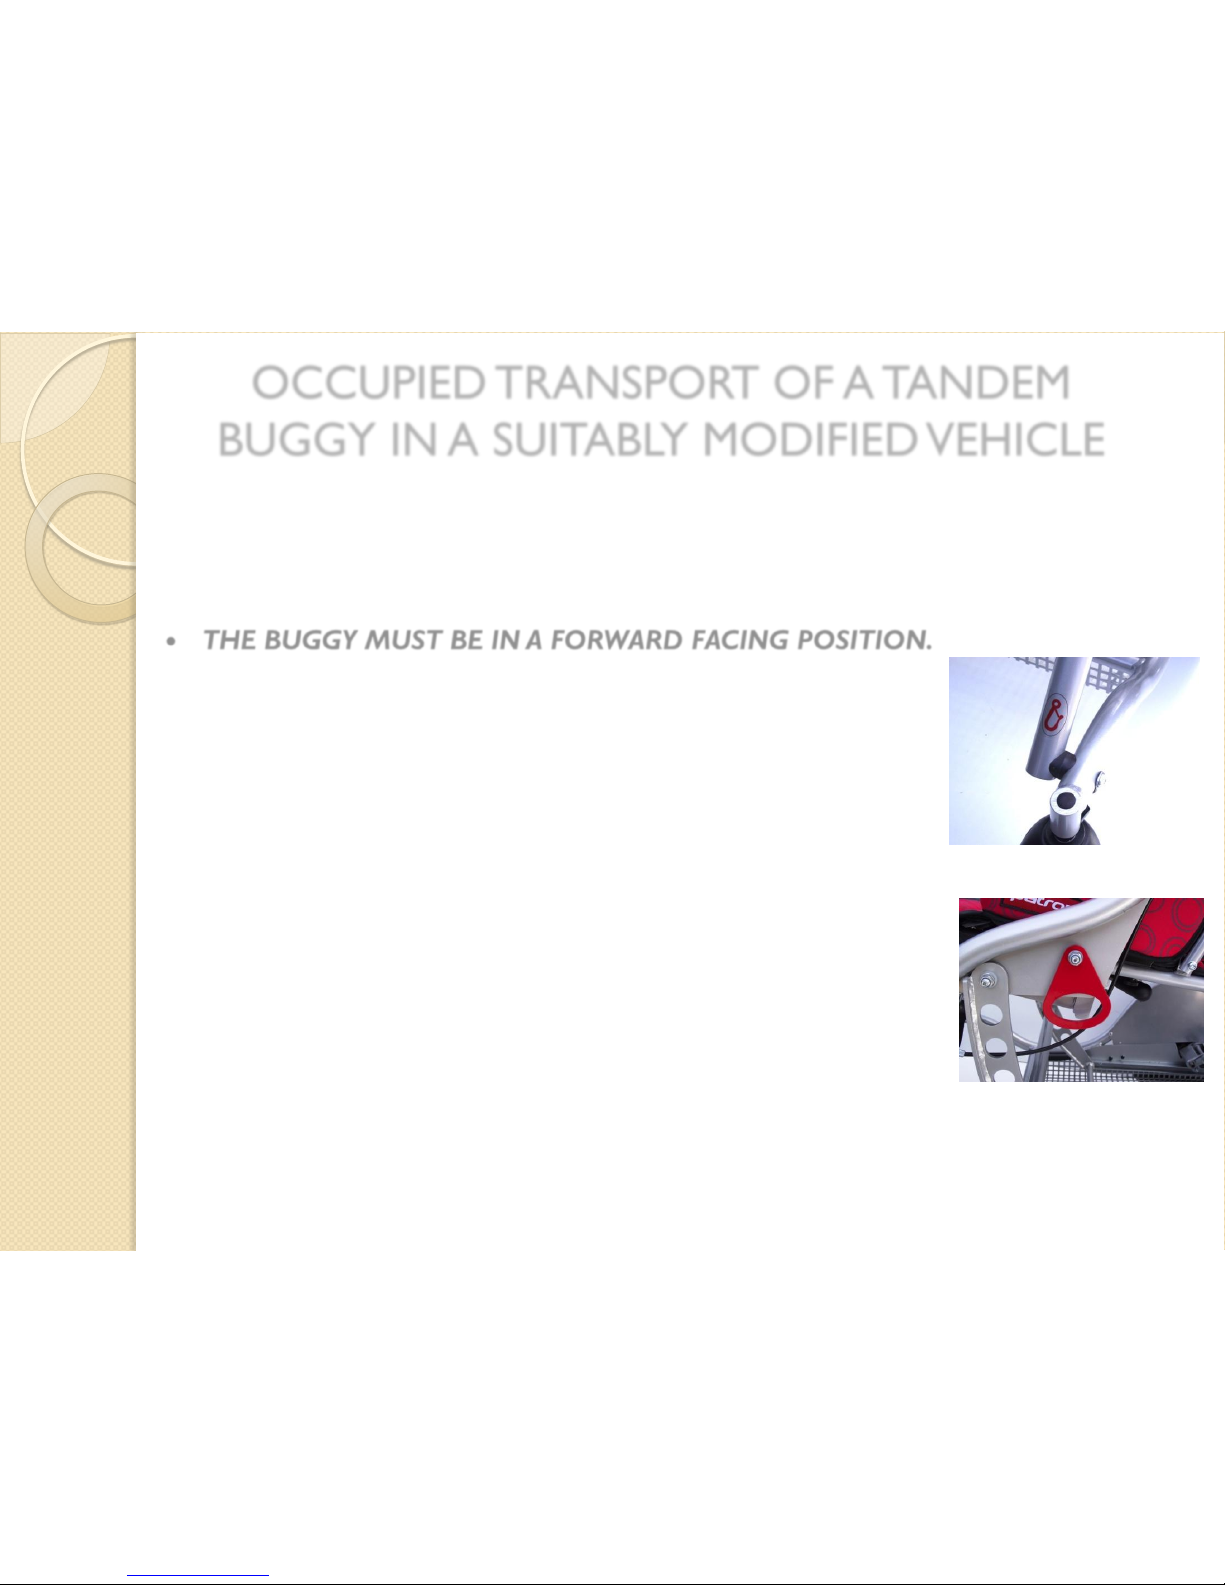
SECURING THE BUGGY TO THE TRACK SYSTEM IN THE VEHICLE FLOOR
The TANDEM BUGGY must be secured to the vehicle floor using a 4-point
webbing restraint system.
THE BUGGY MUST BE IN A FORWARD FACING POSITION.
Wheel the buggy into position and apply the brakes.
The front of the buggy is secured first. Attach the front restraints to the track
system making sure that they are locked in position. Pass the webbing around
the tie-down point, which is clearly marked on the buggy chassis. Always
attach to the vertical section of the frame – the strongest part of the
construction.
Now that the front of the buggy has been secured, carefully move the buggy
backwards to take up the slack in the front restraints, and re-apply the brakes.
The rear restraints are attached to the clearly marked attachment point.
When the restraint is also attached to the track system in the vehicle floor,
use the ratchet to pull the restraint tight. Make sure that you have tensioned
the restraint on both sides of the buggy, and check that the buggy feels secure.
THE RESTRAINTS SHOULD BE ATTACHED AT AN ANGLE OF NO MORE
THAN 45 DEGREES TO THE VEHICLE FLOOR. IF YOU ARE IN ANY
DOUBT, CONTACT THE RESTRAINT MANUFACTURER FOR SPECIFIC
INSTRUCTION RELATING TO THEIR SYSTEM, OR YOUR DEALER FOR
QUERIES RELATING TO THE BUGGY.
Page 14
SECURING THE PASSENGER RESTRAINT AROUND THE OCCUPANT AND ATTACHING
TO THE TRACK SYSTEM IN THE VEHICLE FLOOR.
The following points relate to the safety of the occupant:
Check that occupant weighs no more than 35kg.
Make sure that the seat base is at 90 degrees to the seat back.
The seat back should be as upright as possible.
No additional seating cushions should be used in transportation.
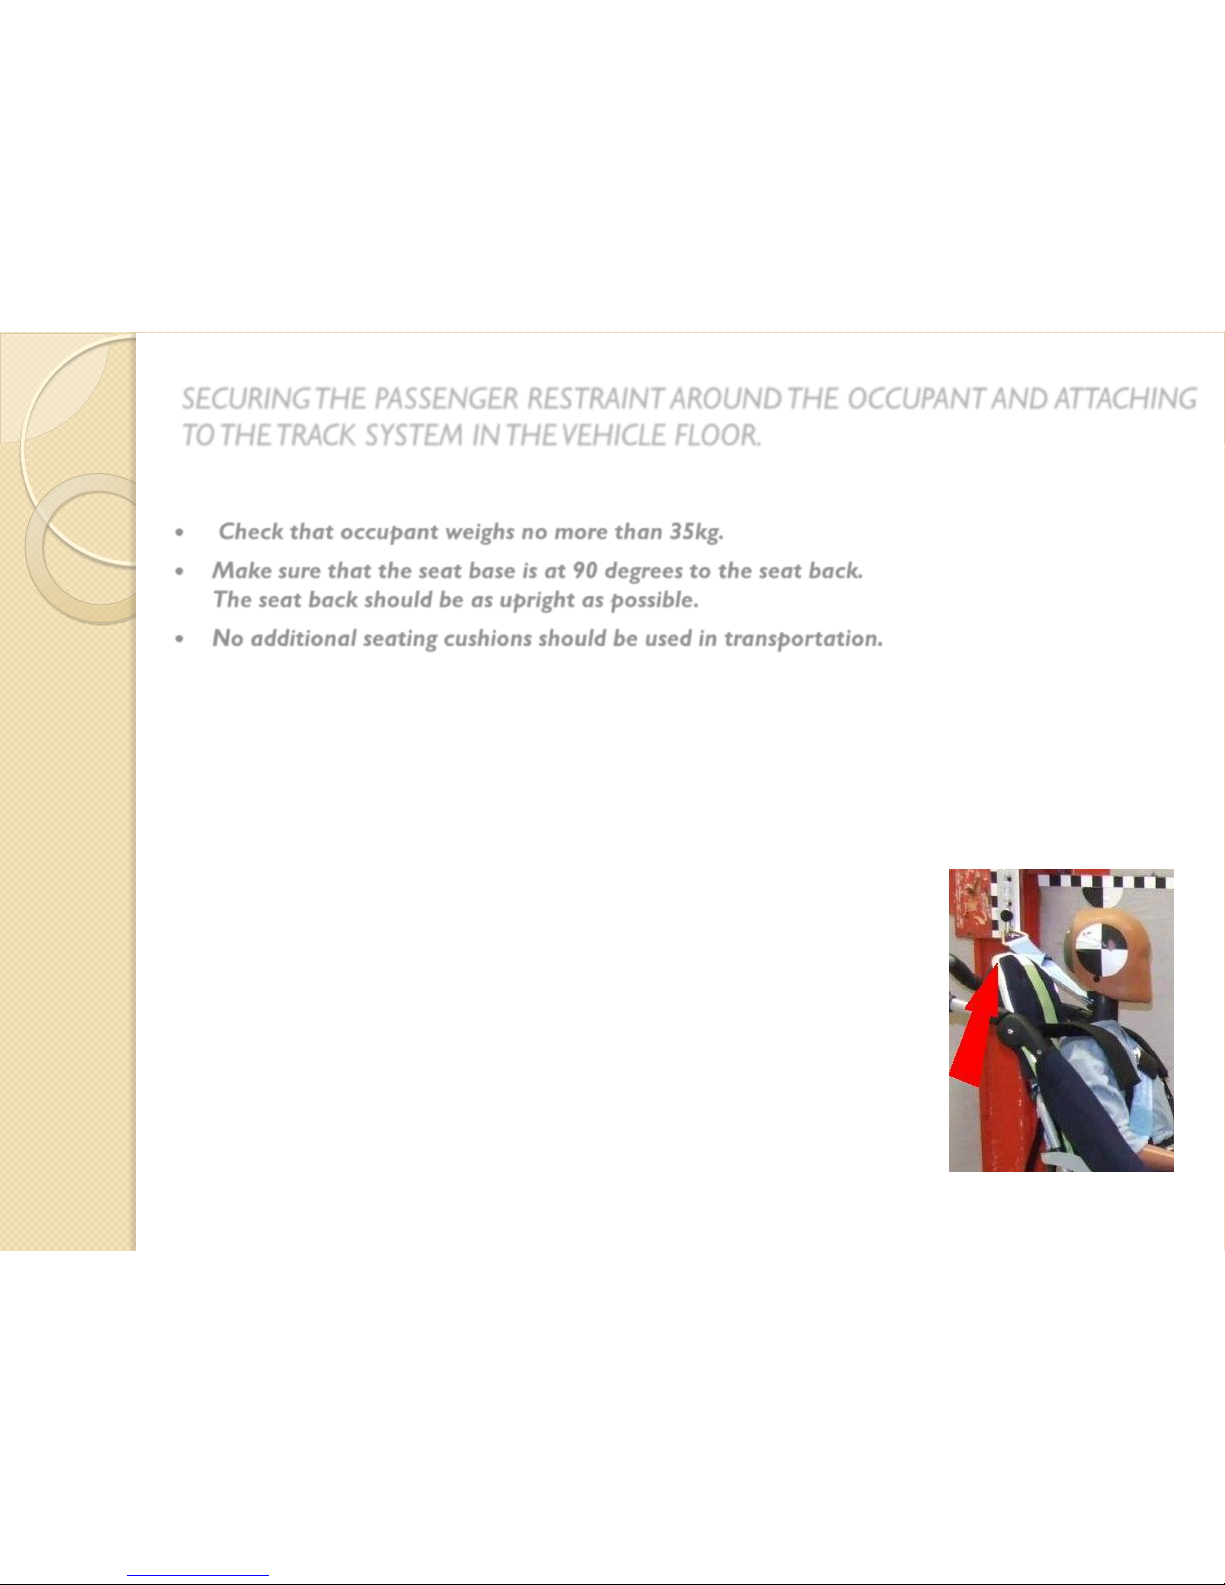
The buggy occupant is protected by a 3-point passenger restraint, described by the
restraint manufacturer as a SPLIT REEL DOUBLE INERTIA.
The double inertia reel is attached to the track system on the track closest to the
vehicle wall on which the upper torso anchorage is mounted. The stalk with the
buckle on is placed opposite the double inertia reel on the other track. These
should be positioned about 350mm/14” behind the buggy backrest to ensure a
steep angle of application of the lap belt. The lap belt is reeled out from the front
of the double inertia reel, fed between the buggy seat side and the backrest in
order to maintain a steep angle over the pelvis. The belt must fit snugly over the
pelvis and between the seat side and the backrest on the other side of the seat
unit. The clip then attaches to the stalk, which is fixed to the track in the vehicle
floor. The lap belt should be adjusted to be close fitting to avoid abdominal
intrusion on impact.
The upper torso restraint is reeled out of the rear of the double inertia unit. The
leading clip is passed over the occupant’s shoulder, and attached to the buckle on
the lap belt. This will be found just above the lap belt attachment to the stalk. The
remaining clip is then attached to the restraint anchorage on the vehicle wall. This
should be adjusted to be at, or just above, shoulder level. The upper torso restraint
should be adjusted to be close fitting, and comfortable for the occupant.
Page 15
KEY POINTS RELATING TO TRANSPORTATION
The buggy must face forwards in the vehicle – in the direction of travel.
The buggy must be restrained with a 4-point tie-down. No other restraint
system must be used.
The occupant must be restrained by a 3-point passenger restraint.
The passenger restraint must be anchored at, or above, shoulder level.
The lap section of the passenger restraint should fit snugly over the pelvis
of the occupant, at a steep angle of application to avoid abdominal
intrusion.
Check with the vehicle converter that the vehicle floor and side wall
structures have the appropriate strength required by the restraint
manufacturers for the installation of the restraint systems.
Check that the vehicle converter has fitted the restraint system in
conjunction with the restraint manufacturer. All manufacturer’s
recommendations and guidance notes should be followed.
Check that all vehicle operators are suitably trained in the use, care and
maintenance of the restraints.
Page 16
CARE AND MAINTENANCE
Your stroller has been designed and produced to a high standard. With correct use and maintenance it will give you many
years of trouble-free service.
Please read the following instructions.
Regularly inspect the frame catch and the attached safety clip, the occupant bar fitting, locking devices, catches, the footrest
and all fixings on the frame to ensure that they are secure and in good working order
Brakes, wheels and tyres are subject to wear. If they need to be replaced, the work must be done by a qualified
rehabilitation engineer.
We recommend that the stroller is checked once a year by a qualified rehabilitation engineer.
Any damage or repairs should be assessed by a qualified rehabilitation engineer, or should be returned to your dealer.
Only genuine Patron Bohemia parts should be used when your stroller is repaired.
Regular lubrication of moving parts will extend the life of your stroller and will make folding and unfolding easier. Use a
spray lubricant and wipe off any excess spray. Any overspray will encourage a build up of dirt.
Make sure that you are familiar with the folding method for your stroller. It should always fold easily, so do not force the
mechanism if it does not. Stop and read this user guide again.
Wheels and other plastic or metal parts may be sponged clean with warm water and a mild detergent.
The fabric covers are removable, and should be washed in water no hotter than 40 degrees centigrade.
To remove the backrest cover, remove any postural accessories and harnesses, unzip the top section and carefully remove
the cover from the backrest. Make sure that you are able to replace the postural accessories in the right place.
The seat cover is closely fitted over the seat sides, and is attached to the seat base with Velcro.
Never clean the stroller with abrasive cleaners, ammonia based, bleach based or spirit based cleaners.
After exposure to damp conditions, dry off your stroller with a soft cloth, and leave unfolded in a warm, dry environment.
Store your stroller in a dry, safe place.
Page 17

 Loading...