

Page 1

IDWedgeBT™ Users Guide
Serial Port Profile Mode
Version 2.3 Software
Confidential Page 1 5/31/2013
Page 2

Copyright
Copyright 2002 - 2013 TokenWorks, Inc. Printed in the USA
Information in this document is subject to change without notice. No part of this
document may be reproduced or transmitted in any form or by any means, electronic
or mechanical, for any purpose, without the express written permission of
TokenWorks, Inc.
www.TokenWorks.com (Company Web Site)
www.CardVisor.com, www.IDVisor.com, www.IDScanner.com (Product Web site)
TokenWorks®, CardVisor®, CardTool®, IDVisor® and IDWedge® are registered
trademarks of TokenWorks, Inc. IDWedgeBT is a TokenWorks Inc trademark.
Version Description of Change
Auth
or
Date
1.0 Initial PC 07272012
1.1 Change wording for SD card access PC 08062012
1.2 Update Config.xml, firmware rev 1.5 PC 11292012
1.3
1.4 Update Magnetic parsing, rev 1.8 PC 02262013
1.5 Rev 1.9 software, updated parsing bugs PC 03052013
1.6 Add Document Issue Date, rev 2.0 PC 03062013
1.7 BT Conn. LED stays on during SD access
1.8
1.9 Change power up initialization, add appendix 2,3 PC 05312013
Change version to match firmware release 1.6.
Update Config.xml, improve Magnetic formula
description, add Self Test appendix
Function button displays 1st LED = HID
Function button outputs configurable string
Move SD Access to beginning of code, add raw data
mode (Lng=99) to magnetic cards
PC 01092013
PC 04112013
PC 05012013
Confidential Page 2 5/31/2013
Page 3

Copyright........................................................................................................................... 2
1 Introduction................................................................................................................. 4
1.1 Document overview................................................................................................... 4
1.2 Operational overview................................................................................................ 4
1.2.1 Power ................................................................................................................. 5
1.2.2 Battery................................................................................................................ 5
1.2.3 Function Button ................................................................................................. 5
1.2.4 Connection Status .............................................................................................. 5
2 Configuration file...................................................................................................... 6
2.1 Config.xml................................................................................................................. 6
2.1.1 Version............................................................................................................... 7
2.1.2 Name.................................................................................................................. 7
2.1.3 Pin......................................................................................................................7
2.1.4 Auth.................................................................................................................... 7
2.1.5 FuncKey............................................................................................................. 7
2.1.6 CreditCard.......................................................................................................... 7
2.1.7 1DBarcode ......................................................................................................... 7
2.1.8 MagTrackCard................................................................................................... 7
2.1.9 MidInitial ........................................................................................................... 7
2.1.10 5DigitZip.......................................................................................................... 7
2.1.11 ScanMsg........................................................................................................... 8
2.2 Reading/Writing Config.xml..................................................................................... 8
3 Formulas and CSV output strings................................................................................ 8
3.1 DL/ID Card CSV string ............................................................................................ 8
3.2 Credit Card CSV string............................................................................................. 9
3.3 Magnetic.txt .............................................................................................................. 9
4 Serial Protocol.............................................................................................................. 12
4.1 Outgoing Card Scan message ............................................................................. 12
4.2 Incoming Bluetooth Commands and Outgoing Responses ................................ 13
4.2.1 Ping.................................................................................................................. 13
4.2.2 Get Serial Number ........................................................................................... 13
4.2.3 Speaker Volume............................................................................................... 14
4.2.4 Read Battery Level .......................................................................................... 14
4.2.5 Write Registration............................................................................................ 15
4.2.6 Read Registration............................................................................................. 15
Appendix 1 – Power on BIT (Built in Test) Description ............................................. 16
Confidential Page 3 5/31/2013
Page 4
1 Introduction
The IDWedgeBT is a barcode/magnetic card scanner that supports a
Bluetooth connection to a host computer/tablet and functions as a Serial Port
Profile device. Cards are scanned and parsed into fields, and these fields
are sent as a Comma Separated Value (CSV) string to the host.
1.1 Document overview
This document will describe the basic functionality of the IDWedgeBT and
how to configure the application parameters and formulas used to control the
output of data from the scanner.
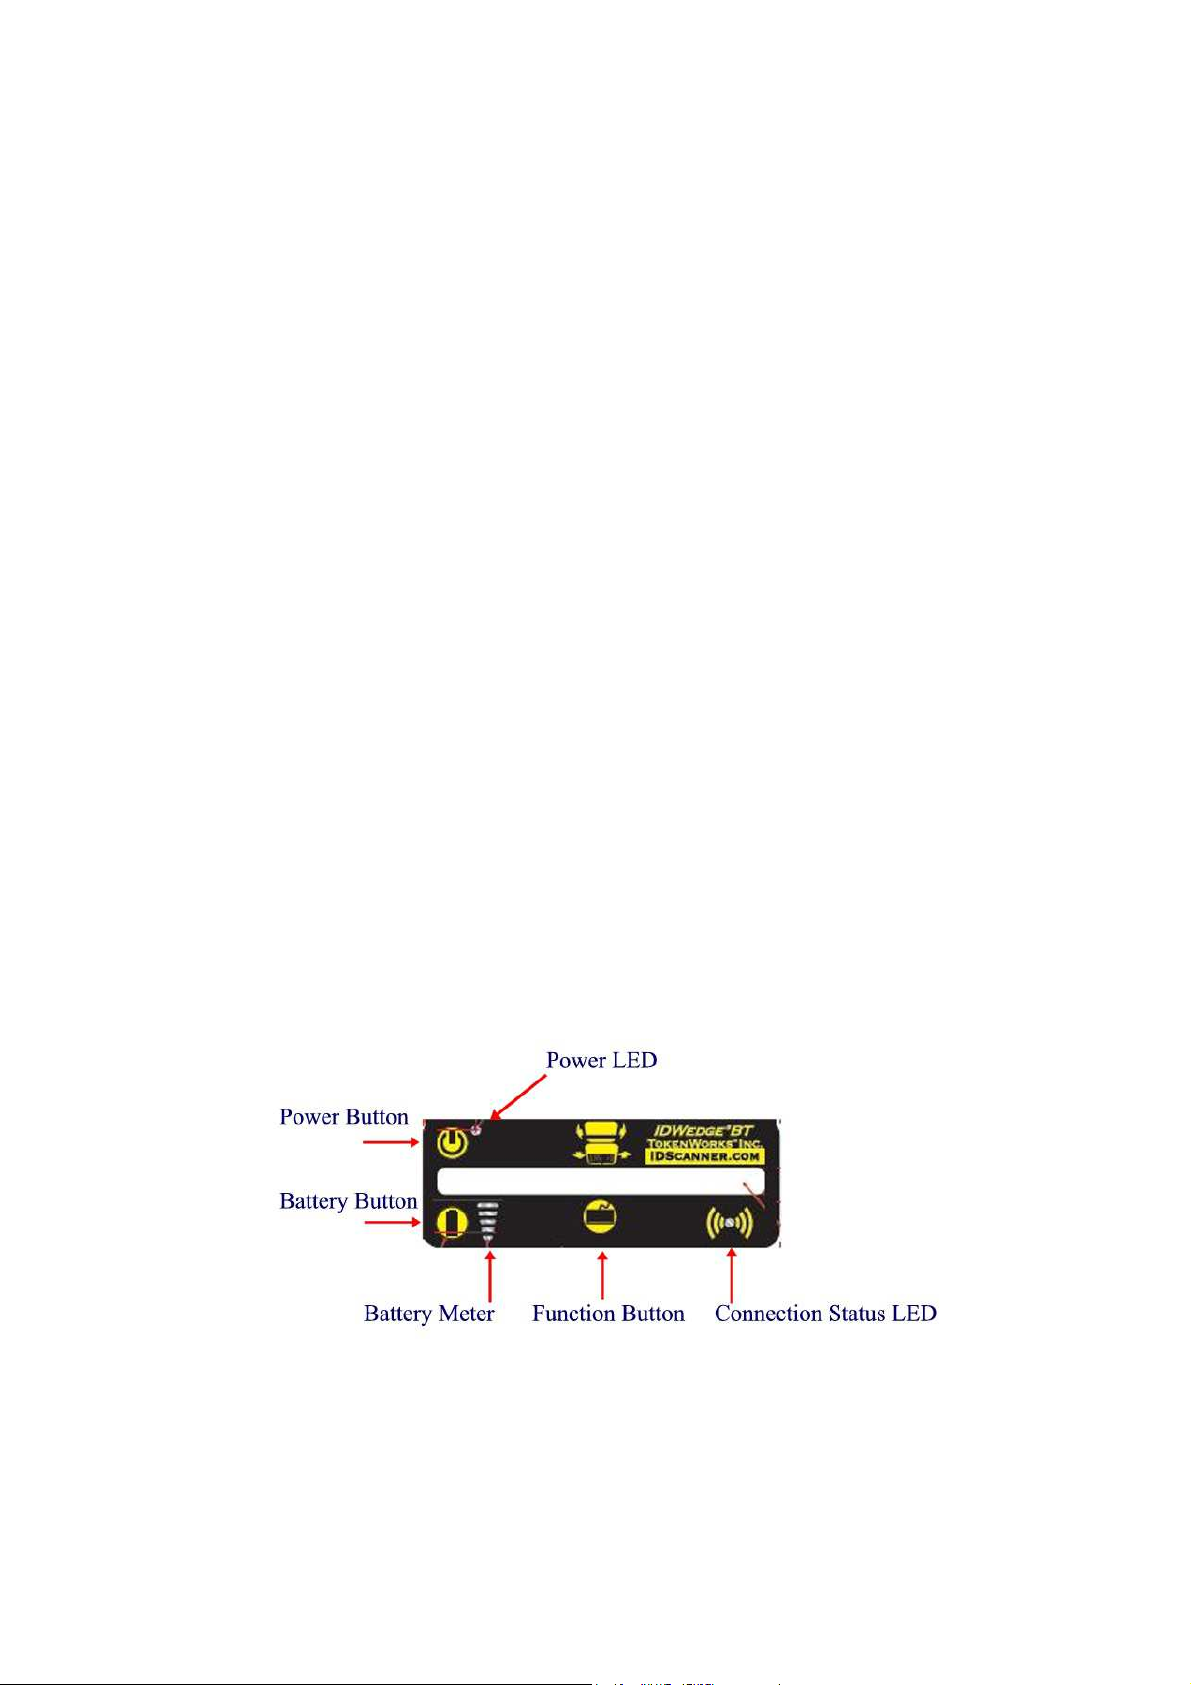
1.2 Operational overview
The diagram below shows the top view of the IDWedgeBT scanner and
the location of the LED indicators and button switches used during the operation
of the device.
Confidential Page 4 5/31/2013
Page 5

1.2.1 Power
The Power Button switches the battery power on/off to the unit. Power can be
applied by connecting the 12VDC power supply, which charges the internal
battery. The USB cable can also supply power, but does not charge the battery.
If either of these two cables is connected the device powers on and ignores the
state of the Power Button. When the device is powered on, the device will
perform a self-test. After approximately 5 seconds the scanner is operational.
See appendix 1 for detail on the Self Test
1.2.2 Battery
The Battery button displays the state of the internal battery, press it once and
view the state of the battery on the 5 segment LED. The Battery button serves a
dual purpose of providing access to the SD card. To access the SD card, with
the power off, press and hold the Battery button, and then power on the device.
Continue to hold the Battery button for 3-4 seconds, and then release it. When
the USB cable is connected to a PC, the IDWedgeBT will now appear as an
external USB memory device, and the Connection Status LED will stay lit.
NOTE: The USB cable supplied with the Scanner supplies operational power.
The preferred method of accessing the SD card is to hold the battery button
down, and plug in the USB cable to the PC; this will avoid having to press the
power button.
1.2.3 Function Button
The Function button is used to re-program the device. If you press and hold this
button during power up, you will put the device into programming mode and the
device will no be operational, this mode is used to re-flash the firmware of the
IDWedgeBT. A custom cable is required to re-program the device. When you
press the Function button, the 1
st
and 2nd segments of the 5 segment LED will
light to identify the SPP application. The Function button also outputs the string
stored in the Config.xml file under the FuncKey variable. This string can be 10
digits or less. If a string longer than 10 digits is used, then the default string of
“TokenWorks” will be output.
1.2.4 Connection Status
This LED will flash when the IDWedgeBT has successfully paired with a
compliant Bluetooth host. The default mode for the Bluetooth connection is
Slave; the host device controls all aspects of pairing and connecting to the
device. When the unit is set up to access the SD card via USB cable connection
to PC, the LED will stay on solid until the next power cycle.
Confidential Page 5 5/31/2013
Page 6

2 Configuration file
The IDWedgeBT maintains configuration file called Config.xml. This file stores
the application parameters. If the file gets erased, it will be created automatically
using default settings. If the file contains editing errors or is corrupted and
cannot be opened, then a file called ConfigError.txt will be written to the SD card.
Once the errors have been corrected and the file can be read, the ConfigError.txt
file will be automatically erased.
2.1 Config.xml
Below is an example of the default Config.xml file. Each tagged item in the file
represents an application variable and these variables control the operation of
the IDWedgeBT.
<?xml version="1.0" encoding="utf-8" ?>
-
<configuration>
-
<appSettings>
<add key="Version" value="2.3S" />
<add key="Name" value="IDWEDGEBT" />
<add key="PIN" value="1234" />
<add key="Auth" value="0" />
<add key="FuncKey" value="TokenWorks"/>
<add key="CreditCard" value="True" />
<add key="1Dbarcode" value="True" />
<add key="MagTrackCard" value="True" />
<add key="MidInitial" value="True" />
<add key="5DigitZip" value="True" />
<add key="ScanMsg" value="True" />
</appSettings>
</configuration>
Confidential Page 6 5/31/2013
Page 7

2.1.1 Version
This is the firmware version; it has the letter ‘S’ appended to the end of the string,
to differentiate it from the HID version of firmware. E.g. 2.3S
2.1.2 Name
This is the Bluetooth name that gets broadcast to the host during pairing and is
displayed in the list of Bluetooth devices on the Host.
2.1.3 Pin
This the 4-digit pin code used during the pairing process.
2.1.4 Auth
This is the Authentication setting. It is set to 0 for Serial Port Profile, it also
support a value of 1,2,4.
Auth Value Description
0 Bluetooth 2.0 Encryption disabled (uses 4 digit pin)
1 Bluetooth 2.1 Keyboard I/O (verify 6 digit code)
2 Bluetooth 2.1 Simple Secure Pair (no pin code)
3 Bluetooth 2.0 Pin Code Authentication (uses 4 digit pin)
NOTE: These settings are included for backwards compatibility with legacy
systems, see appendix 3 for details on Auth setting.
2.1.5 FuncKey
FuncKey holds a custom string, 10 character maximum length, with a default
value of TokenWorks. The FuncKey is also used to re-program the unit.
2.1.6 CreditCard
CreditCard Controls the output of Credit Card scans
2.1.7 1DBarcode
1DBarcode controls the output of Code 128 One dimension barcode scans
2.1.8 MagTrackCard
MagTrackCard controls the output of Magstripe cards like Student Ids, AAA
cards, etc.
2.1.9 MidInitial
MidInitial controls the Middle name field, if set to true only the middle initial is
parsed, if set to false then the whole middle name (if available) is parsed.
2.1.10 5DigitZip
5DigitZip determines if the Zip Code filed will be truncated to the first 5 digits only
Confidential Page 7 5/31/2013
Page 8

2.1.11 ScanMsg
The ScanMsg determines if any error messages associated with card scan will
be output, such as “MNR” which means Mag No Read.
2.2 Reading/Writing Config.xml
To Access the Config.xml file, you must boot the IDWedgeBT while holding the
battery button as described in section 1.2.2. Once you have connected a USB
cable and can explore the contents of the SD memory card, you will be able to
read and write the Config.xml file. You can use any text editor to change items in
the file and save them to the SD card. To ensure you have not made any errors,
open up the Config.xml file using an Internet browser, if a browser cannot open
the file, then there probably are editing mistakes that must be corrected before
the IDWedgeBT can be operational.
3 Formulas and CSV output strings
The CSV output string for DL/ID cards and the CSV output string for credit
cards are predefined, and provide all available fields from a card scan.
Only the card type Magnetic has it’s own formula. The Magnetic card
formula parses two fields from a card, given an offset and length to define a field.
3.1 DL/ID Card CSV string
For Drivers License/ID cards the data will be output using a formula string that
represents each field, separated by a comma.
F[,]M[,]L[,]T[,]A[,]C[,]S[,]Z[,]D[,]E[,]B[,]X[,]H[,]I[,]U[,]P[,]O[,]V[,]?[,]&
The letters in the above formula represent parsed fields from a DL/ID card.
F = First Name Z = Zip code U = Weight
M = Middle Name D = ID # P = Hair Color
L = Last Name E = Expiration O = Class
T = Title B = DOB mmddyyyy V = Endorsement
A = Address X = Sex ? = Restriction
C = City H = Height & = DocIssueDate*
S = State I = Eye color
* DocIssueDate is available on PDF417 2D Barcodes only.
Confidential Page 8 5/31/2013
Page 9

3.2 Credit Card CSV string
For credit cards the data will be output using a formula string that represents
each field, separated by a comma. The field codes are lowercase.
f[,]l[,]p[,]m[,]y
f = First name
l = Last name
p = PAN (Card number)
m = EXP MM
y = EXP YY
3.3 Magnetic.txt
The Magnetic Formula used to send fields to the host and is stored in a file on
the SD card. To Access the Config.xml file, you must boot the IDWedgeBT while
holding the battery button as described in section 1.2.2
The magnetic parsing formula will allow for two tracks to be parsed and
two fields of specific lengths and specific offsets to be parsed per track for a total
of 4 fields. Each field is represent by a track number, and offset starting from
zero and a length. There are three tracks and each track as 2 fields associated
with it, for a total of 6 field designators
The total number of possible field is 6 and each field is mapped to a lower
case letter (field designator):
q – Track1 Field1
r – Track1 Field2
s – Track2 Field1
– Track2 Field2
t
u – Track3 Field1
v – Track3 Field2
The Magnetic.txt must have two lines of data; the first line defines the
track number, offset, and length associated with each field. These values are
Confidential Page 9 5/31/2013
Page 10

stored as a comma separated string of 10 integer values. Any formula with less
than 10 values will be rejected. If you do not need all of the 4 possible fields,
then populate the unused track, field and offset with zeros.
Example of first line of Magnetic.txt: 1,2,4,6,9,2,1,5,6,5
(Track 1, offset1 = 2, length1 = 4, offset2 = 6, length9 = 5, track 2, offset1 = 1,
length1 = 5, offset2 = 6,lenght2 = 5).
The second line of the Magnetic.txt uses brackets to create the commas
Example of second line of Magnetic.txt:
q[,]r[,]s[,]t
Below is an example of the Magnetic.txt file for the formula above.
Example:
1,2,4,6,9,2,1,5,6,5
q[,]r[,]s[,]t
If no second offset is required, then these fields are populated with zero
and the unused lowercase field designators are not required
For example, 1,1,6,0,0,2,1,6,0,0
q[,]s
In version 2.2 and later, Raw data can be extracted from each track by using the value 99
for the length.
If you want to extract the Raw Data from tracks 1 and 2:
1,0,99,0,0,2,0,99,0,0
q[,]s
Raw data mode for magnetic cards, if a track does not read, and ScanMsg is set to true
then the output will be %NR? (Track 1 No Read) Or %ND? (Track 1 No Data)
If ScanMsg is set to false and a track does not read, the output will be just the sentinels,
E.G
Track1 no read /no data = %?
Track2 no read /no data = ;?
Track3 no read /no data = %
Confidential Page 10 5/31/2013
Page 11

The Magnetic formula and parsing has been designed to handle cards on any of the 3
possible tracks. The Magnetic formula applies to cards that have 25 or less characters of
information encoded on any track (Except old New Mexico ID/DL). The following list
of cards is used to identify Drivers License/ID cards, Credit Cards and AAA cards.
Track2 starts with and a length of Card Type
;000000 >28 old AZ state ID/DL
;06360 >28 old AK state ID/DL
;10 >36 Newfoundland ID/DL
;20 >36 Newfoundland ID/DL
;34 >28 AMEX Credit Card
;37 >28 AMEX Credit Card
;4 >31 VISA Credit Card
;4290 >36 AAA Membership Card
;4381 >36 AAA Membership Card
;4382 >36 AAA Membership Card
;51 >31 MasterCard Credit Card
;52 >31 MasterCard Credit Card
;53 >31 MasterCard Credit Card
;54 >31 MasterCard Credit Card
;55 >31 MasterCard Credit Card
;5490 >36 AAA Membership Card
;6006 >28 old CA state ID/DL
;6011 >31 Discover Credit Card
;610054 >28 Ontario Health ID Card
;6202 >36 AAA Membership Card
;6360 >28 United States ID/DL
;636005 >28 South Carolina ID/DL
;6= >23 old NM state ID/DL
NOTE: AAA membership cards fall into the Magnetic formula, Credit Cards fall into
Credit Card parsing, and ID/DL cards are treated as Drivers Licenses.
Each of the above numbers is also tested for the presence of the ‘=’ sign and a length, to
help identify the card type. Cards that do not meet the test will be parsed using Magnetic
formula. There is one exception and that is the South Carolina ID/DL, that card is not
tested for the ‘=’, only the length is tested.
The Location of the ‘=’ sign for Credit cards use a value consistent with a 15 or 16 digit
PAN.
Confidential Page 11 5/31/2013
Page 12

Revision information: Rev 1.8 and newer allows magnetic card of less than 10 characters
to be parsed, previous versions of IDWedgeBT required that all cards have 10 or more
characters encoded.
4 Serial Protocol
The outgoing messages will be bounded by start and end characters:
Start: 0x01,0x02
End: 0x03,0x04
Outgoing messages consists of two types:
•
Card Scan message
• Response to Bluetooth command
Incoming messages will be bounded by start and end characters:
Start: 0x01
End: 0x04
4.1 Outgoing Card Scan message
There are two possible types of card scan messages
•
Successful card scans
•
Card Error messages
A Successful card scan will return a CSV string bounded by the start and end
sentinels.
Example of Credit Card Scan:
01 02 Joe,Tokenworker,6011330055448899,01,15 03 04
The Card Error messages will be output if the ScanMsg variable in the
Config.xml is set to True.
Example of possible error messages:
Mag card No Read (MNR) * 01 02 4D 4E 52 03 04
Mag card No Data (MND) * 01 02 4D 4E 44 03 04
PDf417 No Read (LNR) 01 02 4C 4E 52 03 04
1D No Read (CNR) 01 02 43 4E 52 03 04
Mag parsing error (MPE) 01 02 4D 50 45 03 04
PDF parsing error (LPE) 01 02 4C 50 45 03 04
PDF Formula Error (LFE) 01 02 4C 46 45 03 04
Confidential Page 12 5/31/2013
Page 13

Magnetic Formula Error (MFE) 01 02 4D 46 45 03 04
Magnetic offset error (OTx) x=track # 1-3 01 02 4F 54 3x 03 04
* Note: the MNR, MND message will append the track# for Magnetic parsing.
4.2 Incoming Bluetooth Commands and Outgoing Responses
Once the Host and the scanner are paired and connected, the host can
send commands to the IDWedge. If the commands are accepted by the scanner
then a response will be output to acknowledge the receipt of the command.
Below is a list of Bluetooth commands and the responses that are to be
expected:
4.2.1 Ping
The Ping command is useful for testing the Bluetooth connection
Send: 01 <TXPING:> 04
byte[] PingCmd = { 0x01, 0x3C, 0x54, 0x58, 0x50, 0x49, 0x4E, 0x47, 0x3A, 0x3E, 0x04 };
Receive: 01 02 ACK 03 04
byte[] ACK ={0x01, 0x02, 0x41, 0x43, 0x4B, 0x03, 0x04}
4.2.2 Get Serial Number
The Get Serial Number command returns the S/N of the Scanner
Send: 01 <SERIAL:> 04
byte[] GetSN = { 0x01, 0x3C, 0x53, 0x45, 0x52, 0x49, 0x41, 0x4C, 0x3A, 0x3E, 0x04 };
Receive: 01 02 2600001630 03 04
{0x01, 0x02, 0x32, 0x36, 0x30, 0x30, 0x30, 0x30, 0x31, 0x36, 0x33, 0x30, 0x03, 0x04}
Confidential Page 13 5/31/2013
Page 14

4.2.3 Speaker Volume
The Speaker Volume command controls the Volume of the speaker in the
Scanner
There are 4 possible commands
Send: 01 <SPVOLU=OFF> 04
Send: 01 <SPVOLU=LOW> 04
Send: 01 <SPVOLU=MEDIUM> 04 * Default
Send: 01 <SPVOLU=HIGH> 04
byte[] SPLOW = { 0x01, 0x3C, 0x53, 0x50, 0x56, 0x4F, 0x4C, 0x55, 0x3D,
0x4c, 0x4F, 0x57, 0x3E, 0x04 };
Receive: 01 02 ACK 03 04
byte[] ACK ={0x01, 0x02, 0x41, 0x43, 0x4B, 0x03, 0x04}
4.2.4 Read Battery Level
The Read Battery Level command returns a number from 1 to 5, which correlates
to the number of LEDs that light up when the battery button is pressed. This
allows the application to know when the battery is getting low and needs to be
charged.
Send: 01 <BATLVL:> 04
byte[] BATLVL = { 0x01, 0x3C, 0x42, 0x41, 0x54, 0x4c, 0x56, 0x4c, 0x3A, 0x3E, 0x04 };
Receive: 01 02 5 03 04 = fully charged
Receive: 01 02 1 03 04 = almost empty
byte[] BatResp ={0x01, 0x02, 0x35 0x03, 0x04} = fully charged
byte[] BatResp ={0x01, 0x02, 0x31 0x03, 0x04} = almost empty
Confidential Page 14 5/31/2013
Page 15

4.2.5 Write Registration
The Write Registration will send a 16-byte number or characters to the Scanner
to be saved in the Scanners EEPROM memory, the length must be 16 or the
message will not be recognized. The scanner will also triple beep on a
successful write command.
Send: 01<REGKEY=TOKENWORKS123456> 04
byte[] SetReg = { 0x01, 0x3C, 0x52, 0x45, 0x47, 0x4B, 0x45, 0x59, 0x3D,
0x54, 0x4F, 0x4B, 0x45, 0x4E, 0x57, 0x4F, 0x52, 0x4B, 0x53,
0x31, 0x32, 0x33, 0x34, 0x35, 0x36, 0x3E, 0x04};
Receive: 01 02 ACK 03 04
byte[] ACK ={0x01, 0x02, 0x41, 0x43, 0x4B, 0x03, 0x04}
4.2.6 Read Registration
The Read Registration command will retrieve the previously written 16-byte
pattern sent by the write registration command. If no registration value was
written, the command will not return any value.
Send: 01 <REGKEY:> 04
byte[] ReadReg = { 0x01, 0x3C, 0x52, 0x45, 0x47, 0x4B, 0x45, 0x59, 0x3A, 0x03, 0x04}
Receive: 01 02 TOKENWORKS123456 03 04
Confidential Page 15 5/31/2013
Page 16

Appendix 1 – Power on BIT (Built in Test) Description
On power up, the device will perform a self test and display the results on the 5 bar LED
BIT Sequence
LED test, turn on/off each LED one at a time, then all 5 on/off
LED 1 - SD card Test, verify file create/read/erase
LED 2 - Test ESEEK Communication, verify send/receive hardware signals
LED 3 – Test BT Communication, verify send/receive hardware signals
LED 4 - Read Device.txt and verify BT revision string and ESEEK S/N string
LED 5 - Cumulative Pass/Fail - if LEDs 1-4 are lit, then turn on LED 5
Note: If the Scanner is paired or trying to pair during power up, it will fail to light LED
3,4 and 5. This is normal behavior.
If the Config.xml file is erased, the Scanner will triple beep on the next power cycle, this
is confirmation that the scanner has received the initialization command and has been
configured to read barcodes and magstripe card.
Appendix 2 – LED interpretation
When the Function button is pressed the bottom 2 LED (LED1, 2) will light up to
identify the IDWedgeBT SPP application. The IDWedgeBT can run other applications,
the HID application will only light up the first LED, and the SPP application will light up
LED1 and 2. The IDWedgeBT USB Keyboard application will light three LEDs 1,2,3.
This is helpful for all users to identify what application is running on the device.
The Connection Status LED will only light when the device is in “SD Card Access”
mode, see section 1.2.2. The LED will stay light until the device has been turn off/on.
Confidential Page 16 5/31/2013
Page 17

Appendix 3 – Auth settings
Authentication can have the values 0, 1, 2, or 4, depending on the mode desired with
some limitations on implementation.
0 // With this mode, the module uses Bluetooth version 2.0 NO encryption (open
mode). This mode is useful for legacy devices that do not need security. For this
mode to work, both devices must support open mode. If either device requests
authentication, the PIN code will be required.
1 // In Bluetooth version 2.1, the default is keyboard I/O mode (which is considered
as a secure mode). For Android devices, the user is prompted with a 6-digit code
and is asked to verify that the code matches on the module. Because the module
cannot display a code, simply press OK or Yes on the remote device to
authenticate.
2 // This mode corresponds to Bluetooth version 2.1 Secure Simple Pairing (SSP),
or just works mode. This mode works with iPhones and PCs, however it may not
work appropriately with some Android devices.
4 // This mode is PIN code mode, which forces Bluetooth version 2.0 PIN code
authentication. The functionality is for Serial Port Profile only and it does not
work in HID mode for iOS devices.
Confidential Page 17 5/31/2013
 Loading...