

Page 1
CardVisor® ID Scanner
Hardware User Manual
www.CardVisor.com
www.TokenWorks.com
3511 Silverside Rd, Suite 105
Wilmington, DE 19810
- Product Information Support@TokenWorks.com
- Company Information
Phone: (800) 574 5034
Revision: 1.0 August 2005
Page 2

About This Document
This document describes how to use the CardVisor® ID hardware. The first part of
the manual applies to all versions of the product. The latter part contains specific
instructions for customers with the 2D Bar Code Reader Cradle.
This document should be used in conjunction with the Handspring Visor user manual
(on the Handspring CD or available on-line at Handspring.com), and the CardVisor
Software User manual that details installation and use of PC data transfer software.
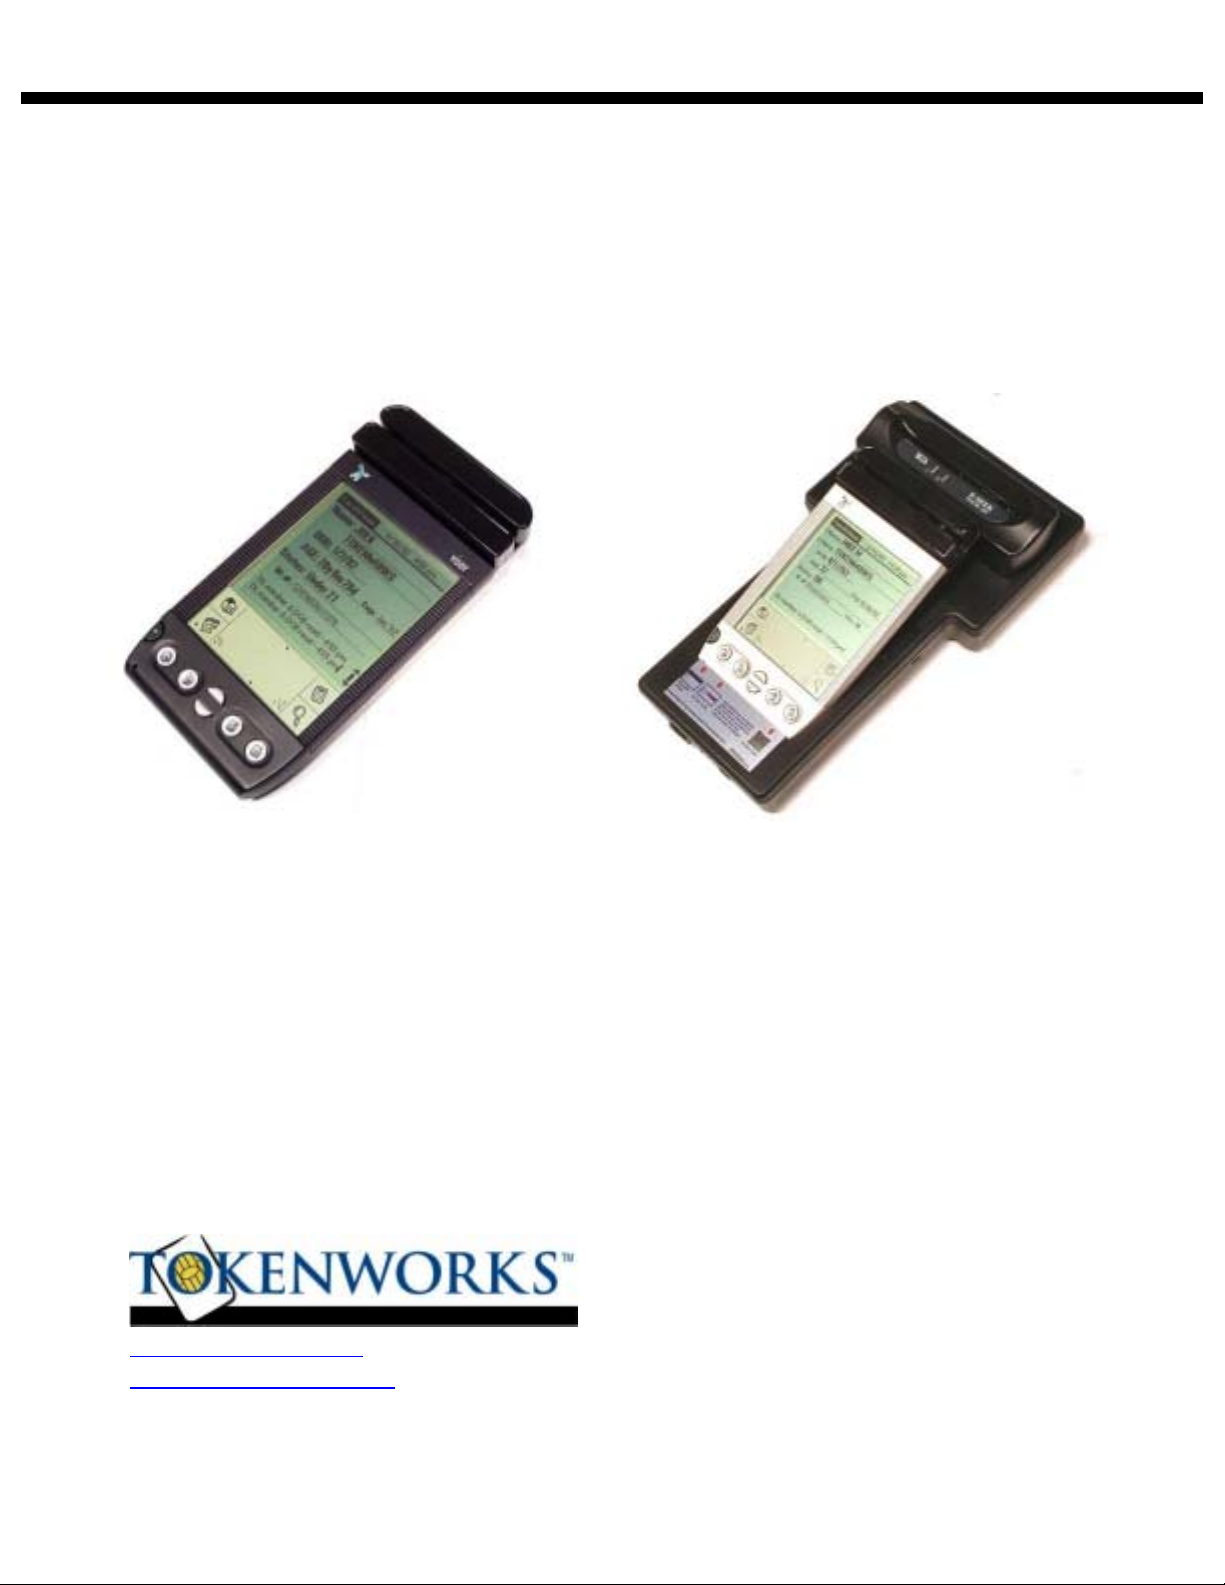
What’s in the box
Magnetic Stripe Reader Only Version
1. CardTool® Reader with CardVisor® software installed in flash memory.
2. Handspring Visor Handheld computer
3. USB HotSync™ cradle
4. Green Handspring CD with Palm Desktop software and HotSync Manager
5. TokenWorks
®
White CD with User Manuals and VIP/Banned list utilities
6. Two AAA alkaline batteries.
Bar Code Reader & Magnetic Stripe Version
1. CardTool® Reader with CardVisor® software installed in flash memory.
2. Bar Code Reader Cradle with AC charging adapter
3. Handspring Visor Deluxe or Handspring Visor Pro Handheld computer
4. USB HotSync™ cradle or USB Hotsync™ charging Cradle with AC adapter (Pro
Version)
5. SC-2000 USB Hotsync cable
6. Green Handspring CD with Palm Desktop software and HotSync Manager
7. TokenWorks
®
White CD with User Manuals and VIP/Banned list utilities
8. Two AAA alkaline batteries and wall charger with four 800mAh AAA rechargeable
batteries (non-Pro Version).
CardVisor Hardware Manual Page 2 of 32
Page 3

Table of Contents
About This Document____________________________________________________ 2
What’s in the box _______________________________________________________ 2
Magnetic Stripe Reader Only Version____________________________________ 2
Bar Code Reader & Magnetic Stripe Version______________________________ 2
Table of Contents _______________________________________________________3
Handspring Visor Button & Icon Layout ____________________________________ 4
Inserting the CardTool___________________________________________________5
CardVisor Application Installation _________________________________________ 5
Main Screen Description_______________________________________________ 6
Swiping a Magnetic Card_________________________________________________6
CardVisor Options Menu _________________________________________________ 7
Age Threshold and Alarms_____________________________________________ 8
Memo Pad _____________________________________________________________ 8
Protecting ID Scanner Data_______________________________________________9
Tip - Appending Notes to Swipe Data via MemoPad __________________________ 11
Appending Notes to License Data (CardVisor III feature)______________________ 12
CardVisor IV – Anti Card Pass Back_______________________________________ 13
Automatic Anti Pass-Back Database Management ________________________ 13
CardTool Removal _____________________________________________________ 14
Maintenance and General Care___________________________________________14
Resetting the Handheld _________________________________________________15
Performing a soft reset _______________________________________________ 15
Performing a Hard Reset _____________________________________________ 16
Power Down Reset - AAA battery devices only ___________________________17
Battery Life ___________________________________________________________ 17
Trouble Shooting – Handheld Computer & Magnetic Stripe Reader _____________19
For ID Scanners with Bar Code Reader Cradle ______________________________ 20
Parts Diagram – Bar Code Reader Cradle __________________________________ 21
Controls Diagram ______________________________________________________ 22
Inserting Handheld into Bar Code Reader Cradle ____________________________ 23
How to scan a Driver’s license with a 2D Bar Code ___________________________ 24
How to scan a Driver’s license with a 2D Bar Code________________________24
Connecting Bar Code Reader Cradle to PC for HotSyncing ____________________ 25
CardVisor Hardware Manual Page 3 of 32
Page 4
Battery_______________________________________________________________ 26
Charging the Bar Code Reader Cradle __________________________________ 26
Battery Life of Bar Code Reader Cradle_________________________________ 26
Charging the Handspring Visor Pro (optional) in the Bar Code Reader Cradle 26
Trouble Shooting – related to Bar Code Reader Cradle ________________________ 27
Copyright_____________________________________________________________ 28
Limited Warranty - CardTool® reader and/or CardVisor® software ______________ 28
Age Verification Calculation Limitations ________________________________ 29
State and Local Privacy Laws, Ordinances or Rules _______________________ 29
Graffiti Table _________________________________________________________ 30
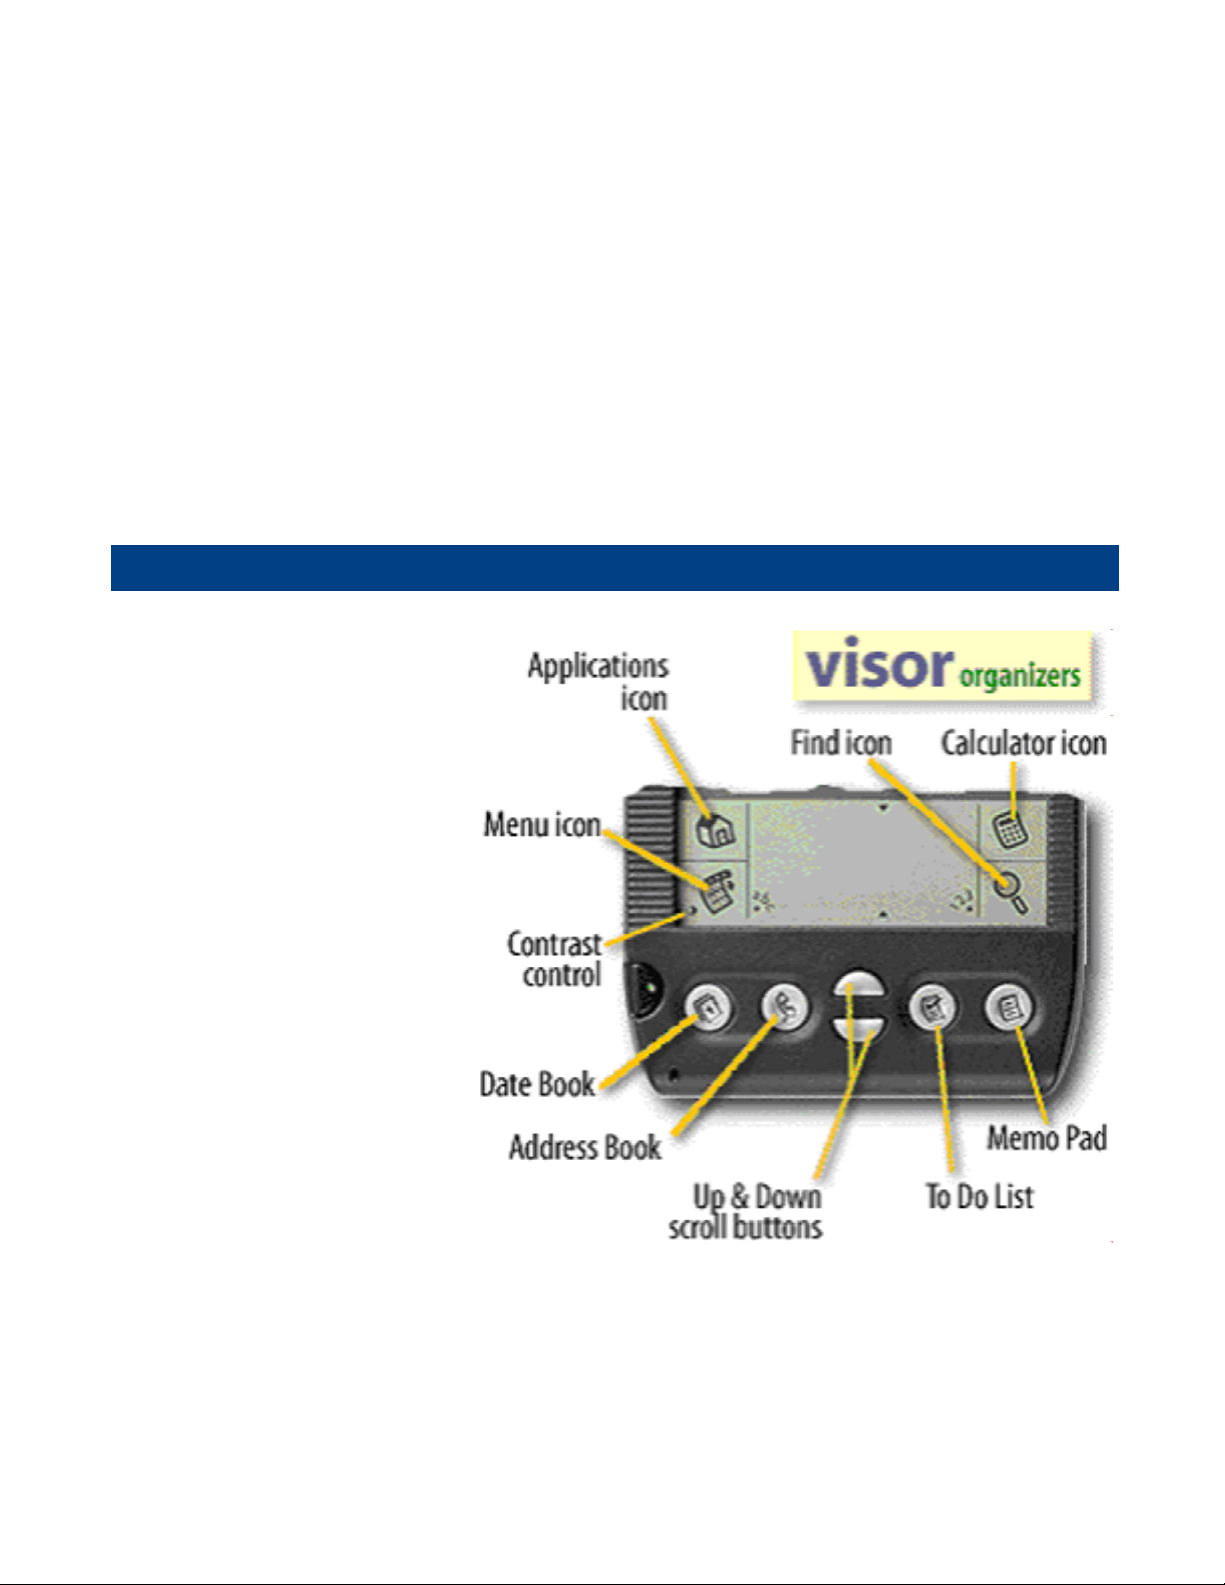
Handspring Visor Button & Icon Layout
Shown are the buttons
and icons referred to
throughout this manual.
Note the location of the
Date Book button, Menu
icon and Memo Pad
button. The power button
is to the left of the Date
Book button.
CardVisor Hardware Manual Page 4 of 32
Page 5
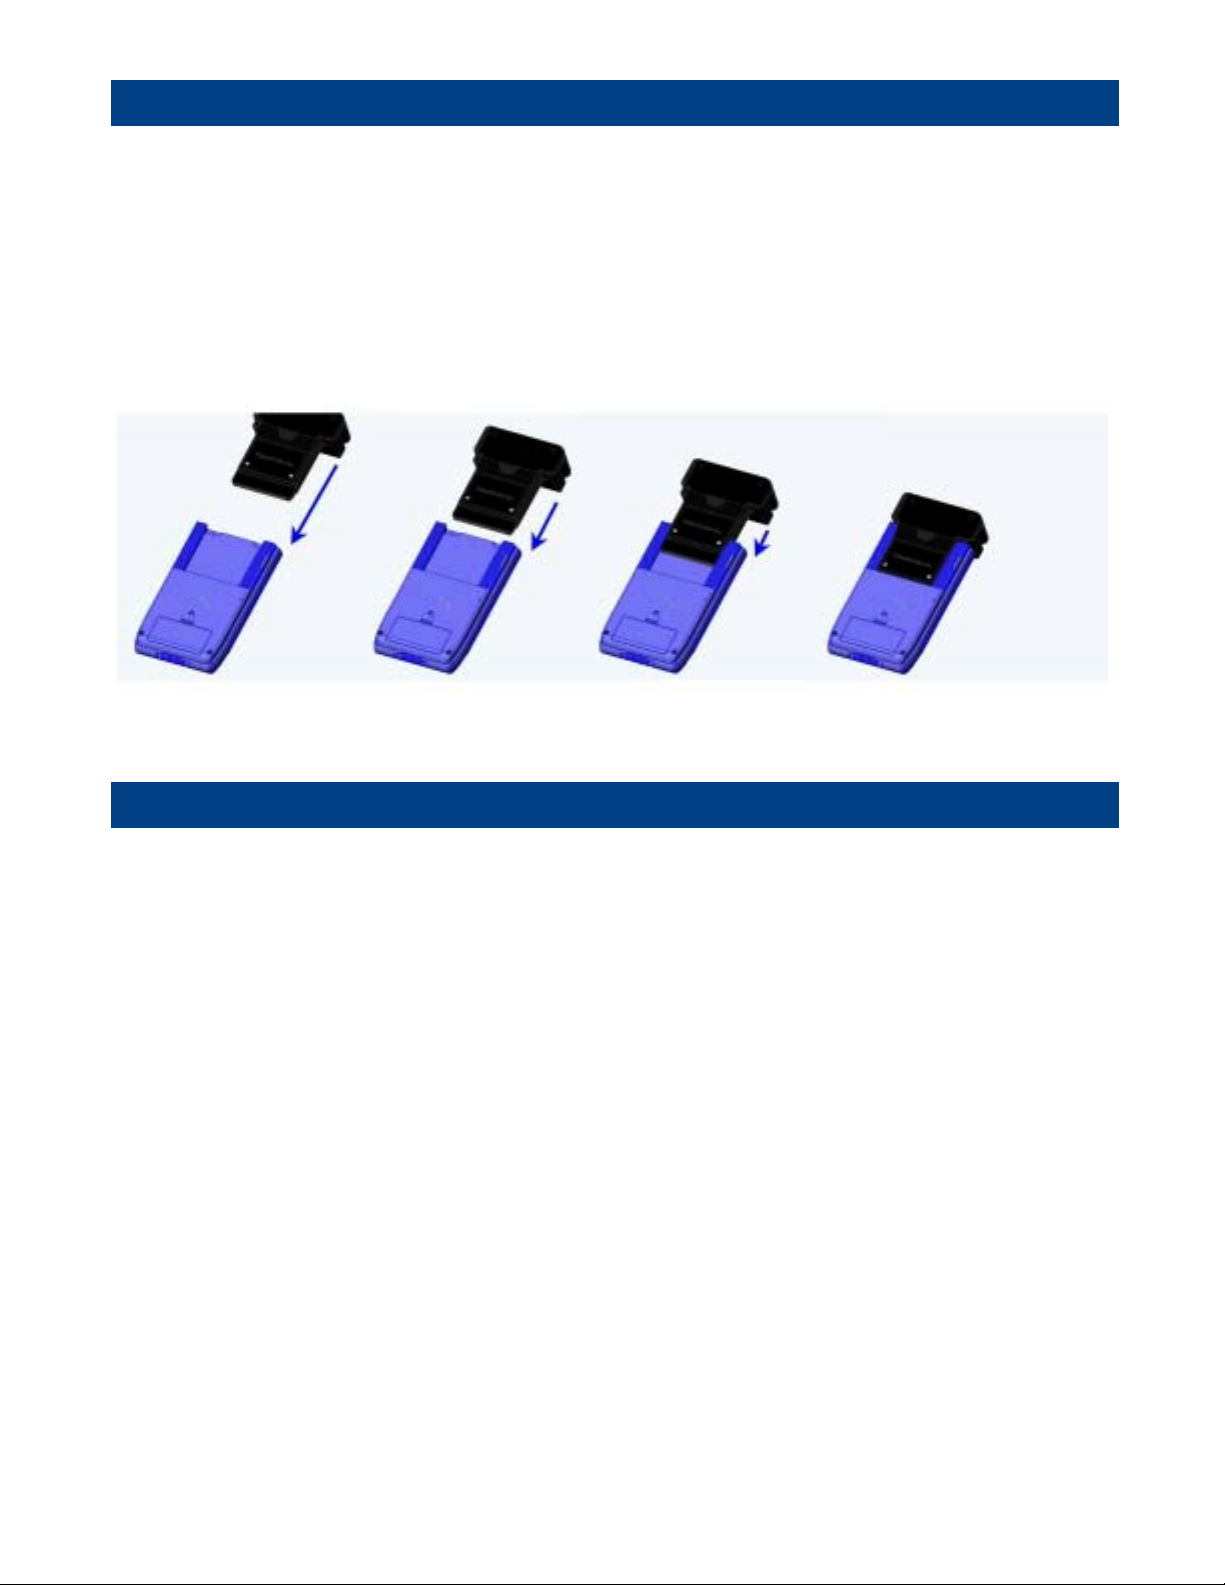
Inserting the CardT ool
To insert the CardTool, align the unit with the Handspring expansion slot (see figure
1) and gradually insert the unit. It should insert smoothly until it makes contact with
the expansion slot stops. Do not force the unit into the expansion slot. If resistance
is significant, withdraw CardTool and ensure there are no foreign objects in the
expansion slot and that CardTool is properly aligned with the Visor expansion slot,
then try again.
Figure 1 – CardTool Reader inserting into Handspring Visor Springboard expansion slot
CardVisor Application Installation
The CardVisor software is stored in the flash memory of the CardTool reader and
automatically launches after plugging in the CardTool reader into the handheld. A
welcome screen appears which instructs the user to press the Date Book button to
launch the main screen of CardVisor magnetic stripe application (shown below). If
the bar code reader cradle is installed, then pressing the Address Book button will
launch the bar code version of CardVisor.
It is VITAL to check the date and time displayed in the top right corner of the screen.
If the date is not correct, then the calculated age will be incorrect! To set the
date/time, click on the Applications Icon (looks like a small house in the graffiti area),
then click on the ‘Prefs’ icon. Tap on the box, which contains the date or time, and
then follow the prompts to change. Details also provided in the Handspring User
guide.
CardVisor Hardware Manual Page 5 of 32
Page 6
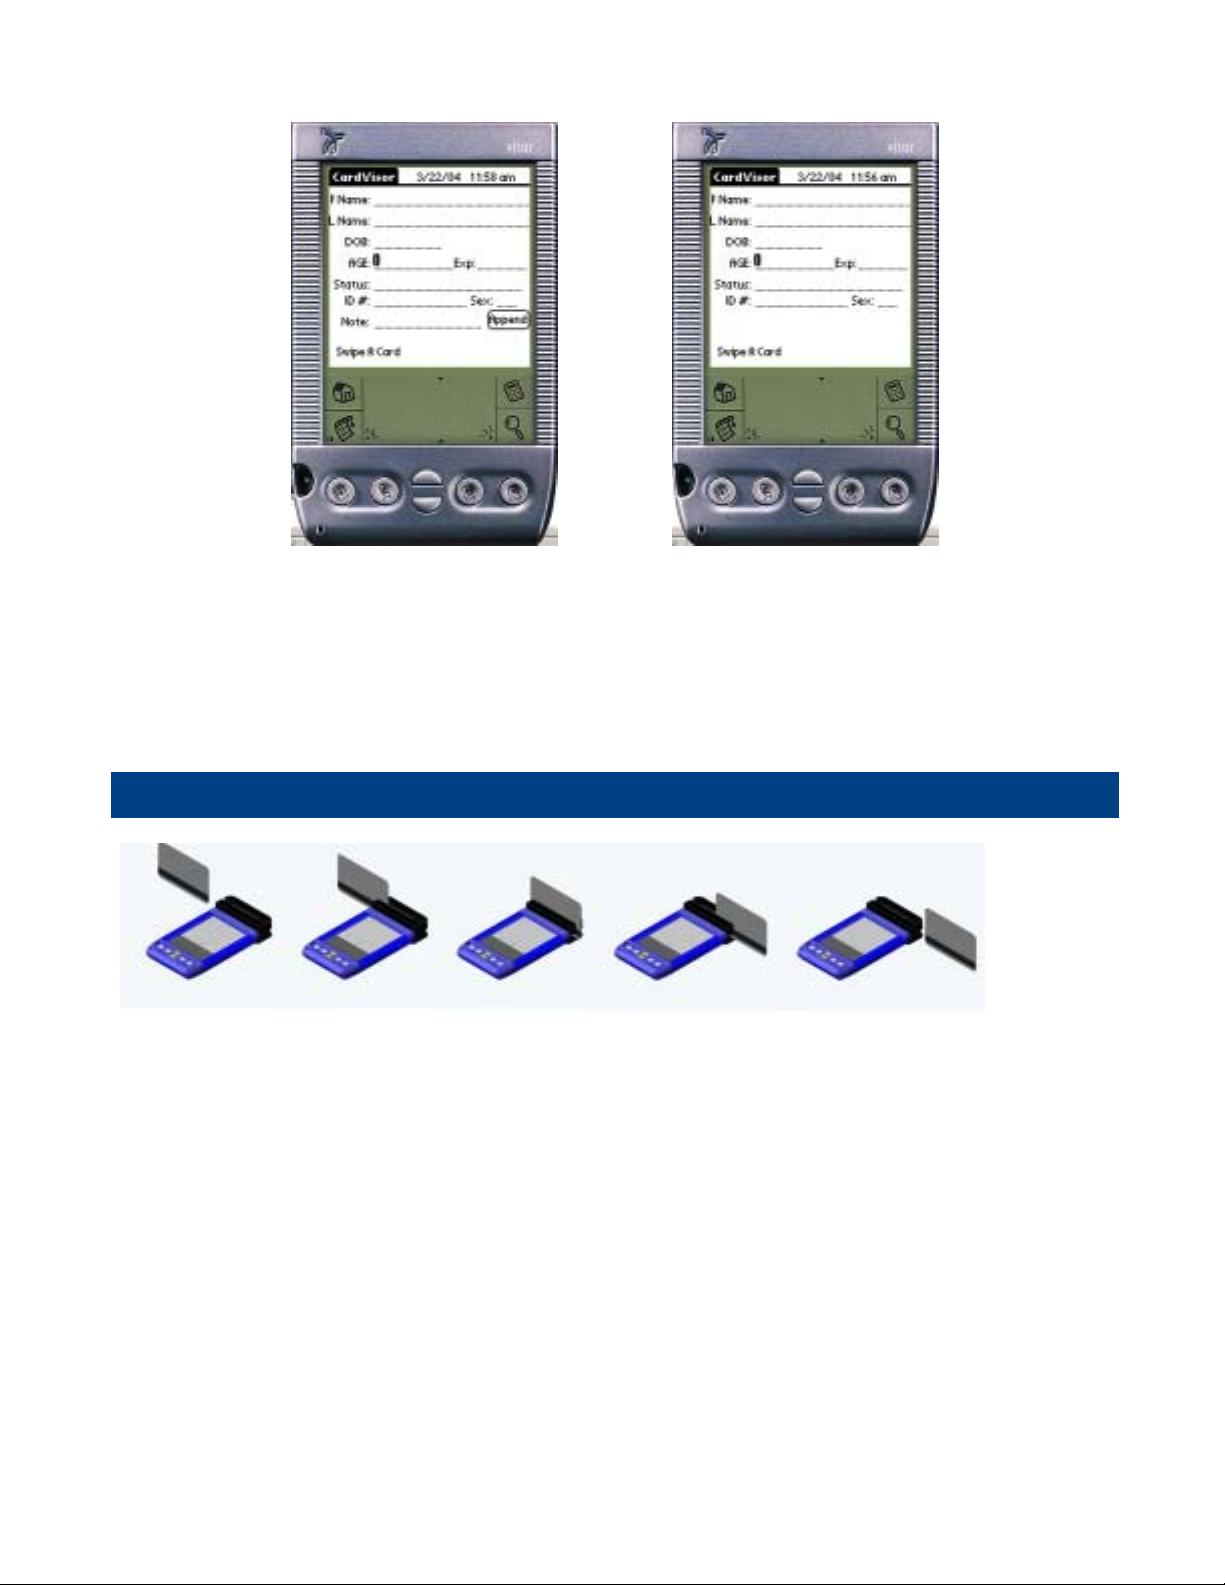
Make Sure Date & Time at the top of the form is current
CardVisor III & IV Main Screen CardVisor I & II Main Screen
Main Screen Description
The main screen is where the magnetic card data and status is displayed after each
swipe. At the bottom of the screen is a dialog box where user messages such as
“Swipe Again” are displayed.
Swiping a Magnetic Card
1. With the CardVisor application running on the Handspring Visor, hold the unit in
your left hand (if you are a lefty, hold the unit in your right hand).
2. Using the other hand, hold the drivers license with the MagStripe facing towards
you and swipe the card towards your body. The above illustration is for a righthanded person.
3. Ensure that the magnetic card’s edge remains in full contact with the base of the
card slot, swipe the card completely through the card slot.
4. It does not matter which way the card is swiped, but it is important that the card
is not skewed / tipped during the swipe. Skewing occurs if the card is tilted or
lifted as it is swiped through the slot.
5. The CardVisor age verification software will display the drivers license information
on the screen after a successful swipe and store the data in the Visor memo pad
application.
CardVisor Hardware Manual Page 6 of 32
Page 7
Tip: Try a few practice swipes, hold the magnetic card in the center and maintain
pressure on the bottom edge of the card as it travels through the slot. Experiment
with the speed and orientation. Some find it easier to hold the Handspring Visor with
the screen facing left or right and swiping the card vertically through the card slot.
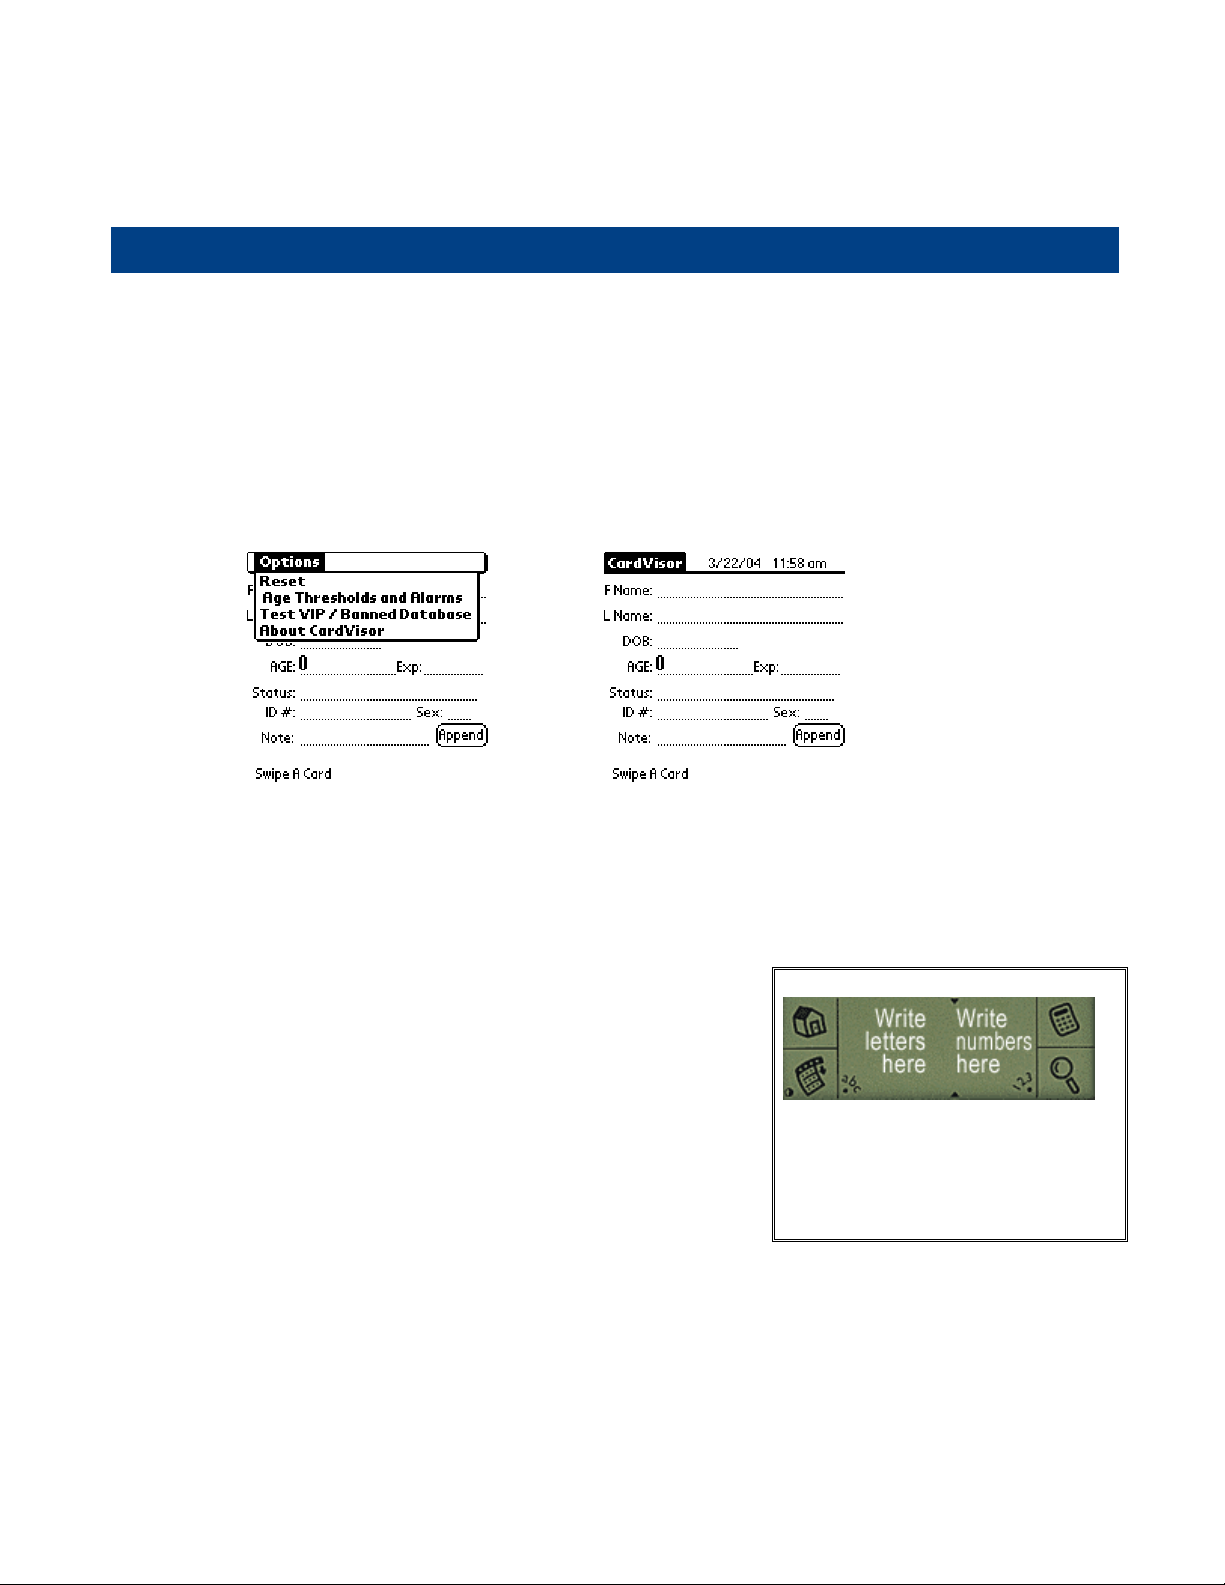
CardVisor Options Menu
The Options menu is used to configure the software. To access it, click on the Menu
Icon, just below the Application icon (small house in the graffiti area -see previous
diagram). Depending on the version of CardVisor software, there are three or four
items on the Options menu. The Reset option will re-initialize the CardTool hardware.
If the unit is not responding to a card swipe, try the reset option. If successful, the
“Swipe A Card” message will be displayed. If not, see the trouble shooting section in
this document.
Options Menu of CardVisor
CardVisor I and II do NOT have the
‘Test VIP/Banned Database’ item
Screen After Reset Command
The ‘About CardVisor’ displays information on the application and its developer. The
‘Age Threshold and Alarms’ item sets the age
What is the Graffiti Area?
thresholds for various alarm events, alarm sounds,
and display options. See the Age Threshold and Alarm
section in this document for additional details. The
‘Test VIP / Banned Database’ item is present in
CardVisor III & IV and should be run whenever a new
Banned/VIP database is loaded into the handheld.
The Graffiti writing area is divided into two parts: one
for writing letters, and one for writing numbers. The
little "abc" or "123" at the bottom corners of the
Graffiti writing area tell you where to write letters or
numbers. You can also tap the "abc" or "123" to
bring up the onscreen keyboard.
CardVisor Hardware Manual Page 7 of 32
Page 8

Age Threshold and Alarms
The Age Threshold and Alarm screen configures at what age CardVisor will alarm at
and what alarm sound will be played. There are six sounds available for the under
18, under 19, under 20, under 21, and expired license conditions. After selecting a
new sound, CardVisor will play it before updating the display.
The Expired alarm may not be disabled, only the alarm sound may be changed. The
Happy Birthday song may be disabled by un-checking the check box. If checked, one
may select either the long or short version of the Happy Birthday. The Visual
indication of a birthday will be displayed on the main screen status line.
If the Age YYMMDD item is checked, then the age will be displayed in years months
and days. This allows one to see how close somebody’s birthday is and wish them a
pre-happy birthday. If un-checked, then the age is displayed just in years.
Under 18 and Under 21
age alarms configured.
Pop Up menu for Under 20
Alarm
Happy Birthday Song –
Long or Short Version
Memo Pad
Press the Memo Pad Button to see the stored license data. Tapping on each line will
provide a detailed view of the swiped license data. The driver's license data is
parsed and stored as Memos in MemoPad application (built-in Palm OS application)
under the CardVisor category. Shown below is a list of Parsed transactions on the
main MemoPad screen. On the right is the detailed data showing the following
parsed information; First, Middle, Last Name, Title (Jr., Sr., II, 3rd, etc.), Address, City,
State, Zip, Driver's License number (0213654424), Expiration date (YYYYMMDD),
Date of Birth YYYYMMDD of birth, Gender (M/F), the status of the swipe (OK, Under
18, Under 19, ID Expired, etc.), and the scan date & time. Also shown are the field
separator characters (^), used when importing the data into programs like Microsoft
ACCESS or Microsoft Excel.
CardVisor Hardware Manual Page 8 of 32
Page 9
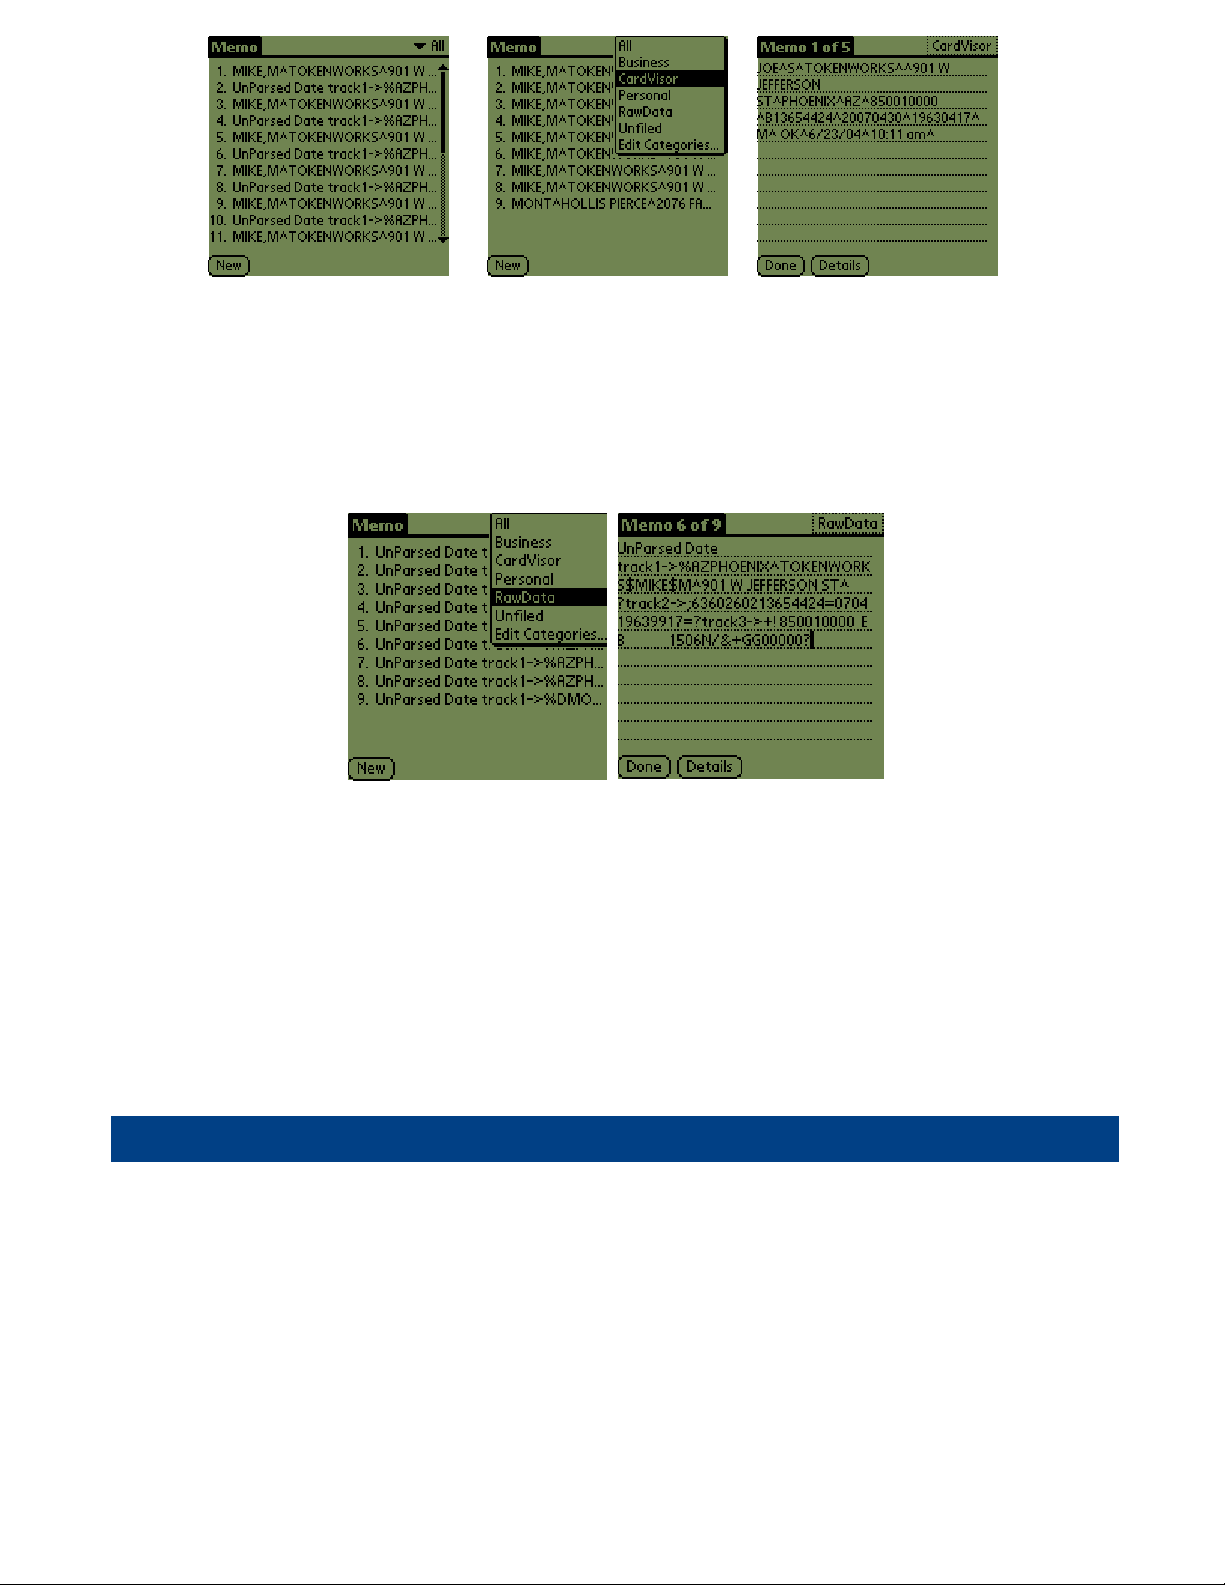
MemoPad showing all
memo Categories
Parsed Data in CardVisor
Category
Individual Memo showing
parsed data
In addition to the parsed data, an unparsed record is also stored in the MemoPad
application under the RawData category. This provides a convenient method to cross
check the parsed information, provide technical feedback to TokenWorks and verify
additional fields from the driver's license..
Unparsed Data in
‘RawData’ Category
Individual Memo showing
unparsed data
Before a new Memo is stored in MemoPad, the last memo is compared to the new
pending Memo. If it is identical in every respect, including the date and time stamp,
then the new memo is not stored. If the new Memo differs in just the time, it is still
stored. This feature prevents redundant Memos for the same license swiped
repeatedly in succession.
Protecting ID Scanner Data
This feature should be used with caution as forgetting the PIN code will require
erasing all saved transaction data. Drivers License Transaction data records are
stored as Memos (in MemoPad application ) and are marked Private by the CardVisor
software. They may be hidden or masked by entering a user selected PIN code via
the security application (old fashion key icon on home screen). Shown below is
what the transaction data stored in MemoPad look like when masked or hidden.
CardVisor Hardware Manual Page 9 of 32
Page 10
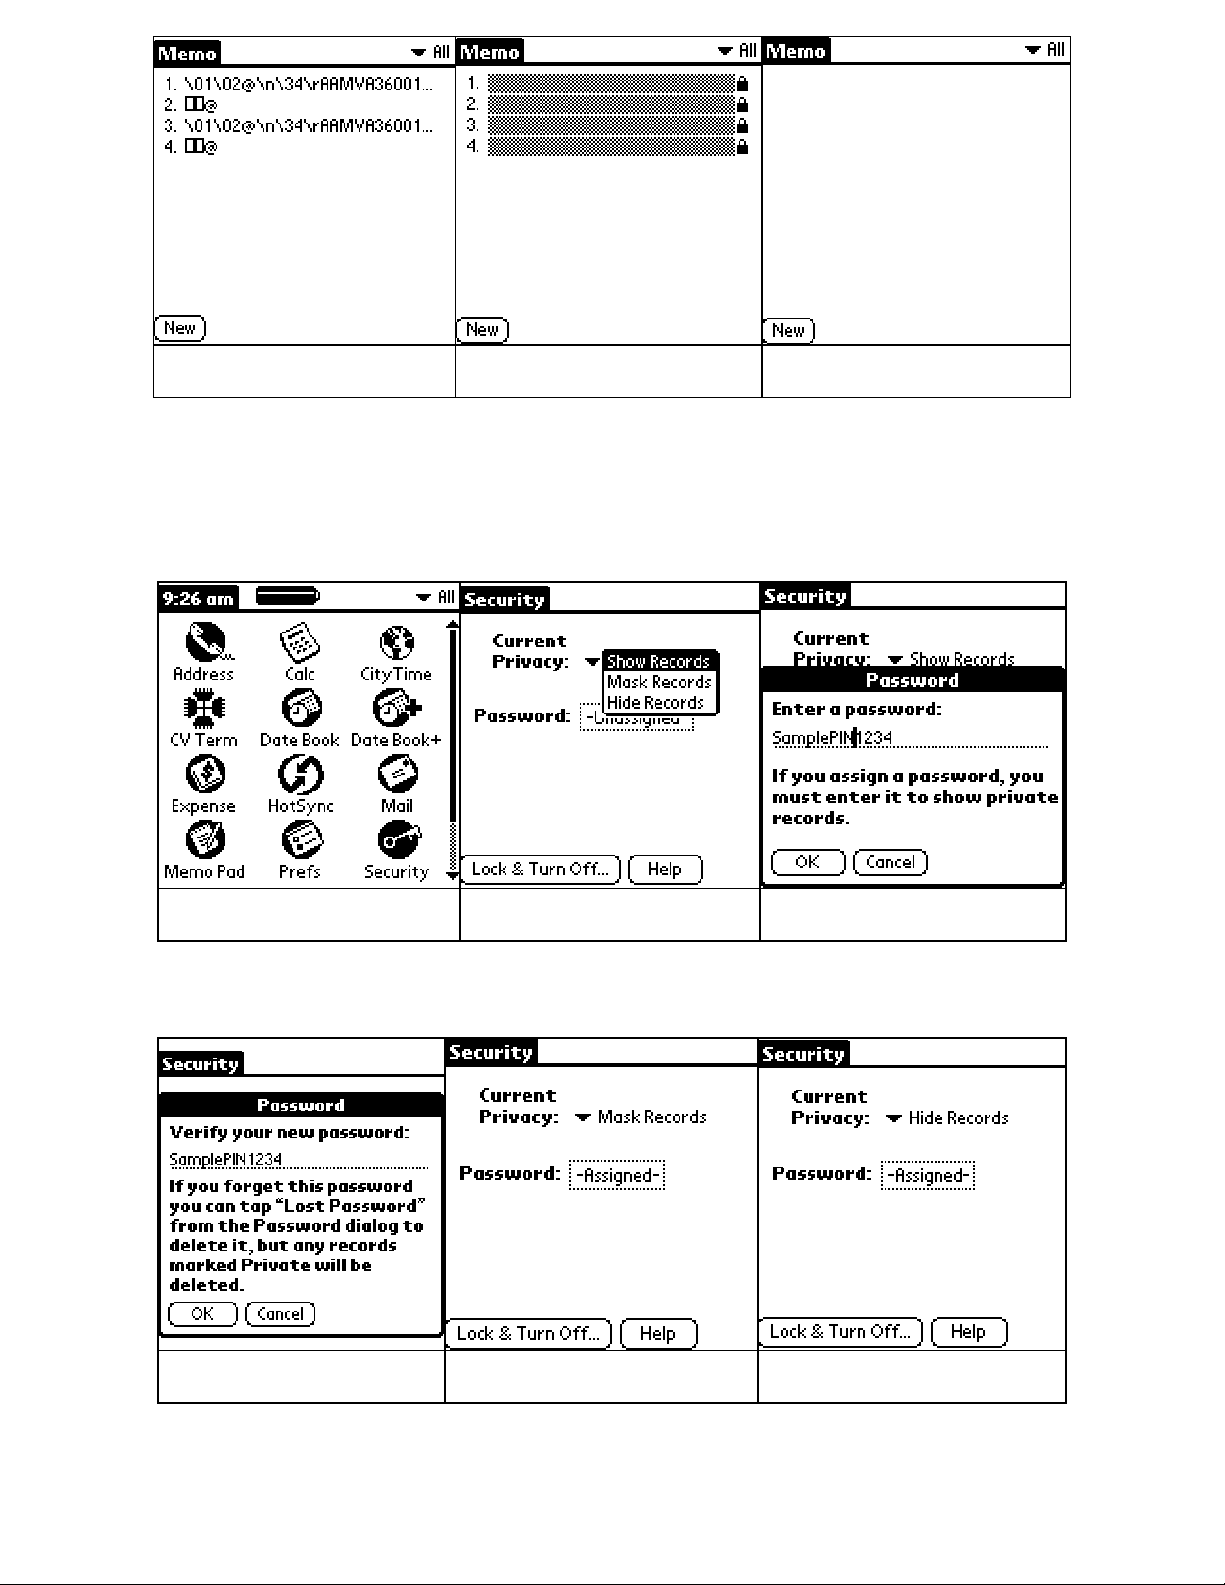
Transaction Data Visible Transaction Data Masked Transaction Data Hidden
To set the PIN code, select the Security Application (shown below) from the Home
screen. Then select Mask Records or Hide Records from the Current Privacy Menu.
Selecting either will prompt a Password or PIN code to be entered, which must then
be confirmed.
Security App.-lower right Select Show or Mask Enter Password
Note: If the PIN code or Password is forgotten, there is no way to recover it via the
standard security application. Resetting the Password will delete all the transaction
data. Use this feature with caution.
Confirm Password Mask Records Enabled Hide Records Enable
CardVisor Hardware Manual Page 10 of 32
Page 11

Note: This same PIN code can be to 'lock' the system so that turning it back on
requires the PIN code. See the Handspring User
guide for using this feature. Again, use the PIN
code feature with caution as forgetting the PIN code
requires a hard reset which will erase all data in the
handheld.
Note: Version 3.5 of the Palm OS Security
application (Platinum, Neo, Prism, Pro, Edge) allow
private data to be hidden or masked. Version 3.1
(Deluxe & Solo have version 3.1) can only hide
Security Palm OS ver. 3.1
private data. Below is the Security Screen from
version 3.1.
Tip - Appending Notes to Swipe Data via MemoPad
After a license has been swiped, it is possible to add one or more comments that will
be uploaded to one or more columns in the Excel spread sheet. This is a great way
for CardVisor III & IV clients to mark a customer as a VIP or Banned individual. It is
also an easy way to record additional fields such as email addresses or phone
numbers. Whenever the Excel import wizard sees the ^ character, it puts the
following data into the next column of the spreadsheet. At the end of each parsed
string (CardVisor Category Memo), there is the carat character. Just tap the stylus at
the end of the line and start making notes. Notes can be made using the keyboard
or via Graffiti (see Graffiti chart in this manual).
Insertion point showing cursor
after last carat (^) character
Adding data to a Memo entry using
the ‘Keyboard’ instead of Graffiti.
CardVisor Hardware Manual Page 11 of 32
Page 12

Memo entry after adding ‘VIP’ to
the end of the string
Memo entry after adding ‘VIP’ & email
address to the end of the. Note: ‘^’
character between fields
Additional columns can be added to the spreadsheet by appending additional ^
characters. See the Graffiti chart on how to write this character. Note: It is not
necessary to have a carat symbol as the last character in the memo. Excel will put
the last field in the proper column with or without a carat symbol at the end.
Appending Notes to License Data (CardVisor III feature)
CardVisor III software allows additional notes (up to 80 characters) to be added to
the Parsed License Data Memo. This is useful for recording marketing information
such as phone numbers and email address or other significant information about an
individual.
After License Scan Input Note (email address) After hitting Append button –
Note Confirmation Message
Only one note can be appended to a license that is swiped successively. In other
words, if a license is swiped and a note is appended and the same license is swiped
again and a new note is appended, the second note will replace the first note. If a
multiple field note is desired, then insert the ‘^’ character between each field when
inputting the note.
CardVisor Hardware Manual Page 12 of 32
Page 13

CardVisor IV – Anti Card Pass Back
CardVisor® IV age verification software has all the features of CardVisor III plus an ID
Anti-Pass-Back feature. This feature may be used several ways;
• at the front door to detect licenses which are 'Passed-Back' to outsiders,
• at the bar to identify individuals who are consuming too much, or
• at the bar to identify individuals who are purchasing for their underage friends.
• at the front door to confirm returning patrons have paid cover charge.
• helps detect fake IDs which have the same 'cloned' data stripe.
Some clubs use the ID Pass-Back detection to ensure wrist bands or ink stamps have
not been transferred from exiting customers. If a customer's ID was scanned when
they first entered and were banded/marked, then when they leave & return, an 'ID
Pass-Back' alarm should be generated when the ID is rescanned.
Shows license number, DOB with current
scan time at the top of the list and
previous scans below.
Automatic Anti Pass-Back Database Management
Multiple scans in a short period of time
may indicate over serving or drinks are
being purchased for underage friends
The database used by the Anti Pass-Back code is automatically deleted after 12
hours of inactivity. In normal operation, this means the database is cleared and
ready for use on a nightly basis, assuming no IDs are swiped for 12 hours. This
automatic management feature can be over ridden by manually deleting the
database from the handheld computer's memory.
Manually deletion of Anti Pass-Back database
Select Delete from main menu Select AntiPassBack Database Confirm Deletion
CardVisor Hardware Manual Page 13 of 32
Page 14

CardTool R emoval
To remove the CardTool, either
use the thumb stop on the back
of the unit to gradually push it
out of the expansion slot or grab
the CardTool at the base of the
card slot and pull it away from
the Handspring Visor in the
same plane as the expansion
slot. Try not to grab the
CardTool by the top and bottom
but rather each side at the base
of the card slot. Grabbing the
top and bottom of the CardTool
will generate a force component,
which will increase the friction
and make it harder to remove. Note: If the Visor is turned off, removal of the CardTool
(or any other module) turns the Visor on.
Maintenance and General Care
• The CardTool is not waterproof. Do not expose to rain or moisture
• Do not drop the CardTool or subject it to strong impact.
• Protect it from temperature extremes. Do not leave on the dashboard of a car
on a hot day and keep it away from heaters and other heat sources.
• Do not store or use your CardTool in any location that is extremely dusty, damp
or wet.
• Ensure the magnetic heads are occasionally cleaned with commercially
available magnetic cleaning cards.
• Clean exterior of case with a dry lint free cloth and do not use abrasive cleaning
products.
CardVisor Hardware Manual Page 14 of 32
Page 15

Resetting the Handheld
Under normal circumstances, you will not have to use the reset button. On occasions,
however your handheld may no longer respond to buttons, cardswipes or screen
taps. In this case, you need to perform a reset to get your handheld running again.
Performing a soft reset
A soft reset tells the handheld to stop what it’s doing and start over again. All records
and entries stored in your handheld are retained with a soft reset.
Locate the Stylus on the right side of the handheld. If you unscrew the tip of the
Stylus (the end you write with), you'll notice a blunt plastic pin, which fits exactly into
your handheld's reset hole. Or, you can unfold a paper clip (or similar object without a
sharp tip), to gently press the reset button inside the hole on the back panel of your
handheld. After a soft reset, the General Preferences screen will display the current
time and date. Make sure the date/time is accurate before proceeding. Remove
and re-insert the CardTool reader to re-associate the Date Book button with the
CardVisor application. Then press the Date Book button and swipe a card.
CardVisor Hardware Manual Page 15 of 32
Location of Reset Hole – Visor Deluxe, Pro, Neo,
Platinum,
Page 16

Performing a Hard Reset
Warning: A HARD RESET WILL ERASE ALL TRANSACTION DATA
Don't perform a hard reset unless the soft reset has not worked and you've backed
up your data, or you're willing to lose the transaction data.
To perform a hard reset:
1. Hold down the power (on/off) button on your device. The power button on
Visor organizers is on the front.
2. While holding down the power button, turn over your device so that you can
see the back of it. Using the reset tool, an unfolded paper clip or a similar
small blunt-tipped object, gently press the reset hole on the back. See
Where's the reset hole in the Hardware Reference Guide.
3. When the device's screen displays the Palm Computing Platform logo, release
the power button.
4. A message will appear warning that you are about to erase all the data stored
on your handheld. In response, do one of the following:
o Press the up scroll button on the front panel of your handheld to
complete the hard reset, erasing everything on your device
or
o Press any other button to begin a soft reset, leaving your data intact.
5. Your device will then take you through a series of screens to calibrate the
digitizer and verify the time and date.
Note: A hard reset does not delete the current date and time. It does restore other
settings to the factory default. .
CardVisor Hardware Manual Page 16 of 32
Page 17

Power Down Reset - AAA battery devices only
A power down reset erases all the data on your device, including a few settings (like
date and time) which are untouched by a hard reset. By removing your AAA batteries,
you allow the capacitor to drain, essentially returning your device to its "factory state."
A power down reset is only for devices that use AAA alkaline batteries (i.e. not a
rechargeable handheld).
Warning: A power down reset will erase everything on your device except the
CardVisor program, which is stored in the CardTool reader. All your data will be
removed, and formats, preferences and other settings are restored to their factory
default settings. Don't perform a power down reset unless you've backed up your
data, or you're willing to lose everything. A POWER DOWN RESET WILL ERASE ALL
TRANSACTION DATA
1. Remove the AAA batteries from the back of your handheld.
2. Leave the batteries out of the handheld for at least 30 minutes.
3. Perform five or more
soft resets in a row, even if the screen does not appear to
turn on.
4. Insert the batteries. If you have any doubts about how old your batteries are,
replace them with new AAA alkaline batteries, preferably a good brand
optimized for low-drain devices.
5. If your device doesn't automatically turn on when you insert the batteries (or if,
once it turns on, the date and time have not been reset), you haven't
successfully performed a power down reset. Try the steps above again. Wait a
little longer this time before inserting the batteries, and perform a few more
soft resets while the batteries are out.
6. After a successful power down reset, you’ll need to perform all the steps
associated with setting up the device like setting the time, inserting the
CardTool reader, etc.
Battery Life for Handheld Computer
The CardTool uses the battery power from the Handspring Visor handheld
computer. If you leave the module installed and use it everyday, you can expect a
fresh set of alkaline AAA batteries to last about 2-3 weeks or 6000 swipes, whichever
comes first. To conserve battery life, remove the CardTool from the Visor when not in
use.
1. If the batteries become low in the course of normal use, an alert appears on the
handheld screen describing the low battery condition. If this alert appears,
perform a HotSync ® operation to back up your data before you replace the
CardVisor Hardware Manual Page 17 of 32
Page 18

batteries. This helps prevent accidental data loss.
2. When replacing the batteries begin by turning your handheld off (so there is no
screen display). Never remove the batteries while your handheld is turned on.
When replacing the batteries, always use new alkaline batteries. Batteries from
other devices (TV remote, etc.) will not have enough power to turn on the Visor.
3. When you remove the batteries, the built-in backup power of your handheld
maintains memory data for a period of up to one minute. Whenever you remove
the batteries, replace them immediately. If you encounter any difficulties in the
course of battery replacement, reinstall the original batteries and wait a few
minutes for the backup power to recharge.
4. If you leave drained batteries in your handheld for an extended period of time, you
will lose all of the stored data. If you install used batteries in you handheld, the
handheld may lock up. If this happens, replace the batteries with new ones and
reset your handheld. (See “Resetting the handheld” section of this guide for
details.) After you reset your handheld, perform a HotSync operation to restore the
data from your desktop computer.
5. For Handspring Visors with built-in rechargeable Lithium Ion batteries (Prism,
Edge, Pro), return the unit to the charging base or bar code reader cradle under
AC power whenever not in use. Note: This ensure these models get their batteries
constantly topped off.
6. For Handspring Visors using alkaline batteries, consider purchasing rechargeable
NiMH AAA batteries. A list of batteries/chargers is provided on the TokenWorks
web site in the support section.
CardVisor Hardware Manual Page 18 of 32
Page 19

Trouble Shooting – Handheld Computer & Magnetic Stripe Reader
Problem Possible Problem Possible Solution
Unit does not power
up – Screen Blank
CardVisor is not
decoding swiped
cards - "swipe
again" displayed
Visor is stuck in
power down mode
Batteries are low or
dead
Batteries on Visor
are installed
incorrectly.
Hardware failure Contact TokenWorks Technical support. Note: if Handspring Visor not
Magnetic stripe is
dirty
Magnetic Card may
be damaged
CardTool is hung Run Reset menu item from main menu. If still experiencing problems,
Magnetic Card may
be miss-aligned
during card swipe
Try soft reset – turn over Handspring V isor so that you can see the back of it.
Using the reset tool, an unfolded paper clip or a similar small blunt-tipped
object, gently press the reset hole on the back. See the Re setting the
Handheld section.
Replace the batteries and try soft reset. If this doe s not work , try diff erent
batteries followed by another soft reset. If unit still does work, try hard reset.
If a hard reset does not work , then try a Power Do wn. See the Reset ting the
Handheld section.
Reinstall batteries correctly. Make sure the (+) and (-) signs on the batteries
line up with the signs on the inside of the battery compartment. Note: if
batteries were mis-installed, then remove batteries, wait 20 minutes for
internal capacitor to discharge and reinstall
purchased from TokenWorks, then contact Handspring technical support at
www.handspring.com
Clean stripe with soft cloth.
Try another card.
perform soft reset with stylus or paper clip. See the Resetting the Handheld
section.
Ensure card is being held flush to base of card track during swipe. Try swiping
at different speeds, in a different direction, holding the card at different
locations, or changing the orientation of the Handspring.
CardVisor does not
respond to card
swipe and does not
display ‘Swipe A
Card’ message
when first
launched.
CardVisor
application not
visible on Main
application
launcher screen
CardVisor does not
launch when Date
Book button is
pressed
Swipe data not
displayed in
MemoPad
Application
Firmware memory
requires reflash
Firmware memory
requires reflash
CardTool is hung Run Reset menu item from main menu. If still experiencing problems,
Category not set to
All or unfiled.
Date Book button
not associated with
Cardvisor Application
The MemoPad
Category is set to
display only personal
or business memos.
Remove and reinsert CardTool reader. If CardWelcome application
automatically reflashes firmware, then this probably will resolve the problem.
If not, Remove and reinsert CardTool re ader agai n. Do no t hit OK button to
launch CardVisot but instead, select pull-down menu icon (below house icon
in graffiti area), and tap on ‘reflash n ow’ menu i tem. T his will force a fi rmware
reflashed.
perform soft reset with stylus or paper clip.
Select All or unfiled in the top right corner of the screen.
Remove and Reinsert the CardTool reader. This will automatically associated
the CardVisor application with the Date Book and Address Buttons (Address
Button is for bar codes version only)
Change Category to ‘All’ or ‘CardVisor.’ To see Unparsed license data, set
category to ‘RawData’
CardVisor Hardware Manual Page 19 of 32
Page 20

For ID Scanners with Bar Code Reader Cradle
This section applies to customers with the Bar Code Reader Cradle
Bar Code Reader Cradle Upgrade
Customers may upgrade a magnetic
stripe version by purchasing the Bar
Code Reader Cradle
1. Bar Code Reader Cradle
2. SC-2000 HotSync Cable with
HotSync button
3. AC – DC Power supply.
4. Wall Charger & 4 AAA NiMh
rechargeable batteries (not
CV_I_BC, CV_II_BC, CV_III_BC
shown)
CardVisor software loaded into the
CardTool
®
Reader, a Handspring™
Visor™ handheld computer, the Bar
Code Reader Cradle with AC adapter,
a USB Hotsync™ Cradle, Palm™
Desktop application for Windows™ or
Macintosh™, SC-2000 USB Hotsync
cable, a wall charger with four
800mAh AAA rechargeable batteries,
CardVisor CD and documentation.
CV_II_BC_Pro, CV_III_BC_Pro, CV_IV_BC_Pro
Package includes CardVisor software
loaded into the CardTool
®
magnetic
card reader, a Handspring™ Visor™
Pro handheld computer, the Bar
Code Reader cradle with AC adapter,
a USB Hotsync™ charging Cradle with
AC adapter, Palm™ Desktop
application for Windows™ or
Macintosh™, SC-2000 USB Hotsync
cable, CardVisor CD and
documentation.
CardVisor Hardware Manual Page 20 of 32
Page 21

Parts Diagram – Bar Code Reader Cradle
CardVisor Hardware Manual Page 21 of 32
Page 22

Cont rol s Di agram
CardVisor Hardware Manual Page 22 of 32
Page 23

Inserting Handheld into Bar Code Reader Cradle
1. Assuming the CardTool reader is already installed in the expansion slot of the
Handspring Visor PDA, create a small gap of about 1/16” between the CardTool
reader body and the top of the Handspring Visor PDA by pulling the CardTool
reader out of the expansion slot. This will allow space for the steel tie down cable
to fit in the gap.
2. Ensure the steel tie down cable is not tethered in the tie down slot and is pulled
away from the reader cradle. This is to ensure the cable is not
3. Make sure the connector at the base of the cradle is clear of foreign bodies
4. Place the handheld’s base into the cradle as shown in step one
5. Lower or tilt the handheld until it rests in the cradle as shown in step four.
Figure 4
6. Once the Handspring is resting in the cradle, pull the Steel Tie Down Cable straight
up. This will pull it into the gap and ensure it does not interfere with the stylus.
Then pull across gap between reader and top of Handspring Visor. Finally pull
past tie down slot and lock gold ball into slot. See Figure 5 below
Figure 5
CardVisor Hardware Manual Page 23 of 32
Figure 6
Tie Down Cable Secured in Tie Down Slot
Page 24

How to scan a Driver’ s license with a 2D Bar Code
How to scan a Driver’s license with a 2D Bar Code
1. Press the Address Button (see figure) - CardVisor Bar Code application will display
‘Scan a bar code license’ at the bottom of the screen and the Red & Green LEDs
will light on the bar code scanner and it will sound 3 beeps.
2. Wait for the Red LED to go off and just the Green LED to be lit.
3. Insert the Driver’s license into the bar code reader ‘dunk’ slot with the bar code
facing the PDA. Make sure the license is fully inserted.
4. The Red LED will start flickering. Wait for the Red Led to stop flickering and
remove the license with a smooth continuous motion.
5. If the card was decoded properly, the bar code reader will beep and shortly
thereafter the display will update. If not, try inserting & removing the license until
you hear the single good read beep. Tip: Try a scans to get the feel and timing of
the bar code reader. It isn’t always necessary to wait for the Red LED to stop
flickering. The scan time depends on the amount of data and the condition of the
bar code. Some licenses can be read as fast as the license can be fully inserted
and withdrawn.
CardVisor Hardware Manual Page 24 of 32
Page 25

Connecting Bar Code Reader Cradle to PC for HotSyncing
There are two HotSync methods provided. The original method which involves
removing the Handspring Visor from the Bar Code Reader cradle and placing it into
the desktop HotSync Cradle. Directions for this are include in the Handspring user
manual. The second method uses the SC-2000 USB HotSync cable which connects
to the front of the Bar Code Reader cradle and the USB port of the PC.
Connecting SC-2000 HotSync cable to Bar Code Reader Cradle
CardVisor Hardware Manual Page 25 of 32
Page 26

Battery - Bar Code Reader Cradle
Charging the Bar Code Reader Cradle
To charge, just plug the wall adapter into the front of the Bar Code Reader Cradle and
the center LED should turn red, indicating the unit is charging. A full charge will
require approximately 4 hours. The charger will automatically switch from full charge
mode to standby as soon as the battery reaches full charge. The charger will not
overcharge the battery and it is recommended to leave the charger connected.
LED Color
Mode Charging Charge Complete Fault
Red Green Yellow
While charging, the bottom of the case will become warm. This is normal and should
return to room temperature once the LED turns green. If the LED is Yellow, try
turning the wall power on/off. If this does not resolve the fault condition, it means
there is a problem with the battery charger or battery and technical support is
required. DO NOT OPEN THE CASE TO SERVICE THE BATTERY. Contact
support@tokenworks.com
to obtain technical support. Do not use a wall charger
other than that supplied by Tokenworks. Using one with a higher voltage or reversed
polarity will damage the charger and using one with a lower voltage or current rating
may cause the charger to exit the charging mode.
Battery Life of Bar Code Reader Cradle
The Bar Code Reader Cradle battery is oversized compared to the capacity of the
handheld. It is recommend that you plug the charger in whenever the handheld
battery are depleted. For customers with the Visor Pro, it is especially important to
return the unit to the charger whenever not in use to ensure all batteries are fully
charged.
Charging the Handspring Visor Pro (optional) in the Ba r Code Reader Cradle
This section applies to the CV_II_BC_Pro, CV_III_BC_Pro, and CV_IV_BC_Pro.
The Handspring Visor Pro has an internal Li-Ion battery and therefore must be
recharged on a regular basis. The Bar Code Reader Cradle can maintain the charge
of the Visor Pro handheld whenever it is in the Bar Code Reader Cradle and powered
by the wall adapter. If the Visor Pro’s battery falls below approximately 50%, then it
must be REMOVED from the bar code reader cradle and charged in the desktop
HotSync charger cradle.
CardVisor Hardware Manual Page 26 of 32
Page 27

Trouble Shooting – Bar Code Reader Cradle
Problem Possible
Problem
Bar Code Reader
does not decode
license – No beep
after withdrawing
license from reader.
Bar Code is dirty Examine bar code for scratches, dirty and clean with
Bar Code is
damaged
License skewed /
tilted during insert
Li-Ion Battery low Plug wall adapter into bar code reader cradle power
License withdrawn
from reader too
soon.
No 2D bar code or
2D bar code not
facing PDA
Possible Solution
soft cloth.
If sufficiently damaged, it may be impossible to read.
Try another license
Try reinserting and removing license while ensuring it
goes in and comes out without tilting or skewing card.
jack
Wait for red LED to stop flashing before withdrawing
license.
Make sure there is a 2D bar code and that it is facing
the PDA. A 2D bar code looks like this:
D E M O
Bar Code Reader
does not turn on
when Bar Code
version of CardVisor
is run (i.e. address
book button)
Foreign object in
slot
Reader is broken Contact TokenWorks for support
Li-Ion Battery is
dead
PDA not positioned
properly in bar code
reader cradle
Bar Code reader
version of CardVisor
not running
Reader is broken Contact TokenWorks for support
Try to clear objects by holding reader upside down and
gently shaking. Do not insert metal objects or other
objects to clear slot!
Plug wall adapter into bar code reader cradle power
jack
Remove and Reinsert Handspring Visor PDA
Look for ‘Scan a drivers license’ message at the
bottom of the screen after hitting the address book
button. If not present, re-associate the CrdVsr2D
application with the address book button (see
Configuration Tip - Front Buttons section of this
manual)
CardVisor Hardware Manual Page 27 of 32
Page 28

Copyright
Copyright 2002 -> 2005 TokenWorks, Inc. Printed in the USA
www.TokenWorks.com
www.CardVisor.com
(Company Web Site)
(Product Web site)
support@tokenworks.com
Information in this document is subject to change without notice. No part of this
document may be reproduced or transmitted in any form or by any means, electronic
or mechanical, for any purpose, without the express written permission of
TokenWorks, Inc. TokenWorks, CardVisor and CardTool are trademarks of
TokenWorks, Inc. Visor and Handspring are trademarks of Handspring Inc.
Limited Warranty - CardT ool® reader and/or CardVisor® software
TokenWorks™ Inc. (hereafter “TokenWorks”) warrants the TokenWorks CardTool®
reader, the CardVisor
®
software, and this Manual, hereafter jointly or individually the
“product” IN ITS ENTIRETY, to be in good working order for a period of 90 days from
the date of purchase. Should this product fail to be in good working order at any time
during this warranty period, TokenWorks will, at its option, repair or replace this
product at no additional charge except as set forth below. Repair parts and
replacement products will be furnished on an exchange basis and will be either
reconditioned or new. All replaced parts and products become the property of
TokenWorks. This limited warranty does not include service to repair damage to the
product resulting from accident, disaster, misuse, abuse, or modification of the
product performed without the prior written approval of TokenWorks.
Limited Warranty service may be obtained by sending the product during the
warranty period to TokenWorks. Before sending material, please obtain a Return
Material Authorization (RMA) number by requesting one from TokenWorks. To obtain
additional return and contact information, visit www.tokenworks.com
. If this product
is to be returned you agree: (a) to insure the product or assume the risk of loss or
damage in transit; (b) to prepay shipping charges to the warranty service location,
and (c) to use the original shipping container or equivalent.
ALL EXPRESS AND IMPLIED WARRANTIES FOR THIS PRODUCT, INCLUDING THE
WARRANTIES OF MERCHANTABILITY AND FITNESS FOR PARTICULAR USE, ARE
LIMITED IN DURATION TO A PERIOD OF 90 DAYS FROM THE DATE OF PURCHASE,
AND NO WARRANTIES, WHETHER EXPRESS OR IMPLIED, SHALL CONTINUE BEYOND
SUCH PERIOD. EACH PURCHASER UNDERSTANDS THAT THE TOKENWORKS
PRODUCT IS OFFERED AS IS. TOKENWORKS AND ITS SUPPLIERS ASSUME NO
RESPONSIBILITY FOR ANY DAMAGE OR LOSS CAUSED BY DELETION OF DATA AS A
RESULT OF MALFUNCTION, DEAD BATTERY, OR REPAIRS. BE SURE TO MAKE
BACKUP COPIES OF ALL IMPORTANT DATA ON OTHER MEDIA TO PROTECT AGAINST
DATA LOSS.
CardVisor Hardware Manual Page 28 of 32
Page 29

IF THIS PRODUCT IS NOT IN GOOD WORKING ORDER AS WARRANTED ABOVE, YOUR
SOLE REMEDY SHALL BE REPAIR OR REPLACEMENT AS PROVIDED ABOVE. IN NO
EVENT WILL TOKENWORKS BE LIABLE TO YOU FOR ANY DAMAGES, INCLUDING ANY
LOST PROFITS, LOST SAVINGS OR OTHER INCIDENTAL OR CONSEQUENTIAL
DAMAGES ARISING OUT OF THE USE OF OR INABILITY TO USE SUCH PRODUCT OR
FOR ANY CLAIM BY ANY OTHER PARTY, IRRESPECTIVE OF ANY NOTICE TO
TOKENWORKS OF THE POSSIBILITY OF SUCH DAMAGES OR CLAIM. THIS WARRANTY
GIVES YOU SPECIFIC LEGAL RIGHTS. YOU MAY ALSO HAVE OTHER RIGHTS, WHICH
VARY FROM STATE TO STATE.
Age Verification Calculation Limitations
The CardVisor application is warranted to read the date of birth information encoded
on the machine-readable (magnetic or 2D bar code) stripe and display the current
age based on current date/time information contained in the handheld computers
real time clock (RTC). It will also read other information on the stripe and present it
to the operator. It should be understood that the displayed age may differ from the
actual age of the person presenting the card for any one of a number of reasons.
Among the most likely are:
• the card does not belong to the person presenting it,
• the encoded machine-readable stripe has been altered,
• the date of birth presented to the issuing authority was misrepresented,
• the issuing authority mis-encoded the date of birth on the card,
• the handheld computer real time clock is not set to the current date/time.
The above list of reasons is not exhaustive.
State and Local Privacy Laws, Ordinances or Rules
Some states and local government units regulate who, how and what information
from a driver’s license can be electronically viewed or recorded. Check with the
authorities in your jurisdiction before using the CardVisor product. Purchaser is
wholly responsible for insuring full compliance with the laws of the jurisdiction
wherein the product is to be used. TokenWorks fully disclaims any liability for any
loss, damages or untoward circumstances that may arise from the inappropriate use
of the product or of the data retrieved through its use.
CardVisor Hardware Manual Page 29 of 32
Page 30

Graffiti Table
CardVisor Hardware Manual Page 30 of 32
Page 31

Checking IDs
TokenWorks provides the CardVisor ID scanner to automate and document the ID
checking process for purchasing age sensitive products (Tobacco/Alcohol).
The number one cause for citations, according to enforcement officers, is mental
errors such as failing to check an ID or making a math error when calculating the age
from the date of birth. In a busy retail environment, it is easy to understand a new or
tired clerk/server skipping important steps or making calculation errors.
Recording the ID data, ID status (OK, under21, etc.) with a date/time stamp provides
an affirmative defense for organizations cited for serving a minor. Several states
have affirmative defense legislation which helps defend an organization's liquor
license if an ID scanner was used.
The CardVisor ID scanners will help detect some fake or altered IDs. Just having one
will cause some people to think twice about presenting such an ID. For example, the
ID scanner will help detect if the printed date of birth or expiration date has been
altered using ink (e.g. changing a 3 to an 8) by reading the unaltered date encoded
on the data stripe and display an underage/expired warning. Another possibility is
the encoded data stripe doesn't match the printed data on the front of the license
(e.g. John Smith is printed on the front, but Mary Jones is encoded on the stripe). In
this case, the ID scanner will NOT produce a warning but an operator who is cross
checking the displayed versus printed data should notice the discrepancy.
However, fake IDs are like counterfeit money in that if the person creating them has
sufficient skill and resources, it is extremely difficult to detect without proper
investigation resources. Merchants serving age sensitive products are expected to
make a reasonable effort when checking IDs and using an ID scanner is a significant
indicator of such effort. That is why many states have affirmative defense legislation
for merchants who use an ID scanner.
CardVisor Hardware Manual Page 31 of 32
Page 32

Cross Check Data
Always cross check the data displayed on the scanner versus what is shown on the
front of the ID. Some fake IDs have a 'cloned' or copied data stripe from another
person who is over 21 years old.
The "F.E.A.R." method of carding from the PA Liquor Control Board.
1. FEEL FOR:
* Glue line or bumpy surfaces by the picture or birth date.
* Pin holes on the surface.
* Thickness of an ID. If it's been re-laminated, it may be thicker.
2. EXAMINE:
* The photo and physical description. They should match the person handing you the ID.
* The expiration date. You CANNOT accept an expired ID.
* The birth date. Do your math. Are they 21?
* Whether or not the ID is a duplicate. If it is, ask for another form of ID.
* The state logo. If it's partially missing or appears altered, the ID might be fake.
* The hologram. Is it a genuine hologram or a basic hologram added to a fake ID?
* The card's reverse side lettering. Some ID-makers neglect the back side of the ID. Look
for blurred lettering or a cut out piece of paper.
* Whether it is an out-of-state license. Use an ID checking guide when you're looking at
an unfamiliar license.
3. ASK:
* About basic information on the card, such as the birth date, middle initial, zip code,
age, etc.
* For a second form of ID. People with fakes rarely carry back-up identification.
*
4. RETURN:
* If you are satisfied that the proof of age is valid, you may permit the individual to be
served.
* If you're not convinced, however, do not serve them.
CardVisor Hardware Manual Page 32 of 32
 Loading...