


H
A
P
P
Y
F
A
C
E
C
L
I
P
C
A
M
E
R
A
W
I
T
H
D
V
R

is a covert, body-worn camera with an internal video recorder (DVR). With three different modes, you can choose
to take photographs, record video, or
record audio. All les are recorded to a Micro SD card
which can be viewed by connecting the
device to a monitor or computer.
The Happy Face
Clip Camera with DVR
In the Box
• Your box contains:
• Happy Face Clip Camera
• USB/Composite RCA cable
• Manual
• CD (The CD contains a manual, VLC Player (the media player we
recommend for viewing videos), the driver to use the device as a
webcam, and an application to sync the timestamp on your videos
with your PC’s time.)

Getting Started
To begin, charge your device by connecting it to a USB port on a
computer using the included cord. The LED will be blue while the
device is charging. Before using the camera for the rst time, be
sure to charge it for at least 4 hours.
Before inserting a micro SD card, make sure the card is formatted
correctly. The device can record in the FAT 16/32 format. If you
aren’t sure how to format an SD card, you can nd instructions
here: http://www.ehow.com/how_2112408_format-memory-
card.html. The Happy Face Clip Camera is compatible with
micro SD cards up to 16Gb capacity.
If you plan on viewing your les on your computer, install VLC
Player from the included disk. If you are unable to download the
software from the disk, it can be downloaded at no cost from
http://www.videolan.org.
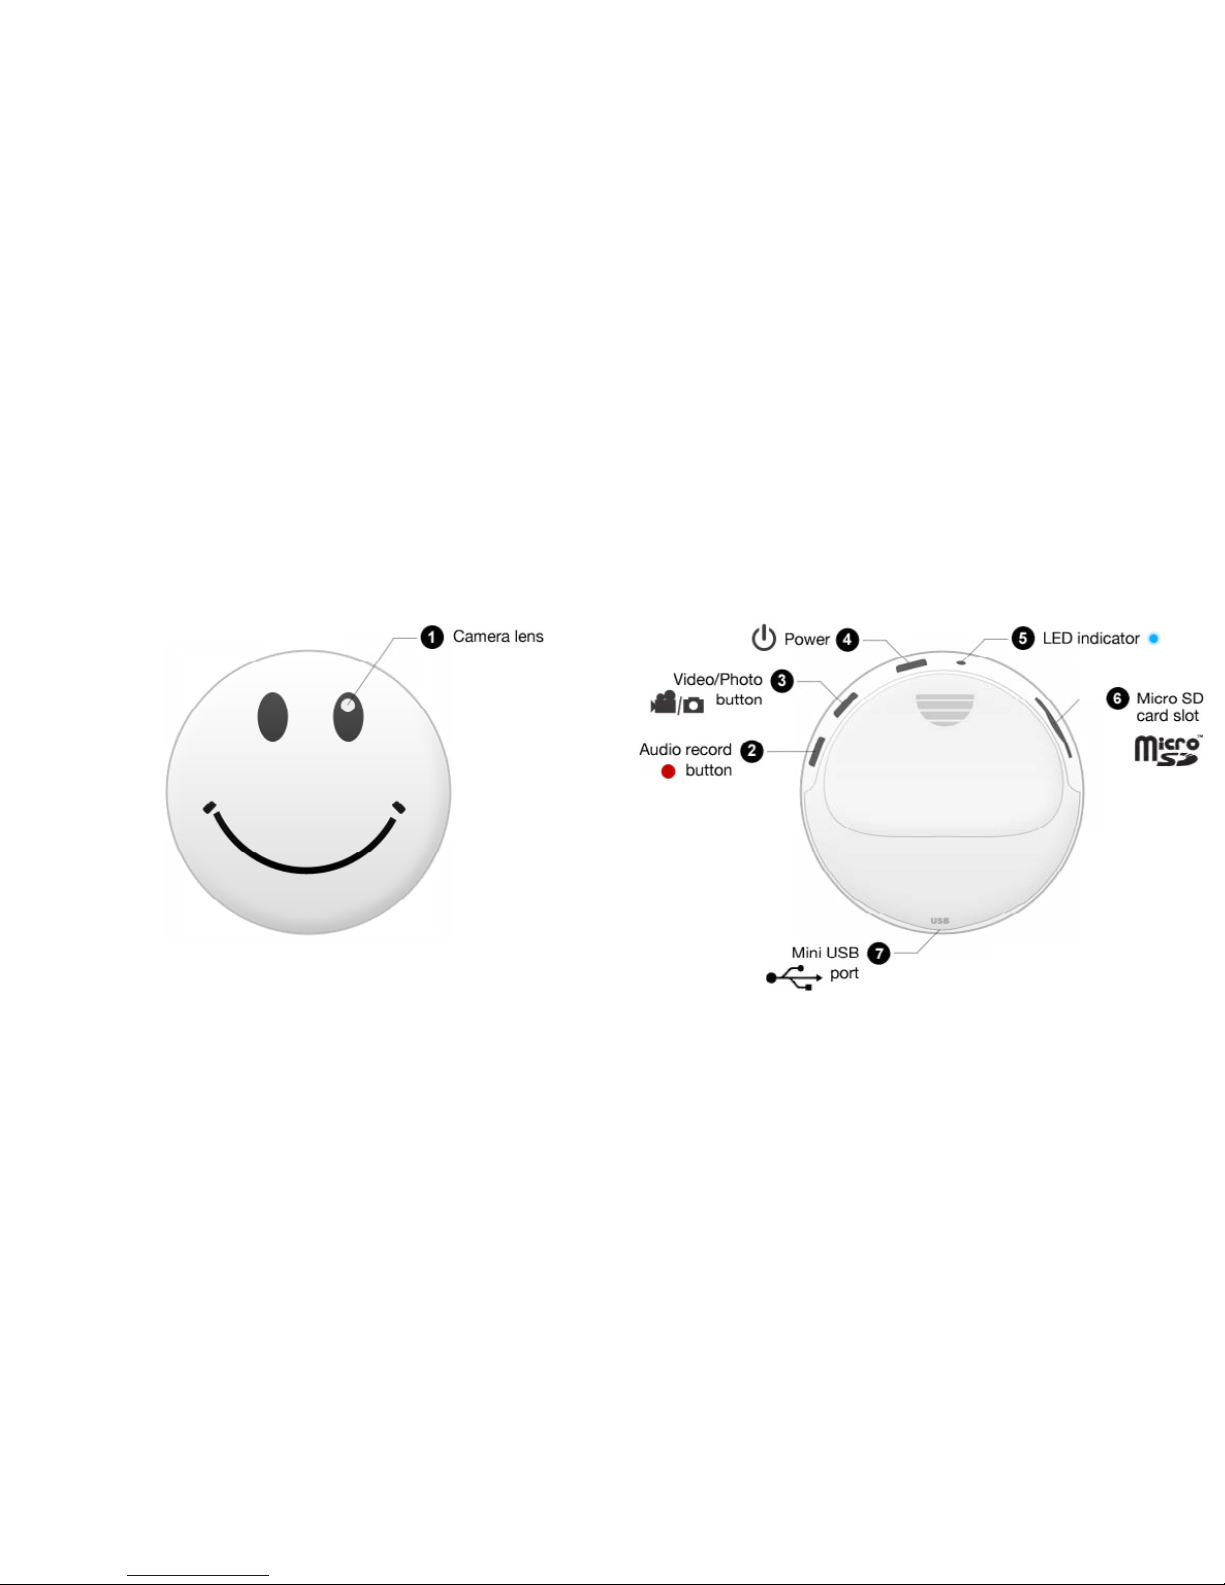
To power the device on, press and hold the Power button for 3
seconds. The LED will blink yellow 3 times and then stay solid
to indicate it is in Standby mode. To power the device off, hold
down the Power button for 3 seconds and the LED will turn off.

Recording Video
From the Standby mode, press and hold the Video/Photo button
for 3 seconds. The LED will blink yellow once every 15 seconds.
When nished, hold the Video/Photo button for 3 seconds to
stop recording and save the le.
Taking Photos
From Standby mode, press the Video/Photo button. The LED will
blink once to conrm the photo is saved.
Recording Audio
From Standby mode, press the Audio Record button. The LED
will blink blue once every 15 seconds. To stop recording and
save the le, hold down the Audio Record button for 3 seconds.
Viewing Your Files
Files can be viewed on a computer, either by connecting the
device via USB or putting the SD card directly into the computer,
or on a monitor by using the included RCA cord.

Viewing les on a computer: To view your les on a computer,
simply connect the device via the supplied USB cord with the Micro SD
card inserted to the device, making sure the device is powered Off. It will
connect as a removable drive, and depending on the settings on your PC,
it may automatically notify you that new hardware was detected. If so,
select Open Folder to View Files. If it is not automatically detected, click
Start on your desktop. Select My Computer if you are using Windows XP,
or Computer if using Windows Vista or Windows 7. The device should be
listed as a Removable Disk under the Devices With Removable Storage
section. Open that drive, which will contain a folder called DCIM. Within
that folder is another folder labelled 100MEDIA. This folder contains your
videos, photos, and audio les.
Viewing les on a monitor: In order to view les on a monitor, turn
the Happy Face Clip Camera on and connect it to your monitor via the
included RCA cord.
Viewing les on a monitor:
• The upper right hand corner shows what le you currently have selected.
• The bottom left corner will show either a video camera icon to indicate
a video le is selected or a microphone icon to indicate an audio le is
selected.
• Tap the Power button to play the selected le. Tapping the Power button
will pause playback of a le.
• Tap the Record button to skip to the previous le.
• Hold the Record button down to rewind a le that is playing.
• Tap the Video/Photograph button to skip to the next le.
• Hold the Video/Photograph button to fast forward a le that is playing.

Using Your Device as a Web Cam
To use your device as a web cam, you will rst need to install
the driver on the included mini disc. Open the folder named
SPCA1528_V2250_WHQL_MultLan and then run the le with
the same name. Once complete, your computer will prompt you
to reboot and complete installation. After rebooting, you should
have an icon named AmCap.
To switch to Web Cam Mode, connect the device to your
computer and hold down the Audio record button. The LED will
begin to slowly blink blue and will no longer be recognized as a
removable drive by your computer. Open AmCap to view the feed
from your camera.
Setting Time and Date
To set the time and date on your device, you must rst have the
driver installed and the device connected in Web Cam Mode.
Open the folder on the included mini disc named SyncTime and
run the application called SyncTime. The SyncTime Tool window
will open and tell you how many devices are currently connected,
which should be 1. Hit the Synchronize button, and the application will notify you that the synchronization is completed. Note
that this will sync the time and date with that on your computer,
so make sure your PC’s time is correct before using this function.

Glossary
Composite Video: Composite video cables carry video signal down a single line. Composite video RCA plugs are commonly yellow for video, with
red and white wires carrying audio.
DVR: short for Digital Video Recorder, this abbreviation refers to any device
capable of recording and saving a digital video le. This is the high-tech
equivalent of a VCR.
GB: Gb is short for gigabit which is a unit used to measure computer storage capacity and is approximate to 125 megabytes.
Micro SD Card: Micro SD cards, also known as TransFlash, are smaller
versions of SD memory cards. As electronic devices are becoming smaller,
Micro SD cards are becoming more and more common in the marketplace. Currently, the highest capacity of micro SD card is 32Gb.
NTSC: the standard analog video format used throughout North America
and much of South America. Some other areas of the world use formats
called PAL or SECAM.
RCA Connector: A type of electrical connector commonly used to carry
audio and video signals.
They have largely replaced BNC connections on most home entertainment
systems. It is used to connect everything from cameras to video game
systems.
USB Port: A USB port is a standard cable connection interface on personal
computers and consumer electronics. USB ports allow stand-alone electronic devices to be connected via cables to a computer. USB can connect
computer peripherals such as mice, keyboards, PDAs, gamepads and
joysticks, scanners, digital cameras, printers, personal media players, ash
 Loading...