

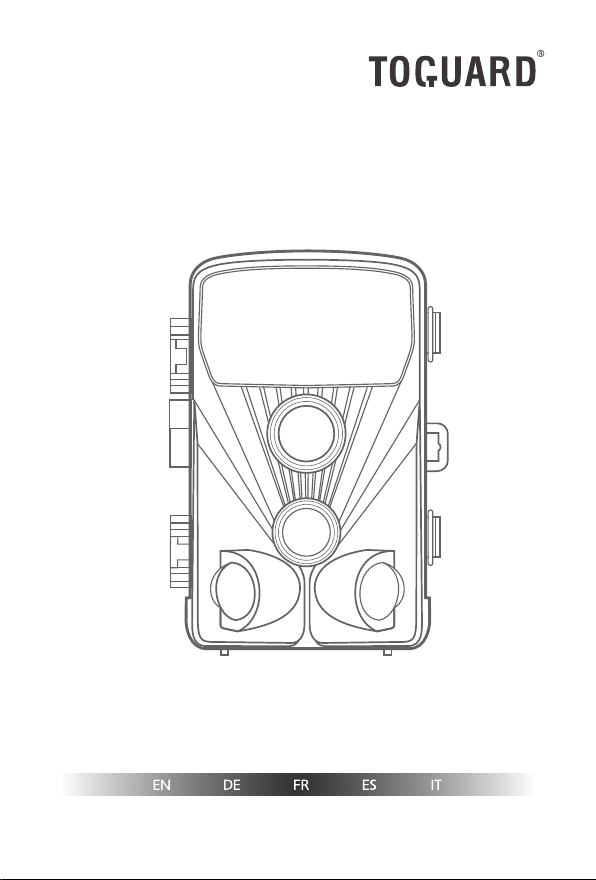
H70 Trail Camera
Instruction Manual


Contents
1.PACKING LIST
2.INTRODUCTION
3.STRUCTURE
4.PREPARING THE CAMERA
5.USING THE CAMERA AND SETUP MENU
5.1 Using the camera
5.2 Setup menu
6.ENTERING AUTOMATIC MONITORING
6.1 Adjusting and installing the camera
6.2 Setting up the live mode
7.CONNECTION TO COMPUTER
8.TECHINCAL SPECIFICATION
9.SIMPLE TROUBLE SHOOTING
9.1Care
9.2Storage
..............................................................................0 1
........................................................................0 1
...............................................................................02
........................................................04
...................................06
.....................................................................06
...........................................................................07
.....................................1 3
.............................................1 3
.............................................................1 5
..................................................1 6
....................................................1 7
...................................................1 8
......................................................................................1 9
........................................................................................1 9
V19 0318

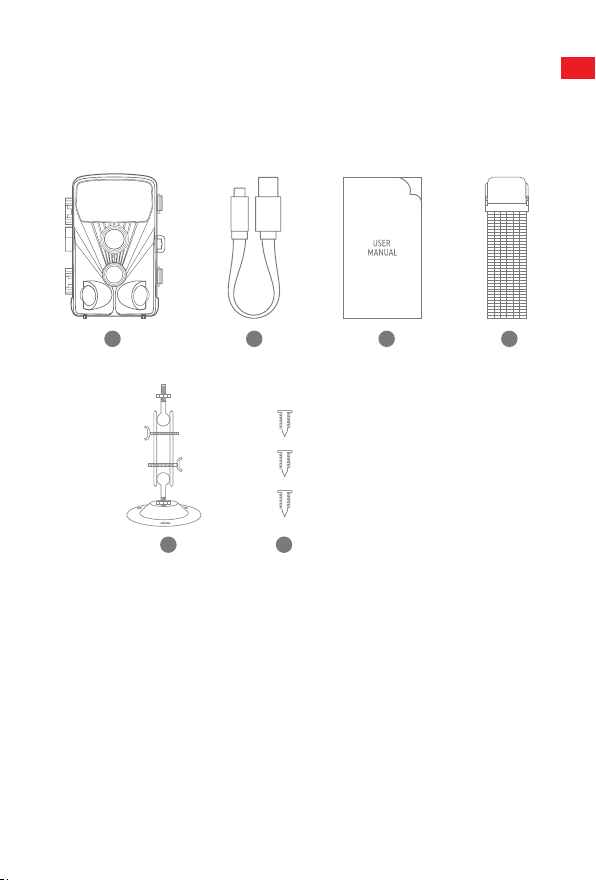
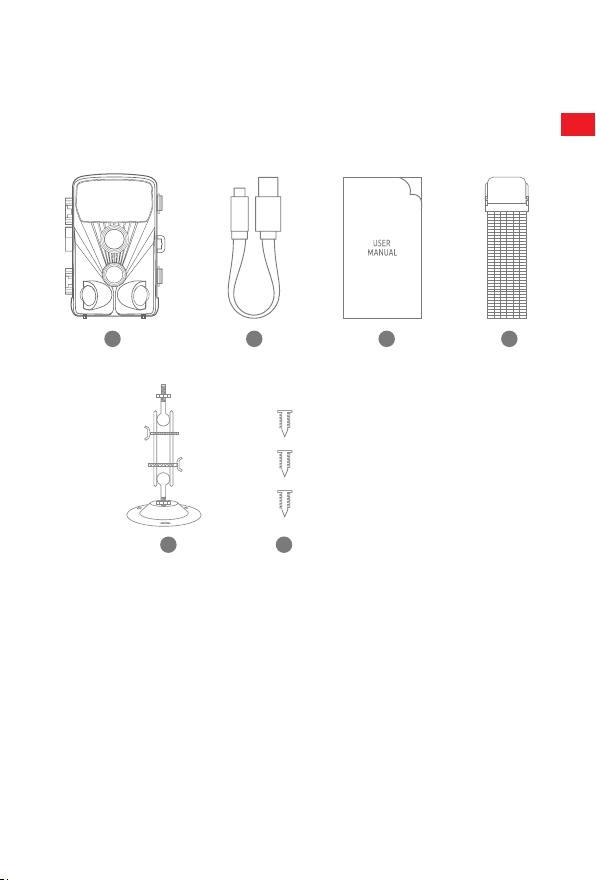
1. PACKING LIST
Ple ase caref ully unpack c amera and chec k tha t be low a ccess ories are
con taine d in the box.
EN
1 2
3 4
1.W ildli fe Camera x 1
2.U SB cable x 1
3.I nstru ction Manual x 1
4.M ounti ng Belt x 1
5.Wall Mount x 1
6.S crews x 3
5 6
2. INTRODUCTION
The Wildlife Camera is a wild life and surve illan ce ca mera with an infra red
sen sor. T he sensor can dete ct sudden changes to t he a mbien t
tem perat ure withi n an eval uatio n area. The s ignal s of the high ly se nsiti ve
inf rared sensor (PIR, pas sive infra red senso r) sw itch on t he c amera ,
act ivati ng pictur e of vide o mode.
1

2. 1 Features Of Wildl ife Cam era
EN
1. CMOS sens or.
2.2 0 Megapix els photo and 1080 P HD vide o.
3.6 .1 cm (2.4’)’ colo r TF T LCD : 32 0x240 pixe ls
4.4 2 pcs IR LEDs .
5.F ull autom atic IR f ilter.
6.Tri gger speed: Approx . 0. 3 sec ond.
7.S etup Serial No. t o rec ord the p ositi on.
8.Tim e, date, temperatu re, phase and Seri al N o. wi ll b e sta mped on t he
photo .
9.P asswo rd protec tion.
10. Power indicati ng.
11. Built -in test function abou t env ironm ental tem perat ure.
12. Built -in micro phone and spea ker.
13. Mini USB 2.0 inter face.
14. Waterproof sta ndard IP56 .
15. Working t emper ature : -20 °C t o 60° C.
16. Extre mely low power consumpt ion in s tandb y ope ratio n pr ovidi ng
extre mely long oper ating time, l asts 6 mo nths with 8 pc s ba tteri es
when taking 5 0 pcs pho tos e very day.
2. 2 Features Of Wildl ife Cam era
1.C amera t rap for h untin g
2.A nimal o r incid ent obs ervat ion.
3.M otion t rigge red sec urity c amera f or dome stic, o ffice o r publi c use.
4.A ny inte rnal an d exter nal sur veill ance.
2
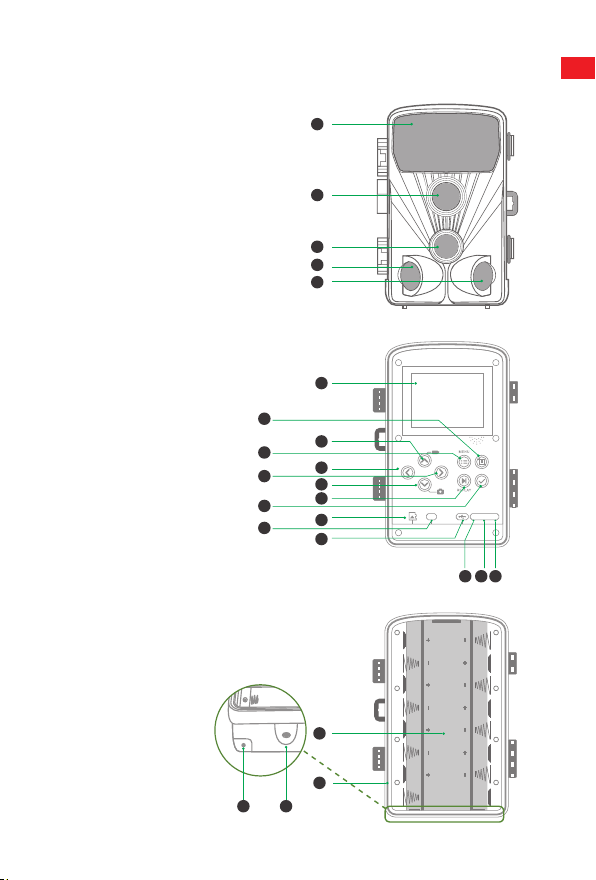
3. STRUCTURE
Und ersta nding t he came ra stru cture h elps to u se this p roduc t more sk illfu lly.
EN
1-I nfrar ed LEDs
2-L ens
3.1 -Fron t motio n senso r
3.2 -Left m otion s ensor
3.3 -Righ t motio n senso r
4.D ispla y screen
5.U pbutton
6.M enu butto n
7.L eft butto n
8.R eplay button
9.S hot butto n
10. Right button
11. OK button
12. Down button
13. TF Slot
14. AV jack
15. USB jack
16. ON
17. SETUP
18. OFF
19. Batte ry compar tment
20. Seal ring
21. DC connec tion 6V/1.5A
22. 1/4" Trip od thread
1
2
3.1
3.2
3.3
4
9
5
6
7
10
12
8
11
13
14
15
SHOT
OK
ON-SET UP- OFF
AV
16 17 18
19
20
22
21
3
EN
24
23
Digit al Trai l Camer a
Model :H70
Power : 8 *AA Bat tery
DC6V In put
RoHS
Made in Chin a
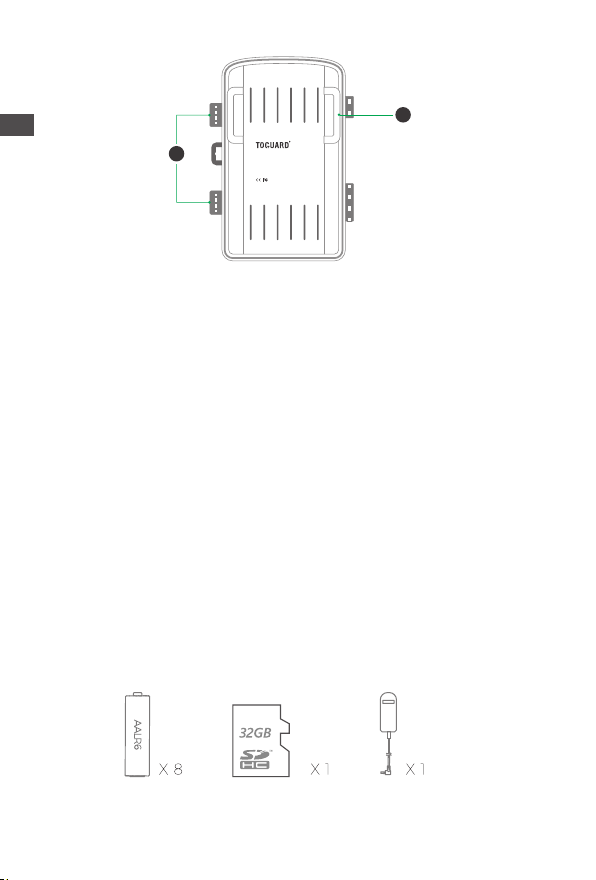
23. Locki ng brac kets 24 .Slot f or moun ting be lt
▲ 1 .The monitor is only switc hed on in the SE TUP m ode for c hangi ng
menu settings or v iewin g ex istin g pho tos and v ideos .
2.A micro SD memor y ca rd mu st h ave b een inser ted i nto the m emory
card slot to save phot os an d vi deos.
3.Usi ng the m ini U SB c onnec tion (USB 2.0) , the cam era c an b e
conne cted to a computer to downl oad photo s and vid eos.
4.Usi ng the m ode s witch , th e thr ee o perat ing m odes: OFF,SET UP an d
ON can b e sel ected .
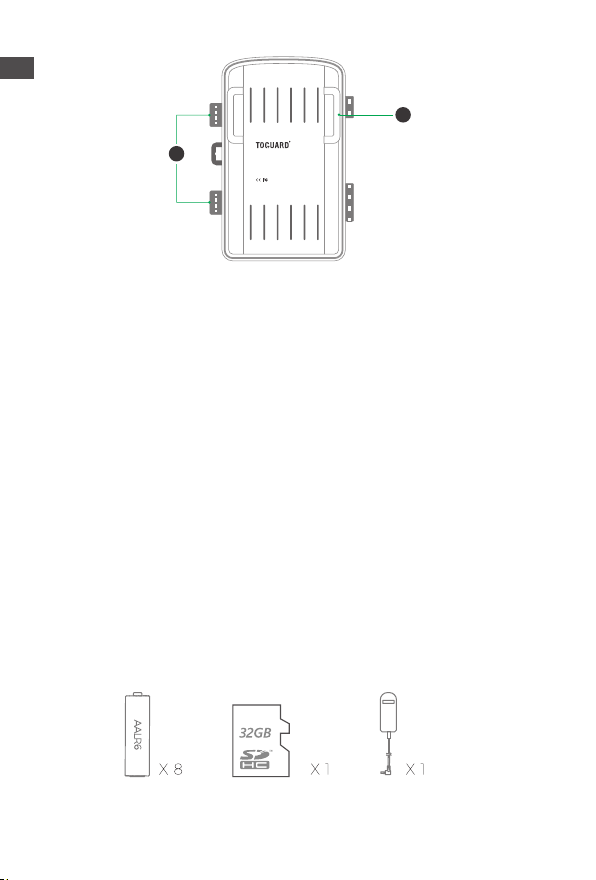
4. PREPARING THE CAMERA
No te :
1.M icro SD m emory cards up to a c apaci ty of 32 GB a re su pport ed.
4
2.I nstea d of type LR6 (AA) batterie s with t he sa me s pecif icati on (w ith
ON- SETUP- OFF
2000 mAh or higher ) ma y be used . We recommend Alkaline batterie s
with low self discharge (no t sup plied ).
3.T he camera must be inse rted 4 or 8 x 1.5 V AA batt eries . D o not use
new and old b atter ies toget her. DC in terfa ce ne ed 6 V/1.5 A ada ptor
with 3.5 mm (outer dia meter ) s*l .3 mm ( inner D) plug head.
4.I nsert CLASS6 or h igher clas s mi cro S D card ( CLASS10 recom mend) .
Prior to inser t into m emory card , en sure that the later al w rite prote ction
on the m emory card has not been lock ed.
5.S witch on the camer a. 3 swit ches: power o ff (O FF) ,setu p menu
/SETUP mode (SETUP) and live mode (ON ).
6.N ew memory card is reco mmend ed t o be form atted when usi ng (a s
below describe d).
7.P lease note that t he ca mera will powe r of f whe n po wer i s ve ry lo w.
AALR6
AALR6
AALR6
AALR6
AALR6
AALR6
AALR6
AALR6
SHOT
OK
ON-SETUP- OFF
AV
EN
Set tings
Time &date
Pho to stam p
Pas sword p rotec tion
Bee p sound
For mat mem ory car d
Ser ial NO
MENU
Bac k
Set tings
Time &date
Not ificat ion:A ll data
Pho to stam p
wil l be dele ted
Pas sword p rotec tion
Bee p sound
Yes
For mat mem ory card
No
Ser ial NO
OK
Sel ect
MENU
Bac k
OK
Sel ect
5
Operation (See Figures Below)
EN
Ope n the locking bra ckets and the prote ctive cov er of the batt ery
com partm ent - insert batt eries -ins ert memor y car d—switc h to
SET UP—ente r system menu by press ing MENU butto n -c hoose to forma t
mem ory card—ch oose to r eset to f actor y.
(th is step can be sk ipped )—cho ose to se tup syste m tim e.
Ope n the battery cov er ► Inse rt 8p cs b atter ies. Batte ry m odel:
AAL R6 > Ensu re that the later al wr ite prote ction on the m emory car d has
not been activat ed > Inse rt C LASS6 or above Micr o SD memo ry c ard i n
the memory card slot befo re s witch ing o n th e cam era and s elect SET UP
mod e to adju st settin gs
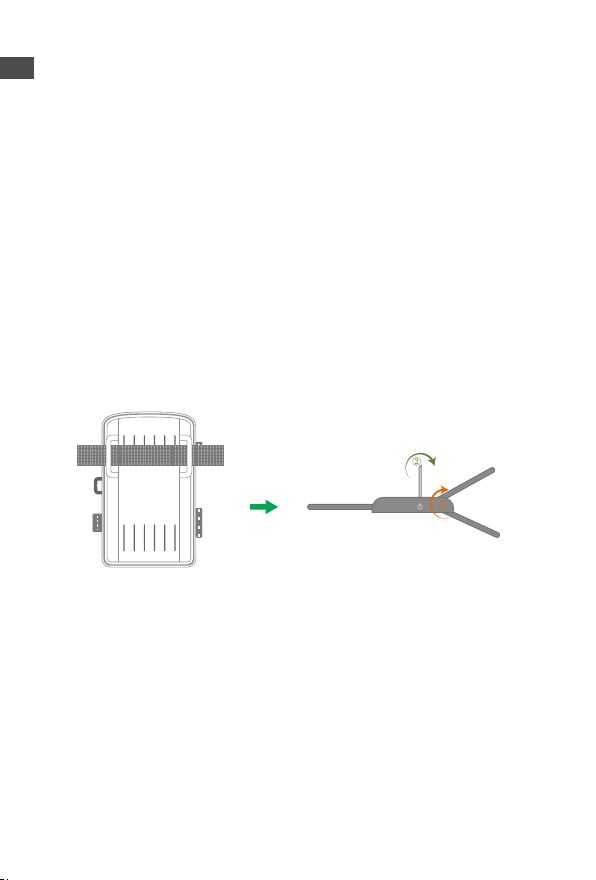
Assembly With Strap
5 . USING THE CAMERA AND SETUP
MENU
5. 1 Using The Came ra
1.O perat ing Butto ns
Fun ction s of oper ating buttons in r ecord ing mode:
Bel ow, th e op erati ng bu ttons are desc ribed in the recor ding mode with
non -acti vated menu.
6
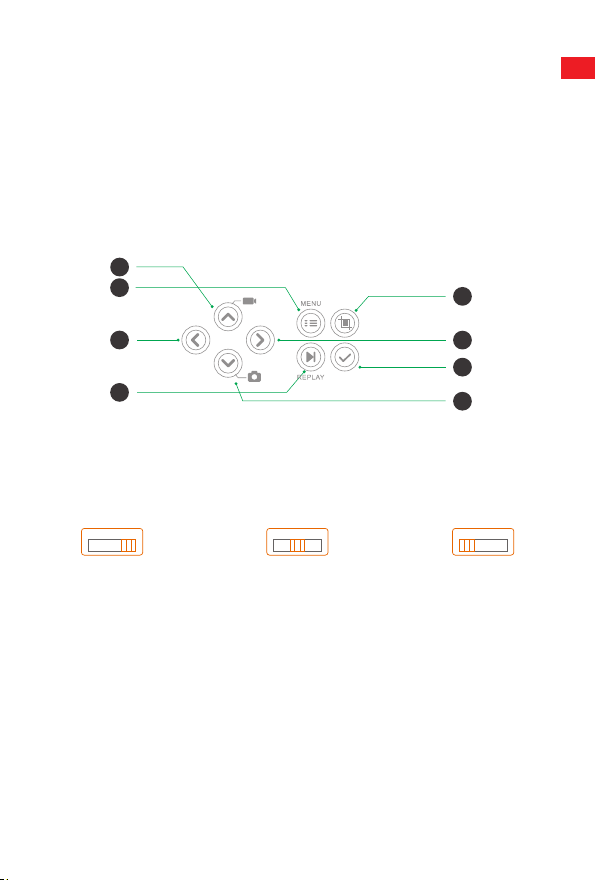
1. UP K ey: Page up ( Menu mode): S witch to Video reco rding mod e
2. MENU: Open o r exi t th is Se tting men u/Sto p pla ying vide o (Re play Mode )
3. Left Key: Page left
4. Replay Key: Revie w pho tos and v ideos
5. SHOT Key: shot video recor ding/ captu ring
6. Right Key: P age r ight
7. OK: Play/ Pause play video files (Rep lay mode)
8. Down Key: Page down(Me nu m ode)/ Switc h to Phot o mod e.
1
2
SHOT
5
EN
3
OK
4
2.M ode Switc h
2.1 Shift the s witch es to cho ose w ork mode:
ON- SET UP-O FF ON- -OF FSET UP ON- -OF FSET UP
Pow er off (OFF) Set up system (S ETUP) Liv e mode (ON)
2.2 Press Up/Dow n ke y to swit ch mo des betwe en Vi deo and P hoto mode .
2.3 Press the M ENU k ey t o ope n se tting menu .Pres s OK to confi rm th e
setti ng change s.
2.4 Press the M ENU k ey o ne mo re t ime t o re turn to p revio us me nu o r exi t
th e se tting s MEN U.
2.5 Switch the mode selec tor to "O FF" to po wer off t he c amera .
7
6
7
8

5. 2 Se tup Menu
EN
1. Mode
Pho to, Video , Photo+V ideo, Sel ect w hethe r ph otos or v ideos shou ld b e
tak en when motio n is dete cted. Whe n in the "Phot o+Vid eo" mode, the
cam era first takes a set numb er of pho tos p rior to r ecord ing a vid eo.
2.P hoto Resolutio n
20M P (5200*3 900) ; 16 MP (4608* 3456) ; 12 MP (4 000*3 000),
8MP (3264x24 48), 5MP (2592 x 1 944). 3MP (204 8x153 6).
Sel ect the desir ed r esolu tion for photo s. We recommen d the resolut ion
16M .A higher resoluti on p roduc es a some what bette r ph oto q ualit y bu t
res ults in l arger files requir ing more space on the memor y car d .
Taking 16GB memory card for exam ple:
Pho to Pixels
20M P
16M P
12M P
8MP
5MP
3MP
3.P hoto series : 1 P, 2 P. 3P
Siz e (MB)
(ap proxi matel y)
3.5
2.7
2.0
1.4
0.9
0.5 4
8
Pho to Quanti ty
(ap proxi matel y)
410 0
530 0
700 0
105 00
166 00
266 00

4.V ideo resolutio n
192 0x108 0P@25 fps, 1280x720P @30fp s, 720x48 0P@30 fps,
640 x480P @30fp s, 320x24 0P@30 fps. Select t he re quire d vi deo r esolu tion.
Sel ect the numbe r of phot os t o be take n in succ essio n whe n th e cam era
is triggered in the Photo mod e. Pl ease also obse rve the p arame ter inter val!
A highe r resolut ion produ ces h igher qua lity video s bu t res ults in l arger
fil es requir ing more spac e on the memor y ca rd. V ideos are reco rded in
AVI format which can be p layed back on most vide o dev ices.
Taking 16GB memory card for exam ple:
EN
Vid eo Length :10 secon ds
Vid eo
Res oluti on
192 0x108 0
128 0x720
720 x480
640 x480
320 *240
5.V ideo Length
▲ D efaul t 5 secon ds, optio nal 3s-59 s, 1-10Mi nutes
Spe cify the durat ion of a vide o recordi ng w hen t he c amera is trigg ed
aut omati cally. The recording period for video s is not limit ed i n the
SET UP mode.
Vid eo size
(MB )
38
22
17
12. 8
6.3
Vid eo
qua ntity
380
659
852
113 2
230 0
9
Total Recordin g
Len gth
(Mi nutes )
63. 5
106
141
189
385

1. In the SETUP mode in daytime and at night.
EN
> When r ecord ing m anual ly, th e camera will stop aut omati cally afte r 29
minut es' recor ding;
> When r ecord ing m anual ly, th e camera will stop whe n one vid eo cl ip
size gets to 4 GB ,
> When r ecord ing m anual ly, th e camera will stop whe n the mem ory
card is f ull or u ltra low power.
2. In live mode (ON) at night the came ra will work auto matic ally as p er
the video len gth s ettin g. F or lo w po wer, it wi ll st op r ecord ing i n
advan ce.
3. Plea se set the shorter video length t o gua rante e a long- time usag e of
batte ries.
6.A udio recording
Turn on/off audio reco rding
7.S hot lag
▲ D efaul ted 1 MIN. optional from 5 se conds -60 minut es.
Sel ect the short est perio d for the came ra t o wai t be fore it r eacts to the
suc cessi ve trigge ring of t he main senso r aft er a n ani mal has f irst been
det ected . The camera does not reco rd an y ph otos or v ideos duri ng
the selected interval . Th is pr event s th e mem ory card from bein g fil led
wit h unneces sary shots.
1.T he shot lag is sh ort, the camer a sh ootin g fre quenc y wo uld b e hi gh,
an d th ere w ould be h igh consu mptio n of the power. It would aff ect t he
us age days of t he ba tteri es.
2.O n the opposit e, i f the sho t lag is long, it would be a lo wer c onsum ption
of pow er to gua rante e a long- time usage .
8.S ide motio n sensors
Dur ing the align ment cons ider wheth er t he us e of the side moti on s ensor s
may be usefu l for attaini ng t he de sired obs ervat ion r esult s or not.
10

9.S ensit ivity of motio n sensors
1. Select "High" For inte rior area s and env ironm ents with litt le in terfe rence
2.S elect "Medium" for exte rior areas an d env ironm ent with a no rmal
amoun t of inte rfere nce,
3.s elect "Low" for a n env ironm ent with a hi gh le vel of in terfe rence .
10. Target record ing time
Pre ss "OK", and then select " ON" t o se t the sta rting work ing and e nding
wor king time. After finis hing setti ng, the c amera onl y wor ks d uring the set
tim e every day. B eyond the peri od, the camer a is in s tandb y.If the star t
tim e is, for in stanc e set to 18:35 and the end time to 8 :25, the camer a wi ll
be operation al from 6:35 pm o f the cur rent day until 8:25 am of t he
fol lowin g day. The camer a wi ll no t be trig gered and will not take any phot os
or videos outsid e of this per iod.
11. Time laps e
Pre ss "MENU" to find "Time lapse ". Press "OK", th en se lect "ON" to set t he
tim e interva l, and s et th e va lues of H r, M in and S ec. F or e xampl e, if the
pro cess of f lower s bloomin g has to be recor ded, time laps e can be used.
The camera autom atica lly takes pict ures in e very set time inte rvals .
12. Langu age
Sel ect the desir ed m enu l angua ge.
The followin g languag es a re av ailab le: Engli sh, G erman , Fr ench, Span ish,
Chi nese, etc.
EN
13. Time& date
Fin d the “Time & Date” in the setup men u, th en p ress OK t o ent er.
Use the “Time Format” and “Date For mat” to c onfig ure t ime and d ate forma t.
Cho ose “Set time & date” to c hange the came ra t ime. Press Lef t/Rig ht to
cho ose numbe r and pr ess U p/Dow n to chan ge v alue. Pres s OK to
con firm changes.
11

14. Photo stamp
EN
Turn on/off displa y of wate rmark on photo
15. Pas sword protecti on
Sel ect "Pass word protectio n". Press "OK" , an d the n se lect "ON" to s et t he
pas sword of the camer a. The p asswo rd is a 4 -digi t nu mber selec ted
bet ween 0-9.
If the passw ord is lost, press MENU key and REPLAY at t he
sa me ti me, and slide the operati ng mo de se lec tor f rom O FF
to SETU P pos iti on. T he ca mera is un locked.
16. Beep sound
Turn on/off beep sound
17. Forma t memory card
Sel ect to format mem ory c ard on th is c amera , we sugg est f ormat the
mem ory card on c omput er then forma t it on t his camer a aga in f or fi rst
use .
18. Seria l NO.
Pre ss "OK", and then select " ON" t o se t the ser ial n umber for the came ra.
You can use a co mbina tion of 4 digi ts t o doc ument s th e loc ation on the
pho tos. When usin g several cameras, thi s mak es i t eas ier to id entif y th e
loc ation when viewing pho tos.
19. Reset settings
Sel ect to reset the camer a to the defa ult s ettin gs.
Ple ase note to s et date and t ime again .
12

20. Versio n
Sel ect to check the camer a's curre nt fi rmwar e ve rsion numb er.
21. Playb ack
Sli de the operat ing mode selec tor switc h to "SET UP" p ositi on. Press repl ay
key and Up/D own key to r eview the phot os/vi deos. While revi ewing pho tos,
pre ss Up/Dow n key to page up/ down. Whil e re viewi ng vi deos, pre ss OK
key to start playing, press O K one mor e tim e to stop . Pr ess r eplay key to
ret urn to standb y.
21. 1 Delete selection
You can use this func tion to d elete indi vidua l re cordi ngs f rom the m emory
car d. Press MENU key under th e mod e of play back, mov e the sel ect b ar
to “Delete curre nt f ile” and press OK to de lete the selec ted recor ding.
21. 2 Delete all recor dings
You can use this func tion to d elete all reco rding s fro m th e mem ory card.
Pre ss MENU key under the mode of playb ack, move the selec tion bar to
“De lete all files ” and press OK to del ete a ll r ecord ings.
21. 3 Activat e slide show
Thi s functio n can be used to play back the phot os st ored on t he m emory
car d automat icall y. Each photo is show n fo r abo ut 2 seco nds. To stop the
sli de show and keep the curre nt im age perma nentl y on the scree n, p ress
the OK butto n.
EN
13
22. Write protecti on
EN
>This function can be used to p rotec t ind ividu al r ecord ings of a ll sa ved
recor dings from ac ciden tal d eleti on.
>Sele ct "Write -prot ect curre nt fi le" to pr otect the curr ently sel ected
recor ding from acci denta l deletio n.
>Sele ct "Write -prot ect all f iles" to prote ct a ll sa ved recor dings from
accid ental deletion .
>Sele ct "Unloc k cu rrent file " to remo ve t he wr ite prote ction for the
curre ntly selected reco rding .
>Sele ct "Unloc k al l fil es" to re move the write pro tecti on fo r al l sav ed
recor dings .
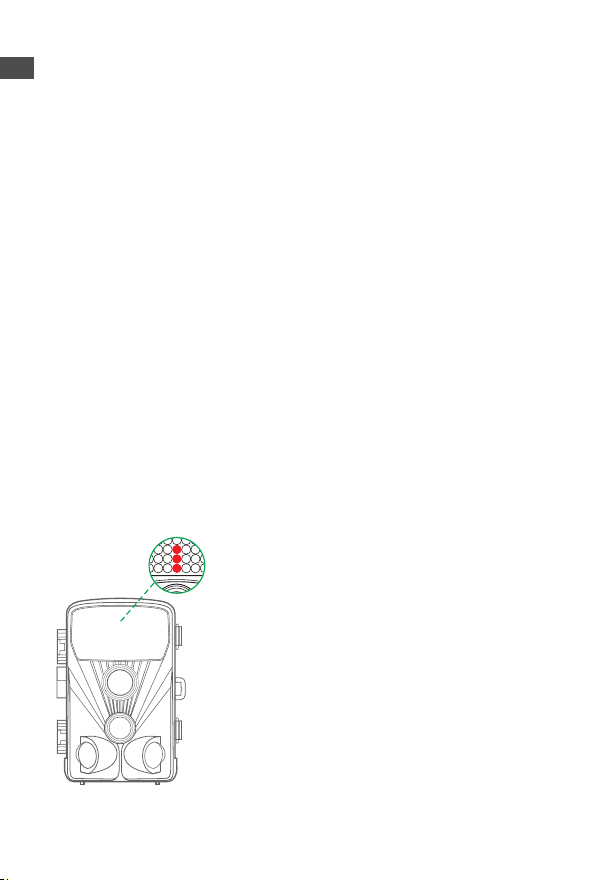
6. ENTERING LIVE MODE
6. 1 Ad justing And Insta lling The Camera
The SETUP mode is ad vanta geous for dete rmini ng t he be st p ossib le
det ectio n angle and range of the m oveme nt s ensor. For this purpose,
att ach the camer a at appr ox. 1 -2m hei ght t o a tree and align the came ra
wit h a desir ed direct ion.
Mov e slowly from one side of the obser ved a rea
to the other. Move parallel to the camer a. Try out
dif feren t angles and dista nces. The green LED
fla shing indicate d that y ou we re d etect ed by sid e
PIR sensor.And the bl ue LE D fl ashin g ind icate d
tha t you were d etect ed by mai n PIR sen sor.
NOT E:green LED only lights up w hen “ Side moti on
sen sor” is O N. In this w ay yo u ca n det ermine the
bes t positio n for al ignin g the cam era.T he
blu e/gre en LED only flash in the S ETUP mode as
soo n as the PIR senso r has detecte d mo vemen t.
14
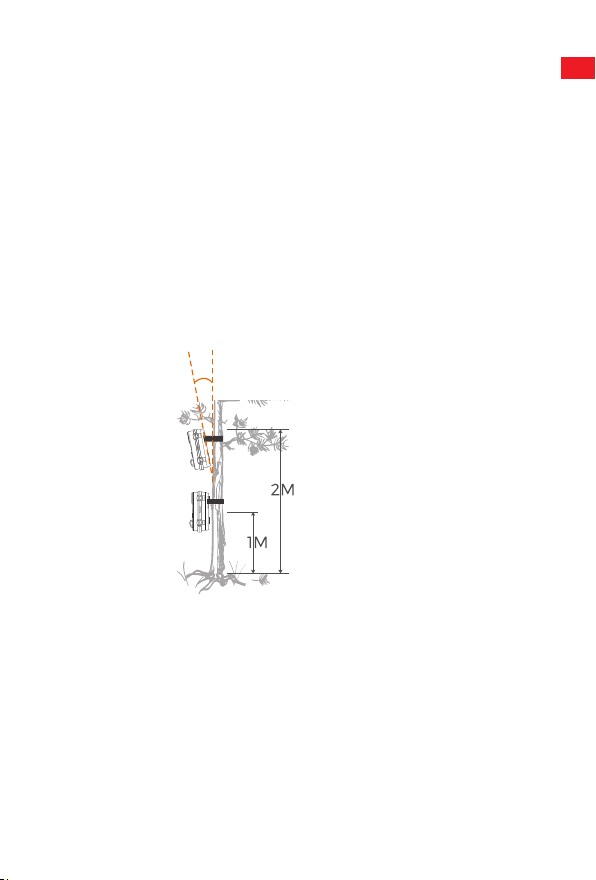
The red LED will flas h for 15 time s when y ou ju st s witch to Live mode (ON) ,
and then the ca mera work auto matic ally and enter s the Sta ndby mode.
To preven t incorre ct s ignal s and unn ecess ary p hotos , we reco mmend
not using the c amera at sunny poin ts a nd ch eck that no b ranch es ar e
in the activ e area of th e sen sor.
Als o check that the camer a is set to t he c orrec t hei ght in li ne w ith t he
poi nt to be obse rved. Where n ecess ary, point the camer a do wn fo r
opt imum alignment
For 1 m eter height, Place the came ra p arall el to the grou nd.
For 2 m eters height, Tilt the came ra down five degr ees t o th e gro und.
10°
Not e:
Ple ase do the h orizo ntal
mov ement before the PIR.
ver tical movement could n ot
det ect corre ctly.
Ple ase quick en your steps when
you do the test in a long di stanc e
bef ore PIR detec tion area .
The PIR dete ction distance would b e sho rter if t he e nviro nment
tem perat ure reach es or ab ove 3 0 °
The screen would aut omati cally turn off with out any o perat ion withi n
3 mi nutes in SETUP mod e, pr ess any b utton wil l mak e tu rn it on again .
EN
15

6. 2 Se tting Up The Live Mode
EN
The standard applicat ion of the Wildli fe Camera is the L ive mode.
In this mode , p hotos are eith er trigge red by moveme nt sensor s or at
int erval s accordi ng to the respect ive setti ng.
To set up the Liv e mo de , swit ch mo de s witch to ON po sitio n. T he re d
LED will flash for 15 times when you just swit ch to Liv e mo de (O N),
and then the camera work auto matic ally and enter s the Standby mode .
As soon as wild animals or other objects direc tly e nter the detec tion area of
the sensor zone, the came ra starts to recor d photos and video s.
Not e:
In the dayti me. IR LEDs will not light up. The photos and videos are in c olor.
At night. IR LEDs will give lights, a nd t he ph otos and video s ar e in blac k and
whi te.
The Shot lag is 1 minute defaulte d. The option al is 5s- 60 mi n.
Ple ase set up record ing mode and relat ed parame ters before en terin g Li ve
mod e.
Whe n Flash Light is set to "Auto" , the camera will adju st th e br ightn ess o f IR
LED s automat icall y in low power. W hen shoot ing a t ni ght, the brigh tness will
dec rease automati cally, and the shoot ing e ffect wil l bec ome a lit tle poor. For
ult ra low power, shoot ing w ill stop at n ight.
16

7.Connection to computer
Ple ase shift Mode to "SET UP", and conne ct the camera to compu ter with
USB cable, the camer a LCD will show "MSDC prompt .This indi cates
con necti ng succes sfull y. A nd t hen r ead or co py t he da ta i n SD card to the
com puter.
1. Connect the camer a to your computer using the US B ca ble.
2.T he camera switches on autom atica lly in the USB mode, irres pecti ve o f
th e se lection on the mode switch .
3.T he camera installs itself on the comput er as an addit ional dri ve un der
th e na me “R emova ble stora ge device "
4.D ouble click on the device to d etect the fold er "DCIM*
5.T he photos and vide os are in the sub folders of the "DCIM " fol der.
6.You can cop y or move pho tos a nd v ideo files on the compu ter.
Alt ernat ively, you can inser t the mem ory c ard in a card read er o n the
com puter.
EN
17

8. TECHNICAL SPECIFICATION
EN
Ele ment
Ima ge sensor
Pho to resolu tion
Scr een
Rec ordin g medium
Vid eo resolu tions
Len s
The distance of night version
Trigg ering distance
Trigg ering time
Sho t lag
IR flash
Det ectio n angle of s ensor
Spr ay water protected
Sto rage formats
Con necti ons
Sta ndby time
Dim ensio ns
Po wer
Mac intos h
20 Megapixel CMOS se nsor
20M P (5200*3 900) ;
16M P (4608*3 456);
12M P (4000*3 000),
8MP (3264 x2448 ),
5MP (2592 x 1 944). 3MP(2048 x1536 ).
6.1 cm (2.4”) color T FTLCD ;
320 x240 pixels
Sup ports Micro SD me mory cards
up to 3 2 GB (Not Included )
192 0x108 0,128 0x720 ,
720 x480,640 x480, 320x2 40
F2. 5, f=3.6m m,FOV =130°
20m
Up to 2 0 meters
0.3 -0.5 second
5 secon ds to 60 minu tes
42 pcs infra red LEDs
130 °
Yes (IP56 )
Pho to:JP EG; Vi deo:AV I. M JPC
Min i USB 2.0
App rox.6 months
(wi th 8 batt eries )
97x 140x6 7mm
8 X LR6 (A A) Al kalin e Ba tteri es
wit h low dischar ge;
Ext ernal 6V power supply,
at least 1.5A ( not s uppli ed)
18

9.SIMPLE TROUBLESHOOTING
1.P lease check whethe r th e bat terie s
ar e in stall ed in pro per w ay.
The camera will not turn on
The camera turns off
aut omati cally
It shows 'SD ca rd Er ror"
2.C heck if t he batter y capacit y is low
or exh auste d. If so, plea se r eplac e
by new batt eries .
1. Please check whet her t he b atter y
capac ity is l ow or exh auste d. If so,
try to c hange new batt eries for
outdo or using or c onnec t AC
adapt er for i ndoor usin g.
2. Please check if S D ca rd is ful l. If so,
trans fer image s an d vid eos to yo ur
compu ter or d elete some fil es in the
Repla y Mode.
1. Please ensure tha t SD card is with
class 10 stand ard or h igher leve l.
2. Please use t he ca mera to f ormat
SD card at th e fi rst t ime.
EN
Vid eos are chopp y or jump y
whe n played on a computer
The image is no t cle ar
The camera does not take
ima ges or record vide os
1. Tr y to use diff erent medi a pl ayers
such as V LC player.
2. Ensure AVI fo rmat Video cli p can be
playe d on your computer.
1 . Please ensur e th at yo u ha ve
re moved the prot ectiv e fi lms o n IR
LE Ds a nd le ns b efore usin g.
1 . Check If th e mem ory of SD car d is
fu ll, trans fer i mages or video s to
yo ur c omput er or del ete s ome files
in the Repl ay M ode.
19

9.1 Care
EN
Do not use any corro sive clea ners, such as methy lated spi rits, thin ners,
etc . to clea n the camera hous ing a nd s uppli ed ac cesso ry. Wh en requir ed,
the clean system com ponen ts wi th a soft dry clot h.
9.2 Storage
Alw ays remov e the ba ttery from the hous ing if th e ca mera is n ot be ing
use d for some t ime a nd s tore the batte ry se parat ely. O n a day to d ay
bas is and over longe r per iods the batte ries can be k ept a t a dry locat ion
out of the reach of child ren.
IF YOU HAV E ANY QUESTIONS OR PROBLEMS.
Ple ase conta ct us by
US A&C anada support @to guard.cc
Eu rop e eu. support@ tog uard.cc
UK uk.suppor t@t oguard.c c
We will offer pr ompt and autho ritat ive r eply with in 24 hou rs, a nd t ry ou r
bes t to reso lve your problem ASAP. More Safe Guarantee wit h TOG UARD!
If you are not satis fied with our prod uct. Pleas e te ll us abo ut yo ur t hough t.
Tha t will be mu ch ap preci ated.
20

21

22
1. VERPACKUNGSLISTE
Bit te packen Sie die Kamera s orgfä ltig aus und ü berpr üfen Sie, ob das
fol gende Zubehör in d er Ve rpack ung entha lten ist.
DE
1 2
3 4
1. Wildkamer a x1
2. USB-Kabel x 1
3.B edien ungsa nleit ung x 1
4.M ontag eband x 1
5.Wandha lteru ng x 1
6.S chrau ben x 3
5 6
2. EINFÜHRUNG
Die Wildkame ra ist e ine Tie r- und Überwac hungs kamer a mit In fraro tsens or.
Der Sensor kann plöt zlich e Änd erung en d er Um gebun gstem perat ur
inn erhal b eines Auswe rtebe reich s er kenne n. Di e Si gnale des
hoc hempf indli chen Infrarots ensor s (PIR, Passi ver I nfrar otsen sor) scha lten
die Kamera ein und a ktivi eren das Bild des Video modus .
23

2. 1 Merkmale der Wild Kamer a
1. CMOS-Sens or
2. 20 M egapi xel-F oto und 1080P HD- Video .
DE
3. TFT-LCD mit 6, 1 cm (2,4 Zoll ): 3 20 x 240 Pixel
4. 42 S tück IR-LEDs.
5. Vollautoma tisch er I R-Fil ter.
6.Tri ggerg eschw indig keit: Ca. 0,3 Sekunden.
7.S erien numme r einrich ten, um d ie Positi on a ufzuz eichn en.
8.Z eit, Datum, Temperat ur, Ph ase und Seriennum mer werde n auf da s
Foto gestempel t.
9. Passworts chutz .
10. Anzei ge der Leistu ng.
11. Eingebau te Testfunk tion über Umge bungs tempe ratur.
12. Eingebau tes Mikro fon und L autsp reche r.
13. Mini USB 2. 0-Sch nitts telle .
14. Wassersich erer Stan dard IP56.
15. Arbeitst emper atur: -20 ° C bis 60 ° C.
16. Extrem niedr iger Stro mverb rauch im Stand by-Be trieb mit extr em
lan ger Betri ebsda uer. 6 Monate mit 8 PC- Batte rien bei tägli ch 5 0 Bil dern.
2. 2 Merkmale der Wild kamer a
1. Ka meraf alle fü r die Jag d
2.Tie r- ode r Vorfal lbeob achtu ng.
3.M otion a usgel öst Kam era für d en Haus gebra uch, Bü ro oder d ie
Öff entli chkei t.
4. Je de inte rne und e xtern e Überw achun g.
24
3. STRUKTUR
Das Ve rstän dnis de r Kamer astru ktur hi lft, di eses Pr odukt g eschi ckter
ein zuset zen.
1-I nfrar ot-LE Ds
2-L inse
3.1 -Fron tbewe gungs senso r
3.2 -Link er Bewegu ngsse nsor
3.3 -Rech tsbew egung ssens or
4. Displayan zeige
5. Auf-Ta ste
6.M enü-Tas te
7. Linke Taste
8. Wiedergab etast e
9. Shot-Taste
10. Recht s-Taste
11. OK-Ta ste
12. Down- Ta ste
13. TF-St eckpl atz
14. AV-Buchse
15. USB-B uchse
16. ON
17. SETUP
18. OFF
19. Batterie fach
20. Dichtung sring
21. DC Ansch luss 6V / 1.5A
22. 1 / 4 "Stativ gewin de
1
2
3.1
3.2
3.3
4
9
5
6
7
10
12
8
11
13
14
15
SHOT
OK
ON-SET UP- OFF
AV
16 17 18
DE
19
20
22
21
25
DE
23
Digit al Trai l Camer a
Model :H70
Power : 8 *AA Bat tery
DC6V In put
RoHS
Made in Chin a
24
22. 2 3. Halt erung en verr iegel n 24. Sch litz fü r die Mon tage de s Rieme ns
▲ 1 .Der Monitor ist nur im SE TUP-M odus eing escha ltet, um
Men üeins tellu ngen zu ä ndern oder vorhand ene Fotos und Vide os
anz uzeig en.
2. Zum Speic hern von Fotos und Vide os muss eine micr oSD-S peich erkar te
in den Speic herka rtens teckp latz eingesetz t sein.
3.M it der Mini-U SB-Verbind ung (USB 2.0) kann die Kame ra a n ein en
Com puter angeschl ossen werden, um F otos und Video s he runte rzula den.
4.M it dem Betrie bsart ensch alter kön nen d ie d rei B etrie bsart en: OFF,
SET UP und ON au sgewä hlt w erden .
4. VORBEREITUNG DER KAMERA
Hi nweis :
1.M icro SD-Speich erkar ten mit einer Kapa zität von bis zu 3 2 GB
wer den unter stütz t..
26

2. Statt Batteri en d es Typs LR6 (AA) mit der glei chen Spezi fikat ion (mit
ON- SETUP- OFF
200 0 mAh oder h öher) verw endet wer den. Wir empfe hlen Alkal ibatt erien
mit niedrige r Selbste ntlad ung (nich t im Lief erumf ang e nthal ten).
3. Die Kamer a muss mit 4 oder 8 x 1,5 V A A-Bat terie n aus gesta ttet sein .
Verw enden Sie kein e neuen und a lten Batt erien zusa mmen. Die
DC- Schni ttste lle benöt igt einen 6V / 1, 5A-Ad apter mit 3,5 mm
(Au ßendu rchme sser) s * l, 3 mm (inn erer D) S tecke rkopf .
4. Legen Sie ei ne Mi cro-S D-Kar te d er Kl asse CLAS S6 od er h öher ein
(Em pfehl ung CLASS 10).S telle n Sie vo r dem Ein setze n in die Speic herka rte
sic her, d ass der seitl iche Schreibsc hutz auf der Speic herka rte n icht
ges perrt ist.
5.S chalt en Sie die K amera ein. 3 S chalt er: Aussc halte n (OF F), Setup -Menü
/ SETUP -Modu s (SETUP) und Live -Modu s (O N).
6. Es w ird empfo hlen, eine ne ue Sp eiche rkart e zu form atier en ( wie u nten
bes chrie ben).
7.B itte beachten Sie, dass sich di e Kam era aussc halte t, we nn d er St rom
seh r niedrig ist.
AALR6
AALR6
AALR6
AALR6
AALR6
AALR6
AALR6
AALR6
SHOT
OK
ON-SETUP- OFF
AV
DE
Set tings
Time &date
Pho to stam p
Pas sword p rotec tion
Bee p sound
For mat mem ory car d
Ser ial NO
MENU
Bac k
27
Set tings
Time &date
Not ificat ion:A ll data
Pho to stam p
wil l be dele ted
Pas sword p rotec tion
Bee p sound
Yes
For mat mem ory card
No
Ser ial NO
OK
Sel ect
MENU
Bac k
OK
Sel ect

Bedienung (siehe Abbildungen unten)
Öff nen Sie die Verrie gelun gskla mmern und die Schutzabd eckun g des
Bat terie fachs . - Legen Sie die Batterien ein. - Setze n Si e die Spe icher karte
DE
ein . - Wechseln Sie z u SE TUP. - Rufen Sie das Systemmen ü auf, indem Sie
die MENU-Taste drücken. - W ählen Sie , um die Speic herka rte zu
for matie ren.
(Di eser Schritt kann über sprun gen w erden ) - Wähle n Si e die Sys temze it.
Bat terie fachd eckel öffnen ► Le gen S ie 8 -teil ige B atter ien ein. Batte riemo dell:
AAL R6> Vergew isser n Si e sic h, d ass d er s eitli che S chrei bschu tz a uf de r
Spe icher karte nicht aktivi ert ist.> Setz en S ie di e CL ASS6 oder die
Mic ro SD-Spe icher karte in den Speic herka rtens teckp latz ein, bevo r Si e
die Kamera einsc halte n, u nd wä hlen Sie den SETUP -Modu s, um die
Ein stell ungen anzupass en
Montage mit Gurt
5. VERWENDUNG DES KAMERA- UND
SETUP-M ENÜS
5. 1 Kame ra v erwenden
1. Bedientas ten
Fun ktion en der Bedien taste n im Aufn ahmem odus:
Im Folgenden sind di e Bed ienta sten im A ufnah memod us m it ni cht
akt ivier tem Menü beschrieb en.
28

1.U P-Taste : Bild auf ( Menüm odus) : Wec hseln Sie in d en
Vid eoauf nahme modus .
2.M ENU: Einstellu ngsme nü öffnen ode r bee nden / Vi deo-W ieder gabe
sto ppen (Wiederga bemod us).
3. Linke Taste: S eite links .
4. Wiedergab etast e: Fotos und Video s üb erprü fen.
5. SHOT-Taste: Video aufna hme / Au fnahm e.
6. Rechte Taste: Seite rech ts.
7. OK: Wiede rgabe / P ause der Wiede rgabe von Vide odate ien
(Wi ederg abemo dus).
8.D own-Tas te: Bild runter ( Menüm odus) / I n den Fot omodu s wec hseln .
1
2
SHOT
5
DE
3
OK
4
2.M odus wechseln
2.1 Verschieb en S ie di e Sc halte r, um den Arbei tsmod us auszuw ählen :
ON- SET UP-O FF ON- -OF FSET UP ON- -OF FSET UP
Aus schal ten (OFF) Setup -Syst em (SETUP ) Liv e-Mod us (ON)
2.2 Drücken Sie die Auf / Ab- Ta ste, um z wisch en den M odi V ideo und
Fot o zu wech seln.
2.3 Drücken Sie die MENU- Ta ste, um d as Einste llung smenü zu öffne n.
Drü cken Sie OK, um die E inste llung en zu bes tätig en.
2.4 Drücken Sie die MENU- Ta ste noch einm al, u m zu m vor herig en M enü
zur ückzu kehre n oder das E inste llung smenü zu verla ssen.
2.5 Stellen Sie den Modus wahls chalt er a uf "O FF", um d ie K amera
aus zusch alten .
29
6
7
8

5. 2 Se tup-Menü
1. Modus
Fot o, Video, Foto + Video , Wä hlen Sie aus, ob F otos oder Vide os
DE
auf genom men werde n sollen, wen n ein e Be wegun g erk annt wird .
Im Modus "Foto + Vid eo" nimmt die Kame ra vo r de r Vid eoauf nahme
zue rst eine festgeleg te A nzahl von Foto s auf .
2. Fotoauflö sung
20M P (5200*3 900) ; 16 MP (4608* 3456) ; 12 MP (4 000*3 000),
8MP (3264 x2448 ), 5MP (2592 x 19 44). 3MP (2048 x1536 ).
Wäh len Sie die gewün schte Aufl ösung für Foto s. W ir em pfehl en d ie
Auf lösun g 16M. Eine höher e Auf lösun g fü hrt z u ei ner e twas bess eren
Fot oqual ität, führt jedoch daz u, da ss g rößer e Dat eien mehr Spei cherp latz
auf der Spei cherk arte benötigen .
Ne hmen Sie zum Beispiel eine
16 -GB-Speic herkarte:
Auf lösun g
20M P
16M P
12M P
8MP
5MP
3MP
3.S erien aufna hme: 1 P, 2P. 3P
Grö ße (MB)(e twa)
3.5
2.7
2.0
1.4
0.9
0.5 4
Fot o Menge(etw a)
410 0
530 0
700 0
105 00
166 00
266 00
30

4.V ideoa uflös ung
192 0x108 0P bei 25 Bi ldern pro Seku nde, 1280x 720P bei 30 B ilder n pro
Sek unde, 720x480P bei 30 Bilde rn p ro Se kunde , 64 0x480 P bei 30 Bilde rn
pro Sekunde, 320x240P bei 30 Bilde rn pr o Se kunde . Wäh len Sie d ie
gew ünsch te Videoa uflös ung.
Wäh len Sie die Anzah l der Fot os au s, d ie na chein ander auf genom men
wer den solle n, wenn die K amera im Fotom odus ausg elöst wird . Bi tte
bea chten Sie auch das Para meter inter vall!
Bei einer höhere n Au flösu ng we rden Vide os vo n hö herer Qual ität erze ugt,
jed och benöt igen größere Datei en me hr S peich erpla tz au f de r
Spe icher karte . Videos werden i m AVI- Forma t au fgeno mmen, das auf den
mei sten Videogerä ten wiede rgege ben werde n kan n.
Ne hmen Sie zum Beispiel eine
16 -GB-Speic herkarte:
Vid eolän ge: 10 Sekund en
Vid eo
Auf lösun g
Vid eo Größe
(MB )
Vid eo-Me nge
Ges amtau fnahme dauer
(Mi nuten)
DE
192 0x108 0
128 0x720
720 x480
640 x480
320 *240
5.V ideol änge
▲ S tanda rdein stell ung 5 Sekunde n, option al 3 s-59s , 1-1 0 Mi nuten
Leg en Sie die D auer einer Vid eoauf nahme fest , we nn di e Ka mera
aut omati sch ausge löst wird. Di e Auf nahme dauer für Vide os i st im
SET UP-Mo dus nicht begrenzt .
38
22
17
12. 8
6.3
31
380
659
852
113 2
230 0
63. 5
106
141
189
385

1.I m SETUP-M odus tagsüber und nacht s.
> Bei der manue llen Aufna hme stopp t die Kam era n ach 29 Mi nuten
aut omati sch;
DE
> Wenn Sie manue ll au fnehm en, stopp t die Kam era, wenn eine
Vid eocli pgröß e 4 GB erreic ht.
> Bei der manue llen Aufna hme stopp t die Kam era, wenn die Speic herka rte
vol l ist oder e xtrem weni g St rom v erbra ucht.
2.I m Live-Mo dus (EIN) arb eitet die Kame ra na chts auto matis ch
die Videolän genei nstel lung. Bei nied rigem Stromver brauc h wi rd di e
Auf nahme vorzeiti g beendet .
3.B itte stellen Sie die k ürzer e Vi deolä nge e in, um ei ne l ange Verwendung der Batt erien zu gewäh rleis ten.
6.Ton aufna hme
Aud ioauf nahme ein- / aussc halte n
7.A ufnah meabs tand
▲ v orein geste llt 1 MIN. option al v on 5 Seku nden bis 60 Mi nuten .
Wäh len Sie die kürze ste Z eit, die die Kamer a war ten soll, bevo r si e auf
das sukzessi ve Auslös en d es Ha uptse nsors rea giert , nac hdem ein Ti er
zum ersten Mal erkan nt wu rde. Die Kamer a ni mmt w ähren d de s
Vorg angs keine Fo tos o der Video s auf
das ausgewäh lte Inter vall. Dad urch wird verh inder t, da ss d ie
Spe icher karte mit unnö tigen Aufnahme n gefüllt wir d.
1. Die Verzög erung der Aufn ahme ist kurz, die Aufn ahmef reque nz der
Kam era wäre hoch und der Strom verbr auch wäre hoch . Dies w ürde sich
auf die Gebr auchs tage der Batte rien auswirken .
2. Im G egent eil, wenn die Verzögerun g we it ist, wäre es e in gering erer
Ene rgiev erbra uch, um e ine lange Nutzung zu g ewähr leist en.
8.S eitli che Beweg ungsm elder
Ber ücksi chtig en Sie währen d de r Aus richt ung, ob d ie Ve rwend ung der
Sei tenbe wegun gssen soren zum Erre ichen der gewü nscht en
Beo bacht ungse rgebn isse nützlich sein kann oder ni cht.
32

9. Empfindli chkei t Bewegun gssen soren
1. Wählen Sie " Hoch" für Inne nbere iche und Umgeb ungen mit geri nger
Int erfer enz.
2. Wählen Sie " Mitte l" fü r Au ßenbe reich e und Umg ebung en mi t
Nor malzu stand Störu ngsgr ad
3. Wählen Sie " Niedr ig" f ür e ine U mgebu ng m it ho her Inter feren z.
10. Ziel- Aufna hmeze it
Drü cken Sie "OK" und wähle n Sie dann " ON", um d ie Ar beits - un d
End arbei tszei t einzust ellen . Nach B eendi gung der Einst ellun g arb eitet die
Kam era jeden Tag n ur währen d de r ein geste llten Zei t. Na ch d ieser Zeit ist
die Kamera im S tandb y-Mod us. W enn die Start zeit beispiels weise auf
18: 35 und die E ndzei t auf 8:2 5 ein geste llt ist, ist die K amera von 18:3 5 Uh r
des aktuelle n Tages bi s 08: 25 U hr be trieb sbere it b in vo n de r
fol gende r Tag. Die Kamera wird nicht ausg elöst und nimm t au ßerha lb
die ses Zeitr aums keine Fo tos o der Video s auf .
11. Zeitraff er-Auf nahme
Drü cken Sie "MENU ", um nach " Zeitr affer " zu such en. D rücke n Si e "OK "
und wählen Sie "EIN" , um das Zeiti nterv all einzu stell en, u nd s telle n Sie die
Werte f ür Hr, Min und Sec ein. Wenn beis piels weise der Proz ess d es
Blü hens von Blume n aufgeze ichne t werden muss , kan n de r Zei traff er
verwe ndet werden. Die K amera nim mt au tomat isch in a llen eing estel lten
Zei tinte rvall en Bilder auf.
12. Sprache
Wäh len Sie die gewün schte Menü sprac he.
Fol gende Sprachen sind ve rfügb ar: E nglis ch, Deuts ch, F ranzö sisch ,
Spa nisch , Chinesi sch usw.
DE
33

13. Zeit & Da tum
Suc hen Sie im S etup- Menü nach „Uhr zeit & Da tum“ und drück en Si e zu r
Bes tätig ung OK.
DE
Verw enden Sie das "Zeitform at" und " Datum sform at", um d as Z eit- und
Dat umsfo rmat zu k onfig urier en. Wähle n Sie „U hrzei t & Datum eins telle n“,
um die Kamer azeit zu änder n. Drücke n Sie li nks / rec hts, um d ie Nu mmer
aus zuwäh len, und drück en Sie hoch / run ter, u m den Wert zu ändern.
Drü cken Sie OK zu Änderun gen bestä tigen .
14. Fotos tempe l
Ein - / Aussc halte n der Anzeige des Wass erzei chens auf dem Foto
15. Passwort schut z
Wäh len Sie "Pass worts chutz ". D rücke n Sie "OK " und wäh len S ie " EIN", um
das Passwort der Kame ra festzu legen . Da s Pas swort ist eine 4-s telli ge
Zah l, die zwisch en 0 und 9 au sgewä hlt wird.
Wenn das Passwo rt ve rlo ren g eht, drücken Sie gleich zei tig
di e MEN U-Ta ste und REPLAY und schiebe n Sie den
Be tri ebsarten wäh ler v on OF F in di e SET UP- Position .
Di e Kam era ist nicht gesper rt.
16. Acoustic signal
Sig nalto n ein- / auss chalt en
17. Speic herka rte forma tiere n
Wäh len Sie diese Opt ion z um F ormat ieren der Spei cherk arte in d ieser
Kam era aus. Wir empfe hlen, die Spei cherk arte im C omput er zu
for matie ren und dann für die erste Verwendun g erneut auf diese r Ka mera
zu formatier en.
18. Serie Nr.
Drü cken Sie "OK" und wähle n Sie "ON", um di e Se rienn ummer der Kame ra
ein zuste llen. Sie könn en eine Kombi natio n au s 4 Ziffe rn ve rwend en,
um den Ort auf den Fotos zu dokum entie ren. Wenn Sie mehre re Kamera s
ver wende n, können Sie den Ort beim Anzeigen von Fotos lei chter ermi tteln .
34

19. Einstell ungen zurückse tzen
Wäh len Sie diese Opt ion, um d ie Ka mera auf die Stand ardei nstel lunge n
zur ückzu setze n. Bitte beachten Sie, um Datum und Uhrz eit e rneut
ein zuste llen.
20. Versio n
Wäh len Sie diese Opt ion, um d ie ak tuell e Fi rmwar e-Vers ionsn ummer der
Kam era zu überpr üfen.
21. Wiederga be
Sch ieben Sie den Betriebsa rtenw ahlsc halte r auf di e Pos ition "SE TUP".
Drü cken Sie die Wiede rgabe taste und die Aufwärts- / A bwärt stast e, u m
die Fotos / Vide os anzuze igen. Drü cken Sie beim Überp rüfen der Foto s
die Aufwärts - / Abwär ts-Tast e, um di e Sei te n ach o ben / unt en z u blä ttern .
Drü cken Sie währe nd der Videow ieder gabe die OK-Tast e, u m die
Wie derga be zu starten . Dr ücken Sie erne ut di e OK -Taste, um die
Wie derga be zu beenden . Dr ücken Sie die Wiede rgabe taste , um zum
Sta ndby- Modus zurückzu kehre n.
21. 1 Auswahl löschen
Mit dieser Funkt ion könne n Sie ein zelne Aufn ahmen von der Spei cherk arte
lös chen. Drücken Sie die MENU- Ta ste unter dem Wied ergab emodu s,
bew egen Sie den Auswa hlbal ken auf "Aktu elle Datei lös chen" und
drü cken Sie OK, um die a usgew ählte Aufn ahme zu l ösche n.
21. 2 Alle Aufnah men lösch en
Mit dieser Funkt ion könne n Sie all e Auf nahme n vo n der Spe icher karte
lös chen. Drücken Sie die MENU- Ta ste unter dem Wied ergab emodu s,
bew egen Sie die Auswa hllei ste auf „Alle Date ien lösch en“ u nd d rücke n
Sie OK, um alle Aufnahmen zu lösch en.
DE
21. 3 Diashow aktivier en
Mit dieser Funkt ion könne n die auf der Spei cherk arte gespe icher ten Fotos
aut omati sch wiede rgege ben werde n. J edes Foto wird etwa 2 S ekund en
lan g angezei gt. Um d ie Di ascha u an zuhal ten u nd d as ak tuell e Bi ld
dau erhaf t auf dem Bi ldsch irm z u be halte n, dr ücken Sie die OK-Tas te.
35

22. Schreibs chutz
> Mit diese r Fu nktio n kön nen Sie e inzel ne A ufnah men a ller gesp eiche rten
Dat en schütz en Aufnah men aus v erseh entli chem Lösc hen.
DE
> Wähle n Sie "A ktuel le Da tei schre iben" , um die aktue ll a usgew ählte
Auf nahme vor vers ehent liche m Löschen zu schüt zen.
> Wähle n Sie "A lle D ateie n sc hreib gesch ützt" , um alle gesp eiche rten
Auf nahme n vor versehe ntlic hem Lösch en zu sch ützen .
> Wähle n Sie "A ktuel le Da tei entsp erren ", um den Schr eibsc hutz für die
akt uell ausgewähl te Aufnah me a ufzuh eben.
> Wähle n Sie "A lle D ateie n en tsper ren", um den S chrei bschu tz f ür al le
ges peich erten Aufnahme n aufzuhe ben.
6.ENTER LIVE-MODUS
6. 1Kamera einst ellen und installieren
Der SETUP-Mo dus ist vorte ilhaf t, um den best mögli chen Erfa ssung swink el
und -bereich des Bewe gungs senso rs zu be stimm en. B ringe n Si e daz u di e
Kam era bei ca. 1 -2 m Hö he z u ein em B aum u nd r ichte n Sie die Kame ra
in die gewün schte Richtung aus.
Bew egen Sie sich langsam von einer Seit e de s
Beo bacht ungsb ereic hs zur andere n. B ewege n
Sie sich paralle l zu r Kam era. Prob ieren Sie
ver schie dene Winkel und E ntfer nunge n aus . Di e
grü ne LED blinkt und zeig t an , das s Si e vom
sei tlich en PIR-Se nsor erkannt wurde n. Un d di e
bla ue LED zeigt an, dass Sie vom PIR-H aupts ensor
erk annt wurden.
HIN WEIS: Die grün e LED leuchte t nu r, wenn „
Sei tenbe wegun g
Sen sor ”ist eingescha ltet. Auf dies e Weise könne n
Sie die best e Positio n für da s Aus richt en d er
Kam era besti mmen. Die blau / g rüne LED blink t
nur im SETUP -Modu s, sobald der PIR- Senso r eine
Bew egung erkannt hat.
36

Die rote LED bl inkt 15 M al, w enn Sie g erade in den Live- Modus (ON)
wec hseln . Die Kamera arbe itet dann auto matis ch un d we chsel t in den
Sta ndby- Modus .
Um falsche Signa le u nd un nötig e Fo tos z u ve rmeid en, e mpfeh len wir, die
Kam era nicht an sonni gen Punkt en z u ver wende n un d zu prüf en, d ass
sic h keine Äste im a ktive n Be reich des Sens ors b efind en.
Verg ewiss ern Sie sich auch, das s die Kam era entsp reche nd dem zu
bet racht enden Punkt auf d ie ri chtig e Hö he ei ngest ellt ist. Rich ten Sie d ie
Kam era bei Bedar f na ch un ten, um e ine optim ale A usric htung zu
err eiche n.
Pos ition ieren Sie die Kamera für e ine H öhe von 1 Met er pa ralle l zu m
Bod en.Ne igen Sie die Kamer a für ei ne Hö he v on 2 Mete rn um fün f Gra d
nac h unten.
10°
Hin weis:
Bit te machen Sie die horizonta le
Bew egung vor dem PIR. vert ikale
Bew egung konnte nicht ric htig
erk annt werden.
Bit te beschl eunig en Sie I hre
Sch ritte , wenn Sie d en Test in einer
gro ßen Entfe rnung vor dem
PIR -Erke nnung sbere ich durch führe n.Der PIR-Erke nnung sabst and wäre
kür zer, w enn die Umgeb ungst emper atur 30 G rad oder mehr über steig t.
Der Bildschi rm schalt et s ich i nnerh alb von 3 Min uten im S ETUP- Modus
aut omati sch aus. Durch Dr ücken eine r be liebi gen Tas te w ird e r wi eder
ein gesch altet .
DE
37

6. 2 Li ve-Modus einr ichten
Die Standard anwen dung der Wildl ife Camer a ist der Live-Mo dus.
In diesem Modus werden Fotos entweder durch Bew egung ssens oren oder
DE
in Intervall en entspr echen d der jeweili gen Einst ellun g aus gelös t.
Um den Live- Modus einzuric hten, schalten Sie den Modusscha lter in d ie
Pos ition ON. Die rote LED blinkt 15 Mal, wenn Sie in de n Li ve-Mo dus ( ON)
wec hseln . Die Kamera arbeitet dann auto matis ch und wechse lt in den
Sta ndby- Modus .
Sob ald wilde Tiere oder ande re O bjekt e dir ekt in de n Er fassu ngsbe reich von
gel angen Im Senso rbere ich begin nt die Kamera mit der Aufnahme von
Fot os und Videos .
Hin weis:
Am Tag. IR-LEDs leuchten nicht auf. Die Fotos und Video s sin d in Farb e. I n
der Nacht. IR-LE Ds leucht en und die Fotos und Video s sin d in Schw arzwe iß.
Die Shot-Verz ögeru ng b eträg t sta ndard mäßig 1 M inute . Die Option ist
5s- 60 min.
Ric hten Sie den Aufna hmemo dus und die zugeh örige n Paramet er ei n, b evor
Sie den Live -Modu s aufrufe n.
38

7. Verbindung zum Computer
Bit te schalt en Sie den Modus auf "SETU P" und verbin den S ie d ie Ka mera
übe r ein USB-Kab el mit dem Comput er. Au f dem LCD -Disp lay d er K amera
wir d die Aufford erung "MSDC" angez eigt.
1.S chlie ßen Sie die Kamer a über das USB-Ka bel a n Ih ren C omput er a n.
2. Die Kamer a wird im USB-Mod us unabhä ngig von der Auswa hl des
Mod ussch alter s automat isch eingescha ltet.
3. Die Kamer a install iert sich als zusätzlic hes Laufw erk unter dem Name n
"Wechsel speic herge rät" auf dem Compu ter.
4. Doppelkli cken Sie auf das Gerät , um den Ordner "DCIM " zu ermittel n.
5.D ie Fotos und Video s befinde n sich in den Unteror dnern des Ordn ers
"DC IM".
6.S ie können Fotos und Videod ateie n auf dem Com puter kop ieren oder
ver schie ben.
Alt ernat iv können Sie die Speic herka rte in ei nen Karte nlese r des Com puter s
ein legen .
DE
39

8. TECHNISCHE DATEN
Ele ment
DE
Bil dsens or
Fot oaufl ösung
Bil dschi rm
Auf zeich nungs mediu m
Vid eoauf lösun gen
Lin se
Die Entfernu ng de r Na chtve rsion
Aus lösee ntfer nung
Trigg ering time
Sch ussve rzöge rung
IR- Blitz
Erf assun gswin kel des Senso r
Spr itzwa sser geschützt
Spe icher forma te
Verb indun gen
Sta ndby- Zeit
Mac intos h
20 Megapixel CMOS se nsor
20M P (5200*3 900) ;
16M P (4608*3 456);
12M P (4000*3 000),
8MP (3264 x2448 ),
5MP (2592 x 1 944). 3MP(2048 x1536 ).
6,1 cm (2,4 ") - Farb- TFT-LCD ;
320 x240 Pixel
Unt erstü tzt Micro SD-Speic herka rten
mit bis zu 32 GB (n icht entha lten)
192 0x108 0,128 0x720 ,
720 x480,640 x480, 320x2 40
F2. 5, f=3.6m m,FOV =130°
20m
Bis zu 20 Meter
0.3 -0.5 Zweitens
5 Sekun den bis 60 Mi nuten
42 Stück Infraro t-LED s
130 °
Ja (IP56)
Fot o: JPEG; Video: AV I. MJ PC
Min i USB 2.0
Ca. 6 M onate (mit 8 Batte rien)
Maß e
Lei stung
97x 140x6 7mm
8 x LR6 (A A) Al kalib atter ien mit
nie drige r Entladu ng;
Ext erne 6-V-Stromv ersor gung,
min deste ns 1,5 A (nic ht mitgel iefer t)
40

9.EINFACHE FEHLERSUCHE
Die Kamera lässt sic h
nic ht einsch alten
Die Kamera schal tet sich
aut omati sch aus
Es zeigt "SD-Kar tenfe hler"
Vid eos sind abgehackt ode r
spr ungha ft, wenn sie auf
ein em Comput er abgesp ielt
wer den
Das Bild ist ni cht k lar
1. Bi tte überp rüfen Sie, ob die Batterien
ric htig eingelegt sind.
Übe rprüf en Sie, ob d ie Ak kukap azitä t
nie drig oder ersc höpft ist. Wen n ja ,
ers etzen Sie bitt e die neuen Batte rien.
1.B itte überp rüfen Sie , ob die
Bat terie kapaz ität niedr ig o der e rschö pft
ist . Wen n di es de r Fa ll is t, w echse ln Si e di e
neu en B atteri en f ür de n Au ßenge brauc h
ode r sch ließe n Si e den Net zadap ter f ür
den Inne ngebr auch an.
2. Bitte übe rprüf en Si e, o b die SD- Karte
vol l ist . Üb ertra gen S ie i n die sem Fall Bilde r
und Vide os a uf Ih ren Compu ter o der
lös chen Sie einig e Da teien .
1.B itte stellen Sie siche r, dass die
SD- Karte dem Stan dard 10 o der höher
ent spric ht.
2. Bitte formati eren Sie die SD-Ka rte
zum ersten Mal mit d er K amera .
1.Ve rwend en Sie v ersch ieden e
Med iapla yer wie den VLC-P layer.
2. Stellen Sie siche r, dass das
AVI- Forma t Videocl ip auf I hrem
Com puter abgespie lt werden kan n
Ste llen Sie siche r, das s Sie die
Sch utzfi lme von IR-LE Ds u nd Ob jekti v
vor der Verwe ndung entfernt hab en.
DE
Die Kamera nimmt kei ne
Bil der oder Videos a uf
Übe rprüfen Sie Wenn der Speicher
der SD-Karte voll is t, übe rtrag en S ie
Bil der oder Videos a uf Ih ren Compu ter
ode r löschen Sie eini ge Dateie n im
Wie derga bemod us.
41

9.1 Pflege
Verw enden Sie zum Reinigen des Kamer agehä uses und des
mit gelie ferte n Zubehör s keine ätzen den R einig ungsm ittel wie z. Bei
DE
Bed arf reini gen Sie die S ystem kompo nente n mi t ein em w eiche n,
tro ckene n Tuch.
9.2 Lagerung
Neh men Sie den Akku immer aus dem Gehä use, wenn Sie die Kamer a
län gere Zeit nich t benutze n, und l agern Sie den Akku sepa rat. Tägli ch
und über längere Zei träum e kön nen die B atter ien an ei nem trock enen
Ort außerhal b der Re ichwe ite v on K inder n auf bewah rt w erden .
WE NN SI E FRA GEN ODER PROBLE ME HA BEN:
Bit te kontak tiere n Sie un s per
US A und Kana da su ppo rt@togua rd. cc
Eu rop a eu. support@ tog uard.cc
UK uk.s upp ort@togu ard .cc
Wir werden inner halb von 24 S tunde n umg ehend und verb indli ch
ant worte n und versuch en, Ihr P roble m so schn ell wie m öglic h zu löse n.
Mehr sichere Garan tie m it T OGUAR D!
Wenn Si e mit uns erem Produ kt n icht zufri eden sind . Erz ählen Sie uns
bit te von Ihrem Geda nken. Viel en D ank.
424344


1. LISTE D'EMBALLAGE
Veui llez déballer soig neuse ment l'apparei l photo et v érifi er qu e le s
acc essoi res ci-de ssous sont co ntenu s dan s la boît e.
FR
1 2
3 4
1. Caméra de ch asee x 1
2. Câble USB x 1
3. Manuel d'inst ructi on x 1
4. Ceinture de m ontag e x 1
5. Fixation murale x 1
6. Vis x 3
5 6
2. INTRODUCTION
La Camera de Ch asse est une c améra de surve illan ce d e la faun e ave c
un capteur infra rouge . Le capt eur peut détec ter des c hange ments
sou dains de la tempér ature ambiante dan s une zon e d'é valua tion. Les
sig naux du c apteu r infraro uge haute ment sens ible (PIR, cap teur
inf rarou ge passif ) allumen t l' appar eil p hoto, act ivant l'im age du mo de
vid éo.
45

2. 1 Caractér istiq ues de Camera de Chas se
1. Capteur CMOS.
2. Photo 20 méga pixel s et vidé o HD 1080 p.
3. LCD TFT coule ur 6,1 c m (2, 4 ’) : 320 x240 pixe ls
4. 42 L EDs IR.
FR
5. Filtre IR en tière ment autom atiqu e.
6. Vitesse de d éclen cheme nt: e nv. 0, 3 sec onde.
7. Configure z le n°de série p our e nregi strer la posit ion.
8. Le t emps, la date, la tempé ratur e, la phase et le num éro d e sé rie s eront
estam pillé s sur la phot o.
9. Protectio n par mo t de pass e.
10. Puissanc e indiqua nt.
11. Fonction de test intégré conce rnant la tempé ratur e amb iante .
12. Micropho ne et ha ut-pa rleur inté grés.
13. Mini interface USB 2.0.
14. Waterproof sta ndard IP56 .
15. Te mpéra ture de t ravai l: -2 0°C à 60° C.
16. Conso mmati on électr ique extrêmeme nt b asse en m ode v eille off rant
une durée de fonct ionne ment extr êmeme nt lo ngue; dur e 6 mois avec
8 piles pour 50 p hotos par jour.
2. 2 Caractér istiq ues de Camera de chas se
1. Pi ège à cam éra pou r la chas se
2. Ob serva tion d' anima l ou d'in ciden t.
3. Ca méra de s écuri té décl enché e pour un e utili satio n domes tique ,
pro fessi onnel le ou pub lique .
4.Tou te surv eilla nce int erne et e xtern e.
46

3. STRUCTURE
Com prend re la str uctur e de la cam éra aid e à utili ser ce pr oduit p lus
hab ileme nt.
1- LE D infra rouge s
2- le ntill e
3.1 -Capt eur de mo uveme nt avan t
3.2 -Capt eur de mo uveme nt gauc he
3.3 -Capt eur de mo uveme nt droi t
4. éc ran d'a ffich age
5. Bo uton Up
6. Bo uton de m enu
7. bo uton ga uche
8. Bo uton Re play
9. bo uton Sh ot
10. B outon d roit
11. b outon O K
12. B outon b as
13. Fente S lot
14. AV Jack
15. USB Jac k
16. ON
17. SETUP
18. OFF
19. C ompar timen t à piles
20. Bague d 'étan chéit é
21. Conne xion DC 6 V / 1.5A
22. F ileta ge de tré pied 1/ 4 "
1
2
3.1
3.2
3.3
4
9
5
6
7
10
12
8
11
13
14
15
SHOT
ON-SET UP- OFF
AV
16 17 18
OK
19
20
22
21
47

24
23
FR
Digit al Trai l Camer a
Model :H70
Power : 8 *AA Bat tery
DC6V In put
RoHS
Made in Chin a
23. Place d e fixat ion 24. Slot po ur cein ture de m ontag e
▲ 1 .Le monit eur est allum é un iquem ent e n mo de CO NFIGU RATION pour
mod ifier les para mètre s du menu ou visua liser des phot os et vidéos
exi stant es.
2.U ne carte mémoire micro SD doit avoir été insé rée dans son logem ent
pou r pouvoir enregist rer des p hotos et des vidéo s.
3.E n utilisa nt la co nnexi on mi ni U SB (U SB 2 .0), l'app areil pho to pe ut ê tre
con necté à u n ordinat eur pour télé charg er de s ph otos et d es vi déos.
4.A l'aide du s élect eur d e mo de, l es t rois modes de fonct ionne ment: OFF,
SET UP et ON peuv ent être séle ction nés.
4. PREPARATION DE LA CAMERA
Re marque :
Les cartes mémoi re M icro SD d 'une capac ité maxim ale d e 32 Go sont
pri ses en charge .
48

2.Vo us pouvez uti liser des pile s de type LR6 (AA) répondan t aux mêmes
ON- SETUP- OFF
spé cific ation s (2000 mAh ou pl us). Nous reco mmand ons les p iles
alc aline s à faibl e autodéc harge (non fo urnie s).
3.L a caméra doit être insérée avec 4 o u 8 piles AA de 1. 5V. N'u tilis ez p as
des piles neuves et usagé es e nsemb le. L 'inte rface CC néces site un
ada ptate ur 6V / 1,5 A av ec un e fi che d e 3, 5 mm (dia mètre exté rieur ) s *
l .3 mm (D inté rieur ).
4.I nsére z une carte micro SD de cl asse CLAS S6 ou sup érieu re (C LASS1 0
rec omman dée). Avant de l'ins érer dans la carte mémoire, ass urez- vous
que la prote ction en écrit ure latér ale de l a car te m émoir e n'a pas été
ver rouil lée.
5. Allumez l'app areil pho to. 3 com mutat eurs: étei ndre (OFF ), me nu d e
con figur ation / Mode SETUP (SET UP) e t mo de di rect (ON) .
6. Il e st recomm andé de f ormat er la no uvell e car te m émoir e lor s de son
uti lisat ion (comm e décrit ci-d essou s).
7.Ve uille z noter que l 'appa reil phot o s'é teind ra l orsqu e le nive au de
pui ssanc e est très b as.
AALR6
AALR6
AALR6
AALR6
AALR6
AALR6
AALR6
AALR6
SHOT
OK
ON-SETUP- OFF
AV
FR
Set tings
Time &date
Pho to stam p
Pas sword p rotec tion
Bee p sound
For mat mem ory car d
Ser ial NO
MENU
Bac k
49
Set tings
Time &date
Not ificat ion:A ll data
Pho to stam p
wil l be dele ted
Pas sword p rotec tion
Bee p sound
Yes
For mat mem ory card
No
Ser ial NO
OK
Sel ect
MENU
Bac k
OK
Sel ect

Fo nc ti on nement (voir figures ci-dessous)
Ouv rez les suppo rts de ve rroui llage et le c ouver cle d e pr otect ion d u
com parti ment à pi les - insérez les pile s - insér ez l a car te m émoir e - passe z
à SETUP (Configu ratio n) - entr ez d ans l e me nu sy stème en appuy ant sur
la touche MENU - cho isiss ez d e for mater la carte mém oire - ch oisis sez
FR
de rétablir les régla ges d'usi ne.
(ce tte étape peut êt re ig norée ) - chois issez de confi gurer l'h eure du
sys tème. Ouvrez le c ouver cle d u co mpart iment à p iles ► In sérez 8 p iles.
Mod èle de batter ie:
AAL R6> Assur ez-vo us que l a pro tecti on c ontre l'éc ritur e la téral e sur la
car te mémoir e n'a pa s été act ivée> Insé rez une c arte mémo ire M icro SD
de classe CLASS6 ou supér ieure dan s la fent e pou r ca rte m émoir e av ant
d'a llume r l'appar eil photo et sélec tionn ez l e mod e SE TUP p our ajust er le s
par amètr es
Assemblage avec sangle
5. UTILISATIONDU MENU APPAREIL
PH OTO ET CONFIGURA TION
5. 1 Util isation de l'appareil p hoto
1. Boutons de f oncti onnem ent
Fon ction s des boutons de comma nde en mo de d ’enre gistr ement :
Les boutons de c omman de sont décri ts ci -dess ous en mo de
d'e nregi strem ent avec menu non activé.
50

1. To uche UP: Page préc édent e (mo de M enu): pass er e n mod e
d’e nregi strem ent vidéo .
2. MENU: Ouvre ou qu itte ce m enu de co nfigu ratio n / Arrêt e la lect ure
de la v idéo (mode de lect ure)
3. To uche gauc he: p age gauch e
4. To uche Repl ay: r evoir des phot os e t des vid éos
5. To uche SHOT: enreg istre ment / ca pture vid éo
6. To uche droi te: p age droit e
7. OK: Lectu re / Paus e lecture de fichi ers vidéo (mo de Re play)
8. To uche Bas: Page sui vante (mod e Me nu) / Bas culer en mode Photo .
1
2
SHOT
5
FR
3
4
OK
2. Commutate ur de mo de
2.1 Déplacez les comm utate urs pour choi sir l e mo de de tra vail
ON- SET UP-O FF ON- -OF FSET UP ON- -OF FSET UP
Mis e hors
ten sion (OFF)
2.2 Appuyez sur la touche Hau t / Bas p our bascu ler e ntre les modes
Vidéo et Photo .
2.3 Appuyez sur la touche MEN U pou r ou vrir le m enu d e ré glage . App uyez
sur OK p our c onfir mer les c hange ments de régla ge.
2.4 Appuyez une nouve lle fois sur la t ouche MENU pou r rev enir au m enu
précé dent ou q uitte r les pa ramèt res d u ME NU.
2.5 Basculez le sélec teur de m ode sur "OFF" pour éte indre l'ap parei l ph oto.
Con figur ation du
sys tème (SETUP)
51
6
7
8
Mod e direct (ON)

5. 2 Me nu d e co nfigurati on
1. Mode
Pho to, Vidéo , Photo + Vid éo, Indiq uez s i de s pho tos ou de s vi déos doive nt
êtr e prises lorsqu'un mou vemen t est dét ecté. En mode "Phot o + Vidéo ",
l'a ppare il prend d'abord un no mbre défi ni de pho tos a vant d'en regis trer
FR
une vidéo.
2. Résolutio n de I’im age
20M P (5200*3 900) ; 16 MP (4608* 3456) ; 12 MP (4 000*3 000),
8MP (3264x24 48), 5MP (2592 x 1 944). 3MP (204 8x153 6).
Sél ectio nnez la r ésolu tion souhaitée pour le s pho tos. Nous reco mmand ons
la résolutio n 16M.Une rés oluti on pl us é levée prod uit une q ualit é ph oto
lég èreme nt meille ure, mais des fichiers plus volu mineu x né cessi tent plus
d’e space sur la carte mémoire
Pr enant un e carte mém oire de 16 Go par e xemple:
Pix els photo
20M P
16M P
12M P
8MP
5MP
3MP
3.S éries photos: 1 P, 2 P. 3P
Taill e (Mo) (envir on)
3.5
2.7
2.0
1.4
0.9
0.5 4
Qua ntité de photos
(en viron )
410 0
530 0
700 0
105 00
166 00
266 00
52

4. Résolutio n vidéo
192 0x108 0P@25 fps, 1280x720P @30fp s, 720x48 0P@30 fps,
640 x480P @30fp s, 320x24 0P@30 fps. Sélection nez la ré solut ion vidéo
req uise. Sélec tionn ez le nombre de p hotos à p rendr e su ccess iveme nt
lor sque l'apparei l photo est d éclen ché en mo de P hoto. Veuillez également
res pecte r l'inter valle de param ètre! Une réso lutio n plus é levée prod uit des
vid éos de meille ure quali té ma is e ntraî ne la cré ation de fichi ers p lus
vol umine ux nécess itant plus d' espac e sur la carte mém oire. Les vidé os
son t enregis trées au forma t AVI et peuve nt ê tre l ues sur l a pl upart des
app areil s vidéo.
Pr enant une c arte mémo ire de 16 Go par exem ple:
FR
Dur ée de la vidé o: 10 se conde s
Rés oluti on
vid éo
192 0x108 0
128 0x720
720 x480
640 x480
320 *240
5. Longueur de l a vidéo
▲5 secon des par défau t, 3s -59s en o ption , 1- 10 mi nutes
Spé cifie z la duré e d'un enregi strem ent vidéo lors que la ca méra est
déc lench ée automa tique ment. La pério de d’enre gistr ement des vidé os
n’e st pas limité e en mode SET UP.
1.E n mode SETUP pend ant l e jo ur et la nuit.
> Lors d'un enre gistr ement manuel, l'ap parei l pho to s 'arrê te
aut omati queme nt après 29 m inute s d'enreg istre ment.
Taill e de la vidéo
(Mo )
38
22
17
12. 8
6.3
Qua ntité de
vid éo
380
659
852
113 2
230 0
53
Dur ée totale
d'e nregi strem ent
(mi nutes )
63. 5
106
141
189
385

> Lorsq ue vous enreg istre z man uelle ment, la camér a s’ arrêt e dès que la
tai lle d’un clip vidé o atteint 4 G o.
> Lors d'un enre gistr ement manuel, l'ap parei l pho to s 'arrê te lo rsque la
car te mémoir e est pl eine ou à très bas se co nsomm ation .
2.E n mode direct (ON ) la nuit , la camé ra fo nctio nnera aut omati queme nt
sel on le réglage de la l ongue ur de la vidéo . Po ur un e pu issan ce fa ible,
FR
l’e nregi strem ent sera arrêté à l’av ance.
3.S 'il vous plaît dé finir la longu eur v idéo plus cour te p our g arant ir u ne
uti lisat ion à long t erme de p iles
6. Enregistr ement audio
Act iver / dé sacti ver l'enr egist remen t audio
7. Te mps entre les pris es de vue
▲ D efaul ted 1 MIN. optional from 5 se conds -60 minut es.
Déf aut 1 MIN. f acult atif de 5 seco ndes à 60 min utes. Sélec tionn ez la
pér iode d'attente la plus courte a vant que la ca méra ne r éagis se a u
déc lench ement successi f du capt eur princ ipal aprè s la déte ction
ini tiale d'un animal. La camér a n' enreg istre pas de p hotos ou de
vid éos penda nt l'inte rvall e sé lecti onné. Cela évi te qu e la cart e
mém oire ne s e remplis se de co ups i nutil es.
1.L e délai de p rise de v ue es t co urt, la f réque nce d e pr ise d e vu e de
l'a ppare il photo est élevé e et la conso mmati on d 'éner gie é levée . Ce la
aff ecter ait les jours d'u tilis ation des batt eries .
2. Au c ontra ire, si l e décalag e est lo ng, c e se rait une conso mmati on
d'é nergi e inférie ure pour gara ntir une utili satio n de long ue du rée.
8. Détecteur de mouve ment latéral
Pen dant l'alignem ent, détermine z si l'ut ilisa tion des capte urs de
mou vemen t latérau x peut ê tre u tile pour obte nir les r ésult ats
d'o bserv ation souhaité s ou non.
9.S ensib ilité du détec teur de m ouvem ent
1. Sélection nez "Elev é" p our l es z ones intér ieure s et les envi ronne ments
peu perturbé s.
54

2. 2.Sélecti onnez "Moyen" pour les zone s ext érieu res et le s
env ironn ement s avec quanti té d 'inte rfére nce.
3.s élect ionne z "Faible " pour u n env ironn ement ave c un nive au él evé
d’i nterf érenc es.
10. Durée d'enre gistr ement cib le
App uyez sur "OK", puis sélecti onnez "ON " pou r dé finir le début et la fi n du
tem ps de travail . Un e foi s le s rég lages ter minés , la camé ra ne fon ction ne
que pendant l’heure défin ie ch aque jour. Au-delà de ce tte pério de, l a
cam éra est en v eille . Si, par exem ple, l'he ure d e dé but e st r églée sur
18h 35 et l'heure de fin à 20h 25, la ca méra sera opér ation nelle de 18h35
du jour à 8h25 suis du
le jour suiv ant. L'apparei l photo ne se déc lench era p as e t ne pren dra
auc une photo ni vidéo en dehor s de cett e période .
11. Photogra phie d’accélér é
App uyez sur "MENU " pour trouve r "Time la pse". Appu yez sur " OK", puis
sél ectio nnez "ON" pour définir l'interva lle de te mps et dé finis sez les
val eurs de H r, Min et Sec. Par exemp le, s i le proc essus de flora ison des
fle urs doit être enre gistr é, vous pouve z uti liser le temps éco ulé. L'app areil
pho to prend automatiq uemen t de s pho tos à cha que inter valle de temps
déf ini.
12. Langu e
Sél ectio nnez la l angue de menu souhaitée .Les langues suiva ntes sont
dis ponib les: anglais, allemand, fra nçais , esp agnol , ch inois , etc .
13. Date&heu re
Rec herch ez l’heur e et la date dans le menu de c onfig urati on, p uis appuy ez
sur OK pour entrer.Utilisez le “Form at heure” et le “ Forma t dat e” p our
con figur er le format heur e et date . Cho isiss ez « Régle r l'h eure et l a da te»
pou r changer l'heure de l a ca méra. Appu yez sur G auche / D roite pou r
cho isir le n uméro et appuy ez sur Haut / Bas pou r cha nger la v aleur.
App uyez sur OK pour
con firme r les modific ation s.
FR
55

14. Timbre phot o
Act iver / dé sacti ver l'aff ichag e du fili grane sur la photo
15. Prote ction du mot de passe
Sél ectio nnez "Protecti on par m ot de pas se". Appuy ez s ur "O K", puis
FR
sél ectio nnez "ON" pour définir le m ot de pa sse d e la camé ra. Le mo t de
pas se est un no mbre à 4 chiff res sélec tionn é ent re 0 et 9.
Si le mot de p asse est p erdu, appuyez simu lta nément sur
le s tou che s MEN U et RE PLAY, pu is fa ite s gli sser le
sé lec teur de mo de de foncti onn ement de l a pos ition OFF
à la positio n SET UP. La camér a est déverroui llé e.
6. Signal acouts tique
Act iver / dé sacti ver le bip s onore
17. Formater la carte mémoire
Sél ectio nnez Formater la c arte mémoire sur c et a ppare il ph oto. Nous
vou s suggéro ns de fo rmate r la cart e mém oire sur odina teur, puis de l e
for mater à n ouvea u sur cet ap parei l pho to p our l a pr emièr e uti lisat ion.
18. Numér o de séri e
App uyez sur "OK", puis sélecti onnez "ON " pou r dé finir le numér o de séri e
de l'apparei l photo. Vous pouvez utilis er u ne co mbina ison de 4 chi ffres
pou r documen ter l'emp lacem ent sur l es p hotos . Lor sque vous util isez
plu sieur s apparei ls photo, cel a fac ilite l'i denti ficat ion d u li eu lo rs d e la
vis ualis ation de photo s.
19. Réinitia liser tous le s par amètr es
Sél ectio nnez pour réin itial iser l'apparei l photo aux p aramè tres par défau t.
S'i l vous plaît note r pou r ré gler la d ate e t l' heure à n ouvea u.
20. Versio n
Sél ectio nnez pour véri fier le n uméro de versi on actuel du micro logic iel de
l'a ppare il photo.
56

21. Lectu re
Fai tes gliss er le sé lecte ur de mod e de fonc tionn ement sur "SET UP".
App uyez sur la touche de relec ture et s ur la to uche Haut / Ba s po ur re voir
les photos / vi déos. Pend ant la ré visio n de phot os, appuy ez su r la touc he
Hau t / Bas pour faire dé filer les page s. Lo rs d e la lect ure d e vi déos,
app uyez sur la touche OK pour commencer la lectu re, appuy ez un e
nou velle fois sur OK pour arr êter. Appuy ez s ur la tou che R eplay pou r
rev enir en m ode veill e.
21. 1 Supprim er la sé lecti on
Vous pouvez utili ser c ette fonc tion pour supp rimer des enre gistr ement s
ind ividu els de la ca rte m émoir e. A ppuye z sur la touch e ME NU da ns l e
mod e de lect ure, déplacez la b arre de s élect ion sur «Supp rimer le fichi er
act uel» et a ppuye z sur OK pour supprime r l' enreg istre ment sélec tionn é.
21. 2 Supprim er tous les e nregi strem ents
Vous pouvez utili ser c ette fonc tion pour supp rimer tous les
enr egist remen ts de la cart e mémoire . Ap puyez sur la t ouche MEN U
dan s le mode de lectu re, dépla cez la b arre de s élect ion s ur « Suppr imer
tou s les fichier s» e t app uyez sur OK p our s uppri mer tous les
enr egist remen ts.
21. 3 Activer le diapo rama
Cet te foncti on peut être utili sée pour lire auto matiq uemen t les pho tos
sto ckées sur la carte mémoire. Cha que p hoto est affic hée
pen dant environ 2 se conde s. Po ur a rrête r le diap orama et conse rver
l’i mage actuelle à l’ écran de façon permanen te, appuy ez su r le bout on O K.
FR
57

22. Protecti on en éc ritur e
> Cette fonction peu t êtr e ut ilisé e pou r pr otége r des enr egist remen ts
ind ividu els de tous les e nregi strem ents. enr egist remen ts su pprim és
acc ident ellem ent.
> Sélec tionn ez "Proté ger en éc ritur e le fich ier actue l" po ur p rotég er
l’e nregi strem ent actue lleme nt sélect ionné con tre t oute supp ressi on
FR
acc ident elle.
> Sélec tionn ez "Proté ger tous les fichi ers e n éc ritur e" po ur p rotég er to us
les enregist remen ts sauveg ardés d'u ne su ppres sion acci dente lle.
> Sélec tionn ez "Déver rouil ler le fi chier act uel" pour supp rimer la prote ction
en écriture de l 'enre gistr ement actuelle ment séle ction né.
> Sélec tionn ez "Déver rouil ler tous les fichi ers" pour supp rimer la
pro tecti on en écritur e de tous les enre gistr ement s sa uvega rdés.
6.ENTRER EN MODE LIVE
6. 1 Ré glage et installa tion de la ca méra
Le mode SETU P est avantag eux pour déter miner le meill eur angle de
dét ectio n et la meill eure portée p ossib les d u ca pteur de mouve ment.
Pou r cela, fixez l'a ppare il ph oto à env. 1 -2 m de haut eur à un arbr e et
ali gner la c améra avec une di recti on so uhait ée.
Dép lacez -vous lentemen t d'un c ôté à l'a utre de
la zone obse rvée. Déplacer parallèl ement à l a
cam éra. Essayez diffé rents ang les e t di stanc es.
Le voyant vert clign otant indi que que v ous avez
été détecté par le capteu r PI R lat éral. Et le v oyant
ble u clignot ant indiq ue q ue le cap teur PIR princ ipal
vou s a détec té.
REM ARQUE : la LED verte ne s’al lume que lorsq ue
cap teur ”est allu mé. De cette mani ère, vous
pou vez déter miner la meill eure position pour
ali gner la c améra . Le voya nt bleu / ve rt ne
cli gnote qu'en mode SETUP dès que le c apteu r
PIR a d étect é un mouv ement .
58

Le voyant rouge clig note 15 f ois l orsqu e vo us pa ssez en m ode direc t (ON ),
pui s la camé ra foncti onne automatiq uemen t et pass e en mode vei lle.
Pou r éviter les signa ux incorr ects et l es p hotos inut iles, nou s vou s
rec omman dons de n e pas utilise r l' appar eil p hoto par temps ens oleil lé et
de vérifier qu'aucune bra nche ne s e tro uve dans la z one a ctive du capte ur.
Vér ifiez égalemen t que la camé ra e st ré glée à la hau teur corre cte en li gne
ave c le poin t à obser ver. S i nécessa ire, dirigez la c améra vers le bas pour
un alignemen t optimal
Pou r une hauteur de 1 mè tre, place z la camé ra p arall èleme nt au sol .
Pou r une hauteur de 2 mè tres, incl inez la c améra de cinq degr és au sol .
10°
Re mar que:
S'i l vous plaît fair e le mouv ement
hor izont al avant le P IR. le
mou vemen t vertica l n'a pa s pu
dét ecter correcte ment.
Veui llez accélérer vos pas lors que
vou s effectu ez le te st su r un e
lon gue dista nce avant la zone de
dét ectio n PIR.
La distance de d étect ion PIR serai t plu s co urte si l a tem pérat ure ambia nte
att eigna it ou dépassa it 3 0 °.
L’écr an s’étei ndrai t automat iquem ent sans aucun e op érati on da ns l es
3 minut es en mo de SE TUP, ap puyez sur n’im porte quel bouton pour le
ral lumer.
FR
59

6. 2 Co nfigurati on d u mo de d irect
L'a pplic ation standard de la caméra Wildlife est le mode Live.
Dan s ce mode , les photos sont décl enché es par des capteu rs de
mou vemen t ou à des interv alles différen ts en fonctio n du régl age r espec tif.
Pou r configu rer le mode direc t, réglez le sélec teur de m ode sur O N. L e
FR
voy ant rouge clignote 15 fois lorsque vous passez en mod e di rect (ON), pui s
la caméra foncti onne automatiq uemen t et pass e en mode veille.
Dès que des animaux sauva ges ou d’autr es objets pénètren t dir ectem ent
dan s la zone de détec tion dela zone du capte ur, la camé ra c ommen ce à
enr egist rer des photo s et des vidéos.
Rem arque :
En journée. Les LED IR ne s'allum eront pas. Les pho tos et le s vi déos sont en
cou leur. La nu it. Les L ED I R von t éc laire r, et les photo s et vidé os so nt e n noi r
et blanc.
Le délai de pris e de vue est de 1 minu te par défaut . L'optio n est 5s-60 m in.
Veui llez conf igure r le mode d’en regis treme nt e t les par amètr es as socié s
ava nt d’entr er en mode direct .
60

7.Connexion à l'ordinateur
Veui llez pass er le mod e sur "SE TUP", et conne cter l'app areil pho to à
l'o rdina teur avec un câble USB, l'écran LCD de l'app areil photo af fiche ra "
Inv ite MSDC. Ceci indique que la conne xion est établ ie. Lisez ensuite ou
cop iez les donné es de la cart e SD sur l'ordinat eur.
1.C onnec tez l'app areil photo à votr e ordinat eur à l'aide du c âble USB.
2.L 'appa reil photo s'allum e automat iquem ent en mode USB, quell e qu e soi t
la sélection sur le commu tateu r de mode .
3.L 'appa reil photo s'insta lle sur l'ord inate ur en tant qu e le cteur
sup pléme ntair e sous le nom de «Pér iphér ique de s tocka ge amovib le».
4. Double-cl iquez sur le périp hériq ue pour détec ter le dossie r "DC IM *
5.L es photos et vidéo s se trou vent dans les sous-doss iers du d ossie r "DCIM".
6.Vo us p ouvez copi er o u dép lacer des phot os e t des fic hiers vidé o su r
vot re ordina teur.
Vou s pou vez égalem ent insérer la car te mé moi re da ns un
le cte ur de carte s ur l' ord inateur.
FR
61

8. SPECIFICATION TECHNIQUE
FR
Éléme nt
Cap teur d'image Capte ur
Résol ution photo
Écra n
Sup port d'enregis treme nt
Rés oluti ons vidéo
Obj ectif
La dista nce de la ver sion de n uit
Dis tance de décle nchem ent
Temps de décle nchem ent
Déc alage
Fla sh SI
Ang le de détecti on d u cap teur
Spr ay protég é contre l'ea u
For mats de s tocka ge
Les liaisons
Temps d'attent e
Dim ensio ns
Pui ssanc e
Mac intos h
CM OS de 20 még api xel s
20M P (5200*3 900) ;
16M P (4608*3 456);
12M P (4000*3 000),
8MP (3264 x2448 ),
5MP (2592 x 1 944). 3MP(2048 x1536 ).
TFT LCD coule ur de 6, 1 cm (2,4 po)
320 x240 pixels
Pre nd en charge les carte s mémo ire
Mic ro SD jusqu'à 32 Go (non incl us)
192 0x108 0,128 0x720 ,
720 x480,640 x480, 320x2 40
F2. 5, f=3.6m m,FOV =130°
20m
Jus qu'à 20 mètres
0.3 -0.5 seconde
5 secon des à 60 m inute s
42 LEDs infr aroug es
130 °
Avoir (IP56)
Pho to:JP EG; Vi deo:AV I. M JPC
Min i USB 2.0
Env iron 6 mo is (avec 8 pi les)
97x 140x6 7mm
8 piles al cal ine s LR6 ( AA) à déch arge
fa ibl e;A lim ent ati on ex ter ne 6V ,a u
mo ins 1,5 A (no nfourni e)
62

9. DÉPANNAGE SIMPLE
1.V érifi ez qu e le s pil es s ont
L'a ppare il photo ne s 'allu me
pas
L'a ppare il photo s'éteint
aut omati queme nt
Il montre 'Erreu r de la
car te SD "
cor recte ment insta llées .
2.V érifi ez si la capac ité de la bat terie est
fai ble o u ép uisée . Si c'es t le cas, veui llez
rem place r les pil es pa r de s pi les n euves .
1.Ve uille z vé rifie r si la c apaci té d e la
bat terie est faib le ou épu isée. Si c'est le
cas , ess ayez de r empla cer les n ouvel les
pil es po ur u ne ut ilisa tion en e xtéri eur ou
con necte z un adap tateu r se cteur pour
une uti lisati on e n int érie ur.
2.V érifi ez si la carte SD est plein e. Si tel
est le cas, trans férez des imag es e t des
vid éos s ur v otre ordin ateu r ou supp rimez
des fich iers en m ode Lectu re.
1.Ve uille z vo us as surer que la carte SD est
de class e 10 ou supér ieure .
2. Veuil lez u tilis er l 'appa reil photo pou r
for mater la carte SD la pr emièr e fo is.
FR
Les vidéos sont agit ées o u
ner veuse s lorsqu' elles sont
lue s sur un ordi nateu r
L'i mage n'est pas cl aire
La caméra ne pr end p as
d'i mages ni n'enr egist re de
vid éos
1. Essay ez d ’util iser diffé rents lec teurs
mul timéd ias tels que le le cteur VLC .
2. Assur ez-v ous q ue l e cli p vi déo a u
for mat AV I pe ut êt re l u sur vot re or dinat eur.
Veui llez vous assu rer que v ous avez
ret iré l es f ilms de p rotec tion des
LED IR et d e la lent ille avant de
Coc hez S i la mém oire de l a car te S D est
sat urée, tran sfére z de s ima ges ou de s
vid éos s ur v otre ordin ateu r ou supp rimez
cer tains fich iers en mode Lectu re.
63

9.1 Soins
EN
N'u tilis ez pas de pr oduit s de nett oyage corr osifs , te ls qu 'esse nces de
mét hyle, diluants , etc. p our n ettoy er l e boî tier de l 'appa reil phot o et les
acc essoi res fourn is. Si n écess aire, nett oyez les compo sants du systè me
ave c un chif fon doux et s ec.
9.2 Stockage
Ret irez toujours la b atter ie du bo îtier si vous ne l 'util isez pas penda nt un
cer tain temps et rang ez-la séparéme nt. Au jo ur l e jou r et sur de l ongue s
pér iodes , les piles peuve nt êt re c onser vées dans un e ndroi t se c, ho rs d e
por tée des enfan ts.
SI VOUS AV EZ DE S QUE STIONS OU DES P ROBLÈMES.
S'i l vous plaît nous cont acter par
Ét ats -Unis et C anada support @to guard.cc
Eu rop e eu. support@ tog uard.cc
UK uk.s upp ort@togu ard .cc
Nou s répondr ons rapid ement et avec auto rité dans les 24 h eures et feron s
de notre mieux pour résou dre votre prob lème le p lus rapid ement poss ible.
Gar antie plus sûre a vec T OGUAR D!
Si vous n'êt es pas satisf ait de no tre produ it. P arlez -nous de votre pen sée,
s'i l vous plaît. Ce sera très appr écié.
646566


1. LISTA IMBALLAGGIO
Dis imbal lare la f otoca mera con atten zione e c ontro llare che gli accessori
sot tosta nti siano nella s catol a.
IT
1 2
5 6
3 4
1. Fotocamer a Caccia x 1
2. Cavo USB x 1
3. Manuale di i struz ioni x 1
4. Cinghia di m ontag gio x 1
5. Montaggio a p arete x 1
6. Viti x 3
2. INTRODUZIONE
The Fotocame ra Caccia è u na t eleca mera per anima li se lvati ci e di
sor vegli anza con un sensor e a infra rossi . Il sens ore può rilev are
cam biame nti impro vvisi alla te mpera tura ambie nte all'i ntern o di un'a rea
di valutazio ne. I se gnali del sens ore a inf raros si al tamen te s ensib ile ( PIR,
sen sore a in fraro ssi passi vi) si a ccend ono s ulla foto camer a, at tivan do
l'i mmagi ne della modalità vide o.
67

2. 1 Caratter istic he di fotocamera Ca ccia
1.S ensor e 1.CMOS
2.F oto da 2,20 megap ixel e vi deo H D 10 80p
3.L CD TFT a colo ri da 3, 6,1 c m (2 ,4 '' ); 3 20x24 0 pix el
4.4 2 pezzi LED IR.5. Full filtr o IR auto matic o.
6. Velocità di rotazi one: ca. 0,3 secon di.
7.I mpost are il numero di serie per regi strar e la posi zione .
8.Tim e, data, la t emper atura , fase e nume ro di se rie s arann o st ampat e
IT
sul la foto.
9. Protezion e passwor d.
10. Indicato re di po tenza .
11. Funzione di test integrata sul la te mpera tura ambi ental e.
12. Microfon o e altop arlan te incorp orati .
13. Interfac cia USB 2.0 M ini.
14. Standard impermea bile IP56 .
15. Temperatur a di eser cizio : da -20 ° C a 60 ° C .
16. Extre mely basso consumo ene rgeti co in mod alità stan dby forni tura di
tem po di funzion ament o es trema mente lung a, d ura 6 mes i con 8 b atter ie
dei pc 50 quando si scatt ano foto foto ogni gio rno.
2. 2 Caratter istic he di fotocamera Ca ccia
1.C amera t rap per l a cacci a
2. Os serva zione a nimal e o incid ente.
3.M otion h a attiv ato la te lecam era di si curez za per us o domes tico, d 'uffi cio o
pub blico .
4. Qu alsia si cont rollo i ntern o ed este rno.
68

3. STRUTTURA
Com prend ere la st ruttu ra dell a fotoc amera c onsen tono di u tiliz zare il
pro dotto p iù abil mente .
1-L ED a infr aross i
2-B oton di t iro
3.1 -Sens ore di mo vimen to ante riore
Sen sore di m ovime nto
3.2 -Sini stra
3.3 -Sens ore di mo vimen to dest ro
4. Di splay s cherm o
5. Pu lsant e UP
6. Pu lsant e Menue
7. Pu lsant e sinis tro
8. Pu lsant e di ripr oduzi one
9. Pu lsant e di scat to
10. P ulsan te dest ro
11. P ulsan te OK
12. P ulsan te di dis cesa
13. S lot TF
14. Jack AV
15. J ack USB
16. ON
17. SETUP
18. OFF
19. Scomp arto ba tteri e.
20 An ello di s icure zza
21. C onnes sione D C 6V / 1.5A
22. Filet tatur a trepp iede1 / 4 "
1
2
3.1
3.2
3.3
4
9
5
6
7
10
12
8
11
13
14
15
SHOT
OK
ON-SET UP- OFF
AV
16 17 18
IT
19
20
22
21
69

24
23
Digit al Trai l Camer a
Model :H70
Power : 8 *AA Bat tery
DC6V In put
RoHS
Made in Chin a
IT
23. S taffe d i fissa ggio 24 . Slot pe r il mont aggio d ella ci nghia
▲ 1 .El monit or si accende sol o in moda lità SETUP per modific are le
imp ostaz ioni del menu o vi suali zzare foto e video esistent i.
2. Una sched a di memo ria micro SD deve essere i nseri ta ne llo slot della
sch eda di memori a pe r mem orizz are foto e vi deo.
3. Con la connes sione mini US B (US B 2. 0), l a fo tocam era p uò e ssere
col legat a a un comput er per s caric are f oto e vid eo.
4.U tiliz zando il selet tore di m odali tà, è possibi le s elezi onare le tre m odali tà
ope rativ e: OFF, SETUP e O N.
4. PREPARARE LA MACCHINA
FOTOGRAFICA
No ta :
1. Sono supp ortat e schede di m emori a Micro SD co n ca pacit à fin o a 32 G B.
70

2. Invece di ba tteri e tip o LR 6 (AA ) co n le stes se sp ecifi che (con 2000
ON- SETUP- OFF
mAh o p iù), possono esser e ut ilizz ate. Racco mandi amo batte rie a lcali ne.
con bassa autosc arica (no n for nita) .
3. La f otoca mera deve inse rire 4 o 8 ba tteri e AA da 1,5 V. Non utilizzar e
bat terie nuove e vecc hie insie me. L'int erfac cia D C ri chied e un adat tator e
da 6 V / 1, 5 A con 3,5 mm ( diame tro e stern o) s * l .3 mm (i ntern o D) .
4. Inserire la s cheda micro S D CLA SS6 o sup erior e (s i con sigli a CL ASS10 ).
Pri ma di inserir e ne lla s cheda di memor ia, assic urars i che la prote zione di
scr ittur a lateral e della sched a di memo ria n on s ia bl occat a.
5. Accendi la v ideoc amera . 3 inter rutto ri: s pento (OF F), m enu di
con figur azion e / modal ità SETUP (SETUP) e mo dalit à li ve (O N).
6. Si c onsig lia di format tare la n uova sche da di mem oria quand o vi ene
uti lizza ta (come descritto di segui to).
7. Notare che l a fot ocame ra s i spe gne quand o la pote nza è tro ppo b assa.
AALR6
AALR6
AALR6
AALR6
AALR6
AALR6
AALR6
AALR6
SHOT
OK
ON-SETUP- OFF
AV
IT
Set tings
Time &date
Pho to stam p
Pas sword p rotec tion
Bee p sound
For mat mem ory car d
Ser ial NO
MENU
Bac k
71
Set tings
Time &date
Not ificat ion:A ll data
Pho to stam p
wil l be dele ted
Pas sword p rotec tion
Bee p sound
Yes
For mat mem ory card
No
Ser ial NO
OK
Sel ect
MENU
Bac k
OK
Sel ect

Op er az io ne (vedi figure sotto)
Apr ire le staffe di blocc aggio e i l co perch io pr otett ivo del v ano batte ria.
Ins erire le batte rie - inserir e la sche da d i mem oria, pas sare a
CON FIGUR AZION E, accede re al me nu di sis tema preme ndo il pu lsant e
MEN U, scegli ere di f ormat tare la s cheda di memor ia, s cegli ere Ripri stino di
fab brica .
(qu esto passaggio può esse re omesso ): s cegli ere l 'orar io d i
con figur azion e del sistema . Ap rire il c operc hio d ella batt eria ► I Inser ire le
IT
bat terie da 8 pezzi. Modello di ba tteri a:
AAL R6> Assic urars i che la prot ezion e da scri ttura lat erale sull a sc heda di
mem oria non sia stata attivata > In serir e la sche da di mem oria
Mic ro SD CLASS6 o su ccess iva nello slot per sche de d i mem oria prim a di
acc ender e la foto camer a e selez ionar e la moda lità SETUP per im posta re
la configura zione
Montaggio a cinghia
5. UTILIZZO DELLA FOTOCAMERA E
DEL MENU DIIMPO STAZIONE
5. 1 util izzando la fotocamera
1. Pulsanti di f unzio namen to
Fun zioni dei puls anti operativi in modal ità di r egist razio ne:
Qui ndi, i pu lsant i operati vi sono descr itti in m odali tà di reg istra zione con
men u non attivat o.
72

1. Ta sto SU: R e P. (Modal ità Menu) : passa alla modal ità di re gistr azion e
vid eo
2.M ENU: aprire o usci re dal m enu d i co nfigu razio ne / inte rromp ere l a
rip roduz ione del video (modalit à di ripr oduzi one)
3. Chiave sinist ra: pagin a sin istra
4. Ta sto di ri produ zione : ri veder e fot o e video
5. Ta sto SHOT: r egist razio ne / acqu isizi one di vi deo filma ti
6. Ta sto destr o: pa gina dest ra
7.O K: riprod uzion e / pausa per ripr odurr e file v ideo (moda lità ripr oduzi one)
8. Ta sto giù: pagin a pr ecede nte ( modal ità menu) / p assa alla moda lità foto.
1
2
SHOT
5
IT
3
4
OK
2. Cambia modali tà
2.1 Cambia gli switc h per sce glier e la moda lità di l avoro :
ON- SET UP-O FF ON- -OF FSET UP ON- -OF FSET UP
Spe gnime nto(O FF)
2.2 Preme re il tasto Su / Giù per cambi are l e mo dalit à tra Vid eo e Foto .
2.3 Preme re il tasto MENU per aprir e il menu di confi guraz ione. Prem ere
OK per confe rmare le modif iche alla conf igura zione .
2.4 Preme re nuovam ente il t asto MENU per tornare al me nu p reced ente
o uscir e dall'im posta zione MEN U.
2.5 Mettere il s elett ore di m odali tà su "OF F" pe r sp egner e la foto camer a.
Sis tema di
con figur azion e (SETUP)
73
6
7
8
Mod alità live (ON)

5. 2 Me nu d i co nfigurazi one
1. Modalità
Fot o, video, foto + video , se lezio nare se s catta re fo to o vide o qu ando
vie ne rileva to un mo vimen to. Q uando si è in moda lità "Fot o + Video ", pr ima
di registrar e un vide o la foto camer a esegue prim a un dete rmina to nu mero
di foto.
2. Risoluzio ne foto
IT
20M P (5200*3 900) ; 16 MP (4608* 3456) ; 12 MP (4 000*3 000),
8MP (3264x24 48), 5MP (2592 x 1 944). 3MP (204 8x153 6).
Sel ezion a la riso luzio ne deside rata per le foto. Racc omand iamo la
ris oluzi one 16M. Una risol uzion e più el evata prod uce una q ualit à
fot ograf ica legge rment e miglior e, m a pro duce file più gran di ch e
ric hiedo no più spazio sul la sc heda di m emori a.
Pr enden do ad esempio u na scheda d i memoria
da 1 6 GB:
Pix el nella foto
20M P
16M P
12M P
8MP
5MP
3MP
3.R ipres a in seri e: 1 P, 2P. 3P
Dim ensio ni (MB) (circ a)
3.5
2.7
2.0
1.4
0.9
0.5 4
Num ero di foto (circ a)
410 0
530 0
700 0
105 00
166 00
266 00
74

4. Risoluzio ne video
192 0x108 0P @ 25fp s, 1280x7 20P @ 30 fps, 720 x480P @ 3 0 fps ,
640 x480P @ 3 0 fps, 320x24 0P @ 30 fps. Selez iona la r isolu zione vid eo
ric hiest a.
Sel ezion a il nume ro di foto c he ve rrann o sc attat e in succ essio ne qu ando
la fotocamer a Spara in mo dalit à fo to. N otare anc he la gam ma di par ametr i!
Una risoluzi one più eleva ta pr oduce vid eo di qua lità più eleva ta, m a
pro duce file più grandi che r ichie dono più spazi o sul la s cheda di memor ia.
I video sono re gistr ati i n fo rmato AVI che p osson o es sere ripro dotti sul la
mag gior parte dei di sposi tivi video .
Pr endendo a d esempio u na scheda di m emoria
da 1 6 GB:
Ris oluzi one video
Ris oluzi one
vid eo
Dur ata del video : 10 seco ndi
Dim ensio ne del
vid eo (MB)
Qua ntità di video
Lun ghezz a di
reg istra zione totale
(mi nuti)
IT
192 0x108 0
128 0x720
720 x480
640 x480
320 *240
5. Lunghezza video
▲Pre defin ito 5 secondi , op ziona le 3s -59s, 1-1 0Minu tes
Spe cific are la durata di una regis trazi one v ideo quan do la fot ocame ra
vie ne attiva ta automa ticam ente. Il perio do d i reg istra zione dei vide o
non è l imita to nella modalità CONF IGURA ZIONE .
1. Nella modalit à di conf igura zione di giorn o e di n otte.
> Quand o si regi stra manualmen te, la fo tocam era si fe rmerà
aut omati camen te dopo 29 m inuti di regis trazi one;
38
22
17
12. 8
6.3
75
380
659
852
113 2
230 0
63. 5
106
141
189
385

> Quand o si regi stra manualmen te, la fo tocam era si fe rmerà qua ndo l e
dim ensio ni di un vide oclip raggiung ono i 4 GB.
> Quand o si regi stra manualmen te, la fo tocam era si ar reste rà q uando la
sch eda di memori a è piena o a bas sissi ma po tenza 2. I n mod alità liv e (ON )
di notte, la te lecam era f unzio nerà auto matic ament e in base a
la regolazio ne della dura ta de l vi deo. Per bassa pote nza, smet terà di
reg istra re in anticip o.
3. Si p rega di i mpost are la durata più brev e de l vid eo p er ga ranti re u na
IT
lun ga durata della b atter ia.
6. Registraz ione audio
Att iva / disatti va l a reg istra zione aud io
7.D istan za di registr azion e
▲ P redet ermin ado 1 MIN. Opcional de 5 segu ndos a 60 minutos.
Pre defin ito 1 MIN. O pzion ale d a 5 secon di a 60 minut i.
Sel ezion are il period o pi ù bre ve i n cui la video camer a de ve at tende re
pri ma di reagire all 'atti vazio ne su ccess iva del s ensor e pr incip ale d opo
che un anima le è stat o rilevat o per la prim a vo lta. La f otoca mera non
reg istra alcuna foto o vi deo duran te
l'i nterv allo seleziona to. Ciò imped isce alla sche da di mem oria di
rie mpirs i di scat ti non necess ari.
1. L'interva llo di r ipres a è breve , la freq uenza di scatt o del la f otoca mera
sar ebbe elevata e il cons umo energ etico sare bbe eleva to. Avrebb e
eff etto sui giorn i di util izzo delle batteri e.
2. Al c ontra rio, se i l ritardo di inter vento è l ungo, sarebbe un m inor
con sumo di e nergi a per garanti re u n uso pro lunga to.
8. Sensori di m ovime nti l atera li
Dur ante l'allinea mento , conside rare se l 'uso di s ensor i di movi mento
lat erale può esse re utile per otten ere i ri sulta ti di oss ervaz ione desid erati
o meno.
9. Sensibili tà sensor i di movi m.
1. Seleziona re "Alto" per aree int erne e am bient i con poc he in terfe renze .
76

2. Seleziona re "Medio " pe r le aree este rne e l'a mbien te c on un a no rmale
qua ntità di inter feren ze,
3. Seleziona "Basso" per un a mbien te co n un live llo eleva to di int erfer enze.
10. Tempo di regis trazi one targe t
Pre mere "OK", quindi sele ziona re "O N" p er im posta re i l tem po d i lav oro
ini ziale e f inale . Dopo aver termi nato la r egola zione , la foto camer a
fun ziona solo per il temp o im posta to og ni g iorno . Olt re i l per iodo, la
fot ocame ra è in attes a. Se l' ora d i in izio è, a d ese mpio, imp ostat a all e
18: 35 e l'or a di fine alle 8:25, la fo tocam era sarà opera tiva dall e 6:3 5 pm .
Son o il gior no dopo. La f otoca mera non si attive rà e non farà foto o v ideo
al di f uori di q uesto periodo.
11. Lasso tempor ale
Pre mere "MENU" per t rovar e "Time Lapse". Prem ere " OK", quin di
sel ezion are "ON" per impos tare l'interva llo di te mpo e imp ostar e i valor i
di Hr, Min e Sec. Ad esemp io, se è nece ssari o registr are il pr ocess o di
fio ritur a dei fiori, è po ssibi le u tiliz zare il l asso di t empo . La foto camer a
sca tta autom atica mente le foto ad o gni inter vallo di tempo imp ostat o.
12. Lingua
Sel ezion a la ling ua del menu desid erato .
Son o disponi bili le s eguen ti lingue : in glese , ted esco, fra ncese , spa gnolo ,
cin ese, ecc.
13. Ora e data
Cer ca "Data e or a" nel m enu d i co nfigu razio ne, q uindi pre mi OK per
acc edere .
Usa "Formato ora" e "Form ato data" per conf igura re il for mato dell' ora e
del la data. Scegli " Impos ta or a e data" per camb iare l'or a del la t eleca mera.
Pre mere Sinistra / De stra per selez ionar e il nume ro e prem ere Su / Giù
per modifica re il va lore. Prem ere OK pe r co nferm are l e mo dific he.
IT
14. Timbro foto
Att iva / disatti va l a vis ualiz zazio ne d ella filig rana nell a fot o
77

15. Protetto da passw ord
Sel ezion a "Protez ione password" . Pr emere "OK" , qu indi selez ionar e "O N"
per impostar e la pass word della te lecam era. La p asswo rd è un n umero
di 4 ci fre selez ionat o da 0-9.
Se la passwo rd vi ene persa, prem ere contem por aneament e
i tasti MENU e REPLAY e s postare il seletto re de lla
mo dal ità d i fun zionamen to da lla posizi one OFF a SE TUP.
La foto cam era è sblocc ata .
IT
16. Señal acústica
Act ivar / de sacti var el pitido
17. Formatta scheda di me moria
Sel ezion are quest a opzione per form attar e la sche da d i mem oria in
que sta fotoc amera , si cons iglia di forma ttare la sched a di memo ria nel
com puter e f ormat tarla nuovamen te in qu esta fotoc amera per il primo
uti lizzo .
18. Numero Serie .
Pre mere "OK", quindi sele ziona re "O N" p er im posta re i l num ero di se rie
del la teleca mera. È p ossib ile utili zzare una comb inazi one di 4 cifr e per
doc ument are la posizi one nelle foto . Ut ilizz ando più telec amere , que sto
ren de più facile ide ntifi care la p osizi one d urant e la visu alizz azion e de lle
fot o.
19. Reset delle impo stazi oni
Sel ezion are per ripri stina re l a fot ocame ra a lle i mpost azion i pr edefi nite.
Ric ordar si di imposta re n uovam ente la d ata e l'o ra.
20. Versio ne
Sel ezion are per verif icare il numer o di vers ione corr ente del firmw are
del la fotoca mera.
78

21. Riproduz ione
Spo stare il selet tore dei modi operativi sulla p osizi one " CONFI GURAZ IONE" .
Pre mi il tasto Ripet i e il ta sto Su / Giù per rived ere l e fo to / i vi deo. Dura nte
la revisione delle f oto, preme re i l tas to S u / Giù p er s posta re le pag ine
su / gi ù. Durant e la revi sione dei vide o, premer e il tast o OK per avvi are l a
rip roduz ione, premere OK a ncora una volt a per in terro mpere . Pre mere il
tas to play per torna re in mod alità stan dby.
21. 1 Elimina la selez ione
È possi bile utilizzar e qu esta funzi one per c ancel lare sing ole r egist razio ni
dal la scheda di memor ia. Preme re i l tas to M ENU s otto la m odali tà d i
rip roduz ione, spostare la barra di selez ione su " Elimi na file corre nte" e
pre mere OK p er cancel lare la r egist razio ne selezi onata .
21. 2 Elimina tutte l e reg istra zioni
È possi bile usare qu esta funzi one per c ancel lare tutt e le regi straz ioni
sul la scheda di memor ia. Preme re i l tas to M ENU i n mo dalit à rip roduz ione,
spo stare la barra di selez ione su " Elimi na tutti i fi le" e pr emere OK per
can cella re tutte le r egist razio ni.
21. 3 Attiva la p resen tazio ne
Que sta funzi one può esser e uti lizza ta p er ri produ rre autom atica mente le
fot o memoriz zate sulla sc heda di m emori a. Og ni f oto v iene visu alizz ata
per circa 2 seco ndi. Per inter rompe re la pr esent azion e e mante nere
l'i mmagi ne corren te perman entem ente sull o sch ermo, pre mere il t asto
OK.
22. protezio ne da sc rittu ra
> Quest a funzion e pu ò ess ere utili zzata per prot egger e sin gole
reg istra zioni di tutti i f ile salva ti Regist razio ni d i can cella zione acc ident ale.
> Selez ionar e "Scrivi pro tezio ne pe r il file cor rente " per pro tegge re la
reg istra zione attualme nte selez ionat a da lla c ancel lazio ne a ccide ntale .
> Selez iona "Proteggi tut ti i file cont ro l a scr ittur a" p er pr otegg ere tutte le
reg istra zioni salvate dalla ca ncell azion e acc ident ale.
IT
79

> Selez ionar e "Sblocc a fi le co rrent e" p er ri muove re l a pro tezio ne d a
scr ittur a per la regi straz ione attualmen te s elezi onata .
> Selez ionar e "Sblocc a tu tti i fil e" pe r ri muove re la pro tezio ne da scr ittur a
per tutte le re gistr azion i sal vate.
6. INOLTRE LA MODALITÀ IN DIRETTA
6. 1 Re golazione e inst allazione della fo tocamera
IT
La modalità CONFIGURA ZIONE è v antag giosa per dete rmina re i l mig lior
ang olo di rileva mento pos sibil e e la ga mma del s ensor e di movi mento .
Per fare questo, pos izion a la foto camer a a ca. 1 -2 m di alte zza su un
alb ero e allinea re l a tel ecame ra c on la dir ezion e des idera ta.
Spo stati lentamen te da un lato del l'are a
oss ervat a all'alt ra. Spost a pa ralle lamen te al la
tel ecame ra. Prova diversi ango li e dist anze.
Il LED verde lampeggi ante indica c he è stat o
ril evato dal sens ore PIR later ale. Il L ED b lu
lam peggi ante indica che è stat o ri levat o dal
sen sore PIR princ ipale .
NOTA: Il LED verde si acce nde solo quand o "M ovime nto l atera le"
sen sore "è a cceso , quindi è po ssibi le determ inare la posiz ione migl iore
per allinear e la foto camer a, Il LE D blu / v erde lamp eggia solo in modal ità
CON FIGUR AZION E non appena il s ensor e PI R ril eva il mo vimen to.
80

Il LED rosso lampeggi a 15 volt e quando si p assa semp licem ente alla
mod alità Live (ON), quind i la foto camer a fun zione rà a utoma ticam ente e
pas serà alla moda lità standby.
Per evitare segnali errat i e foto non neces sarie , si cons iglia di non u tiliz zare
la fotocamer a in luog hi solegg iati e di ver ifica re ch e no n vi sian o ram i
nel l'are a attiva del senso re.
Veri ficar e inoltre che la fotoc amera sia impo stata all' altez za c orret ta in
lin ea con il pu nto d a os serva re. S e ne cessa rio, punta re l a fot ocame ra
ver so il basso per u n al linea mento otti male
Per un'altez za di 1 metro , po sizio nare la f otoca mera paral lela al p avime nto.
Per un'altez za di 2 metri , in clina re la fot ocame ra di cin que g radi vers o il
suo lo..
10°
No ta:
Si prega di fare il movim ento orizzonta le
pri ma del PIR. Il mo vimen to v ertic ale n on
è stato rilevato cor retta mente .
Acc elera re i pass aggi quando si es egue il
tes t a lunga distanza prima d ell'a rea d i
ril evame nto PIR.
La distanza di r ileva mento PIR sare bbe più breve se la te mpera tura
amb iente raggiung e o super a i 30 °
Lo schermo si s pegne rà au tomat icame nte senza alcu na o peraz ione entro
3 minut i nella modal ità C ONFIG URAZI ONE, prem ere q ualsi asi pulsa nte
per riaccend erlo.
IT
81

6. 2Configur azione della modalità live
L'a pplic azion e standar d della Fotoc amera Caccia è la moda lità live.
In questa modali tà, le foto vengo no attiva te da sen sori di m ovime nto o in
int erval li second o la conf igura zione corrispo ndent e.
Per impostar e la moda lità live, spostar e il sele ttore di modal ità su ON. Il LED
ros so lampeg gia 15 volte quando si passa s empli cemen te a lla m odali tà
Liv e (ON), quind i la foto camer a funzion erà autom atica mente e p asser à alla
mod alità standby.
IT
Non appena anima li selvat ici o altri ogget ti en trano dir ettam ente nell' area di
ril evame nto dell' area del senso re, la fotoca mera inizia a regi strar e foto e
vid eo.
Not a:
Nel giorno I LED IR non si a ccend ono. Le f oto e i video sono a color i. Di not te
I LED IR darann o le luci e l e foto e i video saranno i n bi anco e ne ro.
Il ritardo del trigg er è 1 minuto predeter minat o. L'opzi onale è 5 s-60 min.
Imp ostar e la moda lità di r egist razio ne e i relati vi parame tri prima di acced ere
all a modalit à live.
Qua ndo la luce del flash è i mpost ata su "Auto" , la foto camer a reg ola
aut omati camen te la luminos ità dei LED IR a bass a pot enza. Qua ndo s i sc atta
di notte, la luminos ità dimin uisce automati camen te e l'ef fetto di ripre sa
div enta un p o 'scarso . Per una potenza ultrabas sa, i col pi s i fer meran no d i
not te.
82

7. Connessione al computer
Cam biare la Modal ità in "CONFI GURAZ IONE" e c olleg are la fotoca mera al
com puter con un cavo USB, lo scher mo LCD della fotocamer a mostrer à
"pr ompt MSDC". Questo indica che è stato colle gato corre ttame nte, quin di
leg gere o co piare i d ati della scheda SD sul comput er.
1. Collega la fotoca mera al t uo comput er usando il cavo USB.
2. La f otoca mera si a ccend e automat icame nte in modali tà USB,
ind ipend entem ente dalla selezio ne sul selett ore di modali tà.
3.L a telecam era è install ata nel compu ter come un'un ità aggiu ntiva con il
nom e "Dispos itivo di memor izzaz ione rimovibil e"
4. Fare dopp io clic sul dispo sitiv o per rilevar e la cart ella "DCIM *
5. Le f oto e i video si trova no nelle sottocart elle della cartell a "DCIM".
6. È po ssibi le copiar e o spost are foto e fi le video sul compu ter.
In alte rnativa, è po ssi bile ins erire la scheda di m emo ria i n un
le tto re di schede sul c omp uter.
IT
83

8. SPECIFICHE TECNICHE
IT
Ele mento
Sen sor d’imm agine
Ris oluzi one delle foto
LCD
Sup porto di regis trazi one
Ris oluzi oni video
Len te
La distanza della ve rsion e
not turna .
Dis tanza di tiro
Tempo di attiv azion e
Sho t lag
IR flash
Ang olo di rileva mento del
sen sore
Pro tezio ne contro gli spru zzi
d'a cqua.
For mati di a rchiv iazio ne
Con nessi oni
Tiemp o di atte sa
Dim ensio ni
Ene rgia
Mac intos h
Sen sore CMOS da 20 Megapi xel
20M P (5200*3 900) ;
16M P (4608*3 456);
12M P (4000*3 000),
8MP (3264 x2448 ),
5MP (2592 x 1 944). 3MP(2048 x1536 ).
6.1 cm (2.4”) color T FTLCD ;
320 x240 pixels
Sup porta schede di m emori a
Mic ro SD fino a 32 GB (n on i nclus e)
192 0x108 0,128 0x720 ,
720 x480,640 x480, 320x2 40
F2. 5, f=3.6m m,FOV =130°
20m
Fin o a 20 metri
0.3 -0.5 secondi
5 secon di a 60 minut i
42 LED a infraro ssi
130 °
Yes (IP56 )
Pho to:JP EG; Video :AVI. MJPC
Min i USB 2.0
Cir ca 6 mesi (con 8 batte rie)
97x 140x6 7mm
8 batte rie alcal ine LR6 ( AA) a sca rica
bas sa;
Ali menta tore esterno 6V, alm eno
1,5 A ( non in dotazi one)
84

9. SOLUZIONE DI SEMPLICI PROBLEMI
1. Si p rega di v erifi care se l e bat teri e son o
La fotocamer a non si
acc ende.
ins talla te co rrett ament e.
2.C ontro llare se la ca paci tà de lla batter ia
è b assa o è esau rita. In tal c aso, sost ituir li
con nuov e ba tteri e.
La fotocamer a si speg ne
aut omati camen te.
Mos tra 'Erro re scheda SD'
I video sono mossi o s altat i
qua ndo vengo no riprod otti
su un c omput er
L'i mmagi ne non è chia ra
La fotocamer a non sc atta
fot o o regis tra video .
1. Contr ollar e se la capac ità della batt eria
è b assa o es aurit a. I n ta l cas o, p rovar e a
sos titui re l e nuo ve ba tter ie pe r us o
est erno o co llega re l' adatt ator e CA per
uso inte rno.
2. Si p rega di v erifi care se l a sch eda SD è
pie na. I n ta l cas o, t rasfe rire immag ini e
vid eo su l co mpute r o elimi nare alcu ni fi le
in modal ità di r iprodu zion e.
1. Assic urati che la sched a SD sia di c lasse
10 o su perio re.
2. Utili zzar e la foto camer a per form atta re
la sched a SD la prima volt a.
1. Prova a u tiliz zare dive rsi lettor i
mul timed iali come il letto re VL C.
2. Assic urati che il video clip in
for mato AVI p ossa esser e ri prodo tto
sul tuo comp uter.
1. Assic urati di aver rimo sso le
pel licol e pro tett ive d ai LE D e
dal le le nti IR pr ima di u sarle.
1. Contr ollar e se la memor ia de lla sched a
SD è pi ena, tras ferir e imm agini o v ideo sul
com puter o e limin are a lcuni fil e nel la
mod alità di ripro duzio ne.
IT
85

9.1 Cuida do
Non usare deterg enti corr osivi , com e al cool denat urato , di luent i, ec c. p er
pul ire l'all oggia mento della f otoca mera e l' acces sorio in dotaz ione. Se
nec essar io, pulir e i compo nenti del sist ema con un pa nno morbi do e
asc iutto .
9.2 Archivia zione
Rim uover e sempre la b atter ia dalla cust odia se n on si int ende utili zzare la
IT
fot ocame ra per un po 'di temp o e conse rvarl a sep arata mente . Gi orno
dop o giorno e pe r periodi più lung hi, le ba tteri e po ssono esse re
con serva te in un luog o asciutt o, f uori dalla por tata dei bambi ni.
SE AV ETE Q UALUNQUE DOMANDE O P ROBLEMI.
Vi preghiamo di conta ttarc i da
US A e Canada supp ort @toguard .cc
Eu rop a eu. support@ tog uard.cc
UK uk.s upp ort@togu ard .cc
Ti offrir emo una rispo sta rapid a e autor izzat a ent ro 2 4 ore e f aremo tut to
il possibile per riso lvere il tuo probl ema il pr ima possi bile. Più gara nzia di
sic urezz a con Toguard!
Se non sei soddi sfatt o del no stro prodo tto. Per favor e, p arlac i del tuo
pen siero . Questo sarà molt o apprezz ato
868788


1. LISTA DE EMBALAJE
Des embal e la cáma ra con cuidad o y compr uebe que los acces orios que
se encuentra n a conti nuaci ón se en cuent ran e n la caja .
ES
1 2
5 6
3 4
1.C ámara de vida silvestre x 1
2.U SB Cable x 1
3.M anual de instr uccio nes x 1
4.C orrea de monta je x 1
5.M ontaj e en pare d x 1
6.Tor nillo s x 3
2. INTRODUCCIÓN
Cám ara de Caza de vi da s ilves tre e s un a cám ara de vi gilan cia y vid a
sil vestr e con un sens or infrar rojo. El senso r pu ede d etect ar c ambio s
rep entin os en la temp eratu ra ambien te d entro de un ár ea d e eva luaci ón.
Las señales del senso r infrarr ojo altam ente sensi ble (PIR, sens or i nfrar rojo
pas ivo) se e ncien den en la cá mara, acti vando la image n de l mod o de
vid eo.
89

2. 1 Caracter ístic as de Cámara d e Caza
1.C MOS senso r
2.F oto de 20 me gapíx eles y vi deo 1 080p HD
3.6 .1 cm (2.4’’)c olor TFT LCD; 320x2 40 p íxele s
4.4 2 pcs IR LEDs .5. filtr o de infr arroj os a utomá tico compl eto.
6. Velocidad de dispa ro: Aprox . 0.3 se gundo s
7. Configure el númer o de seri e para r egist rar l a po sició n.
8. La h ora, la f echa, la tempe ratur a, la fase y el númer o de seri e se
est ampar án en la foto .
9. Protecció n de cont raseñ as.
ES
10. Indicaci ón de en ergía .
11. Función de p rueba incorpor ada sobre la tempe ratur a amb ienta l.
12. Built -in micró fono y al tavoz .
13. Mini interfaz USB 2.0.
14. Siste ma IP56 a pr ueba de a gua.
15. Temperatur a de trab ajo: -20°C to 60°C .
16. El consum o de ener gía extre madam ente bajo en modo de e spera
pro porci ona un tiempo de opera ción extr emada mente larg o, d ura 6
mes es con 8 bate rías de P C cuando se t oman 50 f otos de f otos por día.
2. 2 Caracter ístic as de Cámara d e Caza
1.C amera t rampa p ara la ca za.
2. Ob serva ción an imal o in ciden te.
3. Cá mara de s eguri dad act ivada p or movi mient o para us o domés tico,
de of icina o p úblic o.
4. Cu alqui er vigi lanci a inter na y exte rna.
90

3. ESTRUCTURA
Com prend er la est ructu ra de la cá mara ay uda a uti lizar e ste pro ducto c on
may or habi lidad .
1. LE Ds infr arroj os
2. 2 le ntes
3.1 s ensor d e movim iento d elant ero
3.2 senso r de movi mient o izqui erdo
3.3 s ensor d e movim iento d erech o
4.P antal la de vis ualiz ación
5.B otón ar riba
6.B otón de m enú
7.B otón de i zquie rda
8.B otón de r eprod ucció n
9.B otón de r eprod ucció n
10. Botón d e derec ha
11. Botón d e encen dido
12. Botón d e caída
13. TF Slot
14. Conec tor AV
15. Conec tor usb
16. ON
17. SETUP
18. OFF
19. Bater ía
20. Sella a nillo
21. D C Conex ión6V /1.5A
22. Rosca d e trípo de de 1/4 ’’
1
2
3.1
3.2
3.3
4
9
5
6
7
10
12
8
11
13
14
15
SHOT
OK
ON-SET UP- OFF
AV
16 17 18
ES
19
20
22
21
91

24
23
ES
23. Corch etes de b loque o 24.Ra nura pa ra la cor rea de mo ntaje
Digit al Trai l Camer a
Model :H70
Power : 8 *AA Bat tery
DC6V In put
RoHS
Made in Chin a
▲ 1 .El monit or solo está ence ndido en el modo CONFI GURAC IÓN para
cam biar la c onfig uraci ón del menú o ver fot os y vide os ex isten tes.
2.U na tarjet a de memo ria micro SD debe habe rse i nsert ado en la ran ura
de la t arjet a de memo ria para guardar fotos y v ideos .
3.C on la conexió n mi ni US B (U SB 2. 0), la cá mara se p uede cone ctar a
una computad ora para desc argar foto s y video s.
4.U tiliz ando el i nterr uptor de modo, se puede n selecci onar los tres modos
de funcionam iento : OFF, SETU P y ON.
4. PREPARANDO LA CAMARA
No ta :
1.S e admiten tarjetas de memor ia m icro SD d e has ta 3 2 GB de c apaci dad.
92

2.E n lugar de l as ba tería s ti po LR 6 (A A) co n la mism a es pecif icaci ón
ON- SETUP- OFF
(co n 2000 mAh o más) , se pued en u sar. Recome ndamo s pi las a lcali nas.
con baja autodes carga (no sumi nistr ada).
3.L a cámara debe inse rtar 4 u 8 x 1.5V pila s AA. No use pila s nue vas y
vie jas junta s. La in terfa z de CC n ecesi ta u n ada ptado r de 6V / 1.5 A co n
3.5 mm (diám etro exterior) s * l . 3 mm (int erior D) cabez a del ta pón.
4. Inserte la t arjet a mic ro S D CLA SS6 o de clas e sup erior (se reco miend a
CLA SS10) . Antes de i nsert ar en la tarje ta d e mem oria, ase gúres e de que la
pro tecci ón de escritu ra l atera l de la t arjet a de memo ria no es té b loque ada.
5. Encienda la c ámara . 3 inter rupto res: apagado (OFF) , men ú de
con figur ación / M odo SETUP (SETUP) y mo do e n viv o (O N).
6. Se r ecomi enda formatear la nueva tarjeta de m emori a cu ando se u sa
(co mo se describ e a conti nuaci ón).
7. Te nga en cu enta que la c ámara se apaga rá cu ando la p otenc ia s ea
muy baja.
AALR6
AALR6
AALR6
AALR6
AALR6
AALR6
AALR6
AALR6
SHOT
OK
ON-SETUP- OFF
AV
ES
Set tings
Time &date
Pho to stam p
Pas sword p rotec tion
Bee p sound
For mat mem ory car d
Ser ial NO
MENU
Bac k
93
Set tings
Time &date
Not ificat ion:A ll data
Pho to stam p
wil l be dele ted
Pas sword p rotec tion
Bee p sound
Yes
For mat mem ory card
No
Ser ial NO
OK
Sel ect
MENU
Bac k
OK
Sel ect

Op er ac ió n (Ver Figuras Abajo)
Abr a los soporte s de bloq ueo y la tapa prot ector a de l com parti mient o de
la batería. Inserte las b aterí as - inse rte la ta rjeta de memor ia, cambi e a
CON FIGUR ACIÓN , ingrese al menú del siste ma presio nando el botón
MEN Ú, elija para form atear la tarje ta de me moria , eli ja r estab lecer a l a
fáb rica.
(es te paso se p uede omiti r): elija la hora de c onfig uraci ón de l si stema .
Abr a la tapa de la baterí a ► Inser te las b aterí as de 8 p iezas . Mo delo de
bat ería:
AAL R6> Asegú rese de q ue no se haya act ivado la prote cción de escri tura
ES
lat eral en l a tarjeta de memor ia> Inser te l a tar jeta de m emori a Mi cro S D
CLA SS6 o superio r en la ranur a de la t arjet a de memo ria antes de
enc ender la cámar a y selec cione el modo CONFIGURA CIÓN para ajus tar
la configura ción
Montaje con correa
5. USANDO LA CÁMARA Y LA
CO NFIGURACIÓN MENÚ
5. 1 usan do l a cá mara
1. Botones de f uncio namie nto
Fun cione s de los botones de o perac ión e n mo do de gra bació n:
A conti nuaci ón, los boton es de ope ració n se desc riben en el mo do
de grabación con menú no activ ado.
94

1. Te cla UP: R e Pá g. (M odo de me nú): camb ia al mod o de grab ación de
vid eo.
2.M ENU: abra o salga de e ste menú de c onfig uraci ón / deje de repro ducir
el video (modo de re produ cción ).
3.L eft Key: Página i zquie rda.
4.R eplay Key: revisa foto s y video sTecla .
5.S HOT: grabac ión / ca ptura de video film ado.
6.C lave derecha: página d erech a.
7.O K: Reprod ucir / Pa usa repro ducir arc hivos de video (mod o de
rep roduc ción) .
8. Te cla abajo : ava nzar pági na (m odo de me nú) / cam biar al m odo de fo to.
1
2
SHOT
5
ES
3
4
OK
2. Cambio de mo do
2.1 Cambi a los interru ptore s pa ra el egir el m odo de tr abajo :
ON- SET UP-O FF ON- -OF FSET UP ON- -OF FSET UP
Apa gado( OFF)
2.2 Presi one la tecla Arri ba / Abaj o par a ca mbiar los modo s ent re V ideo y
Fot o.
2.3 Presi one la tecla MENÚ para abr ir el men ú de conf igura ción. Pres ione
OK para conf irmar los camb ios de config uraci ón.
2.4 Pulse la tecla MENÚ una ve z más par a vol ver al me nú a nteri or o sali r
de la c onfig uraci ón del MENÚ.
2.5 Ponga el selec tor de modo en "O FF" para apaga r la cáma ra.
Sis tema de
con figur ación (SETUP)
95
6
7
8
Mod o en vivo (ON)

5. 2 Me nú d e co nfiguraci ón
1. Modo
Fot o, Video, Foto + Video , se lecci one s i se debe n to mar f otos o vi deos
cua ndo se detect a mo vimie nto. Cuand o es tá en el modo "Fot o + Video ",
la cámara primer o to ma un núm ero d eterm inado de fotos ant es de
gra bar un video.
2. Resolució n de foto
20M P (5200*3 900) ; 16 MP (4608* 3456) ; 12 MP (4 000*3 000),
8MP (3264x24 48), 5MP (2592 x 1 944). 3MP (204 8x153 6).
ES
Sel eccio ne la resoluc ión desea da pa ra l as fo tos. Reco menda mos l a
res oluci ón 16M. Una resol ución más alta prod uce una c alida d fo tográ fica
alg o mejor, p ero produ ce archiv os m ás gr andes que requ ieren más
esp acio en l a tarjeta de memor ia.
Tomando tarjeta de memoria de 16GB p or ejempl o:
Píx eles de l a foto
20M P
16M P
12M P
8MP
5MP
3MP
3.F oto serie : 1 P, 2P. 3P
Tamañ o (MB)
(ap roxim adame nte)
3.5
2.7
2.0
1.4
0.9
0.5 4
96
Can tidad de fotos
(ap roxim adame nte)
410 0
530 0
700 0
105 00
166 00
266 00
 Loading...