


Toft Audio Designs Series ATB Console Manual

Toft Audio Designs Series ATB Console ManualFor More Information, visit www.toftaudio.com
INTRODUCTION
The Series ATB is an extremely versatile and sophisticated 8 bus console in a compact frame. It
has been designed with todays DAW user in mind and offers extremely high audio quality and
features never before found in a console in its’ price range. These features include an optional
digital I/O card which provides the eight subgroup sends and returns as either ADAT optical or
firewire and the master left/right outputs as firewire or SPDIF. ASIO drivers are provided as well
as MIDI connectivity to complete the versatility of this option.
In a multi-track studio environment the console will perform both tracking and remix functions
with consumate ease. Because of the channel monitor and direct output facilities, recording
instruments to tape is simple and of very high quality with little outboard equipment being required. When mixing down, the large number of inputs to the stereo bus (56 on the 16 channel, 72 on the 24 channel and 88 on the 32 channel) makes the job very easy. The large number
of auxiliary sends (six) also adds to the flexibility.
The Series ATB has also been designed for easy servicing. The console is constructed from
individual circuit boards mounted at right angles to an 8 way front panel. It is therefore only
a matter of minutes to remove any channel board from it’s front panel should a component
need replacing. All active circuitry (i.c.’s etc) are socketed, again to aid servicing. All passive
components (resistors, capacitors etc.) are of conventional types not surface mount which are
difficult to remove and replace. The modules connect to each other via ribbon cables which
ensure maximum reliability and freedom from wiring errors.
Connections to the console are via the rear panel where the cables can be conveniently hidden
from view, which is again a feature normally only found in consoles costing considerably more.
The console is fitted with extremely accurate 12 segment bar graph displays on the groups and
master left/right outputs and high quality illuminated V.U meters operate in parallel with the master left/right bargraphs.
By carefully following the installation procedures detailed in the following pages, your Series ATB
console will give years of professional audio quality and reliable service.
1
TABLE OF CONTENTS
Introduction
Power and Audio Connections
Star Grounding
Input Module
Input Module Flow Diagram
Submaster Module
Submaster Module Flow Diagram
Master Section
Master Section Flow Diagram
Overall Flow Diagram
Operational Description
Meter Bridge Option
Technical Specifications
Safety Information
Safety Instructions
Environmental Compliance Statements
Warranty
Registration
Meter Bridge Installation Instructions
1
2
5
6
8
9
11
12
14
15
16
20
22
23
23
24
25
26
29

Toft Audio Designs Series ATB Console ManualFor More Information, visit www.toftaudio.com
3
AUDIO CONNECTIONS:
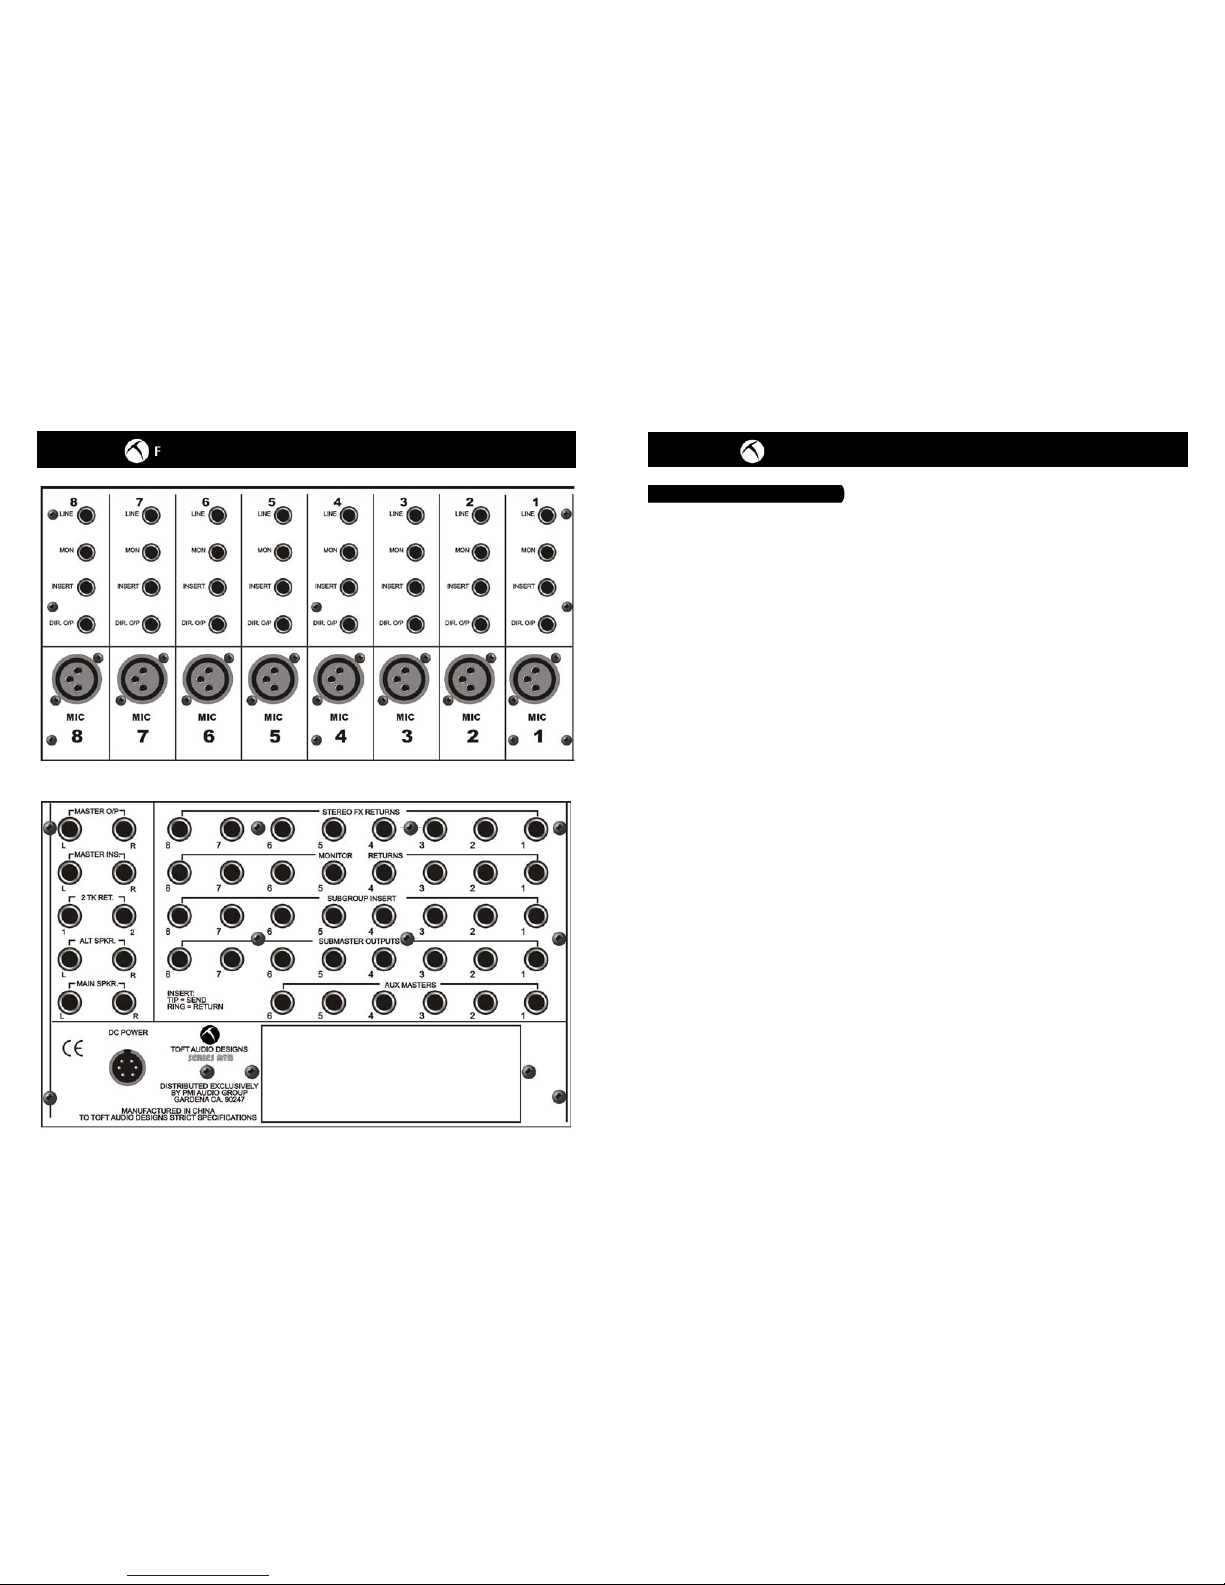
Two types of audio connector are provided on the rear of the unit, x-l-r and 1/4” jack.
The mic input x-l-r is female and therefore the microphone lead requires a male plug. The wiring
convention is as follows:
Pin 1 Earth
Pin 2 +(positive phase)
Pin 3 - (negative phase)
Various connections to the console use balanced (stereo) 1/4” jacks and are wired as follows:
Sleeve Earth
Tip +(positive phase)
Ring - (negative phase)
The balanced connections are: Channel ‘LINE’ Input, Channel ‘MON’, Channel ‘DIR O/P, ‘MONITOR
RETURNS’, ‘SUBMASTER OUTPUTS’, ‘MASTER O/P’, ‘AUX MASTERS’, ‘MAIN SPKRS’ and ‘ALT
SPKRS’
The ‘STEREO FX RETURNS’ and ‘2 TRACK RET.’ 1 and 2 utilise a balanced (stereo) jack wired in the
following manner:
Sleeve Earth
Tip Right (unbalanced)
Ring Left (unbalanced)
The Channel ‘INSERT’ Sends, ‘SUBGROUP INSERT’ Sends and ‘MASTER INS.’ Sends Utilise 1/4”
stereo jacks wired in the following manner:
Sleeve Earth
Tip Send
Ring Return
POWER & AUDIO CONNECTIONS
D.C. POWER:
The Series ATB is supplied with a high quality D.C. power supply which should be connected to a
suitable a.c. power source via an earthed cable connected to the 3 pin euro socket at the back of the
power supply.
The supply has been fitted with the highest quality ‘toroidal’ type transformer in order to minimise
stray hum radiation, but the supply should still be located as far away from the console as possible to
avoid any possibility of hum pick -up.
Before connecting to a power socket, make sure that the correct voltage is selected on the rear of
the power supply, either 115 or 230 volts.
Make sure that the supply is placed in a well ventilated area, with at least one rack space between
the supply and other units.
Low voltage D.C is supplied to the console via a circular locking connector. With the power supply
switched off, this should be pushed firmly into the mating socket on the rear of the console located
behind the Master Module. A locking ring makes sure that the cable cannot be accidentally pulled
from the console.
The D.C power connections are as follows:
Pin 1 +17v
Pin 2 Chassis Ground
Pin 3 Electronics Ground
Pin 4 +48V
Pin 5 -17V
Once the power supply has been connected to the console, the correct voltage selected and the
a.c. power applied, the power supply can be switched on. The power supply is fitted with three
red l.e.d’s which indicate that the +17, -17 and +48 voltages are functioning. If for any reason any
of the l.e.d’s fail to illuminate, do not operate the console. Turn the power supply off immediately
and check that the fuses (located inside the unit) are not blown. If any fuse has blown, replace with
one of the same rating and try again. If the fuse has not blown or a replacement fails subsequently,
seek qualified help.
2
Toft Audio Designs Series ATB Console ManualFor More Information, visit www.toftaudio.com
STAR GROUNDING
By connecting equipment together using the ‘star grounding’ principle it is possible to virtually
eliminate hum loops from studio wiring.
Since the system is quite easy to implement, it only requires following a certain procedure that will
soon become second nature. A few moments spent studying this chapter and following the steps
listed below, could pay dividends in the future.
Step 1. Choose a particular piece of equipment that will be made ‘technical’ earth (in most cases
the mixing console is the ideal choice as it is usually the item that everything else is connected to).
Step 2. On all equipment that is connected to the console inputs, connect the earth (sleeve) of
the cable carrying the signal at the console end but not the end that connects to the equipment.
For example, if it is a jack lead, connect the sleeve at the mixer end but not at the equipment end.
The only exception to this should be a microphone as it cannot get an electrical earth by any other
means. The earth should therefore be connected at both ends of a microphone cable.
Step 3. On all equipment that is connected to the console outputs, connect the earth (sleeve) at
the console end but not at the equipment end (input).
Step 4. Connect the chassis or mains earth of all equipment to the same point that the console
chassis and power supply earth are connected to. This point is then known as the ‘technical’ earth
and should be as good as it possibly can be. In many cases this will be the earth of the mains
socket feeding the console, but sometimes better results and freedom from refrigerator clicks
and pops etc. can be achieved by making an independent ‘technical’ earth. In many professional
recording studios this is done by burying a large copper plate at least three feet underground and
connecting the ‘technical’ earth point to it. A less drastic measure is to use the copper pipe of a
radiator as the earth reference as this often runs underground.
It is essential that if a separate technical earth is generated, this is always used as the earth point
for all equipment. Connecting some equipment to mains earth and some to ‘technical’ earth
could result in a shock hazard as it is sometimes possible for a quite high a.c voltage difference to
be generated across the two earth points.
5
SERIES ATB REAR PANEL - INPUT SECTION
SERIES ATB REAR PANEL - OUTPUT SECTION
4

Toft Audio Designs Series ATB Console ManualFor More Information, visit www.toftaudio.com
on the sub group section, at mixdown a 16 channel Series ATB becomes a 56 input mixer whilst a 24
channel becomes a 72 input mixer and a 32 channel becomes an 88 input mixer.
The input channel is provided with a stereo, non destructive after fade listen system (AFL). By depressing this button, it is possible to hear the selected signal in isolation (or mixed with other selected AFL signals). When the AFL button is depressed, the Channel ‘MUTE’ led will illuminate green to
show that AFL has been selected on that channel. When used for normal channel muting purposes,
the ‘MUTE’ led will illuminate red. The AFL signal follows the position of the channel pan control so
that the signal can be monitored with the stereo perspective intact. As it is a monitor function only,
the AFL can be depressed when recording or mixing without it harming the signal path. It is however
possible to change the function of the switch on a channel by channel basis so that the signal becomes a mono, pre-fade source (PFL). This is useful if the console is used in a live sound application
where a simple check to see if a channel is ‘live’ is required without having to push up the fader. By
removing the base panel of the mixer and accessing the individual channel pcb’s, it will be possible to
see a pushbutton switch mounted approximately halfway down the circuit board. When the button is
depressed (factory default setting) the signal is in AFL mode. If the button is undepressed, the signal
from that channel will become PFL.
Centre detented pan controls are provided for both the channel and monitor sections for accurate
placement of signals in the stereo spectrum.
The channel path is provided with a green l.e.d which illuminates when the signal reaches -20dB at
the channel output and a red l.e.d which illuminates when the signal reaches +10dB at the channel
output. These are extremely useful features and provide a constant indication that a signal is present in the module (green l.e.d), and that signal peak is being reached (red l.e.d).
Routing to the multi-track groups is achieved by means of pushbuttons located beside the channel
fader. These are arranged in pairs and work in conjunction with the pan control so that if for example
groups 1-2 are selected and the pan control is in the mid position, the signal will be fed to groups 1
and 2 in equal amounts. If however the pan control is positioned fully anti-clockwise (left) the signal
will only feed group 1. If the pan control is positioned fully clockwise (right), the signal will only feed
group 2
A high quality 100mm metal bodied fader is provided which gives precise and smooth control of the
channel level.
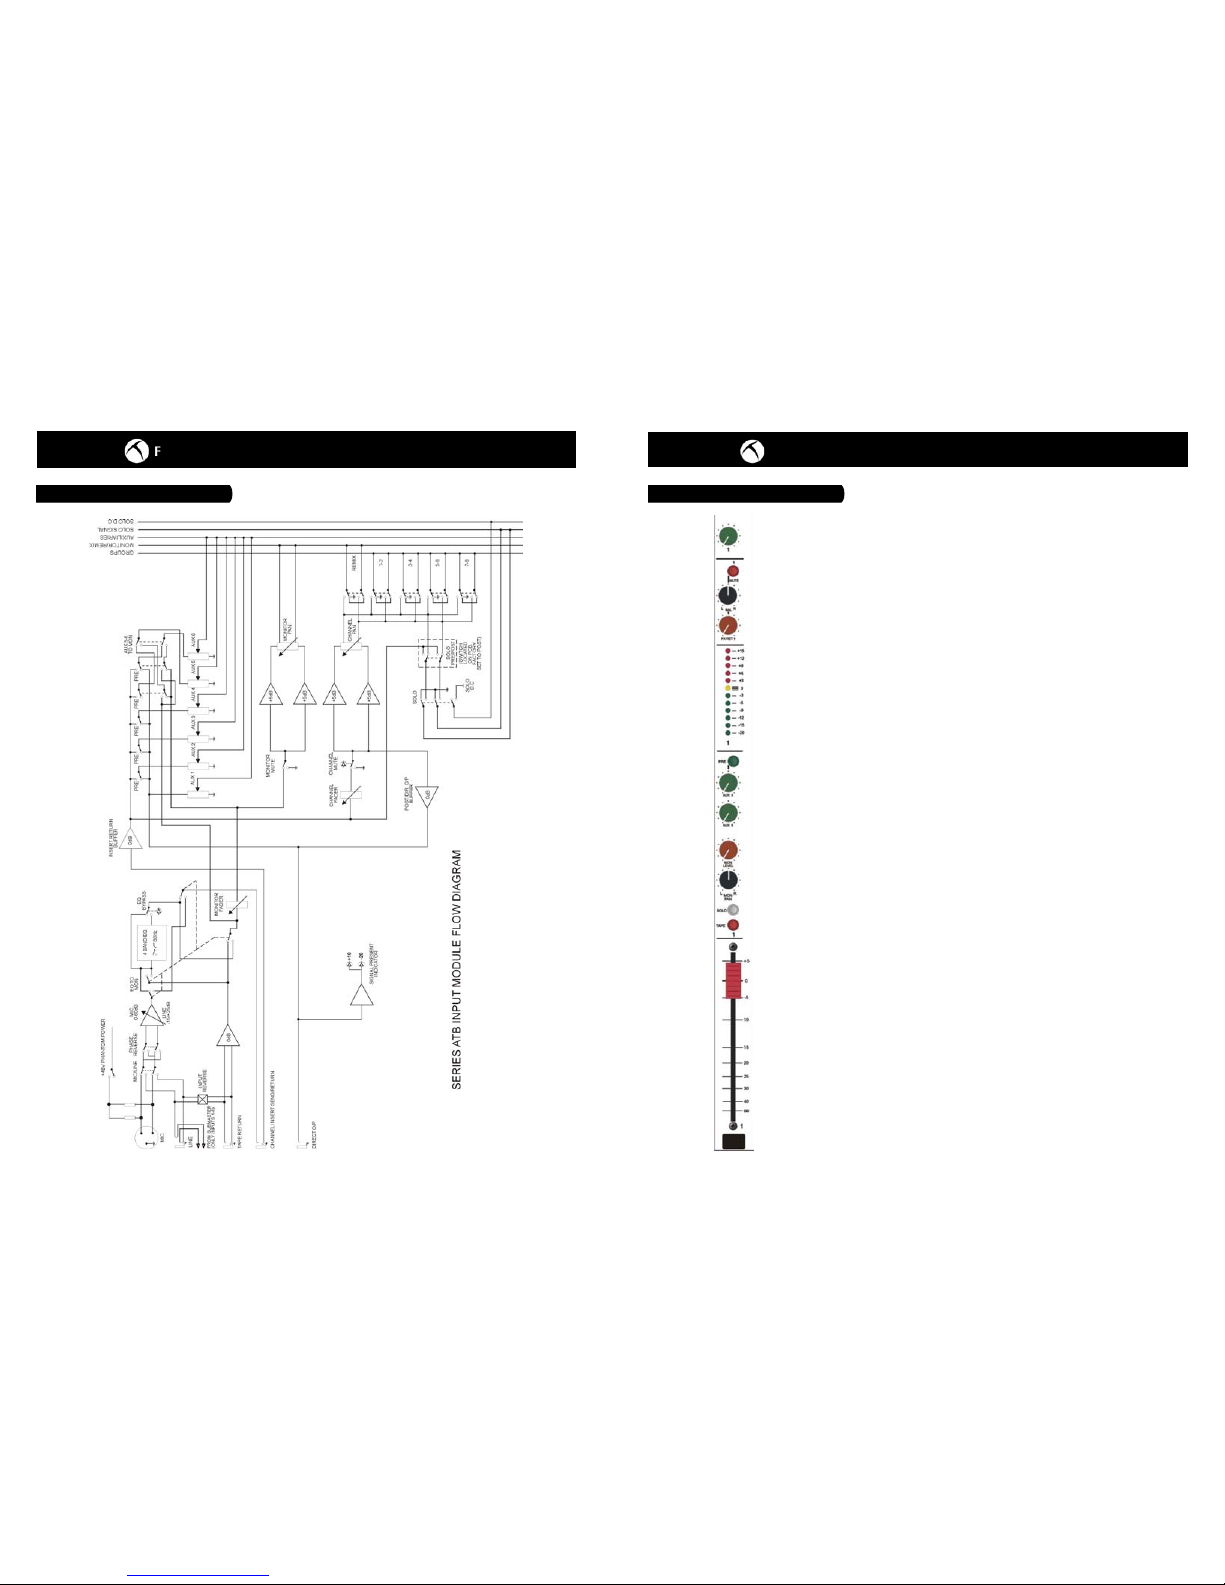
Reference to the Input module signal flow diagram will help to give a better understanding of the
way in which the signal is routed from the input to the group output.
7
INPUT MODULE
INPUT MODULE General Description
INPUT MODULE General Description
The Series ATB Input Module is an extremely sophisticated and
flexible channel that can be used for recording, mixing and monitoring multi-track recordings. It will accept the signal from a low
impedance balanced microphone, high or low level balanced line
input, or even the output from a musical instrument.
The signal can be shaped via the extremely musical four band
equaliser section that allows precise control over the audio spectrum. Boost and cut of 15dB is provided by centre detented
controls and the two sweep frequency ranges overlap to increase
the flexibility of the equaliser section. An 80Hz (high pass) filter
is also incorporated which can be switched in or out of circuit.
The equaliser is extremely useful in both recording and mixing
modes. The equaliser can also be switched from the input channel to the separate monitor channel incorporated into each input
module.
Six auxiliary sends are provided. Aux 1 is permanently pre-fade
while auxes 3-6 can be switched pre or post the channel fader
Auxes 5-6 can also be selected between the channel or monitor
path, greatly adding to the flexibility of the module.
Each module incorporates a monitor section which is used to
monitor a replay channel from a multi-track recording device.
This is in effect a separate signal path which ultimately feeds the
master remix outputs. By making the equaliser and auxiliary
sends 5-6 available to this path, this becomes an extremely versatile feature of the console. When monitoring the output of a
multi-track recorder or DAW, it is possible to create a monitor mix
with equalisation and reverb effects completely independently
from the channel. These effects would also remain when the
recording is played back through the same monitor section.
When the console is used for mixing purposes, the monitor
section functions as an additional line input return to the stereo
mix busses, again with the ability to route the equalisation and
auxiliary sends 5-6 through the monitor section. This effectively
doubles the number of inputs available on remix. As there are
also eight dedicated stereo effects returns and 8 monitor returns
6
Toft Audio Designs Series ATB Console ManualFor More Information, visit www.toftaudio.com
SUBMASTER MODULE
SUBMASTER MODULE General Description
The Submaster section of the console greatly enhances the flexibility of the Series ATB console and as a consequence provides a
number of different functions.
Each Submaster channel provides a method of adjusting the output
level of each of the 8 subgroup outputs via a 100mm high quality
fader. The level is also indicated by a high quality 12 segment bargraph display. The submaster also provides a method of monitoring
and panning the subgroup output on the control room speakers. By
using these controls it is possible to build up a monitor mix of the
recorded tracks and any that are about to be recorded. To enhance
this facility, level controls for auxiliary sends 5 and 6 are included
on each submaster section making it possible to send a headphone
mix from the subgroups together with reverb or echo effects. Auxiliary send 5 can also be switched pre or post the submaster monitor level control making it usable as either a headphone feed (in
‘pre’ mode), or a reverb send (in ‘post’ mode).
A balanced line level input is provided on the rear panel behind the
submaster section so that the replay from an 8 track DAW system
can be connected to the submaster section. Individual ‘TAPE’
switches make it possible to select either the send to the DAW or
its’ output onto the monitoring system. The bargraph metering and
auxiliary sends follow this switch so that they automatically switch
over according to the position of the ‘TAPE’ switch. By this method
it is very easy to build a monitor mix while tracking instruments
onto a DAW.
A further useful feature is that the balanced line level inputs connected to the submaster ‘MONITOR RETURNS’ are also connected
to the ‘LINE INPUT’ jacks of channels 1-8. This means that when
you want to mix from the DAW on channels with equalisation and
more auxiliary sends, selecting ‘LINE’ input on channels 1-8 will
automatically connect the DAW outputs to these channels.
Each of the 8 submaster channels is also provided with a ‘SOLO’
pushbutton. This makes it possible to listen to the signal on any
selected submaster in isolation and in stereo, depending on the
position of the submaster ‘PAN’ control. Since the ‘SOLO’ function
is a ‘post fader’ signal, it’s volume will be dependent on the position
of the Submaster ‘MON LEVEL’ control. This makes it possible to
solo a number of Submaster channels and create a balanced mix of
the solo’d signals.
9
INPUT MODULE FLOW DIAGRAM
8

Toft Audio Designs Series ATB Console ManualFor More Information, visit www.toftaudio.com
SUBMASTER FLOW DIAGRAM
11
A separate facility on each Submaster channel is the inclusion of a stereo Effects Return section located directly above the 12 segment bargraph meters. Individual jack inputs are provided on the rear panel
behind the Submaster section and these are wired in stereo. This therefore adds another 16 input capability to the console in remix mode. An effects return level control (which adjusts both left and right
inputs simultaneously) is combined with a balance control which makes it possible to attenuate either
of the left or right signals in relation to each other. In the centre position the signals will be of equal
strength, but when the balance control is turned anti-clockwise (left) the right signal is attenuated by a
varying degree and when the balance control is turned clockwise (right), the left signal is attenuated by
a varying degree. This allows for adjustment if the stereo signal connected is not equally matched.
A final facility included only on the first 6 Submaster sections, is a master control for each of the balanced auxiliary sends. This makes it possible to adjust the overall level of signal being sent, to either
a reverb (or other such signal processing device), or a headphone amplifier if the auxiliary sends are
being used as a headphone cue (or foldback) system.
Reference to the Submaster module signal flow diagram will help to give a better understanding of the
way in which the signal is routed.
10

Toft Audio Designs Series ATB Console ManualFor More Information, visit www.toftaudio.com
complex dynamic waveforms such as pianos etc. This type of meter will therefore greatly assist
the engineer when it comes to avoiding distortion during recording. However, when used on less
complex waveforms generated by for example, an electric guitar, it is possible to under record the
instrument using a bargraph display as they will sometimes react too much to the peak amplitudes
of the signal and not the average amplitude. They will however, generally result in a better use
of the available dynamic range of the recording medium. An analogue meter such as the conventional V.U. meter also fitted to the Series ATB console, responds mostly to the average level of the
programme, so can therefore be considered more useful when recording instruments such as an
electric guitar. The combination of electronic bargraph and analogue metering therefore provides
the user with the best of both worlds.
A headphone jack with a high quality stereo amplifier is provided so that if the engineer wishes to
monitor the console only on headphones, they can be connected to the jack socket at the top of
the master section. A separate stereo volume control is provided so that the level of the headphones can be adjusted independently.
A stereo master level control is also provided so that the volume of the AFL/PFL system can be
adjusted in the control room monitor speakers.
The final facility provided by the master section is the ability to monitor any one of three stereo
playback devices. ‘2TK 1 RET’ and ‘2TK 2 RET’ are conventional analogue connections located on
the rear of the submaster section so that the playback of a stereo device such as a cd player or
output of a computer sound card can be selected to the control room monitor speakers. ‘2TK DIG
RET’ is provided for use when the optional digital I/O card is connected. This routes the converted
analogue output of a digital playback device connected through the I/O card onto the control room
monitor speakers. The bargraph displays will meter the playback level and, when any of the three
buttons are depressed, it is no longer possible to listen to the master stereo output from the console. This is to make sure that when listening to an important final mix, nothing else will be monitored. The signal will however still appear at the balanced master output jacks at the rear of the
master section and will also be controlled by the stereo master fader.
By selecting the appropriate pushbutton, it is therefore possible to listen to a stereo mix after it
has been recorded, providing an easy A/B comparison method.
Reference to the Master Section signal flow diagram will help to give a better understanding of the
way in which the signal is routed.
13
MASTER SECTION
MASTER SECTION General Description
The Master section of the ATB console contains all of the controls that affect the overall functionality of the console.
An accurately matched 100mm stereo fader controls the level of
the master stereo balanced outputs.
A comprehensive talkback system is provided which incorporates a high quality electret microphone and amplifier with a
continuously variable level control. The signal can be routed to
either the 8 subgroups and master left/right outputs for ‘slate’
announcements (so that the title of a song can be recorded at
the beginning), or to the auxiliary sends so that the engineer can
communicate with the musicians when they are in a separate
room. When the ‘TALK TO GROUPS’ button is used, the monitor
signal is dimmed by 25db to avoid feedback in the control monitor speakers.
Above the talkback section is the master monitor level control for
the control room speakers. This is a very important control as
without this turned up, it will not be possible to hear any signal
on the control room monitor speakers. Coupled with this control
is a ‘MONO’ pushbutton which combines the left/right monitor signals so that it is possible to check mono compatability. It
should be noted that the mono facility is purely a monitor function and does not affect the main stereo left/right output which
remains as a true stereo image. A very useful further facility in
this section is the provision of an ‘ALT MONITOR’ pushbutton
which routes the monitor signal to a second set of output jacks
on the rear of the master section so that an alternative monitor
system can be set up. This makes it possible to listen to the signal on (for example), a different set of monitor speakers so that
comparisons can be made.
A pair of very accurate 12 segment bargraph meters indicate the
signal being sent from the master left/right stereo outputs. As an
extremely useful additional feature to these electronic meters, a
pair of conventional moving coil VU meters are provided which
read in parallel with the bargraph meters. This makes it possible
to compare the signal measured on the two different types of
meters. By their nature, bargraph meters such as the ones fitted to to the Series ATB console, respond very quickly to signal
peak and therefore are useful when used on instruments with
12

Toft Audio Designs Series ATB Console ManualFor More Information, visit www.toftaudio.com
15
OVERALL FLOW DIAGRAMMASTER FLOW DIAGRAM
14

Toft Audio Designs Series ATB Console ManualFor More Information, visit www.toftaudio.com
To monitor the signal being recorded (via the multi-track recorders input/output monitoring system, the
recorder’s output should be connected to the balanced ‘MON’ jack located behind each input module.
This then connects the signal to the separate monitor section incorporated within each input module.
By turning up the appropriate ‘MON LEVEL’ control on an input module and adjusting the associated
‘MON PAN’ control, the signal can be listened to and placed anywhere between the left and right control room monitors. This of course is independent of any main channel panning that is taking place. By
this means a monitor mix of all 16, 24 or 32 channels can be built up depending on the mixer configuration. The multi-track recorder’s own meters can be used to control the record level and monitor the
playback of the signal.
A further very useful feature is the ability to select auxiliary sends 5 and 6 to the monitor circuit by
means of the ‘AUX 5-6 TO MON’ pushbutton located next to the monitor level control. This makes
it possible to supply a headphone mix to artists during recording (by using for example auxiliary 5 as a
headphone feed) and also monitor reverb (or some other processing device) by using (for example) auxiliary 6. In this mode, pressing the ‘PRE’ pushbutton selects the auxiliary send signal either pre or post
the monitor level control. It is therefore extremely quick and easy to record and overdub using this section of the console. An ‘EQ TO MON’ pushbutton completes the versatility of this section by making it
possible to route the entire four band equaliser onto the monitor section. This makes it possible to add
equalisation only on monitor to the track being recorded or playing back, so that it is possible to hear
how the mixed track might sound without actually recording it. In this mode, the eq. is now bypassed
on the channel section.
By using a combination of the channel direct outputs and the subgroups coupled with the channel and
subgroup monitor returns, it is of course possible to record a larger number of tracks than the console
has inputs. Therefore the 16 input console can be connected to a 24 track recorder, the 24 input console can be connected to a 32 track recorder and the 32 input console can be connected to a 40 track
recorder.
When it is required to use the console to mix down the recorded tracks, it is not necessary to re-plug
the console. By depressing the ‘I/P REV’ pushbutton at the top of the input module, the signal connected to the ‘MON’ jack is routed to the channel line input. The signal therefore appears at the main
channel fader and can be routed to the stereo mix via the ‘L-R’ pushbutton and panned via the channel pan control. The normal channel facilities such as AFL, equalisation and auxiliary sends can now be
used. Whatever was plugged into the channel line input now appears at the monitor section and can
also be routed to the stereo mix via the monitor level control and pan. In this way, the number of input
channels to the stereo mix is doubled which greatly enhances the versatility of the console.
Recording With A Microphone
After routing the signal to the desired output, the channel fader should be put to the top of it’s travel
(maximum position) and the ‘INPUT GAIN’ control should be adjusted so that either the input meter
of the device that the microphone is being sent to reads an acceptable level or the channel input
level l.e.d’s (situated next to the channel fader), show the signal level. Using these meters, the level
should be adjusted until the red l.e.d just illuminates on peaks and the level control should then be
brought down so that the red l.e.d is just extinguished.
17
OPERATIONAL DESCRIPTION
Multi-Track Recording Set Up
Make sure that all buttons are up and that all controls are in their default positions, i.e centre detented
potentiometers such as pan and equaliser boost/cut are in their centre positions, level controls and
equaliser frequency sweeps are at minimum (anti-clockwise). The channel fader should be set to
minimum.
The output from a balanced microphone should be wired in accordance with the information given in
section 2 of this manual and connected to the x-l-r input at the rear of the appropriate channel. If the
microphone requires +48 phantom power, this should be selected by depressing the ‘+48’ red button
at the top of the module.
The channel fader should be advanced to the top of its’ travel (maximum) and the mic/line level control
(at the top of the module) should be advanced until the green ‘-20’ l.e.d illuminates to a steady state.
This will indicate that there is signal present at the module output.
There are two ways to set up the console to record in a multi-track setup. If the console is only being
used in conjunction with an 8 track recorder or DAW, the signal can be sent via the ‘Submaster Outputs’ to the inputs of the recorder. The output of the 8 track recorder or DAW should be connected to
the ‘Monitor Returns’. If for example, you wish to route to track 5 of the multi-track recorder depress
the appropriate channel button marked ‘5-6’ and turn the channel pan control fully anti-clockwise (left).
The signal will now appear at the input of the 8 track recorder or DAW and the subgroup bargraph
display will indicate the level being sent to the recorder. To monitor the signal being replayed from the
DAW, depress the red ‘TAPE’ button on the appropriate submaster channel, turn up the ‘MON LEVEL’
control on the appropriate submaster channel and the signal will appear on the monitor speakers. The
‘MONITOR MASTER’ control in the Master section must be turned up. Since a lot of DAW’s (and of
course tape based recording systems) have automatic input/output monitoring systems such that when
a track is set to record the input is monitored through the playback outputs and then automatically
switches to playback when the track is not in record, the ‘TAPE’ button can be left depressed and the
DAW will provide the necessary monitor switching.
The second way of setting the console up is by using the ‘in-line’ monitoring facility provided on every
input. This system is to be favoured when using the console with anything more than an 8 track recording system.
As each input module is provided with a direct output signal derived directly after the channel fader, this
can be used to feed the individual tracks of a multi-track recording device. Therefore the ‘DIR O/P’ jack
located on the rear panel behind each input should be connected to the appropriate input of the recording device. It should be noted that connecting to the ‘DIR O/P’ jack does not break the signal path of
the input module, so all other facilities such as routing and panning to the 8 submaster groups is still
possible. This is especially useful since using the direct outputs only allows one signal to be routed to
each track. It is therefore necessary to use one of the sub groups only if a mix of a number of channels
is required. As the ‘DIR O/P’ jack does not break the signal path from the channel, it is a simple job to
connect from this jack directly to the input of the multi-track recorder or DAW.
16

Toft Audio Designs Series ATB Console ManualFor More Information, visit www.toftaudio.com
the line amplification is 0dB. Decreasing the level will attenuate the signal by up to -15dB and increasing it from midway will amplify it by up to 25dB.
Once the recording has been made, it can be played back either via the Submaster section or Monitor sections of the input channels. This is explained in detail in the previous ‘Multi-Track Recording’
section.
Mixing Down
Changing from the recording mode to mixing on the Series ATB is very easy to accomplish as a lot of
the functions are selectable by push buttons rather than re-plugging connections.
If the replay lines from the multi-track recorder have been connected to the ‘LINE’ jacks on each
Input module, depressing the ‘LINE’ button at the top of the module will bring the signal through the
channel fader. If the replay lines from the multi-track recorder have been connected to the ‘MON’
jack on the rear of the input module (as would be the case when using the channel monitor section
for multi-track monitoring), depressing the ‘I/P REV’ button will bring those signals through the input
channel via the line input. Any signal that was connected to the line input will now be routed through
the channel monitor section.
The input level control at the top of the module should be at it’s midway position and the channel
fader advanced until the green -20db illuminates and an appropriate signal level is metered on the
master left/right bargraph displays.
To select a channel to mix it is only necessary to depress the ‘L-R’ button on the appropriate channel
located next to the channel fader. The channel pan control will position the signal in the stereo image. The channel fader will control the level to the stereo mix which will be metered on both the left
and right bargraph displays located in the master section as well as the two analogue meters. The
stereo master fader located in the Master Module should be put to the top of it’s travel and the master monitor level control should be adjusted so that the signal from the control room monitor speakers is at the appropriate level. When the final mix has been recorded on one of the two analogue 2
track recorders, or digital recorder that can be connected to the console, replay of the final stereo mix
can be made via the ‘2 TK 1 RET ’, ‘2 TK 2 RET ’, or ‘2 TK DIG RET ’, selection buttons on the master
module.
When building up the mix, it is important to work with the relationship between the input level control and the channel fader such that the fader is always as close to the top of it’s travel as possible
yet still allowing enough in hand to increase gain for solo passages etc. If the fader is operated too
low in it’s travel and the input level control too far advanced, overload/headroom problems are more
likely to occur especially when introducing equalisation.
As described in the previous sections on recording and overdubbing, signal processing such as limiter/compressors can be added to individual channels via the ‘INSERT.’ send and return jacks. Alternatively, overall limiting/compression of the stereo mix can be accomplished by means of the ‘MASTER
INS.’ left and right jacks located behind the master module.
19
The phase reverse button located at the top of the module works in conjunction with the mic and
line inputs and can be used to reverse the signal phase of either input. Phase differences can occur
when two microphones are placed in close proximity (for example when recording acoustic guitar)
and causes a cancellation of certain frequencies (usually bass) which results in a ‘thin’ sound. By
using the phase switch, this effect can often be minimised or eliminated altogether. In the line
mode, phase errors can often occur due to incorrect phase wiring of a piece of equipment connected
to the console. Operation of the phase switch under these circumstances will often solve the problem.
Very often at this stage in the recording process, musicians may require a headphone feed so that
they can hear their instrument or a mix of the other musicians. A suitable headphone amplifier
should be connected to the auxiliary send(s) that is to be used for this purpose. To provide a headphone feed (foldback or cue) signal, it is usual that the signal is taken pre-fader. This is so that if the
engineer changes the fader settings during recording, it will not affect the musicians balance. On
the ATB console, auxiliary send 1 is designated as a pre-fader send for this purpose. To provide a
musicians headphone feed therefore, all that is necessary is to turn the appropriate master auxiliary
send level control at the top of the Master Module to just below maximum, and advance the relevant
channel module auxiliary send level until the musician is happy with the level.
To provide auxilairy send to a reverberation/echo device, the same porocedure as above should be
followed, except that it is recommended that auxiliary sends 2-6 are used as they can be selected
post fader. This is necessary because unlike headphone feeds, the reverb/echo signal will need to
follow the fader level.
Equalisation can now be added to the microphone signal if required and this is done by simply
switching the equaliser into circuit by means of the illuminated switch in the equaliser section. The
ATB Series equaliser is very comprehensive and consists of four separate bands each offering +/15dB boost or cut. The high and low sections are of the ‘shelving’ type whilst the two mid sections
are of the ‘peaking’ type and all ranges have been chosen for their musical response and character.
An 80Hz roll off filter is also incorporated which is particularly useful in eliminating microphone rumble etc.
If it is required to introduce further signal processing such as a limiter compressor etc. into the signal
chain, this can be accomplished by connecting the device via the individual ‘INSERT’ jacks on the
rear of each input module. The send (input to the device) is connected to the tip of the jack and the
return (output of the device) is connected to the ring of the jack. The device should be adjusted so
that the required amount of signal processing takes place and care should be taken to make sure that
additional gain is not introduced that may cause distortion. If this is the case it may be necessary to
adjust the channel module input level control to allow for this.
Once all of the microphone channels have been adjusted in the above fashion, the recording can
be carried out. If line level signals are also to be recorded, the procedure is identical to that above
except that a signal is connected to the channel line input jack and the ‘LINE’ button at the top of the
module is depressed. It should be noted that when the input level control is in its’ midway position,
18

Toft Audio Designs Series ATB Console ManualFor More Information, visit www.toftaudio.com
21
This configuration does however mean that without connecting a DAW and using the ‘multitrack’ emulation as described above, it will not be possible to read the channel signal. For this
reason a customer programmable switch has been provided which is accessible through a small
hole in the base panel of the mixer. As standard, the switch is factory set to read the monitor
return signal as described above. By pressing the switch with a small object such as a thin electrical screwdriver, it is possible to change the metering point to post channel fader. The meter
will then always indicate the post fader channel output. This will give a very accurate indication
of the signal level leaving the channel. The switch access hole is located towards the rear of the
mixer base panel.
If a line level signal is connected to the channel ‘LINE’ input, then it will be possible to meter the
signal when the ‘INPUT REVERSE’ switch is depressed.
Reverb/echo effects can be added by using any of the six auxiliary send outputs connected to an
appropriate reverb device. The output of these devices can either be connected to any of the eight
dedicated Stereo Effects channels located in the Sub Group section of the console, or connected as
a line input to any input module or channel Monitor section.
As described previously, one of the main features of the console is the ability to use the channel
Monitor sections as additional line inputs during mixdown. This virtually doubles the amount of channels available to the mix with the possibility of adding equalisation, auxiliary sends, panning and level
controls.
To use this facility, let’s assume that the replay from the mult-track is connected to channels 1-24
line inputs, line has been selected and the signal routed through the ‘L-R’ buttons to the stereo mix.
Additional line level inputs can now be connected to the ‘MON’ jack on any input module and that
signal will also feed the stereo mix. Adjusting the ‘Mon Level’ control and pan will place the signal
across the stereo mix. Selecting ‘Eq’ on the channel monitor section will make it possible to add
equalisation to it. If reverberation/echo is required, this can be achieved by selecting the appropriate
5-6 auxiliary send to be from ‘MON’ and the signal will now be sent either pre or post the appropriate
monitor level control. The signal can be muted via the illuminated ‘MUTE’ button in this section.
Meterbridge Option
The additional meterbridge option greatly enhances the functionality of the ATB console when it is
used with a DAW recorder connected to the direct outputs from each channel.
This is often favoured when the console is connected to a recording device with more than eight
inputs and minimises the need for re-plugging the sub group outputs.
Because each channel is equipped with its own separate monitoring section, the console is able to
record and monitor as many tracks as there are channel inputs.
As it is only possible for the meterbridge to read one signal from each channel, as standard the feed
is sent from the monitor return buffer amplifier before the monitor level control.
This point was chosen so as to provide a more flexibile metering system.
By connecting the output of the DAW or recording device to the balanced ‘Monitor’ inputs of each
channel, the meter will read whatever signal is being replayed. In order to read the signal being sent
to the DAW, most software recording systems can be set to emulate a conventional multi-track
recorder. This means that when the DAW is not playing back or is set for the channel to record, the
input signal is passed straight through to the output making it possible to monitor (and therefore meter) the signal that is feeding the input to the DAW.
This therefore makes it possible to meter the signal both going to and coming from the DAW or recording device. If the meterbridge signal was taken from the channel direct putput, it would only be
possible to read the signal going to the DAW and it would therefore not be possible to compare the
replay signal to the input signal, or see the replay signal during playback or mixdown.
20

Toft Audio Designs Series ATB Console ManualFor More Information, visit www.toftaudio.com
CAUTION: TO REDUCE THE RISK OF ELECTRIC SHOCK, DO NOT REMOVE COVER. NO USER-SERVICEABLE
IMPORTANT SAFETY INFORMATION
The lightning flash with arrowhead symbol, within equilateral triangle, is intended to alert the user
to the presence of uninsulated “dangerous voltage” within the product’s enclosure that may be
of sufficient magnitude to constitute a risk of electric shock to persons.
The exclamation point within an equilateral triangle is intended to alert the user to the presence of
important operating and maintenance (servicing) instructions in the
literature accompanying the appliance.accordance with manufacturers’ instructions.
WARNING: TO AVOID FIRE OR ELECTRIC
SHOCK HAZARD, DO NOT EXPOSE THIS
APPARATUS TO WATER, RAIN OR MOISTURE.
NOTE — This apparatus does not exceed the Class A/Class B (whichever is applicable) limits for radio noise emissions
from digital apparatus as set out in the radio interference regulations of the Canadian Department of Communications.
.
ATTENTION — Le présent appareil numérique n’émet pas de bruits radioélectriques dépassant las limites applicables
aux appareils numériques de class A/de class B (selon le cas) prescrites dans le réglement sur le brouillage radioélectrique édicté par les ministere des communications du Canada.
These limits are designed to provide reasonable protection against harmful interference in a commercial/residential
installation respectively. This equipment generates, uses, and can radiate radio frequency energy and, if not installed and
used in accordance with the instruction manual, may cause harmful interference to radio communications. There is no
guarantee that interference will not occur in a particular installation. If this equipment does cause interference to radio or
television equipment reception, which can be determined by turning the equipment off and on, the user is encouraged
to try to correct the interference by any combination of the following measures: (1) Relocate or reorient the receiving
antenna (2) Increase the separation between the equipment and the receiver (3) Plug the equipment into an outlet on a
circuit different from that to which the receiver is connected (4) Consult your dealer or experienced radio/television
technician for additional assistance
CAUTION — Changes or modifications to this equipment not expressly approved by the party responsible for compliance
could void the user’s authority to operate this equipment.
IMPORTANT SAFETY INSTRUCTIONS
1. Read these instructions.
2. Keep these instructions.
3. Heed all warnings.
4. Follow all instructions.
5. Do not use this apparatus near water. Do not expose to drips or splashes. Do not place any objects filled with liquids,
such as vases, on the apparatus.
6. Clean only with dry cloth.
7. Do not block any ventilation openings. Do not install this apparatus in a confined space such as a book case or similar
unit. Install only in racks designed for the purpose and in accordance with manufacturers’ instructions.
8. Do not install near any heat sources such as radiators, heat registers, stoves, or other apparatus (including amplifiers)
that produce heat.
23
TECHNICAL SPECIFICATIONS
Input impedance:
Microphone: >1.2KΩ electronically balanced
Line: >10KΩ electronically balanced
Output Impedance:
Groups and Auxiliaries: <100Ω electronically balanced
Others: <100Ω unbalanced
Gain:
Microphone: 70dB (channel input to group output)
Gain: 6dB to 65dB
Line: -15 to +25dB
Noise:
Microphone: <-127dBu ref 200Ω, 20Hz to 20kHz
Line: <-75dBu (Eq in, direct output) 20Hz to 20kHz
Overall system <-75dBu (Line input to group output) 20 Hz to 20kHz
Maximum Levels:
Mic Input: +20dBu at all frequencies
Line Input: +22dBu at all frequencies
Group outputs: +26dBu balanced, +22dBu unbalanced into 2KΩ
Distortion:
Microphone: <0.03% T.H.D.(-50dBu input, +4dBu output)
Line: <0.02% T.H.D.(+4dBu input, +4dBu output)
Frequency response:
Microphone: ±1dB 20Hz to 40kHz
Line: ±0.5dB 20Hz to 30kHz
Crosstalk:
Adjacent channel: -70dB @ 1kHz, -60dB @ 15kHz
Adjacent group: -70dB @ 1kHz, -60dB @ 15kHz
Nominal level: +4dBu
In accordance with our policy of product improvement, we reserve the right to alter specifications without prior notice.
22

Toft Audio Designs Series ATB Console ManualFor More Information, visit www.toftaudio.com
WARRANTY
TOFT AUDIO DESIGNS LIMITED WARRANTY
PMI Audio Group warrants that all products will be free
from defects in material or workmanship:
A: For a period of (1) one year from the date of purchase
(hereinafter the labor warranty period), PMI Audio Group
will repair or replace this Product if determined to be defective.
After the expiration of the labor warranty period, the Purchaser
must pay labor charges.
B: In addition, PMI Audio Group will supply, at no charge,
replacements for defective parts for a period of (one year)
from the date of purchase. During the labor warranty period ,
to repair the Product, Purchaser must return the
defective Product, freight prepaid, or deliver it to PMI
Audio Group Service Center. The product to be repaired
is to be returned in either its original carton or a similar
package affording an equal degree of protection. PMI Audio
Group will return the repaired Product freight prepaid to
the Purchaser. PMI Audio Group is not obligated to provide
Purchaser with a substitute unit during the warranty period
or at any time.
CONDITIONS
1. Notification of claims: Warranty Service: If Purchaser
discovers that the Product has proven defective in material
or workmanship, then written notice with an explanation
of the claim shall be given promptly by Purchaser to PMI
but all claims for warranty service must be made within the
warranty period. If after investigation PMI determines that
the reported problem was not covered by the warranty,
Purchaser shall pay PMI for the cost of investigating the
problem at its then prevailing time-and-materials rate. No
repair or replacement by Purchaser of any Product or part
thereof shall extend the warranty period as to the entire
Product. The specific warranty on the repaired part only
shall be in effect for a period of ninety (90) days following
the repair or replacement of that part or the remaining
period of the Product warranty, whichever is greater.
2. Exclusive Remedy: Acceptance: Purchaser’s exclusive
remedy and PMI’s sole obligation is to supply (or pay for)
all labor necessary to repair any product found to be
defective within the warranty period and to supply, at no
extra charge, new or rebuilt replacements for defective
parts. If repair or replacement fails to remedy the defect,
then and only in such an event, shall PMI exchange to
Purchaser a new or reconditioned unit. Purchaser’s failure to
make a claim as provided in paragraph 1 above or continued use of the product shall constitute an unqualified
acceptance of such Product and a waiver by Purchaser of
all claims thereto.
3. Exceptions to Limited warranty: PMI shall have no liability
or obligation to Purchaser with respect to any Product
subjected to abuse, improper use, negligence, accident,
modification, failure of the end-user to follow the operating
and maintenance procedures outlined in the users manual,
attempted repair by non-qualified personnel, operation of
the unit outside of the published environmental and electrical
parameters, or of such products original identification
(trademark, serial number) markings have been defaced,
altered, or removed. PMI excludes from warranty coverage,
Products sold AS IS and/or WITH ALL FAULTS and excludes
used products which have not been sold by PMI to the
Purchaser. PMI also excludes from warranty coverage
consumables such as fuses and batteries, tubes, etc.
4. Proof of purchase: The dealer’s dated bill of sale must
be retained as evidence or the date of purchase and to
establish warranty eligibility.
DISCLAIMER OF WARRANTY
EXCEPT FOR THE FORGOING WARRANTIES, PMI HEREBY
DISCLAIMS AND EXCLUDES ALL OTHER WARRANTIES,
EXPRESS OR LIMITED, INCLUDING, BUT NOT LIMITED
TO ANY/OR ALL IMPLIED WARRANTIES OF MERCHANT
ABILITY, FITNESS FOR A PARTICULAR PURPOSE AND/
OR ANY WARRANTY WITH REGARD TO ANY CLAIM OF
INFRINGEMENT THAT MAY BE PROVED IN SECTION
2-312(3) OF THE UNIFORM COMMERCIAL CODE AND/
OR IN ANY COMPARABLE STATE STATUE. PMI HEREBY
DISCLAIMS ANY REPRESENTATIONS OR WARRANTY
THAT THE PRODUCT IS COMPATIBLE WITH ANY COMBINATION
OF NON-PMI AUDIO PRODUCTS PURCHASER MAY
CHOOSE TO CONNECT TO THE PRODUCT.
LIMITATION ON LIABILITY
THE LIABILITY OF PMI, IF ANY, AND PURCHASER’S
SOLE AND EXCLUSIVE REMEDY FOR DAMAGES FOR
ANY CLAIM OF ANY KIND WHATSOEVER, REGARDLESS
OF THE LEGAL THEORY AND WHETHER ARISING IN
TORT OR CONTRACT, SHALL NOT BE GREATER THAN
THE ACTUAL PURCHASE PRICE OF THE PRODUCT
WITH RESPECT TO WHICH SUCH CLAIM IS MADE. IN
NO EVENT SHALL PMI BE LIABLE TO PURCHASER FOR
ANY SPECIAL, INDIRECT, INCIDENTAL, OR CONSEQUENTIAL
DAMAGES OF ANY KIND INCLUDING, BUT NOT LIMITED
TO, COMPENSATION, REIMBURSEMENT OR DAMAGES
ON ACCOUNT OF THE LOSS OF PRESENT OR PROSPECTIVE
PROFITS OR ANY OTHER REASON WHATSOEVER.
Features and specifications are subject to change without notice
25
9. Do not defeat the safety purpose of the polarized or grounding-type plug. A polarized plug has two blades with one
wider than the other. A grounding-type plug has two blades and a third grounding prong. The wide blade or the
third prong are provided for your safety. If the provided plug does not fit into your outlet, consult an electrician
for replacement of the obsolete outlet.
10. Protect the power cord from being walked on or pinched particularly at plugs, convenience receptacles, and the
point where they exit from the apparatus.
11. Only use attachments/accessories specified by the manufacturer.
12. Use only with a cart, stand, tripod, bracket, or table specified by the manufacturer, or sold with the apparatus. When
a cart is used, use caution when moving the cart/apparatus combination to avoid injury from tip-over.
13. Unplug this apparatus during lightning storms or when unused for long periods of time.
14. Refer all servicing to qualified service personnel. Servicing is required when the apparatus has been damaged in any
way, such as power-supply cord or plug is damaged, liquid has been spilled or objects have fallen into the
apparatus, the apparatus has been exposed to rain or moisture, does not operate normally, or has been dropped.
15. Apparatus designed with Class-I construction must be connected to a mains socket outlet with a protective earthing
connection (the third grounding prong).
16. This apparatus may be equipped with a single-pole, rocker style AC mains power switch. If so this switch is located
on the front panel and should remain readily accessible to the user.
17. The manufacturer reserves the right to change the technical specification of the product without prior notice.
STATEMENT OF RoHS COMPLIANCE
PMI Audio Group manufactures complete electronic products which are covered by the European Union’s “Removal of
Hazardous Substances” directive 2002/95/EC (RoHS). This directive seeks to eliminate toxic substances from the
manufacturing process, such that when equipment is disposed of at the end of its life cycle, the materials it contains do
not contaminate the environment and pose health risks. Banned substances are lead, mercury, cadmium, hexavalent
chromium, polybrominated biphenyls (PBB) and polybrominated diphenyl ethers (PBDE). Lead is used together with
tin in solder connections to reduce the melting point of solder. Lead-free solder requires higher soldering temperatures
which in turn places greater thermal stress on components.
PMI Audio Group takes seriously its obligations under the RoHS directive and insists that its factories use only
components that are certified RoHS compliant, as well as leadfree solder. In a very few cases the necessary components
may not yet be available to the world market but we work continuously to eliminate any such exceptions at the earliest
opportunity. Our printed Circuit Boards (PCB’s) and all soldered joints have been lead-free since 2005.
STATEMENT OF WEEE POLICY
PMI Audio Group manufactures many complete electronic products which are covered by the European Union’s “Waste
Electric and Electronic Equipment” directive 2002/96/EC (WEEE). This directive seeks to ensure that waste electric and
electronic equipment is disposed of in an environmentally responsible manner, at the end of its life cycle. PMI Audio
Group takes seriously its obligations under this directive to take back WEEE-affected products and, from 13th August
2005, will mark all such proVducts with the crossed-out wheeled bin symbol.
Business to Business products: PMI Audio Group will cost-neutrallytake back WEEE-affected electric and electronic
equipment in this category, from 1st January 2006. PMI Audio Group will work with disposal and recycling partners working
within the EU. The waste electric and electronic equipment can then be turned over to a disposal and recycling companies in
the countries concerned.
Business to Customer products: emerging electric andelectronic equipment will be disposed of by local authorities’
collection systems. Dual Use products: this equipment will be disposed of by local authorities’ collection systems.
24

Toft Audio Designs Series ATB Console ManualFor More Information, visit www.toftaudio.com
PLEASE DETACH AND RETURN THIS PORTION TO TOFT AUDIO DESIGNS
WITHIN 14 DAYS OF PURCHASE. YOU MAY ALSO REGISTER
ONLINE AT WWW.TOFTAUDIO.COM
Name:
City: State: Zip:
Telephone Number: Email Address:
Model Purchased: Date Purchased:
Serial Number: Dealer:
Comments:
PMI Audio Group US
1845 W 169th ST
Gardena, CA 90247
PMI Audio Group UK
4 Minerva Court, Woodland Court
Woodlands Industrial Estate
Torquay, Devon TQ2 7BD
Send to the closest PMI facility:
27
REGISTRATION
OWNERS REGISTRATION CARD TO BE COMPLETED AT THE TIME OF PURCHASE
Name
Date of Purchase
Serial Number
Dealer Name
Retain this portion for your records.
26
All warranties apply only to PMI Audio Group
Products purchased and used in the USA, and
to PMI Audio UK Products purchased and used
in the UK, EU and all other countries outside of
the USA. All warranties apply only to PMI Audio
Group/PMI Audio UK Products originally purchased from an authorized PMI Audio Group/PMI
Audio UK dealer. PMI Audio Group/PMI Audio
UK Product that was not purchased through
an authorized and legitimate sales channel is
considered “Grey Market”. Warranties for PMI
Audio Group/PMI Audio UK Products purchased
outside their respective s will be covered by the
PMI Audio Group/PMI Audio UK Importer for that
specific country or region. Products originally
sold to the USA market and consequently resold
overseas forfeit their warranty as do PMI Audio
UKProducts sold outside of the UK and Europe.
Gray Market Information
American PMI Audio Group
Dealers are expressly forbidden to export PMI
Audio Group Products and PMI Audio UK Distributors and Dealers are expressly forbidden to export to North, South, Central and Latin America.
“Grey Market”purchases are not covered by any
warranty. In the case that a PMI Audio Group/
PMI Audio UK Product must be returned to the
factory from outside its respective territory, customer shall adhere to specific shipping, customs,
and commercial invoicing instructions given with
the Return Authorization as PMI Audio Group/
PMI Audio UK will not be responsible for transportation costs or customs fees related to any
importation or re-exportation charges whatsoever.

______________________________________
______________________________________
______________________________________
______________________________________
Toft Audio Designs
place
stamp
here

Toft Audio Designs® is a registered trademark of PMI Audio Group® ©2014 All Rights Reserved
PMI Audio Group US
1845 W 169th ST
Gardena, CA 90247
V: 310.323.9050
W: www.toftaudio.com
E: info@pmiaudio.com
PMI Audio Group UK
4 Minerva Court, Woodland Court
Woodlands Industrial Estate
Torquay, Devon TQ2 7BD
V: 01803 612 700
W: www.toftaudio.com
E: info@pmiaudio.com
 Loading...