

Todo HS-00808 Instruction Manual

INSTRUCTION MANUAL
PAGE 22: MANUAL DE INSTRUCCIONES PAGE 40: BEDIENUNGSANLEITUNG PAGE 58: MANUEL D’INSTRUCTIONS


Welcome
Bienvenido
Willkommen
Bienvenue

4
ENGLISH

5
ENGLISH
THE MULTI-FUCTIONAL CRAFTING MACHINE
CONTENTS
General Safety Warnings ......................................................... 4
What’s in the Box? .................................................................. 5
Using the TODO™ Machine ..................................................... 6
Embossing with Folders ............................................................ 6
Die Cutting with Dies ............................................................ 7 - 8
Embossing with thin Dies ....................................................... 9
Die Cutting with Thick Dies ....................................................... 10
Letterpressing .......................................................................... 11
Hot Foiling ............................................................................. 12
Top Tips ................................................................................. 14
Settings Guide ........................................................................ 15
Frequently Asked Questions .................................................... 16
Cleaning Instructions / Trouble Shooting .................................. 17
Warranty .............................................................................. 18
Specication ......................................................................... 75
To reduce risk of injury, the user must read
and understand this instruction manual
before using the TODO™ machine. This
appliance is intended for domestic use
as described and in accordance with the
instructions provided in this manual.
Please read these instructions carefully and
retain for future use.
NEVER leave a TODO machine
unattended when in operation or
cooling down.
NEVER lift the TODO machine by the
roller mechanism.
WARNING

6
ENGLISH
GENERAL SAFETY WARNINGS
• Never leave the TODO™
unattended during operation or
whilst cooling.
• Ensure that the TODO heating plate
does not come into contact with
surfaces that may be damaged
through excessive heat.
• Regularly check the cord for
damage. Should the cord be
damaged in any way it must only be
replaced by the manufacturer, their
agent, or a similar qualied person
in order to avoid electric shock.
• Regularly check the unit, but do not
switch it on if it appears damaged
or is operating incorrectly. Do not
attempt to carry out any repairs to
the unit in any way, repairs must be
carried out by a suitably qualied
technician. There are no userserviceable parts inside.
• This appliance is not intended for
use by children or persons with
reduced physical, sensory or mental
capabilities, or lack of experience
and knowledge, unless they are
supervised by a person responsible
for their safety. Children should
not be allowed to play with the
appliance.
• Close supervision is necessary when
children are around and be aware
that units can be pulled off work
surfaces or similar areas by the
unwary.
• Never allow the cord to touch wet or
hot surfaces, become twisted or be
within the reach of children or
animals.
• Always allow the unit to cool before
attempting to move it and never
reposition or move the unit by
pulling the cord.
• Do not use this appliance for
anything other than the intended use.
• Unplug from socket when not in use
• or before cleaning.
• Pull on the plug, not the cord.
• Warning - This machine heats up to
approx. 80°C. When using metal
dies they will conduct heat and
therefore, become hot. Be careful
when removing metal dies from
the heating plate. Allow to cool for
30 minutes before
removing metal plates with your
hands. Alternatively, TODO offers
accessories such as silicone mat and
handling device.
• Do not immerse the TODO machine
or heating plate in water.
• Do not touch the heating plate of
the TODO machine with your hand
during operation.
• Do not overload the power socket.
• Never lift the TODO machine by the
roller mechanism.
7
ENGLISH
CONGRATULATIONS on purchasing
your TODO™ machine. TODO is the
ultimate paper crafting tool, which
inspires you to create boundless works
of art. The TODO machine is packed
full of possibilities, it’s a revolution.
From hot foiling, die cutting to
embossing and letterpressing, it frees
the paper artist within you.
This multi-functional crafting machine
works with a wide range of materials.
It is suitable for beginners to advanced
paper crafters and delivers outstanding
results.
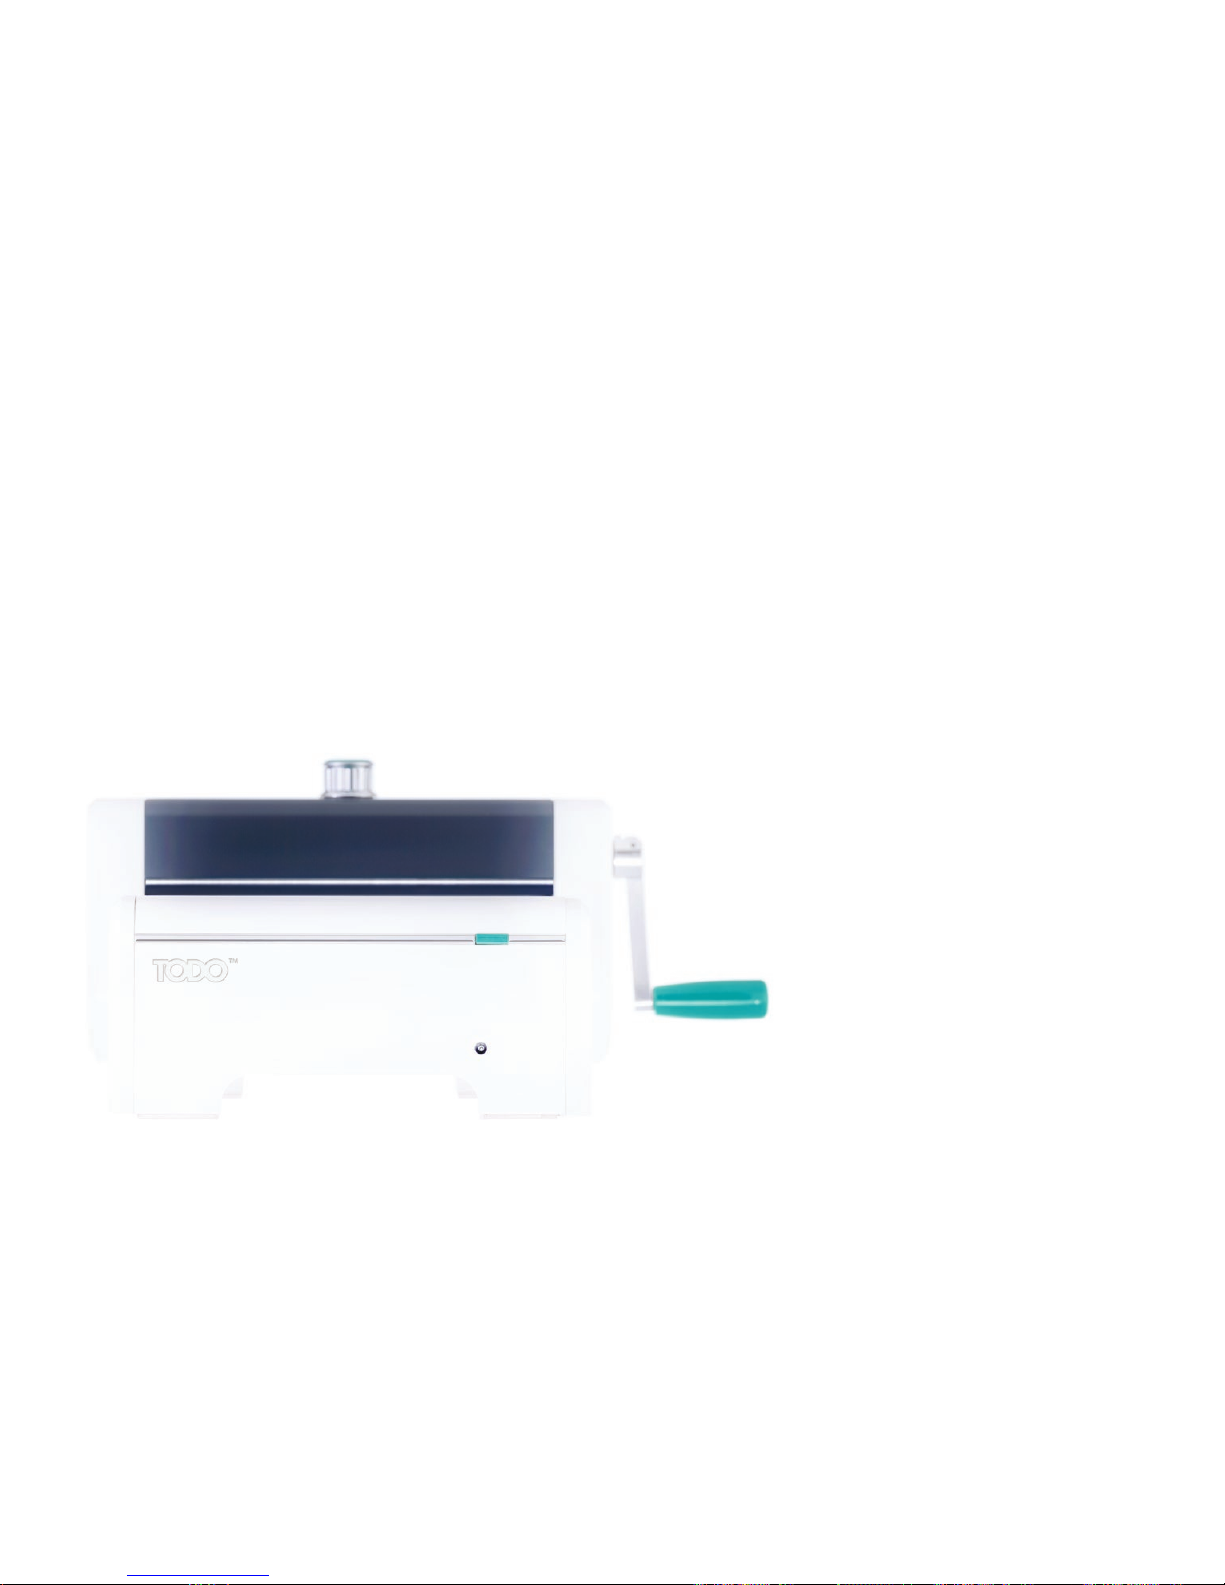
WHAT’S IN THE BOX?
TODO™ Main Unit
Power Cable
Removable Heating Plate
3 x Cutting Mats (A/B/D)
1 x Embossing Mat (C)
Silicone Mat
Die Removal Tool
8
ENGLISH
USING THE TODO™ MACHINE
Work on a solid stable surface. Place the machine on a suitable rm, at and
substantial work surface, at a height that is comfortable for easy operation.
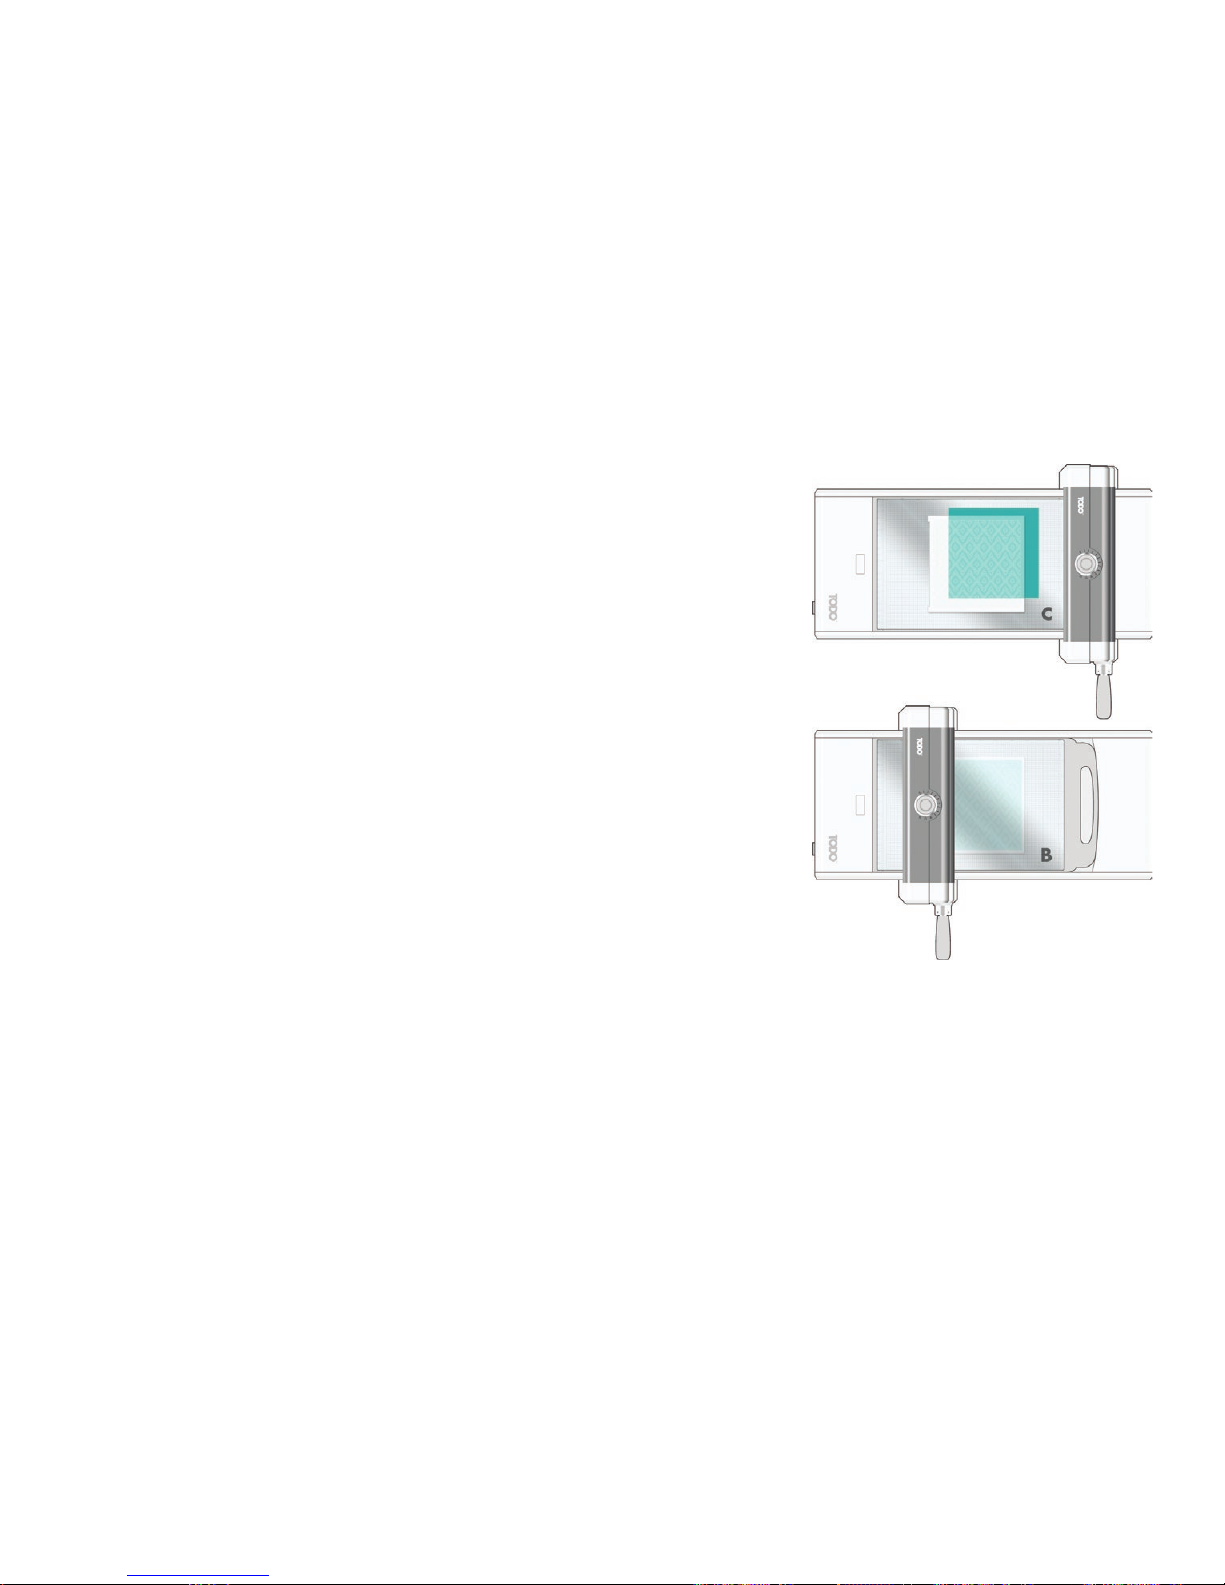
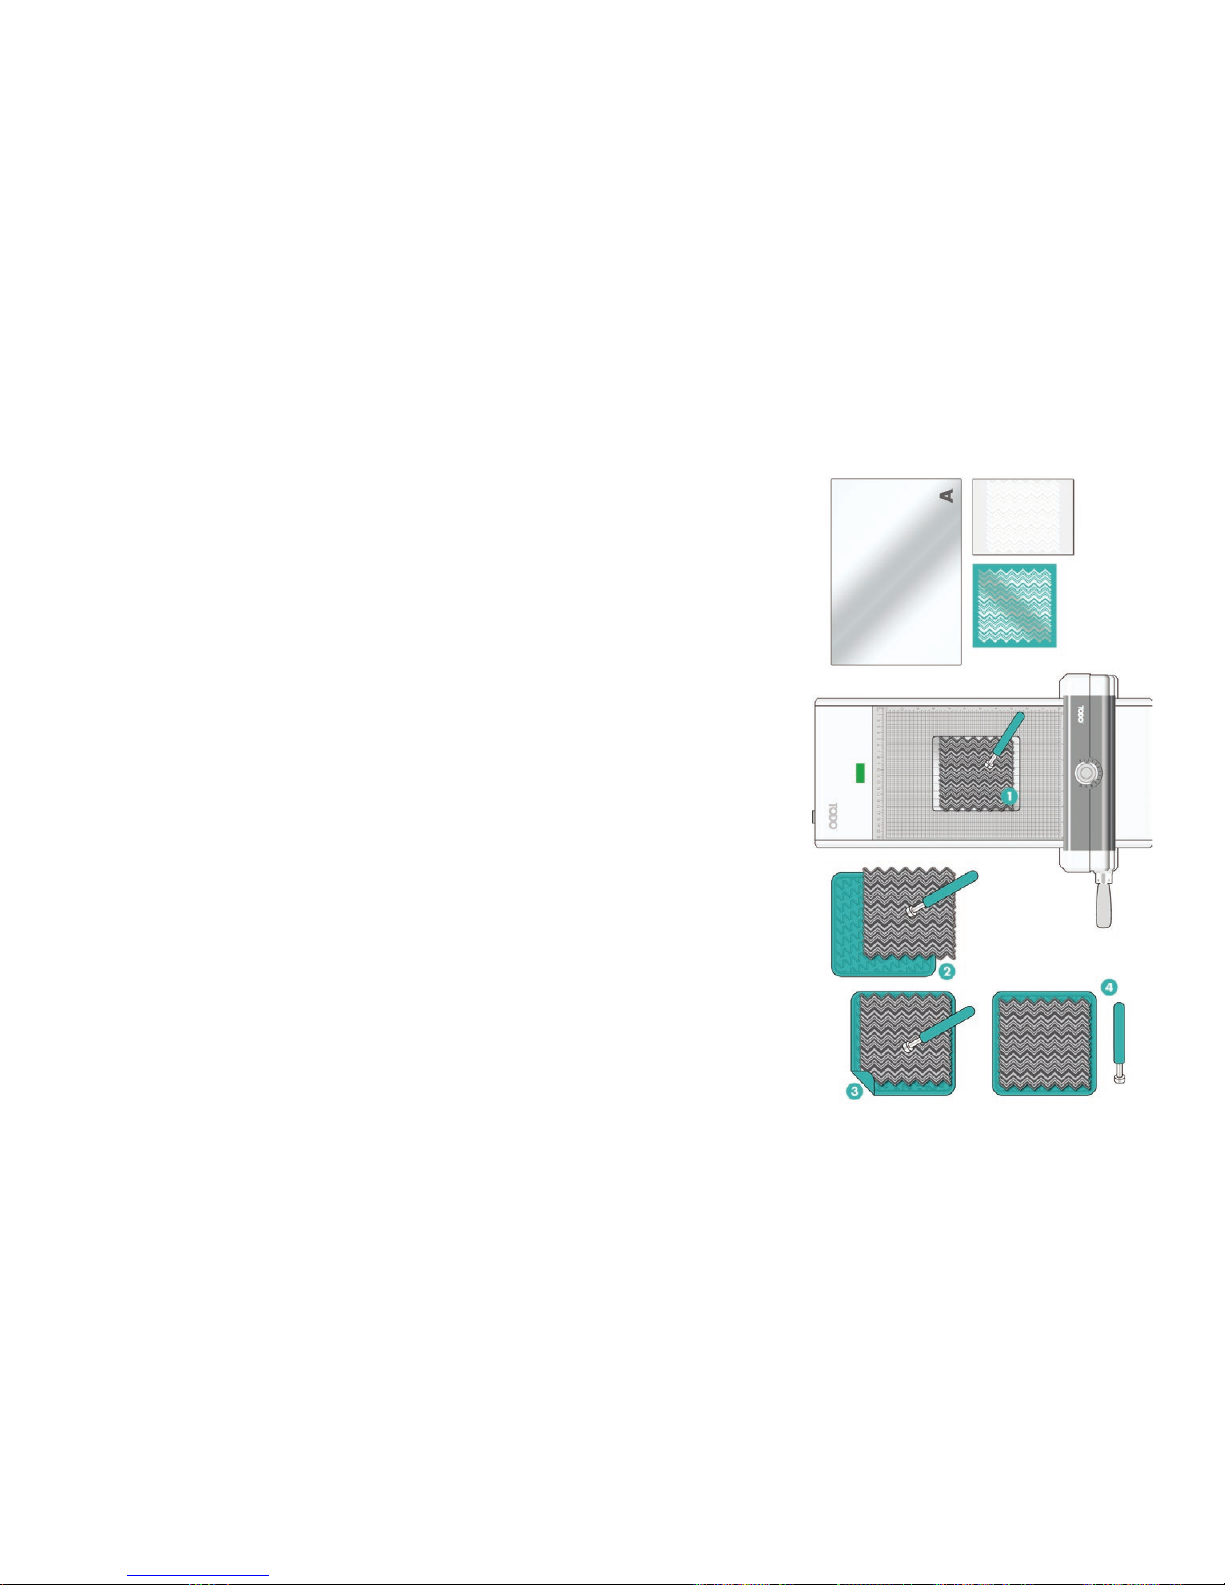
EMBOSSING WITH FOLDERS
An embossing folder is designed to give a plain piece of card a beautifully crisp
embossed design. There are many on the market, but these instructions will work
for all standard embossing folders.
1. Ensure the roller mechanism is to the side of the machine.
2. Place your C Plate on top of the base plate
3. Place your card inside your embossing folder and place your embossing folder
onto the C Plate.
4. Place your B Plate on top of the folder.
5. Adjust the pressure. The exact pressure will depend on the manufacturer of the
folder and the weight of material inside the folder. See settings table on page
15 for guidelines.
6. Turn the handle until the roller mechanism has gone over the complete folder.
7. Roll the mechanism to the opposite end of the machine, or back to the start and
remove the folder and card from the machine.
NOTE: You may feel the pressure increase slightly as the rollers go over the embossing folder. This
is supposed to happen. However, if you feel that you are having to force the rollers over the folder
reverse the rollers and reduce the pressure on the machine before trying again. DO NOT reset dial
during operation, always reverse the roller back before resetting the dial.
TIP: Try experimenting with different materials in
your embossing folders. Acetate, vellum and
chipboard can all be embossed to create
different looks. Just remember to adjust the
pressure for the different materials.
9
ENGLISH
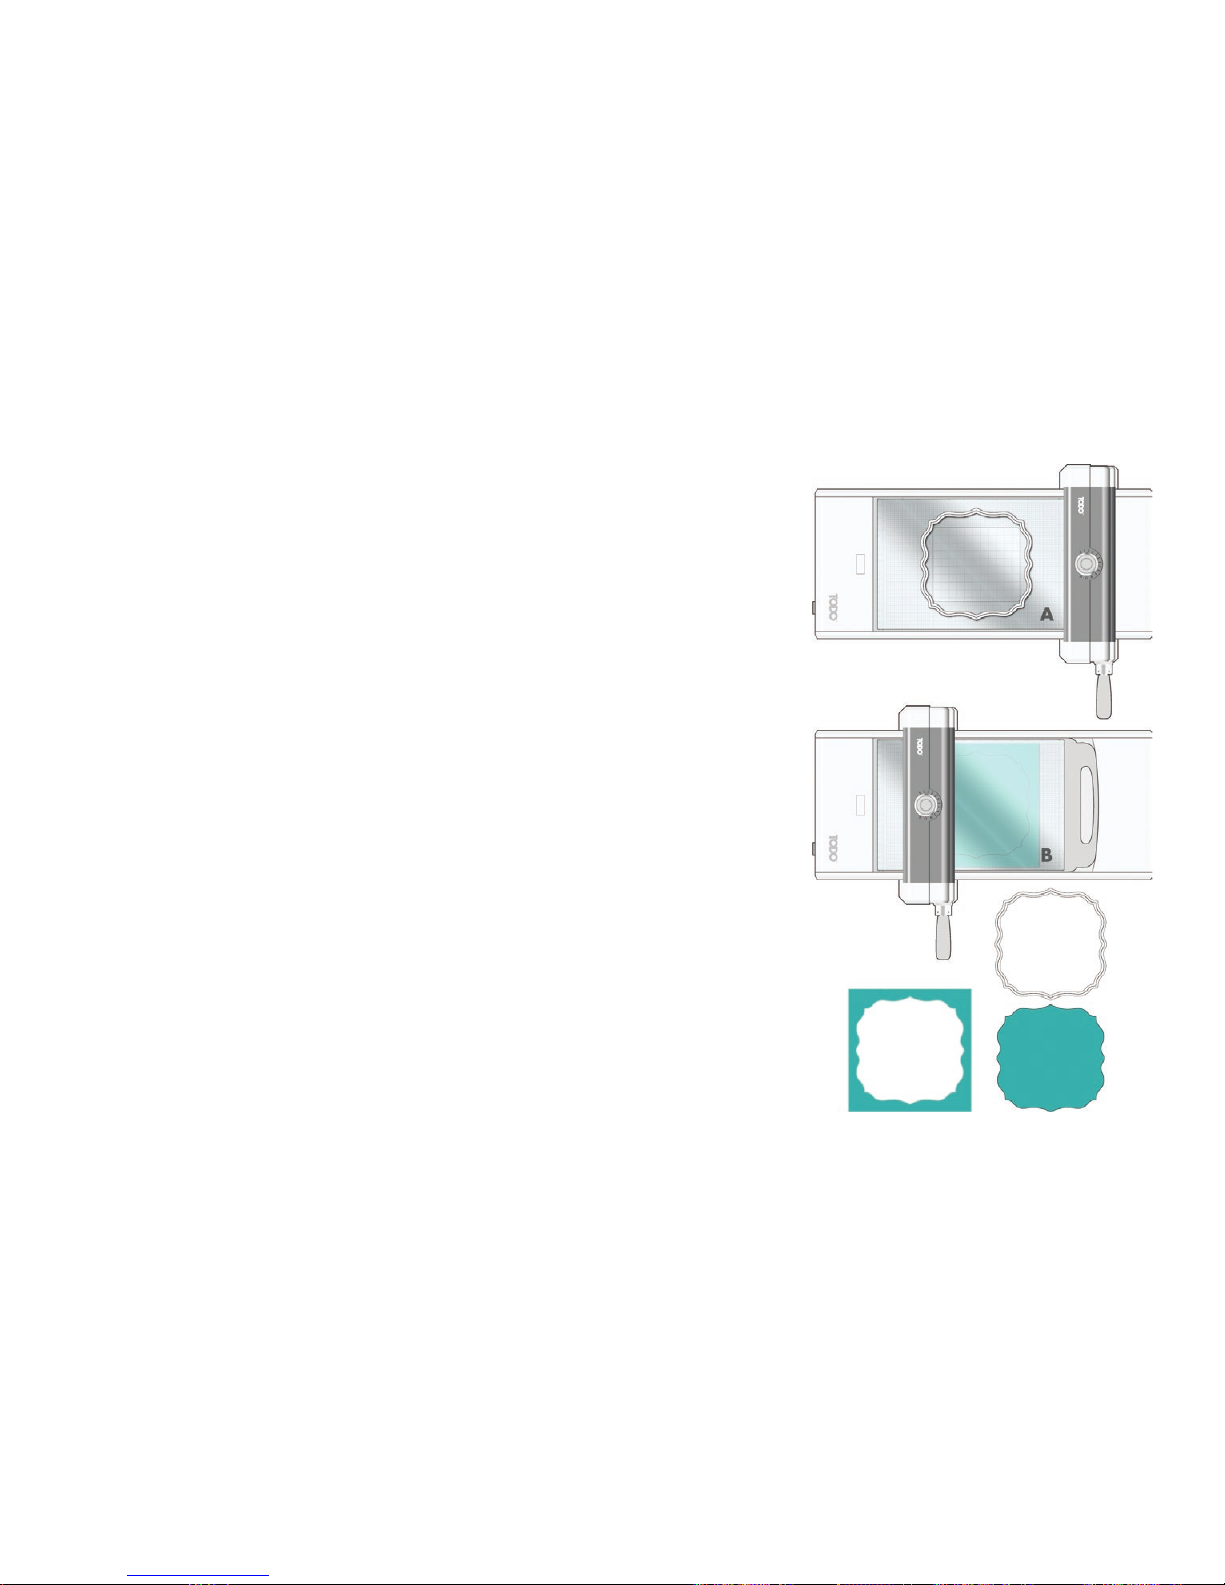
DIE CUTTING WITH DIES
There are a huge number of dies on the market that will work with your TODO™
machine. Here we will look at using Thin Metal Dies. Different brands and
thicknesses of dies will need different pressure. Please refer to the Setting Guide
for guidelines on using other types of die with your machine.
1. Ensure the roller mechanism is to the side of the machine.
2. Place your A Plate on top of the base plate
3. Place your die on the A Plate.
4. Place your material to be cut over your die and then your B Plate on top.
5. Adjust the pressure. The exact pressure will depend on the manufacturer of the
die and the weight of material. See settings table on page 15 for guidelines.
6. Turn the handle until the roller mechanism has gone over the complete die.
7. Roll the mechanism to the opposite end of the machine, or back to the start and
remove the die and card from the machine.
NOTE: You may feel the pressure increase slightly as the rollers go over the die. This is supposed to
happen. However, if you feel that you are having to force the rollers over the die reverse the rollers
and reduce the pressure on the machine before trying again. DO NOT reset dial during operation,
always reverse the roller back before resetting the dial.
NOTE: You will hear a cracking noise as the rollers go over the die; this is the die being pressed
through the card and into the cutting plate and is perfectly normal, although it can be alarming to hear
it the rst time. You will also see marks appearing on your cutting plate – this is all part of the cutting
process and is supposed to happen.

10
ENGLISH
DIE CUTTING WITH INTRICATE DIES
There will be some dies that are more difcult to cut than others. When you
experience this we recommend substituting the B plate for the D plate. The D plate
has a smaller surface area so the pressure can be focussed more on the dies area
and thinner so the roller is closer to the die itself.
1. Ensure the roller mechanism is to the side of the machine.
2. Place your A Plate on top of the base plate
3. Place your die on the A Plate.
4. Place your material to be cut over your die and then your D Plate on top.
5. Adjust the pressure. The exact pressure will depend on the manufacturer of the
die and the weight of material so you may need to adjust the dial up or down
to get the perfect pressure.
6. Turn the handle until the roller mechanism has gone over the complete die.
7. Roll the mechanism to the opposite end of the machine, or back to the start and
remove the die and card from the machine.
NOTE: You may feel the pressure increase slightly as the rollers go over the die. This is supposed to
happen. However, if you feel that you are having to force the rollers over the die reverse the rollers
and reduce the pressure on the machine before trying again. DO NOT reset dial during operation,
always reverse the roller back before resetting the dial.
NOTE: You will hear a cracking noise as the rollers go over the die; this is the die being pressed
through the card and into the cutting plate and is perfectly normal, although it can be alarming to hear
it the rst time. You will also see marks appearing on your cutting plate – this is all part of the cutting
process and is supposed to happen.
TIP: Due to the increased pressure you may nd
your D plate bends. To reduce the risk of this
occurring, alternate the side of the plate that gets
cut after each use.
11
ENGLISH
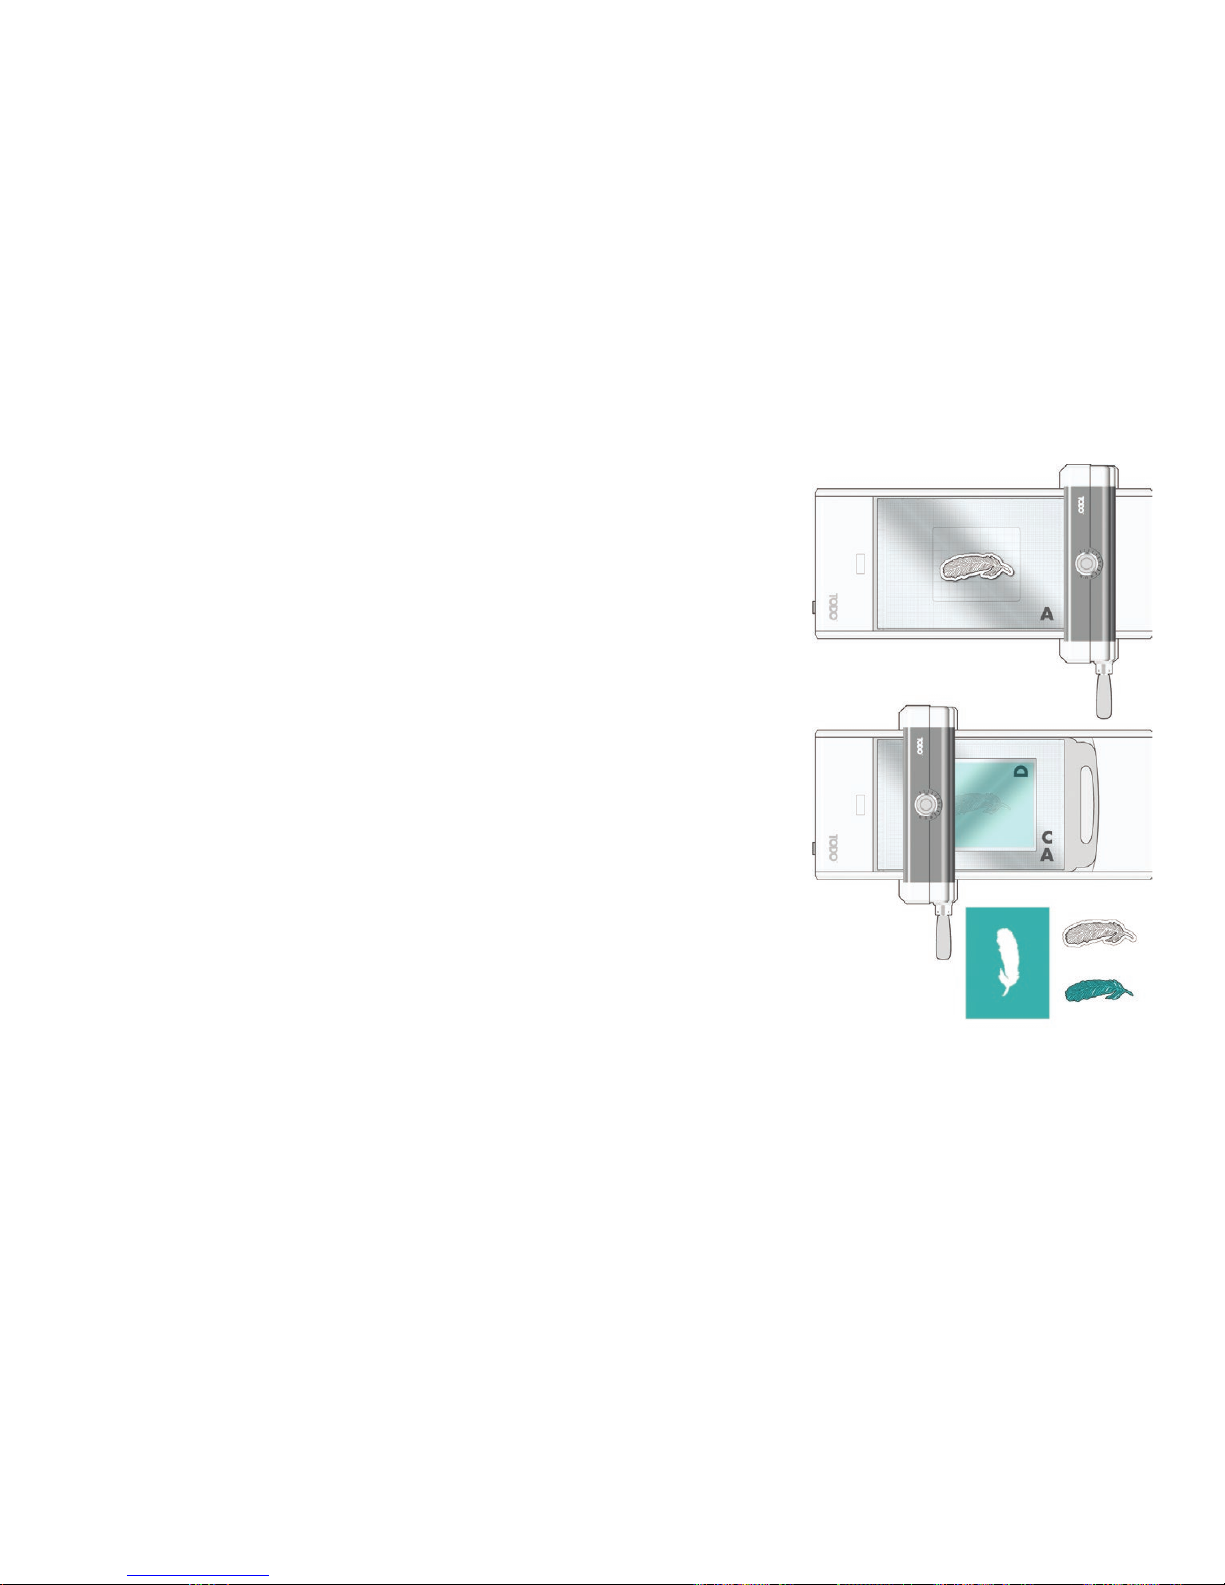
EMBOSSING WITH THIN DIES
Some thin dies have intricate detail that need to be embossed into the card. There
are many of these dies on the market, but these instructions will work for all
standard embossing dies.
1. Ensure the roller mechanism is to the side of the machine.
2. Place your A Plate on top of the base plate
3. Place your die on the A Plate.
4. Place the card to be embossed over your die with your C Plate on top.
5. Place your D Plate on top of the C Plate.
6. Adjust the dial FOUR INCREMENTS higher than the nomal cutting level for
the D plate (this will be the same increase if using the B plate instead). The
exact pressure will depend on the manufacturer of the die and the weight of
material so you may need to adjust the dial up or down to get the perfect
pressure.
7. Turn the handle until the roller mechanism has gone over the complete die.
8. Roll the mechanism to the opposite end of the machine, or back to the start and
remove the die and card from the machine.
NOTE: You may feel the pressure increase slightly as the rollers go over the die. This is supposed to
happen. However, if you feel that you are having to force the rollers over the die reverse the rollers
and reduce the pressure on the machine before trying again. DO NOT reset dial during operation,
always reverse the roller back before resetting the dial.
TIP: Due to the increased pressure you may nd
your D plate bends. To reduce the risk of this
occurring, alternate the side of the plate that gets
cut after each use.

12
ENGLISH
DIE CUTTING WITH THICK DIES
On rare occasions you may nd that the ‘Die Cutting with Dies’ instructions may
not work for thicker dies. In these situations the base plate insert can be removed.
The actual pressure needed to cut will vary depending on the actual die and the
weight of material that you are using, these instructions are for guidelines only.
1. Ensure the roller mechanism is to the end of the machine with the power
indicator light.
2. Take out the base plate insert, using the handle to lift it out.
3. Place the A plate into the base of the unit.
4. Place the die onto the A plate.
5. Place your material to be cut over your die and then your B plate on top.
6. Adjust pressure. The exact pressure will depend on the manufacturer of the die
and the weight of material. See settings table on page 15 for guidelines.
7. Turn the handle until the roller mechanism has gone over the complete die.
8. Roll the mechanism to the opposite end of the machine, or back to the start and
remove the die and card from the machine.
NOTE: You may feel the pressure increase slightly as the rollers go over the die. This is supposed to
happen. However, if you feel that you are having to force the rollers over the die reverse the rollers
and reduce the pressure on the machine before trying again. DO NOT reset dial during operation,
always reverse the roller back before resetting the dial.
NOTE: You will hear a cracking noise as the rollers go over the die; this is the die being pressed
through the card and into the cutting plate and is perfectly normal, although it can be alarming to hear
it the rst time. You will also see marks appearing on your cutting plate – this is all part of the cutting
process and is supposed to happen.

13
ENGLISH
LETTERPRESSING WITH TODO™
Letterpress printing is traditionally a technique of relief printing using a printing
press. With your TODO machine you can use this centuries-old technique to
create some amazing crafty nishes.
There are two ways to use your multi-purpose stamps for letterpressing. You can
either use them plain to create a debossed impression on your cardstock, or you
can ink them to create a coloured and debossed impression on your cardstock.
Both of these techniques use the same method with your machine.
1. Ensure the roller mechanism is to the side of the machine.
2. Place your letterpress stamp anywhere on the base plate.
3. Place your card on top of the stamp and then place your C & A Plate on top
of the card.
4. Adjust the pressure. The exact pressure will depend on the manufacturer of the
stamp and the weight of material. See settings table on page 15 for guidelines.
5. Turn the handle until the roller mechanism has gone over the complete stamp.
6. Roll the mechanism to the opposite end of the machine, or back to the start and
remove the stamp and card from the machine.
NOTE: You will feel the pressure increase slightly as the rollers go over the stamp. This is supposed to
happen. However, if you feel that you are having to force the rollers over the stamp, reverse the rollers
and reduce the pressure on the machine before trying again. When letterpressing, if you add too
much pressure to your stamp it will cut the card. This isn’t a problem, other than you have to repeat the
process.
TIP: Pigment ink works best with your letterpress
stamps as other inks such as solvent-based will
dry too quickly on the stamps. Distress Inks will
give you a textured effect due to the ink bobbling
on the surface of the stamps.

14
ENGLISH
HOT FOILING WITH TODO™
Foil stamping is the application of metallic foil to paper where a heated die is
stamped onto the foil, making it adhere to the surface to leave the design of the
die on the paper. This technique has never been simpler now that you have your
TODO machine!
To hot foil you will need to switch on your TODO machine. When you switch it on
the centre metal panel on the base plate will slowly heat up. This takes
approximately 10-12 minutes to get to temperature (the indicator light will light up
green when the plate is at the correct temperature).
1. Ensure the roller mechanism is to the side of the machine.
2. Flick the switch to the on position to start the machine warming.
3. When the green indicator light is illuminated, place your foiling stamp onto the
metal panel in the centre of the plate.
WARNING: The foiling stamp will become hot very quickly. Always avoid touching
this with your ngers, use tool provided as explained on next page.
4. Place your foil on top of the stamp – the foil needs to go coloured side towards
the stamp – and place your material for foiling on top of this. Place your A
Plate over the top.
5. Adjust the pressure. The exact pressure will depend on the manufacturer of the
stamp and the weight of material. See settings table on page 15 for guidelines.
6. Turn the handle until the roller mechanism has gone over the complete stamp.
Roll the mechanism to the opposite end of the machine, or back to the start and
remove the stamp and material from the machine.
15
ENGLISH
HOT FOILING WITH TODO™ CONTINUED...
ALWAYS turn your TODO machine off immediately after you have nished
foiling. The plate will take approximately 30 minutes to cool down in order for
you to continue working with the machine.
TIP: Experiment with different materials with your foiling, don’t be afraid to try things like corduroy or
mount board. Remember the thicker the item you are foiling, the less pressure you will need on your
machine.
DIE REMOVAL TOOL
A die removal tool and silicone mat has been provided to remove the hot foiling
stamp from the base plate in order to change designs or reposition; do not use
your ngers.
Using the silicone end to hold the die removal tool, position the tool over the hot
foiling stamp so that the magnetic end securely holds the stamp in place. Once in
position, the removal tool will use the magnet on it’s metal base to hold the stamp
or die in position.
Place the hot foil stamp on the silicone mat and carefully remove the tool from the
stamp. Some of the smaller/thinner stamps might be difcult to release from the
magnet. To assist with this, fold over the corner of the silicone mat with your nger
and thumb, using a pinching motion release the stamp from the magnet.
Leave the hot foil stamp on the silicone mat until it has cooled down.
DO NOT TOUCH THE HOT DIES WITH YOUR FINGERS.

16
ENGLISH
TOP TIPS
• Store dies in dry conditions to avoid degradation of the metal.
• Shim between dies when storing to avoid scratching of the printing surface.
• Keep foils stored on the roll to avoid creasing or tearing as this will affect the resulting print.
• Pre-cut your paper to size to reduce waste.
• Fabric-topped ink pads apply ink better than sponged-topped ink pads.
• Blotting your ink pad applies ink more evenly and accurately than wiping it across the plates.
• Inking in small steps around the edge, from one side to the other provides a more effective and neater application of the
ink.
• Wipe off any excess ink with a damp paper towel or cotton swab. This helps prevent ink from getting into unwanted
spaces when you letterpress.
• Don’t be afraid to experiment with more than one colour of ink. Start by inking your plate with the lightest colour rst to
avoid contamination of your ink pads.
• Use up those negative patterns left behind on the foil. Turn one of the larger hot foil stamps so the pattern is facing down
and lay the foil on to this. Then place card over the top and run the TODO roller over the plate. You may get some hot
spots, but generally it’s really good.
• Why not try foiling over foil. This technique creates real impact!
• We recommend letterpressing / hot foiling one plate at a time. This will ensure you achieve the optimum results each time.
• Always ensure the card covers the foil to avoid residue on plates.
• Always alternate between sides when using the cutting plates. This will prolong the life of your plates and help to keep
their shape longer.
17
ENGLISH
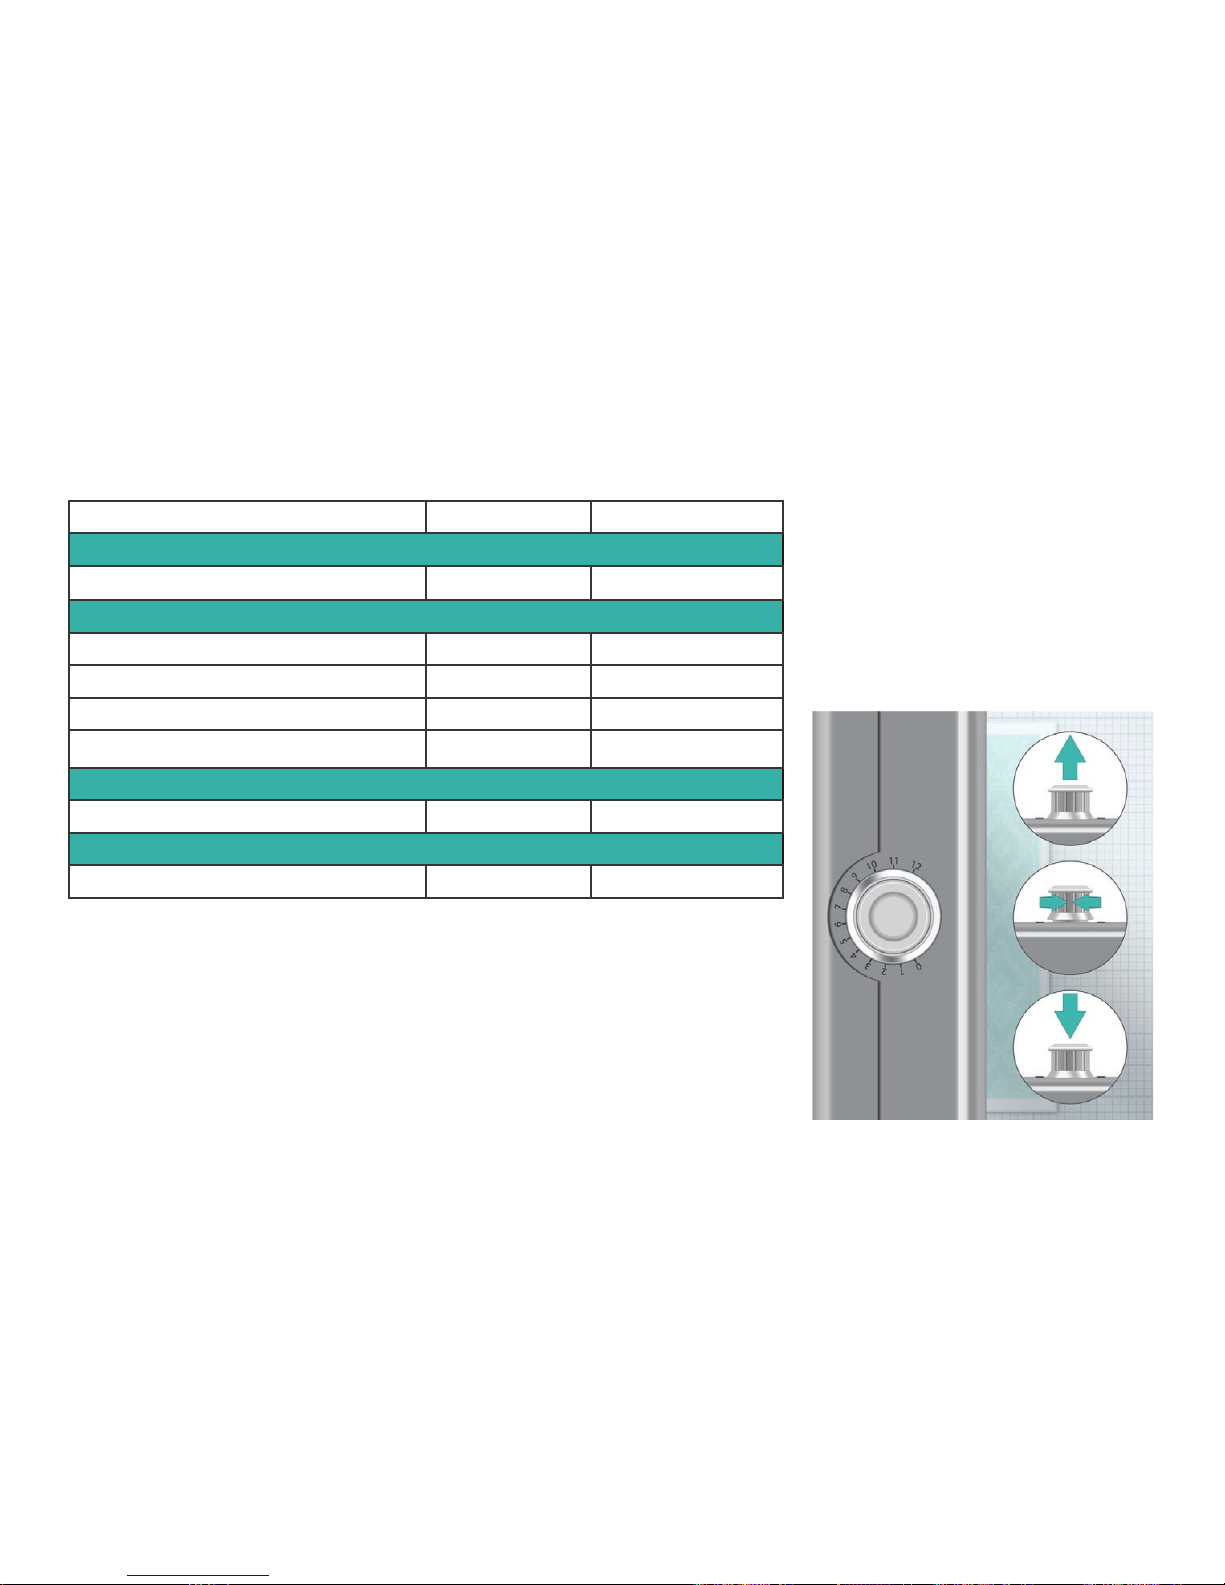
SETTINGS GUIDE
TYPE PLATE SETTING
EMBOSSING
Folder C & B 5-8
DIE CUTTING
Thin Metal Dies* A & B 6-8
Complex (Intricate) Thin Metal Dies A & D 4-6
Thin Foam Topped Dies A 2-3
Thick Foam Topped Dies A & B† 3-5
HOT FOILING
TODO™ Hot Foil & Letterpress Stamp A 2-3
LETTERPRESSING
TODO™ Hot Foil & Letterpress Stamp C & A 6-8
NOTE: The weight of the material that you are using will determine the exact amount of pressure that
you need to use. For example, with paper or vellum you may need to increase the pressure, but with
a thicker card, such as 250gsm or 300gsm you may need to reduce the pressure down by one or two
settings to account for the extra thickness within the sandwich.
NOTE: If you have any difculties moving the roller over the sandwich, it may be caused by an
incorrect combination of plates or dial setting. Position the roller back to its starting position and check
your plate combination and/or try a different dial setting. Forcing the roller over an incorrectly stacked
sandwich will cause damage to your machine and will void the warranty.
† Remove Base Plate Insert / *Some complex dies may require an additional shim
DO NOT PUSH THE ROLLER HOUSING,
ALWAYS USE THE HANDLE TO MOVE THE
ROLLER BACK AND FORWARD.
NEVER LIFT THE TODO MACHINE BY THE
ROLLER MECHANISM.
ADJUST THE PRESSURE
0 = CLOSED ROLLERS
12 = FULLY OPEN ROLLERS

18
ENGLISH
FREQUENTLY ASKED QUESTIONS
My settings seem very different to those on the settings guide table.
The settings are wide to allow for all different thicknesses of materials. It is advisable to start in the middle of the range, so
you can adjust either way. If you have tried a variety of settings and you are not achieving the desired results please contact
your retailer.
What weight of cardstock works well with TODO™?
Around 180gsm to 240gsm works well and uncoated is fabulous!
I’m having difculty achieving a good Die Cut with TODO?
1. Try to run the die through twice and also rotate it. You will feel by the pressure of the machine.
2. D plate can replace the B plate in your cutting sandwich. This has a smaller surface area so the pressure is more focussed
on the Die itself.
3. Some of the more complex dies may need additional shim; Try placing a metal shim under the base plate in the well of the
machine. Note: The metal shim cannot be too thick so as to avoid damaging the electrical point.
I’m having difculty achieving a good hot foil nish with TODO?
1. Ensure that you wait for the machine indicator light to turn green. This should take approximately 10-12 minutes. If for
some reason the machine fails to heat up/turns green quicker than expected return the machine to your retailer.
2. Put the selected hot foil stamp onto the hot plate to warm up; this will ensure the heat has distributed through your chosen
stamp. Run the TODO roller over the hot foil sandwich – take your time to allow the foil to adhere properly to your media.
3. Ensure the foils used are compatible with the TODO machine and ensure they are not creased of damaged as this will
affect your results.
Can I emboss thin dies with embossed detail?
You can emboss and cut by adding your C plate to your normal cutting sandwich (between the card and the B/D plate). You
will need to increase your normal cutting level by 4 increments to allow for the extra height. E.g - A thin die normally cut at a
roller height of 4.5 should be increased to 8.5 after adding the C plate.

19
ENGLISH
CLEANING INSTRUCTIONS
To clean dies and plates use mild soapy water and a sponge. Make sure to dry the dies and plates thoroughly. Do not sub-
merge the machine or heating plate into water. Do not use abrasive cloths or scourers to clean the dies or plates.
For safety, after use, store out of reach of children.
TROUBLE SHOOTING
Unit doesn’t turn on
Check product is plugged in at the wall.
Check socket is working using an alternative product that is known to work.
Check fuse in the plug and replace if unsure (UK ONLY).
Plate doesn’t heat up
Check the unit is switched on at the wall and the heat dial is on. Ensure heating plate is correctly connected. If issue continues return the unit.
Roller doesn’t go to the end
Either change the setting on the dial or reduce the size of the sandwich, so it runs over the plate. Note: DO NOT change the
dial setting mid-way throughoperating.
Trouble adjusting the pressure dial
Ensure the roller has been rolled to either end of the unit, the roller cannot be adjusted mid-way – especially if it is still under
pressure. Note: The dial cannot be pushed down unless it is in line with either a whole or half number.

20
ENGLISH
HELP THE ENVIRONMENT
Your appliance contains valuable materials which can be recovered or recycled.
When you decide to replace your appliance, leave it at a local civic waste
collection point. For more detailed information about recycling of this product,
please contact your local Council, your household waste disposal service or the
shop or source where you purchased the product.
Due to our Policy of continuous development, the actual product may differ slightly
from the one illustrated in these instructions and on the packaging.
WARRANTY
TODO™ comes with a limited one year warranty. TODO is warranted to be free
of defects in workmanship and materials. Ideal Sourcing Ltd will replace a
defective product or parts without charge with proof of purchase. If the product is
damaged due to misuse or neglect the warranty is null and void.
For Customers in the following regions, return faulty items to:
UK CUSTOMERS US CUSTOMERS
Ideal Sourcing Ltd Notions Marketing Corporation
1 Sabre Way 1500 Buchanan S.W.
Peterborough Grand Rapids
PE1 5EJ MI 49507
This device complies with part 15 of the FCC
Rules. Operation is subject to the following two
conditions: (1) This device may not cause harmful
interference, and (2) this device must accept any
interference received, including interference that
may cause undesired operation.
NOTE: This equipment has been tested and
found to comply with the limits for a Class B digital device, pursuant to part 15 of the FCC Rules.
These limits are designed to provide reasonable
protection against harmful interference in a
residential installation. This equipment generates,
uses and can radiate radio frequency energy
and, if not installed and used in accordance with
the instructions, may cause harmful interference
to radio communications. However, there is no
guarantee that interference will not occur in a
particular installation. If this equipment does
cause harmful interference to radio or television
reception, which can be determined by turning
the equipment off and on, the user is encouraged
to try to correct the interference by one or more
of the following measures:
• Reorient or relocate the receiving antenna.
• Increase the separation between the
equipment and receiver.
• Connect the equipment into an outlet on a
circuit different from that to which the receiver
is connected.
• Consult the dealer or an experienced radio/TV
technician for help.
22
ESPAÑOL

23
ESPAÑOL
LA MÁQUINA DE ARTESANÍA MULTIFUNCIÓN
CONTENIDOS
Advertencias de seguridad generales ........................................ 24
¿Qué hay en la caja? ............................................................. 25
Utilización de la máquina TODO™........................................... 26
Grabado en relieve con cubiertas ............................................. 26
Corte con troqueles ............................................................ 27-28
Grabado en relieve con troqueles nos ...................................... 29
Corte con troqueles gruesos ..................................................... 30
Impresión tipográca con TODO™ ........................................... 31
Estampado en caliente con TODO™ ....................................32-33
Consejos principales ............................................................... 34
Guía de ajustes ...................................................................... 35
Preguntas más frecuentes ......................................................... 36
Instrucciones de limpieza / Resolución de problemas .................. 37
Garantía ............................................................................... 38
Especicaciones ..................................................................... 75
Para reducir el riesgo de lesiones, el
usuario debe leer y comprender este
manual de instrucciones antes de utilizar
la máquina TODO™. Este aparato está
concebido para uso doméstico tal como se
describe y de acuerdo con las instrucciones
proporcionadas en este manual.
Por favor, lea estas instrucciones
atentamente y consérvelas para un uso
futuro.
NO DEJE nunca una máquina
TODO sin atender cuando esté en
funcionamiento o enfriándose.
NO ELEVAR NUNCA la máquina
TODO por el mecanismo de rodillos.
ADVERTENCIA
 Loading...