

Todd English TEPM1 Instructions Manual

ELECTRIC PASTA MACHINE
INSTRUCTIONS
MODEL TEPM1
1

MEET
CHEF ENGLISH
To dd E ng li sh i s a ce le br at ed c he f, r es ta ur at eu r, au th or, an d te le vi si on
personality. He has opened innovative and award-winning restaurants around
the globe. Among his numerous accolades from the culinary world, Chef
English is a four-time James Beard Foundation Award winner and was named
Bon Appetit’s Rest a urateur of th e Year. He has auth o red four c ritically
acclaimed cookbooks, including his most recent, Cooking in Everyday
English. Chef English has also created the record-breaking housewares line,
The Todd English Collection, and hosted the Emmy-nominated PBS travel
series Food Trip with Todd English.
To dd E ng li sh K it ch en i s an e xc ep ti on al r an ge o f hi gh -p er fo rm an ce
countertop appliances. Todd’s passion for the creative process results in these
products delivering extraordinary blending, cooking, frying, mixing and ease of
use. As Todd continues pushing the limits of imagination, his attention to detail
and progressive design intrinsically allows endless possibilities that heighten
the delicious world that surrounds us.
2
CONGRATULATIONS!
! Congratulations on buying the Todd English Electric Pasta
Machine. This appliance will help you make fresh pasta in
minutes. I’m a fresh pasta fanatic and am on a mission to
preserve the art of pasta making. I’ve included nine different
discs to make various styles of pasta from Angel Hair to
Pappardelle to Ravioli. I’ve also included some of my favorite
easy to make recipes to get you inspired. Enjoy! #
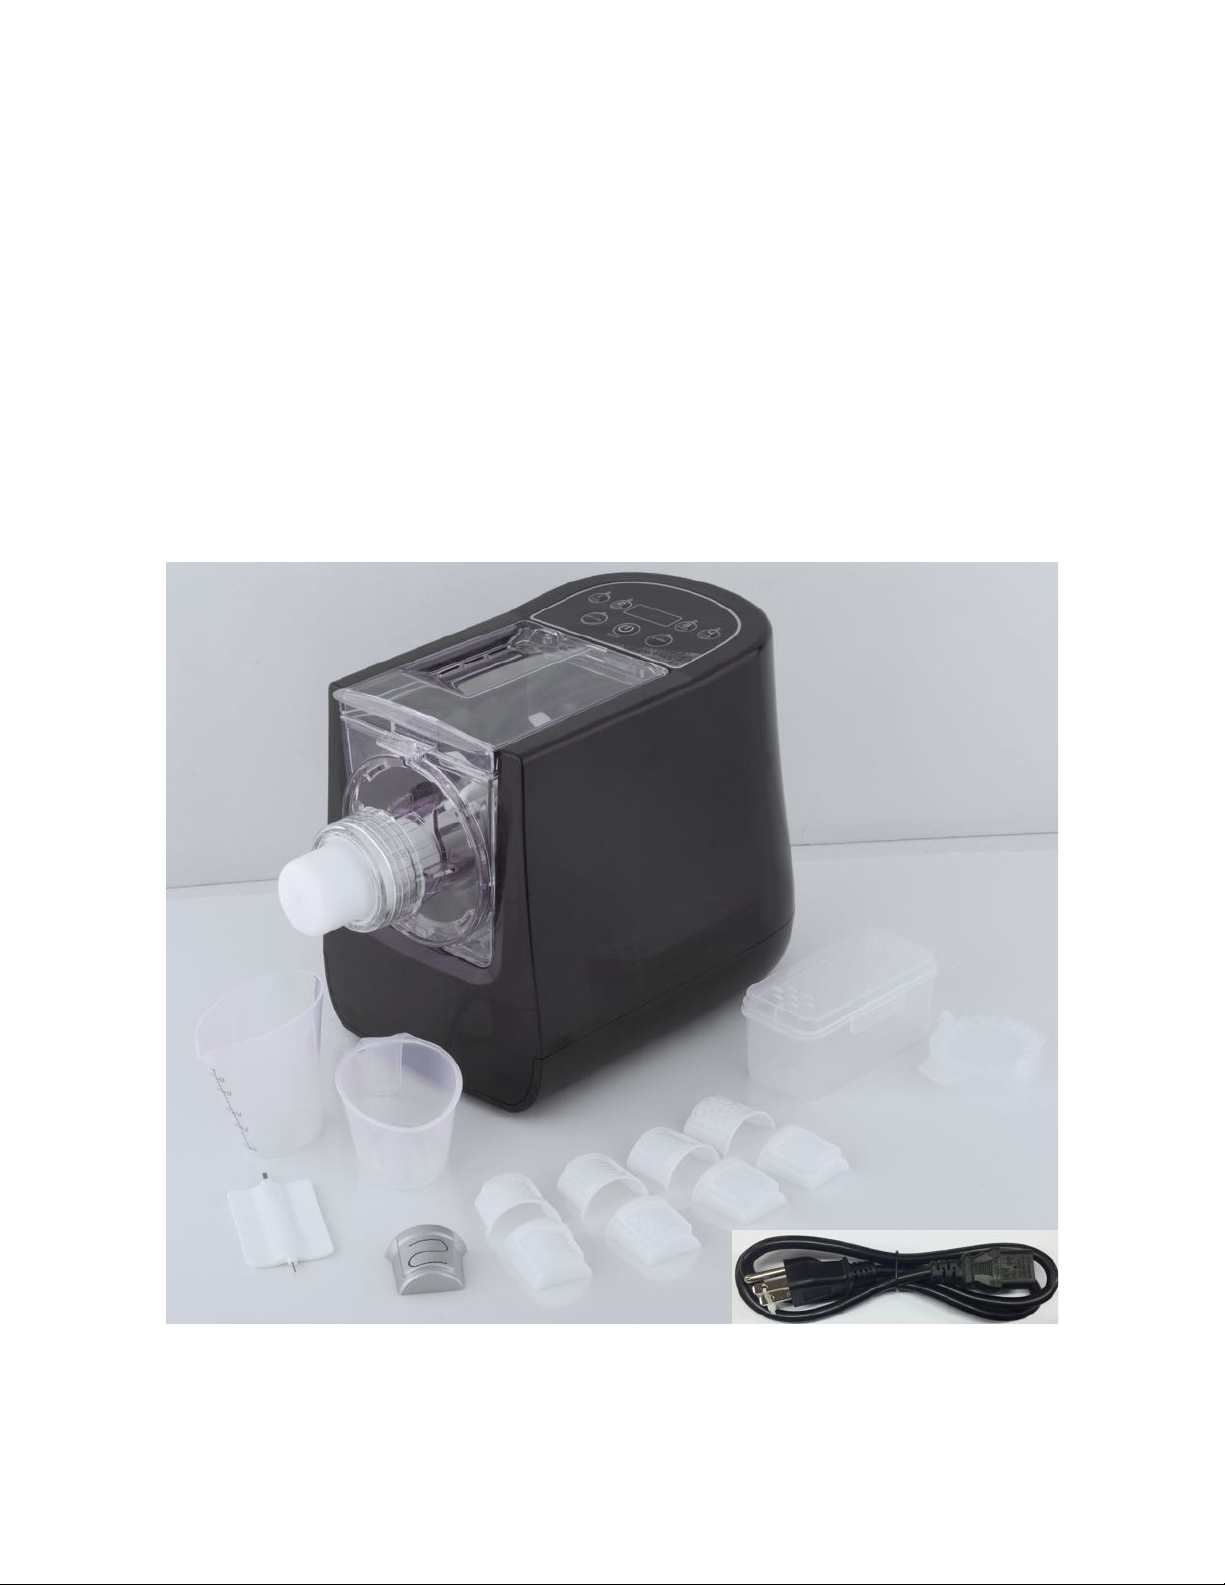
WHAT’S INCLUDED
3
Pasta Maker, Power Cord, Flour Cup, Water Cup, 9
Extruding Discs, Disc Storage Box, Ravioli Tool,
Cleaning Scraper

IMPORTANT SAFEGUARDS
When using electrical appliances, basic safety precautions
should be followed as follows:
•
Read all instructions.#
•
Do not use for anything other than intended use. #
•
Do not place the unit on or near gas or another hot
environment to avoid damages. #
•
Use extreme caution when moving the unit.#
•
Do not use near an open flame or cooktop.#
•
Place the unit on a level surface away from walls and
cupboards. Do not let the cord hang over the edge of a table
or counter or touch hot surfaces including the stove. #
•
Do not immerse the unit in liquid or allow liquid to be in
contact with electrical parts.#
•
Close supervision is necessary when the appliance is used by
or near children. #
•
The lid must be locked in place for the unit to operate. #
•
Do not modify the locking lid mechanism as this will damage
the unit.#
•
To protect against rick of electrical shock do not put the whole
unit, power cord, or plug in water or other liquid. #
•
Do not touch the control panel with any sharp instruments. #
•
Unplug unit from outlet when not in use, before putting on or
taking off parts and before cleaning.#
•
Do not use unit with an extension cord, always plug into a wall
outlet. #
•
To prevent electrical shock do not immerse cord, plugs, or
appliance in water or other liquid.#
•
Do not use the unit if the cord is damaged or is dropped or
damaged in any manner.#
•
The use of attachments not sold by the manufacturer may
cause fire, electric shock or injury. #
•
Do not use the appliance if your hands are wet or if you are
standing on a wet floor.#
•
Do not leave the appliance unattended while it is on.#
•
Do not reach into the feed tube. #
4

•
Keep your hair, clothing and jewelry away from rotating parts.#
•
Refrain from touching moving parts while the device is in use.#
•
Make sure flour and liquid are kneaded properly before
pressing the EXTRUDE button as it may cause blockage on
the disc holes and damage parts.#
•
Always unplug the appliance before dissembling or
assembling the appliance. #
•
The appliance is equipped with a sensor to detect the
softness or hardness of the dough. It will prompt “E1” if the
dough is too dry. Add more water if needed and continue to
knead for 2 minutes, then press “EXTRUDE” button. If noodles
are not being extruded, disconnect the power supply
immediately and clean the disc holes before continuing usage. #
•
Do not add any other ingredients into the bowl besides flour.
Eggs need to be mixed with water then added through the lid. #
•
Do not put any parts of the pasta maker into the dishwasher. #
•
Always plug the unit into a proper 3 pin plug. #
•
Do not use outdoors. #
•
SAVE THESE INSTRUCTIONS.#
•
HOUSEHOLD USE ONLY. #
5
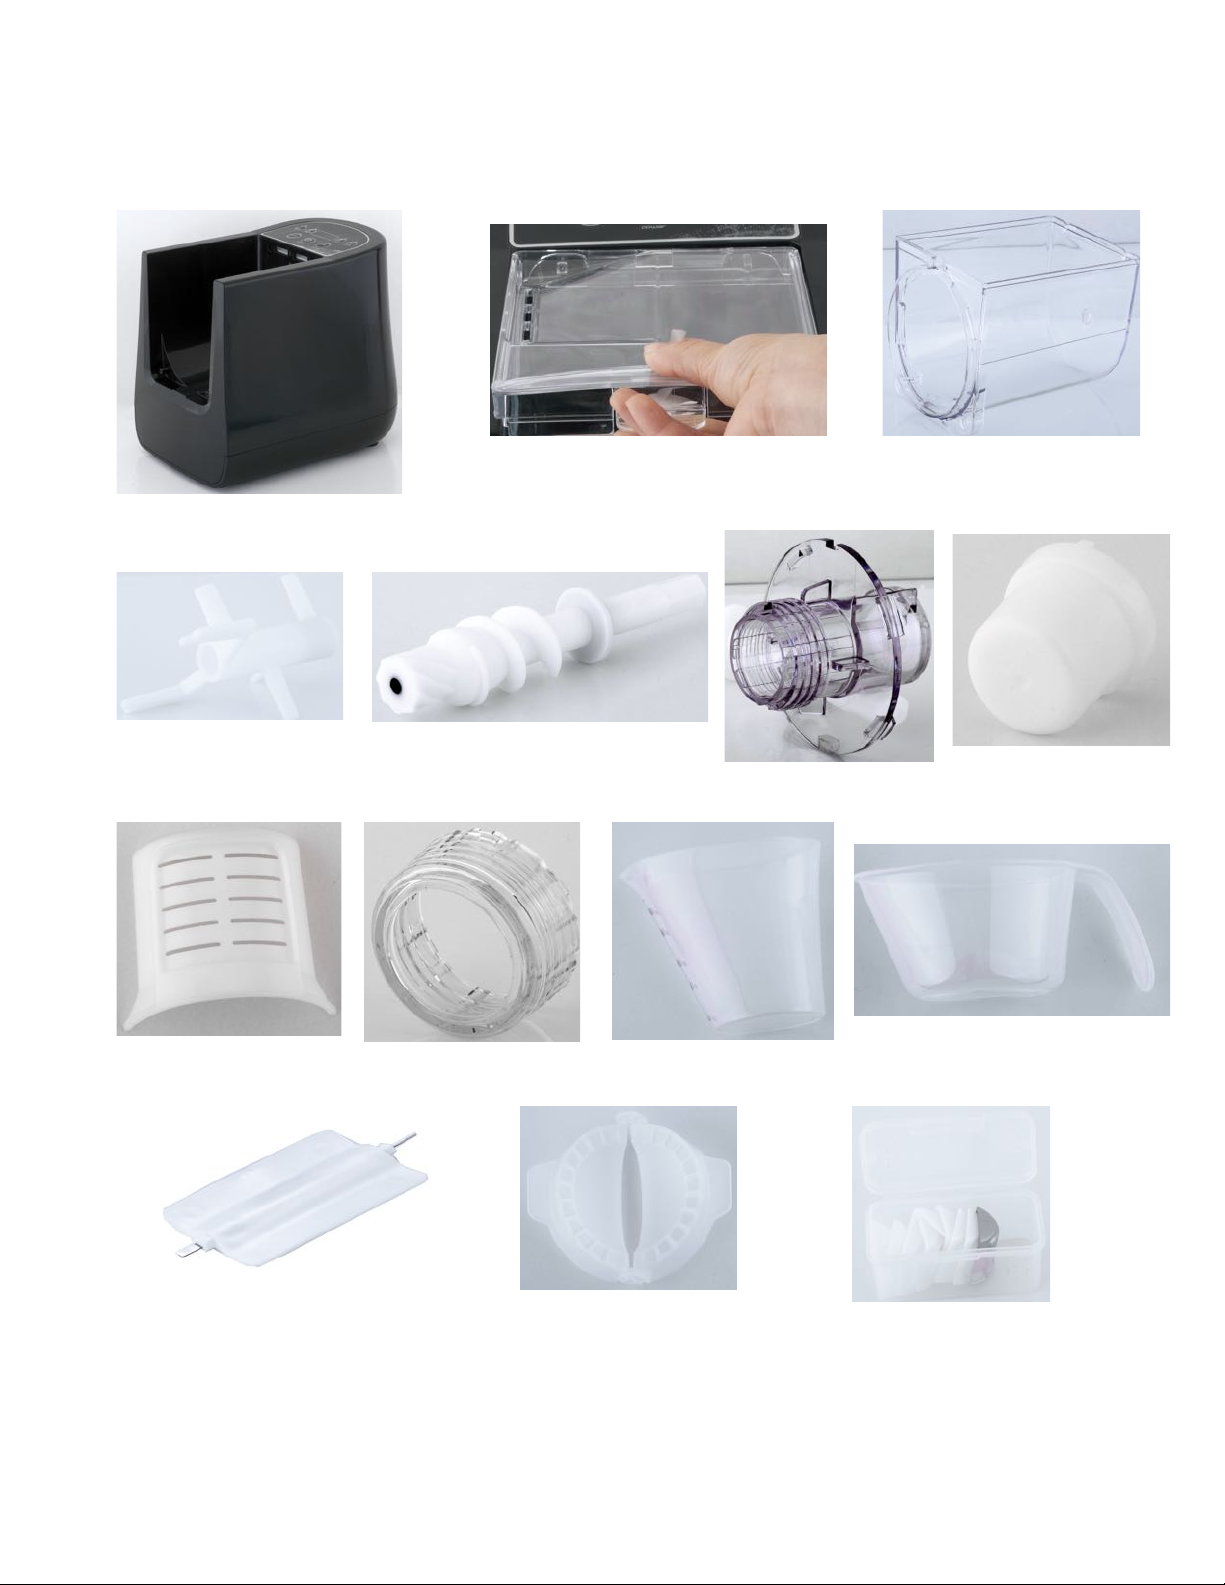
PARTS IDENTIFICATION
6
1. Body#
2. Top Cover#
3. Mixing Bowl#
4. Mixing Axle#
5. Extruding Axle#
6. Fastening Plate#
7. Extruding Head#
8. Extruding Disc #
9. Disc Nut #
10. Liquid Cup#
11. Flour Cup#
12. Cleaning Scraper#
13. Ravioli Tool#
14. Disc Storage Box#
1
2
3
4
5
6
7
8
9
10
11
12
13
14

CONTROL PANEL
7
POWER
Press the power button to turn on the appliance, a beep will be heard
and “ON” displays on the screen. The appliance at this state is in the
standby mode. Press the power button to turn off or stop operation.#
1 CUP, 2 CUPS, 3 CUPS, 4 CUPS
These buttons correlate directly to the amount placed in the mixing bowl.
For example if you put 2 cups of flour in the mixing bowl press 2 CUPS.
On these functions the dough is automatically kneaded and extruded.
The flour cup must always be used when measuring the flour.#
EXTRUDE
If there is still dough remaining in the mixing bowl once it is done on the
cup function, press the EXTRUDE button to have the remaining dough
extrude. This function will take five minutes to complete. If the E1 error
code appears on the screen the dough is too dry and can not extrude.
Clean the disc holes and add more water for kneading before extruding
the pasta. #
KNEAD
Press the KNEAD button if the flour and water need to be mixed together.
This function will take 4 minutes to complete.
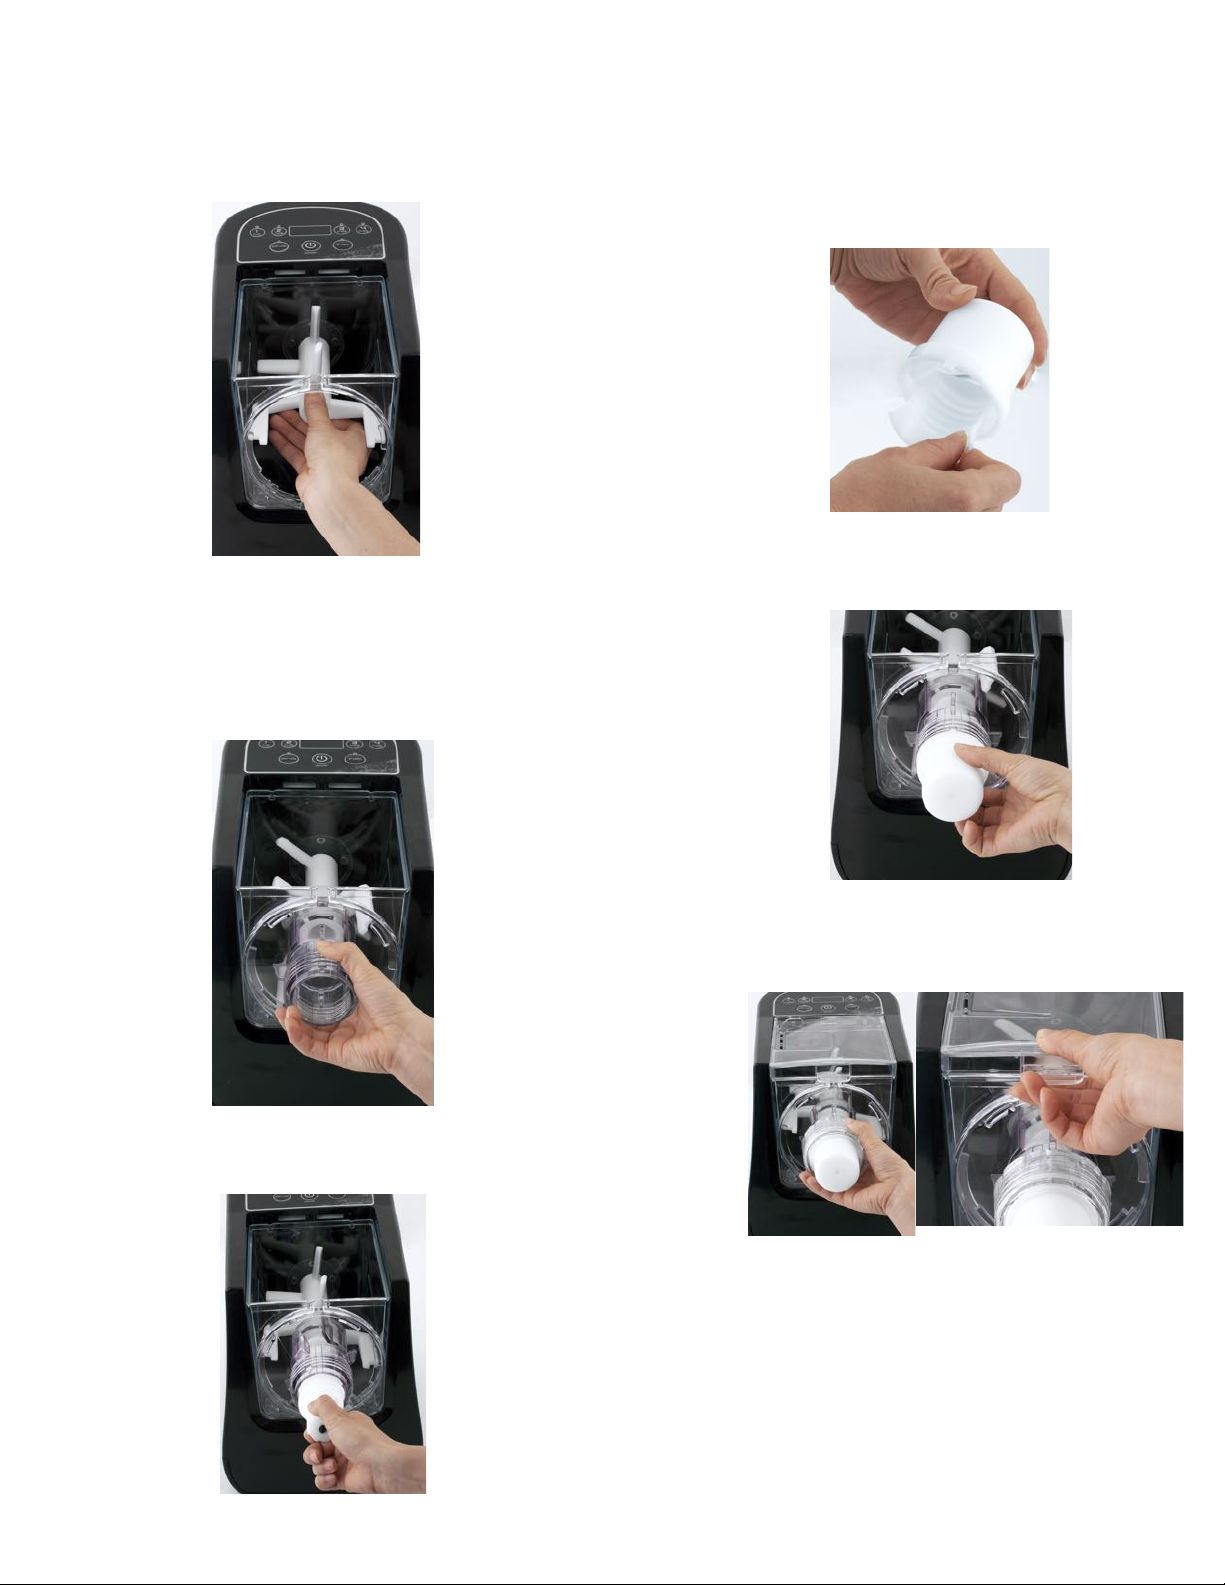
ASSEMBLY INSTRUCTIONS
8
4. Insert desired disc into the
extruding head.
6. Tighten the disc nut
clockwise. Insert top cover into
the housing pointing to the hole
in front of the mixing bowl and
press down.
5. Tighten the extruding head
to the fastening plate.
1. Attach the mixing bowl to the
appliance, insert the mixing axle into
the exposed motor shaft by pointing to
the hexagon hole.
3. Insert the extruding axle.
2. Lock the fastening plate
clockwise.
 Loading...