

Page 1
(2012 10 24) manual_TOCOMSAT duo LITE.indd 20-1 2012-10-24 �� 7:44:57
Page 2

1
User’s Manual
Table of Contents
Safety Warning
General Information
Package Contents & Features
Front Panel
Rear Panel
Remote Control Unit (RCU)
Installing Equipment
Channel List Guide
Menu Guide
Main Page
I. CHANNEL MANAGER
II. INSTALLATION
III. OPTIONS
IV. UTILITY
Troubleshooting
TABLE OF CONTENTS
Table of Contents
1
2
3
3
4
5
6
8
9
11
11
11
13
16
18
19
(2012 10 24) manual_TOCOMSAT duo LITE.indd 2-1 2012-10-24 �� 7:44:57
Page 3
32
User’s ManualUser’s Manual
SAFETY WARNING
Warning
Please read the following recommended instructions carefully to avoid the risk of your physical Injury
before the product is operated.
Safety Instructions and Precautions
- Do not cover the receiver and keep clear space around the receiver for sufficient air circulation.
- Check the receiver's operation voltage 90~250V, 50Hz~60Hz, Max 30W Keep liquid away from the
receiver.
- The receiver shall not be exposed to dripping or splashing and no objects that filled with liquid shall
not be placed on the receiver.
- Unplug the receiver from the wall outlet before cleaning.
- Use a soft cloth and a mild solution of washing-up liquid to clean the casing.
- Do not block the receiver's ventilation slots which are provided for ventilation and protection from
overheating.
- Please maintain the receiver in a free airflow.
- Do not allow the receiver to be exposed to hot, cold or humid condition.
- Do not use any cable and attachment that are not recommended as these may damage your equipment.
- Please unplug the receiver from the wall outlet and disconnect the cable between the receiver and the
antenna when you will not use it for long time.
- Do not remove the cover to reduce the ri
sk of electric shock.
- Do not attempt to service the receiver yourself.
- Refer all serving to qualified service personnel.
- The manual's contents may be updated without notice.
NOTE: To disconnect the apparatus from the mains, the plug must be pulled out from the mains sock-
et, therefore the mains plug shall be readily operable.
User’s
Manual
User’s
Manual
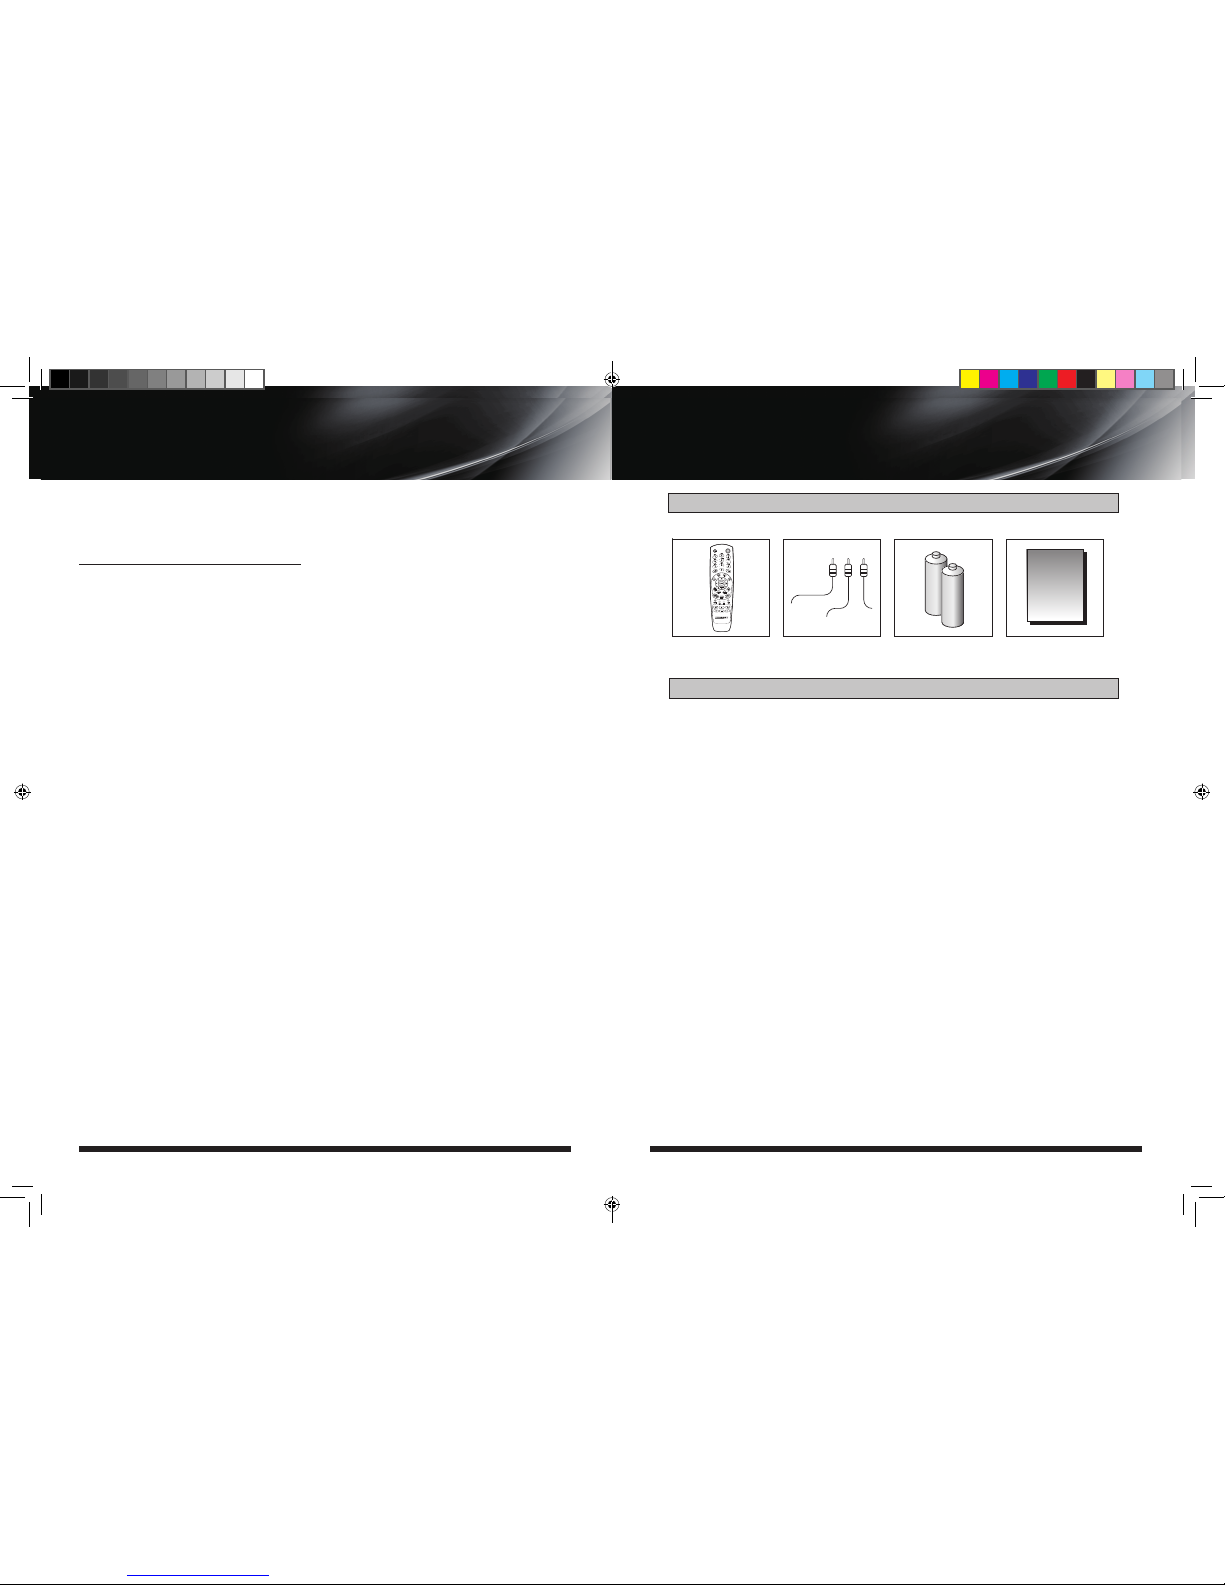
Please ensure that the following items are included with the receiver in your packing.
Remote Control
Unit
User's Manual
Batteries 2EA
(for RCU)
GENERAL INFORMATION
Package Contents & Features
User’s
Manual
Package Contents
Features
User’s
Manual
RCA Cable
• Supports MPEG-2, MPEG-4, H.264 and fully DVB compliant
• DiSEqC 1.0, 1.1, 1.2 and USALS
• Aspect ratio adjustment 4:3 (16/9 crop), 4:3 (16/9 letterbox), 16:9 (4/3 pillar box)
• User friendly OSD and operation
• Total 8,000 Channels Programmable
• Multi-language audio support
• Multi-language menu text support
• Favorite channel selections
• Parental Guide and rating control
• EPG(Provider Electronic Program Guide) for On Screen Channel Information
• On-Screen Display with 65,536 Color
• Blind scan(Power Scan) & Powerful EPG
• Zoom Function in Pause
• Selectable output for 1080p, 1080i, 720p, 480p and 480i format
• Multiple Video Outputs: HDMI
• USB 2.0 Host (Access to HDD, USB memory, Others etc) : 2 Port
• Upgrade Software & Update Channel Database through USB 2.0 Port and RS232 Phone jack
• MP3 File Play by USB 2.0
• PVR Ready via USB
• Recorded file play on PC
• Reservation Recoding by EPG function
(2012 10 24) manual_TOCOMSAT duo LITE.indd 2-3 2012-10-24 �� 7:44:58
Page 4
54
User’s ManualUser’s Manual
GENERAL INFORMATION
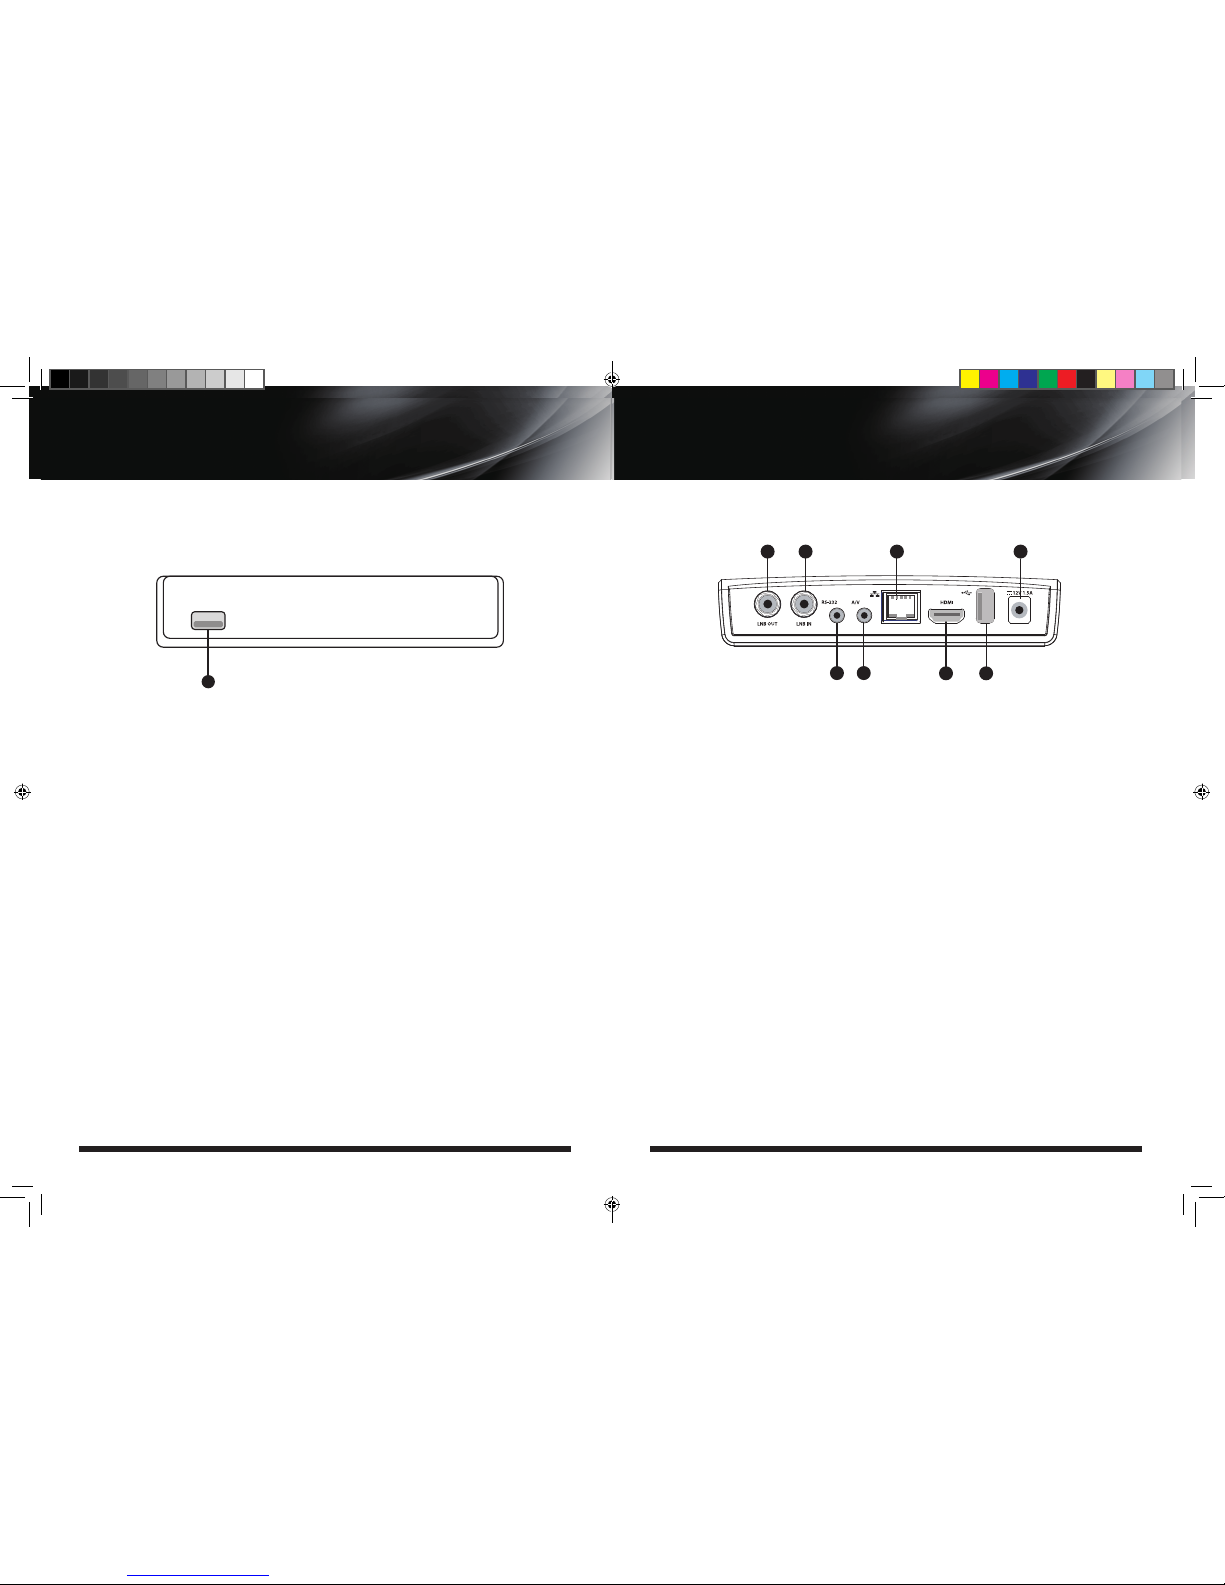
1. USB Port
To upgrade firmware / Recording.
NOTE: The front panel of the product is subject to change without notice.
Front Panel
1
GENERAL INFORMATION
Rear Panel
1. LNB OUT
CONNECT TO SATELLITE ANTENNA CABLE.
2. LNB IN
CONNECT TO SATELLITE ANTENNA CABLE.
3. RS-232
CONNECT TO PERSONAL COMPUTER FOR
SOFTWARE UPGRADE.
CONNECT AUDIO AND VIDEO TO TV BY
PHONE JACK CABLE.
4. A/V
5. ETHERNET
CONNECT TO LAN CABLE (RJ-45).
6. HDMI
CONNECT TO THE TV USING AN HDMI CABLE.
7. USB PORT
INSERT A USB DRIVE FOR SOFTWARE UPGRADE
OR PVR.
8. POWER ADPATOR
12V DC / 1.5A.
NOTE: The rear panel of the product is subject to change without notice.
142
3
6
8
5
7
(2012 10 24) manual_TOCOMSAT duo LITE.indd 4-5 2012-10-24 �� 7:44:58
Page 5
76
User’s ManualUser’s Manual
GENERAL INFORMATION
Remote Control Unit (RCU)
1 2
3
5
4
7
15
12
17
23
28
26
19
25
27
13
20
16
24
6
8
9
10
11
14
18
22
21
11
GENERAL INFORMATION
Remote Control Unit (RCU)
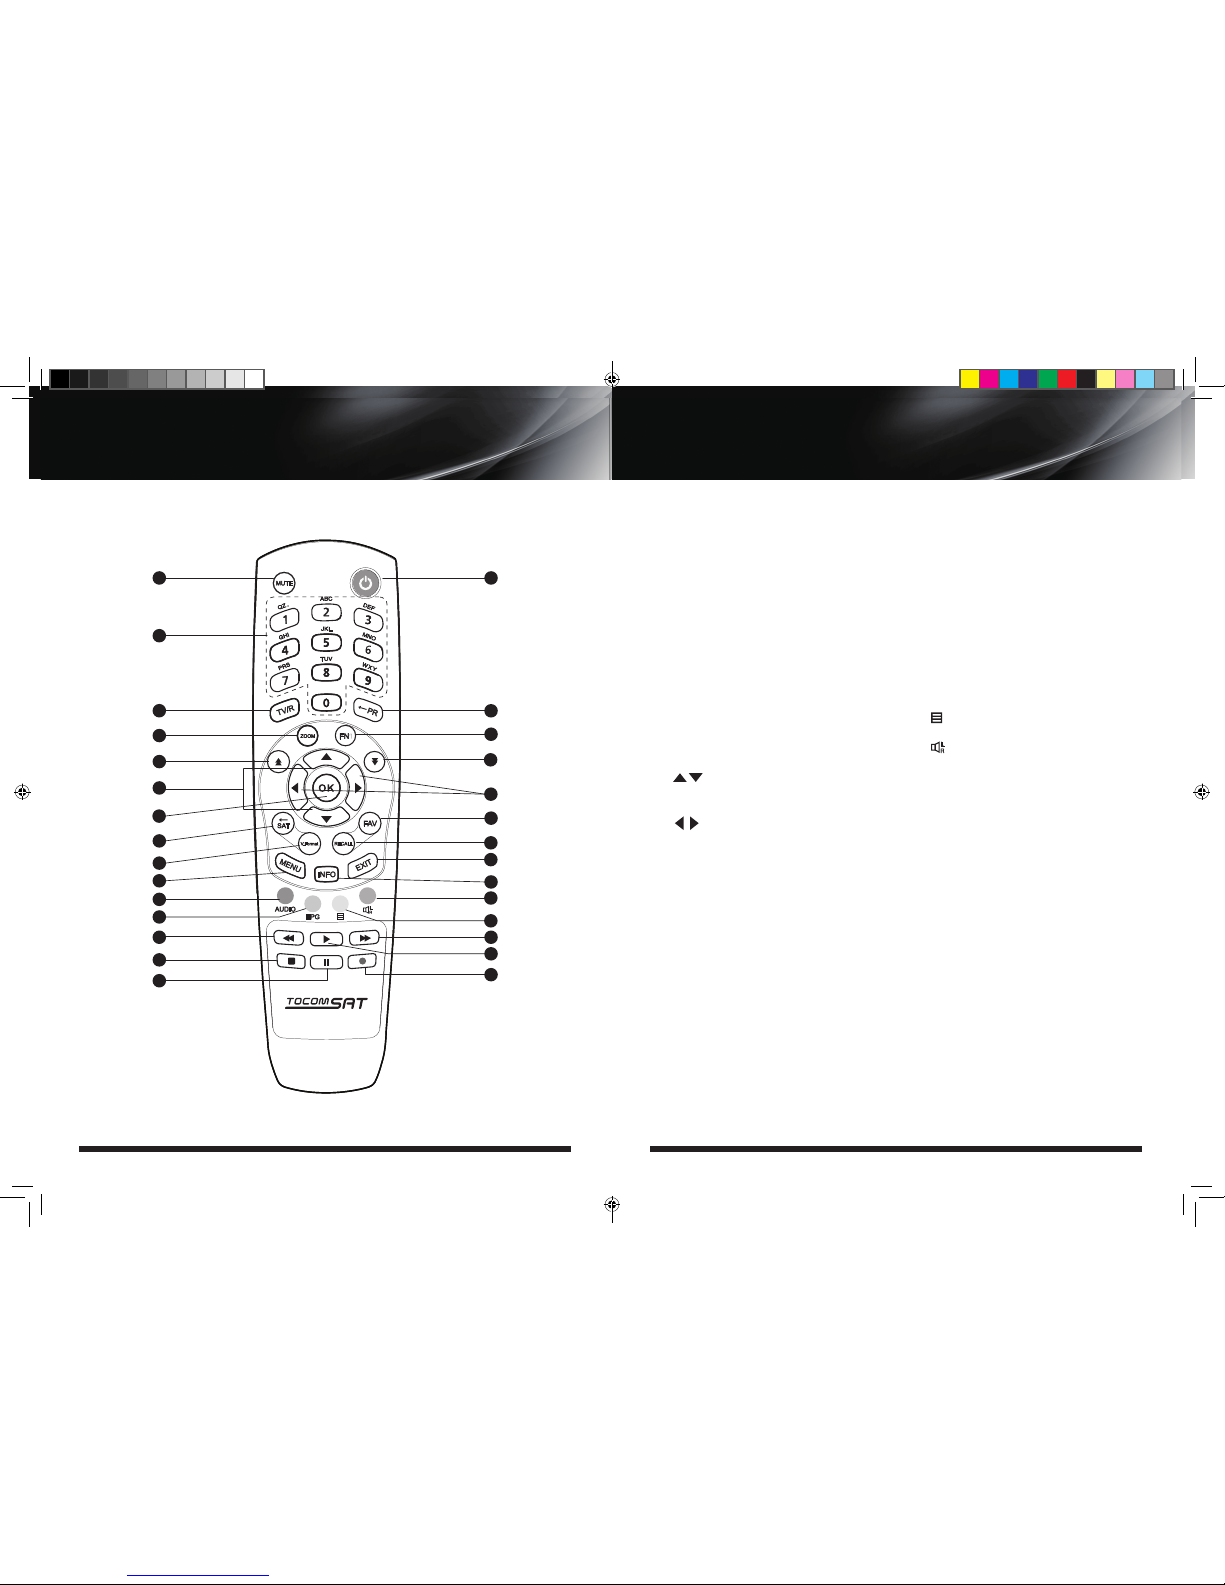
1. MUTE
Enable or disable the audio.
2. POWER
Switch the receiver between
operation and standby mode.
3. Numeric buttons
Select the TV or Radio service
channels and individual menu.
4.TV/R
Switch between TV and Radio.
5. PR
Select the previously viewed
channel.
6. ZOOM
Select Zoom IN/OUT
7. FN
Reserved
8.
Change channel or move to the
item in the menu.
9.
Adjust the volume or move to left
or move item in the menu.
10. OK
OK button.
11. PGUP/PGDN
Page up and Page down
12. SAT
Toggle the selected Satellite list.
13. V.FORMAT
Switch to HD Type.
14. RECALL
Select the previously viewed
channel.
15. FAV
Toggle the selected favorite
mode.
16. MEMU
Display the main menu on screen.
17. INFO
Display the program information
box on the screen and edit the
name of favorite channel list.
18. EXIT
Return to the previous menu or
normal viewing mode from a
menu.
19. AUDIO
Change the audio languages.
20. EPG
Display the TV or Radio program
guide.
21.
Enable subtitle and teletext mode
22.
Select the sound mode
(LEFT/RIGHT/STEREO).
23. REWIND
Start reverse playback and change
the speed of reverse playback.
24. PLAY
Display file lists and plays slow/
normal.
25. F / F
Start fast forward or fast motion
playback and change the speed of
forward playback.
26. STOP
Stop recording or playing.
27. PAUSE
Pause the playing picture or go to
normal mode.
28. RECORD
Record the program.
(2012 10 24) manual_TOCOMSAT duo LITE.indd 6-7 2012-10-24 �� 7:44:58
Page 6
98
User’s ManualUser’s Manual
INSTALLING EQUIPMENTS
Connections
This section explains several ways of connecting the receiver to your existing TV, VCR and Hi-Fi system. You
can choose one of the following setups that we recommend. If you have any problem or need help, consult
your dealer or service provider. Please ensure that the following items are included with the receiver in your
packaging.
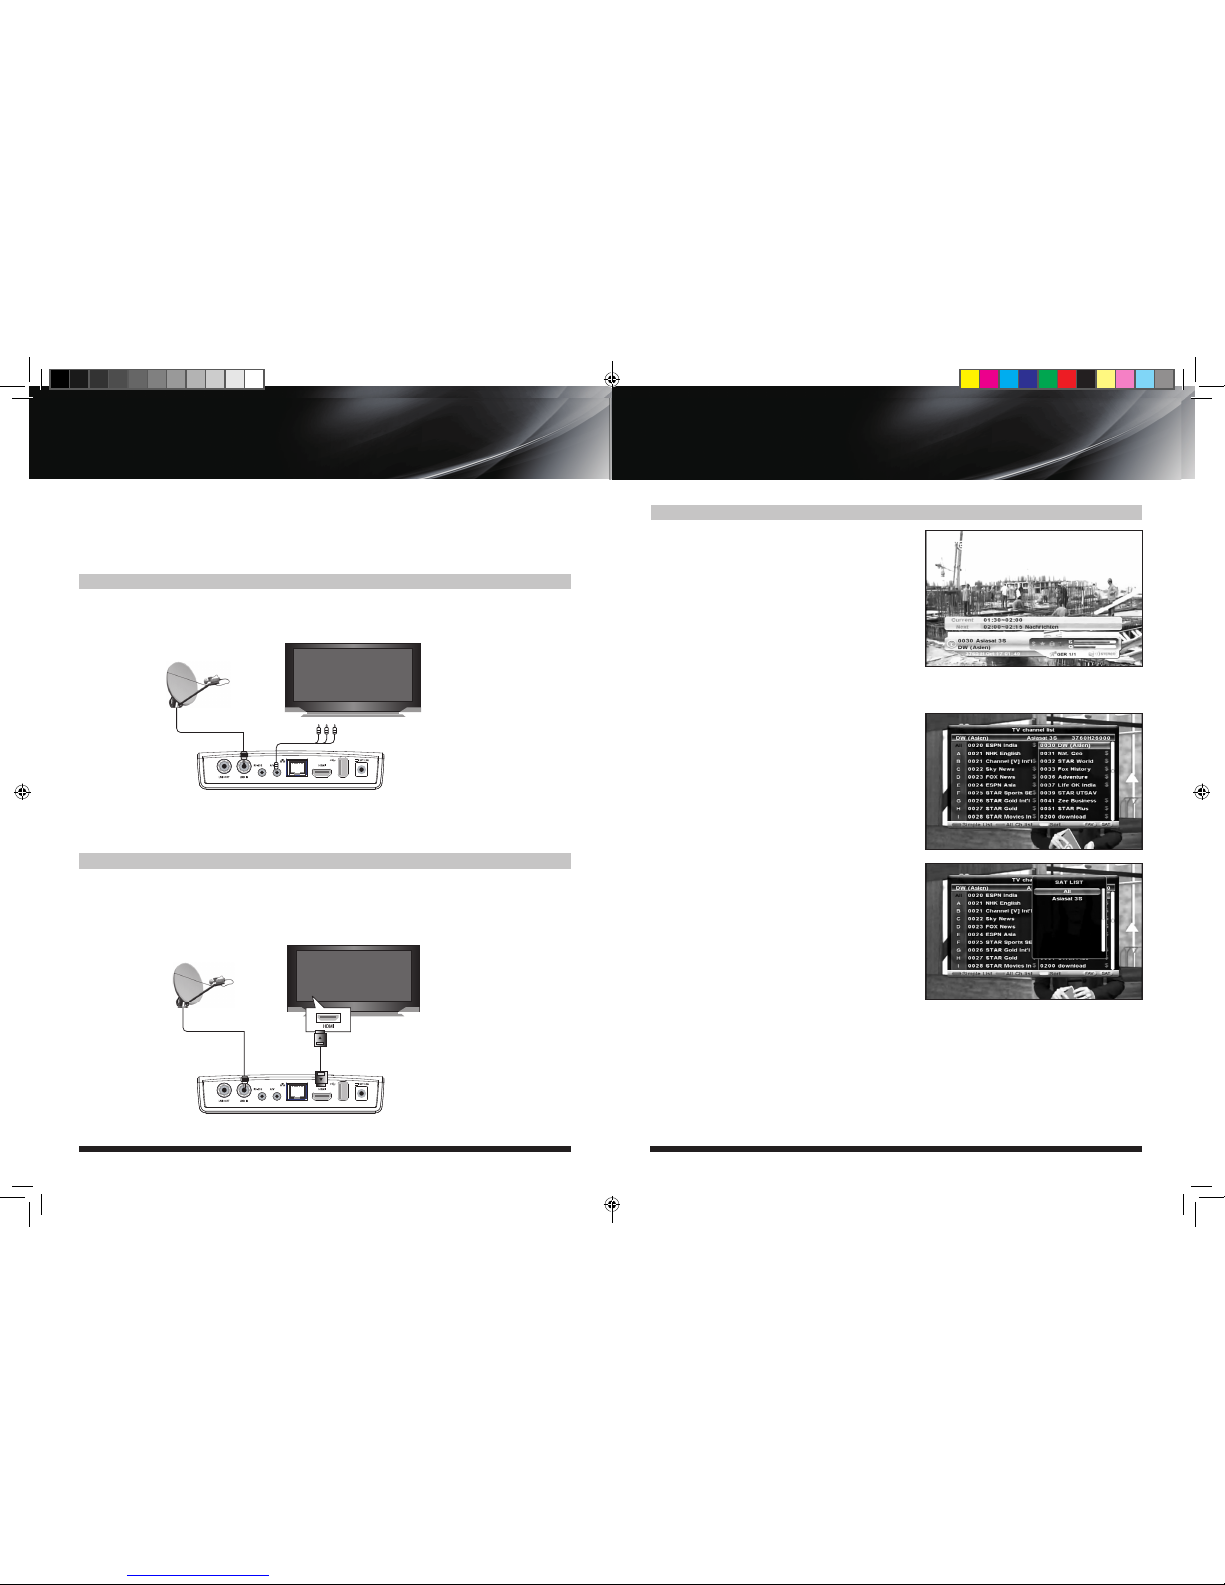
Connecting the receiver to TV with RCA CABLE
Connect the end of RCA cable to RCA output of your receiver and another end of cable to RCA in connector on
your TV.
Connect one end of HDMI cable to the HDMI output of your receiver and another end of cable to HDMI IN connector on your TV.
Connecting the receiver to TV with HDMI cable
CHANNEL LIST GUIDE
Channel List Guide
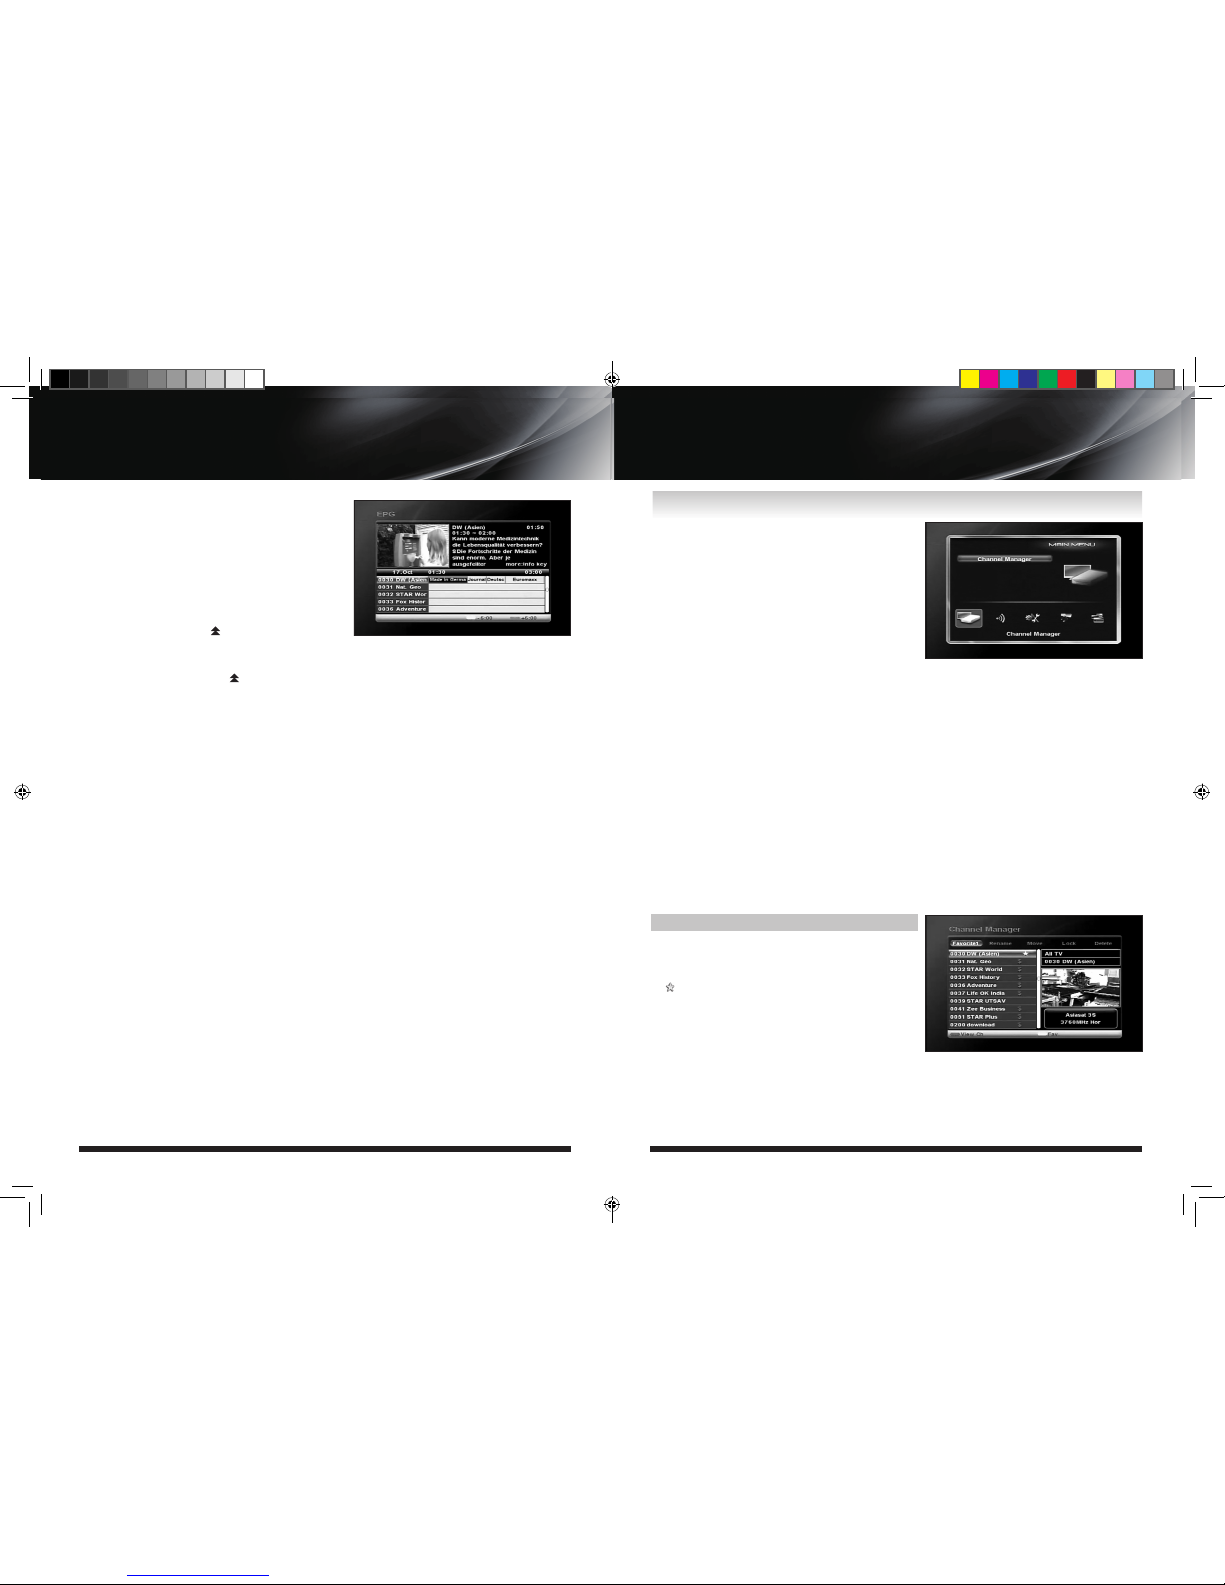
1. Normal Live Mode
a) When you select one channel, information bar appears
automatically on the screen for few seconds. This bar
provides you the current channel information.
b) Press INFO button to see the information during normal
live mode.
2. Detail Channel List
a) Press OK on the normal live mode to go to the channel
list.
b) Press RED button to go to the simple channel list.
c) Press SAT button to sort by Satellite and FAV button for
Favorite 1~8.
d) Press the SAT key to show Satellite Pop-UP Window then
select satellite. Channel list of selected satellite will be
displayed.
e) Press the FAV key to show Favorite Pop-UP Window then
select FAV list. Channel list of selected FAV will be displayed.
CHANNEL LIST GUIDE
(2012 10 24) manual_TOCOMSAT duo LITE.indd 8-9 2012-10-24 �� 7:44:59
Page 7
1110
User’s ManualUser’s Manual
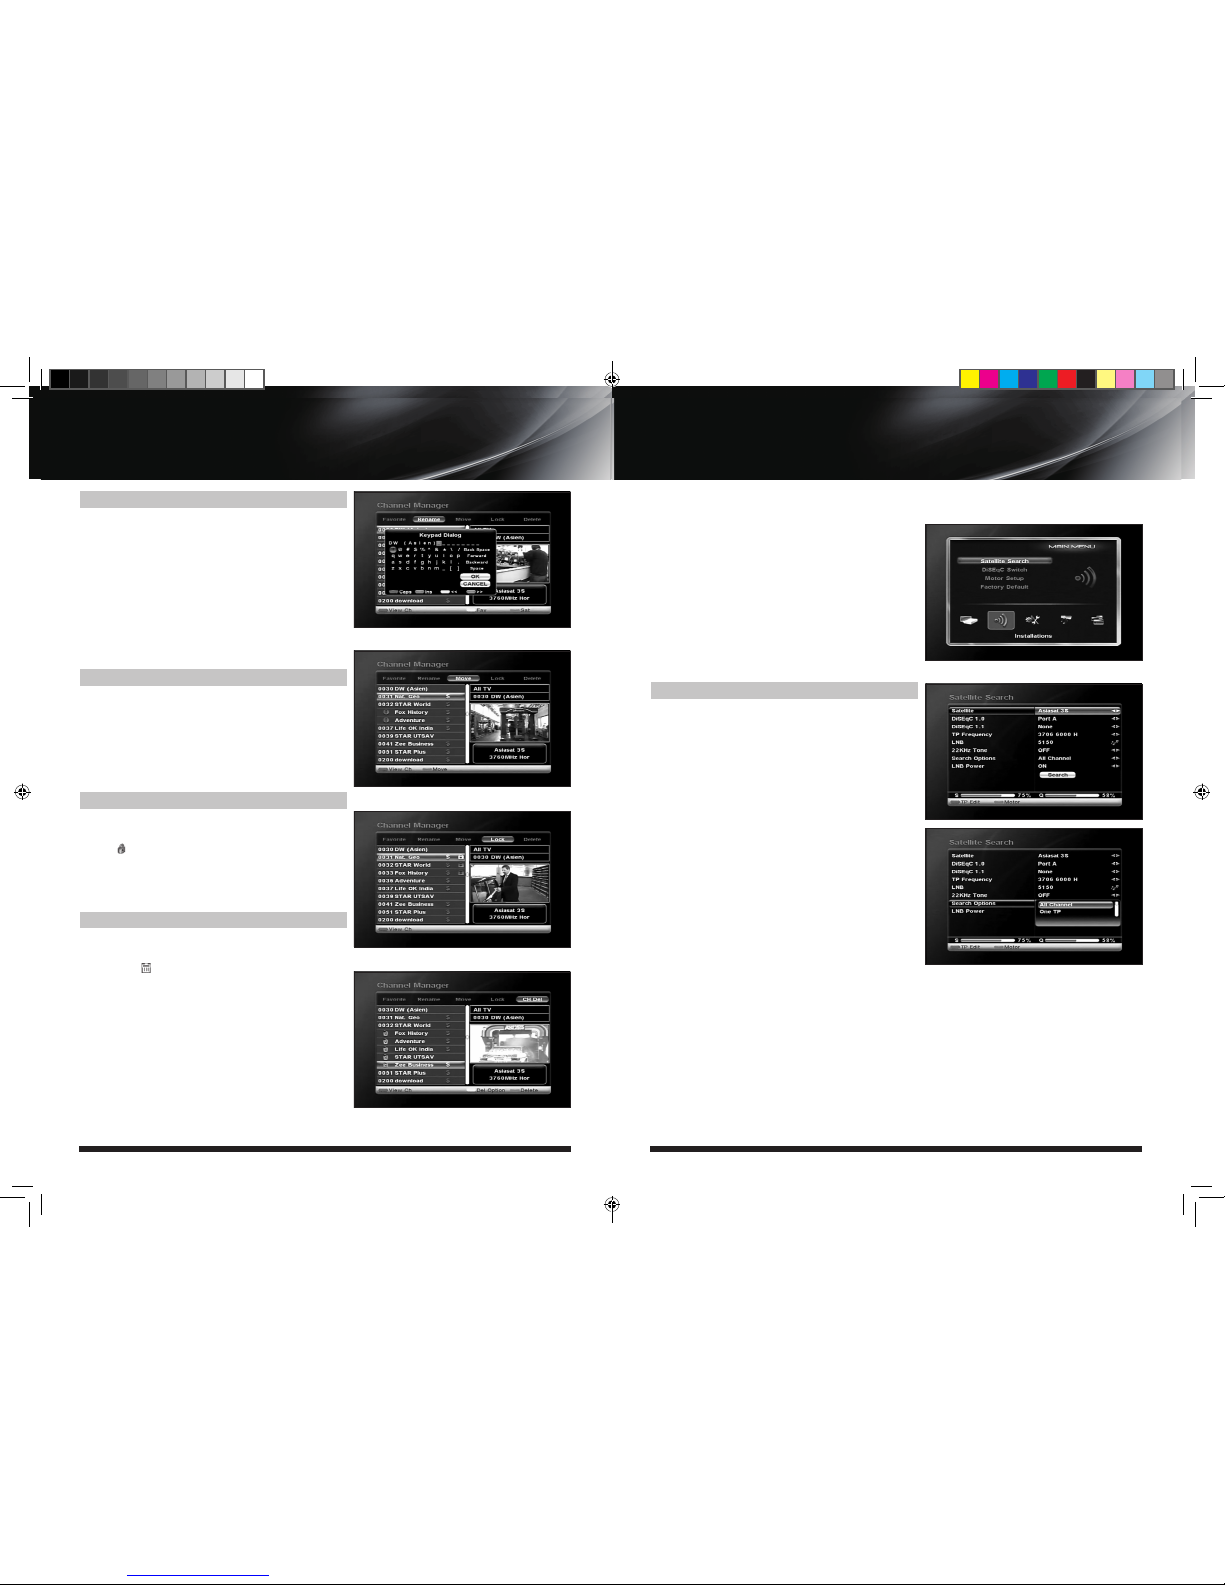
4. EPG (Electronic Program Guide)
a) Press EPG button on the live mode.
b) EPG of the current channel appears on the screen.
c) Select the channel that you want to watch program.
5. ZOOM IN/OUT
a) By selecting page up key ( ) in a normal live mode you
can use Zoom In/Out function.
b) From the Pop-Up Window of Zoom function you can
select(*2*3*4)by page up key( ), for Zoom out press
page down key.
c) When you move cursor of Zoom focus by key (▲▼◀ ▶)
then you can select Zoom In/Out on the focused point
by pressing page up/down keys. Press Pause key then
live mode will be paused on the mode of Zoom.
CHANNEL LIST GUIDE
Channel List Guide
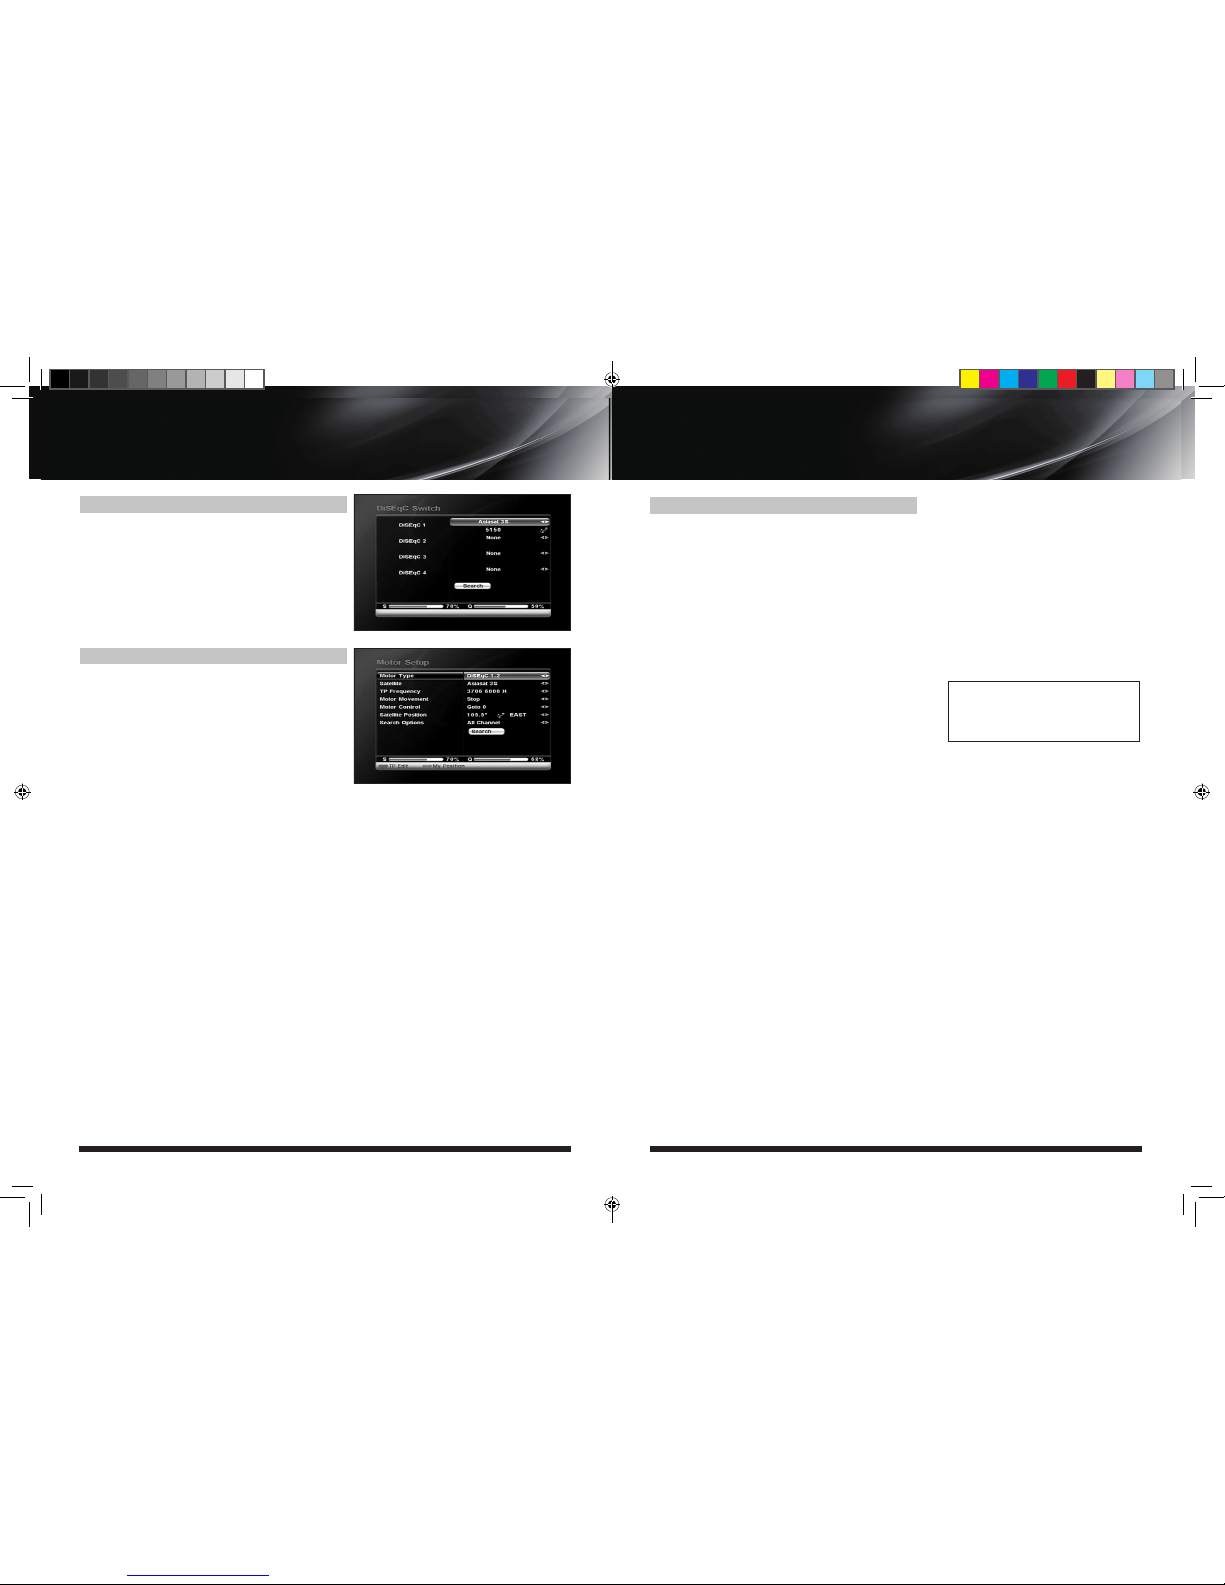
Press the [MENU] key on the RCU to open Main
Page on the screen. Main Page will be displayed.
1. You can move into the main page using ▲▼◀ ▶
on the RCU.
2. Press [OK] to confirm your selection.
3. Press [EXIT] to return to the previous menu or press
[MENU] to go to the current live channel.
This chapter explains how to organize channels according to your preference.
1. Select Channel Manager in the Main Page with ▲▼ and press OK.
2. TV Channel Manager Page displays on the screen.
3. Select the mode that you want to use◀▶.
4. To see the channel that you choose, go to the channel and then press RED button.
5. Press EXIT to return to the previous menu or press MENU to go to the current live channel.
I-1. Favorite
MENU GUIDE
I. Channel Manager
MAIN PAGE
I. CHANNEL MANAGER
I-1. Favorite
I-2. Rename
I-3. Move
I-4. Lock
I-5. Delete
1. Using ◀▶ go to the Favorite mode then press YELLOW
button to choose Favorite 1~8.
2. Press OK on the channel that you want to add or delete.
3. will be marked at the end of selected channel name
bar. To delete press OK again.
4. Selected channels will be automatically saved.
5. If you want to check the saved Favorite Channel List go
to other mode (Rename~Delete) except Favorite and
then press FAV button to check Favorite 1~8.
6. Press EXIT to return to the previous menu or press
MENU to go to the current live channel.
(2012 10 24) manual_TOCOMSAT duo LITE.indd 10-11 2012-10-24 �� 7:44:59
Page 8
1312
User’s ManualUser’s Manual
MENU GUIDE
I. Channel Manager
I-2. Rename
1. Using◀▶go to the Rename mode.
2. Select the channel that you want to rename using ▲▼
and then press OK.
3. Keypad Dialog displays on the screen.
4. Edit the name entering NUMBERS and / or WORDS in the
Keypad Dialog.
5. Press YELLOW button to rename Favorite 1~8 and press
BLUE button to rename Satellite.
6. Press EXIT to return to the previous menu or press MENU
to go to the current live channel.
I-3. Move
1. Using◀▶go to the Move mode.
2. Select channels which you want to move by pressing OK key.
3. Move cursor that you want to place on than press GREEN
button.
4. Press EXIT to return to the previous menu or press MENU
to go to the current live channel.
I-4. Lock
1. Using◀▶go to the Lock mode.
2. Select the channel that you want to lock and then press
OK. will be marked at the end of the selected chann
el name bar. To delete press OK again.
3. Press EXIT to go to Main Page or press MENU to go to
the current live channel.
I-5. Delete
1. Using◀▶go to the Delete mode.
2. Select the channel that you want to delete and then
press OK. will be marked on the selected channel
number. To delete press Blue button again.
3. Press YELLOW button to delete TP. Select one channel
and press Blue button. All channels of that TP will be
automatically selected.
4. Press YELLOW button to delete Satellite. Select one channel and press Blue button. All channels of that the
Satellite will be automatically selected.
5. Press EXIT to return to the previous menu or press MENU
to go to the current live channel.
6. Message Box displays on the screen.
7. Select OK on the Message Box and then press OK to
delete the marked channels.
MENU GUIDE
II. Installation
II. INSTALLATION
This section may help you to set up antenna and
scan satellite or transponder, etc. Select Installations
in Main Page using
▲▼ and press OK.
Press EXIT to return to the previous menu or press
MENU to go to the current live channel.
II-1 Channel Search
II-2. DiSEqC Switch
II-3. Motor Setup
II-4. Factory Default
II-1 Channel Search
1. You can move the cursor using ▲▼ and press OK
when you select the value that you want.
a) Satellite
- Press OK to display the Satellite List Box.
- Select the proper Satellite and then press OK.
b) DiSEqC
- Press OK to display the DiSEqC Port List.
- Select the proper DiSEqC port and then press OK.
c) Frequency
- Press OK to display the Frequency List.
- Select the proper Frequency and then press OK.
d) LNB
- Press OK to display the LNB Frequency List.
- Select the proper LNB Frequency and then press OK.
- You can also input directly the numbers using NUMBER
KEY o
n the RCU.
e) 22KHz Tone
- Select the one among None, 0 KHz or 22 KHz depending
on the user’s antenna switch box.
f) Search Option
- Press OK to display the Search Option list.
- Select the Search Option that you want and then press OK.
g) Search
- Press Search to start scan channels.
- Selected Satellite displays on the screen.
- Press ▶ to select more Satellite or ◀ to cancel the selected Satellites.
- Press OK to start scanning.
(2012 10 24) manual_TOCOMSAT duo LITE.indd 12-13 2012-10-24 �� 7:45:00
Page 9
1514
User’s ManualUser’s Manual
II-2. DiSEqC Switch
1. Select Channel Search in Installation using ▲▼
and press OK.
a) If you select DiSEqC Switch and press OK on the menu,
DiSEqC Switch Page will be displayed.
b) Select the proper Satellite of each DiSEqC port using
◀ ▶ and ▲▼ and press SEARCH. Selected Satellites
will be searched automatically.
II-3 Motor Setup
1. You can move the cursor using ▲▼ and press
OK when you select the value that you want.
a) Motor Type : DiSEqC 1.2, USAL
- Press OK to display Motor Type
- Select the proper Motor Type and then press OK.
b) Satellite
- Press OK to Display the Satellite List Box
- Select the proper Satellite and then press OK.
c) Frequency
- Press OK to Display the Frequency List.
- Select the proper Frequency and then press OK.
d) Motor Movement
- Search the appropriate position of the selected Satellite
using ◀ ▶.
MENU GUIDE
II. Installation
II-3 Motor Setup
e) Motor Control
Select the position using ◀ ▶ and then press OK.
Message box displays on the screen.
- Store Sat position : Stores the current position of the
motor for the selected satellite.
- Goto Sat Position : Moves the motor to the stored posi-
tion of the selected satellite.
- Goto 0 : Goes to the center of the motor.
- Reset Position : Resets all stored position of the motor.
MENU GUIDE
II. Installation
f) Satellite Position
- Input directly the position using NUMBER KEY on the RCU
- Select the direction using ◀▶ (WEST / EAST).
g) Search Option
- Press OK to display the Search Option list.
- Select the Search Option that you want and then press OK.
h) Search
- Press Search to start scan channels.
- Press OK to start scanning.
2. Edit my local position
- Press Green Button to edit local Position.
a) Longtitude
- Input directly the Longtitude using NUMBER KEY on the RCU.
- Select the direction using ◀▶ (WEST / EAST).
b) Latitude
- Input directly the Latitude using NUMBER KEY on the RCU.
- Select the direction using ▲▼ (NORTH / SOUTH).
3. Press EXIT to return to the previous menu or press MENU to go to the current live channel.
◈TP EDIT
To Edit TP Press the RED button on the
RCU.
(2012 10 24) manual_TOCOMSAT duo LITE.indd 14-15 2012-10-24 �� 7:45:00
Page 10
1716
User’s ManualUser’s Manual
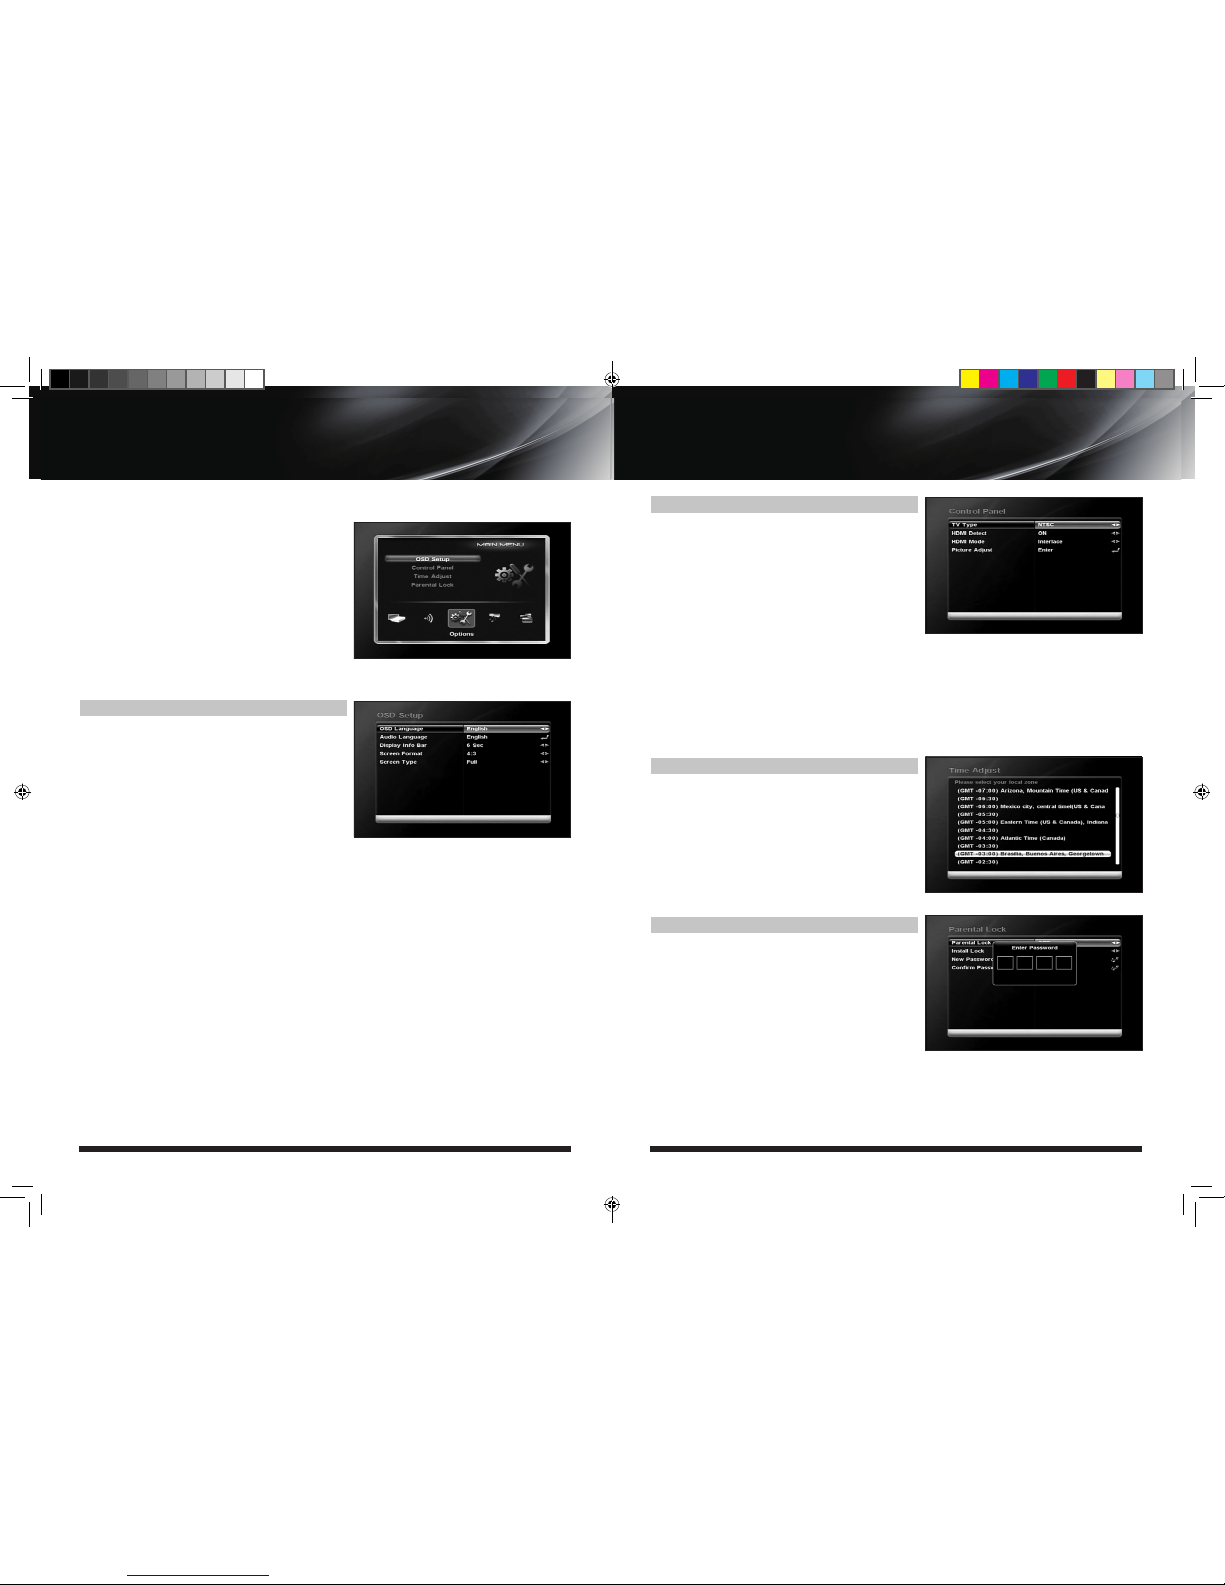
his section may help you to set up OSD language,
time, etc. Select Options in Main Page using
▲▼ and
press OK.
Press EXIT to return to the previous menu or press
MENU to go to the current live channel.
III-1. OSD Setup
III-2. Control Panel
III-3. Time Adjust
III-4. Parental Lock
III-1. OSD Setup
1. Select OSD Setup in Options using ▲▼ and press
OK.
a)OSD Language
- Press OK to display OSD Language list.
- Select the language that you want and then press OK.
b)Audio Language
- Press OK to display Audio Language list.
- Select the language that you want and then press OK.
c)Display Info Bar
- Press OK to display Display Info Bar time list.
- Select the second that you want to display and then press
OK.
d)OSD Position
- Press OK to change Horizontal and Vertical Position of the OSD.
- OSD Pos
ition box displays on the screen.
- Select Hor Position / Ver Position using ▲▼.
- Move the OSD Position to right/left or up/down using◀ ▶.
- Select OK on the OSD Position box and then press OK.
e)Screen format
- Press OK to display screen format list.
- Select the format that you want and then press OK.
2. Press EXIT to return to the previous menu or press MENU to go to the current live channel.
MENU GUIDE
III. Options
III. OPTIONS
III-2. Control Panel
III-3. Time Adjust
Set your local time according to your location.
1. Select Time Setup in Options using◀ ▶ and press OK.
2. Time Adjust page displays on the screen.
3. Move the cursor using◀▶,▲▼and press OK when you
select the value that you want. (Input Hour directly using
number keys on the RCU)
4. Press EXIT to return to the previous menu or press MENU
to go to the current live channel.
III-4. Parental Lock Setup
1. Select Parental Lock Setup in Options using◀▶ and
press OK.
2. Parental Lock Page displays on the screen.
3. You can lock and unlock Parental Lock selecting ON or
OFF using ▲▼ (For Channels).
4. You can lock and unlock Install Lock selecting ON or OFF
using▲▼(For Installation Settings).
5. Enter new password if you want to change the current
password.
6. Confirm your
new password entering new password
again.
1. TV Type : You can press [Left/Right] key to select Auto/
PAL/NTSC/PAL-M//PAL-N circularly.
2. Screen Format: it is for switching the screen aspect ratio
mode. Now we provide 4:3 16:9.
You can press [Left/Right] key to select each mode
circularly.
3. Screen Type: It Is for switching the screen display mode.
You can press [Left/Right] key to select Full/LetterBox/
Cinema mode circularly.
4. HDMI Detect : You can use when you watch HDMI screen.
When HDMI detect is, If you connect HDMI cable on the
rear panel, You can’t watch the component screen.
5. HDMI Mode: It Is for switching the HDMI mode.
You can press [Left/Right] key to select Interiace/
Progressive mode circularly.
6. Picture Adjust: Adjustment of screen Brightness/Contrast/Chroma.
7. Press EXIT to return to the previous menu or press MENU
to go to the current live channel.
MENU GUIDE
III. Options
(2012 10 24) manual_TOCOMSAT duo LITE.indd 16-17 2012-10-24 �� 7:45:01
Page 11

1918
User’s ManualUser’s Manual
This section may help you to use USB, etc.
Select Utility in Main Page using
▲▼ and press OK.
IV-1. System Information
IV-2. USB
IV-3. Time Record
IV-4. Factory Default
IV-1. System Information
This option help you to know the current S/W and
H/W version. Also provides you the product name.
1. Select System Information in Options using ▲▼ and
press OK.
2. Press EXIT to return to the previous menu.
IV-2 USB
The receiver is equipped with host.
1. Select USB in Utility with ▲▼ and press OK.
2. If you want to change mode (S/W Upgrade, BootLoader
Upgrade), press RED button on the RCU.
3. Select the file which you want to upgrade using ▲▼ and
press OK.
4. After downloading the selected file, the receiver will
reboot automatically.
IV-3 Time Record
1. If you "ENABLE" option set to YES, you can edit TIME
RECORD function.
IV-4 Factory Default
Use Factory Default function only when you want to
return the receiver
to the condition of factory
default. All settings and channels will be deleted.
1. Select Factory Default in Installations using ▲▼ and
press OK.
2. Message box displays on the screen.
3. Select OK to return the receiver to the condition of factory default and then press OK.
4. Press EXIT to return to the previous menu or press MENU to go to the current live channel.
MENU GUIDE
IV.Utility
IV. UTILITY
TROUBLESHOOTING
Troubleshooting
Before contacting your local service center, please read the tips below carefully. If the problem persists after
completing the following procedure, please contact your local retrailer for further instructions.
1. Nothing appears on the Front Panel or No power supply
- Check that the power cable is plugged into the power socket.
2. No Picture
3. No Sound
4. Remote Control Unit does not work
5. "No Signal" on the screen
6. Tuner detective check
- Go to the Option and select System Information.
7. You have forgotten your secret PIN code
- You have forgotten your secret PIN code, The Default Pincode is 0000 and the Master Pincode is 2580.
- Check the dish and adjust it.
- Check the cable connection and correct it.
- Get out of UHF mode.
- Check channel and video output.
- Check the volume level of the TV and receiver.
- Check the mute status of TV and receiver.
- Check the cable connection and correct.
- Replace batteries.
- Aim the remote control unit directly to the recei
ver.
- Checking that nothing blocks the front panel.
- Press STB once on RCU and try the remote again
- Check the signal strength and the signal quality in the menu.
- Check the LNB and replace the LNB if neccessary.
- Check the LNB cable.
- Check the dish and adjust it.
(2012 10 24) manual_TOCOMSAT duo LITE.indd 18-19 2012-10-24 �� 7:45:02
 Loading...