

Page 1
V3
This product conforms to BS EN 14988 1&2:2006
Suitable for children who can sit up unaided, aged approximately
6 months but not exceeding 18kg/40lbs.
HIGHCHAIR
IMPORTANT!
KEEP FOR FUTURE
REFERENCE
galley
Page 2

2
We know that safety is of utmost concern for parents and carers of children.
Whilst this product has been developed to meet all of the relevant safety
standards, we need your help to maintain that level of safety and minimise the risk
of a baby using this product being harmed.
WARNING: Your baby should never be left alone in the highchair and all harmful
objects should be kept out of your child’s reach.
WARNING: Do not use the highchair unless all components are correctly fitted and
Adjusted. Your child’s safety is your responsibility.
WARNING: To avoid injury keep your child away when folding and unfolding this
Product. Do not let your child play with this product.
WARNING: Do not leave the baby unattended in the highchair.
WARNING: Be aware of the risks of open fires and other such sources of strong
heat, such as electrical bar fires, gas fires etc. In the vicinity of this highchair.
• Ensure that the locks and catches on the product are not obstructed at any
time during use.
• Ensure the safety harness is fastened and correctly adjusted at all times.
• Do not use near stairs or steps.
• Ensure the highchair is used on a secure and level surface.
• Never carry the highchair with your baby in it.
• Periodically check for loose or damaged parts and do not use if any part is
broken, torn or missing.
• It is recommended that the highchair is only used by babies who can sit and
support themselves unaided.
• Only use parts and accessories approved by the manufacturer. Others may
render the highchair unsafe and will invalidate the warranty.
• This highchair is designed to hold 1 child.
Safety
Whilst we make and test our products to the highest standards of durability
there’s always a small chance of a hiccup! Our promise is to repair, replace or
refund a Toco product that has an identified manufacturing defect from the date of
purchase for a full 3 years thereafter at no extra cost.
However, you must register within 28 days of the date of purchase to receive the
full 3 years guarantee!
To receive your full guarantee you can register your product by:
visiting www.tocobaby.co.uk/warranty.html and complete the warranty form,
or by telephone on 0161 335 2508.
Your 3 year warranty
Page 3
3
Welcome
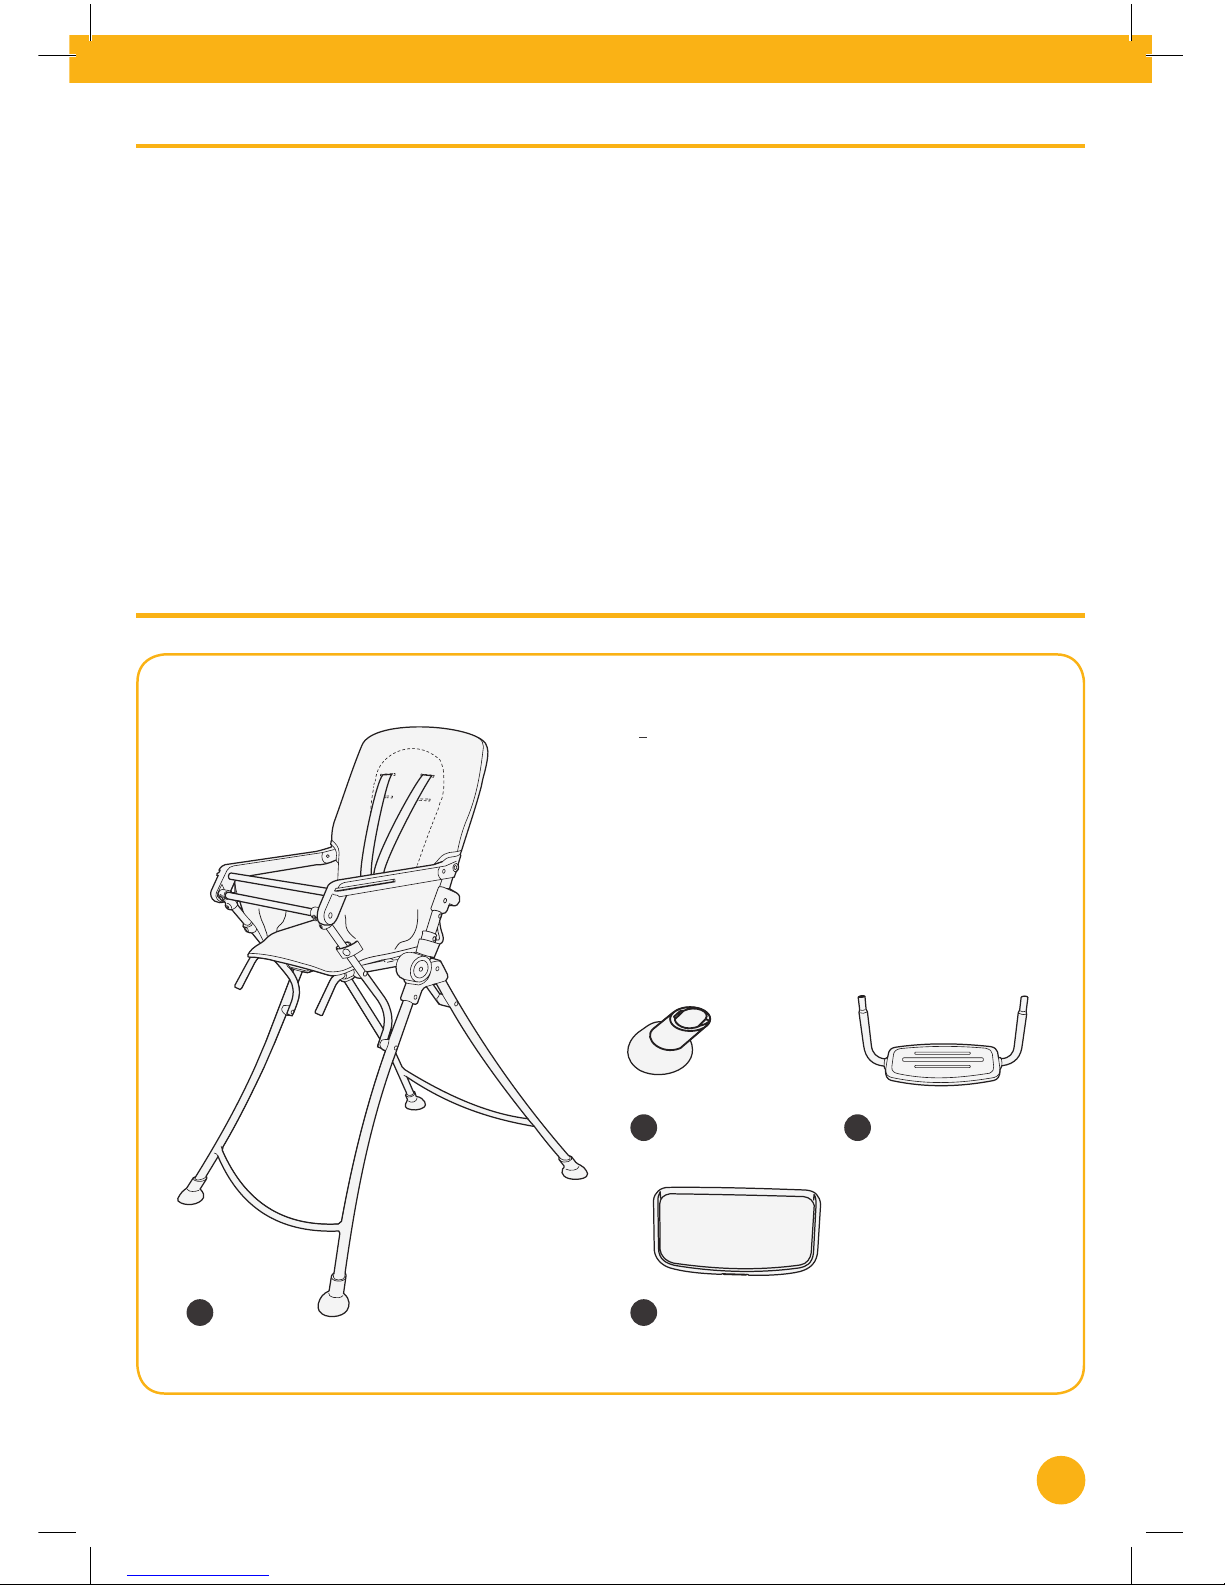
Parts list
Contained in your carton are:
NoPart Qty
1 Highchair 1
2 Feet 4
3 Footrest 1
4 Tray 1
Thank you for purchasing this Toco Galley Highchair.
Please read the instructions and safety advice carefully before use, to ensure safe
and satisfactory operation of this product. Your child’s safety is your responsibility.
Your child’s safety is your responsibility. If you have a query with this product or
require replacement parts, please contact the Toco Helpline on 0161 335 2508.
Lay out the parts on a soft level surface and compare them to the parts list below.
Do not discard any packaging until you are sure that you have all the parts.
Keep children clear during assembly as the pack may contain small parts which
could present a choking hazard. All plastic packaging should be disposed of or
destroyed to keep them away from children.
1
2 3
4
Page 4
4
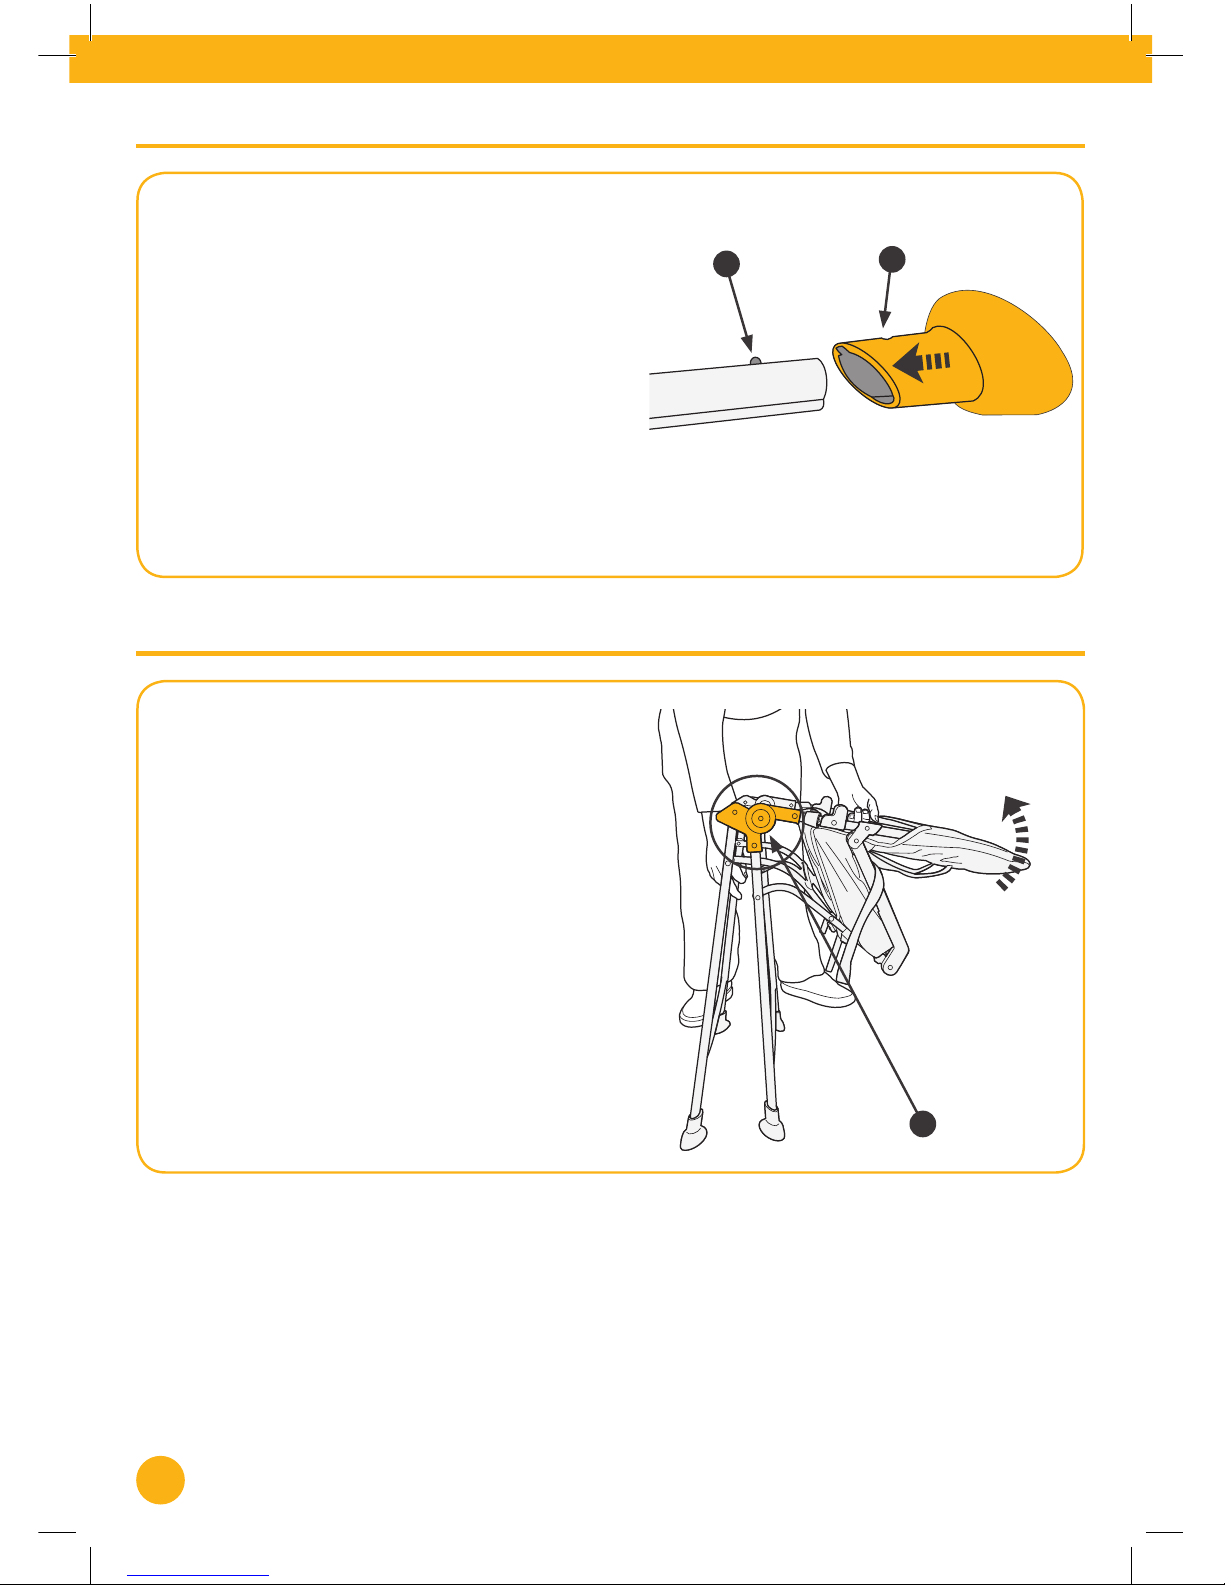
CAUTION: DO NOT place your hand near
the joint (A) whilst opening the highchair.
Place the feet of the highchair on the ground
and holding one of the back legs, raise the
seatback, all the way up towards you, till fully
open.
Check the highchair is securely locked in place.
Note: Each foot has a contoured shape which
must match up with the contour of the leg.
Line up the small hole on the side of the foot
(A) with the spring pin (B) on the highchair
leg. Push the foot on ensuring the spring pin
(B) clicks into place. Pull the foot to check
the spring pin has fully engaged.
To remove the feet: push in the spring pin (B)
and pull the foot o.
A
Opening the highchair
Attaching/removing the feet
A
B
Page 5
5
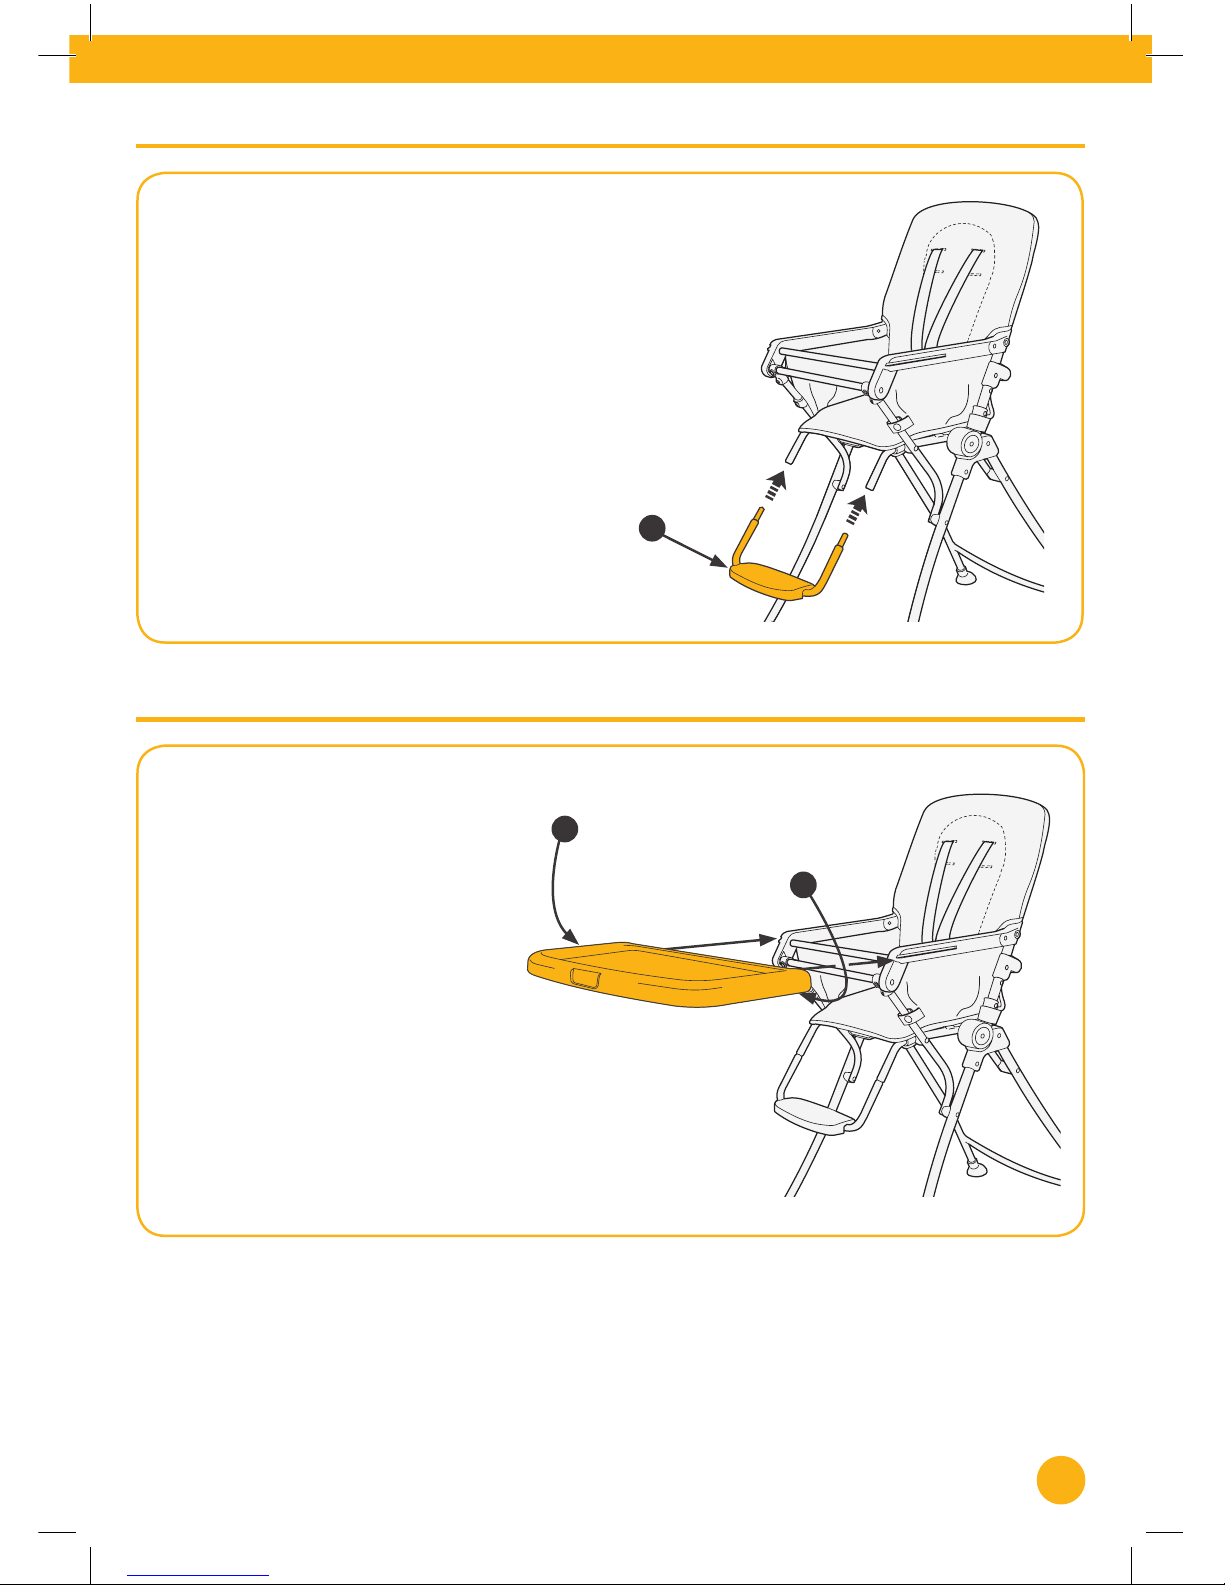
Attach the footrest (A) ensuring both spring
pins click into place. Pull the footrest to check
the spring pins have fully engaged.
To remove the footrest: push in the spring pins
and pull the footrest o.
Grip either side of the tray (A) and feel for the
two levers underneath.
Squeeze the levers (pull the levers
towards the edge of the tray), line up
the tray with the ends of the arms
and slide the tray all the way onto the
arms.
A
A
A
Attaching the tray
Attaching/removing the footrest
Page 6
6
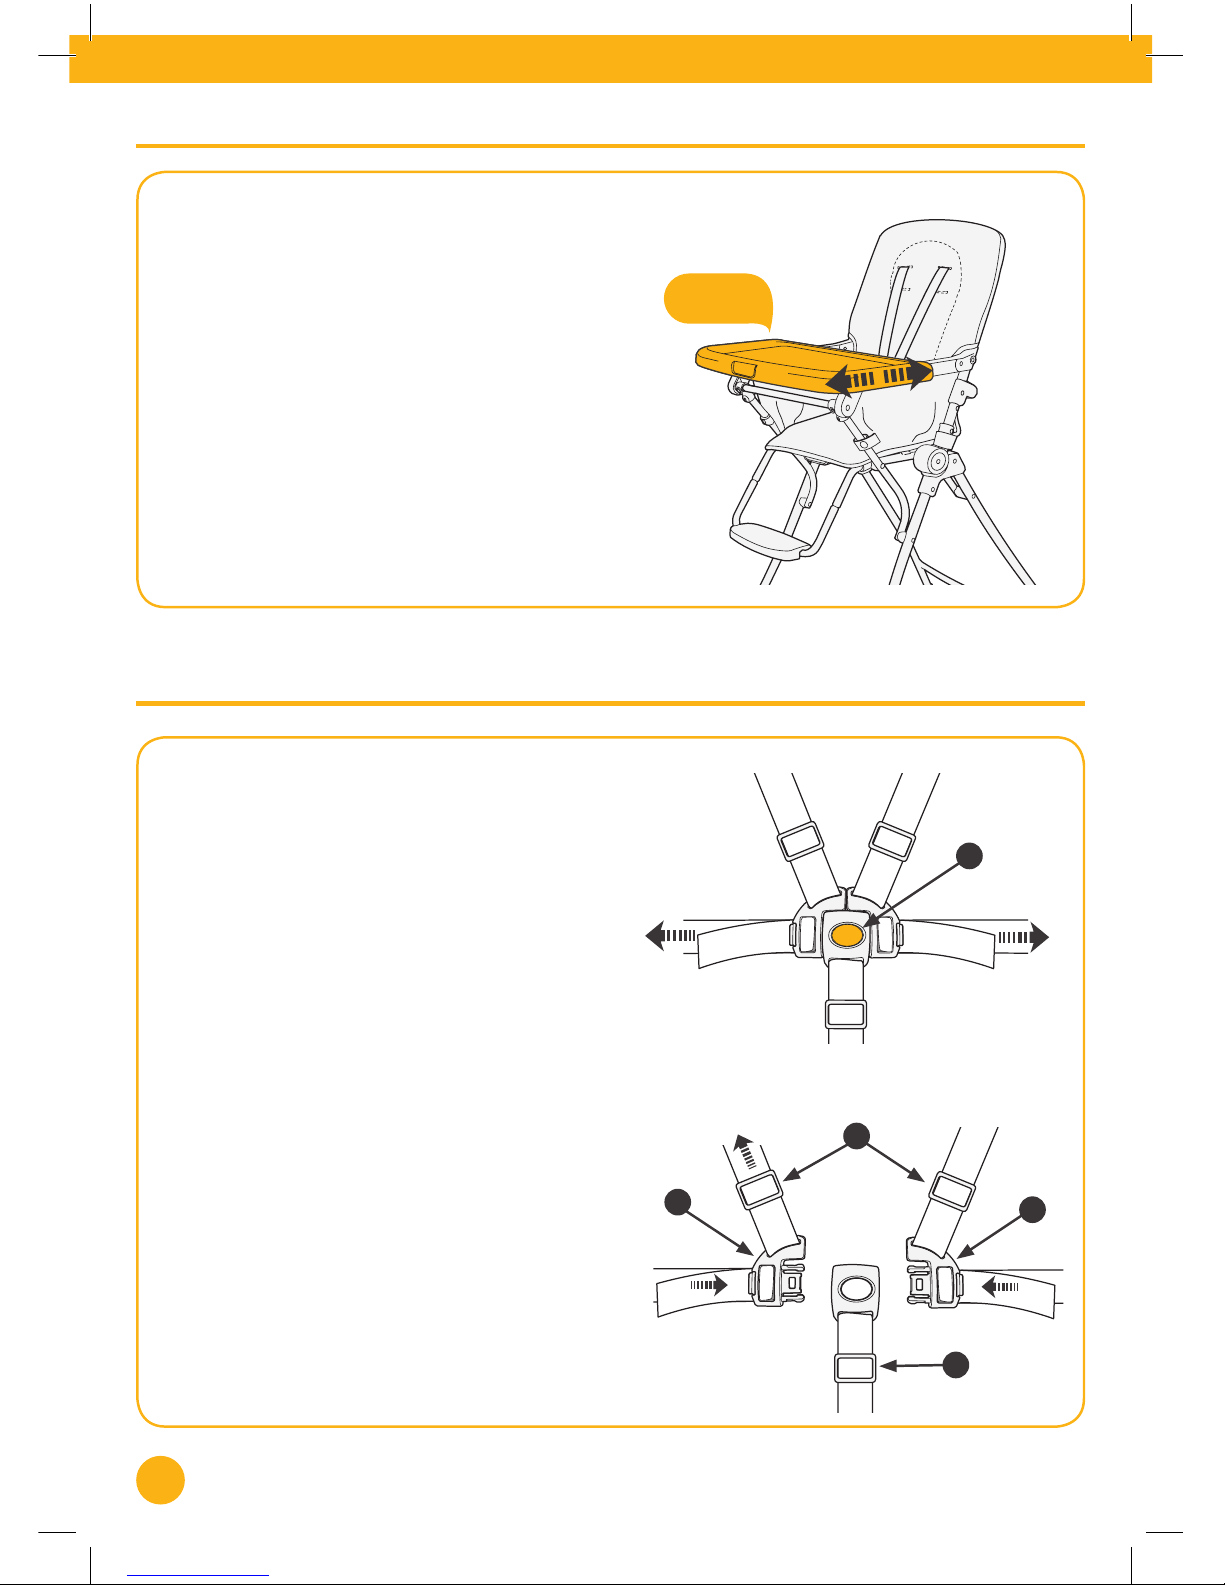
e tray has 3 positions:
Grip either side of the tray and feel for the two
levers underneath.
Squeeze the levers and begin to move the tray
forwards or backwards.
As soon as the tray begins to move let go of the
levers and continue moving the tray till it clicks
into one of the 3 positions.
To release the harness, press the button in on
the centre of the buckle (A) and pull out the
clips.
You can now place your child in the highchair
and re-fasten the harness by pushing the clips
(B) back into the buckle (A).
Ensure the harness is securely and comfortably
adjusted around your child, the harness has
sliding adjusters (C) on the shoulder straps
and on the crotch strap (D) as well as adjusters
on the clips (B) that can be used to make
alterations to the t.
Adjusters (C) and (D) can be altered by
holding the adjuster and pulling the shoulder
or crotch strap in the desired direction.
To use adjusters (B) press in the end of each
clip and pull the waist strap in the desired
direction to tighten or loosen.
C
B
B
D
Adjusting the tray position
A
Using the harness
Click
Page 7
7
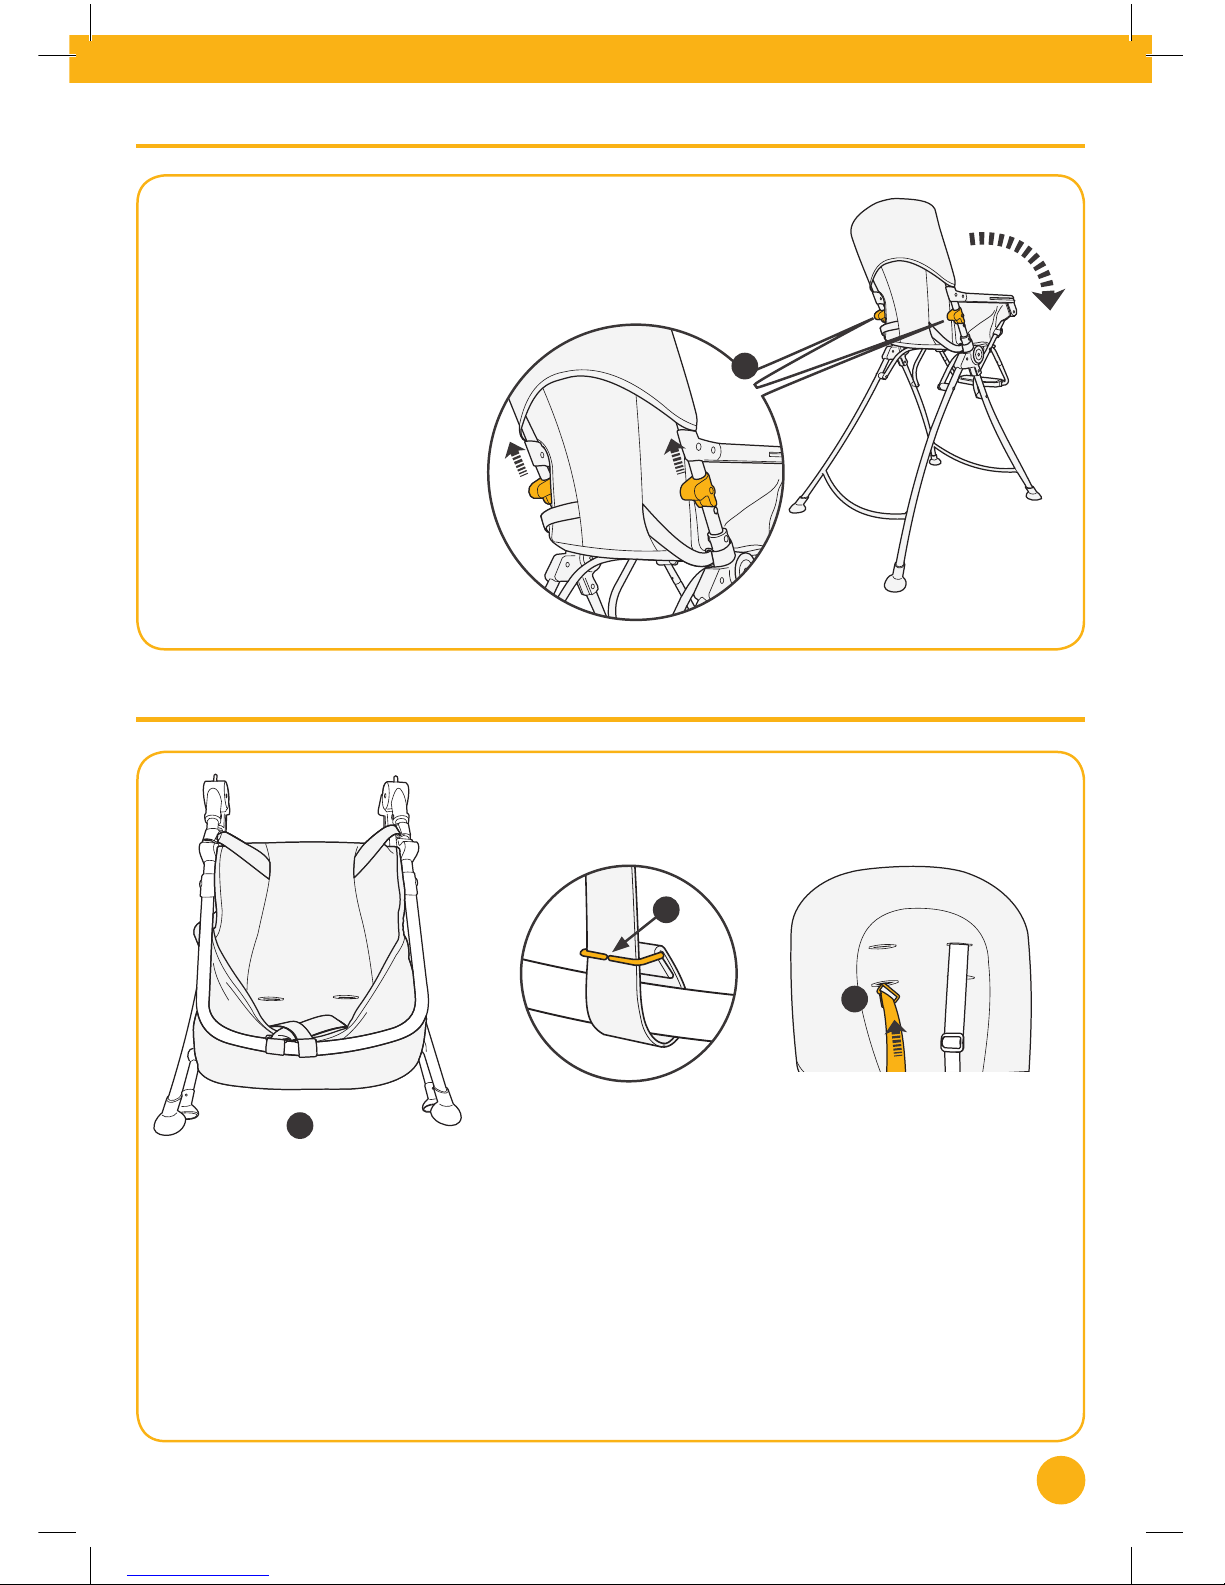
Pull both release catches (A)
upwards and fold the highchair
forwards in half.
With the highchair fully folded (see ‘Folding the highchair’, page 6), pull the back of the seat
cover o from the frame (B).
read the shoulder straps through the gap in the split-rings (C).
Pass both shoulder straps through the seat cover to the front of the highchair then thread them
back through the seat cover to the rear of the highchair at the desired height (D) ensuring they
are not twisted.
Folding the highchair
A
B
C
D
Adjusting the harness height
Page 8
8
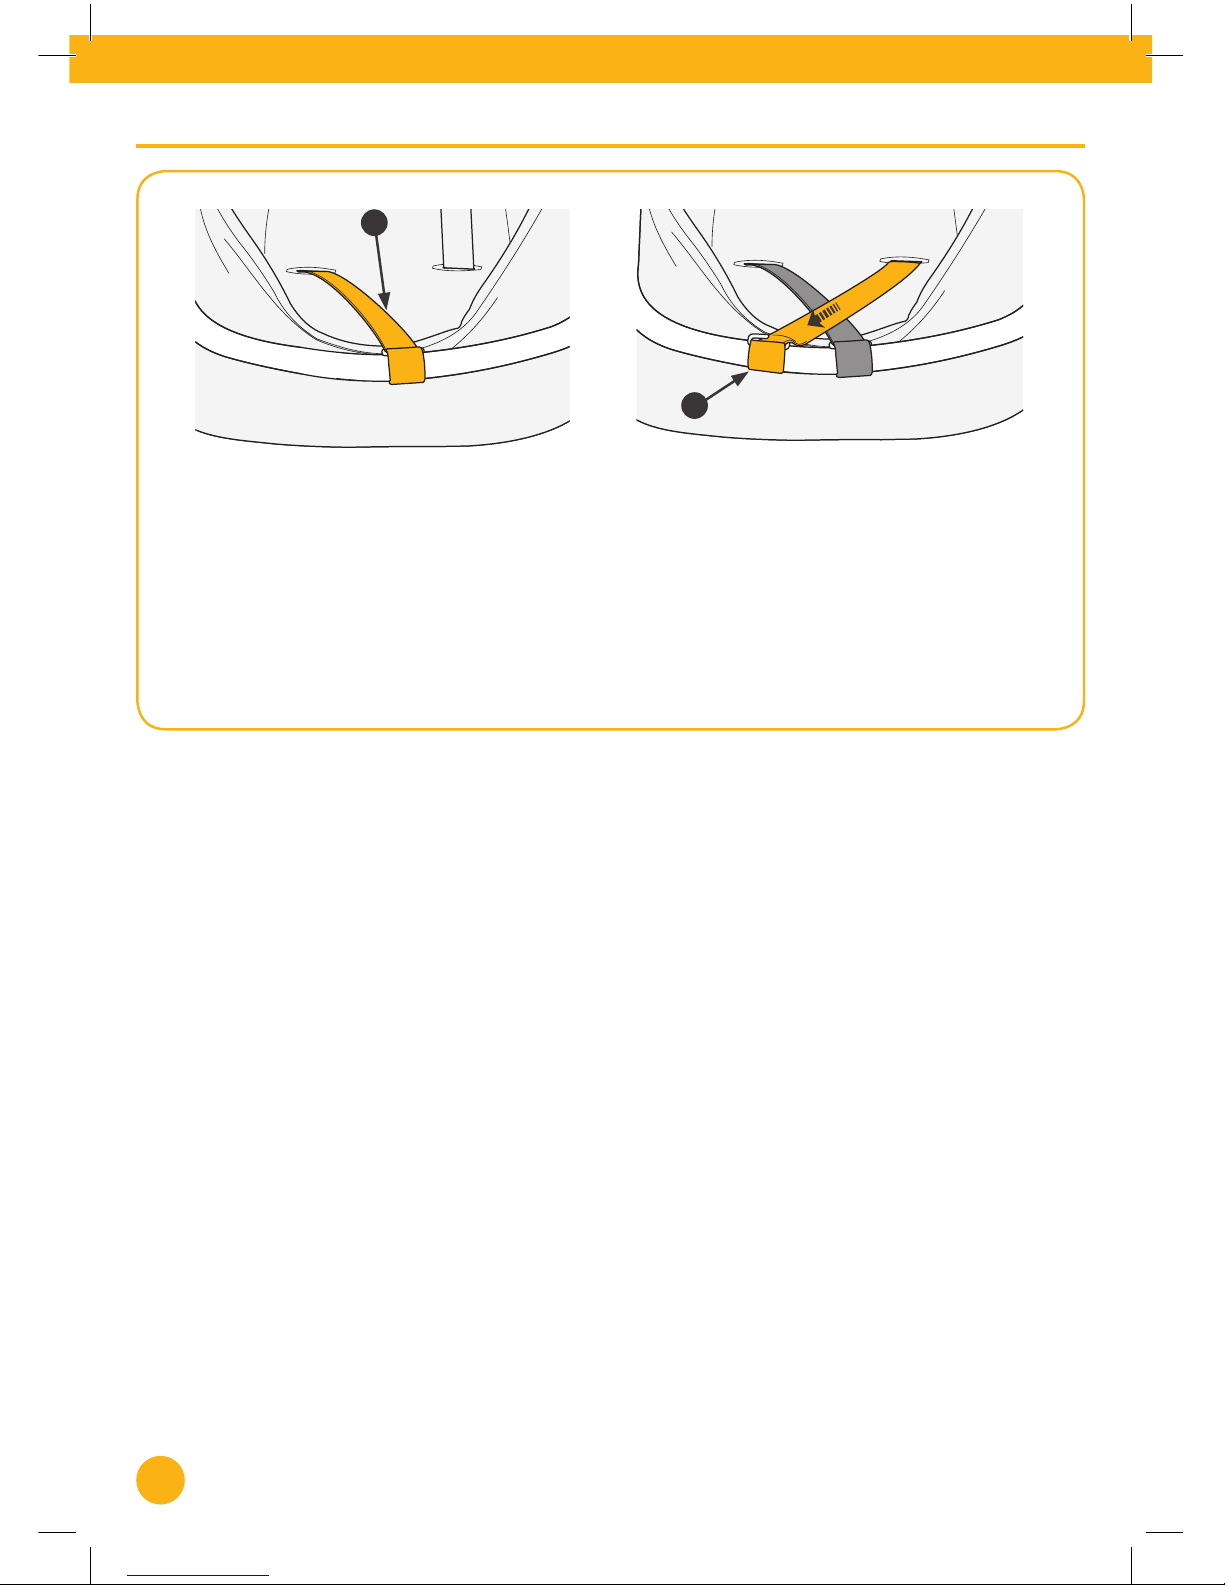
Loop one of the shoulder straps (E) back around the highchair tubing then thread the strap
through the gap in the split-ring (C).
Loop the second shoulder strap (F) around the highchair tubing, ensuring it crosses over the
rst strap, and thread the second strap through the gap in the split-ring (C).
Finally pull the seat cover back over the frame.
Adjusting the harness height (continued)
F
E
Page 9
9
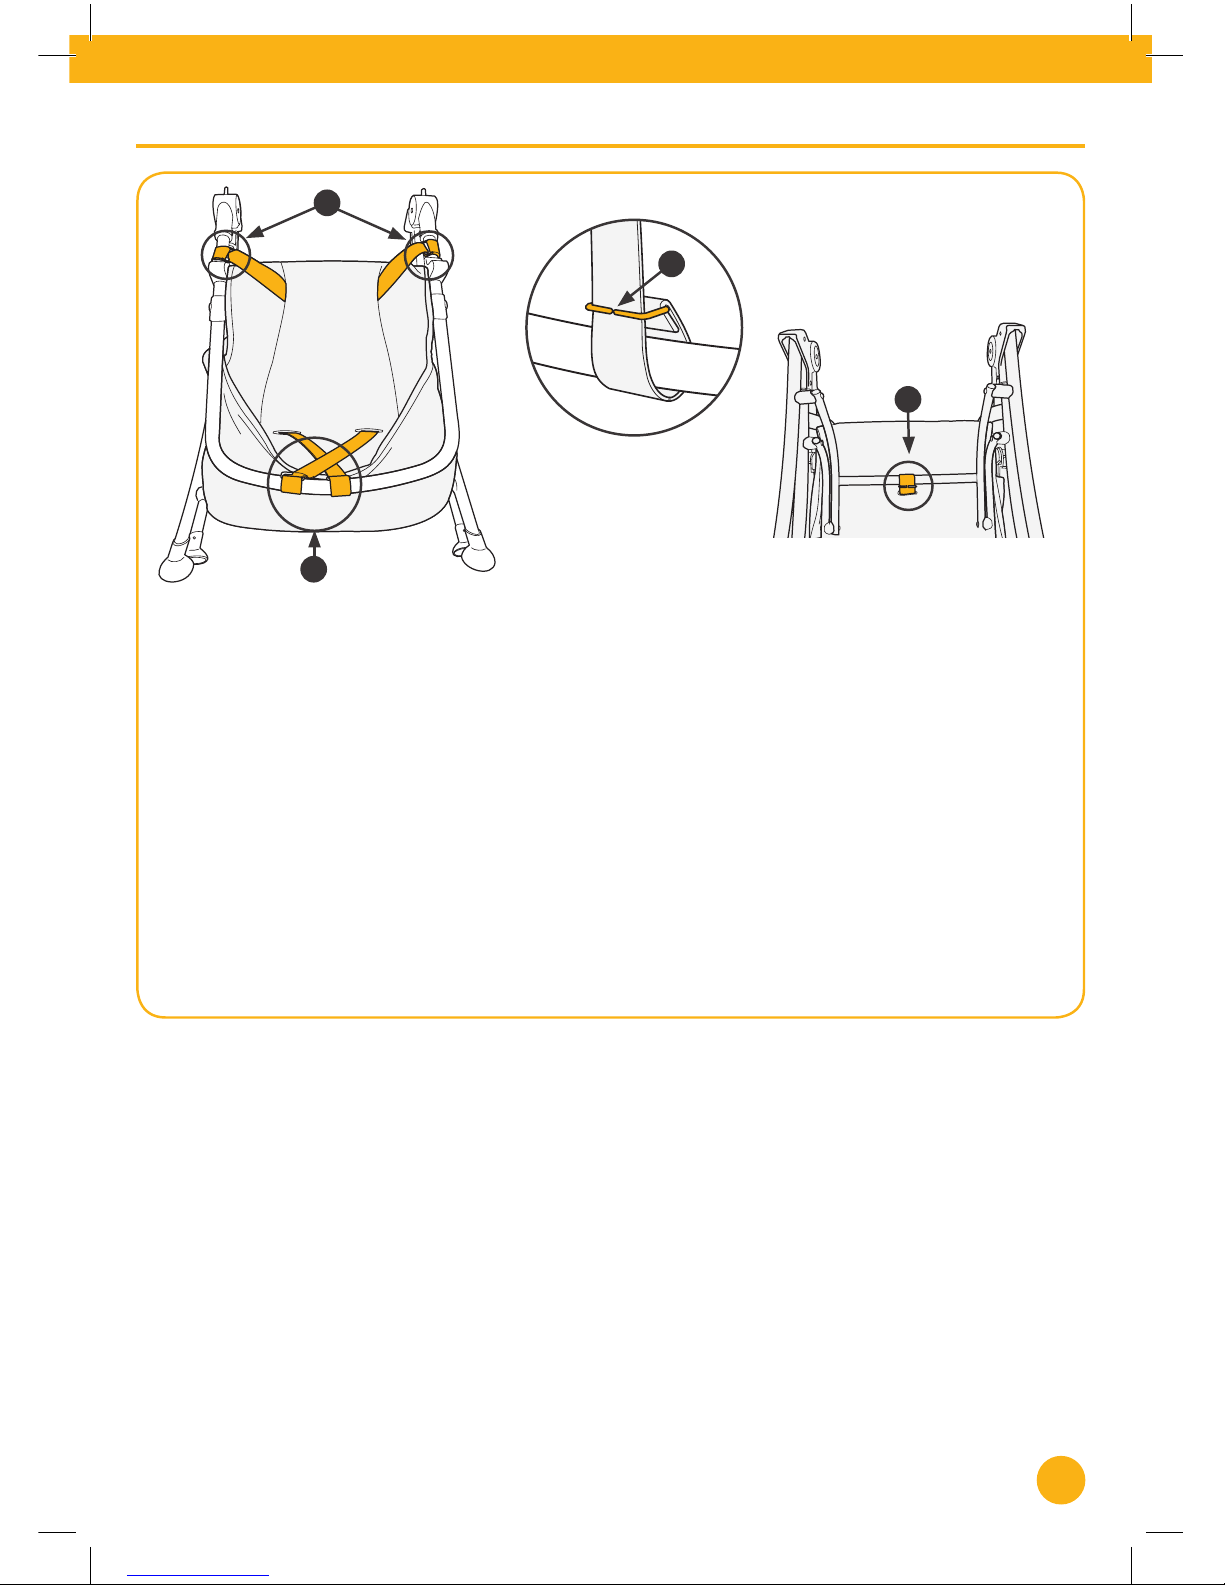
With the highchair fully folded (see ‘Folding the highchair’, page 6), pull the back of the seat
cover o from the frame.
read the shoulder straps (A) through the gap in the split-rings (C) then pull the seat cover
back over the frame.
read the waist straps (B) through the gap in the split-rings (C).
Turn the folded highchair over and thread the crotch strap (D) through the gap in the split ring
(C) and remove from the metal bar.
Open the highchair (see ‘Opening the highchair‘, page 3) and pass all straps through the seat
cover to the front of the highchair and remove the harness.
Removing the harness
B
A
D
C
Page 10
10
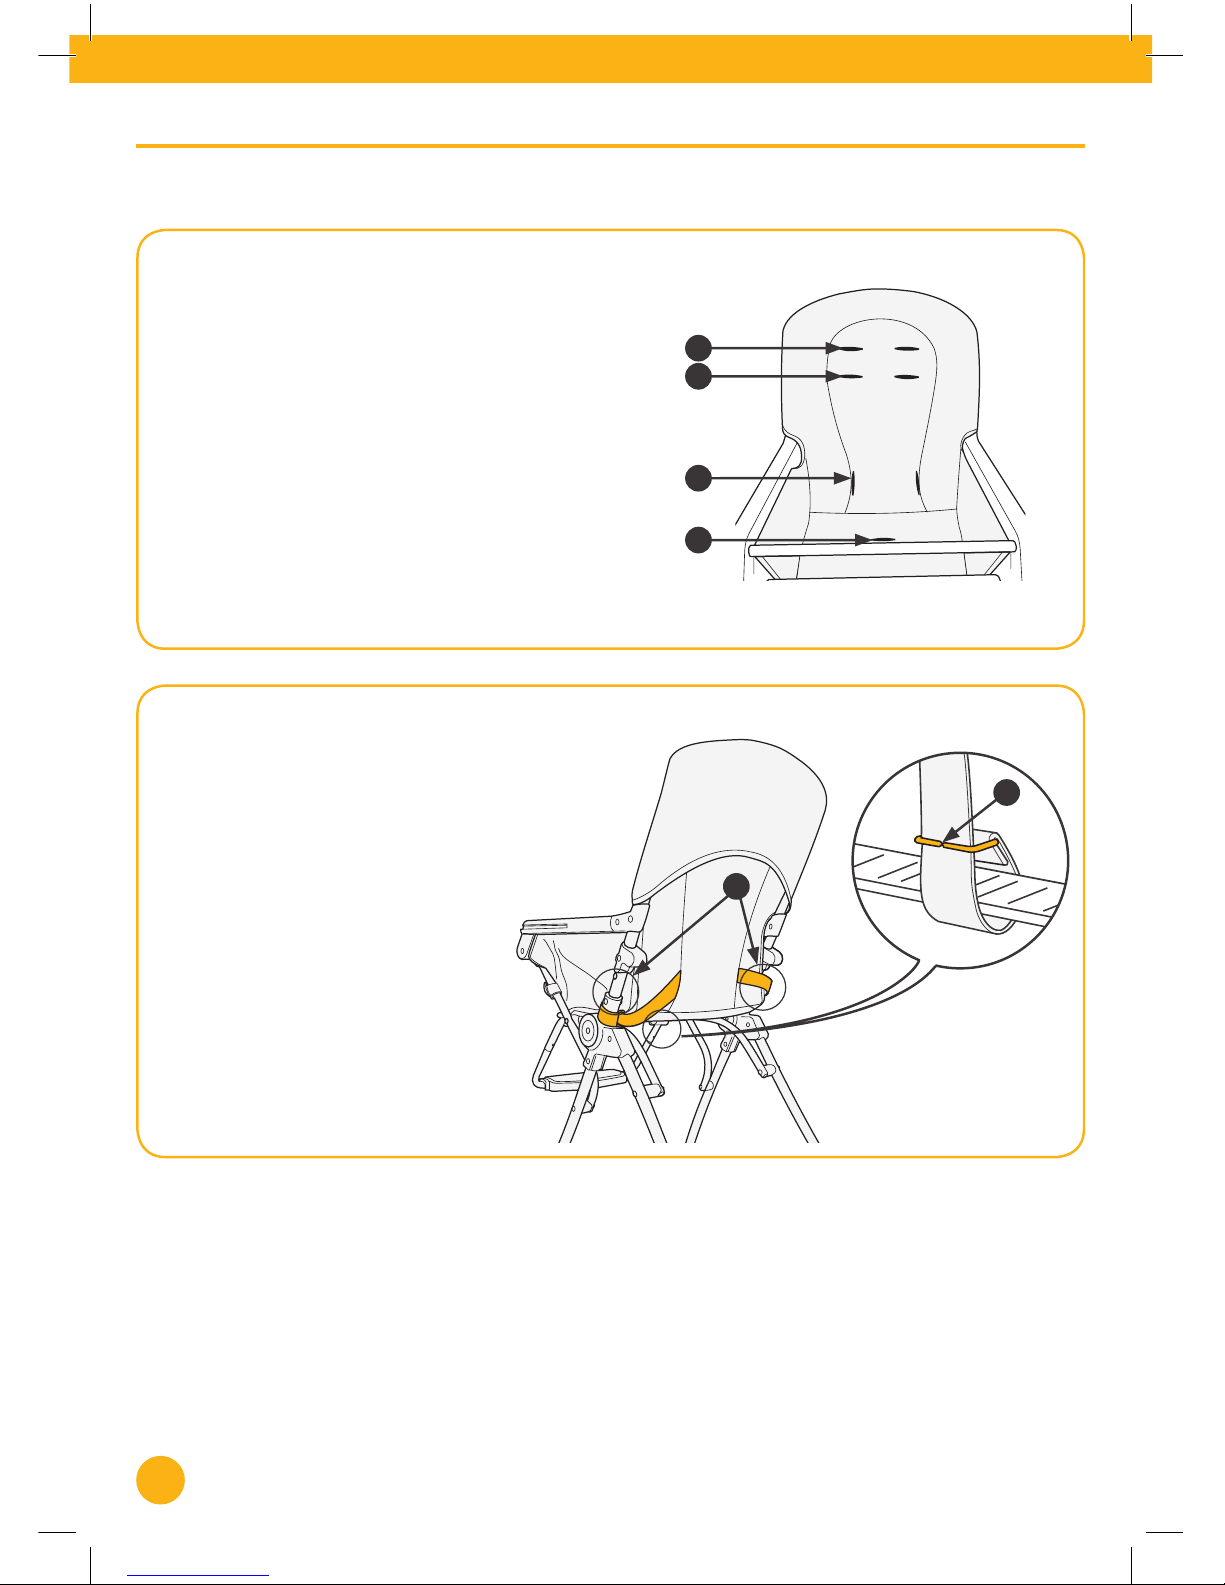
Loop the waist straps around the frame at
points (D) and thread through the gap in
the split ring (F).
Loop the crotch strap around the at metal
bar and thread through the gap in the split
ring (E).
Attention: Care should be taken to avoid twists in any of the straps whilst replacing the harness.
With the highchair fully open (see ‘Opening the
highchair‘, page 3), pass all straps through the seat
cover to the back of the highchair.
Pass the shoulder straps through slots (A1) or (A2)
on the seat back. Use slots (A1) for children from
approximately 6 months and swap to slots (A2) once
the child has outgrown slots (A1).
read the waist straps through slots (B) on the seat
back.
read the crotch strap through slot (C) on the seat
base.
A2
A1
B
C
D
E
Replacing the harness
Page 11
11
• The highchair can be cleaned by using a sponge with warm water and a
mild detergent.
• The tray is NOT dishwasher safe and should be cleaned by hand only.
• A mild disinfectant can be used if desired. Stubborn marks maybe removed
with a non-abrasive cleaner.
• The highchair must be dried thoroughly before using or storing.
• Never clean with abrasive, ammonia based, bleach based or spirit type
cleaners.
• Apply a small amount light lubricant such as WD40 to any of the moving
parts of the highchair as required, but be careful not to get any on the
fabric as it may stain, wipe off any excess lubricant.
Fold the highchair down (see ‘Folding the highchair’, page 6).
Pull the back of the seat cover o from the frame.
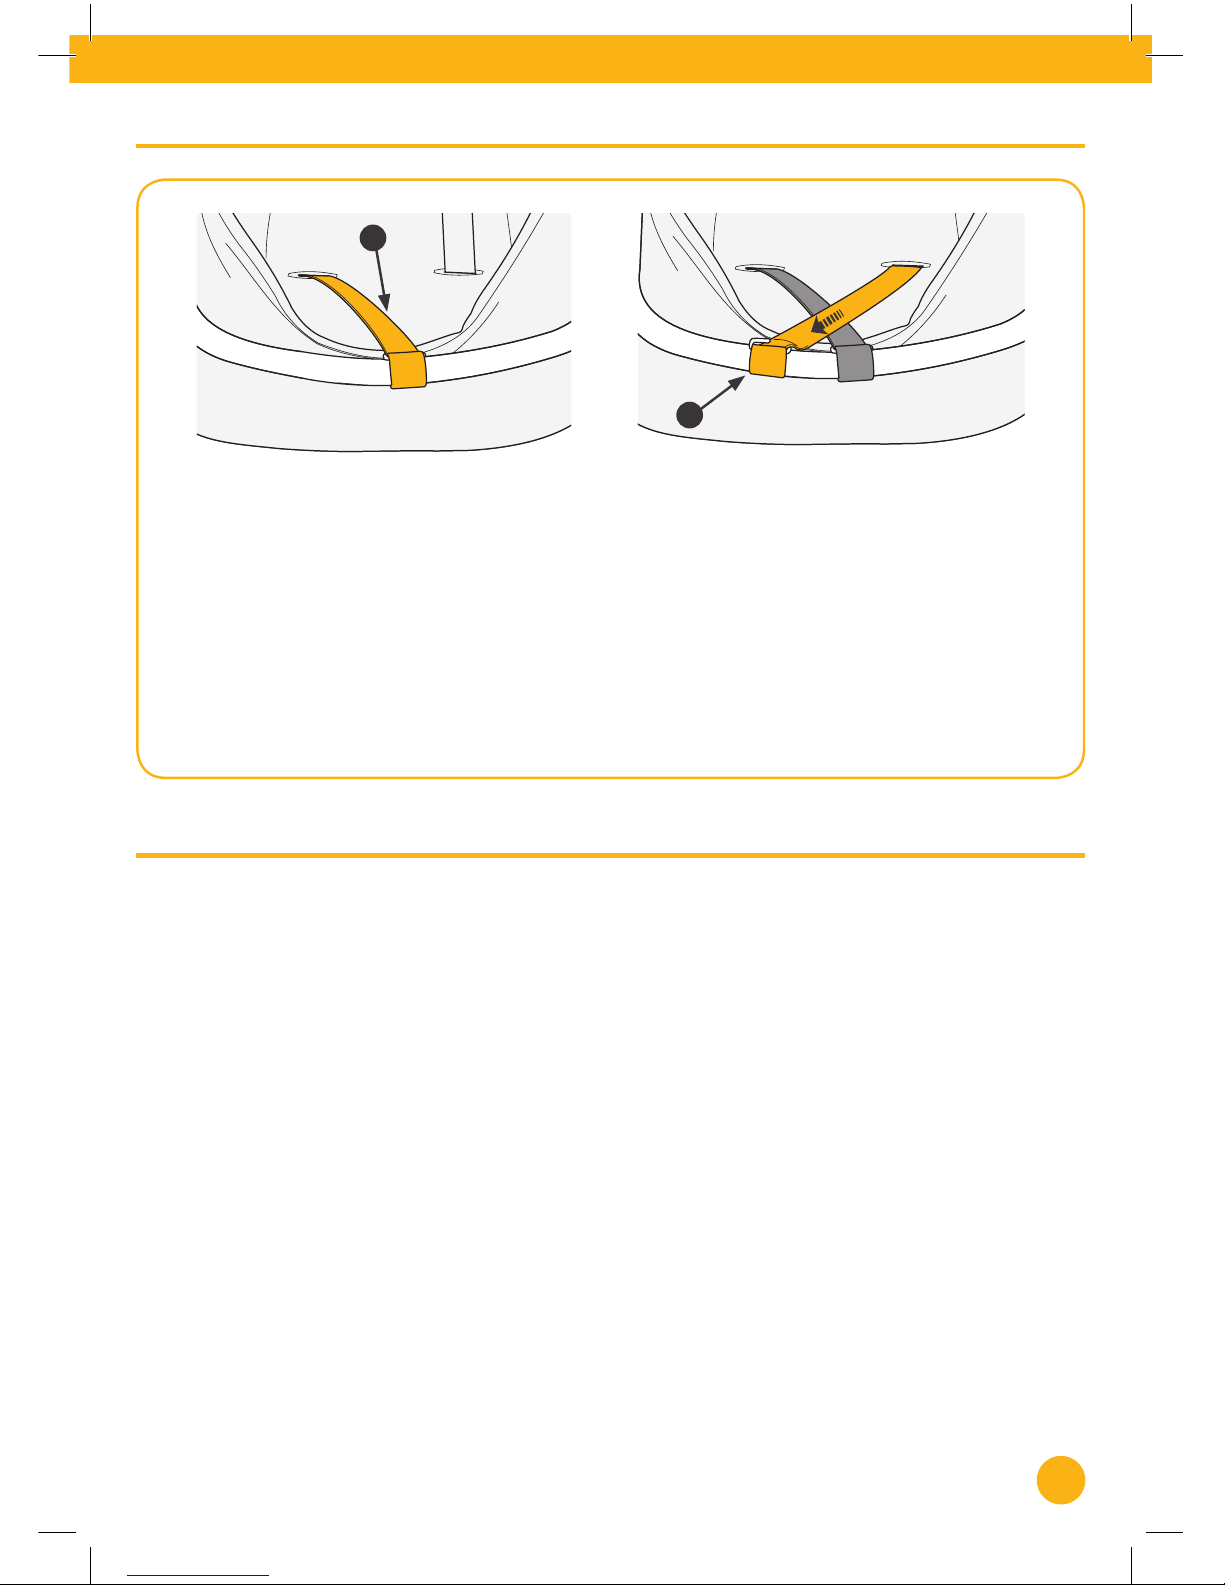
Loop one of the shoulder straps (G) back around the highchair tubing then thread the strap
through the split-ring (F).
Loop the second shoulder strap (H) around the highchair tubing, ensuring it crosses over the rst
strap, and thread the second strap through the split-ring (F).
Check all harness straps are securely attached and nally pull the seat cover back over the frame.
H
G
Replacing the harness (continued)
Care and maintenance
Page 12
Discover more products at
www.toco.co.uk
Discover more products at
www.tocobaby.co.uk
 Loading...