

V1
WALKER
airo
INSTRUCTIONS:
Read the instructions carefully before use and keep
them for future reference. The child may be hurt if you
do not follow these instructions.
BS EN 1273:2005.
This baby walking frame is intended to be used by children
who can sit up unaided, approximately from 6 months. It is
not intended for children who can walk by themselves and
weigh more than 12Kg/26.5lbs.

2
WARNING: Never leave the child unattended.
WARNING: The child will be able to reach further and move rapidly when in the baby
walking frame:
Prevent access to stairs, steps and uneven surfaces.
Guard all fires, heating and cooking appliances.
Remove hot liquids, electrical flexes and other potential hazards from reach.
Prevent collisions with glass in doors, windows and furniture.
Do not use the baby walking frame if any components are broken or missing.
This baby walking frame should be used only for short periods of time (e.g. 20 min).
This baby walking frame is intended to be used by children who can sit up unaided,
approximately from 6 months. It is not intended for children weighing more than
12Kg/26.5lbs.
Do not use replacement parts other than those approved by the manufacturer or
distributor as this may make the the walker unsafe and will invalidate the warranty.
Never use the baby walking frame without the supplied Anti-fall blocks attached.
Never use the baby walking frame without the supplied wheels attached.
Safety
Always take care to insert your batteries correctly, observing the plus and minus
marks on the battery and appliance.
Do not mix new and used batteries.
Do not mix different types of batteries.
Always remove dead batteries and all batteries if you are not going to use the
product for long periods (as batteries may leak and cause damage).
Exhausted batteries should be removed from the product and disposed of in
accordance with the makers recommendations.
Only place batteries marked alkaline in normal household waste.
Never attempt to re-charge ordinary (non-rechargeable) batteries.
Batteries should always be changed by an adult.
Keep batteries out of reach of children.
Never dispose of batteries in a fire this may cause them to explode.
Children can choke on batteries. If swallowed seek medical advise immediately.
Battery warnings
3
Battery disposal
Whilst we make and test our products to the highest standards of durability
there’s always a small chance of a hiccup! Our promise is to repair, replace or
refund a Toco product that has an identified manufacturing defect from the date of
purchase for a full 3 years thereafter at no extra cost.
However, you must register within 28 days of the date of purchase to receive the
full 3 years guarantee!
To receive your full guarantee you can register your product by:
visiting www.tocobaby.co.uk/warranty.html and complete the warranty form,
or by telephone on 0161 335 2508.
Exhausted batteries should be removed from the product and taken to
a recycling facility. You can place batteries marked alkaline in normal
household waste, but these are better taken to a recycling facility.
Please follow these symbols on batteries, which contain harmful substances:
Pb = Battery contains Lead
Cd = Battery contains Cadmium
Hg = Battery contains Mercury
Your 3 year warranty
Batteries should not be
considered regular waste. Empty
batteries should be returned to a
recycling facility
CdPb Hg
4
Welcome
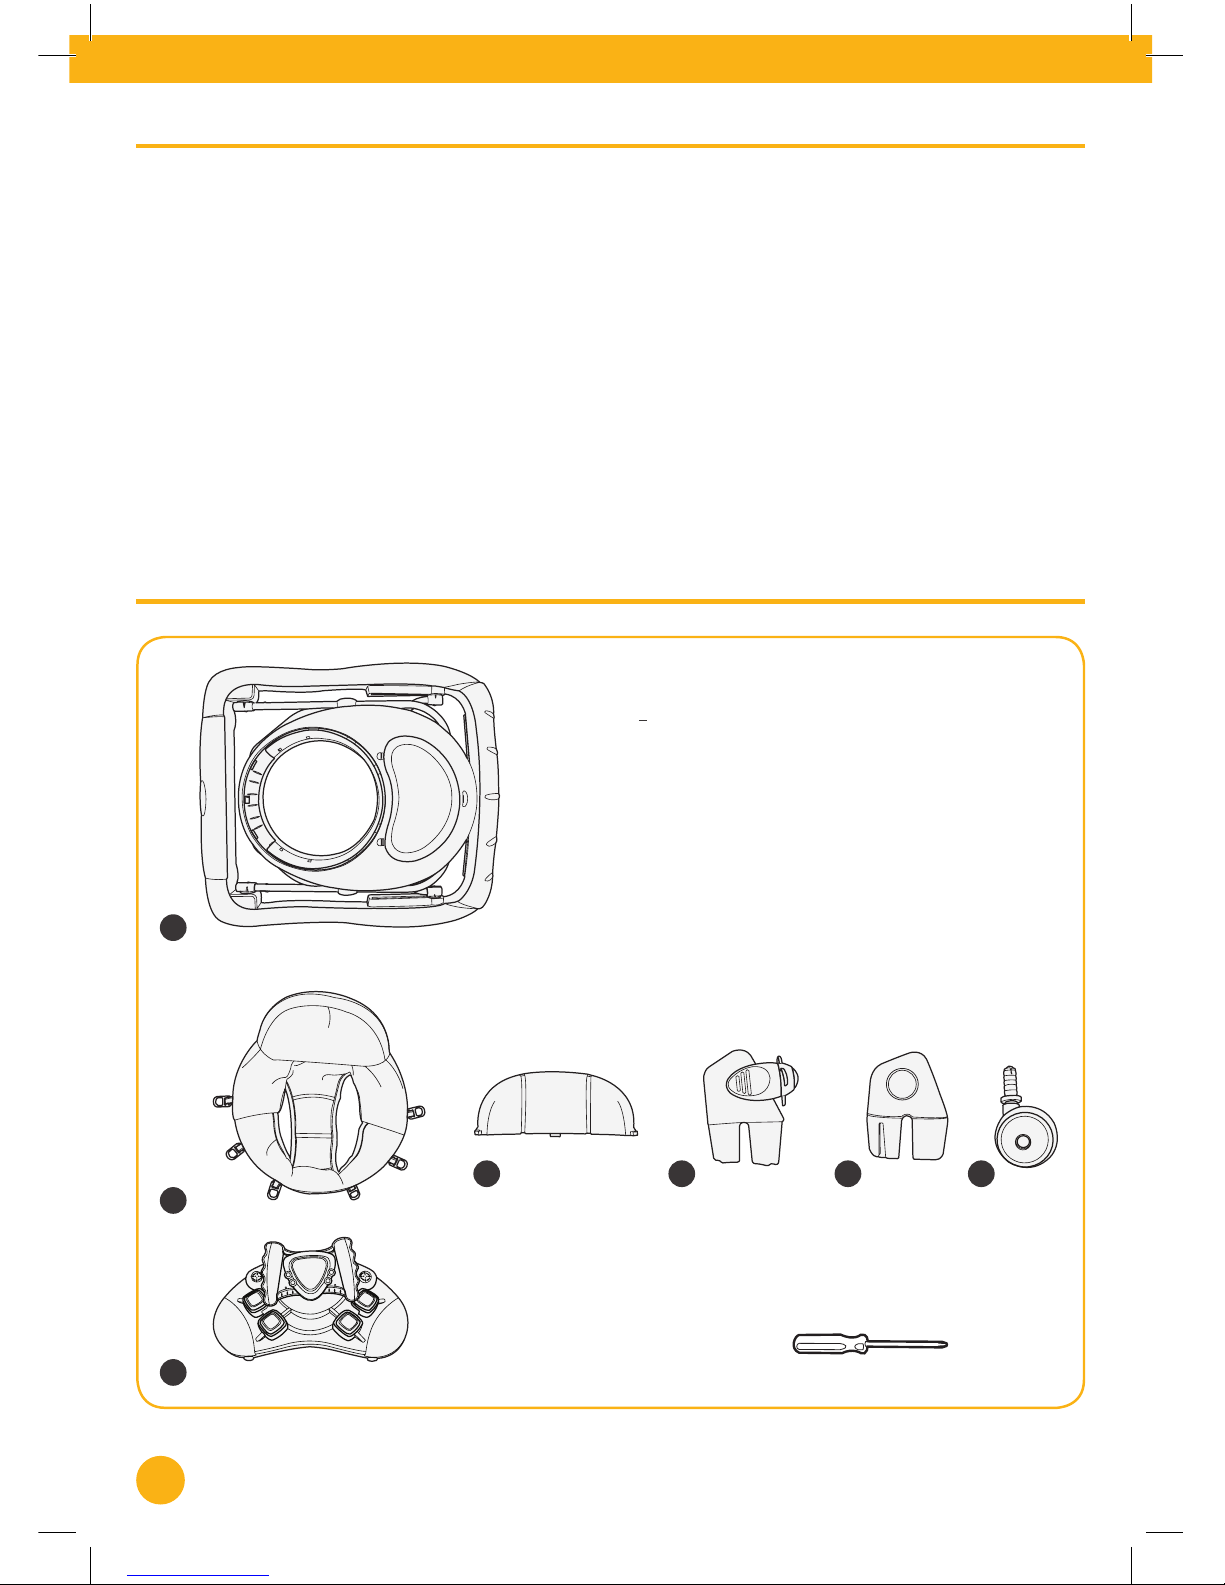
Parts list
Contained in your carton are:
NoPart Qty
1 Walkerbody 1
2 Seat unit 1
3 Seat backrest 1
4 Front wings 2
5 Back wings 2
6 Front wheels* 2
7 Musical play tray
* Rear wheels are pre-attached to walker body
Thank you for purchasing this Toco Airo Walker.
Please read the instructions and safety advice carefully before use, to ensure safe
and satisfactory operation of this product. Your child’s safety is your responsibility.
Your child’s safety is your responsibility. If you have a query with this product or
require replacement parts, please contact the Toco Helpline on 0161 335 2508.
Lay out the parts on a soft level surface and compare them to the parts list below.
Do not discard any packaging until you are sure that you have all the parts.
Keep children clear during assembly as the pack may contain small parts which
could present a choking hazard. All plastic packaging should be disposed of or
destroyed to keep them away from children.
5 6
7
2
1
3 4
You will require one Phillips screwdriver (not
supplied).

5
1. To open, or raise the height, hold either
side of the upper part of the walker and pull
upwards until you hear a click. e walker
will automatically lock open.
3. With the baby walker upside down and
fully folded down, insert the two front
wheels into each round hole on either corner
at the front of the walker.
2. To close or lower the height, twist block
(A) clockwise and push it upwards whilst
pulling the block forward. When at the
desired height release the lock and check the
walker has locked in position.
Opening and closing the walker body
WARNING! NEVER adjust the height when your child is in the walker. DO NOT place your child
in until you have adjusted the height and locked the height adjust lock.
Attaching the walker’s front wheels
A
Click

6
Attaching the seat backrest
4. With the walker the right way up and fully folded down, line up the centre tab on the seat
backrest (A) with the central hole (B) at the back of the walker frame place the centre tab.
Push the tab into the hole.
5. With the centre tab in the centre hole,
push the left-hand-side of the backrest as
shown till the left-hand-side tab slots into
its hole.
6. With the centre tab and left-hand tab in
their holes, push the right-hand-side of the
backrest as shown till the right-hand tab
slots into its hole.
A
B

7
Attaching the seat unit
8. read one of the plastic clips, on the seat
unit, through the slot in the walker frame
(B).
9. On the underside of the walker, pull the
plastic clip through the slot and fold it over
so that it cannot be pulled out again.
10. Repeat steps 8 and 9 with remaining
clips, ensuring the clips are folded over and
cannot be pulled out from the slots.
A
7. Place the seat unit fabric (A) on to the
walker ensuring the backrest fabric goes over
the seat backrest.
B

8
Attaching the front and back wings
11. Insert the wings as shown.
IMPORTANT: Ensure the propellers on the front wings are facing forwards as shown.
e back wings will only t in one way
12. Using a Phillips screwdriver, unscrew the battery cover on the underside of the musical play tray.
Insert 2 x 1.5V AA batteries (not supplied) ensuring the correct battery orientation is observed and
then reattach the cover, replacing the screw, making certain it is not over-tightened.
Musical play tray

9
13. Slide the switch to the left for ON and
to the right for OFF.
14. Place the two tabs at the back of the
musical play tray into the two slots on the
upper surface of the walker body.
15. Push the front of the musical tray back so
that the front tab slots in behind the raised
plastic part (A).
16. To remove: Push the front of the musical
tray back so that the front tab on the musical
play tray is released from the raised plastic
part (B).
Musical play tray (continued)
A
B

10
Care and maintenance
• To prolong the life of your nursery product keep it clean and do not leave it
in direct sunlight for extended periods of time.
• Removable fabric covers and trims may be cleaned using warm water with
a household soap or a mild detergent. Allow it to dry fully, preferably away
from direct sunlight.
• If the wheels squeak - use a silicon based spray ensuring it penetrates the
wheel and axle assembly.
• Do not dry clean, or use bleach.
• Do not machine wash, tumble or spin dry, unless the care labelling on the
product permits these methods.
• Non removable fabric covers and trims may be cleaned using a damp
sponge with soap or mild detergent. Allow it to dry completely before
folding or storing it away.
• In some climates the covers and trims may be affected by mould and
mildew. To help prevent this occurring, do not fold or store the product if it
is damp or wet. Always store the product in a well ventilated area.
• Always check parts regularly for tightness of screws, nuts and other
fasteners - tighten if required. To maintain the safety of your nursery
product, seek prompt repairs for bent, torn, worn or broken parts.


Discover more products at
www.toco.co.uk
Discover more products at
www.tocobaby.co.uk
 Loading...