

Page 1
Tobii Dynavox I-Series
User’s Manual
I–13
I–16
Page 2

User’s manual Tobii Dynavox I-Series
Version 1.0.1
10/2019
All rights reserved.
Copyright © Tobii AB (publ)
No part of this document may be reproduced, stored in a
retrieval system, or transmitted in any form, by any means
(electronic, photocopying, recording, or otherwise) without
the prior written permission of the publisher.
Copyright protection claimed includes all forms and matters of copyrightable material and information allowed by
statutory or judicial law or hereafter granted, including without limitation, material generated from the software programs which are displayed on the screen such as screen
displays, menus, etc.
The information contained in this document is proprietary
to Tobii Dynavox. Any reproduction in part or whole without
prior written authorization by Tobii Dynavox is prohibited.
Products that are referred to in this document may be either trademarks and/or registered trademarks of the respective owners. The publisher and the author make no
claim to these trademarks.
While every precaution has been taken in the preparation
of this document, the publisher and the author assume no
responsibility for errors or omissions, or for damages resulting from the use of information contained in this document or from the use of programs and source code that
may accompany it. In no event shall the publisher and the
author be liable for any loss of profit or any other commercial damage caused or alleged to have been caused directly or indirectly by this document.
Content subject to change without notice.
Please check Tobii Dynavox web site
www.TobiiDynavox.com for updated versions of this
document.
Contact Information:
Tobii Dynavox AB
Karlsrovägen 2D
182 53 Danderyd
Sweden
+46 8 663 69 90
Tobii Dynavox LLC
2100 Wharton Street, Suite
400
Pittsburgh, PA 15203
USA
+1-800-344-1778
The following products are protected by U.S. Patents 7,572,008, 6,659,611, 8,185,845 and 9,996,159:
● I–13
● I–16
You can locate the Type of Tobii Dynavox I-Series device on the label on the back side.
Page 3

Table of Contents
1 Introduction ................................................................................................................................... 6
1.1 Explanation of Admonitions....................................................................................................6
1.2 Symbols and Markings ..........................................................................................................6
1.3 Intended Use .......................................................................................................................8
1.3.1 Intended User Profile..............................................................................................8
1.3.2 Portable Use .........................................................................................................9
1.3.3 Mounted Use.........................................................................................................9
1.4 Package Contents.................................................................................................................9
1.4.1 Tobii Dynavox I-Series with Snap Core First / Communicator 5..................................9
2 Safety...........................................................................................................................................11
2.1 Avoiding Hearing Damage .................................................................................................. 11
2.2 Temperature .......................................................................................................................12
2.3 Power Supply and Batteries ................................................................................................. 12
2.4 Mounting ............................................................................................................................ 13
2.5 Emergency .........................................................................................................................13
2.6 Infrared ..............................................................................................................................13
2.7 Epilepsy .............................................................................................................................13
2.8 Electricity............................................................................................................................13
2.9 Software............................................................................................................................. 13
2.10 Child Safety........................................................................................................................14
2.11 Environmental Control .........................................................................................................14
2.12 Eye Gaze ........................................................................................................................... 14
2.13 Third Party..........................................................................................................................14
3 Overview of the Tobii Dynavox I–13 and I–16 ............................................................................ 15
3.1 Key Features ...................................................................................................................... 15
3.2 Product Layout.................................................................................................................... 15
3.2.1 The Tobii Dynavox I–13 and Tobii Dynavox I–16..................................................... 15
3.2.2 Ports, Sensors and Device Buttons ....................................................................... 16
3.3 Preinstalled Software .......................................................................................................... 18
4 Batteries in the Tobii Dynavox I-Series....................................................................................... 19
4.1 Batteries............................................................................................................................. 19
4.2 Charging the Tobii Dynavox I-Series .....................................................................................19
4.2.1 The Status LED Behavior .....................................................................................19
4.3 Changing the Battery........................................................................................................... 19
5 Using the Tobii Dynavox I-Series................................................................................................ 21
5.1 Starting the Device..............................................................................................................21
5.1.1 First Start Up ....................................................................................................... 21
5.1.1.1 Local Account vs Windows Account.................................................. 21
5.1.1.1.1 What is a local offline account in Windows
10? ......................................................................... 21
5.1.1.1.2 What is a Microsoft account?..................................... 21
5.1.1.2 Creating a User Account.................................................................. 22
5.1.1.3 Tobii Dynavox Configuration ............................................................ 22
5.1.2 Password Information...........................................................................................23
5.2 Shutting Down the Device.................................................................................................... 23
5.3 Using Eye Gaze.................................................................................................................. 23
5.3.1 Positioning .......................................................................................................... 23
Page 4

5.3.2 Track Box............................................................................................................ 24
5.3.3 Track Status ........................................................................................................ 25
5.3.4 Eye Tracking Settings........................................................................................... 26
5.3.4.1 The Calibration Tab .........................................................................26
5.3.4.1.1 Manage Profiles ....................................................... 26
5.3.4.1.2 Create New Profile ................................................... 26
5.3.4.1.3 Calibration Results ................................................... 27
5.3.4.1.4 Test Calibration ........................................................ 28
5.3.4.1.5 Calibration ............................................................... 29
5.3.4.1.6 Wake-on-Gaze
®
.......................................................30
5.3.4.2 The Activation Tab...........................................................................31
5.3.4.2.1 Gaze Settings .......................................................... 31
5.3.4.2.2 Gaze & Switch Settings ............................................32
5.3.4.3 The Feedback Tab ..........................................................................33
5.4 Using the Stand Adjustable Base ......................................................................................... 33
5.5 Using the Partner Window ................................................................................................... 34
5.6 Using the Cameras ............................................................................................................. 34
5.7 Using the Programmable IR Remote Control......................................................................... 35
5.8 Adjusting the Volume........................................................................................................... 35
5.9 Adjusting the Sound ............................................................................................................35
5.10 Tobii Dynavox Hardware Settings.........................................................................................35
5.10.1 Adaptive Buttons ................................................................................................. 36
5.10.1.1 Triangle Button ............................................................................... 36
5.10.1.2 Square Button.................................................................................36
5.10.2 Eye Tracker ........................................................................................................ 37
5.10.2.1 Eye Tracking...................................................................................37
5.10.2.1.1 Enabling Eye Tracking.............................................. 37
5.10.2.1.2 Disabling Eye Tracking ............................................. 37
5.10.2.2 Eye Tracking Settings...................................................................... 37
5.10.3 Switches ............................................................................................................ 37
5.10.3.1 Enabling a Connected Switch........................................................... 38
5.10.3.2 Disabling a Connected Switch.......................................................... 38
5.10.4 Touch & Gestures ............................................................................................... 38
5.10.4.1 Edge Swipe .................................................................................... 38
5.10.4.1.1 Enabling Edge Swipe................................................ 38
5.10.4.1.2 Disabling Edge Swipe............................................... 38
5.10.4.2 Lock Screen ...................................................................................38
5.10.4.2.1 Enabling Lock Screen............................................... 39
5.10.4.2.2 Disabling Lock Screen .............................................. 39
5.10.5 Product Key ........................................................................................................ 39
5.10.6 System & Diagnostics ..........................................................................................40
5.11 Reset the Tobii Dynavox I-Series.......................................................................................... 40
6 Product Care............................................................................................................................... 43
6.1 Temperature & Humidity ......................................................................................................43
6.1.1 General Use - Operating Temperature ................................................................... 43
6.1.2 Transportation and Storage .................................................................................. 43
6.2 Cleaning of the Tobii Dynavox I-Series Device....................................................................... 43
6.3 Placement ..........................................................................................................................43
6.4 Transporting the Tobii Dynavox I-Series Device..................................................................... 43
6.5 Disposing of the Tobii Dynavox I-Series Device ..................................................................... 44
Page 5

Appendix A Support, Warranty, Training Resources and Trouble-shooting................................... 45
A4.1 If the Tobii Dynavox I-Series does not Power up ..................................................... 45
A4.2 How do I carry out a Power Reset on the Tobii Dynavox I-Series?............................ 45
Appendix B Compliance Information .............................................................................................. 47
B1.1 For P15B Equipment............................................................................................ 47
B1.2 For Portable Devices............................................................................................ 47
Appendix C Computer Device States of Operation and LED Status .............................................. 50
Appendix D Technical Specifications .............................................................................................. 52
Appendix E Maximum Allowed Temperature.................................................................................. 56
Appendix F Approved Accessories................................................................................................. 57
Page 6

1 Introduction
SW1
SW2
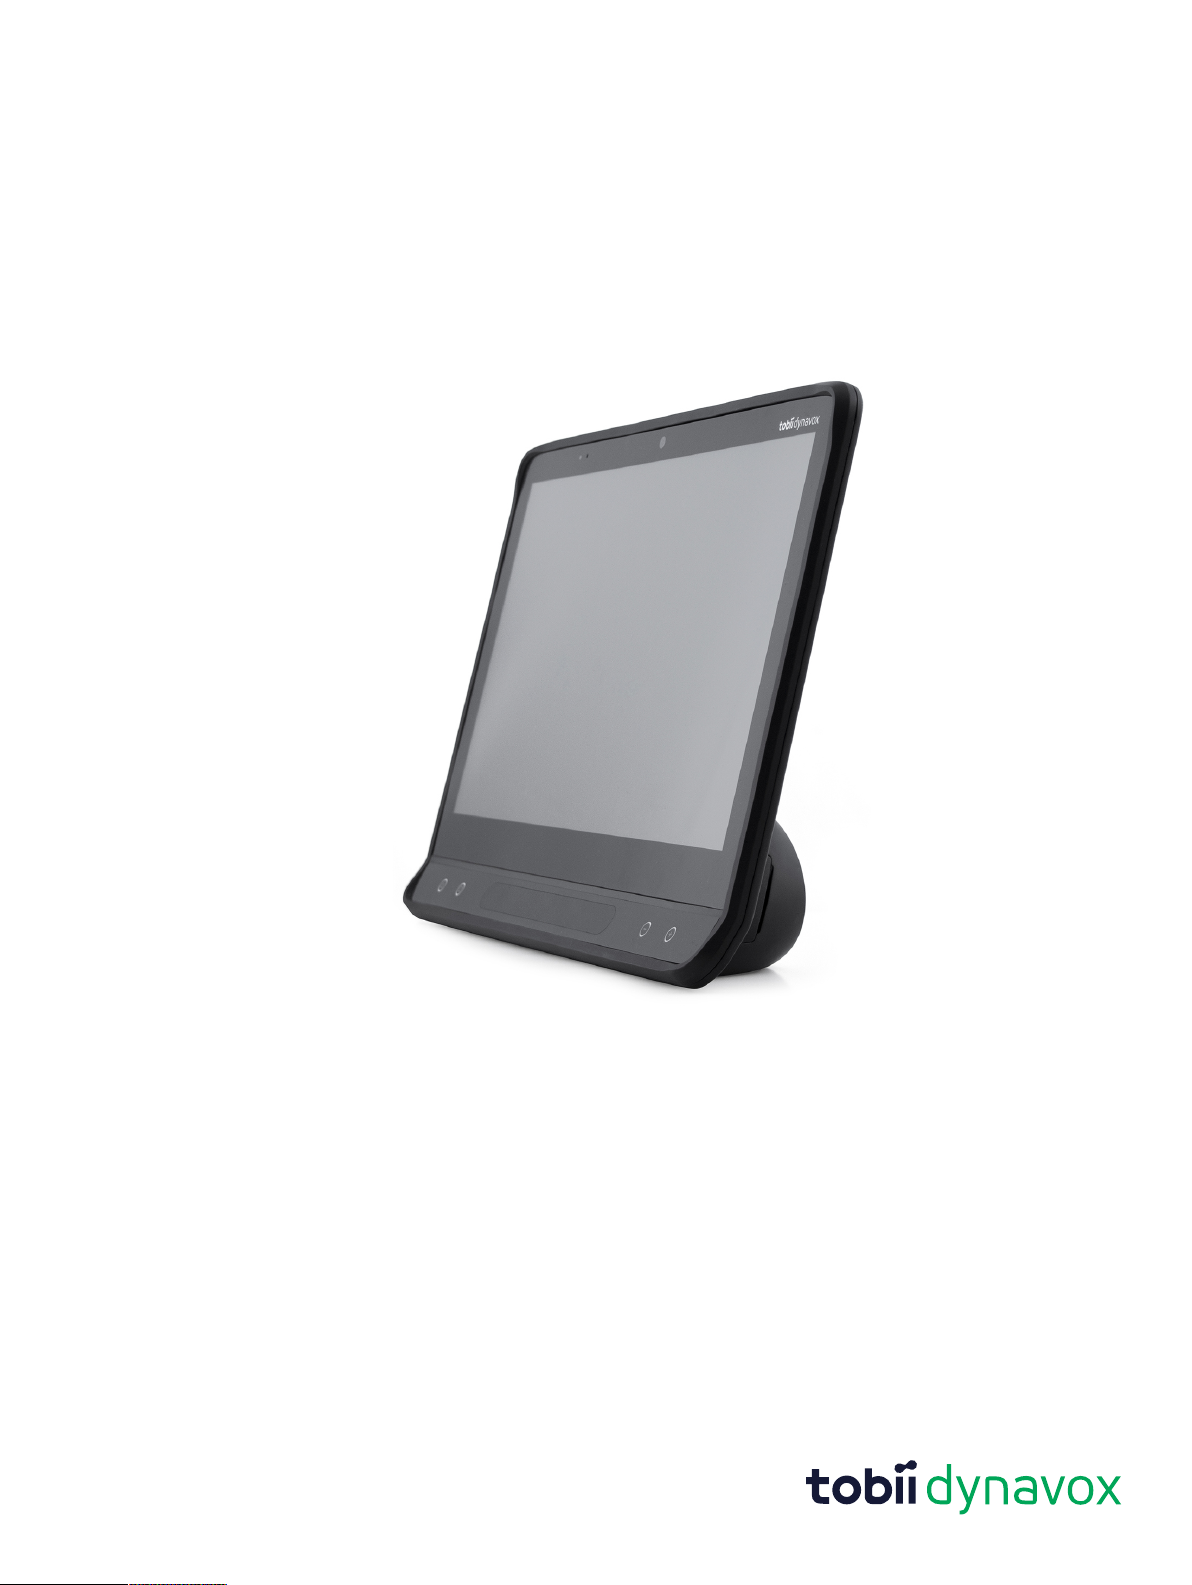
Thank you for purchasing a Tobii Dynavox I-Series device from Tobii Dynavox!
To ensure the optimal performance of this product, please take the time to read this manual carefully.
The Tobii Dynavox I-Series device is available in two different sizes: the Tobii Dynavox I–13 with a 13.3" screen and the Tobii Dynavox I–16 with a 15.6" screen. The Tobii Dynavox I-Series is a Eye Gaze device but can be ordered without the Eye
Gaze function.
This User’s Manual covers:
● The Tobii Dynavox I-Series device, models Tobii Dynavox I–13 and Tobii Dynavox I–16.
● The Eye Gaze functions
1.1 Explanation of Admonitions
In this manual we use six (6) levels of admonitions as follows:
The Note symbol is used for notifying the user of something important or of something that needs special
attention.
The Tips symbol is used for notifying the user of something they might not have thought of.
The Caution symbol is used to inform of something that could cause harm to, or malfunction of, the equipment.
The Warning symbol is used to inform of something in which there is a conceivable risk of harm to the user if the
Warning is ignored.
The High Volume symbol is used to inform of something that can cause damage to hearing.
The High Temperature symbol is used to inform of surface temperature conditions that may cause injury or
discomfort.
1.2 Symbols and Markings
This section provides information about the symbols that are used on the Tobii Dynavox I-Series, its accessories or
packaging.
Symbol or Markings Description
USB 3.0 Port
On/Off (push/push) power
3.5 mm Switch port 1
3.5 mm Switch port 2
6
1 Introduction
#12007957 Tobii Dynavox I-Series User’s manual v.1.0.1 - en-US
Page 7
Symbol or Markings Description
Power Connector
Head phone jack 3.5 mm
Dispose of in accordance with your country's requirements
CE is the abbreviation of the European Communities and
this mark tells customs officials in the European Union that
the product complies with one or more of the EC
Directives
This mark is a certification mark employed on electronic
products manufactured or sold in the United States which
certifies that the electromagnetic interference from the device is under limits approved by the Federal Communications Commission
UL Classification Marks for Canada and the United States
Recognized component mark for Canada and the United
States
Refer to instruction manual/booklet
Recyclable material.
Recyclable material in Taiwan
Conforms to relevant Australian EMC requirements
Manufacturer
Reference number
Serial Number
Safety Class II equipment (reinforced insulation)
#12007957 Tobii Dynavox I-Series User’s manual v.1.0.1 - en-US
This mark shows the pin out polarity on the AC/DC Power
Adapter
1 Introduction
7
Page 8
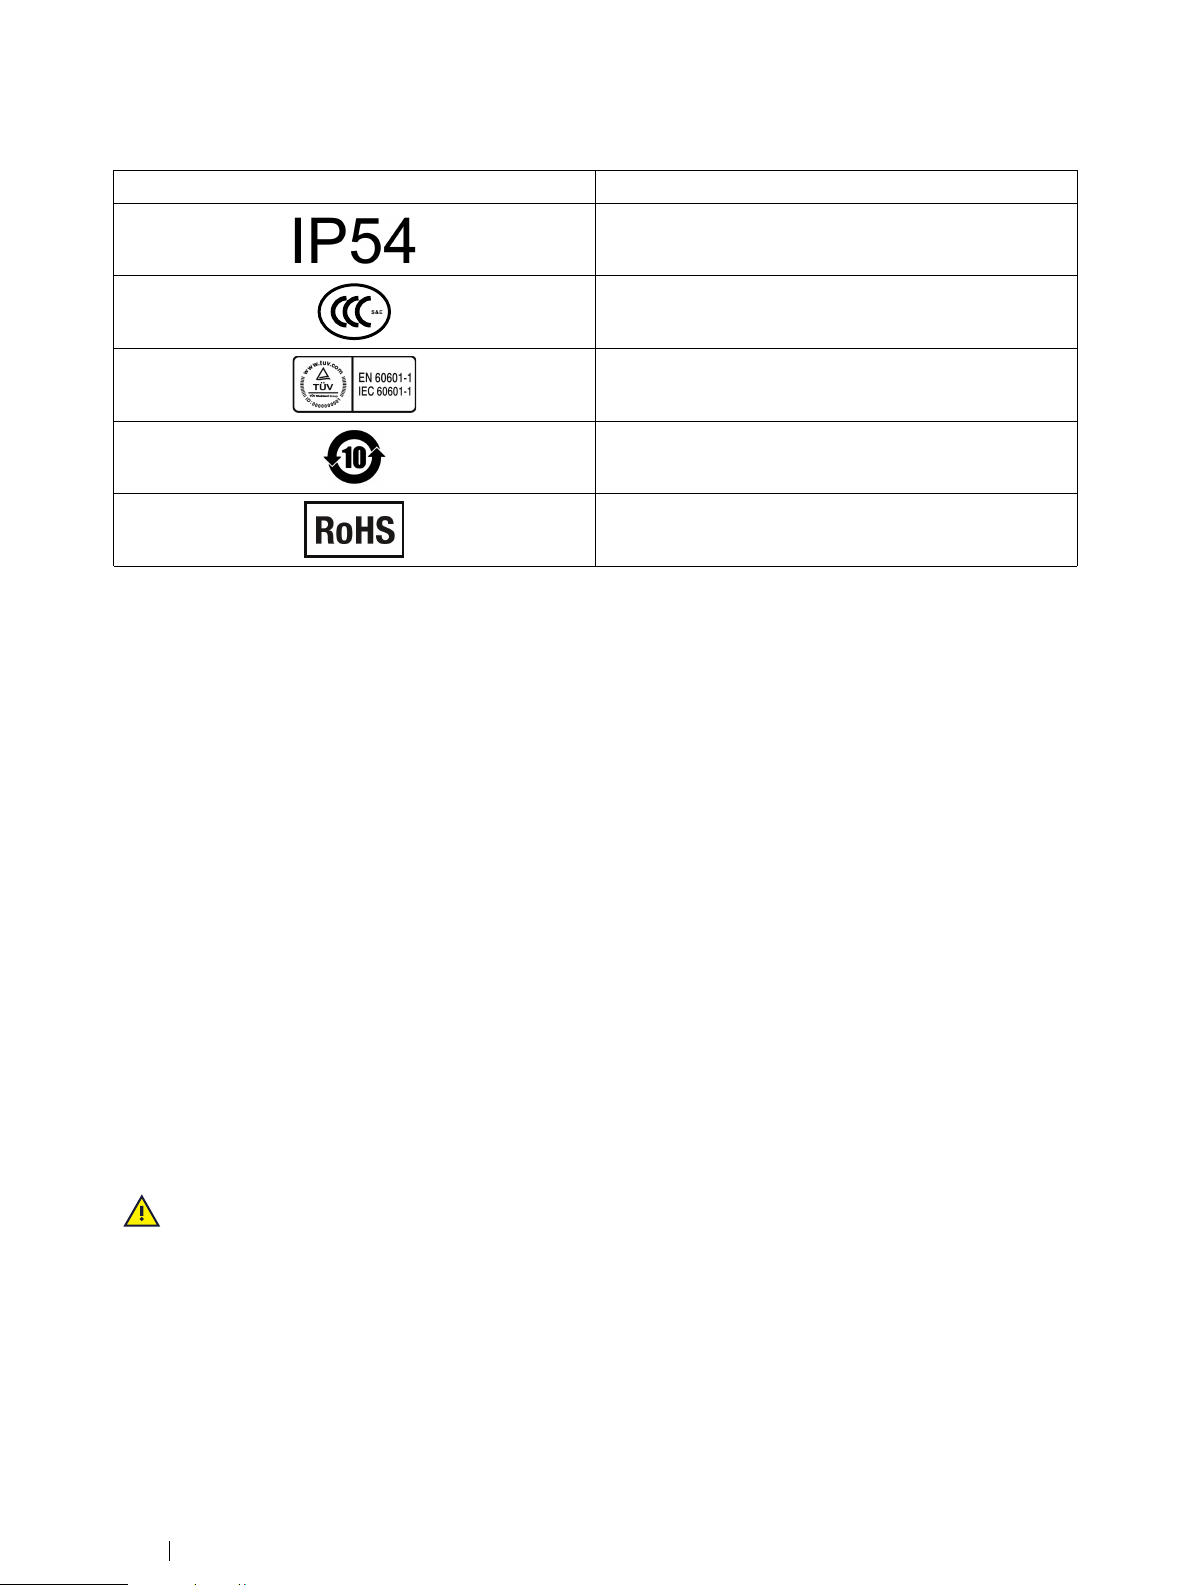
Symbol or Markings Description
Enclosure ingress protection code per IEC 60529
China Compulsory Certificate
The most recognized International Safety mark. This
safety listing signifies that the product was tested to
IEC60601–1
China RoHS compliance.
RoHS directive compliance.
1.3 Intended Use
The Tobii Dynavox I-Series is an Augmentative and Alternative Communication (AAC) product, a purpose-built Speech
Generating Device (SGD) designed to provide to its users increased communication ability and greater independence.
The Tobii Dynavox I-Series is intended primarily to provide, and act as, a compliment to everyday communication for people who have challenges in their ability to speak due to injury, disability or illness. This intended use is reflected in design
features such as long lasting batteries, superior sound quality, high durability, built-in environmental control and alternative
input methods.
The Tobii Dynavox I-Series is a device with an optional Tobii Eye Tracker and a capacitive touch screen for touch access.
The device is intended to be used on a mounting arm, or standing upright on an appropriate surface. In addition to eye
gaze and touch, the device can be operated through switch scanning, mouse, keyboard, or a combination thereof.
The Tobii Dynavox I-Series is designed primarily for face-to-face communication and secondarily for long distance communication, computer access, and environmental control. The Tobii Dynavox I-Series allows the user to communicate via text
or symbols to generate text-to-speech or play back recorded messages for face-to-face communication. The user can also
display their messages on the outwards facing display on the back of the device. The Tobii Dynavox I-Series allows users
to compose text messages (SMS) and e-mails through adapted interfaces or access third party apps and services for online communication, such as Skype or Facebook.
With the Tobii Dynavox I-Series, users have the freedom and flexibility provided via the Microsoft
environment.
The Tobii Dynavox I-Series meets the definition for medical equipment; and is registered as a Class I medical device with
the Swedish Medical Products Agency, and as Class II durable medical equipment with the US FDA. The Tobii Dynavox ISeries is available in two sizes (13.3 and 15.6); and is available as a dedicated (locked) Speech Generating Device. The
Tobii Dynavox I-Series device does not sustain or support life. In case of failure of the Tobii Dynavox I-Series device, the
user should have a low-tech backup solution for communication.
®
Windows 10
Contraindication: The Tobii Dynavox I-Series device should never be, for the user, the only means of communicating important information.
In case of failure of the Tobii Dynavox I-Series device, the user cannot communicate using it.
1.3.1 Intended User Profile
The Primary Users of the Tobii Dynavox I-Series I–13 and I–16 are those individuals who, due to physical and/or cognitive
conditions, require an AAC device for Speech and environmental controls. It is appropriate for users of all ages.
8
1 Introduction
#12007957 Tobii Dynavox I-Series User’s manual v.1.0.1 - en-US
Page 9
1.3.2 Portable Use
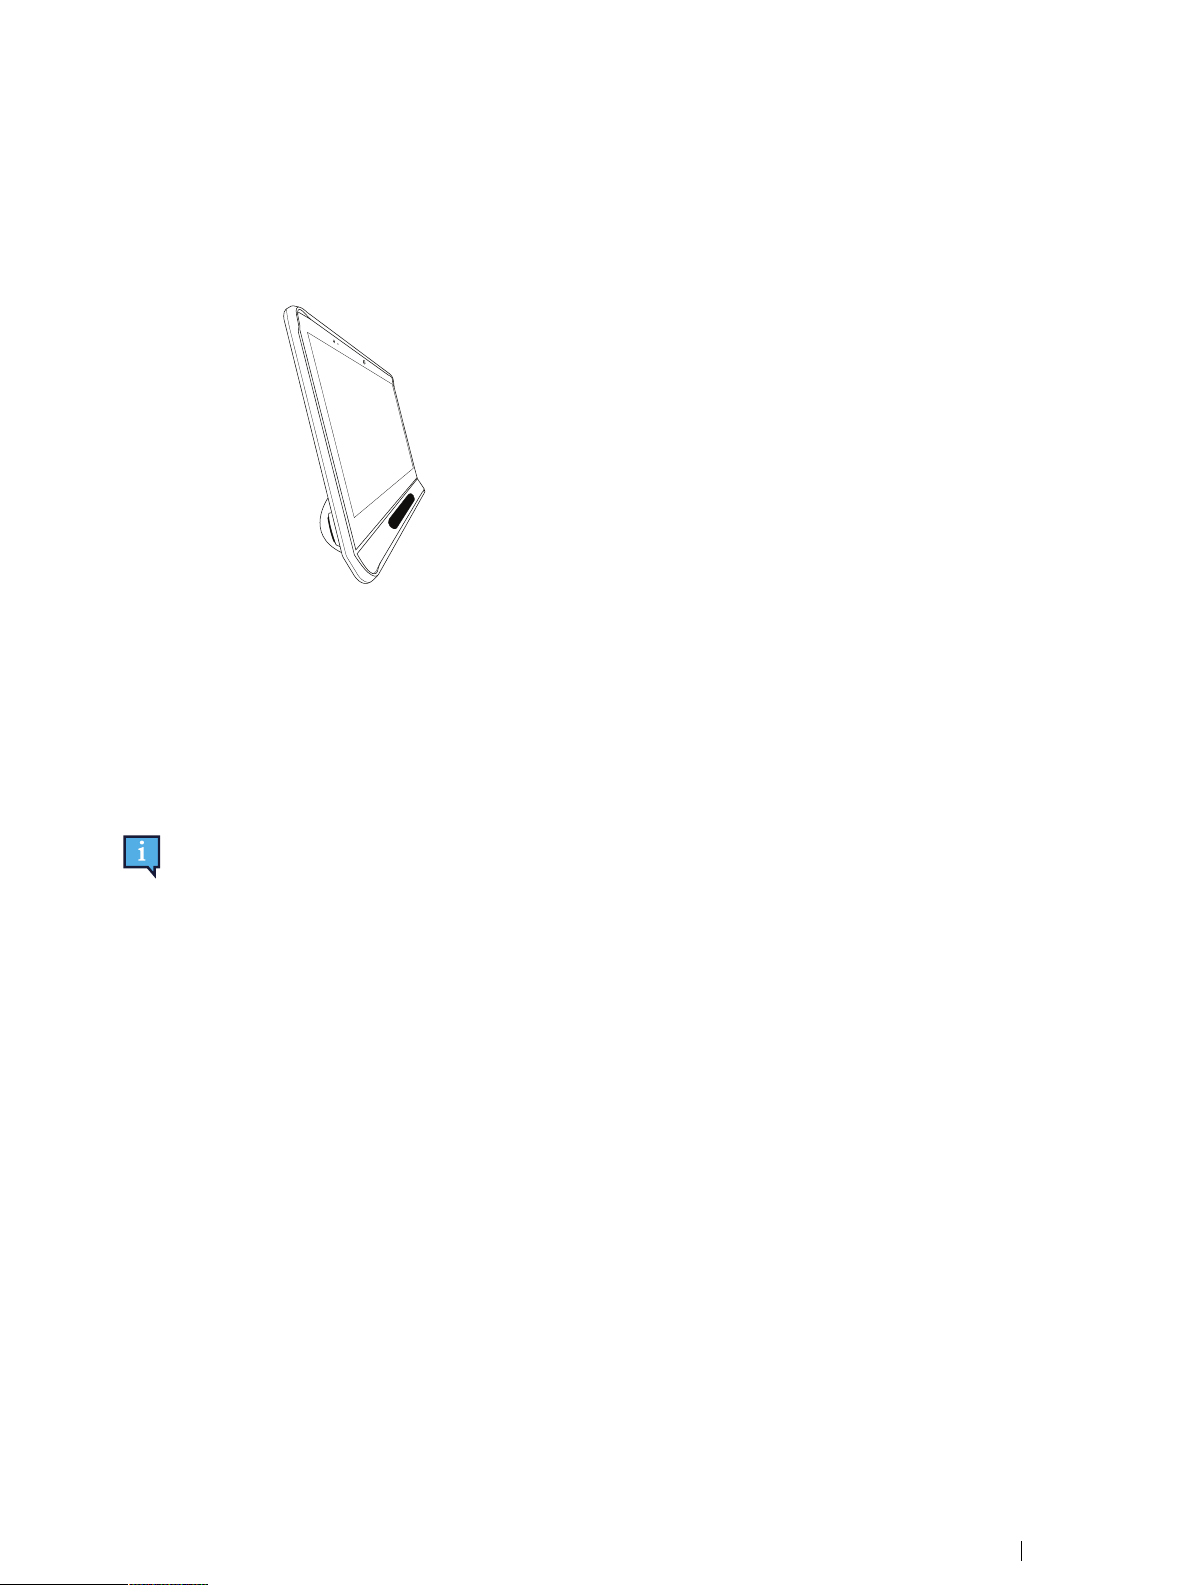
A portable Tobii Dynavox I-Series can be used in two (2) different positions.
● Upright orientation
● Mounted (see section 1.3.3 Mounted Use)
Upright Orientation
1.3.3 Mounted Use
The mounting plate on the device connects to Connect IT/REHAdapt mounts. If using a Daessy mount, an adapter plate is
needed.
1.4 Package Contents
It is recommended to keep the original packaging materials for the Tobii Dynavox I-Series.
If device needs to be returned to Tobii Dynavox for Warranty related issues or repair, it is beneficial that the original packaging or equivalent is used for shipping. Most shipping carriers require at least 2 inches of packing material around the device.
Note: Due to Joint Commission regulations, any shipping materials including boxes sent to Tobii Dynavox must
be discarded.
1.4.1 Tobii Dynavox I-Series with Snap Core First / Communicator 5
The items below are included with your Tobii Dynavox I-Series package:
● 1 Device (13.3″ or 15.6″)
● 1 Adjustable Base
● 1 Eye Tracker (built in)
● 1 Mounting plate for Connect IT/REHAdapt (mounted)
● 1 Battery
● 1 Power Supply
● 1 Windows 10 license
● 1 Tobii Dynavox Communicator 5 software (pre-installed)
● 1 Tobii Dynavox Snap Core First software (pre-installed)
● 1 Tobii Dynavox Computer Control software (pre-installed)
● 1 Tobii Dynavox Pathways for Core First software (pre-installed)
● 1 Tobii Dynavox Accessible Literacy Learning (ALL) software (pre-installed)
● 1 Tobii Dynavox Discover Tobii Dynavox software (pre-installed)
● 1 Tobii Dynavox Hardware Settings software (pre-installed)
● 1 Boardmaker Student Center software (pre-installed)
● 1 Magic EyeFX software with 10 activities (pre-installed)
● 1 Tobii Dynavox I-Series User’s Manual (on the device as a PDF document)
#12007957 Tobii Dynavox I-Series User’s manual v.1.0.1 - en-US
1 Introduction
9
Page 10

● 1 Quick Start Manual (printed)
● 1 Snap Core First Training Cards
● 1 Communicator 5 Training Cards
● 1 Safety and Compliance documents (printed)
● 1 Software license documents (printed)
● 1 Warranty Document (printed)
10
1 Introduction
#12007957 Tobii Dynavox I-Series User’s manual v.1.0.1 - en-US
Page 11

2 Safety
The Tobii Dynavox I-Series device has been tested and approved as compliant to all the Specifications and Standards
listed in Appendix B Compliance Information, page 47 of this manual and in the Appendix D Technical Specifications, page
52 – including, but not limited to, the Medical Device Standard (Class 1/Type B). Nevertheless, in order to ensure safe operation of your Tobii Dynavox I-Series device, there are a few safety warnings to bear in mind:
No modification of this equipment is allowed
Contraindication: The Tobii Dynavox I-Series device should never be, for the user, the only means of communi-
cating important information.
In case of failure of the Tobii Dynavox I-Series device, the user cannot communicate using it.
The Tobii Dynavox I-Series is not to be used as a life supporting device, and it shall not be relied on in case of
loss of function due to power loss or other causes.
There could be a choking hazard risk if small parts detach from the Tobii Dynavox I-Series device.
The Tobii Dynavox I-Series device shall not be exposed to or used in weather conditions outside the Technical
Specification of the Tobii Dynavox I-Series device.
The Tobii Dynavox I-Series device shall only be used with Tobii Dynavox I-Series specific Accessories that have
a mounting instruction included with the accessory.
The charging cable could present strangulation hazards to young children. Never leave small children unattended with the charging cable.
Young children or people with cognitive disabilities should not have access to, or the use of, the Tobii Dynavox ISeries device without parental or guardian supervision.
Do no attach any decorations, post it notes or similar on the screen side of the Tobii Dynavox I-Series device.
These may interfere with the Eye Gaze or touch screen performance.
2.1 Avoiding Hearing Damage
Permanent hearing loss may occur if earphones, headphones or speakers are used at high volume. To prevent
this, the volume should be set to a safe level. You can become desensitized over time to high sound levels which
may then sound acceptable yet still could be damaging your hearing. If you experience symptoms such as ringing in your ears, please lower the volume or stop using the earphones/headphones. The louder the volume, the
less time is required before your hearing could be affected.
Hearing experts suggest the following measures to protect your hearing:
● Limit the amount of time you use earphones or headphones at high volume.
● Avoid turning up the volume to block out noisy surroundings.
● Turn the volume down if you cannot hear people speaking near you.
To establish a safe volume level:
● Set your volume control at a low setting.
● Slowly increase the sound until you can hear it comfortably and clearly, without distortion.
The Tobii Dynavox I-Series device can produce sounds in decibel ranges that may cause hearing loss for a normal hearing person, even when exposed for less than a minute. The Maximum sound level of the unit is in parity
with the sound levels that a healthy young man can produce while screaming. Since the Tobii Dynavox I-Series
device is intended as a voice Prosthetic, it shares the same possibilities and potential risks of causing harm to
hearing. The higher decibel ranges are offered to enable communication in a noisy environment and should be
used with care and only in said noisy environments.
#12007957 Tobii Dynavox I-Series User’s manual v.1.0.1 - en-US
2 Safety
11
Page 12

2.2 Temperature
When used in direct sunshine or in any other hot environment, the Tobii Dynavox I-Series device may have hot
surfaces. There are built-in temperature sensors that monitors the temperature. If the sensors detects temperatures above the temperature specified in Table E.1 Maximum Allowed Temperature, page 56, the device will au-
tomatically trigger a Windows Shut Down or Hibernate (depending on Windows Power Button configuration) to
prevent risk of harm to the user. It may take a while before the Tobii Dynavox I-Series device can be restarted, as
the unit may need time to cool down.
Do not touch the area specified in Figure E.1 Temperature Threshold Area, page 56 when the Tobii Dynavox ISeries device is running. The specified area can reach temperatures which may cause permanent bodily harm in
the event of prolonged direct skin contact. Use appropriate precautions to avoid injury.
2.3 Power Supply and Batteries
The Tobii Dynavox I-Series device uses lithium-ion batteries. These batteries have a storage temperature range
of between -20 ℃/-4 ℉ and 40 ℃/104 ℉ within 3 months.
If you are in a hot environment, be aware that it can affect the ability to charge the batteries. The internal temperature has to be between 0 ℃/32 ℉ and 45 ℃/113 ℉ for the batteries to charge. If the internal battery temperature
raises above 45 ℃/113 ℉ the batteries will not charge at all.
Move the Tobii Dynavox I-Series device and the batteries to a cooler environment to let the batteries charge
properly.
Avoid exposing the batteries to fire or to temperatures above 50 ℃/122 ℉. These conditions may cause a battery
to malfunction, generate heat, ignite or explode. Be aware that it is possible, in a worst case scenario, for temperatures to reach greater than those stated above in, for example, the trunk of a car on a hot day. So, storing the
device, with batteries installed, in a hot car trunk could conceivably lead to a malfunction.
Do not disassemble or harm the battery. Follow the environmental laws and regulations which apply in your area
when disposing of batteries.
The battery may only be replaced by the user with a TDG G1 battery pack sold by Tobii Dynavox. There is a risk
of explosion if the battery is replaced with an incorrect type.
For safe operation of the Tobii Dynavox I-Series device, use only chargers, batteries, and accessories approved
by Tobii Dynavox.
Do not open (except for the battery cover), or modify, the metal casing of the Tobii Dynavox I-Series device or of
the power supply, since you may be exposed to potentially hazardous electrical voltage. The device contains no
serviceable parts. If the Tobii Dynavox I-Series device or its accessories are mechanically damaged, do not to
use them.
If the battery is not charged or the Tobii Dynavox I-Series is not powered up by the power supply, the Tobii Dynavox I-Series device will shut down.
If the Power Supply Cord becomes damaged, contact Tobii Dynavox for replacement.
Do not connect any devices with a non-medical grade power supply to any connector on the Tobii Dynavox I-Series device. Furthermore, all configurations shall comply with the system standard IEC 60601-1-1. Anyone who
connects additional equipment to the signal input part or signal output part is configuring a medical system and is
therefore responsible for ensuring that the system complies with the requirements of the system standard IEC
60601-1-1. The unit is for exclusive interconnection with IEC 60601-1 certified equipment in the patient environment and IEC 60XXX certified equipment out-side of the patient environment. If in doubt, consult the technical
services department or your local representative.
The appliance coupler of the power supply or separable plug is used as the Mains Disconnection Device, please
do not position the Tobii Dynavox I-Series device so that it is difficult to operate the disconnection device.
12
2 Safety
#12007957 Tobii Dynavox I-Series User’s manual v.1.0.1 - en-US
Page 13

Special regulations apply to shipping Lithium-ion batteries. If dropped, crushed, or short-circuited, these batteries
can release dangerous amounts of heat and may ignite, and are dangerous in fires.
Please reference IATA regulations when shipping lithium metal or lithium-ion batteries or cells: http://www.iata.
org/whatwedo/cargo/dgr/Pages/lithium-batteries.aspx
2.4 Mounting
The Tobii Dynavox I-Series should be mounted according to MANUFACTURER instructions of approved mounts.
Tobii Dynavox or its agents are not liable for damage or injuries to a person or its property due to a Tobii Dynavox
I-Series falling from a mounted configuration. The mounting of a Tobii Dynavox I-Series is done entirely at the
user’s own risk.
2.5 Emergency
Do not rely on the device for emergency calls or banking transactions. We recommend having multiple ways to
communicate in emergency situations. Banking transactions should only be carried out with a system recommended by, and approved according to the standards of your bank.
2.6 Infrared
The Tobii Dynavox I-Series emits pulsed infrared (IR) light both from the eye tracker and from the Environmental
Control Unit. Other devices controlled by IR or susceptible to disturbance by IR light might be affected by the IR
light emitted from the Tobii Dynavox I-Series. Do not use the Tobii Dynavox I-Series in the vicinity of such devices
if their functionality is of critical importance.
2.7 Epilepsy
Some people with Photosensitive Epilepsy are susceptible to epileptic seizures or loss of consciousness when
exposed to certain flashing lights or light patterns in everyday life. This may happen even if the person has no
medical history of epilepsy or has never had any epileptic seizures.
A person with Photosensitive Epilepsy would also be likely to have problems with TV screens, some arcade
games, and flickering fluorescent bulbs. Such people may have a seizure while watching certain images or patterns on a monitor, or even when exposed to the light sources of an eye tracker. It is estimated that about 3-5%
of people with epilepsy have this type of Photosensitive Epilepsy. Many people with Photosensitive Epilepsy experience an "aura" or feel odd sensations before the seizure occurs. If you feel odd during use, move your eyes
away from the eye tracker.
2.8 Electricity
Do not open the casing, except for the battery cover, of the Tobii Dynavox I-Series device, since you may be exposed to potentially hazardous electrical voltage. The device contains no user serviceable parts.
2.9 Software
Windows 10 comes with Windows Defender included, providing protection from viruses, malware, and other potential threats. Regardless of whether you use Windows Defender or a third party anti-virus software, we recommend that you always keep your antivirus software up-to-date.
Software other than that which is pre-installed on the Tobii Dynavox I-Series is installed at the user's own risk. External software could cause the Tobii Dynavox I-Series to malfunction and might not be covered by the warranty.
#12007957 Tobii Dynavox I-Series User’s manual v.1.0.1 - en-US
2 Safety
13
Page 14

2.10 Child Safety
The Tobii Dynavox I-Series are advanced computer systems and electronic devices. As such they are composed
of numerous separate, assembled parts. In the hands of a child these parts have the possibility of being separated from the device, possibly constituting a choking hazard or another danger to the child.
Young children should not have access to, or the use of, the device without parental or guardian supervision.
2.11 Environmental Control
The Programmable IR Remote Control — Environmental Control Unit (ECU) is not to be relied on as the only
method of interaction with IR controlled devices.
2.12 Eye Gaze
Some people may experience a certain amount of fatigue (due to intentional eye focusing and hard concentration) or even a dryness of the eyes (due to less frequent blinking) when first getting used to Eye Gaze. If you are
experiencing fatigue or dry eyes start off slowly and limit the length of your Eye Gaze sessions to your comfort
level. Remoisturizing eye drops can be helpful to combat dryness.
2.13 Third Party
Tobii Dynavox assumes no responsibility for any consequence resulting from use of the Tobii Dynavox I-Series in
a manner inconsistent with its intended use, including any use of the Tobii Dynavox I-Series with third-party software and/or hardware that changes the intended use.
14
2 Safety
#12007957 Tobii Dynavox I-Series User’s manual v.1.0.1 - en-US
Page 15

3 Overview of the Tobii Dynavox I–13
13.3”
15.6”
and I–16
3.1 Key Features
The Tobii Dynavox I-Series has several built-in features. Some of these come standard and some can be ordered as additional features.
Standard features: 2 × Camera, 1 × microphone, 2 × speakers, 1 × IR ECU (Environmental Control Unit), 1 × Bluetooth®
and 1 × WLAN (Wireless Local Area Network)
3.2 Product Layout
A Tobii Dynavox I-Series device has a color capacitive touch, LED Backlight screen. The Tobii Dynavox I–13 has a 13.3″
screen with a 1920 × 1080 pixel resolution. The Tobii Dynavox I–16 has a 15.6″ screen with a 1920 × 1080 pixel resolution.
3.2.1 The Tobii Dynavox I–13 and Tobii Dynavox I–16
#12007957 Tobii Dynavox I-Series User’s manual v.1.0.1 - en-US
3 Overview of the Tobii Dynavox I–13 and I–16
15
Page 16
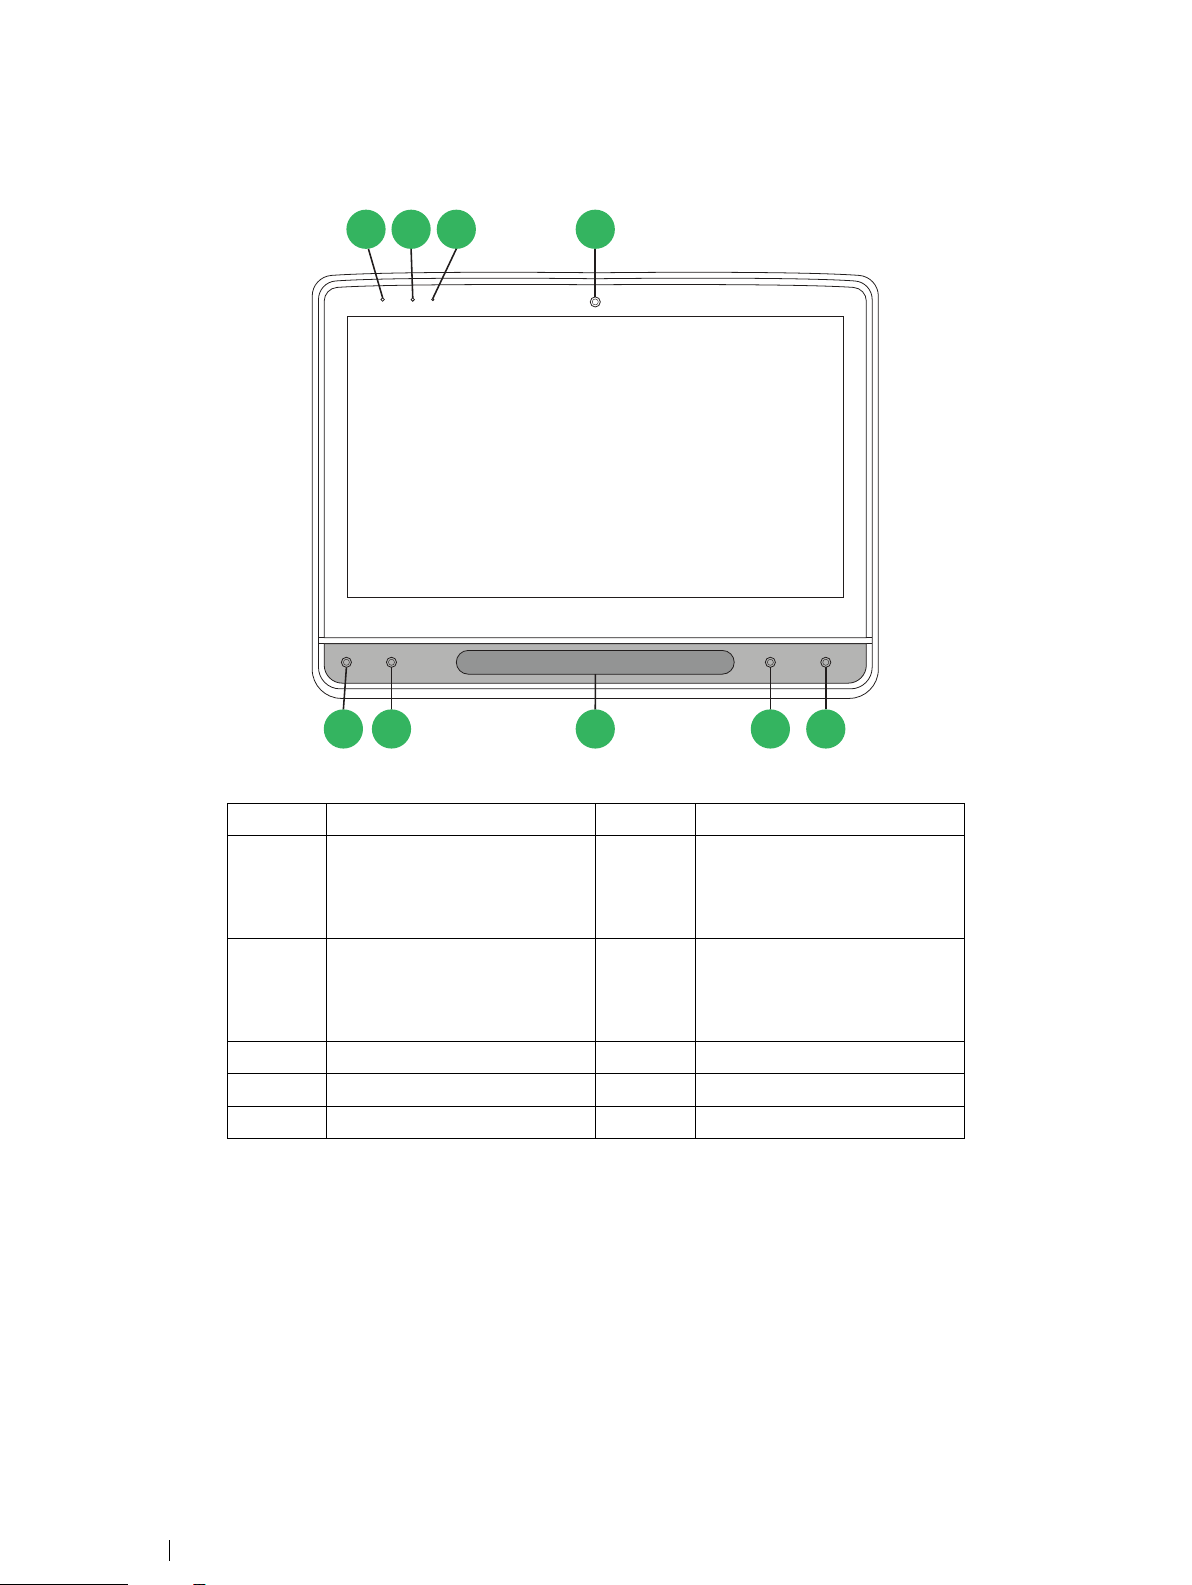
3.2.2 Ports, Sensors and Device Buttons
1 2 3 4
7 56 8 9
Position Description Position Description
1 Status LED 6 Adaptive Button 1 — Triangle
2 Light Sensor
3 Microphone 8 Volume Down
4 Camera 2 MP Fixed Focus(FF) 9 Volume Up
5 Eye Tracker
Figure 3.1 Front
7
(Configurable)
Tracks Status (Default for
touch)
Adaptive Button 2 — Square
(Configurable)
Calibrate Eye Tracker (Default
for touch)
3 Overview of the Tobii Dynavox I–13 and I–16
16
#12007957 Tobii Dynavox I-Series User’s manual v.1.0.1 - en-US
Page 17
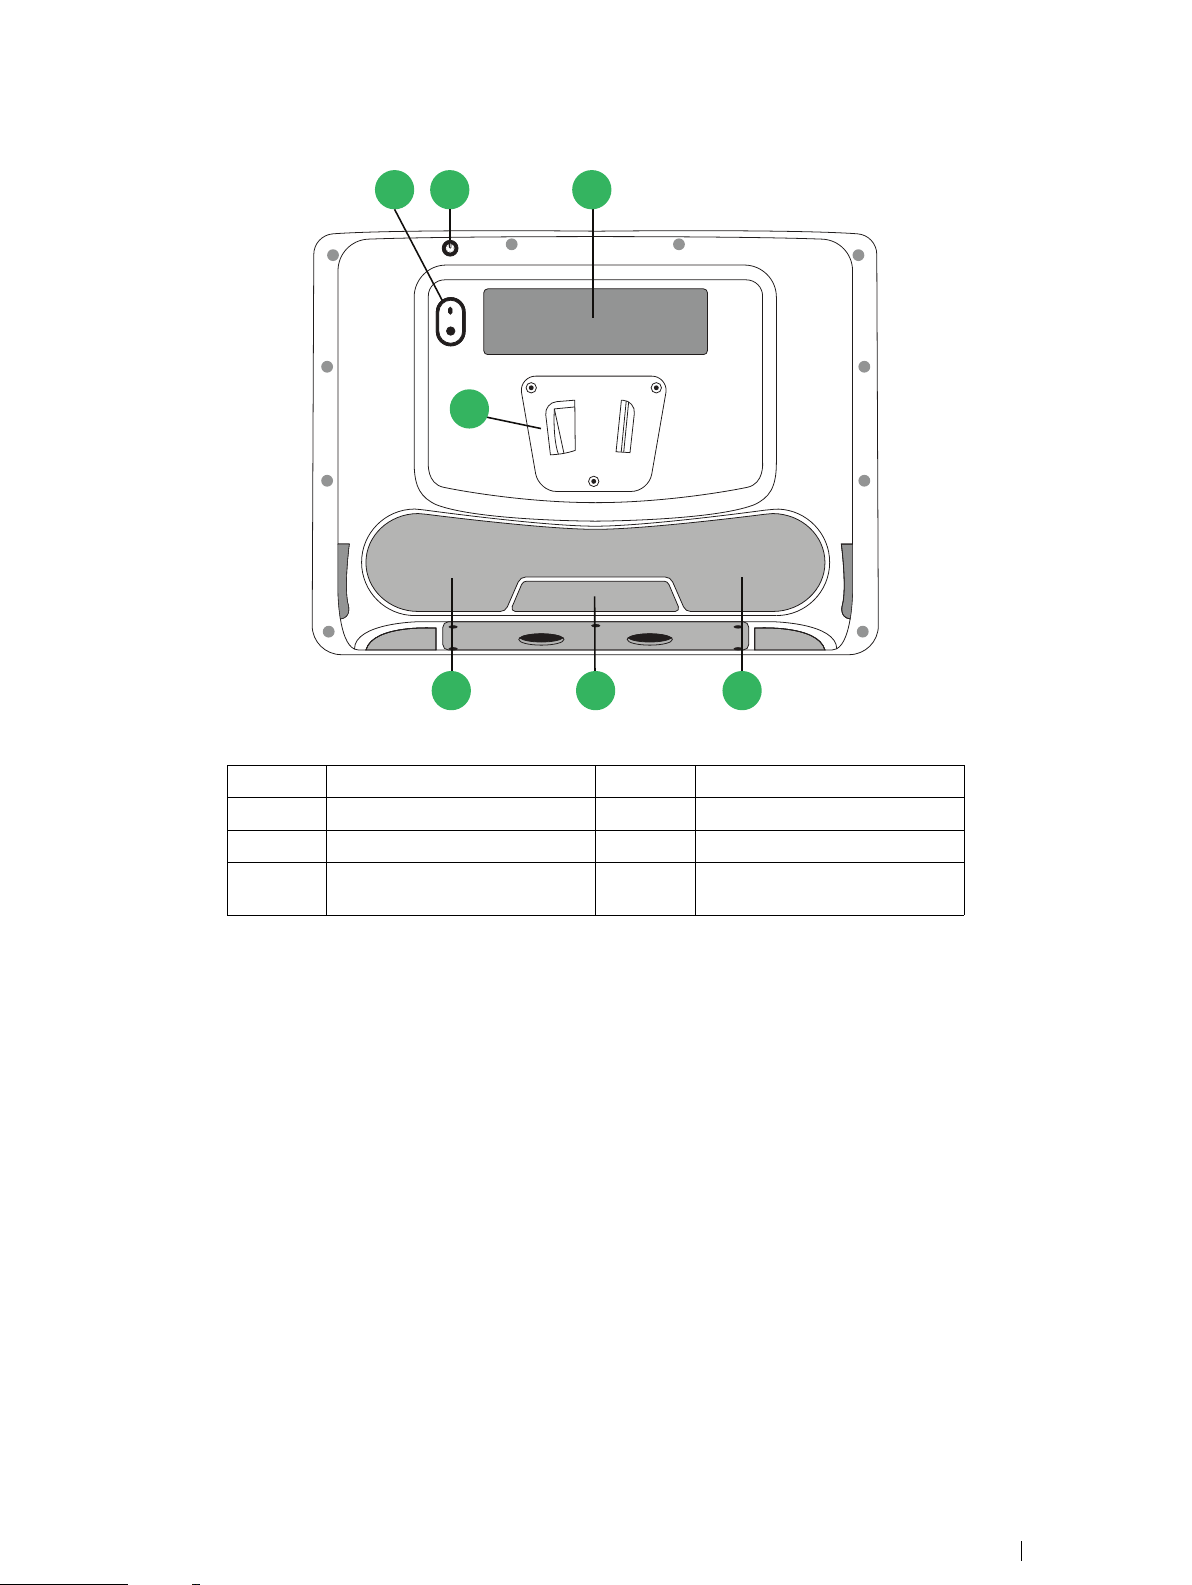
10 11 12
13
14 1415
Position Description Position Description
10 Camera 8 MP Auto Focus (AF) 13 Mounting Plate
11 Power Button 14 Speakers
12 Partner Window 15 Programmable IR Remote/
Figure 3.2 Back
ECU (transmitter and receiver)
#12007957 Tobii Dynavox I-Series User’s manual v.1.0.1 - en-US
3 Overview of the Tobii Dynavox I–13 and I–16
17
Page 18
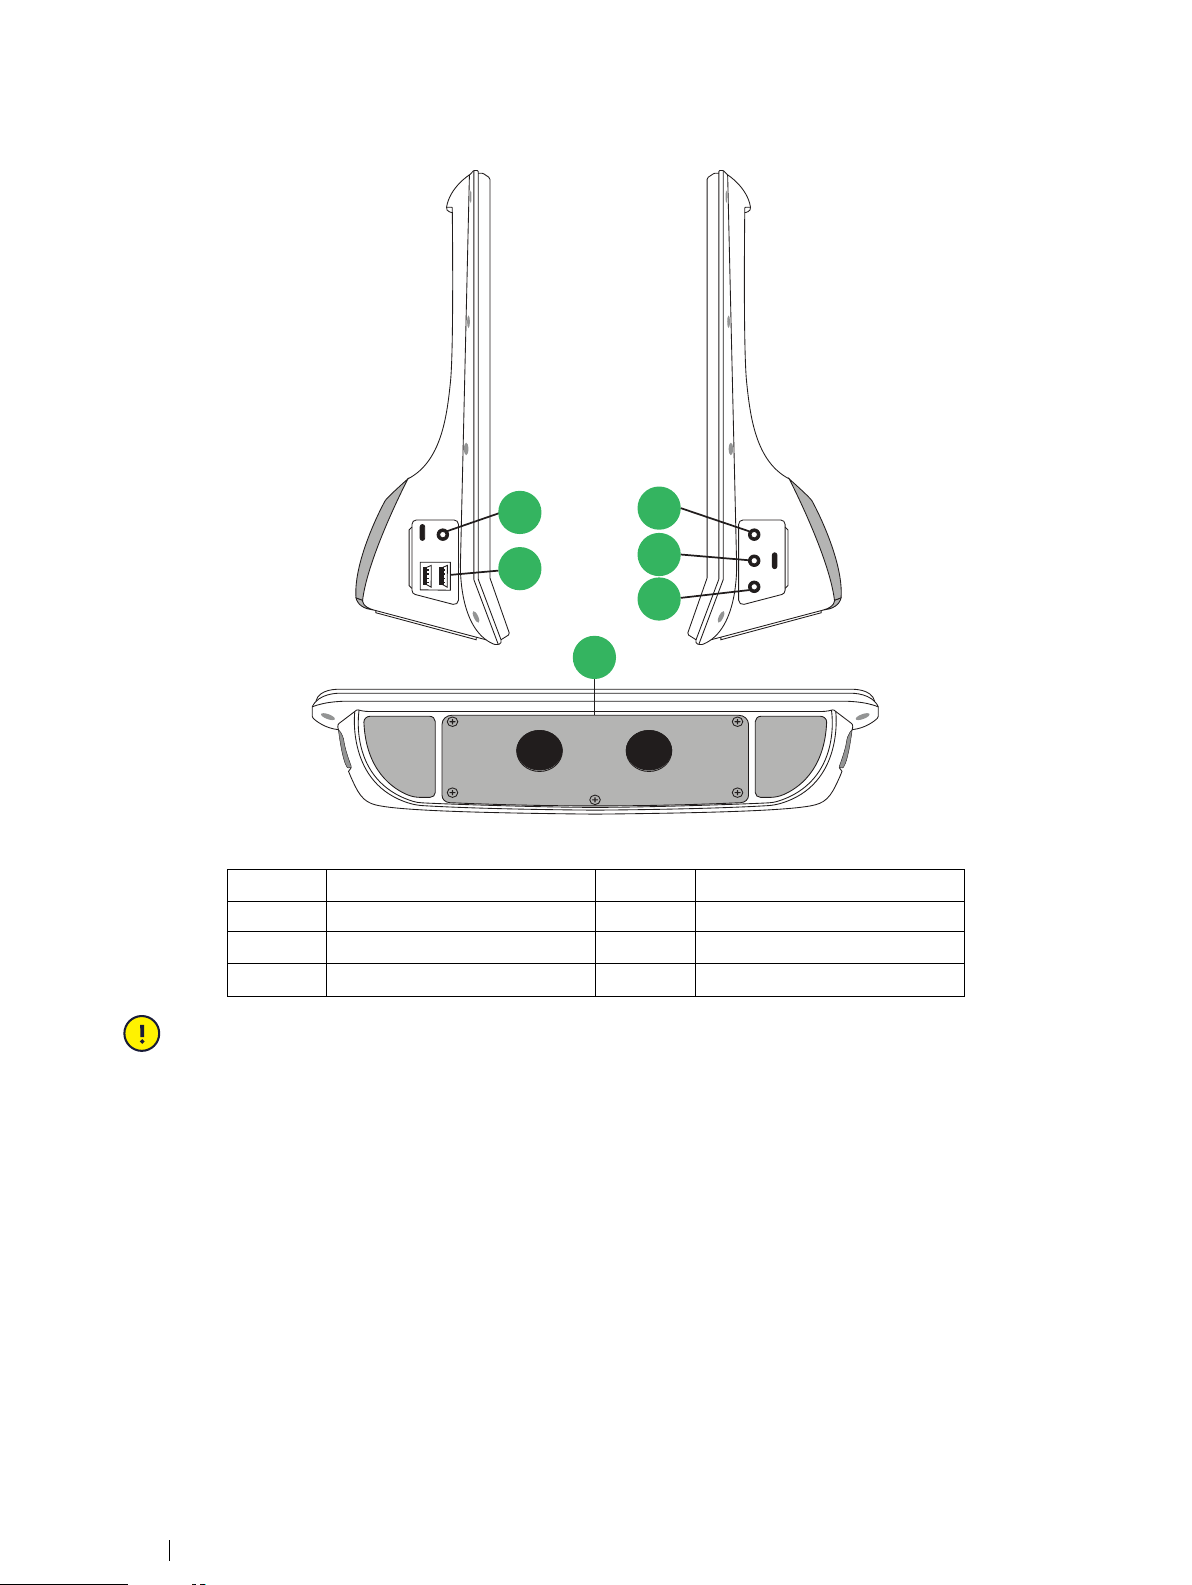
17
18
19
20
21
16
Figure 3.3 Bottom, Left, and Right Side
Position Description Position Description
16 Power Connector 19 Switch Port 1
17 USB 3.0 connectors (2) 20 Switch Port 2
18 Head phone jack 3.5 mm 21 Battery Cover
Never force a connector into a port. If the connector and port do not join with reasonable ease, they probably do
not match. Make sure that the connector matches the port and that you have positioned the connector correctly
in relation to the port.
Be extra careful with the USB connectors.
3.3 Preinstalled Software
The Tobii Dynavox I-Series device is delivered with all pre-ordered and required software installed and ready to use.
Should a reinstallation become necessary at any stage, perform a Factory Recovery. For more information, see 5.11 Reset
the Tobii Dynavox I-Series, page 40.
3 Overview of the Tobii Dynavox I–13 and I–16
18
#12007957 Tobii Dynavox I-Series User’s manual v.1.0.1 - en-US
Page 19

4 Batteries in the Tobii Dynavox I-Series
4.1 Batteries
The Tobii Dynavox I-Series device has one built-in battery and a battery indicator. The battery indicator will send out a
warning of Low battery when the battery drops below 10% of its capacity. If the Tobii Dynavox I-Series device is not powered up by the power supply for charging, the Tobii Dynavox I-Series device will shut down automatically. For more information, see Appendix D Technical Specifications, page 52.
4.2 Charging the Tobii Dynavox I-Series
1. Connect the Power cable to the Power Connector on the device.
2. Connect the Power adapter to an electrical outlet and charge the tablet until the battery is fully charged.
For device storage and battery charging temperatures, see 2 Safety, page 11.
4.2.1 The Status LED Behavior
The status LED will shine with three (3) different colors:
● Green — Fully charged
● Blue — Charging
● Red — Fault
If the LED blinks three (3) times when the power button is pressed, the battery level is below the critical level and
the battery needs to be charged.
4.3 Changing the Battery
The battery may only be replaced by the user with a TDG G1 battery pack sold by Tobii Dynavox. There is a risk
of explosion if the battery is replaced with an incorrect type.
1. Place the device with the display facing down.
2. Unscrew the five (5) screws holding the battery cover in place with a Phillips screw driver.
3. Remove the battery cover plate.
#12007957 Tobii Dynavox I-Series User’s manual v.1.0.1 - en-US
4 Batteries in the Tobii Dynavox I-Series
19
Page 20

4. Pull the Battery strap to remove the battery from the battery compartment.
5. Push the new battery into the battery compartment.
Align the two battery icons, one is located on the battery and one on the device, for the battery to be in the
correct position.
6. Place the battery cover back in place.
7. Tighten the five (5) screws with a Phillips screwdriver.
4 Batteries in the Tobii Dynavox I-Series
20
#12007957 Tobii Dynavox I-Series User’s manual v.1.0.1 - en-US
Page 21

5 Using the Tobii Dynavox I-Series
No skill other than reading is necessary for setting up the Tobii Dynavox I-Series device. Follow this User´s Manual and the
Quick Start Manual.
5.1 Starting the Device
Start the device in one of the following ways:
● Press the power button on the top of the device. (Position 11 in Figure 3.2 Back, page 17)
● Activate a configured Switch.
For more information about configuring a Switch, see 5.10.3 Switches , page 37.
When you have started the device, the Power LED will shine blue or green depending on if the device is connected to AC
or on batteries. For more information about the LED Behavior, see Appendix C Computer Device States of Operation and
LED Status, page 50.
5.1.1 First Start Up
When you start your Tobii Dynavox I-Series for the first time, you are required to go through a couple steps to set your ISeries up with the correct software and language installation. The whole process usually takes between 10-15 minutes.
Immediately after booting up the I-Series, you will be taken through the Windows Out-of-box experience (OOBE). It will require you to acknowledge both Microsoft and Tobii Dynavox End User License Agreements. This is also where you set up
language and time-zone preferences. You will also be able to connect to a WIFI network. Simply follow the instructions on
screen to progress to the next step.
Internet-connectivity is not a requirement.
5.1.1.1 Local Account vs Windows Account
5.1.1.1.1 What is a local offline account in Windows 10?
A local account is a user name and password combination that you have used to log into any of the legacy Windows operating systems. It grants you access to the system's resources and allows you to customize it to your settings and preferences. A local user account in Windows 10 will allow you to install traditional desktop apps, personalize settings and use the
operating system the old fashioned way. Of course, local offline accounts can be created for a single system, so if you have
multiple devices, you will need to use a different local account for each of them. And although it is not necessarily recommended, this type of offline account allows you to remove password protection if you don't want it.
You can access the Windows Store but, if you use Windows 10 Home, you cannot download and install apps without a Microsoft account. If, however, you use Windows 10 Pro, Enterprise or Education, you can download and install apps from
the Windows Store, but only if they're free. If they're paid, you must sign in using a Microsoft account so that their licenses
are associated with you. Lastly, if you use a local offline account in Windows 10, your settings will not be synchronized
across all of the computers and devices you typically use.
5.1.1.1.2 What is a Microsoft account?
A Microsoft account is a rebranding of any of previous accounts for Microsoft products. As such, if you have ever used
services like Hotmail, Outlook.com, Skype, or devices like Xbox game consoles or Windows smartphones, then you are
sure to have a Microsoft account already. By rebranding and combining all these different accounts, Microsoft allows for
complete integration of all their services into a single online account. This means that you can use it to get access to everything connected to the Microsoft ecosystem. For more help on how to create a Microsoft account and why you should do it,
read this article: https://www.digitalcitizen.life/what-is-microsoft-account.
#12007957 Tobii Dynavox I-Series User’s manual v.1.0.1 - en-US
5 Using the Tobii Dynavox I-Series
21
Page 22

The big difference from a local account is that you use an email address instead of a username to log into the operating
system. So you can use either a Microsoft bound email address (hotmail.com, live.com or outlook.com) or Gmail and even
an ISP specific email address to create your Microsoft account. This type of sign in process means that you cannot remove
the password protection. You can only change it.
5.1.1.2 Creating a User Account
Tobii Dynavox recommends using a Microsoft Account, if possible.
Benefits of using a Microsoft Account include One Drive cloud storage to back up files such as photos, videos,
etc., simple Password Recovery through Microsoft, ability to purchase paid apps through the Microsoft Store, parental controls, device sync, and Find My Device.
If you already have a Microsoft Account you want to use, it is OK to use that Microsoft Account.
1. Select the Create account text on the page and follow the directions.
2. Enter your email address.
When creating a Microsoft Account, you can use your current email address, regardless of domain (ex.
@gmail, @yahoo, etc.)
3. Sign in
4. Select Set a PIN and follow the steps, or select Do this later to set up at another time.
Passwords are not always secure. Setting up a PIN allows you to sign in to your device in a more secure
way.
5. Microsoft OneDrive, your personal cloud storage can be set up by selecting Next.
Windows will automatically save files to Microsoft OneDrive.
Select Only save files to this PC if you don’t want Windows to use Microsoft OneDrive.
Tobii Dynavox also recommends that you create a free account on myTobiiDynavox.com. It allows you to save,
backup, and share Page Sets with other users all from one place.
5.1.1.3 Tobii Dynavox Configuration
Once completing the above steps, a Tobii Dynavox setup guide will launch. The setup guide will ask you for a QR-code that
defines what Tobii Dynavox software is to be installed. The QR-code is supplied on paper with your device, and the setup
guide will let you use the built-in rear camera to scan it. Alternatively, you can also manually enter the product key, found
on the same paper as the QR-code. Once the QR-code/product key is successfully read, the system will spend approximately 5-10 minutes configuring your Tobii Dynavox Communication software. In the meantime, you will be asked to acknowledge safety information and manage device settings. Once your software is configured and ready to go, you will be
automatically notified.
1. Remove the QR Code from the box and scan it using the device’s rear-facing camera.
If the camera is having trouble reading the QR code, choose manual entry.
2. An option will show to allow the device to automatically sign into the User Account when the device is powered on.
If you would like to be logged in automatically, leave the box checked and enter the password for the User Ac-
count that was set up in the previous steps above. Uncheck the box if you want to enter the password for the User
Account when the device is started. Once finished, select Next.
3. The device will then configure and finish its setup. Once complete, the device will be ready to use!
Congratulations, you are now ready to use your Tobii Dynavox device!
5 Using the Tobii Dynavox I-Series
22
#12007957 Tobii Dynavox I-Series User’s manual v.1.0.1 - en-US
Page 23

5.1.2 Password Information
X cm / inches
The Tobii Dynavox I-Series device is configured to start up without a password. Though unusual, there are situations in
which the password window could pop up; for example, when creating a new user in the operating system, when returning
from the operating system’s sleep mode or when downloading software updates from the internet.
If you decide to use a password for your user account on your Tobii Dynavox I-Series device, be sure to write it
down in a safe place for later use. Without the operating system’s access password, Tobii Dynavox Support may
be unable to assist you until you have recovered it through Microsoft.
The password is case sensitive.
Should the password window pop up, requiring a password, you need to know the password or where to find it. In order to
type in the password use the Windows on-screen keyboard or an external USB keyboard (not included).
5.2 Shutting Down the Device
The device should be shut down using one of the following ways:
● Use the start menu in Windows (recommended when possible).
● By pressing the power button.
● Through the communication software installed on the device.
Should you be unable to shut the device down using any of the above, you can hold the power button on the top edge of
the device down for seven seconds. The device will consequently shut down immediately, without waiting for open applications to close.
This is not considered a "clean" Windows shut down and is thus not recommended unless completely necessary.
5.3 Using Eye Gaze
The Tobii Dynavox I-Series devices operate with precision regardless of glasses, contact lenses, eye color or light conditions. Eye Gaze enables you to control the computer with your eyes using either Gaze Enabled applications (like Tobii Dynavox Snap Core First
5.3.1 Positioning
®
/ Communicator 5) or through Windows Control.
Figure 5.1 Positioning
#12007957 Tobii Dynavox I-Series User’s manual v.1.0.1 - en-US
5 Using the Tobii Dynavox I-Series
23
Page 24

The Tobii Dynavox I-Series is designed to work optimally when it is parallel to the user’s eyes at a distance of about 60 cm
X cm / inches
(23.5 inches), see Figure 5.1 Positioning, page 23.
Figure 5.2 Positioning when Users Leaning Sideways or Those Lying Down
This means that for those users leaning sideways or those lying down, the Tobii Dynavox I-Series also needs to be tilted in
order to keep the user’s eyes parallel to the screen and at the optimal distance, see Figure 5.2 Positioning when Users
Leaning Sideways or Those Lying Down, page 24.
Make sure the user is placed comfortably in relation to the optimal positioning of, and distance from, the unit. Be
aware also that the user’s comfort, as well as the Eye Gaze performance, will be enhanced if the sun is not shining directly on the screen or into the user’s eyes.
The user should be positioned at the optimal distance to allow for the best possible Eye Gaze.
5.3.2 Track Box
The Tobii Dynavox I-Series allows for extensive Freedom of Head Movement. Once the Tobii Dynavox I-Series is properly
calibrated and placed in front of the user, no further adjustments are required.
The Tobii Dynavox I-Series produces an industry leading sized track box with the approximate dimensions of 30 cm × 20
cm × 20 cm / 11.8 in × 7.9 in × 7.9 in (Width × Height × Depth). The Track Box is an invisible box positioned approximately
60 cm (23.5 in) straight out from a point just above the middle of the screen, see Figure 5.3 The Trackbox, page 24.
At 70 cm (27.5 in) the Tobii Dynavox I-Series allows for lateral Freedom of Head Movement in an area of about 50 × 36 cm
(20 × 14 in) or 35 × 30 cm (13,8 × 11,8 in) depending on which Eye tracker the Tobii Dynavox I-Series is equipped with. For
more information, see Appendix D Technical Specifications, page 52.
In order to function properly for Eye Gaze, the user needs at least one eye in the track box at all times.
5 Using the Tobii Dynavox I-Series
24
Figure 5.3 The Trackbox
#12007957 Tobii Dynavox I-Series User’s manual v.1.0.1 - en-US
Page 25

5.3.3 Track Status
The Track Status function is used to check if the user is correctly positioned in front of the eye tracker.
● The two (2) white dots — The user’s eyes and how they are positioned towards the screen. For optimal position,
the white dots should be in the middle of the black area.
● The color full bar on the left with the white arrow — How far or close the user is positioned from the screen.
– If the white arrow is in the middle of the green area of the bar, the user is at the optimal distance from the
screen.
– If the arrow is on the lower part of the bar — move the user closer.
– If the arrow is on the upper part of the bar — move the user farther away from the bar.
1. Select one of the following ways to access the Track Status:
● Select the Track Status Button, pos x in Fig y, on the device
● Open Track Status from within your Tobii Dynavox Snap Core First
2. Position the user.
3. Select the Close button when finished.
®
/ Communicator 5
#12007957 Tobii Dynavox I-Series User’s manual v.1.0.1 - en-US
5 Using the Tobii Dynavox I-Series
25
Page 26

5.3.4 Eye Tracking Settings
5.3.4.1 The Calibration Tab
Calibration profile: Will show the name of the profile that is active.
Manage profiles: Select this button to change to an already existing profile. For more information, see 5.3.4.1.1 Manage
Profiles, page 26.
Create new profile: Select this button to create a new profile. For more information, see 5.3.4.1.2 Create New Profile,
page 26.
Calibration results: Select this button to view the result of the calibration. For more information, see 5.3.4.1.3 Calibration
Results, page 27.
Test calibration: Select this button to open the test calibration page. For more information, see 5.3.4.1.4 Test Calibration,
page 28.
Track eyes: Select how the device should track the user’s eyes between: Both, Left or Right.
Wake-on-Gaze: Toggle the Wake-on-Gaze function on/off. For more information, see 5.3.4.1.6 Wake-on-Gaze
Calibration: Select the Customize button to customize the calibration For more information, see 5.3.4.1.5 Calibration,
page 29. Select the Calibration button to start a new calibration and follow the on-screen instructions.
®
, page 30
5.3.4.1.1 Manage Profiles
On the Manage Profiles page you will be able to Activate or Delete an existing profile.
In the middle of the screen, under Active Profile, you will be able to see the name of the profile that is active.
All available profiles will be listed on the page, use the
and button to scroll through the available profiles.
5.3.4.1.1.1 Activating a Profile
1. Select the button with the name of the profile to activate.
2. Select the Activate button located in the top right corner of the screen.
3. Select Yes to activate the selected profile or No to cancel.
4. Select Close to leave the page.
5.3.4.1.1.2 Deleting a Profile
1. Select the button with the name of the profile to delete.
2. Select the Delete button located in the top left corner of the screen.
3. Select Yes to delete the selected profile or No to cancel.
4. Select Close to leave the page.
5.3.4.1.2 Create New Profile
1. Select the Calibration type to use.
5 Using the Tobii Dynavox I-Series
26
#12007957 Tobii Dynavox I-Series User’s manual v.1.0.1 - en-US
Page 27

For more information, see .
2. Select the Create new profile button.
3. Select Yes to continue or No to cancel.
4. Give the new profile a name.
Keyboard and mouse must be used.
Only Alpha-Numeric characters can be used.
5. Select the Next button.
6. Position the user so that the two dots, representing the user’s eyes, are in the center of the box shown on screen.
The calibration process will start when the right dot blinks at the user.
7. Follow the on-screen instructions for performing a calibration.
8. Check out the Calibration Results.
For more information, see 5.3.4.1.3 Calibration Results, page 27.
9. Select Close to accept the calibration.
5.3.4.1.3 Calibration Results
On the calibration results page, you will be able to see the result of the calibration for each of the calibration points. How
many calibration points displayed on the page varies depending on which calibration type you have chosen and how you
have customized the calibration.
A calibration point can have three (3) different status:
● Great (Green)
● Good (Yellow)
● No data (Red)
When using the “Accurate” calibration type, the calibration will automatically restart if the eye tracker can’t get
any data from a calibration point.
5.3.4.1.3.1 Improving Calibration Points
If a calibration point is in need of improvement, follow these steps:
1. Toggle the Select points using gaze On/Off check box to On to gaze enable the calibration points in order to select
them with gaze. (Optional)
#12007957 Tobii Dynavox I-Series User’s manual v.1.0.1 - en-US
5 Using the Tobii Dynavox I-Series
27
Page 28

2. Select the calibration points to improve.
3. Select the Improve Point(s) button to start the calibration for the selected calibration points.
4. Repeat step 1–3, if necessary.
5.3.4.1.4 Test Calibration
On the Test Calibration page the calibration can be tested, using predefined targets on the screen to see if the user needs
to recalibrate the eye tracker.
1. Look at each dot in each circle on the screen to see how accurate the eye tracking is in that area.
2. Select Close when finished.
5 Using the Tobii Dynavox I-Series
28
#12007957 Tobii Dynavox I-Series User’s manual v.1.0.1 - en-US
Page 29

5.3.4.1.5 Calibration
5.3.4.1.5.1 Customize
Select the Customize button in the Calibration area to customize the calibration process.
Calibration points: Select if 1, 2, 5, or 9 calibration points should be used.
Step-through: Toggle the Step-through On/Off check box to On to activate the function where you use the “S” key on a
keyboard or tap/click the screen to step through the calibration.
Calibration Area: For more information, see 5.3.4.1.5.1.1 Calibration Area, page 30.
Stimulus:
Select the Browse button to change the Stimulus from the default dot into:
● One of the included stimuli, Image, or Video
● An image of the user's favorite toy
● A favorite video
● Or something else.
Background: Select the Background button to change the color of the background for the calibration procedure.
Stimulus Speed: Select the speed for the stimulus to move around the screen:
● Slow
● Medium
● Fast
Stimulus Size: Select the size of the stimulus when the stimulus is displayed on the screen:
● Small
● Medium
● Large
Close: Select the Close button to leave the page.
#12007957 Tobii Dynavox I-Series User’s manual v.1.0.1 - en-US
5 Using the Tobii Dynavox I-Series
29
Page 30

5.3.4.1.5.1.1 Calibration Area
Select the Calibration area button to be able to customize the calibration area.
Customizing the calibration area can be useful if you have discovered that the user cannot access certain areas of the
screen using Eye Gaze. By sizing the calibration area to exclude the areas that the user cannot access it can improve the
overall calibration.
You can move and resize the calibration area to make it fit your preferred area of the screen.
Select one of the following buttons:
● OK — to set the calibration area to represent the size you have adjusted it to be and exit the calibration area
setting.
● Cancel — to discard the changes and exit the calibration area setting.
● Default — to reset the calibration area to factory default.
5.3.4.1.5.2 Calibration
Select the Calibration button to start the calibration procedure. Follow the on-screen instructions.
To customize the calibration, see 5.3.4.1.5.1 Customize, page 29.
5.3.4.1.6 Wake-on-Gaze
®
The Tobii Dynavox I-Series device can be set to wake automatically from Sleep mode when your eyes are registered as
looking at the display.
5 Using the Tobii Dynavox I-Series
30
#12007957 Tobii Dynavox I-Series User’s manual v.1.0.1 - en-US
Page 31

5.3.4.1.6.1 Enabling Wake-on-Gaze
To enable Wake-on-Gaze for the device:
1. Make sure the Wake-on-Gaze is toggled On.
5.3.4.1.6.2 Disabling Wake-on-Gaze
To disable Wake-on-Gaze for the device:
1. Make sure the Wake-on-Gaze is toggled Off.
5.3.4.2 The Activation Tab
5.3.4.2.1 Gaze Settings
In the Activation Tab, all the settings for how the user shall interact with Eye Gaze is set. If the user shall use the Gaze or
Gaze & Switch to execute the commands and how the interaction shall behave.
Activation method:
● Gaze - Choose Gaze to use your gaze position to activate the zooming function that ends with the execution of the
desired Task.
● Gaze & Switch - Choose Gaze & Switch to use a switch to activate the zooming function that ends with the execution of the desired Task.
Button Dwell Time (Milliseconds)
The Button Dwell Time can be set to 8 different levels, just look at the desired position to change the setting. Changing the
Button Dwell Time will adjust how long the user must fix their gaze on a button before the Task is executed. The scale
presents lower Button Dwell Time to the left and higher to the right.
Look away before reselecting
● On - Choose On to activate Look away before reselecting. When On, the user must first look away from the active gaze region to be able to activate the same gaze region again.
● Off - Choose Off to deactivate Look away before reselecting. When Off, the active gaze region will be activated
again and again as long as the user keeps gazing at the gaze region. (Default)
Make pause button available when looking outside screen
● On - Choose On to activate Make pause button available when looking outside screen. When On, the pause
button for pausing the eye tracking will be available when the user looks outside of the screen.
Pausing the eye tracking
– Select the Pause button to pause the eye tracking.
– Select the Play button to active the eye tracking,
● Off - Choose Off to deactivate Make pause button available when looking outside screen. When Off, the pause
button for pausing the eye tracking will not be available when the user looks outside of the screen (Default).
#12007957 Tobii Dynavox I-Series User’s manual v.1.0.1 - en-US
5 Using the Tobii Dynavox I-Series
31
Page 32

5.3.4.2.2 Gaze & Switch Settings
Minimum Click Duration:
The Minimum Click Duration can be set to 8 different levels, just look at the desired position to change the setting. Changing the Minimum Click Duration will adjust how long time that the user must press the switch before it makes a selection.
The scale presents lower Minimum Click Duration to the left and higher to the right.
Duration Between Clicks:
The Duration Between Clicks can be set to 8 different levels, just look at the desired position to change the setting. Changing the Duration Between Clicks will adjust how the long the "dead time" that Eye Gaze software waits before allowing further switch input. The scale presents lower Minimum Click Duration to the left and higher to the right.
Switch Input: .
● Select the Change button to select the which key on a regular keyboard to use as switch input instead of having to
press a physical switch.. For available keyboard keys, see Figure 5.4 Available Keyboard Keys, page 32
Figure 5.4 Available Keyboard Keys
Look away before reselecting
● On - Choose On to activate Look away before reselecting. When On, the user must first look away from the active gaze region to be able to activate the same gaze region again.
● Off - Choose Off to deactivate Look away before reselecting. When Off, the active gaze region will be activated
again and again as long as the user keeps gazing at the gaze region. (Default)
Make pause button available when looking outside screen
● On - Choose On to activate Make pause button available when looking outside screen. When On, the pause
button for pausing the eye tracking will be available when the user looks outside of the screen.
Pausing the eye tracking
– Select the Pause button to pause the eye tracking.
– Select the Play button to active the eye tracking,
5 Using the Tobii Dynavox I-Series
32
#12007957 Tobii Dynavox I-Series User’s manual v.1.0.1 - en-US
Page 33

● Off - Choose Off to deactivate Make pause button available when looking outside screen. When Off, the pause
button for pausing the eye tracking will not be available when the user looks outside of the screen (Default).
5.3.4.3 The Feedback Tab
Feedback type:
● Clock - The visual feedback is a clock that fills during the specified Button Dwell Time. When the clock is completely
filled, the Task is executed.
● Dot - The visual feedback is a shrinking dot for Gaze users or a static dot for Switch users when a Task is executed.
● Invisible - No visual feedback will be shown on the screen when a Task is executed.
Feedback color: Select the Change button to select the color of the feedback dot. For available colors, see Figure 5.5
Available Colors, page 33.
Figure 5.5 Available Colors
Feedback size: The feedback size of the chosen feedback type can be set to three (3) different values.
● Small
● Medium
● Large
5.4 Using the Stand Adjustable Base
The Tobii Dynavox I-Series comes with a Stand Adjustable Base as an accessory, which allows the user to place the Tobii
Dynavox I-Series device in more positions for the best possible Eye Gaze.
To use the Stand Adjustable base follow these instructions:
1. Place the Stand Adjustable Base on a flat surface and place the Tobii Dynavox I-Series device on to the Stand Adjustable base. The Tobii Dynavox I-Series and the base will lock together by the magnets in the Stand Adjustable
Base.
#12007957 Tobii Dynavox I-Series User’s manual v.1.0.1 - en-US
5 Using the Tobii Dynavox I-Series
33
Page 34

The Stand Adjustable Base may be used with the Tobii Dynavox logo facing forward, angling the device
toward the user, or with the Tobii Dynavox logo toward the back side of the device, which will angle the
screen away from the user.
2. Select in which position to use the Stand Adjustable Base.
First position Second position
Prop is folded in underneath the
Stand Adjustable Base.
Rotate the folding prop out to its end position.
5.5 Using the Partner Window
The partner window will mirror the message window in Tobii Dynavox Snap Core First®/ Communicator 5. For privacy, the
user can toggle the partner window on/off from within Tobii Dynavox Snap Core First
®
/ Communicator 5.
5.6 Using the Cameras
The two built-in cameras allows you to take snapshots of items in front of the Tobii Dynavox I-Series device and also from
the display side.
Use Tobii Dynavox Snap Core First
5 Using the Tobii Dynavox I-Series
34
®
/ Communicator 5 or other relevant software to operate the cameras.
#12007957 Tobii Dynavox I-Series User’s manual v.1.0.1 - en-US
Page 35

5.7 Using the Programmable IR Remote Control
The Tobii Dynavox I-Series device includes a Programmable IR Remote Control — Environmental Control Unit (ECU). The
Programmable IR Remote Control is a programmable Infrared device that can be used to control equipment with an IR Remote Control such as TV-sets or DVDs.
For more information about how to use and program the Programmable IR Remote Control, see the Tobii Dynavox Snap
Core First User’s Manual or the Communicator User’s Guide.
If the device you are trying to control is not responding, try tilting the Tobii Dynavox I-Series device up or down
slightly to change the angle at which the IR signal is being sent.
The ECU is not to be relied on as the only method of interaction with IR controlled devices.
5.8 Adjusting the Volume
To adjust the volume use the Volume Up button (Position 8) and volume down button (Position 9) on the bottom right hand
side of the front of the Tobii Dynavox I-Series device. For position references, see Figure 3.1 Front
Volume adjustments can also be done in your Tobii Dynavox communication software.
The volume buttons can be activated by Eye Gaze when using Snap Core First / Communicator 5 as communication software.
5.9 Adjusting the Sound
You can configure the built-in speakers using the Microsoft Windows Control Panel > Sound.
We refer to Microsoft’s information on how to configure the sound in the Microsoft Windows Control Panel.
5.10 Tobii Dynavox Hardware Settings
With the Tobii Dynavox Hardware Settings it is possible to customize the some behavior of the Tobii Dynavox I-Series. To
access the Tobii Dynavox Hardware Settings follow this procedure:
1. Select the Tobii Dynavox Hardware Settings app,
2. The Tobii Dynavox Hardware Settings opens.
, from the Start screen.
#12007957 Tobii Dynavox I-Series User’s manual v.1.0.1 - en-US
5 Using the Tobii Dynavox I-Series
35
Page 36

5.10.1 Adaptive Buttons
The touch behavior of the of the Adaptive buttons can be set and changed here. The Eye Gaze behaviors for the adaptive
buttons are set in your Tobii Dynavox communications software. See the User’s Manual for SNAP + Core First in the section named “Page Set Settings - Adaptive Buttons” or for Communicator 5 in the section named ”Adaptive Buttons“.
5.10.1.1 Triangle Button
To change and select the touch action for the Triangle button.
1. Open the Tobii Dynavox Hardware Settings app.
2. Select Adaptive Buttons.
3. Select the drop down list
4. Select one of the following actions:
● Disabled
● Send Keyboard Key
● Show/Hide Track Status (Default)
● Enable/Disable Eye Tracker Pause
● Calibrate Eye Tracker
5.10.1.2 Square Button
To change and select the touch action for the Square button.
1. Open the Tobii Dynavox Hardware Settings app.
2. Select Adaptive Buttons.
3. Select the drop down list
4. Select one of the following actions:
● Disabled
● Send Keyboard Key
● Show/Hide Track Status
● Enable/Disable Eye Tracker Pause
● Calibrate Eye Tracker (Default)
5 Using the Tobii Dynavox I-Series
36
#12007957 Tobii Dynavox I-Series User’s manual v.1.0.1 - en-US
Page 37

5.10.2 Eye Tracker
5.10.2.1 Eye Tracking
5.10.2.1.1 Enabling Eye Tracking
To enable the Eye Tracking on the device:
1. Open the Tobii Dynavox Hardware Settings app.
2. Select Eye Tracker.
3. Make sure Eye Tracking is toggled On to enable Eye Tracking.
5.10.2.1.2 Disabling Eye Tracking
To disable the Eye Tracking on the device:
1. Open the Tobii Dynavox Hardware Settings app.
2. Select Switches.
3. Make sure the Eye Tracking is toggled Off to disable Eye Tracking.
5.10.2.2 Eye Tracking Settings
To change the Eye Tracker Settings, select the Open button and you will be taken to the Eye Tracking Settings application.
For more information, see 5.3.4 Eye Tracking Settings.
5.10.3 Switches
#12007957 Tobii Dynavox I-Series User’s manual v.1.0.1 - en-US
5 Using the Tobii Dynavox I-Series
37
Page 38

5.10.3.1 Enabling a Connected Switch
To enable a connected Switch to power on the device:
1. Open the Tobii Dynavox Hardware Settings app.
2. Select Switches.
3. For Switch 1 and/or Switch 2, set the Power on with Switch toggle to On.
5.10.3.2 Disabling a Connected Switch
To disable a connected Switch to power on the device:
1. Open the Tobii Dynavox Hardware Settings app.
2. Select Switches.
3. For Switch 1 and/or Switch 2, set the Power on with Switch toggle to Off.
5.10.4 Touch & Gestures
5.10.4.1 Edge Swipe
Edge Swipe is enabled by default. Edge Swiping will bring up the Action Center menu from the right side of the screen.
5.10.4.1.1 Enabling Edge Swipe
To enable Edge swipe on the device:
1. Open the Tobii Dynavox Hardware Settings app.
2. Select Touch & Gesture.
3. Make sure the Edge Swipe is toggled On to enable the Windows 10 Edge Swipe function.
5.10.4.1.2 Disabling Edge Swipe
To disable Edge swipe on the device:
1. Open the Tobii Dynavox Hardware Settings app.
2. Select Touch & Gesture.
3. Make sure the Edge Swipe is toggled Off.
5.10.4.2 Lock Screen
The Lock Screen is “disabled” by default. This option is important if a user would like to use “Kiosk Mode” on the device.
The Lock Screen must be enabled to use Kiosk Mode. Kiosk Mode is a great way to really lock the device down to the use
of one app, such as Snap, and will not allow the user to access other programs on the device. For more information on Kiosk Mode, see https://docs.microsoft.com/en-us/windows/configuration/set-up-a-kiosk-for-windows-10-for-desktop-edi-
tions#set-up-assigned-access-in-pc-settings
5 Using the Tobii Dynavox I-Series
38
#12007957 Tobii Dynavox I-Series User’s manual v.1.0.1 - en-US
Page 39

5.10.4.2.1 Enabling Lock Screen
To enable Lock Screen on the device:
1. Open the Tobii Dynavox Hardware Settings app.
2. Select Touch & Gesture.
3. Make sure the Lock Screen is toggled On to enable the Lock Screen.
5.10.4.2.2 Disabling Lock Screen
To disable Lock Screen on the device:
1. Open the Tobii Dynavox Hardware Settings app.
2. Select Touch & Gesture.
3. Make sure the Lock Screen is toggled Off to disable the Lock Screen.
5.10.5 Product Key
To view existing I-Series Product Key:
1. Open the Tobii Dynavox Hardware Settings app.
2. Select Product Key.
The following features on the Tobii Dynavox I-Series need a licence for use:
● Eye Tracker
● IR
● Communicator 5
● Look to Learn
● Look to Read
● METACOM
● Snap Core First
If the symbol is visible after a feature, the I-Series Product Key(s) on the device are valid for that feature.
If the
feature.
Some Tobii Dynavox software products may not appear in this list. To view the license status of a product, launch
the software and look in the Settings>About section.
symbol is visible after a feature, the I-Series Product Key(s) on the device are not valid for that
#12007957 Tobii Dynavox I-Series User’s manual v.1.0.1 - en-US
5 Using the Tobii Dynavox I-Series
39
Page 40

5.10.6 System & Diagnostics
To view the version and model of the device:
1. Open the Tobii Dynavox Hardware Settings app.
2. Select System & Diagnostics.
This information is important to have available if you need to contact technical support or inquire about upgrades
to your device.
To save the version and model of the device to a file:
1. Open the Tobii Dynavox Hardware Settings app.
2. Select System & Diagnostics.
3. Select the Save information to file button.
You can attach the file containing the System & Diagnostics information to an e-mail.
5.11 Reset the Tobii Dynavox I-Series
If you have made a lot of different changes to the Tobii Dynavox I-Series and would like to start over, perform a Recovery
from within Windows.
The Tobii Dynavox I-Series uses 100% native Windows 10 recovery/reset functionality.
1. Access the Windows Settings icon from the Windows desktop.
2. Select Updates and Security (you may need to scroll down in the Windows Settings window).
3. Select the Recovery option in the left column.
5 Using the Tobii Dynavox I-Series
40
#12007957 Tobii Dynavox I-Series User’s manual v.1.0.1 - en-US
Page 41

4. Select the Get Started under the heading of Reset this PC.
5. Select one of these options:
● Keep my files
– Reinstalls Windows 10 and keeps your personal files.
– Removes apps and drivers you installed.
– Removes changes you made to settings.
– Removes any apps your PC manufacturer installed. (If your PC came with Windows 10, apps from your
PC manufacturer will be reinstalled.)
The Configuration Manager app that runs at first login (prompting for the QR code) will restore
any licensed Tobii Dynavox applications which are removed.
● Remove everything
– Reinstalls Windows 10 and removes all your personal files.
– Removes apps and drivers you installed.
– Removes changes you made to settings.
#12007957 Tobii Dynavox I-Series User’s manual v.1.0.1 - en-US
5 Using the Tobii Dynavox I-Series
41
Page 42

– Removes any apps your PC manufacturer installed. (If your PC came with Windows 10, apps from your
PC manufacturer will be reinstalled.)
The Configuration Manager app that runs at first login (prompting for the QR code) will restore
any licensed Tobii Dynavox applications which are removed.
Remove everything has two data erasure options:
– Without Clean the drive (default) — This option will take about one hour to perform.
To continue without Clean the drive, select Next.
– With Clean the drive — This option will take many hours to perform.
To enable the Clean the drive option, select Change settings, set Data erasure to ON, then select
Confirm.
This option will also present the user with a BIOS message about resetting BitLocker encryption.
The actual message occurs at reboot and looks like this:A configuration change was re-
quested to Clear this computer’s TPM (Trusted Platform Module) WARNING:
Clearing erases information stored on the TPM: You will lose all created keys
and access to data encrypted by these Keys.Press F12 to Clear the TPM.Press
ESC to reject this change request and continue
Select F12 to proceed with cleaning the drive or ESC to reject this change request and continue.
6. Select Next to continue or Cancel to abort.
7. Select Reset to continue or Cancel to abort.
This will take several minutes. When finished, the Tobii Dynavox I-Series will reboot and you will be presented with the
Manual key entry menu.
Your Serial number and Product key will be auto filled with your information. You can also use the QR Code received with
the original purchase.
Select the Start option.
5 Using the Tobii Dynavox I-Series
42
#12007957 Tobii Dynavox I-Series User’s manual v.1.0.1 - en-US
Page 43

6 Product Care
6.1 Temperature & Humidity
6.1.1 General Use - Operating Temperature
The Tobii Dynavox I-Series is best kept in dry conditions at room temperature. The recommended ranges for temperature
and humidity for the device are as follows:
● Ambient temperature: 0℃ to 35℃ (32℉ to 95℉)
● Humidity: 10% to 95% (no condensation on the device)
● Atmospheric Pressure: 70 kPa to 106 kPa (525 mmHg to 795 mmHg)
6.1.2 Transportation and Storage
For transportation and storage the recommended range for temperature and the humidity value for the device is as
follows:
● Temperature: -30℃ to 70℃ (-22℉ to 158℉)
● Humidity: 10% to 95% (no condensation on the device)
● Atmospheric Pressure: 70 kPa to 106 kPa (375 mmHg to 795 mmHg)
The Tobii Dynavox I-Series is not waterproof or fully water resistant. The device should not be kept in excessively humid,
damp or otherwise wet conditions. Do not submerge the device in water or in any other liquid. Be careful not to allow liquids
to be spilled upon the device especially in the connector areas without the I/O covers in place.
The device is registered as IP Class 54.
The IP class pass for device only, with I/O covers in place. Adaptor mode is excluded.
6.2 Cleaning of the Tobii Dynavox I-Series Device
Before cleaning the Tobii Dynavox I-Series device, shut it down and unplug all cables. The Tobii Dynavox I-Series should
be cleaned after each use, using a hospital grade cleaning product for infection control. The cleaning should be done using
a wipe style product only. Wipe only outer surfaces of the Tobii Dynavox I-Series device and allow the product to dry naturally or follow the wipe instructions. Do not use spray products which may saturate the Tobii Dynavox I-Series device or allow moisture into the unit.
6.3 Placement
Only use the recommended mounts specified by your local reseller or sales representative and make sure that they are
mounted and fastened correctly according to the instructions. Do not place the device on unstable and uneven surfaces.
6.4 Transporting the Tobii Dynavox I-Series Device
Disconnect all the cables from the Tobii Dynavox I-Series while carrying the device.
When you transport the device for repair, shipment, or traveling, use the original casing and packaging materials.
It is recommended to keep the original packaging materials for the Tobii Dynavox I-Series.
If device needs to be returned to Tobii Dynavox for Warranty related issues or repair, it is beneficial that the original packaging or equivalent is used for shipping. Most shipping carriers require at least 2 inches of packing material around the device.
Note: Due to Joint Commission regulations, any shipping materials including boxes sent to Tobii Dynavox must
be discarded.
#12007957 Tobii Dynavox I-Series User’s manual v.1.0.1 - en-US
6 Product Care
43
Page 44

6.5 Disposing of the Tobii Dynavox I-Series Device
Do not dispose of the Tobii Dynavox I-Series Device in general household or office waste. Follow your local regulations for
the disposal of electrical and electronic equipment.
44
6 Product Care
#12007957 Tobii Dynavox I-Series User’s manual v.1.0.1 - en-US
Page 45

Appendix A
Support, Warranty, Training
Resources and Troubleshooting
A1 Customer Support
For support, please contact your local representative or Support at Tobii Dynavox. In order to receive assistance as quickly
as possible, make sure you have access to your Tobii Dynavox I-Series device and, if possible, an Internet connection.
You should also be able to supply the serial number of the device, which you find on the back of the device.
For further product information and other support resources, please visit the Tobii Dynavox website
www.tobiidynavox.com.
A2 Warranty
Please read the Manufacturer’s Warranty paper included in the package.
Please read this User’s Manual carefully before using the device. The warranty is only valid if the device is used according
to the User’s Manual. Disassembling the Tobii Dynavox I-Series device will void the warranty.
It is recommended to keep the original packaging materials for the Tobii Dynavox I-Series.
If device needs to be returned to Tobii Dynavox for Warranty related issues or repair, it is beneficial that the original packaging or equivalent is used for shipping. Most shipping carriers require at least 2 inches of packing material around the device.
Note: Due to Joint Commission regulations, any shipping materials including boxes sent to Tobii Dynavox must
be discarded.
A3 Training Resources
No specific training is required for the safe and effective use of the primary operating functions of the Tobii Dynavox I-Series.
Tobii Dynavox offers a range of training resources for the Tobii Dynavox I-Series products and related communication products. You can find them on the Tobii Dynavox website, www.tobiidynavox.com, including Getting Started Guides, webinars
and Quick Guides. The Tobii Dynavox I-Series Quick Start Manual is delivered with, and stored on, the Tobii Dynavox ISeries device.
A4 Trouble-shooting Guide
A4.1 If the Tobii Dynavox I-Series does not Power up
Connect the power supply and wait a couple of minutes to allow charging before trying to power up the device again. If the
device does not start up correctly, please contact Customer Support. See A1 Customer Support for contact information.
A4.2 How do I carry out a Power Reset on the Tobii Dynavox I-Series?
Hold down the power button of the device for 10 seconds. Doing so will power off the device regardless of what it was
doing. To turn it back on, momentarily press the power button and the device will start up and turn on. If the device does
not start up correctly, please contact Customer Support. See A1 Customer Support for contact information.
Tobii Dynavox I-Series User’s manual v.1.0.1 - en-US
Appendix A Support, Warranty, Training Resources and Trou-
ble-shooting
45
Page 46

A5 What do I do if the Status LED Blink Red Three Times when I Try to
Start the Tobii Dynavox I-Series?
Connect the power supply and wait a couple of minutes to allow charging before trying to power up the device again. If the
device does not start up correctly, please contact Customer Support. See A1 Customer Support for contact information.
Appendix A Support, Warranty, Training Resources and Trou-
46
ble-shooting
Tobii Dynavox I-Series User’s manual v.1.0.1 - en-US
Page 47

Appendix B
Compliance Information
B1 FCC Statement
This device complies with Part 15 of the FCC Rules. Operation is subject to the following two conditions: (1) this device
may not cause harmful interference and (2) this device must accept any interference received, including interference that
may cause undesired operation.
Modifications not expressly approved by Tobii Dynavox could void the user’s authority to operate the equipment
under FCC rules.
B1.1 For P15B Equipment
This equipment has been tested and found to comply with the limits for a Class B digital device, pursuant to part 15 of the
FCC rules. These limits are designed to provide reasonable protection against harmful interference in a residential installation. This equipment generates, uses and can radiate radio frequency energy and, if not installed and used in accordance
with the instructions, may cause harmful interference to radio communications.
However, there is no guarantee that interference will not occur in a particular installation. If this equipment does cause
harmful interference to radio or television reception, which can be determined by turning the equipment off and on, the user
is encouraged to try to correct the interference by one or more of the following measures:
● Reorient or relocate the receiving antenna.
● Increase the separation between the equipment and receiver.
● Connect the equipment into an outlet on a circuit different from that to which the receiver is connected.
● Consult the dealer or an experienced radio/TV technician for help.
B1.2 For Portable Devices
FCC RF Radiation Exposure Statement:
1. This Transmitter must not be co-located or operating in conjunction with any other antenna or transmitter.
2. This equipment complies with FCC RF radiation exposure limits set forth for an uncontrolled environment. This device was tested for typical hand held operations with the device contacted directly to the human body to the sides of
the device. To maintain compliance with FCC RF exposure compliance requirements, avoid direct contact to the
transmitting antenna during transmitting.
B2 Radio Wave Exposure and Specific Absorption Rate (SAR)
Information
The Tobii Dynavox I-Series device has been tested as a Class 1 Medical Device. Medical electrical equipment such as this
requires special caution regarding Electro-magnetic Compatibility (EMC) and thus needs to be installed and placed into
service according to the information provided in this manual.
Using other cables and accessories other than those provided or that are integrated in the device may affect
EMC performance.
The SAR (Specific Absorbtion Rate) limit as dictated by the FCC (in the USA) and by the IC (in Canada) is 1.6W/kg averaged over 1 gram of tissue. In Europe/EU (CE regulations) it is 2.0 W/kg averaged over 10 grams of tissue. The Devices,
I–13 (FCC ID: W5M-GGi13), (IC ID 5534A-GGi13) and I–16 (FCC ID: W5M-GGi16), (IC ID 5534A-GGi16) have been
tested against these SAR limits to maintain compliance with FCC/IC/CE RF exposure requirements.
This equipment complies with FCC/IC/EU RF radiation exposure limits set forth for an uncontrolled environment.
The highest SAR value for the I–13 device is 1.168 W/kg and for the I–16 device is 0.656 W/kg.
In order to maintain compliance as a Class 1 Medical device, the switches that are used in combination with the Tobii Dynavox I-Series device must fulfill the isolation requirements of IEC/EN 60601-1 based on 15 V DC. They must be electrically
floating switches (switches that are not grounded).
Tobii Dynavox I-Series User’s manual v.1.0.1 - en-US
Appendix B Compliance Information
47
Page 48

B3 Industry Canada Statement
Caution
(i) The device for operation in the band 5150-5250 MHz is only for indoor use to reduce the potential for harmful interference to co-channel mobile satellite systems;
(ii) The maximum antenna gain permitted for devices in the bands 5250-5350 MHz and 5470-5725 MHz shall be such that
the equipment still complies with the e.i.r.p. limit;
(iii) The maximum antenna gain permitted for devices in the band 5725-5850 MHz shall be such that the equipment still
complies with the e.i.r.p. limits specified for point-to-point and non-point-to-point operation as appropriate; and
(iv) Users should also be advised that high-power radars are allocated as primary users (i.e. priority users) of the bands
5250-5350 MHz and 5650-5850 MHz and that these radars could cause interference and/or damage to LE-LAN devices.
Avertissement
(i) les dispositifs fonctionnant dans la bande 5150-5250 MHz sont réservés uniquement pour une utilisation à l’intérieur afin
de réduire les risques de brouillage préjudiciable aux systèmes de satellites mobiles utilisant les mêmes canaux;
(ii) le gain maximal d'antenne permis pour les dispositifs utilisant les bandes de 5250 à 5350 MHz et de 5470 à 5725 MHz
doit être conforme à la limite de la p.i.r.e;
(iii) le gain maximal d'antenne permis (pour les dispositifs utilisant la bande de 5725 à 5850 MHz) doit être conforme à la
limite de la p.i.r.e. spécifiée pour l'exploitation point à point et l’exploitation non point à point, selon le cas;
(iv) De plus, les utilisateurs devraient aussi être avisés que les utilisateurs de radars de haute puissance sont désignés utilisateurs principaux (c.-à-d., qu’ils ont la priorité) pour les bandes 5250-5350 MHz et 5650-5850 MHz et que ces radars
pourraient causer du brouillage et/ou des dommages aux dispositifs LANEL.
This device (IC ID: 5534A-GGi13) has been tested to the safety requirements for exposure to radio waves (SAR) in RSS102 to the General Public (Uncontrolled Environment) limits (1.6W/Kg). The highest SAR value for the I–13 device is 1.168
W/kg. This device can be operated safely with a minimum distance 0 cm between the equipment and the user’s body.
This device (IC ID: 5534A-GGi16) has been tested to the safety requirements for exposure to radio waves (SAR) in RSS102 to the General Public (Uncontrolled Environment) limits (1.6W/Kg). The highest SAR value for the I–16 device is 0.656
W/kg.. This device can be operated safely with a minimum distance 0 cm between the equipment and the user’s body.
Ce dispositif (IC ID: 5534A-GGi13) a été testé aux exigences de sécurité pour l’exposition aux ondes radio (SAR) dans le
CNR-102 à le grand public (environnement non contrôlé) des limites (1.6W/Kg). La valeur maximale mesurée de SAR pour
le I–13 dispositif est: 1.168 W/kg. . Ce dispositif peut être exploité en toute sécurité avec un 0cm distance minimale entre
le matériel et les corps de l’utilisateur.
Ce dispositif (IC ID: 5534A-GGi16) a été testé aux exigences de sécurité pour l’exposition aux ondes radio (SAR) dans le
CNR-102 à le grand public (environnement non contrôlé) des limites (1.6W/Kg). La valeur maximale mesurée de SAR pour
le I–16 dispositif est: 0.656 W/kg. . Ce dispositif peut être exploité en toute sécurité avec un 0cm distance minimale entre
le matériel et les corps de l’utilisateur.
This Class B digital apparatus complies with Canadian ICES-003.
Cet appareil numérique de la classe B est conforme à la norme NMB—003 du Canada.
This device complies with Industry Canada license-exempt RSS standard(s). Operation is subject to the following two conditions: (1) this device may not cause interference, and (2) this device must accept any interference, including interference
that may cause undesired operation of the device.
Le présent appareil est conforme aux CNR d'Industrie Canada applicables aux appareils radio exempts de licence. L'exploitation est autorisée aux deux conditions suivantes: (1) l'appareil ne doit pas produire de brouillage, et (2) l'utilisateur de
l'appareil doit accepter tout brouillage radioélectrique subi, même si le brouillage est susceptible d'en compromettre le
fonctionnement.
B4 CE Statement
This equipment complies with the requirements relating to electromagnetic compatibility, the essential protection requirement of Electromagnetic Compatibility (EMC) Directive 2014/30/EU on the approximation of the laws of the Member States
relating to electromagnetic compatibility and Radio Equipment Directive (RED) 2014/53/EU to meet the regulation of the
radio equipment and telecommunications terminal equipment.
Appendix B Compliance Information
48
Tobii Dynavox I-Series User’s manual v.1.0.1 - en-US
Page 49

B5 Directives and Standards
The Tobii Dynavox I-Series complies with the following directives:
● Medical Device Directive 93/42/EEC
● Low voltage Directive 2014/35/EU
● Electromagnetic Compatibility (EMC) Directive 2014/30/EU
● Radio Equipment Directive (RED) 2014/53/EU
● RoHS2 Directive 2011/65/EU
● WEEE Directive 2012/19/EU
● Reach Directive 2006/121/EC, 1907/2006/EC Annex 17
● ISO 14971:2007
● ISO 13485:2016
The device has been tested to comply with IEC/EN 60601-1 Ed 3.1, IEC/EN 60950-1, ISO 14971:2007 and other relevant
standards for the intended markets.
Tobii Dynavox I-Series User’s manual v.1.0.1 - en-US
Appendix B Compliance Information
49
Page 50

Appendix C Computer Device States of
Operation and LED Status
Table C.1 Computer Device States of Operation
Advanced Configuration
and Power Interface (ACPI) State
S0 (Working) Normal operating state - Windows session is running.
S3 (Sleep) The device is sleeping. The Windows session is suspended to RAM, allowing a quick re-
S4 (Hibernate) The device is in hibernation. The Windows session is suspended to the SSD (hard drive)
S5 (Soft Off) Windows is shut down. The device is powered off. Batteries (not drained) and/or AC
G3 (Mechanical Off) All power sources removed (no batteries and no AC adapter attached).
Description
Display will dim and turn off after a time of idle.
sume to state S0 by:
1. Pressing the power button
2. Pressing a button connected to a switch port configured to have power on
functionality
3. Wake on Gaze (if enabled)
The device is consuming a small amount of power in state S3. Fully charged batteries (no
AC adapter attached) will last a minimum of 24 h in state S3.
Windows Critical battery level is monitored in state S3 to prevent the batteries from being
fully drained. The device will enter state S4 (Hibernate) if the critical value is reached.
After a period of inactivity, the device will automatically go into Hibernate (S4)
mode. This is noted by the device momentarily turning on, then hibernating off.
and the device is powered off. The session can be resumed to state S0 by:
1. Pressing the power button
2. Pressing a button connected to a switch port configured to have power on
functionality
adapter attached.
Table C.2 Power Button States of Operation
Device States
If the Power Button
S0 (Working) Normal operating state - Windows session is running.
The Power button will put the device into Standby or force shutdown.
S5 (Soft Off) The device is powered off and Windows is not running.
The Power Button will start up the device and the device will go into Normal operating
state with Windows session running.
Appendix C Computer Device States of Operation and LED
50
Status
is Activated in this State
Tobii Dynavox I-Series User’s manual v.1.0.1 - en-US
Page 51

Table C.3 Status LED
Description
Criteria
Color Status
Battery Charging Blue Light
Battery Fully Charged Green Light
Battery charge is under crit-
Red Blink three (3) times If the battery charge is
ical level
Table C.4 Touch Panel Button LED
Description
Criteria
Color Status
The four (4) touch panel
button LED
White Off / Low / High
The status is set by API
Comment
under the critical level the
device will not start. Please
charge the device for at
least 10 minutes before try-
ing to start the device.
Comment
Tobii Dynavox I-Series User’s manual v.1.0.1 - en-US
Appendix C Computer Device States of Operation and LED
Status
51
Page 52

Appendix D
Technical Specifications
D1 Standard Tobii Dynavox I-Series
Standard Tobii Dynavox I–13 Tobii Dynavox I–16
Type/Model I–13 I–16
Screen 13.3″, LED Backlight Unit,
Brightness: 300 Nits
Screen Resolution 1920 × 1080 pixels (XGA)
Touch Panel Projected Capacitive Touch with Gorilla® Glass, 10 point multi touch
Rear Display 480 × 128 pixels
Dimensions (WxHxD) 34,3 × 24,1 × 8,1 cm
13.5 × 9.5 × 3.2 inches
Weight 2,3 kg
5.0 lbs
Speakers 2 × 10 W Closed Box Speakers
Microphone 1 × Analog Microphone
Processor Intel Core i5–7300U
RAM 8 GB LPDDR4
Operating system Windows 10
Hard disk drive 256 GB, SATA based SSD
2× USB 3.0 (Current limit 1500 mA)
2 × 3.5 mm Switch connector interface, (Pin out for mono plug: Sleeve = Com-
Connectors
1 × 3.5 mm” Headphone jack (stereo) with jack detection
1 × 19 VDC in 2.5/5.5 mm (Power connector)
Buttons 1 × Power On
WLAN (optional) IEEE 802.11 a/b/g/n/ac
Bluetooth (optional) Bluetooth 4.1
Support all standard Windows10 Bluetooth profiles
IR Remote Control (Environmental
Control Unit)
Camera User Camera (back) 8 MP AF (Auto Focus), with flash
Eye Tracker Tobii IS5 Module
Expected Service Life
Battery Run Time
Battery Charge Time Maximum 5.4 h (0-100%)
i
Upright Orientation: 1 × IR filter window with 6 × IR Transmit Diodes
Web Camera (front) 2 MP FF (Fixed Focus)
~9 h ~8 h
mon ground, Tip = Signal)
1 × Volume Up
1 × Volume Down
2 × Programmable
Vishay TSMP77000
5 years
15.6″, LED Backlight Unit
Brightness: 350 Nits
39,1 × 26,9 × 8,1 cm
15.4 × 10.6 × 3.2 inches
2,8 kg
6.3 lbs
Appendix D Technical Specifications
52
Tobii Dynavox I-Series User’s manual v.1.0.1 - en-US
Page 53

Standard Tobii Dynavox I–13 Tobii Dynavox I–16
Type/Model I–13 I–16
Deskstand Integrated
Mounting Systems Supported Tobii Dynavox QR adapter plate for Daessy and REHAdapt
Power Supply 65 W AC adapter
IP class IP54
Pass for device only, with I/O covers in place. Adaptor mode is excluded.
IP22
In adapter mode.
i. Indoor with continuous communication and with Eye Gaze if applicable. ~24 hours with a Power optimized scenario.
D2 Device Power Adapter
Item Specification
Manufacturer FSP Group Inc.
Type Switching Power Adapter
Model FSP065–DBCM1
Input voltage 100 to 240 VAC
Input current (max) 1.0 – 2.0 A
Input frequency 50 to 60 Hz
Output current 3.43 A
Rated output voltage 19.0 VDC
D3 Battery pack
Item Specification Remark
Battery Technology Li-Ion rechargeable battery pack with
Cell 8× Panasonic NCR18650GA
Battery Pack Capacity 95 Wh Initial capacity, new battery pack
Nominal Voltage 14.4Vdc, 6600mAh, 95.04Wh
Charge Time Maximum 5.4 h Charge from 0 to 100%
Cycle Life 500 cycles Minimum 75% of initial capacity
Allowable Operating Temperature 0 – 45 ℃, 45-85%RH Charge condition
Storage Temperature -20 – 35 ℃, 45-85%RH 1 year
gas gauge (SMBus v1.1 interface)
remaining
-20 – 60 ℃, 45-85%RH Discharge condition
-20 – 40 ℃, 45-85%RH 6 months
-20 – 45 ℃, 45-85%RH 1 month
-20 – 50 ℃, 45-85%RH 1 week
Tobii Dynavox I-Series User’s manual v.1.0.1 - en-US
Appendix D Technical Specifications
53
Page 54

Item Specification Remark
Storage Time
i
Maximum 6 months @ charge ≥ 40%
Do not store battery packs
for a long time with less than
40% charge level.
i. It is recommended that the battery shall not be stored in the device if the device is not going to be used within 6 months. If the battery is removed,
the battery will not be drained as quickly as when stored in the device.
D4 Eye Tracker
Technical Specifications
Tobii IS5 Module
Working Distance 45 — 85 cm
18 — 33 inches
Freedom of Head Movement
@ 70 cm / 27.5 inches
(Width x Height)
1
35 × 30 cm
13.8 × 11.8 in
Positioning
Distance (from screen) 45 — 85 cm
17.7 — 33.5 in
Track box size (Width × Height) 20 × 15 — 35 × 30 cm
7.9 × 5.9 — 13.8 × 11.8 in
Track box depth 40 cm
15.7 in
Gaze Data Rate 60 Hz
User Calibration
(former tracking robustness)
>99%
Detect Gaze
Interaction >30Hz 90% for 95% of population
Raw data max frame rate 90% for 95% of population
Gaze Accuracy
Across 95% of population
2
<1.71°
Gaze Precision
Across 95% of population
2
<0.79°
Max Head Movement Speed
Eye Position 40 cm/s (15.7 in/s)
Gaze Data 10 cm/s (3.9 in/s)
Max Head Tilt 25°
Max Yaw, pitch
25°
Data Flow and Data Rate
Gaze Latency
Gaze Recovery
Mounting
Power Supply
17 ms
50 ms
Built-in
Built-in
2
2
1. Freedom of head movement describes the volume in front of the tracker in which the user must have at least one of the eyes. The numbers are
specified parallell/orthogonal to screen surface, assuming eye tracker is at 20 degree angle to screen.
Appendix D Technical Specifications
54
Tobii Dynavox I-Series User’s manual v.1.0.1 - en-US
Page 55

2. The degree-of-accuracy and precision over percentage-of-population numbers result from extensive testing across representatives of the whole
population. We have made use of hundreds of thousands of diagnostic images and performed tests on approximately 800 individuals with different conditions, vision, ethnicities, everyday dust, smudges or blemishes around their eyes, with eyes out of focus, etc. This has resulted in a
much more robust and high performance eye tracking experience and a much more realistic representation of true performance across the
whole population, not just in a mathematically “ideal” scenario.
3. The “ideal” degree numbers are the previous standard of measuring accuracy and precision, both previously from Tobii and presently from all
eye tracking competitors. Though “ideal” numbers are useful to get a general feel about comparative quality and performance, they are not applicable to real world usage in the same way as quantitative degree-of-accuracy and precision over percentage-of-population numbers based on
extensive testing across representatives of the whole population.
Tobii Dynavox I-Series User’s manual v.1.0.1 - en-US
Appendix D Technical Specifications
55
Page 56

Appendix E Maximum Allowed
1
Temperature
Table E.1 Maximum Allowed Temperature
Allowable maximum temperature for the Tobii Dynavox I-Series metal external surfaces
which are likely to be touched
Temperature threshold:
External surfaces temperature allowed
External surfaces temperature allowed in an area unlikely to be touched, see position 1 in Fig-
ure E.1 Temperature Threshold Area, page 56 for the position of these areas.
Figure E.1 Temperature Threshold Area
Do not touch the area specified in Figure E.1 Temperature Threshold Area, page 56 when the Tobii Dynavox ISeries device is running. The specified area can reach temperatures which may cause permanent bodily harm in
the event of prolonged direct skin contact. Use appropriate precautions to avoid injury.
Maximum Tempera-
ture ℃/℉
55/131
60/140
Appendix E Maximum Allowed Temperature
56
Tobii Dynavox I-Series User’s manual v.1.0.1 - en-US
Page 57

Appendix F Approved Accessories
Description Model Tobii Dynavox Part No.
Tobii Dynavox I-Series AC Adapter
(Power Supply)
Battery pack TDG G1 12006939
Stand Adjustable Base I-13/I-16 12006959
For information about the latest approved Tobii Dynavox Accessories, please visit the www.tobiidynavox.com website or
contact your local Tobii Dynavox reseller.
FSP065–DBCM1 12007159
Tobii Dynavox I-Series User’s manual v.1.0.1 - en-US
Appendix F Approved Accessories
57
Page 58

Copyright ©TobiiAB (publ). Not all products and services offered ineach local market. Specifications are subject to change without priornotice. All trademarks are the property of their respective owners.
Support for Your Tobii Dynavox Device
Get Help Online
See the product-specific Support page for your Tobii Dynavox device. It contains up-to-date information about issues and tips & tricks related to the product. Find our Support pages online at: www.TobiiDynavox.com/support-training
Contact Your Solution Consultant or Reseller
For questions or problems with your product, contact your Tobii Dynavox solution consultant or authorized reseller for assistance. They are most familiar with your personal setup and
can best help you with tips and product training. For contact details, visit www.TobiiDynavox.com/contact
#12007957 Tobii Dynavox I-Series User’s manual v.1.0.1 - en-US
 Loading...