

Page 1
6 Configuring the Tobii Dynavox I-Series+
with the I-Series Control Center
The I-Series Control Center is the program on your Tobii Dynavox I-Series+ Device where you can access and change the settings that you have chosen during your first setup with the I-Series Welcome Guide. You can also run the Welcome Guide
again at any time of your choosing.
To open the I-Series Control Center:
ͻ Double-click on the I-Series Control Center shortcut on the desktop,
or
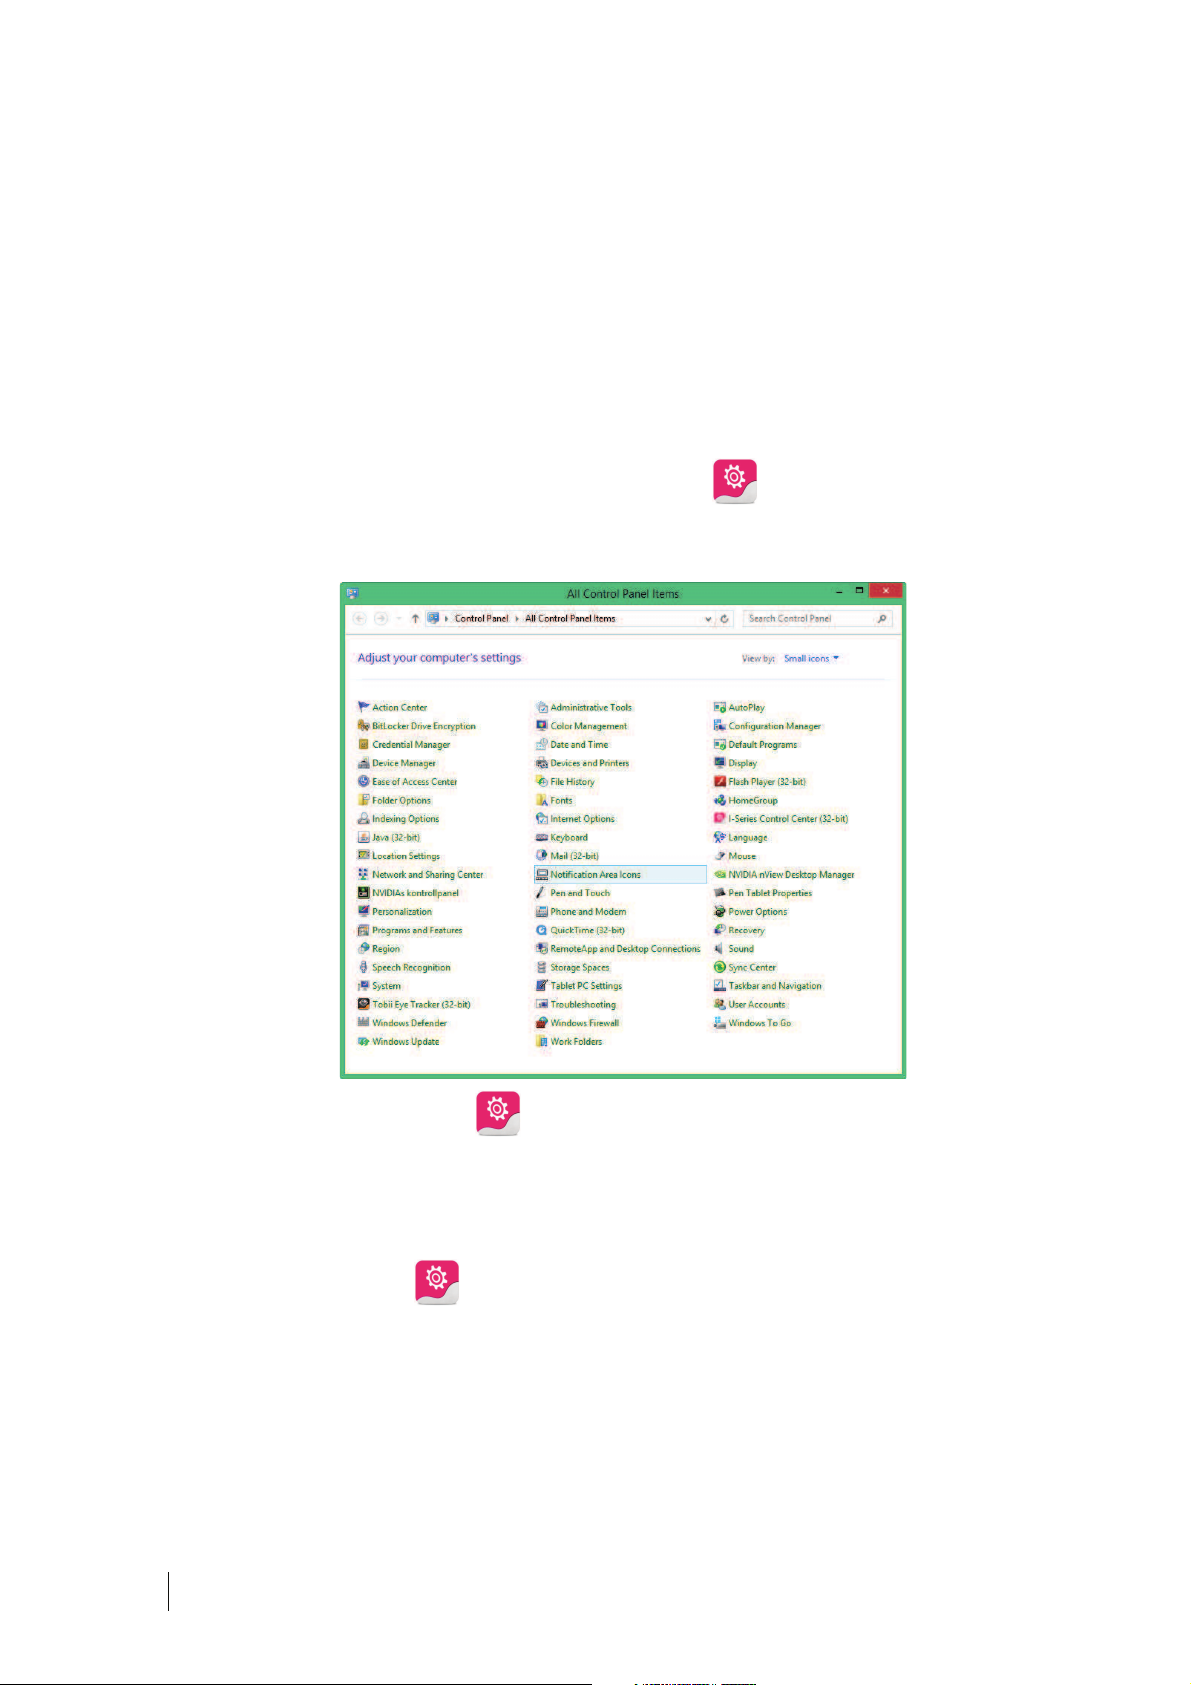
1. Go to Start menu > Control Panel.
.
2. Double-click I-Series Control Center, , if the Control Panel is in Classic View.
If the Control Panel is in Category view, select View by: > Small icons or Large icons, and Double-click
I-Series Control Center
or
1. Go to Start menu > Tobii Dynavox.
2. Click I-Series Control Center,
or
ͻ Through the communication software installed on the device
6 Configuring the Tobii Dynavox I-Series+ with the I-Series
46
Control Center
.
Tobii Dynavox I-Series+ Users manual v.1.0 - en-US
Page 2
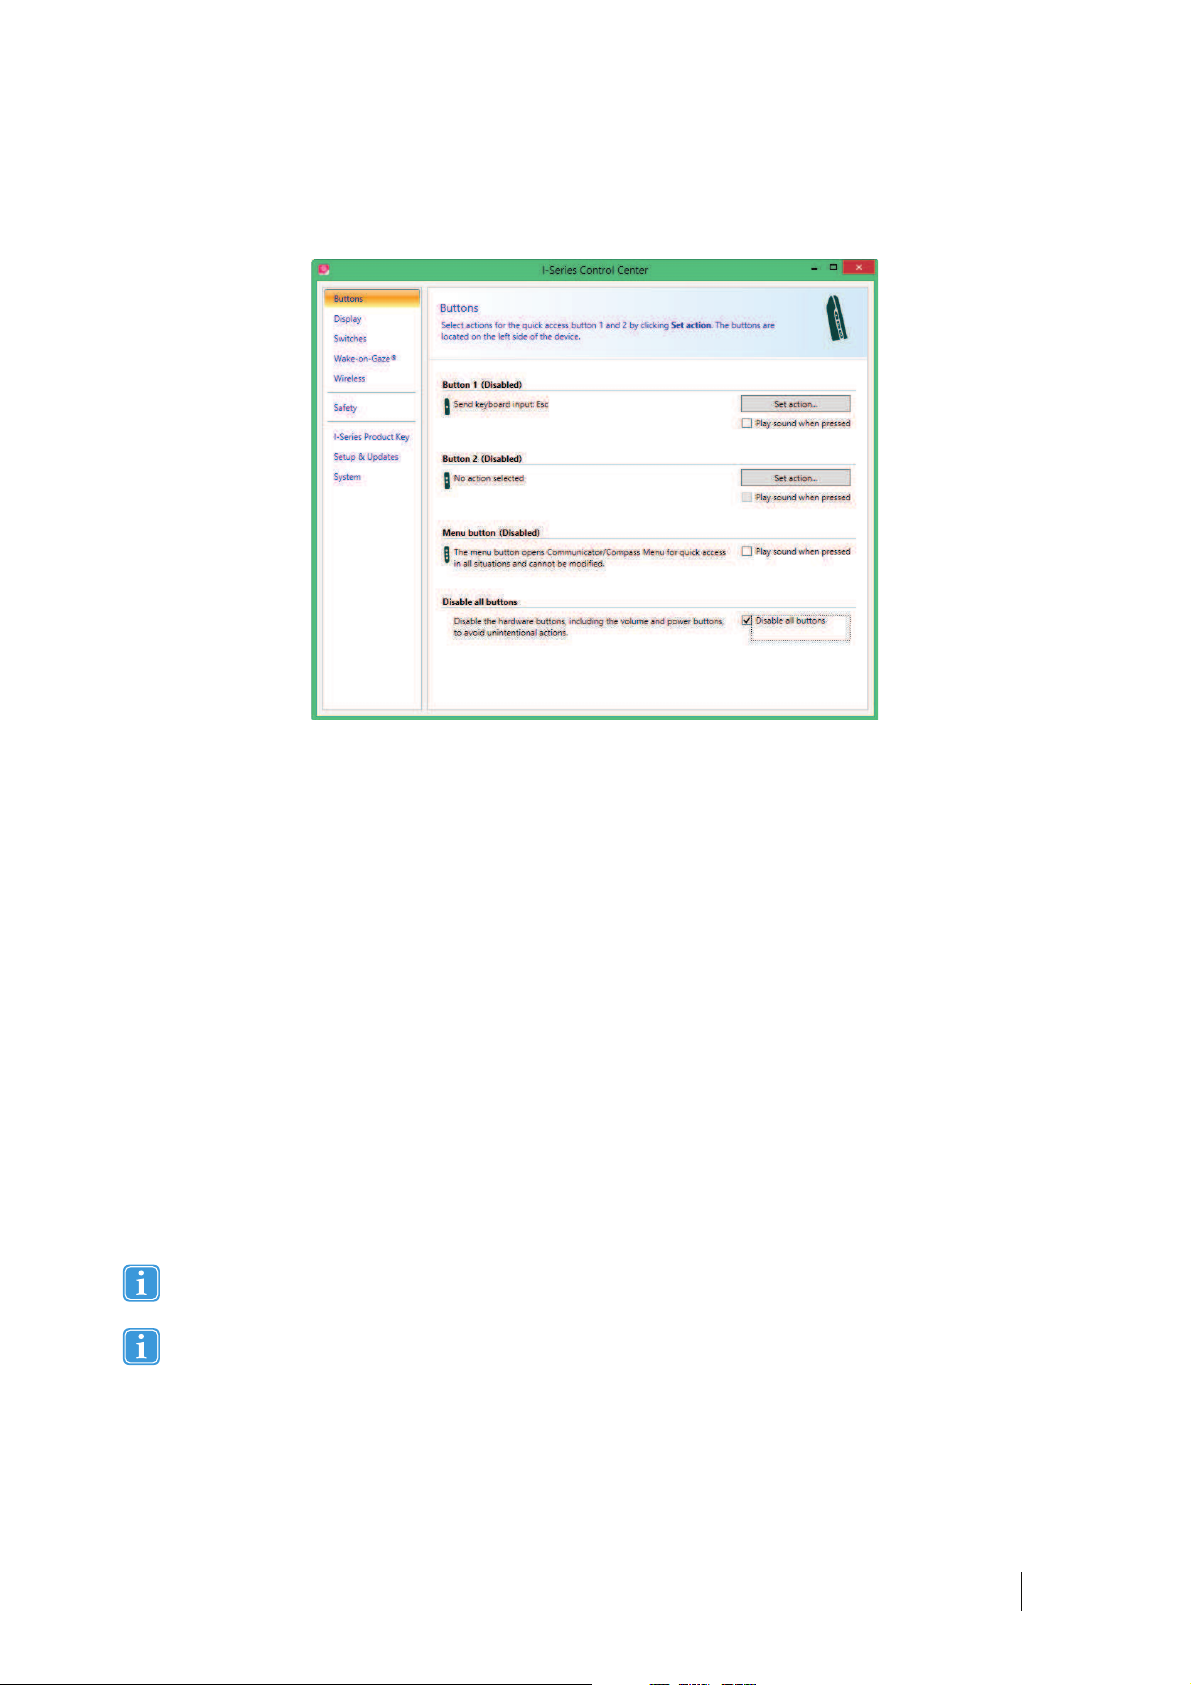
6.1 Buttons
You can create shortcuts to tasks, called actions, by programming the Quick Access buttons. The Quick Access buttons are located on the left side of the Tobii Dynavox I-Series+ device, named 1, 2 and Menu.
For more information about how to program an action for a button, see 6.10 Creating Shortcuts to Actions, page 58
6.1.1 Play Sound when Pressed
To enable Play sound when pressed:
1. Open the I-Series Control Center > Button.
2. Select the Play sound when pressed check box to allow Audio feedback when the button is activated.
To disable Play sound when pressed:
1. Open the I-Series Control Center > Button.
2. Select to clear the Play sound when pressed check box.
6.1.2 Disable All Buttons
To avoid unintentional actions, all buttons on the Tobii Dynavox I-Series+ device can be disabled.
To Disable all buttons:
1. Open the I-Series Control Center > Button.
2. Select the Disable All Buttons check box.
The Power button will work for starting the device even if all buttons are disabled.
Pressing the Power button for more than 7 seconds will shut down the device immediately, disregarding any unsaved
changes, even if all buttons are disabled.
To Enable all buttons:
1. Open the I-Series Control Center >Button.
2. Select to clear the Disable All Buttons check box to allow all buttons again.
Tobii Dynavox I-Series+ Users manual v.1.0 - en-US
6 Configuring the Tobii Dynavox I-Series+ with the I-Series
Control Center
47
Page 3
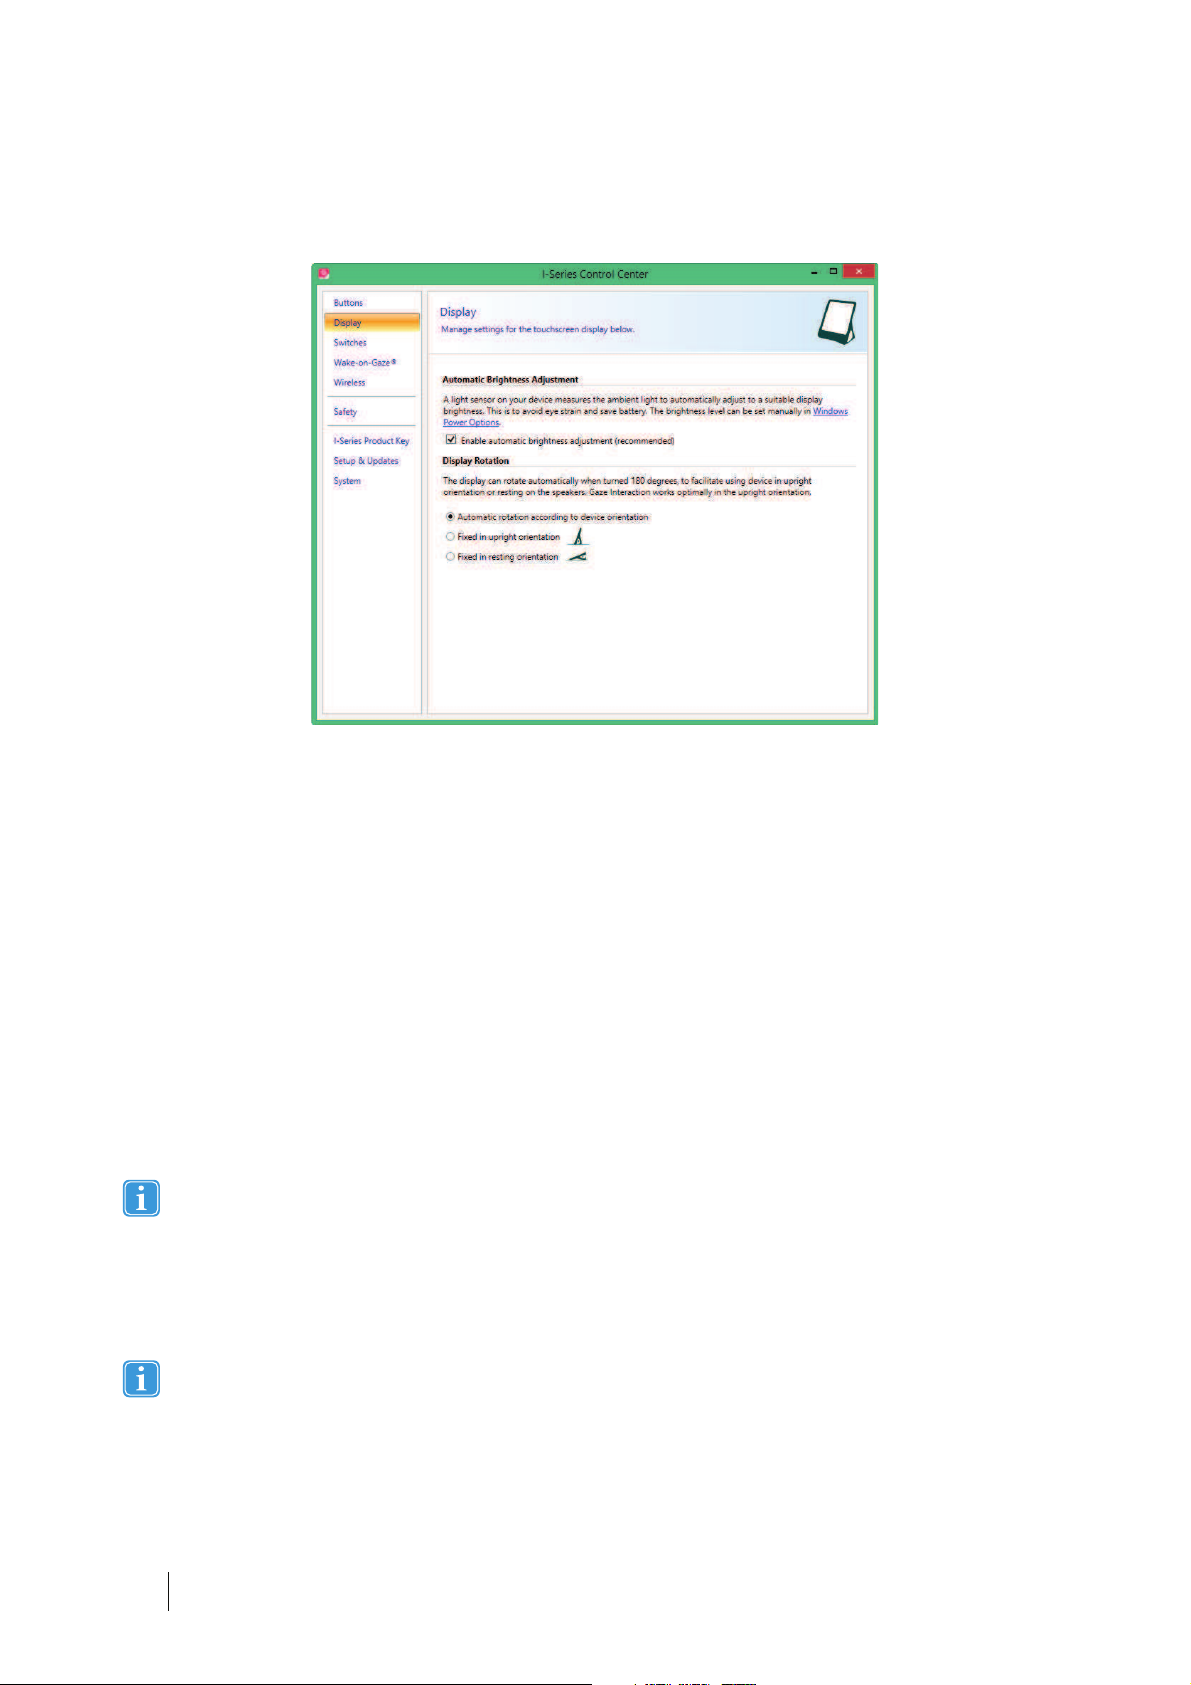
6.2 Display
6.2.1 Brightness Adjustment
There is a sensor on the device which will automatically adjust the screen brightness according to the surrounding light, relative
to the selected level from Windows®.
To disable Automatic Brightness Adjustment:
1. Open the I-Series Control Center > Display.
2. Select to clear the Enable automatic brightness adjustment (recommended) check box.
To enable Automatic Brightness Adjustment:
1. Open the I-Series Control Center > Display.
2. Select the Enable automatic brightness adjustment (recommended) check box.
To manually adjust Brightness:
1. Open the I-Series Control Center > Display.
2. Select the Windows Power Options link.
3. Make the Brightness adjustments
Using a darker setting can improve battery runtime.
6.2.2 Display Rotation
The display can rotate automatically when turned 180 degrees, to facilitate using device in Upright orientation or Resting on the
speakers.
With the Automatic display rotation activated, it could take a couple of seconds (the screen could also turn black) before the display is rotated.
To enable Automatic rotation according to device position:
1. Open the I-Series Control Center > Display.
2. Select the Automatic rotation according to device orientation radio button.
6 Configuring the Tobii Dynavox I-Series+ with the I-Series
48
Control Center
Tobii Dynavox I-Series+ Users manual v.1.0 - en-US
Page 4
The external display will rotate when the Tobii Dynavox I-Series+ is rotated if the Tobii Dynavox I-Series+ is set up like
this:
ͻ External display connected via HDMI
ͻ The Tobii Dynavox I-Series+ is set to Automatic rotation in I-Series Control Center
ͻ Dual screens is set to Clone/Duplicate mode in Windows
To be able to rotate the Tobii Dynavox I-Series+ without rotating the external display, set the Dual screen to Extended
mode in Windows. In Extended mode the rotation function is independent on each display.
To set Fixed device position:
1. Open the I-Series Control Center > Display.
2. Select the Fixed in upright orientation or the Fixed in resting orientation radio button.
Gaze Interaction is optimized to work properly in the Upright orientation.
For more information about Upright orientation and Resting orientation, see 1.3.1 Portable Use, page 9.
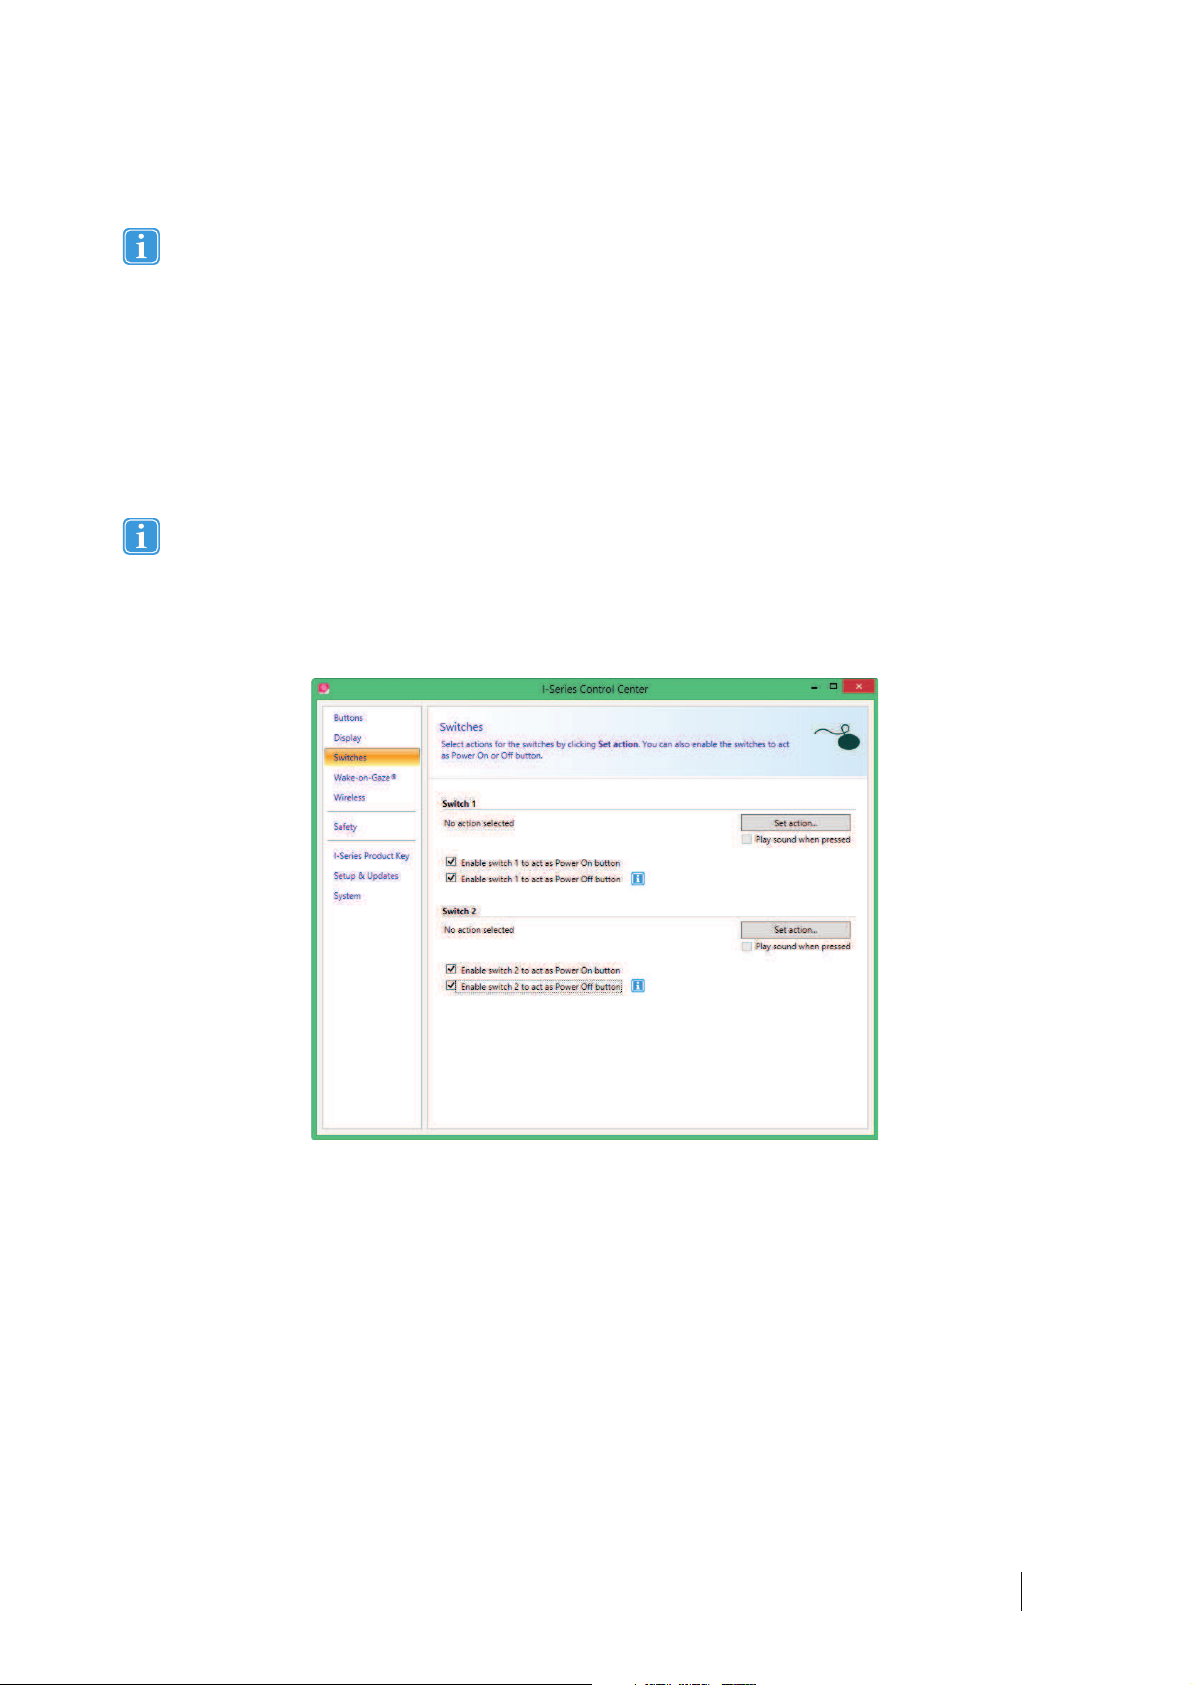
6.3 Switches
You can enable the switches to act as power ON (see 6.3.2 Configuring a Switch to Power On, page 50) or OFF (see 6.3.3
Configuring a Switch to Power Off, page 50) button.
Select the Play sound when pressed checkbox to allow Audio feedback when the switch is activated.
Select actions for the switches by selecting Set action.
For more information about how to program an action for a Switch, see 6.10 Creating Shortcuts to Actions, page 58
6.3.1 Play Sound when Pressed
To enable Play sound when pressed:
1. Open the I-Series Control Center >Button.
2. Select the Play sound when pressed check box to allow Audio feedback when the button is activated.
To disable Play sound when pressed:
1. Open the I-Series Control Center > Button.
6 Configuring the Tobii Dynavox I-Series+ with the I-Series
Tobii Dynavox I-Series+ Users manual v.1.0 - en-US
Control Center
49
Page 5
2. Select to clear the Play sound when pressed check box.
6.3.2 Configuring a Switch to Power On
To enable a connected Switch to power on the device:
1. Open the I-Series Control Center > Switches.
2. Select the Enable switch 1 or 2 to act as Power On Button check box.
To disable a connected Switch to power on the device:
1. Open the I-Series Control Center > Switches.
2. Select to clear the Enable switch 1 or 2 to act as Power On Button check box.
6.3.3 Configuring a Switch to Power Off
To enable a connected Switch to power off the device:
1. Open the I-Series Control Center > Switches.
2. Select the Enable switch 1 or 2 to act as Power Off Button check box.
To disable a connected Switch to power off the device:
1. Open the I-Series Control Center > Switches.
2. Select to clear the Enable switch 1 or 2 to act as Power Off Button check box.
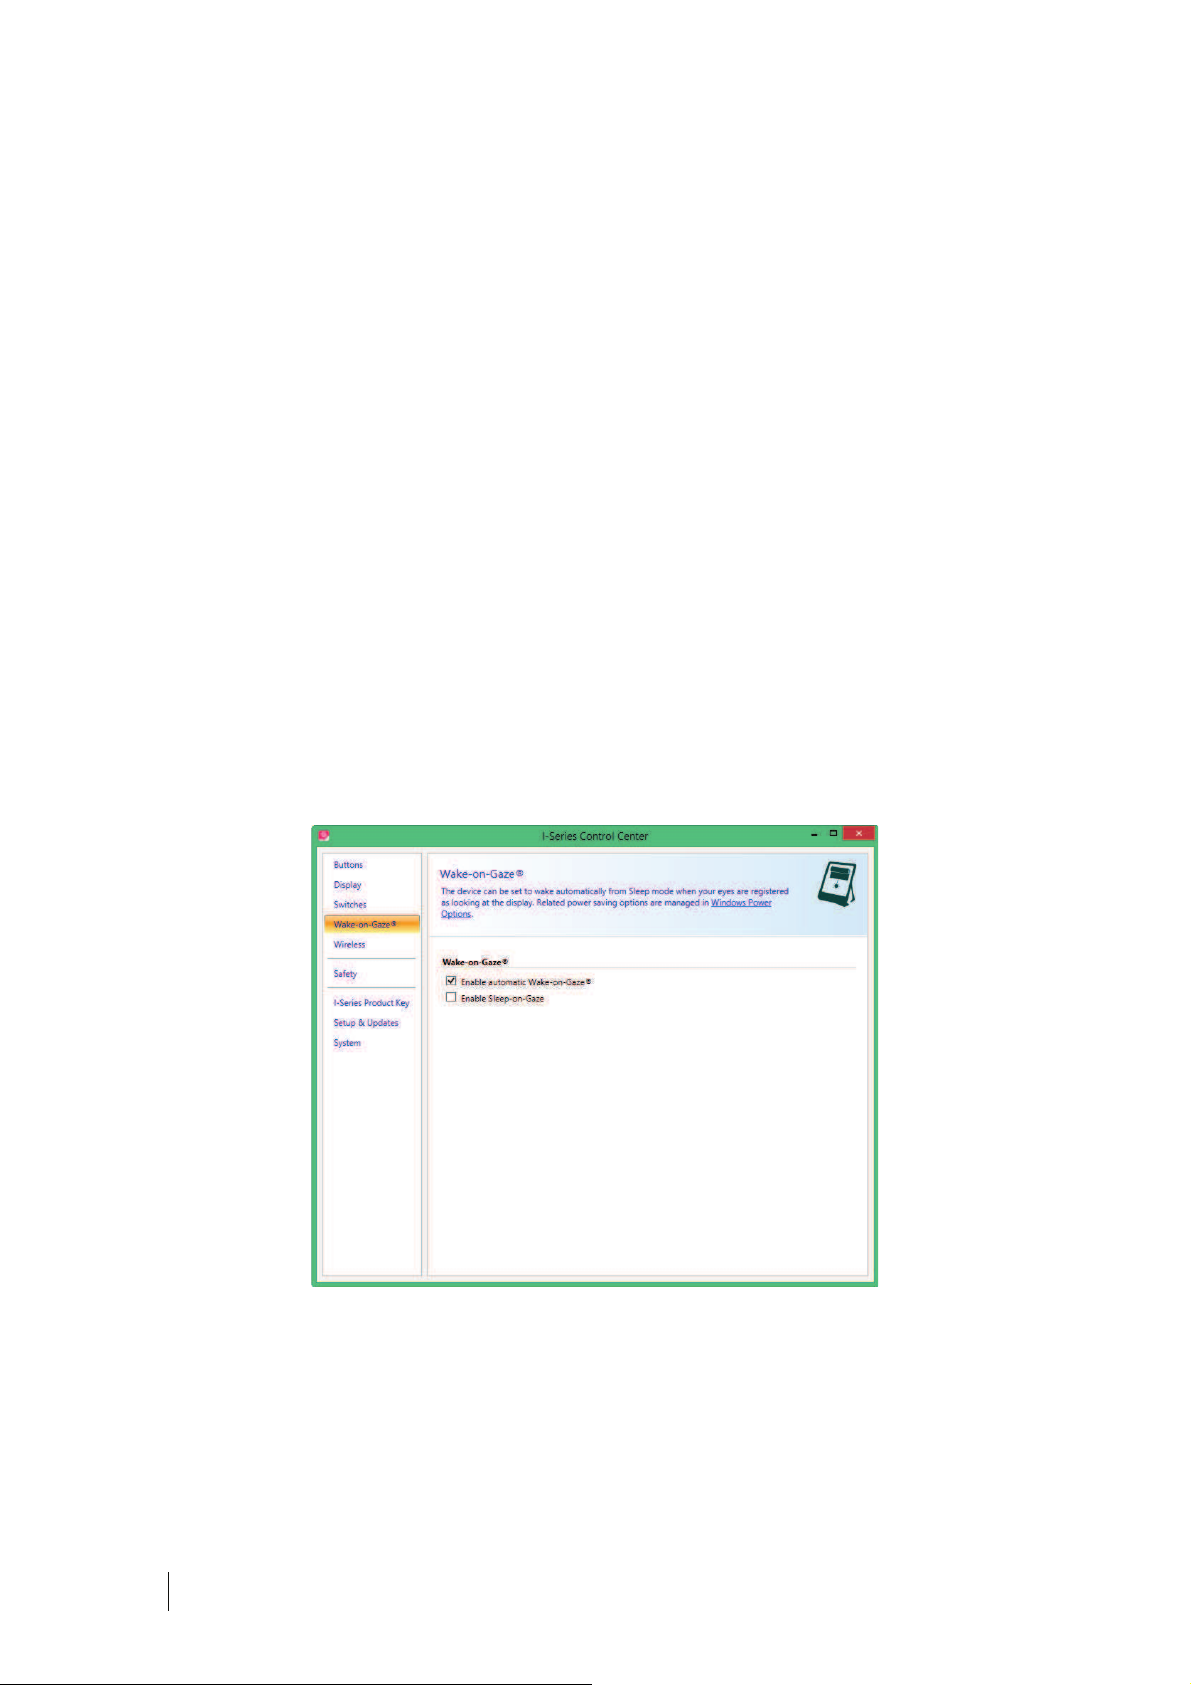
6.4 Wake-on-Gaze®
The Tobii Dynavox I-Series+ device can be set to wake automatically from Sleep mode when your eyes are registered as looking
at the display.
To enable Wake-on-Gaze for the device:
1. Open the I-Series Control Center > Wake-on-Gaze.
2. Select the Enable automatic Wake-on-Gaze check box.
3. Select Windows Power Options link to adjust the Power Options (if needed)
6 Configuring the Tobii Dynavox I-Series+ with the I-Series
50
Control Center
Tobii Dynavox I-Series+ Users manual v.1.0 - en-US
Page 6
To disable Wake-on-Gaze for the device:
1. Open the I-Series Control Center > Wake-on-Gaze.
2. Select to clear the Enable automatic Wake-on-Gaze check box.
For information about how to use Wake-on-Gaze®, see 5.5 Wake the Tobii Dynavox I-Series+ from Sleep with
Gaze Interaction, page 41.
The Tobii Dynavox I-Series+ device can also be set to go to sleep using your gaze (to reduce battery consumption, or in situations where the device is not needed).
To enable Sleep-on-Gaze for the device:
1. Open the I-Series Control Center > Wake-on-Gaze.
2. Make sure Wake-on-Gaze is activated
3. Select the Enable Sleep-on-Gaze check box.
To disable Wake-on-Gaze for the device:
1. Open the I-Series Control Center > Wake-on-Gaze.
2. Select to clear the Enable Sleep-om-Gaze check box.
For information about how to use Sleep-on-Gaze®, see 5.5 Wake the Tobii Dynavox I-Series+ from Sleep with
Gaze Interaction, page 41.
6.5 Wireless
6.5.1 WLAN
The built-in WLAN (Wireless Local Area Network) support enables connection to wireless networks (such as Wi-FiΡ networks
and access points) in compliance with the standard 802.11 b/g/n for both the Iʹ12+ and the Iʹ15+.
6.5.1.1 Handling Tobii Dynavox Product Key
To be able to use WLAN communication, a I-Series Product Key is required. To view or enter a I-Series Product Key, go to the
I-Series Product Key section in the I-Series Control Center. See 6.7 I-Series Product Key, page 54
Tobii Dynavox I-Series+ Users manual v.1.0 - en-US
6 Configuring the Tobii Dynavox I-Series+ with the I-Series
Control Center
51
Page 7
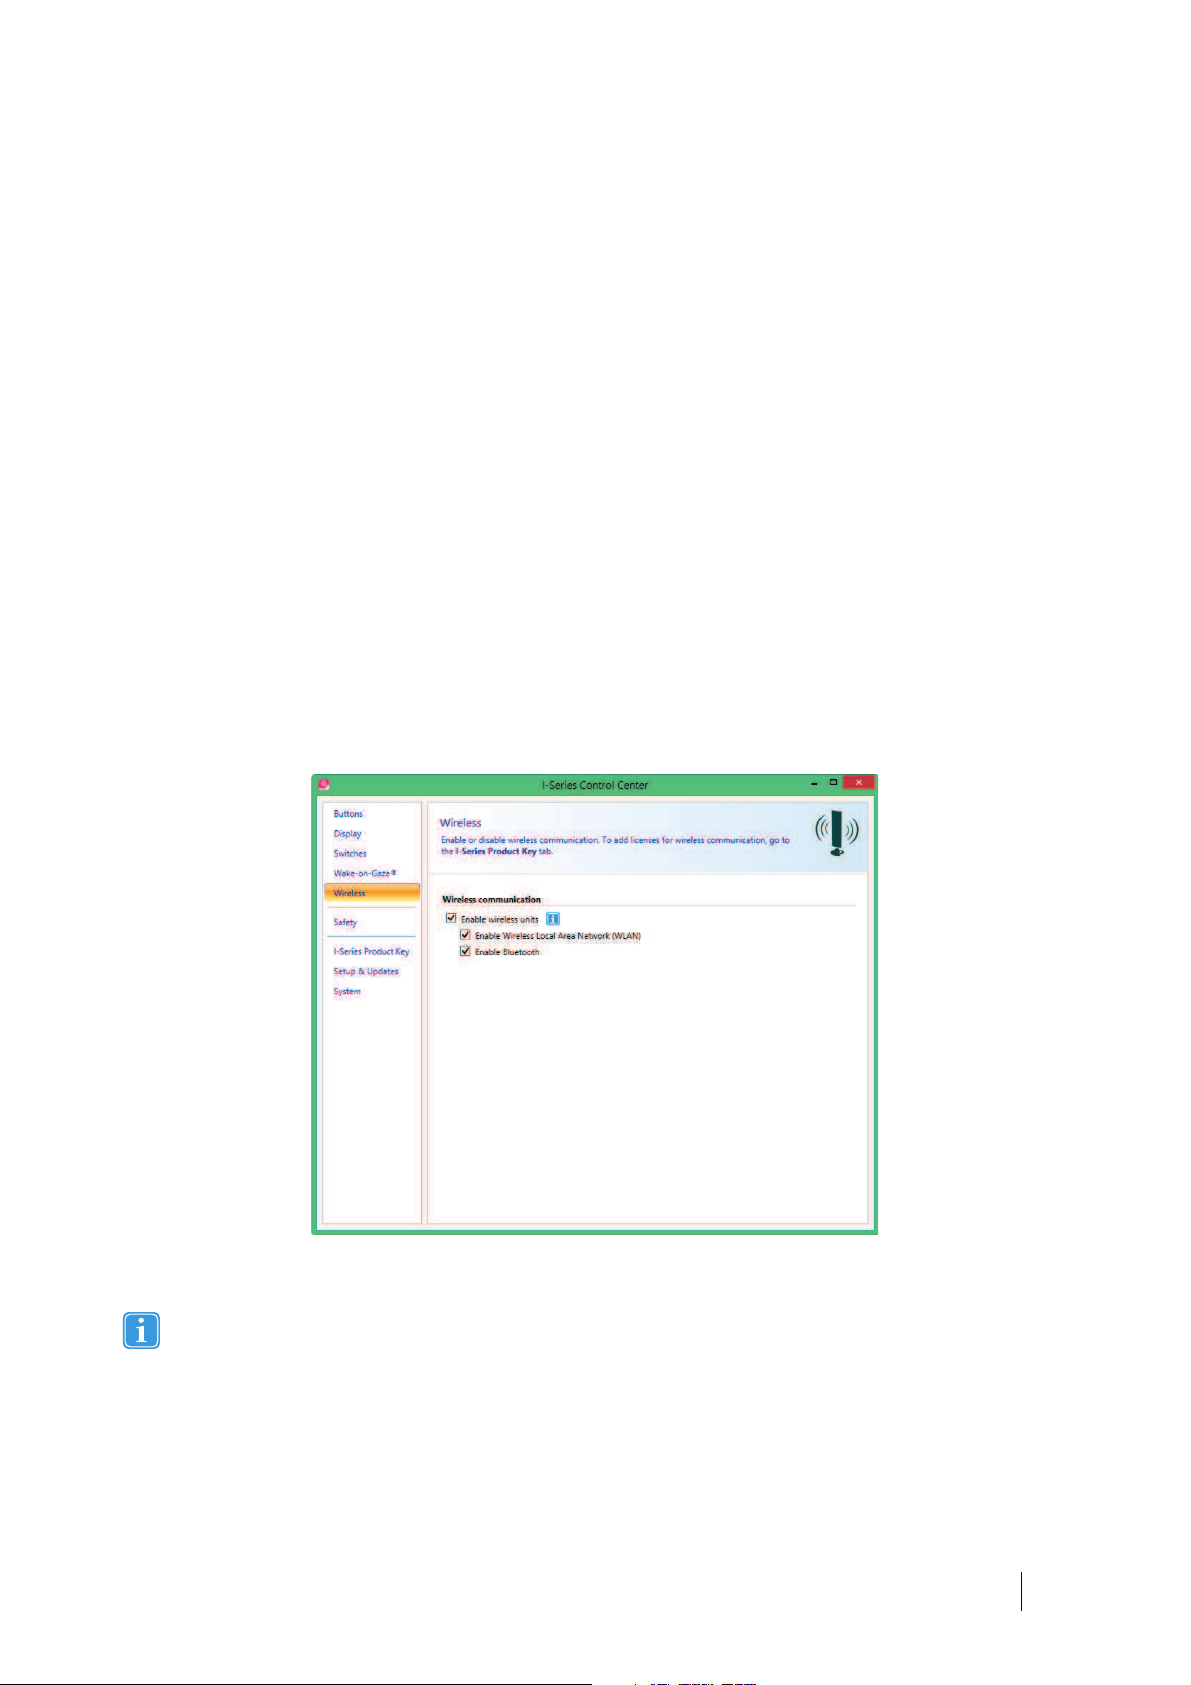
6.5.1.2 Enabling and Disabling the WLAN Communication
To enable WLAN communication:
1. Open the I-Series Control Center > Wireless.
2. Select the Enable Wireless Local Area Network (WLAN) check box.
To disable WLAN communication:
1. Open the I-Series Control Center > Wireless.
2. Clear the Enable Wireless Local Area Network (WLAN) check box or select the Disable all wireless units check
box for disabling all wireless units.
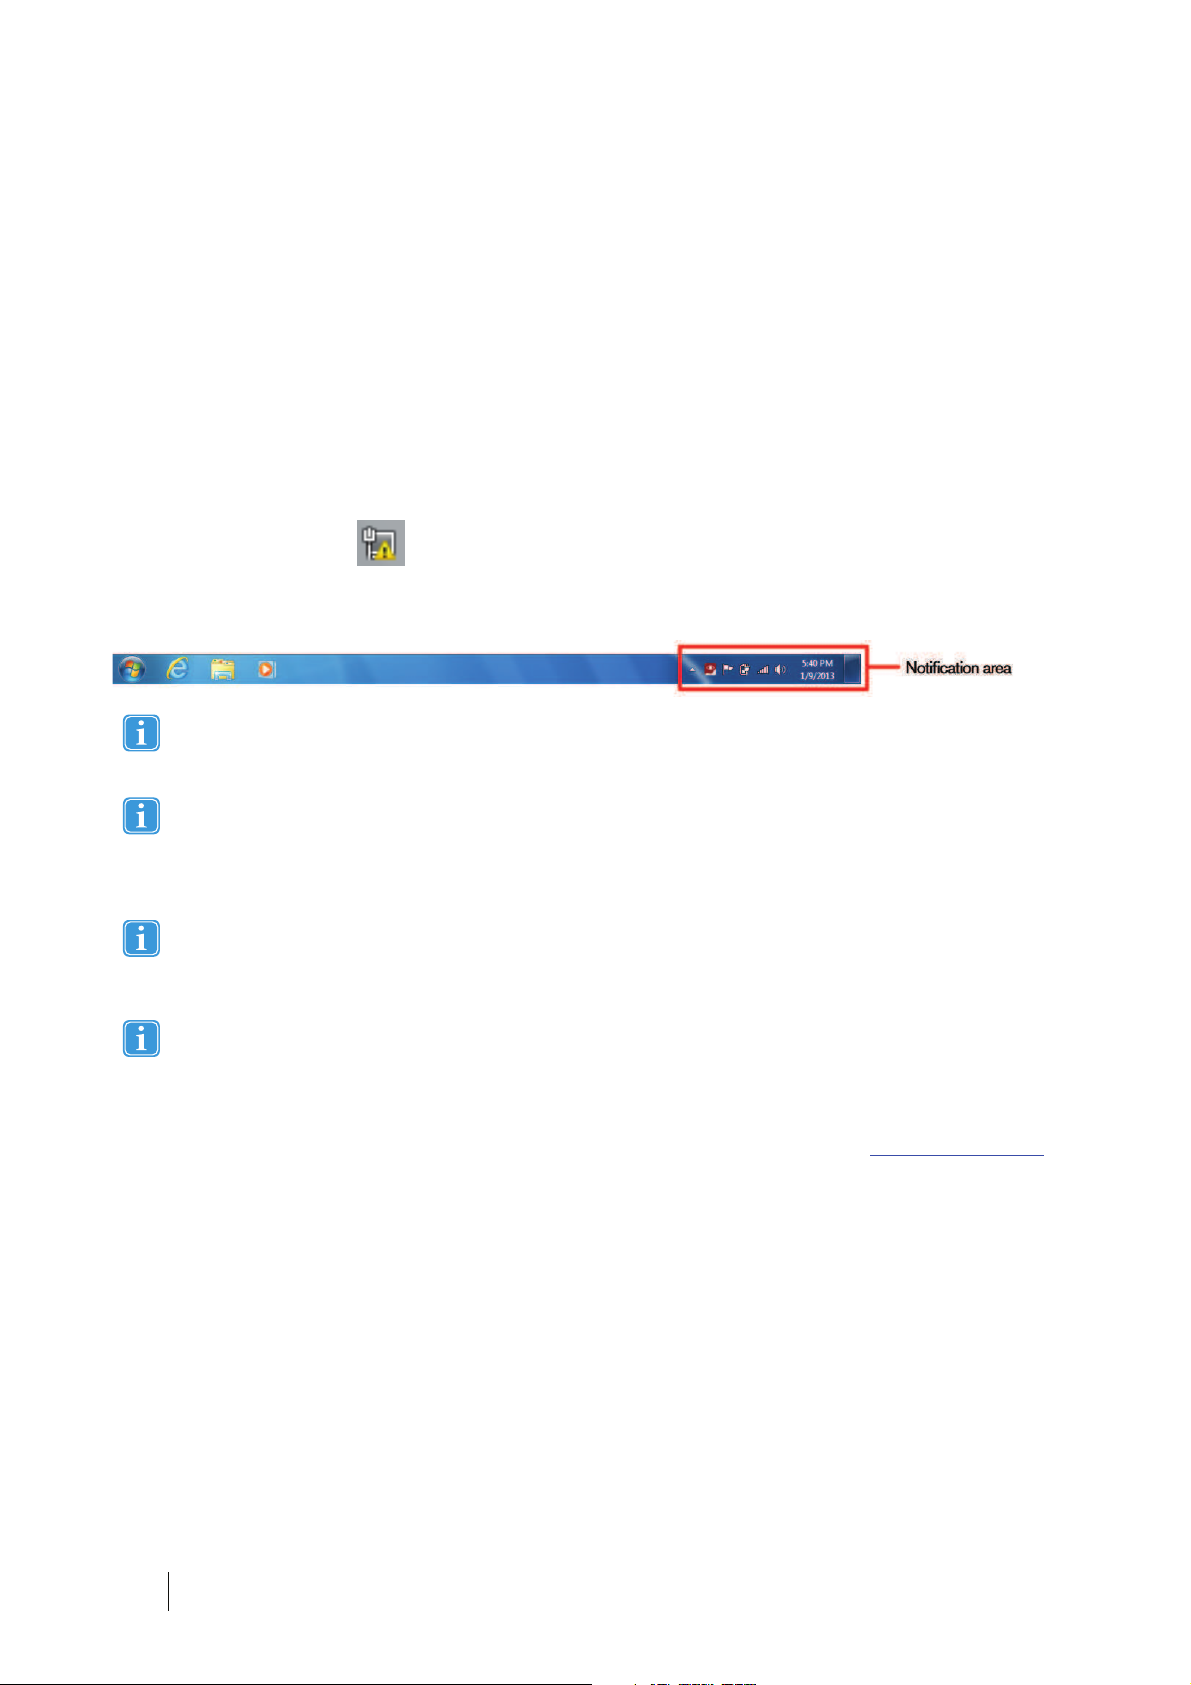
6.5.1.3 Connecting to a WLAN
1. Click on the WLAN icon, , in the Notification area on the Desktop.
2. Select Connect to a network.
3. Select a network to connect to.
A wireless access point which supports antenna diversity is recommended when setting up a wireless network to use
with a Tobii Dynavox I-Series+ device, for reliable performance. Such access points are generally recognized by having two antennas on the router device.
Using an antivirus program is strongly recommended.
6.5.2 Bluetooth® for Mobile Phone Communication
The built-in Bluetooth® enables connection to a mobile phone which complies with mobile Bluetooth® standards.
Only for use with Tobii Dynavox Communicator for mobile phone communication.
For more information about how to use and program an Mobile phone to work with Bluetooth® on the Tobii Dynavox I-Series+
device, see Tobii Dynavox Getting Started Communicator 5.
For information about the Mobile phones that complies with the Tobii Dynavox I-Series+ device, see
6.5.2.1 Handling I-Series Product Key
To use Bluetooth® communication in the device, a I-Series Product Key is required. To view or enter a I-Series Product Key, go
to the I-Series Product Key section in the I-Series Control Center. See 6.7 I-Series Product Key, page 54
6.5.2.2 Enabling and Disabling Bluetooth® Communication
To enable Bluetooth® communication:
1. Open the I-Series Control Center > Wireless.
2. Select the Enable Bluetooth check box.
To disable Bluetooth® communication:
1. Open the I-Series Control Center > Wireless.
2. Clear the Enable Bluetooth check box or select the Disable all wireless units check box for disabling all wireless
units.
www.tobiidynavox.com
6 Configuring the Tobii Dynavox I-Series+ with the I-Series
52
Control Center
Tobii Dynavox I-Series+ Users manual v.1.0 - en-US
Page 8
6.5.2.3 Connecting to a Bluetooth® Device
For more information see Getting Started with Essentials for Communicator 4.
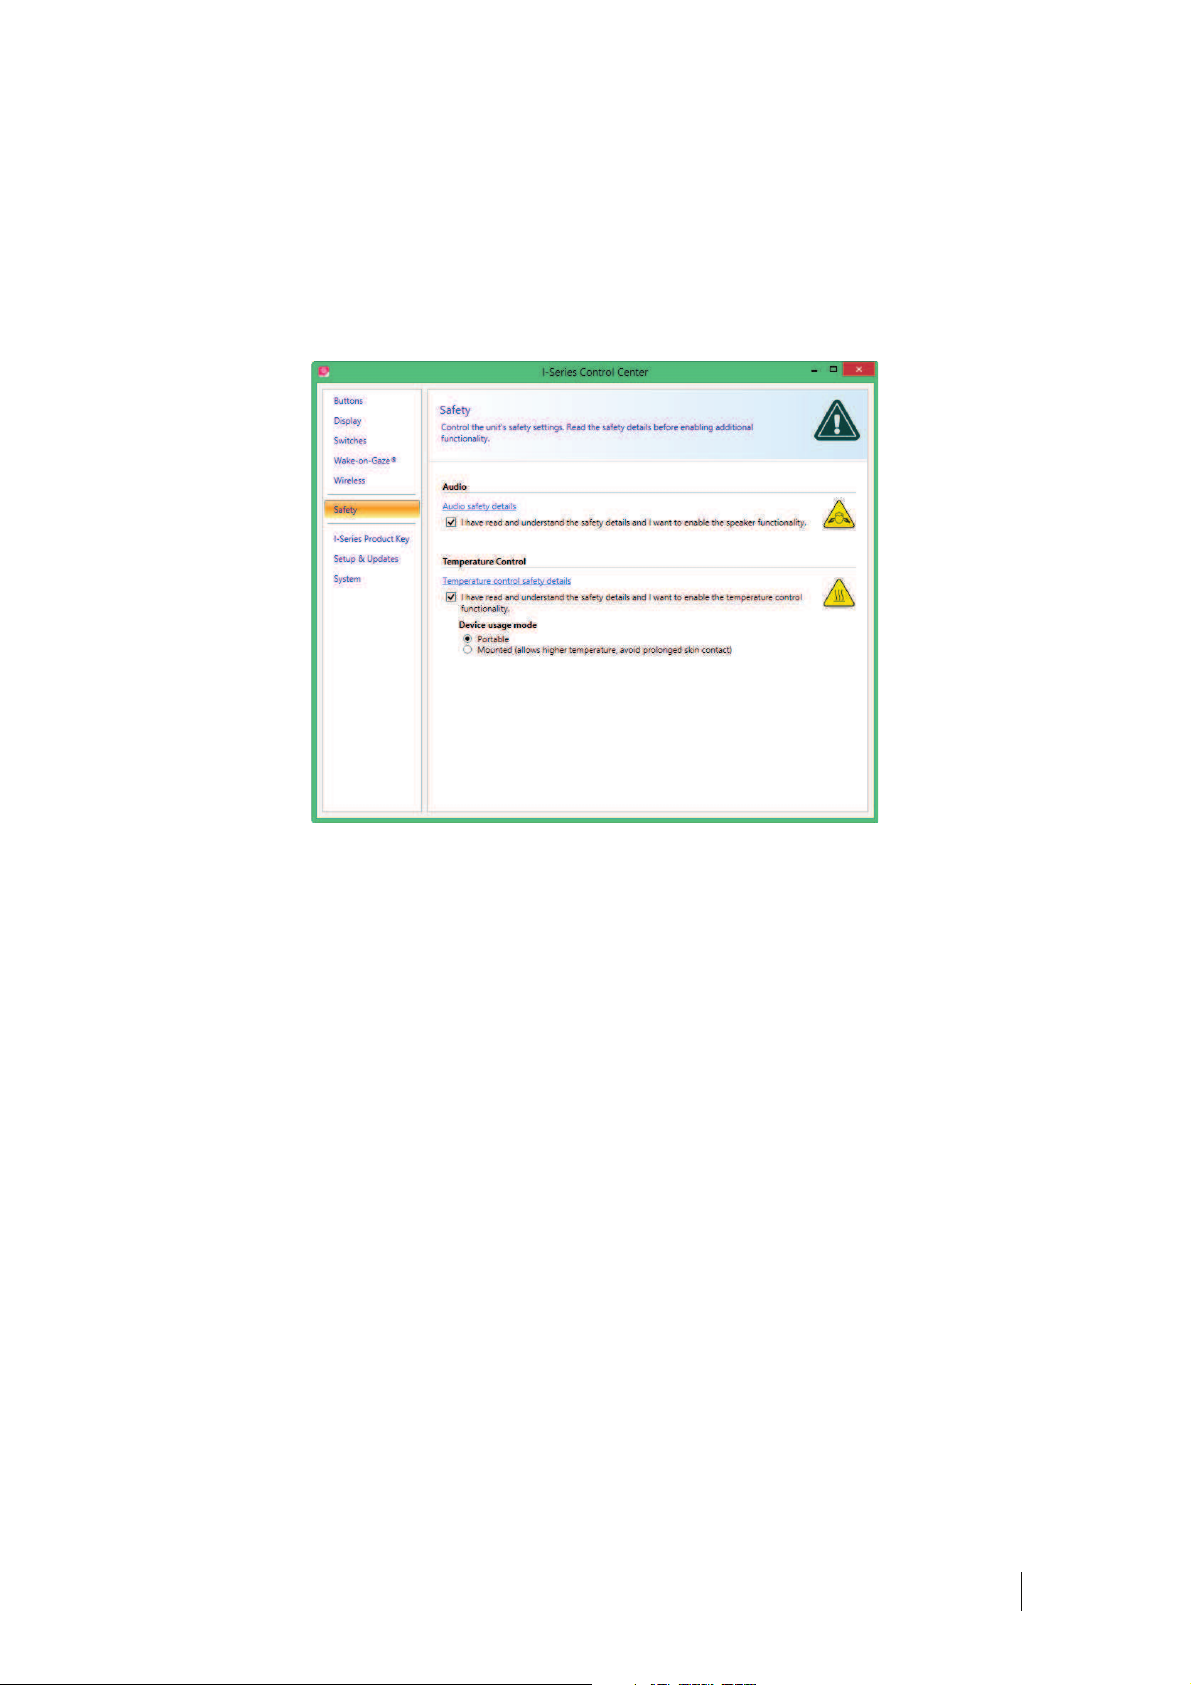
6.6 Safety
Upon starting the device for the first time, the safety settings in the I-Series Control Center will be a part of the I-Series Welcome Guide. To be able to run through the guide these safety settings must be confirmed. The safety settings exist for the safety
of the customer. Be sure to read the safety details before accepting any changes.
6.6.1 Audio
Before you can use the speaker functionality and adjust speaker output settings you need to confirm the Audio safety details (if
not already done during first start up).
To confirm:
1. Open the I-Series Control Center > Safety
2. Click on the Audio safety details text. A new dialog box opens and displays the safety text. Please read this
thoroughly.
3. Select the I have read and understand the safety details and I want to enable the speaker functionality
check box to confirm that you have read and understood the safety text.
6.6.2 Temperature Control
Before you can set the device usage in I-Series Control Center > Temperature Control you need to confirm the Temperature control safety details (if not done during first start up).
To confirm:
1. Open the I-Series Control Center > Safety
2. Click on the Temperature Control safety details text. A new dialog opens and displays the safety text. Please read
this thoroughly.
3. Select the I have read and understand the safety details and I want to enable the temperature control func-
tionality check box to confirm that you have read and understood the safety text.
Tobii Dynavox I-Series+ Users manual v.1.0 - en-US
6 Configuring the Tobii Dynavox I-Series+ with the I-Series
Control Center
53
Page 9

You can use the device in a portable or mounted mode. Your choice will affect the maximum allowed device temperature. While having the device mounted, it is allowed to run at a higher temperature.
Both the Iʹ12+ and the Iʹ15+ can be used both as a portable and mounted device and can be operated in both portable and mounted mode.
If the device is gets overheated the device will shut down. It may take a while before it can be restarted as the unit
may first need time to cool down. If the device is still too hot, the power button will flash purple for a couple of seconds when trying to restart the Tobii Dynavox I-Series+ device. For more information, see Appendix C Computer De-
vice States of Operation, page 85 and Table D.1 Maximum Allowed Temperature, page 87.
6.6.2.1 Device Usage
Specifying device usage mode takes place outside of the Safety settings but within I-Series Control Center.
To specify device usage:
1. Open the I-Series Control Center > Safety.
2. Click on preferred option for Device usage.
ͻ Portable Ͷ Portable mode sets the maximum device temperature shut down limit to a lower temperature, reducing
the risk for permanent bodily harm cased by prolonged exposure to the skin
ͻ Mounted Ͷ Mounted mode sets the maximum device temperature to a higher temperature shut down limit
For more information, see Table D.1 Maximum Allowed Temperature, page 87
6.7 I-Series Product Key
The following features on the Tobii Dynavox I-Series+ needs a licence for use:
ͻ Eye tracker
ͻ Bluetooth®
ͻ WLAN
ͻ IR
ͻ Tobii Dynavox Communicator
ͻ Tobii Dynavox Compass
To view existing I-Series Product Key:
ͻ Open the I-Series Control Center > I-Series Product Key.
6 Configuring the Tobii Dynavox I-Series+ with the I-Series
54
Control Center
Tobii Dynavox I-Series+ Users manual v.1.0 - en-US
Page 10
If the symbol is visible after a feature, the I-Series Product Key(s) on the device are valid for that feature.
To add a I-Series Product Key:
1. Open the I-Series Control Center > I-Series Product Key.
2. In the Enter a I-Series product key box, type the new I-Series Product Key.
To type the I-Series Product Key use either a connected keyboard or enable the on-screen keyboard by selecting this button
.
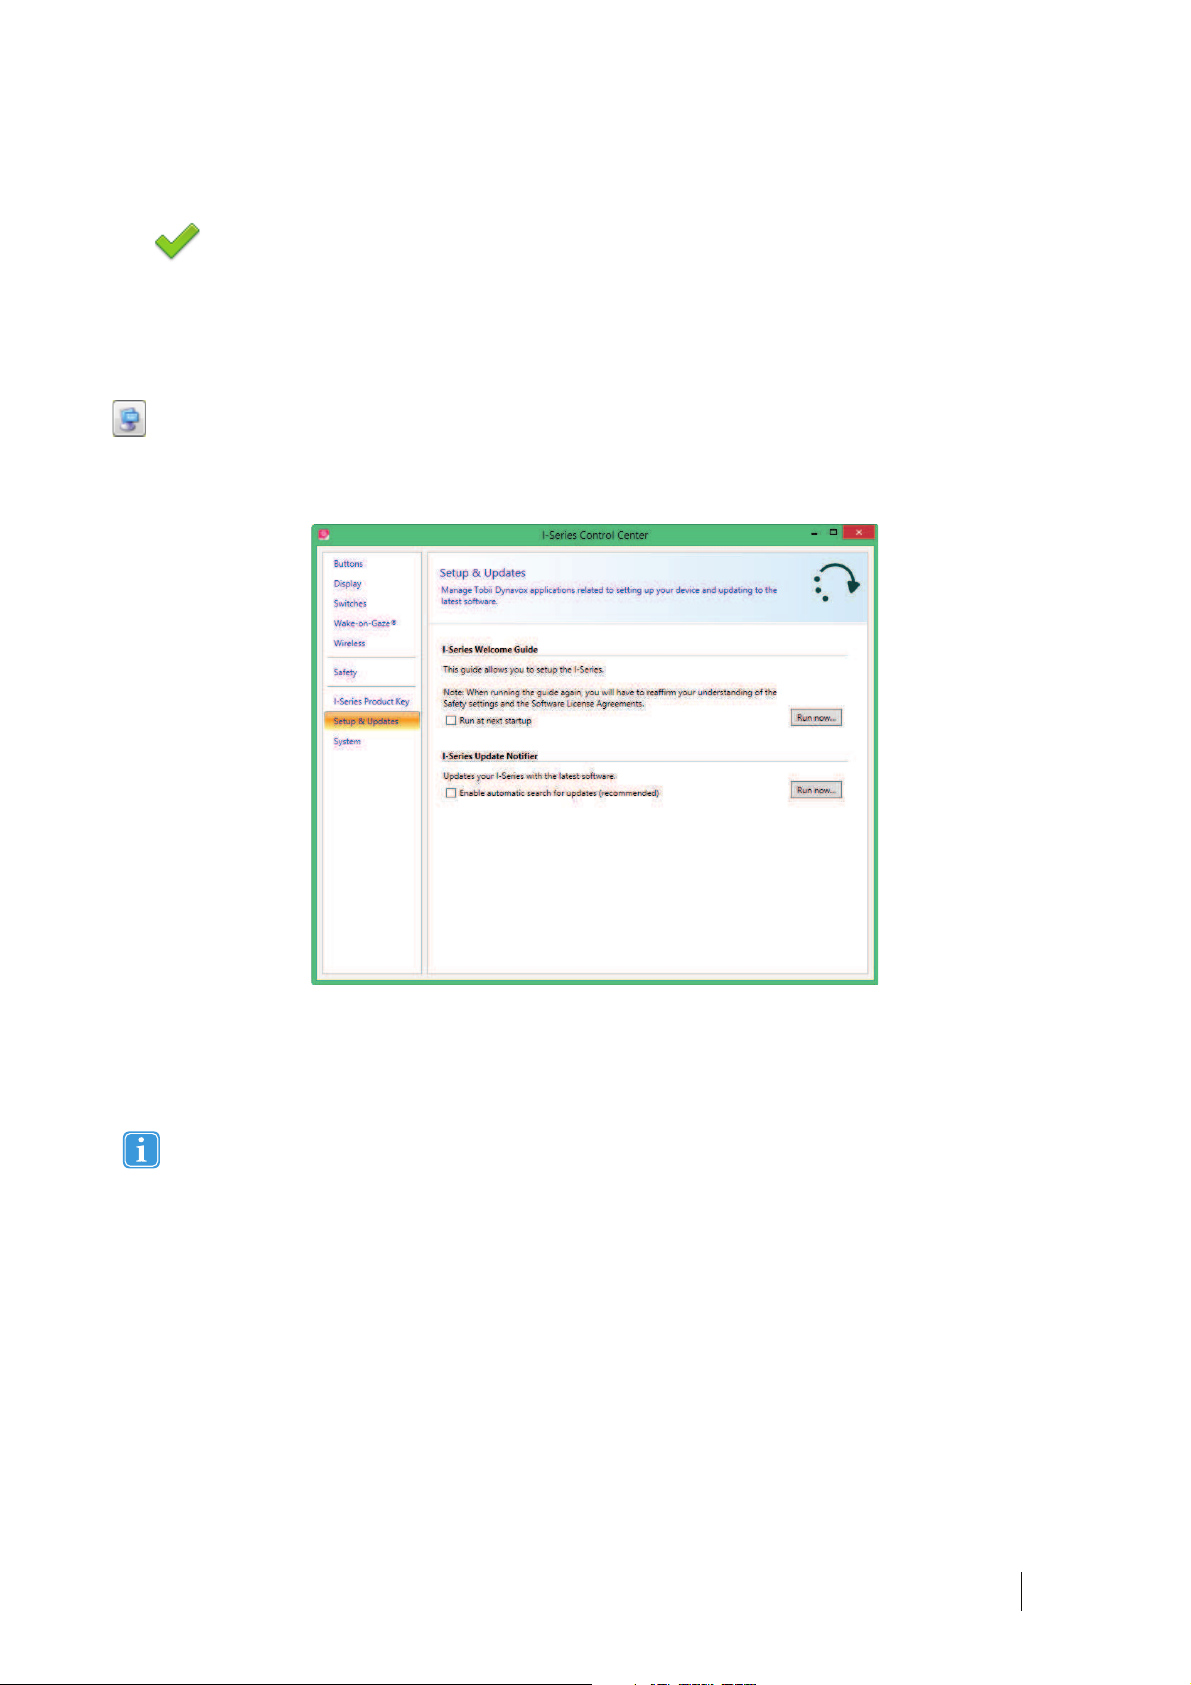
6.8 Setup & Updates
Manage Tobii Dynavox applications related to setting up your device and updating to the latest software.
6.8.1 I-Series Welcome Guide
The I-Series Welcome Guide guides the user through the setup procedure, such as License Agreement and Safety Setting etc.
If the I-Series Welcome Guide is not finished, it will automatically start up next time the Tobii Dynavox I-Series+ is
powered up.
To run the I-Series Welcome Guide at next start up, follow these step:
1. Open the I-Series Control Center > Setup & Updates.
2. Select the Run at next startup check box.
To run the I-Series Welcome Guide at once, follow these steps:
1. Open the I-Series Control Center > Setup & Updates.
2. Select the Run now button.
6.8.2 I-Series Update Notifier
The I-Series Update Notifier is a program that notifies you when the latest software updates for your Tobii Dynavox Software are
available (either automatically, on a regular basis, or manually, at a time of your choosing) and assists you in installing the
updates.
Tobii Dynavox I-Series+ Users manual v.1.0 - en-US
6 Configuring the Tobii Dynavox I-Series+ with the I-Series
Control Center
55
Page 11

If you have chosen to "Enable automatic updates" in either the I-Series Welcome Guide or, later, in the I-Series Control Center,
the I-Series Update Notifier will actively search Tobii Dynavoxs sites for version Updates of your software.
To keep your Tobii Dynavox I-Series+ device running properly it is highly recommended that you update your
Tobii Dynavox Software on a regular basis and it is therefore highly recommended that you enable automatic updates.
To Enable automatic search for updates:
1. Open the I-Series Control Center > Setup & Updates.
2. Select the Enable automatic search for updates (recommended) check box.
If an update is found the following I-Series Update Notifier window will pop up:
The update or updates available will show themselves in the Step One window of I-Series Update Notifier as large button with a
green check mark on the right side. You will also be able to see the version number of the software that you currently have and
the version number of the update.
If you choose not to download one or more of the available updates you can click on the button of the update you do not want
and the check mark will turn into a red "X" mark.
Proceed in the following way:
ͻ Click the Download button to download the updates to your Device and continue to Step Two.
ͻ In Step Two, Click the Install button to install the chosen updates on your device and proceed to Step Three.
ͻ Step Three informs you that your system has been updated, select the Done button to close the I-Series Update
Notifier.
If you choose not to "Enable automatic updates" you can still check for updates for your Tobii Dynavox software and update
them manually using the I-Series Update Notifier.
To open and activate the I-Series Update Notifier manually (this opens the Step One window shown above and starts the same
automatic update process):
ͻ Navigate in Windows from your desktop to Start Menu Tobii Dynavox and select the I-Series Update Notifier icon,
.
or
1. Open the I-Series Control Center > Setup & Updates.
2. Select the Run now button.
6 Configuring the Tobii Dynavox I-Series+ with the I-Series
56
Control Center
Tobii Dynavox I-Series+ Users manual v.1.0 - en-US
Page 12
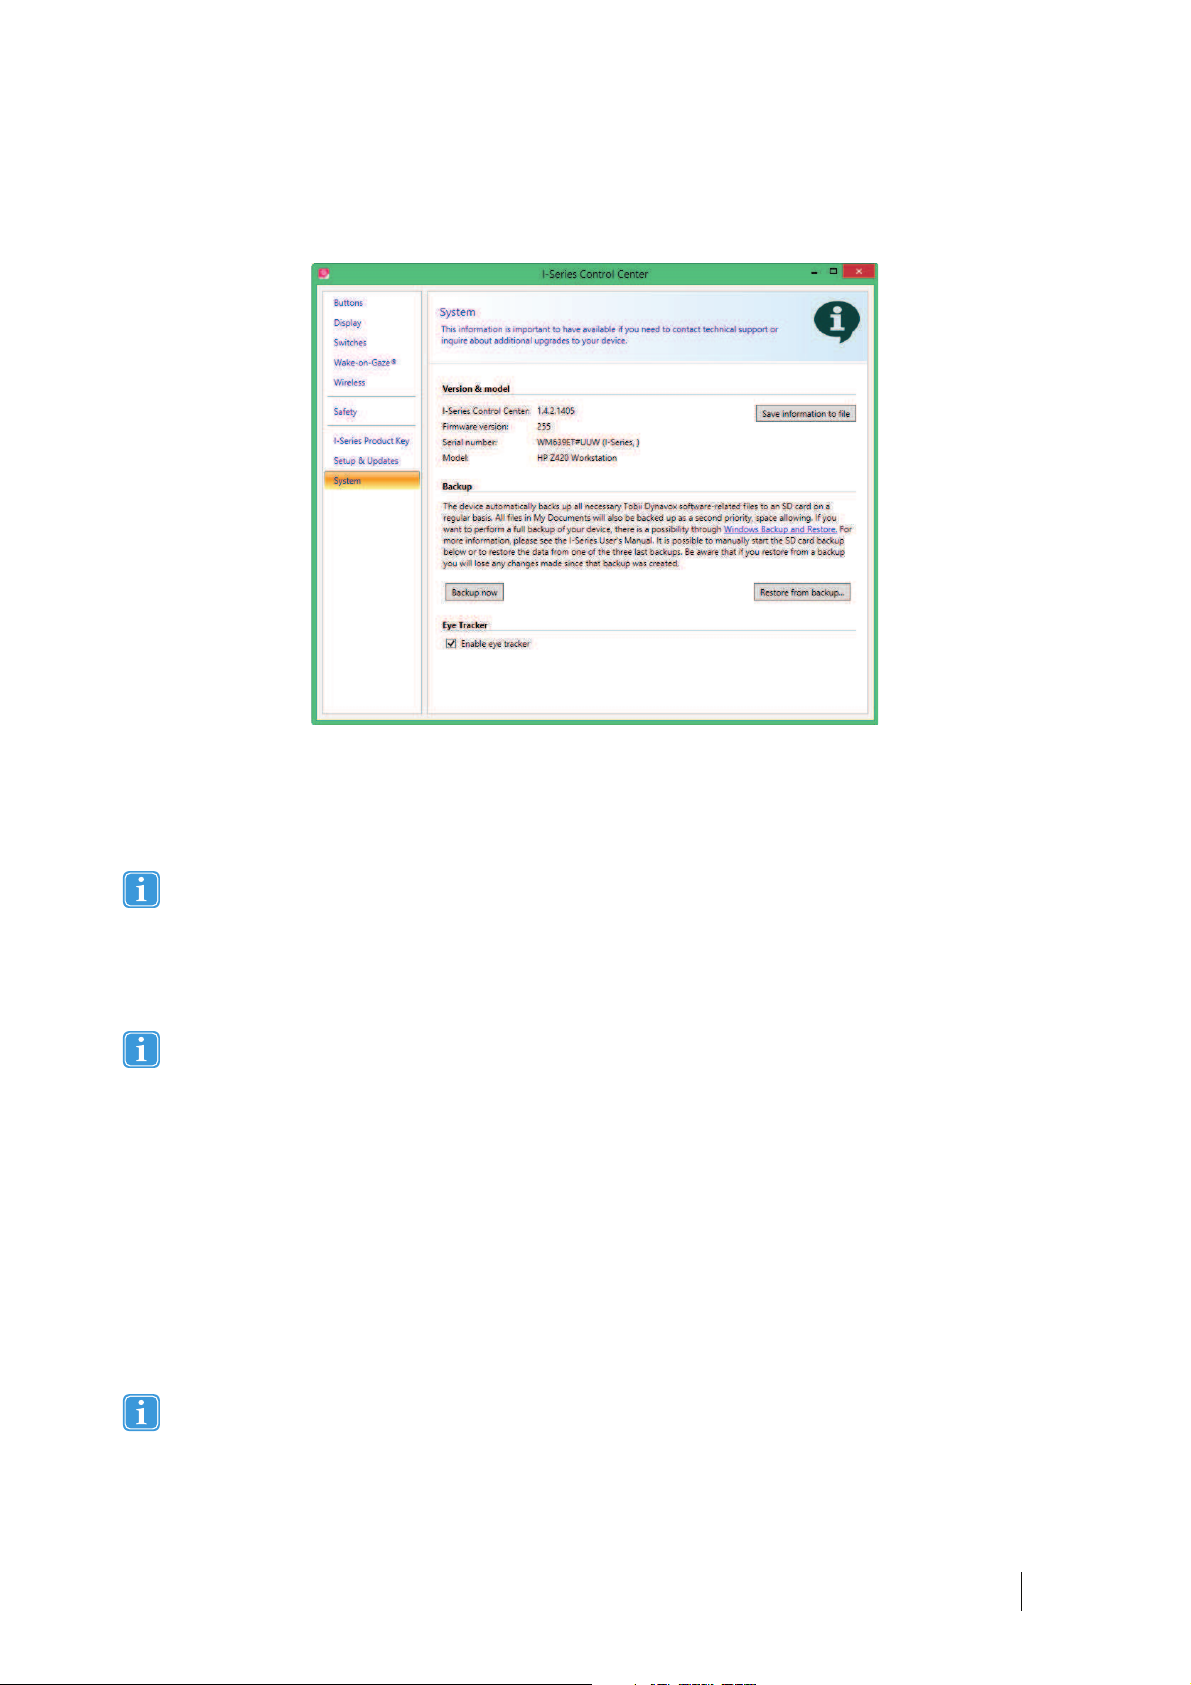
6.9 System
6.9.1 Version & Model
To view the version and model of the device:
ͻ Open the I-Series Control Center > System.
Please have this information available if you have problems with the device and need to contact Customer Support.
To save the version and model of the device to a file:
1. Open the I-Series Control Center > System.
2. Select the Save information to file button.
You can attach the file containing all the information into a an e-mail.
6.9.2 Backup
This is a system backup specific to your Tobii Dynavox software-related files. The device automatically and regularly, once a
week, backs up the data that is associated with your Tobii Dynavox communications applications (
Tobii Dynavox Communicator /Tobii DynaVox Compass Page Sets, files, settings, etc.), your Gaze Interaction files (profiles, calibration settings, interaction settings, etc.) and your device specific settings from the I-Series Control Center. You can manually
start the backup below and/or restore the data from one of the three latest backups. Be aware that the changes made since the
latest backup will be reverted if you choose to restore from a previous backup. All files in the My Documents folder will be
backed up as well, if space is available on the microSD-card, as a second priority after the Tobii Dynavox software-related files.
To back up all files on your device please use Microsofts own Windows Backup and Restore application.
The backup process executes once a week (every Sunday at 15.00) and the three latest backups are saved on the microSDcard.
If your Tobii Dynavox I-Series+ device is not up and running at this time the backup will be performed at next start up.
The process backs up files for all users. If the backup drive does not have enough space some files will not be backed
up. Image files have the lowest priority (backed up last). The largest file size for the backup of individual files is 100
MB, files larger than this will be excluded.
Tobii Dynavox I-Series+ Users manual v.1.0 - en-US
6 Configuring the Tobii Dynavox I-Series+ with the I-Series
Control Center
57
Page 13

The backup files are placed in the directory Q:\Backup\<date> (On the microSD-card).
Tobii Dynavox will not take responsibility for any other data than the Tobii Dynavox applications data
6.9.2.1 User Profile Card
The Tobii Dynavox I-Series+ device comes with a 32 GB microSD-card installed. The purpose of this card is to backup personal settings and data. In the case of fatal damage to the Tobii Dynavox I-Series+ device. The microSD-card can be removed and
inserted into a new device for quick and easy retrieval and restoration of personal data and settings.
6.9.2.2 Backup Manually by the User
To perform a manual backup of the system:
1. Open the I-Series Control Center > System.
2. Select the Backup now button.
When the backup is finished, the following will show up on the screen: Backup finished.
6.9.2.3 Restoring Backup Files by the User
To restore one of the three last backup of the system:
1. Open the I-Series Control Center > System.
2. Select the Restore from backup button.
3. Select the one of the last backups by selecting the Restore from this backup button next to the date of the stored
backup.
When the restore is finished, the following text will show up on the screen: Restore finished and the
show up next to the date that was selected to restore from.
Copies of these backup files can be saved anywhere you wish, to an external hard drive, for example, or to a USB stick. Copy
the folders in the directory Q:\Backup\<date> to any external directory or drive of your choosing.
symbol will
6.9.2.4 Backup Failed
One likely reason that the backup failed is that there are too many files in the My Documents folder. Try moving the files that are
not backup- critical to another location (such as pictures, music files, etc).
6.9.3 Eye Tracker
To enable the Eye tracker:
1. Open the I-Series Control Center > System.
2. Select the Enable Eye Tracker check box.
To disable the Eye tracker:
1. Open the I-Series Control Center > System.
2. Clear the Enable Eye Tracker check box.
6.10 Creating Shortcuts to Actions
You can create shortcuts, called actions, by programming the Quick Access buttons and connected Switches. The Quick Access buttons are located on the left side of the Tobii Dynavox I-Series+ device, named 1, 2 and Menu.
Switches are connected to the Switch connectors.
6 Configuring the Tobii Dynavox I-Series+ with the I-Series
58
Control Center
Tobii Dynavox I-Series+ Users manual v.1.0 - en-US
Page 14
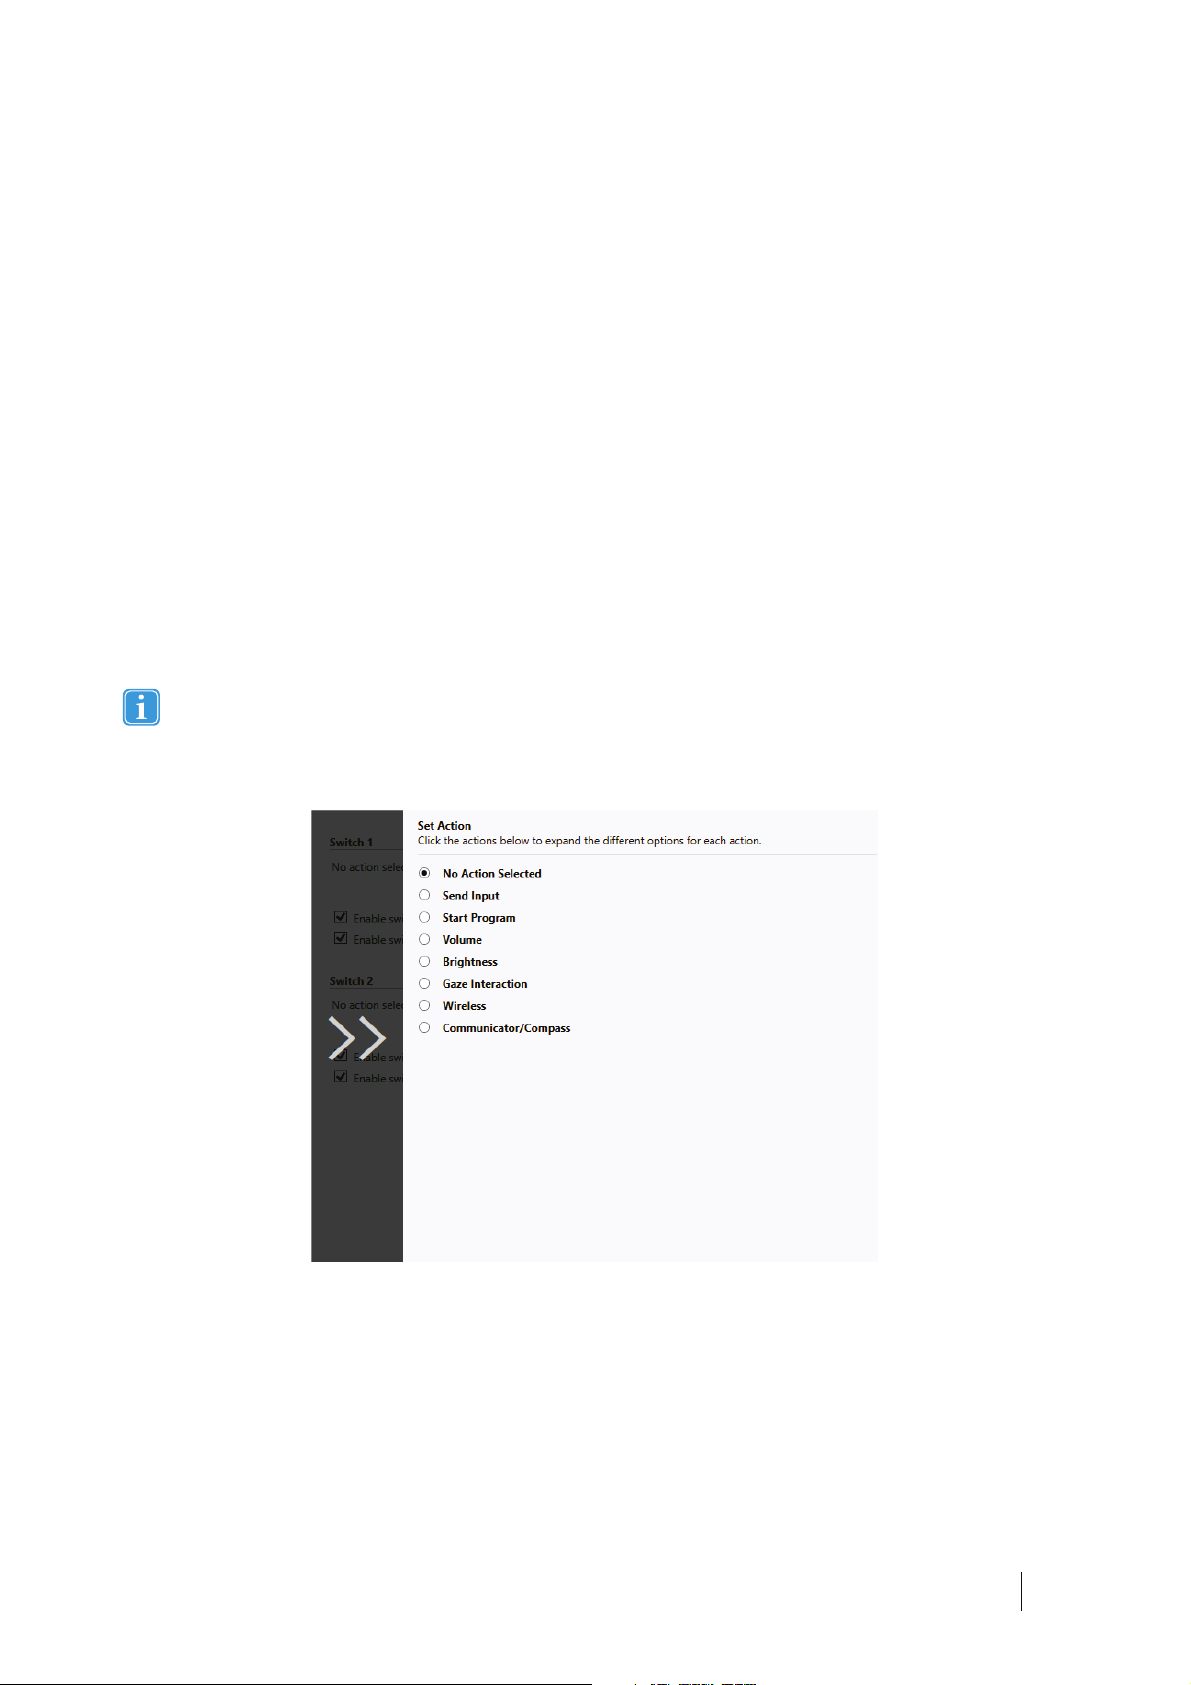
6.10.1 Available Actions
This is a short description of each action available to set:
ͻ Send input ʹ Allows the user to send input to an alternative program (keystroke, mouse click or text).
ͻ Start Program ʹ Allows the user to start a program.
ͻ Volume ʹ Allows the user to adjust the volume up or down or to set mute on or off.
ͻ Backlight ʹ Allows the user increase or decrease the backlight of the screen.
ͻ Gaze Interaction ʹ Allows the user to show and hide the track status window, calibrate or pause the Gaze Interaction
ON or OFF.
ͻ Wireless ʹ Allows the user to either set all radio connections on or off, or a specific wireless connection.
ͻ Tobii Dynavox Communicator /Tobii DynaVox Compass Ͷ Actions are set and customized in
Tobii Dynavox Communicator /Tobii DynaVox Compass.
The available actions are the same for the Quick Access buttons and Switches.
To create a shortcut to an action:
1. Open the I-Series Control Center.
2. Select Buttons or Switches, depending on which one you want to customize.
3. Click Set action to view the dialog box where you can select the action you would like the button to perform. By selecting one of the actions, the options for this action will be revealed below the chosen action.
If you would like the Quick Access button to make a sound when pressed, select the Play sound check box after
having set an action.
6.10.2 Selecting Actions
ͻ No Action Selected Ͷ Default Ͷ choose to delete a previous set task
ͻ Send Input ʹ choose either to send a keyboard input, a mouse click or specified text by selecting the option you want
the device button or Switch to perform.
ʹ Send keyboard input Ͷ In the Send keyboard input list, select the keystroke you want to send to an alternative
program.
ʹ Send mouse click Ͷ In the Send mouse click list, select the desired mouse click: left, middle or right mouse
click.
ʹ Send text ʹ In the Send text box, type the text you want to send to an alternative program.
ͻ Start Program Ͷ Click Browse the first time you are using this option to find and select a program.
6 Configuring the Tobii Dynavox I-Series+ with the I-Series
Tobii Dynavox I-Series+ Users manual v.1.0 - en-US
Control Center
59
Page 15

The next time you select the Start Program option a list of previously selected programs will be displayed. You can
then directly select a program from the list or select Browse if you want to start a program not in the list.
For the selected program it is possible to add program arguments. However, this is normally not required. If the program
should require program arguments and you do not know what to enter, please contact the company you purchased the
software from.
ͻ Volume Ͷ choose to increase, decrease or mute the volume by selecting the preferred option.
ͻ Backlight Ͷ choose to either increase or decrease the screen backlight by selecting the preferred option.
ͻ Gaze Interaction ʹ choose to toggle track status window, calibrate Gaze Interaction, Pause the Gaze Interaction or
toggle Windows Control ON/OFF.
To enable this option the Tobii Dynavox I-Series+ device must have an Eye Tracker and the
Tobii Dynavox Gaze Interaction Software installed.
ͻ Wireless Ͷ you can either set all radio connections on/off or each individual wireless unit on/off one by one, by select-
ing the options.
ͻ Communicator /Compass Ͷ Actions are set and customized in
Tobii Dynavox Communicator /Tobii DynaVox Compass
If actions for a Switch are customized both in the I-Series Control Center and in
Tobii Dynavox Communicator /Tobii DynaVox Compass or in alternative communication software all actions
will be performed simultaneously. Ensure that the specified action for a Switch does not conflict with an action set for
the same Switch in Tobii Dynavox Communicator /Tobii DynaVox Compass or in alternative communication
software.
To get back from slide in menus, just select the arrows in the greyed out areas.
6 Configuring the Tobii Dynavox I-Series+ with the I-Series
60
Control Center
Tobii Dynavox I-Series+ Users manual v.1.0 - en-US
Page 16

7 Gaze Interaction Settings
7.1 Accessing the Gaze Interaction Settings
Gaze Interaction Settings is a program for quick and easy access to control functions such as Track Status, Calibration and
common settings.
Start Gaze Interaction Settings for Windows 8.1 in one of the following ways:
ͻ Go to Start menu > Tobii Dynavox.
ͻ Double-click on the Gaze Interaction Settings icon,
Desktop (if one has been made).
ͻ Right-click (long-hold finger on icon for touch screen right clicking) on the Gaze Interaction Settings icon, , in
the Notification area and then select Settings.
ͻ Through the communication software installed on the device.
In the list to the left in Gaze Interaction Settings, select which option you want to change. In the list to the right, the available
options will be revealed.
Click OK to save changes. This will also close Gaze Interaction Settings.
Click Cancel to cancel the changes. This will also close Gaze Interaction Settings.
Click Apply to save changes. Gaze Interaction Settings will remain open.
, in the Notification area, or on the shortcut, , on the
Anywhere you see this icon, , there is an information box with additional information for the feature.
Tobii Dynavox I-Series+ Users manual v.1.0 - en-US
7 Gaze Interaction Settings
61
Page 17

7.2 Calibration
This section will describe how to calibrate an individual, enabling optimal Gaze Interaction with the Tobii Dynavox I-Series+
device.
7.2.1 Starting Calibration
The calibration can be started in one of the following ways:
ͻ Open Gaze Interaction Settings > Gaze Interaction and then select the Start Calibration... button.
ͻ Right-click (long-hold finger on icon for touch screen right clicking) on the Gaze Interaction Settings icon,
the Notification area and select Start Calibration.
ͻ Through the communication software installed on the device.
7.2.2 Interrupting Calibration
Interrupt the calibration in one of the following ways:
ͻ Press Esc.
ͻ Left-click on the screen using a mouse.
ͻ Touch the screen (on a touch screen device).
7.2.3 Customizing Active Eye
Based on certain conditions, or disabilities, you may only have one eye that functions well with Gaze Interaction. In this case,
and if you know which eye is most functional, you can select which eye to track for Gaze Interaction.
, in
To select the eye you want to be tracked by the eye tracker, follow these steps:
1. Open Gaze Interaction Settings > Calibration.
2. Select the Track only this eye for Gaze Interaction check box under Left or Right Eye Calibration Result box.
7 Gaze Interaction Settings
62
Tobii Dynavox I-Series+ Users manual v.1.0 - en-US
Page 18

7.2.4 Improving Calibration Point(s)
After calibration, you may want to improve one or more points.
There is a color scheme used that will help you to understand the quality of your calibration.
All three color statuses are the result of a successful calibration.
ͻ If the background color of the Calibration Result is light red, you have achieved a successful, but relatively low quality
calibration. You can improve one or more points individually, or recalibrate completely, to achieve better
Gaze Interaction results.
Improving even one (or more) of the calibrations points can significantly improve the calibration.
ͻ If the background color of the Calibration Result is light yellow, you have achieved successful and good quality calibra-
tion. You might be able achieve better Gaze Interaction results by improving one or more points individually.
ͻ If the background color of the Calibration Result is green, you have achieved a successful and high quality calibration.
Be aware that no matter what quality of calibration you have achieved you will be able to select OK or Apply and begin using Gaze Interaction. It is the accuracy and functionality of the Gaze Interaction that is affected by the quality of
the calibration results. Try for the best calibration possible.
Remember! In the end it is the personal experience that counts!
The closer the lines within the calibration point are to a dot in the center of the circle of the calibration point, the better the cali-
bration is of that point,
To improve one or more calibration points, follow these steps :
1. Open Gaze Interaction Settings > Calibration.
2. Select the point(s) you want to improve under Calibration Result.
3. Select the Improve Point(s) button and a calibration for the selected point(s) will start.
.You can choose the points to be improved and calibrate only those points again.
Tobii Dynavox I-Series+ Users manual v.1.0 - en-US
7 Gaze Interaction Settings
63
Page 19

7.2.5 Removing Calibration Point(s)
If there is a calibration point that is consistently bad after calibration (the green lines are scattered all around and outside the
circle of the calibration point) you can remove that point completely from the calibration, this may improve the calibration of the
other points. Be aware that if you remove a point, that area of the screen will be uncalibrated and Gaze Interaction will not function properly there.
To remove one or more calibration points, follow these steps:
1. Open Gaze Interaction Settings > Calibration.
2. Select the point(s) you want to remove under Calibration Result.
3. Select the Remove Point(s) button.
7.2.6 Customizing the Calibration
To customize the calibration, follow these steps:
1. Open Gaze Interaction Settings > Calibration.
2. Select the Settings... button
General
3. Select calibration background by selecting the background color button and select the desired color.
4. Specify the number of points you want to calibrate with (two, five or nine) from the Calibration points drop down list.
The higher number of points, the more accurate the calibration.
5. Select if you want to have sound feedback or not from the Sound feedback drop down list.
Stimulus
6. Select the stimulus type from the Stimulus type drop down list. There are three types available, each with different customizing options:
ͻ Dot:
ʹ Select color of the dot by selecting the Stimulus color button.
ʹ Select size of the dot by selecting from the Stimulus size drop down list.
ʹ Select speed of the dot by selecting from the Stimulus speed drop down list.
ͻ Image:
7 Gaze Interaction Settings
64
Tobii Dynavox I-Series+ Users manual v.1.0 - en-US
Page 20

ʹ Select primary stimulus by selecting Browse and selecting an image.
ʹ Select secondary stimulus by selecting Browse and selecting an image.
ʹ Select size of the image by selecting from the Stimulus size drop down list.
ʹ Select speed of the image by selecting from the Stimulus speed drop down list.
ͻ Video:
ʹ Select primary stimulus by selecting Browse and selecting a video.
ʹ Select secondary stimulus by selecting Browse and selecting a video.
ʹ Select size of the video by selecting from the Stimulus size drop down list.
ʹ Select speed of the video by selecting from the Stimulus speed drop down list.
7. Check the Animate stimuli check box if you want the stimuli to be animated (as opposed to static).
8. If you want to control the calibration, i.e. decide when to move the calibration stimuli, with a keyboard, check the Key-
board step-through check box.
ͻ For Keyboard step-through, use the S key to step (to move the calibration stimuli) and the Esc key, the Left
mouse button or touching the touch screen to interrupt calibration. When using Image or Video calibration, use the
T key to toggle between primary and secondary stimulus images.
To get back from slide in menus, just select the arrows in the greyed out areas.
7.2.7 Customizing the Calibration Area
Customizing the calibration area can be useful if you have discovered that the user cannot access certain areas of the screen
using Gaze Interaction. By sizing the calibration area to exclude the areas that the user cannot access it can improve the overall
calibration.
To customize the calibration area, follow these steps:
1. Open Tobii Dynavox Gaze Interaction Settings > Calibration.
2. Select the Setting button.
3. Select the Calibration area: Change... button.
Tobii Dynavox I-Series+ Users manual v.1.0 - en-US
7 Gaze Interaction Settings
65
Page 21

4. A blue semi-transparent area is displayed on the desktop. You can move and resize the blue area to make it fit your preferred calibration area.
7.3 Interaction
To adapt the interaction method and visual feedback for Gaze Interaction, follow these steps:
1. Open Gaze Interaction Settings > Interaction.
Scope
If different settings are needed for different Gaze Interaction applications, make the adaptations here.
2. Select how the interactions settings should be reflected:
ͻ Select Default settings of the currently selected user profile if you want to apply the new settings to the
whole user profile and not only to a particular application.
ͻ Select Application specific settings of the currently selected user profile if you want to apply the new set-
tings to a specific application of a user profile. Then select the available application in the Application drop down
list.
7 Gaze Interaction Settings
66
Tobii Dynavox I-Series+ Users manual v.1.0 - en-US
Page 22

Method
3. Select the activation method from the Activation method drop down list. There are three methods available, each with
different activation times:
ͻ Dwell. Adjust the dwell time by moving the Dwell time slider.
ͻ Switch. Adjust the minimum time for a click duration and the minimum time between clicks by moving the respective
slider.
ͻ Blink. Adjust the minimum and maximum duration for a blink by moving the respective slider.
Visual Feedback
4. Select the symbol for visual feedback from the Dwell feedback type drop down list.
5. Select the color of the feedback symbol in the Feedback color drop down list.
6. Specify the dot size and opacity of the feedback symbol by moving the respective slider.
7. Select the Show visible outline around the activated region check box to see a dashed line around the activated
area in all instances of Gaze Interaction selection
8. Select Simulate activation if you want to see how the activation method will appear on the screen. The example is
shown above the Simulate activation button.
7.4 User Profile
7.4.1 Creating a New Profile
Use of different profiles allows you to store multiple peoples calibrations and feedback preferences on one device. Alternatively,
one person might want to store multiple profiles for him/herself if that person wears glasses occasionally or uses multiple means
of accessing the device.
To create a new profile:
1. Open Gaze Interaction Settings, select User Profiles.
2. Enter a new name in the Profile name field.
3. Select an existing profile in the Based on profile drop down list. The new profile will inherit all settings from the selected profile. Note that if no profiles have been created previously, the only one to select is the default profile.
4. Click Create to save the new profile. The new profile is saved directly upon selecting Create.
Tobii Dynavox I-Series+ Users manual v.1.0 - en-US
7 Gaze Interaction Settings
67
Page 23

7.4.2 Selecting Current User Profile
To select current user profile:
1. Open Gaze Interaction Settings.
2. Select a user profile in the Current User Profile drop down list.
3. Select Apply
7.4.3 Deleting a Profile
To delete a profile:
1. Open Gaze Interaction Settings > User Profiles.
2. Select a profile in the Profile to delete drop down list.
3. Click Delete to delete the selected profile. The profile is deleted directly upon selecting Delete. Note that the default
profile cannot be deleted.
7.5 Windows Control
Windows Control allows you to access the desktop and all applications of your Windows computer with Gaze Interaction.
7.5.1 Auto Start
To enable Windows Control automatically when the your device starts up:
ͻ Select the Auto start Windows Control at boot check box.
To disable Windows Control automatically when the your device starts up:
ͻ Select to clear the Auto start Windows Control at boot check box.
7.5.2 Windows Control Type
Select which type of Windows Control you wish to use:
ͻ Gaze Selection Ͷ Select the Gaze Selection radio button. For more information about using Gaze Selection, see 5.4.3
Using Gaze Selection, page 29
ͻ Mouse Emulation Ͷ Select the Mouse Emulation radio button. For more information about using Mouse Emulation, see
5.4.4 Using Mouse Emulation, page 39
7 Gaze Interaction Settings
68
Tobii Dynavox I-Series+ Users manual v.1.0 - en-US
Page 24

7.5.2.1 Gaze Selection
The settings for Gaze Selection are found in the Gaze Selection Taskbar, docked to the screen when Gaze Selection
Windows Control is running. Gaze at the
For information about the Gaze Selection Settings, see 8 Gaze Selection Settings, page 73
7.5.2.2 Mouse Emulation
settings icon to select it and the Gaze Selection Settings will open.
7.5.2.2.1 Mouse Control Speed
Customize the mouse control speed by moving the Mouse control speed slider. Move the slider to the right to increase the
speed and to the left to decrease it.
Tobii Dynavox I-Series+ Users manual v.1.0 - en-US
7 Gaze Interaction Settings
69
Page 25

7.5.2.2.2 Magnifier Size and Zoom
Customize the size of the magnifier by moving the Magnifier Size slider. Move the slider to the right to increase the size and
to the left to decrease it.
Customize the zoom factor by moving the Zoom Factor slider. Move the slider to the right to increase the zoom factor and to
the left to decrease it.
7.5.2.2.3 Auto Switch from Right to Left Click
Check this check box if you want Windows Control Mouse Emulation mode to automatically switch the desired mouse click se-
lection back to a left click,
, after a right click, , has been chosen and performed.
7.5.2.2.4 Turn off Scroll Functionality
Check the Turn off scroll functionality check box if you do not want Gaze Interactionscrolling to be active.
7.5.2.2.5 Custom Cursors
Custom cursors is a feature that turns the regular mouse cursor into a number of different cursors when using Windows Control
in Mouse Emulation mode.
The different cursors visually represent the type of "mouse click" for Gaze Interaction that you have chosen from the Mouse Emulation Menu (for the definitions of the Mouse Emulation Menu symbols see 5.4.4.2 Clicking with Windows Control in Mouse
Emulation Mode, page 40, 5.4.4.3 Magnifying with Windows Control in Mouse Emulation Mode, page 40 and 5.4.4.4 Selecting Mouse Emulation Functions, page 40).
or + = cursor type (move cursor, no clicking)
+ = cursor type (single left click)
+ = cursor type (single right click)
+ = cursor type (double left click)
+ = cursor type (double right click)
or + = cursor types (drag) and (drop)
or + = cursor type (no movement)
Check the Custom cursors check box to activate custom cursors for Windows Control in Mouse Emulation mode.
7.5.2.2.6 Hide Menu
Check the Hide Menu check box if you want the Mouse Emulation menu to be hidden during use. The
(F2) key on the
keyboard can also be used to toggle On and Off (hide/show) the Mouse Emulation Menu instantly during use.
7 Gaze Interaction Settings
70
Tobii Dynavox I-Series+ Users manual v.1.0 - en-US
Page 26

7.6 System Settings
7.6.1 System Off-Screen Menu
Select the Position Drop down menu to make changes to where the System Off-Screen menu appear on the screen.
The System Off-Screen menu can be set to appear:
ͻ Bottom (Default)
ͻ Top
ͻ Left
ͻ Right
ͻ None
Set the System Off-Screen menu to None to disable the System Off-Screen menu.
Figure 7.1 System Off-Screen Menu Areas
7.6.2 Positioning Guide
To turn On the Positioning Guide:
1. Open Gaze Interaction Settings > System Settings.
Tobii Dynavox I-Series+ Users manual v.1.0 - en-US
7 Gaze Interaction Settings
71
Page 27

2. Select the Enable positioning guide check box.
To turn Off the Positioning Guide:
1. Open Gaze Interaction Settings > System Settings.
2. Select to clear the Enable positioning guide check box.
For more information about the Positioning Guide, see 5.3.4 Positioning Guide
7.7 System Information
To view the version and model of the device:
Open the Gaze Interaction Settings > System Information.
Please have this information available if you have problems with the device and need to contact Customer Support.
By clicking Copy all information you can paste the information into a document (such as Notepad or WordPad) or directly into an e-mail.
7.7.1 Upgrade Eye Tracker Firmware
If there is a new Firmware for the Eye Tracker module, the Upgrade button will be selectable.
Select the Upgrade button to start upgrading the Firmware for the Eye Tracker.
A Pop up notification will be shown when starting the Tobii Dynavox Gaze Interaction Settings if there is a Upgrade
for the Eye Tracker Firmware.
7 Gaze Interaction Settings
72
Tobii Dynavox I-Series+ Users manual v.1.0 - en-US
Page 28

8 Gaze Selection Settings
The Gaze Selection Settings Dialog is controlled by Gaze Interaction and the user can make all changes without using a keyboard and/or a mouse.
8.1 The General Settings Tab
Selection
ͻ Gaze - Choose Gaze to use your gaze position to activate the zooming function that ends with the execution of the de-
sired Task.
ͻ Switch - Choose Switch to use a switch to activate the zooming function that ends with the execution of the desired
Task.
Precision
The zoom precision can be set to 8 different levels, just look at the desired position to change the setting. Changing the Precision will adjust how deep the zoom will go before executing the Task. The further to the right on the scale the deeper the zoom.
If the Precision is set to zero, no zooming will happen. It will be an instant click with Primary Selection. With Secondary Selection it will still be a zoom.
Speed
The zoom speed can be set to 8 different levels, just look at the desired position to change the setting. Changing the Speed will
affect how fast the zoom is before the execution of the Task. The further to the right on the scale the faster the zoom.
Tobii Dynavox I-Series+ Users manual v.1.0 - en-US
8 Gaze Selection Settings
73
Page 29

8.2 The Keyboard Settings Tab
Keyboard layout
The selected language keyboard layout is shown. Select the Change button to change the keyboard layout to another language.
There are a number of different language keyboard layouts available.
Gaze typing speed
The Gaze typing speed can be set to 8 different levels, just look at the desired position to change the setting. Changing the
Gaze typing speed will adjust how long the user must fix their gaze on a button before the Task is executed. The scale presents
lower Gaze typing speeds to the left and higher to the right.
Sound feedback
ͻ On - Choose On to activate sound feedback when selecting a button on the Gaze keyboard.
ͻ Off - Choose Off to deactivate sound feedback when selecting a button on the Gaze keyboard.
To finish, select OK to save or Cancel to abort you changes.
8.3 The Taskbar Settings Tab
Select which tasks to use on the Taskbar. For more information about the tasks, see 5.4.3.2 Task Buttons, page 31.
Be aware that the more Tasks used on the Taskbar the more difficult they might become to select on smaller screens.
Toggle the On/Off check box to On for each Task to enable it for use on the Taskbar.
8 Gaze Selection Settings
74
Tobii Dynavox I-Series+ Users manual v.1.0 - en-US
Page 30

Toggle the On/Off check box to Off for each Task to disable its use and visibility on the Taskbar.
8.3.1 Maximize Left Click/Tap
Use the Maximize Left Click/Tap feature to expand and emphasize the Left Click/Tap Task on the Taskbar. If it is toggled to
Off, all selected Tasks will be spaced evenly along the Taskbar. If it is toggled to On, all Tasks other than Left Click/Tap will retain their original/smaller sizes and the Left Click/Tap Task will fill the remaining space on the Taskbar. Activating this feature
can greatly expand the active region of the Left Click/Tap Task making it much easier to select.
Tobii Dynavox I-Series+ Users manual v.1.0 - en-US
8 Gaze Selection Settings
75
Page 31

9 Product Care
9.1 Temperature & Humidity
9.1.1 General Use
The Tobii Dynavox I-Series+ is best kept in dry conditions at room temperature. The recommended range for temperature and
the humidity value for the device is as follows:
Portable mode:
ͻ Ambient temperature: 0ഒ to 30ഒ (32ഘ to 86ഘ)
ͻ Humidity: Max 70% (no condensation on the device)
Mounted mode:
ͻ Ambient temperature: 0ഒ to 40ഒ (32ഘ to 104ഘ)
ͻ Humidity: Max 70% (no condensation on the device)
9.1.2 Transportation and Storage
For transportation and storage excluding batteries the recommended range for temperature and the humidity value for the device is as follows:
ͻ Temperature: -40ഒ to 70ഒ (-40ഘ to 158ഘ)
ͻ Humidity: 20% to 70% (no condensation on the device)
The Tobii Dynavox I-Series+ is not waterproof or fully water resistant. The device should not be kept in excessively humid, damp
or otherwise wet conditions. Do not submerge the device in water or in any other liquid. Be careful not to allow liquids to be
spilled upon the device especially in the connector areas without the I/O covers in place(Position 29 in Figure 3.2 Bottom, Left
and Right Side, page 17). The device is registered as IP Class 43 (with I/O covers in place).
9.2 Cleaning
Before cleaning the Tobii Dynavox I-Series+ device shut it down, unplug all cables, attach the I/O covers (Position 29 in Figure
3.2 Bottom, Left and Right Side, page 17) and remove the batteries. Use a soft, slightly damp, lint-free cloth or Alcohol Cleaning
Wipes (i.e. damp cloth with 96% alcohol). Avoid getting moisture in openings on the device. Dont use window cleaners, household cleaners, aerosol sprays, solvents, alcohol, ammonia, or abrasives to clean the device.
9.2.1 Cleaning of the Speakers
If the openings for the speakers are clogged carefully use cotton sticks and/or a toothbrush to avoid damaging the IP-protection
for Tobii Dynavox I-Series+ speakers.
9.3 Placement
Only use the recommended mounts specified by the your local reseller or sales represent and make sure that they are mounted
and fastened correctly according to the instructions. Do not place the device on unstable and uneven surfaces.
9.4 Transporting the Tobii Dynavox I-Series+ Device
Disconnect all the cables and use the handle on the back side of the device to hold the device while carrying it.
When you transport the device for repair, shipment or traveling, use the original casing and packaging materials.
Keep the original packaging materials for the Tobii Dynavox I-Series+.
In case the device needs to be returned to Tobii Dynavox for Warranty related issues or repair, it is required that the
original packaging (or equal equivalent) is used for shipping.
76
9 Product Care
Tobii Dynavox I-Series+ Users manual v.1.0 - en-US
Page 32

9.5 Disposing of the Batteries
Do not dispose of the batteries in general household or office waste. Follow your local regulations for the disposal of batteries.
9.6 Disposing of the Tobii Dynavox I-Series+ Device
Do not dispose of the Tobii Dynavox I-Series+ Device in general household or office waste. Follow your local regulations for the
disposal of electrical and electronic equipment.
Tobii Dynavox I-Series+ Users manual v.1.0 - en-US
9 Product Care
77
Page 33

Appendix A
Support, Warranty, Training
Resources
A1 Customer Support
For support, please contact your local representative or Support at Tobii Dynavox. In order to receive assistance as quickly as
possible, make sure you have access to your Tobii Dynavox I-Series+ device and, if possible, an Internet connection. You
should also be able to supply the serial number of the device, which you find on the back of the device, in the I-Series Control
Center or Gaze Interaction Settings, see 6.9 System, page 57 and 7.7 System Information, page 72.
For further product information and other support resources, please visit the Tobii Dynavox website www.tobiidynavox.com.
A2 Warranty
Please read the Manufacturers Warranty paper included in the package.
Please read this Users Manual carefully before using the device. The warranty is only valid if the device is used according to the
Users Manual. Disassembling the Tobii Dynavox I-Series+ device will void the warranty.
Keep the original packaging materials for the Tobii Dynavox I-Series+.
In case the device needs to be returned to Tobii Dynavox for Warranty related issues or repair, it is required that the
original packaging (or equal equivalent) is used for shipping.
A3 Training Resources
Tobii Dynavox offers a range of training resources for the Tobii Dynavox I-Series+ products and related communication
products. You can find them on the Tobii Dynavox website,
and Quick guides. The Tobii Dynavox I-Series+ Quick Start Manual is delivered with, and stored on, the
Tobii Dynavox I-Series+ device.
www.tobiidynavox.com, including Getting Started Guides, webinars
Appendix A Support, Warranty, Training Resources
78
Tobii Dynavox I-Series+ Users manual v.1.0 - en-US
Page 34

Appendix B
Compliance Information
B1 FCC Statement
This device complies with Part 15 of the FCC Rules. Operation is subject to the following two conditions: (1) this device may
not cause harmful interference and (2) this device must accept any interference received, including interference that may cause
undesired operation.
Modifications not expressly approved by Tobii Dynavox could void the users authority to operate the equipment
under FCC rules.
B1.1 For P15B Equipment
This equipment has been tested and found to comply with the limits for a Class B digital device, pursuant to part 15 of the FCC
rules. These limits are designed to provide reasonable protection against harmful interference in a residential installation. This
equipment generates, uses and can radiate radio frequency energy and, if not installed and used in accordance with the
instructions, may cause harmful interference to radio communications.
However, there is no guarantee that interference will not occur in a particular installation. If this equipment does cause harmful
interference to radio or television reception, which can be determined by turning the equipment off and on, the user is
encouraged to try to correct the interference by one or more of the following measures:
ͻ Reorient or relocate the receiving antenna.
ͻ Increase the separation between the equipment and receiver.
ͻ Connect the equipment into an outlet on a circuit different from that to which the receiver is connected.
ͻ Consult the dealer or an experienced radio/TV technician for help.
B1.2 For Portable Devices
FCC RF Radiation Exposure Statement:
1. This Transmitter must not be co-located or operating in conjunction with any other antenna or transmitter.
2. This equipment complies with FCC RF radiation exposure limits set forth for an uncontrolled environment. This device
was tested for typical hand held operations with the device contacted directly to the human body to the sides of the
device. To maintain compliance with FCC RF exposure compliance requirements, avoid direct contact to the
transmitting antenna during transmitting.
B2 Radio Wave Exposure and Specific Absorption Rate (SAR) Information
The Tobii Dynavox I-Series+ device has been tested as a Class 1 Medical Device. Medical electrical equipment such as this
requires special caution regarding Electro-magnetic Compatibility (EMC) and thus needs to be installed and placed into service
according to the information provided in this manual.
Using other cables and accessories other than those provided or that are integrated in the device may affect EMC
performance.
The SAR (Specific Absorbtion Rate) limit as dictated by the FCC (in the USA) is 1.6W/kg averaged over 1 gram of tissue. In
Europe/EU (CE regulations) it is 2.0 W/kg averaged over 10 grams of tissue. The Devices, Tobii Dynavox Iʹ12+ (FCC ID:
W5MTDI12A) and Tobii Dynavox Iʹ15+ (FCC ID: W5MTDI15) have been tested against these SAR limits to maintain
compliance with FCC/CE RF exposure requirements.
This equipment complies with FCC RF radiation exposure limits set forth for an uncontrolled environment.
The highest SAR value for the Iʹ12+ device is 0.8 W/kg. The highest SAR value for the Iʹ15+ device is 0.8 W/kg.
Tobii Dynavox I-Series+Users manual v.1.0 - en-US
Appendix B Compliance Information
79
Page 35

Guidance and manufacturers declaration ʹ electromagnetic emissions
The Tobii Dynavox I-Series+ is intended for use in the electromagnetic environment specified below. The customer or the
user of the Tobii Dynavox I-Series+ device should assure that it is used in such an environment.
Emissions Test
Compliance
Electromagnetic environment ʹ
guidance
RF (Radio Frequency
emissions CISPR 11
Group 1 The Tobii Dynavox I-Series+ must emit
electromagnetic energy in order to
perform its intended function. Nearby
electronic equipment may be affected
RF emissions CISPR 11 Class B
Harmonic emissions
IEC 61000-3-2
Not Applicable The product has an active power of
Pч75 W at rated load conditions.
Therefore no limits are applicable.
Voltage Fluctuations/flicker
emissions IEC 61000-3-3
Not Applicable The product has an active power of
Pч75 W at rated load conditions.
Therefore it is not likely to produce
voltage fluctuations or flicker above the
limit values.
The Tobii Dynavox I-Series+ device should not be used adjacent to or stacked with other equipment.
Guidance and manufacturers declaration ʹ electromagnetic immunity
The Tobii Dynavox I-Series+ device is intended for use in the electromagnetic environment specified below. The customer or
the user of the Tobii Dynavox I-Series+ device should assure that it is used in such an environment.
IMMUNITY test
IEC 60601 test level Compliance level
Electromagnetic environment
ʹ guidance
Electrostatic discharge
(ESD)
IEC 61000-4-2
± 6 kV contact
± 8 kV air
± 6 kV contact
± 8 kV air
Floors should be wood,
concrete or ceramic tile. If
floors are covered with
synthetic material, the
relative humidity should be at
least 30 %.
Electrical fast transient/burst
IEC 61000-4-4
Surge
± 2 kV for power supply
lines
± 1 kV for input/output lines
± 1 kV line to line ± 1 kV line to line Mains power quality should
± 2 kV for power supply
lines
± 1 kV for input/output lines
Mains power quality should
be that of a typical
commercial or hospital
environment.
be that of a typical
IEC 61000-4-5
commercial or hospital
environment.
Appendix B Compliance Information
80
Tobii Dynavox I-Series+ Users manual v.1.0 - en-US
Page 36

Guidance and manufacturers declaration ʹ electromagnetic immunity
The Tobii Dynavox I-Series+ device is intended for use in the electromagnetic environment specified below. The customer or
the user of the Tobii Dynavox I-Series+ device should assure that it is used in such an environment.
IMMUNITY test
IEC 60601 test level Compliance level
Electromagnetic environment
ʹ guidance
Voltage dips, short
interruptions and voltage
variations on power supply
input lines.
IEC 61000-4-11
< 5 % UT (>95 % dip in UT)
for 0.5 cycles.
40 % UT (60 % dip in UT)
for 5 cycles.
70 % UT (30 % dip in UT)
for 25 cycles.
< 5 % UT (>95 % dip in UT)
for 5 s
< 5 % UT (>95 % dip in UT)
for 0.5 cycles.
40 % UT (60 % dip in UT)
for 5 cycles.
70 % UT (30 % dip in UT)
for 25 cycles.
< 5 % UT (>95 % dip in UT)
for 5 s
Mains power quality should
be that of a typical
commercial or hospital
environment. If the user of
the Tobii Dynavox I-Series+
device requires continued
operation during mains
interruptions, it is
recommended that the
Tobii Dynavox I-Series+
device batteries are in place
or that the device be
powered from an
uninterruptable power supply
(UPS).
UT is at 100 VAC 60 Hz or
230 VAC 50 Hz.
Power frequency (50/60 Hz)
magnetic field
IEC 61000-4-8
3 A/m 3 A/m Power frequency magnetic
fields should be at levels
characteristic of a typical
location in a typical
commercial or hospital
environment.
Guidance and manufacturers declaration ʹ electromagnetic immunity
The Tobii Dynavox I-Series+ device is intended for use in the electromagnetic environment specified below. The customer of
the user of the Tobii Dynavox I-Series+ device should assure that it is used in such an environment.
Immunity test
IEC 60601 test level Compliance level
Electromagnetic environment
- guidance
Portable and mobile RF
communications equipment
should be used no closer to
any part of the
Tobii Dynavox I-Series+
device, including cables,
than the recommended
separation distance
calculated from the equation
applicable to the frequency
of the transmitter.
Recommended separation
distance
Conducted RF
IEC 61000-4-6
3 Vrms 150 kHz to 80 MHz 3 V
Radiated RF
IEC 61000-4-3
3 V/m 80 MHz to 2.5 GHz
3 V/m
80 MHz
for 150 kHz to
for 80 MHz to
800 MHz
Tobii Dynavox I-Series+Users manual v.1.0 - en-US
Appendix B Compliance Information
81
Page 37

Guidance and manufacturers declaration ʹ electromagnetic immunity
The Tobii Dynavox I-Series+ device is intended for use in the electromagnetic environment specified below. The customer of
the user of the Tobii Dynavox I-Series+ device should assure that it is used in such an environment.
Immunity test
IEC 60601 test level Compliance level
Electromagnetic environment
- guidance
2.5 GHz
for 800 MHz to
where "P" is the maximum
output power rating of the
transmitter in watts (W)
according to the transmitter
manufacturer and "d" is the
recommended separation
distance in meters (m).
Field strengths from fixed RF
transmitters, as determined
by an electromagnetic site
I
survey,
the compliance level in each
frequency range.
should be less than
ii
Interference may occur in the
vicinity of equipment marked
with the following symbol.
NOTE 1 At 80 MHz and 800 MHz, the higher frequency range applies.
NOTE 2 These guidelines may not apply in all situations. Electromagnetic propagation is affected by absorption and
reflected from structures, objects and people.
i. Field strengths from fixed transmitters, such as base stations for radio (cellular/cordless) telephones and land mobile radios, amateur radio, AM and
FM radio broadcast and TV broadcast cannot be predicted theoretically with accuracy. To assess the electromagnetic environment due to fixed RF
transmitters, an electromagnetic site survey should be considered. If the measured field strength in the location in which the Tobii Dynavox I-Series+
device is used exceeds the applicable RF compliance level above, the Tobii Dynavox I-Series+ device should be observed to verify normal operation. If
abnormal performance is observed, additional measures may be necessary, such as reorienting or relocating the Tobii Dynavox I-Series+ device.
ii. Over the frequency range 150 kHz to 80 MHz, field strengths should be less than 3 V/m.
Recommended separation distances between portable and mobile RF (Radio Frequency) communications equipment and
the Tobii Dynavox I-Series+ device.
The Tobii Dynavox I-Series+ device is intended for use in the electromagnetic environment in which radiated RF
disturbances are controlled. The customer or the user of the Tobii Dynavox I-Series+ device can help prevent
electromagnetic interference by maintaining a minimum distance between portable and mobile RF communication equipment
(transmitters) and the Tobii Dynavox I-Series+ device as recommended below, according to the maximum output power of
the communications equipment.
Rated maximum output
power of transmitter
W
150 kHz to 80 MHz 80 MHz to 800 MHz
Separation distance according to frequency of transmitter
800 MHz to 2.5 GHz
0.01 0.12 m 0.12 m 0.24 m
0.1 0.37 m 0.37 m 0.74 m
1 1.2 m 1.2 m 2.4 m
10 3.7 m 3.7 m 7.4 m
100 11.7 m 11.7 m 23.4 m
Under test specifications specified in 6.2.1.10 EN 60 601-1-2 (2007) the Tobii Dynavox I-Series+ device shall not:
ͻ Exhibit component failure
Appendix B Compliance Information
82
Tobii Dynavox I-Series+ Users manual v.1.0 - en-US
Page 38

Page 39

Page 40

Appendix C Computer Device States of
Operation
Table C.1 Computer Device States of Operation
Advanced Configuration and
Power Interface (ACPI)
State
Description
S0 (Working)
Normal operating state - Windows session is running
Display will dim and turn off after a time of idle. The 1, 2, Menu and Volume Up and Down
buttons are however always illuminated in state S0.
S3 (Sleep)
The device is sleeping. The Windows session is suspended to RAM, allowing a quick
resume to state S0 by:
1. Pressing the power button
2. Pressing a button connected to a switch port configured to have power on functionality
3. Wake on Gaze (if enabled)
The device is consuming a small amount of power in state S3. Fully charged batteries (no AC
adapter attached) will last a minimum of 24 h in state S3.
Windows Critical battery level is monitored in state S3 to prevent the batteries from being
fully drained. The device will enter state S4 (Hibernate) if the critical value is reached.
S4 (Hibernate) The device is in hibernation. The Windows session is suspended to the SSD (hard drive) and
the device is powered off. The session can be resumed to state S0 by:
1. Pressing the power button
2. Pressing a button connected to a switch port configured to have power on functionality
S5 (Soft Off) Windows is shut down. The device is powered off. Batteries (not drained) and/or AC adapter
attached.
G3 (Mechanical Off) All power sources removed (no batteries and no AC adapter attached).
Table C.2 Power Button Normal Operation, LED Behavior
ACPI State
Power Button Illumination Button 1, 2, Menu, Volume
Up and Volume Down
Buttons
White Illumination
No Battery Charging Battery Charging
S0 (Working)
Green Light
Blue Light
ON
S3 (Sleep)
Green Blinking Light Blue Blinking Light OFF
S4 (Hibernate)
OFF
Blue Light
OFF
S5 (Soft off)
OFF
Blue Light
OFF
Tobii Dynavox I-Series+Users manual v.1.0 - en-US
Appendix C Computer Device States of Operation
85
Page 41

Table C.3 Power Button Error or Warning, LED Behavior
Error or Warning
ACPI State and condition
Chassis near overheating In state ACPI S0
(Working), when the
chassis temperature is ч 1
degree Celsius from the
Maximum Threshold
according to the Safety
Settings specified in Table
D.1 Maximum Allowed
Temperature, page 87.
Chassis overheats In state ACPI S0
(Working), when the
chassis temperature is > the
Maximum Threshold
according to the Safety
Settings specified in Table
D.1 Maximum Allowed
Temperature, page 87.
Chassis overheated In state ACPI S4
(Hibernate) and ACPI S5
(Soft Off), when the power
I
button
is pressed.
Power Button llumination
Comment
Purple Light Purple light as a warning to
the user when the Device is
close to the overheat
threshold.
Purple Quick Blinking Light
The Device will blink the LED
during the hibernate or
shutdown process.
Purple Quick Blinking Light
for 5 seconds.
The Device will blink the LED
and remain in the state ACPI
S4 (Hibernate) or ACPI S5
(Soft Off).
The Device will
start up and be
operational for up
to 9 minutes if the
temperature does
not drop below the
Maximum
Threshold
according to the
Safety Settings
specified in Table
D.1 Maximum
Allowed
Temperature, page
87 within the 9
minutes.
Low Battery Level for
Battery Packs
In state ACPI S4
(Hibernate) and S5 (Soft
off), when the power button
is pressed and:
1. No DC plug inserted,
and
2. Battery level is at or
below the critical level
i. Or a switch port configured to have power button functionality.
Appendix C Computer Device States of Operation
86
Blue Quick Blinking Light for
5 seconds.
I
Tobii Dynavox I-Series+ Users manual v.1.0 - en-US
Page 42

Appendix D Maximum Allowed
Temperature
Table D.1 Maximum Allowed Temperature
Allowable maximum temperature for the Tobii Dynavox I-Series+ metal external surfaces which are
likely to be touched
Mounted Mode temperature threshold:
External surfaces temperature allowed
External surfaces temperature allowed in an area unlikely to be touched, see position 1 in Figure
D.1 Temperature Threshold Area, page 87 for the position of this area.
Portable Mode temperature threshold:
External surfaces temperature allowed
External surfaces temperature allowed in an area unlikely to be touched, see position 1 in Figure
D.1 Temperature Threshold Area, page 87 for the position of this area.
Maximum Temperature
Portable
Mode
43/109
46/115
ഒ/ഘ
Mounted
Mode
55/131
60/140
Tobii Dynavox I-Series+Users manual v.1.0 - en-US
Figure D.1 Temperature Threshold Area
Appendix D Maximum Allowed Temperature
87
Page 43

Appendix E
Technical Specifications
E1 Standard Tobii Dynavox I-Series+
Standard
Tobii Dynavox Iʹ12+ Tobii Dynavox Iʹ15+
Type/Model Iʹ12+ ETR Iʹ15+ ETR
Screen
12.1഼, Aspect ratio: 4:3, LED Backlight
Unit,
White Luminance 500 cd/m
2
15.0഼, Aspect ratio: 4:3, LED Backlight
Unit
White Luminance 400 cd/m
2
Screen Resolution
1024 × 768 pixels (XGA)
Touch Panel
Projected Capacitive Touch with Gorilla® Glass, 10 point multi touch
Dimensions (WxHxD)
30,7 × 27,4 × 10,5 cm
12.1 × 10.8 × 4.1 inches
36,9 × 32,6 × 11,2 cm
14.5 × 12.8 × 4.4 inches
Weight 2,8 kg
6.2 lbs
3,8 kg
8.4 lbs
Speakers 2 × 3 W Closed Box Speakers
Microphone 1 × Analog Microphone
Processor
Intel® Celeron Quad Core Processor J1900 (2M Cache, 2 Ghz)
RAM
4 GB DDR3
Operating system
Microsoft Windows 8.1
Hard disk drive
2.5഼ SSD 120 GB minimum
SD-Card MicroSD-Card 32 GB
Connectors
1 × Connector for an HDMI 1.3 Connector Type A cable
2 × USB 2.0 (Current limit = 1000 mA)
1 × USB 3.0 (Current limit 1500 mA)
1 × RJ45 100/1000 Mbit/s (Ethernet)
2 × 3.5 mm Switch connector interface, (Pin out for mono plug: Sleeve =
Common ground, Tip = Signal)
1 × 3.5 mm Headphone jack (stereo) with jack detection
1 × 24 VDC in 2.5/5.5 mm (Power connector)
Buttons
1 × Power On
1 × Volume Up
1 × Volume Down
1 × Menu
2 × Programmable
WLAN (optional)
IEEE 802.11 b/g/n Dual antenna diversity system
Bluetooth® (optional)
Bluetooth® 3.0+HS
Dedicated for Mobile Phone Communication
IR Remote Control (Environmental
Control Unit)
GEWA Programmable IR Remote Control (Environmental Control Unit),
19 ʹ 455 kHz, 940 nm, compatible with a wide range of remote controls
Resting Orientation: 1 × IR filter window with 1 × IR Receive Sensor, 3 × IR
Transmit Diodes and 1 × Red Status LED
Upright Orientation: 1 × IR filter window with 4 × IR Transmit Diodes
88
Appendix E Technical Specifications
Tobii Dynavox I-Series+ Users manual v.1.0 - en-US
Page 44

Standard
Tobii Dynavox Iʹ12+ Tobii Dynavox Iʹ15+
Type/Model Iʹ12+ ETR Iʹ15+ ETR
Camera
User Camera (back) 5 MP AF (Auto Focus)
Web Camera (front) 2 MP FF (Fixed Focus)
Eye Tracker
Tobii IS20 Module
Battery Run Time
I
~9 h ~9.5/8iih
Battery Charge Time
Maximum 5.4 h (0-100%)
Battery Storage Time Maximum 6 months @ charge ш 40%
Deskstand Integrated
Mounting Systems Supported Tobii Dynavox QR adapter plate for Daessy and REHAdapt
Power Supply Adapter Technology Co. Ltd, ATM065-A240
Input: Universal 100 ~ 240 VAC / 50 ~ 60 Hz
Output: +24VDC / 0~2.71A
IP class
IP 43 (with I/O covers in place)
i. Indoor with continuous communication and with Gaze Interaction if applicable. ~24 hours with a Power optimized scenario.
ii. 9.5 hours without the Eye tracker activated, 8 hours with the Eye tracker activated
E2 Battery pack
Item
Specification
Remark
Battery Technology Li-Ion rechargeable battery pack with
gas gauge (SMBus v1.1 interface)
Cell
6× Panasonic NCR18650 (3S2P)
Battery Pack Capacity
62.64 Wh Initial capacity, new battery pack
Nominal Voltage 10.8 V
Charge Time
Maximum 5.4 h
Charge from 0 to 100%
Cycle Life
500 cycles Minimum 75% of initial capacity
remaining
Allowable Operating Temperature
0 ʹ 45 ഒ, 45-85%RH
Charge condition
-20 ʹ 60 ഒ, 45-85%RH Discharge condition
Storage Temperature -20 ʹ 35 ഒ, 45-85%RH
1 year
-20 ʹ 40 ഒ, 45-85%RH 6 months
-20 ʹ 45 ഒ, 45-85%RH 1 month
-20 ʹ 50 ഒ, 45-85%RH 1 week
Storage Time
I
Maximum 6 months @ charge ш 40%
Do not long time store
battery packs with less than
40% charge level
i. Batteries shall not be stored in the device
Tobii Dynavox I-Series+Users manual v.1.0 - en-US
Appendix E Technical Specifications
89
Page 45

E3 Eye Tracker
Technical Specifications
Tobii IS20 Module
Working Distance
40 - 90 cm
18 - 35 inches
Freedom of Head Movement
i
@ 70 cm / 27.5 inches
(Width x Height)
50 × 36 cm
20 × 14 in
Head Movement Speed (optimal)
11.8 in/s
30 cm/s
Gaze Data Rate 30 Hz
Gaze Accuracy
ii
Under ideal conditions
0.4° (Std dev 0.1°)
Across 30 × 20 × 20 cm head box
0.5° (Std dev 0.2°)
Screen Size <22഼
Distance (from screen)
45 Ͷ 85 cm
17.7 Ͷ 33.5 in
Track box size (Width × Height)
27 × 23 Ͷ 52 × 44 cm
10.6 × 9.1 Ͷ 20.5 × 17.3 in
Track box depth
40 cm
15.7 in
Gaze Precision (=sample to sample noise)
iii
Under ideal conditions, without filter, on artificial eyes Pending
Across head box, without filter, on human eyes
0.4° (Std dev 0.1°)
Mounting
Built in
Power Supply
Built in
i. Freedom of head movement describes the volume in front of the tracker in which the user must have at least one of the eyes. The numbers are
specified parallell/orthogonal to screen surface, assuming eye tracker is at 20 degree angle to screen.
ii. Gaze accuracy describes the angular average distance from the actual gaze point to the one measured by the eye tracker.
Accuracy under ideal conditions is measured with users placed in the center of the eye tracker track box with the head resting on a chin rest, and the
room and screen illumination constant at 300 lux.
Accuracy across head box is measured with users after calibration systematically positioned at varying positions ranging from center of the head box
up to +/- 15 cm horizontal, +/- 10 cm vertical and +/- 10 cm distance.
Accuracy across varying background illumination is measured with users head resting on a chin rest, and after calibration modifying background
illumination from 1 to 1000 lux.
iii. Gaze Precision describes the point-to-point variation between individual gaze samples (here specified with binocular data, ie both eyes, and
measured on artificial eyes). Gaze Precision with Stampe filter is with Stampe stage 2 noise-reduction algorithm applied to raw data (Stampe ,
Behavior Research Methods, Instruments & Computers 1993, 25 (2), 137-142).
Precision without filter is based on raw data, without any de-noising filter applied, either inside or outside the eye tracker.
Precision under ideal conditions is measured with users placed in the center of the eye tracker track box with the head resting on a chin rest, and the
room and screen illumination constant at 300 lux.
Precision across head box is measured with users after calibration systematically positioned at varying positions ranging from center of the head box
up to +/- 15 cm horizontal, +/- 10 cm vertical and +/- 10 cm distance.
90
Appendix E Technical Specifications
Tobii Dynavox I-Series+ Users manual v.1.0 - en-US
Page 46

Appendix F Approved Accessories
Description Model Tobii Dynavox Part No.
Tobii Dynavox I-Series+ AC Adapter
(Power Supply)
Battery pack TISB1
AdapterTech ATM065ʹA240
12002664
12004072
For information about the latest approved Tobii Dynavox Accessories, please visit the
your local Tobii Dynavox reseller.
www.tobiidynavox.com website or contact
Tobii Dynavox I-Series+Users manual v.1.0 - en-US
Appendix F Approved Accessories
91
Page 47

Tobii Dynavox I-Series+ Users manual v.1.0 - en-US
Support for Your Tobii Dynavox Device
Get Help Online
See the product-specific Support page for your Tobii Dynavox device. It contains up-to-date information about issues and tips & tricks related to the product. Find our Support pages online at:
www.TobiiDynavox.com or www.myTobiiDynavox.com.
Contact Your Sales Representative or Reseller
For questions or problems with your product, contact your Tobii Dynavox sales representative or authorized reseller for assistance. They are most familiar with your personal setup and can best
help you with tips and product training. For contact details, visit www.TobiiDynavox.com/contact
Copyright ©Tobii AB (publ). Illustrations and specifications do not necessarily apply to products and services offered in each local market. Technical specifications are subject to change without prior notice. All other trademarks are the property of their respective
owners.
 Loading...