

Page 1

Tobii Glasses 2 Eye Tracker
User’s Manual
Tobii Glasses Head Unit
Tobii Glasses Recording Unit
Tobii Glasses Controller Software
Page 2

Page 3

User’s manual Tobii Glasses 2 Eye Tracker
Version 1.0.2
12/2014
All rights reserved.
Copyright © Tobii Technology AB
The information contained in this document is proprietary to
Tobii Technology. Any reproduction in part or whole without
prior written authorization by Tobii Technology is prohibited.
Products that are referred to in this document may be either
trademarks and/or registered trademarks of the respective
owners. The publisher and the author make no claim to these
trademarks.
While every precaution has been taken in the preparation of
this document, the publisher and the author assume no
responsibility for errors or omissions, or for damages
resulting from the use of information contained in this
document or from the use of programs and source code that
may accompany it. In no event shall the publisher and the
author be liable for any loss of profit or any other commercial
damage caused or alleged to have been caused directly or
indirectly by this document.
Content subject to change without notice.
Please check Tobii web site www.tobii.com for updated
versions of this document.
Page 4

Page 5

Table of Contents
1 Safety and Compliance .................................................................................................................. 1
1.1 Safety and Usage.................. . . ..................... . ..................... . . ..................... . ..................... . ......1
1.1.1 Usage Warning........ . . ..................... . ..................... . .................... . . .................... . ......1
1.1.2 Emergency Warning .............. . .................... . . .................... . .................... . . ................1
1.1.3 Child Safety .................. . .................... . . ................... . . .................... . ..................... . . .1
1.1.4 Infrared Warning .... . ..................... . .................... . . .................... . .................... . . .........1
1.1.5 Epilepsy Warning ........... . .................... . . ................... . . .................... . . ..................... . .1
1.1.6 Mechanical Shock Warning.............. . . .................... . .................... . . .................... . ......2
1.1.7 Bending Warning .......... . . .................... . . ................... . . .................... . ..................... . ..2
1.1.8 Do not open the devices .................. . . .................... . .................... . . ..................... . .....2
1.1.9 Connectors ................. . ..................... . . .................... . . .................... . .................... . . ..2
1.1.10 HDMI Cable Warning ..... . ..................... . ..................... . . ..................... . .....................2
1.1.11 Environment .............. . . ................... . . .................... . . .................... . . ..................... . ....2
1.1.12 Battery Warning.......... . ..................... . . ..................... . ..................... . .................... . . ..3
1.1.13 Wireless Warning ... . . ..................... . ..................... . ..................... . . .................... . ......3
1.1.14 Transportation . ..................... . .................... . . .................... . .................... . . ................3
1.1.15 Accessories ..................... . ..................... . .................... . . ................... . . ....................3
1.1.16 Cleaning ................... . . ..................... . ..................... . . .................... . . .................... . . ..3
1.1.17 Disposal...... . . ..................... . ..................... . . ..................... . .................... . . ................3
1.2 Compliance Information ......... . . .................... . ..................... . . .................... . . ..................... . .......4
1.2.1 Federal Communication Commission Interference Statement......... . . ..................... . .......4
1.2.2 Canadian Compliance Statement.................. . . ..................... . ..................... . . .............4
1.2.3 EU Compliance Statement ........... . .................... . . .................... . .................... . . .........4
1.2.4 Declaration of Conformity (Standards) .............. . .................... . . ..................... . ............4
1.3 Other limitations and considerations ................. . . .................... . .................... . . ..................... . .....5
1.3.1 Intended use ................. . ..................... . ..................... . ..................... . . .....................5
1.3.2 SD memory cards .... . ..................... . . ..................... . .................... . . .................... . ......5
1.3.3 Multiple connections between Glasses Controller Software and Recording Unit .............5
1.3.4 Eye movement classification ...................... . . ..................... . ..................... . . ................5
1.3.5 Light conditions .. . ..................... . ..................... . . ..................... . ..................... . ..........5
1.3.6 Eyelashes........... . ..................... . . ..................... . ..................... . ..................... . . .........5
1.3.7 Droopy eyelids ....... . . .................... . .................... . . .................... . .................... . . .........6
1.3.8 Eye glasses and contact lenses...... . .................... . . .................... . .................... . . .........6
1.3.9 WLAN connectivity. . . .................... . . ..................... . ..................... . . .................... . . ......6
1.3.10 Power.. . .................... . . .................... . ..................... . . .................... . . ..................... . ...6
1.3.11 Keeping Tobii Glasses Controller Software and the Recording Unit firmware up to
date.......... . . ..................... . ..................... . .................... . . ................... . . ....................6
2 Introduction.................................................................................................................................... 7
2.1 Intended use........ . .................... . . .................... . . .................... . . ..................... . ..................... . . ..7
2.2 Usage overview..... . . ..................... . ..................... . . ................... . . .................... . .................... . . ..7
3 Installing and Updating Tobii Glasses Controller Software ............................................................. 8
3.1 Obtaining the Tobii Glasses Controller Software installer ..................... . . ..................... . ...............8
3.2 Installing Tobii Glasses Controller Software.................. . . .................... . .................... . . ................8
3.3 Updating Tobii Glasses Controller Software ................. . ..................... . .................... . . ................8
4 Updating the Tobii Glasses Recording Unit firmware...................................................................... 9
5 Getting to know Tobii Glasses 2 .................................................................................................. 10
5.1 System overview ................... . . .................... . .................... . . .................... . . .................... . . ......10
Page 6

5.1.1 Tobii Glasses 2 Packages ..... . .................... . . .................... . ..................... . ..............10
5.1.2 System components ....... . .................... . . .................... . ..................... . . ....................11
5.1.3 Tobii Glasses 2 Head Unit................... . . .................... . . .................... . .................... . .12
5.1.4 Tobii Glasses 2 Recording Unit................. . ..................... . ..................... . .................13
5.2 Tobii Glasses Controller Software user interface overview . . ..................... . . .................... . ...........14
5.2.1 About the software ......... . .................... . . ................... . . .................... . . .....................14
5.2.2 Studies (Create or switch study) .. . .................... . . ..................... . ..................... . . .......15
5.2.3 Dashboard ... . . ..................... . ..................... . ..................... . .................... . . ..............15
5.2.4 Live Viewer............ . . .................... . .................... . . .................... . . ..................... . ......15
5.2.5 Recording List . .................... . . .................... . . .................... . .................... . . ..............15
5.2.6 Participants List .................... . .................... . . .................... . ..................... . ..............15
6 Workflow Quick Guide................................................................................................................. 16
6.1 Preparations before a data collection day .... . . ..................... . ..................... . ..................... . . .......16
6.1.1 Charging batteries and preparing memory cards . .................... . . .................... . ...........16
6.2 Data collection ........ . . .................... . . ..................... . ..................... . ..................... . . ..................16
6.2.1 Preparing for recording ................. . .................... . . .................... . . ..................... . ......16
6.2.2 Making recordings...... . . ................... . . ..................... . ..................... . ..................... . . .16
6.2.3 Checking the recording.......... . ..................... . ..................... . . ..................... . ............17
6.2.4 Turning the Glasses off .. ..................... . ..................... . . .................... . .................... . .17
6.3 After data collection. . . .................... . ..................... . . ..................... . ..................... . ...................17
6.4 Further analysis with Tobii Glasses Analysis Software .................. . . .................... . . .................... .17
7 Basic Operations with Tobii Glasses 2......................................................................................... 18
7.1 Setting up Tobii Glasses 2 hardware ......... . . .................... . .................... . . .................... . . ..........18
7.1.1 Charging Recording Unit batteries ............ . ..................... . . .................... . . ................18
7.1.2 Inserting/removing the battery – Glasses Recording Unit....... . ..................... . ..............20
7.1.3 Inserting/removing an SD memory card in the Recording Unit .. . .................... . . ............20
7.1.4 Connecting the HDMI cable ... . .................... . . ..................... . ..................... . .............21
7.1.5 Changing nose pads (remove and mount new):.................... . . ..................... . .............21
7.1.6 Changing the lenses on the Head Unit ......... . . .................... . . .................... . . ..............22
7.1.7 Turning Tobii Glasses 2 on and off ............... . . .................... . . ..................... . .............22
7.2 Managing study data in Tobii Glasses Controller Software..... . ..................... . .................... . . .......22
7.2.1 Creating a new study .. . . ..................... . ..................... . . ..................... . .................... . .22
7.2.2 Adding participants to a study................... . .................... . . .................... . ..................22
7.2.3 Opening a study (and switching from one study to another) . . . ..................... . ...............23
7.2.4 Deleting a study in Tobii Glasses Controller Software ....... . . ................... . . ..................23
7.3 Connecting the Tablet running Tobii Glasses Controller Software to a Recording Unit . . ................23
7.3.1 Connecting/Disconnecting over WLAN ................. . ..................... . . ..................... . ....23
7.3.2 Connecting/Disconnecting wired connection.......... . . ..................... . ..................... . ....24
7.3.3 Verifying the Recording Unit is connected to Tobii Glasses Controller Software ... . . .......25
7.3.4 Hiding/showing Glasses from the Dashboard .... . ..................... . . .................... . . .........25
7.4 Fitting the Tobii Glasses 2 Eye Tracker onto a participant for recording ................ . . .....................26
7.5 Recording with Tobii Glasses 2. .................... . .................... . . .................... . ..................... . .......27
7.5.1 Starting a recording.... . . .................... . . ..................... . ..................... . ..................... . .27
7.5.2 Pausing a recording in progress................ . .................... . . .................... . . .................28
7.5.3 Stopping a recording in progress ..... . . ..................... . .................... . . .................... . ....28
7.6 Watching a recording live with the Live Viewer ................ . ..................... . . .................... . . ...........28
7.7 Locating recordings................... . . .................... . . ..................... . ..................... . . .................... . .28
7.7.1 Using the Recordings List to locate recordings .............. . ..................... . . ...................29
7.7.2 Using the Participants List to locate recordings................. . . .................... . . ................29
Page 7

7.8 Replaying a recording .................... . .................... . . ..................... . ..................... . ....................30
7.9 Exporting a gaze replay video . ..................... . ..................... . . .................... . . .................... . . .......30
7.10 Deleting a recording .............. . . .................... . .................... . . .................... . .................... . . .......30
7.11 Backing up recorded data ... . .................... . . .................... . . .................... . . ..................... . .........30
7.12 Other operations and information .............. . . .................... . ..................... . ..................... . ..........31
7.12.1 Status LEDs indication scheme for the Recording Unit................. . .................... . . .......31
7.12.2 Tobii Glasses 2 data structure .............. . . ................... . . .................... . ..................... .32
7.12.3 Displaying the Glasses Control Panel Properties .... . ..................... . ..................... . . .....32
7.12.4 Renaming the Recording Unit ................ . ..................... . . .................... . . ...................32
7.12.5 Memory cards................ . .................... . . .................... . ..................... . . ....................33
7.13 Tobii Glasses Controller Software considerations and limitations........... . ..................... . . .............33
7.13.1 Dashboard information ... . ..................... . ..................... . . ..................... . ...................33
7.13.2 Anyone running Tobii Glasses Controller Software can connect and control any
Tobii Glasses Recording Unit......... . .................... . . ..................... . ..................... . . .....33
7.13.3 Editing or removing participants from a Study . . .................... . .................... . . ..............33
8 Advanced Usage with Multiple Units ............................................................................................ 34
9 Accessories ................................................................................................................................. 35
9.1 Tobii Glasses 2 Carry Case . .................... . . ..................... . .................... . . .................... . ...........35
9.2 Tobii Glasses 2 Accessories Box ..................... . . .................... . .................... . . .................... . ....35
9.3 Tablet computer included in the Tobii Glasses 2 Premium Package ............ . ..................... . . ........36
9.3.1 Preparing your Dell Tablet for use .................... . . .................... . . .................... . ...........36
9.3.2 Support for your Dell Tablet................... . ..................... . . .................... . . ...................37
Appendix A Technical Specifications ................................................................................................ 38
A1 Eye Tracking ...... . . .................... . . .................... . . .................... . .................... . . .................... . ....38
A2 Glasses Head Unit ............... . . .................... . . .................... . . .................... . .................... . . .......38
A3 Recording Unit............... . . .................... . .................... . . .................... . ..................... . . .............38
A4 Compliance.................... . . .................... . . ..................... . ..................... . . .................... . ...........39
A5 Compatible Software ............. . . .................... . .................... . . .................... . .................... . . .......39
A6 Glasses Controller Software — Feature overview . . ..................... . . .................... . . .................... . .39
A7 Glasses Controller Software — Minimum system requirements ..................... . ..................... . . .....39
Appendix B Calibration target........................................................................................................... 40
Page 8

Page 9
1 Safety and Compliance
1.1 Safety and Usage
1.1.1 Usage Warning
The Tobii Glasses 2 system is composed of several components as described in the User’s Manual and should be
used according to manufacturer instructions. Connecting, or by other means using any other component than advised
in the User’s Manual may damage or injure a person, their property or recorded data, and is done entirely at the user’s
own risk.
The Tobii Glasses 2 Eye Tracker should be fitted on the test participant according to manufacturer instructions. Tobii
or its agents are not liable for damage or injuries to a person or their property due to a Tobii Glasses 2 Eye Tracker
being dropped in any configuration. Fitting the Tobii Glasses 2 onto a test participant is done entirely at the user’s
own risk.
Tobii Glasses 2 Eye Tracker is equipped with a head strap to enable tighter mounting of the eye tracker onto the
wearer’s head. Neither Tobii nor its agents are liable for damages or injuries to a person or their property caused by
the Tobii Glasses 2 Head Unit head strap
1.1.2 Emergency Warning
The Tobii Glasses 2 system is to be used for research purposes only. Be aware that due to the low, but possible risk
of failure or distraction, the Tobii Glasses 2 should not be relied upon or used in dangerous or otherwise critical
situations.
1.1.3 Child Safety
The Tobii Glasses 2 system is an advanced computer system and electronic device. As such it is composed of numerous separate, assembled parts. In the hands of a child some of these parts may become detached from the device, possibly constituting a choking hazard or another danger to the child.
Young children should not have access to, or use of the device without parental or guardian supervision.
1.1.4 Infrared Warning
When activated, the Tobii Glasses 2 Eye Tracker Head Unit emits pulsed infrared (IR) light. Certain medical and other
devices are susceptible to disturbance by IR light and/or radiation. Do not use the Tobii Glasses 2 system when in
the vicinity of such susceptible devices as their accuracy or proper functionality could be impaired.
1.1.5 Epilepsy Warning
Some people with photosensitive epilepsy (PSE) are susceptible to epileptic seizures or loss of consciousness when
exposed to certain flashing lights or light patterns in everyday life. This may happen even if the person has no medical
history of epilepsy or has never had any epileptic seizures.
A person with PSE would also be likely to have problems with TV screens, some arcade games, and flickering fluorescent bulbs. Such people may have a seizure while watching certain images or patterns on a monitor, or even when exposed to the light sources of an eye tracker. It is estimated that 3 to 5% of those diagnosed with epilepsy have this
type of epilepsy. Many people with PSE experience an "aura" or odd sensations before a seizure occurs. If you, or the
wearer of the Tobii Glasses 2 Eye Tracker, feel odd during use, turn off and remove the Tobii Glasses 2 Head Unit.
Tobii Glasses 2 Eye TrackerUser’s manual v.1.0.2 - en-US
1 Safety and Compliance
1
Page 10
1.1.6 Mechanical Shock Warning
The Tobii Glasses 2 system is a delicate measuring instrument used for research purposes and should be treated
with care at all times. To avoid breaking or damaging the internal electronic circuits, do not drop, knock, or shake the
device. Eye tracking quality or accuracy can be seriously affected if the Tobii Glasses 2 Head Unit or Recording Unit
has been dropped. If the eye tracker is exposed to mechanical shock, for example, when dropped, do not try to start it
or connect it to a power source. Contact Tobii Support for instructions.
1.1.7 Bending Warning
To avoid breaking or damaging the internal electronic circuits, do not bend any part of the eye tracking system. Eye
tracking quality or accuracy can be seriously affected if the Tobii Glasses 2 Head Unit or Recording Unit has been
bent.
1.1.8 Do not open the devices
Do not open or disassemble the Tobii Glasses 2 Head Unit or the Recording Unit. Non-compliance will result in loss
of warranty! There are no user serviceable components inside. Contact Tobii Technical Support if your Tobii Glasses
2 is not working properly.
1.1.9 Connectors
The Tobii Glasses 2 Head Unit and Recording Unit have numerous external interfaces (connectors). Connecting any
other device or connector than those intended may cause personal injuries and/or damage the Tobii Glasses 2. Tobii
or its agents are not liable for any damages or injuries to a person or their property due to connecting unintended
connectors.
1.1.10 HDMI Cable Warning
The provided HDMI cable should only be used to connect the Head Unit with the Recording Unit. Do not use the
HDMI cable for any other purpose or for connecting to any other devices. Only use HDMI cables provided by Tobii to
connect the Head Unit with the Recording Unit. Tobii or its agents are not liable for any damages or injuries to a person or property due to wrong use of the provided cables.
1.1.11 Environment
The Tobii Glasses 2 system is designed for use in dry indoor environments. Avoid any exposure to direct sunlight as
this will affect eye tracking quality and longer exposure can overheat the equipment. Avoid exposure to any liquids,
gels, moist, rain, sweat or other damp materials or environments. Do not use the eye tracker near water — the device
is not water resistant.
The device complies with IP Class 20 and has no protection against objects smaller than 5 mm. Keep the eye tracker
in a clean and dust free environment. When using the equipment take adequate precautions against dust and dirt.
Do not place or use the equipment in places subject to extreme temperatures and humidity, such as on top of and or
near a heating element, in a hot or damp room, or in a hot automobile in the sun. Usage temperature: 0℃ to +30℃ /
32℉ to 86℉
1 Safety and Compliance
2
Tobii Glasses 2 Eye Tracker User’s manual v.1.0.2 - en-US
Page 11
1.1.12 Battery Warning
The Tobii Glasses 2 system includes rechargeable Lithium-ion batteries. Lithium-ion batteries can explode or cause a
fire if they are used or charged incorrectly or if they are defective.
Do not short circuit the battery poles. Do not expose the battery to water or humidity. Do not expose batteries to heat,
direct sunlight, solder, or fire. Immediately disconnect the batteries if, during operation, they emit an unusual smell, feel
hot, change shape/dimensions, or behave abnormally. Do not use any defective batteries.
To recharge the batteries, use a battery charger specifically designed for the purpose and comply with the recharging
instructions specified by the manufacturer of the charger. Charge the batteries under supervision and do not place
combustible materials close to or on top of the batteries or the charger as this may result in overheating, explosion or
fire.
Avertissement relatif aux batteries
Le système Tobii Glasses 2 système comporte des piles lithium-ion rechargeables. Les batteries lithium-ion peuvent
exploser ou provoquer un incendie si elles sont utilisées ou chargées de façon incorrecte ou si elles sont
défectueuses.
Ne pas court-circuiter les pôles de la batterie. Ne pas exposer la pile à l'eau ou à l'humidité. Ne pas exposer les batteries à la chaleur, à la lumière du soleil, une soudure ou un feu. Déconnecter immédiatement les batteries si, pendant
le fonctionnement, elles émettent une odeur inhabituelle, sont chaudes, changent de forme/dimensions ou se comportent de manière anormale. Ne pas utiliser des batteries défectueuses.
Pour recharger les batteries, utiliser un chargeur spécialement conçu à cet effet et se conformer aux instructions de
recharge fournies par le fabricant du chargeur. Recharger les batteries sous surveillance et ne pas placer de matériaux combustibles à proximité ou au-dessus des batteries ou du chargeur en raison du risque de surchauffe, d'explosion ou d'incendie.
1.1.13 Wireless Warning
The Recording Unit contains radio transmitters and receivers (WLAN). Make sure that it is placed as far as possible
from any equipment, objects or body parts sensitive to such signals.
1.1.14 Transportation
Always use the supplied carry case and packaging material to transport the eye tracking equipment and provide
added protection.
1.1.15 Accessories
Only use accessories provided by or approved by Tobii.
1.1.16 Cleaning
Before cleaning any part of the Tobii Glasses 2 system, unplug the power cord from the outlet and make sure the device is turned off. Both the Tobii Glasses 2 Head Unit and Recording Unit have surface coatings that require special
care. Only use the supplied microfiber cleaning cloth or similar products specially intended for cleaning screens or
glass with a special coating. Avoid touching or scratching the glass and the eye tracking sensors and illuminators on
the Tobii Glasses 2 Head Unit and keep all the surfaces clean. Eye tracking quality may be degraded if surfaces are
dusty or damaged. Some plastic parts, such as the ear pieces and the nose pads, can be cleaned with water or disinfectant applied on a piece of soft cloth. Avoid contact with any other parts such as the illuminators, sensors and all
electronic components.
1.1.17 Disposal
Do not dispose of the device in general household or office waste. Follow local regulations for disposal of electrical
and electronic equipment.
Tobii Glasses 2 Eye TrackerUser’s manual v.1.0.2 - en-US
1 Safety and Compliance
3
Page 12

1.2 Compliance Information
All Tobii Glasses 2 are CE-marked, indicating compliance with the essential health and safety requirements set out in
European Directives.
1.2.1 Federal Communication Commission Interference Statement
This device complies with Part 15 of the FCC Rules. Operation is subject to the following two conditions: (1) this device may
not cause harmful interference, and (2) this device must accept any interference received, including interference that may cause
undesired operation.
FCC Caution: Any changes or modifications not expressly approved by the party responsible for compliance could void the user's authority to operate this equipment.
This equipment has been tested and found to comply with the limits for a Class B digital device, pursuant to part 15 of the FCC
Rules. These limits are designed to provide reasonable protection against harmful interference in a residential installation. This
equipment generates, uses and can radiate radio frequency energy and, if not installed and used in accordance with the instructions, may cause harmful interference to radio communications.
However, there is no guarantee that interference will not occur in a particular installation. If this equipment does cause harmful
interference to radio or television reception, which can be determined by turning the equipment off and on, the user is encouraged to try to correct the interference by one or more of the following measures:
• Reorient or relocate the receiving antenna.
• Increase the separation between the equipment and receiver.
• Connect the equipment into a wall outlet on a circuit different from that to which the receiver is connected.
• Consult the dealer or experienced radio/TV technician for assistance.
1.2.2 Canadian Compliance Statement
CAN ICES-3(B)/NMB-3(B).
This device complies with Industry Canada license-exempt RSS standard(s).
Operation is subject to the following two conditions:
(1) this device may not cause interference, and
(2) this device must accept any interference, including interference that may cause undesired operation of the device.
Le présent appareil est conforme aux CNR d'Industrie Canada applicables aux appareils radio exempts de licence. L'exploitation
est autorisée aux deux conditions suivantes:
(1) l'appareil ne doit pas produire de brouillage, et
(2) l'utilisateur de l'appareil doit accepter tout brouillage radioélectrique subi, même si le brouillage est susceptible d'en compromettre le fonctionnement.
1.2.3 EU Compliance Statement
Tobii Technology AB declares that this device is in compliance with the essential requirements and other relevant provisions of
the R&TTE and EMF Directive.
1.2.4 Declaration of Conformity (Standards)
The Tobii Glasses 2 Recording unit and its handling comply with the following standards:
• EMC Emission: EN55022:2010 Class B, FCC part 15, Class B
• EMC Immunity: EN55024:2010
• SAR EN62311:2008
• Low Voltage Directive 2006/95/EEG
• EMC Directive 2004/108/EC
• Radio and Telecommunications Terminal Equipment Directive (R&TTE) 1999/5/EC
• RoHS Directive 2002/95/EC
• RoHS2 Directive 2006/121/EC
1 Safety and Compliance
4
Tobii Glasses 2 Eye Tracker User’s manual v.1.0.2 - en-US
Page 13

• WEEE Directive 2002/96/EC
• Reach Directive 2006/121/EC
• China RoHS Directive
• CFR 47 (FCC) part 15, Class B
• Canadian ICES-003
• Japan TCM mark (WLAN) [Ref 4]
• Japan VCCI mark
• IEC/EN/UL60950-1:2005 (Electrical safety for global/EU/US)
1.3 Other limitations and considerations
1.3.1 Intended use
Tobii Glasses 2 is intended to be used in research activities about human behavior including eye movements, involving adult participants in a dry and dust free indoor environment. The product should only be used as described in the
User’s Manual. Please read the User’s Manual and other supplied documentation thoroughly before using the
product.
1.3.2 SD memory cards
SD memory cards used in the Tobii Glasses 2 Recording Unit must be formatted as FAT32. SDHC cards are usually
pre-formatted as FAT32 and will work out of the box while SDXC cards must be formatted as FAT32 before they can
be used with the Recording Unit. Only use SD cards recommended by or supplied by Tobii.
1.3.3 Multiple connections between Glasses Controller Software and Recording Unit
Under no circumstances should the tablet or computer running Tobii Glasses Controller Software connect to the
same Recording Unit using both a wireless and a wired connection at the same time.
1.3.4 Eye movement classification
Gaze presented in the Live Viewer and replay tabs of Tobii Glasses Controller Software is filtered through a five-point
moving average filter. Such filters do not entirely mimic true eye movement behavior and fixations may seem to dynamically shift locations. This has no significant impact for qualitative observational analysis in Tobii Glasses Controller
Software. When data is transferred to Tobii Glasses Analysis Software, only raw, unfiltered data is transferred, giving
the analyst full access to more advanced eye movement classification filters suitable for quantitative analysis of gaze
data.
1.3.5 Light conditions
We recommend that eye tracking studies be performed in a controlled and well-lit environment. Sunlight should be
avoided since it contains high levels of infrared light which will interfere with the eye tracker system. Sunlight affects
eye tracking performance severely and longer exposure can overheat the eye tracker. The eye tracker is not designed
for exposure to (direct) sunlight. Eye tracking generally does not work in strong direct sunlight. Shielding the eye
tracker adequately from the sun may prevent sunlight from interfering with eye tracking. For better performance, use
the supplied tinted lenses if the product is used in an environment with strong sunlight..
1.3.6 Eyelashes
Long eyelashes can be obstructive when the participant’s eyes are less open, especially if the participant is wearing
mascara. In rare cases, eyelashes may completely block the view of the participant’s pupils, making eye tracking
impossible.
Tobii Glasses 2 Eye TrackerUser’s manual v.1.0.2 - en-US
1 Safety and Compliance
5
Page 14
1.3.7 Droopy eyelids
Droopy eyelids or otherwise obstructive eyelids can block the view of the participant’s pupils. In rare cases, such eyelids may completely block the view of the participant’s pupils, making eye tracking impossible.
1.3.8 Eye glasses and contact lenses
Tobii Glasses 2 is not designed to work in conjunction with standard eye glasses. Participants who wear eye glasses
should be screened out, or asked to remove their own glasses before wearing the Head Unit.
Standard contact lenses may slightly increase noise but do not normally introduce any errors in the data. Colored or
fancy lenses that change the appearance of the pupil or iris should be avoided as they might make eye tracking
impossible.
1.3.9 WLAN connectivity
WLAN signal quality is affected by different environmental factors such as the distance between the Recording Unit
and the tablet/computer, the presence of walls, windows, furniture and other objects, and the presence of other
WLAN devices and networks in the same area. A weak or low quality WLAN signal will decrease the quality of, or
even interrupt the Live Viewing video in Tobii Glasses Controller Software or even disconnect the Recording Unit
from the tablet/ computer.
1.3.10 Power
We recommend that you connect the power cord of the chargers to an outlet with a protective earth/ground connection. Use an accessible outlet and make sure the cords are properly placed to avoid the risk of tripping. Never use
damaged power cords.
1.3.11 Keeping Tobii Glasses Controller Software and the Recording Unit firmware up to date
From time to time Tobii will release updates for the eye tracker firmware and Tobii Glasses Controller Software that
will improve performance and/or introduce new functionality. When a new version of Tobii Glasses Controller Software or the Recording Unit firmware is available, the user will be notified with an alert symbol at the top of the user interface if the computer is online. Alternatively, the latest firmware and software can be downloaded from the Tobii
Support website http://www.tobii.com/analysissupport Make sure to regularly check for and update to the latest version of the software and firmware.
1 Safety and Compliance
6
Tobii Glasses 2 Eye Tracker User’s manual v.1.0.2 - en-US
Page 15
2 Introduction
Tobii Glasses 2 is designed to enable easy, precise and efficient collection of eye tracking data in a wide variety of research
scenarios. The discreet, ultra-lightweight design ensures natural behavior and research validity in both qualitative and quantitative real-world research. Accurate data and robust eye tracking capabilities can be relied on in uncontrolled situations and realworld environments.
2.1 Intended use
Tobii Glasses 2 is intended to be used in research activities about human behavior including eye movements, involving adult
participants in a dry and dust free indoor environment. The product should only be used as described in the User’s Manual.
Please read the User’s Manual and other supplied documentation thoroughly before using the product.
2.2 Usage overview
The Tobii Glasses 2 eye tracking system is designed to be used for research purposes with adult participants and it includes
the lightweight Tobii Glasses Head Unit, a wearable Recording Unit and Tobii Glasses Controller Software running on a Window 8 Pro tablet or any Windows 8/8.1 or Windows 7 computer. The tablet/computer may or may not be included in the shipment depending on what package was purchased.
To record eye tracking data, the Tobii Glasses Head Unit must be fitted onto the test participant’s head (similar to a standard
pair of glasses). The system must then be calibrated separately for each participant. In the calibration process the test participant is asked to look at a Calibration Card held in-front of the participant for a few seconds. The researcher then starts the recording from Tobii Glasses Controller Software running on a Windows 8/8.1 Pro tablet or any Windows 8/8.1 or 7 computer.
After the session, the researcher stops the recording and removes the head unit from the test participant. All interactions with
the eye tracker (adding participants to test, initiating calibration, starting/stopping recordings etc.) are done through Tobii
Glasses Controller Software. The controller software also enables the researcher to view the eye tracking session both in realtime (streamed through a wireless or wired connection) and after the recording. When viewing a recording, the participant’s
gaze point appears as a colored dot on the scene camera video from the HD camera integrated in the Tobii Glasses 2 Head
Unit.
For any eye tracking analysis beyond looking at the eye tracking replay (as described above), recorded data must be transferred
to a computer running Tobii Glasses Analysis Software. Tobii Glasses Analysis Software runs on Windows computers and must
be purchased separately. Tobii Eye Trackers are designed for use in indoor office environments.
Tobii Glasses 2 Eye TrackerUser’s manual v.1.0.2 - en-US
2 Introduction
7
Page 16
3 Installing and Updating Tobii Glasses
Controller Software
Tobii Glasses Controller Software is designed to be installed on a Window 8/8.1 Pro tablet but can also be installed on any
Windows 8/8.1 or 7 computer. Please refer to the System Recommendations document for the most current computer requirements for Tobii Glasses Controller Software.
3.1 Obtaining the Tobii Glasses Controller Software installer
A download link to the installer for Tobii Glasses Controller Software is found on the USB memory stick included in the Tobii
Glasses 2 hardware package. Alternatively, the latest version of Tobii Glasses Controller Software can be downloaded from the
Tobii Support website at http://www.tobii.com/analysissupport. For best performance of the software check for updates frequently and install available new releases.
3.2 Installing Tobii Glasses Controller Software
To install Tobii Glasses Controller Software:
• Tap or click the installation file and follow the instructions on the screen.
Tobii Glasses Controller Software uses the following ports to communicate with the Recording Unit: 13006 (udp),
80 (tcp, http), 49152 (udp). Please make sure to allow the software to use these ports in Windows Firewall.
We recommend you don’t installing any antivirus software on your tablet/computer as these may block communication between your tablet and the Tobii Glasses 2 Eye Tracker. For best performance also avoid installing any application that relies on constant Internet access such as Skype, Spotify or other similar communication or media software.
3.3 Updating Tobii Glasses Controller Software
When a new version of Tobii Glasses Controller Software is available, the user will be notified with an alert symbol at the top of
the user interface if the computer is online.
To update Tobii Glasses Controller Software:
1. Tap the alert symbol.
2. Tap Release Notes to read the release notes.
3. Tap Update to update Tobii Glasses Controller Software and follow the instructions on the screen.
3 Installing and Updating Tobii Glasses Controller Software
8
Tobii Glasses 2 Eye Tracker User’s manual v.1.0.2 - en-US
Page 17

4 Updating the Tobii Glasses Recording
Unit firmware
From time to time Tobii will release new updates of the Tobii Glasses Recording Unit firmware that will improve performance
and/or introduce new functionality. Updating the Recording Unit firmware is done through Tobii Glasses Controller Software. If
the computer is online Tobii Controller Software will indicate with an alert on the dashboard if there is a new firmware available.
The Recording Unit may also be updated using an SD memory card with the new firmware. If this alternative is necessary, contact Tobii Support or visit http://www.tobii.com/analysissupport for further instructions and to download the latest firmware.
To update the Recording Unit firmware:
1. Make sure Tobii Glasses Controller Software is connected to the Recording Unit with an Ethernet cable and that the Recording Unit is powered.
2. Tap the Settings icon on the Dashboard of the Glasses Control Panel for the relevant Recording Unit.
3. To initiate firmware upgrade, Tap Upgrade Firmware, and follow the instructions on the screen.
Tobii Glasses 2 Eye TrackerUser’s manual v.1.0.2 - en-US
4 Updating the Tobii Glasses Recording Unit firmware
9
Page 18
5 Getting to know Tobii Glasses 2
5.1 System overview
5.1.1 Tobii Glasses 2 Packages
Tobii Glasses 2 is sold in four different packages. An overview of the package contents is presented in the table below.
Components
Head Unit
Recording Unit
Protective lenses (2 pcs) - 1 clear & 1
tinted
Nose Pads in different sizes (4 pcs)
Head Strap
Rechargeable Li-ion batteries type
18650 (4 pcs)
Battery charger for Li-Ion batteries +
power cables (EU, US, UK + AUS)
USB charger for Recording Unit +
power plugs (EU, US, UK + AUS)
SD memory cards (3 pcs) + sleeves
Calibration cards (3 pcs)
Calibration stickers (10 pcs)
Carry case for Tobii Glasses 2
USB memory stick with documentation
and software
Safety and compliance document
(printed)
User’s Manual (PDF)
Quick start guide (printed and PDF)
HDMI A to HDMI D cable
Ethernet cable (3 meters)
USB to micro USB cable for Recording
Unit charging
Cable cord clip
Microfiber cleaning cloth
Glasses Controller Software
Glasses Analysis Software
WLAN functionality
Dell Windows 8.1 Pro tablet
1
Live View
Package
● ● ● ●
● ● ● ●
● ● ● ●
● ● ● ●
● ● ● ●
● ● ● ●
● ● ● ●
● ● ● ●
● ● ● ●
● ● ● ●
● ● ● ●
● ● ● ●
● ● ● ●
● ● ● ●
● ● ● ●
● ● ● ●
● ● ● ●
● ● ● ●
● ● ● ●
● ● ● ●
● ● ● ●
● ● ● ●
Live View Wire-
less Package
● ● ●
Premium
Package
● ●
●
Subscription
Package
1. See separate product description for details.
5 Getting to know Tobii Glasses 2
10
Tobii Glasses 2 Eye Tracker User’s manual v.1.0.2 - en-US
Page 19
One day onsite installation and startup
2
training
Tobii Care
2
●
●
5.1.2 System components
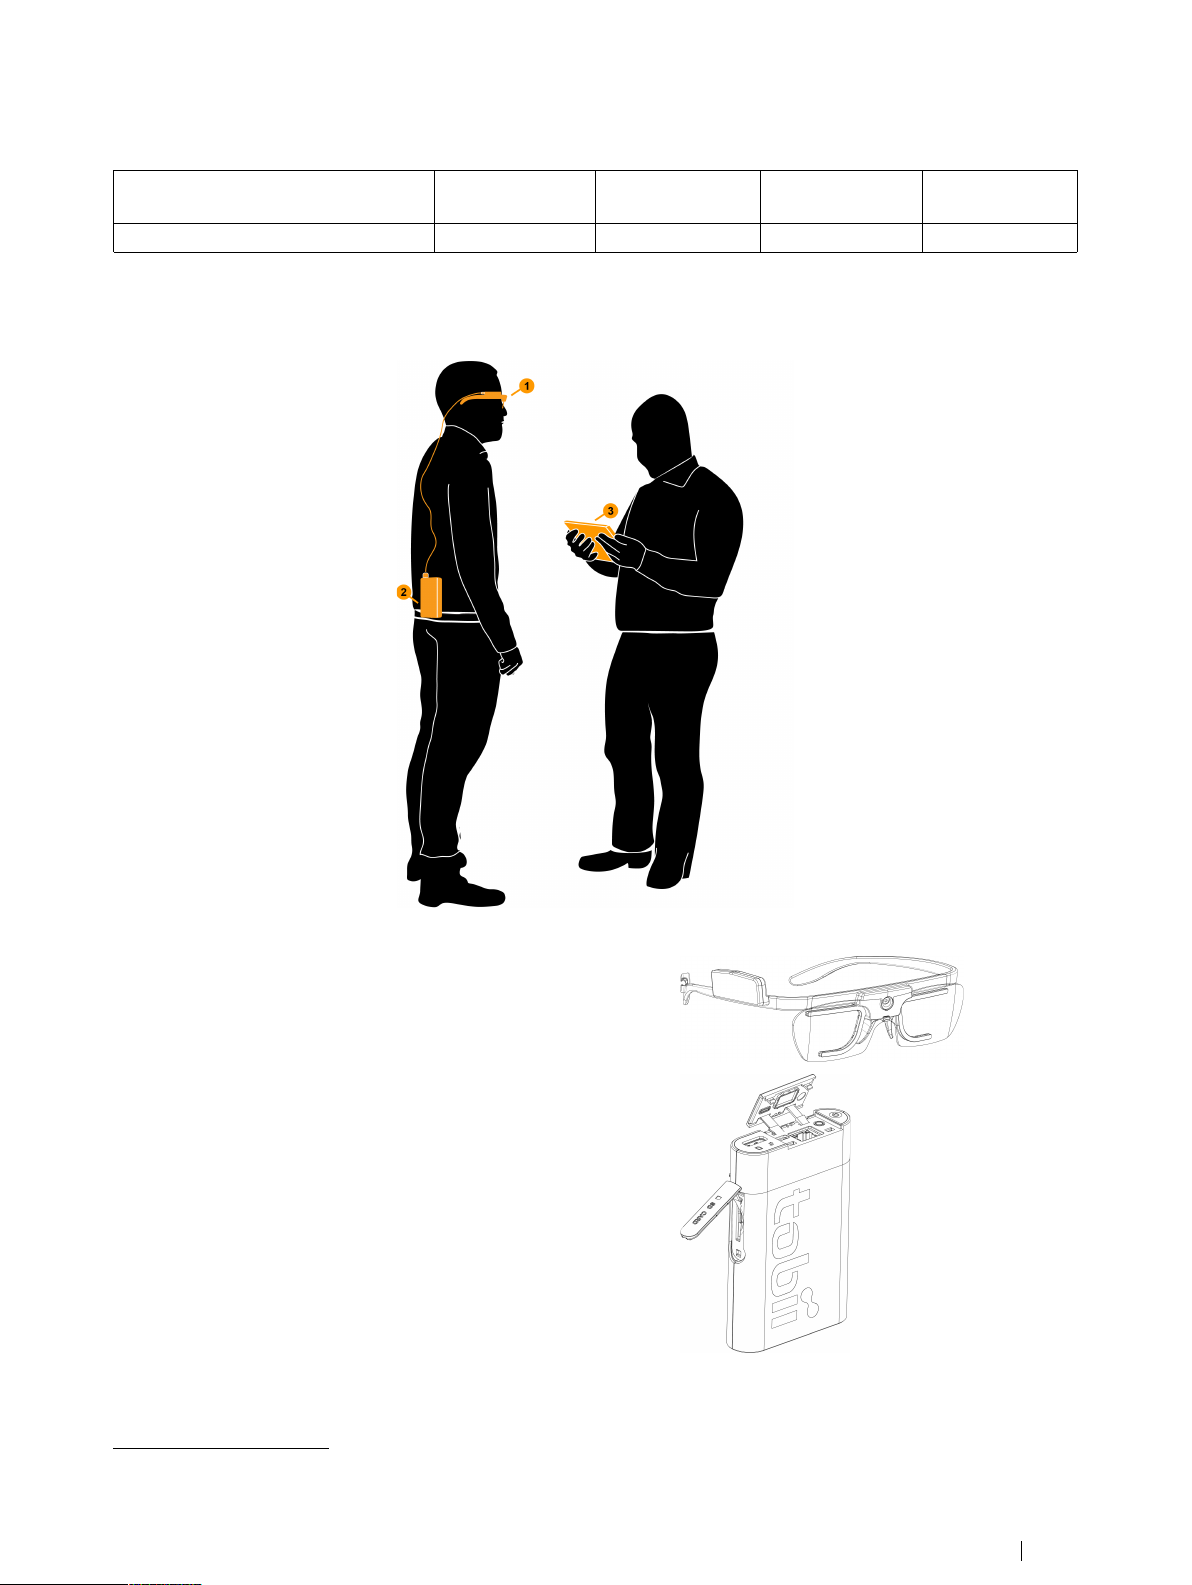
The Tobii Glasses 2 system is made up of several components. Each component is briefly described below.
The system includes:
1. A wearable eye tracker (glasses), referred to as the Head Unit.
2. A Recording Unit, connected to the Head Unit via an HDMI cable.
The Recording Unit holds the battery and stores the recorded data
on an SD memory card. The Recording Unit is controlled from a
tablet or computer running Tobii Glasses Controller Software.
2. See separate product description for details.
Tobii Glasses 2 Eye TrackerUser’s manual v.1.0.2 - en-US
5 Getting to know Tobii Glasses 2
11
Page 20
3. A Windows 7 or Windows 8/8.1 Pro tablet3or computer running Tobii Controller Software. Tobii Glasses Controller allows
for managing participants, controlling the eye tracker and viewing both real-time and recorded eye tracking data. Tobii
Glasses Controller connects to the eye tracker through an Ethernet connection (either wireless or wired). No eye tracking
data is stored on the tablet computer.
4. Tobii Glasses Analysis Software
4
(optional) installed on a Windows computer. Any eye tracking analysis beyond qualitative
analysis of eye tracking session replay, is carried out using Tobii Glasses Analysis Software.
The Recording Unit contains radio transmitters and receivers (WLAN). Make sure that it is placed as far as possible
from any equipment, objects or body parts sensitive to such signals.
The Tobii Glasses 2 Head Unit is designed to connect only to the Tobii Glasses 2 Recording Unit and should not be
connected to any other device.
The Tobii Glasses 2 Recording Unit is designed to connect only to the Tobii Glasses 2 Head Unit and a Windows 8/
8.1 Pro tablet or any Windows 8/8.1 or 7 tablet/computer running Tobii Glasses Controller Software. The Recording
Unit should not be connected to any other devices.
Tobii Glasses Controller Software is designed to be used only with Tobii Glasses 2 Eye Trackers. No other types of
eye trackers can or should be used together with Tobii Glasses Controller Software.
Tobii Glasses Controller Software is designed to be installed and used on Windows 8/8.1 Pro tablets or any Windows 8/8.1 or 7 computer. The software should not be installed on any other types of devices.
5.1.3 Tobii Glasses 2 Head Unit
The Head Unit is a highly sophisticated measuring device. It consists of several very sensitive sensors and must be cared for as
instructed for it to work properly.
The Head Unit consists of the following parts:
3. Only included in the Tobii Glasses 2 Premium Package. Must be purchased separately for all other packages.
4. Only included in the Tobii Glasses 2 Premium and Subscription packages. Must be purchased separately for all other packages.
5 Getting to know Tobii Glasses 2
12
Tobii Glasses 2 Eye Tracker User’s manual v.1.0.2 - en-US
Page 21

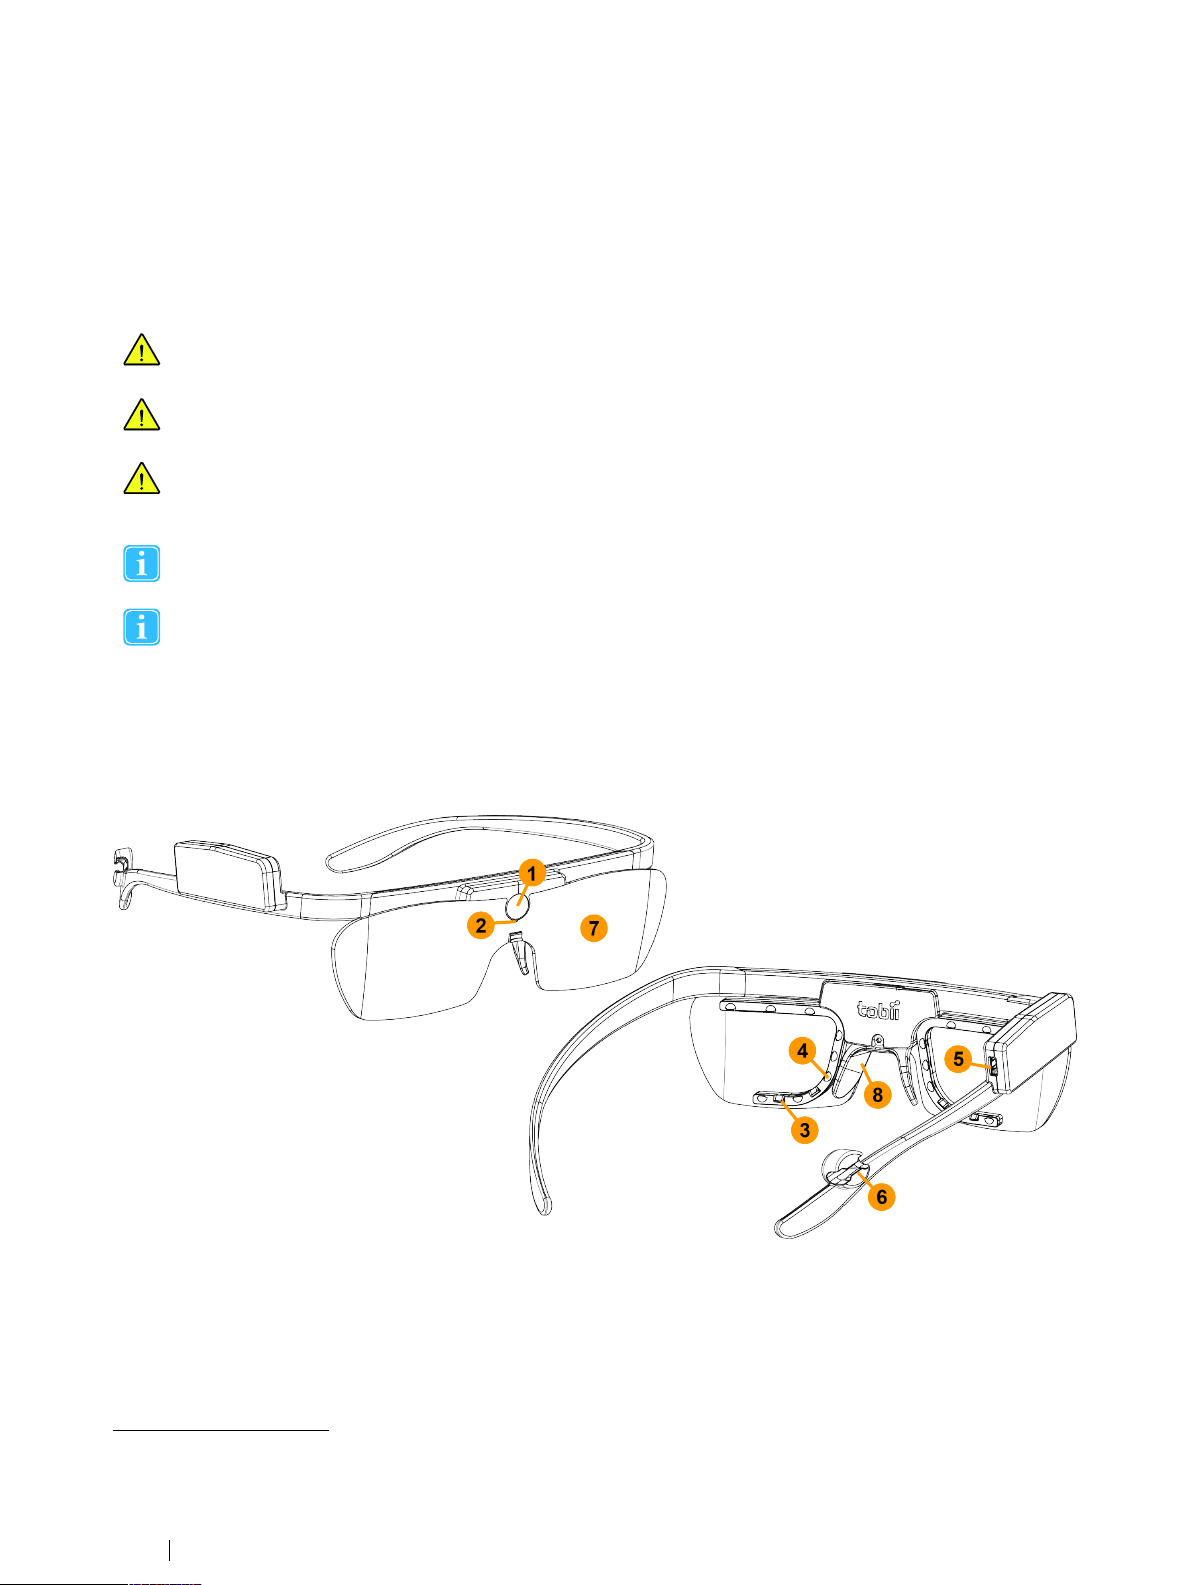
1. High-definition scene camera – Captures a high-definition video of what is in front of the participant.
2. Microphone – Picks up sounds from the participant and its surroundings.
3. Eye tracking sensors – Records eye orientation e.g. the direction of the eye gaze.
4. IR illuminators – Illuminates the eyes to support the eye tracking sensors.
5. Micro HDMI connector – Connects to Tobii Glasses Recording Unit via the supplied HDMI cable.
6. Cable guide – Guides the HDMI cable towards the participant’s back.
7. Protective lens – Both clear and tinted versions supplied
8. Nose pad — Exchangeable and available in different sizes.
5.1.4 Tobii Glasses 2 Recording Unit
The Recording Unit is a small computer that controls the Head Unit (the eye tracking glasses). It records and stores eye tracking
data, sounds and scene camera video on a removable SD memory card. The Recording Unit carries a replaceable and rechargeable Li-ion battery that supplies power to both the Recording Unit and the Head Unit. The Recording Unit has several
connectors and a power button and is controlled from Tobii Controller Software.
The Recording Unit consists of the following parts:
Tobii Glasses 2 Eye TrackerUser’s manual v.1.0.2 - en-US
5 Getting to know Tobii Glasses 2
13
Page 22

1. Power button & power indicator LED Touch button that turns the Recording Unit on
and off. LED indicates power state and remaining battery power.
2. 3.5 mm connector for data synchroniza-
tion– Currently not in use.
3. LAN port – Connects to a Windows tablet or
computer running Tobii Controller Software, via
the supplied Ethernet cable. The Recording Unit
can also be connected to the tablet or computer
via WLAN
4. Connection status LED – Indicates connection to Head Unit and Tobii Glasses Controller
Software.
5. SD card Activity LED – Indicates if SD memory
card is present and if Recording Unit is busy
writing on the SD memory card.
6. HDMI connector – Connects to Tobii Glasses
2 Head Unit via the supplied HDMI cable.
7. Micro USB connector – Connects to USB
charger for powering the unit and charging the
battery.
8. SD memory card slot – Slot for SD memory
card for storage of recorded data.
9. Battery compartment – Holds the battery for
the Recording Unit and Head Unit
10. Belt clip – For attaching the Recording Unit to
participant’s belt.
5
.
5.2 Tobii Glasses Controller Software user interface overview
This section aims to give a broad overview of the user interface of Tobii Glasses Controller Software. For hands on instructions,
see section 7 Basic Operations with Tobii Glasses 2, page 18.
The Tobii Glasses Controller Software user interface has been optimized to enable easy and efficient data collection with Tobii
Glasses 2. The software also supports basic replay functionality for qualitative observational analysis and for validation of recorded data. Any further analysis should be performed using Tobii Glasses Analysis Software.
5.2.1 About the software
This is where you access information about Tobii Glasses Controller Software such as the version number.
5. Not available in the Tobii Glasses 2 Live View Package.
5 Getting to know Tobii Glasses 2
14
Tobii Glasses 2 Eye Tracker User’s manual v.1.0.2 - en-US
Page 23
5.2.2 Studies (Create or switch study)
This is where you manage your active studies. From here you can create, delete and switch between studies.
5.2.3 Dashboard
The Dashboard is where you start, pause and stop recordings, and where you get an overview of what is going on right now.
The Dashboard consists of Glasses Control Panels, one for each Recording Unit currently or previously connected to Glasses
Controller Software. Each Glasses Control Panel provides information about whether or not there is a connection between
Controller Software and the Recording Unit. When there is a connection, the Glasses Control Panel provides buttons to control
the Recording Unit, information about remaining battery power and SD memory card storage capacity. The Dashboard is independent of the opened study.
The Dashboard synchronizes data from the Tobii Glasses Recording Unit only when there is a connection between
the Recording Unit and Tobii Glasses Controller Software.
5.2.4 Live Viewer
Live Viewer allows you to view real-time eye tracking data overlaid on the scene camera video while you make a recording. It also provides buttons to stop and pause a recording, and displays critical information such as remaining battery, memory time
and recording duration. The Live Viewer only works when the Recording Unit is connected to Glasses Controller Software (over
WLAN or by wired connection). For best performance use a wired connection.
5.2.5 Recording List
Recordings List is a searchable and sortable list about completed recordings in the currently open study., Individual recordings
can be replayed and exported as a gaze replay video from the Recordings List.
No video or eye tracking data is stored on the tablet running Tobii Glasses Controller Software. Data is instead stored
on the SD memory card inside the Recording Unit. This means that for any replay to work, the Recording Unit, complete with the SD memory card that was used for recording, must be connected to Tobii Glasses Controller Software.
For best performance use a wired connection.
5.2.6 Participants List
Participants List allows you to manage participants, whether you want to add new participants or find information or recordings
for a specific participant. Participants shown in the Participants List are the participants associated to the currently open study.
Tobii Glasses 2 Eye TrackerUser’s manual v.1.0.2 - en-US
5 Getting to know Tobii Glasses 2
15
Page 24

6 Workflow Quick Guide
This section is a quick guide on how to use Tobii Glasses 2. For in depth descriptions on basic operations and handling procedures, refer to the following sections.
6.1 Preparations before a data collection day
We recommend making a test recording before going into the field for data collection. To make a test recording follow the steps
in section 7.5 Recording with Tobii Glasses 2, page 27.
6.1.1 Charging batteries and preparing memory cards
1. Charge Recording Unit batteries. See section 7.1.1 Charging Recording Unit batteries, page 18
2. Charge your Windows tablet or computer. See the User’s manual for the computer.
3. Backup any old data on SD memory cards if necessary. See section 7.11 Backing up recorded data, page 30
4. Insert memory card in Recording Unit. See section 7.1.3 Inserting/removing an SD memory card in the Recording Unit,
page 20
5. Make sure you bring all necessary parts and components and make sure they are packaged and transported with care.
6.2 Data collection
We recommend making a test recording at the start of a new data collection day.
6.2.1 Preparing for recording
1. Use the supplied microfiber cloth to clean the Head Unit. Make sure to clean all optical parts such as the eye tracking
sensors and IR illuminators for best performance.
2. Turn the Tobii Glasses Eye Tracker and Tablet on. See section 7.1.7 Turning Tobii Glasses 2 on and off, page 22.
3. Start Tobii Glasses Controller Software on the Tablet or computer.
4. Open an existing study or create a new. See section 7.2 Managing study data in Tobii Glasses Controller Software,
page 22.
5. Connect the Recording Unit and tablet/computer (via Ethernet cable or WLAN). See section 7.3 Connecting the Tablet
running Tobii Glasses Controller Software to a Recording Unit.
6.2.2 Making recordings
1. Check battery and memory levels on the Tobii Glasses Controller Software Dashboard.
2. Fit the Glasses onto the participant. See section 7.4 Fitting the Tobii Glasses 2 Eye Tracker onto a participant for re-
cording, page 26.
3. Start a new recording by using an existing participant name or by creating a new one. See section 7.5 Recording with
Tobii Glasses 2, page 27. This process includes calibrating the participant and verifying the accuracy though the Live
Viewer before starting the actual recording.
4. If connected by Ethernet cable, disconnect the cable after the start of the recording if it is necessary for the participant
to walk around freely.
5. Ask the participant to perform the tasks.
6. When the data collection is complete, connect the Recording Unit to the tablet if it has been disconnected. See section
7.3 Connecting the Tablet running Tobii Glasses Controller Software to a Recording Unit, page 23.
7. Stop the recording on the Dashboard or through the Live Viewer. See section 7.5.3 Stopping a recording in progress,
page 28.
6 Workflow Quick Guide
16
Tobii Glasses 2 Eye Tracker User’s manual v.1.0.2 - en-US
Page 25

8. Remove the Glasses from the participant.
6.2.3 Checking the recording
1. Check recorded data by replaying the video from the Recording List. See section 7.8 Replaying a recording, page 30.
6.2.4 Turning the Glasses off
1. Check battery and memory levels on the Dashboard.
2. On the Recording Unit, press and hold the power button until the LEDs stop flashing. Release the button and the Recording Unit will turn off within the next 10 seconds.
6.3 After data collection
1. Back up all recorded data from the SD memory card to an external storage drive. See section: 7.11 Backing up recorded data, page 30
2. Charge Recording Unit batteries. See section 7.1.1 Charging Recording Unit batteries, page 18.
3. Charge Tablet computer. See tablet/computer user manual
6.4 Further analysis with Tobii Glasses Analysis Software
To perform any analysis beyond simple replay of a recording, you need to import your recordings into Tobii Glasses Analysis
Software. Tobii Glasses Analysis Software is a separate software and must be purchased separately. Please refer to the Tobii
Glasses Analysis Software User’s Manual for more information on how to use the software.
Tobii Glasses 2 Eye TrackerUser’s manual v.1.0.2 - en-US
6 Workflow Quick Guide
17
Page 26

7 Basic Operations with Tobii Glasses 2
This section covers the basic operating procedures for all components in the Tobii Glasses 2 eye tracking system, including the
Head Unit, Recording Unit and Tobii Glasses Controller Software.
7.1 Setting up Tobii Glasses 2 hardware
This section covers how to assemble and prepare the hardware.
To get Tobii Glasses 2 ready for use, follow the instructions in the sections below.
7.1.1 Charging Recording Unit batteries
When charging Recording Unit batteries, use the supplied battery charger.
Charging the battery inside the Recording Unit by using the USB charger
should only be considered a backup solution.
7.1.1.1 Charging the Glasses Recording Unit battery using the battery charger
1. Locate the battery charger in the Tobii Glasses 2 package.
2. Gently pull down the bottom spring-tensioned tabs and insert rechargeable batteries with the positive end (+) at the top
of the charger and negative end (-) against the bottom spring tab.
3. Plug the power cord into a standard AC outlet. The charger automatically checks the status of the battery inserted while
the LCD screen displays readouts of current voltage and charging status for each battery.
No batteries are loaded OR the battery has been damaged OR the battery has been inserted upside
down.
Charging in process with battery voltage displayed and capacity bars flashing.
Fully charged (4.2 Volts) as indicated by battery voltage display and three solid bars above.
4. Remove the batteries and unplug the power cord when done charging.
7 Basic Operations with Tobii Glasses 2
18
Tobii Glasses 2 Eye Tracker User’s manual v.1.0.2 - en-US
Page 27
The Tobii Glasses 2 system includes rechargeable Lithium-ion batteries. Lithium-ion batteries can explode or cause a
fire if they are used or charged incorrectly or if they are defective.
Do not short-circuit battery poles. Do not expose the battery to water or humidity. Do not expose batteries to heat, direct sunlight, solder or fire. Immediately disconnect the batteries if, during operation, they emit an unusual smell, feel
hot, change shape/dimensions, or behave abnormally. Do not use any defective batteries.
To recharge the batteries, use a battery charger specifically designed for the purpose and observe the recharging instructions specified by the manufacturer of the charger. Charge the batteries under supervision and do not place
combustible materials close to or on top of the batteries or the charger, as this may result in overheating, explosion or
fire.
Never install batteries backwards or attempt to charge non-rechargeable batteries in the battery charger.
For you protection and for the batteries being charged, use the charger only as instructed.
Discontinue use if the battery contacts, cord or charger are dropped or damaged in any way.
Always disconnect the power supply and remove the batteries when charging is complete.
Do not attempt to charge with AC and car power sources at the same time.
Under no circumstances should the charger be dismantled, modified or used for other purposes.
Keep the charger out of the reach of children.
7.1.1.2 Charging the Glasses Recording Unit battery using USB charger
Charging a battery inside the Recording Unit using the supplied USB charger should be considered a backup solution. We recommend charging the batteries using the supplied stand-alone battery charger. If the Recording Unit is in use while it is being
charged with the USB charger, the Recording Unit may become hot. If so, stop charging the battery. The Power LED on the Recording Unit will blink green when the battery is being charged.
To charge a battery inside the Recording Unit:
1. Locate the USB charger in the Tobii Glasses 2 package.
2. With the battery inside the Recording Unit, connect the micro USB cable to the Recording Unit.
3. Plug the USB charger into a standard AC outlet. The Recording Unit will NOT display any evidence that the battery is
being charged on any of the LEDs.
Tobii Glasses 2 Eye TrackerUser’s manual v.1.0.2 - en-US
7 Basic Operations with Tobii Glasses 2
19
Page 28

7.1.2 Inserting/removing the battery – Glasses Recording Unit
Only use the supplied rechargeable Li–ion batteries (type
18650, 4.2 Volts) in the Recording Unit.
To insert a battery into the Tobii Glasses Recording
Unit (See illustration to the right):
1. Turn off the Recording Unit.
2. Push and turn the bottom of the Recording Unit and then
lift the battery compartment lid.
3. Remove any old battery and insert a new one. When inserting a new battery, make sure to turn the battery so
that the positive end (+) is at the top of the Recording
Unit and the negative end (-) is against the bottom.
4. Put the battery container lid back on and lock it by pushturning it.
Never insert batteries the wrong way in the Recording Unit as this may damage the device. The battery should be inserted with the positive end (+) at the top of the Recording Unit and the negative end (-) against the bottom.
Never insert any other type of batteries than the supplied Li–ion batteries (type 18650, 4.2 Volts) in the Recording
Unit as this may damage the device permanently.
7.1.3 Inserting/removing an SD memory card in the Recording Unit
To insert an SD memory card into the Tobii Glasses Recording Unit (See illustration above):
1. Tap the Eject symbol on Tobii Glasses Controller Software Dashboard for the relevant Recording Unit.
2. Tap Yes in the dialog box to confirm.
3. Open the SD memory card lid of the Recording Unit.
4. To release the SD memory card gently press the SD memory card inside the Recording Unit. Remove the SD memory
card.
5. Gently insert a new SD memory card into the SD memory card slot with the contacts facing upward (towards the same
side as the Tobii logo on the side of the Recording Unit).
6. Close the SD memory card lid.
Never remove the SD card from the Glasses 2 Recording Unit while a recording is ongoing as doing so will corrupt
any data being recorded.
The Recording Unit only supports SD memory cards formatted as FAT32. Make sure to format any new SD memory
cards as FAT32 before inserting them in the Recording Unit. New SDXC SD memory cards must always be formatted
as FAT32 before they will work with the Recording Unit.
7 Basic Operations with Tobii Glasses 2
20
Tobii Glasses 2 Eye Tracker User’s manual v.1.0.2 - en-US
Page 29

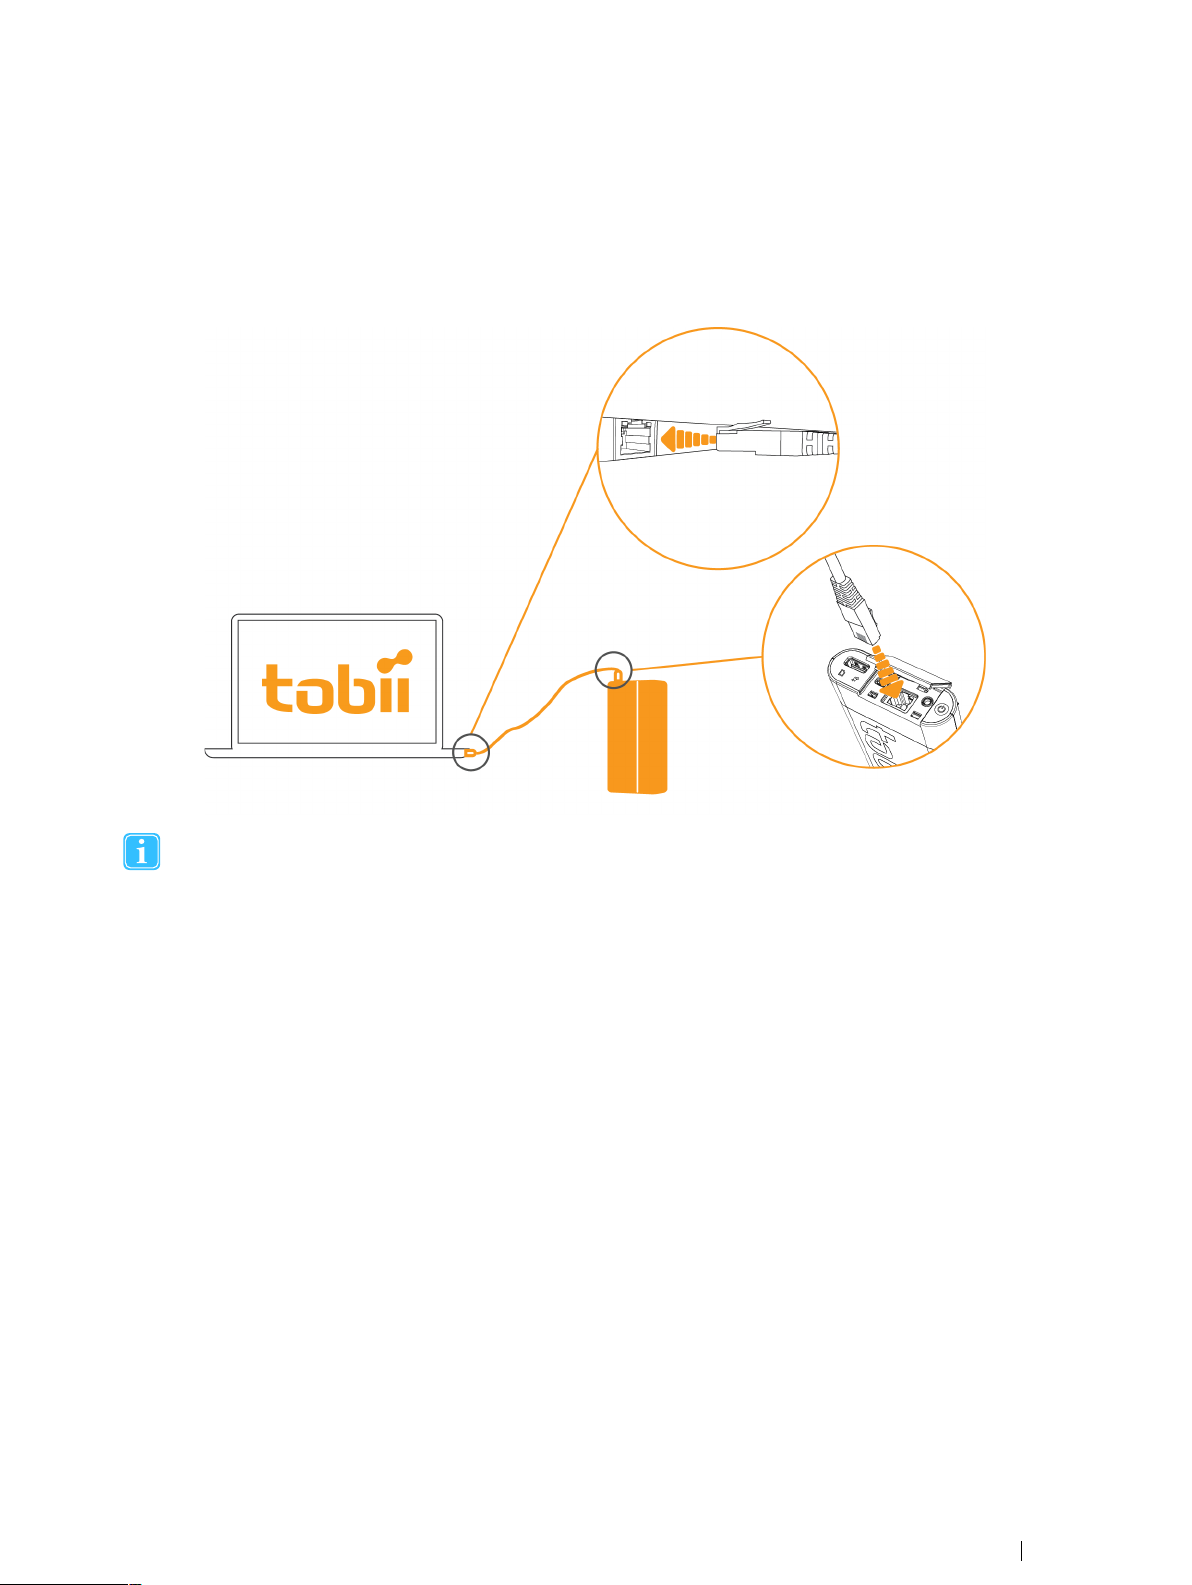
7.1.4 Connecting the HDMI cable
1. On the Head Unit, gently connect the HDMI cable to the micro
HDMI connector and then attach the cable to the Cable Guide.
2. Connect the other end of the HDMI cable to the Recording Unit
HDMI connector.
7.1.5 Changing nose pads (remove and mount new):
1. To remove the existing nose pad: Gently squeeze the
tips of the nose pad towards each other and then gently
pull the nose pad straight away from its mounting.
2. To mount a new nose pad: Gently squeeze the tips of
the nose pad towards each other and then gently push
the Nose pad straight onto the mounting indentations.
Tobii Glasses 2 Eye TrackerUser’s manual v.1.0.2 - en-US
7 Basic Operations with Tobii Glasses 2
21
Page 30

7.1.6 Changing the lenses on the Head Unit
Glasses 2 comes with two different protective lenses, one clear and one tinted. The tinted lens is intended to be used in bright
or sunny environments, while the clear lens is intended for general use. Glasses 2 will function even though no lens is attached
to the Head Unit.
1. Locate the small hook that keeps the lens in place, located between the scene camera and the nose pad at the front of
the Tobii Glasses Head Unit.
2. To remove the existing lens: Gently push the hook downwards while gently turning the lens past the retaining clip.
3. To mount a lens: Fit the position guides into the indentations, and then gently press the lens past the retaining clip so
that it locks in place.
7.1.7 Turning Tobii Glasses 2 on and off
To turn on the Tobii Glasses 2 Eye Tracker (implies
that the Recording Unit is turned off):
1. Make sure the eye tracker is fully assembled according
to the instructions above.
2. On the Recording Unit, press and hold the power button
for approximately 3 seconds (until the Connection Status LED and the SD card Activity LED flash green to indicate startup.)
To turn off the Tobii Glasses 2 Eye Tracker (Implies
that Recording Unit is turned on):
• On the Recording Unit, press and hold the power button
for at least 4 seconds.
• During these 4 seconds, before the actual shutdown
process begins, the Connection Status LED and the SD
card Activity LED flash yellow to indicate that the Recording Unit is about to start the shutdown process.
• When the Connection Status LED and the SD card Activity LED turn bright yellow, the shutdown process begins and the button can be released.
7.2 Managing study data in Tobii Glasses Controller Software
7.2.1 Creating a new study
When a new study is created, a new file container for participants and recordings is created automatically. Participants and recordings are not shared among studies.
To create a new study:
1. Tap Studies.
2. Tap Create New Study in the lower right hand corner.
3. Type a name for your study in the Create New Study dialog box.
4. Tap Create.
7.2.2 Adding participants to a study
Participants can be added to a study in two different ways — either as a part of creating a recording (see section 7.5 Recording
with Tobii Glasses 2, page 27), or through the Participants List (see below). If participants' names or identification codes are
7 Basic Operations with Tobii Glasses 2
22
Tobii Glasses 2 Eye Tracker User’s manual v.1.0.2 - en-US
Page 31

known beforehand, entering this information into the Tobii Glasses Controller Software in advance of data collection may simplify the participant set up process in the field.
Participants cannot be deleted or removed once they have been created in Tobii Glasses Controller Software.
To add a new participant to your study:
1. Tap Participants on the Menu bar.
2. Tap New Participant in the lower right hand corner. A Create new participant dialog box opens.
3. Type the participant’s name in the participant field and participant details in the participant info field.
4. Tap Create to add the participant to the study.
7.2.3 Opening a study (and switching from one study to another)
To open a study:
1. Tap Studies.
2. Tap Open for the study that you want to open. The list of studies can be sorted and searched.
7.2.4 Deleting a study in Tobii Glasses Controller Software
Deleting a study will only erase the meta data and information in Tobii Glasses Controller Software. It will not affect
any recordings and data stored on any SD memory card in the Recording Unit. Once a study is deleted it is no longer
possible to replay recordings or view information about recordings or participants from Glasses Controller Software.
Data on the SD memory cards can still be imported into Tobii Glasses Analysis Software.
To delete a study:
1. Tap Studies.
2. In the My Studies dialog, select the studies you want to delete by ticking the boxes.
3. Tap Delete. A confirmation dialog box appears.
4. Tap Yes, delete this study to confirm deleting of the study.
7.3 Connecting the Tablet running Tobii Glasses Controller Software to a Recording Unit
For Tobii Glasses Controller Software to be able to send or receive information to/from Tobii Glasses 2, the Recording Unit and
the tablet/computer running Tobii Glasses Controller Software must be connected to each other. The connection can either be
established over WLAN
stalled on the tablet running Tobii Glasses Controller Software). The Recording Unit works as a network access point, and a
computer running Tobii Glasses Controller Software connects to it in a way similar to how a computer would connect to any
network.
7.3.1 Connecting/Disconnecting over WLAN
To wirelessly connect the tablet/computer running Tobii Glasses Controller Software to the Recording Unit:
1. Open the Charms bar by sliding your finger inward from the screen’s right edge in Windows 8/8.1.
2. Tap settings in the Charms bar.
3. Tap the Wireless network icon. A list of available networks will appear. (It may take up to two minutes before a newly
started Recording Unit appears in the list of available networks.)
6
(wireless) or with an Ethernet cable (if using an Ethernet cable, a USB/LAN adapter needs to be in-
7
6. Not available in the Tobii Glasses 2 Live View Package.
7. Not available in the Tobii Glasses 2 Live View Package.
Tobii Glasses 2 Eye TrackerUser’s manual v.1.0.2 - en-US
7 Basic Operations with Tobii Glasses 2
23
Page 32
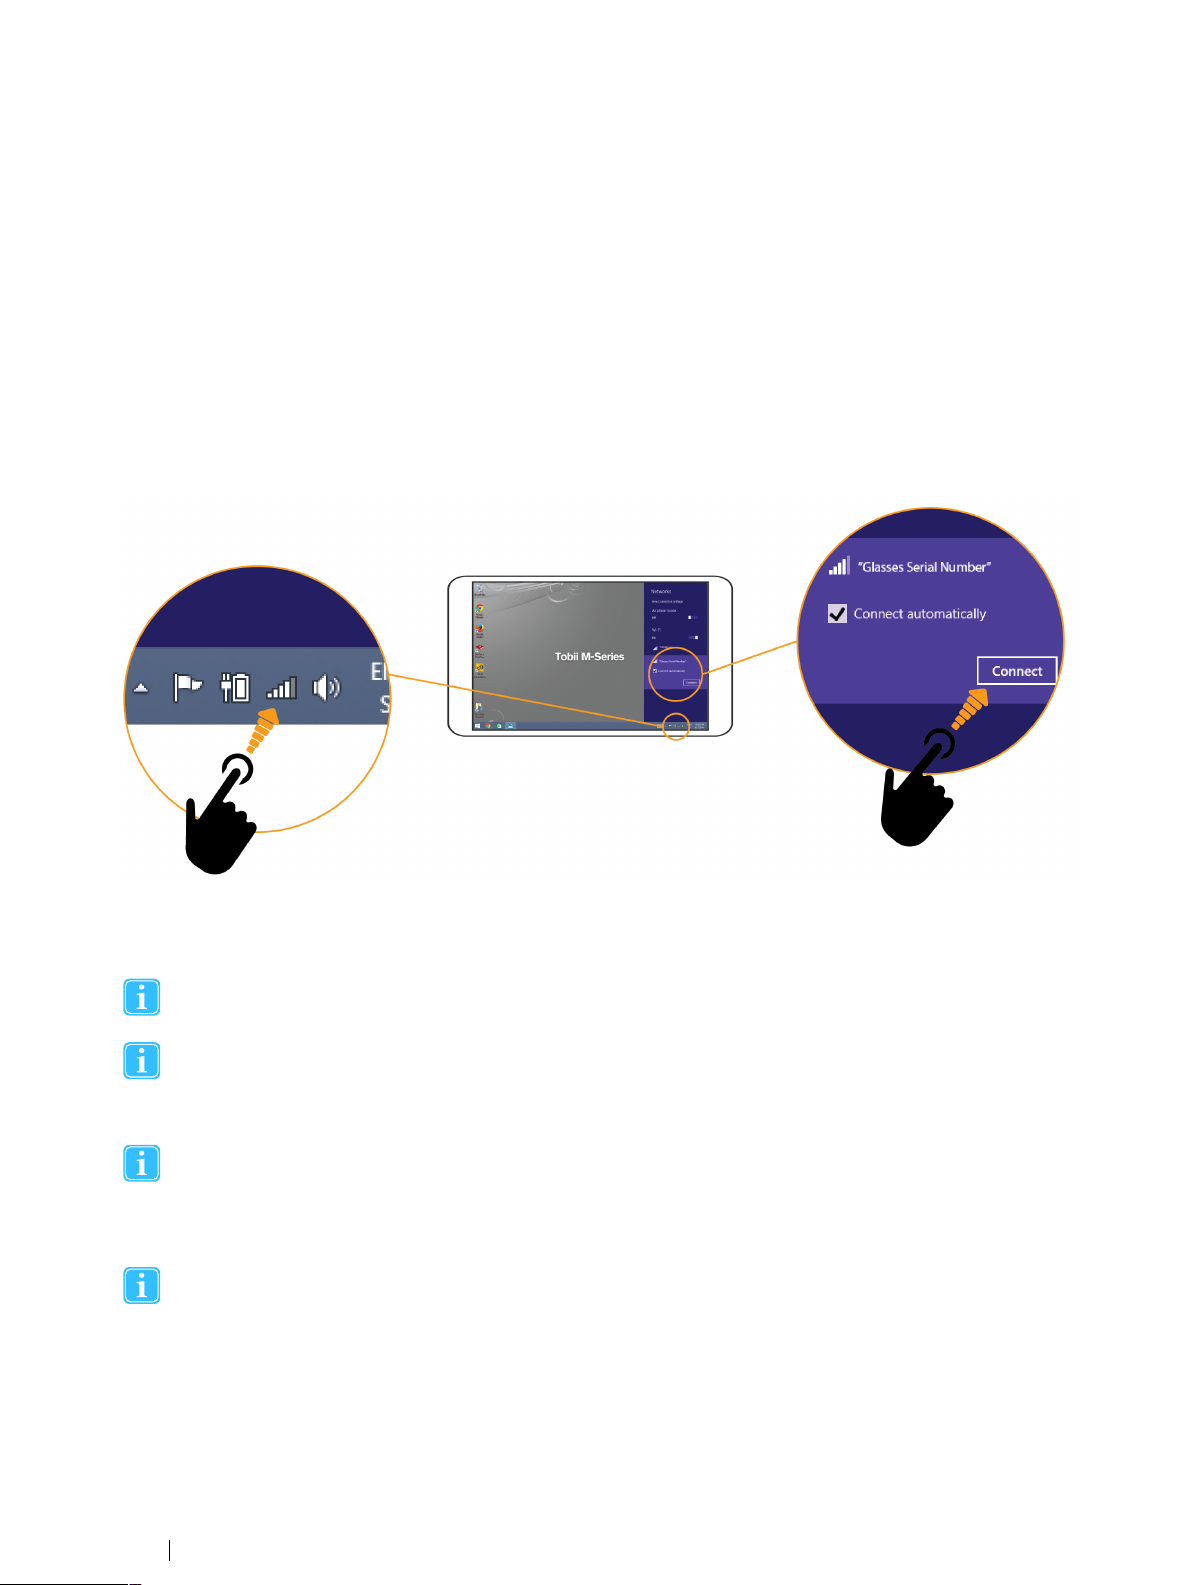
4. If the tablet/computer is already connected to another network (WLAN/internet/LAN connection etc), make sure to disconnect from this network first. You may otherwise experience that the tablet is not reconnecting automatically to the
Recording Unit after losing connection to it.
• To disconnect from your current network: tap Current connection and then tap Disconnect
5. Tap the WLAN network that has the same name as the serial number of your Recording Unit (TG02X-XXX...). You will
find the serial number on the sticker on the back of the Recording Unit.
6. Select the Connect automatically check box to always connect automatically to the Recording Unit.
7. Tap Connect.
8. Enter the WLAN password, TobiiGlasses into the network security key field and tap Next. It may take up to two minutes before Tobii Glasses Controller Software establishes a connection to the Recording Unit. On Tobii Glasses Controller Software Dashboard, the Glasses Control panel will display “Ready” whenever there is a connection between the
software and the Recording Unit.
The connection will be lost when either the tablet computer or the Recording Unit is turned off, or if the distance between the
tablet/computer and the Recording Unit is too great. When there is no connection between Tobii Glasses Controller Software
and the Recording Unit, the Glasses Control panel will display “Disconnected”.
For the best WLAN speed and performance we recommend using the power plan “High performance” on your tablet/computer.
If the tablet/computer is set to automatically connect to other wireless networks in range, the tablet will switch to any
of these networks if the Recording Unit goes out of range. Make sure to always disconnect manually from these networks to ensure that the tablet/computer running Tobii Glasses Controller Software will switch back once the Recording Unit comes back into range.
WLAN signal quality is affected by different environmental factors such as the distance between the Recording Unit
and the tablet, the presence of walls, windows, furniture and other objects, and the presence of other WLAN devices
and networks in the same area. A weak or low quality WLAN signal will decrease the quality of, or even interrupt the
Live Viewing video in Tobii Glasses Controller Software or even disconnect the Recording Unit from the tablet/
computer.
Networks settings on the tablet/computer must be set to Obtain an IP address automatically for the connection to
work correctly. On most computers this is the default setting.
7.3.2 Connecting/Disconnecting wired connection
To connect Tobii Glasses to Tobii Glasses Controller Software using an Ethernet cable:
1. Locate the LAN port on your tablet/computer or install a USB Ethernet adapter if there is no available ethernet port.
7 Basic Operations with Tobii Glasses 2
24
Tobii Glasses 2 Eye Tracker User’s manual v.1.0.2 - en-US
Page 33
2. Connect the Ethernet cable to the LAN port on the tablet/computer and to the Recording Unit LAN port. The Glasses
Control panel on Tobii Glasses Controller Software Dashboard will display “Ready” whenever there is a connection between the software and the Recording Unit.
The connection will be lost if the Ethernet cable is unplugged or if the tablet computer or Recording Unit is turned off. When
there is no connection between Tobii Glasses Controller Software and the Recording Unit, the Glasses Control panel will display “Disconnected”. The connection will be reestablished when the Ethernet cable is reconnected.
Networks settings on the tablet/computer must be set to Obtain an IP address automatically for the connection to
work correctly. On most computers this is the default setting.
7.3.3 Verifying the Recording Unit is connected to Tobii Glasses Controller Software
Once Tobii Glasses Controller Software has established a connection to the Recording Unit, a Glasses Control Panel for the
Recording Unit will appear on the Dashboard. When connection is lost the Glasses Control Panel will remain on the Dashboard,
but will display “Disconnected”.
To verify that Tobii Glasses Controller Software is connected to a Recording Unit:
1. The Glasses Control Panel for the Recording Unit on the Dashboard displays “Ready”.
2. On the Recording Unit, the Connection Status LED emits a constant green light.
7.3.4 Hiding/showing Glasses from the Dashboard
Every Recording Unit that at any time has been connected to your installation of Tobii Glasses Controller Software will appear
on your Dashboard. It is possible to hide Recording Units not currently in use, or to show ones that have been hidden.
To Hide/Show a Recording Unit on the Dashboard:
1. Tap the Hide/Show Glasses drop down menu on the Dashboard.
2. Select the check boxes of the Recording Units that should be visible on the Dashboard, and deselect the ones that
should be hidden.
Tobii Glasses 2 Eye TrackerUser’s manual v.1.0.2 - en-US
7 Basic Operations with Tobii Glasses 2
25
Page 34
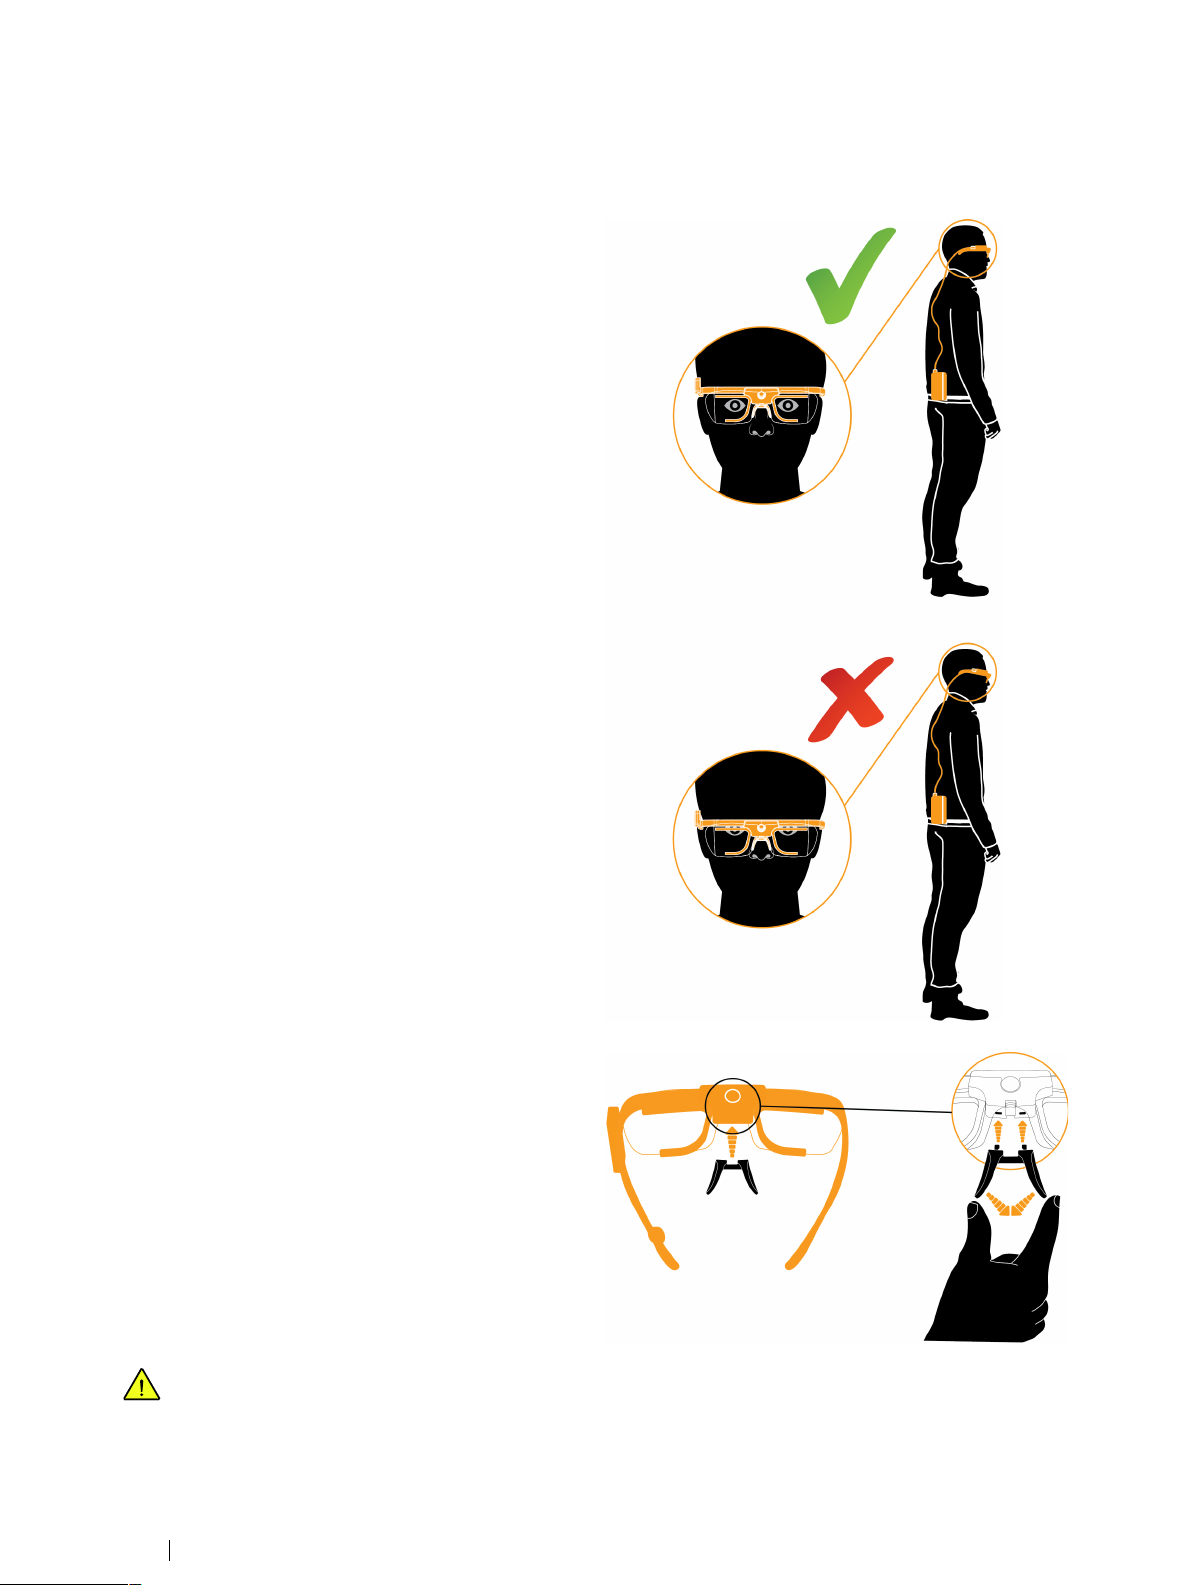
7.4 Fitting the Tobii Glasses 2 Eye Tracker onto a participant for recording
To fit the Tobii Glasses 2 Eye Tracker onto a test
participant:
1. Make sure all optical parts on the Head Unit such as eye
tracking sensors, and IR illuminators are clean and not
scratched or damaged in any way.
2. Make sure that participant characteristics match the requirements of the Glasses 2 Eye Tracker.
3. Make sure that Tobii Glasses Controller Software is running on your tablet/computer.
4. Make sure the Recording Unit is turned on.
5. Make sure there is a connection between Tobii Glasses
Controller Software and the Recording Unit either over
WLAN or Ethernet on the Dashboard in Tobii Glasses
Controller Software.
6. Gently fit the Head Unit onto the participant as shown in
the illustration.
7. Make sure the Glasses fit comfortably and securely.
8. To ensure the Head Unit is stably and securely positioned on the participant’s head and nose, exchange the
Nose Pad for another Nose Pad in a different size or
shape if necessary. (To change the Nose Pad, see instructions below)
9. We recommend you always use the Head Strap to secure the Head Unit on the participant’s head. This will
reduce the risk of the Head Unit falling.
10. Make sure the HDMI cable runs through the Cable
Guide, and then behind the participant. Secure the cable
onto the participants clothing if necessary.
11. Gently attach the Recording Unit to the participant’s belt
or clothing somewhere along waistband of the trousers/
skirt, preferably along the participant’s right side or on
the back. It is also possible to place the Recording Unit
in a pocket or bag.
To change the Nose pad:
1. To remove the existing nose pad from the Head Unit:
Gently squeeze the tips of the nose pad towards each
other and then gently pull the Nose pad straight away
from its mounting.
2. To mount a new nose pad: Gently squeeze the tips of
the nose pad towards each other and then gently push
the nose pad straight onto its mounting until it locks in
place.
The Recording Unit contains radio transmitters and receivers (WLAN). Make sure that it is placed as far as possible
from any equipment, objects or body parts sensitive to such signals.
7 Basic Operations with Tobii Glasses 2
26
Tobii Glasses 2 Eye Tracker User’s manual v.1.0.2 - en-US
Page 35

7.5 Recording with Tobii Glasses 2
Tobii Glasses 2 recordings are initiated from the Dashboard in Tobii Glasses Controller Software on your tablet/computer. Recordings are associated with the study that was open when initiating the recording. Make sure the Recording Unit is correctly
connected over WLAN or Ethernet to your tablet/computer with Tobii Glasses Controller Software before attempting to start/
stop/pause a recording.
7.5.1 Starting a recording
You must go through four basic steps to start a recording:
1. Create/Select a participant.
2. Calibrate the participant.
3. Verify the calibration.
4. Start the recording.
7.5.1.1 Creating/Selecting a participant and initiating a recording:
1. Make sure the correct study is open in Tobii Glasses Controller Software.
2. Tap Dashboard on the Menu bar.
3. Make sure the Glasses Control Panel for the relevant Recording Unit displays “Ready”.
4. Tap Start New Recording on the Glasses Control Panel of the relevant Recording Unit.
5. Create a new participant or select an existing participant.
6. To create a new participant, type the participant’s name in the Participant field and participant details in the Participant
Info field. Then tap Create
7. To select an existing participant, tap Existing Participant and select the appropriate participant from the list.
7.5.1.2 Calibrating the participant:
To be able to collect accurate eye tracking data Tobii Glasses 2 must be calibrated individually for each participant. During the
calibration process the participant must be wearing the Head Unit while focusing on the center of the calibration target. The calibration target is printed on the supplied calibration cards and calibration stickers.
1. Make sure the calibration card or the calibration sticker is visible to the participant and appears in the scene camera live
view video in Tobii Glasses Controller Software. The calibration card should be held flat against a wall or otherwise
straight towards the participant. The distance between the participant and the Calibration Card should be between 0.75
and 1.25 meters (2.5 and 4.1 feet).
2. Ask the participant to look at and focus on the center of the Calibration Target. Keep the calibration card completely still
during the calibration process.
3. While the participant is looking at the Calibration Target, tap the Calibrate icon in the bottom right hand corner of the live
view window. Animated graphics illustrate the progress of the calibration process.
4. If calibration was unsuccessful try to re-calibrate the participant.
7.5.1.3 Verifying the calibration:
1. Once the calibration is complete, the results will be displayed in the calibration results box. Verify calibration results by
asking the participant to look at a few objects suggested by you, for example the calibration target, while verifying in the
live view video that eye tracking data is accurate.
2. If eye tracking accuracy is acceptable for your study, continue to the next step. Otherwise tap Recalibrate and repeat
the calibration process.
7.5.1.4 Starting the recording:
1. Tap Record after calibrations have been completed. Live Viewer will continue to show real time eye tracking.
Tobii Glasses 2 Eye TrackerUser’s manual v.1.0.2 - en-US
7 Basic Operations with Tobii Glasses 2
27
Page 36
7.5.2 Pausing a recording in progress
Ongoing recordings can only be paused when the Recording Unit is connected to the tablet/computer with Tobii Glasses Controller Software. Pausing a recording can be done from both the Dashboard and Live Viewer.
To pause a recording from the Dashboard:
1. Make sure the Glasses 2 are connected to Tobii Glasses Controller Software.
2. Tap Pause on the Glasses Control Panel for the relevant Recording Unit. The recording is now paused and the Pause
button has become a Resume button. To resume recording, tap Resume.
To pause a recording from Live Viewer:
1. Make sure the Live Viewer video is playing; this indicates that there is a valid connection between the Glasses 2 and Tobii Glasses Controller Software.
2. Tap Pause. The recording is now paused and the Pause button has become a Resume button. To resume the recording,
tap Resume.
Pausing a recording from the Live Viewer will not only pause the live viewing, but will also stop all data collection.
7.5.3 Stopping a recording in progress
Recordings in progress can only be stopped when the Recording Unit is connected to the tablet/computer with Tobii Glasses
Controller Software. Stopping of recordings can be done from both the Dashboard and the Live Viewer.
To stop a Recording from the Dashboard:
1. Make sure the Glasses 2 are connected to Tobii Glasses Controller Software.
2. Tap stop on the Glasses Control Panel for the relevant Recording Unit. A confirmation dialog box appear.
3. Tap Yes to confirm stopping the recording.
To stop a Recording from the Live Viewer:
1. Make sure the Live View video is playing, this indicates that there is a valid connection between the Glasses and Tobii
Glasses Controller Software.
2. Tap the Stop button. A confirmation dialog appears.
3. Tap Yes to confirm stopping of the recording. The Recording will stop and the Glasses Dashboard will appear.
7.6 Watching a recording live with the Live Viewer
The Live Viewer functionality enables you to view real time eye tracking data overlaid on the scene camera video. Live Viewer only works when the Recording Unit is connected to the tablet/computer with Tobii Glasses Controller Software. Live Viewer provides buttons to stop, pause and resume a recording. It also provides critical information such as remaining battery and memory
time remaining, recording duration, and whether the Glasses are connected to Tobii Glasses Controller Software or not.
To live view an ongoing recording:
1. Make sure the Glasses 2 are connected to Tobii Glasses Controller Software.
2. Tap Live Viewer on the menu bar.
A weak or low quality WLAN signal will decrease the quality of, or even interrupt the live viewing video in Tobii
Glasses Controller Software or even disconnect the Recording Unit from the tablet/computer. For the best possible
live viewing quality, use an Ethernet cable to connect to the Recording Unit.
7.7 Locating recordings
Recordings can be found and accessed from both the Recordings list and the Participants list in Tobii Glasses Controller Software. The Recording List enables you to find collections of recordings based on recording name, duration, quality, date etc.,
7 Basic Operations with Tobii Glasses 2
28
Tobii Glasses 2 Eye Tracker User’s manual v.1.0.2 - en-US
Page 37

while the Participants List lets you find all the recordings associated with a specific participant. Once a recording has been located, it can be replayed or deleted; see following sections for instructions.
7.7.1 Using the Recordings List to locate recordings
The Recordings List shows details about completed recordings in the currently open study.
To open the Recordings List:
1. Tap Recordings on the menu bar.
Details about each recording include:
• Checkbox – indicating if a recording is selected or not for replay.
• Availability Icon – indicating if the recording is available for replay:
– Light grey = SD memory card with recording not accessible, insert SD memory card and re-connect the Recording
Unit.
– Dark grey = Recording is available.
– Red = Recording deleted, no longer available.
• Recording – recording name, as typed in when the recording was initiated.
• Participant – participant name, as typed in when the participant was created.
• Duration – the duration of the full recording excluding pauses.
• Gaze Samples – the amount of valid eye tracking samples recorded as a percentage of a theoretical maximum number
of samples, given the recording duration. (e.g. participant blinks will reduce “Eye tracking quality” since closed eyes
makes it impossible for the eye tracker to collect valid data.
• Date – date and time for the start of the recording.
• Open – tap to start a replay.
The Recordings List can be sorted and/or searched to give a better overview of the recordings.
To sort the Recordings List:
1. Tap the column name of the column that you want to sort by.
To search for a recording in the Recordings List:
1. Type the recording name or the participant name in the search field.
7.7.2 Using the Participants List to locate recordings
Participants shown in the Participants list belong to the currently open study. All completed recordings for any given Participant
can be listed in the Participants List.
To open the Participants List:
1. Tap Participants on the menu bar.
To access all recordings of a specific participant:
1. Tap the participant’s name in the Participants List. A recording list opens that shows the participant’s completed
recordings.
To filter the Participants List:
1. To the right of the word Filter, tap either All, Today or Yesterday to display recordings made according to your choice.
To sort the Participants List:
1. Tap the Sort By drop down menu and then select the basis of the sorting you want. You can sort the Participants List
based on either time (new/old) or participant name (A-Z/Z-A).
To search for a participant in the Participants List:
1. Start typing the participant name or participant details in the search field.
Tobii Glasses 2 Eye TrackerUser’s manual v.1.0.2 - en-US
7 Basic Operations with Tobii Glasses 2
29
Page 38

7.8 Replaying a recording
A replay of a recording can either be initiated from the Recording List, or though the Participants List when accessing the recording list for a participant. It is also possible to export the gaze replay video from the Recordings list.
Video and eye tracking data is stored only on the SD memory card inside the Recording Unit, not on the Tobii Glasses
Controller Software tablet/computer. For any replay to work, the Recording Unit with the SD memory card used during the recording must be connected to Tobii Glasses Controller Software.
To start replaying a recording:
1. Find the recording you want to replay using any of the above described methods
2. Tap Open on the row of the recording you want to replay.
To pause replaying a recording:
• Tap the video display area to pause the video.
To skim through or jump in the video replay:
• Tap and drag the track slider below the video display area.
To switch to next or previous recording:
• Tap the arrows at the side of the video.
To exit replay mode:
• Tap the X at the top right.
7.9 Exporting a gaze replay video
To export a recording as a video from Tobii Glasses Controller Software:
1. Select the recordings you want to export from the Recordings List.
2. Tap Export recordings.
3. Choose where on your tablet/computer you want to save the exported videos.
4. Tap OK; the selected recordings are now exported as videos.
7.10 Deleting a recording
To delete recordings the Recording Unit with the inserted SD memory card used for recording must be connected to Tobii
Glasses Controller Software.
Deleted recordings will still show up in the Recordings List in Tobii Glasses Controller Software, indicated by a grey
and strike through availability icon, but they will not be available for replay. Deleting a recording will delete the file permanently from the SD memory card in the Recording Unit, and the recording cannot be recovered.
To delete a recording:
1. Using any of the above methods to find the recording you want to delete.
2. Tap Open on the row of the recording you want to delete. The replay window opens.
3. To delete the recording, tap Delete Recording. A confirmation dialog box opens.
4. Tap Yes to confirm deleting of the recording.
7.11 Backing up recorded data
Make sure to regularly back up recorded data during a data collection day.
To back up SD memory card data using a SD memory card slot or reader:
1. Insert the SD memory card you wish to backup into the SD memory card slot or reader on your tablet/computer.
7 Basic Operations with Tobii Glasses 2
30
Tobii Glasses 2 Eye Tracker User’s manual v.1.0.2 - en-US
Page 39
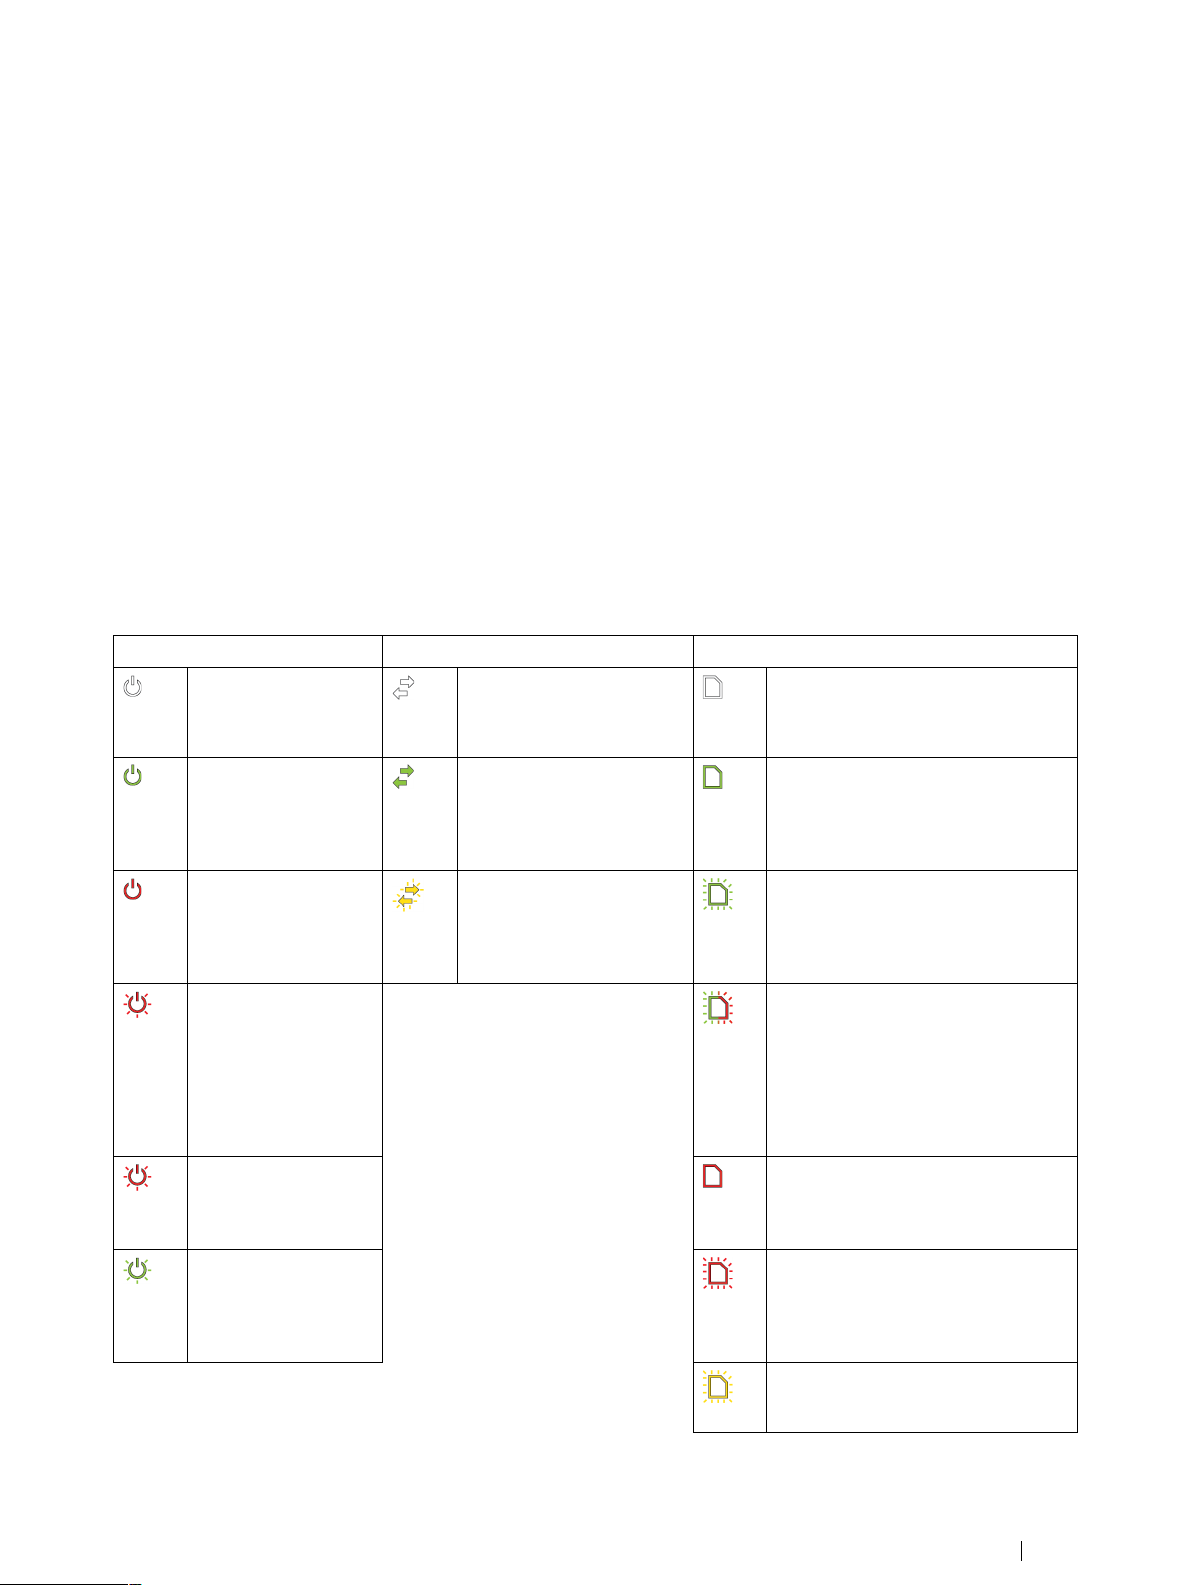
2. Open the SD memory card storage device your computer’s file manager.
3. Copy all files from the SD memory card to a backup folder or drive on the computer.
7.12 Other operations and information
7.12.1 Status LEDs indication scheme for the Recording Unit
There are three LED indicators on the Recording Unit:
1. Power Indicator LED.
2. Connection Status LED.
3. SD card Activity LED.
Rules of thumb:
• To start a Recording: All three LEDs should be green.
• Red LEDs typically mean that something needs attending to, except when the Recording Unit is in Stand by/Sleep
mode.
Table 7.1 Recording Unit LED status overview
Power Indicator LED
(LED off) The Recording Unit is turned off.
All other LED indicators are off.
(LED solid green) The
Recording Unit is powered on. ~100-30% of
battery power
remaining
(LED solid red)The
battery is running out
of power. ~29-10% of
battery power
remaining.
(LED blinking red)The
battery is out of power.
Stop any ongoing recordings immediately
and replace the
battery.
(LED slow blinking
red) The Recording
unit is in Standby/
Sleep mode.
Connection Status LED SD Card Activity LED
(LED off) The Recording
Unit is not connected to Tobii Glasses Controller
Software.
(LED solid green) The Recording Unit is connected to
Tobii Glasses Controller
Software.
(LED blinking yellow) The
Recording Unit is not connected to Head Unit. Check
the HDMI cable.
(LED off) No SD card present. Insert
SD card in order to record
(LED solid green) Recording Unit is
ready to start recording. The SD card
can be removed.
(LED blinking green) Recording Unit
is busy writing to SD card. Do not remove SD card.
(LED blinking alternately red/green)
The Recording Unit is busy writing to
the SD memory card and the SD
memory card has less than 30 minutes
recording time left. Stop the recording
as soon as possible and replace the
SD memory card with another that has
space.
(LED solid red) There is less than
enough space for 30 min. of
recording.
(LED blinking green)
The battery inside the
Recording Unit is
charging via the USB
port.
Tobii Glasses 2 Eye TrackerUser’s manual v.1.0.2 - en-US
(LED blinking red)The SD card is running out of space. Stop any ongoing
recording immediately and replace the
card.
(LED blinking yellow) There is something wrong with the SD card and it
cannot be written to.
7 Basic Operations with Tobii Glasses 2
31
Page 40
7.12.2 Tobii Glasses 2 data structure
Data from a Tobii Glasses 2 recording is contained in “studies”. Each study contains general study details, participant data and
recording data. Since both Tobii Glasses Controller Software and the Recording Unit can generate and store data in a given
study, data is automatically synchronized between the two units whenever there is a connection between them. As seen in the
table below, scene camera video and full recording data (including all eye tracking data) is ONLY stored on the Recording Unit
SD card (SD); all other data is stored both on the Recording Unit SD card and on the tablet/computer running Tobii Glasses
Controller Software (TGCS).
Container
Study
Type Data Data is stored
General
Study name SD + TGCS
Date created
Participant
Participant name
Participant info SD + TGCS
Names of associated
recordings
Recording
Recording name
Scene camera video SD
Full Recording data set (Eye
tracking data)
Duration
Eye tracking quality
Recording date
SD + TGCS
SD + TGCS
SD + TGCS
SD + TGCS
SD
SD + TGCS
SD + TGCS
SD + TGCS
7.12.3 Displaying the Glasses Control Panel Properties
Every Recording Unit has its own Device name, Serial number, Firmware version etc. This information is accessible in Glasses
Control Panel Properties on the Dashboard in Tobii Glasses Controller Software.
To display Glasses Control Panel Properties:
1. Locate the Glasses Control Panel for the relevant Recording Unit on the Dashboard.
2. Tap the Properties icon in the bottom left hand corner of the Glasses Control Panel.
Information displayed in the Glasses Control Panel Properties:
• Name of Recording Unit (Editable)
• Recording Unit serial number
• Firmware version
• Date of last firmware update
To return to the Glasses Control Panel:
• On Glasses Control Panel Properties, tap the bottom left hand corner.
7.12.4 Renaming the Recording Unit
The name of a Recording Unit can be changed to make it easier to keep track of which eye tracker is which.
To rename a Recording Unit:
1. Open Glasses Control Panel Properties as described in the section above.
7 Basic Operations with Tobii Glasses 2
32
Tobii Glasses 2 Eye Tracker User’s manual v.1.0.2 - en-US
Page 41

2. Tap Rename Glasses in Glasses Control Panel Properties .
3. Type a new name and tap Save Changes.
7.12.5 Memory cards
SD memory cards used in the Tobii Glasses 2 Recording Unit must be formatted as FAT32. SDHC cards are usually pre-formatted as FAT32 and will work out of the box while SDXC cards must be formatted as FAT32 before they can be used with the
Recording Unit. SD memory cards provided by Tobii can be used directly without any formatting. If for any reason (data deletion,
malfunction, etc) a memory card must be formatted, this is done from a Windows computer. Make sure to format the SD card as
FAT32.
7.13 Tobii Glasses Controller Software considerations and limitations
7.13.1 Dashboard information
Information on the Glasses Control Panel is synchronized with a Recording Unit as long as the software is running and there is
a connection between the tablet/computer. There are cases when they are not connected to each other which might cause the
information on the Dashboard to be misleading. If a recording that was started by one tablet/computer is stopped by another
tablet/computer, the Glasses Control Panel of the tablet that started the recording will state that the Glasses are still recording.
When connection is re-established, the information on the Dashboard will be updated. The same is true if a Recording Unit runs
out of battery or space on the SD card.
7.13.2 Anyone running Tobii Glasses Controller Software can connect and control any Tobii Glasses Recording Unit.
There are no means of locking a Recording Unit to one or several tablets or licenses of Tobii Glasses Controller Software. Anyone who has Tobii Glasses Controller Software installed on a Windows computer or tablet can potentially connect and control
any Recording Unit.
7.13.3 Editing or removing participants from a Study
Participants cannot be edited or removed from the Participants List. If, for any reason a faulty participant is added to the Participants List, ignore this participant and add a new Participant with the correct data.
Tobii Glasses 2 Eye TrackerUser’s manual v.1.0.2 - en-US
7 Basic Operations with Tobii Glasses 2
33
Page 42

8 Advanced Usage with Multiple Units
In most research scenarios one tablet/computer connects to one Tobii Glasses 2 Recording Unit. There are scenarios where
one would like to connect one tablet to multiple Recording Units, or multiple tablets to one or more Recording Units.
The Recording Unit works as a network access point and multiple tablets running Tobii Glasses Controller Software can connect to it simultaneously. The opposite, one tablet/computer connected to multiple Recording Units, is however limited by the
number of network hardware devices in the computer. To connect multiple Recording Units to one tablet/computer, a router or
switch must be used, along with Ethernet cables between the Recording Units and the router/switch. In this case the switch becomes the access point rather than the Recording Units.
Known issues when connecting multiple tablets/computers to the same Recording Unit:
• If commands are sent from several instances of Tobii Glasses Controller Software to the same Recording Unit, the Recording Unit may receive conflicting instructions and may stop reacting.
• The bandwidth may be insufficient to allow for several instances of Tobii Glasses Controller Software to allow live viewing of an ongoing recording.
8 Advanced Usage with Multiple Units
34
Tobii Glasses 2 Eye Tracker User’s manual v.1.0.2 - en-US
Page 43
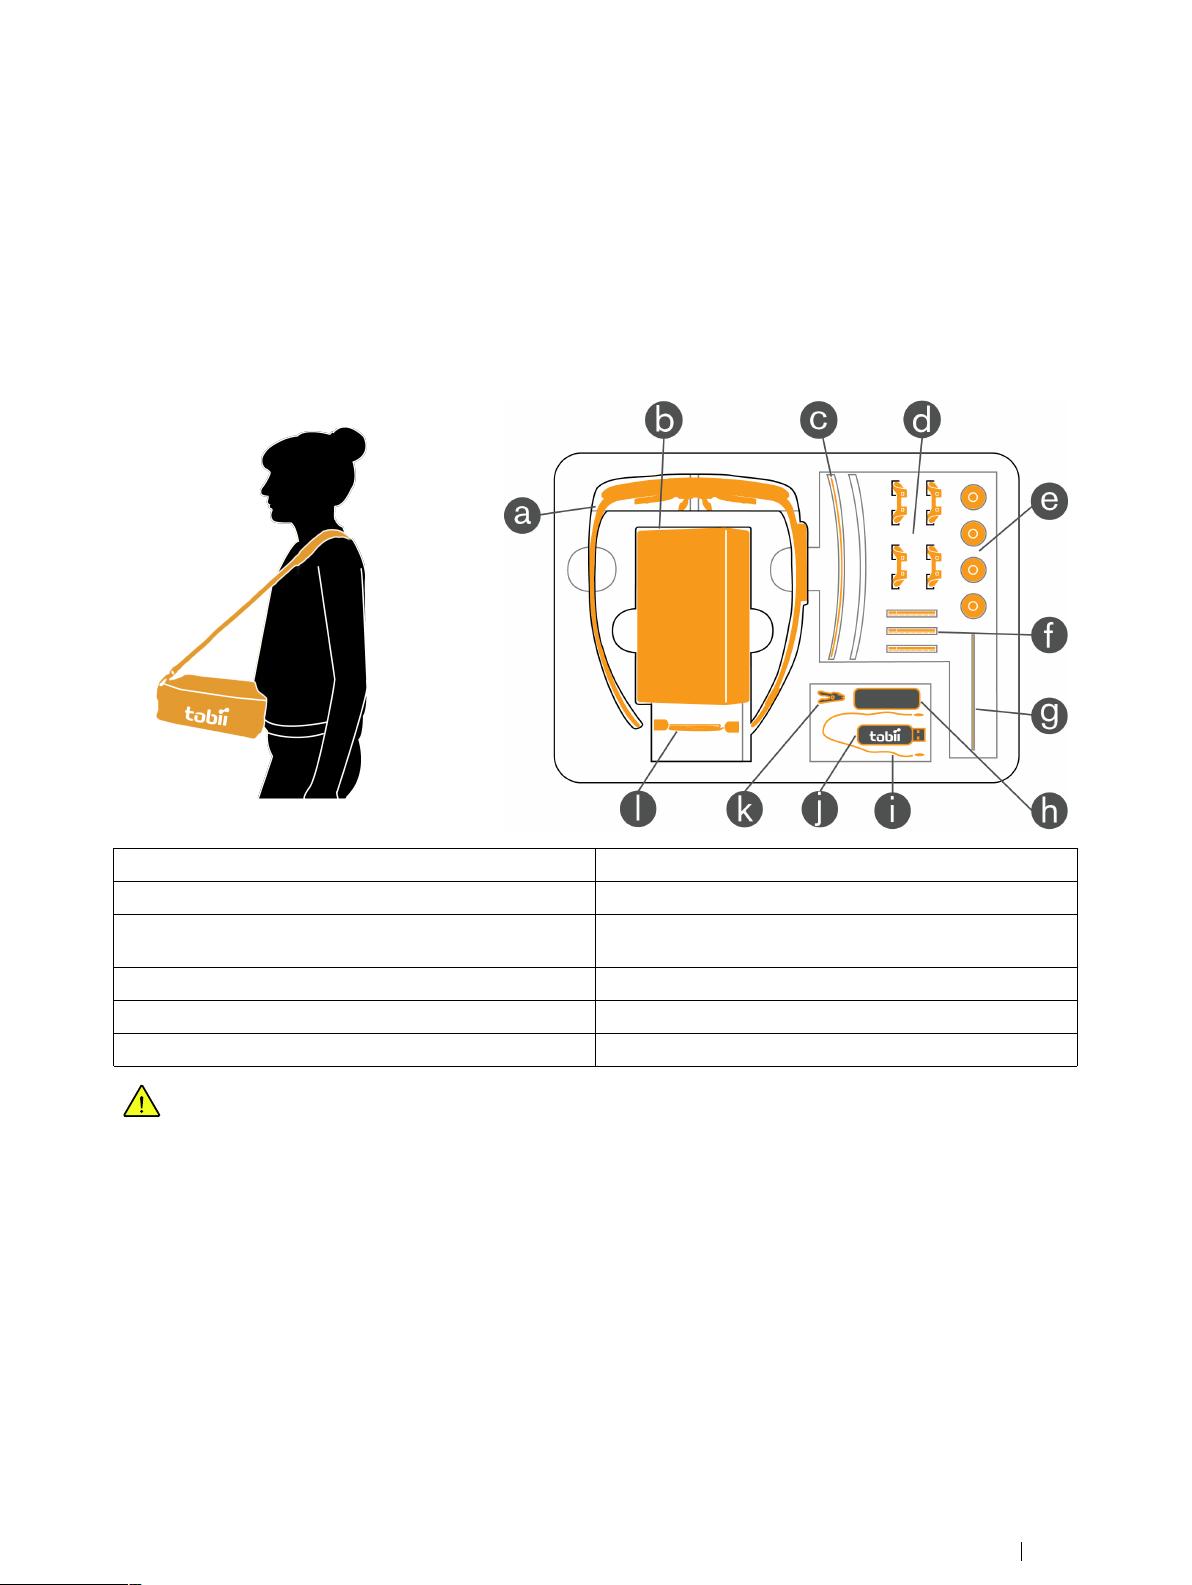
9 Accessories
9.1 Tobii Glasses 2 Carry Case
Tobii Glasses 2 comes with a dedicated Carry Case that will accommodate the most important components needed for data
collection with Tobii Glasses 2, including the Head Unit, Recording Unit, SD memory cards, batteries, etc. See the illustration
(below right)and the table below for information about how to fit the equipment in the Carry Case. The Carry Case can be used
as a portable tablet rest; please see illustration below left.
a. Head Unit
b. Recording Unit h. Microfiber cleaning cloth
c. Protective Lenses (1 clear + 1 tinted, 1 attached to Head
Unit)
d. Nose Pads in different sizes
e. Rechargeable Li-Ion batteries type 18650
f. SD memory cards + sleeves
When using the Carry Case as a portable table rest, please be careful; if the Carry Case is tilted too much it may
cause your device to slide off and drop.
g. Calibration Card
i. Head Strap
j. USB memory stick with documentation and software
k. Cable cord clip
l. HDMI A to HDMI D cable
9.2 Tobii Glasses 2 Accessories Box
The Tobii Glasses 2 comes with a box full of accessories that will compliment and improve the ease of use of the Glasses 2 solution such as an Ethernet cable, battery charger, USB charger for the Recording Unit, etc. See the illustration and the table below for information on the contents of the Accessories Box.
Tobii Glasses 2 Eye TrackerUser’s manual v.1.0.2 - en-US
9 Accessories
35
Page 44

1. Battery charger for Li-ion batteries
2. USB Ethernet Adapter
3. Power cables for battery charger (EU, US, UK + AUS)
4. USB charger for Recording Unit 8. Calibration Stickers
5. Power plugs for USB charger (EU, US, UK + AUS)
6. Ethernet cable (3 meters)
7. Calibration Cards
9.3 Tablet computer included in the Tobii Glasses 2 Premium Package
The Tobii Glasses 2 Premium Package includes a Dell Windows 8.1 Pro Tablet8.
9.3.1 Preparing your Dell Tablet for use
Windows will download the latest updates and update the computer when you connect your Dell Windows 8.1 Pro Tablet to
the Internet for the first time. This may take a considerable amount of time and require several reboots. Dell Digital Delivery will
also automatically connect to the Internet and suggest a few downloads for your Dell tablet.
Please make sure you do NOT download and install the McAfee Security Center 30–day trial as this software may
block communication between your tablet and the Tobii Glasses 2 Eye Tracker. If you have already installed the McAfee Security Center software, please uninstall the software before installing Tobii Glasses Controller Software. For
best performance also avoid installing any application that relies on constant Internet access such as Skype, Spotify
or other similar communication or media software.
8. The actual make and model of the included tablet may be different in your shipment. Please see your order or delivery confirmation for details.
36
9 Accessories
Tobii Glasses 2 Eye Tracker User’s manual v.1.0.2 - en-US
Page 45

9.3.2 Support for your Dell Tablet
The Dell Tablet included in the Tobii Glasses 2 Premium Package includes 3 years of Dell Support. To get support for your tablet or Windows 8.1 please use the Dell Service Tag number located on the shipping box when communicating with Dell. Visit
the Dell website http://www.dell.com for contact details and information. For any support related to Tobii Glasses 2 Eye Tracker,
Tobii Glasses Controller Software or Tobii Glasses Analysis Software please contact Tobii for support: http://www.tobii.com/
analysissupport.
Tobii Glasses 2 Eye TrackerUser’s manual v.1.0.2 - en-US
9 Accessories
37
Page 46

Appendix A
A1 Eye Tracking
Technical Specifications
Eye tracking technique
Binocular eye tracking Yes
Sampling rate
Calibration procedure
Parallax compensation tool Automatic
Slippage compensation
Pupil measurement Yes, absolute measure
Corneal reflection, dark pupil
30 Hz
1 point
Yes, 3D eye tracking model
A2 Glasses Head Unit
Material
Protective lens Plastic, in 2 versions: clear and tinted
Interchangeable lenses Yes
Nose pad Grilamid plastic, interchangeable
Scene camera, video resolution
Scene camera, video format
Scene camera, field of view
Scene camera Horizontal and vertical FOV (approx.)
Weight 45 grams including protective lens
Frame dimensions (width ×depth ×height)
Cable length
Visual field of view (frame obstruction)
Audio Integrated microphone
Design characteristics Light weight and discreet
Number of eye tracking sensors
Fixed geometry Yes
Sensors
Grilamid plastic, stainless steel, aluminum
1920 ×1080 at 25 fps
H.264
90 deg. 16:9 format
82 deg. horizontal / 48 deg. vertical
179 ×159 ×57 mm
1200 mm
More than 160 deg. horizontally, 70 deg. vertically
4 sensors
Gyroscope and accelerometer (available in future firmware
releases)
A3 Recording Unit
Battery recording time 120 min.
Battery type Rechargeable 18650 Li-lion, Capacity: 3 400 mAh
Storage Media
Connectors HDMI, Micro USB, 3.5 mm jack
Dimensions (height x width x depth)
Weight
Appendix A Technical Specifications
38
SD (SDXC, SDHC) card
130 x 85 x 27 mm
312 grams
Tobii Glasses 2 Eye Tracker User’s manual v.1.0.2 - en-US
Page 47

A4 Compliance
Ingress protection IP class 20
CE - European Union
FCC - USA
CCC - China Yes
VCCI - Japan Yes
Eye Safety (EN 62471:2008)
Underwriters Lab US (UL 60950)
Yes
Yes
Yes
Yes
A5 Compatible Software
Recording and live viewing
Data analysis and export
Tobii Glasses Controller Software
Tobii Glasses Analysis Software
A6 Glasses Controller Software — Feature overview
• Manage participants
• Manage recordings
• Live viewing of recordings
• Instant replay of recordings
• Simple calibration
A7 Glasses Controller Software — Minimum system requirements
Operating System: Windows 7, Windows 8, Windows 8.1 (32 bit and 64 bit)
CPU: Intel Core I5
Resolution: 1024 ×768
Memory: 2 GB
Tobii Glasses 2 Eye TrackerUser’s manual v.1.0.2 - en-US
Appendix A Technical Specifications
39
Page 48
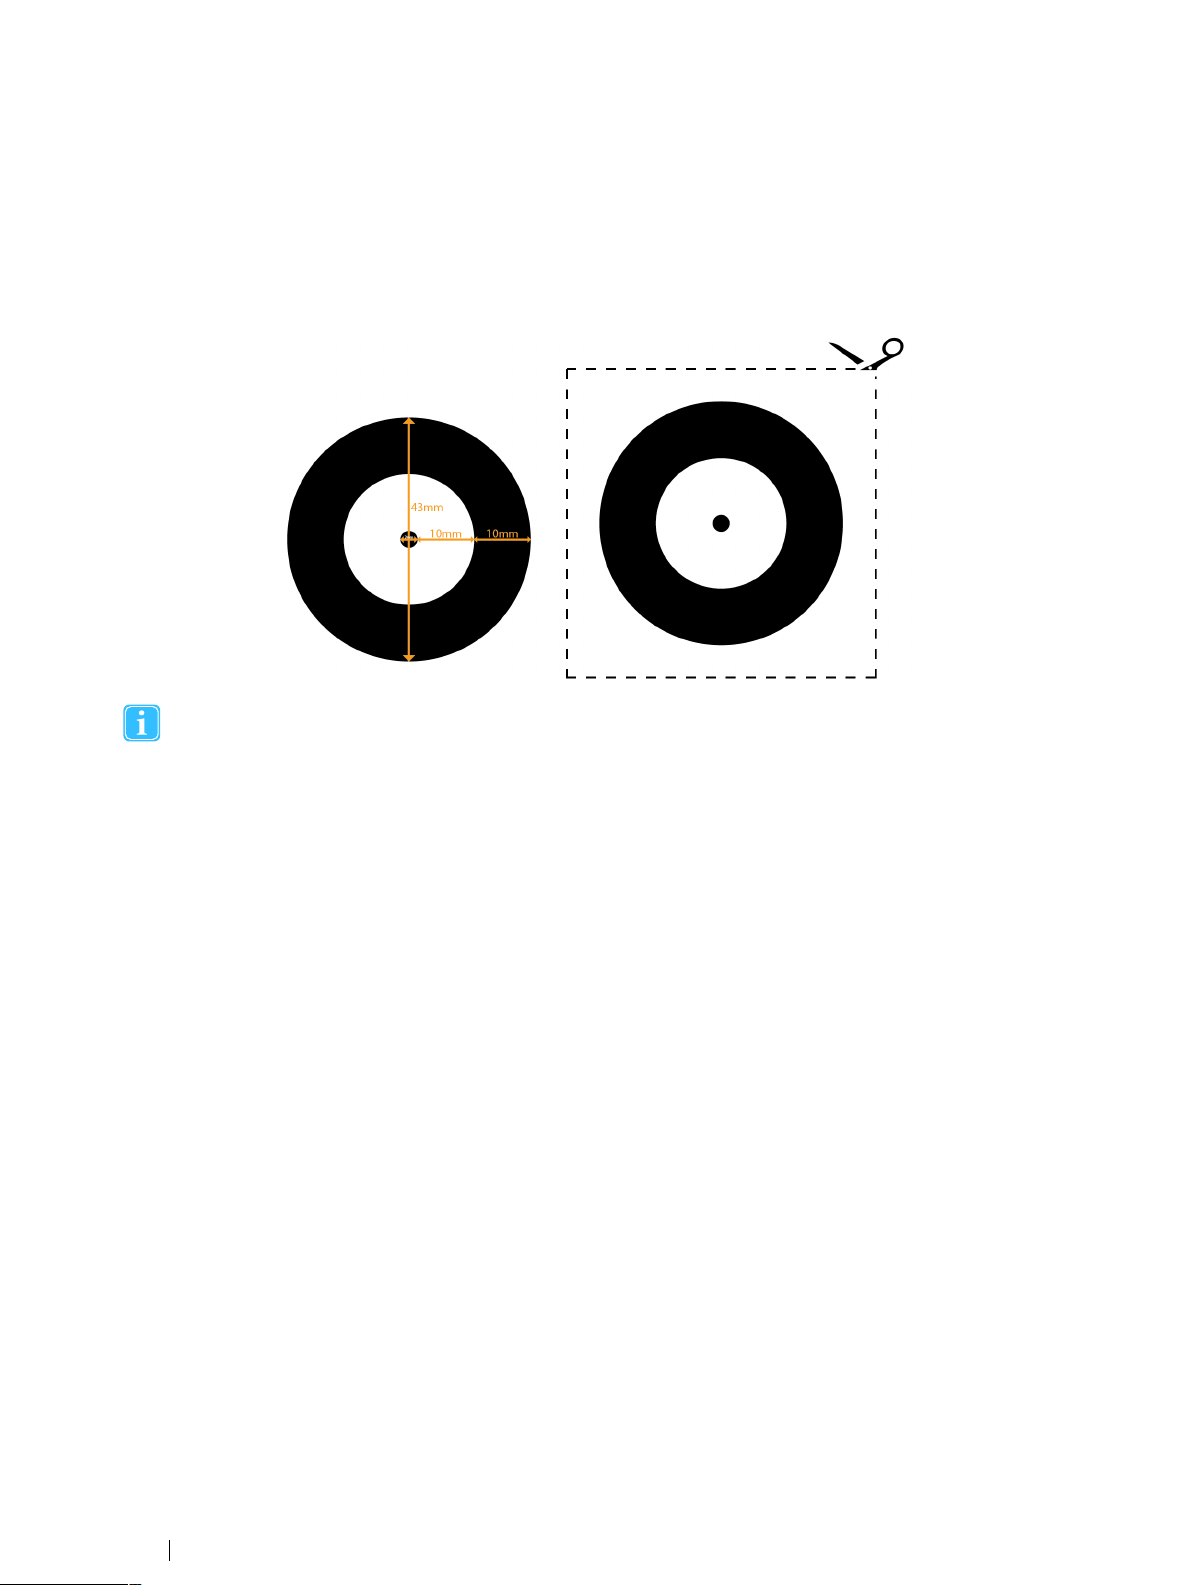
Appendix B
Below are two scale illustrations of the Tobii Glasses 2 Calibration Target; one with accurate dimensions illustrated (below left)
and one without (below right). The right target can be printed, cut out and used for calibration with Tobii Glasses 2. Please
verify that the dimensions of the printout are accurate, as stated in the below left illustration.
If you wish to use a printed Calibration target, you must print and cut out the right hand Calibration target. Using the
above left target with dimensions in any way may impact calibration.
Calibration target
Appendix B Calibration target
40
Tobii Glasses 2 Eye Tracker User’s manual v.1.0.2 - en-US
Page 49

41
Page 50

Tobii Support
EUROPE / GLOBAL NORTH AMERICA JAPAN CHINA
Phone (SWE): +46 8 522 950 10 Phone: +1 703 738 1320 Phone: +81 3 5793 3316 Phone: +86 180 1558 5168
Phone (GER): +49 69 24 75 03 4-27
support@tobii.com support.us@tobii.com support.jp@tobii.com support.cn@tobii.com
Support hours: 8 am - 6 pm Support hours: 8 am - 8 pm Support hours: 9 am - 5.30 pm
Between July-August: 9am - 5pm (US Eastern Standard Time, GMT -6) (Japan Standard Time, GMT +9)
(Central European Time, GMT +1)
©Tobii®. Illustrations and specifications do not necessarily apply to products and services offered in each local market. Technical specifications are subject to change without prior notice. All other trademarks are the property of their respective owners.
Tobii Headquarters (EMEA) CENTRAL EUROPE CHINA JAPAN NORTH AMERICA
Tobii Technology AB Tobii Technology GmbH Tobii China - Sales Office Tobii Technology Japan, Ltd Tobii Technology, Inc.
Karlsrovägen 2D Barckhausstr. 1 Room E2, 29/F 5-23-7 Higashigotanda, Shinagawa-ku 510 N, Washington Street, Suite 200
S-182 53 Danderyd D-60325 Frankfurt am Main Shanghai Industrial Investment Building Tokyo 141-0022 Fall Church VA 22046
Sweden Germany No. 18 Caoxi North Road Japan USA
Phone : +46 8 663 69 90 Phone: +49 69 24 75 03 40 Mobile: +86 180 1558 6966 Phone: +81-3-5793-3316 Phone: +1-703-738-1300
Fax: +46 8 30 14 00 Fax: +49 69 24 75 03 429 Fax: +81-3-5793-3317 Fax: +1-703-738-1313
www.tobii.com www.tobii.com www.tobii.com www.tobii.com www.tobii.com
sales@tobii.com sales.de@tobii.com sales.cn@tobii.com sales.jp@tobii.com sales.us@tobii.com
Shanghai, China Toll-Free: +1-888-898-6244
 Loading...