

Page 1

Tobii C-Series User’s Manual
User’s Manual
Tobii C-Series
C8
C12
C15
CEye
Celebrating Communication
Page 2

Tobii C-Series User’s Manual
Content subject to change without notice.
Please check Tobii web site www.tobii.com for
updated versions of this manual.
Manual Version 2.1
November 2010
All rights reserved.
© Tobii Technology AB
The information contained in this document
is proprietary to Tobii Technology. Any
reproduction in part or whole without prior
written authoriztion by Tobii Technology is
prohibited.
US Patent 7, 572,008 (applies to Tobii CEye)
Tobii_manual_CseriesC8C12C15CEye_V2_1_192010_UsEng
Page 3

Contents
Introduction 6
1
1.1 Intended Use 6
1.2 Package Contents 7
1.3 Customer Support 7
1.4 Warranty 7
Safety 8
2
2.1 Avoiding Hearing Damage 9
2.2 Mounting Warning 9
2.3 Emergency Warning 10
2.4 Infrared Warning 10
2.5 Epilepsy Warning 10
2.6 Child Safety 10
Overview of the Tobii C8, C12 and C15 11
3
3.1 Key Features 11
3.2 Product Layout 11
3.2.1 The Tobii C8, Tobii C12 and Tobii C15 11
3.2.2 Ports, Sensors and Device Buttons 12
3.3 Preinstalled Software 13
3.4 Configuring the Device 13
Batteries in the Tobii C-Series 14
4
4.1 Batteries 14
4.1.1 Hot Swappable 14
4.2 Charging 14
4.2.1 Checking Charge Level 15
4.3 Inserting and Releasing the Batteries 16
Using the Tobii C-Series 18
5
5.1 Starting the Device 18
5.1.1 Password Information 18
5.1.2 C-Series Welcome Guide 19
5.1.3 C-Series Welcome Center 20
5.1.4 C-Series Update Notifier 21
5.2 Shutting Down the Device 23
5.3 Configuring a Switch to Power On or Off 24
5.3.1 Configuring a Switch to Power On 24
Page 4

5.3.2 Configuring a Switch to Power Off 24
5.4 Safety Settings: C-Series Hardware Options 25
5.4.1 Audio Safety 25
5.4.2 Temperature Control Safety 26
5.4.3 Saving Changes for Future Sessions 27
5.4.4 Disabling Safety Page as Default Page on Startup 27
5.5 Adapting the Touch Screen for the User 28
5.5.1 Calibrating the Touch Screen 28
5.6 Adjusting the Backlight 30
5.6.1 Adjusting the Sound 31
5.7 Using Headphones 32
5.8 Using Bluetooth® (optional) 32
5.8.1 Handling Licenses 32
5.8.2 Enabling and Disabling Bluetooth® Communication 32
5.8.3 Connecting to a Bluetooth® Device 33
5.9 Using the WLAN (optional) 33
5.9.1 Handling Licenses 33
5.9.2 Enabling and Disabling the WLAN Communication 33
5.9.3 Connecting to a WLAN 34
5.10 Using the Camera 34
5.11 Using the Mobile Phone (optional) 35
5.11.1 Handling Licenses 35
5.11.2 Enabling and Disabling the Mobile Phone 35
5.12 Using Environmental Control (optional) 36
5.12.1 Handling Licenses 37
5.12.2 Enabling and Disabling Tira 37
5.13 Creating Shortcuts to Actions 37
5.13.1 Available Actions 38
5.13.2 Selecting Actions 39
5.14 Handling Licenses 41
5.15 System Information 42
5.16 Performing Backup and Restore 42
5.16.1 User Profile Card 42
5.16.2 Restoring Backup Files by the User 43
Tobii CEye Module & Eye Control 44
6
6.1 Installing the Tobii CEye Module 44
6.1.1 Mounting the CEye Module to the Tobii C12 or C15 44
6.1.2 Required Software 45
6.1.3 Installation of Eye Control Software from USB Stick 46
6.2 Using the Tobii CEye Module 47
Page 5

6.2.1 Positioning 47
6.2.2 Track Status Viewer 47
6.2.3 Track Box 48
6.2.4 Accessing the Tobii Eye Control Options 49
6.2.5 Creating a New Profile 50
6.2.6 Selecting Current User Profile 50
6.2.7 Deleting a Profile 51
6.2.8 Customizing the Interaction 51
6.2.9 Customizing the Calibration 53
6.2.10 Customizing the Calibration Area 55
6.2.11 Showing Track Status 56
6.2.12 Calibrating 57
6.2.13 Interrupting Calibration 57
6.2.14 Customizing Active Eye 57
6.2.15 Improving Calibration Point(s) 58
6.2.16 Removing Calibration Point(s) 59
6.2.17 Customizing Windows Control 60
6.2.18 Starting and Disabling Windows Control 62
6.2.19 Placing the Windows Control Menu 62
6.2.20 Clicking with Windows Control 63
6.2.21 Magnifying with Windows Control 63
6.2.22 Selecting Windows Control Functions 63
6.2.23 Pausing Windows Control 63
6.2.24 Scrolling with Windows Control 64
Product Care 65
7
7.1 Changing the Side Covers 65
7.2 Cleaning 66
7.2.1 Cleaning of the Speaker Mesh 66
7.3 Placement 67
7.4 Transporting the C-Series Device 67
7.5 Disposing of the Batteries 67
7.6 Disposing of the C-Series Device 67
Appendices 68
8
8.1 Appendix A: Training Resources 68
8.2 Appendix B: CEye - Software License 68
8.3 Appendix C: Technical Specifications 69
8.4 Appendix D: Approved Accessories 70
Page 6

Tobii C-Series User’s Manual
Introduction1
Thank you for purchasing a Tobii C-Series device from Tobii Technology!
To ensure the optimal performance of this product, please take the time to
read this manual carefully.
The C-Series device is available in three different sizes: the Tobii C8 with
an 8.4” screen, the Tobii C12 with a 12.1” screen and the Tobii C15 with a
15.0” screen. The Tobii C12 and C15 can be used with the Tobii CEye, to
enable eye control of the device.
This User’s Manual covers:
• The C-Series device, models Tobii C8, Tobii C12 and Tobii C15.
• The C-Series Hardware Options program (for controlling the
device and licenses).
• Tobii CEye (eye tracking module including Windows Control). Tobii
CEye is optional equipment and is only used with the Tobii C12 and
C15.
1.1 Intended Use
A variety of communication methods allow Tobii C-Series users the
ability to achieve their full potential. A user can communicate via text or
symbols to generate synthesized (computer voice) or digitized (recorded
voice) speech for face-to-face communication. A user also has the option
of communication through e-mail, text messages and chat. With the
Tobii C-Series, users also have the freedom and exibility to write and
edit documents, surf the Internet, play music and games, control a TV,
DVD and other household appliances via IR remote control and even
plan and manage their time – making independence easy. The C-Series
devices are available both as a dedicated Speech Generating Devices, with
communications software access only, or as open devices with access to
the regular Windows environment.
The C-Series device is not intended as sole communication means for
a user but as a complementary communication solution. Low-tech and
no-tech Assistive and Alternative Communication (AAC) solutions used
as additional methods are recommended as best practice for any person
utilizing a high-tech AAC device.
Chapter 1 Introduction
6
Page 7

Tobii C-Series User’s Manual
1.2 Package Contents
The items below are included with your C-Series package:
• A Tobii C8, a Tobii C12 or a Tobii C15
• Two rechargeable Lithium Ion (LiPo) batteries
• A DC power adapter/charger including four different plugs for
different regions
• A carrying strap, extendable to shoulder strap
• A User’s Manual (this document)
• A Getting Started Guide
• Five pairs of side covers, the black covers are mounted on the
device
• A stylus
• System restore discs
• Communication software installation disc (if ordered)
The Tobii CEye package (if included with the Tobii C12 or C15):
• A Tobii CEye module with two screws attached
• A Torx 10 screwdriver
• A Getting Started Guide
• A USB stick with the latest necessary software
1.3 Customer Support
For support, please contact your local representative or Support at Tobii.
In order to receive assistance as quickly as possible, make sure you have
access to your C-Series device and, if possible, an Internet connection. You
should also be able to supply the serial number of the device, which you nd
on the back of the device or in the C-Series Hardware Options, see the
System Information section in the Using the Tobii C-Series chapter.
For further product information and other support resources, please visit
the Tobii community www.mytobiicommunity.com and the Tobii website
www.tobii.com/assistive_technology.aspx.
1.4 Warranty
Please read this User’s Manual carefully before using the device. The
warranty is only valid if the device is used according to the User’s Manual
and the warranty seal is not broken. Disassembling the C-Series device will
void the warranty.
Chapter 1 Introduction
7
Page 8

Tobii C-Series User’s Manual
Safety2
The C-Series device has been tested and found to comply with the limits
for a Class B digital device, pursuant to part 15 of the FCC Rules. These
limits are designed to provide reasonable protection against harmful
interference in a residential installation. The C-Series device may emit
electromagnetic waves, which can cause harmful interference to radio
communications, especially if the device is not installed and used in
accordance with this User’s Manual. If you experience interference in your
radio or television communications, shut the C- Series device down. If the
interference persists after restarting the device, try one or more of the
following measures:
• Reorient or relocate the receiving antenna.
• Increase the separation between the equipment and receiver.
• Connect the equipment into an outlet on a circuit different from
that to which the receiver is connected.
• Consult the dealer or a qualied radio/TV technician for help.
Modications not expressly approved by Tobii Technology could void the
user’s authority to operate the equipment under the FCC rules.
The SAR (Specic Absorbtion Rate) limit as dictated by the FCC (in
the USA) is 1.6W/kg averaged over 1 gram of tissue. In Europe/EU (CE
regulations) it is 2.0 W/kg averaged over 10 grams of tissue. The Devices,
Tobii C8 (FCC ID: W5MTOBIIC8), Tobii C12 (FCC ID: W5MTOBIIC12)
and Tobii C15 (FCC ID:W5MTOBIIC15) have been tested against
these SAR limits to maintain compliance with FCC/CE RF exposure
requirements.
To ensure safe operation of your C-Series device, please note the following:
Do not place the device on your lap, a pillow or any other soft material
when it is powered on, since the material can block the fan and cause the
device to overheat.
The C-Series device contains Lithium Ion batteries. These batteries have a
storage temperature range of between 0°C and 50°C. Avoid exposing the
batteries to re or to temperatures above 50°C (122°F). These conditions
may cause a battery to malfunction, generate heat, ignite or explode. Be
Chapter 2 Safety
8
Page 9

Tobii C-Series User’s Manual
aware that it is possible, in a worst case scenario, for temperatures to reach
greater than those stated above in, for example, the trunk of a car on a hot
day. So, storing the device, with batteries installed, in a hot car trunk could
conceivably lead to a malfunction.
Do not disassemble or harm the battery. Pay attention to the
environmental laws and regulations which apply in your area when disposing
of batteries.
For safe operation of the C-Series device, use only charger, batteries and
accessories approved by Tobii Technology.
Do not open the metal casing of the C-Series device, since you may be
exposed to potentially hazardous electrical voltage. The device contains no
serviceable parts.
2.1 Avoiding Hearing Damage
Permanent hearing loss may occur if earphones, headphones or speakers
are used at high volume. To prevent this, the volume should be set to a safe
level. You can become desensitized over time to high sound levels which
may then sound acceptable yet still could be damaging your hearing. If you
experience symptoms such as ringing in your ears, please lower the volume
or stop using the earphones/headphones. The louder the volume, the less
time is required before your hearing could be affected.
Hearing experts suggest the following measures to protect your hearing:
• Limit the amount of time you use earphones or headphones at high
volume.
• Avoid turning up the volume to block out noisy surroundings.
• Turn the volume down if you cannot hear people speaking near
you.
To establish a safe volume level:
1. Set your volume control at a low setting.
2. Slowly increase the sound until you can hear it comfortably and
clearly, without distortion.
2.2 Mounting Warning
The C-Series devices should be mounted according to instructions for
approved mounts or mounting brackets. However, should the device for
Chapter 2 Safety
9
Page 10

Tobii C-Series User’s Manual
any reason harm or damage someone or something due to falling, Neither
Tobii Technology nor any of its representatives will be responsible or liable
for any damages or injuries which may arise. The mounting of devices from
the C-Series is done entirely at the user’s own risk.
2.3 Emergency Warning
Do not rely on the device for emergency calls or banking transactions.
We recommend having multiple ways to communicate in emergency
situations. Banking transactions should only be carried out with a system
recommended by, and approved according to the standards of, your bank.
2.4 Infrared Warning
When activated, the Tobii CEye emits pulsed infrared (IR) light. Certain
medical devices are susceptible to disturbance by IR light and/or radiation.
Do not use the CEye when in the vicinity of such susceptible medical
devices as their accuracy or proper functionality could be inhibited.
2.5 Epilepsy Warning
Some people with Photosensitive Epilepsy are susceptible to epileptic
seizures or loss of consciousness when exposed to certain ashing lights
or light patterns in everyday life. This may happen even if the person has no
medical history of epilepsy or has never had any epileptic seizures.
10
A person with Photosensitive Epilepsy would also be likely to have
problems with TV screens, some arcade games, and ickering uorescent
bulbs. Such people may have a seizure while watching certain images or
patterns on a monitor, or even when exposed to the light sources of an eye
tracker. It is estimated that about 3-5% of people with epilepsy have this
type of Photosensitive Epilepsy. Many people with Photosensitive Epilepsy
experience an “aura” or feel odd sensations before the seizure occurs. If
you feel odd during use, move your eyes away from the eye tracker.
2.6 Child Safety
The C-Series are advanced computer systems and electronic devices. As
such they are composed of numerous separate, assembled parts. In the
hands of a child certain of these parts have the possibility of being separated
from the device, possibly constituting a choking hazard or another danger
to the child.
Young children should not have access to, or the use of, the device without
parental or guardian supervision.
Chapter 2 Safety
Page 11

Tobii C-Series User’s Manual
Overview of the Tobii
C8, C12 and C153
3.1 Key Features
The C-Series has several built-in features. Some of these come standard
and some can be ordered as additional features.
Standard features: Camera, microphones and speakers.
Additional features: Bluetooth, Mobile phone, WLAN (Wireless Local
Area Network also called WiFi) and ECU (Environmental Control Unit).
The additional features can be purchased with the initial order or as an
additional license after delivery. To order a license, please contact Tobii
Customer Service, your reseller or your sales representative.
3.2 Product Layout
A C-Series device has a color TFT display with a touch screen. The Tobii
C8 has an 8.4” screen with an 800x600 pixel resolution. The Tobii C12 has
a 12.1” screen with a 1024 x 768 pixel resolution. The Tobii C15 has a 15.0”
screen with a 1024 x 768 pixel resolution.
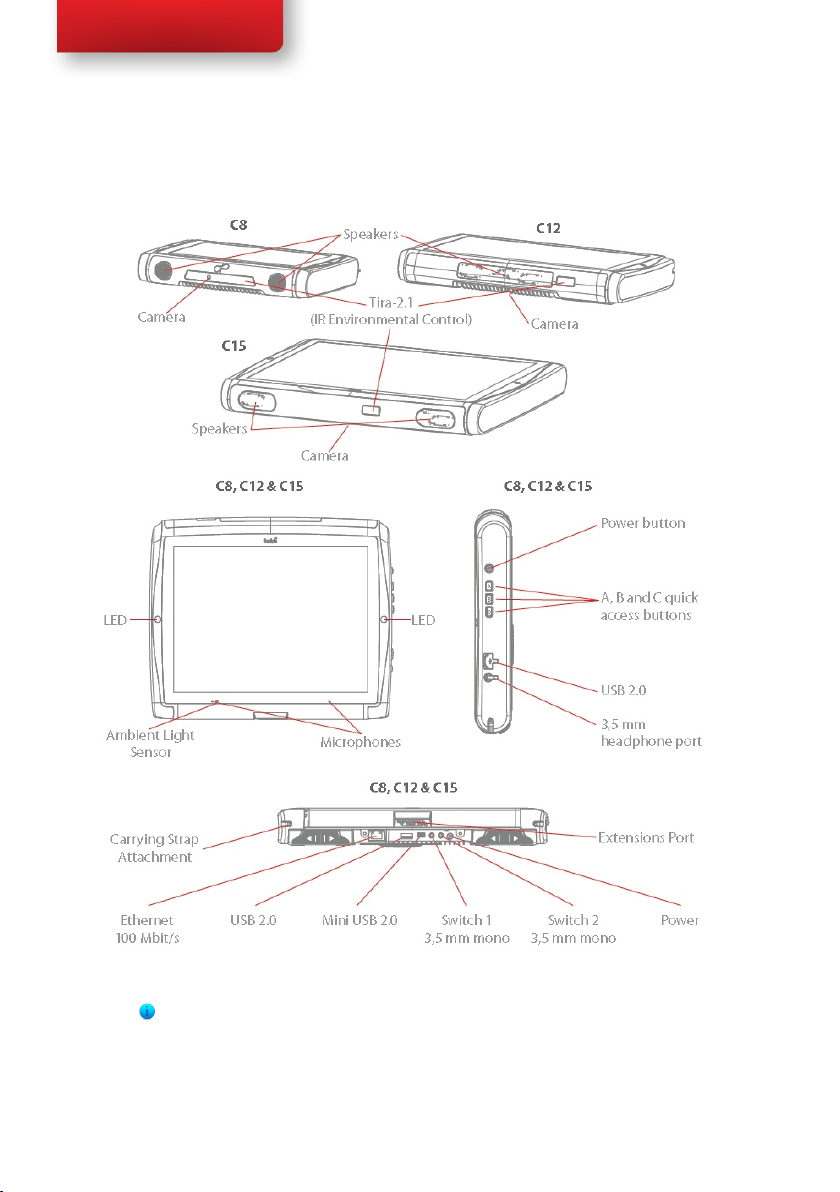
3.2.1 The Tobii C8, Tobii C12 and Tobii C15
Chapter 3 Overview of the Tobii C8, C12 and C15
11
Page 12
Tobii C-Series User’s Manual
3.2.2 Ports, Sensors and Device Buttons
12
Never force a connector into a port. If the connector and port do not
join with reasonable ease, they probably do not match. Make sure that the
connector matches the port and that you have positioned the connector
correctly in relation to the port.
Chapter 3 Overview of the Tobii C8, C12 and C15
Page 13
Tobii C-Series User’s Manual
3.3 Preinstalled Software
The C-Series device is delivered with all preordered and required software
installed and ready to use. Should a reinstallation become necessary at any
stage, a setup le and discs are included.
The product number for Windows® can be found on the back of the
C-Series device, if there should be a need to reinstall Windows®.
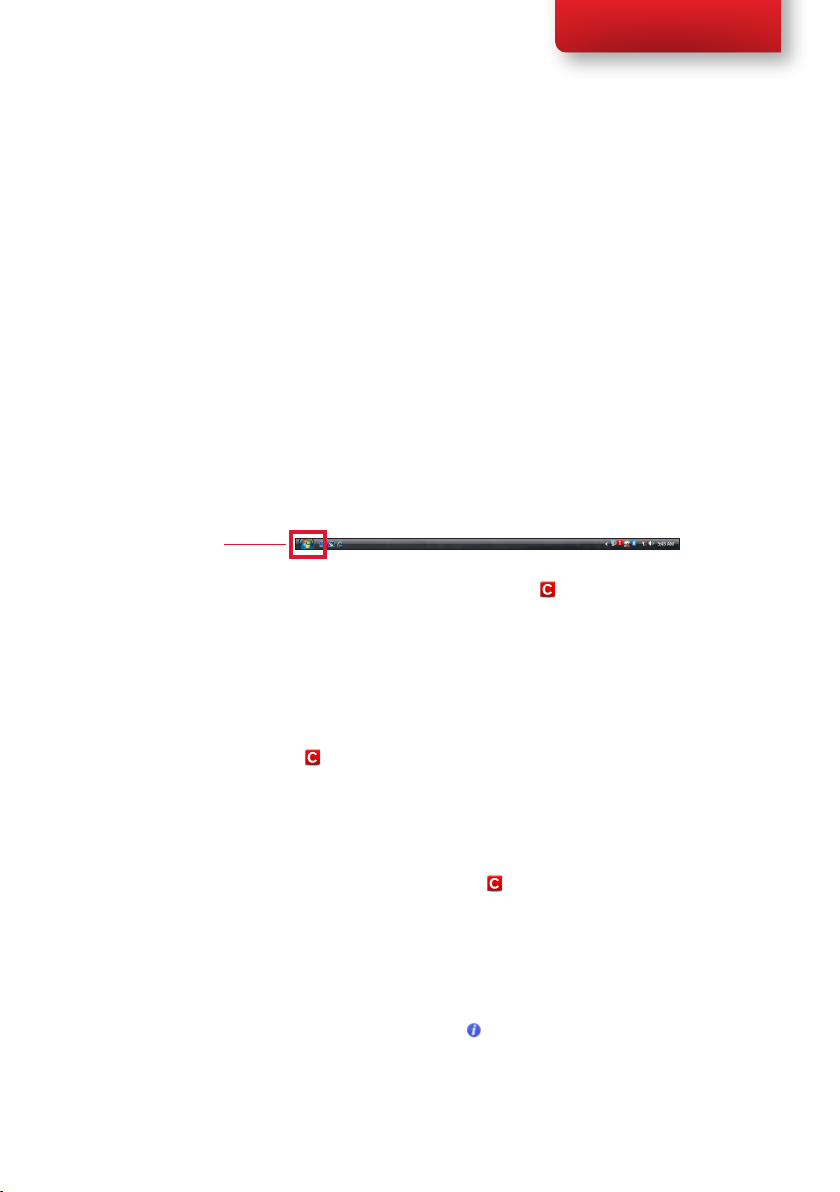
3.4 Configuring the Device
Use the preinstalled C-Series Hardware Options to congure the
hardware functions on the device. You can access C-Series Hardware
Options in one of the following ways:
1. Go to Start menu > Control Panel.
Start menu
2. Double-click C-Series Hardware Options, , if the Control
Panel is in Classic View. If the Control Panel is in Control Panel
Home view, click Additional Options > C-series Hardware
Options.
or
• Double-click on the C-Series Hardware Options shortcut on
the desktop, .
or
3. Go to Start menu > All Programs > Tobii > C-Series
Hardware Options.
4. Click C-Series Hardware Options, .
In the list to the left, select which hardware conguration you want to
change. In the list to the right, the different settings will be revealed. The
changes are instantly executed. If you want to cancel the changes click
Cancel.
Please note that anywhere you see this icon, , an information box is
displayed when you briey rest the mouse pointer on the icon or by
touching the icon on the screen.
Chapter 3 Overview of the Tobii C8, C12 and C15
13
Page 14
Tobii C-Series User’s Manual
Batteries in the Tobii
C-Series4
4.1 Batteries
The C-Series device has two battery compartments. The batteries for the
Tobii C8 differ in size and capacity from those of the Tobii C12 and C15, see
the Appendix C: Technical Specications.
Tobii C8 batteries:
• Standard, included.
Tobii C12 and C15 batteries:
• Standard, included.
4.1.1 Hot Swappable
You can remove/replace one battery without switching off the device,
providing that the remaining battery is sufciently charged. The remaining
battery requires being at least 5% charged to maintain device operation.
14
4.2 Charging
The batteries should only be charged using the included adapter, or by
using the Tobii C-Series Table Charger (not included, separate purchase
required). When the C-Series device is shut down and the adapter is
plugged in, the charging of completely discharged batteries may take up to 6
hours. The device can be used while the batteries are being charged, though
this may affect the time a battery takes to reach full capacity.
To be sure that charging takes place in both the C-Series device
and when using the C-Series Table Charger, be sure to plug the
adaptor into both the wall socket and the device or Charger
BEFORE you insert the batteries.
The expected battery lifetime is 500 charge/discharge cycles. After that, the
capacity of the battery will decrease by about 20% in usage time.
See Safety chapter for battery storage temperatures.
Chapter 4 Batteries in the Tobii C-Series
Page 15
Tobii C-Series User’s Manual
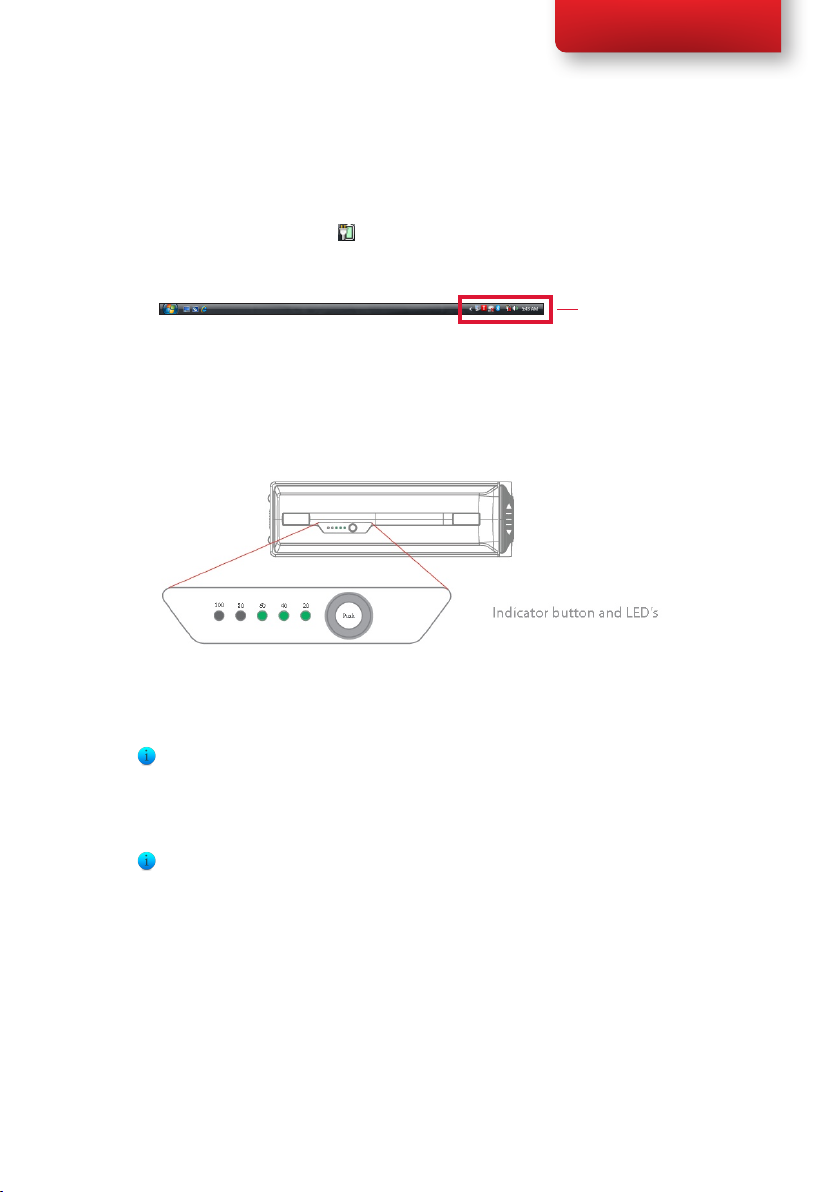
4.2.1 Checking Charge Level
Click on the battery icon, , in the Notication area to see the remaining
charge of the battery, which is installed in the device.
Notication Area
You may also, at any time, check the status of a battery by pressing the
indicator button on the face of the battery. Five LEDs (light-emitting diodes)
will indicate the remaining charge level. For example, three lit LEDs indicate
a 60% remaining charge.
When charging, the highest capacity LED indicator will be blinking.
The lowest capacity LED indicator (the “20” LED), will also blink when
the indicator button is pressed if the battery’s capacity has dropped below
10%. So don’t rely upon the blinking of the 20% indicator as a guarantee for
charging.
If the batteries have been deeply discharged (this can happen by leaving an
empty battery inserted in the C-Series device without the power adapter
connected) you may not see any indication of charging when you reconnect
the adapter properly to the C-Series device or the Table Charger. It may
take some time (even up to 20 minutes) before you see an LED indication
that any charging is taking place. The battery IS being charged during this
duration though it is a recovery charge raising the level enough to begin
normal charging.
Chapter 3 Batteries in the Tobii C-Series
15
Page 16
Tobii C-Series User’s Manual
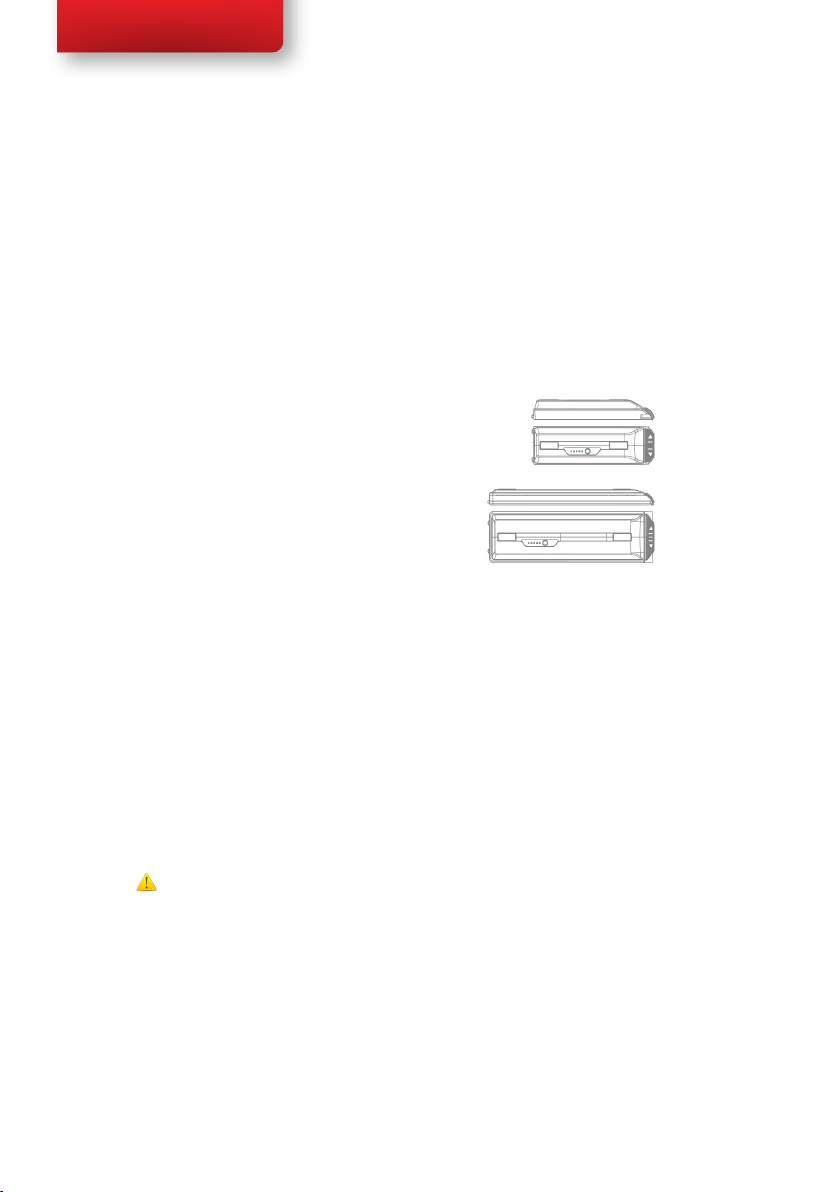
4.3 Inserting and Releasing the Batteries
For safety reasons, the C-Series device is delivered without the batteries
inserted. The batteries are delivered only partially charged. The C-Series
device can be used right away. It is nevertheless recommended that the
batteries are charged for at least two hours before taking the device in use.
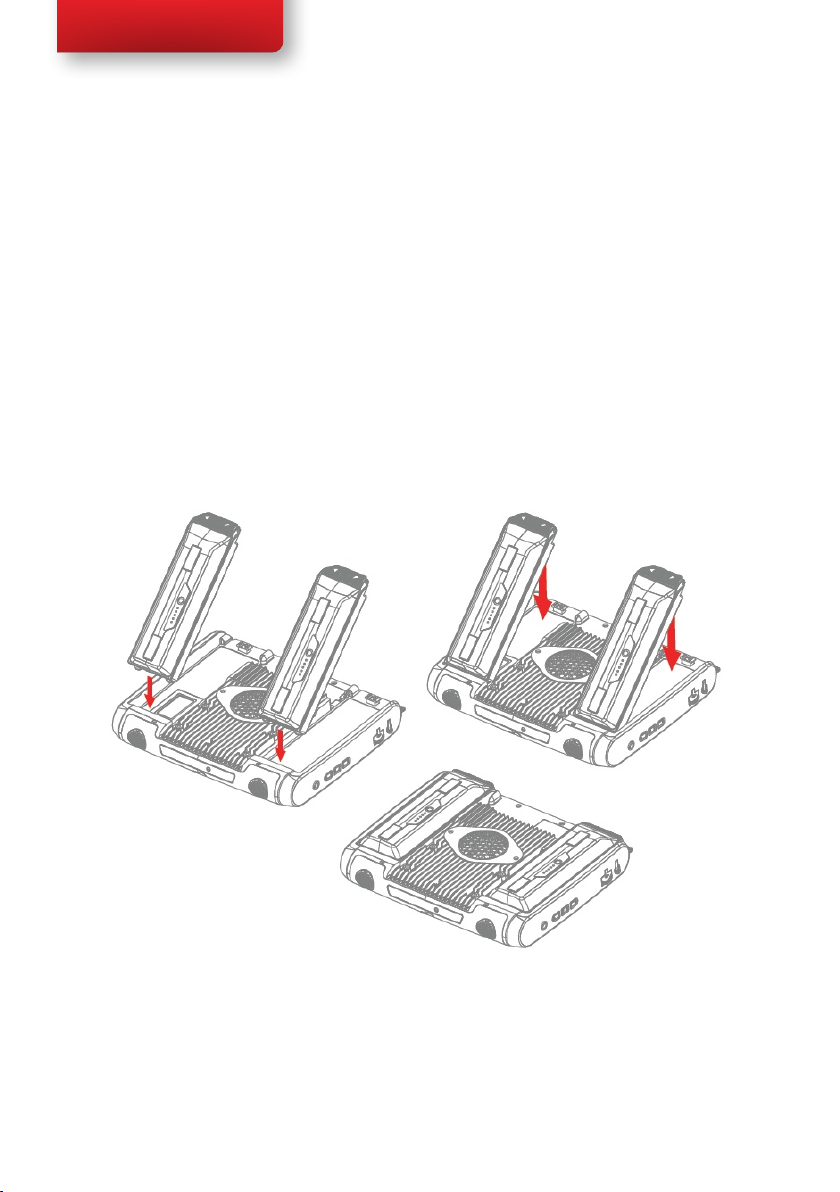
To insert the batteries:
1. Place the C-Series device face down on a at surface.
2. Insert a battery in the battery compartment.
3. Press the battery down until it locks in place. You should hear a
click that conrms that the battery is in a locked position.
16
Chapter 4 Batteries in the Tobii C-Series
Page 17
Tobii C-Series User’s Manual
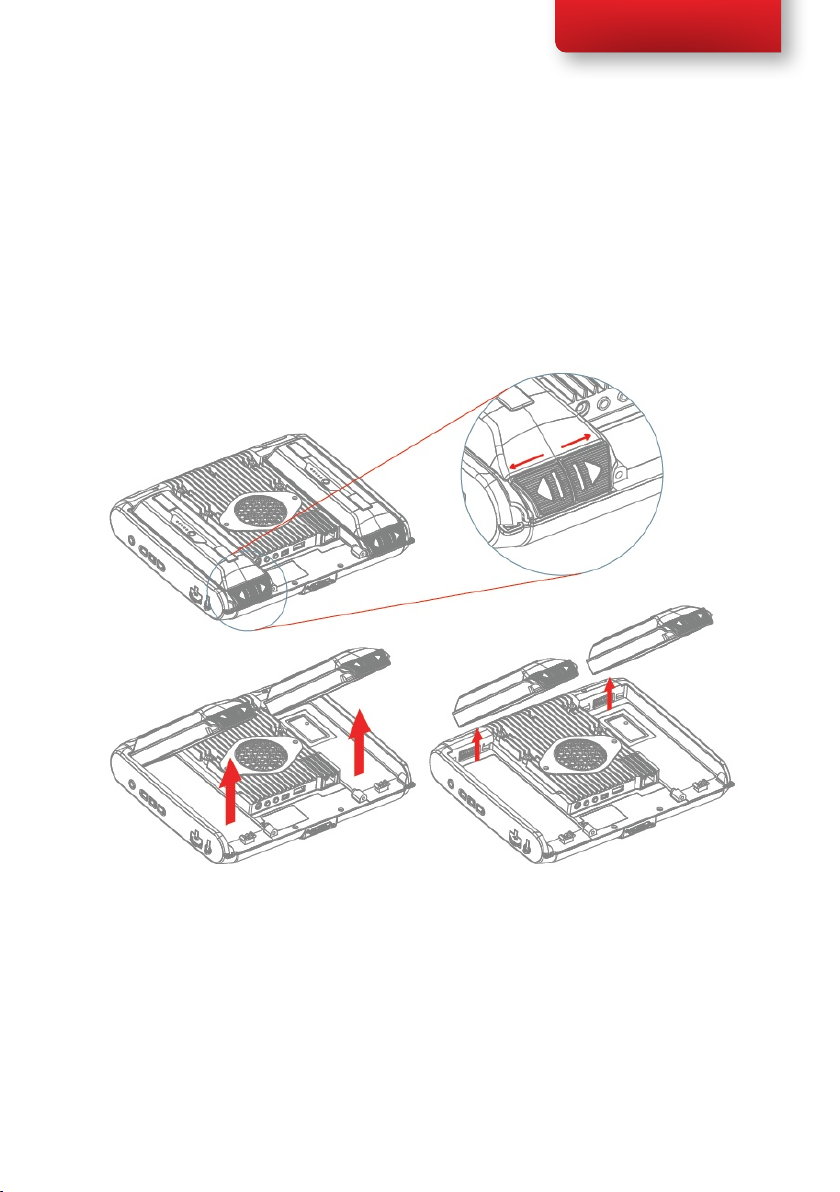
To release the batteries:
1. Place the C-Series device face down on a at surface.
2. Use both hands to slide the rubber feet apart on the battery. You
will hear a click as they are released.
3. Lift the battery up and out of the device.
Chapter 3 Batteries in the Tobii C-Series
17
Page 18

Tobii C-Series User’s Manual
Using the Tobii C-Series5
5.1 Starting the Device
Start the device in one of the following ways:
• Press the power button on the right side of the device .
• Activate a congured Switch (see Conguring a Switch to
Power On or Off).
When you have started the device, the LEDs on both sides of the display
will rst shine blue, then turn green at the start up of the display.
18
5.1.1 Password Information
The C-Series device is congured to start up, using the operating system
present, without a password. Though unusual, there are situations in which
the password window could plausibly pop up; for example, when creating
a new user in the operating system, when returning from the operating
system’s sleep mode or when downloading software updates from the
internet.
Be aware that creating a new user and downloading updates from the
internet could possibly compromise the system and software settings of the
operating system that have been set and installed at Tobii Technology.
Should the password window pop up, requiring a password, the default
Chapter 5 Using the Tobii C-Series
Page 19
Tobii C-Series User’s Manual
password on all C-Series devices is, “Tobii” (case sensitive). In order to
type in the password, an external USB keyboard is required (not included).
If you decide to change the password, be sure to write it down in a safe
place for later use.
Suggested place to keep new password:
Without the operating system’s access password, Tobii Support may be
unable to assist you with any future difculties.
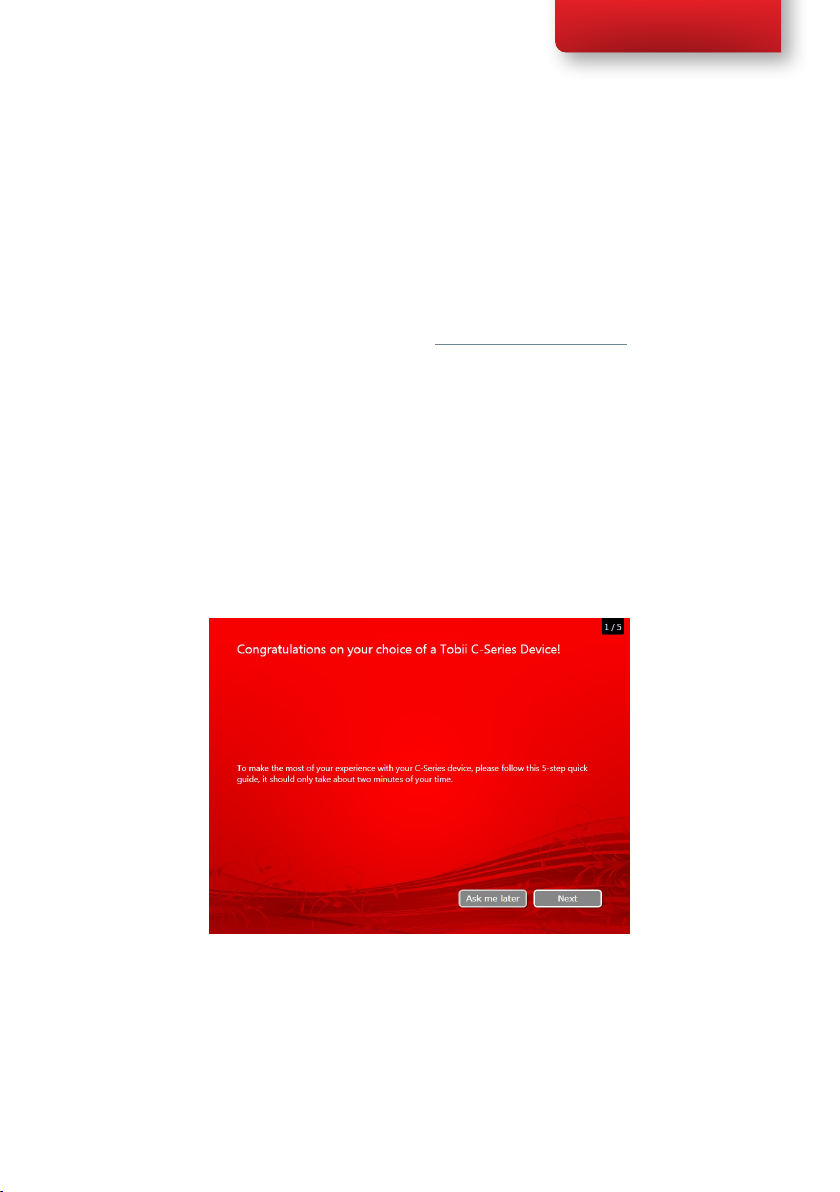
5.1.2 C-Series Welcome Guide
When you start your C-Series Device for the rst time you will be greeted
by the C-Series Welcome Guide. The guide is a setup wizard that will walk
you through ve steps that will help you make the most of your device.
Follow the instructions and click on Next to get to the next page of the
Guide.
Note: The guide will only take about two minutes to complete, but if you
wish you can opt out of going through the steps by clicking on Ask me
later. If you opt out the Welcome Guide will open again the next time you
start your device.
Chapter 5 Using the Tobii C-Series
19
Page 20
Tobii C-Series User’s Manual
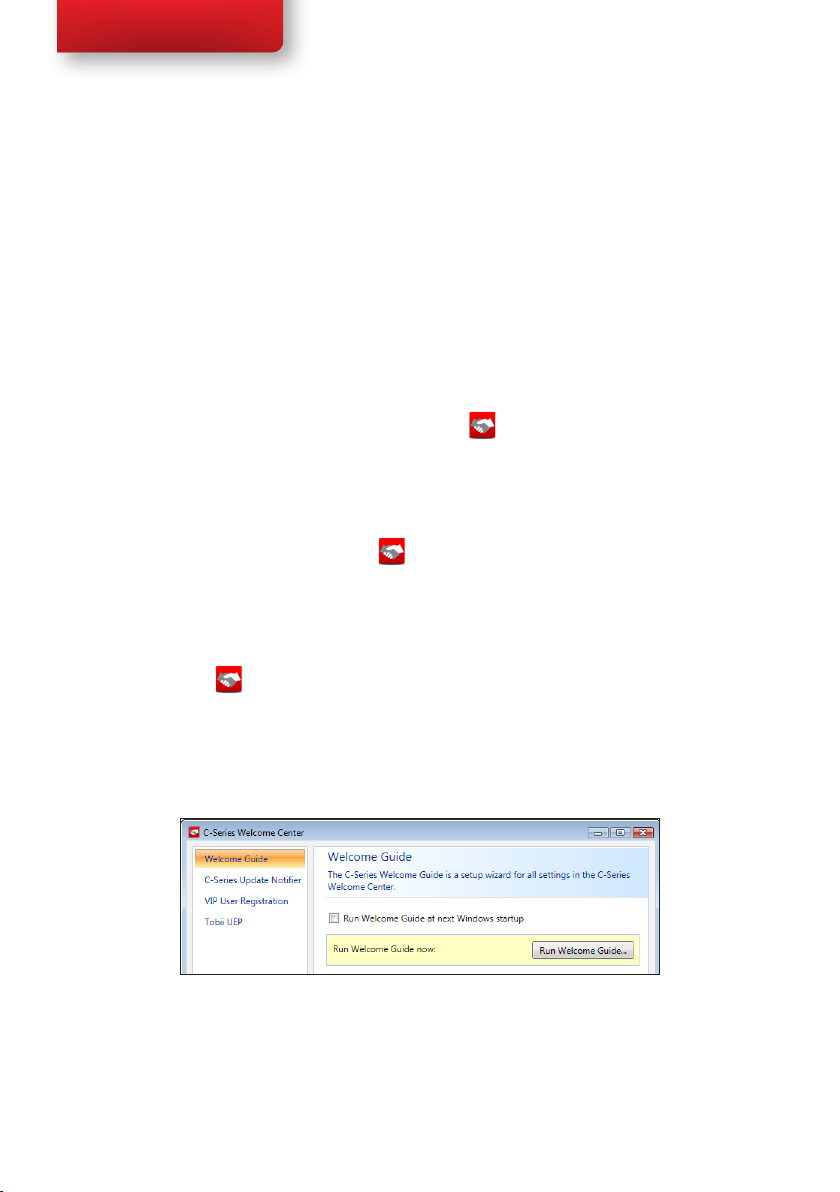
5.1.3 C-Series Welcome Center
The C-Series Welcome Center is the program on your C-Series Device
where you can access and change the settings that you have chosen during
your rst setup with the C-Series Welcome Guide, or even run the
Welcome Guide again at a time of your choosing.
To open the C-Series Welcome Center:
• Navigate in Windows from your desktop to Start Menu > All
Programs > Tobii > C-Series Welcome Center and click on
the C-Series Welcome Center icon, .
or
• Navigate in Windows from your desktop to Start Menu >
Control Panel > Additional Options and click on the C-Series
Welcome Center icon, .
or (if you use the “Classic View” for your Control Panel in Windows)
20
• Navigate in Windows from your desktop to Start Menu >
Control Panel and click on the C-Series Welcome Center icon,
.
Within the C-Series Welcome Center you can:
• Run the C-Series Guide immediately or choose to have it run upon
the next start up
• Choose to enable the automatic updates for your Tobii software
or search for updates immediately (must be connected to the
internet).
Chapter 5 Using the Tobii C-Series
Page 21
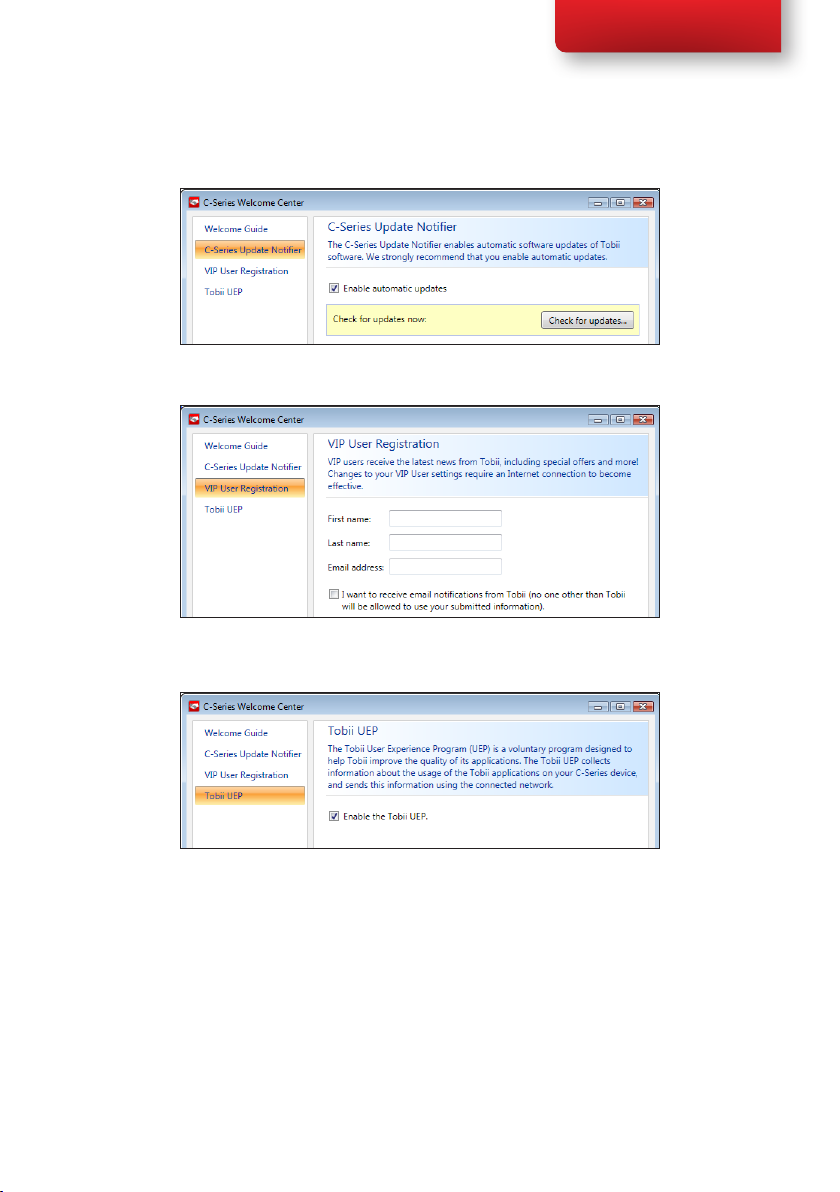
• Register as a VIP User.
Tobii C-Series User’s Manual
• Enable the Tobii User Experience Program.
5.1.4 C-Series Update Notifier
The Tobii C-Series Update Notier is a program that noties you when
the latest software updates for your Tobii Software are available (either
automatically, on a regular basis, or manually, at a time of your choosing)
and assists you in installing the updates.
If you have chosen to “Enable automatic updates” in either the C-Series
Welcome Guide or, later, in the C-Series Welcome Center, the Update
Chapter 5 Using the Tobii C-Series
21
Page 22
Tobii C-Series User’s Manual
Notier will actively search Tobii’s sites for version Updates of your
software.
To keep your C-Series Device running properly it is highly recommended
that you update your Tobii Software on a regular basis and it is therefore
highly recommended that you enable automatic updates.
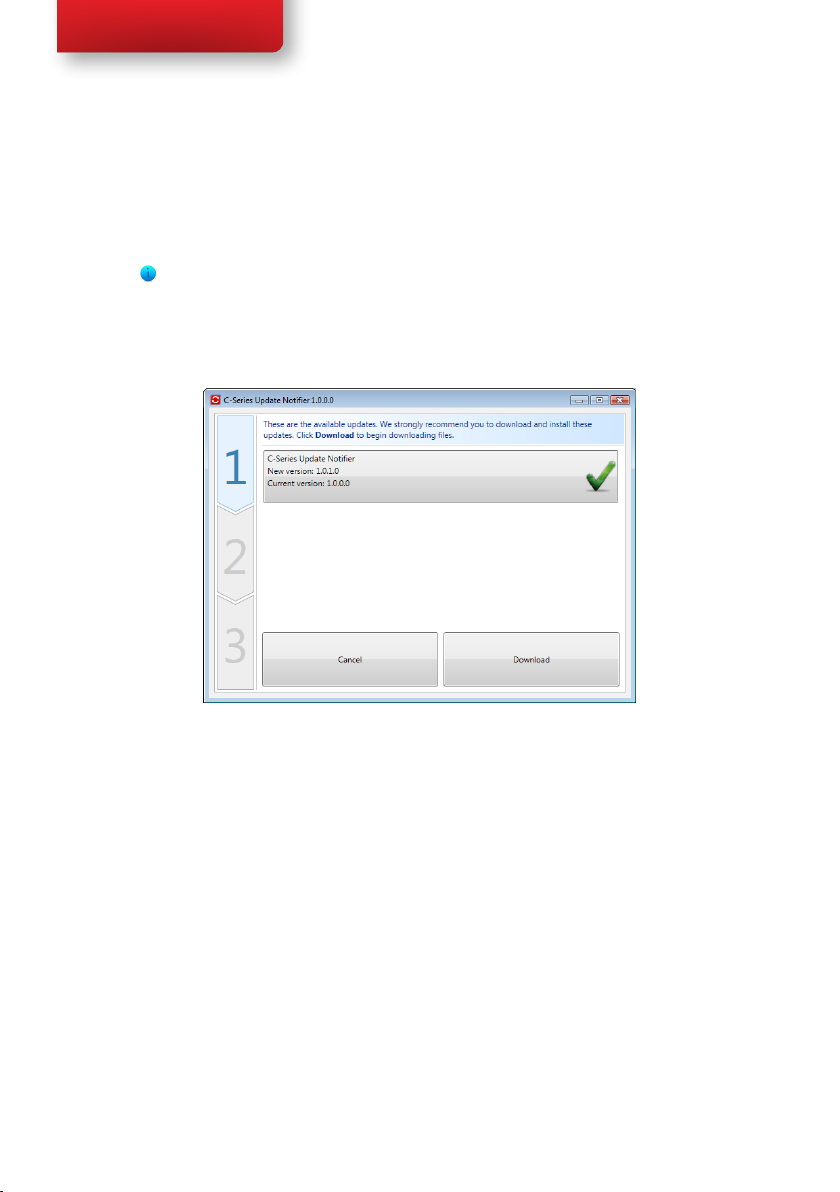
If an update is found the following Update Notier window will pop up:
22
The update or updates available will show themselves in the Step One
window of Update Notier as large button with a green check mark on the
right side. You will also be able to see the version number of the software
that you currently have and the version number of the update.
If you choose not to download one or more of the available updates you
can click on the button of the update you do not want and the check mark
will turn into a red “X” mark.
Proceed in the following way:
• Click the Download button to download the updates to your
Device and continue to Step Two.
• In Step Two Click the Install button to Install the chosen Updates
to your Device and proceed to Step Three.
• Step Three informs you that your system has been updated, click
the Done button to close the Update Notier.
Chapter 5 Using the Tobii C-Series
Page 23

Tobii C-Series User’s Manual
If you choose not to “Enable automatic updates” you can still check for
updates for your Tobii software and update them manually using the
C-Series Update Notier.
To open and activate the C-Series Update Notier manually (this opens
the Step One window shown above and starts the same automatic update
process):
• Navigate in Windows from your desktop to Start Menu > All
Programs > Tobii > C-Series Update Notier and click on
the C-Series Update Notier icon, .
5.2 Shutting Down the Device
The device should be shut down using one of the following ways:
• Use the start menu in Windows (recommended when possible).
• Press a congured Switch for two to seven seconds. Please note
that pressing the Switch for more than 7 seconds will shut down
the device immediately, disregarding any unsaved changes.
Should you be unable to shut the device down using either of the above,
you can hold the power button on the right side of the device down for
ve seconds. The device will consequently shut down immediately, without
waiting for open applications to close. This is not considered a “clean”
Windows shut down and is thus not recommended unless completely
necessary.
Chapter 5 Using the Tobii C-Series
23
Page 24

Tobii C-Series User’s Manual
5.3 Configuring a Switch to Power On or Off
5.3.1 Configuring a Switch to Power On
To congure a connected Switch to power on the device:
1. Open the C-Series Hardware Options > Switches.
2. Select the Enable switch X to power on device check box. To
disable, click to clear the Enable switch X to power on device
check box.
24
5.3.2 Configuring a Switch to Power Off
To congure a connected Switch to power off the device:
1. Open the C-Series Hardware Options > Switches.
2. Select the Enable switch X to power off device check box. To
disable, click to clear the Enable switch X to power off device
check box.
Chapter 5 Using the Tobii C-Series
Page 25

Tobii C-Series User’s Manual
5.4 Safety Settings: C-Series Hardware
Options
Upon starting the device, the safety settings in C-Series Hardware
Options will open as the default page automatically (other that during
the rst start up of the device, when the C-Series Welcome Guide setup
wizard will open rst). The safety settings exist for the safety of the
customer. Be sure to read the safety details before accepting any changes.
5.4.1 Audio Safety
Before you can use the speaker functionality and adjust speaker output
settings in C-Series Hardware Options > Audio you need to conrm
the Audio safety details. To conrm:
1. Open the C-Series Hardware Options > Safety
2. Click on the Audio safety details text. A new dialog box opens
and displays the safety text. Please read this thoroughly.
3. Select the I have read and understand the safety details
and I want to enable the speaker functionality check box to
conrm that you have read and understood the safety text.
4. Click Apply or OK to save.
Chapter 5 Using the Tobii C-Series
25
Page 26

Tobii C-Series User’s Manual
5.4.2 Temperature Control Safety
Before you can set the device usage in C-Series Hardware Options
> Temperature you need to conrm the Temperature control safety
details. To conrm:
1. Open the C-Series Hardware Options > Safety
2. Click on the Temperature control safety details text. A
new dialog opens and displays the safety text. Please read this
thoroughly.
3. Select the I have read and understand the safety details and
I want to enable the temperature control functionality
check box to conrm that you have read and understood the safety
text.
4. Click Apply or OK to save.
You can use the device in a portable or mounted mode. Your choice will
affect the maximum allowed device temperature and the fan speed. While
having the device mounted, it is allowed to run at a higher temperature.
You have to have conrmed (as shown above) that you have read, and
understood the Temperature control safety details before you can
specify the device usage to portable or mounted. This is done in C-Series
Hardware Options > Safety.
26
Specifying device usage mode takes place outside of the Safety settings but
within C-Series Hardware Options. To specify device usage:
1. Open the C-Series Hardware Options > Temperature
Control.
2. Click on preferred option below Device usage.
Important! If the device is gets overheated the LEDs on the sides of the
display turn orange and the device shuts down. It may take a while before it
can be restarted as the unit may rst need time to cool down.
Return to C-Series Hardware Options > Safety to save changes for
future sessions.
Chapter 5 Using the Tobii C-Series
Page 27

Tobii C-Series User’s Manual
5.4.3 Saving Changes for Future Sessions
To save your changes for future sessions:
1. Select the Save my changes for future sessions check box.
2. Click Apply or OK to save. Both the audio and the temperature
control settings will be stored in memory. If this check box is not
selected when you click Apply or OK the settings will only be
stored until you log out.
5.4.4 Disabling Safety Page as Default Page on Startup
The Safety page is shown by default when the C-Series device is started. In
order to disable:
1. Open the C-Series Hardware Options > Safety.
2. Select the Do not show this page on startup check box.
3. Click Apply or OK to save.
Chapter 5 Using the Tobii C-Series
27
Page 28

Tobii C-Series User’s Manual
5.5 Adapting the Touch Screen for the User
The Touch Screen interprets your touch and moves the cursor to
wherever your nger contacts the screen. The Touch Screen can be
“calibrated” for your touch, either by the separate touch screen software,
TouchKit, or in the C-Series Hardware Options.
Use your nger or a stylus on the Touch Screen. Do not use any sharp
objects as the screen could scratch or break.
5.5.1 Calibrating the Touch Screen
Using the Touch Screen calibration in the C-Series Hardware Options:
1. Open the C-Series Hardware Options > Touch Screen.
2. Press the calibrate button to start a calibration of the Touch
Screen. The screen will turn white and display an active red target
in the bottom left corner with a 15 second timer beside it.
3. Touch and hold the target before the 15 seconds is up, it will turn
blue. Continue holding until the timer clock has counted up to
100%. The target will then move to the next corner, anticlockwise/
counterclockwise.
28
Chapter 5 Using the Tobii C-Series
Page 29

Tobii C-Series User’s Manual
Using the Touch Screen software calibration:
1. Go to Start menu > All Programs > TouchKit > Congure
Utility.
2. Select the Tools tab.
3. Click on 4 Points Calibration to start the calibration of the
touch screen. The screen will turn white and display an active red
target in the bottom left corner with a 15 second timer beside it.
4. Touch and hold the target before the 15 seconds is up, it will turn
blue. Continue holding until the timer clock has counted up to
100%. The target will then move to the next corner, anticlockwise/
counterclockwise.
Chapter 5 Using the Tobii C-Series
29
Page 30

Tobii C-Series User’s Manual
5.6 Adjusting the Backlight
You can adjust the display brightness level by:
1. Opening the C-Series Hardware Options > Backlight.
2. Moving the slider to the right to increase the brightness and to the
left to decrease it. The backlight needs a short while to adjust when
changing the brightness.
There is a sensor on the device which will automatically adjust the screen
brightness according to the surrounding light, relative to the selected level.
30
Using a darker setting can improve battery life.
Chapter 5 Using the Tobii C-Series
Page 31

Tobii C-Series User’s Manual
5.6.1 Adjusting the Sound
You can congure the built-in speakers using the Windows 7 Control
Panel > Hardware and Sound and the C-Series Hardware
Options.
Refer to Microsoft’s information on how to congure the sound in the
Windows 7 Control Panel.
To congure the sound in C-Series Hardware Options:
1. Open the C-Series Hardware Options > Audio.
2. Click one of the options below Speaker output.
The two audio channels, Left and Right, provide two levels of audio output.
For example, the Left Channel may output the auditory scanning cues to
the user’s headphones, while the Right Channel could output the chosen
text to the speakers of the device, to be spoken aloud.
Please note that the Left and Right Channel do not refer to left and right
speakers. Either channel can output sound/audio to both of the speakers.
Chapter 5 Using the Tobii C-Series
31
Page 32

Tobii C-Series User’s Manual
5.7 Using Headphones
If you want to enable the use of headphones:
1. Open the C-Series Hardware Options > Audio.
2. Select the Enable headphones check box.
If you want to disable the use of headphones:
1. Open the C-Series Hardware Options > Audio.
2. Click to clear the Enable headphones check box.
5.8 Using Bluetooth® (optional)
The built-in Bluetooth® enables connection to wireless devices which
comply with ordinary Bluetooth® standards.
32
5.8.1 Handling Licenses
To use Bluetooth® communication in the device, a license is required.
To view or enter a license, go to the Licenses section in the C-Series
Hardware Options.
5.8.2 Enabling and Disabling Bluetooth® Communication
You enable and disable Bluetooth® communication in the Wireless section
in the C-Series Hardware Options.
To enable Bluetooth® communication:
1. Select the Enable wireless units check box.
2. Select the Bluetooth check box.
Chapter 5 Using the Tobii C-Series
Page 33

Tobii C-Series User’s Manual
To disable Bluetooth® communication:
• Clear the Bluetooth check box or the Enable wireless units
check box for disabling all wireless units.
If the Bluetooth® communication is activated you can see the Bluetooth
icon in the Notication area on the desktop.
Notication Area
5.8.3 Connecting to a Bluetooth® Device
When the Bluetooth communication is activated (see above) you can
connect the C-Series device to another Bluetooth® device.
To search for available Bluetooth® devices and connect to them, use the
Bluetooth Places in Windows 7. To access Bluetooth Places:
• Double-click on the Bluetooth icon, , in the Notication area.
5.9 Using the WLAN (optional)
The built-in WLAN (Wireless Local Area Network) support enables
connection to a wireless network in compliance with the standard
802.11 b/g for the C8 and C12 and 802.11 b/g/n for the C15.
5.9.1 Handling Licenses
To be able to use WLAN communication, a license is required. To view
or enter a license, go to the Licenses section in the C-Series Hardware
Options.
5.9.2 Enabling and Disabling the WLAN Communication
You can enable and disable WLAN communication in the Wireless section
in the C-Series Hardware Options.
Chapter 5 Using the Tobii C-Series
33
Page 34

Tobii C-Series User’s Manual
To enable WLAN communication:
1. Select the Enable wireless units check box.
2. Select the WLAN check box.
To disable WLAN communication:
• Clear the WLAN check box or clear the Enable wireless units
check box for disabling all wireless units.
5.9.3 Connecting to a WLAN
To enable WLAN communication:
1. Click on the WLAN icon, , in the Notication area on the
Desktop.
2. Select Connect to a network.
3. Select a network to connect to.
A wireless access point which supports antenna diversity is recommended
when setting up a wireless network to use with a C-Series device, for
reliable performance. Such access points are generally recognized by having
two antennas on the router device.
34
Using an antivirus program is strongly recommended.
5.10 Using the Camera
The built-in camera allows you to take snapshots of items in front of the
C-Series device. On the Tobii C8, the camera is located on the top of the
device.
On the Tobii C12 and Tobii C15, it is located on the back of the device.
Chapter 5 Using the Tobii C-Series
Page 35

Tobii C-Series User’s Manual
Refer to Tobii Communicator or alternative communication software
manuals for camera function utilization.
5.11 Using the Mobile Phone (optional)
To use the built-in Mobile phone communication feature you need a valid
SIM card from a network operator in your area. The SIM card should be
installed beneath the SIM card cover on the back of the C-Series device.
The Mobile phone feature can be used to:
• Send and receive text messages (SMS) and multimedia message
(MMS)
• Make telephone calls through synthetic voice
• Answer telephone calls through synthetic voice
5.11.1 Handling Licenses
To be able to use Mobile phone communication, a license is required.
To view or enter a license, go to the Licenses section in the C-Series
Hardware Options.
5.11.2 Enabling and Disabling the Mobile Phone
You can enable and disable Mobile phone communication in the Wireless
section in the C-Series Hardware Options.
Chapter 5 Using the Tobii C-Series
35
Page 36

Tobii C-Series User’s Manual
To enable Mobile phone communication:
1. Select the Enable wireless units check box.
2. Select the Mobile Phone check box.
To disable Mobile phone communication:
• Clear the Mobile Phone check box or clear the Enable
wireless units check box for disabling all wireless units.
The SIM card must not have a security code enabled to be used with a
C-Series device.
36
5.12 Using Environmental Control
(optional)
The C-Series device includes an environmental control unit, Tira-2.1.
The Tira is a programmable infrared device that can be used to control
equipment with IR remote controllers such as TV-sets or DVDs. Refer
to Tobii Communicator or alternative communication software manuals
on how to connect, congure and use IR remote controls.
Chapter 5 Using the Tobii C-Series
Page 37

Tobii C-Series User’s Manual
If the device you are trying to control is not responding, try tilting the
C-Series device up or down slightly to change angle at which the IR signal is
being sent.
5.12.1 Handling Licenses
To use the Tira, a license is required. To view or enter a license, go to the
Licenses section in the C-Series Hardware Options.
5.12.2 Enabling and Disabling Tira
You can enable and disable Tira in the Environmental Control section of the
C-Series Hardware Options.
To enable Tira:
• Select the Tira check box.
To disable Tira:
• Clear the Tira check box.
5.13 Creating Shortcuts to Actions
You can create shortcuts to tasks, called actions, by programming the
quick access buttons and connected Switches. The quick access buttons
are located on the right side of the C-Series device, named A, B and C.
Switches are connected to the Switch connectors.
Chapter 5 Using the Tobii C-Series
37
Page 38

Tobii C-Series User’s Manual
5.13.1 Available Actions
This is a short description of each action available to set:
• Send input – Allows the user to send input to an alternative
program (keystroke, mouse click or text).
• Start Program – Allows the user to start a program.
• Volume – Allows the user to adjust the volume up or down or to
set mute on or off.
• Backlight – Allows the user increase or decrease the backlight of
the screen.
• Eye tracking – Allows the user to show and hide the track status
window, calibrate or pause the eye tracking on or off.
• Wireless – Allows the user to either set all radio connections on or
off, or a specic wireless connection.
• Touch Screen – Allows the user to turn on or off the Touch
Screen.
38
The available actions are the same for the quick access buttons and
Switches. To create a shortcut to an action:
1. Open the C-Series Hardware Options.
2. Select Buttons or Switches, depending on which one you want
to customize.
3. Click Set action to view the dialog box where you can select the
action you would like the button to perform. By selecting one of
the actions, the options for this action will be revealed below the
chosen action.
Chapter 5 Using the Tobii C-Series
Page 39

Tobii C-Series User’s Manual
If you would like the quick access button to make a sound when pressed,
select the Play sound check box after having set an action.
5.13.2 Selecting Actions
Send Input – choose either to send a keyboard input, a mouse click or
specied text by clicking the option you want the device button or Switch
to perform.
• Send keyboard input – In the Send keyboard input list,
select the keystroke you want to send to an alternative program.
• Send mouse click – In the Send mouse click list, select the
desired mouse click: left, middle or right mouse click.
• Send text – In the Send text box, type the text you want to
send to an alternative program.
Start Program – Click Browse the rst time you are using this option to
nd and select a program.
The next time you click the Start Program option a list of previously
selected programs will be displayed. You can then directly select a program
from the list or click Browse if you want to start a program not in the list.
Chapter 5 Using the Tobii C-Series
39
Page 40

Tobii C-Series User’s Manual
For the selected program it is possible to add program arguments.
However, this is normally not required. If the program should require
arguments and you do not know what to enter, please contact the company
you purchased the software from.
Volume – choose to increase, decrease or mute the volume by clicking the
preferred option.
40
Backlight – choose to either increase or decrease the screen backlight by
clicking the preferred option.
Eye Tracking – choose to toggle track status window, calibrate eye
tracking or toggle eye tracking on/off.
To enable this option you have to install the Tobii Eye Control Suite and a
CEye. See Tobii CEye Module chapter.
Wireless – you can either set all radio connections on/off or each
individual wireless unit on/off one by one, by clicking the options.
Chapter 5 Using the Tobii C-Series
Page 41

Tobii C-Series User’s Manual
Touch Screen – choose to turn the touch screen on or off.
If actions for a Switch are customized both in the C-Series Hardware
Options and in Tobii Communicator or in alternative communication
software all actions will be performed simultaneously. Ensure that the
specied action for a Switch does not conict with an action set for the
same Switch in Tobii Communicator or in alternative communication
software.
5.14 Handling Licenses
To add new and/or view existing licenses:
• Open the C-Series Hardware Options > Licenses.
Chapter 5 Using the Tobii C-Series
41
Page 42

Tobii C-Series User’s Manual
To add a license:
1. Click Add License(s).
2. In the Enter license box, type the new license and then click
Add.
For typing the license use either a connected keyboard or the on-screen
keyboard by clicking this button .
5.15 System Information
To view the version and model of the device:
42
1. Open the C-Series Hardware Options.
2. Select System Information. Please have this information
available if you have problems with the device and need to contact
Customer Support.
By clicking Copy all information you can paste the information into a
document (such as Notepad or WordPad) or directly into an e-mail.
5.16 Performing Backup and Restore
5.16.1 User Profile Card
The C-Series device comes with a 1GB SD card installed. The purpose of
this card is to backup personal settings and data. In the case of fatal damage
to the C-Series device, Tobii Technology can remove the SD card and have
it inserted into a new device for quick and easy retrieval and restoration of
personal data and settings.
Chapter 5 Using the Tobii C-Series
Page 43

Tobii C-Series User’s Manual
5.16.2 Restoring Backup Files by the User
The backup les are placed in the directory Q:\Backup\<date>. The
backup process, which runs as user TobiiTaskManager, executes once
a week (every Sunday at 15.00) and the three latest backups are saved.
The process backs up les for all users. If the backup drive does not
have enough space some les will not be backed up. Image les have the
lowest priority (backed up last). The largest le size for the backup of
individual les is 100 MB, les larger than this will be excluded.
To restore backup les, copy the folders in the directory
Q:\Backup\<date> to the C:\ drive.
Copies of these backup les can be saved anywhere you wish, to an
external hard drive, for example, or to a USB stick. Copy the folders in
the directory Q:\Backup\<date> to any external directory or drive of
your choosing.
Chapter 5 Using the Tobii C-Series
43
Page 44

Tobii C-Series User’s Manual
Tobii CEye Module &
Eye Control6
The Tobii CEye Module is an eye control unit which is designed to dock
seamlessly into a Tobii C12 or C15 (not used with C8) and operate with
precision regardless of glasses, contact lenses, eye color or light conditions.
The CEye Module enables you to control the computer with your eyes.
By looking at the screen, you control the mouse pointer and you click by
blinking, dwelling (staring at the screen for a certain length of time) or using
a Switch.
6.1 Installing the Tobii CEye Module
To enable eye control with a Tobii C12 or C15 you must rst connect the
Tobii CEye Module to the device and then install the Tobii Eye Control
Suite. See instructions below.
6.1.1 Mounting the CEye Module to the Tobii C12 or C15
44
When mounting the Tobii CEye to a Tobii C12 or C15 it is important that
the contact areas between them are clean.
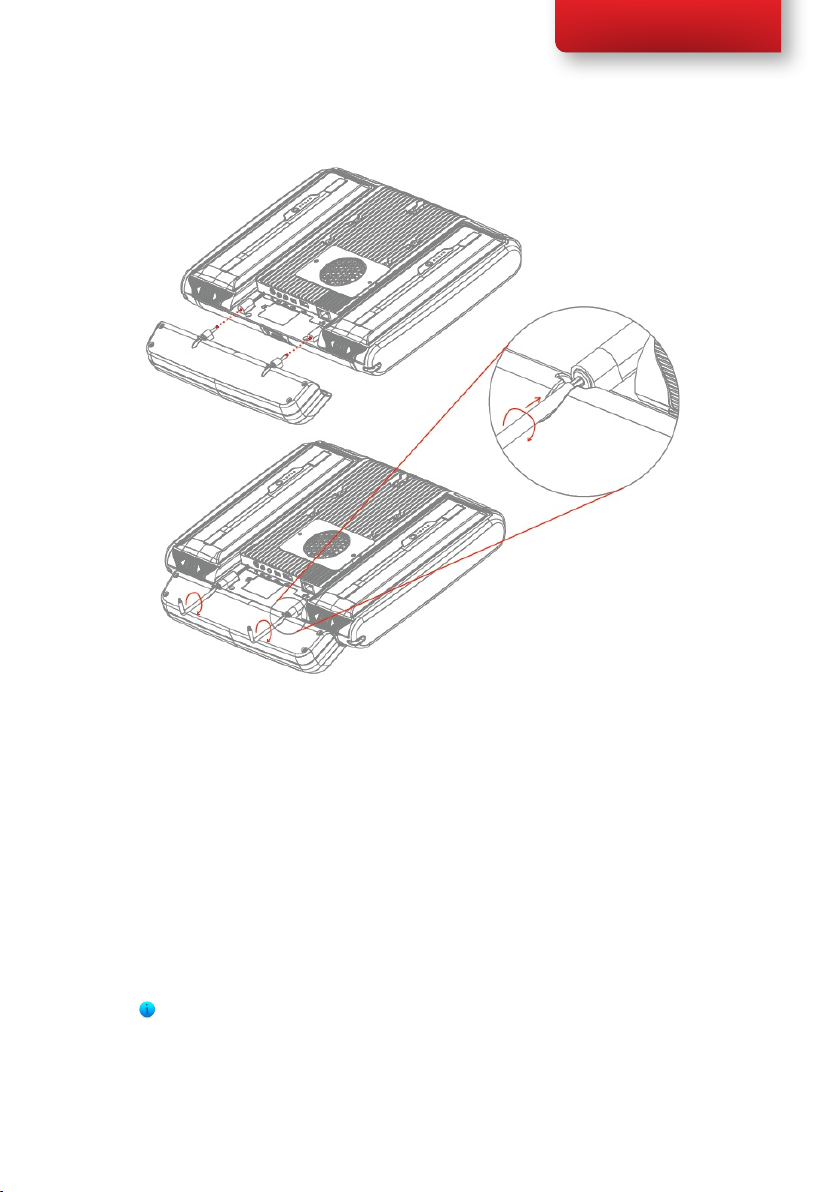
Mount the CEye to the Tobii C12 or C15 in the following way:
1. Make sure that the Tobii C12/C15 is shut down.
2. Remove the power adapter and batteries.
3. Place the Tobii C12/C15 face down on a at surface.
4. Use the accompanying Torx 10 screwdriver and screws to mount
the CEye to the Tobii C12/C15.
Do not overtighten the screws, tighten until you encounter resistance.
Overtightening may increase risk for breakage and will not improve
functionality. First, screw one screw in lightly, then the second, lightly.
Second, tighten the rst screw, then the second.
Chapter 6 Tobii CEye Module & Eye Control
Page 45
Tobii C-Series User’s Manual
6.1.2 Required Software
The required software for the CEye module is the Tobii Eye Control Suite.
The Tobii Eye Control Suite includes two components: the interaction
server application and a system tray application, Tobii Eye Control
Options.
The interaction server runs in the background and has no user interface.
A user interface is instead provided by the tray application, Tobii
Eye Control Options, or by Tobii Communicator or alternative
communication software. The interaction server also contains the
Windows Control application, accessible from the Tobii Eye Control
Options.
The latest required software will be on a USB stick delivered with the CEye
Module.
Chapter 6 Tobii CEye Module & Eye Control
45
Page 46

Tobii C-Series User’s Manual
6.1.3 Installation of Eye Control Software from USB Stick
To install the latest necessary software from the USB stick, make sure the
C-Series Device is turned on, then:
1. Insert the included USB stick in one of the two USB ports on
the C-Series (marked with the USB icon, ). The AutoPlay
window opens automatically, labeled with the name of the USB
manufacturer and the drive, KINGSTON (D:).
2. Double-click on the Open folder to view les folder.
3. Double-click on the -Startup icon to start the Tobii Eye
Control Suite installation process.
Be aware that after double-clicking the -Startup icon it may take up to
a minute or so before the Tobii Eye Control Suite window will open.
Though nothing appears to be happening during this time, drivers are being
automatically installed.
4. Tobii Eye Control Suite window will open. Read the installation
information and follow the instructions (click Next, etc.). After
installation is complete, click Close.
5. Close the KINGSTON (D:) drive window
6. Remove the USB stick.
46
The required software is now installed onto your C-Series device. To
activate the software once your CEye module is physically attached:
• Open Tobii Communicator or your alternative communications
software, and follow the instructions provided in the respective
manuals for enabling and calibrating eye control.
To enable eye control in the Windows environment (Windows Control),
activate Tobii Eye Control Options using the following pathway:
• Start > All Programs > Tobii > Tobii Eye Control Suite >
Tobii Eye Control Options
See Accessing the Tobii Eye Control Options in this chapter of the
User’s Manual for more information.
Chapter 6 Tobii CEye Module & Eye Control
Page 47

Tobii C-Series User’s Manual
6.2 Using the Tobii CEye Module
6.2.1 Positioning
The Tobii C12 or C15 with the CEye attached is designed to work optimally
when it is parallel to the user’s eyes at a distance of about 60 cm (23.5 in).
This means that for those users leaning sideways or those lying down the
C12/CEye or C15/CEye also needs to be tilted in order to keep the users
eyes parallel to the screen and at the optimal distance.
Make sure the user is placed comfortably in relation to the optimal
positioning of, and distance from, the unit. Be aware also that the user’s
comfort, as well as the Eye Tracking performance, will be enhanced if the
sun is not shining directly on the screen or into the user’s eyes.
6.2.2 Track Status Viewer
Use the Track Status viewer (see Using the Tobii C-Eye
Module>Showing Track Status for more information on how open the
Track Status viewer) to help determine the optimal height and horizontal
positioning for eye tracking with the C12/CEye or C15/CEye.
• Ideally, the two dots that represent the user’s eyes should be in the
middle of the Track Status viewer.
• Use the distance meter on the right hand side of the Track Status
viewer to determine the optimal distance the user should be from
the C12/CEye or C15/CEye.
• The white bar in the distance meter should hover near the center,
within the green, when the optimal distance from the C12/CEye or
C15/CEye is reached.
Chapter 6 Tobii CEye Module & Eye Control
47
Page 48

Tobii C-Series User’s Manual
For information about calibration of the CEye see Using the Tobii C-Eye
Module>Calibrating. Also check the lighting conditions, related to what
is mentioned above, when calibrating.
6.2.3 Track Box
The Tobii CEye allows for extensive head movement. Once the C12CEye
or C15/CEye is properly calibrated and placed in front of the user, no
further adjustments are required.
48
The Tobii CEye produces an industry leading sized track box with the
approximate dimensions of 40 cm x 30 cm 20 cm / 15.7 in x 11.8 in x 7.9
in (Width x Height x Depth). The Track Box is an invisible box positioned
approximately 60 cm (23.5 in) straight out from a point just above the
middle of the C12 screen.
In order to be tracked properly for functional Eye Tracking the user needs
at least one eye in the track box at all times.
Chapter 6 Tobii CEye Module & Eye Control
Page 49

Tobii C-Series User’s Manual
6.2.4 Accessing the Tobii Eye Control Options
The Tobii Eye Control Options is a program for quick and easy access
to control functions such as track status, calibration and common settings.
You start Tobii Eye Control Options in one of the following ways:
• Go to Start menu > All Programs > Tobii > Tobii Eye
Control Suite > Tobii Eye Control Options.
• Double-click on the Tobii Eye Control Options icon, , in the
Notication area, or on the shortcut, , on the Desktop (if one
has been made).
• Right-click (hold nger on icon for touch screen right clicking) on
the Tobii Eye Control Options icon, , in the Notication area
and then click Settings.
In the list to the left in Tobii Eye Control Options, select which option
you want to change. In the list to the right, the available options will be
revealed.
Click OK to save changes. This will also close Tobii Eye Control Options
closes.
Click Cancel to cancel the changes. This will also close Tobii Eye Control
Options.
Click Apply to save changes. Tobii Eye Control Options will remain open.
Chapter 6 Tobii CEye Module & Eye Control
49
Page 50

Tobii C-Series User’s Manual
6.2.5 Creating a New Profile
Use of different proles allows you to store multiple people’s calibrations
and feedback preferences on one device. Alternatively, one person might
want to store multiple proles for him/herself if that person wears glasses
occasionally or uses multiple means of accessing the device.
To create a new prole:
1. Open Tobii Eye Control Options, click User Proles.
2. Enter a new name in the Prole name eld.
3. Select an existing prole in the Based on prole drop down list.
The new prole will inherit all settings from the selected prole.
Note that if no proles have been created previously, the only one
to select is the default prole.
4. Click Create to save the new prole. The new prole is saved
directly upon clicking Create.
50
6.2.6 Selecting Current User Profile
To select current user prole:
1. Open Tobii Eye Control Options.
2. Select a user prole in the Current User Prole drop down list.
3. Select Apply.
Chapter 6 Tobii CEye Module & Eye Control
Page 51

Tobii C-Series User’s Manual
6.2.7 Deleting a Profile
To delete a prole:
1. Open Tobii Eye Control Options > User Proles.
2. Select a prole in the Prole to delete drop down list.
3. Click Delete to delete the selected prole. The prole is deleted
directly upon clicking Delete. Note that the default prole cannot
be deleted.
6.2.8 Customizing the Interaction
To adapt the CEye module’s interaction, follow the steps below.
1. Open Tobii Eye Control Options > Interaction.
Chapter 6 Tobii CEye Module & Eye Control
51
Page 52

Tobii C-Series User’s Manual
Scope
2. Select how the interactions setting should be reected:
• Click Default settings of the currently selected user
• Click Application specic settings of the currently
Method
3. Select the activation method from the Activation method drop
down list. There are three methods available, each with different
activation times:
• Dwell. Adjust the dwell time by moving the Dwell time
• Switch. Adjust the minimum time for a click duration and the
• Blink. Adjust the minimum and maximum duration for a blink
prole if you want to apply the new settings to the whole
user prole and not only to a particular application.
selected user prole if you want to apply the new
settings to a specic application of a user prole. Then select
application in the Application drop down list.
slider.
minimum time between clicks by moving the respective slider.
by moving the respective slider.
52
Visual Feedback
4. Select the symbol for visual feedback from the Dwell feedback
type drop down list.
5. Select the color of the feedback symbol in the Feedback color
drop down list.
6. Specify the dot size and opacity of the feedback symbol by moving
the respective slider.
7. Select the Show visible outline around the activated region
checkbox to see a dashed line around the activated area in all
instances of eye control selection
8. Select Simulate activation if you want to see how the activation
method will appear on the screen. The example is shown above the
Simulate activation button.
Chapter 6 Tobii CEye Module & Eye Control
Page 53

6.2.9 Customizing the Calibration
To customize the calibration, follow the steps below.
Tobii C-Series User’s Manual
1. Open Tobii Eye Control Options > Calibration Settings.
General
2. Select calibration background by clicking the background color
button and select the desired color.
3. Specify the number of points you want to calibrate with (two, ve
or nine) from the Calibration points drop down list. The higher
number of points, the more accurate the calibration.
4. Select if you want to have sound feedback or not from the Sound
feedback drop down list.
Chapter 6 Tobii CEye Module & Eye Control
53
Page 54

Tobii C-Series User’s Manual
Stimulus
5. Select the stimulus type from the Stimulus type drop down list.
There are three types available, each with different customizing
options:
• Dot:
• Image:
- Select color of the dot by clicking the Stimulus color
button.
- Select size of the dot by selecting from the Stimulus
size drop down list.
- Select speed of the dot by selecting from the Stimulus
speed drop down list.
- Select primary stimulus by clicking Browse and selecting
an image.
- Select secondary stimulus by clicking Browse and
selecting an image.
- Select size of the image by selecting from the Stimulus
size drop down list.
- Select speed of the image by selecting from the
Stimulus speed drop down list.
54
• Video:
- Select primary stimulus by clicking Browse and selecting
a video.
- Select secondary stimulus by clicking Browse and
selecting a video.
- Select size of the video by selecting from the Stimulus
size drop down list.
- Select speed of the video by selecting from the
Stimulus speed drop down list.
6. Check the Animate stimuli check box if you want the stimuli to
be animated.
7. If you want to control the calibration, i.e. decide when to move the
calibration stimuli, with a keyboard, check the Keyboard step-
through check box.
Chapter 6 Tobii CEye Module & Eye Control
Page 55

• For Keyboard step-through, use the ‘S’ key to step (to
move the calibration stimuli) and the ‘Esc’ key, the Left mouse
button or touching the touch screen to interrupt calibration.
When using Image or Video calibration, use the ‘T’ key to
toggle between primary and secondary stimulus images.
6.2.10 Customizing the Calibration Area
Tobii C-Series User’s Manual
To customize the calibration area, follow the steps below:
1. Open Tobii Eye Control Options > Eye Tracking.
2. Click the Calibration Area… button.
3. A blue semi-transparent area is displayed on the desktop. You
can move and resize the blue area to make it t your preferred
calibration area.
Chapter 6 Tobii CEye Module & Eye Control
55
Page 56

Tobii C-Series User’s Manual
6.2.11 Showing Track Status
The track status viewer is a window/dialog where you can verify that the
eye tracker recognizes your eyes and that you are well positioned in front
of the device.
56
Open the track status viewer in one of the following ways:
• Open Tobii Eye Control Options > Eye Tracking and select
the Track status button.
• Right-click (hold nger on icon for touch screen right clicking) on
the Tobii Eye Control Options icon, , in the Notication area
and select Show track status.
Notication Area
Chapter 6 Tobii CEye Module & Eye Control
Page 57

Tobii C-Series User’s Manual
6.2.12 Calibrating
The calibration can be started in one of the following ways:
• Open Tobii Eye Control Options > Eye Tracking and then
click the Start Calibration... button.
• Right-click (hold nger on icon for touch screen right clicking) on
the Tobii Eye Control Options icon, , in the Notication area
and select Start Calibration.
Notication Area
6.2.13 Interrupting Calibration
Interrupt the calibration in one of the following ways:
• Press Esc.
• Left-click on the screen with the mouse.
• Touch the screen.
6.2.14 Customizing Active Eye
Select the eye you want to be tracked by the eye tracker by:
1. Opening Tobii Eye Control Options > Eye Tracking.
2. Selecting active eye from the Active Eye drop down list.
Note! This is done after a calibration is nished.
Chapter 6 Tobii CEye Module & Eye Control
57
Page 58

Tobii C-Series User’s Manual
6.2.15 Improving Calibration Point(s)
After calibration, you may want to improve one or more points.
58
There is a color scheme used that will help you to understand the quality of
your calibration.
• If the background color of the Calibration Result is light red, you
have achieved a relatively low quality calibration. You can improve
one or more points individually, or recalibrate completely, to
achieve better eye tracking results.
• If the background color of the Calibration Result is light yellow,
you have achieved a medium quality calibration. You might be able
achieve better eye tracking results by improving one or more
points individually.
• If the background color of the Calibration Result is green, you have
achieved a high quality calibration.
Be aware that no matter what quality of calibration you have achieved you
will be able to select OK or Apply and begin using eye control. It is the
accuracy and functionality of the eye control that is affected by the quality
of the calibration results. Try for the best calibration possible.
Chapter 6 Tobii CEye Module & Eye Control
Page 59

Tobii C-Series User’s Manual
The closer the lines within the calibration point are to a dot in the center of
the circle of the calibration point, the better the calibration is of that point,
.You can choose the points to be improved and calibrate only those
points again. Improve one or more calibration points by:
1. Opening Tobii Eye Control Options > Eye Tracking.
2. Under Calibration Result marking the point(s) you want to
improve.
3. Clicking Improve Point(s) and a calibration for the selected
point(s) will start.
6.2.16 Removing Calibration Point(s)
If there is a calibration point that is consistently bad after calibration (the
green lines are scattered all around and outside the circle of the calibration
point) you can remove that point completely from the calibration, this may
improve the calibration of the other points. Be aware that if you remove a
point, that area of the screen will be uncalibrated and eye tracking will not
function properly there.
Remove one or more calibration points by:
1. Opening Tobii Eye Control Options > Eye Tracking.
2. Under Calibration Result marking the point(s) you want to
remove.
3. Clicking Remove Point(s).
Chapter 6 Tobii CEye Module & Eye Control
59
Page 60

Tobii C-Series User’s Manual
6.2.17 Customizing Windows Control
To customize Windows Control, follow the steps below:
60
• Open Tobii Eye Control Options > Windows Control
Settings.
Mouse control speed
• Customize the mouse control speed by moving the Mouse
control speed slider. Move the slider to the right to increase the
speed and to the left to decrease it.
Magnier size and zoom
• Customize the size of the magnier by moving the Magnier Size
slider. Move the slider to the right to increase the size and to the
left to decrease it.
• Customize the zoom factor by moving the Zoom Factor slider.
Move the slider to the right to increase the zoom factor and to the
left to decrease it.
Auto switch from right to left click
Chapter 6 Tobii CEye Module & Eye Control
Page 61

Tobii C-Series User’s Manual
• Check this check box if you want Windows Control to
automatically switch the desired mouse click selection back to a left
click, , after a right click, , has been chosen and performed.
Auto start
• Check the Auto start windows control at boot check box
if you want Windows Control to auto start when the Tobii Eye
Control Suite starts.
Turn off scroll functionality
• Check the Turn off scroll functionality check box if you do not
want eye controlled scrolling to be active.
Custom cursors
Custom cursors is a feature that turns the regular mouse cursor into a
number of different cursors when using Windows Control.
The different cursors visually represent the type of “mouse click” for
eye control that you have chosen from the Windows Control Menu (for
the denitions of the Windows Control Menu symbols see Clicking
with Windows Control, Magnifying with Windows Control and
Selecting Windows Control Functions).
or + = cursor type (move cursor, no clicking)
+ = cursor type (single left click)
+ = cursor type (single right click)
+ = cursor type (double left click)
+ = cursor type (double right click)
or + = cursor types (drag) and (drop)
or + = cursor type (no movement)
• Check the Custom cursors check box to activate custom cursors
for Windows Control.
Chapter 6 Tobii CEye Module & Eye Control
61
Page 62

Tobii C-Series User’s Manual
6.2.18 Starting and Disabling Windows Control
To start the Windows Control, right-click on the Tobii Eye Control
Options icon, , in the Notication area and select Enable Windows
Control.
Or
Select the Tobii Windows Control shortcut icon, , from your
desktop. This will immediately start Windows Control.
To disable Windows Control right-click on the Tobii Eye Control
Options icon, , in the Notication area and select Disable Windows
Control.
You can also start the Windows Control Menu from Tobii Communicator
or alternative communication software, which has implemented the
functions provided by the Tobii Eye Control SDK
Notication Area
62
6.2.19 Placing the Windows Control Menu
The menu can be placed anywhere on the desktop or docked along the
edge of the screen. You dock the Windows Control Menu by dragging it
to the edge of the screen. You can also do this by pressing and dragging
the Move icon . When the menu is docked you have to look outside the
screen to bring up the Window Control Menu items.
Chapter 6 Tobii CEye Module & Eye Control
Page 63

Tobii C-Series User’s Manual
6.2.20 Clicking with Windows Control
Select what type of mouse click you want to perform from the Button
drop down list in the Windows Control Menu.
Right-click simulates a right mouse click.
Left-click simulates a left mouse click.
6.2.21 Magnifying with Windows Control
To use the magnier, select the magnier icon, , in the Windows Control
Menu.
If you want to perform a click with the magnier:
1. Select the magnier.
2. Select the other options as usual. The options will now have
changed to reect the magnication state.
Right Click Zoom
Left Click Zoom
6.2.22 Selecting Windows Control Functions
You can set different functions for clicking:
Mouse cursor
No cursor movement on screen
Single-click
Double-click
Drag and drop
6.2.23 Pausing Windows Control
To pause Windows Control select the Pause icon in the Windows Control
Menu.
Chapter 6 Tobii CEye Module & Eye Control
63
Page 64

Tobii C-Series User’s Manual
Pause
Pausing eye control can also be accomplished at any time by looking
at (about) the Tobii logo at the bottom/center of the Tobii CEye, then
selecting, using eye control, the pause icon that pops up.
6.2.24 Scrolling with Windows Control
The scroll buttons appear automatically in the upper right corner in any
object which can be scrolled. The buttons will only appear on the window
which has focus. To activate the scroll press the
the way you can use the icon to hide them.
When scroll mode is activated you will see a shaded gradient over the
window which will be scrolled.
icon. If the buttons are in
64
To scroll, look at the top or bottom of this gradient area.
Scroll functionality can be turned off in Tobii Eye Control Options >
Windows Control Settings > Turn off scroll functionality.
Chapter 6 Tobii CEye Module & Eye Control
Page 65

Tobii C-Series User’s Manual
Product Care7
7.1 Changing the Side Covers
To remove the side covers:
1. Shut down the C-series.
2. Remove the power adaptor and batteries (See Installing and
Releasing the Batteries)
3. Place the C-Series device face down on a at surface with the side
cover you wish to remove facing away from you.
4. Take a rm grip on the top and bottom of the device and push the
two protruding plastic tabs away from you with your thumbs. With
some pressure the tabs should release and the side cover should
come off.
To reapply the side covers:
1. Place the C-Series device face down on a at surface with the side
cover you wish to apply facing away from you.
2. Place the plastic tabs in their slots on the device.
3. Press the side cover onto the side of the device. You should hear a
click when it has fastened.
Chapter 7 Product Care
65
Page 66

Tobii C-Series User’s Manual
When reapplying the side cover to the side of the device with the power
button, be sure that the power button (and other buttons) makes it’s way
through the hole in the side cover and is not stuck under it. Otherwise the
device might not start, as the power button may be registered as pressed.
7.2 Cleaning
Before cleaning the C-Series device shut it down, unplug all cables and
remove the batteries. Use a soft, slightly damp, lint-free cloth. Avoid getting
moisture in openings on the device. Don’t use window cleaners, household
cleaners, aerosol sprays, solvents, alcohol, ammonia, or abrasives to clean
the device.
7.2.1 Cleaning of the Speaker Mesh
Spray the speaker mesh carefully with a water and dish soap mixture using a
misting spray bottle. Wipe the mesh clean. If excess moisture gets into the
speaker housing, make sure that it drains through the drainage holes (see
illustration) in the back of the device.
66
Chapter 7 Product Care
Page 67

Tobii C-Series User’s Manual
7.3 Placement
Only use the arms and stands specied by the supplier and make sure that
they are mounted and fastened correctly according to the instructions. Do
not place the device on unstable and uneven surfaces.
Do not cover the ventilation opening on the back of the device, with the fan
underneath. If this opening is covered, built up heat may cause failure and be
a possible re hazard.
7.4 Transporting the C-Series Device
Disconnect all the cables and either hold the device with both hands while
carrying it, or use the included carrying strap/ shoulder strap.
When you transport the device for repair, shipment or traveling, use the
original casing and packaging materials.
If you have attached a CEye to a C12 or C15 device, do not carry the
connected devices by solely gripping the CEye. The CEye attachment points
may not hold the weight of the C12 or C15, and the devices could break
apart causing permanent damage to both and causing the C12 or C15 to fall.
7.5 Disposing of the Batteries
Do not dispose of the batteries in general household or ofce waste.
Follow your local regulations for the disposal of batteries.
7.6 Disposing of the C-Series Device
Do not dispose of the C-Series Device in general household or ofce
waste. Follow your local regulations for the disposal of electrical and
electronic equipment.
Chapter 7 Product Care
67
Page 68

Tobii C-Series User’s Manual
Appendices8
8.1 Appendix A: Training Resources
Tobii offers a range of training resources for the C-Series products and
related communication products. You can nd them on the Tobii website,
www.tobii.com, including Getting Started Guides, webinars and Quick
guides. The C-Series Getting Started Guide is delivered with, and stored
on, the device.
8.2 Appendix B: CEye - Software License
The CEye module contains open source software. Please refer to the
attached license document for terms and conditions.
68
Chapter 8 Appendices
Page 69

Tobii C-Series User’s Manual
8.3 Appendix C: Technical Specifications
Tobii C8 Tobii C12 Tobii C15
Screen
Screen resolution
Dimensions
(WxHxD)
Weight
Speakers
Microphones
Processor
RAM
Operating system
Hard disk drive
SD Card
Connectors
WLAN (optional)
Bluetooth
(optional)
Mobile Phone /
GSM (optional)
ECU
(Environmental
Control Unit)
Battery Time
Camera
Deskstand
Mounting Systems
Supported
8.4” resistive touch,
CCFL backlit
800 x 600 pixels 1024 x 768 pixels 1024 x 768 pixels
9.4” x 7.9” x 1.5”
23,9 x 20,1 x 3,8 cm
4.0 lbs
1,8 kg
2 integrated 2 pairs integrated
Tri-band (900, 1800, 1900 MHz)
~6h ~5h ~5h
Optional brackets for Vesa, Daessy, Rehadapt, CJT
12.1” resistive touch,
CCFL backlit
12.3” x 10.4” x 1.8”
31,2 x 26,4 x 4,6 cm
6.5 lbs
2,9 kg
2 integrated
Intel Core Duo U2500 / 1,2 GHz
2GB DDR2
Microsoft Windows 7
60GB
1GB
2 x USB 2.0
1 x Mini USB 2.0
Ethernet (1 x RJ45)
2 x 1/8” Switch
1 x 1/8” Headphone (stereo)
1 x DC in 2.5/5.5 mm
IEEE 802.11 b/g IEEE 802.11 b/g/n
Class 2
Tira-2.1
640x480 pixels
Integrated
15.0” resistive touch,
LED backlit
14.6” x 11.8” x 2.2”
37,0 x 30,0 x 5,7 cm
8.8 lbs
4,0 kg
Quad-band (850, 900,
1800, 1900 MHz)
Chapter 8 Appendices
69
Page 70

Tobii C-Series User’s Manual
Working distance (optimal)
Track Box -for Eye/Head Movement
(Width Height Depth)
Head movement speed (optimal)
Gaze Data rate
Accuracy gaze estimation
Weight
8.4 Appendix D: Approved Accessories
For information about the latest approved accessories for the Tobii C8,
C12, C15 and CEye, please contact your local Tobii reseller.
Tobii CEye
23,5 in
60 cm
15,7 x 11,8 x 7,9 in
40 x 30 x 20 cm
11,8 in/s
30 cm/s
30 Hz
0,8 degrees
12.3 oz
350 g
70
Chapter 8 Appendices
Page 71

Page 72

www.tobii.com
Tobii Support
SWED EN
Phone: +46 8 522 95 0 20
support@tobii.com
Support hours: 8 am - 6 pm
Betwe en July-August: 9am - 5pm
(Centra l Eur opean Time , GMT +1)
GERM ANY
Phone: +49 69 24 75 03 4-28
support@tobii.com
Support hours: 8 am - 6 pm
Betwe en July-August: 9am - 5pm
(Centra l Eur opean Time , GMT +1)
USA
Toll-Free: +1-800-793-9227
Phone: +1-781-4 61-8200
techsuppor t@tobiiATI.com
Support hours: 9 am - 9 pm
(US Easter n Star ndard Time, GMT -6)
JAPAN
Phone: +81-3-5793-3316
support.j p@tobii.com
Support hours: 9 am - 5.30 pm
(Japa n Stan dard Time, GMT +9)
EUROP E, MIDDLE EAS T,
AFRIC A
Tobii Technology AB
Karls rovägen 2D
S-182 53 D ander yd
Sweden
Phone : +46 8 6 63 69 90
Fax: +46 8 30 14 00
www.to bii.com
sales @tobii.com
CENTR AL EU ROPE
Tobii Technology Gmb H
Nieden au 45
D-60 325 Fra nkfurt am Main
Germa ny
Phone: +49 69 24 75 03 40
Fax: +49 69 24 75 03 429
www.to bii.com
sales .de@tobii.c om
NORWAY
Tobii Norge
Thorm øhlens gate 55
5008 Berge n
Norwa y
Phone: +47 55 55 10 60
Fax: ++47 55 55 10 61
www.to bii.com
sales .no@tobii.c om
ASIA
Tobii Technology, Ltd.
3-4-13 Takanawa, Minato -ku
Tokyo 108-0074
Japan
Phone: +81-3-5793 -3316
Fax: +81-3-5793 -3317
www.to bii.com
sales .jp@tobii.c om
NORTH AME RICA
Tobii ATI
333 Elm Street
Dedham , MA 02026
USA
Toll-Fre e: 800 -793-9227
Phone: 781-461-8200
Fax: 781-461-8213
www.to biiATI.com
sales .us@tobii.c om
 Loading...