

Page 1
INSTRUCTION MANUAL
TUV48S
cookin’in style
INCLUDES RECIPES
Page 2

2
READ AND SAVE THESE INSTRUCTIONS
WARNING:
A risk of fire and electrical shock exists in all electrical
appliances and may cause personal injur y or death. Please follow
all safety instructions.
IMPORTANT SAFEGUARDS
When using electrical appliances, basic safety precautions should always
be followed to reduce the risk of fire, electric shock and injury to persons,
including the following:
• Read all instructions before using appliance.
•
Do not touch hot surfaces. Use handles and oven mitts.
•
Do not immerse cord, plug, or appliance in water or other liquid. See
cleaning instructions.
•
This appliance is not for use by children.
•
Close supervision is necessary when any appliance is used near children.
•
CAUTION: Never leave appliance unattended when in use.
•
Do not clean with metal scouring pads. Pieces of the pad may break off
and touch electrical parts.
•
Unplug from outlet when not in use and before cleaning. Press STOP
button to turn appliance off before unplugging. Allow to cool before
attaching or removing parts and before cleaning the appliance.
•
Do not operate any damaged appliance. Do not operate with a damaged
cord or plug, or after the appliance malfunctions or has been dropped
or damaged in any manner. Return appliance to the nearest authorized
service center for examination, repair, electrical or mechanical adjustment.
•
When using this appliance, provide at least four inches of space above,
behind, and on both sides for air circulation. Do not store any item on
top of the appliance. Do not use on surfaces where heat may cause a
problem.
• Oversized foods or utensils must not be inserted into the appliance.
• A fire may occur if this appliance touches or is covered by flammable
material, including curtains, draperies, walls, etc., when in operation.
• Do not store any materials, other than manufacturer’s recommended
accessories, in this oven when not in use.
• Extreme caution should be exercised when using containers constructed
of any material other than metal.
• Do not place any flammable material such as paper, cardboard, plastic,
etc. in the oven.
• Do not cover drip tray or any part of the oven with metal foil. This will
cause over-heating of the oven.
• Use attachments only if recommended by Toastmaster Inc.
• Do not use outdoors or while standing in a damp area.
• Do not let cord hang over edge of table or counter, or touch hot surfaces.
Page 3

3
• Do not place on or near a hot gas or electric burner.
• Extreme caution must be used when moving an appliance containing hot
oil or other hot liquids.
• Use extreme caution when removing bake/broil basket or drip tray or
disposing of hot grease.
• Use appliance only as indicated in these instructions.
SAVE THESE INSTRUCTIONS
This product is for household use only.
CAUTION: A short power supply cord is provided to reduce the risk of
personal injury resulting from becoming entangled in or tripping over a longer
cord. Extension cords are available from local hardware stores and may be
used if care is exercised in their use. If an extension cord is required, special
care and caution is necessary. Also the cord must be: (1) marked with an
electrical rating of 125 V, and at least 15 A., 1875 W., and (2) the cord must
be arranged so that it will not drape over the countertop or tabletop where it
can be pulled on by children or tripped over accidentally.
POLARIZED PLUG: This appliance has a polarized plug, (one blade is wider
than the other). As a safety feature to reduce the risk of electrical shock, this
plug is intended to fit in a polarized outlet only one way. If the plug does
not fit fully in the outlet, reverse the plug. If it still does not fit, contact a
qualified electrician. Do not attempt to modify the plug in any way.
ELECTRIC POWER: If electric circuit is overloaded with other appliances,
your appliance may not operate properly. It should be operated on a
separate electric circuit from other operating appliances.
PLASTICIZER WARNING
CAUTION: To prevent Plasticizers from migrating from the finish of the
counter top or table top or other furniture, place NON-PLASTIC coasters or
place mats between the appliance and the finish of the counter top or table
top.
Failure to do so may cause the finish to darken, permanent blemishes
may occur or stains can appear.
Page 4
4
The UltraVection™Oven is a patented technology that combines three methods of heat transfer (convection, conduction and radiant heat) which creates superheated air movement. The UltraVection™ Oven holds the flavor
resulting in foods that are cooked with a superior taste, texture and appearance not possible with any other oven-cooking method. This revolutionary
cooking process allows for greater moisture retention and is perfect for
cooking fish, steaks, poultry, seafood, French fries and many convenience
foods.
The UltraVection
™
Oven may look like a typical oven. In fact, it is computer
controlled and has a unique patented air surround basket. The
UltraVection
™
patented process cooks fast without microwaves, saving energy over a conventional oven . . . and most of all it’s easy to use. It completely eliminates the use of oil, pans or trays. So enjoy those French fries
and onion rings without the oil and the guilt!
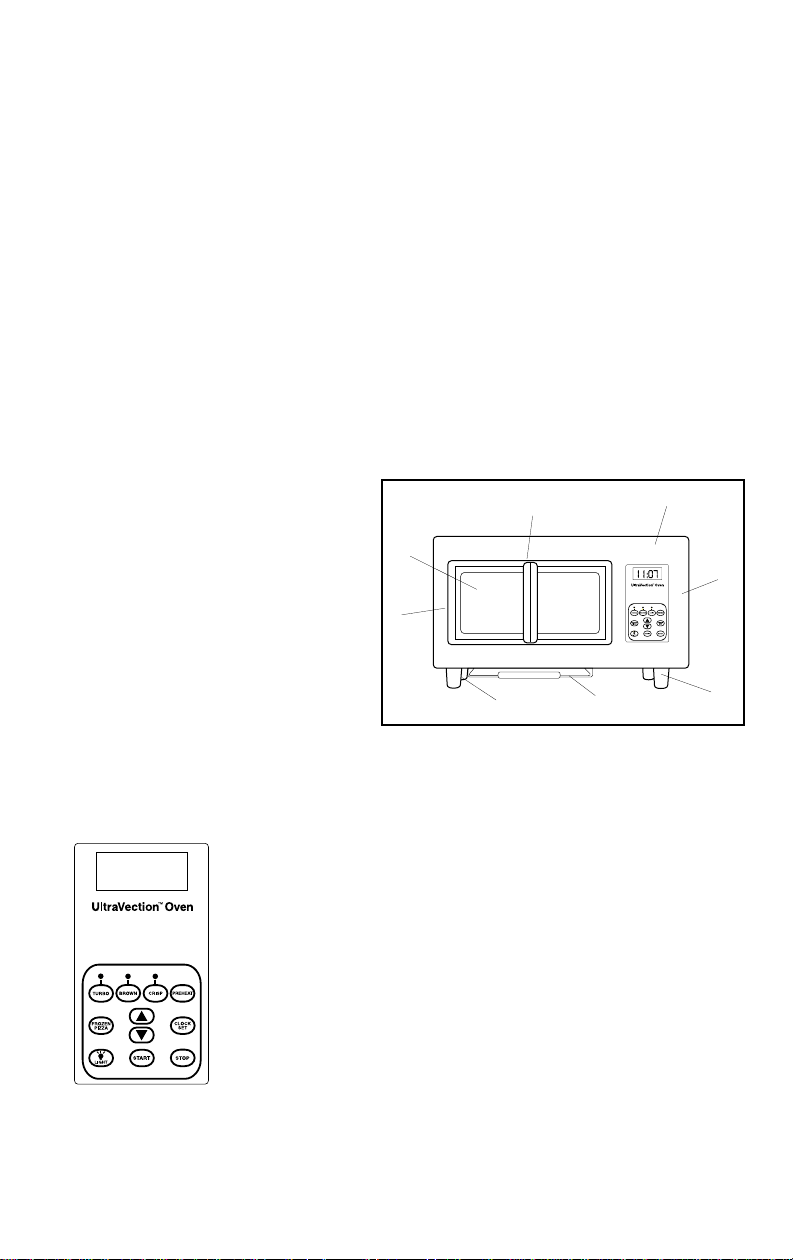
Your product may var y slightly from illustrations.
Product Diagram/Explanation of control panel
UNIT
A. UltraVection
™
Oven
B. Control Panel
C. Feet
D. Drip Tray (P/N 21265S)
E. Drip Tray Slot (P/N 21266S)
F. Patented Air Surround Basket
G. Window
H. Basket Handle
CONTROL PANEL DISPLAY
Indicates time of day or time remaining in the cooking function. Peel off the
clear plastic film placed over the control panel.
FUNCTION
ARROWS
Press arrows to adjust clock and time for TURBO,
BROWN, and CRISP functions.
UP ARROW
Press once and time will increase in 10-second intervals. Press and hold and time will increase in 1-minute
intervals.
DOWN ARROW
Press once and time will decrease in 10-second intervals. Press and hold
and time will decrease in 1-minute intervals.
A
B
C
DE
F
G
H
Page 5

5
PREHEAT
Preset function is set at 4:00 minutes and can not be adjusted. Always
preheat the UltraVection™ Oven for the first use except where indicated.
When cooking consecutive batches of food it is not necessary to preheat
after the first batch.
During PREHEAT, P will appear on the display.
TURBO is the basic cooking function. Food is rapidly seared, sealing in
moisture and flavor. It is preset at 5:30 (5 minutes and 30 seconds) and can
be adjusted from 10 seconds to 16 minutes. During use, the TURBO function light will be on. The cooking time will count down on the display.
CRISP is the finishing touch after cooking with TURBO. It adds a deep fried
texture, color and crunch to French fries, tater tots, onion rings and many
other foods. It is preset at :30 seconds and can be adjusted from
10 seconds to 6 minutes. During use, the CRISP function light will be on. The
cooking time will count down on the display.
BROWN is the function for additional browning of the food. Preset function
is :30 seconds and can be adjusted from 10 seconds to 5 minutes. During
use, the BROWN function light will be on. The cooking time will count down
on the display.
FROZEN PIZZA
This is a preset combination of TURBO, CRISP AND BROWN functions. It is
a total of 8:00 minutes and can not be adjusted. Place frozen pizza into
preheated oven, press the FROZEN PIZZA button and the oven will start
automatically. The cooking time will count down on the display. Note: Since
frozen pizza toppings vary, so do their cooking times. It is a good idea to
check pizza for doneness one minute from end of the auto pizza cycle.
START
Press START to start the oven once the cooking function(s) has been selected:
TURBO, CRISP and/or BROWN.
LIGHT
To turn the interior oven light on, simply push the LIGHT button. It will
remain on for approximately five minutes before going off or may be
turned off by pressing the LIGHT button again. To replace the bulb see Bulb
Replacement.
STOP
Press and hold to stop operation of the oven. Press again to cancel a
function.
CLOCK SET
Use this button to set time as described on page 6.
Page 6

6
BEFORE FIRST USE
1. Unwrap product and remove any packaging materials that may have
been included to prevent damage during shipping.
2. Place on a flat, stable surface, approximately in the center (front to
back) of counter-top..
3. Before using for the first time, the cooking basket and drip tray should
be washed with warm soapy water. Rinse and dr y.
4. Insert drip tray (Fig. 1). Always have drip tray in place before using
(Fig. 2).
5. Read instruction book thoroughly to become familiar with the
UltraVection™ Oven.
NOTE: A slight odor or smoking from the interior of the UltraVection™
Oven may be noticed when first using. This is normal due to residues from
manufacturing.
SETTING THE CLOCK
1. Plug unit into 120V ~ 60Hz outlet. 12:00 will show on the display and
the colon will blink.
2. Press the CLOCK SET button. The colon will stop blinking.
3. Press the UP ARROW or DOWN ARROW to select the time.
4. Press the START button, the colon will blink. The time will now be displayed and you will exit the clock setting mode.
NOTE: The instructions have been written with the clock set. However, the
clock does not have to be set before using the oven. Just push function button(s), select cooking time(s), then START.
USING YOUR OVEN
The UltraVection™ Oven cooks using super heated air movement.
Therefore, the outside of the oven and the glass door become hot. Always
use caution when touching these parts and never use the top of your oven
as a resting-place for anything. We recommend using a potholder or insulated mitt to remove the air surround basket after cooking. Foods become
hot during the cooking process. Allow to cool slightly before serving.
Always preheat oven before using unless chart or recipe indicates otherwise.
1. Plug into 120V ~ 60Hz outlet. Set the clock.
AT
Fig. 1
Fig. 2
HE
PRE
N
W
O
R
B
O
B
R
U
T
O
A
S
T
W
A
R
M
T
N
E
Z
O
R
F
A
Z
IZ
P
n
O
r
e
w
o
P
Page 7

7
2. Press the PREHEAT button, P will be on the display, the oven will start.
After four minutes, the oven will beep and the P will flash on the display to indicate that it is preheated. The PREHEAT function is a preset
function and can not be adjusted. If you do not start cooking within five
minutes, PREHEAT again. The display will show the time of day after
nine minutes if the oven is not used.
CAUTION: Use caution when removing basket and food. Protect your
hands with insulated oven mitts. Always protect counter-top from heated
basket when removing from unit.
3. Pull the handle of the air surround basket straight out. The TURBO
default time shows on the display and the TURBO function light will be
on. Add food to the non-stick grid. There should be space between
food to allow air to circulate around the food. Insert food basket into
oven.
4. Select one, two or all three functions, TURBO, CRISP, and/or BROWN
in this order. Refer to cooking chart for times.
5. Press the START button, the function light will be on. During cooking, if
the basket is removed and returned to oven in under nine minutes, the
programmed cooking time will resume. Otherwise, the time of day will
be displayed and the cooking time will need to be re-programmed.
Note: When a combination of functions is chosen, each function time
will count down separately on the display window, one immediately
following the other. While the time for each function is counting down,
the light for that function will be on.
NOTE: The display will flash “OPEN” only when the basket is removed
during the operation of a programmed function (PREHEAT, TURBO,
BROWN or CRISP). The oven will resume operation when the basket is
replaced in the oven. If a program function is selected and the oven
beeps several times, the basket is not completely inserted in the oven.
6. The oven will beep and shut off automatically when the cooking cycle
is complete. The last function light will be on and :0 will be on the display.
7. Carefully remove basket and food. Use a nylon or plastic utensil to
remove food to protect non-stick coating. Never cut food in non-stick
basket. When basket is removed, the display will read the time of day.
Page 8

8
To prevent heat loss, avoid opening basket excessively. Start another
basket of food immediately. If you wait more than five minutes,
PREHEAT again before cooking.
8. Unplug and allow the oven and accessories to cool completely before
cleaning. Keep drip tray and oven clean and free of crumbs, grease
and particles. See CLEANING INSTRUCTIONS.
COOKING TIPS
• Times given in cooking charts are suggestions. Experimentation will
be necessary to find the combination of cooking features that best
suits your personal taste. For frozen convenience foods begin by
starting with TURBO for approximately one half of package cooking
time. Then add time for crisp and/or brown. If necessary, cook for
additional time.
• Always watch foods closely when experimenting to prevent
over- cooking. If food is not done when you take it out of the oven
you can always return it to the oven for additional time.
• Arrange all food in a single layer in basket.
• For cooking small portions, make sure they are centered in the
basket. When cooking large portions, distribute evenly to promote
uniform cooking.
• Remove crumbs and/or ice crystals from food before placing in basket.
• Leave air space between foods to allow proper air circulation.
• Avoid cooking foods small enough to fall through basket.
• Do not cover food while it is cooking.
• When cooking more than one piece of meat, try to select even
thicknesses. This will promote consistent doneness and appearance.
• Trim all excess fat off meat and poultry to reduce smoking and splattering.
• To toast two slices of bread, PREHEAT the oven. Center bread in the
basket. Select BROWN for 40 seconds for light color toast,
50 seconds for medium and one minute for dark. At the end of the
cycle, flip toast over and reprogram for the same time again.
CLEANING INSTRUCTIONS
CAUTION: DO NOT IMMERSE THE OVEN IN OR SPLASH WITH WATER
OR OTHER LIQUID.
NOTE: Do not use harsh abrasives on any part of the oven.
1. Always unplug and allow to cool completely before cleaning or moving.
2. Remove basket. The glass window and wire basket may be
disassembled for cleaning. Lay basket flat and pull the right side of the
patended Air Surround Basket out and away from the glass door. Pull
the other side away from the door. Clean and reassemble, keeping the
door tabs (located on the glass door) on the inside of the patended Air
Surround Basket.
Page 9

9
3. Using a damp cloth and plastic scouring pad, wipe the inside of the
oven cavity and heating elements removing any food residue or
grease. Dry thoroughly.
4. Remove drip tray. Wash drip tray and patended Air Surround Basket
in hot soapy water and dry thoroughly. The basket and tray may also
be washed on the top rack of the dishwasher.
5. Reassemble making sure the top of wire basket fits securely into door
tabs and hooks.
6. Slide drip tray back into the drip tray slot and replace the food basket.
7. Clean exterior with clean damp cloth and dry thoroughly after each
use.
NOTE: Do not use without drip tray in place.
Any servicing requiring disassembly other than the above cleaning must be
performed by an authorized ser vice center.
BULB REPLACEMENT
1. Unplug unit and allow oven to cool completely.
2. Remove the one screw securing the small cover
plate in back of unit.
3. Remove bulb by turning.
4. Replace with new 15 watt bulb (P/N 2127OS).
5. Replace the cover and secure with screw.
Any service requiring disassembly, must be performed by a qualified electrician.
STORAGE
• Be sure the UltraVection™ Oven is completely cool before storing.
• All par ts should be thoroughly cleaned and dried.
• Always store with basket in place.
Page 10

10
CONVENIENCE FOOD COOKING CHART
Times below are in a preheated oven and to be used only as a guideline.
If using a different brand of food or quantity of food, times may need to be
adjusted to personal taste. When cooking other brands and flavors of
pizza, you may need to experiment to find the best combination of
functions instead of using the FROZEN PIZZA button.
FOOD AMOUNT TURBO CRISP BROWN
APPETIZERS - SNACKS
TGI Friday’s™Potato Skins 8 oz. 8 min. 30 sec.
Breaded Mushroom Poppers
®
8 oz. 7 min.
Stuffed Jalapenõ Poppers
®
16 oz. 6 min. 30 sec.
Cheese Sticks Poppers
®
8 oz. 5 min. 1 min.
LaChoy
®
Egg Rolls 7.25 oz. 4 min. 1min. 30 sec.
Tyson
®
Hot’n Spicy Chicken Wings 14 oz. 9 min. 1 min.
Delimex
®
Chicken Taquitos 10 Taquitos 4 min. 30 sec.
Pillsbury
®
Toaster Struddle 2-4 3 min. 1 min.
Pillsbury
®
Toaster Scramble 2-4 3 min. 1 min.
SuperPretzel
®
Frozen 3 pretzels 2 min. 1 min.
Baked Soft Pretzels
NY
™
Texas Garlic Toast 4 slices 3 min. 2 min.
FRENCH FRIES - ONION RINGS
Ore Ida
®
Golden Crinkles 2 servings 5 min. 1 min.
Ore Ida
®
Golden Crinkles 3 servings 7 min. 1 min.
Ore Ida
®
Golden Crinkles 4 servings 9 min. 1 min.
Ore Ida
®
Steak Fries 2 servings 6 min. 1 min.
Ore Ida
®
Steak Fries 4 servings 8 min. 1 min.
Ore Ida
®
Tater Tots 4 servings 6 min. 3 min. 1 min.
Ore Ida
®
Onion Rings 4 servings 7 min. 1 min.
PIZZA
Freschetta
™
4-Cheese Pizza 11.15 oz. Press pre-programmed FROZEN PIZZA button.
Freschetta
™
Pepperoni Pizza 11.58 oz. Press pre-programmed FROZEN PIZZA button.
DiGiorno
®
Four Cheese Rising 12 oz. Press pre-programmed FROZEN PIZZA button.
Crust Pizza
Jenos
®
Crisp’ n Tasty 7 oz. 5 min.
Totino’s
®
Crisp’n Crust 10.9 oz. 6 min.
Party Pizza
Ore Ida
®
Bagel Bites 7 oz. 5min.
Totino’s
®
Pizza Rolls 15 oz. 5min. 1 min.
ENTREES
Holten Meats Thick N Juicy
®
4 patties 14 min.
Quarter Pound Beef Patties
Banquet
®
Chicken Nuggets 13.5 oz. 5 min. 30 sec.
Mrs. Paul’s Select Cuts
™
Fish Sticks 18 sticks 6 min. 30 sec.
Mrs. Paul’s Select Cuts
™
Fish Filets 8 filets 9 min.
Sea Pak
®
Breaded Popcorn Shrimp 6 oz. 4 min. 1 min.
Sea Pak
®
Breaded Butterfly Shrimp 9 oz. 6 min.
Kroger
®
Breaded Calamari Rings 6 oz. 3 min. 1 min.
Page 11

11
MEAT, POULTRY AND SEAFOOD COOKING CHART
PREHEAT OVEN EXCEPT FOR FROZEN MEATS
One of the UltraVection’s™ Oven most convenient features is its ability to cook
frozen steaks, chops and fillets to restaurant quality perfection in very little time.
To grill frozen meats, DO NOT PREHEAT the oven. Place food in the basket and
put in the UltraV ection oven. Press PREHEAT and at the end of the preheat time,
cook on TURBO and/or CRISP for the time in the cooking chart. If meat is
undercooked when removed from the oven, return to the oven for additional
cooking time. If another batch of frozen meat is needed, carefully place into the
hot oven and cook for a few minutes less than the time in the frozen meat chart.
The second batch will be more browned on the outside when the inside
achieves the same doneness.
Cooking Chart Information
The times listed in the cooking chart are to be used ONLY AS A GUIDELINE. Use a meat thermometer to be sure of internal temperature for food
safety. Cooking times will var y with thickness of meat. We do not recommend cooking frozen poultry or seafood.
NOTE: The USDA recommends that foods should be cooked to a minimum internal temperature as listed below:
Beef, pork, lamb, ground products 160°F
Beef, pork, lamb, roasts or steaks 145°F
Poultry products 170-180°F
Ground poultry products 165°F
Seafood 145-150°F
FOOD AMOUNT COOK TO TURBO CRISP BROWN
BEEF - Fresh
T-bone Steak 2 145°F Med. Rare 7 min. 30 sec.
8 oz. 160°F Medium 9 min.
1
⁄2-inch thick 170°F Well 11 min.
T-bone Steak 1 145°F Med. Rare 5min. 30 sec.
8 oz. 160°F Medium 6min. 30 sec.
1
⁄2-inch thick 170°F Well 8 min.
Rib Eye Steak 4 145°F Med. Rare 15 min. 2 min. 30 sec.
8 oz. 160°F Medium 15 min. 5 min.
1-inch thick 170°F Well 15 min. 5 min. 3 min. 30 sec.
Rib Eye Steak 2 145°F Med. Rare 15 min. 1 min.
8 oz. 160°F Medium 15 min. 3 min.
1-inch thick 170°F Well 15 min. 5 min.
Hamburgers 4 160°F Well 9min. 30 sec.
4 oz.
1
⁄2-inch thick
Frozen - Place food in cold basket then preheat and follow times.
T-bone Steak 2 145°F Med. Rare 8 min.
8 oz. 160°F Medium 10 min.
1
⁄2-inch thick 170°F Well 14 min. 30 sec.
T-bone Steak 1 145°F Med. Rare 7 min. 30 sec.
8 oz. 160°F Medium 9 min. 30 sec.
1
⁄2
-inch thick 170°F Well 11 min. 30 sec. 2 min.
Hamburgers 4 160°F Well 14 min.
4 oz. each
1
⁄2-inch thick
Page 12

12
MEAT, POULTRY AND SEAFOOD COOKING CHART (Con’t.)
FOOD AMOUNT COOK TO TURBO CRISP BROWN
POULTRY - Fresh
Chicken Wings 8 wings 180°F Well 14 min. 3 min. 30 sec.
Chicken Breast 1 lb. 170°F Well 9 min. 30 sec.
Tenders
Chicken Breast 2 170°F Well 12 min.
Boneless Skinless* 4 oz.
Chicken Legs 6 legs 180°F Well 12 min. 5 min.
Turkey Burgers 4 165°F Well 12 min.
4 oz.
1
⁄
2-inch thick
PORK - Fresh
Pork Loin Chops 2 160°F Medium 8 min. 30 sec.
8 oz. 170°F Well 12 min. 30 sec.
1
⁄2-inch thick
Pork Loin Chops 3 160°F Medium 9 min. 30 sec.
8 oz. 170°F Well 13 min. 30 sec.
1
⁄2-inch thick
American 2 160°F Medium 15 min.
Pork Chops 8 oz. 170°F Well 16 min.
1-inch thick
American 4 160°F Medium 16 min. 4 min.
Pork Chops 6 oz. 170°F Well 16 min. 5 min.
1-inch thick
PORK - Frozen - Place food in cold basket then preheat and follow times.
Pork Loin Chops 2 160°F Medium 10 min.
8 oz. 170°F Well 14 min.
1
⁄2-inch thick
SEAFOOD - Fresh
Salmon Fillets 2 145°F 11 min.
8 oz.
3
⁄4-inch thick
Salmon Steak 1 145°F 5 min. 30 sec.
4 oz.
1
⁄2-inch thick
Sea Scallops 1 lb. 145°F 5 min.
Jumbo Shrimp 1 lb. 145°F 5 min. 30 sec.
Orange Roughy 2 145°F 9 min.
6 oz.
1
⁄2-inch thick
MISCELLANEOUS - Fresh
Rodeo
®
Hot Dogs 10 hot dogs 165°F 3 min. 30 sec.
Armour™ Jumbo 8 hot dogs 165°F 4 min. 1 min.
Hot Dogs 20 sec.
Bob Evans
®
14 links 165°F 6 min. 30 sec.
Original Breakfast
Sausage Links
Fresh Sausage 9 slices 165°F 6 min. 2 min. 1 min.
Patties
Johnsonville
®
5 Bratwurst 165°F 10 min.
Bratwurst
*Marinating before cooking is recommended.
Page 13

13
Some of the recipes in this book are from the following organizations:
National Pork Producers Council, The National Honey Board, Belgian
Endive Marketing Board, New Zealand Wasubi Limited, and Lawrys.
MARINADES
Marinades usually consist of liquid ingredients such as fruit or vegetable
juices, wine, water and oil in combination with seasonings and herbs. Meat
and poultry is allowed to soak in the marinade mixture for several hours or
as long as overnight to impart flavor and/or tenderize. To tenderize, a
marinade must contain an acidic ingredient such as lemon juice, wine, vinegar or yogurt; the acid penetrates meat fibers to help tenderize them.
Guidelines for Marinating
• Always marinate food in refrigerator; never at room temperature.
• Allow
1
⁄4to 1⁄2cup of marinade for each 1 to 2 pounds of meat.
• Cooked marinades should be completely cooled before adding to food.
• The tenderizing effect of a marinade is usually about
1
⁄4-inch from the cut
surface of the meat.
• A heavy-duty sealable plastic bag is convenient for marinating; a glass
dish may also be used. Select dishes in which the foods will fit snugly but
lie flat.
• Turn food occasionally during marinating so that all sides are equally
exposed to the marinade.
• For tenderization to take place, beef must be marinated at least 6 hours
or as long as overnight. Marinating longer than 24 hours causes the
meat fibers on the surface to break down, resulting in a “mushy” texture.
• Remaining marinade may also be served as a sauce with the grilled
meat or poultry. It should be heated to the boiling point before serving.
• If marinade is not used as a sauce for the meat or poultr y, it should be
discarded.
Page 14

14
Blend all ingredients together. Toss, coating meat completely. Marinate in
refrigerator at least 30 minutes. Pat dry before grilling.
RED WINE VINEGAR
1
⁄4cup red wine vinegar
2 TBL vegetable oil
1 TBL Dijon
®
mustard
1 clove minced garlic
1
⁄2tsp dried Italian seasoning
1
⁄8tsp coarsely ground pepper
SZUECHAUN
1
⁄8cup soy sauce
3 TBL lemon juice
1 TBL sesame oil
2 TBL sugar
2 TBL corn starch
CURRY YOGURT
1
⁄3cup plain yogurt
2 TBL lemon juice
1 TBL vegetable oil
2 cloves minced garlic
1
⁄2tsp curry powder
1
⁄8tsp crushed red pepper
SPICY HERB
1
⁄2cup vinegar
1
⁄2cup vegetable oil
2 TBL lemon juice
1
⁄2tsp Tabasco®pepper sauce
1
⁄4cup chopped onions
1 clove minced garlic
1
⁄4tsp salt
1
⁄4tsp dried basil leaves
1
⁄8tsp dried tarragon leaves
1
⁄8tsp dry mustard
MEXICALI
1
⁄2cup prepared salsa
2 TBL lime juice
1 TBL vegetable oil
2 TBL chopped cilantro
Page 15

15
LEMON ORIENTAL
1
⁄2cup lemon juice
1 TBL soy sauce
1 TBL vegetable oil
2 TBL chopped onion
1
⁄4tsp ground ginger
1
⁄8tsp crushed red pepper
FIVE-SPICE
1
⁄4cup soy sauce
1
⁄4cup lemon juice
1
⁄2cup minced onion
2 TBL grated fresh ginger root
2 tsp five-spice powder
2 TBL chili oil
2 tsp sesame oil
HONEY GARLIC
1
⁄2cup lemon juice
1
⁄4cup honey
2 TBL soy sauce
2 cloves crushed garlic
ISLAND
1
⁄2cup orange juice
4 TBL lime juice
3 cloves crushed garlic
2 tsp dried thyme
1 TBL honey
HERBED
1
⁄3cup each red wine vinegar and water
1 TBL vegetable oil
1 tsp dried thyme leaves or
1 TBL minced fresh thyme leaves
1
⁄2tsp each coarsely ground black pepper, salt and sugar
ZESTY
1
1
⁄2 TBL each dr y mustard and sweet paprika
1 TBL ground coriander
1 tsp coarsely ground black pepper
1
⁄2tsp salt
3 TBL lemon juice
2 TBL each
vegetable oil and water
3 cloves minced garlic
Page 16

16
LEMON-BASIL
1
⁄4cup each fresh lemon juice and water
1 TBL finely chopped fresh basil or
1 tsp dried crushed basil leaves
1 tsp vegetable oil
1
⁄2tsp grated lemon peel
1
⁄4tsp coarsely ground black pepper
RUBS
Rubs are a highly concentrated blend of herbs and spices which flavors the
exterior of the food as it cooks. They are applied to the exterior surface of
tender cuts of meats and poultry just before cooking; they need no
standing time. However, for convenience, rubs may be applied several
hours in advance. The coated meat should be refrigerated until cooking
time. Flavors become more pronounced the longer the rub is on the meat.
You can create your own blend of seasonings for rubs or use a commercial
blend.
CAJUN SEASONING
1 TBL dried basil leaves
1 TBL dried oregano leaves
1 TBL paprika
2 tsp salt
2 tsp dried thyme leaves
1 tsp ground allspice
1
⁄2tsp ground red pepper
SOUTHWESTERN
1
1
⁄2 tsp chili powder
1 tsp garlic powder
1
⁄2tsp dried crushed oregano
1
⁄2tsp ground cumin
LEMON-ROSEMARY
1
1
⁄2 tsp grated lemon peel
1 tsp dried rosemary leaves
1
⁄4tsp salt
1
⁄4tsp thyme leaves
1
⁄4tsp coarsely ground pepper
2 cloves minced garlic
MEDITERRANEAN
Zest of 2 lemons
1
⁄3cup thinly sliced garlic cloves
1
⁄3cup fresh chopped rosemary
1
⁄4cup fresh chopped sage leaves
1
⁄4cup coarsely ground black pepper
2 TBL salt
Page 17

17
CARIBBEAN JERK
2 TBL dehydrated onion
1 TBL garlic powder
4 tsp dried crushed thyme leaves
2 tsp salt
2 tsp ground allspice
1
⁄2tsp ground nutmeg
1 TBL sugar
CAJUN
2 TBL paprika
2 tsp salt
2 tsp onion powder
2 tsp garlic powder
2 tsp cayenne pepper
1
1
⁄2tsp ground white pepper
1
⁄2tsp ground black pepper
1 tsp dry thyme leaves
1 tsp oregano leaves
SPICY FIREWORKS
2 TBL ground cumin
2 TBL chili powder
1 TBL ground coriander
1
1
⁄2tsp cayenne pepper
1 TBL ground black pepper
1
1
⁄2 tsp ground cinnamon
1
1
⁄2tsp brown sugar
3
⁄4tsp salt
QUICK SERVE DIPPING SAUCES
Blend ingredients together and serve.
CHINESE MUSTARD
Yield:
3
⁄4cup
4 tsp dry mustard
6 TBL soy sauce
4 TBL cider vinegar
2 tsp sesame oil
1 tsp sugar
Water to taste
Page 18

18
ITALIAN BARBECUE
Yield:
1
⁄2cup
1
⁄2cup barbecue sauce
2 TBL Italian salad dressing
HONEY MUSTARD
Yield:
3
⁄4cup
1
⁄2cup honey
1
⁄4cup Dijon®mustard
CHILLED DIPPING SAUCES
Blend ingredients together, chill and ser ve.
GUACAMOLE
Yield: 1 cup
2 ripe avocados, mashed
Juice of one lemon
1
⁄2small red onion, diced
1 tomato, seeded and diced
Salt to taste
Hot pepper sauce, to taste
CREAMY HONEY SESAME
Yield: 1
1
⁄2 cups
3
⁄4cup mayonnaise
1
⁄4cup rice vinegar
1
⁄4cup honey
3 TBL toasted sesame seeds
1 TBL grated fresh ginger root
1 small clove minced garlic
3
⁄4tsp Oriental sesame oil
1
⁄8tsp crushed red pepper flakes
Salt, to taste
Page 19

19
SWEETLY CURRIED
Yield: 2 cups
1 cup sour cream
6 TBL honey
2 TBL cider vinegar
2 tsp curry powder
1
⁄2tsp ground cumin
1
⁄4tsp salt
2 TBL chopped fresh cilantro
OR
2 TBL chopped fresh parsley
BLUE CHEESE
Yield: 1
1
⁄2cups
1
⁄2pint sour cream
1
⁄4cup milk
1
⁄3cup blue cheese, crumbled
2 TBL finely diced red onion
SPICY DIPPING SAUCE
Yield:
3
⁄4cup
4 TBL soy sauce
4 TBL rice vinegar
2 TBL water
1 TBL molasses
1 tsp crushed red pepper
1 clove minced garlic
WARM SERVE DIPPING SAUCES
Follow instructions below each recipe and serve.
SASSY SEAFOOD
Yield: 1
1
⁄4cups
1 cup catsup
3 TBL lemon juice
1 TBL sugar
2 tsp prepared horseradish
1
⁄2tsp Tabasco®pepper sauce
Place all ingredients into sauce pan and heat on stovetop over medium heat
until hot, stirring occasionally.
Page 20

20
SALMON
Yield: 2
1
⁄2cups
3 TBL butter
1 clove minced garlic
1
⁄2cup chopped onion
3 TBL flour
1
1
⁄2cups milk
1
⁄4tsp thyme
2 TBL tomato paste
2 TBL lemon juice
Place butter in sauce pan and heat on stovetop over medium heat until
butter melts. Saute onion and garlic.
Blend in flour, milk and remaining ingredients. Cook until mixture bubbles
and thickens, stirring occasionally.
DILL
Yield: 1
1
⁄2cups
3 TBL butter
3 TBL flour
1
1
⁄2cups milk
2 TBL fresh minced dill
pinch nutmeg
Place butter in sauce pan and heat on stovetop over medium heat until
butter melts.
Blend in flour, milk and remaining ingredients. Cook until mixture bubbles
and thickens, stirring occasionally.
SPECIALTY DIPPING SAUCES
Follow instructions below each recipe and serve.
HOT CLAM AND CRAB
Yield: 3
1
⁄4cups
8 oz cream cheese, softened
1
⁄4cup butter, do not substitute margarine
1
⁄4cup mayonnaise
6
1
⁄2oz canned crabmeat, drained
6
1
⁄2oz canned clams, drained
Combine all ingredients in saucepan, heat slowly, stirring occasionally for
about 30 minutes until warmed thoroughly.
Page 21

21
SPICED
Yield:
1
⁄3cup
1 small clove crushed garlic
1
⁄2tsp toasted cumin seed
1
⁄2tsp paprika
1 pinch cayenne pepper
1
⁄4cup olive oil
1 TBL balsamic vinegar
2 TBL water
Place crushed garlic and spices in a grinder and blend to form a smooth
paste. Put in a bowl, and very gradually whisk in the oil and then vinegar
followed by water to form a thin pouring sauce.
GRILLED SALSA-CHEESE
Yield: 1
1
⁄3cups
1
⁄2pound mild cheese (such as Edam, Gouda or Jack)
1
⁄2cup bottled salsa
Shred cheese; place in small sauce pan. Stir in salsa. Heat on stovetop over
medium heat until cheese melts, stirring frequently to make sure cheese
doesn’t scorch.
RECIPES
Cooking times are for thawed meats.
SUNNY SIRLOIN STEAK
Yield: 4 servings
1 lb beef top sirloin steak,
3
⁄4-inch thick, cut in 4 pieces
1
⁄2cup orange juice
1
⁄4cup soy sauce
1 clove minced garlic
2 dashes ground cloves
Combine orange juice, soy sauce, garlic and cloves. Place steak in a large
sealable plastic bag, add marinade, turning once to coat. Seal bag securely
and marinate in refrigerator 2 to 4 hours, turning at least once. Drain
marinade from steak. Arrange in single layer in basket. Cook on TURBO
13 minutes or until done.
Page 22

22
CARIBBEAN CHICKEN WINGS
Yield: 8 wings
1
⁄3cup rice wine vinegar
1
⁄3cup pineapple juice
1
⁄2tsp garlic salt
1
⁄2tsp hot pepper sauce
8 chicken wings
Combine vinegar, pineapple juice and seasonings. Place chicken wings in
a large sealable plastic bag, add marinade turning once to coat. Seal bag
and marinate in refrigerator 2 to 4 hours turning at least once. Drain
marinade from chicken wings. Arrange in single layer in basket. Cook on
TURBO 5
1
⁄2minutes, CRISP 6 minutes and BROWN 1 minute or until done.
MARIACHI CHICKEN BITES
Yield: 4 servings
3
⁄4cup crushed tortilla chips
1
1
⁄2oz package Lawry’s®Taco Spices and Seasonings
1 lb chicken breast tenders, cut in 1-inch cubes
In large sealable plastic bag, combine chips and taco spices and
seasoning; shake. Dampen chicken with water, shake off excess. Put
chicken in bag and shake to coat with chips. Arrange in single layer in
basket. Cook on TURBO 5 minutes, and CRISP 3 minutes or until done.
HONEY MUSTARD-GLAZED STEAKS
Yield: 2 servings
1
1
⁄2TBL coarse-grain or regular Dijon®-style mustard
1
⁄2tsp chopped parsley
2 tsp honey
1
⁄2tsp each cider vinegar and water
1
⁄8tsp hot red pepper sauce
1
⁄8tsp coarse ground black pepper
2 8-oz beef top sirloin steaks,
3
⁄4-inch thick
2 onion slices,
1
⁄4-inch thick
Combine mustard, parsley, honey, vinegar, water, pepper sauce and
pepper. Place beef top loin steaks in basket; brush top with
1
⁄2tablespoon
glaze. Place onion slices on top of glazed steak. Top with remaining sauce.
Cook on TURBO 15 minutes or until done.
Page 23

23
MINI MARYLAND CRAB CAKES
Yield: 12 servings
2 slices bread, crusts removed and cubed
2 6-oz cans Fancy Lump crab meat, drained
1 egg, beaten
1
⁄2tsp seafood seasoning (like Old Bay®)
1 tsp baking powder
1 tsp parsley
1 tsp Worcestershire sauce
1 TBL mayonnaise
1 tsp Dijon
®
mustard
Combine ingredients. Shape into 12 patties. Arrange in single layer in
basket. Cook on CRISP 3 minutes and BROWN 2 minutes or until done.
FLAVORFUL TURKEY BURGERS
Yield: 4 servings
1 cup cooked brown rice
1
⁄2cup chopped onion
1 small apple, peeled and chopped
1 clove minced garlic
1
⁄2tsp dried sage
3
⁄4lb ground turkey
2 TBL ketchup
1
⁄2tsp salt
1
⁄8tsp ground black pepper
4 hamburger buns
Cook rice and set aside to cool.
Combine ingredients in large bowl. Shape into 4
3
⁄4-inch thick patties.
Arrange in single layer in basket. Cook on TURBO 16 minutes and CRISP
3 minutes or until done. When burgers are done, open basket and place
tops of buns on burgers followed by the bottoms. Cook on TURBO for
1 minute to warm buns.
TERIYAKI PORK CHOPS
Yield: 2 servings
2
1
⁄2
-inch thick pork loin chops
1
⁄4cup teriyaki marinade
1 tsp hot pepper sauce
1 TBL chopped green onion
Combine all ingredients in a bowl or a large sealable plastic bag and
marinate from 30 minutes to overnight in the refrigerator. Remove chops,
discarding marinade. Arrange in single layer in basket. Cook on TURBO
81⁄2 minutes or until done.
Page 24

24
CORIANDER-PEPPER CHOPS
Yield: 2 servings
2
1
⁄2-inch pork loin chops
1 clove crushed garlic
1
⁄2TBL ground coriander
1
⁄2TBL coarsely ground black pepper
1
⁄2TBL brown sugar
1
1
⁄2TBL soy sauce
Combine all ingredients in a large sealable plastic bag and marinate for
30 minutes. Remove chops from marinade, discarding marinade. Arrange
in single layer in basket. Cook on TURBO 11
1
⁄2minutes or until done.
FAJITAS
FAJITA MARINADE
1
⁄4cup olive oil
1 TBL white wine vinegar
1
⁄2tsp Tabasco®pepper sauce
1 TBL lemon juice
1
⁄2tsp chili powder
1
⁄2tsp salt
1
⁄8tsp garlic salt
FAJITA MIXTURE
Yield: 2 Servings
1
⁄2lb chicken breast tenders, cut in half lengthwise
1
⁄2red pepper, sliced in 1⁄2-inch rings
1
⁄2green pepper, sliced in 1⁄2 inch rings
1
⁄2medium onion, sliced in 1⁄2-inch rings
4 flour tortillas
Prepare marinade in large sealable plastic bag. Add meat and vegetables.
Marinate for 30 minutes or overnight in refrigerator. Place vegetables and
meat in single layer in basket. Cook on TURBO 71⁄2minutes and BROWN
2 minutes or until done. Remove meat and vegetables mixture. Place
tortillas, one at a time into basket and warm on BROWN for 30 seconds
each. Serve with your favorite condiments: salsa, sour cream, shredded
cheese, avocado, or refried beans.
PILLSBURY
®
CINNAMON ROLLS
Yield: 8 rolls
12.4 oz tube Pillsbury
®
Cinnamon Rolls
1 handi-foil
®
brownie pan (9 5⁄16-inches x 6 7⁄8-inches x 1 1⁄4-inches)
non-stick spray
DO NOT PREHEAT THE OVEN. Place the rolls, cinnamon topping up, in
greased disposable lightweight foil pan. Place foil pan in basket and insert
into COLD oven. Press PREHEAT. When preheat cycle is over, IMMEDIATEL Y
cook on TURBO 2 minutes 10 seconds and CRISP 2 minutes or until done.
Remove and allow to cool slightly before icing.
Page 25

25
PILLSBURY®REAL APPLE TURNOVERS
Yield: 6 turnovers
12 oz box refrigerated Pillbury
®
Real Apple Turnovers
1 handi-foil
®
brownie pan (9 5⁄16-inches x 6 7⁄8-inches x 1 1⁄4-inches)
non-stick spray
DO NOT PREHEAT THE OVEN. Fill three turnovers according to package
directions. Place in greased lightweight foil pan. Place foil pan in basket
and insert into COLD oven. Press PREHEAT. When preheat cycle is over,
IMMEDIATELY cook on TURBO 2 minutes 10 seconds and CRISP 1 minute
30 seconds. Allow to cool and repeat for remaining turnovers.
PILLSBURY
®
BUTTERMILK BISCUITS
Yield: 10 biscuits
7.5 oz can Pillbury
®
buttermilk biscuits
1 handi-foil
®
brownie pan (9 5⁄16-inches x 6 7⁄8-inches x 1 1⁄4-inches)
non-stick spray
DO NOT PREHEAT THE OVEN. Place biscuits into greased disposable
lightweight foil pan. Place foil pan in basket and insert into COLD oven.
Press PREHEAT. When preheat cycle is over, IMMEDIATELY cook on TURBO
2 minutes 20 seconds and CRISP 1 minute.
PILLSBURY
®
CRESCENT ROLLS
Yield: 4 rolls
4 oz tube Pillbury
®
Original Crescent Dinner Rolls
1 handi-foil
®
brownie pan (9 5⁄16-inches x 6 7⁄8-inches x 1 1⁄4-inches)
non-stick spray
DO NOT PREHEAT THE OVEN. Place the rolls in greased disposable
lightweight foil pan. Place foil pan in basket and insert into COLD oven.
Press PREHEAT. When preheat cycle is over, IMMEDIATELY cook on TURBO
2 minutes 20 seconds and CRISP 1 minute.
SERVICE INFORMATION
Please refer to warranty statement to determine if in-warranty service applies.
This appliance must be serviced by a Toastmaster authorized service center.
Unauthorized service will void warranty. Consult your phone directory under
“Appliances-Household-Small-Service and Repair,” or call 1-800-947-3744
in the U.S. and Canada, 52-5-397-2848 in Mexico.
If an authorized service center is not available locally, your appliance may be
returned postage prepaid to our National Service Center at the address shown
on the back of this book.
Products must be adequately protected to avoid shipping damage. Surround
your appliance with three inches of protective padding and include a copy of
your dated sales receipt and a note explaining the problem you have
experienced. We recommend insuring your package. No CODs accepted.
Page 26

26
FOOD
AMOUNT
TURBO CRISP
BROWN
Page 27

27
FOOD
AMOUNT
TURBO CRISP
BROWN
Page 28

28
LIMITED ONE-YEAR GUARANTEE
Toastmaster Inc. warrants this product, to original purchaser, for one year from purchase date to be free of defects in material
and workmanship.
This warranty is the only written or express warranty given by Toastmaster Inc. This warranty gives you specific legal rights. You
may have other rights which vary from state to state. ANY OTHER RIGHT WHICH YOU MAY HAVE, INCLUDING ANY IMPLIED
WARRANTY OF MERCHANTABILITY OR FITNESS FOR A PARTICULAR PURPOSE IS LIMITED IN DURATION TO THE DURATION OF
THIS WARRANTY.
Defective product may be brought or sent (freight prepaid) to an authorized service center listed in the phone book, or to Service
Department, Toastmaster Inc., 708 South Missouri St., Macon, MO 63552, for free repair or replacement at our option.
Your remedy does not include: cost of inconvenience, damage due to product failure, transportation damages, misuse, abuse, accident or the like, or commercial use. IN NO EVENT SHALL TOASTMASTER INC. BE LIABLE FOR INCIDENTAL OR CONSEQUENTIAL
DAMAGES.
Some states do not allow limitations on how long an implied warranty lasts, or allow the exclusion or limitation of incidental
or consequential damages, so the above limitations or exclusions may not apply to you.
For information, write Consumer Claims Manager, at the Macon address. Send name, address, zip, telephone area code and
daytime number, model, serial number, and purchase date.
EVERYBODY EATS. It’s a fact of life.
But sometimes preparing
meals can become a chore.
That’s why TOASTMASTER has been invited
into millions of kitchens just like yours
so we can HELP YOU MASTER your
mixing, baking, grilling, toasting,
brewing, heating and serving
tasks WITH EASE AND STYLE.
The TOASTMASTER name stands for a
CELEBRATION of INNOVATION designed
to serve your life and keep you
COOKIN’ IN STYLE.
KEEP DATED SALES RECEIPT FOR WARRANTY SERVICE.
Keep this booklet. Record the following for reference:
Date purchased
Model number
Date code (stamped on bottom)
Page 29

?? QUESTIONS??
Before Contacting Your Retailer,
Call TOLL-FREE
1-800-947-3744
Monday–Friday,
7:30 a.m.-5:30 p.m. C.S.T.
FLAVORFUL, JUICY STEAKS - from frozen to
grilled perfection at ULTRAVECTION speed
CRISP, HOT PIZZA IN 8 MINUTES!
No soggy crust!
FRIES COME OUT SO HOT AND CRISPY -
you’ll think they’re deep-fried!
No need to add any oils!
 Loading...