

Page 1
Page 2

2
IMPORTANT SAFEGUARDS
When using electrical appliances especially when children are present, basic safety
precautions should always be followed to reduce the risk of re, electric shock, and/or
injury to persons, including the following:
1. READ ALL INSTRUCTIONS.
2. Do not touch hot surfaces. Use any handles or knobs.
3. To protect against electrical shock, do not place cord, plug or appliance in water or
other liquid.
4. Close supervision is necessary when any appliance is used near children.
5. Do not leave appliance unattended while in use.
6. Unplug from outlet when not in use and before cleaning or storing. Allow to cool
before cleaning and putting on or removing parts.
7. Do not operate any electrical appliance with a damaged cord or plug or after
appliance malfunctions or has been dropped or damaged in any manner. Return
appliance to nearest authorized service facility for examination, repair or adjustment.
8. The use of accessory attachments not recommended by the appliance manufacturer
may result in re, electrical shock or injury.
9. Do not use outdoors or for commercial purposes.
10. Do not let cord hang over edge of table or counter, or touch hot surfaces.
11. Do not place appliance on or near a hot gas or electric burner, or in a heated oven
or microwave.
12. Extreme caution must be used when moving an appliance containing hot oil or other
hot liquids.
13. Always attach plug to appliance rst then plug the cord into the wall outlet. To
disconnect, turn any control o then remove the plug from the wall outlet.
14. Do not use the appliance for other than its intended use.
15. CAUTION-Risk of electric shock. Cook only in removable container.
16. This appliance cooks under pressure. Improper use may result in scalding or other
injury. Make certain product is properly closed before operating. See “Operating
Instructions” and “Using the Pressure Cooker”.
17. Do not ll above the MAX line of the inner pot. See image B under “Operating
Instructions”. When cooking foods that expand when cooking such as rice or dried
vegetables, do not ll over ½ full. Over lling may cause a risk of clogging the vent
pipe and developing excess pressure.
18. Be aware that certain foods such as applesauce, cranberries, pearl barley, oatmeal
or other cereals, split peas, noodles, macaroni, rhubarb, or spaghetti can foam, froth
and sputter, and clog the pressure release device (steam vent). These foods should
not be cooked in a pressure cooker
19. Always check the pressure release devices for clogging before use.
20. Do not open the pressure cooker until the product has cooled and all internal
pressure has been released. If the lid is dicult to rotate, this indicates that the
cooker is still pressurized – do not force it open. Any pressure in the cooker can be
hazardous. See “Operating Instructions” and “Using the Pressure Cooker”.
21. Do not use this pressure cooker for pressure frying with oil.
22. FOR HOUSEHOLD USE ONLY.
SAVE THESE INSTRUCTIONS
Page 3

3
ADDITIONAL SAFEGUARDS
• When pressure is building or being released and when removing the lid, hot steam
will be released. Keep hands and face clear. Use extreme caution when releasing
steam or removing the lid.
• CAUTION HOT SURFACES. This appliance generates heat and escaping steam
during use. Proper precautions must be taken to prevent the risk of personal injury,
res, and damage to property.
• Do not clean with metal scouring pads. Pieces can break o the pad and touch
electrical parts involving a risk of electric shock.
• Do not store any materials, other than manufacturers recommended accessories, in
this appliance when not in use.
• Do not place any of the following materials in the appliance: paper, cardboard, plastic.
• Ensure a minimum distance around the appliance of at least 4 inches to other
objects, cupboards and walls when in operation. Do not place any item on top of the
appliance when in operation.
• A re may occur if the appliance is covered or touches ammable material, including
curtains, draperies, walls, and the like.
• When in operation the Pressure Cooker requires sucient air space on all sides
including top and bottom. Never operate the appliance near any ammable materials
such as dish towels, paper towels, curtains, paper plates, etc.
• This appliance has been designed for use with a 3 prong, grounded, 120V electrical
outlet only. Do not use any other electrical outlet.
• Anyone who has not fully read and understood all operating and safety instructions
contained in this manual is not qualied to operate or clean this appliance.
• If this unit falls or accidentally becomes immersed in water, unplug it from the wall
outlet immediately. Do not reach into the water.
• Do not operate this appliance on an unstable surface.
• If this appliance begins to malfunction during use, immediately unplug the cord. Do
not use or attempt to repair a malfunctioning appliance.
• NEVER FORCE THE PRESSURE COOKER OPEN. To open the pressure cooker,
press the “KEEP WARM/CANCEL” button until the program is cancelled. Slide
the steam release switch to the open position to fully release pressure. When all
steam is safely released the safety valve will drop into the plastic housing of the lid.
Carefully turn the lid handle to the open position. Tilt the lid away from you when
removing to avoid skin contact with excess steam.
• CAUTION: TO REDUCE RISK OF ELECTRIC SHOCK, COOK ONLY IN THE
REMOVABLE INNER POT.
• NEVER pour cold water into a hot pressure cooker.
• The DELAY TIMER feature is not suitable for all foods. NEVER leave raw meats,
raw poultry, raw sh or any dairy based recipes (milk, etc) in the pressure cooker to
cook with the DELAY TIMER setting.
This appliance is for HOUSEHOLD USE ONLY. It may be plugged into an AC electrical
outlet (ordinary household current). Do not use any other electrical outlet.
GROUNDING INSTRUCTIONS
This appliance has a grounded plug and must be grounded while in use. Do not ignore the grounding
pin while using. Do not remove the grounding pin or attempt to modify the plug in any way.
WARNING: To ensure continued protection against risk of electric shock, connect to
properly grounded outlets only.
Page 4
4
SHORT CORD INSTRUCTIONS
A short power supply cord is provided to reduce the hazards resulting from entanglement
or tripping over a longer cord. Never use with an extension cord.
LINE CORD SAFETY TIPS
1. Never pull or yank on cord or the appliance.
2. To insert plug, grasp it rmly and guide it into outlet.
3. To disconnect appliance, grasp plug and remove it from outlet.
4. Before each use, inspect the line cord for cuts and/or abrasion marks. If any are
found, this indicates that the appliance should be serviced and the line cord replaced.
5. Never wrap the cord tightly around the appliance, as this could place undue stress
on the cord where it enters the appliance and cause it to fray and break.
DO NOT OPERATE APPLIANCE IF THE LINE CORD SHOWS ANY DAMAGE, OR IF
APPLIANCE WORKS INTERMITTENTLY OR STOPS WORKING ENTIRELY.
IMPORTANT
During the rst few minutes of initial use, you may notice smoke and/or a slight odor.
This is normal and should quickly disappear. It will not recur after appliance has been
used a few more times.
OPERATING INSTRUCTIONS
PRODUCT MAY VARY SLIGHTLY FROM ILLUSTRATIONS
A. B. C.
Pressure
Release
Valve
Lock Pin
Safety Valve
Page 5

5
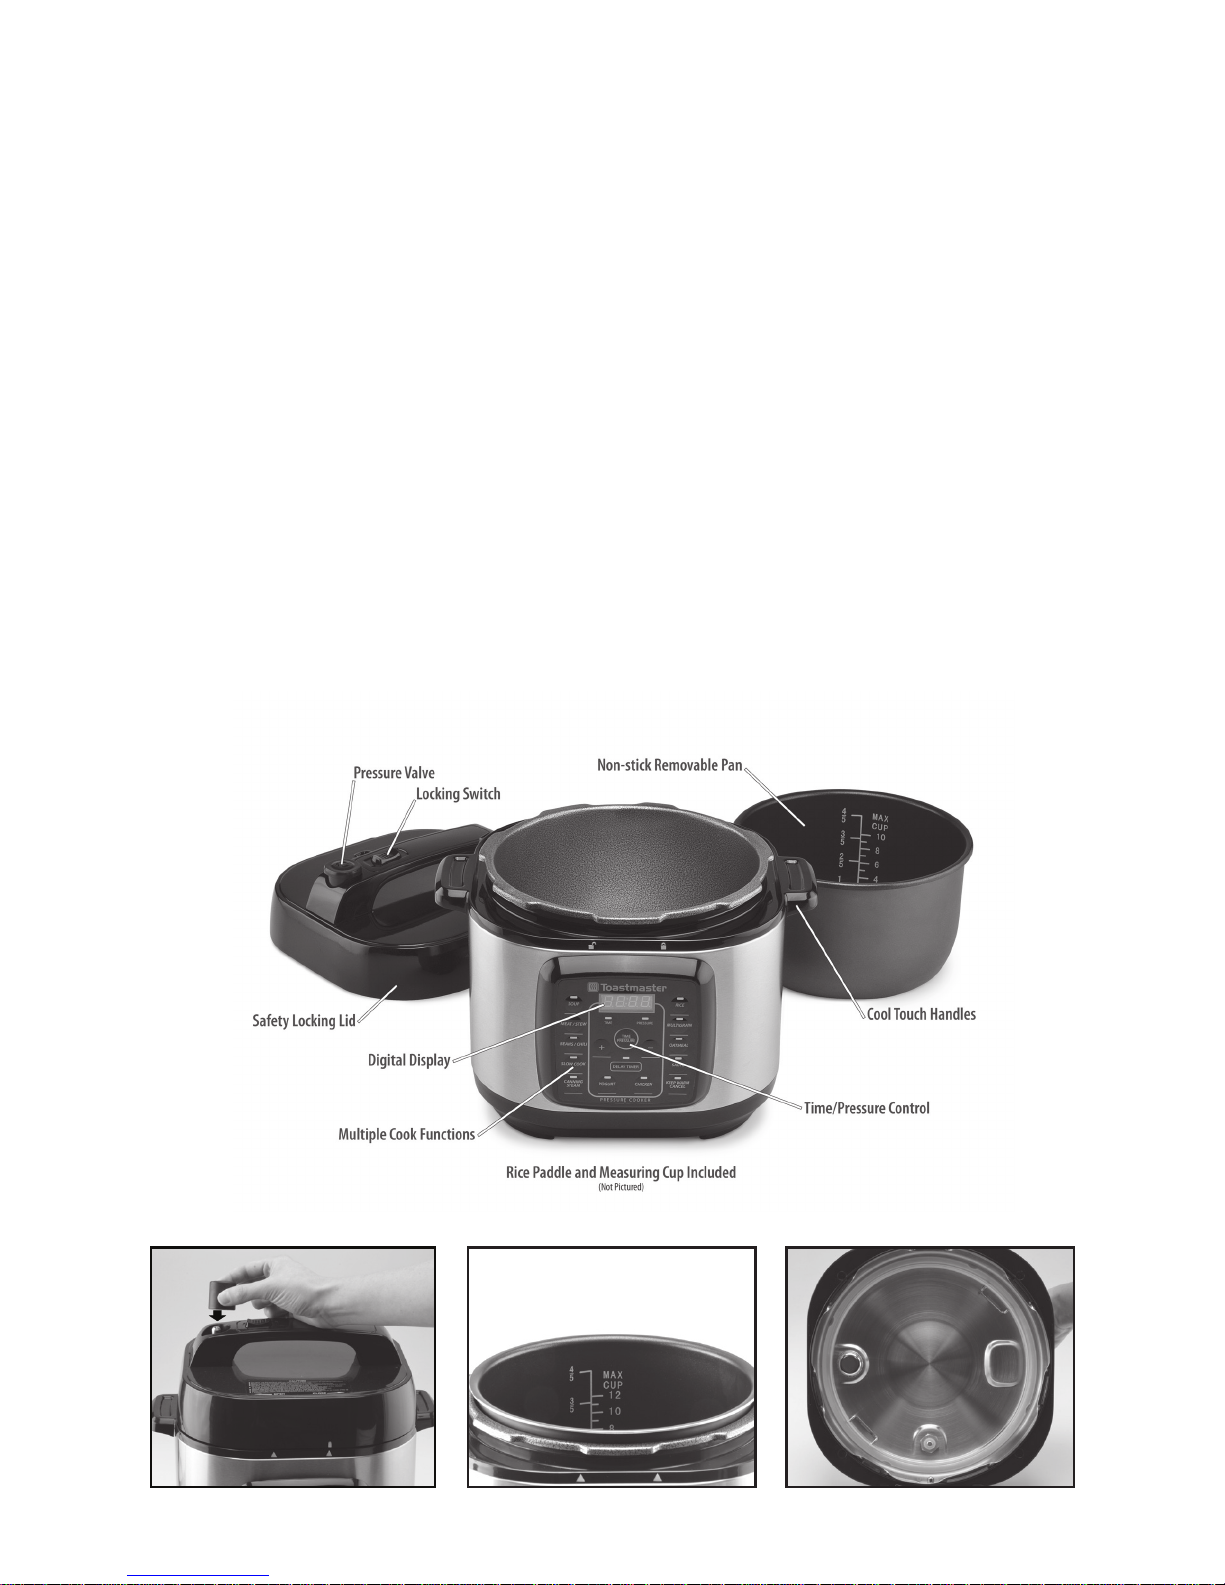
BEFORE USING
Solid surface counter tops can be easily scratched, cracked, scorched, or damaged, especially
when exposed to heat. To prevent damage, use precautions when using this product.
Carefully unpack the pressure cooker and all parts. Remove all packaging materials,
including any corrugate inserts, plastic bags, stickers or labels.
IMPORTANT: The pressure valve is not attached to the pressure cooker lid inside
the box. To attach the pressure valve line it up with the metal post in the handle
and gently press down until it is engaged (image A).
Clean the interior and exterior surfaces of the pressure cooker main body with a damp
cloth or sponge. Wipe dry with a soft cloth. Wash the removable inner pot and the inside
of the lid with warm soapy water. Rinse the inner pot and lid and dry thoroughly. NOTE:
If there is heavy buildup, the rubber gasket ring can be removed from the wire gasket
holder on the inside of the lid (image D). To replace it rmly work the channel in the
center of the rubber gasket ring back around the wire gasket holder in a single spot and
continue to press the gasket back under the wire gasket holder around the entire inner
lid.
NEVER IMMERSE THE PRESSURE COOKER OR CORD IN WATER OR ANY OTHER
LIQUID.
D.
Gasket Ring
Wire Gasket
Holder
E. F.
G. I.H.
J.
Page 6

6
For best performance check all parts before each use. Make sure that the pressure valve
on the handle, the sliding pressure release switch, the safety valve integrated into the
lid and the rubber gasket ring are all clean and that there is nothing blocking any valve.
Position the pressure cooker on a dry, level, heat-resistant surface. It is recommended
to operate this appliance on a separate outlet and circuit from other appliances to avoid
overloading the circuit.
USING THE PRESSURE COOKER
1. Place the pressure cooker on a clean, dry, level, stable, and heat-resistant surface
in the center of the countertop.
2. Prepare ingredients in advance and add them to the nonstick removable inner pot.
NEVER ll the inner pot above the MAX marking (image B). Place inner pot into the
pressure cooker.
3. Connect the power cord to the pressure cooker and plug cord into a 120 volt wall outlet.
4. The pressure cooker will emit a single audible tone, the entire function panel will
blink three times and then the display screen will show four dashes “- - - -”.
5. If selecting a mode that will cook under pressure, secure the pressure cooker lid.
6. To secure the lid, align the indicator mark on the edge of the lid with the left
indicator triangle. Press down rmly so the gasket seals and rotate the handle
counterclockwise until the indicator mark on the edge of the lid is aligned with the
right indicator triangle (image E).
7. Press the button for the desired pressure cooking mode. When a button is pressed,
there will be a single audible tone, the light on the button will blink and the display
screen will show the default cook time for the specic mode selected. Reference
the cooking chart for specic information on cooking functions, default times
and pressure settings.
8. While the light on the button is blinking, the cook time may be adjusted by pressing
the “+” or “-” buttons. The pressure may be adjusted by pressing the “TIME/
PRESSURE” button and using the “+” or “-” buttons.
9. After about 10 seconds of inactivity, there will be three audible tones and the
pressure cooker will begin heating. NOTE: If the lid is not on the pressure cooker,
the pressure cooker will heat but will not begin building pressure.
DELAY TIMER FEATURE: After selecting a cook mode, it is possible to delay the start
of the cooking process.
• Press the DELAY TIMER button after the cook mode has been set. NOTE: the
default delay start is 6 hours.
• The time in the display will be 6:00 and the “6” will blink.
• Use the “+” and “-” buttons to set the delay start time. The delay start time range is
10 minutes to 6 hours.
• After toggling to the desired delay start time, the display will continue blinking until
there is approximately 10 seconds of inactivity. The pressure cooker will emit three
audible tones and the delay timer will begin counting down. When the display
reaches “0:00” the cook cycle will begin.
• The DELAY TIMER feature is not suitable for all foods. NEVER leave raw meats,
raw poultry, raw sh or any dairy based recipes (milk, etc) in the pressure cooker to
cook with the DELAY TIMER setting.
Page 7

7
NOTE: The cook time selected does not include the time required for the pressure
cooker to build up to the pressure level selected. The time will start counting down once
the pressure level is reached.
10. During a cook cycle, it is possible to adjust both the time and pressure level. To adjust,
press the “TIME/PRESSURE” button to display the setting that will be adjusted and
use the “+” and “-” buttons to make the adjustment. After three seconds of inactivity,
the adjusted time will be shown in the display.
11. Once the cook time has elapsed, the pressure cooker will emit 10 audible tones
indicating the cooking is nished. The pressure cooker will enter KEEP WARM
mode. The KEEP WARM light will illuminate and the display will show the amount of
time that has passed since the cook cycle ended and the pressure cooker entered
KEEP WARM mode.
12. The cook cycle can be stopped at any time by pressing the “KEEP WARM/CANCEL”
button. Stopping the cook cycle puts the pressure cooker in standby mode. To begin
cooking again, new mode, time and pressure selections must be made.
WARNING: Before the lid will open all steam and pressure must be released from the
pressure cooker. When releasing steam and pressure keep all body parts, especially
exposed skin, away from the valves and gaps where pressure and steam will be released.
13. Release the pressure by sliding the release switch toward the steam release valve
(image G).
CAUTION: Escaping steam can burn, take precautions to avoid contact with the
steam during use.
14. Once the pressure is released, the pressure safety pin will drop into the lid and the
lid can be opened safely (image C).
15. To remove the lid hold the handle and rotate the lid clockwise until the indicator line
on the lid is aligned with the left indicator triangle (image F).
16. Use caution and open the lid away from yourself to avoid any steam inside the inner
pot. Remove lid slowly to allow condensation to drip back into the inner pot.
17. If removing the inner pot, use oven mitts or a pot holder and place the inner pot on
a hot pad or heat-resistant surface.
WARNING: To avoid damage to surfaces, never place the hot removable pot directly on a
tabletop or counter top. It is recommended to use a heat-resistant trivet or cutting board.
18. If cooking is complete, unplug the cord plug from the wall outlet and allow the
pressure cooker and all parts to cool completely before moving, putting on or taking
o parts, or cleaning.
CAUTION: FOOD, INNER POT AND OTHER PARTS WILL BE VERY HOT. DO NOT
ATTEMPT TO REMOVE FOOD FROM THE INNER POT WITH YOUR HANDS.
Page 8

8
PRESSURE COOKER GUIDE
MODE
DEFAULT
TIME
DEFAULT
PRESSURE*
MIN - MAX
TIME
MIN - MAX
PRESSURE
NOTES
SOUP 30 min 60 kPa 5 min - 2 hrs 10 - 80 kPA
MEAT /
STEW
40 min 80 kPa 5 min - 2 hrs 10 - 80 kPA
BEANS /
CHILI
30 min 60 kPa 5 min - 2 hrs 10 - 80 kPA
SLOW
COOK
8 hours ---
2 hrs - 24 hrs
---
Slow cooking
does not require
pressure. If the
lid is in place
pressure may
build but with
the pressure
protection, it will
not exceed 30
Kpa.
CANNING /
STEAM
10 min 80 kPa 5 min - 2 hrs 10 - 80 kPA
The steam
mode heats
liquids to a boil
in a few minutes
to steam foods.
RICE 15 min 50 kPa 5 min - 2 hrs 10 - 80 kPA
MULTI-
GRAIN
40 min 80 kPa 5 min - 2 hrs 10 - 80 kPA
OATMEAL 20 min 80 kPa 5 min - 2 hrs 10 - 80 kPA
SAUTÉ 15 min ---
5 min - 30 min
---
Use sauté to
sear or brown
foods directly
in the inner pot
before cooking
an entire meal
under pressure.
When sautéing
it is not
necessary to
use the
pressure
cooker lid.
YOGURT 8 hours ---
2 hrs - 48 hrs
---
CHICKEN 20 min 70 kPa 5 min - 2 hrs 10 - 80 kPA
Page 9

9
MODE
DEFAULT
TIME
DEFAULT
PRESSURE*
MIN - MAX
TIME
MIN - MAX
PRESSURE
NOTES
KEEP
WARM
10 hours ---
After a selected
cook mode ends,
the pressure
cooker shifts to
a KEEP WARM
mode. KEEP
WARM can also
be used
independently.
* The pressure levels programmed into the logic of this pressure cooker are
measured in kPa. The kPa unit of measurement is dierent from PSI (pounds
per square inch). 1 PSI is approximately 7 kPa.
TIPS AND HINTS
• Never load the inner pot above the MAX line (image B).
• The pressure levels programmed into the logic of this pressure cooker are measured
in kPa. The kPa unit of measurement is dierent from PSI (pounds per square inch).
1 PSI is approximately 7 kPa.
• Use the SAUTE setting to sear or brown foods directly in the inner pan before
cooking a full meal on a setting with pressure.
• If cooking frozen foods without defrosting the foods, adjust the cooking time to add
an additional 10 minutes.
• Pressure cooking requires the addition of some form of liquid. Reference recipes
online for suggested food to liquid ratios.
• The selected cook time does not include the time required to build to pressure.
• When the pressure cooker enters KEEP WARM mode, the display indicates the
time that has passed since the cook cycle was completed and the pressure cooker
entered KEEP WARM mode.
• NEVER pour cold water into a hot pressure cooker.
• If the lid is in the closed position and excess steam is noticed between the lid and
pressure cooker housing, it is possible the lid is not seated properly and the rubber
gasket ring has not formed a full seal. Try pushing down the lid rmly. The safety
valve may also be stuck. It is important to regularly check the safety valve when the
pressure cooker is not in use to make sure it moves up and down and the silicone
ring meets the inner lid without gaps.
• The condensation container will help to drain any excess liquid that gathers around
the rim of the pressure cooker body. Insert and remove the condensation container
by sliding it on and o of the rails (image I).
• The pressure cooker housing includes a convenient spoon slot to store the plastic
spoon (image J).
Page 10

10
TROUBLESHOOTING GUIDE
FAULT POSSIBLE CAUSE SUGGESTED CORRECTION
Lid wil not close
Gasket is not in place or
missing
Adjust or insert gasket
Lid is not properly
aligned with pressure
cooker base
Align the indicator line on the
edge of the lid with the left
indicator triangle and rotate the
lid counterclockwise
Lid will not open
Pressure cooker is still
pressurized
Slide the pressure release
switch to the release
position and let out any
remaining pressure
Safety valve at the back
of the lid is caught in the
lock (up) position
Using a long utensil, gently
press the safety valve until it
releases and drops
Excess steam leaking
between the lid and
the pressure cooker
housing
Damaged gasket Replace the gasket
Missing gasket Insert the gasket
Build up or debris on
gasket
Remove the gasket and clean it
according to instructions
Lid not properly attached
Ensure lid is aligned and
closed. Gently push down on
the lid handle.
Safety valve will not rise
(lock) so pressure cannot build
Not enough liquid added
to the recipe
Remove lid and add liquid
Silicone stopper on
safety valve is dirty or
worn out
Clean safety valve and silicone
stopper / replace silicone stopper
Occasional popping noise
coming from pressure
cooker
The control board
component cycles with
the thermostat during
use
This is normal
The inner pot is wet
Make sure the inner pot and the
inside of the pressure cooker
are completely dry before use
Excessive steam
coming from the steam
release valve
Steam release valve not
properly connected
Remove the steam release
valve according to instructions
and replace it on the metal post
Rice is too soft Too much water added
Adjust the rice to water ratio to
use less water
Page 11

11
FAULT POSSIBLE CAUSE SUGGESTED CORRECTION
Rice is not fully cooked
(too hard)
Not enough water added
Adjust the rice to water ratio to
use more water
Lid removed
After the cook cycle has ended
leave the lid in place for an
additional 5 minutes
Pressure cooker won’t
energize
Power cord is disconnected
from pressure cooker
Ensure cord is secured to the
pressure cooker
Wall outlet is faulty
Check the GFI on the wall outlet
or try another outlet
CARE AND CLEANING
This appliance requires little maintenance. It contains no user serviceable parts. Do not
try to repair it yourself. Any servicing requiring disassembly must be performed by a
qualied appliance repair technician.
The pressure cooker should be cleaned thoroughly following each use to maintain
optimal performance and avoid any staining from food build-up or residue.
1. Before cleaning, unplug from outlet and allow pressure cooker and all parts to cool
completely.
2. The removable inner pot can be washed in hot soapy water or in a dishwasher.
Wipe the inside and outside of the pressure cooker as well as the lid with a slightly
damp, soft cloth and mild detergent if needed. NEVER IMMERSE THE PRESSURE
COOKER OR CORD IN WATER OR ANY OTHER LIQUID.
3. NEVER USE ABRASIVE CLEANERS OR SCOURING PADS TO CLEAN THE
PRESSURE COOKER, AS THOSE MAY DAMAGE THE SURFACES.
4. If there is any excess build-up or food residue, the rubber gasket ring on the inside
of the lid can be removed for cleaning. Gently remove the rubber gasket ring from
the wire gasket holder on the inside of the lid. To replace it rmly work the channel
in the center of the rubber gasket ring back around the wire gasket holder in a single
spot and continue to press the gasket back under the wire gasket holder around the
entire inner lid (image D).
5. The pressure valve on the lid handle should be removed regularly for cleaning. To remove
the pressure valve, grasp the valve and gently pull up. It should disengage from the
metal post in the handle. Apply a drop of mild detergent and thoroughly rinse under warm
running water. After the pressure valve is completely dry, put it back in place by lining it
up with the metal post in the handle and gently press down until it is engaged (image A).
RUBBER GASKET RING: On occasion it may be necessary to replace the rubber
gasket ring. The gasket ring may need replacement simply due to frequent use. The
gasket ring may also need to be replaced if the pressure cooker is not used for a long
period of time and the gasket has hardened or cracked. The rubber gasket ring should
only be replaced with a suitable gasket ring of the same type and size.
To store, be sure all parts are clean and dry. Store appliance in its box or in a clean, dry
place. Never store it while it is hot or wet. Never wrap cord tightly around the appliance;
disconnect it from the appliance and keep it loosely coiled in the inner pot or nearby.
Page 12

12
ONE YEAR LIMITED WARRANTY
SELECT BRANDS, INC. warrants, subject to the conditions stated below, that from the date
of purchase, this product will be free from mechanical defects for a period of one (1) year.
SELECT BRANDS, INC., at its option, will repair or replace this product found to be defective
during the warranty period. Should this product become defective by reason of improper
workmanship or material defect during the specied warranty period, Select Brands, Inc. will
repair or replace the same eecting all necessary parts replacements for a period of one year
from the date of purchase.
Transportation charges on parts, or products in whole, submitted for repair or replacement,
under this warranty, must be borne by the purchaser.
CONDITIONS: This warranty is valid for the original retail purchaser from the date of initial
retail purchase and is not transferable. This warranty does not apply to product sold by third
party resellers. Keep the original sales receipt. Proof of purchase is required to obtain warranty
service or replacement. Dealers, service centers, or retail stores do not have the right to alter,
modify or in any way, change the terms and conditions of this warranty.
Warranty registration is not necessary to obtain warranty on Select Brands, Inc. products. Save
your proof of purchase receipt.
ABOUT YOUR PRODUCT WARRANTY: Most warranty repairs are handled routinely, but
sometimes requests for warranty service may not be appropriate. For example, warranty
service would NOT apply if the product damage occurred because of misuse, lack of routine
maintenance, shipping, handling, warehousing or improper installation. Similarly, the warranty
is void if the manufacturing date or the serial number on the product has been removed or the
equipment has been altered or modied. During the warranty period, the authorized service
dealer, at its option, will repair or replace any part that, upon examination, is found to be
defective under normal use and service.
NORMAL WEAR: This warranty does not cover normal wear of parts or damage resulting
from any of the following: Negligent use or misuse of the product; Improper voltage or current;
Use contrary to the operation instructions; Deviation from instructions regarding storage
and transportation; Repair or alteration by anyone other than SELECT BRANDS, INC. or an
authorized service center. Further, the warranty does not cover Acts of God, such as re, ood,
hurricanes and tornadoes.
SELECT BRANDS, INC. shall not be liable for any incidental or consequential damages caused
by the breach of any express or implied warranty. Except to the extent prohibited by applicable
law, any implied warranty of merchantability or tness for a particular purpose is limited in
duration to the duration of the above warranty. Some states, provinces or jurisdictions do not
allow the exclusion or limitation of incidental or consequential damages or limitations on how
long an implied warranty lasts, so the above limitations or exclusion may not apply to you. This
warranty gives you specic legal rights, and you may also have other rights that vary from state
to state or province to province.
HOW TO OBTAIN WARRANTY SERVICE: You must contact SELECT BRANDS, INC.
Customer Service at 1-913-663-4500. A Customer Service representative will attempt to
resolve warranty issues over the phone. If telephone resolution is not possible, the Customer
Service representative will require your assistance in performing routine diagnostic procedures.
This warranty is eective for the time periods listed above and subject to the conditions provided
for in this policy.
TOASTMASTER is a Registered Trademark of Applica Consumer Products, Inc., and used under
license by Select Brands, Inc.
Printed in China
3017
 Loading...