

Page 1

8-Cup
Food Processor
USE AND CARE GUIDE
MODEL T F P 8 W
Page 2

IMPORTANT SAFEGUARDS
When using electrical appliances, basic safety precautions should
always be followed including the following:
◆ Read all instructions.
◆ To protect against risk of electrical shock do not put cord, plugs,
or appliance in water or other liquid.
◆ Close supervision is necessary when any appliance is used by or
near children.
◆ Unplug from outlet when not in use, before putting on or taking
off parts, and before cleaning.
◆ Avoid contacting moving parts. Keep fingers out of discharge
opening.
◆ Never feed food by hand. Always use food pusher.
◆ Blades are sharp. Handle carefully.
◆ Keep hands and utensils away from moving blades or discs while
processing food to reduce the risk of severe injury to persons or
damage to the food processor.
◆ A scraper may be used but must be used only when the food
processor is not running.
◆ To reduce the risk of injury. Never place cutting blade or discs on
base without first putting bowl properly in place.
◆ Be certain cover is securely locked in place before operating
appliance.
◆ Do not attempt to defeat the cover interlock mechanism.
◆ Do not operate any appliance with a damaged cord or plug or
after the appliance malfunctions, or is dropped or damaged in any
manner. Contact Consumer Service.
◆ The use of attachments not recommended or sold by the
manufacturer may cause fire, electric shock or injury.
◆ Do not use outdoors.
◆ Do not let cord hang over edge of table or counter.
◆ Do not let cord contact hot surface, including the stove.
SAVE THESE INSTRUCTIONS
For Household Use Only.
Page 3

ADDITIONAL IMPORTANT
SAFEGUARDS
◆ All users of this appliance must read and understand this Owner’s
Manual before operating or cleaning this appliance.
◆ The cord of this appliance should be plugged into a 120V AC
electrical outlet only.
◆ Do not leave this appliance unattended during use.
◆ If this appliance begins to malfunction during use, immediately turn
the unit OFF and unplug the cord. Do not use or attempt to repair
the malfunctioning appliance.
◆ If this appliance falls or accidentally becomes immersed in water,
unplug it immediately. Do not reach into the water! Do not use
this appliance after it has fallen into or becomes immersed in
water.
◆ To reduce the risk of injury to persons or property, never use this
appliance in an unstable position.
◆ Do not use this appliance for other than its intended use.
Page 4

Polarized Plug
This appliance has a polarized plug (one blade is wider than the
other). To reduce the risk of electrical shock, this plug is intended to
fit into a polarized outlet only one way. If the plug does not fit fully in
the outlet, reverse the plug. If it still does not fit, contact a qualified
electrician. Do not attempt to modify the plug in any way.
Short Cord Instructions
A short power-supply cord is provided to reduce the risk resulting
from becoming entangled in or tripping over a longer cord.
Do not use an extension cord with this product.
Electric Power
If the electrical circuit is overloaded with other appliances, your
appliance may not operate properly. It should be operated on a
separate electrical circuit from other appliances.
Page 5
Plasticizer Warning
CAUTION: To prevent Plasticizers from migrating from the finish of
the countertop, tabletop or other furniture, place NON-PLASTIC
coaster or placemats between the appliance and the finish of the
countertop, tabletop or other furniture.
Failure to do so may cause the finish to darken, permanent blemishes
may occur or stains can appear.
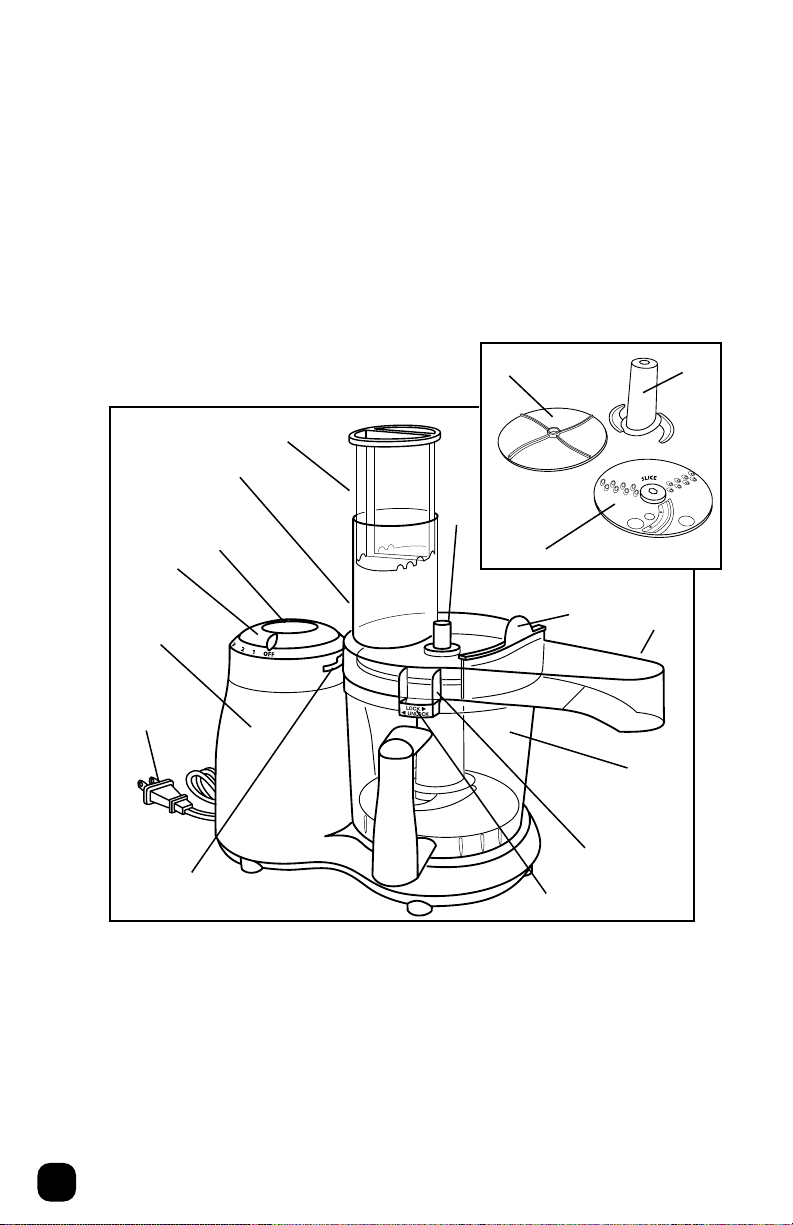
Getting to Know Your
8-Cup Food Processor
14.
5.
4.
6.
3.
2.
16.
15.
1.
13.
12.
1. Food Processor Body
2. 8-Speed Control Dial
3. Pulse Button
4. Lid with Food Chute
P/N 71033
5. Food Pusher P/N 71034
6. Drive Shaft
7. Shield P/N 71035
8. Continuous Flow
Side Chute
7.
10.
11.
9. 8-Cup Processor Bowl
P/N 71036
10. Interlock Mechanism
11. Lock Tabs
12. Latch
13. Cord
14. Discharge Disc P/N 71037
15. Chopping Blade P/N 71038
16. Slicing/Shredding Disc
P/N 71039
8.
9.
Page 6
Before Using For The First Time
1. Remove all packaging material before using.
2. Wash Lid, Chopping Blade, Processing Bowl,
Food Chute, Shield, Food Pusher and Discs, in warm soapy water.
Rinse and dry thoroughly, see CARE AND CLEANING.
CAUTION: BLADES ARE SHARP, HANDLE WITH CARE.
CAUTION: DO NOT IMMERSE FOOD PROCESSOR BODY
IN WATER OR OTHER LIQUIDS.
Operating Instructions
How to Slice or Shred Food:
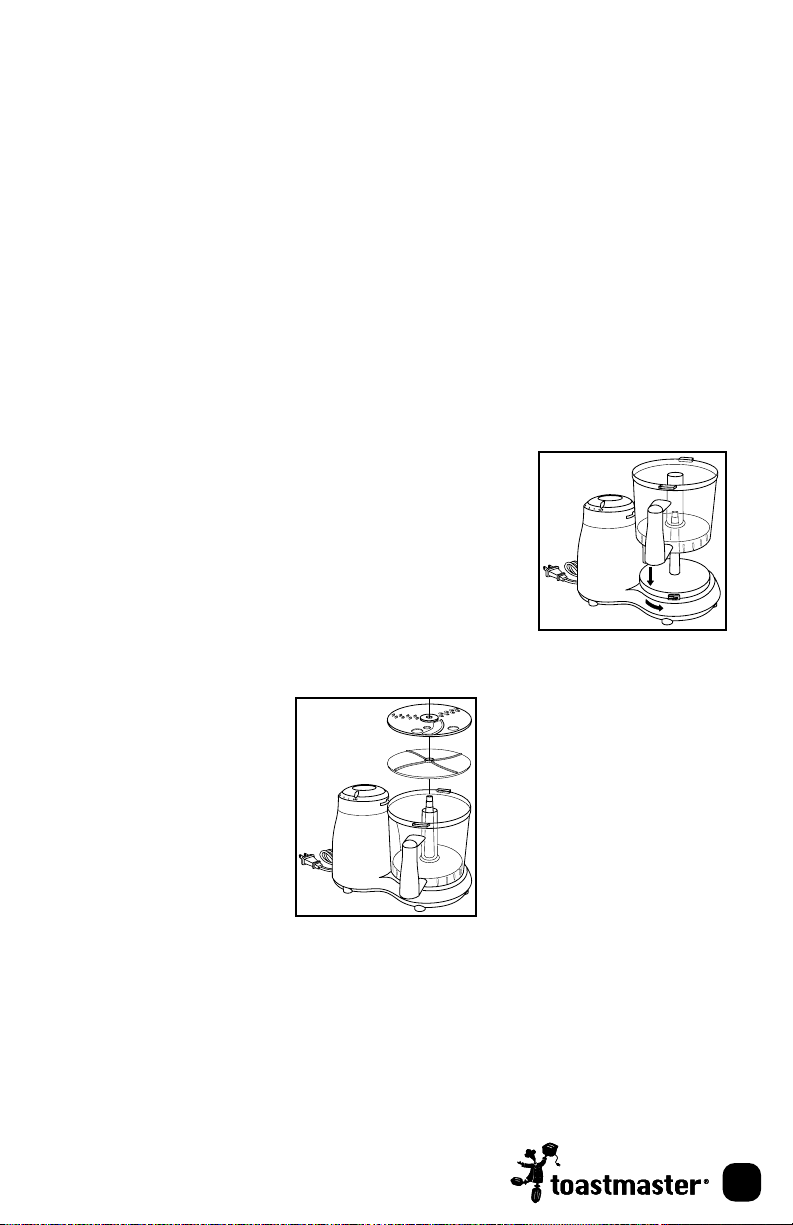
1. Attach the 8-Cup Processor Bowl to the
Food Processor Body by placing on Drive
Shaft. Turn 8-Cup Processor Bowl counterclockwise until it clicks into place. (See
Picture A)
NOTE: For Slicing or Shredding Food the
Chopping Blade is not needed.
2. Place the Discharge Disc onto the Drive Shaft. (See Picture B)
Picture B
3. Place the Slicing/Shredding Disc on the Drive Shaft.(See Above
Picture B)
NOTE: Both sides of the Slicing/Shredding Disc indicate
which Function it will perform.
Picture A
Page 7
Operating Instructions (Cont.)
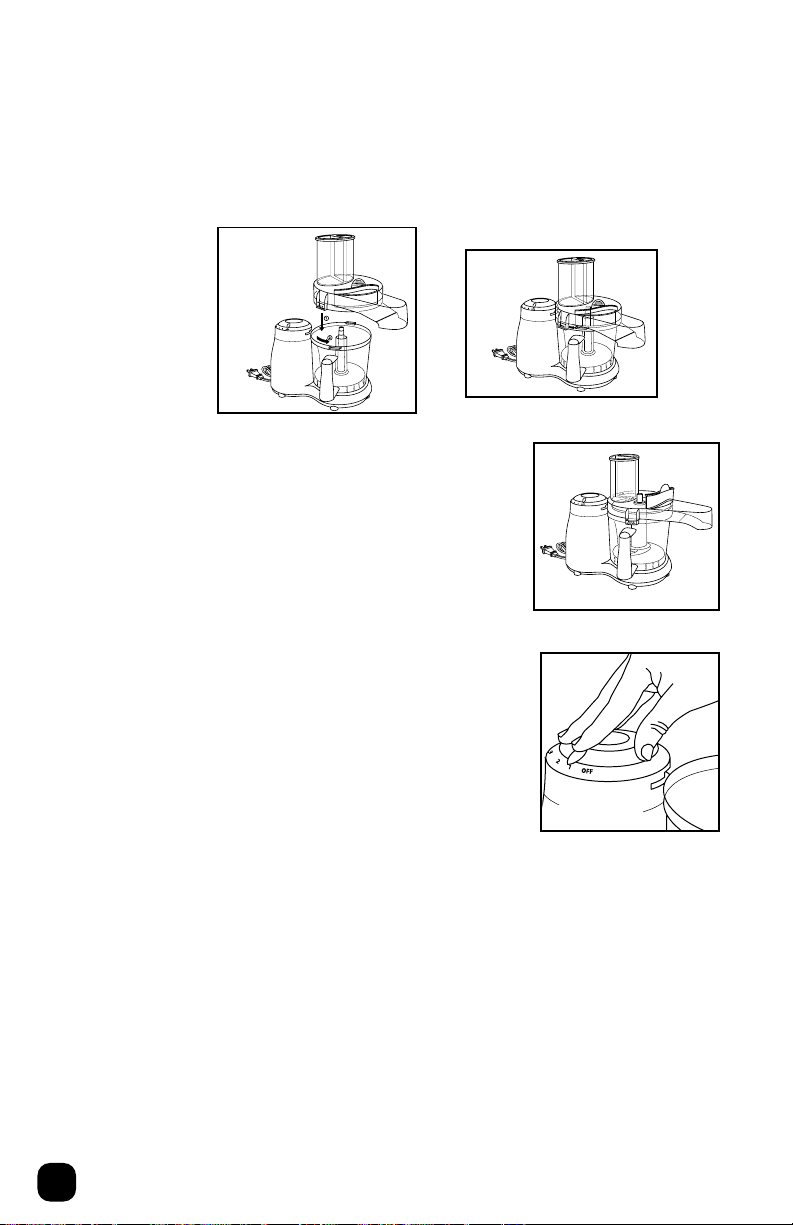
4. Place Lid with Food Chute so each Interlock Mechanism is to the
left of the Tabs. Turn the Lid with Food Chute counter-clockwise
until you hear or feel the Latch lock. Do not force the Interlock
Mechanism. (See Pictures C & D)
Picture C
Picture D
5. Make sure unit is in the OFF position. Plug
your 8-Cup Food Processor into a 120 V AC
electrical outlet.
6. Set Speed Control to level 1.
NOTE: To process food into 8-Cup Food
Processor make sure that Shield is closed.
To process food using the Food Chute
make sure the Shield is Open,
(See Picture E) and place a bowl/ container
under the chute to catch processed food.
7. Using constant, even pressure on the
Food Pusher, feed food into the Chute. For
more power, slowly increase Speed Control
from 1 to a higher number or turn to OFF
and press Pulse Button. (See Picture F)
8. After processing food, move speed Control
Dial to OFF and unplug unit.
9. Remove the Lid with Food Chute by turning it clockwise.
Carefully remove Slicing/Shredding disc and Discharge disc.
Grasp handle of the 8-Cup Processor Bowl and turn clockwise to
remove. Clean according to directions under User Maintenance.
Picture E
Picture F
Page 8

How to Chop Food
1. Attach the 8-Cup Processor Bowl to the
Food Processor Body by placing on Drive
Shaft. Turn 8-Cup Processor Bowl counterclockwise until it clicks into place. (See
Picture A on previous page)
2. Carefully place Chopping Blade on Drive
Shaft with the Chopping Blades sliding
down first. (See Picture G)
3. Food should be cut into
Food Processor.
4. Place Lid with Food Chute so each Interlock Mechanism is to the
left of the Tabs. Turn the Lid with Food Chute counter-clockwise
until you hear or feel the latch lock. Do not force the Interlock
Mechanism. (See Pictures C & D)
5. Plug your 8-Cup Food Processor into a 120 V AC electrical
outlet.
6. Make sure Shield is down. This will keep food in the Food
Processor Bowl.
7. Set Speed Control to level 1.
8. For more power, slowly increase Speed Control from 1 to a
higher number or turn to OFF position and press Pulse Button.
(See Picture F)
9. After chopping food, move Speed Control Dial to OFF and
unplug unit.
10. Remove the Lid with Food Chute by turning it clockwise.
Carefully remove Chopping Blade from Drive Shaft. Grasp handle
of the 8-Cup Processor Bowl and turn clockwise to remove.
Clean according to directions under User Maintenance.
1/2”
to 1”pieces, before placing in 8-Cup
Picture G
Page 9

Usage Guide
The three functions of your 8-Cup Food Processor allow you to chop,
shred or slice a wide variety of food quickly and effortlessly.
BLADE ATTACHMENT FOODS RESULTS
Chopping Blade Bread Crumbs
Carrots Chopped
Celery Chopped/Diced
Onions Chopped/Diced
Chocolate Grated
Garlic Minced
Eggs (Hard Boiled) Chopped
Nuts Chopped, Ground
Parsley, Fresh Herbs Chopped
Hard Fruits Chopped
Sauces/Salad Dressings Blended
Slicing Disc Apples, Pears Sliced
Carrots Sliced
Celery Sliced
Onions Sliced
Potatoes Sliced
Shredding Disc Carrots Grated
Potatoes Grated
Zucchini Grated
NOTE: Certain foods should not be chopped, shredded or sliced.
Avoid slicing raw meat. Attempting to chop ice or to grind coffee
beans will damage the Chopping Blade and 8-Cup Processor Bowl.
Very hard foods that can not be cut with an ordinary knife blade
should be avoided.
Page 10

Chopping Guide
FOOD QUANTITY PREPARATION APROX. TIME
(SECONDS)
Bread 1-2 slices Two slices of bread 5-7
cut into 3/4” cubes
Parsley/Herbs Handful Wash, dry thoroughly 30
Onion 1-2 small Peel onions, 4-6
cut into 6-8 pieces
Garlic 1 or more Peel 5-7
large cloves
Mushrooms 4 small cut in half Pulse 3
1-1/2 oz.
Pepper 1 medium Clean and quarter 5-6
to fit Container
Eggs Up to 3 eggs Peel, cut into quarters 4-6
(Hard Boiled)
Chocolate 1 or 2 pc. Break each square Pulse 6-8
Square 1 oz. into 1/2” pieces
Total (Pulse until desired
texture is reached)
Carrots 1/2 cup Peel and cut into Pulse
1/4” lengths
NOTE: Timing on chart above applies to Speed 4 or Pulse.
Helpful Hints
1. Be careful not to over-process food. Most foods require only
3 to 10 seconds.
2. Process up to 8 cups of food at a time.
3. If food is not chopping into even-sized pieces, remove some of
the food from the Processor Bowl and process smaller quantities
at a time.
4. Do not attempt to process extremely hard food which is difficult
to cut with a kitchen knife.
5. Remove bones, pits and hard shells before processing to avoid
damage to the unit.
6. This unit is not designed for processing liquids or foods with a
high liquid content.
7. Lift the Chopping Blade out before emptying the contents of the
8- Cup Processor Bowl.
Page 11

User Maintenance Instructions
Care and Cleaning
This appliance requires little maintenance. It contains no userserviceable parts. Contact qualified personnel if the product requires
servicing.
CAUTION: BLADES ARE SHARP, HANDLE WITH CARE.
CAUTION: NEVER PLACE FOOD PROCESSOR BASE
IN WATER OR OTHER LIQUIDS.
1. Always unplug the unit before cleaning. Allow Chopping Blade
or Disc to stop rotating before disassembling.
2. Remove attachments from Food Processor Body.
3. Wash the 8-Cup Processor Bowl Lid with Food Chute, Food
Pusher, Slicing/Shredding Disc, Discharge Disc, Chopping Blade
and Shield in warm soapy water. Removable parts may also be
placed on the top shelf of your dishwasher.
4. Never immerse the Food Processor body in water or any other
liquid. If necessary , wipe exterior surface with a damp cloth or
sponge and dry thoroughly.
To Store and Clean
Unplug and clean unit; store in its box or in a clean, dry place. Never
store it while it is still plugged in. Never wrap cord tightly around the
appliance. Do not put any stress on the cord where it enters the
unit,as it could cause the cord to fray and break.
Page 12

Recipes
Spinach Dip Yield: 4 Cups
5 ounce spinach leaves 2 teaspoon salt
8 ounce water chestnuts, drained 1 teaspoon dried tarragon leaves
1 cup sour cream
1 cup plain yogurt
2 bunches green onions, 2 cloves garlic
cut in 2 inch pieces
Using the chopping blade, chop half each of the spinach and water
chestnuts on Speed 5. Remove from bowl and set aside. Repeat for
the other half. Add remaining ingredients to bowl and process on
Speed 5 until ingredients are chopped and mixed together. Stir all
ingredients together. Cover and refrigerate for 2 hours to enhance
flavor.
Crab Dip Yield: 4 Cups
1/2
teaspoon dry mustard
1/2
teaspoon pepper
8 ounce Crab Delights
®
2 teaspoons chili sauce
(imitation crab meat) 2 teaspoons Worcestershire
1 medium cucumber peeled sauce
11 ounce cream cheese, softened
1/3
cup mayonnaise salt and pepper
1/8
teaspoon sugar
Using the chopping blade, add all ingredients to bowl and process on
Speed 6 until ingredients are chopped and mixed together. Cover
and refrigerate for 2 hours to enhance flavor.
Chicken Salad Yield: 4 Servings
1/2
1
cups cooked chicken OR 2 hard-boiled eggs
turkey OR 6
chunk-style chicken, drained
1 stalk celery salt and pepper
4 green onions
Using the chopping blade, chop the chicken through the pickle on
Speed 6 to desired consistency. Stir in remaining ingredients .
3/4
ounce can 1 sweet pickle
1/3
cup salad dressing
Page 13

Pimento Cheese Spread Yield: 8 Servings
16 ounce Cheddar cheese 2 cups salad dressing
4 ounce pimentos, drained
Using fine shredding disk, grate cheese using Speed 8. Remove from
bowl. Using chopping blade, chop pimentos on Speed 3. Add cheese
and salad dressing and process on Speed 6 until mixed.
Macaroni Salad Yield: 12 Servings
3 cups uncooked elbow macaroni
1/2
cup green peppers
1 tablespoon oil 3 hard-boiled eggs
1/2
cup onions
1/2
cup carrots
1 cup celery
Dressing
1/3
1
cups sugar 1 cup salad dressing
1/2
cup vinegar 1
2 eggs 1-5
1/2
1
teaspoon salt
1/2
teaspoons prepared mustard
1/3
ounces can evaporated milk
Cook macaroni, drain and stir in oil. Using the chopping blade, chop
onions, celery, green peppers and eggs on Speed 5 until chopped.
Using the shredding disk, grate carrots. Add to macaroni.
To make dressing, combine sugar, vinegar, eggs and salt. Bring to a
boil over medium heat, stirring frequently. Cool and stir in rest of
dressing ingredients. Pour over macaroni, refrigerate several hours.
Page 14

Squash Casserole Yield: 6 Servings
1 onion 6 ounces stuffing mix
3 carrots (chicken or herb)
6 cups unpeeled zucchini or
yellow squash
1 can cream of chicken soup
1 cup sour cream
Temperature: 350˚F/177˚C Time: 25-30 minutes
Using the chopping blade, chop onions on Speed 6. Using the
shredding disk, shred carrots. Remove carrots and onions from bowl
and set aside. Using the slicing disc, slice squash on Speed 8.
Boil vegetables for 5 minutes. Drain and set aside. Combine soup and
sour cream. Stir into vegetable. Combine stuffing mix with melted
butter and spread half on the bottom of a 9x13-inch greased pan.
Spoon vegetable mixture on top and sprinkle with remaining stuffing
mix. Bake as directed.
1/2
cup butter, melted
Page 15

Chicken Pot Pie Yield: 6 Servings
Filling
1 onion 1 stalk celery
4 cups pre-cooked chicken salt and pepper
or beef 6 cups chicken broth
6 potatoes, peeled 2 Tablespoons all purpose flour
6 carrots
Crust
2 cups all-purpose flour
4 teaspoons baking powder
Temperature: 425˚F/218˚C Time: 45 minutes
Using chopping blade, chop onion on Speed 2 and remove from
bowl. Insert slicing disk and slice potatoes, carrots and celery on
Speed 7. Add all ingredients to broth and boil for 20 minutes. To
thicken, carefully remove
1/2
cup broth. Dissolve 2 tablespoons of flour
into broth. Carefully pour thickening back into pan of vegetables and
stir until thickened. Pour into a 9x13-inch greased pan.
Using chopping blade, combine crust ingredients flour through
butter. Add the milk through the feed tube and stop as soon as it is
absorbed. Form the dough into a ball and roll onto a lightly floured
surface. Cut into 2-inch biscuits and place on top of filling. Bake as
directed.
1/2
teaspoon salt
1/4
cup butter, softened
2/3
cup milk
Meatballs Yield: 4 Servings
1 pound lean stew meat
1 slice bread 1 clove garlic
1 small onion salt and pepper
1 egg 1/2 cup all purpose flour
Temperature: Medium Time: 20-30 minutes
Using the chopping blade, add all ingredients, except flour, in the
order listed, to bowl and chop on Speed 8 until meat is ground and
ingredients are mixed together.
Shape into 2-inch meatballs and coat with flour. Add oil to skillet and
cook meatballs as directed.
1/2
teaspoon dried thyme
Page 16

Fresh Salsa Yield: 5 Cups
4 cups Roma tomatoes, quartered and seeds removed
2 small jalapeno peppers, seeds removed
1 large onion, cut into 1-inch cubes
1 teaspoon cider vinegar
1 teaspoon salt
1/2
teaspoon black pepper
Using the chopping blade and feeding tube add the onions, tomatoes
then jalapeno peppers on Speed 6. Add the salt, pepper, vinegar and
cilantro until chopped. Remove from bowl. Cover and refrigerate for
2 hours to enhance flavor.
Bruschetta Yield: 4 Cups
3 cups Roma tomatoes, quartered and seeds removed
1/2
medium onion, cut into 1-inch cubes
3 large cloves garlic, cut into thirds
16 fresh basil leaves
2 tablespoons olive oil
1 teaspoon red wine vinegar
1/2
teaspoon salt
1/4
teaspoon black pepper
Using the chopping blade, add the onions, garlic, olive oil, red wine
vinegar, salt and pepper to the food processor bowl. Coarsely chop.
Using the feeding tube, add tomatoes one at a time through the
feeder tube. Add basil and coarsely chop. Remove from bowl and
serve on warm grilled bread.
Grilled Bread for Bruschetta
1 loaf French Baguette or crusty Italian Bread, cut diagonally
1/2
in
-inch slices
2 teaspoons garlic salt
3/4
cup olive oil
Mix together olive oil and garlic salt. Brush both sides of the sliced
bread with the oil mixture. Lightly brown both sides of the bread.
Top warm bread with Bruschetta and serve.
Page 17

“Fried” Chicken Salad Yield: 5 Servings
1 12- ounce box breaded chicken breast tenders
1 package of iceberg lettuce salad mix
1 medium cucumber with peeling
1 medium green pepper, quartered lengthwise
10 radishes
1 bunch green onions with tops
2 Roma tomatoes, halved
Salad Dressing
Cook chicken breast tenders according to package instructions while
preparing salad.
Empty salad mix into a large bowl. Place under Continuos Flow Side
Chute and open shield.
Using slicing disc, place cucumber into large side of food chute and
slice into salad bowl on Speed 8. Place two quarters of green pepper
into large side of feeder tube at a time and slice into salad bowl. Place
5 radishes into large side of feeder and slice into a salad bowl. Place
bunch of green onions into small side of feeder tube and slice into
salad bowl. Place two Roma tomatoes into the large side of the feeder
tube and slice into salad bowl.
Top with warm chicken tenders and serve with your choice of salad
dressing.
Page 18

LIMITED ONE YEAR WARRANTY
Warranty: This Toastmaster®product is warranted to be free from defects in materials or workmanship for a period of
(1) year from the original purchase date. This product warranty covers only the original consumer purchaser of the
product.
Warranty Coverage: This warranty is void if the product has been damaged by accident in shipment, unreasonable
use, misuse, neglect, improper service, commercial use, repairs by unauthorized personnel, normal wear and tear,
improper assembly, installation or maintenance abuse or other causes not arising out of defects in materials or
workmanship. This warranty is effective only if the product is purchased and operated in the USA, and does not extend
to any units which have been used in violation of written instructions furnished with the product or to units which have
been altered or modified or to damage to products or parts thereof which have had the serial number removed,
altered, defaced or rendered illegible.
Implied Warranties: ANY IMPLIED WARRANTIES WHICH THE PURCHASER MAY HAVE ARE LIMITED IN DURATION
TO ONE (1) YEAR FROM THE DATE OF PURCHASE. Some states do not allow limitations on how long an implied
warranty lasts, so the above limitation may not apply to you.
Warranty Performance: During the above one-year warranty period, a product with a defect will be either repaired or
replaced with a reconditioned comparable model (at our option) when the product is returned to the Repair Center, or
the purchase price refunded. The repaired or replacement product will be in warranty for the balance of the one-year
warranty period and an additional one-month period. No charge will be made for such repair or replacement.
Service and Repair: Should the appliance malfunction, you should first call toll-free 1 (800) 947-3744 between the hours
of 9:00 am and 5:00 pm Central Standard Time and ask for CONSUMER SERVICE stating that you are a consumer with
a problem. Please refer to model number TFP8W when you call.
In-Warranty Service (USA): For an appliance covered under the warranty period, no charge is made for service or
postage. Call for return authorization (1 800 947-3744).
Out-of Warranty Service: A flat rate charge by model is made for out-of-warranty service. Include $8.00 (U.S.) for
return shipping and handling. We will notify you by mail of the amount of the charge for service and require you to pay
in advance for the repair or replacement.
For Products Purchased in the USA, but Used in Canada: You may return the product insured, packaged with
sufficient protection, and postage and insurance prepaid to the USA address listed below. Please note that all customs
duty / brokerage fees, if any, must be paid by you and we will require you to pay the cost of customs duty /
brokerage fees to us in advance of our performing any service.
Risk During Shipment: We cannot assume responsibility for loss or damage during incoming shipment. For your
protection, carefully package the product for shipment and insure it with the carrier. Be sure to enclose the following
items with your appliance: any accessories related to your problem, your full return address and daytime phone
number, a note describing the problem you experienced, a copy of your sales receipt or other proof of purchase to
determine warranty status. C.O.D. shipments cannot be accepted.
To return the appliance, ship to:
Salton Inc.
Attn: Repair Center
708 South Missouri Street
Macon, MO 63552
Email: consumer_relations@toastmaster.com
www.Toastmaster.com
Limitation of Remedies: No representative or person is authorized to assume for us any other liability in connection
with the sale of our products. There shall be no claims for defects or failure of performance or product failure under
any theory of tort, contract or commercial law including, but not limited to negligence, gross negligence, strict liability,
breach of warranty and breach of contract. Repair, replacement or refund shall be the sole remedy of the purchaser
under this warranty, and in no event shall we be liable for any incidental or consequential damages, losses or
expenses. Some states do not allow the exclusion or limitation of incidental or consequential damages, so the above
limitation or exclusion may not apply to you.
Legal Rights: This warranty gives you specific legal rights, and you may also have other rights which vary from state
to state.
To contact us, please write to or call:
Salton Inc.
P.O. Box 6916
Columbia, MO 65205-6916
© 2003 Toastmaster Inc. P/N 61376
All Rights Reserved Printed in China
Page 19

Keep Dated Sales Receipt for Warranty Service.
Keep this booklet. Record the following for reference:
Date purchased _______________________________________________
Model number _______________________________________________
Date code (stamped on bottom)________________________________
EVERYBODY EATS. It’s a fact of life.
But sometimes preparing
meals can become a chore.
That’s why TOASTMASTER has been invited
into millions of kitchens just like yours
so we can HELP YOU MASTER your
mixing, baking, grilling, toasting,
brewing, heating and serving
tasks WITH EASE AND STYLE.
The TOASTMASTER name stands for a
CELEBRATION of INNOVATION designed
to serve your life and keep you
COOKIN’ IN STYLE.
Page 20

Contact Information
Coordonnées :
Contacte a:
National Service Center
708 South Missouri Street
Macon, Mo 63552
In USA and Canada call:
Consumer Service: 1-800-947-3744
Consumer Parts: 1-800-947-3745
consumer_relations@toastmaster.com
M. - 5:30 P.M. CST
Hours: 8:00
Aux USA et au Canada, appeler les numéros suivants :
Service Consommateurs : 1-800-947-3744
Pièces Consommateurs : 1-800-947-3745
consumer_relations@toastmaster.com
Horaires : De 8h00 à 17h30, heure GMT - 6
En México:
Toastmaster de México, S.A. de C.V.
Cerrada de Recursos
Hidráulicos Número 6
La Loma Industrial
Tlalnepantla de Baz, C.P. 54060
Estado de México
52-5-397-2848
Horario: 8:00 a.m. hasta 5:30 p.m., hora del Centro
A.
©2003 Toastmaster Inc.
A Subsidiary of Salton, Inc.
Subsidiaire de Salton, Inc.
A una Subsidiaria de Salton, Inc.
Page 21

Page 22

?
T F P 8 W
Questions
Call toll free 1-8 0 0 - 9 47-3744
Monday–Friday, 8:00 a.m.-5:30 p.m. CST
www.toastmaster.com
 Loading...