

Page 1
Electric Skillet
USE AND CARE GUIDE
MODEL TES1CAN
Page 2

READ AND SAVE
THESE INSTRUCTIONS
WARNING: A risk of fire and electrical shock exists in all electrical
appliances and may cause personal injury or death. Please follow all
safety instructions.
IMPORTANT SAFEGUARDS
When using electrical appliances, basic safety precautions should
always be followed, including the following:
◆ Read all instructions before using appliance.
◆ Do not touch hot surfaces. Use handles or knobs.
◆ To protect against electrical shock, do not immerse cord, plugs, or
heat control in water or other liquid. See instructions for cleaning.
◆ Close supervision is necessary when any appliance is used near
children.
◆ This appliance is not for use by children.
◆ Unplug from outlet when not in use and before cleaning. Allow to
cool before putting on or taking off parts, and before cleaning the
appliance.
◆ Do not operate any damaged appliance. Do not operate with a
damaged cord or plug, or after the appliance malfunctions, or has
been dropped or damaged in any manner. Contact consumer service
for return authorization, examination, repair or adjustment.
◆ The use of accessory attachments not recommended by
Toastmaster may cause injuries.
◆ Do not use outdoors or while standing in a damp area.
◆ Do not let cord hang over edge of table or counter, or touch hot
surfaces.
◆ Do not place on or near a hot gas or electric burner, or in a heated
oven.
◆ Extreme caution must be used when moving an appliance
containing hot oil or other hot liquids.
◆ Always attach heat control to appliance first, then plug cord in the
wall outlet. To disconnect, turn the heat control to “OFF,” then
remove plug from wall outlet.
◆ CAUTION: Hot surfaces.
◆ When using this appliance, provide 4 to 6 inches air space above
and on all sides for air circulation. Do not use on surfaces where
heat may cause a problem.
◆ Do not use appliance for other than intended household use.
1.
Page 3
SAVE THESE INSTRUCTIONS
CAUTION: A short power supply cord is provided to reduce the risk
of personal injury resulting from becoming entangled in or tripping
over a longer cord. Extension cords are available from local hardware
stores and may be used if care is exercised in their use. If an
extension cord is required, special care and caution is necessary. Also
the cord must be: (1) marked with an electrical rating of 125 V, and
at least 13 A., 1625 W., and (2) the cord must be arranged so that it
will not drape over the countertop or tabletop where it can be pulled
on by children or tripped over accidentally.
GROUNDED-TYPE PLUG: This appliance has a 3-prong grounded
type plug. This plug will only fit into an electrical outlet made for
a 3-prong plug. This is a safety feature. If the plug should fail to fit
the outlet, contact a qualified electrician. Do not attempt to defeat
this safety feature.
ELECTRIC POWER: If electric circuit is overloaded with other
appliances, your appliance may not operate properly. It should be
operated on a separate electric circuit from other appliances.
This product is for household use only.
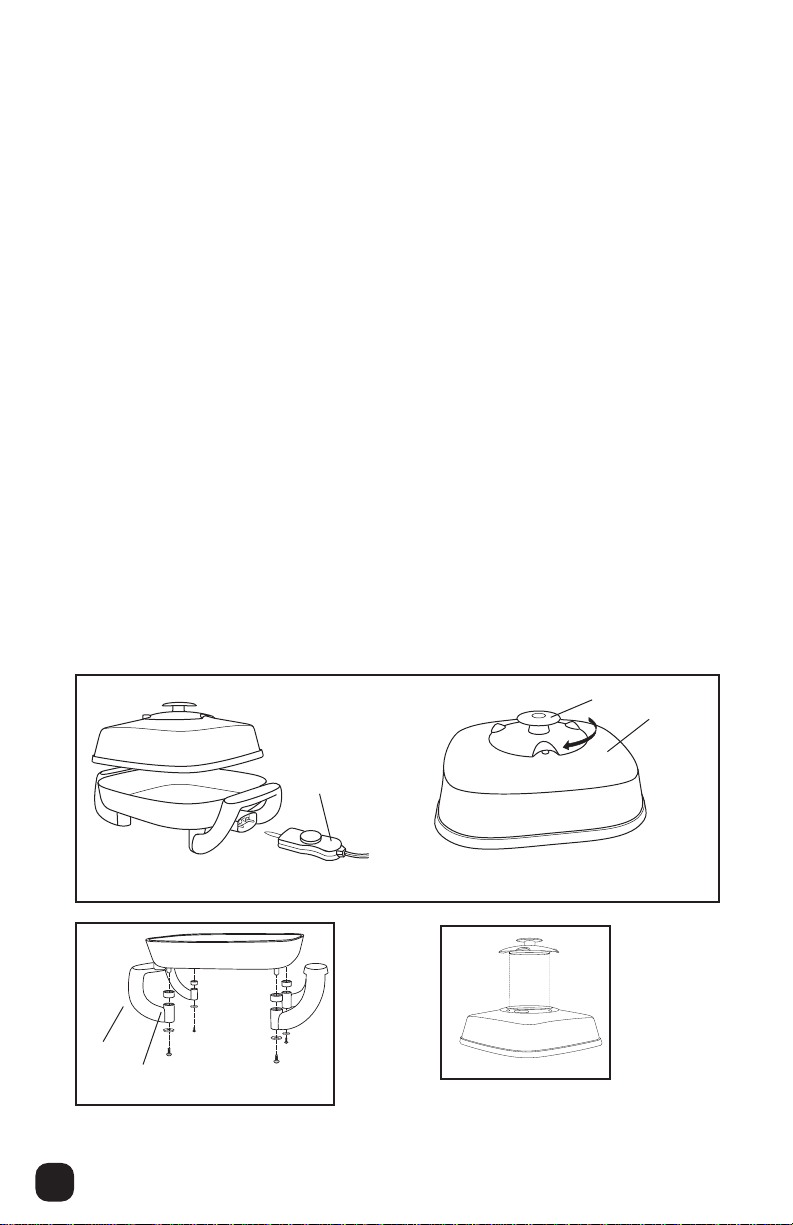
ASSEMBLY INSTRUCTIONS
Note: Product may vary slightly from illustrations.
1.
2.
5.
Figure 1
3.
4.
A
2.
Figure 2 - Adjustable Steam Vents
B
Page 4

Figure (cont.)
Attach each of the two foot-handle assemblies to
the bottom of the skillet with the screws provided.
Tighten with a #2 phillips screwdriver.
1. Handle (P/N 21725 TM)
2. Lid (P/N 21726 TM)
3. Leg (P/N 21727 TM)
4. Hardware Package (P/N 21728 TM)
Screw (4)
Snap the lid handle onto the lid by pressing firmly
on the lid handle while holding the underside of
the lid. It should snap into place and allow
movement for adjusting the steam vents.
Washer (4)
Spacer (4)
5. Probe Assembly (P/N 21824 TM)
How to Use
1. Remove the heat control from the skillet and set aside.
2. Before using for the first time, wash skillet and cover in hot, sudsy water. Rinse and dry
completely.
3. Turn heat control to the “OFF” position. Plug heat control securely into electric skillet. Plug
cord into any standard 120 volt AC wall outlet. ALWAYS PLUG CORD INTO SKILLET FIRST,
THEN INTO WALL OUTLET.
4. Preheat skillet before cooking unless otherwise stated in recipe. To preheat, turn the heat
control to desired temperature. The indicator light on the heat control will glow. The light will
go out once the selected temperature has been reached.
5. Add food and cook according to recipe or cooking charts. Adjust heat control as necessary.
NOTE: During cooking, the light will go on and off indicating that the electric skillet is maintaining
proper temperature.
The cover on the electric skillet is designed to allow excess steam to escape through the
6.
vents in the cover during cooking, see Figure 2.
7. Liquids such as broth, water, etc. may be added to the skillet during cooking.
8. When cooking has been completed, turn heat control to the “OFF” position. The indicator
light on the heat control will be out. Unplug cord from wall outlet. Let the skillet cool
completely. Remove heat control from skillet. Follow Care and Cleaning instructions.
Cooking Methods
FRY/SAUTÉ
Cooking food rapidly in an open skillet using a small quantity of fat.
Add oil, shortening, butter or margarine to skillet and preheat to desired temperature (350°F).
Amount of fat used will vary accordingly to recipe and type or amount of food to be prepared.
PAN-BROIL
Cooking food over high heat in an open skillet using little or no fat.
Add little or no oil, shortening, butter or margarine to skillet and preheat to desired temperature
(400°F). Place food in hot skillet. Brown, turning often. Remove excess fat as it accumulates.
BRAISE
Searing food in hot fat until brown, then simmering in a covered skillet with liquid added.
Add a small quantity of fat to skillet and preheat to 350°F. Brown food well on all sides. Add
specified amount of liquid, cover and turn heat control down to 200°F just until indicator light goes
out (simmer point). Cook as specified in recipe or until food is tender. Check during cooking and
add more liquid as necessary.
DO NOT LET SKILLET BOIL DRY.
SIMMER
Gently cooking food in a liquid just below boiling temperature.
Add oil, shortening, butter or margarine to skillet and preheat to desired temperature. If required,
brown food on all sides. Add liquid or make sauce as directed in recipe. With heat control set at
250°F or slightly higher, bring liquid to a boil. Turn heat control down just until indicator light goes
out. This is the simmer point.
Cover. Simmer food for the directed length of time or until food is done. Check periodically during
cooking and add more liquid as necessary.
DO NOT LET SKILLET BOIL DRY.
3.
Page 5

Cooking Methods (cont.)
STEAM
Cooking food by exposing it to steam in a covered skillet.
Place a small amount of water in the bottom of skillet. Add vegetables or other foods and cover. Turn heat
control to 250°F and steam food until done. Check often, adding more water as necessary.
DO NOT LET SKILLET BOIL DRY.
WARM
Gradually bringing cooked and cooled food back up to serving temperature.
Preheat skillet with heat control set on warm. Place food to be warmed in skillet. Cover. Heat until
food is warm, turning or stirring occasionally.
Please note: The USDA recommends that meats such as beef and lamb, etc. should be cooked to an
internal temperature of 145°-170°F, pork should be cooked to an internal temperature of
160°-170°F, and poultry products should be cooked to an internal temperature of 170°-180°F to be
sure any harmful bacteria has been killed. When reheating meat/poultry products, they should be
cooked to an internal temperature of at least 165°F.
Cooking Charts
Frying Chart
Food/Preheat Cooking Method Time
Temperature
BEEF
Hamburgers With or without extra fat Medium well: 3-4 min. each side
1/2-inch thick / 350°F Well: 4-5 min. each side
Sandwich Steaks Use 2 tablespoons fat Rare: 1 min. each side
1/4-inch thick / 350°F Medium: 1-1/2 min. each side
CHICKEN
Chicken Breasts Use 3-4 tablespoons fat, 10-20 min. total
(boneless) / 350°F turning often
Pieces Use 3-4 tablespoons fat, 25-30 min. total
350°F turning often
LAMB
Lamb Chops With or without extra fat Medium: 19-21 min. total
1/2-inch thick / 350°F Well: 24-26 min. total
PORK
Pork Chops With or without extra fat 15-20 min. total
1/2-inch thick / 350°F 30-40 min. total
Bacon
Slices / 350°F Start in cold pan 5-7 min. total
Sausage Patties Turn sausage on all to brown. 6-7 min. total
1/2-inch thick Sausage should be well done
300°F with no trace of pink.
VEAL
Cutlets, Chops Use 2-3 tablespoons fat 3-5 min. each side (cutlets)
1/8 to 1/2-inch thick 5-10 min. each side (chops)
350°F
FISH
Fish Fillet 1/2-inch thick / 350°F Use 3-4 tablespoons fat 3-5 min. each side
Well: 2 min. each side
4.
Page 6

Braising Chart
Food/Preheat Cooking Method Time
Temperature
BEEF
Chuck Steak, If desired, pound 1/4 to 1/2 cup flour into meat. 55 min.
London Broil, etc. Use 1/4 cup fat heated to 350°F to brown meat 5 to to 1 hr. 20 min.
2-inches thick 10 minutes on each side. Add 2 to 3 cups of liquid. total
350°F brown Turn heat control down to 200°F. Cover and cook
200°F finish for 45 minutes to 1 hour, or until tender. Add more
CHICKEN
Chicken Pieces If desired, coat chicken with seasoned flour. 45 min. total
350°F brown Using 1/4 cup fat for every 2 to 3 pounds of chicken,
200°F finish brown on all sides for 15 minutes at 350°F. Add
LAMB
Lamb Chops Use 2 tablespoons of fat heated to 350°F to brown meat 30 to 40 min.
1/2-inch to 5 minutes on each side. Add 2 to 3 cups of liquid. Turn total
1-inch thick heat control down to 200°F. Cover and cook for 20 to
350°F brown 30 minutes or until tender. Add more liquid as it
200°F finish becomes necessary.
PORK
Pork Chops Use 2 tablespoons of fat heated to 350°F to brown 40 min. to
1/2-inch to meat 5 to 10 minutes on each side. Add 2 to 3 1 hr. total
1-inch thick cups of liquid. Turn heat control down to 200°F. Cover
350°F brown and cook for 30 to 40 minutes or until tender and
200°F finish completely cooked. Add more liquid as it becomes
VEAL
Veal Chops Use 1/4 cup of fat heated to 350°F to brown meat 30 to 40 min.
1/2-inch to 5 minutes on each side. Add 2 to 3 cups of liquid. total
1-inch thick Turn heat control down to 200°F. Cover and cook
350°F brown for 20 to 30 minutes or until tender. Add more liquid
200°F finish as it becomes necessary.
liquid as it becomes necessary.
2 to 3 cups of liquid. Turn heat control down to
200°F. Cover and cook for 30 minutes or until done.
Add more liquid as it becomes necessary.
necessary.
User Maintenance Instructions
This appliance requires little maintenance. It contains no user serviceable parts. Do not try to repair
it yourself. Contact a qualified appliance repair technician if the product requires servicing.
Care and Cleaning
1. When cooking is completed, unplug cord from wall outlet. Allow electric skillet to cool
completely.
2. Remove heat control from skillet. If necessary, wipe heat control with a damp, soft cloth. Dry
heat control completely. Set aside.
3. Immerse electric skillet and cover in hot, sudsy water. Clean thoroughly using a sponge or soft
cloth. Rinse in hot water. Dry completely.
4. For stubborn food particles, loosen with a plastic cleaning pad. Avoid hard scouring of the
non-stick finish as this may cause surface scratches.
Keep Dated Sales Receipt for Warranty Service.
Keep this booklet. Record the following for reference:
Date purchased ______________________________________________________________
Model number ______________________________________________________________
Date code (stamped on bottom)________________________________________________
5.
Page 7

LIMITED ONE YEAR WARRANTY
Warranty: This Toastmaster®product is warranted to be free from defects in materials or workmanship for a period of
(1) year from the original purchase date. This product warranty covers only the original consumer purchaser of the
product.
Warranty Coverage: This warranty is void if the product has been damaged by accident in shipment, unreasonable
use, misuse, neglect, improper service, commercial use, repairs by unauthorized personnel, normal wear and tear,
improper assembly, installation or maintenance abuse or other causes not arising out of defects in materials or
workmanship. This warranty is effective only if the product is purchased and operated in the USA, and does not extend
to any units which have been used in violation of written instructions furnished with the product or to units which have
been altered or modified or to damage to products or parts thereof which have had the serial number removed,
altered, defaced or rendered illegible.
Implied Warranties: ANY IMPLIED WARRANTIES WHICH THE PURCHASER MAY HAVE ARE LIMITED IN DURATION
TO ONE (1) YEAR FROM THE DATE OF PURCHASE. Some states do not allow limitations on how long an implied
warranty lasts, so the above limitation may not apply to you.
Warranty Performance: During the above one-year warranty period, a product with a defect will be either repaired or
replaced with a reconditioned comparable model (at our option) when the product is returned to the Repair Center, or
the purchase price refunded. The repaired or replacement product will be in warranty for the balance of the one-year
warranty period and an additional one-month period. No charge will be made for such repair or replacement.
Service and Repair: Should the appliance malfunction, you should first call toll-free 1 (800) 947-3744 between the hours
of 9:00 am and 5:00 pm Central Standard Time and ask for CONSUMER SERVICE stating that you are a consumer with
a problem. Please refer to model number TES1CAN when you call.
In-Warranty Service (USA): For an appliance covered under the warranty period, no charge is made for service or
postage. Call for return authorization (1 800 947-3744).
Out-of Warranty Service: A flat rate charge by model is made for out-of-warranty service. Include $12.00 (U.S.) for
return shipping and handling. We will notify you by mail of the amount of the charge for service and require you to pay
in advance for the repair or replacement.
For Products Purchased in the USA, but Used in Canada: You may return the product insured, packaged with
sufficient protection, and postage and insurance prepaid to the USA address listed below. Please note that all customs
duty / brokerage fees, if any, must be paid by you and we will require you to pay the cost of customs duty /
brokerage fees to us in advance of our performing any service.
Risk During Shipment: We cannot assume responsibility for loss or damage during incoming shipment. For your
protection, carefully package the product for shipment and insure it with the carrier. Be sure to enclose the following
items with your appliance: any accessories related to your problem, your full return address and daytime phone
number, a note describing the problem you experienced, a copy of your sales receipt or other proof of purchase to
determine warranty status. C.O.D. shipments cannot be accepted.
To return the appliance, ship to:
Salton Inc.
Attn: Repair Center
708 South Missouri Street
Macon, MO 63552
Email: consumer_relations@toastmaster.com
www.Toastmaster.com
Limitation of Remedies: No representative or person is authorized to assume for us any other liability in connection
with the sale of our products. There shall be no claims for defects or failure of performance or product failure under
any theory of tort, contract or commercial law including, but not limited to negligence, gross negligence, strict liability,
breach of warranty and breach of contract. Repair, replacement or refund shall be the sole remedy of the purchaser
under this warranty, and in no event shall we be liable for any incidental or consequential damages, losses or
expenses. Some states do not allow the exclusion or limitation of incidental or consequential damages, so the above
limitation or exclusion may not apply to you.
Legal Rights: This warranty gives you specific legal rights, and you may also have other rights which vary from state
to state.
To contact us, please write to or call:
Salton Inc.
P. O. Box 6916
Columbia, MO 65205-6916
© 2002 Toastmaster Inc. P/N 61103
All Rights Reserved Printed in China
6.
Page 8

?
• Full size skillet with lid
• Adjustable lid vent
• Non-stick coated
• Infinitely adjustable thermostat
• Completely immersible with probe removed
Questions
Call toll free 1-800-947-3744
Monday– Friday, 8:00 a.m.- 5:30 p.m. CST
www.toastmaster.com
TES1CAN
 Loading...