

Page 1
USE AND CARE GUIDE
MODELS TCOV6R AND TCOV6RCAN
Convection
Oven-Broiler
Page 2

1.
IMPORTANT SAFEGUARDS
When using electrical appliances, basic safety precautions should always
be followed including the following:
◆ Read all instructions.
◆ Do not touch hot surfaces. Use handles or knobs.
◆ To protect against electrical shock, do not immerse cord, plugs, or
appliance in water or other liquid.
◆ Close supervision is necessary when any appliance is used by or near
children.
◆ Unplug from outlet when not in use and before cleaning. Allow to
cool before putting on or taking off parts.
◆ Do not operate any appliance with a damaged cord or plug or after
the appliance malfunctions or has been damaged in any manner.
Contact Consumer Service for examination, repair or adjustment.
◆ The use of accessory attachments not recommended by the
appliance manufacturer may cause injuries.
◆ Do not use outdoors.
◆ Do not let cord hang over edge of table or counter, or touch hot
surfaces.
◆ Do not place on or near a hot gas or electric burner, or in a heated
oven.
◆ Extreme caution must be used when moving an appliance
containing hot oil or other liquids.
◆ To disconnect, turn Timer to "off", then remove plug from wall outlet.
◆ Oversize foods or metal utensils must not be inserted in a
oven/broiler as they may create a fire or risk of electrical shock.
◆ A fire may occur if the oven/broiler is covered or touching
flammable material, including curtains, draperies, walls, and the
like, when in operation. Do not store any item on top of the
appliance when in operation.
◆ Do not clean with metal scouring pads. Pieces can break off the pad
and touch electrical parts involving a risk of electrical shock.
◆ Extreme caution should be exercised when using containers
constructed of other than metal or glass.
◆ Do not store any materials, other than manufacturers recommended
accessories, in this oven when not in use.
Page 3

2.
Convection Oven-Baker Use and Care Guide
IMPORTANT SAFEGUARDS
(cont.)
◆ Do not place any of the following materials in the oven: paper,
cardboard, plastic, and the like.
◆ Do not cover crumb tray or any part of the oven with metal foil.
This will cause overheating of the oven.
◆ Use extreme caution when removing tray or disposing of hot grease.
SAVE THESE INSTRUCTIONS
For Household Use Only
ADDITIONAL IMPORTANT
SAFEGUARDS
CAUTION HOT SURFACES: This appliance generates heat and
escaping steam during use. Proper precautions must be taken to prevent
the risk of burns, fires, or other injury to persons or damage to property.
◆ A person who has not read and understood all operating and safety
instructions is not qualified to operate this appliance. All users of
this appliance must read and understand this Owner’s Manual
before operating or cleaning this appliance.
◆ If this appliance falls or accidentally becomes immersed in water,
unplug it from the wall immediately. Do not reach into the water!
◆ When using this appliance, provide adequate air space above and on
all sides for air circulation. Do not operate this appliance while it is
touching or near curtains, wall coverings, clothing, dishtowels or
other flammable materials.
◆ To reduce the risk of fire, do not leave this appliance unattended
during use.
◆ If this appliance begins to malfunction during use, immediately
unplug the cord. Do not use or attempt to repair a malfunctioning
appliance!
◆ The cord to this appliance should only be plugged into a 120V AC
electrical wall outlet.
◆ Do not use this appliance in an unstable position.
Page 4

3.
ADDITIONAL IMPORTANT
SAFEGUARDS
(cont.)
◆ To reduce the risk of burns or other injuries, do not touch hot
surfaces. Use of protective oven mitts or gloves as well as longhandled utensils is recommended. Use the Rotisserie Remover
when removing Rotisserie Bar Assembly from inside the Rotisserie.
◆ To reduce the risk of injury to persons or property, unplug this
appliance before inserting food. Always keep the appliance
unplugged from the wall outlet when not in use.
◆ Do not attempt to dislodge food or clean the Rotisserie while it is
plugged in or while it is still hot.
◆ Do not attempt to use this appliance without the door in place.
Polarized Plug
This appliance has a polarized plug (one blade is wider than the
other). To reduce the risk of electrical shock, this plug is intended to
fit into a polarized outlet only one way. If the plug does not fit fully in
the outlet, reverse the plug. If it still does not fit, contact a qualified
electrician. Do not attempt to modify the plug in any way.
Short Cord Instructions
A short power-supply cord is provided to reduce the risk resulting
from becoming entangled in or tripping over a longer cord.
Do not use an extension cord with this product.
Electric Power
If the electrical circuit is overloaded with other appliances, your
appliance may not operate properly. It should be operated on a
separate electrical circuit from other appliances.
Plasticizers Warning
CAUTION: To prevent Plasticizers from migrating from the finish of
the countertop or tabletop or other furniture, place NON-PLASTIC
coasters or placemats between the appliance and the finish of the
countertop or tabletop.
Failure to do so may cause the finish to darken, permanent blemishes
may occur or stains can appear.
Page 5
4.
Getting To Know Your Convection
Oven-Broiler
A convection oven circulates heated air continuously throughout the
oven cavity to maintain uniform temperature around the food. This
constant, gentle air flow is what seals in juices, promotes browning
and may shorten cooking time without turning and basting. Your
Toastmaster®convection oven can DEFROST, BAKE, ROAST, BROIL,
ROTISSERIE, DEHYDRATE and SLOW COOK.
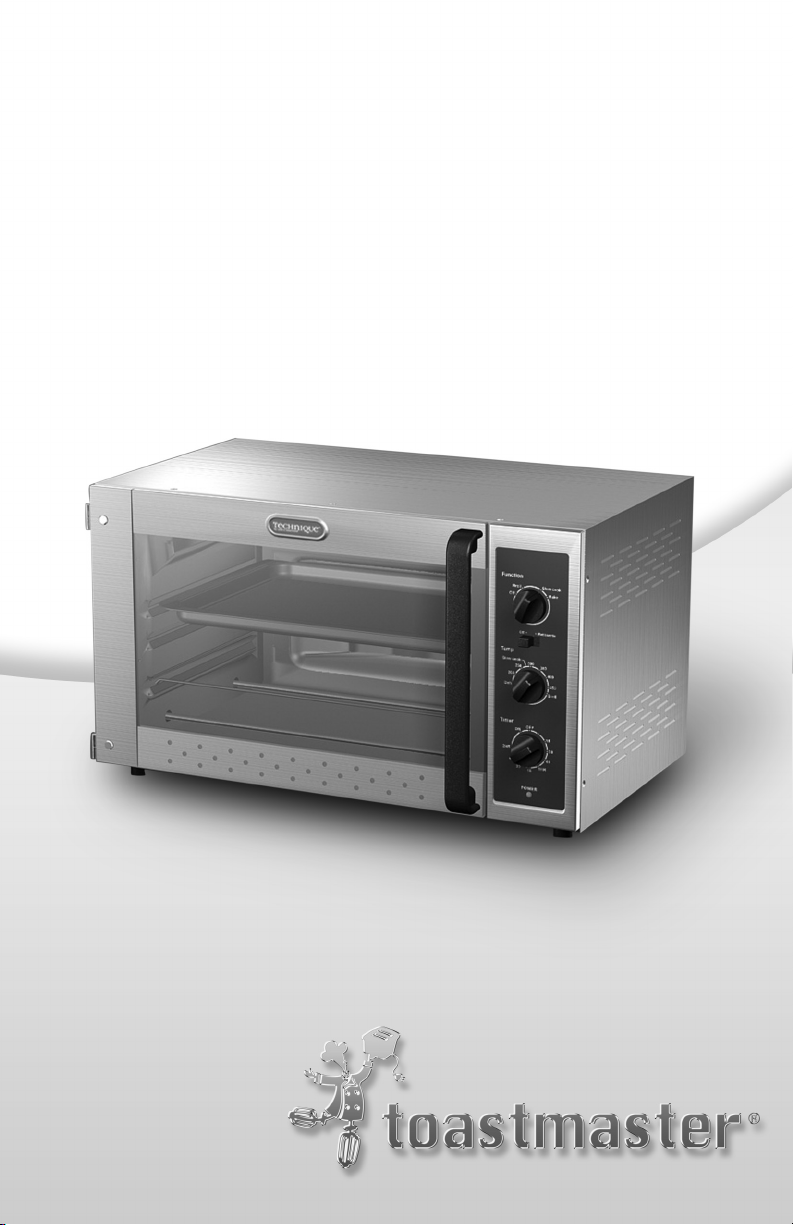
FIGURE 1
FIGURE 2
Shelf 1 & 2
Shelf 3 & 4
Shelf 5 & 6
Convection Oven-Baker Use and Care Guide
Page 6
FIGURE 3
1. Wire Rack
(P/N 22643)
2. Broil Insert
(P/N C-21184)
3. Bake/Broil Pan
(P/N C-21185)
Bake/Broil
Assembly
FIGURE 4
1. Wire Rack
(Shelf positions 1, 3, 5)
2. Wire Rack Inverted
(Shelf positions 2, 4, 6)
5.
4. Pizza Pan
(P/N 22642)
3. Pizza Rack
(Shelf positions 3, 4, 5 or 6)
5. Pizza Rack
(P/N 22647)
Page 7

6.
Convection Oven-Baker Use and Care Guide
Selector Dial
The oven has four different settings: DEFROST, BROIL, SLOW
COOK AND BAKE. Turn dial to indicator line above dial to select
setting. The convection fan is ON in all modes.
Temperature Control Dial
Your oven has an adjustable temperature control dial with
temperatures 200°-450° Fahrenheit. This allows you to prepare
recipes according to package or recipe directions.
Timer
The timer control dial also acts as the oven’s ON and OFF switch.
Turn the timer clockwise to select appropriate cooking time. The dial
is marked with 1 or 2 hour (HR) in 15 minute segments. If cooking
less than 1 hour, turn the timer past 1 hour, then back to desired
cooking time. When cooking time is complete, a signal will sound and
the unit will turn OFF automatically.
On
If you are cooking for less than 15 minutes or do not wish to use the timer
feature, turn the dial to ON to turn oven on. Return to OFF position
when cooking is complete. The indicator light will go OFF.
Power Light
The Power Light will remain ON anytime the oven timer is turned ON.
Heating Elements
On the SLOW COOK setting, constant low wattage heat is provided
by the top and bottom elements. On the BAKE setting, the top and
bottom elements will turn OFF and ON as the thermostat cycles to
control the cooking temperature. On the BROIL and ROTISSERIE
settings, only the upper elements cycle ON and OFF. The indicator
light will cycle ON and OFF with the thermostat.
NOTE: Some elements will appear black during certain heating
functions. This is normal.
Page 8

Interior Oven Light
The light will be ON anytime the unit is in operation. To replace
oven light see page 20.
Rack Positions
The Wire Rack can be inserted into positions 1, 2, 3, 4, 5 or 6
(See Figure 4 for shelf positions). Baking on both the Wire Rack and
Bake/Broil Pan at the same time is not recommended except when
using the SLOW COOK setting.
Pizza Rack and Pizza Pan Positions
The Pizza Rack can be inserted into positions 3, 4, 5 or 6 (See figure 4
for shelf positions). Baking on both the Pizza Rack and Bake/Broil Pan
at the same time is not recommended.
Defrost
1. Insert the Wire Rack into the Lower Shelf Rail.
2. Plug into 120 V 60 Hz outlet.
3. Remove all protective wrappings from food before placing in
Oven-Broiler.
4. Center a baking container or food on the Wire Rack or use the
Bake/Broil Pan and close the Glass Door.
5. Turn the Function Control to Defrost.
6. Set the Temperature Control to 200°F.
7. Turn the Timer to the desired time or to the ON position. The
Power Light will illuminate.
NOTE: To set the Timer Control for less than 1 hour, turn the timer
past 1 hour, and then turn back to the appropriate amount of time.
CAUTION: As soon as the Timer Control is engaged, the OvenBroiler will turn ON. Both the top and the bottom Heating Elements
may cycle ON and OFF to maintain temperature for the entire
cooking time.
CAUTION: As soon as the Timer Control is engaged both Heating
Elements will become hot immediately. Use care not to place
anything on top of the Oven-Broiler. Do not touch the Oven-Broiler
or any part of the Oven-Broiler without wearing oven mitts.
7.
Page 9

8.
Convection Oven-Baker Use and Care Guide
Defrost (Cont.)
8. If the timer has been set, when the Defrost time is complete, a
signal will sound, and the timer will finish in the OFF position.
NOTE: If you are ready to remove the food from the Oven-Broiler
before the timer shuts the Oven-Broiler OFF, you may shut the
Oven-Broiler OFF manually by turning the timer to the OFF
position. The Power Light will go off. If the ON position has been
selected, the Oven-Broiler must be shut off manually by turning the
Timer Control to the OFF position. The Power Light will go off.
9. Open the Glass Door. Wear protective oven mitts to remove food
from Oven-Broiler. Be careful when removing food. The inside
of the Oven-Broiler is very hot. Close the Glass Door.
10. Unplug and allow to cool completely before cleaning.
WARNING: DO NOT LEAVE OVEN-BROILER UNATTENDED.
See User Maintenance Instructions. Unplug when not in use.
Hints For Defrost
◆ Do not use this method for defrosting meat, poultry or fish.
◆ Do not cover food.
◆ Brush frozen dough with vegetable oil to prevent drying out and
remove to preheat Toaster Oven-Broiler before baking.
Bake
1. Place Bake/Broil Pan or Wire Rack into correct position.
2. Plug into 120V ~ 60Hz outlet.
3. Position selector dial to BAKE. Turn temperature control dial to
temperature setting. Set timer to ON or desired baking time. Oven
will shut OFF automatically if timer is set. Preheat if necessary.
4. Carefully center baking dish directly on Bake/Broil Pan or Wire
Rack and close door. You may place foods such as biscuits directly
onto Bake/Broil Pan.
Page 10

Bake (Cont.)
5. Convection baking will cook some foods faster. Check 5-10
minutes before the end of the suggested bake time. Continue
baking if necessary.
6. When finished, turn temperature control dial to lowest position.
Make sure the timer is in the OFF position.
7. Unplug and allow to cool completely before cleaning.
Roast
1. Remove Bake/Broil Pan and Wire Rack.
2. Place Bake/Broil Pan and Broil Insert in position 5. The
Bake/Broil Pan must be placed below the food to prevent grease
from coming in contact with heating elements and to reduce
clean-up.
3. Put seasoned meat, fat side up, in center of Wire Rack.
4. Plug into 120V ~ 60Hz outlet.
5. Position selector dial to BAKE. Turn temperature control dial to
325°-350°F (standard roasting temperature). It is not necessary to
preheat your oven. Since some meats and poultry roast faster in a
convection oven, a meat thermometer should always be used to
gauge internal temperature. The thermometer should be inserted
into thickest portion of roast away from bones or fatty areas.
Check progress two-thirds into the cooking process to ensure meat
does not over cook.
6. Set timer to MANUAL ON or desired roasting time. Oven will shut
OFF automatically if timer is set.
7. When finished, turn temperature control dial to lowest position.
Make sure the timer is in the OFF position.
8. Unplug and allow to cool completely before cleaning.
9.
Page 11

10.
Convection Oven-Baker Use and Care Guide
INTERNAL TEMPERATURE ROASTING CHART
CUT INTERNAL TEMPERATURE
Beef 145°F Rare
160°F Medium
170°F Well Done
Ham (fresh) 160°F
Ham (precooked) 140°F Rare
Lamb 160°F Medium Well
170°F Well Done
Pork 160°F Medium
170°F Well Done
Turkey or Chicken, Whole 180°F
Turkey or Chicken, Breast 170°F
Hints For Roast
◆ A meat thermometer inserted into the center of the meat should
always be used to ensure desired doneness.
◆ Roasting is recommended for large, tender cuts of meat and
poultry. Seasoning prior to cooking adds to the flavor and the
aroma during cooking.
◆ A layer of fat on the top of the roast promotes better browning
and provides natural basting.
◆ When roasting meats with a high fat content, the Bake/Broil Pan
may fill with grease before cooking is completed. Carefully remove
the Bake/Broil Pan using oven mitts and empty. Replace for
continued roasting.
Page 12

11.
F
OOD
T
OTALCOOKINGTIME
*
Beef Steaks (3/4-inch thick) 22-28 minutes
Ham Steak (1-inch thick) 25-30 minutes
Fish Fillet 8-12 minutes
Fish Steak (1-inch thick) 10-14 minutes
Ground Beef (3/4-inch thick) 25-30 minutes
Hot Dogs 10-20 minutes
* Turn food halfway through cooking time. Broil times are approximate
and may vary depending on meat
NOTES: To speed up browning, brush lean cuts of meat, chicken and fish
with oil, margarine or melted butter. Broiling times indicated are for fresh
meat at refrigerator temperature.
Broil
1. Remove Bake/Broil Pan and Wire Rack.
2. Place the Broil Insert in the Bake/Broil Pan. Always use the Bake/Broil
Pan and Broil Insert when broiling. Place food on Broil Insert and
position the Bake/Broil Pan in shelf position 1. Juices and fat will drip
into the pan and decrease spattering while broiling. Close the door.
3. Plug into 120V ~ 60Hz outlet.
4. Position selector dial to BROIL. Turn temperature control dial to
BROIL.
5. Since broiling time is usually brief, the use of a timer is not
recommended. Set timer to MANUAL ON.
6. Broil food until done, turning half way through cooking time.
Carefully remove Bake/Broil Pan and Broil Insert from oven using
oven mitts.
7. When finished, turn temperature control dial to lowest position.
Make sure the timer is in the OFF position.
8. Unplug and allow to cool completely before cleaning.
Broil Recommendations
Broiling is used for tender cuts of meats or marinated meats, fish and
some fruits and vegetables. Cooking time is determined by the
desired donesness and the distance between the food and the heating
element(s). The following chart is to be used as a guideline.
Broil Chart
Page 13

12.
Convection Oven-Baker Use and Care Guide
Hints For Broil
◆ Do not place aluminum foil on top of Broil Insert. This traps
grease and can cause a fire.
◆ Trim excess fat from meat and score edges to prevent curling and
thaw frozen meats before broiling. This will reduce smoke during
broiling.
Slow Cook
1. Remove Bake/Broil Pan from oven. Place Wire Rack in position
5 or 6. No preheat is necessary.
2. Cover baking container and place on Wire Rack in center of
the oven.
3. Plug into 120V ~ 60Hz outlet.
4. Position selector dial to SLOW COOK. Turn temperature control
dial to 250°F. The indicator light will remain on. Because of the
low wattage being used, the heating elements will remain dark
while maintaining the proper temperature.
5. Set timer to MANUAL ON.
6. Do not open the door during the first two hours of the slow cook
period.
7. When finished, make sure the timer is in the OFF position.
8. Unplug and allow to cool completely before cleaning.
Hints For Slow Cook
Most slow cooker recipes may be used in Slow Cook by using the
following guidelines.
◆ All baking dishes should be covered. Aluminum foil may be used
if ends are tucked against edge of pan.
◆ Oven-proof glass and ceramic dishes are recommended.
◆ Aluminum foil pans and pans that will rust, such as cast iron or
tin should not be used.
Page 14

13.
Hints For Slow Cook (cont.)
◆ Separate dishes can cook simultaneously, yet food retains its own
flavor. Select foods that will take the same amount of time to cook.
◆ Milk, cream and sour cream may curdle. It is best to add them in
the last hour of cooking. If a recipe specifies one of these
ingredients as the only liquid in the cooking process, try
substituting evaporated milk, water or condensed soup, such as
cream of mushroom or chicken soup.
◆ Slow cook enhances the flavor of spices and salt. We recommend
you reduce seasoning in your own recipes.
◆ Pre-cooked spaghetti and pasta products should be added in the
last hour of slow cooking.
Rotisserie Function
Using the Rotisserie to cook meats and poultry allows them to selfbaste in their own juices. This seals in flavor while any excess fat drips
off of the food. The food being cooked on the Rotisserie must be no
wider than 12 inches and should weigh no more than 10 pounds. This
allows the entire piece of food to be over the Heating Elements. The
food should be placed onto the Rotisserie Bar with the Prongs
securely in place, see below. The Rotisserie may be used with the
BROIL Functions. Check your food prior to the time it should be
done and continue cooking as necessary.
Rotisserie
Meat Tines (P/ N 21434)
Use for whole turkeys, chickens, cornish
hens, roast, etc. When using, be sure to
place 1 at each end of the meat on the
Rotisserie Bar.
Rotisserie Bar (P/ N 22644)
Fits into the Oven. The heavy- duty Oven
Motor turns the bar so the food cooks
evenly and conveniently.
Page 15

14.
Convection Oven-Baker Use and Care Guide
Rotisserie (cont.)
Rotisserie Bar Handles (P/ N 22645)
Use to remove the Rotisserie Bar from
the Oven.
Drip Pan (P/ N 22646)
Use to catch drippings from meat
during Rotisserie cooking process.
1. Place Drip Pan into bottom of oven between the two heating
elements.
2. Carefully center the food on Rotisserie Bar using the Meat Tines to
secure the food in place. (See Figure 8) If the food is not centered
it will cause a jerking motion during cooking. This results in undue
stress on the Motor.
3. Place the round pointed end of Rotisserie Bar into opening on the
right side Oven Wall. Place the opposite end of the Rotisserie Bar
into the Bracket on
the left side Oven
Wall. (See Figures 6
and 7)
4. Plug into outlet.
5. Position selector dial
to ROTISSERIE/
BROIL
6. Turn temperature
control dial to
temperature setting.
NOTE: Since meats and poultry roast faster in a convection oven,
a meat thermometer should always be used to gauge internal
temperature. The thermometer should be inserted into the
thickest portion of roast away from bones or fatty areas. Check
progress two-thirds into the cooking process to ensure meat does
not over cook.
FIGURE 6
FIGURE 5
FIGURE 8
FIGURE 7
Page 16

15.
Time And Temperature Chart
CUT OF MEAT APPROXIMATE OVEN INTERNAL APPROXIMATE
WEIGHT TEMPERATURE TEMPERATURE ROTISSERIE TIME
(LBS)
Rib Eye Roast 6-10 350° F 145˚ F (med-rare) 2 hours 30 minutes
160˚ F (med) 3 hours
Eye of Round Roast 4-6 400° F 145˚ F (med-rare) 1 hour
160˚ F (med) 1 hour 15 minutes
Center Loin
(boneless) 4-6 325° F 160˚ F 1 hour
Center Loin 6-10 325˚ F 160˚ F 2 hours 15 minutes
(boneless, 2 tied together)
Pork Shoulder Boston 3-5 325° F 160˚ F 2 hours 30 minutes
Butt Roast (boneless)
Turkey 8-10 325° F 180˚ F 2 hours 15 minutes
Chicken 4-6 375˚ F 180˚ F 1 hour 15 minutes
Duck 5-8 350˚ F 180˚ F 2 hours
Leg (semi-boneless) 4-7 325° F 160˚ F (med) 2 hours 15 minutes
170˚ F (well) 2 hours 30 minutes
LAMB POULTRY PORK BEEF
Rotisserie (cont.)
7. Set timer to MANUAL ON or desired baking time (Refer to TIME
AND TEMPERATURE CHART for cooking times). Oven will shut
OFF automatically if timer is set.
8. When finished, using the Rotisserie Bar Handles, carefully remove
food from the oven.
9. Allow food to cool 15-20 minutes before removing food from
Rotisserie Bar and carving.
CAUTION: DO NOT CARVE MEAT WHILE IT IS IN THE OVEN
OR ON THE ROTISSERIE BAR.
10.Turn Temperature control dial to lowest position. Make sure the
timer is in the OFF position. Allow the Oven and the Drip Tray
with juices to cool completely before removing the Drip Tray for
emptying for cleaning.
Page 17

16.
Convection Oven-Baker Use and Care Guide
Hints For Rotisserie
◆ A meat thermometer inserted into the thickest part of the meat
or poultry should always be used to ensure desired doneness.
Please refer to USDA recommended temperatures.
◆ Rotisserie cooking is recommended for large, tender cuts of
meat and poultry.
◆ Seasoning prior to cooking adds to the flavor and the aroma
during cooking.
◆ Do not spray any type of aerosol spray flavoring inside the
Oven Cavity while cooking.
◆ Always center food on the Rotisserie Bar before cooking.
◆ To avoid burning the exterior of your food, do not baste food
with barbeque sauce until the last 20- 30 minutes of cooking.
◆ Once the food is placed inside the Oven Cavity, watch the food
while the Rotisserie rotates at least 1 complete turn to ensure
proper clearance of the Heating Elements and Drip Pan.
◆ When the Door is opened during operation, the Rotisserie Bar
may reverse directions.
USDA Recommended Temperatures
The United States Department of Agriculture recommends that meat
and poultry be cooked to the following internal temperatures to be
sure any harmful bacteria has been killed. Ground turkey and
chicken should be cooked to an internal temperature of 165° F and
ground beef, veal, lamb and pork be cooked to an internal
temperature of 160° F. Chicken and turkey should be cooked to an
internal temperature of 170° F for white meat and 180° F for dark
meat. Goose and duck should be cooked to an internal temperature
of 180° F. Fresh beef, veal and lamb, etc. should be cooked to an
internal temperature of at least 145° F. Fresh pork should be cooked
to an internal temperature of at least 160° F. When re- heating meat
and poultry products, they should also be cooked to an internal
temperature of 165° F.
Page 18

17.
Pizza
1. Remove Bake/Broil Pan, Wire Rack and Pizza Rack from oven.
2. Position selector dial to BAKE. Turn temperature to suggested
temperature listed on pizza box. Allow oven to preheat for 10 minutes.
3. Place pizza directly on Pizza Rack or in the Pizza Pan provided and
then place on Pizza Rack. Close the glass door.
4. Set timer to recommended time.
5. When pizza is finished baking, using oven mitts, carefully remove Pizza
Pan and/or Pizza Rack with pizza.
6. Turn temperature control dial to lowest position. Make sure the timer
is in the OFF position.
7. Unplug and allow to cool completely before cleaning.
User Maintenance Instructions
This appliance requires little maintenance. It contains no user
serviceable parts. Do not try to repair it yourself. Contact a qualified
appliance repair technician if the product requires servicing.
Dehydrate
1. Plug into 120 V ~ 60 Hz outlet.
2. Position selector dial to Bake.
3. Turn temperature control dial to Deh.
4. Set timer to Manual On by turning counter-clockwise.
5. Leave door ajar approximately 1 inch.
6. When finished, leave temperature control dial on Deh. Make sure
the timer is in the Off position.The indicator light will go off.
7. Unplug and allow to cool completely before cleaning.
Page 19

18.
Convection Oven-Baker Use and Care Guide
Hints For Dehydrate
◆ Food dehydration is an inexpensive, nutritious and easy way to
prepare convenience foods.
◆ Time required for the process will vary with thickness and type of
food being dehydrated.
◆ Guides to preparing foods for drying are included with your order
of Toastmaster Dehydration Racks (P/N 22684DEH) or may be
found in various cook books.
Care And Cleaning
To assure optimum safety, keep unit clean, free of grease and food
buildup.
CAUTION: Unplug appliance and allow to cool completely before
cleaning. Never place unit, electric cord or plug in water or other
liquids.
CAUTION: Do not clean oven with metal scouring pads. Pieces can
break off and touch electrical parts, creating a risk of electric shock.
Clean-Up Of Bake/Broil Pan, Broil
Insert, Wire Rack, Pizza Rack, Pizza
Pan, Rotisserie Bar And Meat Tines.
1. Always unplug and allow to cool completely before cleaning
or moving.
2. Remove Bake/Broil Pan, Broil Insert, Wire Rack, Pizza Rack,
Pizza Pan, Drip Pan, Rotisserie Bar and Meat Tines.
3. Clean with a mild or non-abrasive cleaner and a plastic scouring pad.
4. Rinse and dry thoroughly.
Page 20

19.
Clean-Up Of Non-Stick Walls
And Interior
1. Always unplug and allow to cool completely before cleaning
or moving.
2. Remove Bake/Broil Pan, Broil Insert, Wire Rack, Pizza Rack, Pizza
Pan, Drip Pan, Rotisserie Bar and Meat Tines.
3. Clean interior after each use to avoid buildup.
4. Clean with a mild or non-abrasive cleaner and a plastic scouring
pad. Do not rub too hard as surface can be scratched.
5. Rinse and dry thoroughly before closing door.
Clean-Up Of Oven Door And Exterior
The door can be removed for easier cleaning. To remove it, open
fully and lift, clearing the hinge pins. To replace, slide the door over
the hinge pins, being sure to gently push door all the way down on
pins to avoid glass breakage.
1. Always unplug and allow to cool completely before cleaning
or moving.
2. Clean with glass cleaner or mild detergent and damp cloth or
plastic scouring pad. Do not use an abrasive cleaner or pad as they
might mar the finish. The door may be placed in the dishwasher
for easy clean-up.
3. Rinse and dry thoroughly with a clean cloth. Allow to dry before
closing door.
Page 21

20.
Convection Oven-Baker Use and Care Guide
1. Unplug unit and allow oven to cool completely.
2. To remove the Oven Door, open and lift upwards and off of the
door pins. (See figure 9).
3. Remove screw from oven light bracket, holding onto bracket to
prevent glass from falling.
4. Remove bracket and glass.
5. Remove bulb by turning counter-clockwise.
6. Replace with new bulb, turning clockwise.
7. Replace glass and bracket, being sure the two tabs on the bracket
are in the slots provided for them on the oven wall.
8. Replace bracket screw.
NOTE: Use only a 656 or equivalent 6-watt, 120 volt bulb.
Do not operate the oven without the oven lamp glass in place.
FIGURE 9
To Remove Oven Door and Replace
Oven Light
Page 22

21.
Recipes
Broil
BROILED SHRIMP SKEWERS
24 large shrimp, peeled and de-veined
4 tablespoons olive oil
3 tablespoons chopped fresh parsley
3 medium garlic cloves, minced
salt and freshly ground black pepper
lemon wedges to serve
Rinse the shrimp in cold water and pat dry with paper towels. In a bowl,
combine the olive oil, parsley, garlic, salt and pepper to season. Toss the
shrimp in the mixture to coat thoroughly. Cover and marinate for 1 hour in
the refrigerator. Place the shrimp on the Broil Pan Insert and Bake/Broil
Pan. Broil for 3-5 minutes on each side or until the shrimp become pink.
Serve with lemon wedges.
Yield 4 Servings
Bake
HERB CRUSTED CHICKEN BREASTS
4 chicken breast halves, boneless-skinless
3 tablespoons butter, melted
1 cup fresh bread crumbs
1/4 cup freshly grated Parmesan cheese
2 tablespoons chopped fresh parsley
2 medium garlic cloves, minced
1/4 teaspoon Italian seasoning
salt and pepper
Preheat
Convection Oven-Broiler
on Bake to 350˚ F. Grease a 7 x 11-inch
baking pan. Brush both sides of the chicken breasts with melted butter.
Season with salt and pepper. In a small mixing bowl, combine the bread
crumbs, Parmesan cheese, parsley, garlic and Italian seasoning until well
blended. Coat each chicken breast thoroughly in the bread crumb mixture.
Arrange in baking pan. Bake for 35-45 minutes or until the juices run clear,
and the chicken is at least 170 ˚ F with the crust browned to a light golden
brown.
Yield 4 Servings
Page 23

22.
Convection Oven-Baker Use and Care Guide
CRAB AND SHRIMP MEDLEY
2 cup bay or salad shrimp
2 cup flaked crab meat
1 cup chopped red pepper
1 cup chopped celery
2/3 cup chopped green onions & tops
1 cup mayonnaise
1 cup sour cream
3/4 cup Parmesan cheese, freshly grated
1 1/2 cup fresh bread crumbs
1/4 cup Worcestershire sauce
1 tablespoon white pepper
1/4 teaspoon Cayenne pepper
1 teaspoon salt
Preheat
Convection Oven-Broiler
on Bake to 400˚ F. Combine all ingredients
except 1/3 cup of bread crumbs and 1/4 cup of the Parmesan cheese. Mix
well. Place crab and shrimp mixture in a 9x13-inch baking dish. Mix
together the remaining bread crumbs and Parmesan cheese and sprinkle
evenly over the seafood mixture. Bake for 45-50 minutes or until the
mixture is bubbling along the sides and the top is golden brown. Serve on
crackers or as a dip.
Yield 15 Servings
CARAMEL CHOCOLATE CHUNK CHEESECAKE
Crust
1/4 cup butter, melted
3/4 cup quick rolled oats
3/4 cup walnuts, chopped
3/4 cup brown sugar
1/2 teaspoon cinnamon
Preheat Convection Oven Broiler on Bake to 350˚ F. Using a mixer
combine crust ingredients on medium low speed for 2 to 3 minute. Press
into a 9-inch greased cheesecake pan. Bake crust 18-20 minutes as directed.
While crust is baking, prepare filling.
Filling
24 oz. cream cheese softened
1/2 cup brown sugar
2 tablespoons cornstarch
1/2 cup dark corn syrup
1 1/2 teaspoons vanilla extract
3 large eggs, room temperature
1 egg yolk, room temperature
Page 24

23.
Topping
1 cup milk chocolate chips
Using a mixer combine cream cheese, brown sugar, cornstarch, corn
syrup and vanilla extract on high speed for 2 to 3 minutes. Add eggs and
yolk one at a time beating after each addition on medium high speed.
Pour into the baked crust. Bake at 350˚ F for 15 minutes, then reduce to
200˚ F and bake for an additional hour.
Remove the cheesecake from the oven and sprinkle the chocolate chips
over the top. Return to the oven and bake for 5 minutes. Chill overnight.
Store in refrigerator.
Yield 12 Servings
Pizza
BASIC PIZZA DOUGH
1/2 cup water
1 1/4 teaspoon active dry yeast
1 1/2 cups (divided) bread flour
1/2 teaspoon salt
1 tablespoon olive oil
Combine the warm water and yeast together in a large bowl. Add 3/4
cups of the flour mixture and mix together. Add salt, olive oil, and the
rest of the flour. Mix with your hands until there is a dough consistency.
Move the dough to a lightly floured surface and knead for 5-10 minutes
until the dough is smooth and elastic to the touch. Place the dough in a
lightly oiled bowl and cover with plastic wrap or kitchen towel for one
hour or until double in size. Punch down the dough and let it rest for
15 minutes. Using your fingertips, press into the Pizza Pan provided with
your Convection Oven-Broiler.
ITALIAN PIZZA DOUGH
1/2 cup water
3/4 teaspoon active dry yeast
1 1/2 cups (divided) bread flour
1/2 teaspoon salt
3 teaspoons olive oil
1 teaspoon sugar
1/2 teaspoon Italian seasoning
Page 25

24.
Convection Oven-Baker Use and Care Guide
Combine the warm water and yeast together in a large bowl. Add 3/4
cups of the flour mixture and mix together. Add salt, olive oil, sugar,
Italian seasoning and the rest of the flour. Mix with your hands until
there is a dough consistency. Move the dough to a lightly floured surface
and knead for 5-10 minutes until the dough is smooth and elastic to the
touch. Place the dough in a lightly oiled bowl and cover with plastic wrap
or kitchen towel for one hour or until double in size. Punch down the
dough and let it rest for 15 minutes. Using your fingertips, press dough
into the Pizza Pan provided with your Convection Oven-Broiler.
PIZZA SAUCE
1 1/2 tablespoons olive oil
1/2 cup onion, chopped
4 ounce can tomato sauce
1 cup diced tomatoes
1/4 teaspoon oregano
1/4 teaspoon basil
1/8 teaspoon garlic powder
1/4 teaspoon salt
1/2 teaspoon ground pepper
Heat oil over medium heat and saute onions until transparent. Stir in
remaining ingredients. Cover and simmer for 30 minutes, stirring
occasionally. Spread sauce over pizza dough. Top with desired pizza
ingredients and bake according to instructions.
Yield one 12-inch pizza
VEGETARIAN PIZZA
Pizza dough and sauce for one 12-inch pizza
1/2 small zucchini, thinly sliced
1/2 medium onion thinly sliced
1 medium garlic clove, chopped
1/2 medium green pepper, chopped
1/2 medium red pepper, sliced
1/2 cup mushrooms, sliced
1/4 cup green olives, sliced
3/4 cup Mozzarella cheese, grated
Preheat Oven to 425˚ F. Sprinkle toppings over sauce and bake for
15-20 minutes or until cheese is melted and toppings are warm.
Page 26

25.
BACON CHEESEBURGER PIZZA
Pizza dough and sauce for one 12-inch pizza
3/4 pound hamburger, cooked
1/2 small onion, chopped
1 medium garlic clove, chopped
3/4 pound bacon, cooked and crumbled
1 cup Mozzarella cheese, grated
Preheat Oven to 425˚ F. Sprinkle toppings over sauce and bake for
15-20 minutes or until cheese is melted and toppings are warm.
Rotisserie
BEEF ROAST
1 6-8 pound boneless beef roast
Marinade
3/4 cup vegetable oil
3/4 cup lemon juice
8-10 cracked black peppercorn
6-8 whole cloves garlic
1 sliced red onion
1 tablespoon dry rosemary
Mix ingredients together and pour over desired meat portion. Allow to
marinate overnight in the refrigerator, turning from time to time. Select
Rotisserie/Broil and set temperature to 400˚ F. Turn Rotisserie switch to
ON position Rotisserie. Place meat on Rotisserie Bar Assembly and insert
into Oven for 2 1/2 hours or until the beef is at least 145˚ F.
Page 27

26.
Convection Oven-Baker Use and Care Guide
HONEY PINEAPPLE PORK ROAST
1 3-4 pound boneless pork roast
Marinade
1/4 cup tamari or light soy sauce
1/4 cup white vinegar
1/4 cup extra virgin olive oil
1/4 cup fresh or canned (packed in juice) crushed pineapple
2 tablespoons honey
2 tablespoons finely chopped ginger
2 cloves finely chopped garlic
Place a 3-4 lb. boneless, trimmed and tied pork roast in marinade for
4 hours in the refrigerator. Place on Rotisserie Bar and insert into oven.
Select Rotisserie/Broil and set temperature to 325˚ F. Rotisserie for
1- 1 1/2 hours or until the pork is at least 160 ˚ F.
Yields 10-12 Servings.
DELI ROTISSERIE CHICKEN
1 5 pound whole roasting chicken
1 teaspoon salt
2 teaspoons paprika
1 teaspoon chili powder
1 teaspoon garlic powder
2 teaspoon pepper
1 teaspoon onion powder
1 teaspoon dried thyme
Remove the giblets from the chicken and discard. Wash the cavity well and
dry with paper towels. Tie the chicken wings and legs with cooking string.
Combine all the spices in a small bowl and mix well. Rub thoroughly into
the skin of the chicken, pressing gently. Cover the chicken and refrigerate
overnight. Prepare Rotisserie Bar Assembly. Place on Rotisserie Bar and
insert into oven. Select Rotisserie/Broil and set temperature to 375˚ F.
Turn Rotisserie switch to ON position. Rotisserie for 1-1 1/2 hours or until
the thigh is at least 180˚ F.
Yields 4 Servings.
Page 28

27.
Slow Cook
SPAGHETTI SAUCE WITH MEATBALLS
Sauce
1 small onion chopped
3 cloves garlic, chopped
1 tablespoon oil
30 oz. italian style stewed tomatoes
30 oz. italian style tomato sauce
1/2 cup basil leaves
1/2 tablespoon oregano
1 teaspoon thyme
1/4 cup sugar
1/4 teaspoon crushed red pepper
1 bay leaf
salt and pepper
1/2 mushroom, sliced
Heat oil in a skillet over medium heat. Add onion and garlic; cook until
tender. Add the remaining sauce ingredients. Remove from heat and
pour into a 3 quart ceramic casserole dish. Thoroughly combine meatball
ingredients and form into 1 inch balls. Roll meatballs in flour. Heat oil in
large skillet over medium heat and brown meatballs. Add the meatballs
to the sauce. Place on wire shelf in center of Oven. Turn to the Slow Cook
function and bake for 8 -10 hours or until meatballs are at least 160˚ F. Serve
over cooked spaghetti or homemade pasta.
Yield 6-8 Servings
CHILI
1 pound lean ground beef
1 medium onion, chopped
1 15 ounce can Hunt’s Ready Tomato Sauce®-
Special Chunky Style
1 15 ounce can Tomatoes, garlic style
1 15 ounce can chili beans
1 tablespoon chili powder
2 tablespoons dill pickle juice
Saute ground beef and onion; drain. Combine with other ingredients in
a ceramic 3 quart casserole dish. Place on wire shelf in center of oven.
Turn to the Slow Cook function and bake for 6-8 hours.
Meatballs
1 small onion, chopped
1 clove garlic, chopped
1 lb. Italian sausage
1 egg
salt and pepper
1/2 cup bread crumbs
1 oz. Parmesan or Romano
cheese, grated
Coating
1/3 cup flour
1/3 cup oil
Page 29

28.
Convection Oven-Baker Use and Care Guide
CHICKEN & RICE
3 tablespoons olive oil
1 pound chicken breast tenders
1 cup water
2-10 oz. cans reduced fat cream of chicken soup
1/2 teaspoon pepper
1/2 tablespoon dried parsley
1 cup Uncle Ben’s
™
brown rice
Heat olive oil in a skillet over medium high heat. Add chicken breast and
brown for 5 minutes on each side. In a 3 quart ceramic casserole dish, combine
water and cream of chicken soup and stir until smooth. Stir remaining
ingredients and then add chicken tenders to chicken soup mixture. Place on
wire shelf in center of oven. Turn to the Slow Cook function and bake for 6-8
hours or until chicken is at least 170˚ F and rice is done.
SWISS STEAK
4-4 oz. tenderized round steaks pieces
1/3 cup all purpose flour
1/2 teaspoon salt
1/2 teaspoon pepper
3 tablespoons oil
1 small onion, sliced and divided into rings
1 green pepper, sliced into rings
2-15 oz. cans stewing tomatoes
Heat oil in a skillet over medium high heat. Coat the round steak pieces
with flour, salt and pepper. Add to skillet and brown for 5 minutes on each
side. Remove from skillet and place in a ceramic 3 quart casserole dish.
Add green pepper rings, onion rings and stewing tomatoes on top of
browned steaks. Place on wire shelf in center of oven. Turn oven to Slow
Cook and bake for 6-8 hours or until steak is tender and at least 145 F.
Page 30

29.
INDEX
BAKE
Caramel Chocolate Chunk Cheesecake . . . . . . . . . . . . . . . . . . . . . . . .22
Crab and Shrimp Medley . . . . . . . . . . . . . . . . . . . . . . . . . . . . . . . . . . .22
Herb Crusted Chicken Breast . . . . . . . . . . . . . . . . . . . . . . . . . . . . . . . .21
BROIL
Broiled Shrimp Skewers . . . . . . . . . . . . . . . . . . . . . . . . . . . . . . . . . . . .21
PIZZA
Bacon Cheeseburger Pizza . . . . . . . . . . . . . . . . . . . . . . . . . . . . . . . . . .25
Basic Pizza Dough . . . . . . . . . . . . . . . . . . . . . . . . . . . . . . . . . . . . . . . . .23
Italian Pizza Dough . . . . . . . . . . . . . . . . . . . . . . . . . . . . . . . . . . . . . . . .23
Pizza Sauce . . . . . . . . . . . . . . . . . . . . . . . . . . . . . . . . . . . . . . . . . . . . . . .24
Vegetarian Pizza . . . . . . . . . . . . . . . . . . . . . . . . . . . . . . . . . . . . . . . . . . .24
ROTISSERIE
Beef Roast . . . . . . . . . . . . . . . . . . . . . . . . . . . . . . . . . . . . . . . . . . . . . . .25
Deli Rotisserie Chicken . . . . . . . . . . . . . . . . . . . . . . . . . . . . . . . . . . . . .26
Honey Pineapple Pork Roast . . . . . . . . . . . . . . . . . . . . . . . . . . . . . . . .26
SLOW COOK
Chicken & Rice . . . . . . . . . . . . . . . . . . . . . . . . . . . . . . . . . . . . . . . . . . .28
Chili . . . . . . . . . . . . . . . . . . . . . . . . . . . . . . . . . . . . . . . . . . . . . . . . . . . .27
Spaghetti Sauce with Meatballs . . . . . . . . . . . . . . . . . . . . . . . . . . . . . .27
Swiss Steak . . . . . . . . . . . . . . . . . . . . . . . . . . . . . . . . . . . . . . . . . . . . . . .28
Page 31

30.
Convection Oven-Baker Use and Care Guide
LIMITED ONE-YEAR WARRANTY
Warranty Coverage: This product is warranted to be free from defects in materials or workmanship for a period of
one (1) year from the original purchase date. This product warranty is extended only to the original consumer
purchaser of the product and is not transferable. For a period of one (1) year from the date of original purchase of
the product, our Repair Center will, at its option, either (1) repair the product or (2) replace the product with a
reconditioned comparable model. These remedies are the purchaser's exclusive remedies under this warranty.
Warranty Service: To obtain warranty service, you must call our warranty service number at 1-800-233-9054 for
return instructions on how to deliver the product, in either the original packaging or packaging affording an equal
degree of protection to the Repair Center specified below. You must enclose a copy of your sales receipt or other proof
of purchase to demonstrate eligibility for warranty coverage.
What Is Not Cover
ed: This warranty does not cover damage resulting from misuse, accident, commercial use,
improper service or any other damage caused by anything other than defects in material or workmanship during
ordinary consumer use. This warranty is invalid if the serial number has been altered or removed from the product.
This warranty is valid only in the United States and Canada.
LIMITATION ON DAMAGES: THERE SHALL BE NO LIABILITY FOR ANY INCIDENTAL OR CONSEQUENTIAL
DAMAGES FOR BREACH OF ANY EXPRESS OR IMPLIED WARRANTY OR CONDITION ON THIS PRODUCT.
DURATION OF IMPLIED WARRANTIES: EXCEPT TO THE EXTENT PROHIBITED BY APPLICABLE LAW, ALL IMPLIED
WARRANTIES AND CONDITIONS, INCLUDING, WITHOUT LIMITATION, IMPLIED WARRANTIES AND CONDITIONS
OF MERCHANTABILITY AND FITNESS FOR A PARTICULAR PURPOSE OR USE ON THIS PRODUCT ARE LIMITED IN
DURATION TO THE DURATION OF THIS WARRANTY.
Some jurisdictions do not allow the exclusion or limitation of incidental or consequential damages, or allow limitations
on how long an implied warranty lasts, so the above limitations or exclusions may not apply to you. This warranty
gives you specific legal rights and you may have other rights under the laws of your jurisdiction.
For more information on our products, visit our website: www.maxim-toastmaster.com.
P/N 61642 Rev. 1
To return the appliance, ship to:
ATTN: Repair Center
708 South Missouri Street
Macon, MO 63552 USA
To contact us, please write to or call:
Consumer Relations Department
PO Box 7366
Columbia MO 65205-7366 USA
1-800-233-9054
E-mail: consumer_relations@toastmaster.com
Page 32

31.
EVERYBODY EATS. It’s a fact of life.
But sometimes preparing
meals can become a chore.
That’s why TOASTMASTER has been invited
into millions of kitchens just like yours
so we can HELP YOU MASTER your
mixing, baking, grilling, toasting,
brewing, heating and serving
tasks WITH EASE AND STYLE.
The TOASTMASTER name stands for a
CELEBRATION of INNOVATION designed
to serve your life and keep you
COOKIN’ IN STYLE.
Keep Dated Sales Receipts for Warranty Service.
Keep this booklet. Record the following for reference:
Date purchased _______________________________________________
Model number _______________________________________________
Date code (stamped on bottom)________________________________
Page 33

?
• Cooking systems: bake, broil,
rotisserie and slow cook
• 2-hour timer
• Interior oven light
• Removable door for easy cleaning
• Accessories include wire rack,
bake/broil pan and broil insert
Questions
Call toll free 1-800-233-9054
Monday–Friday, 8:00 a.m. - 5:30 p.m. CST
www.maxim-toastmaster.com
TCOV6R AND TCOV6RCAN
 Loading...