


WOOD BURNING STOVES
Installation and Operating
Instructions
IMPORTANT – Installation MUST ONLY be carried out by a ‘Gas Safe’
registered engineer/installer
Please read this user’s Installation and Operating Instructions fully
before installation and operation
Keep these instructions for future reference
2
Ref: 14/ST/BF/1
This user manual is suitable for the models listed below:
‘OFNI’ - 5KW
‘ELDUR’ - 6KW
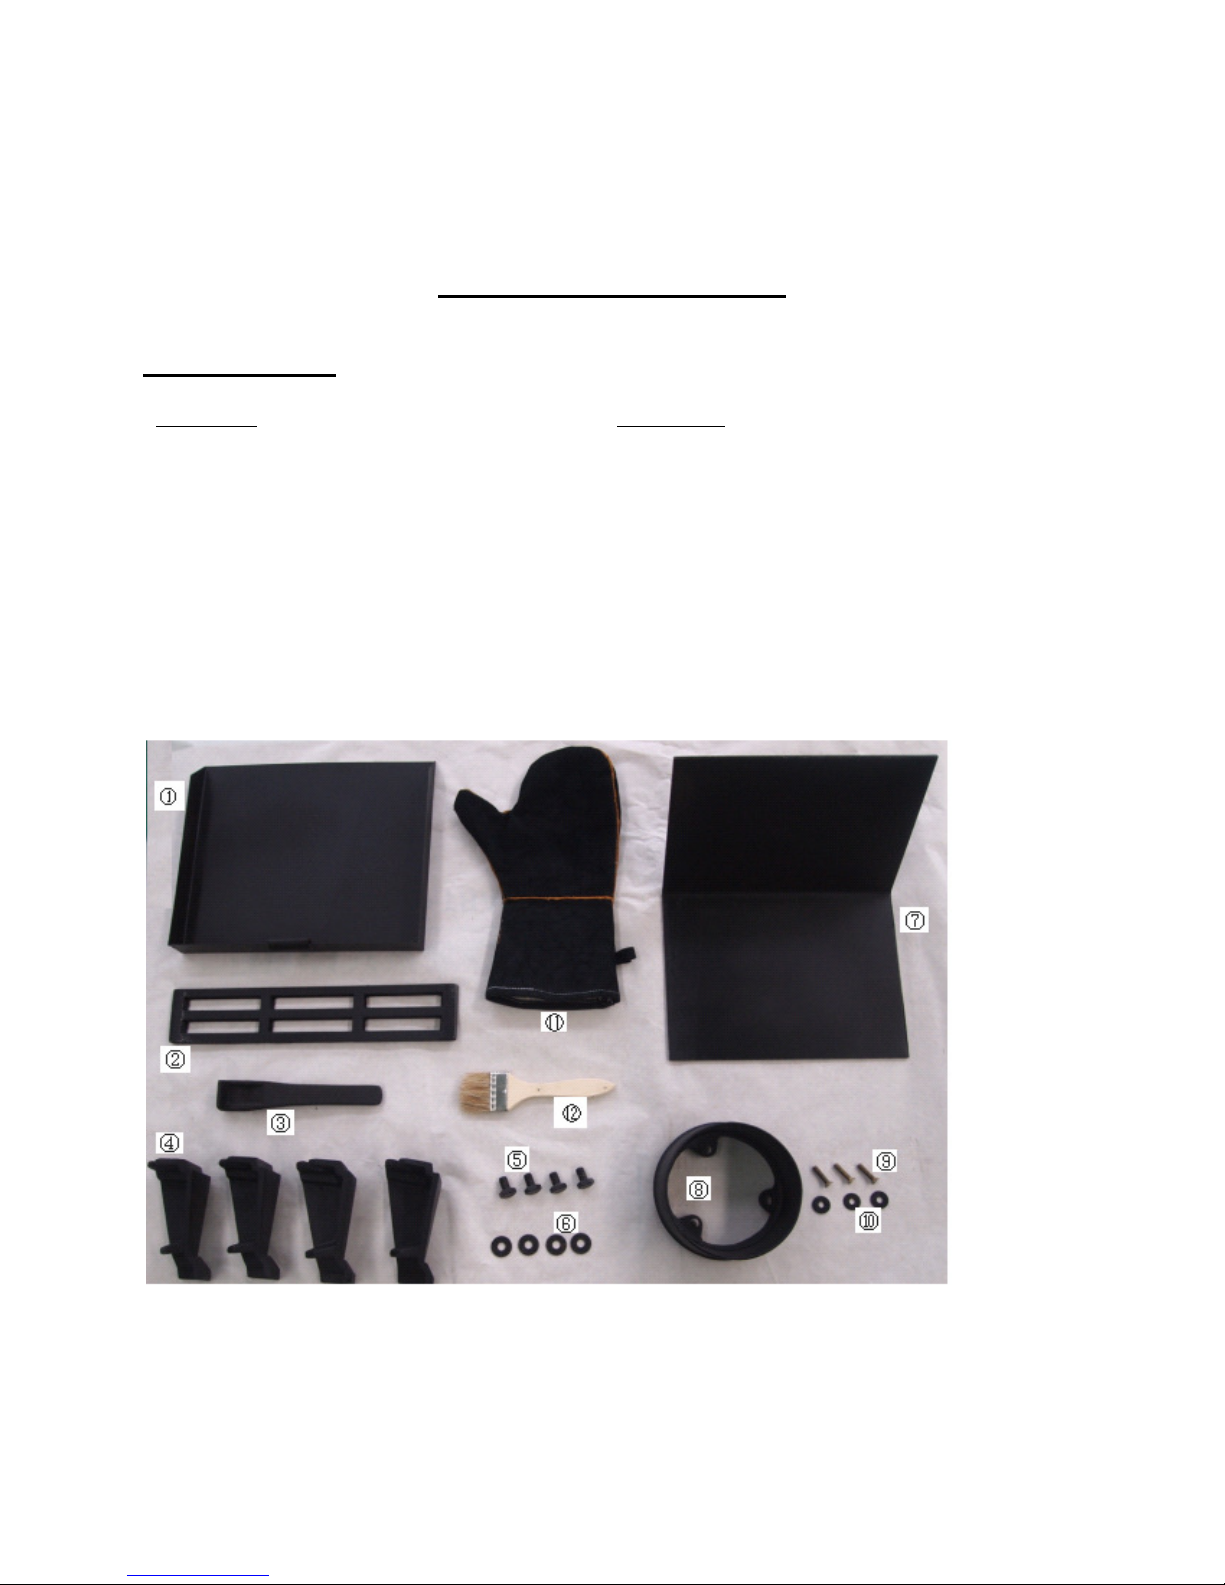
List of Components
Description of Parts
Stove parts Accessories
1. Ashpan 1 11. Glove 1
2. Coal Guard 1 12. Brush 1
3. Ashpan tool 1
4. Legs 4
5. Leg Height Screws 4
6. Leg Washers 4
7. Baffle Plate 1
8. Flue Collar 1
9. Flue Collar Screws 3
10. Flue Collar Washers 3
3
Ref: 14/ST/BF/1
Assembly Instructions
PLEASE READ THESE INSTRUCTIONS CAREFULLY
It is important that your stove is installed by a Gas Safe registered engineer/installer;
incorrect installation can result in a fault and be dangerous.
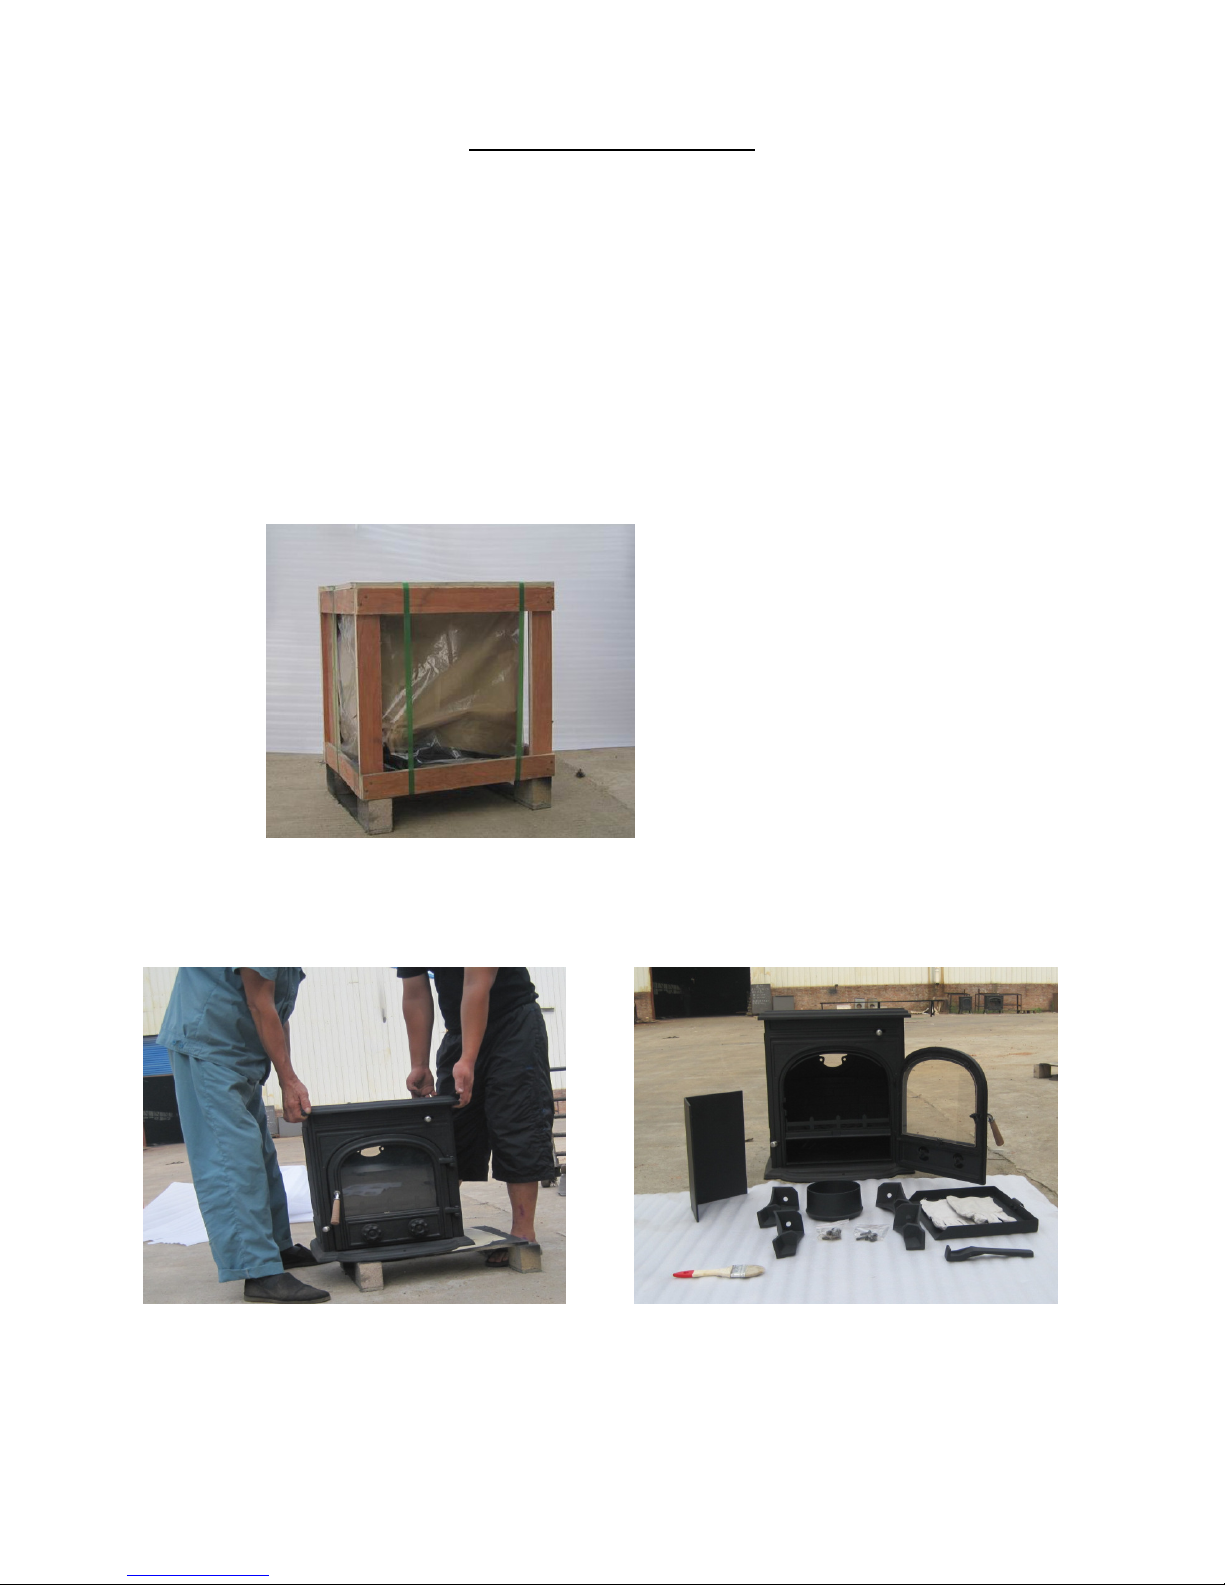
Your Stove comes packed in a plywood crate. TWO PERSONS ARE REQUIRED TO MOVE
THE CRATE AND STOVE.
1. Remove the outer packaging
A. Carefully remove the packing straps and lift off the upper crate.
B.Remove the plastic bag and take down the stove from the bottom panel
IMPORTANT - Ensure the plastic bag is disposed of correctly and kept away from children.
C. Open the door, take out all the contents. Place a
ll the items on a cardboard box or surface that
will not scratch or damage the parts.
IMPORTANT: TWO PERSONS ARE REQUIRED FOR LIFTING THE STOVE
4
Ref: 14/ST/BF/1
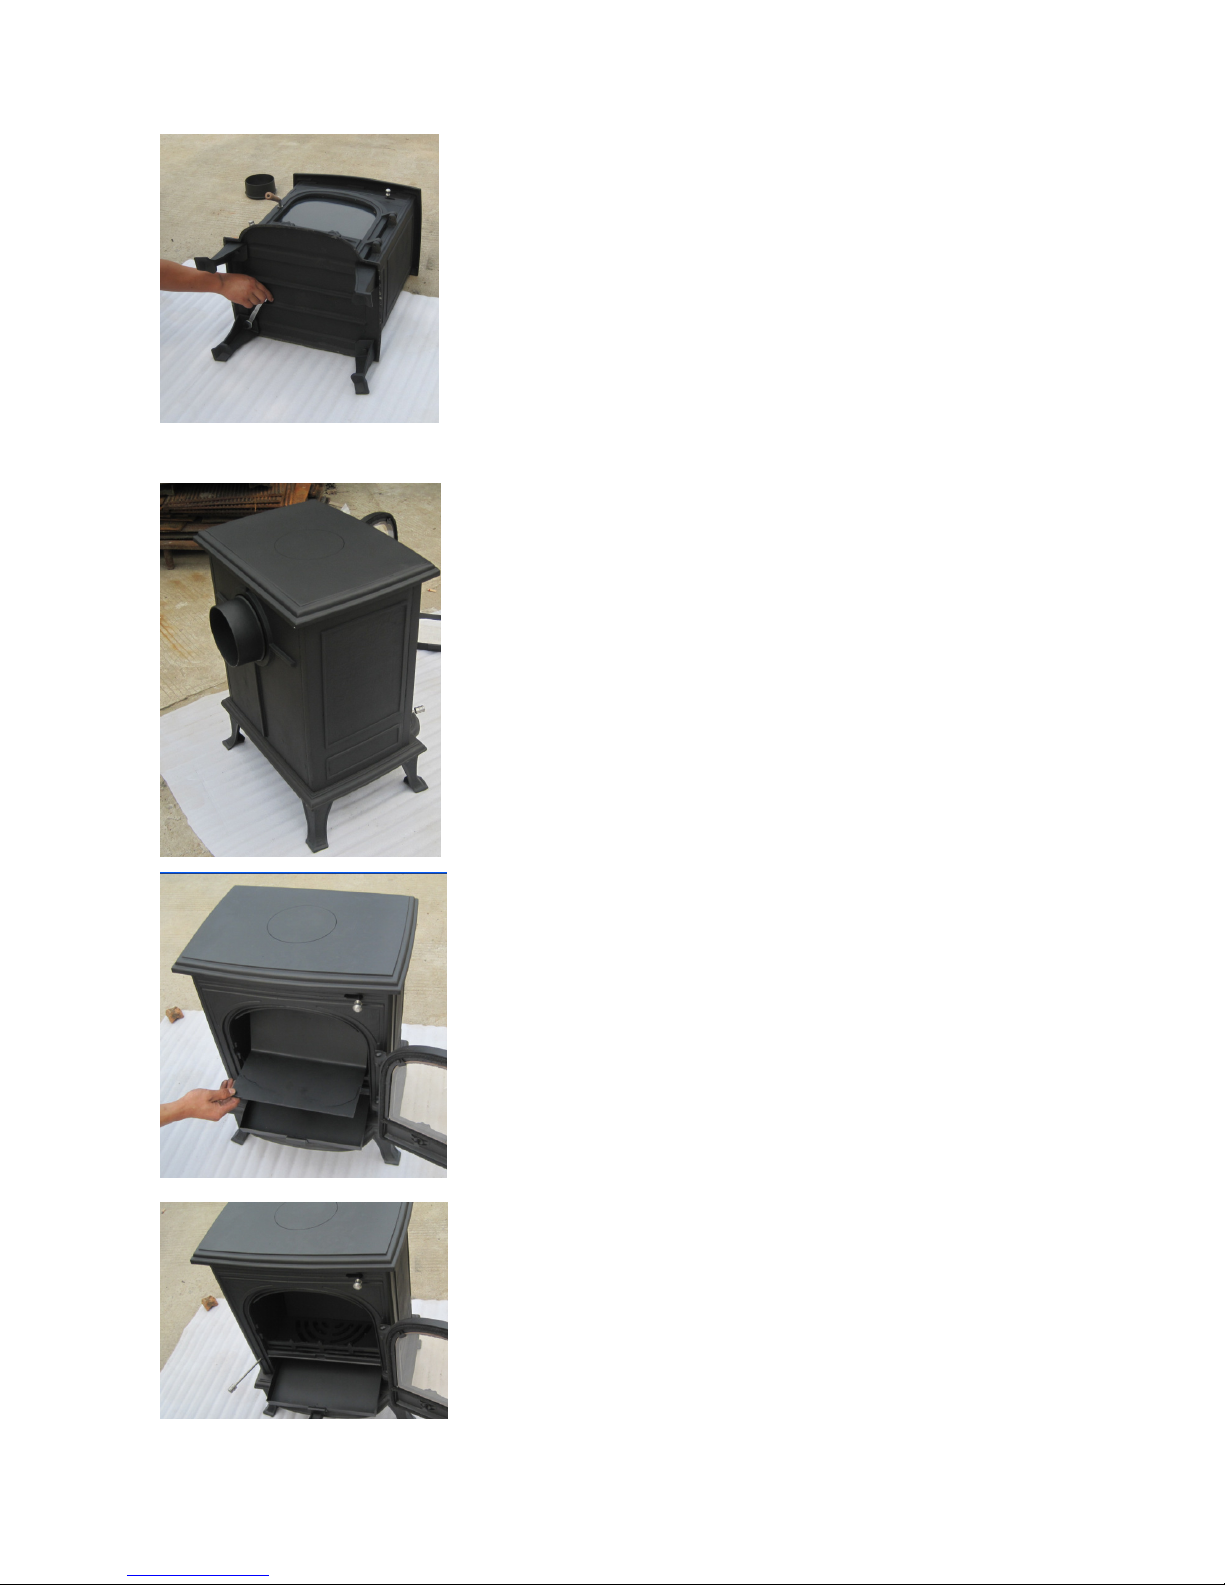
2. Fix the legs with a set of the screws and washers supplied
3. Fit the Flue Collar with the set screws and washers supplied.
Rear or top flue option
If the Top Flue position is required remove the fitted Flue Cover
and refit on the rear opening.
4. To fit the Baffle:
Insert the baffle, upside down, as shown, ensuring you are
holding the shorter of the two sides. Turn the baffle as you fit it,
so that the edge that you are holding is placed on the ledge at
the rear of the stove. The other edge rests on a lip behind two
holding bars at the back of the Air Wash Chamber.
5. Fit the Coal Guard and ashpan

5
Ref: 14/ST/BF/1
Installation Instructions
READ THESE INSTRUCTIONS CAREFULLY BEFORE INSTALLATION
These instructions cover the basic principles to ensure satisfactory installation of the stove and cannot
cover all situations due to the site of location conditions. In all cases the installation must comply with
National and European Building Regulations, Local Authority Byelaws and other specifications or
regulations as they affect the installation of the stove.
Health and Safety Precautions
Handling
Adequate facilities must be available for unloading and site handling.
Fire Cement
Some types of fire cement are caustic and should not be allowed to come into contact with the skin. In
case of contact, wash immediately with plenty of water.
Metal Parts
When installing or servicing the stove, take care to avoid the possibility of personal injury.
Note:
Any white deposits on the stove joints are caused by humidity reacting with the joint sealant. These
deposits may be brushed off and, if necessary, blackened with a proprietary stove polish.
Important Warning
This stove MUST NOT be installed into a chimney that is shared with any other heating appliance.
No purpose provided ventilation is required for stoves rated under 5kW. For each kW above 5kW, 550
mm
2
of fixed ventilation is required i.e. a stove rated at 8kW would require 3 x 550 mm2 = 1650 mm
2
o
f fixed ventilation.
If more than one appliance is installed in the same room, the ventilation requirements for each
appliance must be added together.
There MUST NOT be an extractor fan fitted in the same room as the stove as this can cause the stove
to emit fumes into the room.
Installation
Chimney
The chimney must be fitted in accordance with manufacturer’s instructions and the relevant part of the
Building Regulations. The chimney height and the position of the chimney terminal should conform to
Building Regulations. Check that the chimney is in good condition, dry, free from cracks and
obstructions. The diameter of the flue should not be less than 125mm and not more than 200mm. If any
of these requirements are not met, the chimney should be lined by a suitable method. The chimney
must be swept before connection to the stove.
Where the chimney is believed to have previously served as an open fire installation, it is possible that
the higher flue gas temperature from the stove may loosen deposits that were previously securely in
place, with the possible risk of flue blockage. It is therefore recommended that the chimney be swept a
second time within a month of regular use after installation. If you have any doubts about the suitability
of your chimney, consult a local installer.
Flue Draught

6
Ref: 14/ST/BF/1
A flue draught of minimum 1.2mm to a maximum 2.5mm water gauge is required for satisfactory
appliance performance. The flue draught should be checked under fire at high output and, if it exceeds
the recommended maximum, a draught stabiliser must be fitted so that the rate of burning can be
controlled and to prevent over firing.
Connection to the Chimney
An existing fireplace opening can be bricked up or sealed with a register plate. A short length of flue
pipe of a minimum 125mm internal diameter may then be used to connect the stove to the chimney.
This flue pipe should conform to Building Regulations. Ensure that the pipe end is no closer than
76mm to the side or rear chimney walls.
Ideally, the old fireplace should be filled in so that there is a smooth streamlined entry into the flueway.
The length of any horizontal run of flue pipe must not exceed 125mm.
It is essential that all connections between the stove and chimney-flue are sealed and made airtight.
This appliance is not suitable for installation in a shared flue system.
Both the chimney and flue pipe must be accessible for cleaning and if any parts of the chimney cannot
be reached through the stove (with baffle removed), a soot door must be fitted in a suitable position to
enable this to be done.
Material Clearances
A MINIMUM clearance to combustible material MUST be at least 1500mm.
The stove can be recessed in a suitable sized fireplace but a permanent free air gap of at least 150mm
must be left around the sides and top and at least 50mm at the back of the stove to obtain maximum
heat output and for access to the rear of the stove.
All non-combustible walls closer than 400mm to the stove should be at least 75mm thick. In all
instances the back wall of the fireplace recess and the hearth should be made of non-combustible
material. Allow an apron of at least 300mm at the front of the stove and 150mm on either side. The
hearth on which the stove is to be placed should not be less than 125mm thick and should be in
accordance with the current building regulations. Care should be taken to level the stove using the
adjusting screws in the feet.
The appliance shall be installed on a floor with adequate load-bearing capacity. If the existing
construction does not meet this prerequisite, suitable measures (e.g. load disturbing plate) should be
taken to achieve it.
Commissioning and Handover by Installer
After completion of the installation, allow a suitable period of time for any fire cement and mortar to
dry out. A small fire should be lit first and checked to ensure the smoke and fumes are taken from the
stove up the chimney and emitted safely to atmosphere. Do not run the stove at full output for at least 3
to 4 days.
Upon finishing the installation and commissioning, the installer must ensure that the operating
instructions and operating tools for the stove are left with the customer. They should also advise the
customer on the correct use of the appliance and warn them to use only the recommended fuels for the
stove. Warn the user on what to do should smoke or fumes be emitted from the stove and to use a
suitable fireguard in the presence of children, aged and/or infirm persons.
O
perating Instructions

7
Ref: 14/ST/BF/1
These stoves have been designed to burn clean and efficiently only when operated correctly following
the manufacturer’s guidance given in this manual.
WARNING These appliances will be HOT when in operation and due care should be taken when
operating the controls.
Air Controls
It is essential for the stove to have an adequate air supply for combustion and ventilation.
The primary and secondary air inlets must be kept clear from obstruction.
Primary Air
Primary air is controlled via the two rotary air controls on the bottom of the door.
This provides a conventional air draught to the bed of the fire. The primary air intakes can be adjusted
to give the best possible results when burning different fuels.
Secondary Air
The cast iron stove is fitted with an “air wash” system. This secondary air supply to the stove is
controlled through a slider assembly located at the top of the stove.
Note: The secondary air control is open when pushed to the right.
Closed Open
M
ulti-fuel Grate
There are two types of multi-fuel grates for these stoves, Rotary style and grid style. For the rotary style
grate, you can operate it by dragging the stainless steel rod forward and backward. For grid style grate,
a special hook is supplied to de-ash. It is important to de-ash regularly, to ensure that the primary
airflow is not impeded, as a build-up of ash can damage the cast iron bed.
Ashpan
It is essential that you empty the ashpan regularly. Use the supplied tool to lift the ashpan out of the
stove.
IMPORTANT - It is very important to empty the ashpan regularly. If the ash is allowed to build up on
the underside of the grate then burnout or distortion of the grate may be caused
On Solid Mineral Fuels

8
Ref: 14/ST/BF/1
DO NOT have more than a 30 degree incline of the fuel bed from front to back, when you put solid
mineral fuels on the fuel bed. The height of loading fuels must not exceed the rear cast iron lining. The
refuelling intervals at nominal heat output will be approximately every 4 hours. When using solid
mineral fuels, we suggest you keep the secondary air control in the closed position, so it can burn at
maximum efficiency. This allows the primary air controls to be adjusted to set the burn rate of the
appliance.
In order to prevent the ash from being stacked to the underside of the bottom grate, always de-ash
before refuelling. Once the ash builds up, it can easily stifle the airflow and causes the fire to die.
On Wood burning
With a full load of wood, the stove will need to be refuelled approximately every 1.5 hours. Wood can
be stacked higher in the stove than solid mineral fuel but care must be taken that logs do not touch the
baffle.
Wood burns most efficiently with the primary air controls closed and the secondary control partially
open. Moving the secondary control will control the burn rate of the stove.
NOTE – primary and secondary air is needed to light the stove, see section entitled ‘Lighting the Stove’.
Wood burns best with a layer of ash on the fuel bed and it is therefore only necessary to remove surplus
ash from the stove occasionally.
Burn only dry, well-seasoned wood, which should have been cut, split and stacked for at least 12
months, with free air movement around the sides of the stack to enable it to dry out. Burning wet or
unseasoned wood will create tar deposits in the stove and chimney and will not produce a satisfactory
heat output.
Lighting the Stove
It is recommended to get the best out of the appliance that you start with two or three small fires before
you operate your stove to its maximum heat output. This is to allow the paint to cure equally around its
surface and to give a long service life for the paint finish. During this curing in process you may notice
an unpleasant smell. It is non-toxic, but for your comfort we would suggest that during this period you
leave all doors and windows open.
First, load the fire with starting fuel, i.e. paper, dry sticks and/or firelighters in the mode chosen, either
wood or solid mineral fuel. DO NOT USE liquid/lighter fuels to start this appliance.
Light the fire at the base leaving all air controls open. Allow the fuel to reach a steady glow and build
the fire up gradually. Once you have a good fire established across the grate bed, further fuel can be
added as required.
Shutting Down
In order to shut down the stove, close the primary air controls, then close the secondary air slider by
moving the handle all the way to the LEFT. If the controls are left in this position, the fire will be
starved of air and will go out. If you want to revive the fire it is recommended that the primary air
control is opened first, then open the secondary air slider.
WARNING - The stove will remain HOT for a considerable time after the fire has been extinguished.
WARNING - Petroleum based fuels or household waste must not be burnt on this appliance.
Should any difficulties arise over fuel quality or suitability, consult your local approved coal merchant.
Safety Notes for your guidance

9
Ref: 14/ST/BF/1
• This appliance is NOT suitable for use in a shared flue.
• This appliance should NEVER be operated with the doors open.
• NEVER clean glass when the stove is hot. ALWAYS use stove glass cleaner, which is available
from DIY and stove retailers, only when the stove is cool.
• DO NOT use an aerosol spray on or near the stove when it is alight.
• DO NOT use liquid fuels in this appliance.
• NEVER leave the stove unattended for long periods without first adjusting the controls to a safe
setting – careful air supply control should be exercised at all times.
• DO NOT modify the appliance as it could result in damage to the appliance or injury to users.
• IMPORTANT – DO NOT fit an extractor fan in the same room as this appliance.
• IMPORTANT – A MINIMUM DISTANCE of 1500mm from combustible material.
FIRES CAN BE DANGEROUS – Always use a fireguard in the presence of children, the elderly
or the infirm.
DO NOT OVERFIRE – it is possible to fire the stove beyond its design capacity, this could
damage the stove, so watch for signs of overfiring – if any part of the stove starts to glow red, the
fire is in an overfire situation and the controls should be adjusted to immediately prevent the
overfiring.
WARNING – FUME EMISSION
Properly installed and operated, this appliance will not emit fumes. Occasional fumes from de-ashing
and refuelling may occur. Persistent fume emission must be stopped.
If fume emission does persist, then the following immediate action should be taken: -
1. Open doors and windows to ventilate room
2. Put the fire out, or safely dispose of the fuel from the appliance.
3. Check for flue chimney blockage and clean it if required.
4. Do not attempt to re-light the fire until the cause has been identified and corrected.
5. If necessary seek professional assistance.
IN THE EVENT OF A CHIMNEY FIRE
• Raise the alarm to let others in the house know.
• Call the Fire Brigade
• Close all air controls.
• Place a fireguard or spark guard in front of the stove.
• Feel the chimney breast for sign of excessive heat.
• Move furniture and rugs away from the fireplace and remove any nearby ornaments.
• DO NOT endanger yourself or any other person, so if necessary leave the house
immediately after calling the Fire Brigade.
MAINTENANCE

1
0 Ref: 14/ST/BF/1
Stove body
Use a soft brush to clean the stove; cleaning must ALWAYS be done after it has cooled down. The
finish can be renewed with proprietary stove paint
Baffle plate
Remove and clean the baffle plate once a month to avoid soot or fly ash.
Fireproof glass
Use a proprietary glass cleaner to clean the glass when cool. Any material that may damage the glass
should not be used to clean the panel. Wet logs on heated glass, a badly aimed poker or heavy
slamming of the doors could crack the glass panels and care should be taken.
Ceramic rope
Ceramic or fibreglass rope is used on the stoves. Inspect the rope around the door and glass. If rope is
becoming detached, use a proprietary rope glue to reattach it. Ensure you replace the rope in the case of
it being in poor condition.
Flue way and Chimney
Keep the chimney, flue way and any connection flue pipe swept regularly.
For users of smokeless fuels, sweep at least once a year, for wood and other fuels, at least twice a year.
If the stove is fitted in place of an open fire, then the chimney should be swept once every month after
installation to clear any soot falls which may have occurred due to the difference in combustion
between the stove and an open fire.
Problem solving
P
roblem Probable cause Corrective action
Wood, too damp or poor
quality
Use the recommended fuel

1
1 Ref: 14/ST/BF/1
Fire difficult to start
Fire goes out
Logs are too big
To light the fire, use small & very dry
twigs. To maintain the fire, use split
logs.
Lack of air
Open lower spin wheel and top air
control lever
Insufficient draught
Check that the flue is not blocked;
sweep it if necessary. Seek advice from
a chimney specialist
F
ire burns too quickly
Too much draught
Ensure that the lower spin wheel is
closed.
Partially close the top air control lever.
Excessive draw
Install a draught stabilizer. Consult a
qualified installer
Poor quality wood
Do not continuously burn small wood,
Sticks, bundles, carpentry off-cuts
(plywood, pallets), etc.
Smokes when lighting up
Flue duct is cold Burn paper and kindling wood to
increase heat.
Room is in decompression
Houses equipped with mechanical
ventilation, partly open a window until
the fire is well established.
Smokes while burning
Draught is insufficient
Consult a chimney specialist.
Check that the flue is not obstructed,
Sweep if necessary.
D
own draught
Houses equipped with mechanical
ventilation, should partly open a
window until the fire is well established.
Low heat output Incorrect Fuels Use the recommended fuel.
 Loading...