


PARTY GRILL
AND RACLETTE
Instruction Booklet
Model: TPG-457
Booklet_TPG-457_EngCov.qxd:Salton Booklet 8/13/08 10:09 AM Page 1

SAL6-480 BookletTPG_323_V3_EN 6/1/06 6:34 PM Page 2
IMPORTANT SAFEGUARDS
When using electrical appliances, basic safety precautions should always
be followed including the following:
1. Read all instructions.
2. Do not touch hot surfaces. Use handles or knobs.
3. To protect against electrical hazards, do not immerse cord, plugs,
or the appliance in water or other liquid.
4. Close supervision is necessary when any appliance is used by
or near children.
5. Unplug from outlet when not in use and before cleaning. Allow to cool
before putting on or taking off parts, and before cleaning the appliance.
6. Do not operate any appliance with a damaged cord or plug or after
the appliance malfunctions, or has been damaged in any manner. Return
appliance to Toastess for examination, repair or adjustment. See Warranty.
7. The use of accessories or attachments not recommended by Toastess may
cause hazards.
8. Do not use outdoors.
9. Do not let cord hang over edge of table or counter, or touch hot surfaces.
10. Do not place on or near a hot gas or electric burner, or in a heated oven.
11. Extreme caution must be used when moving an appliance containing
hot liquids.
12. Always attach plug to appliance first, then plug cord into the wall outlet.
To disconnect, turn any control to ‘OFF’, then remove plug from wall outlet.
13. Do not use appliance for other than intended use.
14. Do not leave unit unattended while in use.
SAVE THESE INSTRUCTIONS
HOUSEHOLD USE ONLY
2
POLARIZED PLUG
This appliance has a polarized plug (one blade is wider than the other).
To reduce the risk of electric shock, this plug will fit in a polarized outlet
only one way. If the plug does not fit fully in the outlet, reverse the plug.
If it still does not fit, contact a qualified electrician. Do not modify
the plug in any way.
INTRODUCTION
The Party Grill & Raclette is a enjoyable and healthy way of cooking meats,
fish and vegetables... in minutes! Well-known in Europe, the art of cooking
raclette encourages you and your guests to create simple yet delicious meals
together. Delight in fresh foods hot off the grill while enjoying the fun, party
atmosphere that this Party Grill & Raclette creates. Explore the wonderful
versatility of this product as you and your guests prepare grilled meats,
raclette... even appetizers such as cheese on potatoes, toast, or grilled
tomatoes can be a meal that is as unique as the person preparing it. It’s easy
to use and a snap to clean. Try the recipes included as an introduction to this
exciting method of cooking... and have fun!
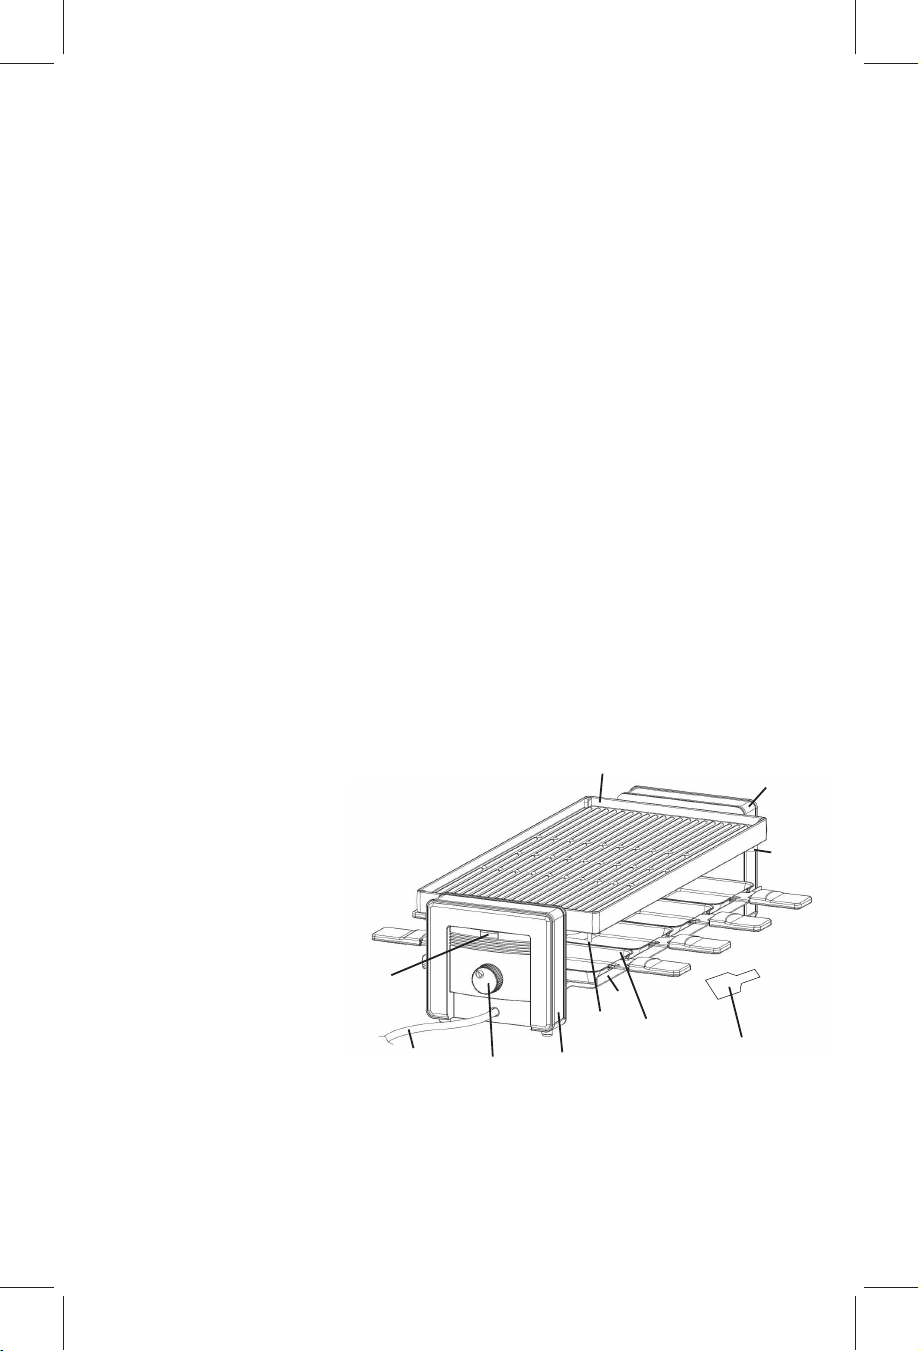
DESCRIPTION OF PARTS
1. Reversible Plate
2. Grill Supports
3. Raclette Pans
4. Lower Plate/Base
5. Temperature Control Dial
6. Indicator Light
7. Power cord
8. Handles
9. Spatulas
6
1
8
2
4
2
3
7
5
8
9
3

SAL6-480 BookletTPG_323_V3_EN 6/1/06 6:34 PM Page 4
BEFORE FIRST USE
1. Remove all packaging.
2. Wash the Grill Plate, Raclette Pans and Spatulas in warm soapy water.
Rinse and dry.
3. Wipe the Lower Plate/Base of the unit with a damp cloth. Dry.
NOTE: DO NOT WIPE ELEMENT. DO NOT IMMERSE UNIT IN WATER
OR ANY OTHER LIQUID.
4. Place the Lower Plate/Base on a flat level heat resistant surface close
to a 120 volt A.C. wall outlet. IMPORTANT: The Grill must be at least
6” (15cm) away from walls, curtains, etc. and in a well ventilated area.
5. Season the non-stick Grill Plate and Raclette Pans (inside only) by wiping
them with a paper towel moistened in 1 tbsp. (15 ml) of good quality
vegetable oil. Let the oil remain on the surface.
6. Place the Grill Plate on top of the Grill Plate Supports. Place the Raclette
Pans under the element on the Lower Plate.
7. Turn the Temperature Control Switch to the MAX position and heat for
approximately 10 minutes. This will burn off any manufacturing oils still
on the Grill.
normal and will not last more than a few minutes.
8. Turn off the Grill by turning the Temperature Control Dial to ‘•’ and
unplugging the Power Cord from the wall outlet or follow the directions
in the HOW TO USE section.
NOTE: The Grill may smoke during this process. This is
HOW TO USE
1. Place the Base on a flat level surface. Turn the Temperature Control Dial
to ‘•‘ position.
careful of splattering fat or juice when grilling foods.
2. Position the Reversible Grill Plate over the Element on the Grill Supports.
Use the smooth side for warming, preparing fondue or breakfast foods, etc.
Use the ridged side for grilling meats, fish or vegetables.
3. Place Raclette Pans under the element so they rest on the Lower Plate.
4. Plug the Power Cord into a 120 volt AC wall outlet.
NOTE: Ensure that the area being used is well ventilated. Be
4

SAL6-480 BookletTPG_323_V3_EN 6/1/06 6:34 PM Page 5
5. Turn the Temperature Control Dial to the MAX position and preheat
for about 10 minutes. When cooking turn the Temperature Control Dial
between ‘•‘ and MAX positions. These settings reflect temperatures
ranging from low to high respectively. The temperature may be adjusted
during cooking for optimal cooking results.
6. The Raclette Pans can be moved on and off the Lower Plate as food
is cooked and served.
NOTE: Be sure to place the hot raclette pans
on a heat-resistant surface when removed from the Grill.
7. Use smooth-edge utensils, preferably wooden or plastic. The spatulas,
included with the Grill, are specially designed to remove food from pans
easily and without sticking.
NOTE: Do not cut food on the Reversible
Plate or in the Raclette Pans as this may damage the coating.
8. When cooking is complete, turn the Temperature Control Dial to the ‘•’
position and remove plug from wall outlet.
9. Do not move the unit until it is completely cool. Remove the Raclette
Pans before moving to prevent them from falling from the Lower Plate.
HELPFUL HINTS
• Before preheating the Grill Plate, use a paper towel moistened in 1 tbsp.
(15 ml) of good quality vegetable oil and spread on cooking surface
of Grill Plate and inside Raclette Pans.
• Always preheat the Grill at the MAX temperature setting for 10 minutes.
• DO NOT use metal utensils to place food on or remove food from
the Grill Plate. This may scratch the non-stick Grill Plate.
• Use the Spatulas included with the appliance to remove food from
the Raclette Pans.
• Never cut food directly on the Grill Plate or in the Raclette Pans.
• When using the Raclette Pans on top of the Grill Plate, place gently
so they do not scratch the Grill Plate.
5

SAL6-480 BookletTPG_323_V3_EN 6/1/06 6:34 PM Page 6
GENERAL USE GUIDE
Smooth-Faced Plate
USE FOOD GUIDELINES
Warming Tray • Any type of food or • Place food in a heat-resistant
leftovers such as pasta, plate or pot and warm to desired
soups, casseroles, etc. temperature
Fondue • Cheese, chocolate • Can accommodate 2 aluminum
and Chinese fondue. or enameled steel pots.
WARNING: Do not use (Approximately 7” / 175mm)
with hot oil fondue. • Preheat pot on stove top or fondue
burner before placing on Plate.
• Place a piece of aluminum foil
under the fondue pot to avoid
damaging the non-stick coating.
Griddle • Pancakes, eggs, etc., • Pour batter or eggs directly
• Frying or browning meats, onto plate and cook to
poultry, fish, etc. desired taste
• Brown meats with a small
amount of vegetable oil.
Ridged Plate
USE FOOD GUIDELINES
Grilling • Meats, fish, poultry, • Spread a little vegetable oil
seafood and vegetables. on the Grill Plate. Preheat.
Place food on Grill Plate.
• Grill food according to taste.
Turn food from time to time.
• Grilling time depends on type
of food, initial temperature
and thickness.
6

SAL6-480 BookletTPG_323_V3_EN 6/1/06 6:34 PM Page 7
Raclette Pans
USE FOOD GUIDELINES
Broiling • Raclette cheese, raw eggs, • Place food in Raclette Pans.
breads, hors d’oeuvres. • Position Pans on Lower Plate
• Thinly sliced meats or fish. and broil to taste, verifying every
now and then.
• Melted cheese can be spread
on grilled food or bread.
Desserts • Fruits (flambé bananas, • Place food in Raclette Pans.
fruit gratins, etc.) • Cut fruit into slices.
• Thinly sliced cake sprinkled • Sprinkle fruit or cake with sugar
with liqueur. and position Pans on Lower Plate.
CARE AND CLEANING
1. Turn the Temperature Control Dial to the ‘•’ position. Remove
the plug from the wall outlet and allow the appliance to cool
completely before cleaning.
2. Remove the Reversible Plate, Raclette Pans and Spatulas from the appliance.
The Reversible Plate and Raclette Pans are dishwasher safe and can be
placed in the dishwasher or can be washed in hot soapy water along
with the Spatulas. Rinse and Dry.
3. Wipe the Lower Plate/Base with a soft damp cloth. Dry.
IMPORTANT NOTES:
- DO NOT WIPE THE ELEMENT
-
DO NOT USE STEEL WOOL OR ABRASIVE CLEANERS ON ANY PART
OF THE APPLIANCE.
DO NOT IMMERSE THE LOWER PLATE/BASE OR THE PLUG IN WATER
-
OR ANY OTHER LIQUID
4. To protect the appliance’s non-stick coating, wipe the Reversible Plate
and enameled Raclette Pans with a paper towel moistened with one
tablespoon of cooking oil. It is recommended to repeat this step after
every use.
RECIPES
There is an enormous choice of suitable meats, ranging from small sausages
to brochettes, chicken and fish, which can all be cooked on the Grill Plate.
Smaller pieces of food can also be cooked in the Raclette Pans. Please use
the following recipes as a guide.
7

SAL6-480 BookletTPG_323_V3_EN 6/1/06 6:34 PM Page 8
Raclette-Style Cheese
Use this simple recipe for making raclette cheese. Melt the blend of cheeses
in the Raclette Pans and spread on crusty bread or grilled vegetables.
1-1/2 cups (375 ml) shredded processed* Gruyere cheese
1 cup (250 ml) shredded Gouda Cheese
1 tbsp (15 ml) snipped fresh basil or oregano
2 tsp. (10 ml) Dijon-style mustard
1 tsp. (5 ml) white wine
Worcestershire sauce, to taste
Tabasco sauce, to taste
Blanched cauliflower and/or broccoli flowerets
Halved tiny new potatoes
Pita bread wedges
In a small mixing bowl combine cheeses; let stand to soften. Add basil
or oregano, mustard, wine and Worcestershire and Tabasco sauces. Beat with
an electric mixer on low speed until well combined; (mixture will be crumbly).
Form into a ball about 4” (10 cm) round by 1 inch (2.5 cm) high. Wrap in clear
plastic wrap. Chill several hours or overnight.
Preheat the Grill. Unwrap cheese round and cut into wedges. Place the wedges
in Raclette Pans. Place Pans on Lower Plate and melt cheese until softened
and heated through. Check often to make sure the cheese doesn’t over-melt
(the cheese shouldn’t loose it’s shape or start to run).
Grill vegetables and potatoes on the Grill Plate while cheese is melting. Serve
cheese with warm vegetables and pita bread.
*It is important to use processed cheese. Processed cheese melts smoothly,
giving an acceptable texture.
Veal Medallions with Camembert
4 veal medallions (1/2”/12mm thick)
4 slices Camembert cheese
Salt and pepper, to taste
Preheat the Grill. Season medallions with salt and pepper. Place medallions
on the Grill Plate and cook until desired doneness. Place cooked medallions
in Raclette Pans. Place a slice of cheese on each of the medallions and place
Raclette Pans on the Lower Plate until cheese is melted. Serve.
8

SAL6-480 BookletTPG_323_V3_EN 6/1/06 6:34 PM Page 9
King-Sized Prawns with Dill
6 – 8 raw, shelled prawns
Marinade:
juice of 1 lemon
4-5 tbsp. (60-75 ml) oil
1 tsp (5 ml) sea salt
1 tsp. (5 ml) chopped dill
white pepper, to taste
In a medium size bowl mix all of the marinade ingredients. Marinate prawns
in this mixture for 1 – 2 hours.
Preheat Grill. Place prawns directly on Grill Plate turning them over
occasionally until done.
Provençale Tomato Halves
medium sized tomatoes
chopped parsley
crushed garlic
fine bread crumbs
olive oil
Preheat Grill. Halve tomatoes. Place each half in a Raclette Pan and add
a very small amount of water. Place pans onto top of Grill Plate and steam
for about 20 minutes, turning once or twice. Mix chopped parsley, crushed
garlic, fine breadcrumbs and olive oil into a thick paste. Spread on top of the
tomatoes and place Raclette Pans on the Lower Plate for approximately 5 minutes.
Pears Savoy-Style
Pears, thinly sliced
butter
sugar
cream
Preheat Grill. Peel, halve and core pears then thinly slice. Melt butter in
Raclette Pans on the Lower Plate. Arrange pears in a fan shape and sprinkle
with sugar. Place Raclette Pans on top of Grill Plate and cook for a few
minutes until pears turn soft. Pour some cream over them and place Raclette
Pans on the Lower Plate. Cook gently until the sauce is slightly caramelized.
9

SAL6-480 BookletTPG_323_V3_EN 6/1/06 6:34 PM Page 10
Fondue Scampi
1 clove garlic, cut in half
13 oz. (364 g) Gruyère cheese
7 oz. (196g) Emmentaler cheese
1 tsp. (5 ml) cornstarch
1-1/2 cups (375 ml) Rosé wine
1 tsp. (5ml) lemon juice
1 shot Kirsch
1 tsp. (5 ml) dried dill
10 oz. (280 g) frozen (cooked and shelled) shrimp
Crusty French or Italian bread, cut into bit sized pieces
Thaw shrimp.
Set the temperature control to MAX and preheat the grill.
While the grill is preheating, rub the inside of a fondue pot with garlic. Put
coarsely grated cheeses, cornstarch, Rosè and lemon juice into the fondue
pot. Stir and heat on stove top – do not boil. Stir until smooth then add
Kirsch and dill. Stir until smooth.
Lower Grill Temperature Control to a medium setting and place fondue pot
on the smooth-faced side of the Reversible Plate to keep the fondue warm.
Dip bread pieces and shrimp into fondue.
French Toast
4 eggs
1/2 tsp. (3 ml) salt
3 tbsp. (45 ml) sugar
1-1/3 cups (335 ml) milk
8 slices day old bread
1 tbsp. (15 ml) unsalted butter – divided
Preheat Grill for 10 minutes with the smooth grill plate facing up. Turn the
Temperature Control to a medium setting.
While the grill is preheating, combine eggs, salt, sugar and milk in a shallow
baking dish. Blend thoroughly.
Put a small amount of butter on the grill plate and spread with a plastic
or wooden spatula.
Soak bread in egg mixture, turning once to coat both sides. Place on the grill
plate and cook until golden brown, turning once so both sides are cooked.
Serve immediately or place in an oven to keep warm.
NOTE: Do not soak
bread until ready to cook or the bread will break apart.
10

A short supply cord is provided to reduce the hazards of becoming entangled in
or tripping over a long cord. Extension cords may be used if care is exercised in
their use. If an extension cord is used, the marked electrical rating of the
detachable power-supply cord or extension cord should be at least as great as
the electrical rating of the appliance. If the appliance is of the grounded type,
the extension cord should be of a grounded 3-wire cord. The extension cord
should be arranged so that it will not drape over the counter top or table top,
where it can be pulled on by children or tripped over.
LIMITED WARRANTY
Toastess International warrants that this appliance shall be free from defects in
material and workmanship for a period of one year from the date of purchase.
During this ‘in-warranty’ period, defective products will be repaired or replaced
at the discretion of the retailer and/or Toastess International. This warranty covers
normal domestic usage and does not cover damage which occurs in shipment
or failure which results from alteration, accident, misuse, abuse, glass breakage,
neglect, commercial use or improper maintenance.
A defective product should be returned to the original place of purchase within
the retailer’s stipulated return/exchange period*. If you are unable to have a
defective product replaced under warranty by the retailer, please check our
website at “www.toastess.com” for the service centre nearest you or you may
contact us for assistance by mail, e-mail, fax or telephone as listed below.
To ensure prompt ‘in-warranty’ service, securely package and return the product
to us prepaid. Be sure to include the original proof of purchase and a description
of the defect along with your address and zip/postal code.
For repairs not covered by the warranty, please contact us for assistance.
* Return/exchange policies at each retailer vary and may differ from the Toastess International
1 year limited warranty period.
TOASTESS INTERNATIONAL
Customer Service Department
81A Brunswick
Dollard-des-Ormeaux
Québec, Canada H9B 2J5
E-mail: info@toastess.com
Fax: 514-685-8300
Tel: 514-685-2820
Booklet_THP-433_ENG.qxd 5/12/08 3:30 PM Page 5
 Loading...