

Page 1
OPERATING INSTRUCTIONS
TOA INTERCOM SYSTEM
TELEPHONE LINE INTERFACE
TD-600
Please follow the instructions in this manual to obtain the optimum results from
this manual.
We also recommend you to keep this manual handy for future reference.
TOA Corporation
Page 2

CONTENTS
General description
Part description
Connections
1. Power connection
2. Intercom line connection
3. Telephone line connection
4. Facsimile connection
Exchange DIP switch setting and programming
Signal mode adjustment and setting
1. Receiving sound volume adjustment
2. Adjustment of current supplied to telephone
3. Jumper wire connection
4. Polarity reverse signal control
Call operations
Installation
Specifications
Accessories
2
3
4
4
5
6
6
7
8
9
10
10
11
12
12
GENERAL DESCRIPTION
By using the TD-600 telephone interface in conjunction with TOA' s intercom exchange,
a pushphone (*DTMF) can be used as a handset intercom station. Two pushphones can
be connected per interface.
DTMF=Dual tone multi-frequency
– 2 –
Page 3
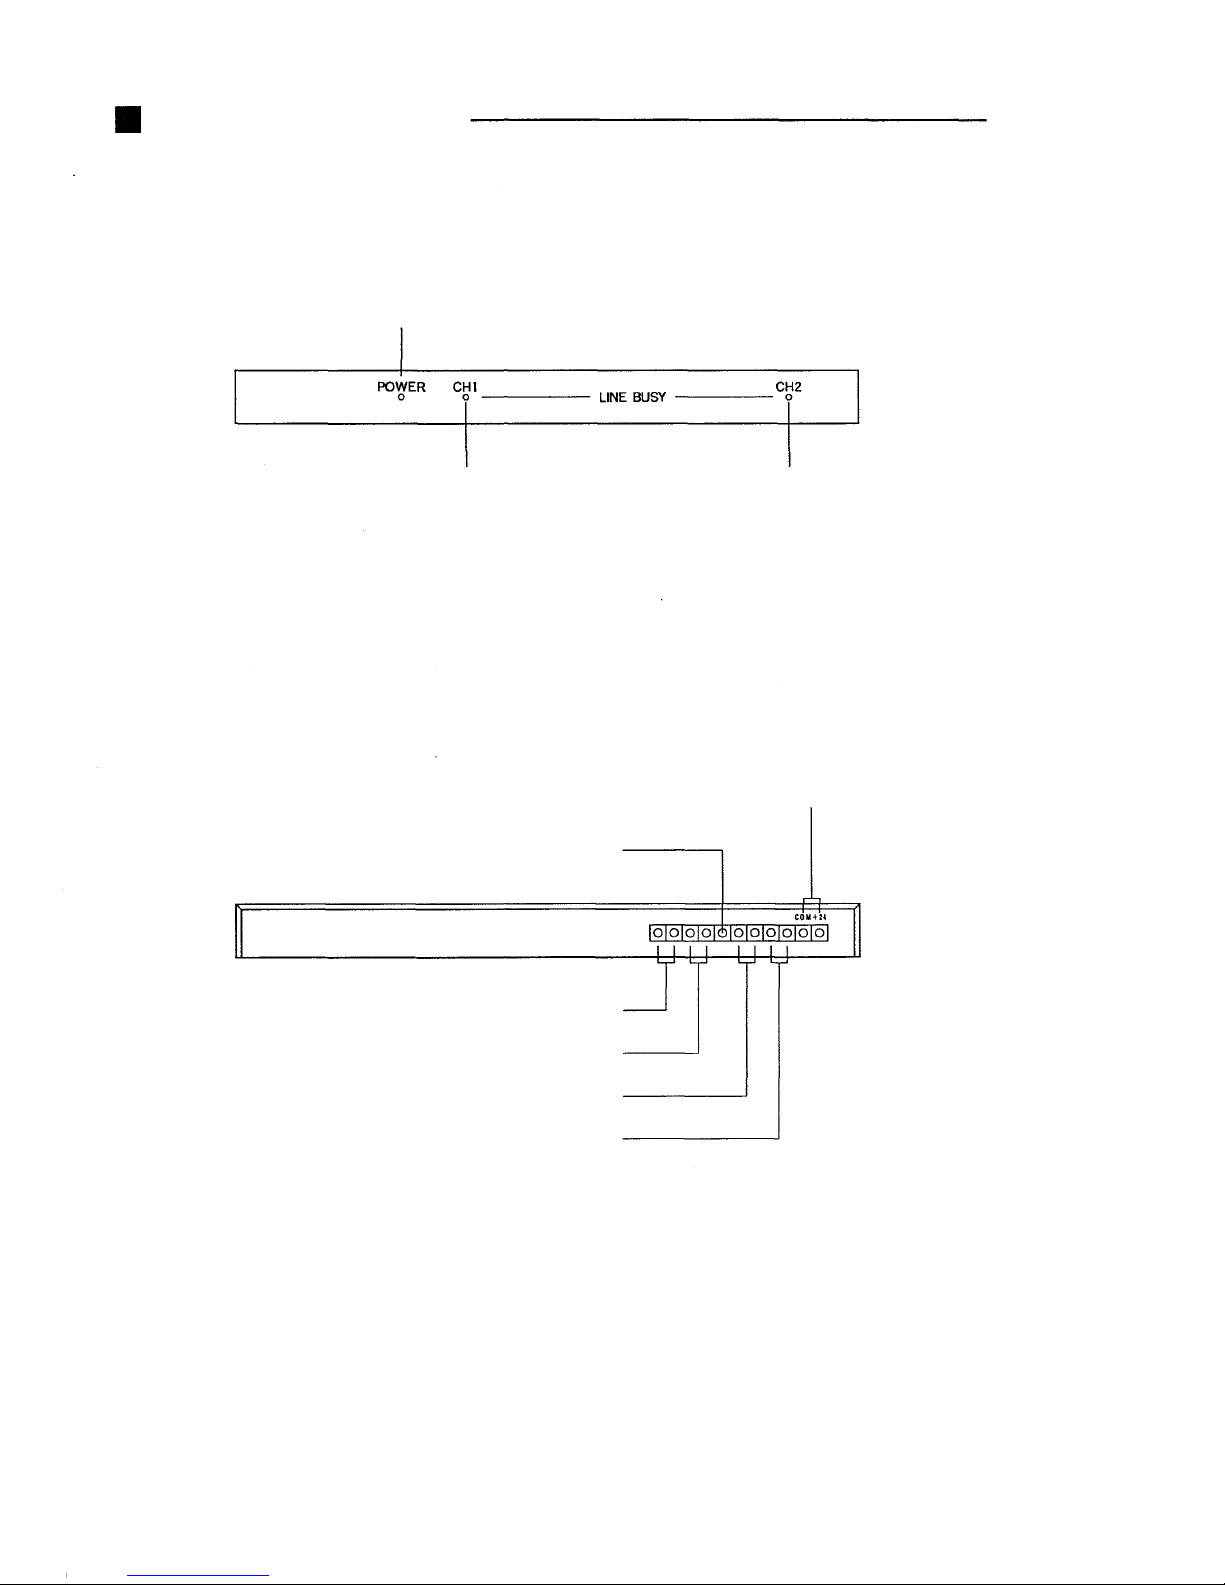
PART DESCRIPTION
[Front view]
Power indicator
[Rear view]
CH1 telephone
hook-off indicator
Earth terminal
(Be sure to ground.)
CH2 intercom line terminal
CH2 telephone line terminal
CH2 telephone
hook-off indicator
Power supply terminal
CH1 intercom line terminal
CH1 telephone line terminal
– 3 –
Page 4
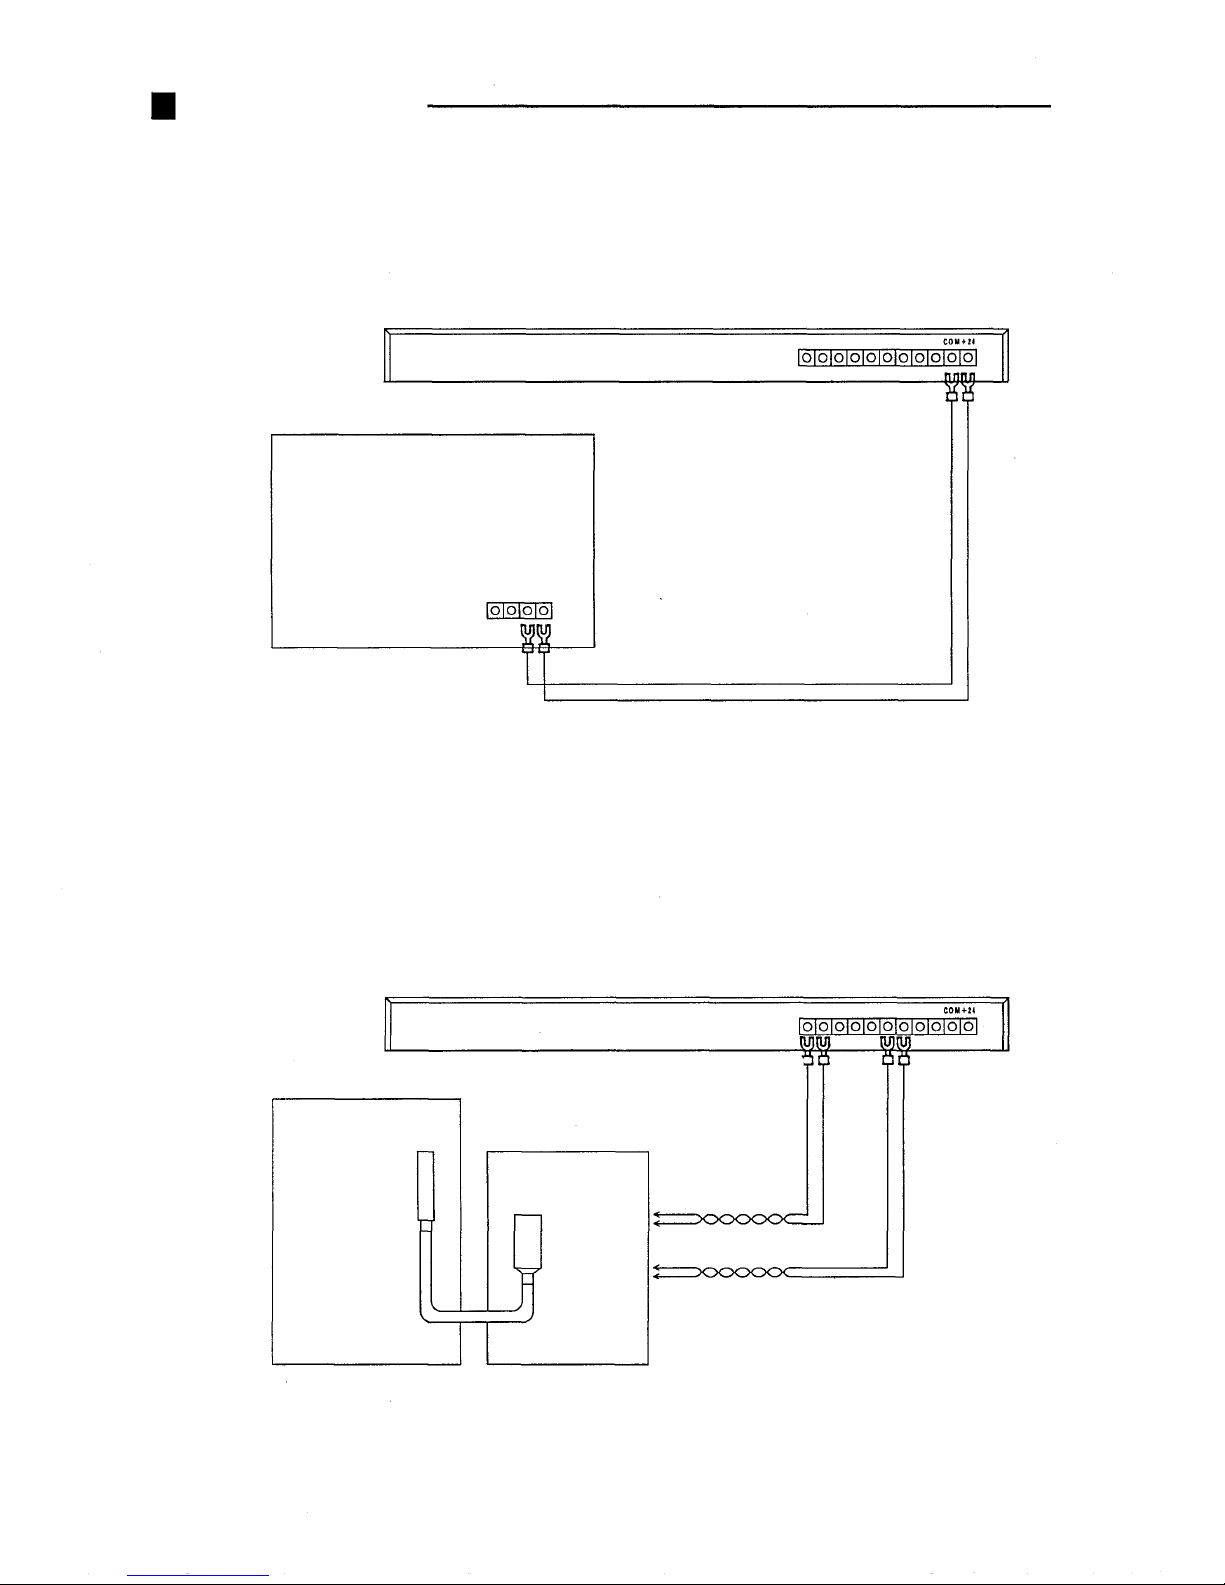
CONNECTIONS
1. Power connection
24V DC power supply
[AD-242A (2.5A) etc]
TD-600
2. Intercom line connection
2. 1 When using EXES-6000 exchange
EXES-6000
series exchange
CH2 intercom line terminal
YR-810/801
TD-600
CH1 intercom line
terminal
Twisted pair cable etc.
BX-610/620
– 4 –
Page 5
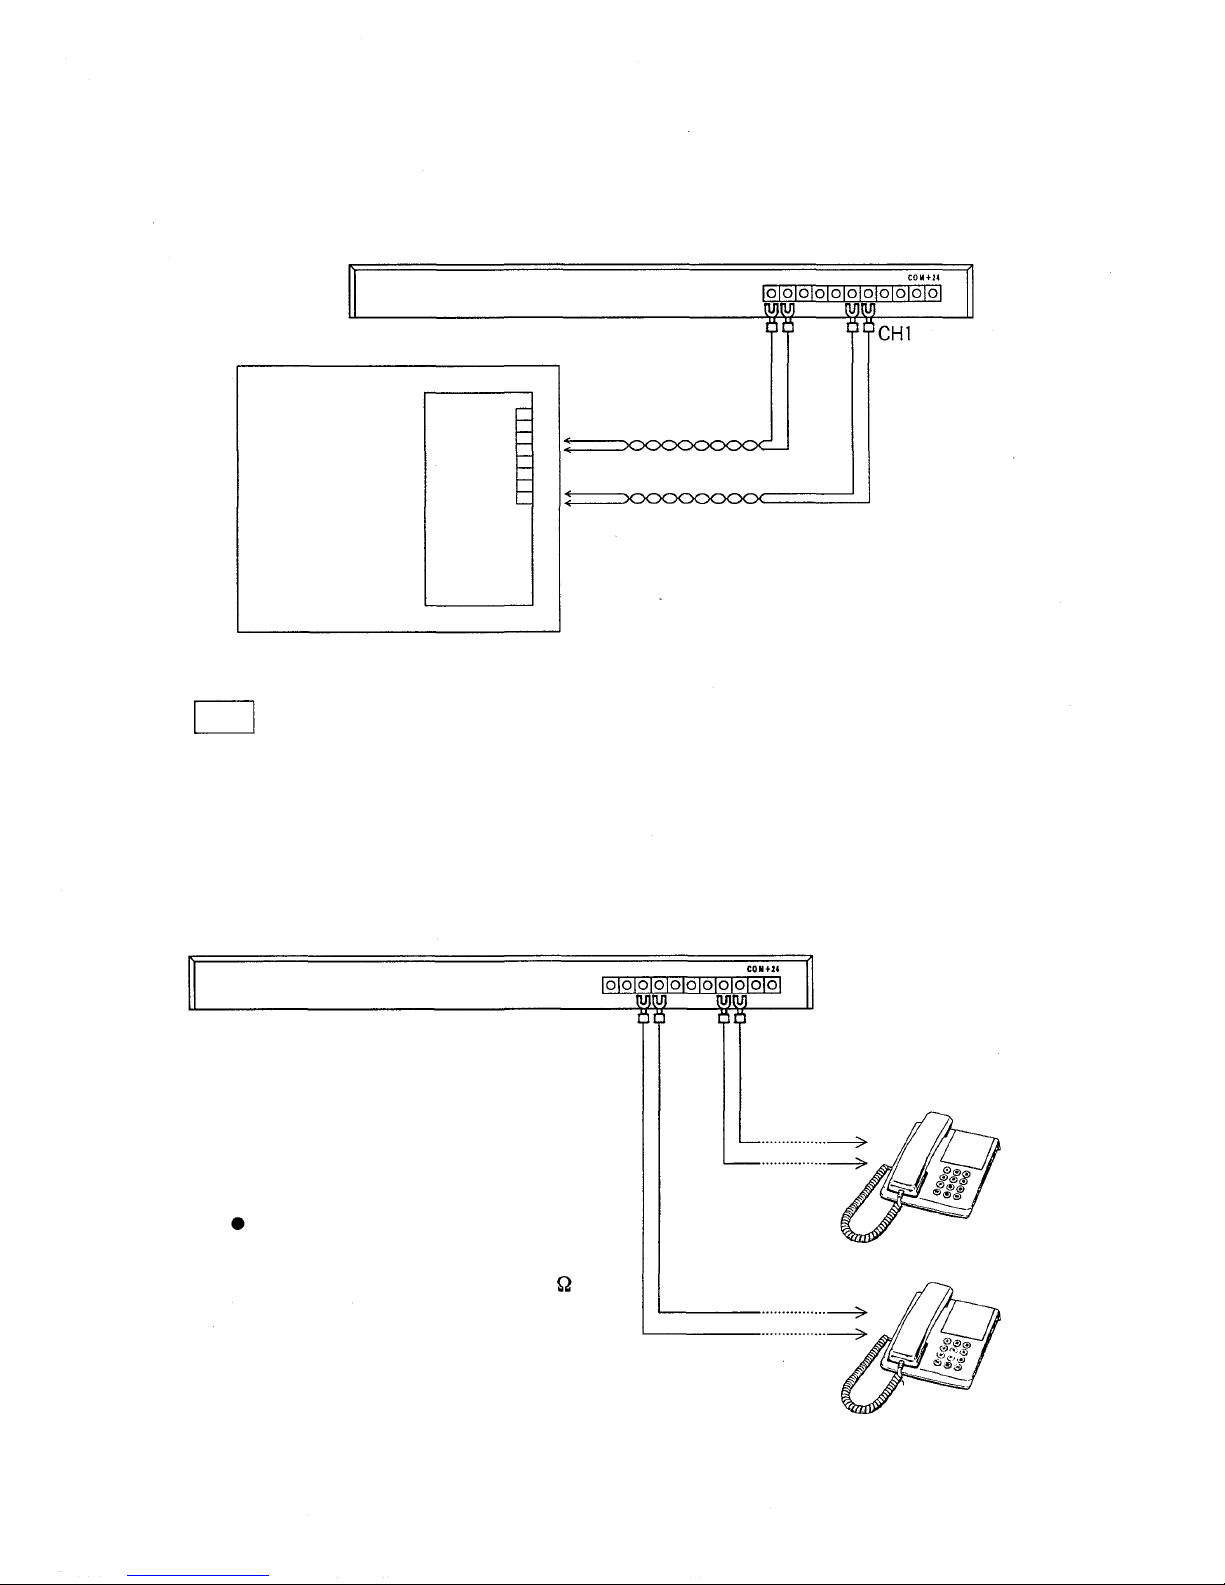
2.2
When using EX-200 exchange
TD-600
EX-200 exchange
Perform jumper wire settings as instructed in page 9.
Note:
Telephone line connection
3.
LM-20
CH2 intercom line terminal
intercom line
terminal
Twisted pair cable etc.
CH2 telephone line terminal
Usable telephones
1) DTMF type
2) Type with line impedance of 600
TD-600
CH1 telephone line
terminal
DTMF telephone
– 5 –
Page 6
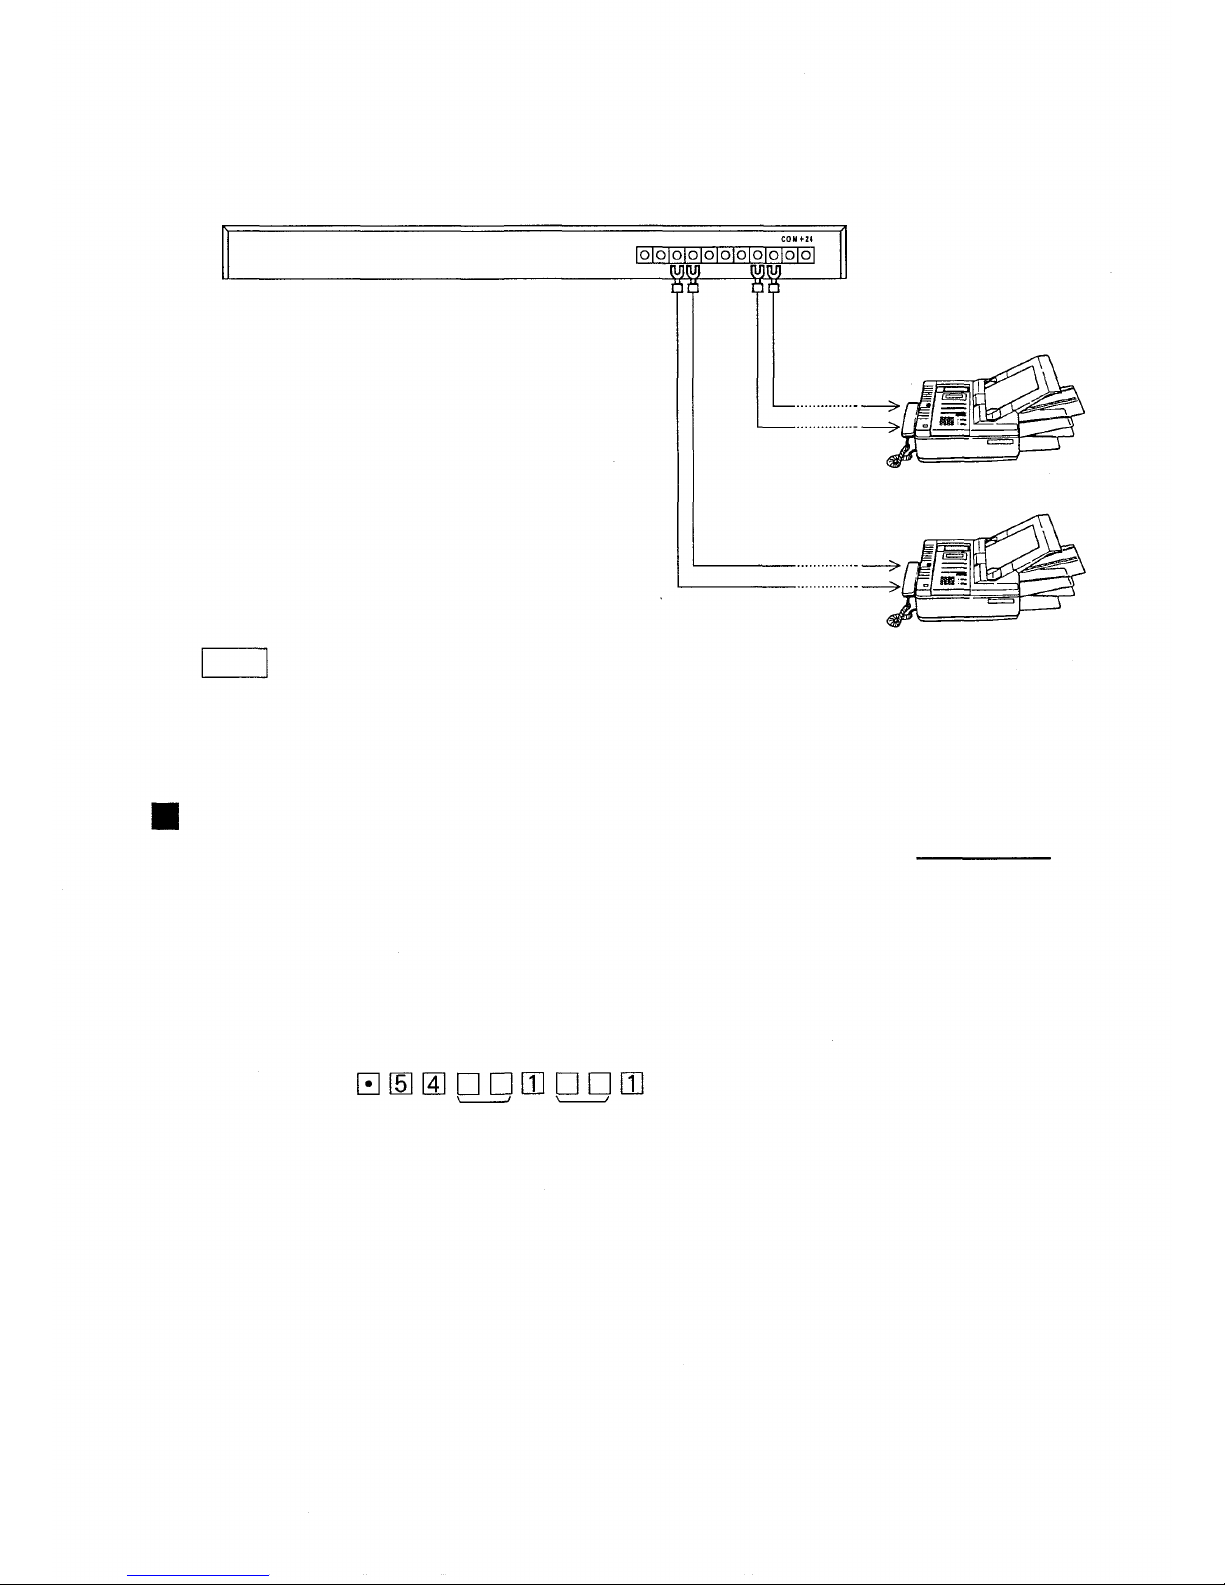
Facsimile connection
4.
TD-600
CH2 telephone line terminal
To facsimile line
CH1 telephone line terminal
terminal
Note:
Usable facsimiles are restricted that selecting signal is transmitted a pushphone.
EXCHANGE DIP SWITCH SETTING
AND PROGRAMMING
Facsimile
Al l the lines or exchanges to connect the TD-600 should be set to the continuous call tone.
1. When using EX-200 exchange
Perform the handset station registration with the station No. 24.
Handset station No. Handset station No.
2. When using EX-600 exchange
Set the DIP swtich (SW-B-1) of CP-60 to ON to select the continuous call tone.
3. When using EX-610/620/630 exchange
Set the DIP swtich (SW-E-8) of CP-66 to ON to select the continuous call tone.
– 6 –
Page 7
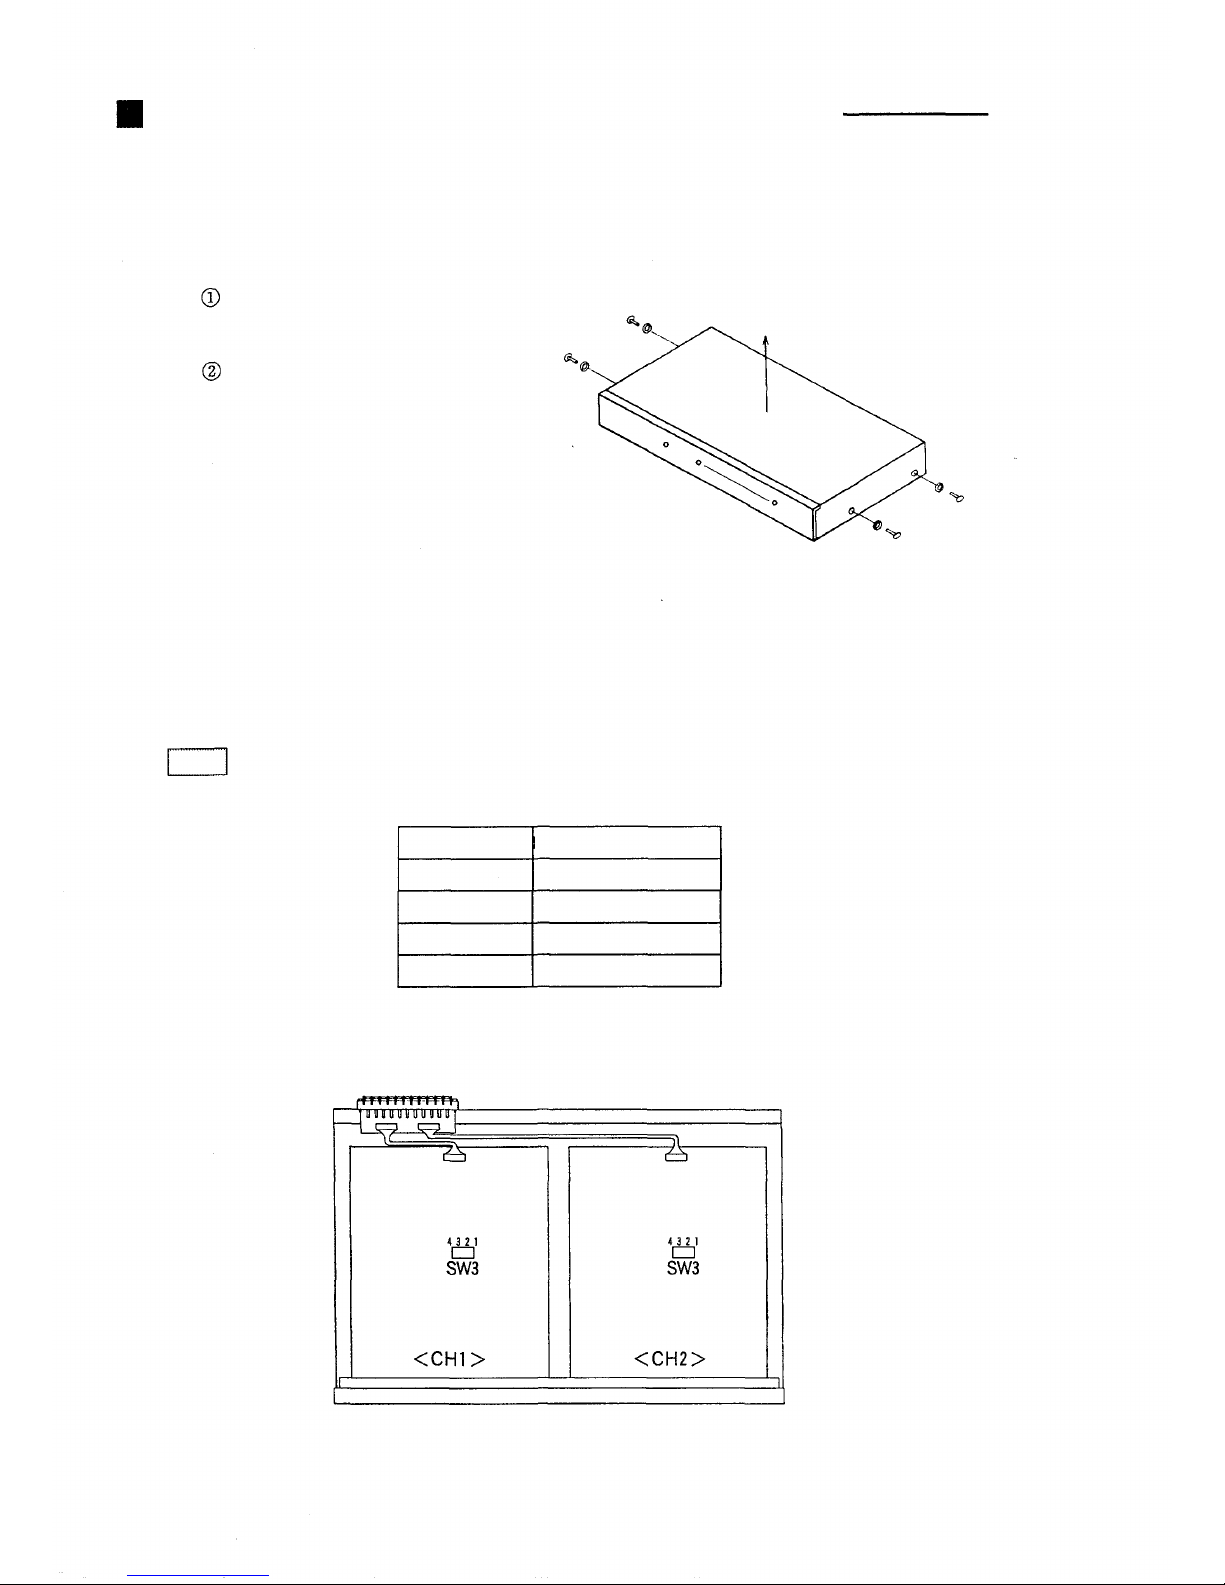
SIGNAL MODE ADJUSTMENT AND SETTING
Perform the signal mode setting before the final installation or wiring work because the
setting requires the removal of the top cover.
Remove side plate screws (four places).
Detach the top cover.
1. RECEIVING SOUND VOLUME ADJUSTMENT
The receiving sound volume can be adjusted in 8dB steps by switching SW3 setting
as shown in the figure below.
Position of SW3 is factory-preset to "1".
Note:
Position of SW3
1
2
3
4
Position 1 of SW3 is set to 0dB.
Receiving sound volume step
0dB
+
8dB
+
16dB
+ 24dB
[Rear]
[Front]
– 7 –
Page 8
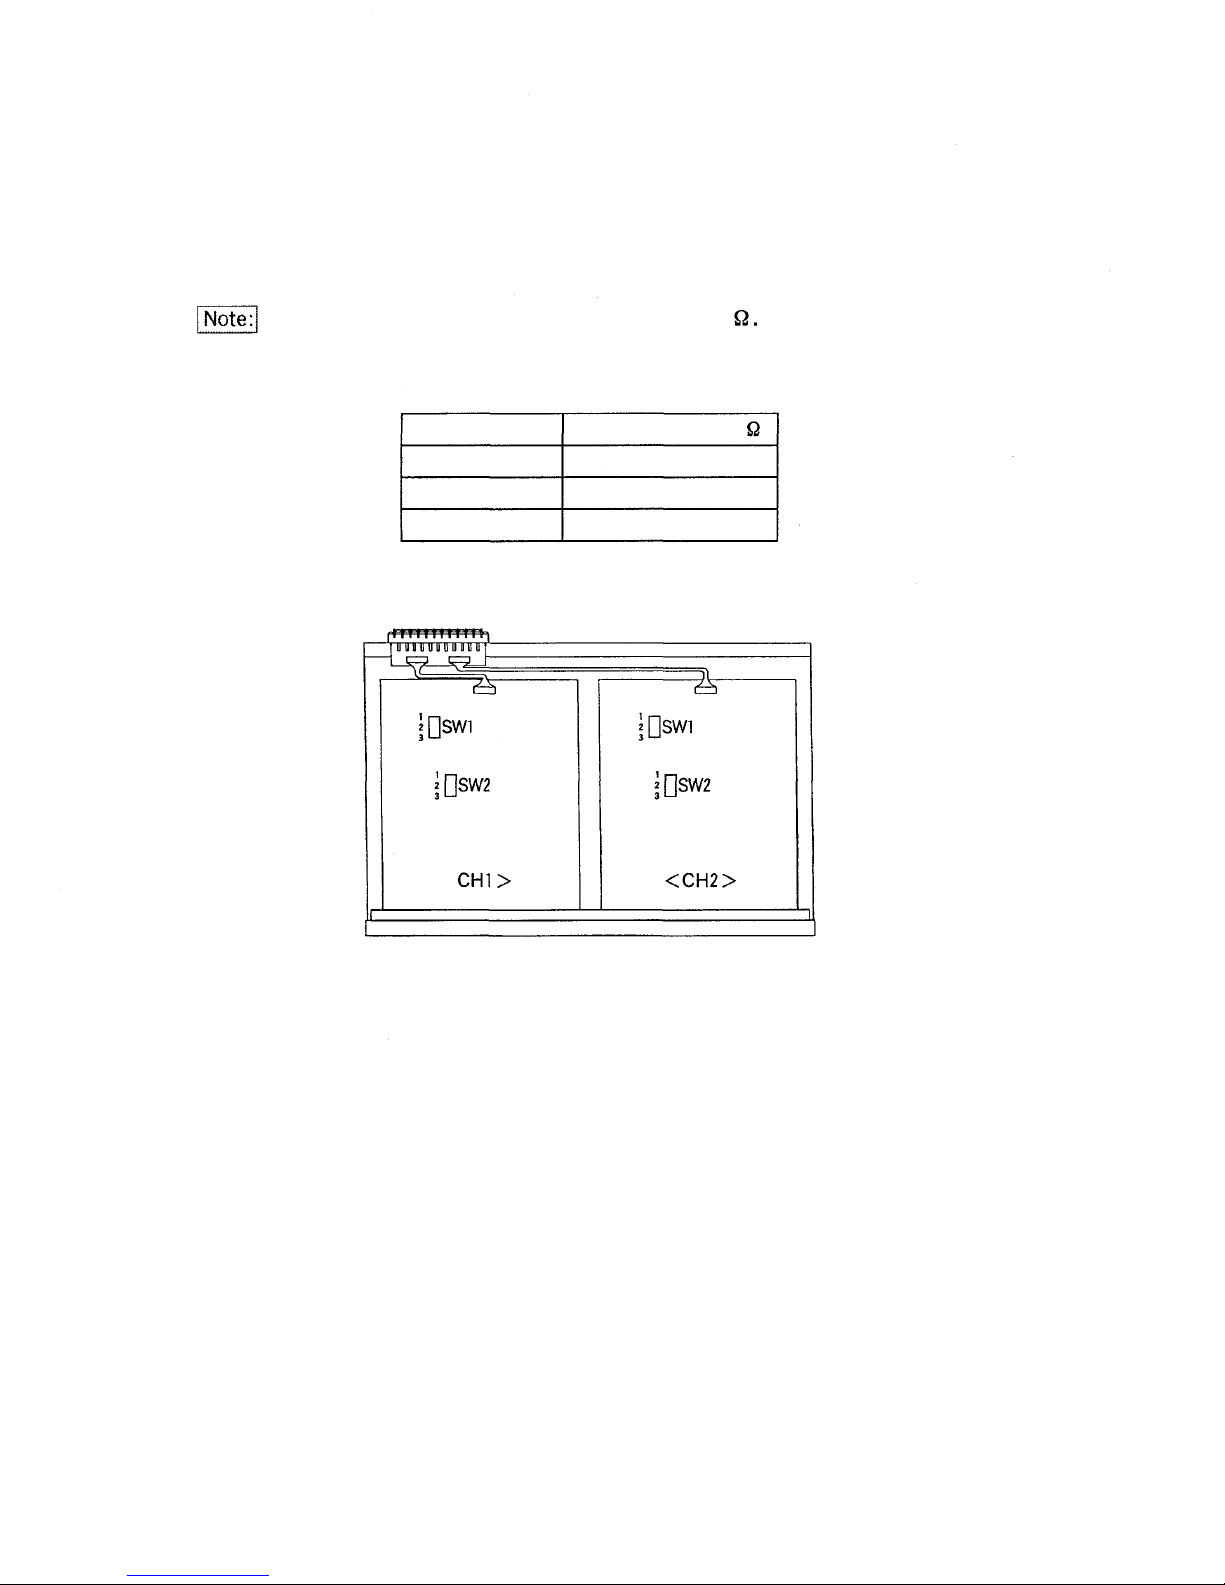
2. ADJUSTMENT OF CURRENT SUPPLIED TO TELEPHONE
The distance between the TD-600 and telephone can be made greater by making switch
positions of both SW1 and SW2 identical to adjust the current to be supplied to the
telephone. See the table below.
The line loop resistance is factory-preset to 0~1500
Positions of SW1/SW2
1
2
3
Line loop resistance ( )
0~1500
1500~2000
2000 or more
[Rear]
[Front]
– 8 –
Page 9

JUMPER WIRE CONNECTION (When using the EX-200 exchange)
3.
Referring to Table 1, change settings of jumper wires JP1-JP3.
All jumpers are factory-preset to the EXES-6000' s settings.
Table 1
Exchange
Jumper
JP1
JP2
JP3
EXES-6000
Jumper installed
Jumper installed
Jumper not installed
[Rear]
EX-200
Cut jumper
Cut jumper
Install jumper
[Front]
– 9 –
Page 10

4. POLARITY REVERSE SIGNAL CONTROL
When connecting the telephone line terminal to equipment that must not receive the polarity
reverse signal, install the jumper wire in place marked with JP4 in the figure.
Jumper JP4 is not factory-preset because the polarity reverse signal is set to transmit
from the CH1 or CH2 telephone line terminal.
[Rear]
[Front]
CALL OPERATIONS
(1 )Lift up the handset and confirm that a dial tone is audible. Dial the desired station number
within 10 seconds.
(2)Replace the handset when terminating the conversation.
(3)The intercom station's dial key
[Example]
Intercom station
(All call paging)
• Dialing must be completed within 10 seconds after lifting up the handset. If incomplete,
no dial signal can be transmitted to the exchange even when the dial keys are pressed.
Thus, the pushphone cannot be used for functions such as call transfer, speech message,
busy call back etc. to dial during the conversation.
• When transmitting the DTMF signal during the conversation in conunction with the TI-20
or TI-600 tie-line unit etc., do not press any button of pushphone. This will lead to
malfuction of the exchange.
corresponds to dial key
Pushphone
(All call paging)
of the pushphone.
– 10 –
Page 11

INSTALLATION
Rack mounting
Attach supplied brackets to the TD-600 to mount it in the rack.
M5 Rack mounting screw
M3 Washer
M3 Binding head screw
Rack mounting bracket
Fiber washer
Unit can not be built in the inside of EX - 610/620 exchanges.
Mount it using the optional CR-271N or CR-392N cabinet rack.
Desk-top application
Attach supplied rubber feet to holes ( ø 2.5mm) on the bottom surface (four places).
Rubber foot
– 11 –
Page 12

SPECIFICATIONS
Operating voltage
Current consumption
Applicable telephone
Permissible line resistance
Frequency response
Max. output signal level
Line output DC voltage
Ringing tone
Line capacity
Line connection
Installation method
Ambient temperature range
Dimensions
Finish
Weight
+ 24V DC (20V~28V)
250 mA
max.
DTMF type
2500
(loop)
300~3400 Hz
-10 dBm
-48V
75V,
16Hz
2 lines
Screw terminal
Desk top or rack mounting
0°C~40°C ( 3 20F~1040F)
432(483)(W)x44.5(H)x298(D) mm
(17.01(19. 02) x 1.75 x 11.73 in.)
Panel: metallic gold
Case: colored steel plate-dark grey (Munsell N3.0)
Rack mounting bracket: metallic gold
3.3kg (7.3lb.)
ACCESSORIES
Rack mounting bracket
Rack mounting screw
(M5x12 tapping screw)
Fiber washer
Binding head screw (M3x6)
M3 washer
Rubber foot
Installation manual
2
4
4
4
4
4
1
TOA Corporation
KOBE, JAPAN
133-06-171-00
Page 13

TD-600
Please see the reverse side for English manual.
Page 14

EXES-6000
EX-200
EX-600/610/620/630
EXES-2000
Page 15

CH1
CH2
CH2
CH2
CH1
CH1
– 3 –
Page 16

TD-600
TD-600
– 4 –
Page 17

TD-600
TD-600
– 5 –
Page 18

TD-600
– 6 –
Page 19

<CH 1 >
<CH2>
– 7 –
Page 20

<CH1>
<CH2>
– 8 –
Page 21

EXES-6000
EX-200J
– 9 –
Page 22

<CH1>
<CH2>
– 10 –
Page 23

M5
M3
M3
– 11 –
Page 24

133-06-171-00
 Loading...