

Page 1
Thank you for purchasing TOA's Speaker Mount Bracket.
Please carefully follow the instructions in this manual to ensure long,
trouble-free use of your equipment.
SP-131
SP-201
SP-301
SPEAKER MOUNT BRACKETS
INSTALLATION MANUAL
1. SAFETY PRECAUTIONS
• Before installation or use, be sure to carefully read all the instructions in this section for correct and safe
operation.
• Be sure to follow all the precautionary instructions in this section, which contain important warnings and/or
cautions regarding safety.
• After reading, keep this manual handy for future reference.
Indicates a potentially hazardous situation which, if mishandled, could
result in death or serious personal injury.
WARNING
Indicates a potentially hazardous situation which, if mishandled, could
result in moderate or minor personal injury, and/or property damage.
CAUTION
When Installing the Unit
• Install the unit only in a location that can structurally support the weight of the unit and the speaker. Doing
otherwise may result in the speaker falling down and causing personal injury and/or property damage.
• Do not use other methods than specified to mount the unit. Extreme force is applied to the unit and the
speaker could fall off, possibly resulting in personal injuries.
• Use nuts and bolts that are appropriate for the wall's structure and composition. Failure to do so may cause
the speaker to fall, resulting in material damage and possible personal injury.
• Tighten each nut and bolt securely. Ensure that the unit has no loose joints after installation to prevent
accidents that could result in personal injury.
• Do not mount the unit in locations exposed to constant vibration. The unit can be damaged by excessive
vibration, potentially causing the speaker to fall, which could result in personal injury.
• Do not use anti-rust lubricant. If it contacts resin or rubber parts, they could deteriorate and cause the unit to
fall, possibly resulting in personal injury.
When Installing the Unit
• Avoid touching the unit's sharp metal edge to prevent injury.
When the Unit is in Use
• Do not stand or sit on, nor hang down from the unit as this may cause it to fall down or drop, resulting in
personal injury and/or property damage.
• Have the unit checked periodically by the shop from where it was purchased. Failure to do so may result in
corrosion or damage to the unit that could cause the unit to fall, possibly causing personal injury.
2. GENERAL DESCRIPTION
These Speaker Mount Brackets are designed to mount horn speakers or wide range speakers to walls or
poles. Pole mounting of the speaker requires addition of the optional YS-60B Pole Band.
Page 2
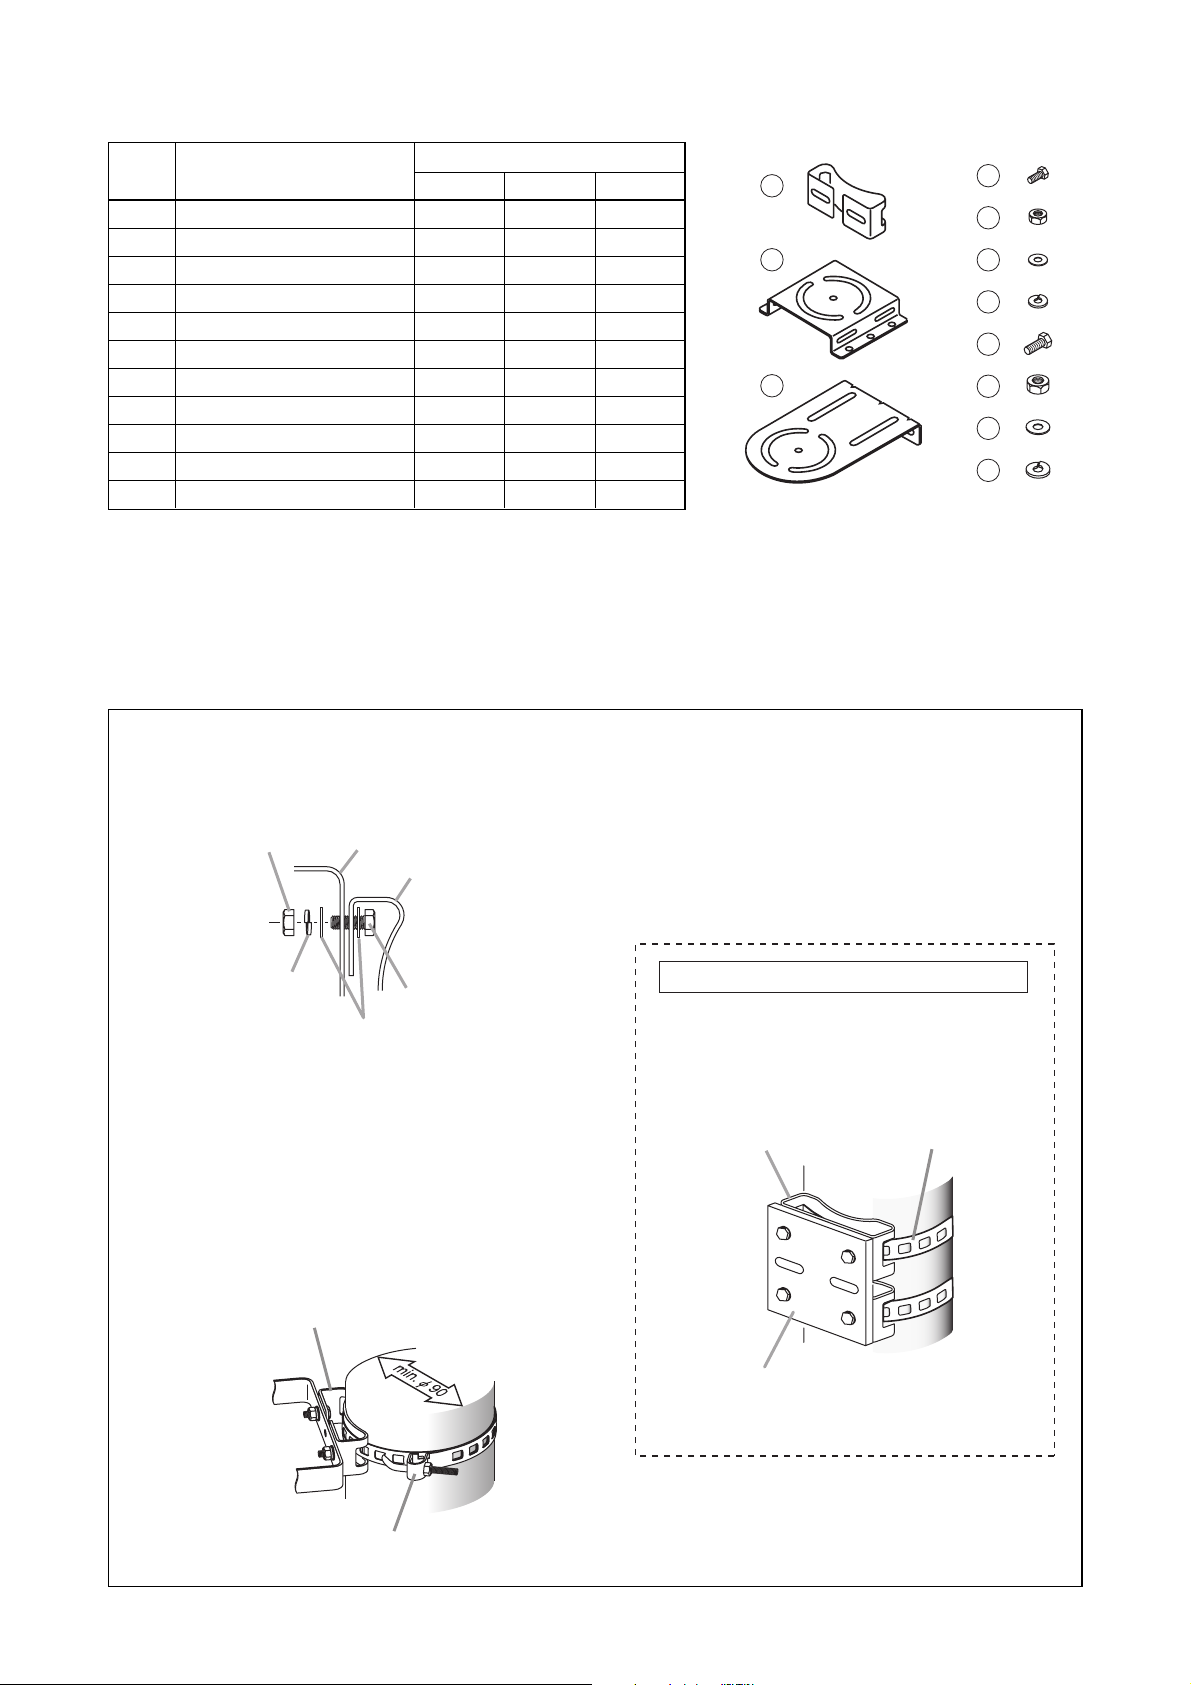
3. COMPONENT PARTS
4. INSTALLATION
4.1. SP-131 (Designed for pole mounting)
Quantity
SP-131* SP-201 SP-301
2
--
-
1
-
--
1
422
422
844
422
422
422
844
422
No.
1
2
3
4
5
6
7
8
9
10
11
Part name
SP-131 pole bracket
SP-201 base bracket
SP-301 base bracket
Hexagon bolt M8 x 20
Nut (for M8)
Plain washer (for M8)
Spring washer (for M8)
Hexagon bolt M10 x 25
Nut (for M10)
Plain washer (for M10)
Spring washer (for M10)
* The SP-131 contains 2 sets of brackets.
Step 1. Attach the SP-131 pole bracket to the speaker's mounting bracket.
Use the supplied bolts that fit holes in the speaker mounting bracket.
Step 2. Mount the SP-131 pole bracket to
the pole by using the YS-60B Pole
Band.
Note
The YS-60B permits speaker mounting to
a pole of 9 to 34 cm in diameter.
1
4
5
2
6
7
8
3
9
10
11
Nut
Spring washer
Speaker's mounting bracket
SP-131 pole bracket
Hexagon bolt
Plain washers
Example of mounting reinforcement
If the installation location is susceptible to
vibrations or strong wind, use the SP-131 in
combination with 2 YS-60Bs to reinforce the
mounting strength as shown below.
SP-131 pole bracket YS-60B (option)
SP-131 pole bracket
YS-60B (option)
Reinforcing plate
Note: Separately prepare the one with 5 mm or
more in thickness.
Page 3
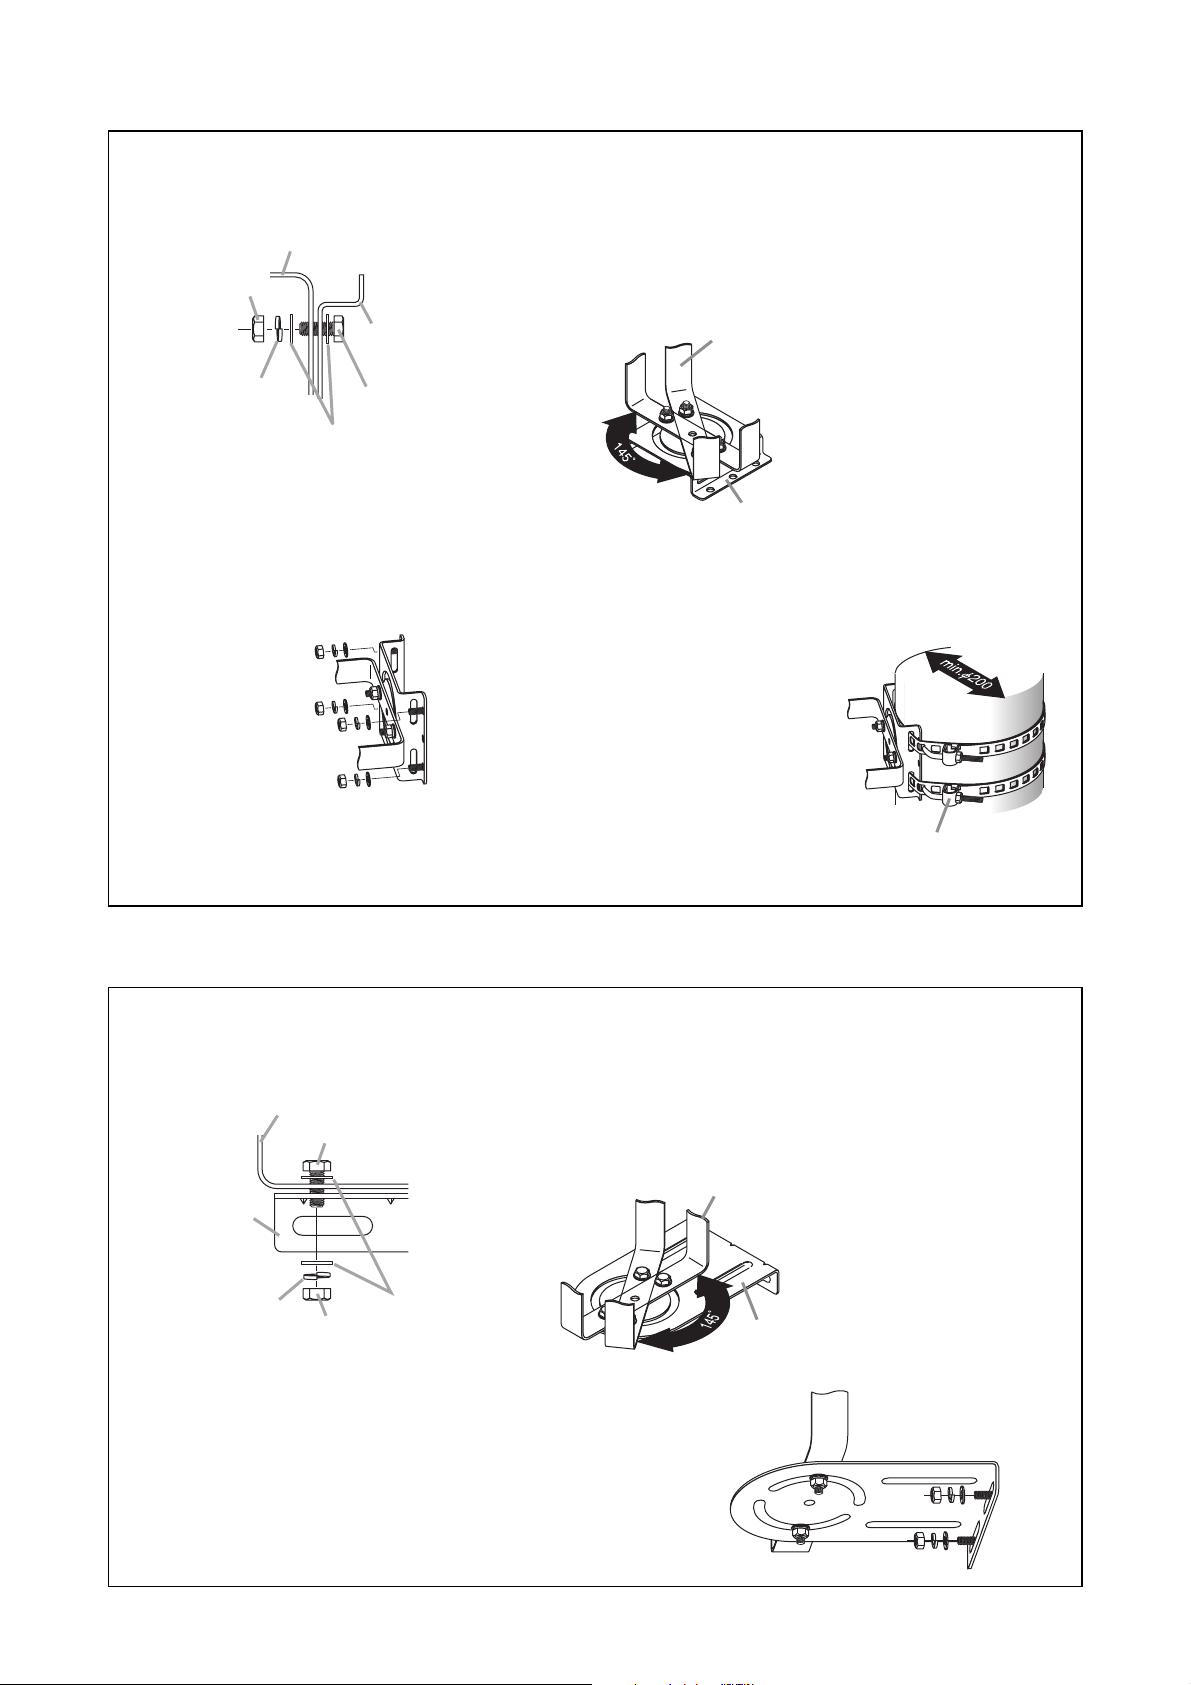
4.2. SP-201 (Designed for wall or pole mounting)
4.3. SP-301 (Designed for wall mounting)
Step 1. Attach the SP-201 base bracket to the speaker's mounting bracket.
Use the supplied bolts that fit holes in the speaker mounting bracket.
Step 2. Adjust the mounting angle of the
speaker's mounting bracket.
Adjustable range: Up to 145°
Step 3. Mount the SP-201 base bracket to the wall or pole.
[Example of wall mounting]
Note
Any bolts, nuts, and washers for
wall mounting are not supplied.
Separately prepare ones appropriate for walls.
Step 1. Attach the SP-301 base bracket to the speaker's mounting bracket.
Use the supplied bolts that fit holes in the speaker mounting bracket.
Step 2. Adjust the mounting angle of the
speaker's mounting bracket.
Adjustable range: Up to 145°
Step 3. Mount the SP-301 base bracket to the wall.
Note
Any bolts, nuts, and washers for wall mounting are
not supplied.
Separately prepare ones appropriate for walls.
[Example of pole mounting]
Use 2 of the optional YS-60B Pole
Bands as shown at right.
Note
The YS-60B permits speaker
mounting to a pole of 20 to 34 cm
in diameter.
Note
Tighten the bolts after angle
adjustment.
Note
Tighten the bolts after angle
adjustment.
Speaker's mounting bracket
Nut
Spring washer
SP-201
base bracket
Hexagon bolt
Plain washers
Speaker's
mounting bracket
SP-201 base bracket
YS-60B (option)
Speaker's mounting bracket
Hexagon bolt
SP-301
base bracket
Spring washer
Nut
Plain washers
Speaker's mounting bracket
SP-301 base bracket
Page 4
* The TOA speakers heavier than 5 kg can be mounted if they are recommended for use with the SP-131 in
our catalogs or other material.
Note: The design and specifications are subject to change without notice for improvement.
• Optional product
Pole Band: YS-60B
533-06-152-10
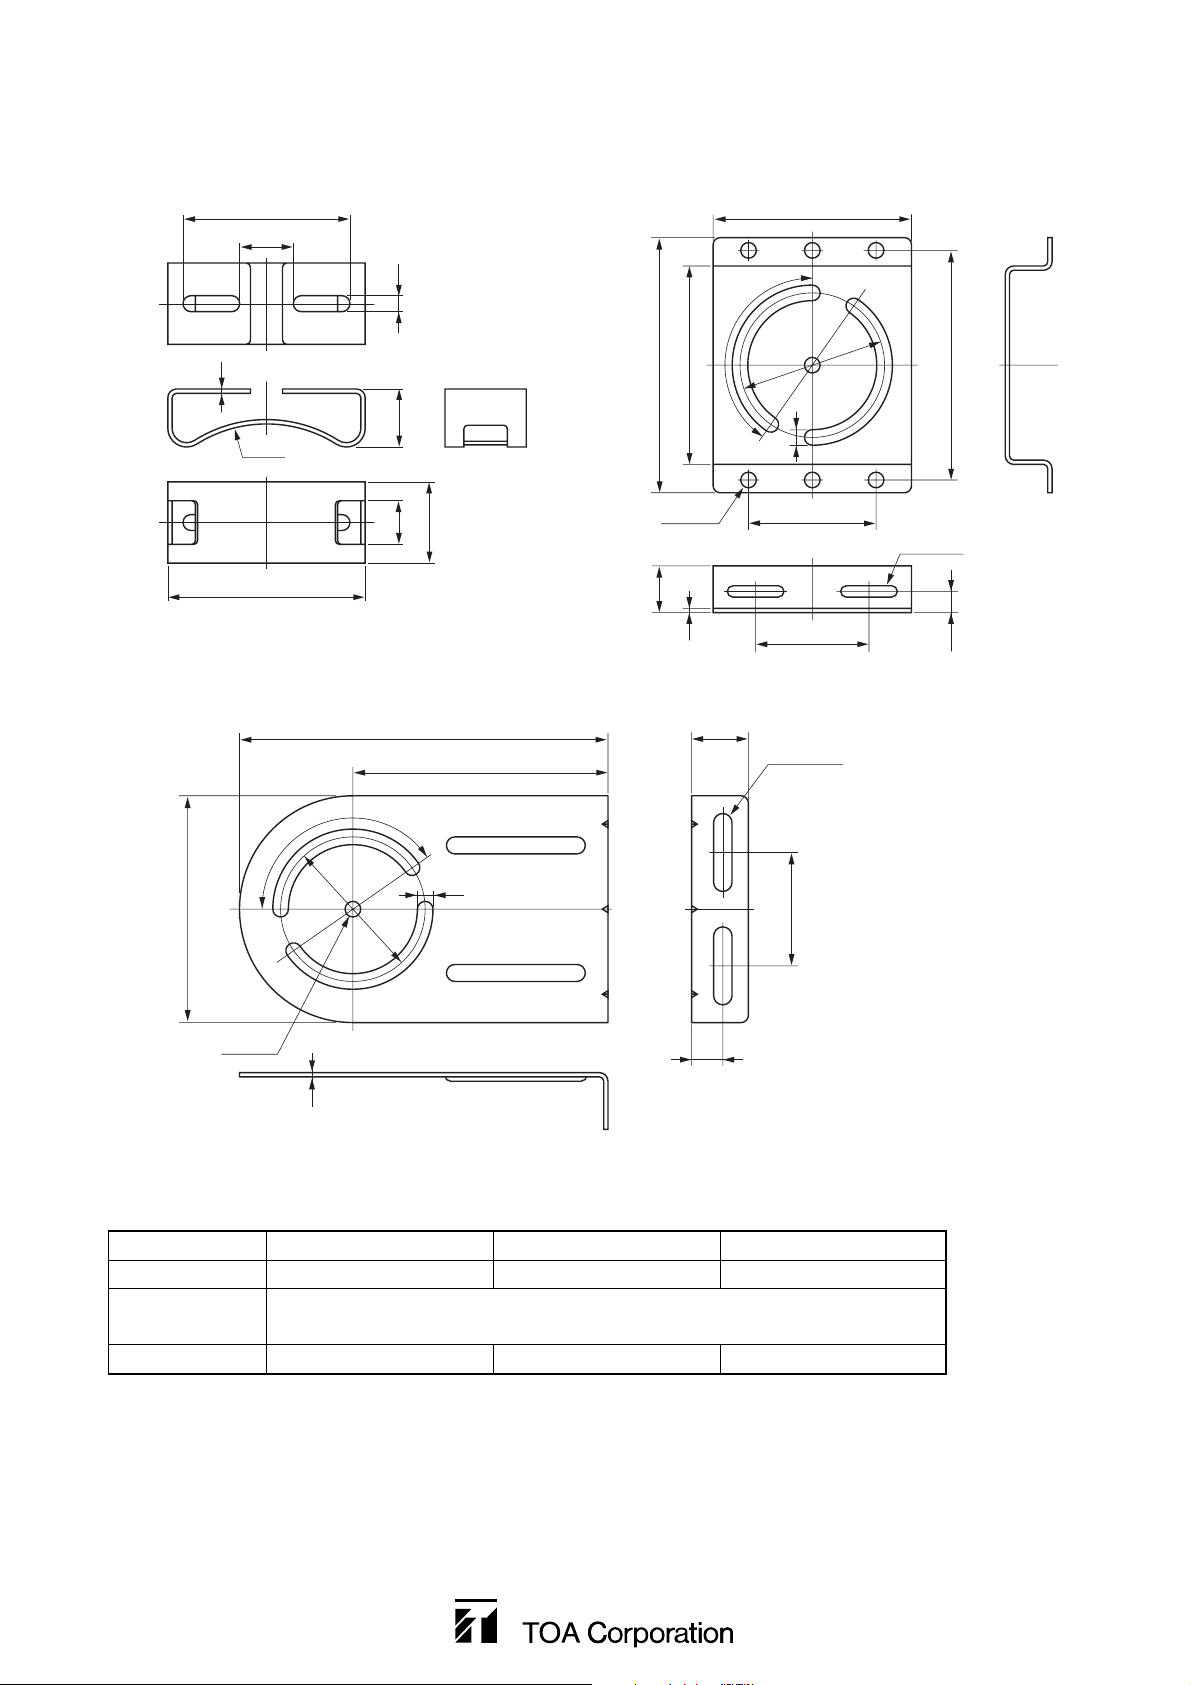
5. DIMENSIONAL DIAGRAM
6. SPECIFICATIONS
[SP-131]
[SP-301]
[SP-201]
SP-301
5 kg
Bracket: Stainless (SUS304)
Bolt, nut, washer: Stainless
910 g (Bracket only)
Model No.
Withstand load
Finish
Weight
SP-131
5 kg*
330 g (per bracket)
SP-201
10 kg
610 g (Bracket only)
Unit: mm
115
37
11
145°
3
40
R90
56
30
136
260
180
180
7-ø11
33
140
3
46
140
11
90
80
2-13x55
ø102
162
4-8x40
15
145°
160
ø11
3
ø102
11
80
28
 Loading...