

Toa SB-38S Instruction Manual

PROFESSIONAL SOUND SYSTEM
Instruction Manual
Low Frequency Enclosure
APPEARANCE
Model SB-38S
Stands for the position of the gravity
center when the speaker unit HLS38UL-8
is installed inside.
Note:Be sure to install each speaker unit from
the inside of the enclosure baffle board.
1. Punched-metal grille
2. Enclosure
3. Nut for horn mounting bracket(HY-M94)
4. Hol e for suspension kit(HY-38S)
5. Rear board
6. Terminal panel
7. Input terminal
FEATURES
1. Low frequency, vented(bass-reflex) enclosure for permanent installation.
2. Creates a woofer system that reproduces low frequencies with high efficiencies when the
HLS38UL-8 woofer is mounted. The tuning frequency is 45Hz.
3. The speaker is mounted to the baffle board from the rear of the enclosure, facilitating
maintenance after installation.
4. Creates a wide-range, high-efficient standard speaker system(GS-382S) when used in
conjunction with a LE-M94 CD horn, a HFD-220-8 compression driver, and a HLS38UL-8
woofer.
5. It is possible to suspend the SB-38W with the optional HY-38S suspension kit.
6. It is easy to mount the LE-M94 to the enclosure with the optional HY-M94 horn mounting
bracket when the standard speaker system is configured.
7. Large input screw terminal.
8. A protective punched-metal grille.
9. Finished with paint(dark gray).
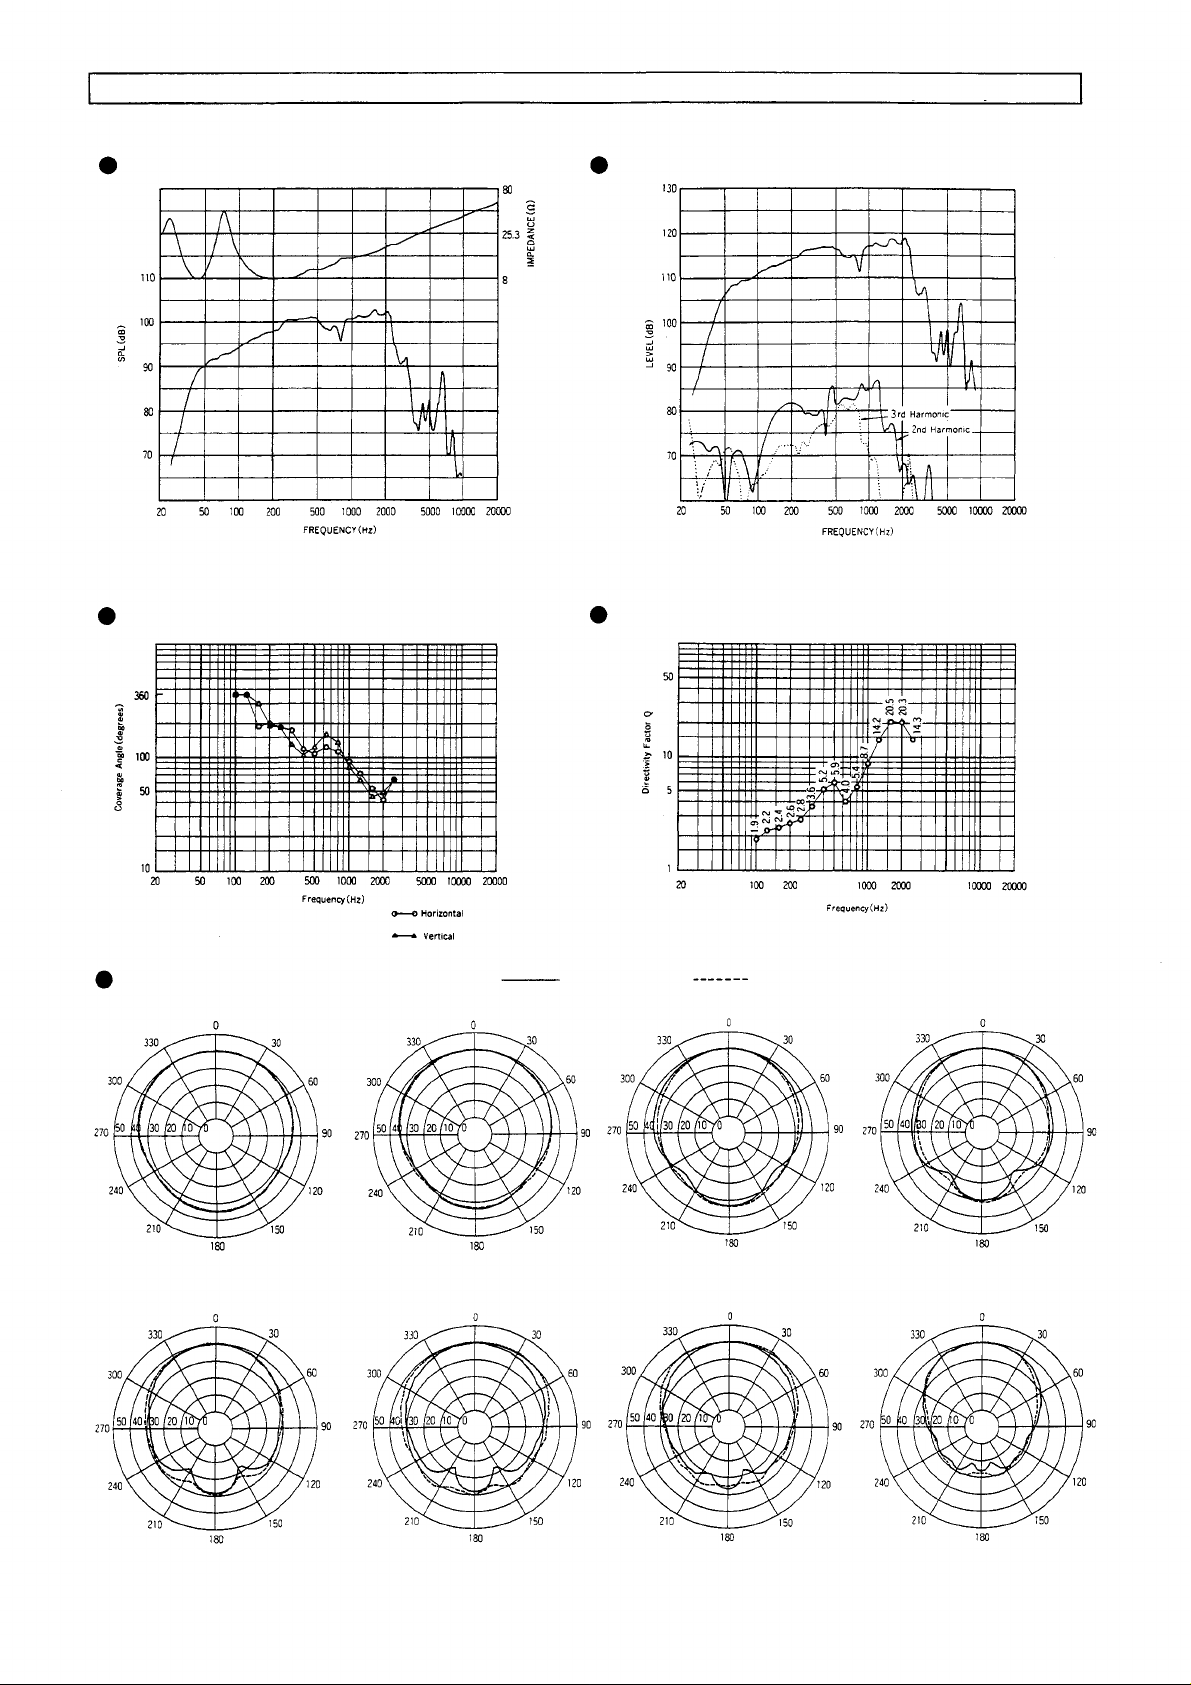
Characteristic Diagrams(Assembled the HLS38UL-8 Low-Frequency Loudspeaker)
Frequency Response • Impedance Curve
Measured in an anechoic environment at 1 watt and 1
meter.
Coverage Angle vs Frequency(-6dB
)
Harmonic Distortion
Measured at 50 watts (—10dB power), 1 meter.
Directivity Factor(Q) vs Frequency
Polar Response(1/3 Octave Pink Noise)
200Hz 250Hz 315Hz 400Hz
Horizontal
Vertical
500Hz 630Hz 800Hz 1000Hz
- 2 -
Specifications(Assembled the HLS38UL-8 Low-Frequency Loudspeaker)
Enclosure:Vented (bass-reflex) type
Tuning Frequency:45 Hz
Applicable Speaker Unit:HLS38UL-8
Nominal lmpedance:8 ohms
Power Handling1:500 W continuous pink noise
Sensitivity2:99 dB(1W/1m)
Frequency Range:40 Hz~3,000 Hz
Highest Recommended Crossover Frequency:800 Hz
Note
1. AES Standard(60 to 600 Hz)
2. Sensitivity is based on a band-limited(100 to 800 Hz) pink noise signal.
3. Specifications are subject to change without notice.
Installation Examples
The SB-38S is a fixed enclosure for reproducing low f requencies. A high-efficient low
frequency speaker system consists of the SB-38S and one HLS38UL-8 woofer, and a highlinearity, wide-rage two-way speaker system is configured in addition to TOA's LE-series
constant directivity horns and HFD-series compression driver. When driving the speaker
system with multi-amplifier operation, the time alignment and speaker system phase can be
set to their optimum performance conditions by using our integrated sound processor "SAORI"
as a divider. When driving the standard speaker system(GS-382S) with passive operation, use
the optional HNW-80 0 dividing network.
Input Terminal:2P screw terminal(M5)
Material: Particle board
Finish:Paint
Dimensions:700(H)X500(W)X420(D)mm
Weight
Including speaker unit:34kg
Only enclosure:21kg
Accessories
Rubber spacer:4
Instruction manual: 1
Warranty card: 1
Rear board mounting screw: 10
Mounting the Low-Frequency Loudspeaker
1. Remove the rear board.
2. Screw the speaker unit to the baffle board from the inside of the baffle at 8 places.(The
screws are attached to the speaker unit.)
3. Connect the cables to the speaker unit. Connect the red cable to the red terminal and
connect the black cable to the black terminal.
4. Replace the rear board by screwing at 12 places.
Note: Be sure to install the speaker unit from the inside of the enclosure baffle board.
Suspending the Enclosure
Before mounting the speaker unit, mount the HY-38S suspension kit to the enclosure. For
details, refer to the HY-38S's instruction manual.
When suspending t h i s speaker, make sure to suspend it after investigating structure of
installation locations, and confirming that the suspending wires or belts are heavy-duty to this
speaker.
Mounting the Horn
When the standard speaker system(GS-382S) is configured, the constant directivity horn LEM94 is mounted on the SB-38S with the horn mounting bracket HY-M94. For details, refer to
the HY-M94's instruction manual.
Mounting the Dividing Network
When using the HNW-800 dividing network, detach the terminal panel at the back of enclosure
and mount the dividing network. For details, refer to the HNW-800's instruction manual.
Installing the Enclosure
If necessary, attach the provided rubber spacer to the four locations at the bottom of the
enclosure.
- 3 -
 Loading...