

Page 1
INSTRUCTION MANUAL
POWERED HORN SPEAKER
Thank you for purchasing TOA’s Powered Horn Speaker.
Please carefully follow the instruction in this manual to ensure long, trouble-free use of your equipment.
Q-SC-P620
Page 2
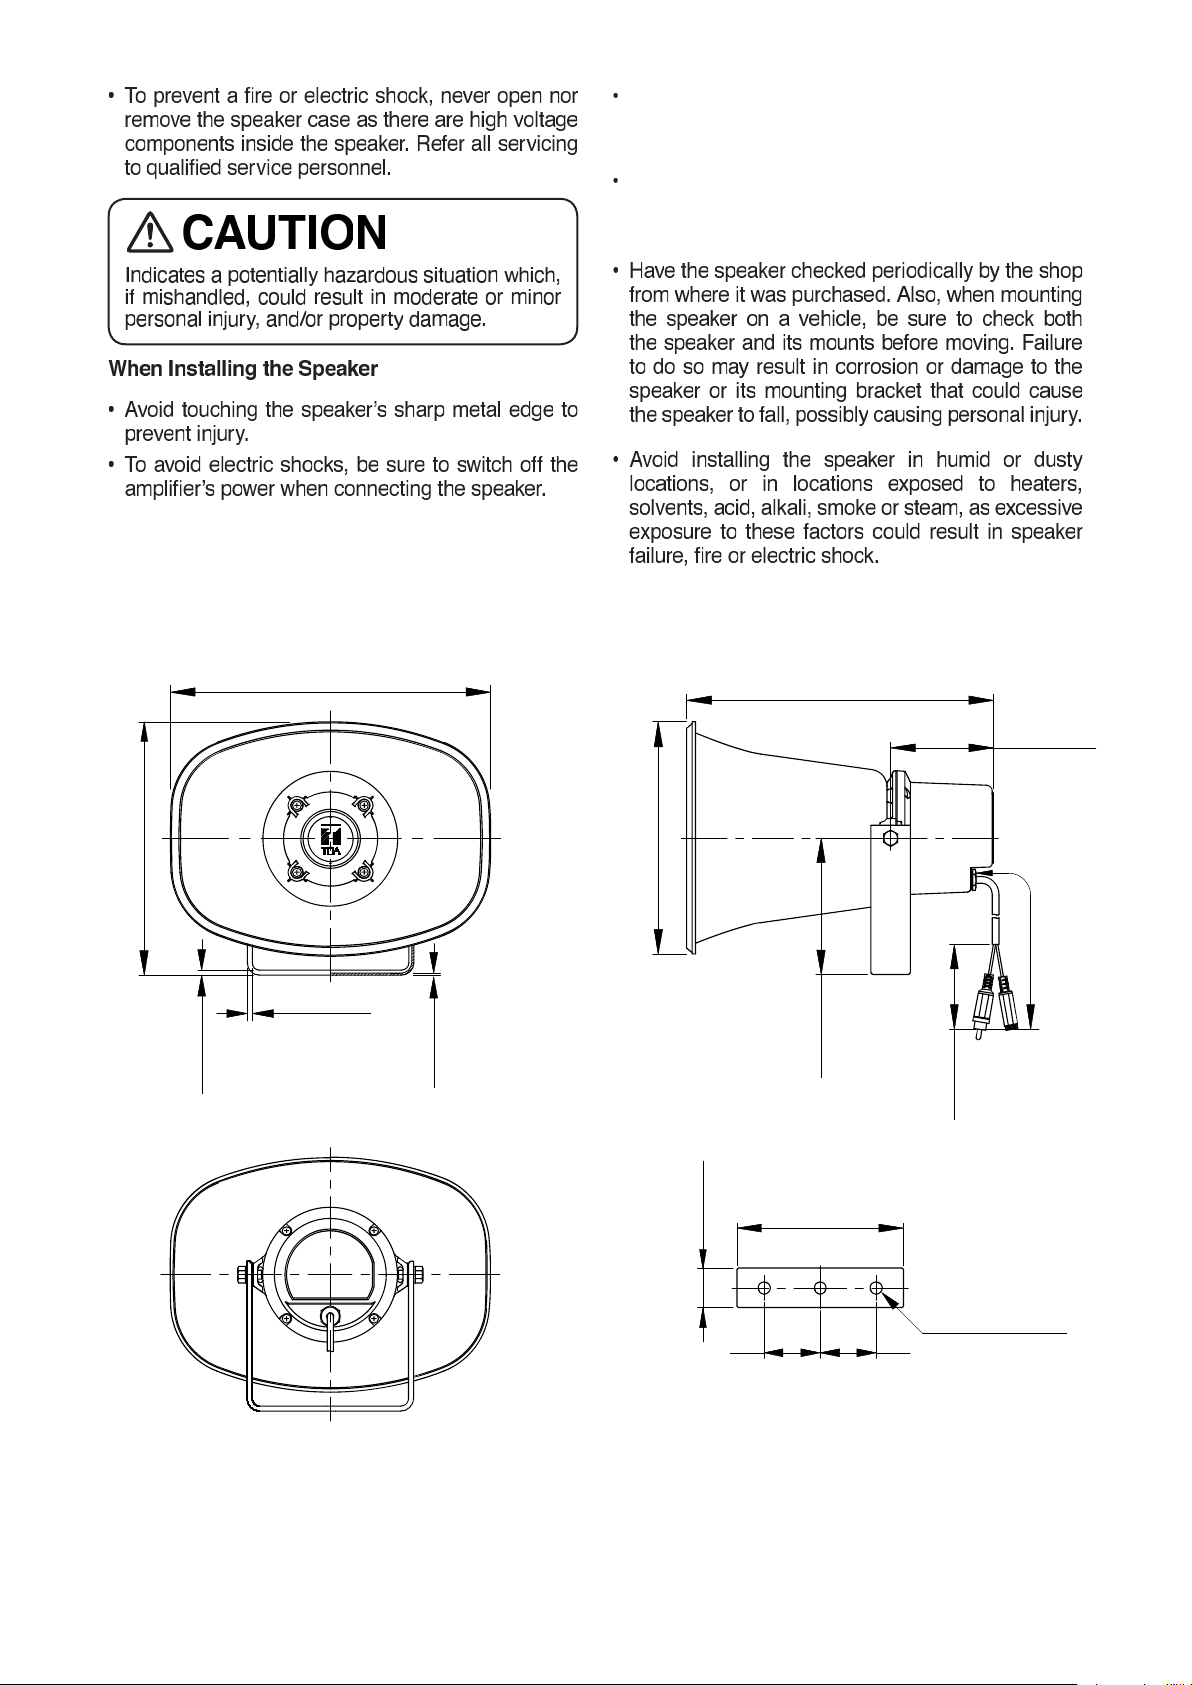
2. DIMENSIONAL DIAGRAM
[Front]
Do not operate the speaker for an extended period
of time with the sound distorting. Doing so may
cause the speaker to overheat, resulting in a fire.
Do not stand or sit on, nor hang down from the
speaker as this may cause it to fall down or drop,
resulting in personal injury and/or property damage.
[Side]
Unit: mm(inch)
292 (11.49”)
230 (9.05”)
4.5 (0.18”)
4.5 (0.18”)
[Rear] [Mounting bracket]
1.5 (0.06”)
212 (8.35”)
36 (1.42”)
280 (11.02”)
94 (3.70”)
1960 - 2000
(77.16” - 78.74”)
124 (4.88”)
85 (3.35”)
152 (5.98”)
3 - Ø11(Ø0.43”)
51 51
(2.01”) (2.01”)
3.
GENERAL DESCRIPTION
The Q-SC-P620 is a highly intelligible speaker with a built-in 20W digital power amplifier, that provides public address
announcement and remote paging via network video surveillance applications. Its powder-coated finish and stainless steel
screws ensure the unit’s weatherproof capability.
Page 3

4. SET THE GAIN AND VOLUME LEVEL
To Set the gain and volume level of the amplifier module, please follow
instruction as below :
1. Remove 4 screws to open back cover of Horn speaker.
On the PCB, there is DIP Switch marked “SW1”.
To Set gain refer to table below :
GAIN G1 G2
8dB OFF OFF
16dB ON OFF
24dB OFF ON
32dB ON ON
Adjust the internal volume (anti-clockwise for
Note.
Factory preset the gain and volume :
* Gain setting : 16dB
* Internal Volume : Maximum
Now replace the rear cover. As this Horn speaker is
3.
weatherproof to IP65, care must be taken during the
replacement of the back cover, to ensure the gaskets are
correctly refitted and watertight.
2.
volume down or clockwise for volume up)
until the output level is adequate. If the output
level is insufficient, set the gain to the next
highest gain, according to the table and
repeat the precedure with the internal
volume.
ATTENTION !!
To avoid damage, do not put more
pressure when turning the internal control.
The rotational stopper strength of internal
volume is about 2.94 N.cm.
5. WIRING CONNECTION AND WIRING BALANCED INPUT
Connect the DC plug to power sources (DC 12V).
Recommended adaptor power supply, please use TOA’s optional adaptor product.
For Audio sources, connect to RCA Jack.
ON
1 2
G1
3
G2 NC
DC Plug
( DC Input )
INTERNAL VOLUME
Power sources
(DC 12 V)
WARNING
Please ensure that power source is terminated correctly to
prevent damage to the amplifier module
HOW TO MAKE BALANCED-LINE INPUT
Default wiring audio input from factory is unbalanced installation.
Below is the instruction to adjust audio input for balanced-line installation .
Speaker cord
Remove RCA Jack Cover
Speaker cord
Green (Cold)
6. INSTALLATION PRECAUTIONS
Local codes may be required for other installation methods. Check with authority
having jurisdiction to determine acceptability of the mounting methods.
When installing the Horn speaker, be sure the drain hole is positioned toward the
ground. Otherwise, rainwater could enter the interior of speaker and the aging of
parts may cause speaker failure.
Do not install the speaker face-up from a horizontal plane. If water accumulates in
the horn, this may cause the speaker to malfunction.
Do not install the speaker under environment that subject speaker to contamination.
Cut Black cable (Earth)
(ground wire)
Yellow (Hot)
RCA Jack
( Audio input)
RCA Jack
(Audio input)
[Front view]
Drain hole
Audio sources
Center horn
Page 4

7. WIRING DIAGRAM
Shown below is a connection diagram when shipped from the factory.
Power Amplfier Module
DC Input
(12V)
4
Ω
Audio Input
32 dB
* Factory setting preset :
- Internal volume : maximum
- Setting gain : 16 dB
+
-
0
8. SPECIFICATIONS
Power Source 12V DC, 2A ( DC Socket “+” Type A : 5.5 x 2.1mm )
Power Consumption
Input 0 dB*, 10kΩ, Unbalanced (RCA plug)
15W (1.25A) at Rated output
25W (2.10A) at Maximum output
Signal Gain 8, 16, 24 or 32 dB ( Factory pre-set to 16dB )
Volume Adjustment Internal volume control ( Factory pre-set to maximum position )
113dB ( 1W, 1m at 500 Hz to 2.5 kHz peak level )
Sound Pressure Level
Max. SPL ( above 120dB )
Frequency Response 250 - 10,000 Hz
Operating Temperature
-20°C to +55°C ( must be free from dew condensation )
Dust/Water Protection IP 65
Horn Flare: HIPS resin, white ( RAL9010 equivalent )
Finish Reflector horn and case: ABS resin, white ( RAL9010 equivalent )
Cable Cord
Bracket, screws & bolts:
Length: 2m Flying Lead ( RCA plug ) & DC socket ( ”+” )
Stainless steel
Dimensions 292 (W) x 230 (H) x 280 (D) mm
Weight Approx. 1.8 kg
Note: The design and specifications are subject to change without prior notice for improvement.
Optional product
AD-5000-2 (LTE24E-S2-1) AC Adapter: Use this adaptor for supply voltage DC12V to product.
0 dB = 1 V
Traceability Information for Europe
Manufacturer: Authorized representative:
PT. TOA GALVA INDUSTRIES
Jl. Raya Bogor km 34-35, Tapos
Depok 16958, Indonesia
TOA Electronics, Inc.
400 Oyster Point Blvd, Suite 301
South San Francisco, CA, 94080, USA
URL : http://www.toa.com.sg/URL : http://www.toa.com.sg/
133-01-00101-00
 Loading...