

Page 1
IP-EN1-EB Instruction Manual
1
Instruction Manual
Indication Panel for mandatory indications
of EN 54-16 for VX-2000 and SX-2000 IP-EN1-EB
1134
TOA Electronics Europe GmbH
Süderstrasse 282, 20537 Hamburg, Germany
14
1134 - CPR - 102
1134 - CPR - 110
EN 54-16: 2008 Fire detection and fire alarm systems - Part 16:
Voice alarm control and indicating equipment
■ Description
The indication panel IP-EN1-EB is designed to provide the mandatory indications as
required by EN 54-16: 2008 for the VX-2000 and SX-2000 system. Additional 8 indicators
can be used to indicate faults in fire zones (this is an option with requirements in the EN 54-
16) or other faults (EN 54-16 requires yellow indications for faults). A buzzer sounds at
every new fault and can be silenced by depressing the acknowledge button. The lamp test
button allows checking the proper operation of all indicators and the buzzer. All faults can
be reset by using a key.
In addition to above, indication panel IP-EN1-EB provides a general fault output with a
switch-over relay that can be equipped with optional resistors for a surveillance of the
connected fire detection system (FDS) (the surveillance must be performed by the FDS). It
also provides one emergency control input that can either be activated by making/breaking
a contact or by a voltage of 12 or 24 VDC (depending on jumper setting). It supports the
change between emergency and normal mode / silence, controlled by a single contact of
the FDS. The voltage-controlled control input allows a fire detection system to monitor
connection.
The indications and controls require a certain setting in the software that will be described
in this instruction manual.
■ Precautions
Make sure that the power supply of the IP-EN1-EB is switched off or disconnected when
connecting or disconnecting wires to avoid a damage of the IP-EN1-EB.
Make sure that the jumper settings and connection to external equipment is made
correctly, otherwise it may cause malfunctions of the IP-EN1-EB or external equipment
as a fire detection system.
Make sure of right polarity when connecting the power supply and external equipment.
Page 2

IP-EN1-EB Instruction Manual
2
■ Contents
1 Abbreviations .................................................................................................................. 3
2 Software and Firmware Versions supporting the Indication Panel ............................. 3
3 Nomenclature .................................................................................................................. 3
3.1 Appearance Front ........................................................................................................ 3
3.2 Appearance Rear ......................................................................................................... 4
4 Preparation and Connections to Fire Detection Systems ............................................ 5
4.1 Overview ...................................................................................................................... 5
4.2 General Fault Control Output CN9 ............................................................................... 6
4.2.1 Make a contact without surveillance.................................................................................. 6
4.2.2 Make a contact with surveillance ....................................................................................... 6
4.2.3 Break a contact without surveillance ................................................................................. 6
4.2.4 Break a contact with surveillance ...................................................................................... 6
4.3 Emergency Control Input CN13 and System Settings .................................................. 7
4.3.1 Control Voltage Selection .................................................................................................. 7
4.3.2 Total Resistance Setting for Voltage Control .................................................................... 7
4.3.3 Making a Contact: Emergency Activation (VX, SX), breaking a contact: Emergency
Reset (VX, SX) / Silencing (SX) ........................................................................................ 8
4.3.4 Making a Contact: Emergency Activation (VX), breaking a contact: Silencing (VX) ........ 8
4.3.5 Breaking a contact: Emergency Activation (VX, SX), making the contact: Emergency
Reset (VX, SX) / Silencing (SX) ........................................................................................ 9
4.3.6 Breaking a contact: Emergency Activation (VX), making the contact: Silencing (VX) ...... 9
4.3.7 Voltage: Emergency Activation (VX, SX), no voltage: Emergency Reset (VX, SX) /
Silencing (SX) .................................................................................................................. 10
4.3.8 Voltage: Emergency Activation (VX), no voltage: Silencing (VX) ................................... 10
4.3.9 No Voltage: Emergency Activation (VX, SX) Voltage: Emergency Reset (VX, SX) /
Silencing (SX) .................................................................................................................. 11
4.3.10 No Voltage: Emergency Activation (VX) Voltage: Silencing (VX)................................ 11
5 Connections and Settings for the VX-2000 System .....................................................12
5.1 Connections to VX-2000 .............................................................................................12
5.2 Settings in the VX-2000 Setting Software ....................................................................13
5.2.1 Mandatory Indication ....................................................................................................... 13
5.2.1.1 Fault Indications ............................................................................................................ 13
5.2.1.2 Status Indications .......................................................................................................... 14
5.2.2 Control Input Settings for Emergency and Button Controls ............................................ 15
5.2.3 Indication of Failures in Fire Alarm Areas (option of EN 54-16) ..................................... 15
6 Connection and Settings for the SX-2000 System .......................................................16
6.1 Connections to SX-2000 .............................................................................................16
6.2 Connections at SX-2000 Components.........................................................................17
6.3 SX-2000 Settings ........................................................................................................18
6.3.1 Mandatory Indication ....................................................................................................... 18
6.3.1.1 Fault Indications ............................................................................................................ 18
6.3.1.2 Status Indications .......................................................................................................... 19
6.3.2 Indication of Failures in Fire Alarm Areas (option of EN 54-16) ..................................... 19
7 Specifications ................................................................................................................20
8 Accessories ...................................................................................................................20
9 Optional Accessories ....................................................................................................20
Page 3

IP-EN1-EB Instruction Manual
3
1 Abbreviations
FA fire area
FDS fire detection system
2 Software and Firmware Versions supporting the
Indication Panel
VX-2000
Setting software version
3.1.0 and higher
Firmware version of VX-2000 (system manager)
3.10 and higher
Firmware version of VX-2000SF
3.00 and higher
SX-2000
Setting software version
3.10 and higher
Firmware version of SX-2000SM
3.10 and higher
Firmware version of SX-2100AI, SX-2000AO, SX-2100AO
3.10 and higher
3 Nomenclature
3.1 Appearance Front
1 Failure reset key lock
2 power indicator
3 emergency mode indicator
4 general fault indicator
5 CPU fault indicator
6 power fault indicator
7 fireman microphone fault indicator
8 fuse rupture indicator
9 network fault indicator
10 lamp test button
11 fault acknowledge button
12 buzzer
13 8 indicators for faults in fire zones or
other faults
d
IP-EN1-EB INDICATION PANEL
3
2
4
5
6
7
8
9
1
10
11
12
13
13
FAULT FIRE ZONE 5
FAULT FIRE ZONE 1
FAULT FIRE ZONE 6
FAULT FIRE ZONE 2
FAULT FIRE ZONE 7
FAULT FIRE ZONE 3
FAULT FIRE ZONE 8
FAULT FIRE ZONE 4
POWER
EMERGENCY
GENERAL FAULT
CPU FAULT
POWER FAULT
FIREMAN MIC FAULT
FUSE RUPTURE
NETWORK FAULT
EN 54-16
mandatory
indications
optional (FA)
indications
Page 4
IP-EN1-EB Instruction Manual
4
3.2 Appearance Rear
Right side (EN 54-16 mandatory indications)
1 Connectors to VX-2000/SX-2000
2 Connectors to fire detection system (FDS)
3 Insertion place for resistors (R1, R2, R3) for surveillance by FDS
4 Jumper (CN18) for control voltage selection 12/24 VDC from FDS
5 Jumpers (CN19, CN20) for selection pulse/level control from FDS
6 Jumpers (CN6, CN8) for selection of contact or voltage control of FDS
7 Insertion place for resistor (R6) for resistance matching to FDS (chapter 4.3.2)
8 Earth connector: when using the emergency control input, then connect this
point to earth
Left side (fire area fault indications or other fault indications)
9 Connectors to VX-2000 for fault indications in fire areas
10 Connectors to SX-2000 for fault indications in fire areas
CN7
CN15
CN2
CN9
CN12
CN18
CN13
CN10
R6
1
1
1 1 1
1
3 2 1
R2
R3
R1
CN6
CN8
CN19
CN1
CN5
CN11
CN3
1
5 6 4
2
3
7
8
CN20
CN7
CN2
1
1
CN1
10
9
Page 5
IP-EN1-EB Instruction Manual
5
4 Preparation and Connections to Fire Detection Systems
4.1 Overview
CN9
CN18
CN13
R6
1
1
3 2 1
R2
R3
R1
CN20
CN6
CN8
CN19
Emergency control input CN13
FDS
contact
_
+
make: Emergency start
break: emergency reset
(SX: or silence at break)
make: Emergency start
break: silence
(VX-2000 only)
General fault control output CN9
Wire/resistor insertion (R1, R2, R3)
FDS contact output without surveillance
R1
Insert a wire at R1 position
When control output is monitored
and activation by making a contact
Insert R1 and R3
as required by
surveillance
When control output is monitored
and activation by breaking a contact
Insert R1 and R2
as required by
surveillance
R3
R1
1 3 CN9
R2
R1
2
1
CN9
FDS control voltage (CN18 setting)
CN18
24 VDC *
CN18
12 VDC
3 2 1
FDS contact/voltage control
Contact control *
Voltage control
3 2 1
FDS
voltage
+
_
+
Rear of
indication
panel, board
on right side,
right side of the
board
Activation by make contact or voltage on *
make: emergency reset
(SX: or silence at make)
break: Emergency start
make: silence
break: Emergency start
(VX-2000 only)
3 2 1
Activation by break contact or voltage off
* : factory preset
Refer also to the system settings
FDS
FDS
FDS contact output with surveillance
Connection for fire detecting system (FDS)
jumper
CN20
CN19
CN20
CN19
CN6
CN8
CN6
CN8
CN20
CN19
CN20
CN19
1
1
1
Page 6
IP-EN1-EB Instruction Manual
6
4.2 General Fault Control Output CN9
A general fault information to the fire detection system can be provided in four different
ways:
1. make a contact without surveillance
2. make a contact with surveillance
3. break a contact without surveillance
4. break a contact with surveillance
The corresponding settings in the setting software are described in the chapter 5.2 for the
VX-2000 system and in the chapter 6.3 of the SX-2000 system.
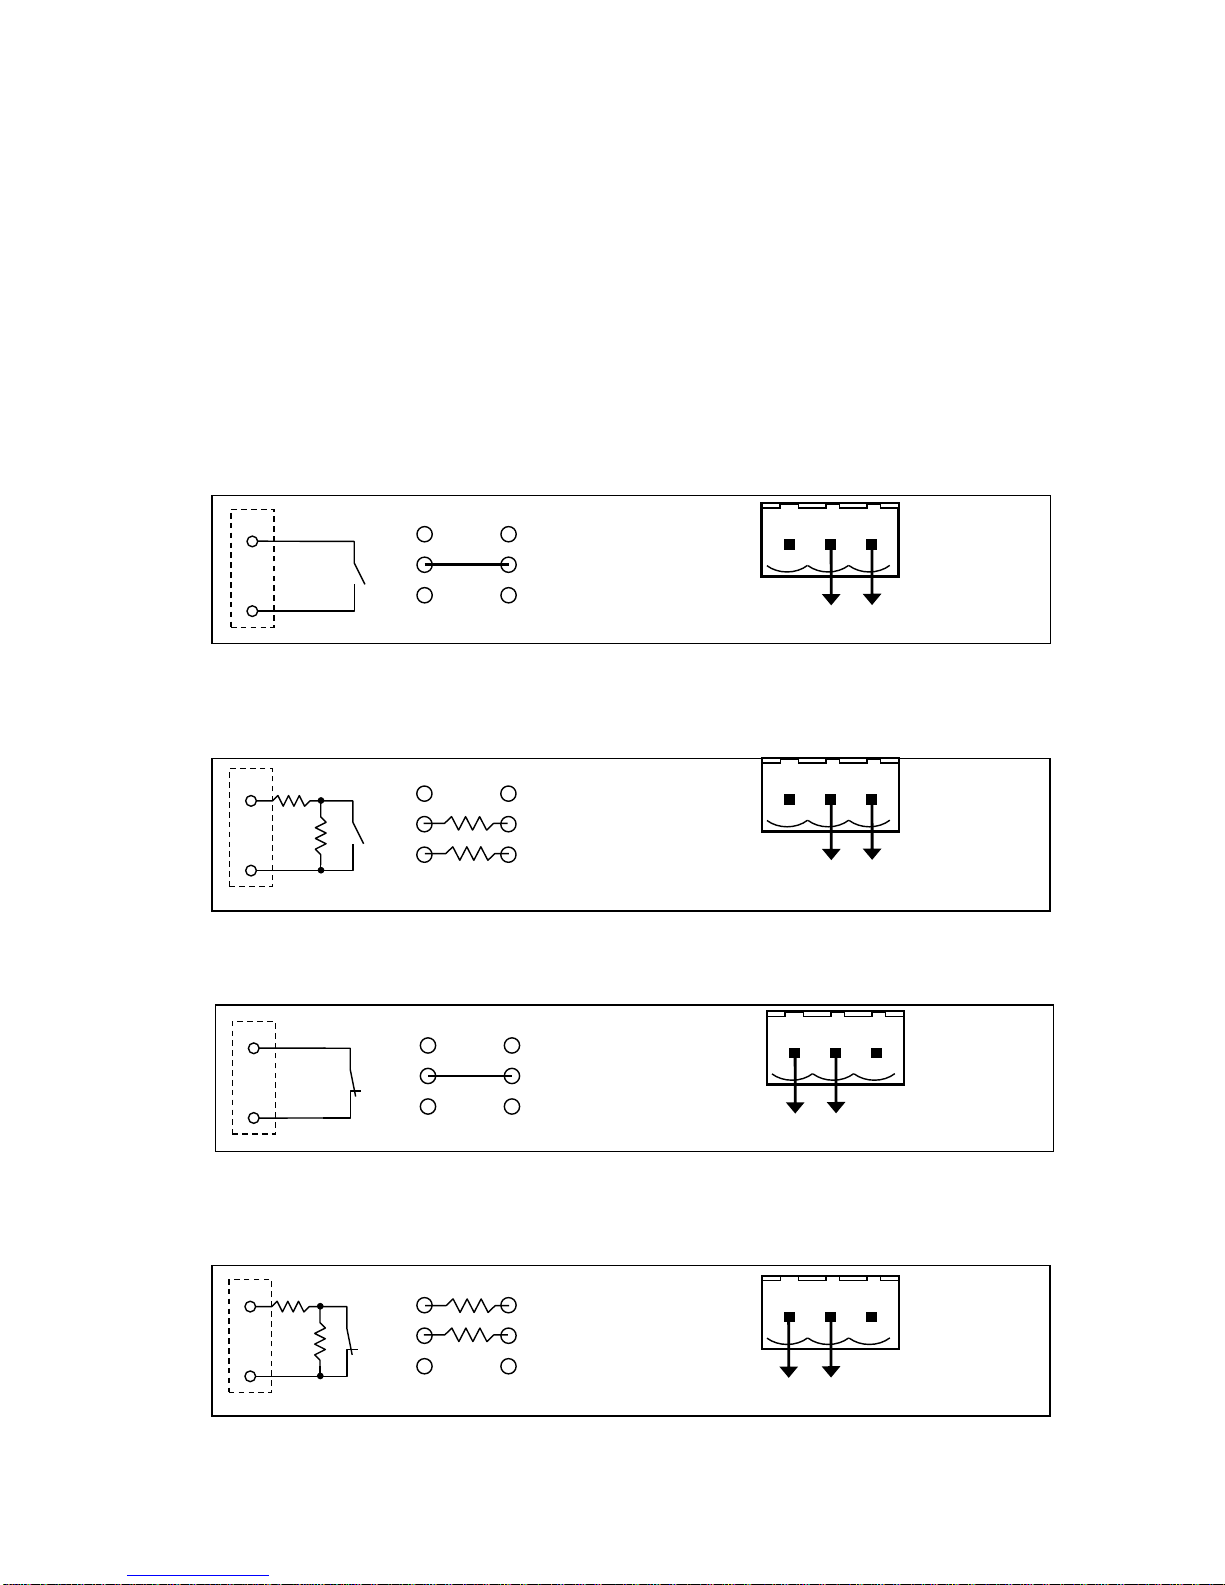
4.2.1 Make a contact without surveillance
Solder in a wire on position “R1” Connect to pins 2 and 3 of CN9 to the FDS
4.2.2 Make a contact with surveillance
Solder in resistors R1 and R3 Connect to pins 2 and 3 of CN9 to the FDS
as required by the FDS
4.2.3 Break a contact without surveillance
Solder in a wire on position “R1” Connect to pins 1 and 2 of CN9 to the FDS
4.2.4 Break a contact with surveillance
Solder in resistors R1 and R2 Connect to pins 1 and 2 of CN9 to the FDS
as required by the FDS
R1
1 2 3
To FDS
CN9
2 3 CN9
R1
1 2 3
To FDS
CN9
R3
R1
2 3 CN9
R3
R1
1
2
3
To FDS
CN9
1 2 CN9
R1
1 2 3
To FDS
CN9
R2
R1
1 2 CN9
R2
Page 7

IP-EN1-EB Instruction Manual
7
4.3 Emergency Control Input CN13 and System Settings
A single control input with two poles is provided that can be used for activating emergency,
and resetting emergency or activating silence. When activating silence, then emergency
reset must be controlled by an emergency or fireman microphone, or a separate contact
connected directly to the VA system. The corresponding settings in the setting software are
described in the chapter 5.2 for the VX-2000 system and in the chapter 6.3 of the
SX-2000 system.
There are various combinations to connect the emergency controls from the FDS, please
find the settings in the indicated chapter:
VX-2000
Emergency activation
Emergency
reset
Silence
chapter
by contact
by voltage
make
break
on
off
4.3.3 *
4.3.4
4.3.5
4.3.6
4.3.7
4.3.8
4.3.9
4.3.10
* : factory preset
SX-2000
Emergency activation
Emergency
reset
Silence
chapter
by contact
by voltage
make
break
on
off
4.3.3 *
4.3.5
4.3.7
4.3.9
* : factory preset
4.3.1 Control Voltage Selection
Set the jumper 18 according to the control voltage as shown below:
4.3.2 Total Resistance Setting for Voltage Control
If a certain resistance is required at voltage control, then solder in a resistor at position
R6.
Resistance FDS
200 Ω
250 Ω
320 Ω
400 Ω
500 Ω
630 Ω
800 Ω
1k Ω
12 VDC [Ω/W]
250 /1
330 /½
470 /½
680 /½
1k /¼
1.8k /¼
3.9k /¼
-
24 VDC [Ω/W]
220 /4
270 /3
390 /2
510 /2
680 /1
910/1
1.33k /1
2k /½
CN18
24 VDC *
CN18
12 VDC
1
1
* : factory preset
Page 8

IP-EN1-EB Instruction Manual
8
4.3.3 Making a Contact: Emergency Activation (VX, SX),
breaking a contact: Emergency Reset (VX, SX) / Silencing (SX)
VX-2000 Settings
Connector
Control input
Setting
CN11
1
Emergency pattern start
CN11
2
Emergency reset
SX-2000 Setting
Connector
Control input
Setting
CN15 pin 4
any
Emergency pattern start
CN15 pin 6
any
Emergency reset /
silence: emergency pattern stop
4.3.4 Making a Contact: Emergency Activation (VX),
breaking a contact: Silencing (VX)
VX-2000 Settings
Connector
Control input
Setting
CN11
1
Emergency pattern start
CN11
2
Silence
CN13
R6
1
1 3 2
1
R2
R3
R1
CN20
CN6
CN8
CN19
FDS
contact
_
+
CN13
R6
1
1
3 2 1
R2
R3
R1
CN20
CN6
CN8
CN19
FDS
contact
_
+
Page 9

IP-EN1-EB Instruction Manual
9
4.3.5 Breaking a contact: Emergency Activation (VX, SX),
making the contact: Emergency Reset (VX, SX) / Silencing (SX)
VX-2000 Settings
Connector
Control input
Setting
CN11
1
Emergency reset
CN11
2
Emergency pattern start
SX-2000 Setting
Connector
Control input
Setting
CN15 pin 4
any
Emergency reset /
silence: emergency pattern stop
CN15 pin 6
any
Emergency pattern start
4.3.6 Breaking a contact: Emergency Activation (VX),
making the contact: Silencing (VX)
VX-2000 Settings
Connector
Control input
Setting
CN11
1
Silence
CN11
2
Emergency pattern start
CN13
R6
1
1
3 2 1
R2
R3
R1
CN20
CN6
CN8
CN19
FDS
contact
_
+
CN13
R6
1
1
3 2 1
R2
R3
R1
CN20
CN6
CN8
CN19
FDS
contact
_
+
Page 10

IP-EN1-EB Instruction Manual
10
4.3.7 Voltage on: Emergency Activation (VX, SX),
voltage off: Emergency Reset (VX, SX) / Silencing (SX)
VX-2000 Settings
Connector
Control input
Setting
CN11
1
Emergency pattern start
CN11
2
Emergency reset
SX-2000 Setting
Connector
Control input
Setting
CN15 pin 4
any
Emergency pattern start
CN15 pin 6
any
Emergency reset /
silence: emergency pattern stop
4.3.8 Voltage on: Emergency Activation (VX),
voltage off: Silencing (VX)
VX-2000 Settings
Connector
Control input
Setting
CN11
1
Emergency pattern start
CN11
2
Silence
CN13
R6
1
1 3 2
1
R2
R3
R1
CN20
CN6
CN8
CN19
_
+
FDS
voltage
_
CN13
R6
1
1
3 2 1
R2
R3
R1
CN20
CN6
CN8
CN19
_
+
FDS
voltage
_
Page 11

IP-EN1-EB Instruction Manual
11
4.3.9 Voltage off: Emergency Activation (VX, SX)
Voltage on: Emergency Reset (VX, SX) / Silencing (SX)
VX-2000 Settings
Connector
Control input
Setting
CN11
1
Emergency reset
CN11
2
Emergency pattern start
SX-2000 Setting
Connector
Control input
Setting
CN15 pin 4
any
Emergency reset /
silence: emergency pattern stop
CN15 pin 6
any
Emergency pattern start
4.3.10 Voltage off: Emergency Activation (VX)
Voltage on: Silencing (VX)
VX-2000 Settings
Connector
Control input
Setting
CN11
1
Silence
CN11
2
Emergency pattern start
CN13
R6
1
1
3 2 1
R2
R3
R1
CN20
CN6
CN8
CN19
_
+
FDS
voltage
_
CN13
R6
1
1 3 2
1
R2
R3
R1
CN20
CN6
CN8
CN19
_
+
FDS
voltage
_
Page 12

IP-EN1-EB Instruction Manual
12
5 Connections and Settings for the VX-2000 System
5.1 Connections to VX-2000
Rear right side (mandatory indications)
1 Connect CN1 to CTRL OUT 1-8 of the VX-2000
(use Cat5/5E/6 FTP or STP or SFTP (with shield)
2 Connect CN11 to CTRL IN 1-8 of the VX-2000
(use Cat5/5E/6 FTP or STP or SFTP (with shield)
3 Connect CN10 with power supply from VX-2000DS or VX-3000DS (don’t connect to
regulated 24 VDC), + on pin 1, - on pin 2
4 Connect CN2 to the CPU OFF output of the VX-2000, connect to pins 2 and 3
5 CN15 provides the access to 4 control inputs of the VX-2000 that are not used by the
indication panel and can be used for other control purposes:
CN15 pin no.
1 2 3 4 5
6
VX-2000 control input no.
5
COM 4 7
COM
8
Rear left side (fault indications of fire areas or other fault indications)
6 Connect CN1 (of rear left side) to CTRL OUT 9-16 of the VX-2000
(use Cat5/5E/6 FTP or STP or SFTP (with shield)
CN7
CN15
CN9
CN12
CN18
CN13
CN10
R6
1 1 1 1 1 1 3 2 1
R2
R3
R1
CN20
CN6
CN8
CN19
CN1
CN5
CN11
CN3
+ -
20-40 VDC
CPU OFF
CTRL OUT 1-8
CTRL IN 1-8
1
CN12
2
3 4 5
CN2
CN7
CN2
1 1 1
CN1
CTRL OUT 9-16
6
Page 13

IP-EN1-EB Instruction Manual
13
5.2 Settings in the VX-2000 Setting Software
5.2.1 Mandatory Indication
5.2.1.1 Fault Indications
No.*
Indication of
VX-2000
connections/
assignment
Settings in Operation setting mode, button
[Failure Output]: use one Fault Output
Pattern per indication (one line in the list),
make a check in
4
General fault
Control output
3
Tab “Equipment” if not noted otherwise:
1. all emergency and fireman microphones
2. external fault CIN connected to the
optional Ethernet Switch **
3. all EV-200M
4. VX-2000
5. all VX-2000SF
6. all amplifiers including the standby
amplifier (tab “Power amplifier”)
7. all faults (short circuit, open circuit,
ground fault) for each loudspeaker line
(tab “Speaker”)
8. each VX-2000DS connection to VX2000SF (tab “Power supply”)
5
CPU fault
CPU OFF
control output
Only connection, no setting
6
Power fault
Control output
5
Tab “Power Supply”:
each existing VX-2000DS connection to
VX-2000SF
7
Fireman/
emergency
microphone fault
Control output
6
Tab “Equipment”:
all emergency and fireman microphones
8
Fuse fault
Control output
4
Tab “Power Amplifier”:
all amplifiers including the standby amplifier
9
Network fault
Control output
7
Tab “Equipment”:
external fault CIN connected to the Ethernet
Switch if used **
12
buzzer
Control output
8
Enable Failure Buzzer (Cout-8) ***
*: number as on “Appearance Front Panel”, page 3
**: refer to next page “Details to number 9”
***: refer to “New function Enable Failure Buzzer”
[ ]: button of the main menu of the VX-2000 setting software
Page 14

IP-EN1-EB Instruction Manual
14
Details to number 9 (network fault):
When using an NX-100S with IES-3000 series Ethernet switch, then the ports used for the
link between decentralised parts of the system on the Ethernet switches must be set for port
surveillance to provide a contact output making a contact when a fault appears. Please refer
to the manual of the IES-3000 Ethernet switch series to do so.
Connect this contact to a control input of the VX-2000. In the activation setting mode of the
VX-2000 setting software, select the function “External Fault CIN” for this control input.
Go to the operation setting mode and select the button [Failure Output]. Select a free line
in the failure pattern list (make a new failure pattern) and select the tab “Equipment”. In the
list “External Fault CIN”, make a check at the control input used for receiving a fault from
the Ethernet switch. Select control output number 7 for this pattern.
New function Enable Failure Buzzer
The new VX-2000 setting software version 3.1.0 provides a setting for the buzzer control of
the indication panel. When selected, then control output 8 cannot be used for other functions.
5.2.1.2 Status Indications
No.*
Indication of
connections
Operation setting mode,
make a check in
2
Power
DC out of
VX-2000DS,
VX-3000DS
- (no setting required)
3
Emergency mode
VX-2000
control output 2
[Emergency], tab “Emergency
Output”: Cout-2
*: number as on “Appearance Front Panel”, page 3
[ ]: button of the main menu of the VX-2000 setting software
Page 15

IP-EN1-EB Instruction Manual
15
5.2.2 Control Input Settings for Emergency and Button Controls
The settings are to be made in the activation setting mode. Select the button “Control Input”
of the main menu.
Control input
Function setting
Refer to
1, 2
Emergency pattern, Emergency reset, silence
Chapter 4.3
3
Failure output reset
-
6
Failure output receipt (no control output required)
-
5.2.3 Indication of Failures in Fire Alarm Areas (option of EN 54-16)
When using this option, then a failure of each fire area must be indicated. Consider that a
fire area may consist of several paging zones, i.e. a fire area can cover a group of zones.
The fire areas should be declared by the responsible party (e.g. fire brigade, fire expert)
who is aware of the emergency concept.
Failures in of up to 8 fire areas can be indicated. The control outputs 9-16 shall be used for
that.
Setting by the VX-2000 Setting Software
a. In operation mode, select the button [Failure Output].
b. Select a free line (make a new failure pattern) and
c. Select the tab “Speaker”.
d. Make a check into each box (short circuit, break, earth leakage) of each speaker zone
that belongs to that fire area.
e. Select the control output for the corresponding indication LED (refer to next table)
f. Proceed again from step 2 on for the other fire zones.
Relation of Control Output to indication LED of fire area (FA)
Indication LED
FA 1
FA 2
FA 3
FA 4
FA 5
FA 6
FA 7
FA 8
Control output no.
9
10
11
16
13
14
12
15
Page 16

IP-EN1-EB Instruction Manual
16
6 Connection and Settings for the SX-2000 System
6.1 Connections to SX-2000
Rear right side (mandatory indications)
1 Connect CN5 to Status output 2 of the SX-2000SM (use Cat5/5E/6 cable)
2 Prepare an RJ45 connector with connections between the pins: 1-8, 2-7, 3-6, 4-5 and
plug into CN11
3 Connect CN3 to Status output 1 of the SX-2000SM (use Cat5/5E/6 cable)
4 Connect CN10 with power supply from VX-2000DS or VX-3000DS (don’t connect to
regulated 24 VDC), + on pin 1, - on pin 2
5 Connect to control outputs for EMG status, fuse rupture, power fault, FM fault, network
fault. For details refer to table “CN7 main connections”
6 Connect to control inputs for fault acknowledge, fault reset, EMG start, EMG reset. For
details refer to table “CN15 connections”
7 Connect to control output for programmed general fault, pins 1 and 3
CN7 main connections CN15 connections
Pin no.
indication
Pin no.
indication
1
Power LED
1 Fault acknowledge
2
Emergency mode
2 COM (ground)
3
Fuse rupture
3 Fault reset
4
COM (ground)
4
Emergency pattern stop /
emergency reset
(refer to chapter 3.3)
5
Power fault
5 COM (ground)
6
Fireman microphone fault
6 Emergency pattern start
7
Network fault
For the connections to the SX-2000 components connections refer to 6.2 Connections at
SX-2000 Components on next page.
CN7
CN15
CN9
CN12
CN18
CN13
CN10
R6
1 1 1 1 1 1 3 2 1
R2
R3
R1
CN20
CN6
CN8
CN19
CN1
CN5
CN11
CN3
STATUS OUTPUT 2
STATUS OUTPUT 1
+ -
20-40 VDC
To control outputs for EMG status, fuse
rupture, power fault, FM fault, network fault
To control inputs for fault acknowledge,
fault reset, EMG start, EMG reset
1 2 3
4 5 6
To control output for general fault
7
CN2
Page 17

IP-EN1-EB Instruction Manual
17
Rear left side (fire area fault indications or other fault indications)
8 Connect to control outputs for faults in the fire areas 1, 2, 5 -8. For details refer to table
“CN7 FA connections”
9 Connect to control outputs for faults in the fire areas 3 and 4. For details refer to table
“CN2 connections”
CN7 FA connections CN2 FA connections
Pin no.
indication
Pin no.
indication
1
Fault in fire area 1
1 Fault in fire area 3
2
Fault in fire area 2
2 Fault in fire area 4
3
Fault in fire area 7
3 COM (ground)
4
COM (ground)
5
Fault in fire area 5
6 Fault in fire area 6
7 Fault in fire area 8
For the connections to the SX-2000 components connections refer to 6.2 Connections at
SX-2000 Components below.
6.2 Connections at SX-2000 Components
Since the control inputs and outputs of the SX-2000 components are isolated from ground
(COM; earth-free), all “C” contacts must be connected together and be connected to the
COM of the indication panel.
Example (using control inputs and outputs of the SX-2000SM):
CN7
CN2
1 1 1
CN1
FA 1
COM
FA 2
FA 7
FA 5
FA 6
FA 8
fire areas (FA)
FA 4
FA 3
COM
7 8
To COM of
indication
panel
To COM of
indication
panel
Connections to control input or output of indication panel
Page 18

IP-EN1-EB Instruction Manual
18
6.3 SX-2000 Settings
6.3.1 Mandatory Indication
Some control outputs are fixed by the SX-2000 system, others require a preparation. Before
preparing the failure settings, prepare 5 control output pattern for activating the indication
panel IP-EN1-EB. Since any control output can be used for the fault output, here we use the
control outputs of the SX-2000SM as an example written in rectangle brackets [#].
6.3.1.1 Fault Indications
In the first step, prepare the “Surveillance Settings”. Set a check for
- “DC Power” of each SX-2000 component
- “DS Link” of each DS link connected to VX-2000DS / VX-3000DS
- “RM” on the SX-2100 where an emergency/fireman microphone is connected
- Each amplifier (used for emergency)
- Each loudspeaker line (used for emergency)
In the second step proceed as described below:
No.*
Indication
of
SX-2000 connector
to IP-EN1-EB
connector
Pattern Settings / Failure Output
4
General
fault
Status control
output 1 to CN3
and any control
output [6] to CN2,
pins 1 and 3
- select DS LINK, DC FUSE, RM LINK; all SX-2000
components, all emergency/fireman microphones,
all amplifiers and all speaker lines
- select the “Failure status output” for the general
fault indication of the indication panel [6]
5
CPU fault
6
Power fault
Any control output
[1]
to CN7 pin 5
- select DS LINK;
- select the “Failure status output” for controlling
the power fault indication of the indication panel [1]
7
Fireman/
emergency
microphone
fault
Any control output
[2]
to CN7 pin 6
- select “RM LINK”;
- select each fireman/emergency microphone of the
SX-2100AI
- select the “Failure status output” for the fireman
microphone fault indication of the indication panel
[2]
8
Fuse fault
Any control output
[3]
to CN7 pin 3
- select “DC FUSE”
- select the “Failure status output” for the amplifier
fault indication of the indication panel [3]
9
Network
fault
Any control output
[4]
to CN7 pin 7
Event Settings: assign “external failure input” to all
control inputs to which the fault control outputs of the
Ethernet switches are connected to.
Pattern settings / failure Output:
make a pattern for each Ethernet switch fault:
- select the “external failure input” prepared (above)
- select the “Failure status output” for controlling the
network fault indication of the indication panel [4]
Make another pattern for each Ethernet switch fault:
- select the “external failure input” prepared (above)
- select the “Failure Status Output” for the general
fault indication of the indication panel [6]
12
buzzer
Status control
output 2 to CN5
No settings required (fixed function)
*: number as on “Appearance Front Panel”, page 3
Page 19

IP-EN1-EB Instruction Manual
19
6.3.1.2 Status Indications
No.*
Indication of
SX-2000 connector
to IP-EN1 connector
Settings
2
Power
-
- (no setting required)
3
Emergency
mode
Any control output
[5]
to CN7 pin 2
Event Setting / System event: in “Control
output pattern of emergency status“,
assign the control output [5] for controlling
the indicating of the emergency status
*: number as on “Appearance Front Panel”, page 3
6.3.2 Indication of Failures in Fire Alarm Areas (option of EN 54-16)
When using this option, then a failure of each fire area must be indicated. Consider that a
fire area may consist of several paging zones, i.e. a fire area can cover a group of zones.
The fire areas should be declared by the responsible party (e.g. fire brigade, fire expert)
who is aware of the emergency concept.
Failures in of up to 8 fire areas can be indicated. Any control output can be used for that.
Setting by the SX-2000 Setting Software
1. In the surveillance settings, make a check for each speaker zone that shall be
monitored.
2. In the pattern settings, control outputs, prepare as many control output pattern as
required for the failure indications of the fire zones.
3. In the pattern settings, failure output, make a failure pattern for each fire area. To do
so, activate the zones in each fire area by a mouse click and select the control output
pattern used for the control of the particular fire zone of the field failure status output
Relation of Control Input connection of the fire area’s Indication LED
The connectors CN2 and CN7 of the right board (view from rear) contain the control
inputs for the failure indications in the fire areas.
Indication LED
FA 1
FA 2
FA 3
FA 4
FA 5
FA 6
FA 7
FA 8
COM
COM
Connector no.
CN7
CN7
CN2
CN2
CN7
CN7
CN7
CN7
CN2
CN7
Pin no.
1 2 1 2 5 6 3 7 3
4
Page 20

IP-EN1-EB Instruction Manual
20 133-05-00022-0A
7 Specifications
Supply voltage
20 – 40 VDC
Current consumption
60 mA max.
Emergency control input
Contact or 12 VDC / 24 VDC (selectable)
Contact control
Open voltage: 24 VDC, current: 12 mA
Voltage control
12 VDC, 12 mA (1 kohm) or
24 VDC, 12 mA (2 kohm); isolated
General fault control output
NC, NO; max. 40 VDC, 100 mA; isolated
Dimensions (W x H x D)
483 x 44 x 47 mm (without plugs) (19”, 1U)
Weight
470 g (incl. plugs)
Finish
Aluminium, brushed, black
8 Accessories
2-pin removable screw terminal .................................. 2
3-pin removable screw terminal .................................. 3
6-pin removable screw terminal .................................. 1
7-pin removable screw terminal .................................. 2
Keys ........................................................................... 2
9 Optional Accessories
Labels in other languages request
24.06.2016
Traceability Information for EU (EMC directive 2004/108/EC); manufacturer:
TOA Electronics Europe GmbH
Süderstraße 282 ♦ 20537 Hamburg ♦ Germany
Tel.: +49-(0)40-25 17 19-0 ♦ Fax: +49-(0)40-25 17 19-98 ♦ URL: www.toa.eu
 Loading...