

Page 1
Please follow the instructions in this manual to obtain the optimum results from this unit.
We also recommend that you keep this manual handy for future reference.
HY-RR1REINFORCEMENT RING
INSTRUCTION MANUAL
Indicates a potentially hazardous situation which, if mishandled, could
result in death or serious personal injury.
WARNING
Indicates a potentially hazardous situation which, if mishandled, could
result in moderate or minor personal injury, and/or property damage.
CAUTION
• Be sure to read the instructions in this section carefully before use.
• Make sure to observe the instructions in this manual as the conventions of safety symbols and messages
regarded as very important precautions are included.
• We also recommend you keep this instruction manual handy for future reference.
• Leave the installation to your TOA dealer because the installation requires expert knowledge. Improper
installation may cause the speaker to fall, resulting in personal injury and/or property damage.
• Install the mounting hardware in a location that can structurally support the weight of the mounting hardware
and the speaker. Doing otherwise may result in the speaker falling down and causing personal injury and/or
property damage.
• Do not use other methods than specified to mount the unit. Incorrect mounting may cause the speaker to fall
off, possibly resulting in personal injuries.
• Tighten each screw securely. Ensure that the unit has no loose joints after installation to prevent accidents
that could result in personal injury.
• Use the specified speaker in combination. Doing otherwise may cause the speaker to fall off, resulting in
personal injury.
• Avoid touching the unit's sharp metal edge to prevent injury.
2. GENERAL DESCRIPTION
The HY-RR1 Reinforcement Ring is specially designed for use with the F-1522SC Ceiling Speaker System.
It permits the F-1522SC to be installed even in a weak ceiling.
1. SAFETY PRECAUTIONS
Page 2
Printed in Indonesia
533-06-105-70
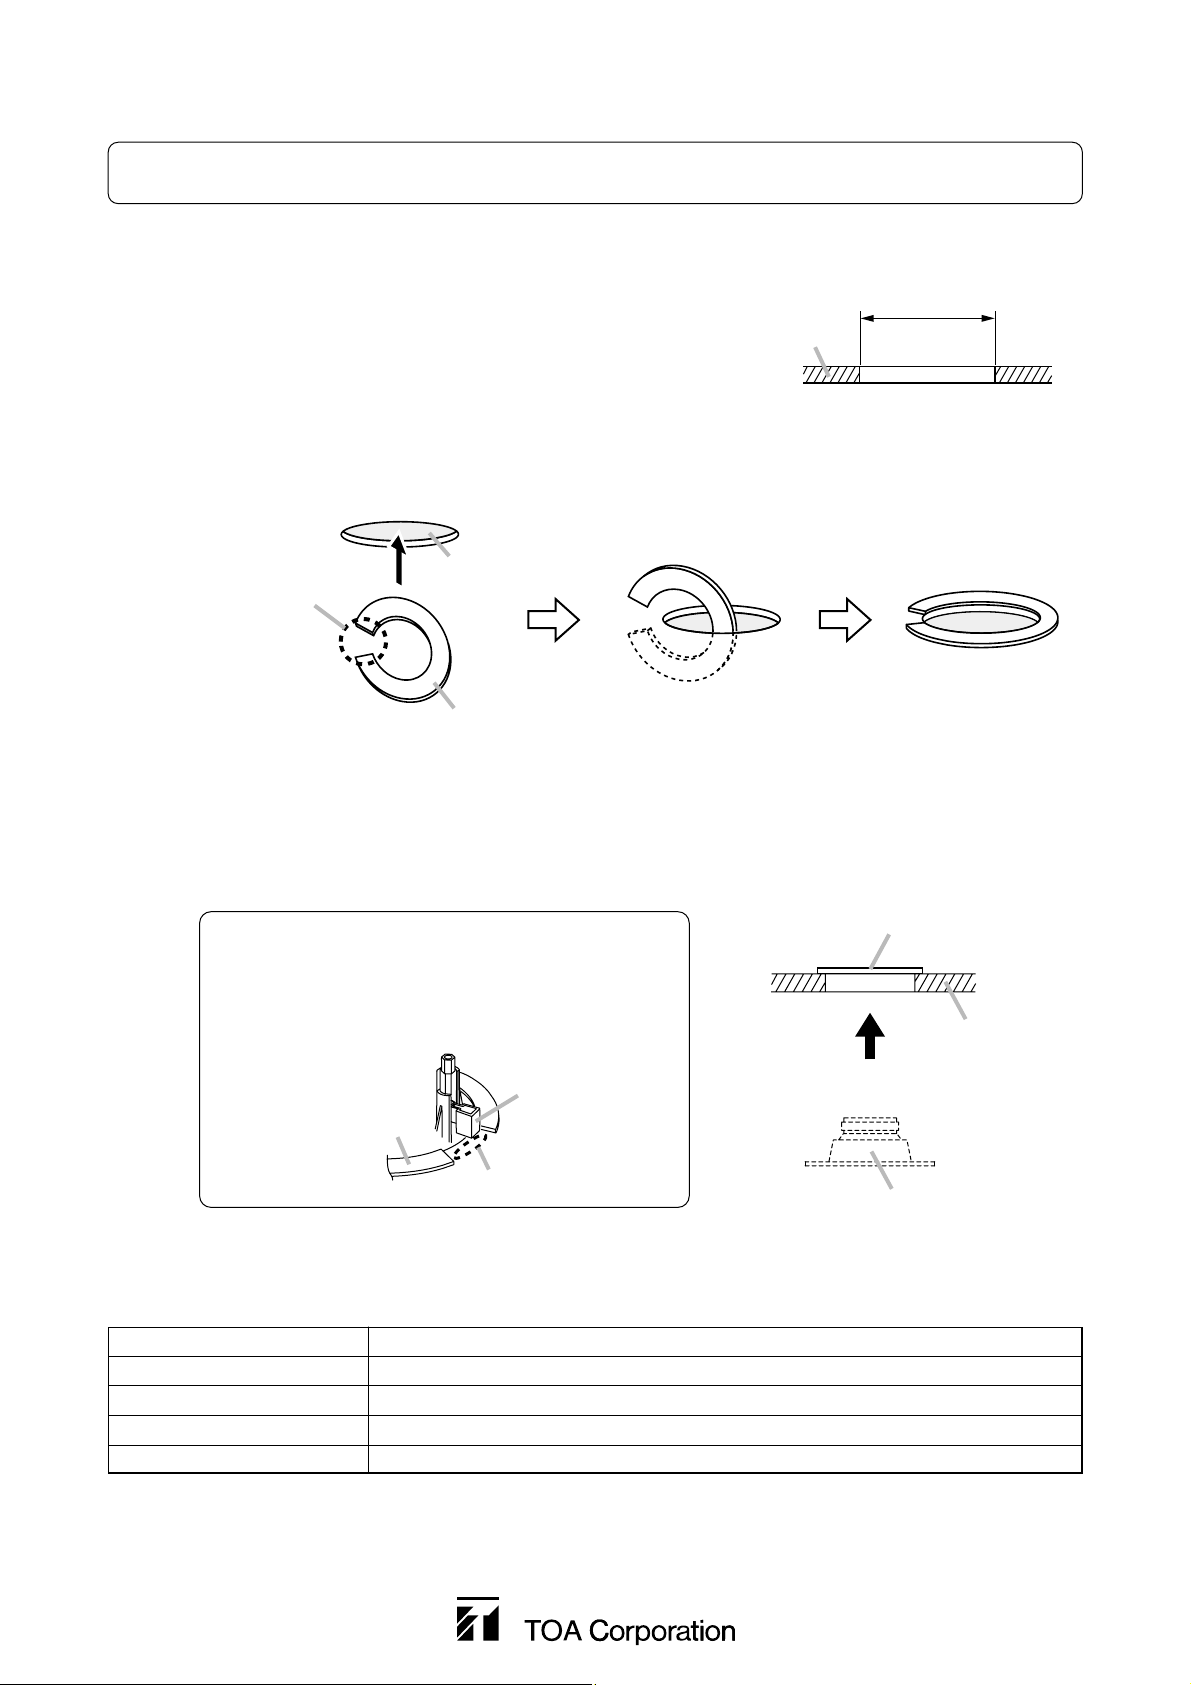
3. INSTALLATION
Refer to the F-1522SC speaker's instruction manual for information.
Step 1. Cut a ø135 mm (5 5/16") hole in the ceiling.
To position and trace the hole, use the paper pattern
included with the F-1522SC.
4. SPECIFICATIONS
Note: The design and specifications are subject to change without notice for improvement.
Mounting Hole Diameter ø135 mm (5 5/16")
Finish Surface-treated steel plate
Dimensions ø175 mm (1.2 mm in thickness) or ø6 57/64" (3/64" in thickness)
Weight 80 g
Usable Speaker F-1522SC
Step 2. Insert the HY-RR1 into the ceiling using its cut-out section and place it on the ceiling as shown below.
Step 3. Mount the F-1522SC speaker.
Refer to the instruction manual included with the F-1522SC for correct mounting procedure.
Ceiling panel
ø135 ±5 mm
5
/16 ±13/64" )
(5
HY-RR1 placed on
Mounting hole
Cut-out section
HY-RR1
ceiling panel
Caution
Install the speaker so that its mounting tab does not
come to the cut-out section of the HY-RR1.
Ensure that the mounting tab presses the HY-RR1.
Avoid this way.
Mounting tab
HY-RR1
Cut-out section
Install the speaker.
HY-RR1
Ceiling panel
Speaker unit
 Loading...