

Page 1
• Before installation or use, be sure to carefully read all the
instructions in this section for correct and safe operation.
• Be sure to follow all the precautionary instructions in this
section, which contain important warnings and/or
cautions regarding safety.
• After reading, keep this manual handy for future
reference.
1. SAFETY PRECAUTIONS
CAUTION
Indicates a potentially hazardous situation which,
if mishandled, could result in moderate or minor
personal injury, and/or property damage.
• Cautions on Use
Be sure to observe the following instructions. Failing to
observe may cause hearing impairment.
· Reduce the volume to its lowest setting before use.
· Never use the megaphone in close proximity to a
person's ear.
· Point the megaphone toward the ground when
conducting operational tests.
• Make sure to observe the following handling precautions
so that a fire or personal injury does not result from
leakage or explosion of the battery.
· Do not short, disassemble, heat nor put the battery into
a fire.
· Avoid using both new and old batteries together.
· Never charge batteries of the type which are not
rechargeable.
· Do not solder a battery directly.
· Be sure to use the specified type of batteries.
· Note correct polarity (positive and negative orientation)
when inserting a battery in the unit.
· Avoid locations exposed to the direct sunlight, high
temperature and high humidity when storing batteries.
2. GENERAL DESCRIPTION
The ER-2230W and ER-2930W are 30 W shoulder-type
megaphones featuring a built-in whistle. Designed to house an
optional wireless tuner module, the ER-2930W can be used to
make announcements from remote locations using a wireless
microphone when so equipped.
3. FEATURES
• The microphone attached to the megaphone is equipped with a
talk switch and volume control that offer easy operation.
• An optional wired microphone can be connected to the external
microphone input to make public address announcements and
an audio player to the auxiliary input terminal to play music.
• A 12 V storage battery can be connected to the external power
input terminal for extended operation.
• The operation panel's power indicator permits easy checks of
the remaining battery voltage level (either continuously lit or
flashing)
• Can be mounted on the optional ST-16A speaker stand.
• Microphone with anti-bacteria treatment improve hygiene and
safety during use.
• Though not waterproof constructed, the megaphones can be
used in locations exposed to light rain or a spray of water with
use of the supplied splash-proof cover.
4. HANDLING PRECAUTIONS
• Immediately contact your TOA dealer if the following
irregularities should occur. To avoid unit failure, make no
further attempt to use the unit in these conditions.
· Smoke coming from the unit or a strange smell detected.
· Water or other foreign objects get inside the unit.
· No sound heard (after checking to be sure that the batteries
are loaded in correct orientation, and satisfactorily charged).
• Avoid storing the unit in humid or dusty locations, in locations
exposed to direct sunlight, near heaters, or exposed to sooty
smoke, as these conditions may result in unit failure.
• Do not use the unit in heavy rains or strong winds, or in
locations where the unit is directly exposed to water even using
with the supplied splash-proof cover.
• When batteries are left installed in the megaphone for extended
periods of time, be sure to check them periodically for charge
and leakage.
• Do not use the unit for extended periods of time with a distorted
sound output. This could cause the inner parts to become hot
and possibly result in unit failure.
• Noise may be produced when a mobile phone is used near the
unit. However, this is not a failure. Use the mobile phone as far
as possible from the unit.
• Use a tightly wrung-out damp cloth to clean the unit. If the unit
becomes extremely dirty, use a cloth moistened in a neutral
detergent and tightly wrung-out. Never use volatile liquids such
as benzene, thinner, or alcohol to clean the unit, as these may
deform or discolor its case.
ER-2230W
ER-2930W
MEGAPHONE
WIRELESS MEGAPHONE
INSTRUCTION MANUAL
Thank you for purchasing TOA's Megaphones.
Please carefully follow the instructions in this manual to ensure long, trouble-free use of your equipment.
Traceability Information for Europe (EMC directive 2004/108/EC)
Manufacturer:
TOA Corporation
7-2-1, Minatojima Nakamachi, Chuo-ku, Kobe, Hyogo, Japan
Authorized representative:
TOA Electronics Europe GmbH
Suederstrasse 282, 20537 Hamburg,Germany
Page 2
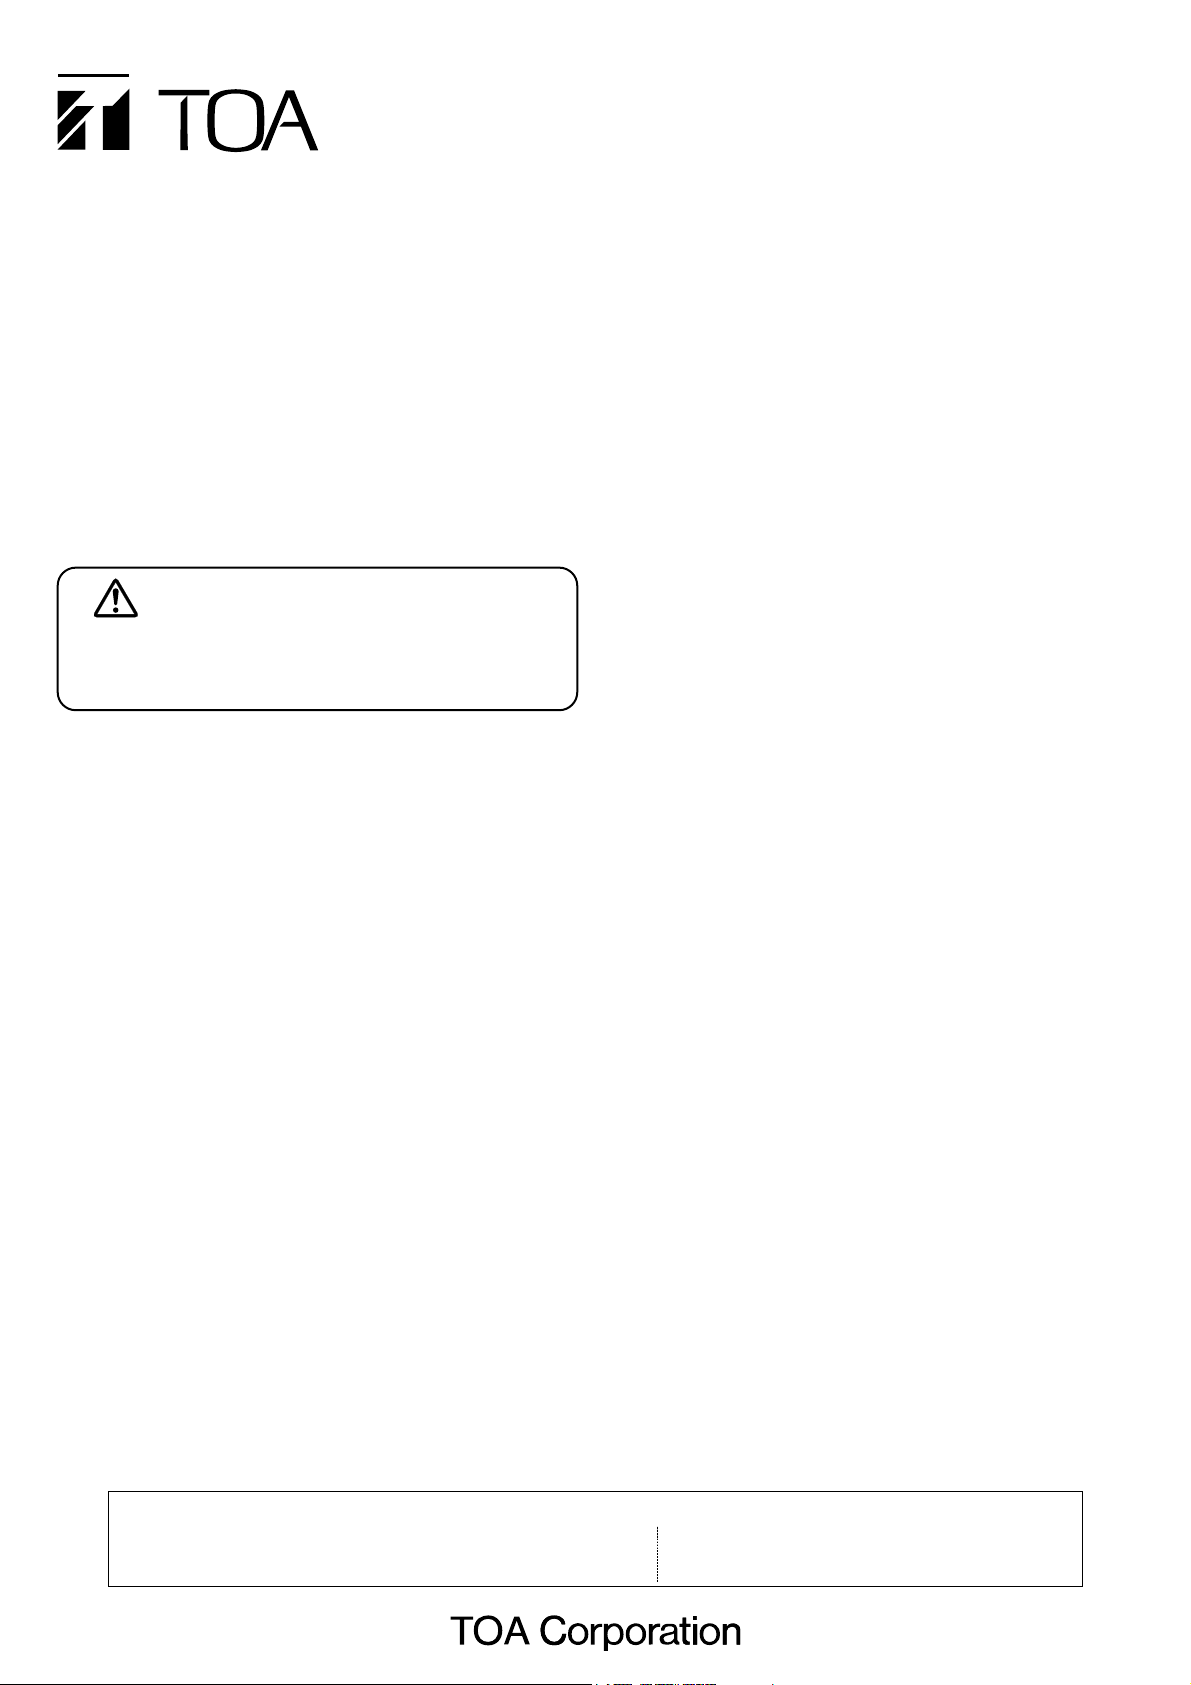
10. Wireless/Aux input volume control
Adjusts the volume of the wireless microphone or other
equipment connected to the AUX input.
Notes
• The wireless function cannot be used with the ER-2230W.
• This volume control is for both a wireless microphone and
external equipment connected to the AUX input. Properly
pre-adjust the output level of external equipment.
11. Auxiliary input terminal
Connect the output of other external equipment such as an
audio player to this terminal using the supplied 3.5 mm mini
plug.
12. External microphone volume control
Adjusts the volume of microphone connected to the rearmounted external microphone input terminal (13).
13. External microphone input terminal
Connect the optional wired microphone to this terminal. This
terminal is unbalanced and permits connection of a 6.3 mm
phone plug.
14. Power indicator
Lights when the External input power switch (15) is set to the
ON position, and also indicates the remaining battery voltage
as follows:
Steady ON: Remaining battery voltage is sufficient.
Flashing: Batteries need replacement .
Note: Use this indicator for basic reference, since manganese
batteries feature a voltage return phenomenon.
15. External input power switch
Press this switch when using the wireless microphone, AUX
input-connected equipment, or the external microphone.
Pressing the switch turns the power ON, and pressing it
again turns the power OFF.
16. External power input terminal
Connect this terminal to a 12 V battery with the supplied
external power plug cord.
Note: Inserting the plug into the External power input terminal
disconnects the internal power (dry battery), permitting
the external power supply to take precedence.
17. Talk switch
Press to talk (power turns ON).
Release to turn the power OFF.
18. Volume control
Rotate upward to increase output volume.
5. NOMENCLATURE AND FUNCTIONS
6. REPLACING THE BATTERIES
Step 1. Open the battery cover by pushing its dented portion in
the direction indicated by the white arrow.
Step 2. Remove the battery case and insert ten D batteries into
the case, carefully noting the battery polarity indications.
Step 3. Replace the battery case in the megaphone and
securely close the battery cover.
Note: If sound is not output through the megaphone, check to be
sure that the batteries are inserted into the battery
compartment according to the battery polarity indications.
The figure shows the ER-2930W.
1. Battery Cover
The battery compartment is built inside.
Open and close the battery cover when replacing the
batteries.
2. Tuner cover (ER-2930W only)
Open and close the tuner cover when mounting the optional
WTU-3800/4800 Wireless Tuner Module.
3. Microphone hanger
Hook the microphone onto this hanger when not using it.
Note: To avoid damage, do not use excessive force when
hooking the microphone.
4. Antenna (ER-2930W only)
A fold-down antenna. Set it upright when using the wireless
microphone.
5. Shoulder strap
Use this strap to hang the unit from the shoulder for transport
or use. (Length: approx. 1 m)
6. Handle
7. Speaker (outer horn)
8. Stand socket
The megaphone can be mounted on the optionally available
ST-16A Speaker Stand using the threaded hole on its bottom.
For mounting details, refer to the ST-16A instruction manual.
Note: For the mounting, do not use the spacer supplied with
the ST-16A.
9. Signal tone switch
A whistle tone sounds while this switch is pressed, and stops
when released.
Note: Output volume is fixed, and cannot be adjusted with the
volume control.
6
5
4
3
C
H
A
N
2
N
E
C
L
H
A
N
G
E
1
8
Operation panel
Microphone
7
[Microphone] [Operation panel]
EXT.
BATTERY
12V 30W
Mouthpiece
17 18
40 cm curl cord
(extends to 1.8 m)
14
WHISTLE
PUSH-ON
WIRELESS/AUX
MAX
MIN
EXT. MIC
MIN MAX
BATTERY
POWER
ON
9 10 11 12 13 15 16
Body
C
H
A
N
N
E
L
CH
AN
GE
Battery polarity indication
Polarity indications
in the battery case
CHANNEL
CHANGE
Volume
high
Dented portion
Battery cover
Page 3

7. USING THE SUPPLIED MICROPHONE
Step 1. Detach the microphone from the microphone hanger.
Step 2. Using the volume control, adjust the volume to an
appropriate level that does not generate feedback when
holding down the talk switch.
Feedback is more likely to occur when using the
megaphone indoors or in other reverberant places.
Particularly when the batteries are new, it may be
impossible to adjust the volume to maximum without
causing howling. In such cases, set the volume to about
mid-level.
Step 3. Speak into the microphone while holding it about 1 cm
away from the mouth.
Note: Speaking too far from the microphone or in too
soft voice may result in insufficient volume.
[When Attaching the Microphone]
Reduce the volume to its lowest setting, then press the
microphone onto the hanger. Leaving the volume set higher can
cause howling if the talk switch is accidentally pressed when
attaching or detaching the microphone.
Step 1. Remove the tuner cover located above the battery
cover. To do this, remove both the left and right cover
mounting screws.
Step 2. Insert the optional WTU-3800/4800 Wireless Tuner
Module into the tuner receptacle.
Notes
• Avoid using any other than the designated type of
tuner module. The megaphone could be damaged.
• Ensure that the group/channel numbers of the tuner
module match those of the wireless microphone.
• Take care regarding the correct orientation of the tuner
module and fully insert the module into the tuner
receptacle.
Step 3. Replace the tuner cover.
8. WHEN USING THE WIRELESS FUNCTION
(ER-2930W only)
Mounting the wireless tuner module
Using the wireless microphone
Changing the group/channel number of the wireless
tuner module
Step 1. Set the antenna on the top panel upright.
Step 2. Turn ON the External input power switch on the
operation panel.
The power indicator lights.
Note
If the power indicator flashes, this indicates that the
batteries need replacement.
Step 3. Turn ON the wireless microphone's power switch.
The power indicator lights.
Step 4 Adjust the volume using the Wireless/AUX input volume
control.
Step 5. After using the wireless function, reduce the volume to
its lowest setting and be sure to set the External input
power switch to the OFF position.
Note
While the power switch is turned ON, electrical current
continues to flow to the electrical circuit, resulting in
quickly drained batteries.
CAUTION
Point the megaphone toward the ground when
conducting operational tests.
CAUTION
• Before pressing the microphone's talk switch, fully turn
down the volume.
• Point the megaphone toward the ground when conducting
operational tests.
Notes
• When the wireless microphone is interrupted due to
interference, change the tuner module's group/channel number.
Note that changing the number unnecessarily could adversely
affect the tuner module's reception.
• When changing the group/channel number, also change that of
the wireless microphone to the same number as the tuner
module's.
Step 1. Open the rubber cover on the tuner cover.
Step 2. Change the group/channel number using the mini
screwdriver supplied with the tuner module.
For setting procedure of the group/channel number,
refer to the instruction manuals included with the tuner
module and the wireless microphone.
Step 3. Close the rubber cover.
Tuner receptacle
Wireless tuner module
WTU-3800/4800 (optional)
Group/channel numbers
CHANNEL
CHANGE
Cover mounting screw
Tuner cover
Antenna
1
3
Wireless microphone
WM-3220/3310/4200/4300
C
H
A
N
N
E
L
CHANGE
2, 5
4
Wireless/AUX input volume control
(optional)
Power indicator
External input power switch
Rubber cover
Page 4

9. USING EXTERNAL EQUIPMENT
Step 1. Connect the external equipment.
1-1. When using a general-purpose microphone
Connect the moving coil-type microphone to the
External microphone input terminal.
1-2. When using an audio player
Connect an audio player to the Auxiliary input terminal
using the supplied 3.5 mm mini plug.
Note
Arrange for the connection cord and external equipment
connection plug separately. It is recommended that the
commercial 3.5 mm stereo plug for audio applications
be used.
Step 2. Turn ON the External input power switch on the
operation panel.
The power indicator lights.
Note
If the indicator flashes, this indicates that the batteries
need replacement.
Step 3. Adjust the volume.
Use the External microphone volume control or the Aux
input volume control corresponding to the input in use.
Note
Connected external equipment can be used
simultaneously. However, since the volume of each
component cannot be individually adjusted by the
megaphone, use each component's volume control for
individual volume adjustment.
Step 4.
After use, fully turn down the volume control and be sure
to set the External input power switch to the OFF position.
Note
While the power switch is turned ON, electrical current
continues to flow to the electrical circuit, resulting in
quickly drained batteries.
Notes
• Inserting the plug into the External power input terminal
disconnects the internal power (dry battery), permitting the
external power supply to take precedence.
• When connecting to a 12 V battery, be sure to insert a 5 A fuse
(separately available) for safety.
• Do not power the megaphone from a vehicle cigarette lighter
socket while the engine is running. The battery voltage may rise,
possibly causing unit failure.
10. USING THE EXTERNAL POWER SUPPLY
11. SPECIFICATIONS
*1Battery life estimates assume 30 minutes of continuous use per day.
*
2
Audible range estimates assume use on a relatively quiet street
using new batteries and will vary depending on remaining battery
capacity, surrounding noise, wind direction, obstacles and other
environmental conditions.
*
3
0 dB = 1 V
*
4
Without batteries
Notes
• No accessory batteries are supplied.
• The design and specifications are subject to change without notice
for improvement.
Model No. ER-2230W ER-2930W
Power Source Battery: D (R20P) x 10 (15 V DC)
External power: 12 V DC battery
External power input terminal:
ø5.5 mm, center positive
Output Rated 30 W, Max. 45 W (AUX input)
Signal Whistle (1,600 to 2,400 Hz)
Battery Life*
1
Voice: approx. 17 hours
Whistle: approx. 90 min.
Audible Range*
2
Voice: approx. 800 m
Whistle: approx. 1,000 m
AUX Input Sensitivity –10 dB*
3
(300 mV), 10 kΩ (3.5 mm jack,
stereo plug acceptable), volume control
(both AUX input and wireless microphone
adjustable for ER-2930W)
External Microphone 600 Ω, unbalanced, 6.3 mm phone jack,
Input volume control
Receiving Frequency
–
800 MHz band
Antenna
–
Fold-down flexible
antenna
Diaphragm Polyimide film (voice coil, bobbin)
Anti-bacteria Treatment Microphone
Remaining Battery LED (also serves as a power indicator),
Indication Steady ON: Normal use,
Flashing: Batteries need replacement
Operating Temperature –10ºC to +40ºC
Finish Horn ring:Vinyl chloride, gray
Horn: Aluminum, light gray, paint
Case top: Die-cast aluminum, gray, paint
Others: ABS resin, gray
Dimensions ø351 x 512 (length) mm
Weight (Body)*
4
3.6 kg 3.8 kg
Weight (Microphone) 150 g
• Accessories
3.5 mm mini plug (AUX input) ................................. 1
External power plug cord (1 m) .............................. 1
Splash-proof cover ................................................. 1
• Optional products
Speaker stand: ST-16A
Microphone: DM series
Wireless tuner module: WTU-3800/4800 series*
5
Wireless microphone: WM-3220/3310/ 4200/4300 series*
5
*5
ER-2930W only
Using the supplied plug cord for external power, connect a 12 V
battery to the External power input terminal on the operation
panel. Connect the white character side of the external power
cord to the positive (+) terminal.
533-03-024-0A
URL: http://www.toa.jp/
[Operation panel]
WHISTLE
PUSH-ON
Wireless/Aux input
volume control
Auxiliary input terminal
External microphone volume control
WIRELESS / AUX
MAX
MIN
EXT. MIC
MIN MAX
BATTERY
POWER
ON
External microphone input
terminal
Power indicator
EXT.
BATTERY
12V 30W
External input power
switch
Use a 5 A fuse (procured separately).
Make the white character side positive (+).
The center terminal of the plug is positive.
To External power input terminal
External power plug cord
(supplied)
 Loading...