

Page 1
EM-380-AS
GOOSENECK MICROPHONE
INSTRUCTION MANUAL
Thank you for purchasing TOA’s Gooseneck Microphone.
Please carefully follow the instructions in this manual to ensure long, trouble-free use of your equipment.
1. GENERAL DESCRIPTION
2. FEATURES
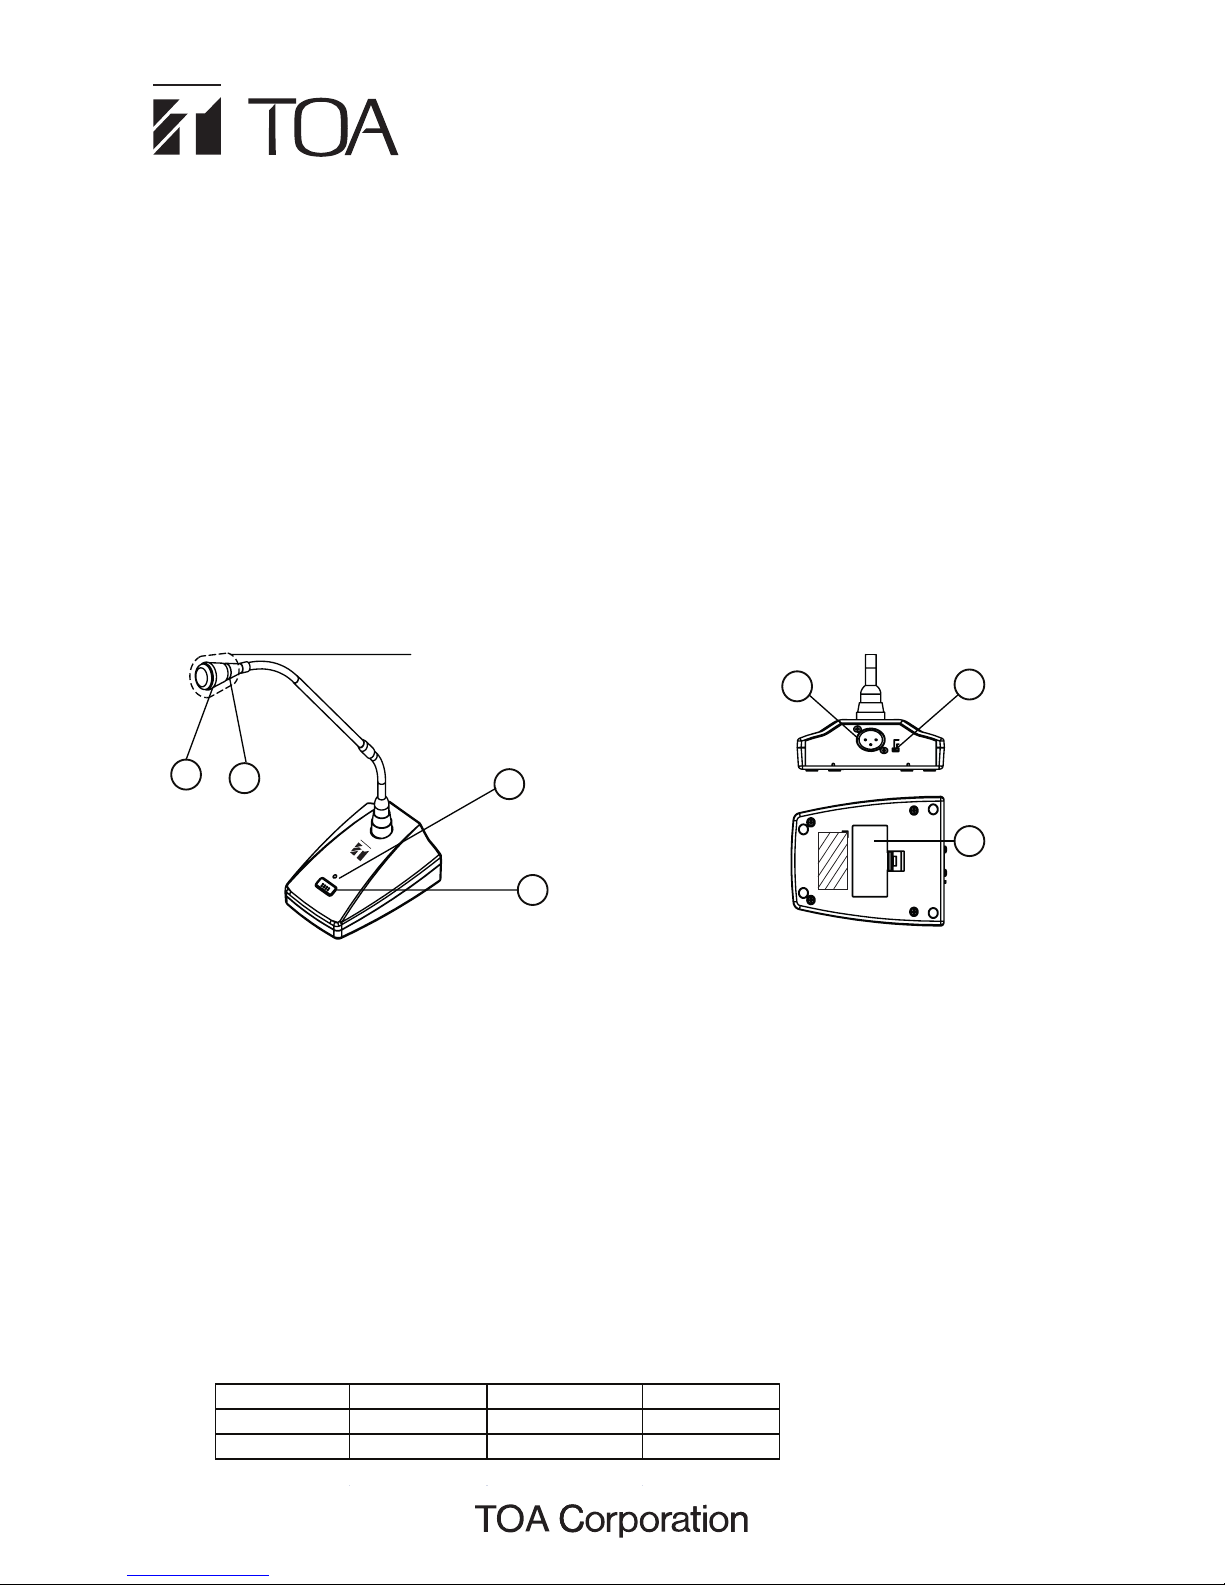
1. Microphone
2. Gooseneck Lamp
3. Power Lamp
4. Microphone ON/OFF Button
Press this key to turn on or off microphone.
5. Balance Output XLR
6. Selector switch
7. Battery Compartment
3. BEFORE USING THE UNIT
4. NOMENCLATURE AND FUNCTIONS
TOA's EM-380 Gooseneck Microphone is a unique shape and high quality condenser microphone designed for use in
lecture halls, house of worship and paging applications. This product is equipped with an optional power that is selectable between battery or phantom power.
p#ZQSFTTJOHUIFCVUUPOUIFNJDSPQIPOFDBOCFUVSOPOPSPGG
p.JDSPQIPOFPQFSBUJPOCZTFMFDUJOHUIFCBUUFSZ1IBOUPNTXJUDIPOUIFSFBSPGUIFNJDSPQIPOF
p
Use two pieces batteries size “ AA ”.
Prepare two AA batteries (3 VDC) or phantom power 9 - 52 VDC to operate the unit.
[Rear]
<#PUUPN>
Windscreen
(Accessory)
1
3
2
4
5
6
7
Light blue when the microphone is turned on and it
will turn off when microphone in off mode.
Same as gooseneck lamp, power lamp will turn on
when the microphone is turned on and it will turn off
when microphone in off mode.
Output impedance of the microphone is 750 ohms.
Use the supplied cable to connect with an amplifier.
Selecting this switch to use battery or phantom as
the power supply for this unit.
Place AA batteries (2 pcs).
Close-talk type cardioid electret condenser microphone. The gooseneck shaft facilitates positioning
of the microphone for the optimum acoustic effect.
MIC OUT
BATTERY
PHANTOM
0/0''
Note : Recommended to use the supplied cord or
balance cable, especially if using the phantom
power. Otherwise gooseneck lamp and power lamp
dimly lit, although the unit can operate normally.
Note : if battery is low, the lamp will turn off, but the
microphone still can be used. Recommended to
change the battery when this happen.
5. BATTERY
Application and use battery for speech and paging be assumed such as table below
Application 3 hoursweek 3 hoursday Times*
Speech 20 months 3 months -
Paging - - 92,500
* Approximate be assumed use one time paging for 10 seconds.
5.1. Life Span
Page 2

6. CONNECTION
7. OPERATION
8. USING THE SELECTOR SWITCH MODE
Step 1. Set the amplifier's microphone volume
control to the minimum position.
Step 2. Using the supplied cable to connect the
mic out of microphone unit to the
amplifier's microphone input.
Amplifier
XLR to Phone Jack Cable
EM-380-AS
Step 1. Press the microphone ON/OFF button.
The gooseneck lamp and the power lamp light and turning on the microphone.
Step 2. Make an announcement.
Keep your mouth 5 – 10 cm away from the microphone and speak normally for the best possible sound rep roduction. Adjust the microphone orientation for the best position by turning its gooseneck shaft. If distance
of mouth is too near, it cause voice distortion. Adjust the microphone by pulling away or lowering it. Because
the high sensitivity’s microphone.
Step 3. After announcement is completed, press the microphone ON/OFF button.
Both the unit’s lamp will go off and microphone turn off.
Selector switch have 2 modes. There are battery mode and phantom mode. If using battery as power input, select the
switch to battery position. And if using phantom as power input, select to phantom position. Be sure to turn ON the
phantom power from Amplifier or mixer. For reference can use phantom power from mixer amplifier A-2000 Series,
A-2000D Series, A-2128, A-1724 and other TOA’s mixer amplifier.
9. SPECIFICATION
Element Condenser Microphone
Polar pattern Cardioid
Rated Impedance
750 ohms, balance
Rated Sensitivity -41 ± 3dB (1kHz 0dB = 1V / Pa)
Power 3V DC (2 x "AA" batteries) or Phantom Power ( 9 - 52 V)
Frequency Response
Finish Stand = ABS Resin, Black, Paint
Weight
550 g ( exclude batteries)
Accessory
50 - 16,000 Hz
Operating Temperature 0 °C to +40 °C (32 °F to 104 °F)
Shaft = Copper alloy, Black, Paint
Windscreen ..... 1
XLR to Phone Jack Cable (7.5m) ....1
URL: http://www.toa.com.sg
Dimensions 110 (w) x 145 (d) x 532 (h) mm
133-04-00013-00
Traceability Information for Europe
Manufacturer : Authorized representative :
PT. TOA GALVA INDUSTRIES TOA Electronic Europe GmbH
Jl. Raya Bogor km 34-35, Tapos Suederstrasse 282, 20537 Hamburg,
Depok 16958, Indonesia Germany
Battery
ribbon
Note : The design and specifications are subject to change without notice for improvement.
Caution : If the microphone is not used more than 1 month, please pull out the battery from
the unit in order to avoid the battery leakage. To release the batteries, please pull the remaining ribbon carefully from the battery compartment.
Note : Be sure to press the ON/OFF button after announcement completion. Failure to do this, shortening the battery
life.
Step 1. Open the battery cover.
Step 2. Insert the battery according to battery polarity and make sure the remaining
ribbon on top of the batteries. (see right below picture).
Step 3. Put back the battery cover to product.
5.2. Battery Insertion
 Loading...