

Page 1

Operating Instructions
COMPUTER INTERFACE
CI-600
TOA Corporation
Page 2

WARNING : (For U. S. A. only)
This equipment generates, uses, and can radiate radio frequency energy and
if not installed and used in accordance w i t h the instructions manual, may
cause interference to radio communications. It has been tested and found to
comply wi th the limit s for a Class A computing device pursuant to Subject J of
Part 15 of FCC Rules, which are designed to provide reasonable protection such
interference when operated in a commercial environment.
Operation
of
this
equipment
in a
residential
area
is
likely
to
cause
interference in which case the user at his own expense w i l l be required to
take whatever measures may be required to correct the interference.
CONTENTS
General Description
Features
......................................................................................
........................................................................... 4
CI-600 New Functions
1.
Personal Data Display
2.
Speech Message
3.
Time Message Service
4.
Recorded Message Paging
5.
System
6.
Remote
Installation
Maintenance
Function Control
.................................................................................
......................................................................
...............................................................
...............................................................
................................................................
.....................................................................
................................................................
PART 1. INITIAL SETTING
1. Connection
1-1.
Initial
1-2.
Application Sett
Setting
......................................................................
ing
..................................................................
4
5~ 8
9~13
14~15
16
17
17
18
19
20
2. DIP
Switch
3. DEC
Setting
Terminal Setting
.........................................................................
......................................................................
4. Input
4-1.
Control
4-2.
Basic
4-3.
Guide Message List
Keys
.....................................................................
Input
Method
...................................................................
...................................................................
21
22
23~24
24
25
- 2 -
Page 3

5. Initial Setting
5-1. Initial
5-2. Initial
Setting
Sett
(1)
Clock
Setting
(2)
New
Programing .............................................................
(3)
Tie-line
(4)
Fixed
Message
4-a.
Fixed
4-b.
Fixed Message
(5)
Password Sett
(6)
Personal Data
Flowchart
ing
Operation
.............................................................
............................................................
...................................................................
Data
Transfer
Setting
Message
..........................................................
............................................................
Registration
Registration
ing
................................................................
Registration
PART 2. APPLICATION SETTING
1.
Application
2.
Initial
3.
System
Setting
Setting
Menu
Programing
Flowchart
.............................................................
..................................................................
Menu
...................................................................
(Status)
(Number)
.......................................
...................................
..................................................
26
27
27
28~38
39
40
40
40~41
42~43
45~46
46
41
44
3-1.
Programing
3-2.
Programing
3-3.
External
4.
System Maintenance
Alteration
Station Status Display
Line
Status Display
Menu
4-1. Link Control Menu
4-1-a.
Link
Disconnect
4-1-b.
Link
Reconnect
4-2. Line Control Menu
4-2-a.
Line Disconnect
4-2-b.
Line Reconnect
4-3. Speech Path Control Menu
4-3-a.
Stat
ion
Speech
4-3-b.
Stat
ion
Speech
4-4.
Dial
Data
Output
Menu
4-5.
Exchange
4-6.
Exchange Sequence Displ a y
Sequence D isplay
..............................................................
....................................................
.........................................................
...................................................................
ion
............................................................
ion
.............................................................
ion
............................................................
ion
.............................................................
Path Connect
Path Disconnect
ion
................................................
ion
.............................................
................................................................
............................................................
and
Printout
...............................................
46~50
50
51
52
52
52
53
53
54
54
55
55
56
5.
Personal
6.
Remote
Data
Display
Menu
Function Control
Menu
................................................................
...............................................................
- 3 -
56
57
Page 4

This booklet explains the CI-600 Computer Interface in two parts: Part 1 Initial
Setting and Part 2 Application Setting. Please read this operating instructions
carefully for correct operation of your computer interface.
General Description
•
In conjunction with a computer and the EX-610, EX-620 or EX-630 intercom exchange, the CI-600 provides
such functions as system programming and maintenance, personal schedule information, and automatic
message distribution at preset time.
Features
•
1. Connectable to VT-100 mode DEC terminals.
2. Recorded message distribution during absence.
3. Display of personal IN/OUT status, location, return time, etc.
4. Password access to important functions.
5. Connectable to one master terminal and two sub-terminals.
6. Easy programming and maintenance from master terminal.
- 4 -
Page 5

CI-600 NEW FUNCTIONS
This chapter explains the performance and operation of the new functions available when the EX-610, EX-
620 or EX-630 exchange is connected to the SI-62 speech interface, SM-600 speech message device, and CI-
600 computer interface.
1. PERSONAL DATA DISPLAY
Register the "status" of Fixed Message as we ll as the "Names", "Personal Number " and "Station Number"
of
Personal
registration.)
By programming the personal number, status, time/date, etc. locally from any master station such personal
information
automatically displayed on the data terminal or computer screen for easy reference.
To operate the new functions, use the personal number f o r those registered under the personal number
during
the station number.
the
Cl-600's
Data
during
as the
initial
location,
initial
setting
conference,
setting,
while
of the
and
return
the
CI-600.
time/date
station
(Refer
number
to the
from
section
the
has to be
"CI-600
conference
used
for
Initial
or
business trip
those
registered
Setting"
can be
using
for
- 5 -
Page 6
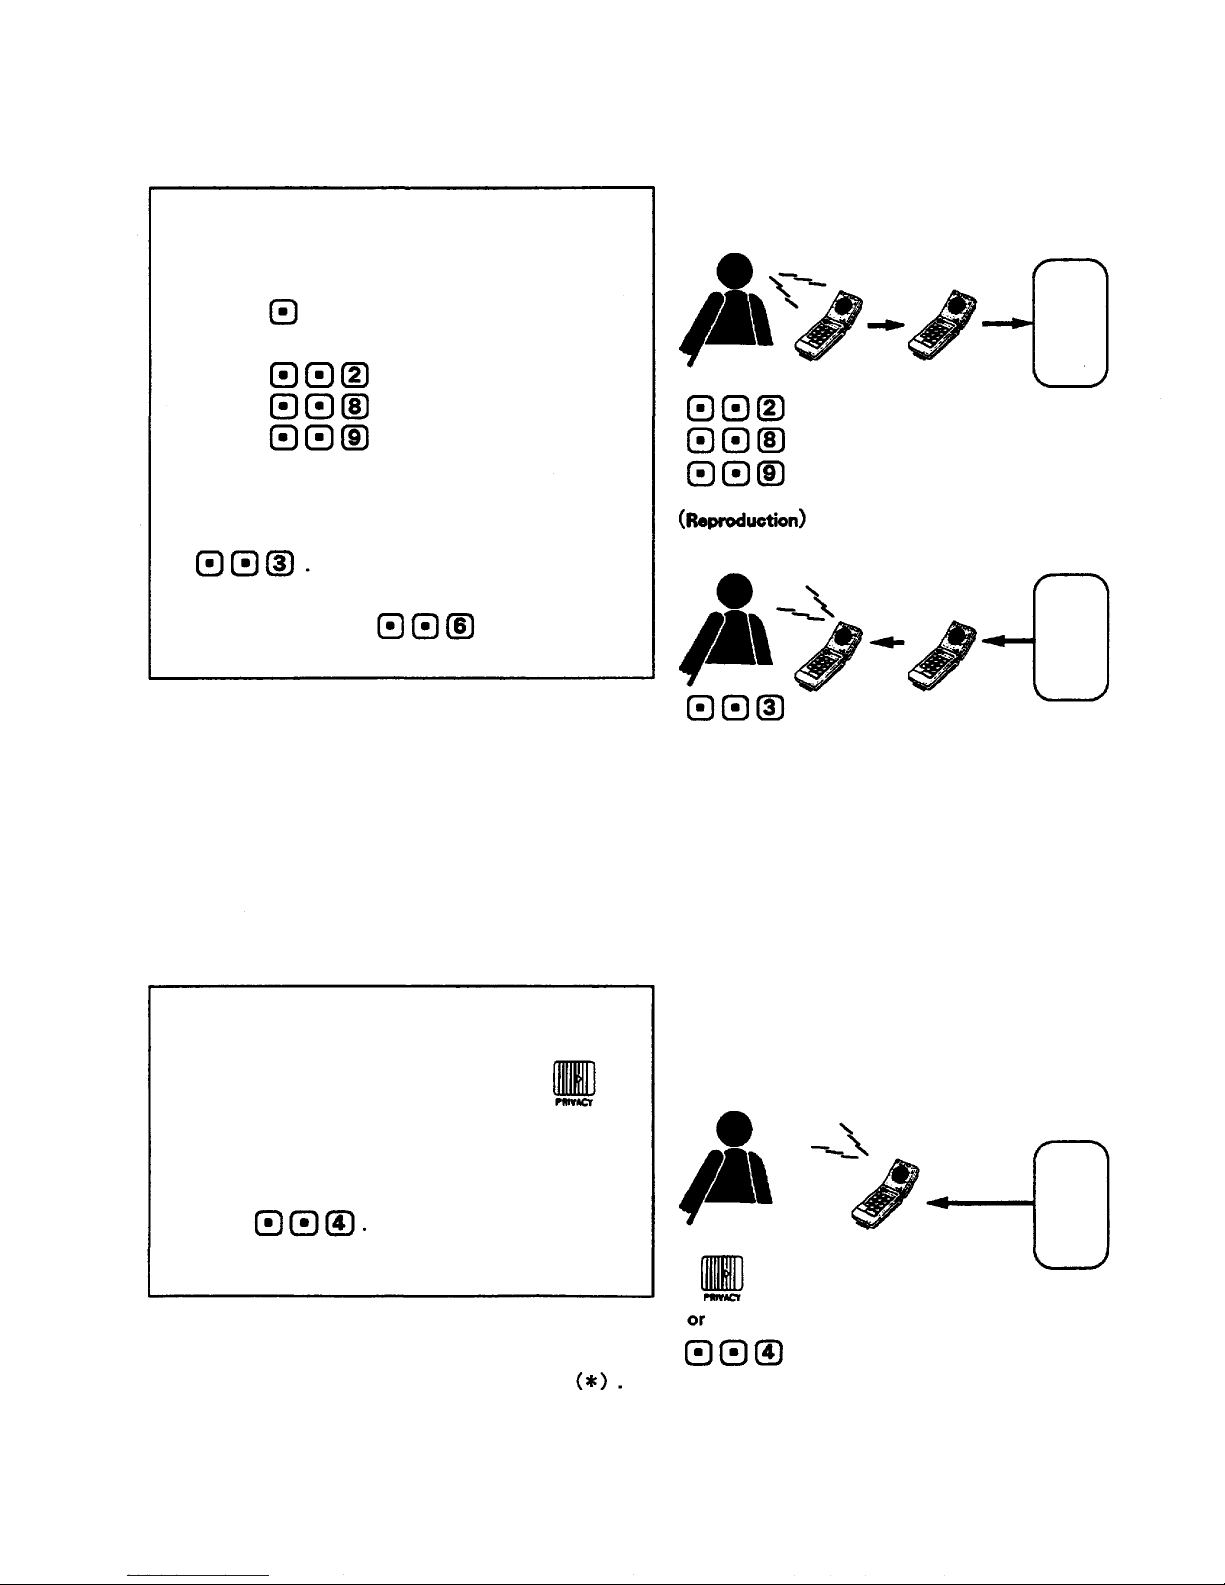
< Operation Using the Personal Number>
[Registration]
Press
Status Time/Date
Personal No.
(Confirmation tone is heard.)
(0-9) (0101-1231) (0001-2400) (1000-1999)
at the destination station to register the status, location and time/date.
Press
(Confirmation tone is heard.)
Personal No.
(1000-1999)
at the destination station to register the location.
[Cancellation]
To cancel the registered data,
Press
(Confirmation tone)
Personal No.
(1000-1999)
to cancel the status, location and time/date data registered.
< Operation Using the Station Number>
[Registration]
Press
(Confirmation tone is heard.)
Status Time/Date
(0-9) (1010-1231)
(0001-2400)
at the originally assigned station to register the status and time/date data.
[Cancellation]
To cancel the registered status and time/date,
press
(Confirmation tone is heard) at the assigned station.
- 6 -
Page 7
Station No. Personal No. Name Status Location Time/Date
1000 Smith, Dick Conference 235 15:00
210 Cash, Tom
(Confirmation tone is heard.)
Station No. Personal No. Name Status Location Time/Date
1000 Smith, Dick 210
210 Cash, Tom - -
(Confirmation tone is heard.)
Station No. Personal No. Name Status Location Time/Dat
1000 Smith, Dick
210 Cash, Tom -
(Confirmation tone is heard.)
Station No. Personal No. Name Status Location Time/Date
1000 S mith, Dic k
210 Cash, Tom Conference - 15:00
(Confirmation tone is heard.)
Station No. Personal No. Name Status Location Time/Date
1000 S mith, Dick
210 Cash. Tom
e
(Confirmation tone is heard.)
(8-second message) (Confirmation tone is heard.)
Station No. Personal No. Name Status Location Time/Date
1000 Smith, Dick
210 Cash, Tom *
- 7 -
Page 8

The personal information display contains " Station Number ", " Personal Number ", " Name ", " Status ",
" Location ", and " Time/Date " columns. The indications in the last three columns change whenever the
new data are entered. (Refer to page 6.)
Operation (1) :
The status column displays the status in word so programmed as to correspond to the selected number
during
initial
made appears in the Location column. The column, however, shows nothing if the status is " OUT ".
Dial ing
Operation (2) :
This key sequence turns the Location display into the station number a t which the entry has been made,
while displaying nothing in the Status and Time/Date columns.
Operation (4) :
Nothing is displayed in the Location column. Both the status and time/date indications change as the
new data are registered.
setting.
When
the
status
for time/date displays nothing in the Time/Date column.
is set for " IN ", the
station
number
at
which
the
entry
has
been
(1) When in Operation (1), such other functions using Personal Number as IN/OUT Annunciation and
Location Indication are also affected by the status setting. If, for example, the status is IN,
the indication board lamps come on, and they go out if OUT is entered.
When in Operation (2), such lamps come on, w h i l e they go out when in O peration (3).
(2) • Key operations in Operation (1) and (4) automatically registers the fixed response message, in
addition to the personal information data. When the personal number registered in Operation (1)
or the station registered in Operation (4) is called, therefore, the call is not connected to the
called party, transmitting only the fixed response message to the ca lling party. (Refer to the
section " Speech Message " for details.)
• The fixed response message is deleted when dialed as in Operation (2), (3) or (5).
• If the response message is recorded from the station programmed into the CI-600, the status
column display turns into asterisk
erasing the time/date column.
- 8 -
Page 9
2. SPEECH MESSAGE
Speech
Message
messages or 96 8-second i n dividual messages and 10 f ix ed messages can be stored.
comprises
individual
and
fixed
message
files. A maximum
of 128
8-second
individual
SM-600 (8-second
message x 32 )
128 8-second
individual
messages
SM-600 (8-second
message x 32 )
SM-600 (8-second
96 8-second individual
messages and 10 fixed
messages
message x 32 )
SM-600 (8-second
message x 32 )
The
individual
calling parties during absence. It can also be used to leave a " call me " message when the called party
message file
is
recorded
by
users
for use as a
response
message
CI-600 (10 fixed
messages)
SM-600 (8-second
message x 32 )
SM-600 (8-second
message x 32 )
SM-600 (8-second
message x 32 )
transmitted
to the
is busy or absent.
The
Fixed
Message
file
is
pre-recorded
at
time
of
system
installation
and its
content
corresponds
to the
type of status (message number) to be selected. When the status is registered, its corresponding message
is automatically transmitted from the called station to the calling party.
The following functions can be achieved by using these message fa cilities:
User's response message as we l l as a " c a ll me " message f r o m the c alling party can be recorded into
the user's station. (Absence Mailing Function).
A " c al l me " message can be recorded into the called station when the called party is busy or
absent. (Message M ai l i ng Function).
The user can retrieve the information stored in the voice mailbox from the remote station. (Remote
Message Pickup Function).
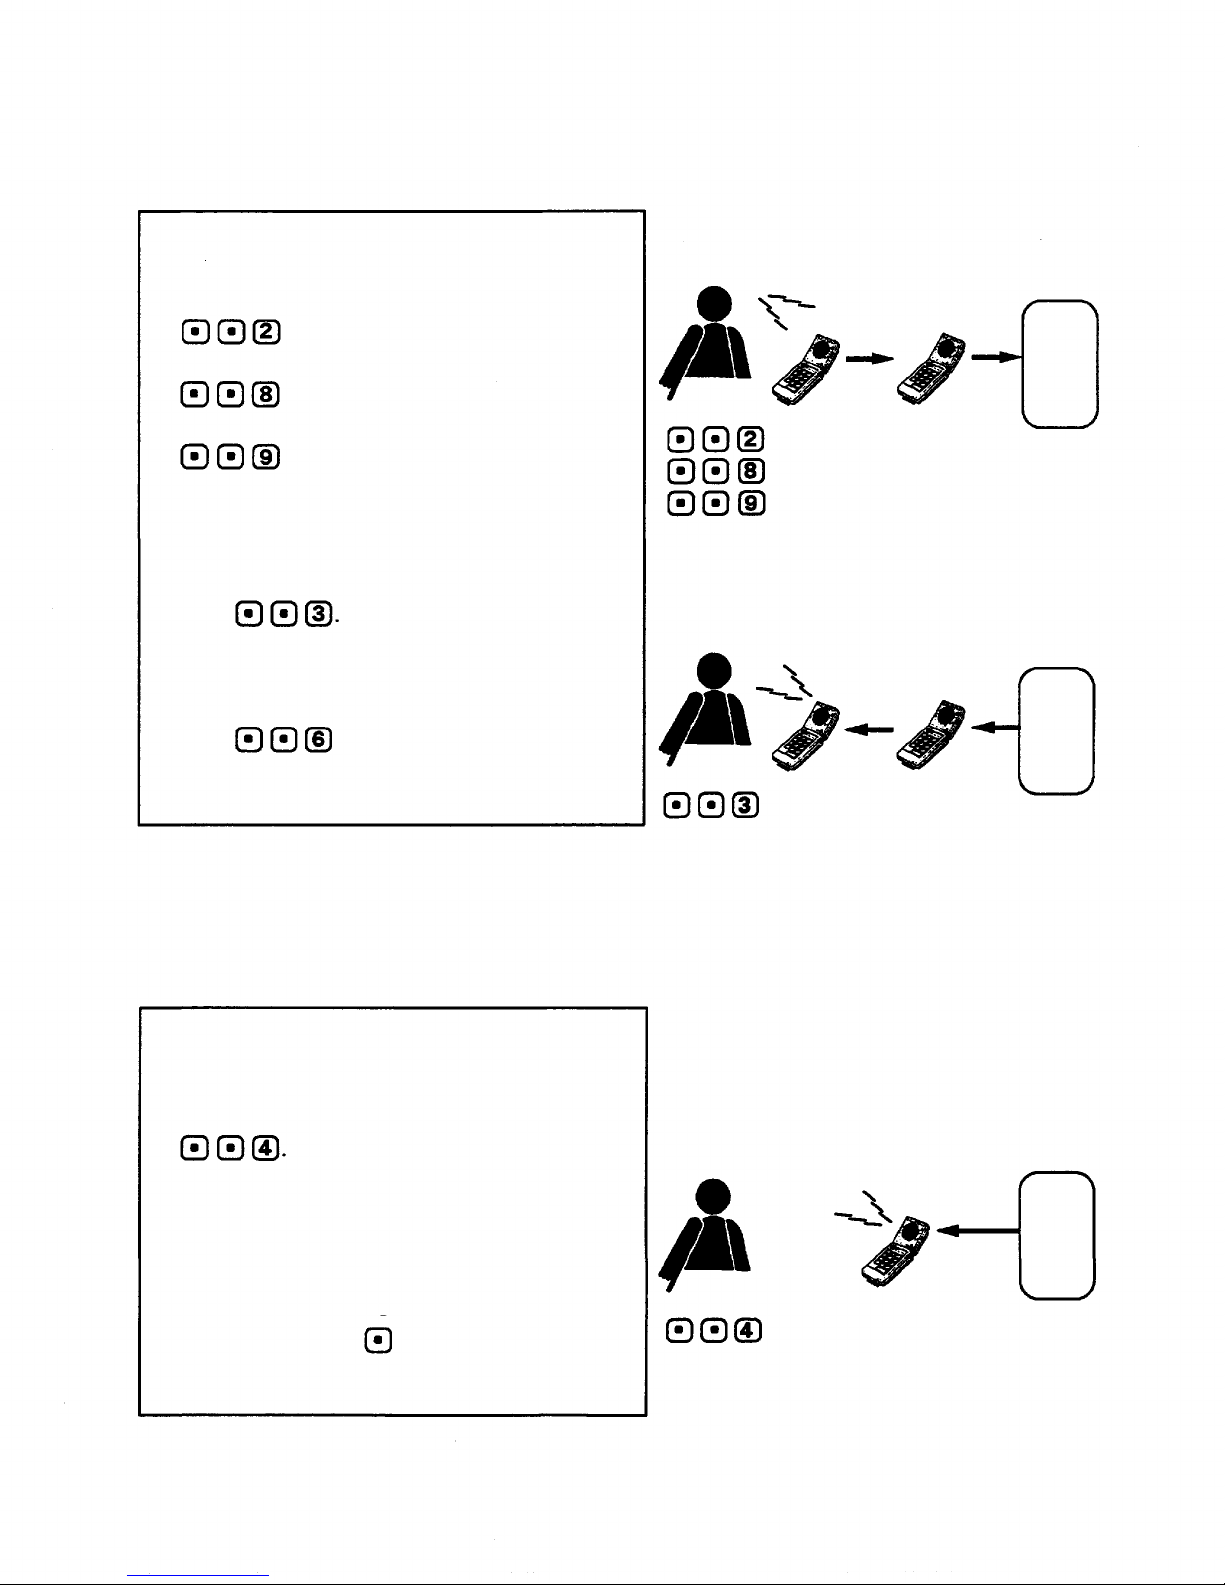
Absence Mailing Function
Response Message Setting
< Individual Response Message Recording
for Station Number Calls>
(for 8-second message recording) or
(for 16-second message recording) or
(for 32-second message reco rding).
To check for the recorded message, press
Setting the Privacy switch to ON
after confirming the content
automat i c a l ly tra nsmi ts the response message to
the party who has made a call using the station
number.
(Recording)
Speech Message
Fil e
SM-600
SM-600
SM-600
- 9 -
Page 10
The individual response message recording is terminated automatically after a specified period of time.
with a confir m ation tone. To terminate the recording immediately, press
To re-record, after erasing a previous recording by pressing
record the message again from the beginning.
(confirmation tone is heard),
< Fixed Response Message Registration
for Station Number Calls>
Press
(Confirmation
Status Time/Date
(0-9) (0101-1231)
(0001-2400)
tone)
and the fixed message is registered as a response
message. To check for the registered message, press
Setting the Privacy switch to ON
after confirming the content
automatically transmits the response message to the
party
who has
made a call
using
the
station
number.
< Fixed Response Message Registration
for Personal Number Calls>
Press
Status Time/Date Personal No.
(0-9) (0101-1231) (0001-2400)
(Confirma-
ti on tone)
(Confirmation
tone)
No. 225
Out t o lunch. CI-600 Fixed
Message File
CI-600
This registers the fixed message as a response
message, a utomatically transmitting it to the
party
who has
To check for the registered message,
press
Note:
Time/date
file
No.
0
1
2
3
made a Personal
Time/date recording can be confirmed
(reproduced) by DIP switch setting.
(10 x 0.7
Content
Zero
One
Two
Three
second
Number
(Personal Number).
numerical
call.
information)
- 10 -
Fixed
No.
0
1
2
3
message
file
Business trip.
(10 x
1.5-second
Content
Business trip
Day off
Out to lunch
In conference
CI-600 Fixed
Message F i le
CI-600
message)
Page 11
b. "
Call
me "
Message
using the station number).
Recording
(when
response
message
(Recording)
is
transmitted
from
the
station
called
To leave a " call me " message at the called
Speech Message
station upon hearing a response message, after
either the response message is fi n i s h e d or
pressing
press
in the middle of reproduction,
(for 8-second message) or
(for 16-second message) or
(for 32-second message).
To check f o r the recorded message, press
Speech Message
To re-record, press
recording is erased).
When a call
transmitted from the called station, the original conversation is automatically resumed upon completion
of the
message
is
made
response
file
left
from
message.
over.
the
station
When a busy
(previous
in
conference
tone
is
heard
or
on-hold
during
mode,
and the
recording,
this
response
indicates
message
that
there
is
is no
File
SM-600
File
SM-600
c. Cancellation of Absence Mailing Mode
Shifting the Privacy switch back to OFF
reproduces the " call me " messages received
from other stations. To hear messages again,
press
Shifting the Privacy switch back to OFF erases the
response message as well as a status asterisk
Speech Message
File
SM-600
- 11 -
Page 12
(2)
Message
Mailing
Function
(Available
a. " Call me " Message Recording
only
for
station
number
calls)
To leave a " cal l me " message at the c all e d
station, press
(for recording an 8-second
message) or
(for recording a 16-second
message) or
(for recording a 32-second
message).
To check for the recorded message,
press
To re-record,
press
previous recording.
(confirmation tone) to erase a
(Recording)
Speech Message
File
SM-600
(Reproduction)
Speech Message
File
SM-600
No " call me " message can be recorded from the station
in conference or on-hold mode.
b. " Call me " Message Reproduction
To reproduce the " c a l l me " messages received
from other stations, press
The messages recorded during conversation are
automatically reproduced as soon as the
conversation is terminated.
To te rmina te the message in the middle of
reproduction, press
Speech Message
File
SM-600
- 12 -
Page 13
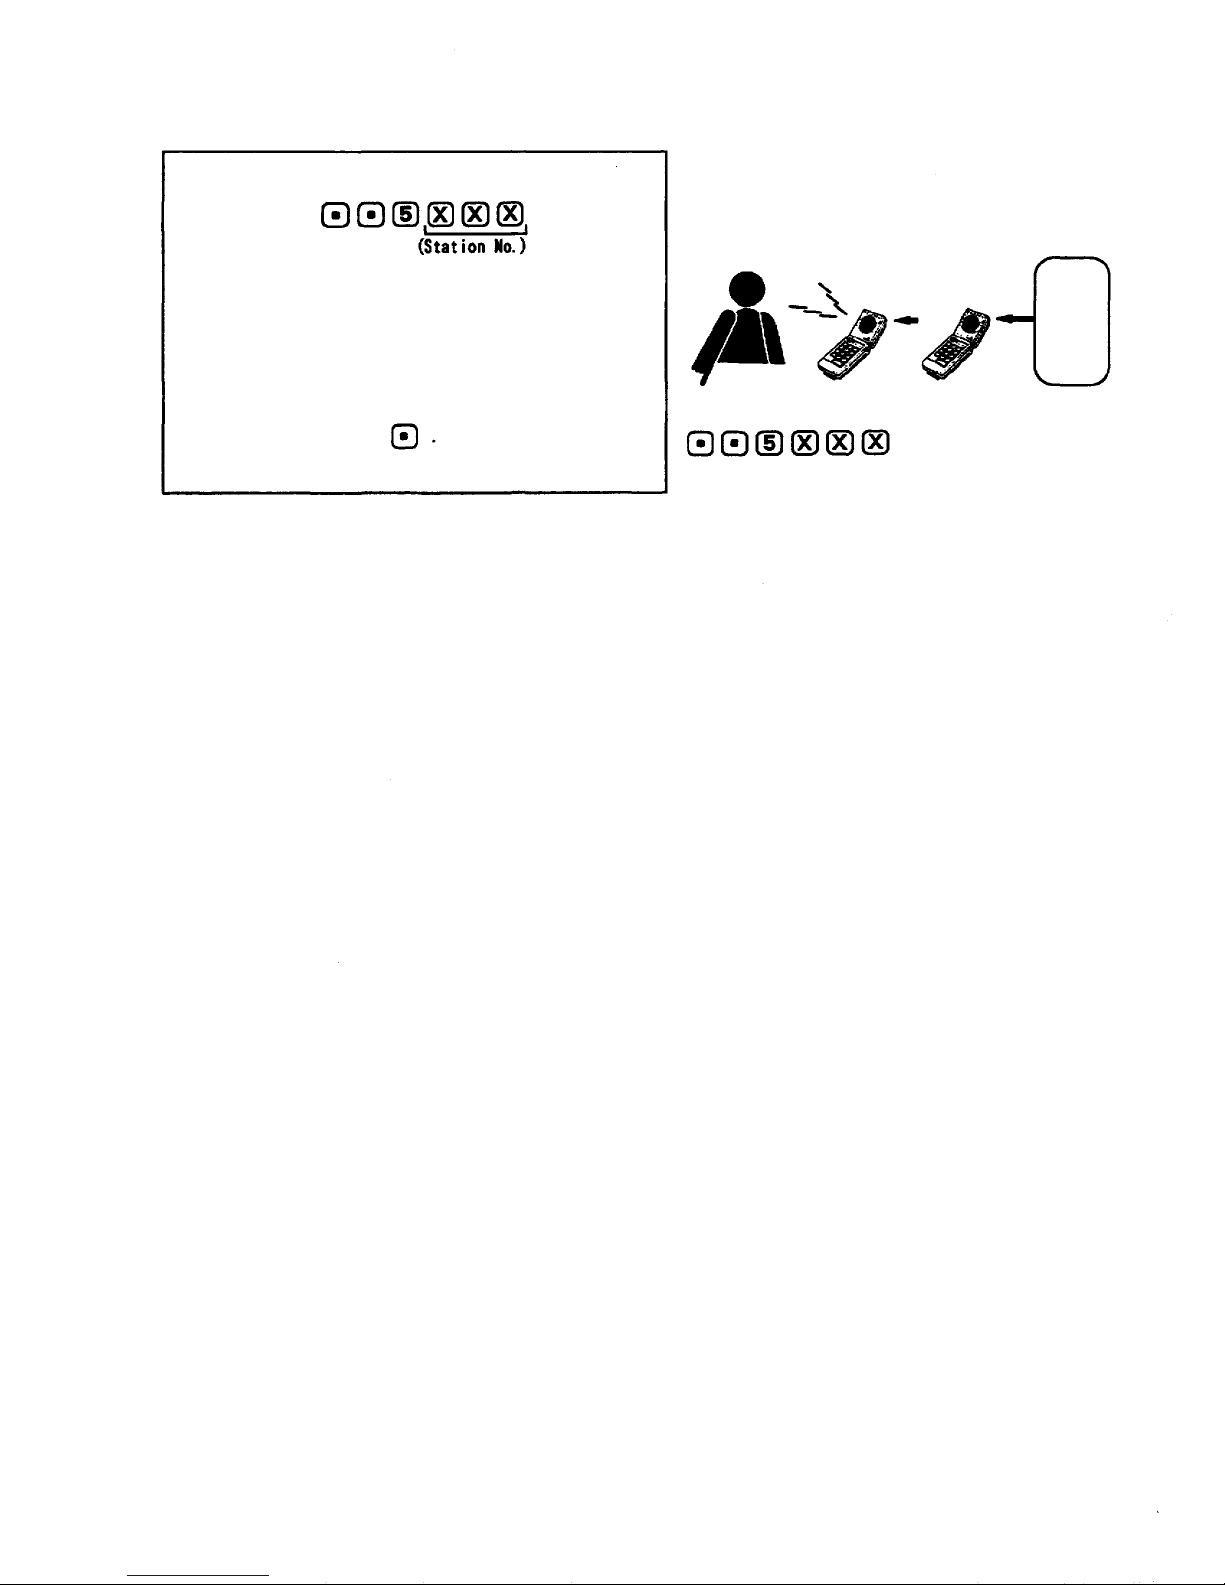
(3) Remote Message Pickup
(Reproduction)
By pressing
Speech Message
the user can retrieve the information stored in
his station from any other master station remotely,
SM-600
with no need to come back to his station.
To terminate the message in the m i ddle of
reproduction, press
(4) Other Functions
a. By establishing station 200 programming a 2-second " Hurry-up " tone can be transmitted to users to
urge them to terminate their recording of the response or " ca l l me " message.
b. The station having the " call me" messages transmits a brief signal at one minute intervals to
indicate the reception of the messages.
File
c. It is possible to prevent the recorded response message from being erased when the Privacy switch is
switched to OFF. (Station 200 programming must be established.)
- 13 -
Page 14
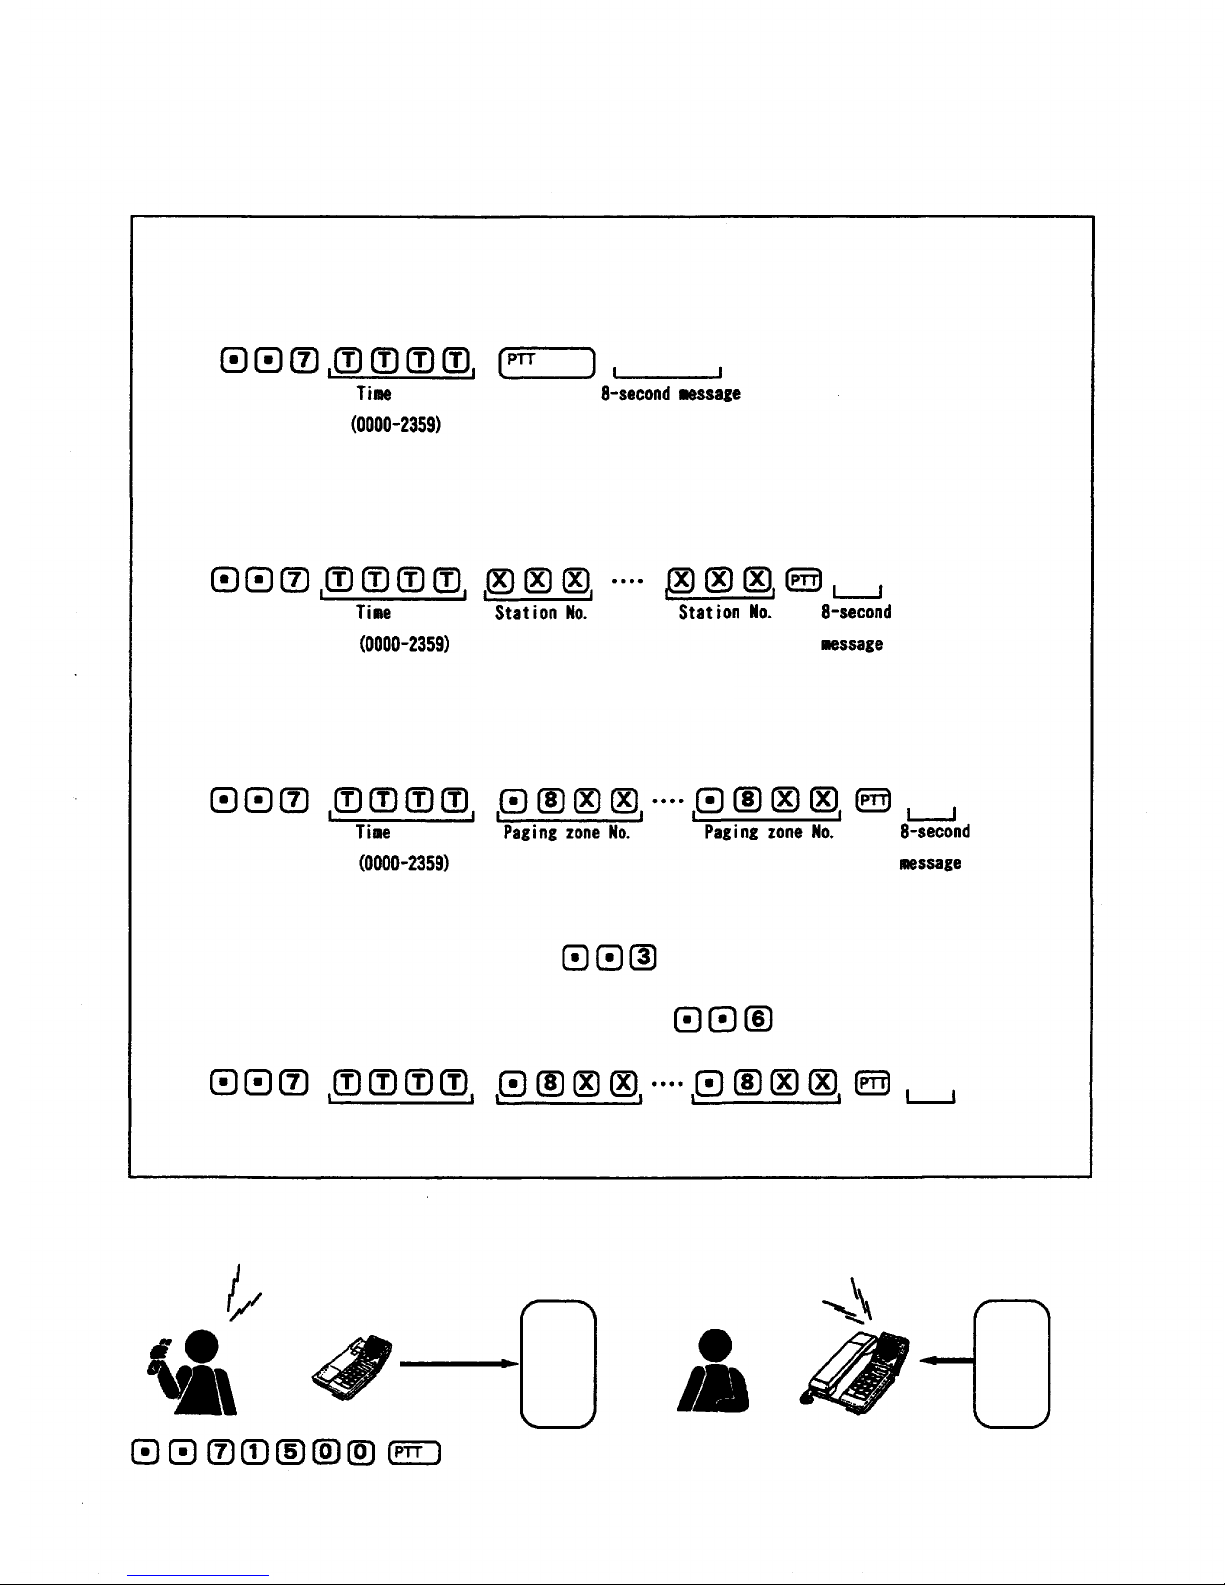
3. TIME MESSAGE SERVICE
This function automatically transmits a pre-recorded message to the specified stations or paging zones at
the preset time.
< Operation >
(1) If transmitting the message to the station at which the entry is made.
(Confirmation tone)
(2) If transmitting the message to other stations.
(Confirmation tone)
(3) If transmitting the message t o paging zones.
To check for the recorded message, press
To re-record, erase a previous recording by pressing
Conference in
conference room.
Speech Message
File
after hearing the confirmation tone.
and then press
(Confirmation
tone)
Conference in
conference room.
Speech Message
(Confirma-
tion tone)
File
SM-600
- 14 -
SM-600
It's 3pm.
Page 15
Note:
1. A message is audible following a paging pre-announcement tone from the programmed statio n ( s) or
stations
registered and its Privacy switch is set to ON, a continuous call tone is sounded at the station and
within
the
programmed
paging
zone(s)
at
preset
time.
When
only
one
station
has
been
the message is audible if a handset is lifted or the Privacy switch is switched to OFF.
2.
When
one of the
programmed
stations
or
paging
zones
is
busy
at the
preset
time,
the
message
is
distributed 30 seconds after the line is freed.
3. A
maximum
of
four
stations
or
paging
zones
can be
registered
for
this
function
at a
time.
Be sure to fi rst press
when re-recording from the beginning. Pressing
or replacing
the handset for re-recording registers the previous incomplete recording.
<Cancellation or Alteration>
When
cancelling
and all registrations are cancelled. To alter the registration, enter the new data from the
beginning after the above key operation is completed.
To cancel only the specified registration, press
have been used for the registration.
or
altering
the
registration,
(Confirmation tone)
press
after pressing all the numbers that
(Confirmation tone)
- 15 -
Page 16
4. RECORDED MESSAGE PAGING
This
function
employs
the
SM-600
unit
to
prevent
feedback
caused
when
making a paging
call
from
the
station located close to the external PA speaker or when having to increase the sound volume due to
the high ambient noise level.
< Operation >
To
make a paging
call,
press
(Confirma-
tion tone)
Paging zone No. 8-second
(00-31, 80-99) message
To check for the recorded message, press
before pressing the
To re-record, either press
or replace a handset
and then press
(Confirma-
tion tone)
To respond to the paging call, press
bar.
(Paging
begins.)
(Paging
begins.)
Mr. Brown, please
dial Area 3.
Mr. Brown, please
dial Area 3.
Paging zone No.
(00-31, 80-99)
1.
The paging party may simply wait for a response or wa i t by dialing
simply waiting, the same message can be paged repeatedly if the
2.
The Paging Transfer is impossible to operate.
or replacing a handset. When
bar is pressed.
- 16 -
Page 17

5. SYSTEM MAINTENANCE
By controlling or monitoring the exchange from a computer or data terminal the system maintenance and
inspection can be performed easily. (Refer to the Application section of the CI-600 Operating Instructions
for operation.)
(1) Link Control
Each
individual
operation
when
link
(speech
the DL
unit
path)
fails.
can be
made
unusable
to
permit
repair
work
without stopping
the
system
(2) Line Control
Each individual line can be made unusable to permit repair work without stopping the system operation
when dial related malfunctions are caused by failures of the station, line or LM unit.
(3) Speech Path Control
This function establishes the speech path that per mits monitoring of operations of each link or station
at time of system installation or inspection, with no need to actually perform various tests from one
station to another.
(4) Dial Data Output Monitoring
When
dial
related
allows the dial data received in each line to be monitored.
malfunctions caused by
failures
of the
station,
line
or LM
unit
occur,
this
function
(5) Exchange Sequence Display
The most recent operations of the exchange can be checked. T his function is instrumental in determining
the cause of the exchange failure.
6. REMOTE FUNCTION CONTROL
A computer or data terminal can be used for function dialing instead of the station. (Refer to the
Application section of the CI-600 Operating Instructions for operation.)
This function not only shortens lengthy sta tion key operations, but also permits alterations of
registered data of such indications as the Location Indication without actually going to the station.
- 17 -
Page 18

Installation
Refer to the following procedures when installing the CI-600.
Equipment installation
Connection to exchange
Connection to computer or data terminal
DIP switch setting
Initial terminal setting
Power ON
Equipment installation
See Installation manual.
System
programming
Initial exchange setting
CI-600 data transmission
System
maintenance
Clock setting
CI-600 data reception
Fixed message registration
Password registration
Personal data registration
Personal data
display
Remote
control
Initial setting
function
Application Setting
Performed only for new installation.
Performed
only
for
tie-line
system.
- 18 -
Page 19

PART 1. INITIAL SETTING
1. Connection
1-1 Initial Setting
Connect
equipment
as
Single system
Tie-line system
follows
when
Exchange (CP-66)
Master terminal
performing
initial
setting.
CI-600
PROGRAMMING STATION
(PROGRAMMABLE STATION : Normally,
hard-wired station No. 200.)
Exchange A (CP-66)
CI-600
Data Transfer (Connector No. 2)
Transmission
Master terminal
Note:
Connect
When
completing
CI-600A to CI-600B and connect the line to CI-600C in its place.
the
No.2
RS-232C
interconnection. Refer to page 5 of installation manual.
setting
up a
data
3-exchange
transfer
connector
tie-line
from
CI-600A
located
system,
to
CI-600B,
on the
to
rear
transfer
first
Exchange B (CP-66)
Reception
Master terminal
panel
of
each
CI-600
data
from
CI-600A
disconnect
the
for
tie-line
to
CI-600C
RS-232C
line
CI-600
system
after
leading
from
- 19 -
Page 20

1-2. Application Setting
After
completion
of
initial
setting,
connect
as
shown
Exchange (CP-66)
below.
CI-600
Sub-terminal
Note:
The master terminal can process all CI-600 functions. The sub-terminals can only select Nos.4 and 5 of
the
Main
Menu.
(The
sub-terminals
cannot
Sub-terminal
be
used
- 20 -
until
initial
setting
Master terminal
is
completed.)
Page 21

2. DIP Switch Setting
Remove
the
Cl-600's
A. MODE SELECT DIP switch
front
cover
to set
MODE
SELECT
and
BAUD
RATE
DIP
switches.
SWITCH NO.
1
2
3
4
5
6
FUNCTION
Terminal connected to
CI-600
Fixed message reproduction
mode
Communication format
Password reset
(Be sure to switch back to
OFF after use.)
ON
Data terminal
Leave
this
switch OFF.
Fixed message and t ime
7 B I T EVEN STOP B I T 2
Leave
this
switch
Password erased when
power switched off.
OFF
Computer
Fixed message only
8 BIT EVEN STOP
BIT 2
OFF
Password saved when
power switched off.
Data reset
7
8
B. BAUD RATE DIP switch
SWITCH NO.
1
2
3
4
Note:
Do not set two or
(Be sure to switch back to
OFF after use.)
Backup battery
BAUD RATE
9600
4800
2400
1200
more
switches
SWITCH NO.
5
6
7
8
to ON
simultaneously
A l l stored data
erased when power
switched off.
Be sure to switch to ON after switching
power ON.
BAUD RATE
600
A l l stored data
saved when power
switched off.
300
150
75
after turning
power
on.
- 21 -
Page 22

3. DEC Terminal Setting
Before
commencing
menu. (Different menus are displayed as the setting key is pressed.)
initial
setting
of
CI-600,
set the
terminal's
communication
format
using
the
Directory
CRT DISPLAY
1
Directory
Terminal Setting
2
Default
On Iine
VT100 MODE
ASCII
Disable On-Demand Loading
ITEMS
No Auto Answerback
Display Setting
3
4
5
6
7
Keyboard Setting
Tab Setting
UDK
Setting
General Setting
Communications Port Setting
No Auto Wrap
No New Line (CR/LF)
Interpret Controls
No Status Display
Transmit
[Note: Match baud rates of CI-600 and VT
terminal.]
No XOFF
7 Bit or 8 Bit
8
Even
Parity
[Note: Match parity of CI-600 and VT terminal.]
2 Stop Bits
No Local Echo
RS-232C Port, Data Leads Only
Printer Setting
9
10
Directory
- 22 -
Speed
[Note: Match wi t h transmission speed of CI-600
and VT terminal.]
Normal
Print
Mode
Print Full Page
JIS or ASCII
Terminator=FF
No Printer to Host
Save
Page 23

4. Input
4-1 . Control Keys
([CNTL]+[G])
Direct
return
to
MAIN
MENU.
or PF1 (CLEAR key)
or PF2 (PASS key)
or PF3 (DISPLAY key)
(CURSOR SET key)
or PF12 (HELP key)
or PF13 (PRINT key)
Clears all data on display.
Skips display to next screen.
Returns display to previous screen.
Instant access to current connection and function
status.
Moves cursor to top of screen.
Moves cursor to end of screen.
Alternately shifts cursor to top or end of screen.
Displays key operation guide.
(Note:
Prints
printer,
screen display.)
Press
out
data
press
RETURN
PRINT
or
screen
key to
SCREEN
return
display.
key to
to
previous
(When
using
print
screen.)
DEC
the
(RETURN key)
TAB
Cursor control keys.
Advances cursor to next line. Also functions as data
entry key.
Advances cursor to next input block.
- 23 -
Page 24

Note:
1.
Control
2. After connecting CI-600 to a terminal or turning its power ON, always be sure to reset the
3.
When
key
(ˆG)
entry
is
rendered
all
other
control
screen by pressing PF1 or ˆC.
entering
both capital and small letters can be used.
and
function
information,
always
invalid
key
operations
use
capital
if
initial
can
letters
setting
still
be
performed.
for all
has not
been
items except
performed.
name
entries,
However,
where
4-2. Basic Input Method
An " Enter or Exit (E or X) " completion prompt is displayed on the last line of each menu. To register
input
data,
the
cursor
is called for whenever "press Enter key" is mentioned in the text.
To advance to the next screen without registering any changes made to the present screen, enter " E " and
press the return key. This key operation is called for whenever " press Exit E key " is mentioned in the
text.
must
be
moved
to
this
line
before
the
return
key is
pressed.
This
key
operation
" X " key entries are only valid while performing system programming. The entry followed by depression of
the
return
key
switches
the
screen
to its
corresponding
master
menu
without
registering
any
changes
made
to the present screen. This key operation is called for whenever " press Exit X key " is mentioned in the
text.
The previous menu can be returned to whenever the prompt " NO SELECTION: RETURN TO PREVIOUS MENU " is
displayed. To do so, simply press the return key.
Note:
Note:
Keep
Keep
in
mind
in
mind
be erased.
be erased.
that
that
all new
all new
data
data
entered
entered
on a
on a
screen
screen
terminated
terminated
by an "
by an "
EXIT
EXIT
" key
" key
operation
operation
will
will
- 24 -
Page 25

Explanations
There has been data input error. Reenter data.
Guide Messages
Data input error. Reenter.
information registration. Reenter.
The same number or name has been registered more than once during personal
A number other than those specified has been input. Reenter correct number.
Duplicated data. Reenter.
Wrong number input. Reenter.
Line is busy. I mpossible to process.
No idle link is available. Reenter after a while.
Link Busy. Reenter.
Line Busy: Reenter.
Exchange programming switch is ON. Reenter after setting it to OFF.
Exchange is not connected properly. Correct connections.
Exchange not connected.
Subterminals can select only items 4 and 5 of Main Menu.
Exchange Programming Switch is ON.
Selection limited to Item 4 and 5.
Data is correct. Enter after reconfirmation.
Data is correct. Enter after reconfirmation.
Data display got started.
Ready. Press Enter.
Ok. Next INPUT: Enter.
Display mode started.
Press PTT bar on programming station.
Data in display.
*** Data display. ***
* Press [PTT] on programming station. *
Fixed message recording began.
*** Recording started. ***
Fixed message reproduction began.
*** Play started. ***
Processed normally.
*** Finished. ***
Now receiving data through data transfer.
Connection to other CI-600 was completed by data transfer processing.
*** Connector in reception mode. ***
*** Connector 2 connected. ***
Now transmitting data.
*** Connector to in transmission mode. ***
Now dialing the exchange. If this message stays on the screen for a while
without turning into the "Finished" message, use clear key to start again.
*** Exchange in dial mode. ***
System is busy. Reenter data after a while.
*** System busy. Reenter after awhile. ***
- 25 -
4-3. Guide Message List
Page 26

5. INITIAL SETTING
5-1. Initial Setting Flowchart
INITIAL SETTING COMPLETION
When
initial
setting
is
finished,
the
main menu is displayed on the screen.
At this time, the second and the third
sub-terminals may be used.
POWER ON (START)
CLOCK SETTING
FIXED MESSAGE
SETTING (NUMBER)
S GROUP A GROUP B GROUP C GROUP D GROUP E GROUP F GROUP G GROUP
NEW PROGRAMING
INPUT
PASSWORD SETTING
DATA TRANSFER
(RECEPTION MODE)
PERSONAL DATA
REGISTRATION
FIXED MESSAGE
SETTING (STATUS)
DATA TRANSFER
(TRANSMISSION MODE)
MA I N MENU
displaysExchange programming
setting
initial
CI-600
[E].
entry displays
press Exit
To
displays
return,
To
A, B, E, or G, "0
Group
in
station status.
the
When
Press [PF2] (ˆP) or E x it [E] to advance to next screen
status.
entry
[E].
line
F, "0
Group
press Exit
in
external
return,
the
When
(in the allow direction
Press ˆB to move in the reverse direction.
If "Exit" [X] is pressed while in a system programming menu, the screen returns to the New
Prograimingmaster menu.
key
("G)
entry
is
Control
rendered
invalid
if
initial
setting
has not
been performed.
"D displays the data for the selected programming menu. (I n groups A, B, E, F, and G, the screen is
switched to the status display. To return to the same programming menu, press Exit [E] key.)
To see the
HELP
menu,
press PF12
(H).
To
exit
from
the
HELP
menu,
press
the
return
key.
programming)
(new
- 26 -
Page 27

5-2 . Initial Setting Operation
(1) Switch ON terminal.
(2) Clock setting display appears on the terminal screen within approximately three seconds.
1. Refer to page 25 of operating instructions if data cannot be c o r r ectly displayed or input.
2.
During
returns
initial
to the
setting
Main
Menu
menus
after
are
displayed
initial
in
sequence
setting
as
is
completed.
they
are
processed.
The
screen
(1) Clock Setting
DATE
(mm-dd-yy)
TIME
(hh:mm:ss)
Enter or Exit (E):
TOA : CI600 SYSTEM
EXES-6000 system
computer interface
(1) Input the date (month, day, year) in 2-digit intervals.
(Example: 03-30-89 fo r March 30.1989)
(2) Input current time (hour, minute, second) in 2-digit intervals. (Example: 13:25:00 for 1:25pm)
(3) Press Enter key to advance the screen to the New Programming menu.
Note:
Whenever the Clock menu is displayed, the current time at the instant the display appears is
automatically shown. If no change is necessary, simply press the Enter key.
- 27 -
Page 28

(2) New Programming
PROGRAMMING (Y or N)
ALL NEW INITIALIZATION (Y or N) :
Enter :
(1) Programming Set (Y or N): Select [Y] (Yes) or [N] (No).
:
- [Y] displays Function Group [S] on the screen.
- [N]
displays
the
Fixed
Message
menu
if the
system
is not a
tie-line
system.
If it is a
tie-line
system, the Transfer (Reception mode) menu i s displayed. (Refer to page 39 for operation.)
(2) All New Initialization (Y or N): If [Y] has been selected in Step (1), press [Y] again to
clear all Programming data. Press [N] to retain current initialization data.
(3) Press Enter key.
- 28 -
Page 29

When
programming
the
system,
Installation Table.
Function Group S
40. Numbering schedules of Tie-line
41. Call tone selection
42. Selection of Paging Pre-announcement
430. Single-digit dialing key selection
431. Selection of 1st digit of 4-digit
45. Time-out of Conversation
46. Time-out of Paging Ca ll
470. Pager call output digit selection
471.
Pager
call
48. Pre-pause time selection
490. Number of SM-600 u ni t s connected
491. Message recording hurry-up mode
492. Response message cance11ation
refer
function
to the
A: B: C:
code
output
CP-66
mode
Installation
(0.1.2)
(0,1.2)
(0, 5-9)
(2-9)
(00, 01-99)
(00, 01-99)
(0,1, 2)
(0,1, 2)
(0-9)
(0, 1-4)
(0, 1)
(0, 1)
Handbook
and
CP-66
Enter or Exit (E or X)
(1) Input the necessary data for the desired items.
Note :
1. To skip the menu or move to the next menu, press Exit [E] or P F 2 ( ˆP). Each subsequent
Programming menu is displayed. (If the Programming Alteration sub-menu is not d i splaye d
during
initial
flowchart.)
2. Press ˆB to return to the next previous screen.
3. Press Exit [E] to return to the New Programming menu.
setting,
refer
to
page
26 of
operating
instructions
regarding
initial
setting
- 29 -
Page 30

Function Group A
50: Executive Priority
No. Station No. (0: Off/1 : On)
1:
2:
3:
4:
5:
6:
7:
8:
Enter or Exit (E or X) :
(1) Input each station number and press [1] (ON) or [0] (OFF) f o r registration or cancellation.
(2) Press Enter key upon station block completion.
(3) Repeat steps (1) and (2) above for each required station block.
Note:
Function
The same setting procedure is also used for Menus 51-59 of Function Group A, Menu 60 of
Group B is displayed.
- 30 -
Page 31

Function Group B
60: Secretary Transfer
No. Station 1 Station 2
1:
2:
3:
4:
5:
6:
7:
8:
Enter or Exit (E or X) :
(1) Input each executive's station number in the Station 1 column, and each corresponding
secretary's station number in the Station 2 column.
(2) Press Enter key upon station block completion.
(3) Repeat steps (1) and (2) above for each required station block.
Note:
1. The same setting procedure is also used for Menus 61 and 62 of Function Group B. Upon
Completion of Function Group B, Menu 70 of Function Group C is displayed.
2. Input the following data in the Station 1 and 2 columns of Menus 60 - 62.
Menu
60
61
62
Station 1
Executive Station No.
Substation No.
Original Station No.
Station 2
Secretary Station No.
Master station No.
Transferred Station No.
- 31 -
Page 32

Function Group C
70: Paging Response/Paging Priority
No. Group First Station Last Station
1:
2:
3:
4:
5:
6:
7:
8:
Enter or Exit (E or X) :
(1)
Input
(2) Press Enter key upon station block completion.
(3) Repeat steps (1) and (2) above for each required station block.
group
number
and
corresponding
first
and
last
station
numbers.
Note:
The same setting procedure is also used for Menus 71 and 72 of Function Group C. Upon
completion of Function Group C, Menu 80 of Function Group D is displayed.
- 32 -
Page 33

Function Group D
80: Combination Paging
No.
Group
1:
2:
3:
4:
5:
6:
7:
8:
Enter or Exit (E or X) :
(1) Input group numbers.
(2) Input [1] for each necessary station.
1......8.....16......24......31
(I :
INPUT)
(Example)
No.
Group 1 ......
1: 83 1 1 1 1
2: 84 1 1 1
3:
8
.......
1 11
16
.......
24
(3) Press Enter key.
(4) Menu 81: Group Blocking (Allowed Calls Among Groups) is displayed.
Note:
Only
applicable
to
single-exchange
systems.
.......
31
- 33 -
Page 34

81: Group Blocking (Allowed Calls Among Groups)
Calling Called Group No.
Group No. 1. 2. 3. 4. 5. 6. 7. 8.
1.
2.
3.
4.
5.
6.
7.
8.
Enter or Exit (E or X) :
(1) Input group numbers.
(2) Input [1] for each necessary station.
(3)
(4)
(Example)
Calling Called Group No.
Group No. 1. 2. 3. 4. 5. 6. 7. 8.
1.
2.
3.
85
1 1
10011
Press Enter key.
Menu 82: Group Blocking (Allowed Access to paging Zones) is displayed.
- 34 -
Page 35

82: Group Blocking (Allowed Access to Paging Zones)
No. Paging Group 1. 2. 3. 4. 5. 6. 7. 8.
1.
2.
3.
4.
5.
6.
7.
8.
Enter or Exit (E or X)
(1) Input the group numbers.
(2) Input [1] t o the necessary stations.
(ExampIe)
No. Paging Group 1. 2. 3. 4. 5. 6. 7. 8.
1. 03 11110011
2.
3.
(3) Press Enter key.
(4) Menu 90: Programmable Station Numbering (of Function Group E) is displayed.
- 35 -
Page 36

Function Group E
90 : Programmable Station Numbering
No. Hardwired No. Programmed No.
First Last First Last
1:
2:
3:
4:
5:
6:
7:
8:
Enter or Exit (E or X)
(1) Input the hard-wired station numbers.
(2) Input the programmable station numbers.
(Example)
No. Hardwired No. Programmed No.
First Last First Last
1: 200 400
2: 210 220 410 420
3:
(3) Press Enter key.
(4) Menu 23: OD-600 L ine allocation (of Function Group F) is displayed.
- 36 -
Page 37

Function Group F
23: OD-600 Line allocation
Outgoing call access No.
(0, 2-9, 20-99)
First line No.
(00-15)
Last Iine No.
(00-15)
Enter or Exit (E or X)
(1) Input the external line access number.
(2) Input the f i r s t line number.
(3) Input the last line number.
(4) Press Enter key.
(5) Menu 24: LD-600 Line allocation is displayed.
Note:
The same setting procedure is also used for Menus 24 - 29 of Function Group F. Upon completion
of Function Group F, Menu 30 of Function Group G is displayed.
- 37 -
Page 38

Function Group G
30: Handset station registration
No. Station No. (0:0ff/1:0n)
1:
2:
3:
4:
5:
6:
7:
8:
Enter or Exit (E or X)
(1) Input each station number and press [1] (ON) or [0] (OFF) for registration or cancellation.
(2) Press Enter key upon each station block completion.
(3) Repeat Steps (1) and (2) for each required station block.
(4) Press Exit [E] to exit from the menu 30.
(5) Press Exit [X] to return to the New Programming Menu.
Note:
The same setting procedure is also used for Menus 31 - 39 of Function Group G. Upon completion
of Function Group G, the screen returns to the Function Group S menu.
- 38 -
Page 39

(3) Tie-line Data Transfer
**RECEPTION MODE**
Start (S) or Exit(E) :
Connector 2 unconnected. Connect it to other CI-600's connector 2 in transmission mode.
**TRANSMISSION MODE**
Start (S) or Exit(E)
Connector 2 unconnected. Connect it to other Cl-600's connector 2 in reception mode.
When
setting
Registration eliminates the need for programming each individual CI-600 unit used.
up a
tie-line
system,
direct
transfer
of
such
data
as
Fixed
Message
and
Personal
Data
Refer to the following procedure for data transfer.
(1) Connect as shown on page 19.
(2)
Perform
(3)
Perform
unit.
connected to the sending unit.
(4) Press [S] and the return key for CI-600(A).
(5) The screen displays the data being transmitted.
(6) After transmission is completed, the message FINISHED is displayed. (The transmission time is
initial
initial
In
this
setting
setting
mode,
the
of
CI-600(A),
and
call
message
and
call
up the
"CONNECT
CI-600
OK"
up the
TRANSFER
will
be
CI-600-TRANSFER
(RECEPTION
displayed
(TRANSMISSION
MODE)
on the
screen
for
each
subsequent
when
properly
MODE)
menu.
about 6 minutes at a baud rate of 9600 bauds.)
(7) After completion of data transfer, connect the next unit to be programmed and repeat the
procedure from Step (3).
Note:
When any data changes are registered after commencing actual use, ensure a l l connected CI-600
units carry the same information by either transferring or directly inputting the data into
each individual unit.
- 39 -
Page 40

(4) Fixed Message Setting
4-a . Fixed Message Registration (Status)
STATUS DATA FILE
Mode : (1:Rec/2:Play/3:Status change)
Item No. : (0-9)
Message :
(16
Max)
In/Out status :
Time/Date status :
Enter or Exit (E) :
(1) Mode: To record a message, press [1]. To confirm the recorded message, press [2]. To change the
contents programmed in Steps (3), (4) and (5), press[3].
(2) Item No.: Input a number from 0 to 9.
(3) Message: Input the desired message (Max. 16 characters).
(4) In/Out status: Press [1] for IN or [2] for OUT.
(5) Time/Date status: Press [1] if message input in Step (3) is to include a specified time. Press
[2] if the message is to include a specified date.
(6) Press Enter key twice.
(7) To record a message, press the PTT bar on Programming Station. When the PTT bar is released,
the station is put in recording mode and the message can be recorded using the station
microphone. As soon as the recording is finished, a confirmation tone will be sounded.
(8)
Pressing
ˆJ.)
Exit
[E]
displays
(1:In
(1:Time
the
/
next
2:Out)
/
2:Date)
menu.
(To
print
out the
Fixed
Message
list,
press
PF13
or
4-b Fixed Message Registration (Number)
NUMBER DATA FILE
Mode : (1:Rec/2:Play)
Item No. : (0-9)
Enter or Exit(E) :
(1) Mode: Select [1] record or [2] play mode.
(2) Item No. : Input a number from 0 to 9.
(3) Press Enter key twice.
(4) To record a message, press the PTT bar on Programming Station. When the PTT bar is released.
- 40 -
Page 41

the station is put in recording node and the message can be recorded using the station
microphone. As soon as the recording is finished, a confirmation tone w i l l be sounded.
(5) Press Exit [E] to display the Password menu.
Note:
The
maximum
recording
time
per
message
and per
second, respectively.
(5) Password Setting
time/date
digit
is
about
1.5
seconds
and 0.7
(1) New
NEW CODE (6 Max)
Enter :
code: A maximum
of six
characters
:
can be
input.
(2) Press Enter key.
The screen switches to the Personal Data Display menu.
- 41 -
Page 42

(6) Personal Data Registration
ACTION
:
NAME (16 Max) :
STATION No. :
PERSONAL No. :
Enter or Exit(E) :
(1) Action: Press [1] for new registration or [9] for deletion.
(2) Name: A maximum of 16 characters can be input.
(3) Station No. : Input the station number assigned to the person.
Personal No.: Input the personal number assigned to the name.
(4)
(5) Press Enter key. After confirming the registered data, press the key again.
(6) To terminate registration, press Ex it [E].
Note:
1. Each individual's personal data can be displayed in the form of table arranged in alphabetical
order. It is also possible to display the data in numerical order based on personal or station
numbers.
(1:Insert,
9:Delete)
2. A maximum of 256 persons can be registered per system (regardless of whether the system is a
single-exchange
registered more than once.
3. Both capital and small letters may be used to input names. (Note that names beginning with
capital letters are listed ahead of those beginning with small letters. For instance. Mr. Smith
will be listed before Mr. parker, though both names a r e listed in alphabetical order.)
or
tie-line
system).
Names,
station
numbers
and
personal numbers
can not be
INITIAL SETTINGS ARE NOW COMPLETE.
Note:
Sub-terminals
cannot
be
used before
initial
setting
is
completed.
- 42 -
Page 43

If ˆG is
entered
that terminal.
from
terminal
after
initial
MAIN MENU
(1) SYSTEM INITIAL SETTING
(2) SYSTEM PROGRAMMING
(3) SYSTEM MAINTENANCE
(4) PERSONAL DATA DISPLAY
(5) REMOTE FUNCTION CONTROL
MENU No. :
setting,
the
Main
Menu
is
displayed
on the
CRT
screen
of
- 43 -
Page 44

PART 2. APPLICATION SETTING
1. Application Setting Flowchart
POWER ON (START)
MAIN MENU
Press ˆG to return to Main Menu
from any screen display.
PASSWORD CHECK
SYSTEM INITIAL
SETTING MENU
CLOCK SETTING
NEW PROGRAMMING
DATA TRANSFER
(RECEPTION MODE)
FIXED MESSAGE
SETTING
PASSWORD SETTING
PERSONAL DATA
REGISTRATION
PASSWORD CHECK
SYSTEM
PROGRAMMING MENU
SYSTEM MAINTENANCE
MENU
LINK CONTROL
LINE CONTROL
SPEECH PATH
CONTROL
DIAL DA TA OUTPUT
EXCHANGE SEQUENCE
DISPLAY
EXCHANGE SEQUENCE
DISPLAY AND PRINTOUT
Password Check
Directory Menu
REMOTE FUNCTION
CONTROL
PERSONAL
DATA DISPLAY
DATA TRANSFER
(TRANSMISSION MODE)
Data input procedures are the same
as those for initial setting. However.
Exit [E] entry returns screen to
System In itial Setting Menu. When the
Fixed Message menu is displayed,
PF2 entry displays the Message
Number menu.
PROGRAMMING ALTERATION
B MENU
B GROUP
S GROUP
A MENU
A GROUP
** Data input procedures are the same as those for i n itial setting. However, Exit
[E] entry returns screen to sub-menu (or t o master menu if Group has no sub-
menu). To return to master menu, press Exi t [X].
C MENU
C GROUP
D MENU
D GROUP
PROGRAMMING
STATION DISPLAY
E GROUP
EXTERNAL LINE
STATUS DISPLAY
F MENU
F GROUP
G MENU
G GROUP
Programming
displays
Programming
change master menu
Programming sub-menus
(Group menus). (No sub-
menu for Groups S and
E.)
**Exchange programming
displ a y s (Change mode)
- 44 -
Page 45

MAIN MENU
(1) SYSTEM INITIAL SETTING
(2) SYSTEM PROGRAMMING
(3) SYSTEM MAINTENANCE
(4) PERSONAL DATA DISPLAY
(5) REMOTE FUNCTION CONTROL
MENU No. :
If
initial
turned ON.
If
either
displayed. Input the password (Max. s i x characters) and press the Enter key to register.
setting
(1)
System
has
Initial
been
performed,
Setting
this
or (2)
Main
Menu
System
will
be
displayed
Programming
is
on the
selected,
screen
the
when
Password
Note:
If the
password
advance to the next menu.
does
not
match
that
registered
during
initial
setting,
the
screen
power
menu
will
will
not
is
be
PASSWORD
Code (6 Max) :
Enter :
2. Initial Setting Menu
(1) Use
this
menu
to
modify
correct password is entered after having selected [1] of the Main Menu.
1. CLOCK SETTING
2. NEW PROGRAMMING
3. DATA TRANSFER (RECEPTION MODE)
4. FIXED MESSAGE SETTING
5. PASSWORD SETTING
6. PERSONAL DATA REGISTRATION
7. DATA TRASNFER (TRANSMISSION MODE)
NO SELECTION: RETURN TO PREVIOUS MENU
MENU No. :
the
pre-programmed
initial
settings.
This
menu
is
displayed
if the
- 45 -
Page 46

(2) Select the required item by inputting its number and pressing the Enter key. The screen displays
the selected menu.
(3) After the menu has been processed, press Exit [E] to return the screen to the original System
Initial
Setting
menu.
3. System Programming Menu
(1) This menu is displayed if the correct password is entered after having selected [2] of the Main
Menu.
1. PROGRAMMING ALTERATION
2. PROGRAMMING STATION STATUS DISPLAY
3. EXTERNAL LINE STATUS DISPLAY
NO SELECTION: RETURN TO PREVIOUS MENU
MENU No. :
EX-610 2B *
(* ) The model number of the system exchange is indicated here. Confirm connection between the
exchange and the CI-600 if the wrong model number is indicated.
3-1. Programming Alteration Menu
(2) Selection of Item (1) displays the Programming Alter a t i o n menu.
1. Function Group S
2. Function Group A
3. Function Group B
4. Function Group C
5. Function Group D
6. Function Group E
7. Function Group F
8. Function Group G
9. Personal Number/Single Digit Dialing/Remote Response
NO SELECTION: RETURN TO PROGRAMMING MENU
MENU No.:
MODE: (J : jump, I : initial clear)
- 46 -
Page 47

Note :
MODE:
Enter
data on the display.
(3)
Selection
is pressed after processing a block, the screen returns to the System Programming Menu.)
[J]
of an
(+Return
item
Function Group S
40. Numbering schedules of Tie-line
41. Cal l tone selection
42. Selection of Paging Pre-announcement
430. Single-digit dialing key selection
431. Selection of 1st digit of 4-digit
45. Time-out of Conversation
46. Time-out of Paging Call
470.
Pager
call
471.
Pager
call
48. Pre-pause time selection
490. Number of SM-600 units connected
491. Message recording hurry-up mode
492. Response message cancellation
key)
in
this
output
function
digit
to
call
menu
displays
A: B: C:
selection
code
output
up the
its
mode
registered
corresponding
menu.
Press
[I] to
programming
data
clear
block.
the
registered
(If
Exit
[E]
Enter or Exit (E or X) :
Function Group A
1. 50: Executive Priority
2. 51: Continuous Calling Tone
3. 52: Station Allowed Access to Al l Call
4. 53: Stations Allowed Access to Conference
5. 54: Automatic Access to Paging
6. 56: Stations Allowed Access to One Shot Make Out
7. 57: Stations Allowed Access to Make/Break Output
8. 58: Stations Allowed Access to 8 Selectable/Decimal Output
9. 59: Stations Allowed Access to 4 Decimal Digits Output
NO SELECTION: RETURN TO PROGRAMMING ALTERATION MENU
MENU No.:
Note :
Press A to set al l the items to ON.
MODE : (J:jump, I:initial
clear,
A:all set)
- 47 -
Page 48

Function Group B
1. 60: Secretary Transfer
2. 61: Master/Sub
3. 62: Group Hunting
NO SELECTION : RETURN TO PROGRAMMING ALTERATION MENU
MENU
No. :
Function Group C
1. 70: Paging Response/Paging Priorit y
2. 71: Group Blocking
3. 72: Calling Party Indication
MODE:
(J:jump,
I:initial
clear)
NO SELECTION : RETURN TO PROGRAMMING ALTERATION MENU
MENU
No. :
Function Group D
1. 80: Combination Paging (Single-exes only)
2. 81: Group Blocking (Allowed Calls Among Groups)
3. 82: Group Blocking (Allowed Access to Paging Zones)
NO SELECTION : RETURN TO PROGRAMMING ALTERATION MENU
MENU
No. :
MODE:
MODE:
(J:jump,
(J:jump,
I:initial
I:initial
clear)
clear)
- 48 -
Page 49

Function Group E
90 : Programable Station Numbering
No. Hardwired No. Programmed No.
First Last First Last
1:
2:
3:
4:
5:
6:
7:
8:
Enter or Exit (E or X) :
Function Group F
1. 23: OD-600 Line allocation
2. 24: LD-600 Line allocation
3. 25: CB-600 Telephone line allocation
4. 26: TI-600 Line allocation
5. 27: CB-600 Telephone line allocation to station group
6. 28: Telephone line allocation to city pager
7. 29: Fixed speed dialing
NO SELECTION : RETURN TO PROGRAMMING ALTERATION MENU
MENU
No. :
MODE:
(J:jump,
I:initial
clear)
- 49 -
Page 50

Function Group G
1: 30: Handset station
2: 31: Stations Allowed Access to outgoing phone call
3: 32: Stations Allowed Access to incoming phone call
4: 34: Automatic pager transfer
5: 35: Door station
6: 36: Station Allowed to refuse voice call
7: 37: Stations Allowed to refuse priority interruption
8: 38: Stations Allowed Access to zone paging
9: 39: Stations Allowed to refuse station paging
NO SELECTION : RETURN TO PROGRAMMING ALTERATION MENU
MENU
No. : MODE : (J:jump,
I:initial
clear,
A:all set)
3-2. Programming Station Status Display
(1) This display appears if Item [2], Programming Station Display is selected from the System
Programming menu.
F: To
view
the
first
page
of
function
N: To view the next page of function table.
B: To view the previous page of function table.
L: To view the last page of function table.
E: To terminate the menu and return to System Programming Menu.
(2) This display can also be accessed by pressing PF3 or ^D while the screen displays Function Group
A, B, E or G. Pressing Exit [E] returns the screen to the previous display.
E. A. B. G.
No. 90. 50. 51. 52. 53. 54. 56. 57. 58. 59. 60. 61. 62. 30. 31. 32. 33. 34. 35. 36. 37. 38. 39
table.
First, Next, Back, Last or Exit : (F, N, B, L, E)
- 50 -
Page 51

3-3. External Line Status Display
(1) This display appears if Item [3] is selected from the System Programming Menu. Pres sing Exit [E]
returns the screen to the System Programming Menu.
(2) This display can also be accessed by pressing PF3 or ^D while the screen displays Function Group
F menu (except menu No. 29). Pressing Exit [E] returns the screen to the previous display.
Interface 23. 24. 25. 27. 28. 26.
Line No. 00-600 CB-600 Group mode Pager TI-600
00:
01:
02:
03:
04:
05:
06:
07:
08:
09:
10:
11:
12:
13:
14:
15:
Exit (E) :
- 51 -
Page 52

4. System Maintenance Menu
Selection
of
Item 3 from
the
Main
Menu
displays
this
menu.
SYSTEM MAINTENANCE MENU
(1) Link Control Menu
(2) Line Control Menu
(3) Speech Path Control Menu
(4) Dial Data Output Menu
(5) Exchange Sequence Displa y
(6) Exchange Sequence Display and Printout
NO SELECTION : RETURN TO PREVIOUS MENU
MENU No. :
4-1. Link Control Menu
This Menu is displayed if Item 1 is selected from the System Maintenance Menu.
Link Control Menu
LINK No. (00-15) :
ON(1) or OFF(2) :
Enter or Exit(E) :
4- 1- a. Link Disconnection
(1) Input the link number (00 - 15).
(2) Select OFF (2).
(3) Press Enter key, and the link is disconnected.
(4) Press Exit [E] if no registration is required.
4-1-b. Link Reconnection
(1) Input the same selected link number.
(2) Select ON (1).
(3) Press Enter key, and the link is reconnected.
LINK CONTROL STATUS DISPLAY
Link No. : Control mode (1:on, 2:off)
The
connection
status
list
for all
links
can be
- 52 -
printed
out by
pressing
PF13
or
Page 53

4-2. Line Control Menu
This menu is displayed if Item 2 is selected from the System Maintenance Menu.
LINE CONTROL No. :
(hardwired No. or Tie-Line:T00-T15)
ON(1)
or OFF
Enter or Exit(E):
4-2-a. Line Disconnection
(1) Input the station (hard-wired station) number.
(2) Select OFF (2).
(3) Press Enter key, and the selected line is disconnected.
(4) Press Exit [E] if no registration is required.
4-2-b. Line Reconnection
(1) Input the same selected station number.
(2) Select ON (1).
(3) Press Enter key to reconnect the line.
(2):
LINE CONTROL STATUS DISPLAY
Link No. : Control mode (1:on, 2:off)
The connection status list for all lines can be printed out by pressing PF13 or
Note:
Tie-line system lines can also be connected or disconnected using the above procedure.
- 53 -
Page 54

4- 3 . Speech Path Control Menu
T No. :
(hardwired No.)
R No. :
(hardwired No. or Paging No.)
LINK No. :
(00-15)
MODE SELECT :
ON (1) or OFF (2) :
Enter or Exit (E) :
(Item
3 of the
System
Maintenance
0. During Conversation
Menu)
1. Press-to-talk (R->T)
2. Press-to-talk (T->R)
3. OFF duration on T & R
8. Calling
9. Privacy/Disconnected
10.
Busy
11. Dialing
12. Zone Paging
13. All call
14. Priority/Executive priority
15. Registration/Call holding/Mic-off
4-3-a. Station Speech Path Connection
The following is an example to demonstrate how to operate keys for each column.
(1) Input station No. 200 for the T No. and station No. 204 for the R No.
(2) Input 01 fo r the Link No.
(3)
Select
(4) Select ON (1) and press Enter key. The "Finished" message indicates speech path connection.
(5)
Press
"13. A l l C a l l " for the mode.
Exit [E] if no registration is required.
4-3-b. Station Speech Path Disconnection
(1) Input station No. 200 for the T No., and station No. 204 for the R No.
(2)
Select line No.01 for the link No.
(3) Select "13. ALL CALL" for the mode.
(4) Press OFF (2) and Enter key. The "FINISHED" message indicates speech path disconnection.
- 54 -
Page 55

4-4. Dial Data Output Menu
No. KEY SELECTON
(hardwired No. or Tie-Line : T00-T15)
Enter or Exit(E) :
(Item 4 of the System Maintenance Menu)
This menu is used t o check f o r individual station dialing errors. To monitor, for example, the key
operation of Station No. 200, enter 200 in the No. column. Pressing the Enter key enables the monitor
display for the designated station number. A l l key entries from Station No. 200 are then consecutively
displayed in the Key Selection column. Press PF1 to clear the menu. Pre ss Ex it [E] t o return to the System
Maintenance Menu.
4-5. Exchange Sequence Display
(Item 5 of the System Maintenance Menu)
No. Date Time Link T No. R No. Link T No. R No. Status
First, Next, Back, Last, Clear or Exit: (F, N, B, L, C, E)
Thi s menu monitors a l l exchange operations. A maximum of 180 operations can be stored in memory. If the
number of operations exceeds 180, the system, in continuous update, records only the most recent 180
operations, deleting all earlier entries.
(1) P ress F t o see the menu from the beginning. (N switches the screen to the next menu, while B
returns the screen to the previous menu.)
(2) Press L to monitor the latest operation. (This status is displayed on the screen whenever Item 5
of the System Maintenance Menu i s selected.)
(3) Press [C] to clear all the stored data (180).
(4) Press [E] to terminate the menu.
- 55 -
Page 56

4-6. Exchange Sequence Display and Printout
No. Date Time Link T No. R No. Link T No. R No. Status
Exit (E) :
(1) This display appears on the Monitor while its corresponding data is being printed out by the
printer.
(
Item 6 of System Programing Menu).
Note:
A l l exchange operation data is deleted from the memory after it is printed out. Should print-out
be interrupted in the middle of a line, the entire line is then stored in memory wi th all
succeeding data.
(2)
Press the Enter key to return to the System Maintenance Menu. (The printer stops.)
Personal
Data
Personal No. Station No. Name Status Location Time/Date
First, Next, Back, Last or Exit : (F, N, B, L, E)
Display
Menu
(Item
4 of the
Main
Menu)
Note:
Be sure to register both personal numbers and station numbers during the initial setting
procedure.
(1) All subsequently entered personal data, including the station number to which calls are to be
forwarded, is displayed on the terminal screen.
(2) Location is not shown in the display if the registered person is OUT.
- 56 -
Page 57

6. Remote Function Control Menu
Station No. :
(Item
5 of the
Main
Menu)
Operation Data Input :
Enter or Exit (E) :
Station can be remotely operated by key operation at the terminal.
(1) Station No. : Input station number.
(2) Operation Data Input: Input desired dial number.
(3) If the Enter key is pressed and operation is properly processed, the "FINISHED" message is
displayed on the terminal screen.
Note :
Refer to page 7 of installation manual regarding specifications and accessories.
- 57 -
Page 58

TOA Corporation
133 - 06 - 170 - 9A
 Loading...