

Page 1

Contents
1. Preface
2. Safety Notices
3. Ready to Use
3.1 Packing List
3.2 Product Appearance
3.3 Instructions on Keys
3.4 Features Overview
3.5 Technical Specifications
4. Quick Guides
4.1 Switch On/Off
4.2 Battery Management and Charging
4.3 Operation of the Function Icons
4.4 WIFI Settings
4.5 USB-HOST and Extended Function
4.5.1 External USB Function
4.5.2 External 3G USB Dongle Function
4.5.3 External RJ45 USB Dongle Function
4.6 Camera Function
4.7 High Definition Function
4.8 tf (Micro sd) Card Storage
4.9 APK Install and Manage
5. Operation Details
5.1 Desktop System 1(Multimedia)
5.1.1 Audio Player
5.1.2 Video Player
5.1.3 Photo Browser
5.1.4 Sound Recorder
5.1.5 Explorer
5.2 Desktop System 2 (E-book)
5.2.1 Local E-book Reader
5.2.2 Online E-book Reader
5.3 Desktop System 3 (Network Function)
5.3.1 Web Brower
5.3.2 Email
5.4 Desktop System 4 (Games)
5.5 Desktop System 5 (Other Functions)
5.5.1 Calculator
5.5.2 Clock
5.5.3 APK Installer
1
Page 2

5.5.4 Settings
5.5.4.1 Wireless and network
5.5.4.2 Sound
5.5.4.3 Display
5.5.4.4 High Definition
5.5.4.5 Location and security
5.5.4.6 Application
5.5.4.7 Accounts and sync
5.5.4.8 Privacy
5.5.4.9 Storage
5.5.4.10 Language and keyboard
5.5.4.11 Voice input and output
5.5.4.12 Date and time
5.5.4.13 About MID
5.6 Desktop Function Icon and Setting
5.6.1 Desktop Function Icon
5.6.2 Desktop Notification
5.6.3 Add, Move, or Delete Desktop Icon
6. Firmware Update
7. Troubleshooting
1. Preface
Dear Customers,
Thanks very much for purchasing our product!
This device is a built-in high performance Wifi receiver module,
supporting an external 3G USB-DONGLE wireless network card,
using broadband wireless networks, breaking through the restraint of
network cables; it will bring you into the portable media player world
and fulfill your entertainment needs. It also supports picture browsing,
e-book reading, games, online chat and other functions; various
settings will fully show your individuality.
To operate this player easily, first, please read this User Manual
included with the player. Then you will have a better understanding
of the operations. Before operating this player, please carefully read
all data we provide about the player, so that you will have a better
understanding of the product and its operations.
The Company will not be responsible for any loss of personal data
and damage caused by incorrect operation of the
Software/Hardware, artificial damages, replacement of batteries or
2
Page 3

any other accident. To avoid loss of your data, please backup your
data to your computer at all times.
Also, since we can not control any dispute from users’
misunderstanding or incorrect operation against the manual, the
Company will not take any relevant responsibility for any accidental
loss potentially occurring in the process of using this manual.
Due to constant product development, the information in this manual
is subject to change without any prior notice.
This manual is protected by copyright and no part is permitted to be
copied or reproduced in any way without prior written permission of
the Company.
The Company reserves the final explanation right of this manual,
warranty as well as its related information.
(Note: When compiling this manual, we are very careful to provide
you completely reliable information. However, there is inevitably
some error and oversight, please understand, and we welcome your
suggestions. If any problem occurs during your use of this product,
please immediately contact your local seller)
Thanks for your support and please pay attention to our other
products
2. Safety Notices
1) Please keep the device away from strong magnetic fields in order
to avoid damage to the product.
2) Please do not let the device fall onto, rub against or knock against
hard objects during use, because this may cause surface scratches
on the device, battery damage, data loss or other damage to the
hardware.
3) Never let this product be exposed to a humid environment or rain
as the water leaking into the device could disable it to the extent of
being beyond repair.
4) Never clean the device with any chemicals or detergent, these will
damage the product surface and corrode the finish.
5) You are recommended not to use the headset with the volume at
its highest settings, please adjust the volume to an appropriate safe
level and limit the amount of time you spend using headphones to
avoid possible damage to your hearing. Excessive volume will cause
permanent hearing damage.
6) Please do not cut off the power abruptly during software updates
3
Page 4

or downloading, because this may cause data loss or system errors.
7) Over-voltage, power cable strain and bending or squeezing of the
power cable by heavy objects must be avoided to prevent the
possibility of overheating or fire.
8) In order to eliminate the risk of electric shock, do not touch the
cable power plug with wet hands.
9) Some movies, music and pictures are under the protection of
copyright, unauthorized usage is deemed as an infringement to the
laws of copyright.
10) Please don’t turn on the device on in locations where wireless
equipment is forbidden or when the usage of the device will cause
interference and possible danger.
11) All the wireless equipment is subject to external interference and
this can affect its performance.
12) Please comply with any related restrictions and rules, wireless
equipment can influence the flight of the plane; please consult the
relevant airline company if you intend to use the device on a plane.
13) Please don’t use the device in a petrol station, or near to fuel or
chemicals.
14) Please comply with any related restrictions and rules; do not use
the device where blasting operations are in progress.
15) Only qualified maintenance personnel can install or repair the
device. Opening the device in any way will invalidate the warranty.
16) Please use the original accessories and battery provided with
the device, do not use the incompatible products.
17) The device is not waterproof, please keep it dry.
18) For the sake of data safety, please back up any important
information on the device, or keep a handwritten record.
19) When connecting with other devices, please read the user
manual for detailed safety instructions. Don’t connect the device to
incompatible products.
3. Ready to Use
3.1 Packing List
Components Quantity
MID Device 1
Power Switching Adaptor 1
Earphone 1
USB Cable 1
4
Page 5
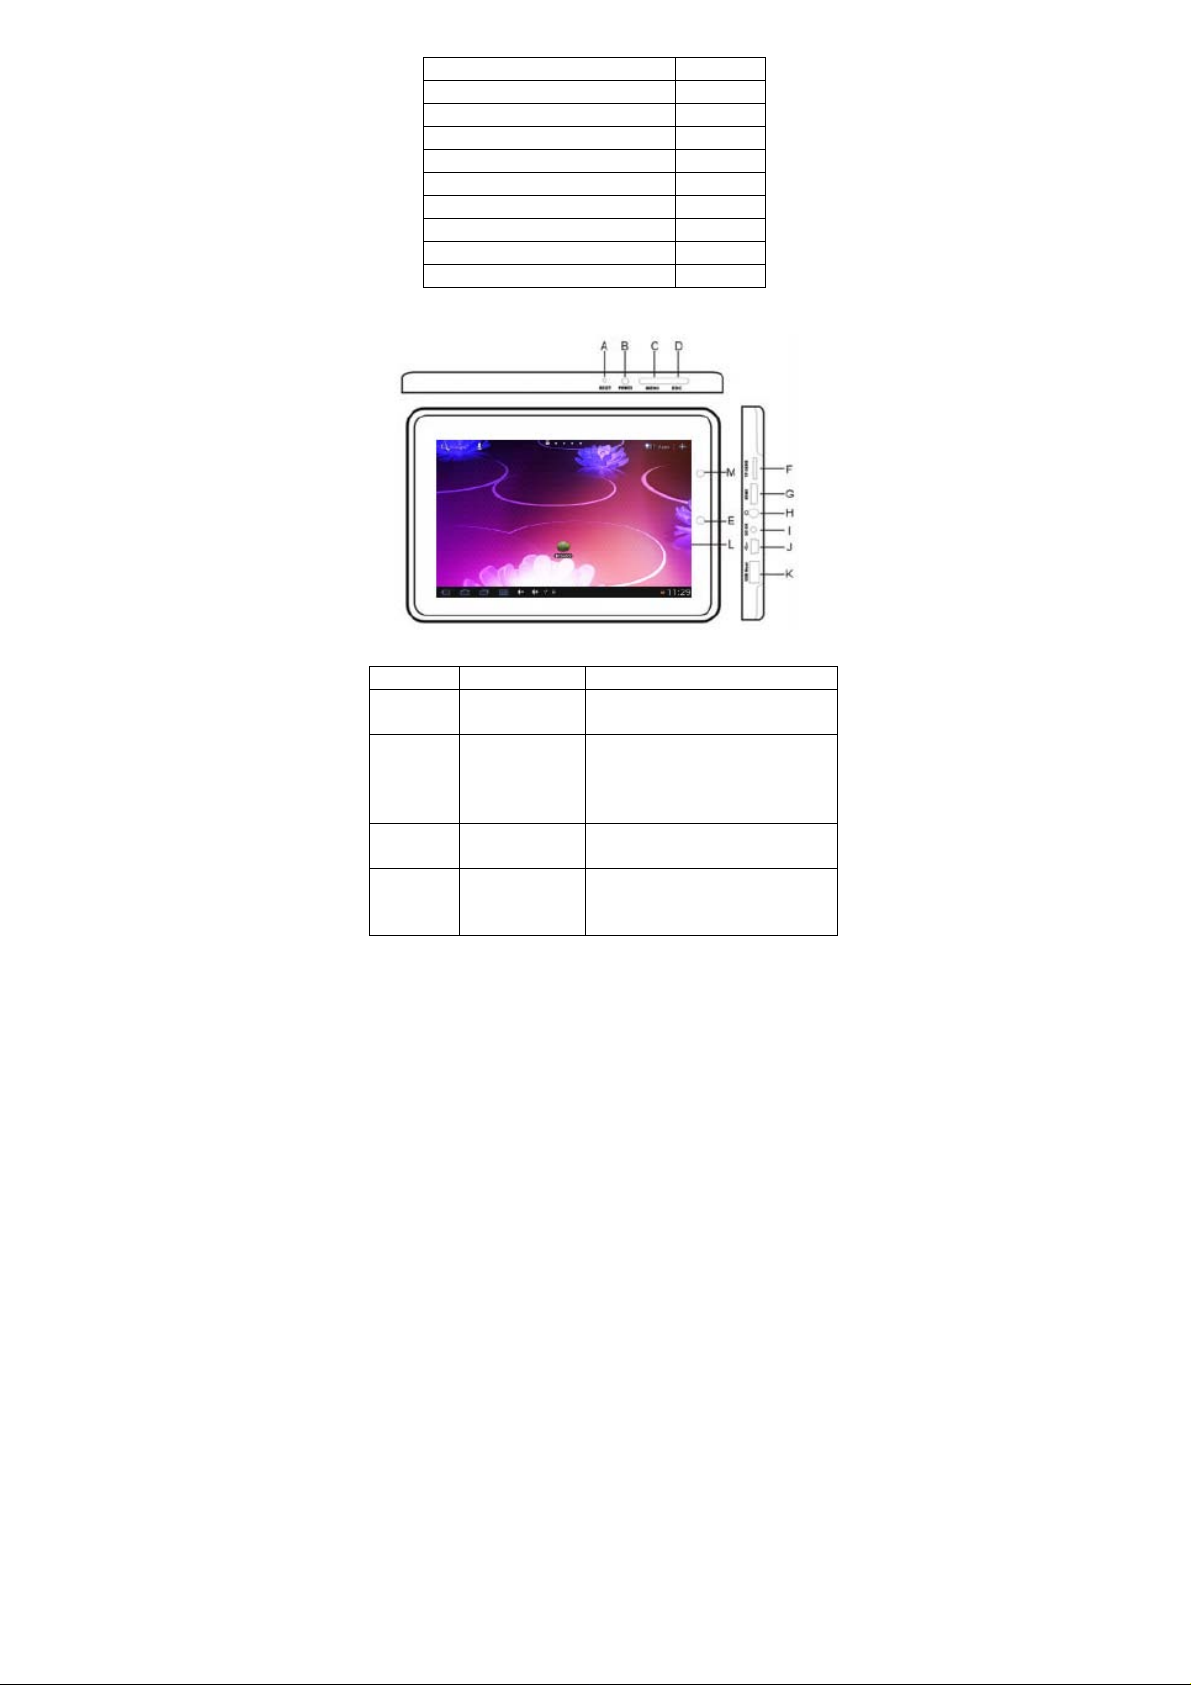
User Manual 1
CD-ROM 1
Warranty Card 1
Handwriting Pen(Optional) 1
HD Cable (Optional) 1
Leather Case (Optional) 1
3G USB Dongle(Optional) 1
RJ45 USB Dongle (Optional) 1
Keyboard/Mouse (Optional) 1
tf (Micro sd) Card (Optional) 1
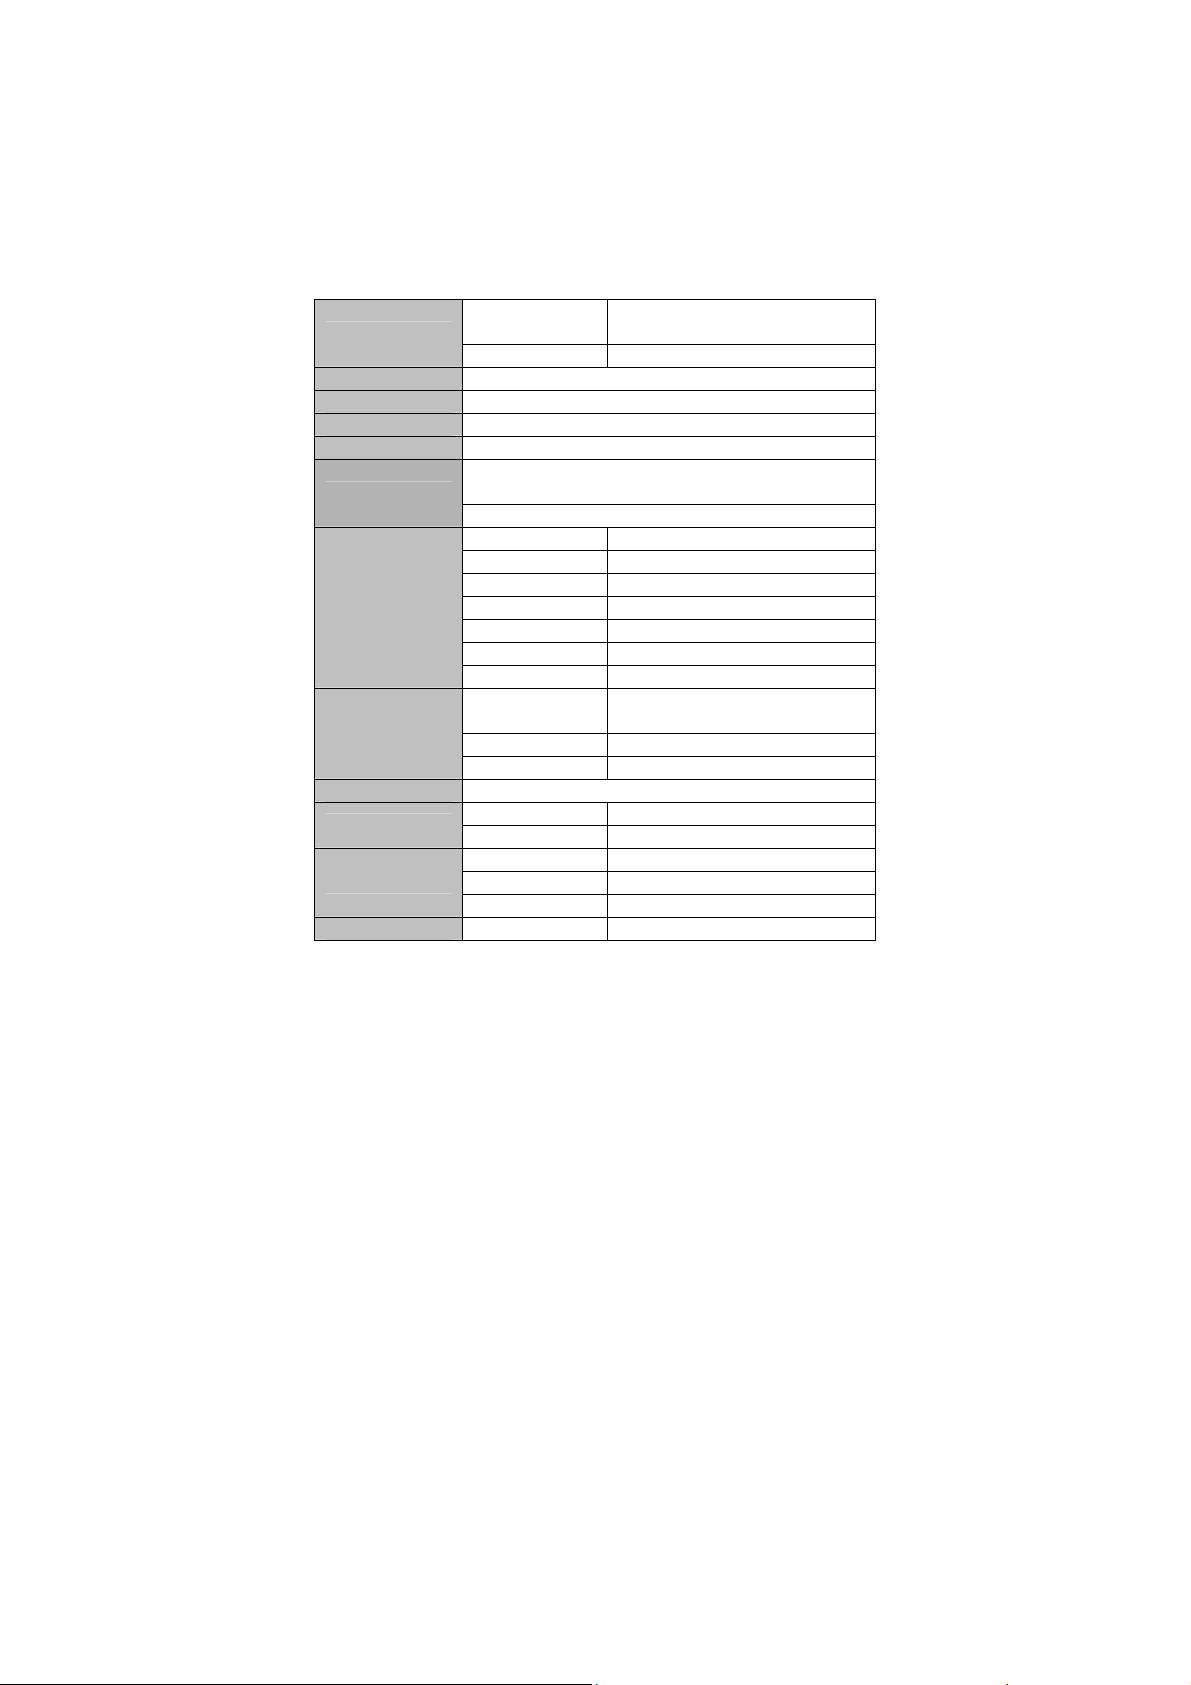
3.2 Product Appearance
3.3 Instructions on Keys
Symbol Name Description
A RESET
B POWER
C MENU
D ESC
Press this button to reset the
system when the device is halted.
Press this button for a short time to
enter sleeping/wake up mode,
press it for a longtime to switch
ON/OFF.
Press this button for a short time to
enter the submenu.
Press this button for a short time to
return to a previous screen. Press
this button for a longtime start
5
Page 6

touch screen calibration.
Track Ball
E
F tf card Slot tf (Micro sd) Card Slot
G HD
H
J MINI USB Port MINI 5 PIN USB Port
K USB Host Port
L Display High Definition Display area
M Camera camera (Optional Function)
Navigation/
Indication Light
Stereo
Earpieces Jack
I DC Socket Connect with 5V@2A DC charger
Trackball navigation button and
indication light (Optional Function)
High Definition Connector
(Optional Function)
Stereo Headphone Jack
Port for external USB Driver, 3G
Dongle, Mouse, etc
3.4 Features Overview
Adopts the RK2918 as the main chip, ARM embedded Dual CPU
Structure(ARM Cortex A8 1.0GHz)Support ANDROID 2.3 smart
operation system
7" high resolution TFT capacitive multi touch panel LCD display,
800x480 pixel resolution
Supports 4GB ~ 16GB Flash memory (optional), supports
max.32GB external Micro SD card
Supports HD 1080P MKV, AVI, RM, RMVB, MP4, MOV, VOB, DA T,
FLV, 3GP, H.246 etc formats, Max resolution supported is
1920*1080
Supports MP3, WMA, OGG, APE, FLAC, AAC, WAV audio
formats and multi EQ modes
Supports JPG, JPEG, BMP, GIF etc. picture formats
Supports TXT, LRC, PDF, Html, Html, EPUB file formats, supports
auto-browse, zoom, bookmarks, flip over functions
WiFi ready, you can connect with broadband wireless internet and
operate various software in the Android 2.3 OS, the system is
preset parts of third softwares: Office (Open Office version),
Google browser, IM (MSN/QQ), Web TV, Online MP3, online
novel, network games, E-book, etc
Supports built-in microphone record function
Supports USB-HOST and external U-disk, Keyboard, Mouse, etc
Supports external 3G USB-DONGLE wireless network card (3G
6
Page 7
card or USB-Dongle should be purchased separately)
Supports built-in camera (optional)
Supports 1080P High Definition output (optional)
Supports G-sensor screen rotation function
Supports built-in speaker and stereo earphone
Supports multiple languages
Can be used as a USB portable hard disk, driver not needed for
WIN2000 or above
3.5 Technical Specifications
LCD Display
PC interface High speed USB2.0 (FS)
Built-in Flash Flash Memory: 4GB~16GB(Optional)
Built-in RAM RAM: DDRIII 512MB
Capacity Expansion Support Micro sd Card, capacity 1GB~32GB
Power Supply
Music Function
Video Function
Photo Browse Support max. 8000x8000 JPG, JPEG, BMP, GIF
E-book Function
WI-FI Function
HDMI Function Main chip set IT6610
Size
Resolution 800x480
Built-in 3.7V@4000mAH Lithium rechargeable battery AC charger,
Input: AC110V~240V, Output: DC 5V@2A
Max. 6h video playing time(factory default)
Format MP3, WMA, OGG, APE, FLAC, AAC, WAV
Headset max. output (L)5mW+(R)5mW(32Ohm)
MP3 Bit rate 8Kbps ~ 392 Kbps
WMA、WMV、Bit rate 5Kbps ~ 192 Kbps
Frequency response 20Hz to 20KHz
SN ratio 90dB
Distortion <0.05%
Play format
Max Resolution 1920x1080
Ratio 4:3, 16:9, full screen for optional
Format TXT, LRC, PDF, Html, Htm, EPUB, etc
Max. capacity 5M
Main chip set 802.11b/g/n
Transmission rate Max108Mbps
Work Frequency 2.4GHz
7.0” TFT capacitive touch panel LCD
display 160k color
MKV, AVI, RM, RMVB, MP4, MOV, VOB,
DAT, FLV, 3GP, etc
7
Page 8
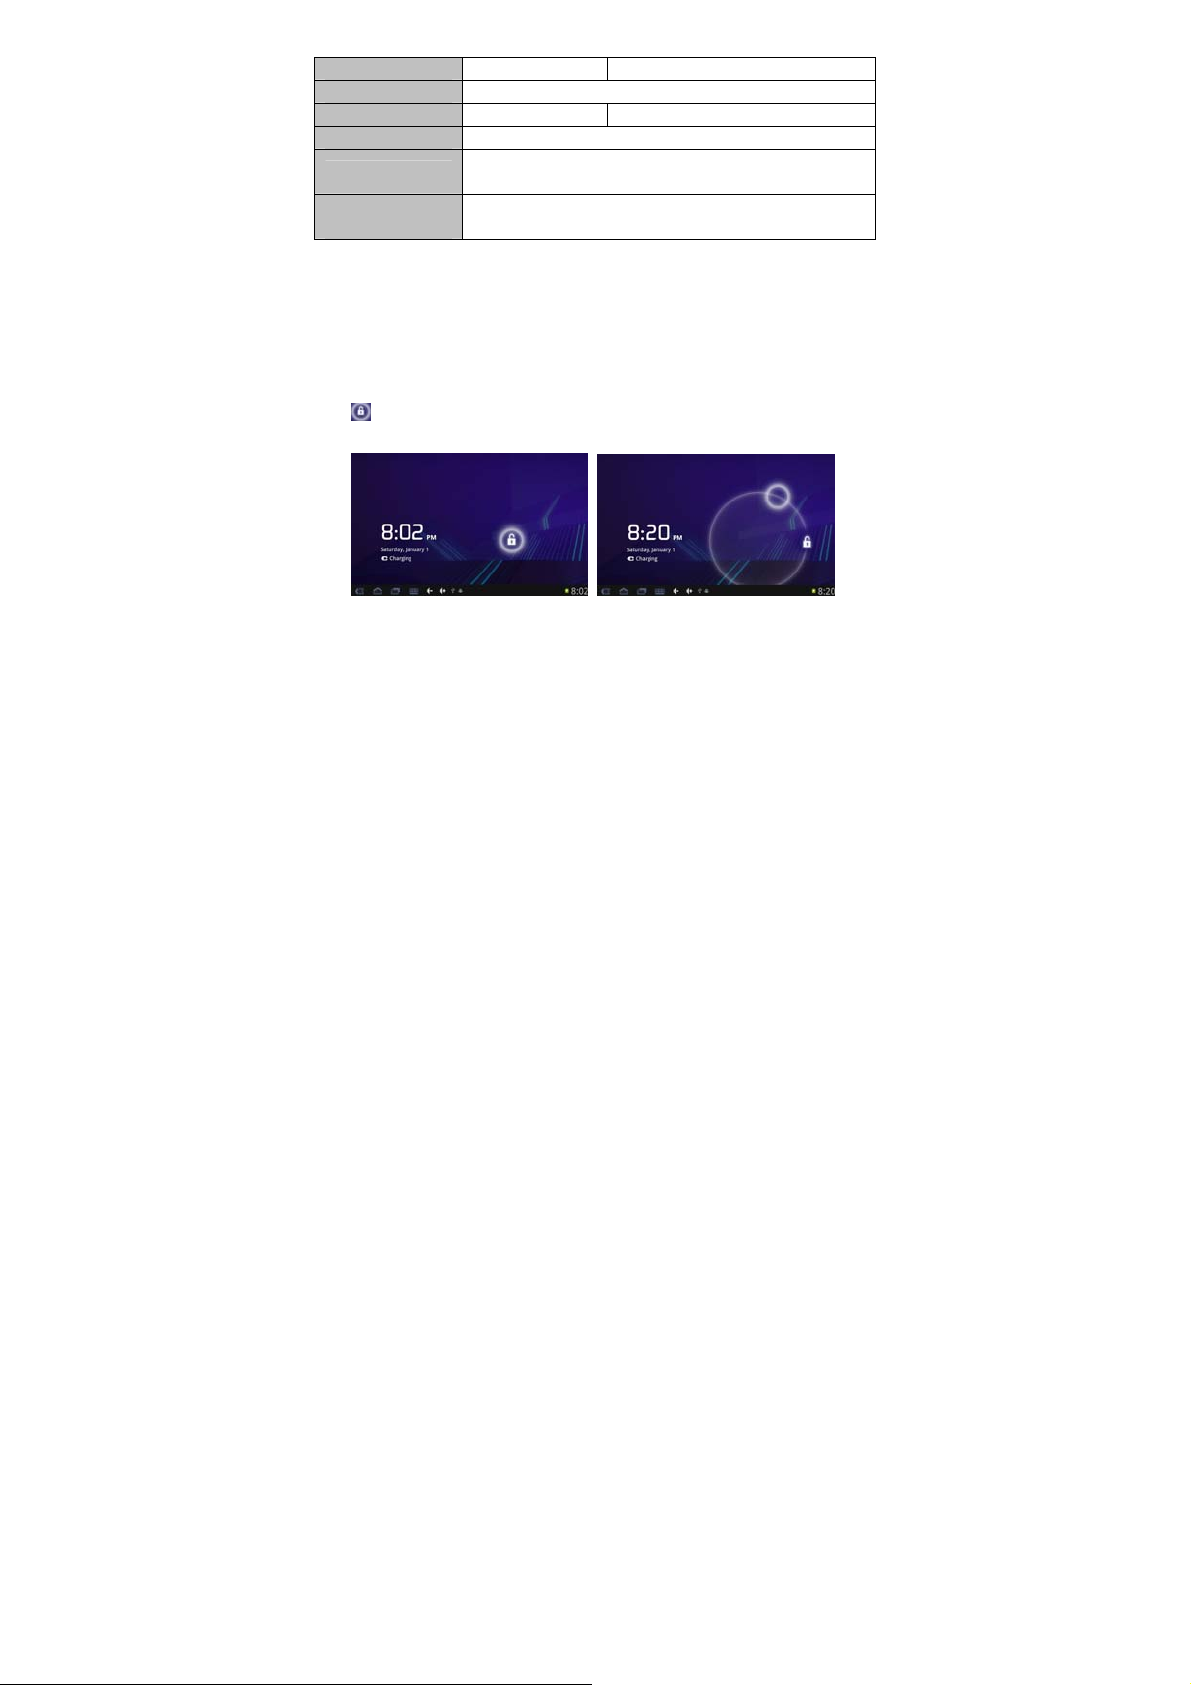
(Optional) Resolution 720P, 1080P
Camera Function Support camera function (Optional)
Recording function Format WAV
Working temperature -5 - 40 ℃
Languages
Operation systems
supported
English, French, German, Spanish, Simplified Chinese, Traditional
Chinese, etc
Windows98SE/ME/2K/XP
4. Quick Guides
4.1 Switch On/Off
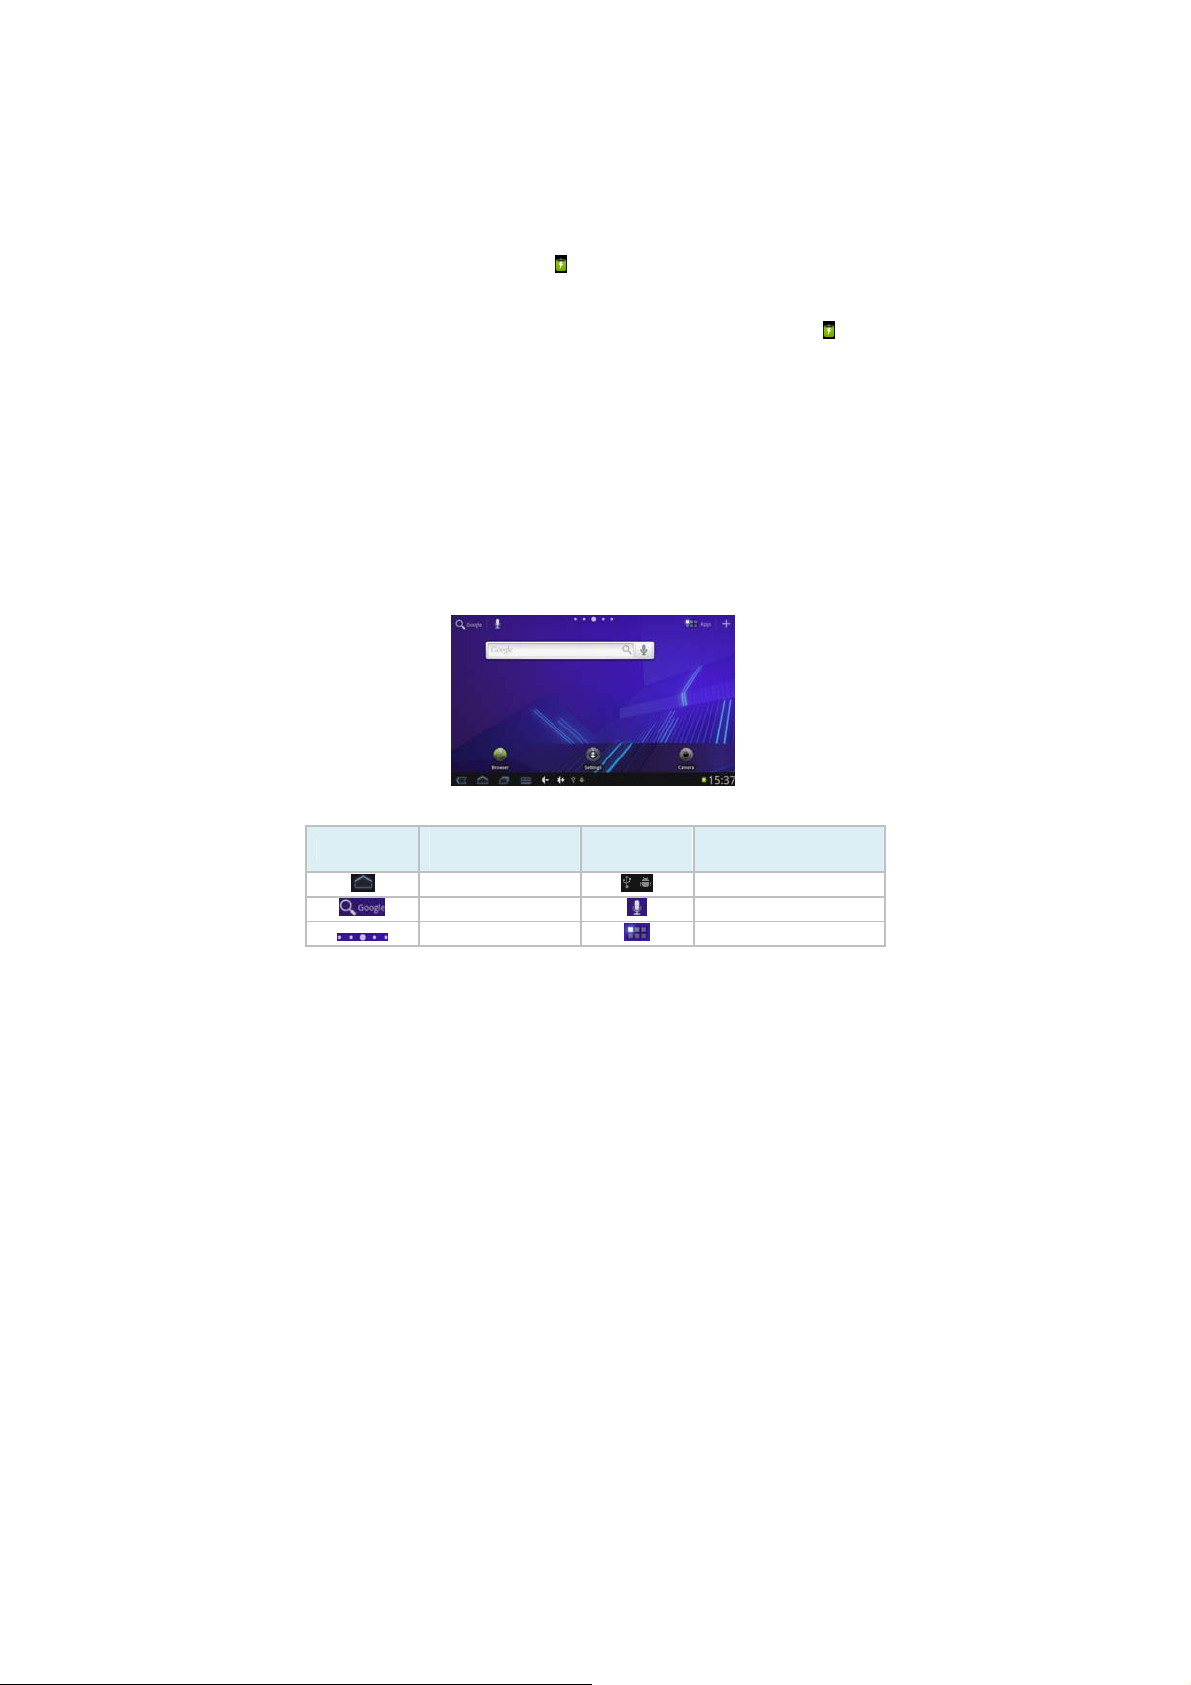
Switch ON and Unlock: When the device is in its OFF mode, press
and hold the Power key for 3 seconds to enter the Android startup
process. The device will take about 100 seconds to enter the system
desktop, with the display in locked mode, please press and move the
icon by the white circle, the display will unlock automatically, see
the image below:
When the device is in use, please put it into SLEEP mode, then the
device will be ready to use whenever you like, and you don’t need to
start the Android operating system again.
4.1.1 Power Saving Mode and Locked Mode: Pressing the
“POWER” key when the device is in use will result in the system
entering SLEEP power save and locked mode. Pressing the
POWER key or tapping the touch screen for 3 seconds, will return
the system to locked mode within 1 second.
Note: The primary operation of the device will not stop under the
power saving mode, it is just the display that is turned off and
showing a black screen. This means that music play, movies play etc.
will still continue to run.
4.4.2 Switch OFF: When the device is in use, press and hold the
POWER key for 3 seconds, the screen will display the power off
interface, choose the power off option to confirm your selection and
the system will shut down automatically.
Note: When the device is running low on battery power, it will sound
8
Page 9
an alarm and then shut down automatically if it isn’t plugged into a
power source to start charging. If the device cannot start up please
check if the battery power is too low by charging the device.
4.2 Battery Management and Charging
4.2.1 Charge the battery about 8-12 hours to make sure the battery
is fully charged for the first time.
4.2.2 Insert the micro port of the battery adaptor into the DC slot on
the device, and connect the other side with the power socket. Then
the Power indicating lamp of the device will be high lighted blue, the
desktop icon of the battery
please wait until the battery is fully charged, don’t disconnect the
power when charging. Once the battery is fully charged, the
indicating lamp will change into dark blue, the Icon on the desktop
will stop rolling. When the battery is exhausted completely, please
charge at least one minute before starting it up
Note: In order to keep the battery working to its full potential, please
pay attention to the following advice:
1) Don’t charge the power in excessively high temperatures.
2) There is no need to run down the power for this Li-ion battery, you
can charge the battery even when there is still power left in the
battery without it affecting the lifespan of the battery.
3) In order to keep the battery in good condition, Make sure you
charge it at least once every two weeks if the device hasn’t been
used for a long time.
4.3 Operation of the Function Icons
keeps rolling to show it is charging,
Definition of the Function Icons:
Icon
Back to main menu Notifications
Function
instruction
Icon Function instruction
Google Search Voice Search
Menu Switch App Menu
9
Page 10
Browse All Menu Google Search
Return Home Page
Recent Browse Function Menu
Reduce the volume Increase the volume
Notifications WiFi Status
Power Status System Time
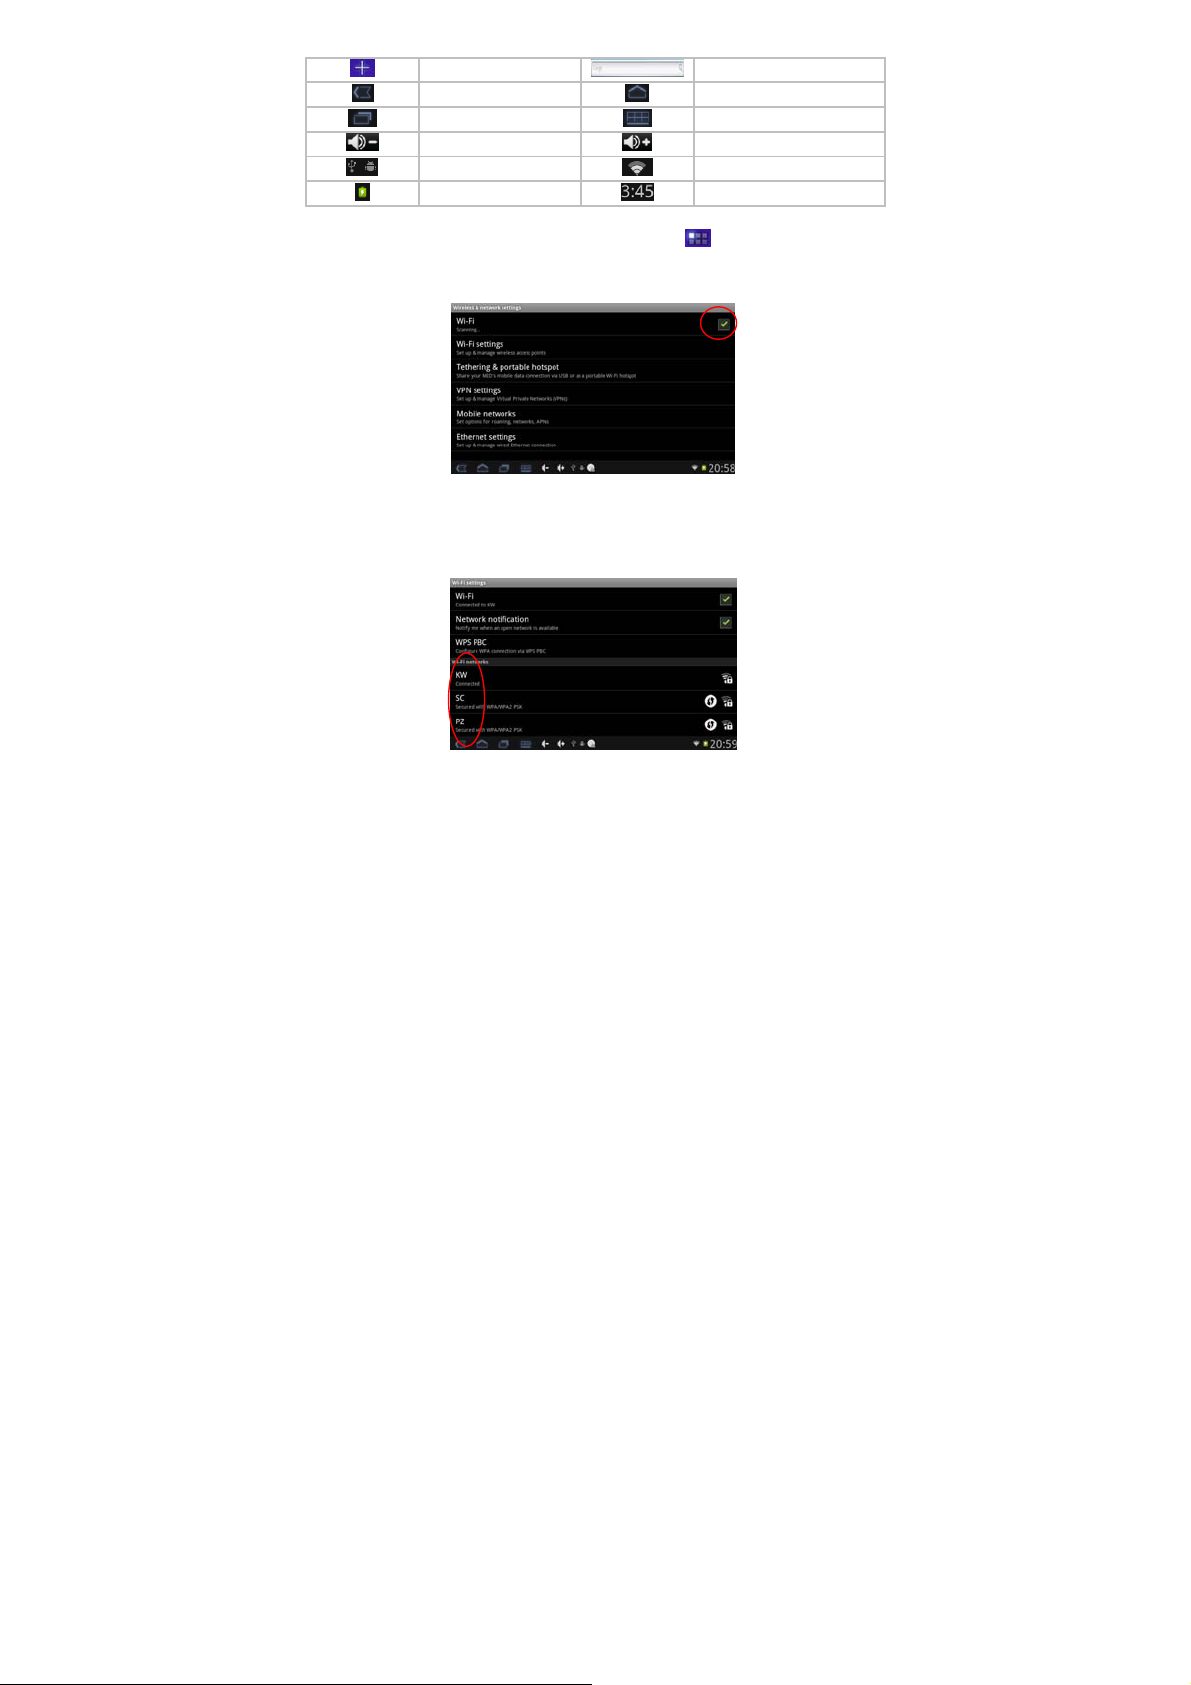
4.4 WI-FI Settings
4.4.1 Turn on WIFI: Tap the App Menu icon
app menu list, tap “Settings” to enter into the setting interface, tap
“Wireless and networks” to setup, select the “WiFi” as below:
4.4.2 Connecting to a network: Tap “Wi-Fi Settings” to enter this
menu, the device will find the WiFi networks automatically. Please
refer to the example picture below, it has found several WiFi network
names:
to enter into the
After selecting the network you would like to connect to, the system
will either connect to the network. If the network is secured and
requires a security key to be entered, the system will pop up a
connection window where you can input the correct security code
and then press “Connect”.
The system will connect to the network automatically, and once
connected will show a Status of “Connected” You can see the
network connection status by pressing the network name, see the
figure below:
10
Page 11
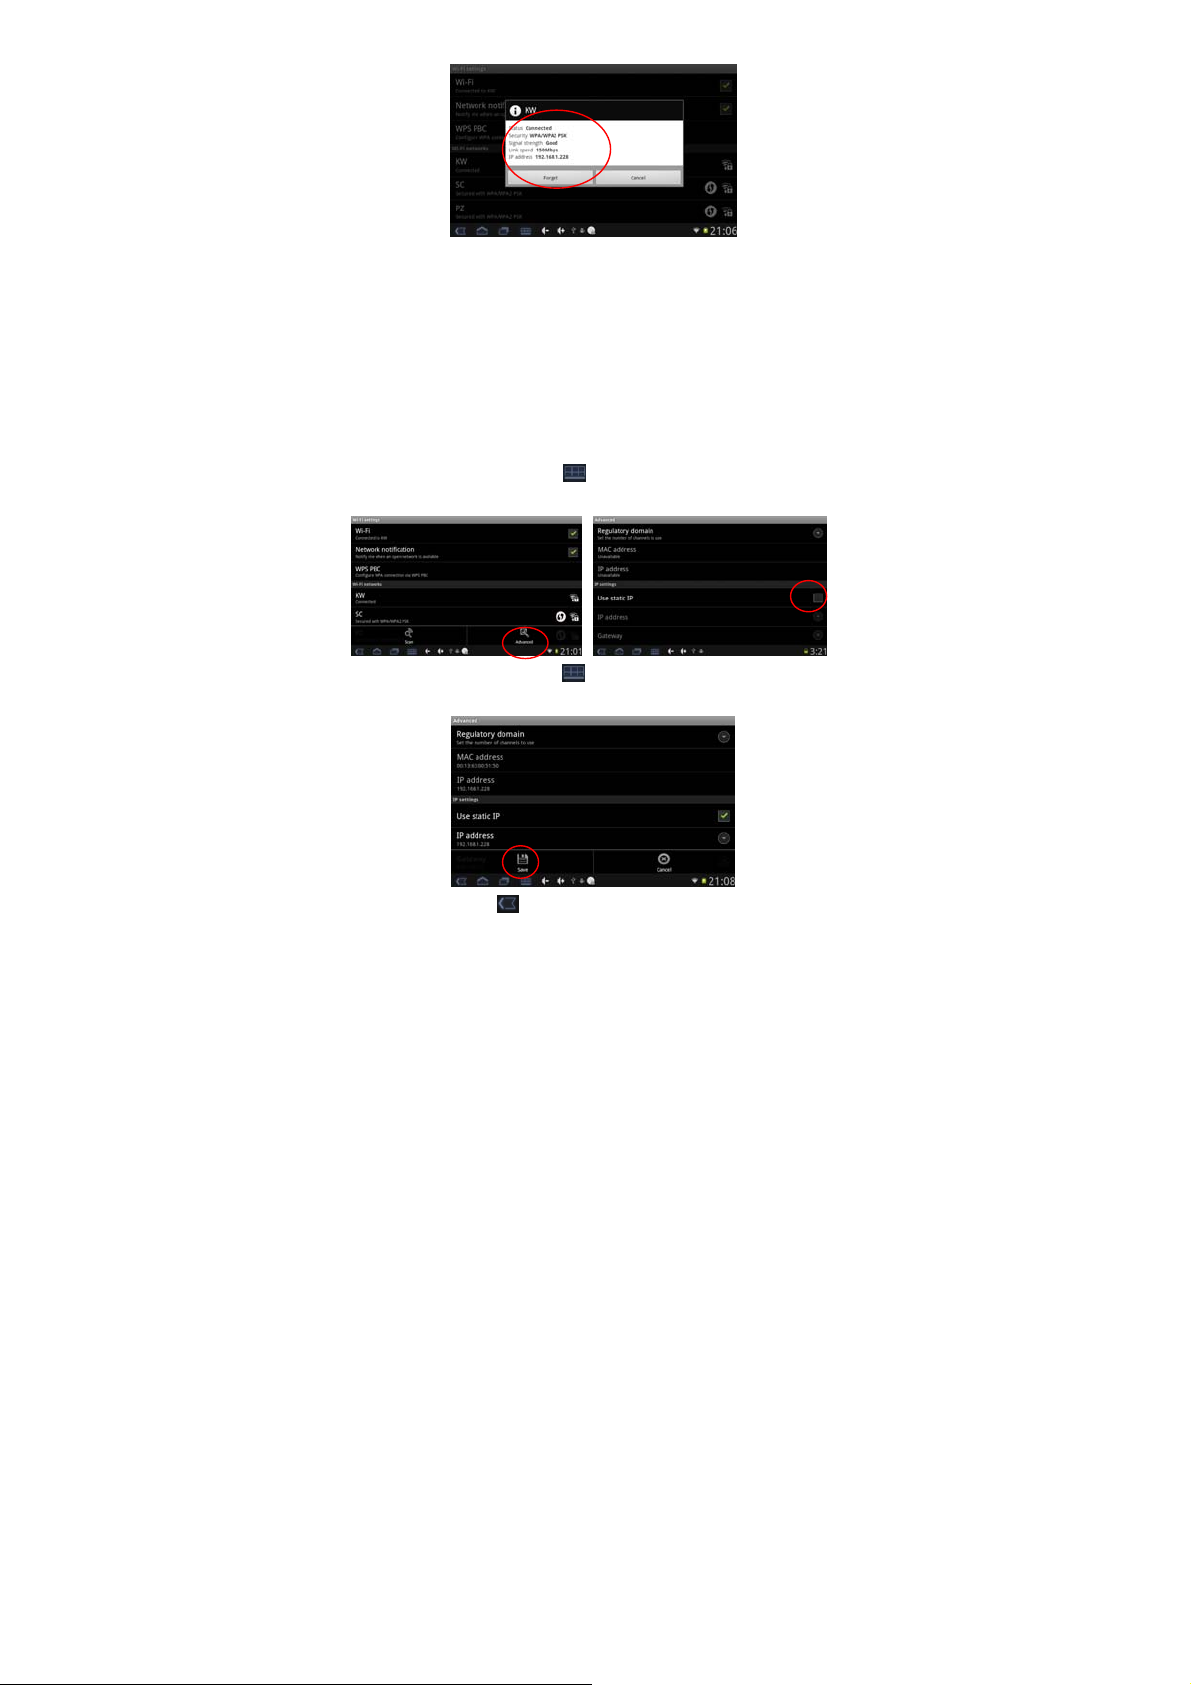
4.2.3 IP address settings and connection: There are two setting
methods to allow the IP address to be set. Whether the IP Address is
distributed automatically or not, is depended on the Wi-Fi Router’s
settings.
1) IP Address assigned automatically
By default this device is setup to be assigned an IP Address
automatically.
If the wireless network you want to connect to, assigns the IP
Address automatically, but the settings have been changed to a
Static IP Address, use the follow ing procedure to change the settings.
Tap the Function Menu icon
tap “Advance”, then un-tick the selection in the “Use static IP” box.
on the bottom of the screen and
Tap the Function Menu icon
tap “Save” to complete this setting, see the figure as below:
on the bottom of the screen then
Tap the Return icon
the Wi-Fi settings screen. Select the network you would like to
once complete, the system will return you to
11
Page 12
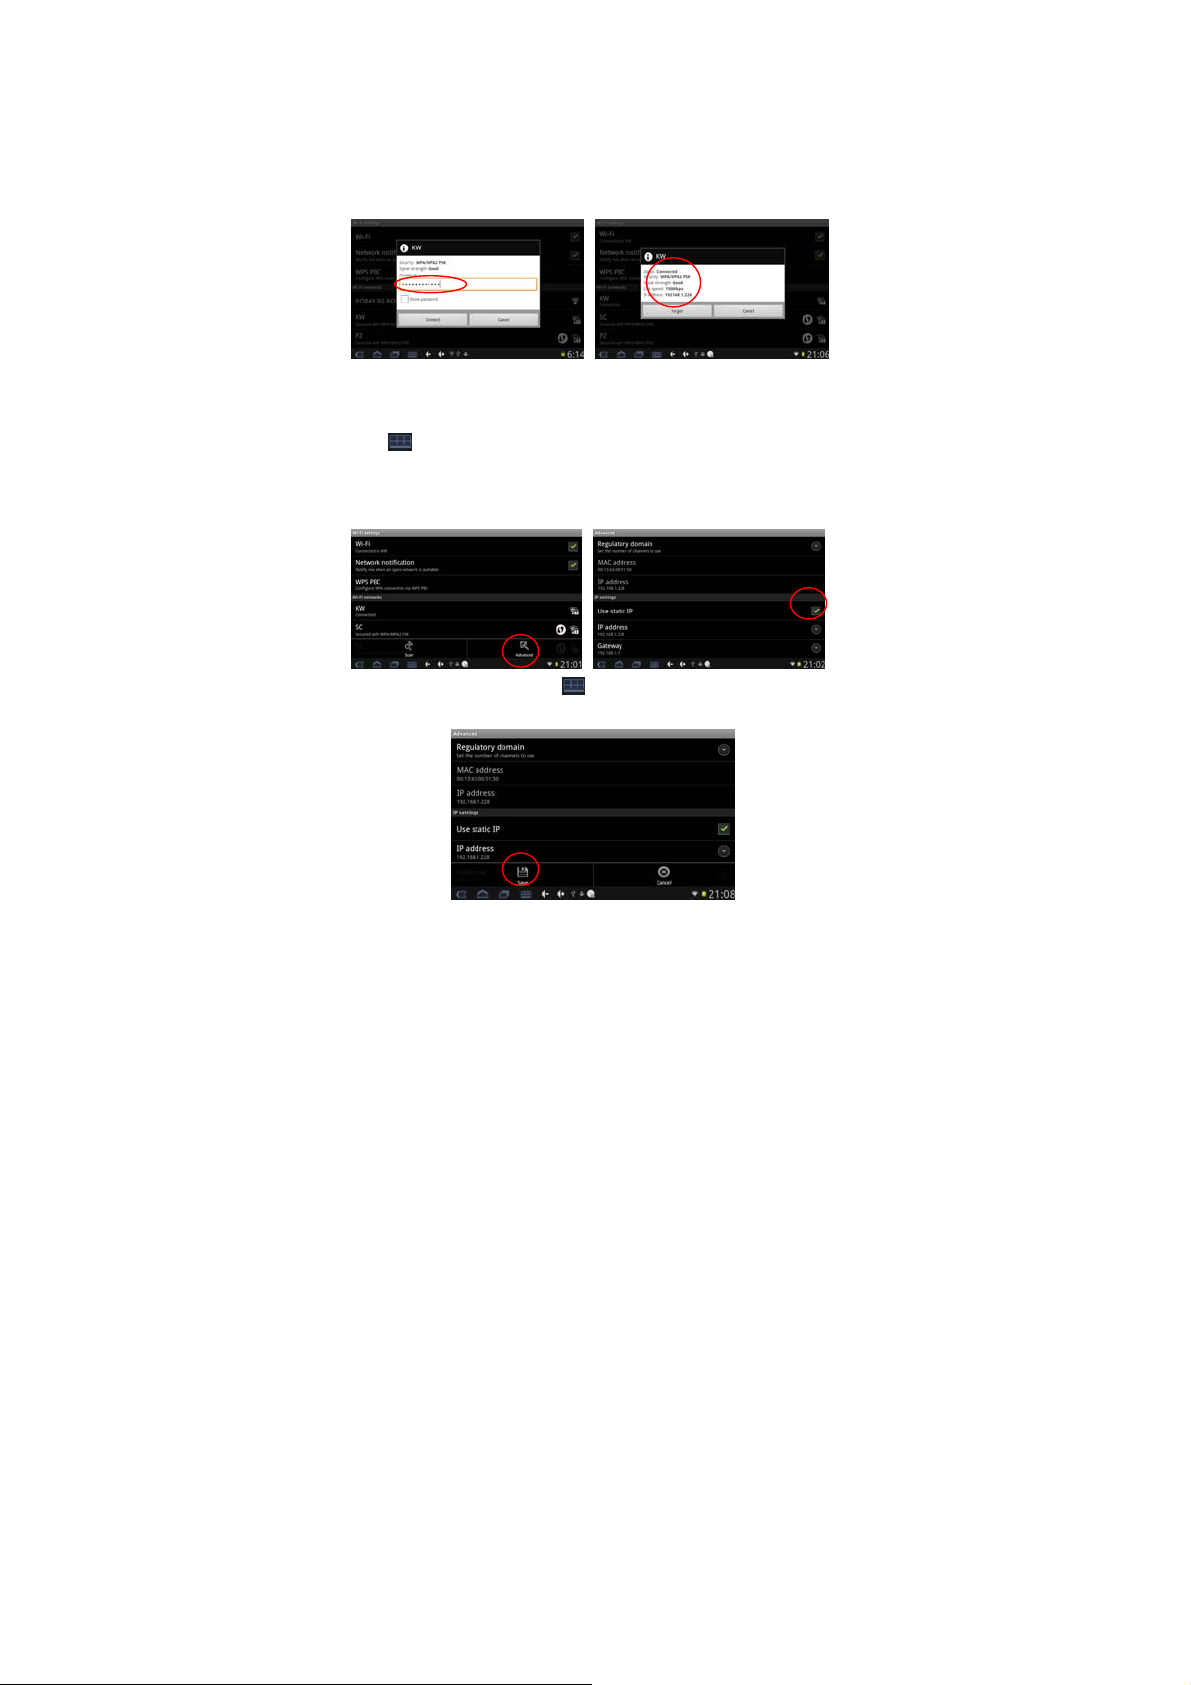
connect to, for example, double tap “KW” network, the system will
enter into an interface and ask you to input the code. Input the
correct code and press “Finish”, the system will connect and
distribute the IP address automatically. It will show “Connected” once
the system has completed connecting. You can see the network
connecting status accordingly when you select the network name,
see the figure shown below:
2) Static IP Address - Manual Setup
If the Wi-Fi network requires a Static IP Address, please use the
following procedure to change the settings. Tap the Function Menu
icon
Select the “Use static IP” tick box, and then set the IP address,
Gateway and Netmask using the information you have for that
Network. See the figure below:
on the bottom of the screen and tap “Advance”
Tap the Function Menu icon
tap “Save” to complete this setting, see the figure as below:
Select the network you would like to connect to, for example, double
tap “KW” network, the system will enter into an interface and ask you
on the bottom of the screen then
12
Page 13
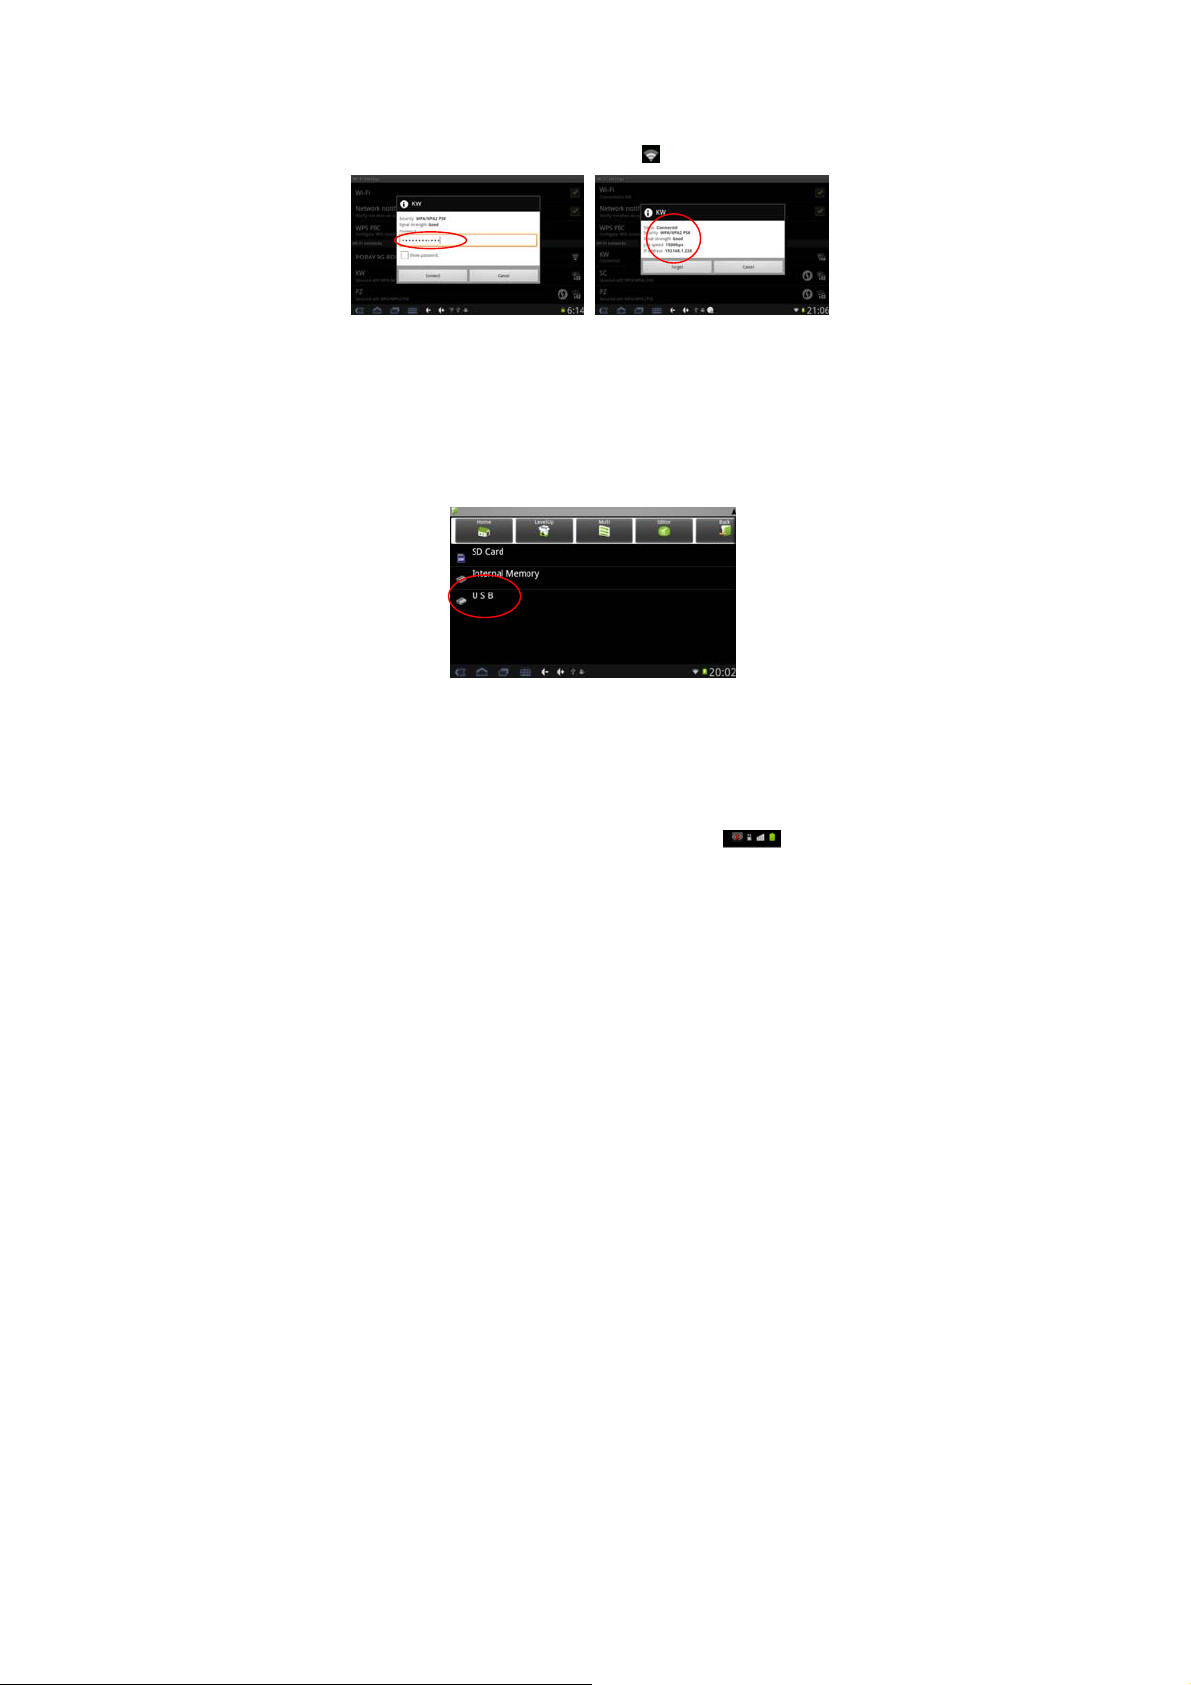
to input the code. Input the correct code and press “Finish”. The
systems will to the static IP address that you input. It will show
“Connected” once the system has completed connecting. You can
see the network connecting status accordingly when you select the
network name. There will be a WIFI icon
see the figure as below:
4.5 USB-HOST and Extended Function
If you would like to attach an external USB device such as a 3G USB
Dongle, USB Storage Device or USB Keyboard, please follow the
procedure below.
4.5.1 External USB Function
This device supports OTG function. Please insert the USB disk into
the USB HOST port, then tap the “Explorer“ in the desktop, select
the “USB” to enter into USB disk, see the figure shown below:
4.5.2 External 3G USB Dongle Function
1) Insert the 3G USB-Dongle to USB HOST interface.
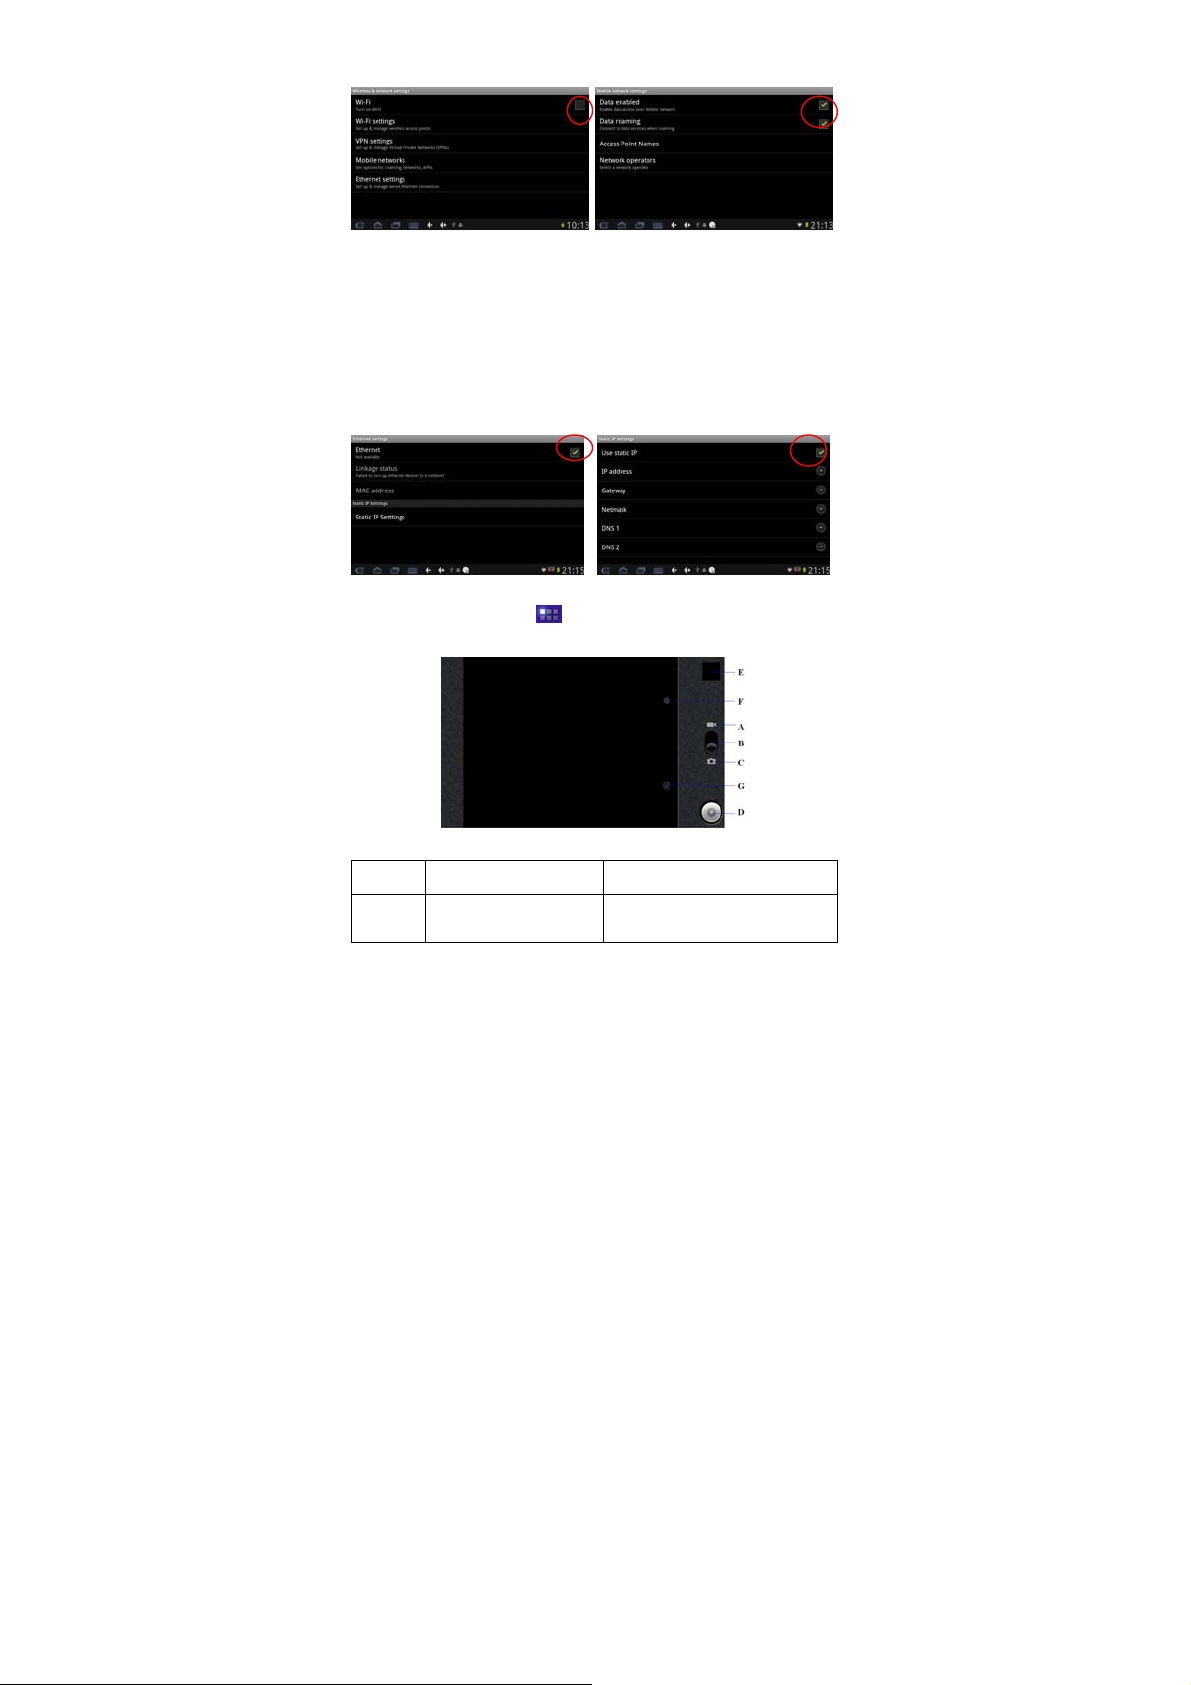
2) Press “Setting”, to enter into the setting interface, press “Wireless
and networks” to enter the setup interface. Un-tick box behind the
“Wi-Fi” to disable it (Note: Wireless and Mobile networks can’t be
enabled at the same time). Tick the box behind “Mobile network” in
to enable mobile networking, the 3G network icon
showed on the bottom of the screen when device connects the 3G
successfully.
Note: If mobile networking won’t turn on, please check and confirm
the 3G USB Dongle that you are trying to use is compatible with this
13
will be
Page 14
device.
4.5.3 External RJ45 USB Dongle Function
1) Insert the External RJ45 Card USB Dongle, and tap the “Ethernet
settings” into the network settings.
2) Select “Ethernet”, if the Router assigns the IP address
automatically , the system will connect to the netw ork automatically. If
the IP address is assigned statically, please select “Use static IP”,
then set the correct IP address, Gateway, Netmask and DNS to
connect the network.
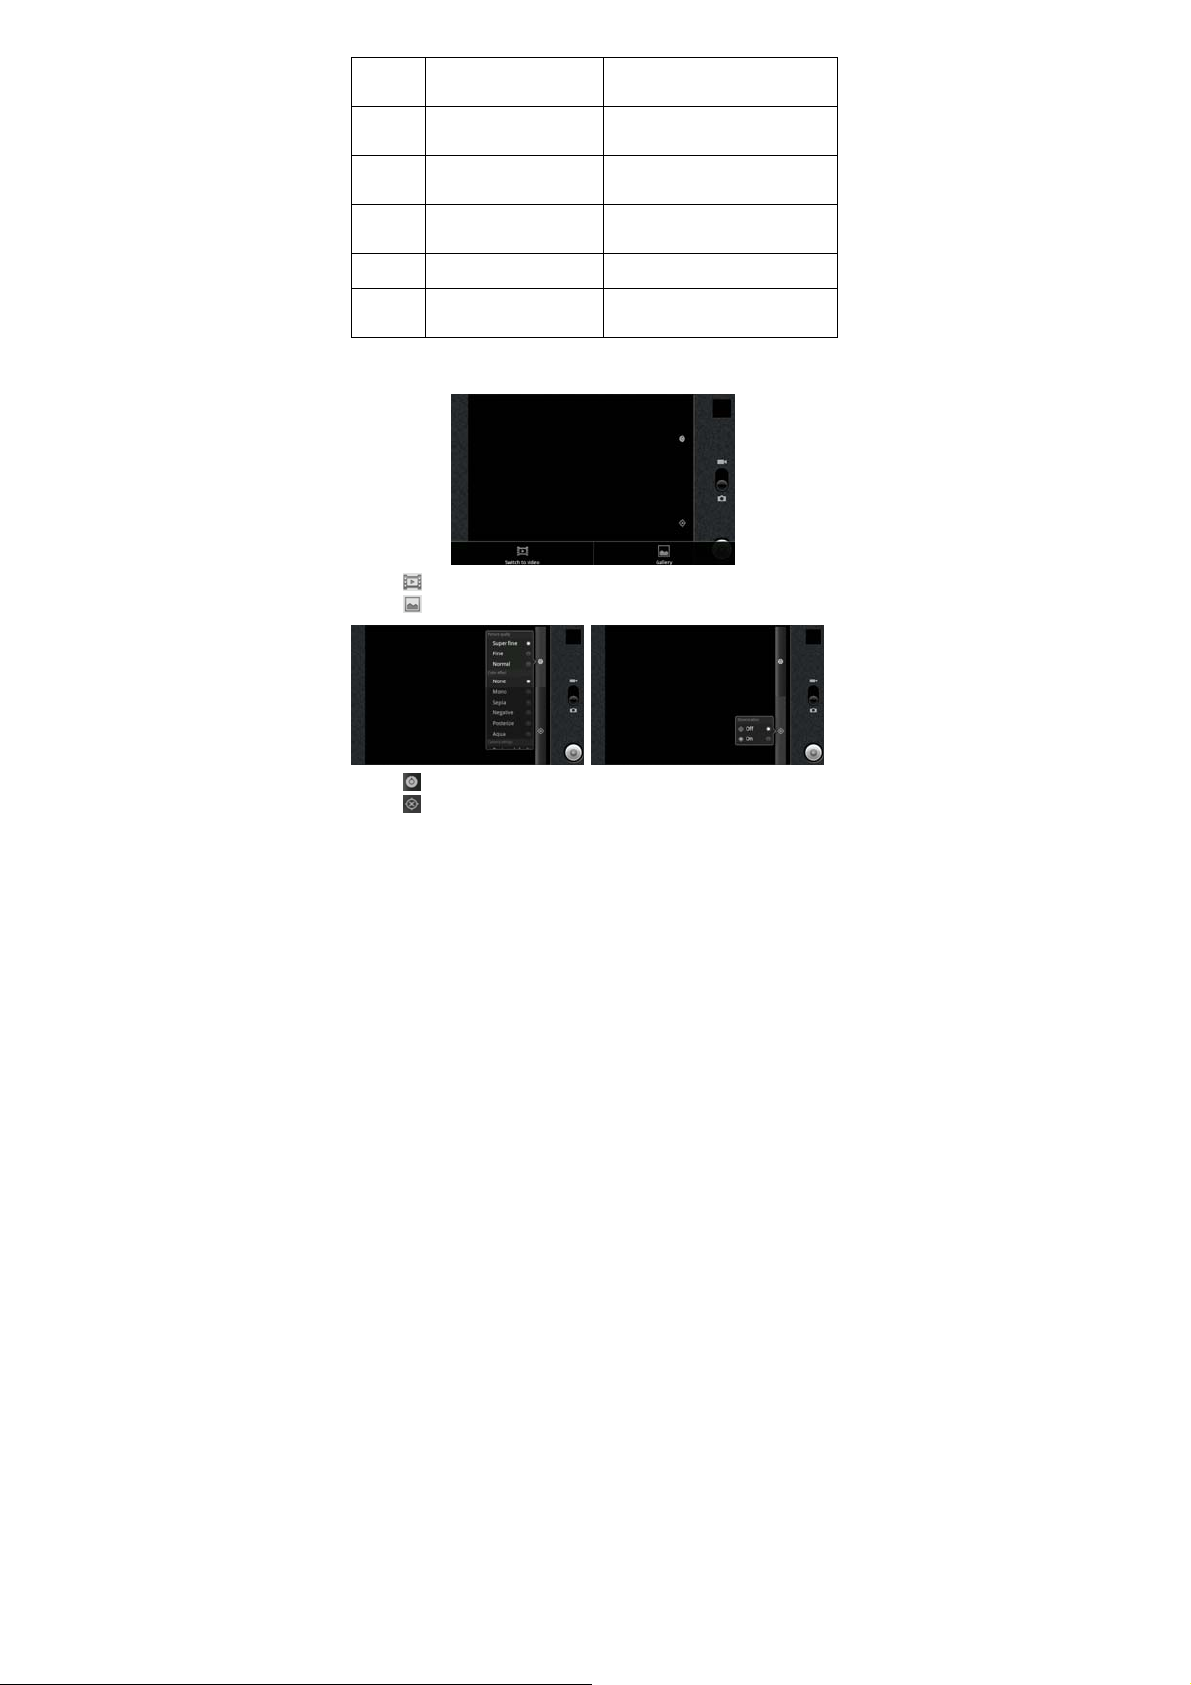
4.6 Camera Function
Tap the App Menu icon
“Camera” to enter into the camera function interface:
to enter into the app menu list, tap
Camera function buttons description:
Button Button Descri pti on Function Introduction
A Video Icon
When B slides to A, it is the
Video Mode
14
Page 15
Video and Photo
B
Switched Icon
C Photo Icon
Starting and Stopping
D
Icon
Photo/Video Preview
E
Icon
F Camera Setting Tap to view the setting options
G Store Location
In the photo mode, tap the menu button, the interface pops up as
below:
For selecting the Video/ Photo
function
When B slides to C, it is the
Photo Mode
For starting/stopping the
Video/ Photo
For previewing the Video/
Photo
Tap to select store location
on/off
1) Tap to switch to video function.
2) Tap
to preview the photos.
1) Tap
2) Tap
4.7 High Definition Function(optional)
You will enjoy 1080P HDMI video playback on your HD TV using the
Video player function.
1) Connect the TV to the device by using HD Cable.
2) Tab the “Setting” icon in the desktop, and then select HD setting to
transfer the contents on the device to the TV display.
to change the Picture Size and the Picture Quality.
to set the Store Location Off or On.
15
Page 16
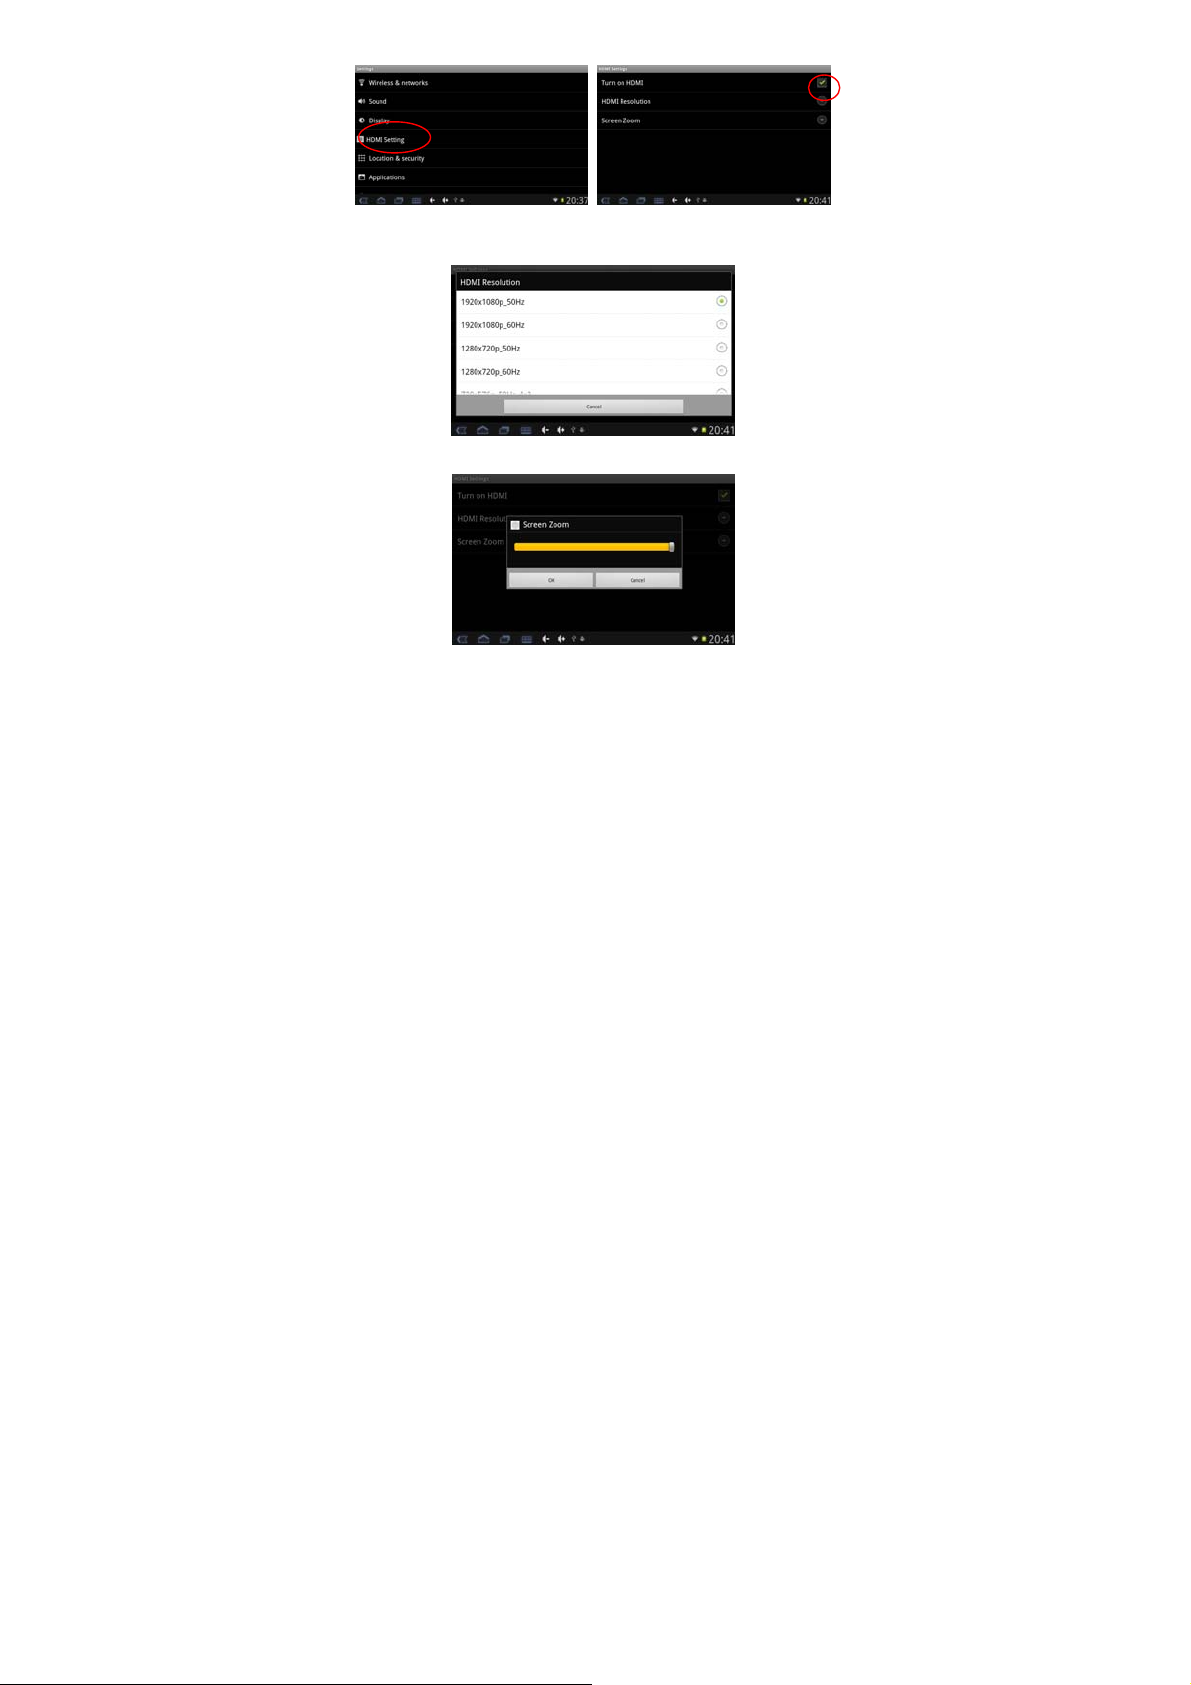
3) HDMI Resolution setup: Select the correct HDMI output resolution
according to your HD TV configuration.
4) Screen Zoom setup: Select the screen size of the output video.
4.8 tf (Micro sd) Card Storage
There is a tf (Micro sd) card slot in this device. It supports reading
files on tf (Micro sd). Insert the card into the card slot by the correct
way, and follow advice when using the card slot:
1) Insert the memory card into the card slot on the right side.
2) Don’t pull out the card when it is in use (reading, copying),
otherwise, it may cause data errors.
3) Don’t use the memory card in high temperature conditions.
4) Keep the memory card away from the liquid and erosive
materials.
5) To remove the card, just push the card towards the slot, and this
will automatically release the card.
16
Page 17
4.9 APK Install and Manage
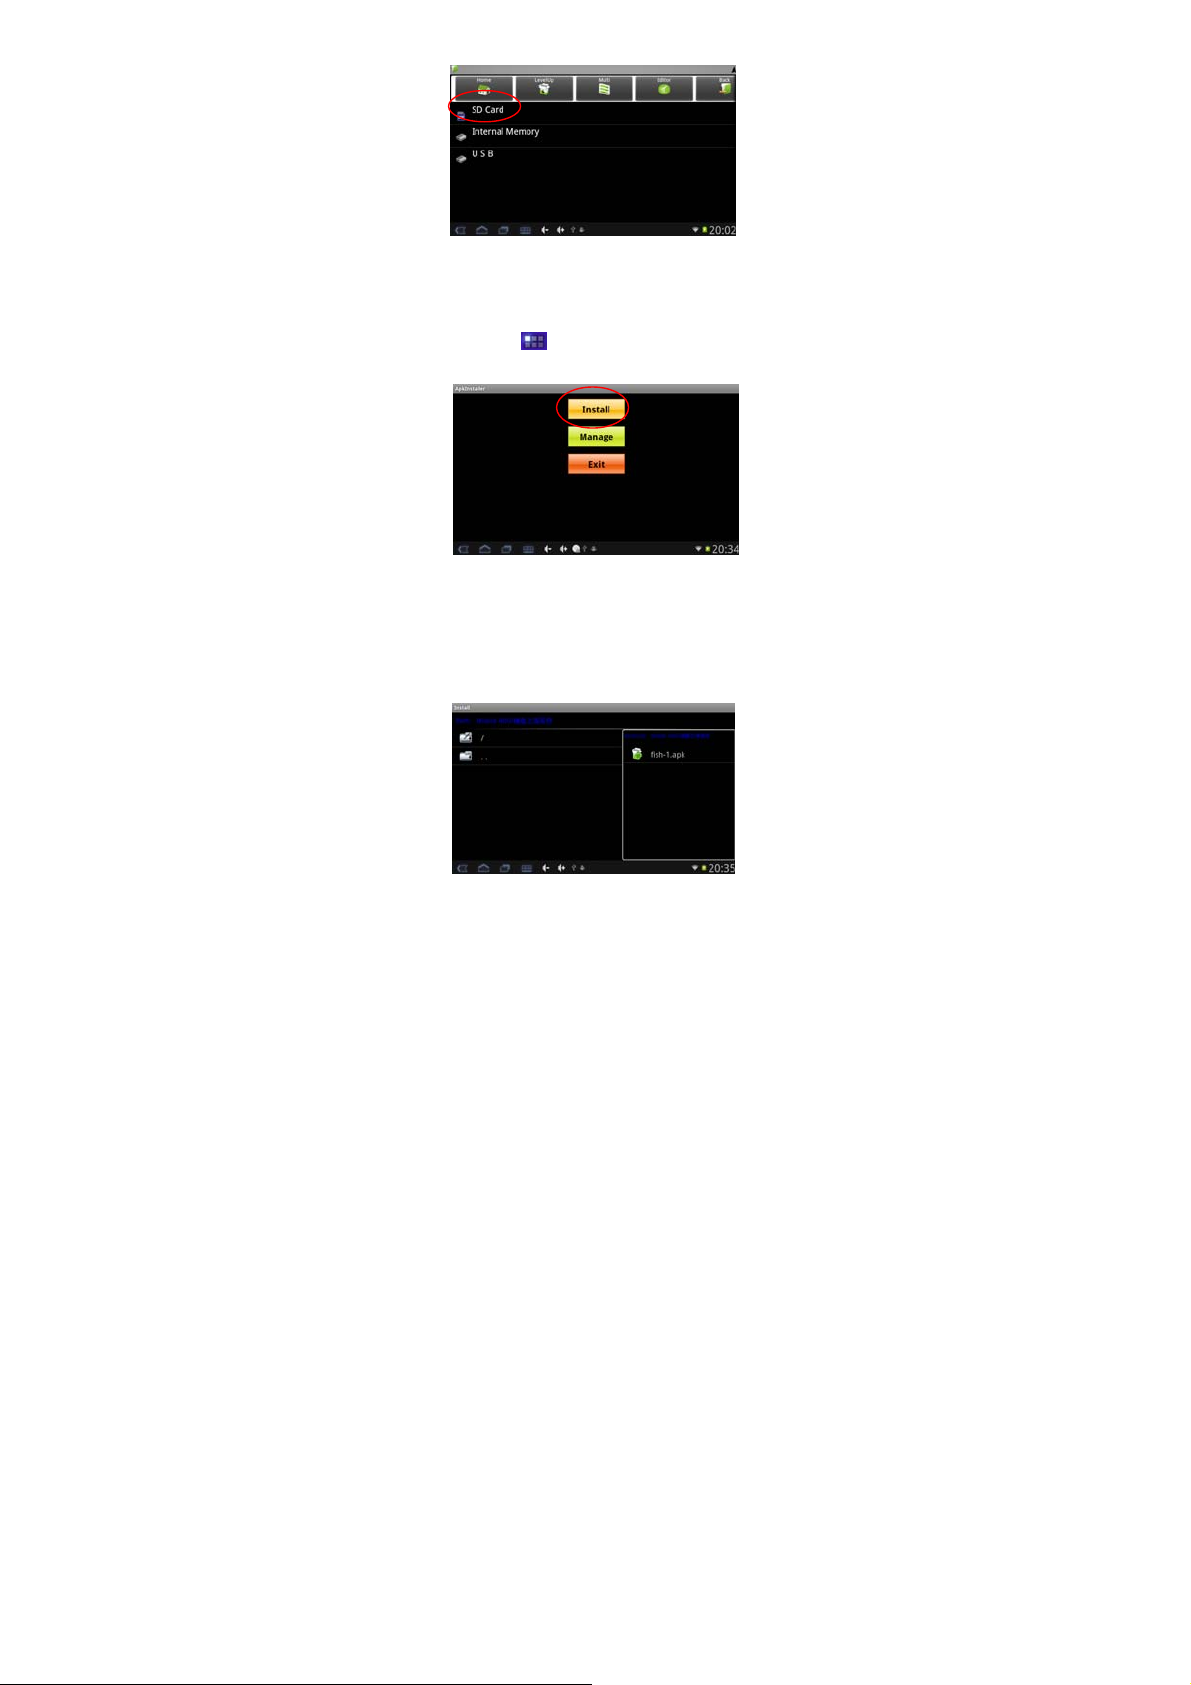
This device supports installing third party applications programs
designed to run on Android. Many application programs could be
downloaded from internet and then installed by the APK Installer.
Tap the App Menu icon
Installer” to enter into the interface as below:
4.9.1 Install: Press “Install” to enter into the APK installer interface.
The installation .apk files could be installed from two locations: 1)
Internal Memory which means the built-in storage. 2) Micro SD Card
which means a memory card inserted into the Micro SD card slot.
Select the program to be installed from the right window, tap it to
install and follow the prompts.
to enter into the app menu list, tap “APK
4.9.2 Manage: Tap to Launch, Export, Uninstall the applications.
The default view shows all the applications installed on the device,
tap the icon of the application you would like to manage.
17
Page 18
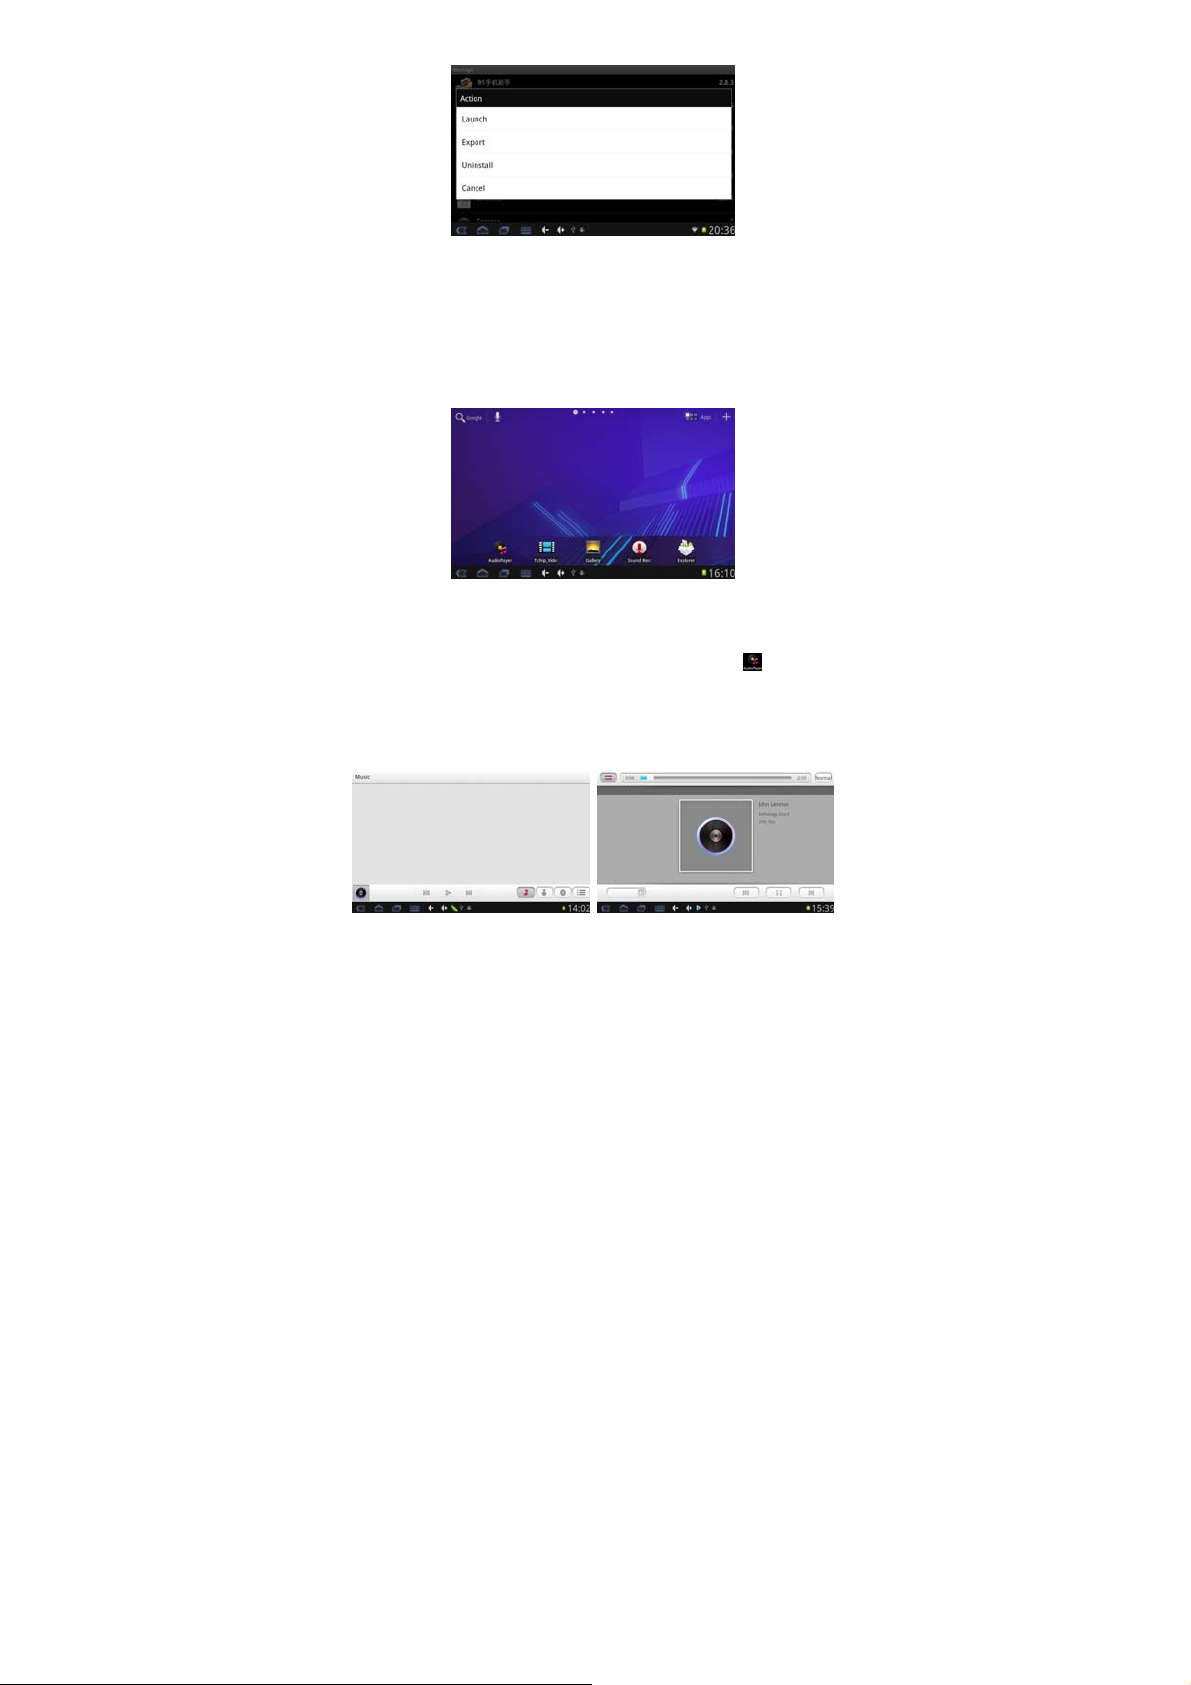
1) Launch: Tap to run the software.
2) Export: Tap to export the software to the Micro SD card.
3) Uninstall: Tap to uninstall the software.
4) Cancel: Tap to return to the main menu.
Note: Only the user-installed applications could be uninstalled.
5. Operation Details
5.1 Desktop System 1 (Multimedia)
5.1.1 Audio Player
The device supports the following audio file formats: mp3, wav, midi
and wma.
In the application menu or on the desktop, tap the icon
the audio player.
If there are no music files in the audio player playlist, the system will
automatically load any music files from the tf (Micro sd) to the audio
player playlist after the audio player is launched.
to launch
1) If there are many songs in the music play list, slide up/down the
18
Page 19
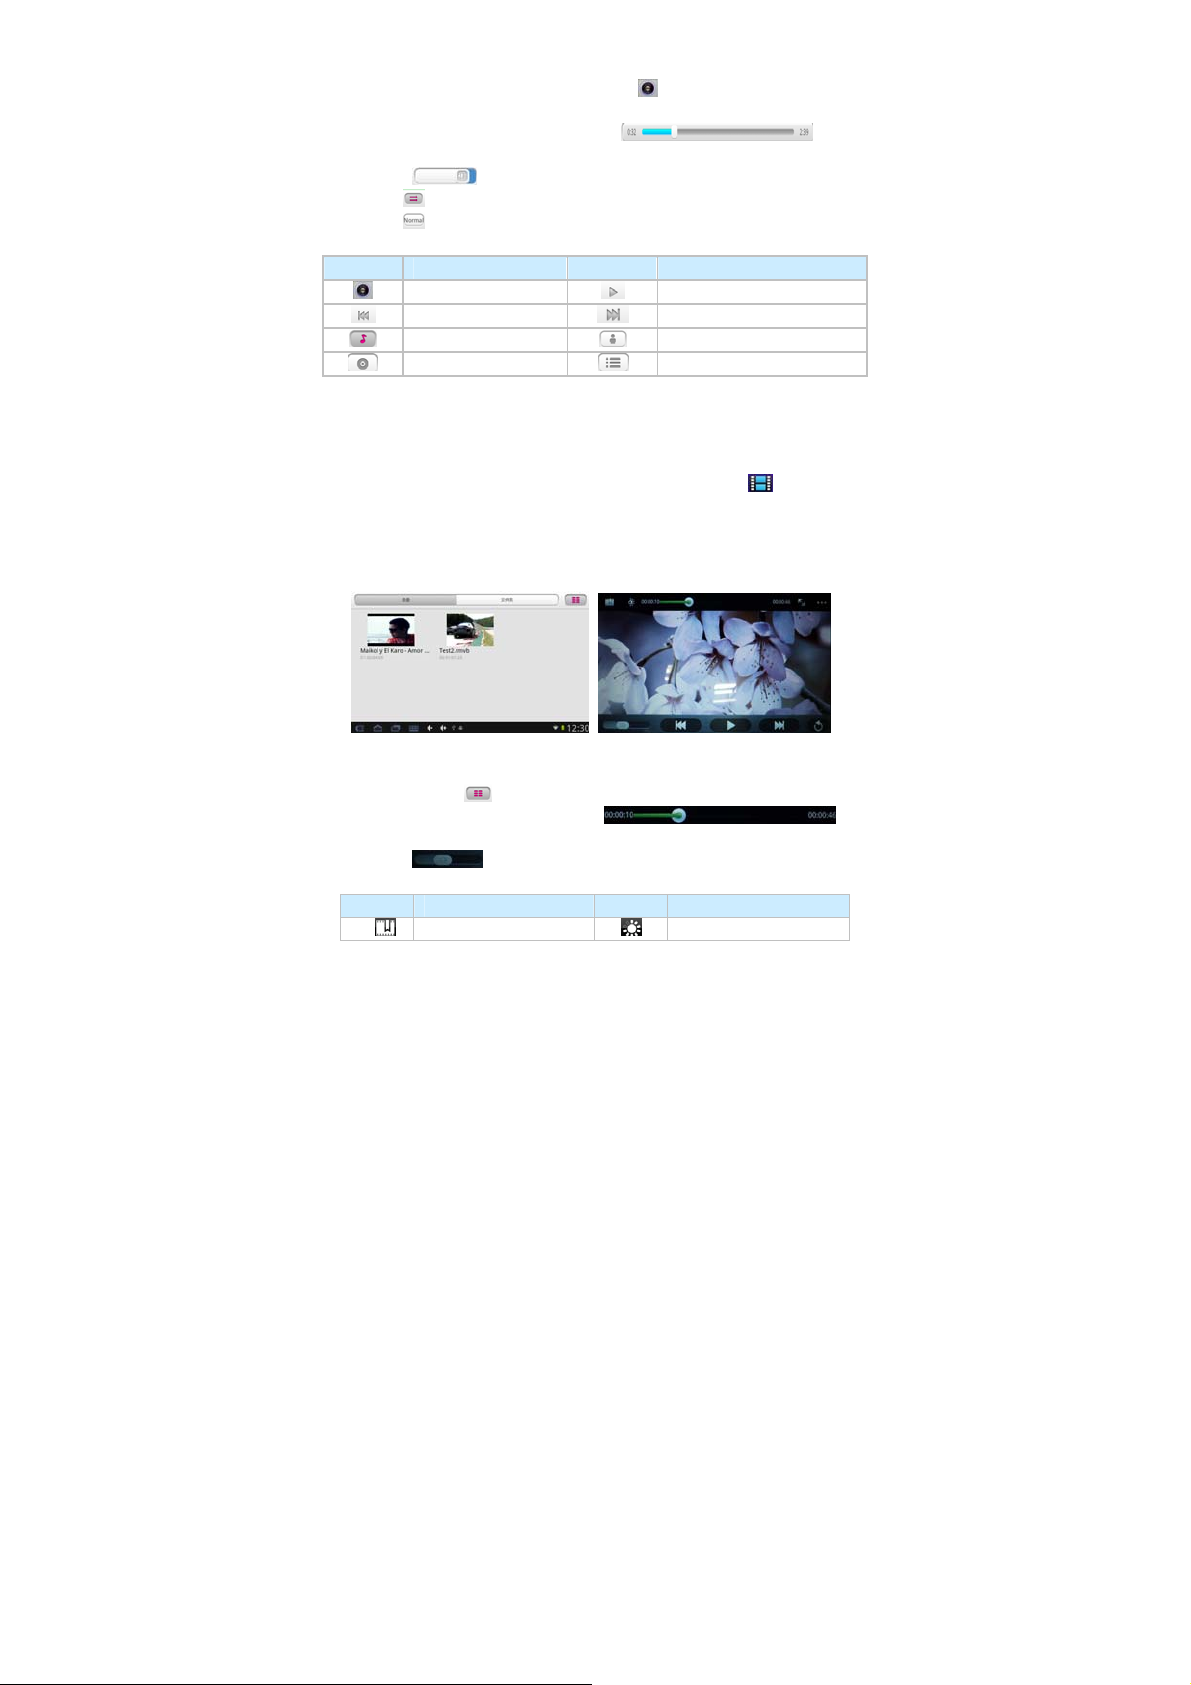
list by using the touch screen.
2) In the music playing interface, tap
playing list.
3) Drag the playback progress bar
adjust audio playback progress.
4) Drag
5) Tap
6) Tap
Audio Player Buttons Description:
Button Function Button Function
Current Playing Play Audio
Go to previous song Skip to next song
Audio List Artist
Album Playlist
Note: Audio player can play WAV record files
5.1.2 Video Player
The device supports the following video file formats: MKV, AVI, RM,
RMVB, MP4, MOV, VOB, DAT, FLV, 3GP.
In the application menu or on the desktop, tap the icon
into the video player interface.
When no video files are in the video player playlist, the system will
automatically load any music files from the Micro SD card to the
video player playlist after the video player has been launched.
bar to adjust the audio play volume.
to change play mode.
to change the play EQ.
to enter into the audio
to enter
to
1) If there are many videos available, please slide up/down the list by
using the touch screen.
2) Tap the icon
3) Drag the playback progress bar
to adjust audio playback progress.
4) Drag
Video Player Buttons Description:
Button Function Button Function
Add video bookmark Adjust brightness
to change the file list pattern.
bar to adjust the audio play volume.
19
Page 20
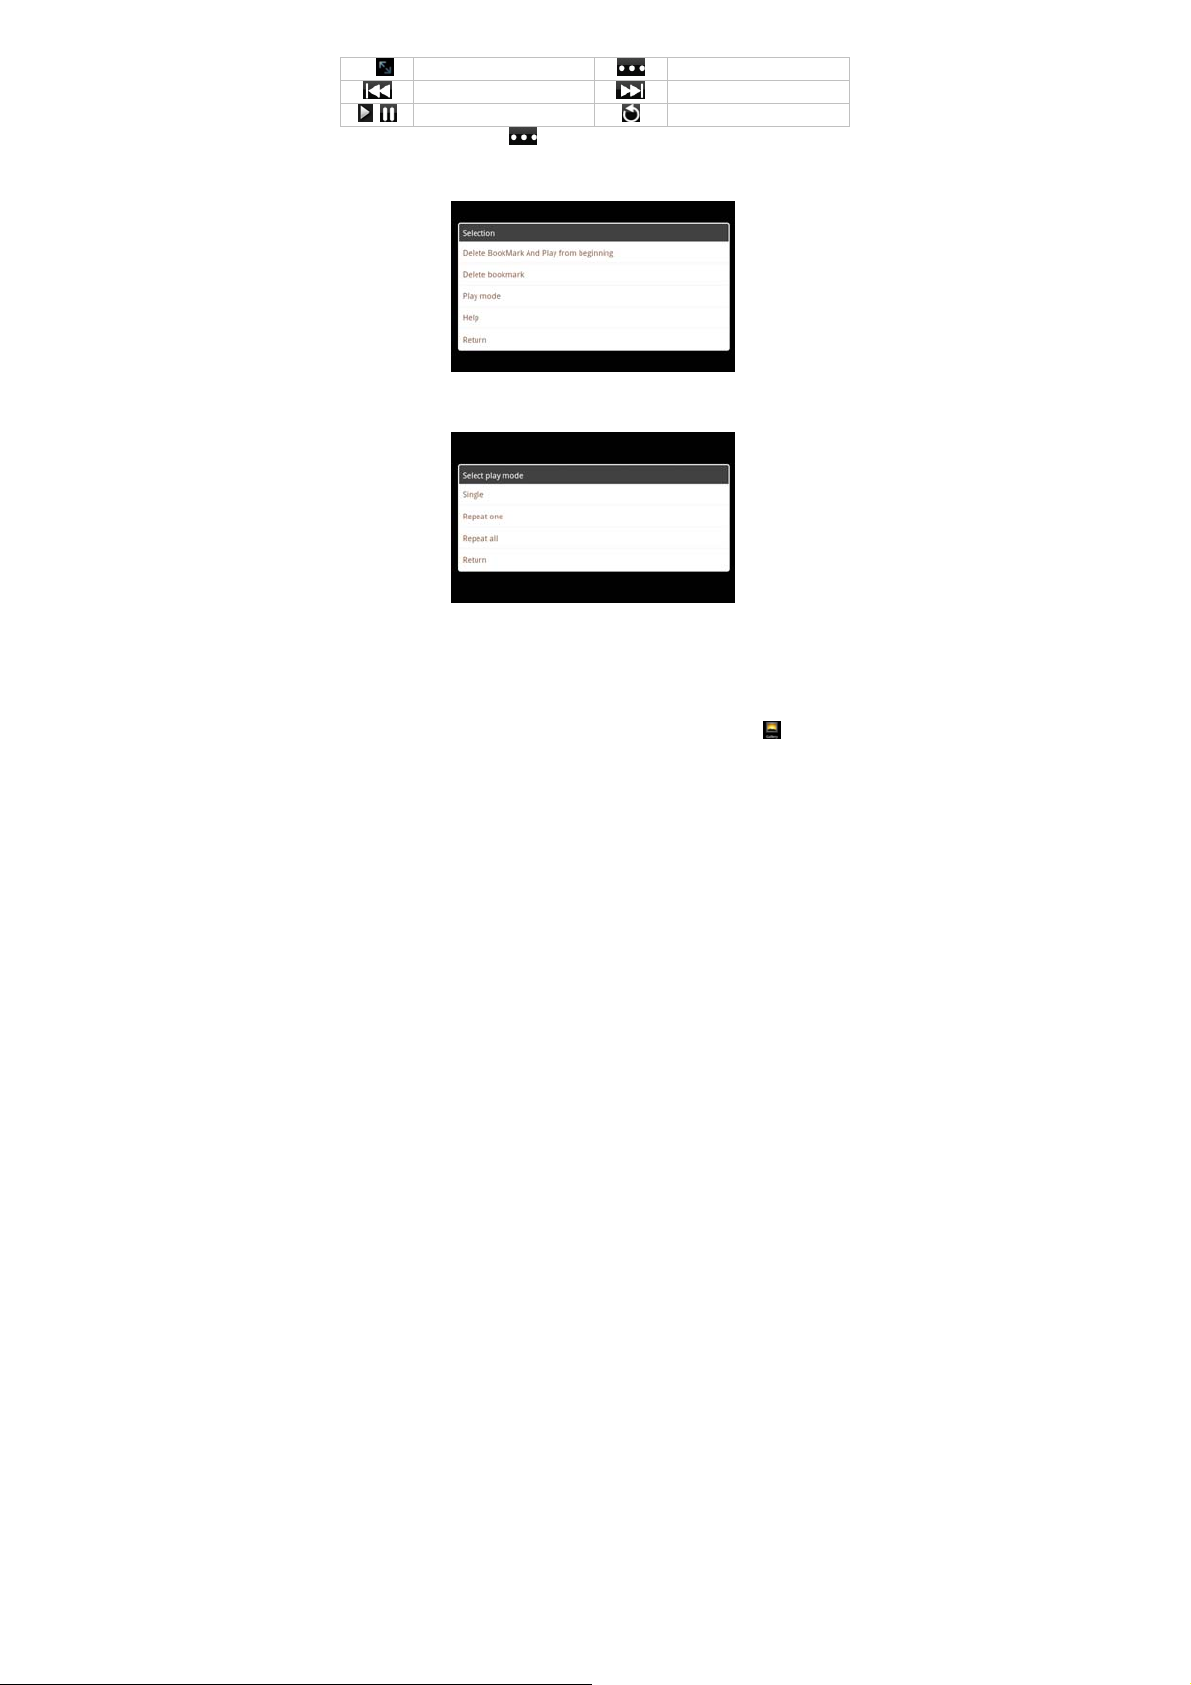
Video size Menu
Go to previous video Skip to next video
Play and Pause Quit
5) Tap the menu icon to select Delete Bookmark and Play from
Beginning, Delete Bookmark, Play mode, Help, or tap Return to go
back to the previous menu, please check the figure as shown below:
6) Tap Play Mode to select one of the play modes: Single, Repeat
one, Repeat all, or tap return to go back to the previous menu
7) High Definition Video out, for details please refer to High Definition
Function in Chapter 5.5.4.4.
5.1.3 Photo Browser
The device supports picture formats of BMP, JPG, JPEG, PNG and
GIF.
In the application menu or on the desktop, tap the Gallery
enter the photo browser.
If there are no files in the photo list, the system will automatically
load the image files from the Micro SD card to the photo browsing list
after the photo browser has launched.
icon to
20
Page 21
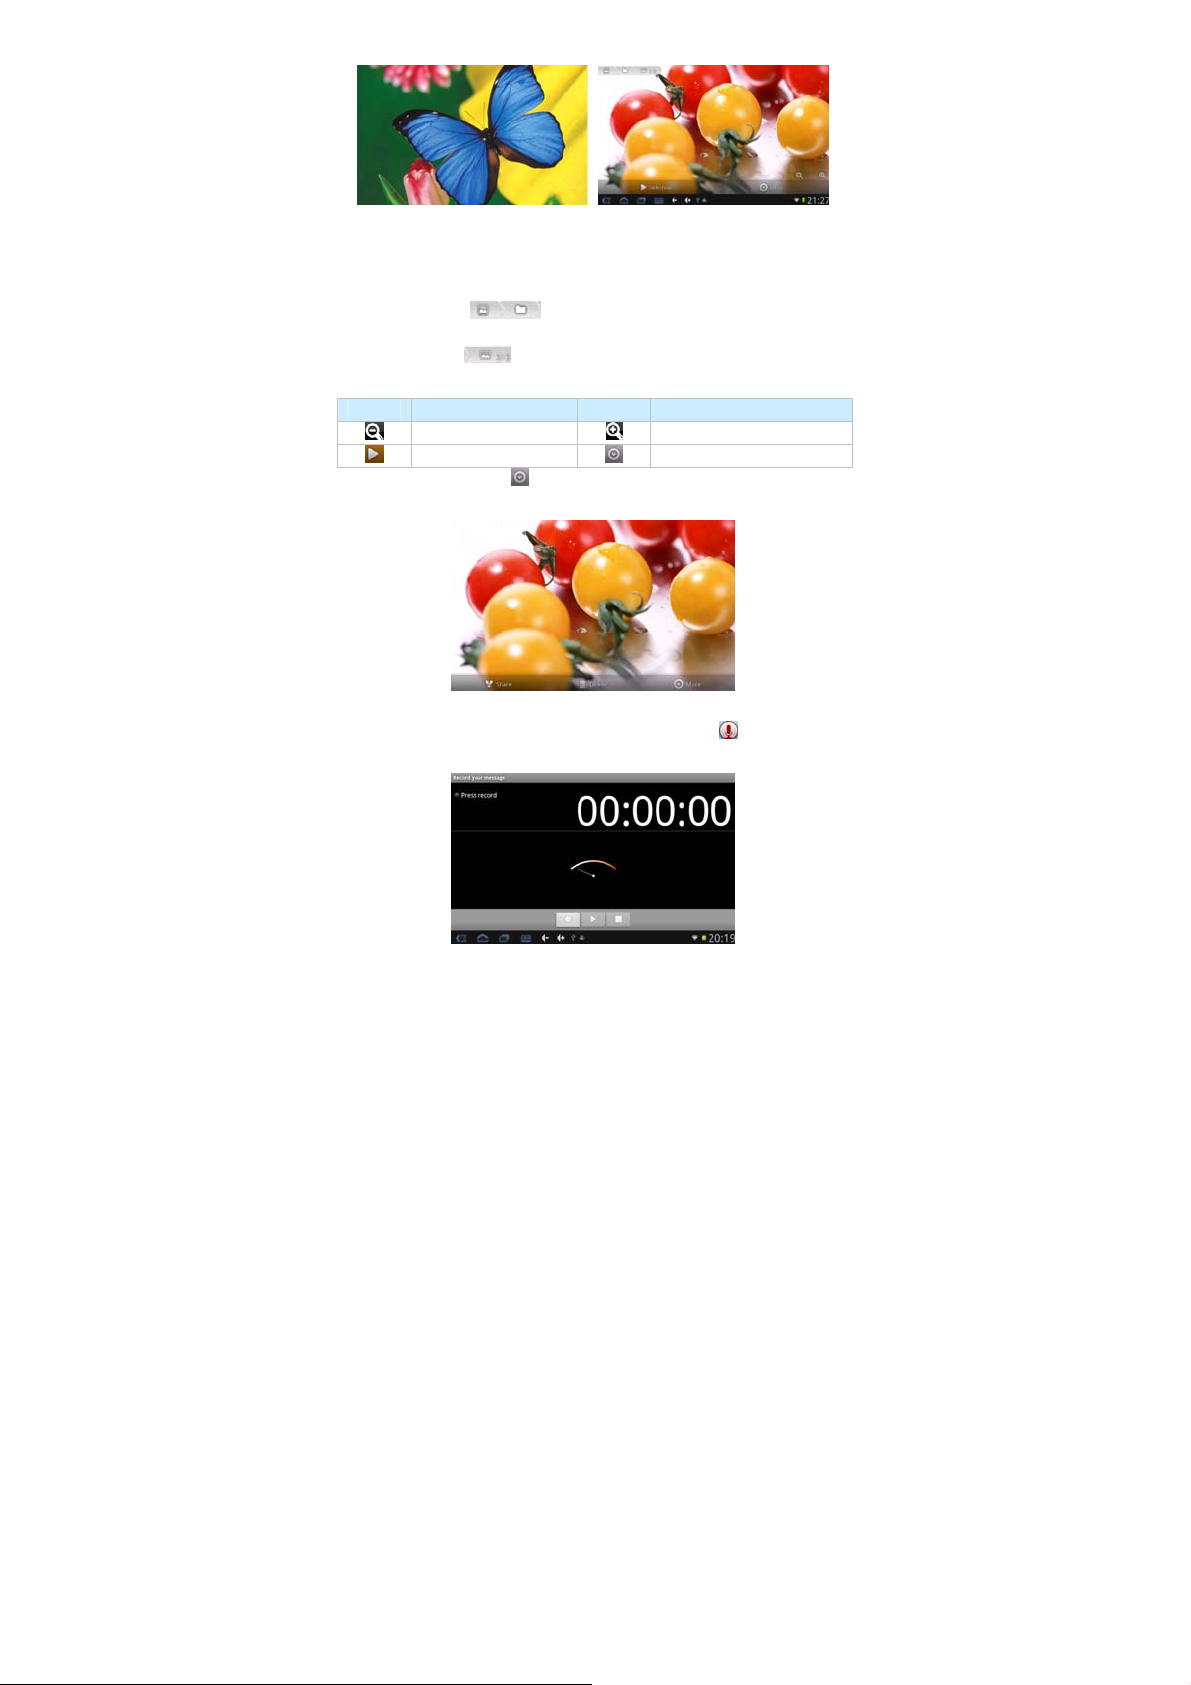
1) To view a picture, navigate to the image you would like to view
and select it.
2) Tap and slide the touch screen to left/right to view the
previous/next picture.
3) Tap the icon
picture ford.
4) Tap the icon
Photo Browser Buttons Description:
Button Function Button Function
Zoom out Zoom in
Slideshow Menu
5) Tap the menu icon to select Share, Delete or more functions,
please check the figure as shown below:
5.1.4 Sound Recorder
In the application menu or on the desktop, tap the
into the sound recorder.
to return to the Gallery interface/ Flash
to view the picture information.
icon to enter
21
Page 22
1) Tap the record icon
stop recording.
2) Once you finish the recording, you will be asked if you want to
“Use this recording” or “Discard” the recording.
3) Recording playback: Use Explorer to find the Record folder on the
Internal Memory storage, select the recording to playback by tap on
it. For more details about playback please refer to 5.1.1 (Audio
Player).
5.1.5 Explorer
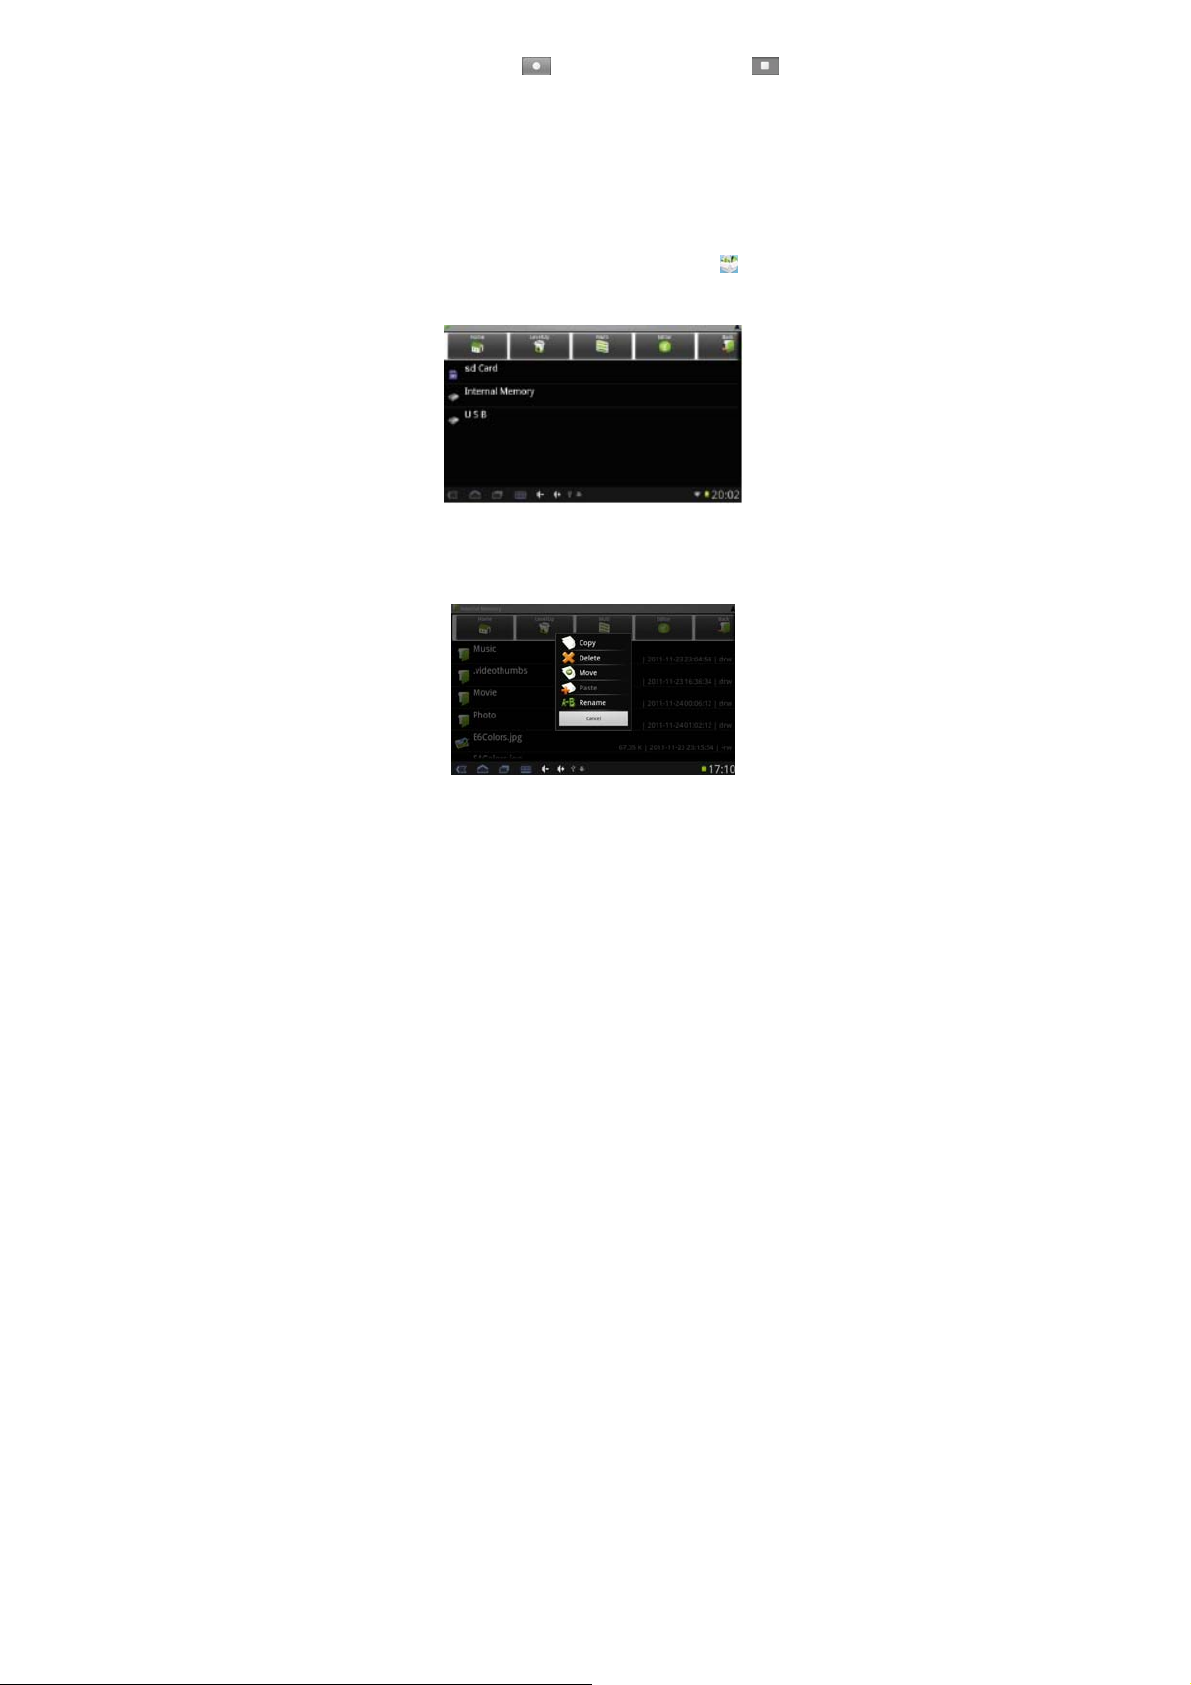
In the application menu or on the desktop, tap the
the file management Interface. Tap tf Card, Internal Memory or USB
to open their root directory folders and files.
to start recording, tap the icon to
icon to enter
1) In the file explorer interface, tap and hold down on the icon of a
file you want to manage.
2) A pop-up action menu, which includes Copy, Delete, Move, Paste,
Rename, New folder etc will appear as below:
3) Choose the action and finish the management by the prompts.
5.2 System Desktop 2 (E-Book)
The device supports E-Book formats: TXT, LRC, PDF, HTM, EPUB,
etc., supports automatic browsing, zooming, bookmarks, page etc.
22
Page 23
5.2.1 Local E-Book Reader
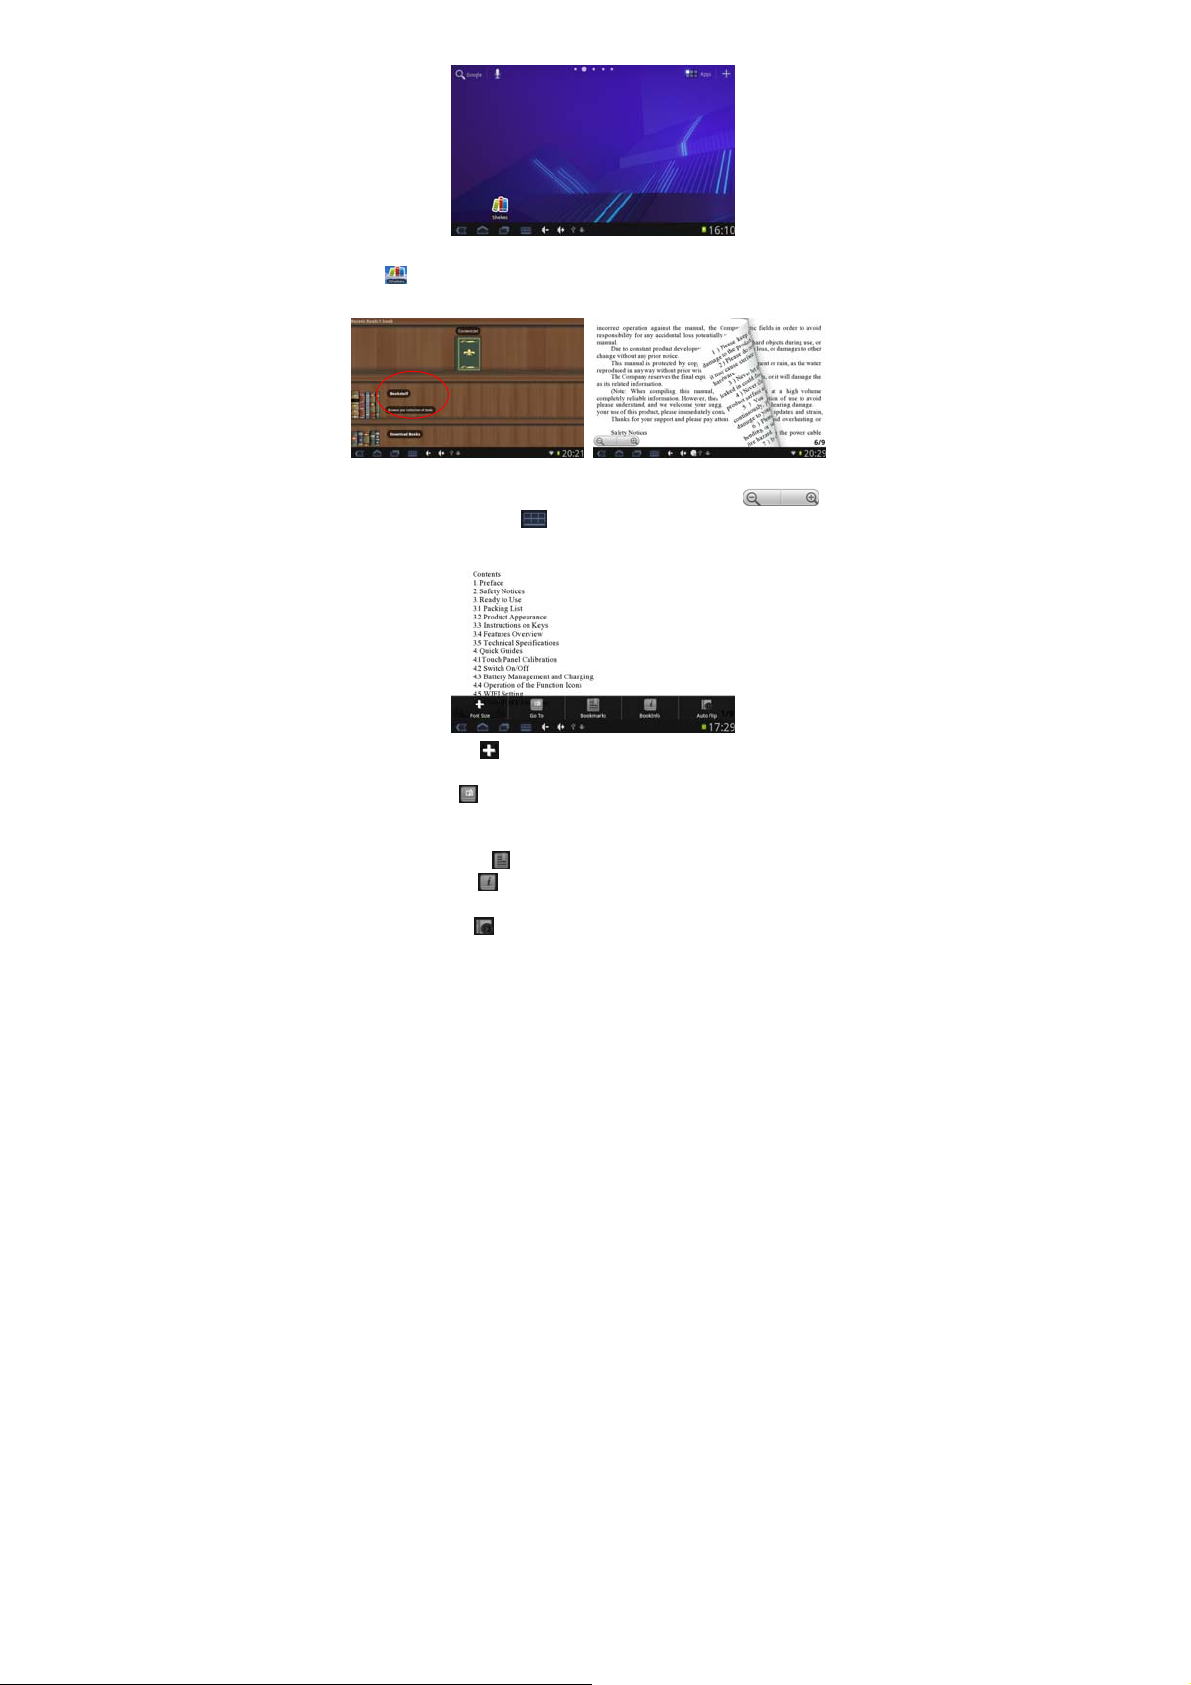
Tap
on the desktop, to enter into the E-Book application. T ap the
“Bookshelf” to open the folder and select the E-Book file to read.
1) Tap and slide the page to left/right side to flip over.
2) Zoom in/out the page by using the fingers or the icon
3) Tap the menu icon on the bottom of the screen to check
more functions as shown below:
4) Font Size: Tap
XL and XXL.
5) Go To: Tap
pages you want then click confirm so that it will automatically jump to
the specified page.
6) Bookmarks: Tap
7) Book info: Tap
author.
8) Auto Flip: T ap
to set the font size, available font sizes: S, M, L,
then a prompt box pops up, input the number o f
to add, delete display the bookmarks.
view the book name and information about the
to set up the auto flip time or manual flip.
.
23
Page 24
5.2.2 Online E-Book Reader
Note: For the online E-Book reader function, the device must be
connected to a Wireless or 3G Network (for details refer to chapter
4.4 & 4.5).
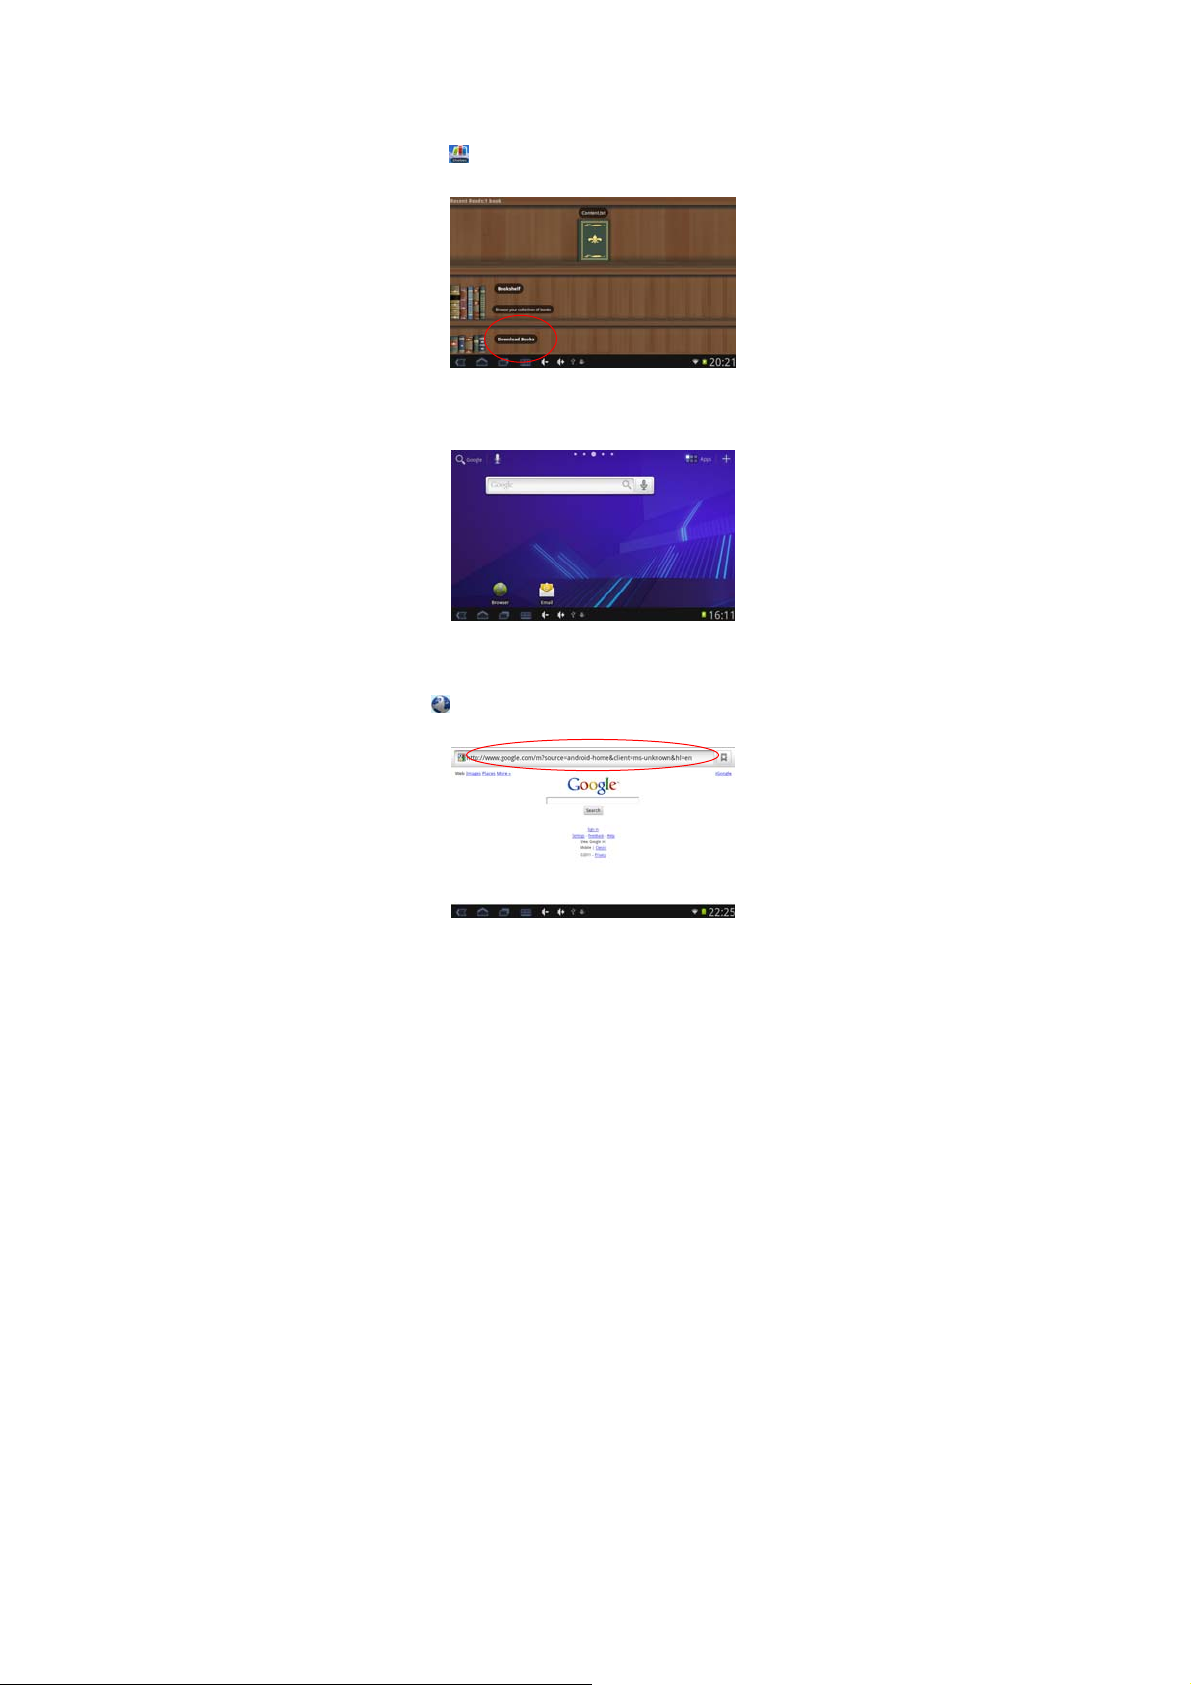
Tap the icon
interface as below:
on the app menu or desktop to go to the E-Book
Select the “Download Books” to download online books by the
prompts.
5.3 Desktop System 3 (Network Function)
5.3.1 Web Browser
Note: For the Web Browser function, the device must be connected
to a Wireless or 3G Network (for details refer to chapter 4.4 & 4.5).
1) Tap the
Browser interface as below:
icon on the app menu or desktop to enter to the Web
2) Tap the address bar and input the website address for the web
24
Page 25
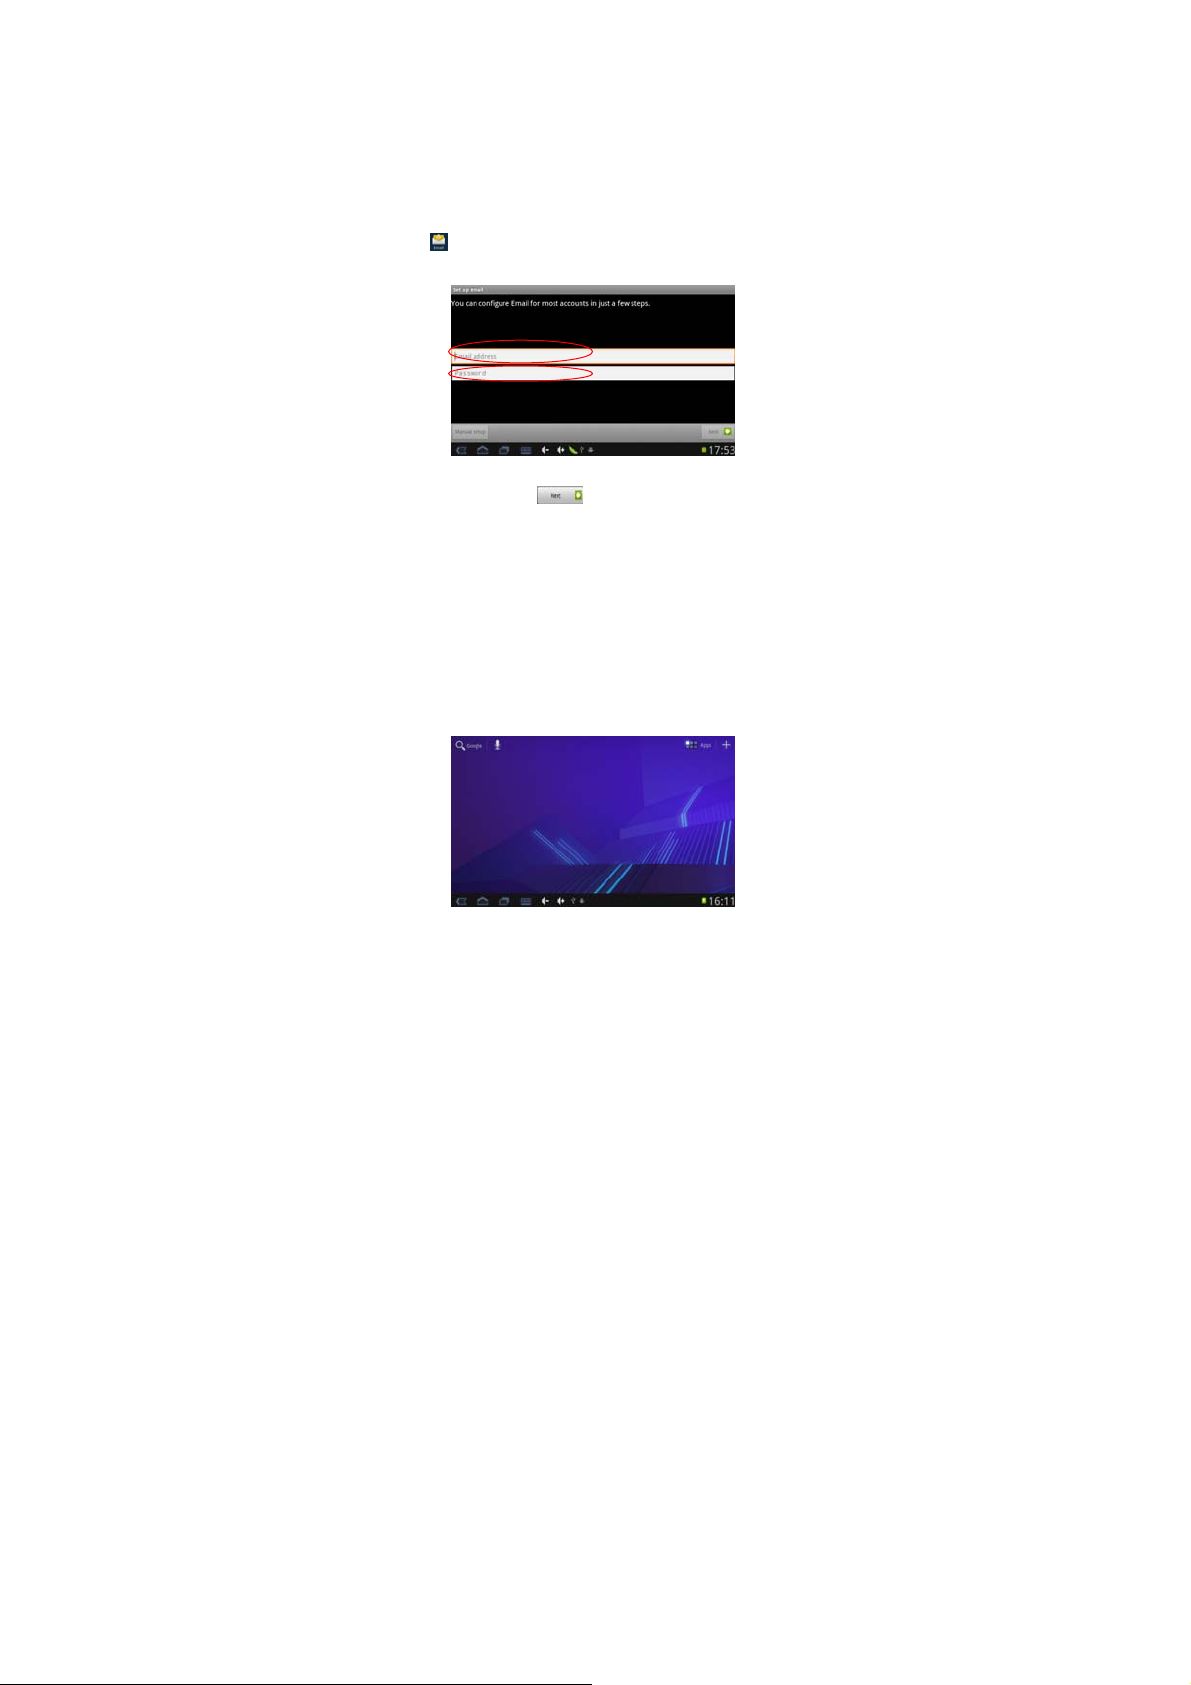
you would like to view by using the popup keyboards and then click
“Go”.
Note: The Web Browser for this device is adopted the popular
third-party Android browser application; please follow the prompts
and standard operating mode to operate.
5.3.2 Email
Note: For the Email function, the device must be connected to a
Wireless or 3G Network (for details refer to chapter 4.4 & 4.5).
1) Tap the
interface as below:
Input the correct Email address Password by using the popup
keyboards and then click “
Note: The Email Icon for this device is adopted the popular
third-party Android Email application; please follow the prompts and
standard operating mode to use it.
5.4 Desktop System 4 (Games)
You can download and install Android games from the Market place
or Internet as you want, and then move the game icons to this
desktop.
Tap the relevant game icon on the app menu or desktop to enter the
game interface, you can play the game by following the instructions
on the display.
icon on the app menu or desktop to enter to the Email
”.
5.5 Desktop System 5 (Other Functions)
25
Page 26
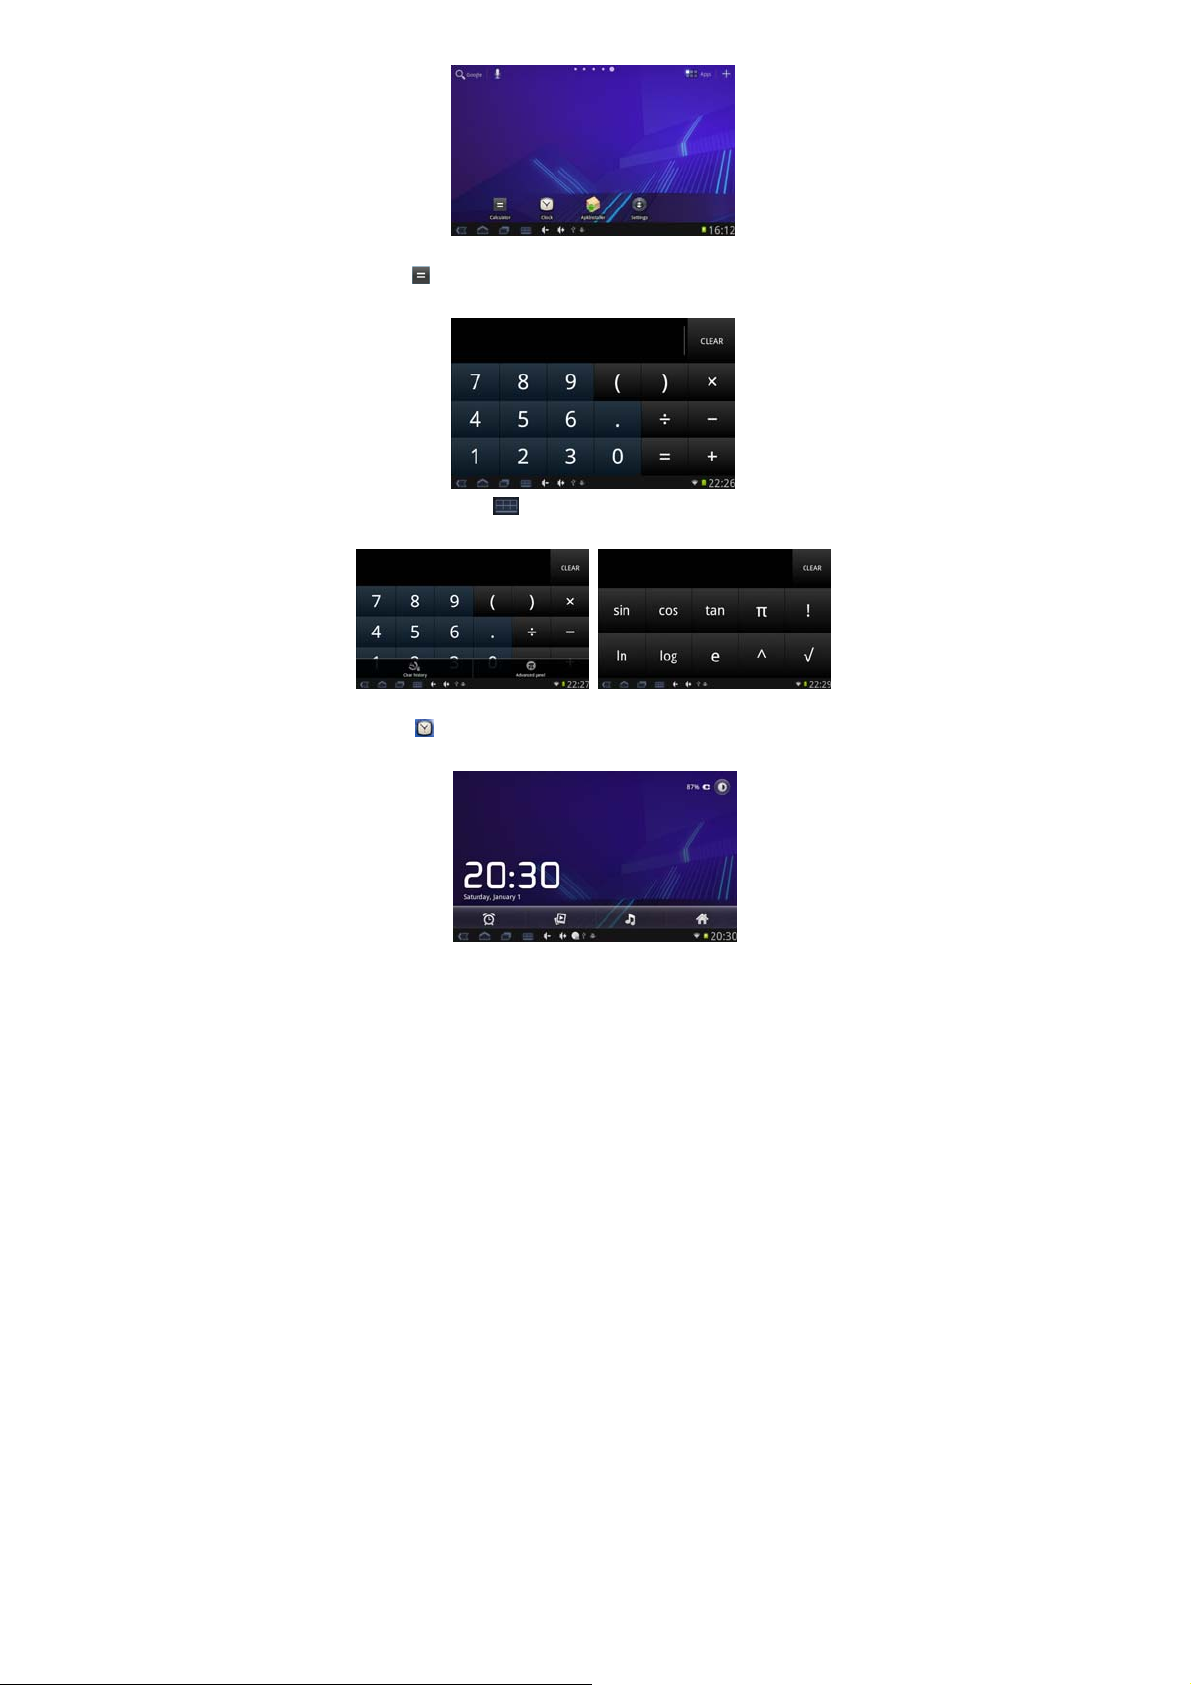
5.5.1 Calculator
Tap the
function as below:
Tap the menu icon
functions as shown below:
5.5.2 Clock
Tap the
function as below:
icon on the app menu or desktop to open the Calculator
on the bottom of the screen to check more
icon on the app menu or desktop to open the Clock
26
Page 27
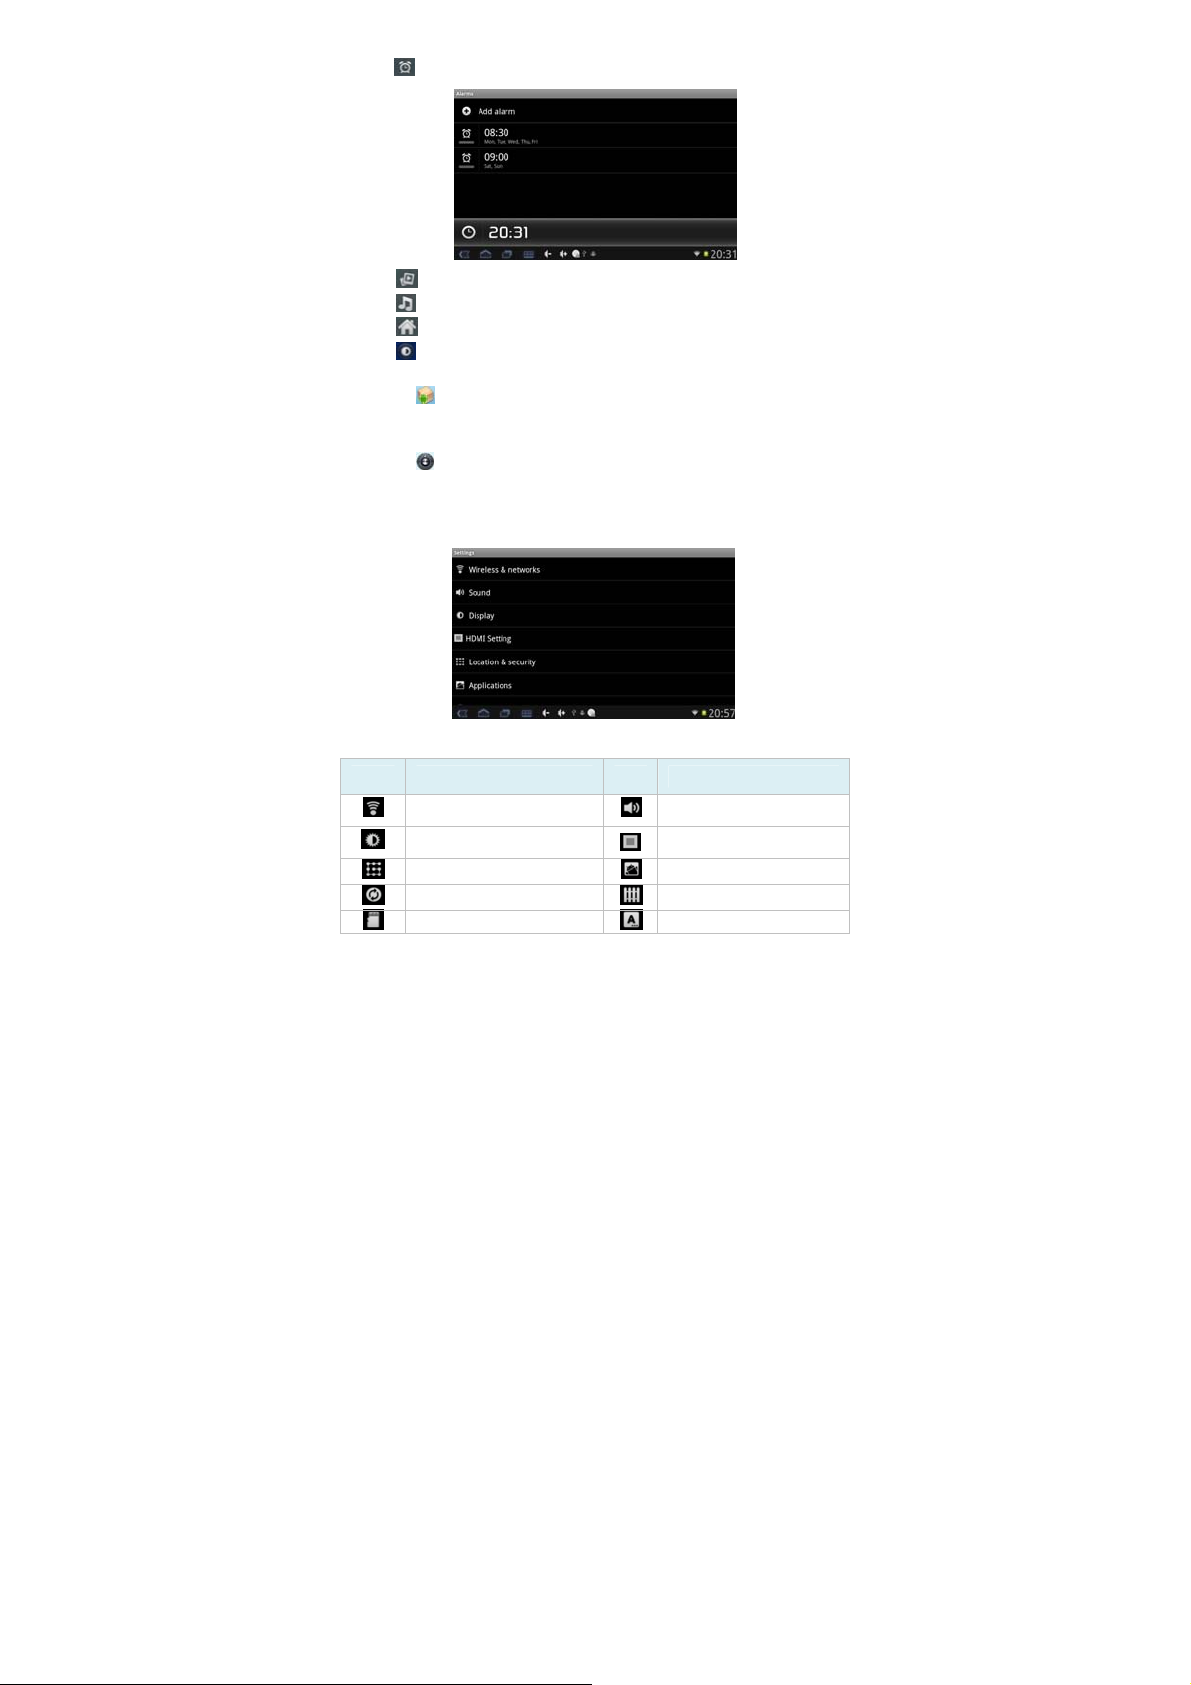
- Tap
- Tap
- Tap
- Tap to return the Main interface.
- Tap
5.5.3 APK Installer
Tap the
Installer interface, for detail refers to Chapter 4.10.
5.5.4 Device Settings
Tap the
Installer interface, you can set wireless and network, sound and
backlight, location and safety, application, etc. Slide on the screen to
page up/down and view more setting options.
to set the alarm clocks.
to enter the Photo Browser.
to enter the Audio Player.
to adjust the backlight.
icon on the app menu or desktop to open the APK
icon on the app menu or desktop to open the APK
Setting icons description:
Icon Description Icon Description
Wireless & networks Sound
Display HDMI
Location & security Applications
Accounts & Sync Privacy
Storage Language & keyboard
27
Page 28
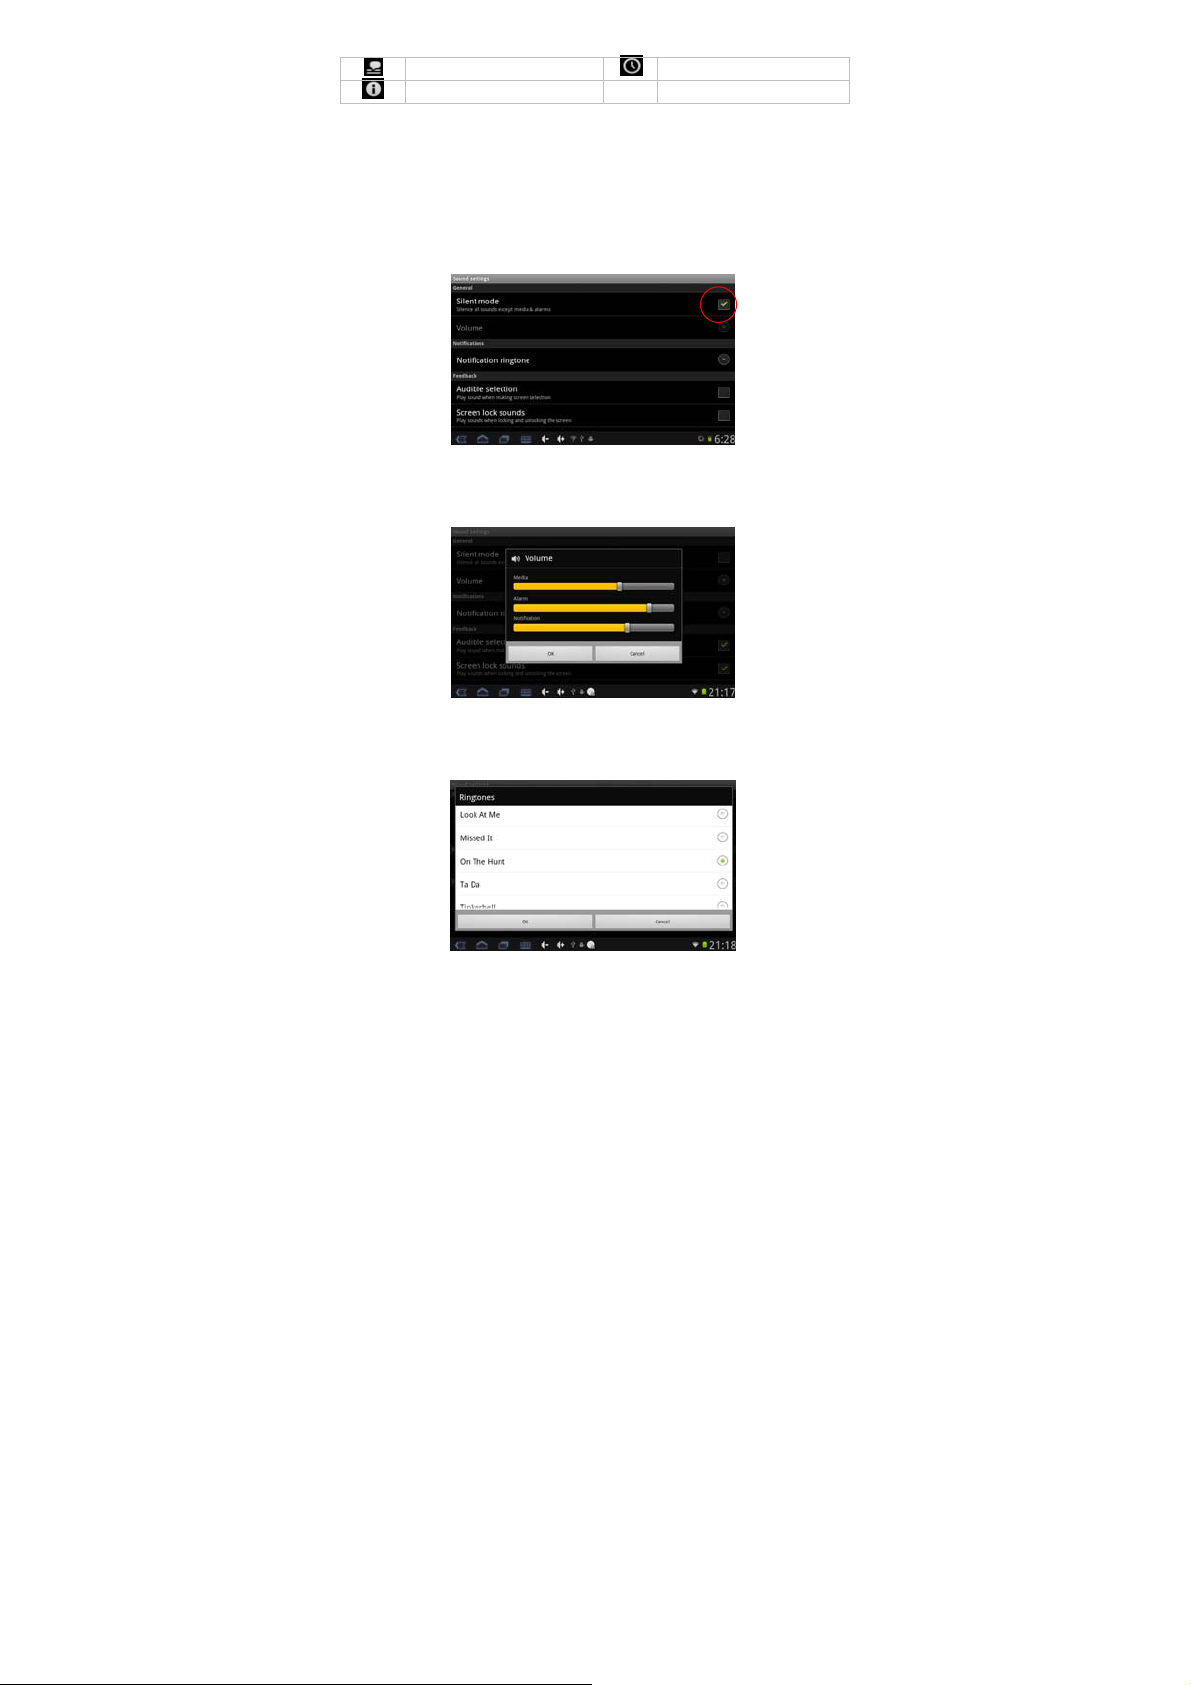
Voice input & output Date & time
About MID
5.5.4.1 Wireless and network
For detail refer to Chapter 4.4 WIFI settings.
5.5.4.2 Sound
Tap “Sound “to enter the relevant settings interface.
1) Silent Mode
Tick the box behind “Silent Mode” to turn off all system sounds
except media and alarms.
2) Volume
Tap “Volume” to adjust the volume of Ringtone, Media, Alarm and
Notification, and tap “OK” to finish.
3) Notification Ringtone
Tap “Notification Ringtone“ to choose any of the default ringtones,
and tap “OK” to finish.
28
Page 29
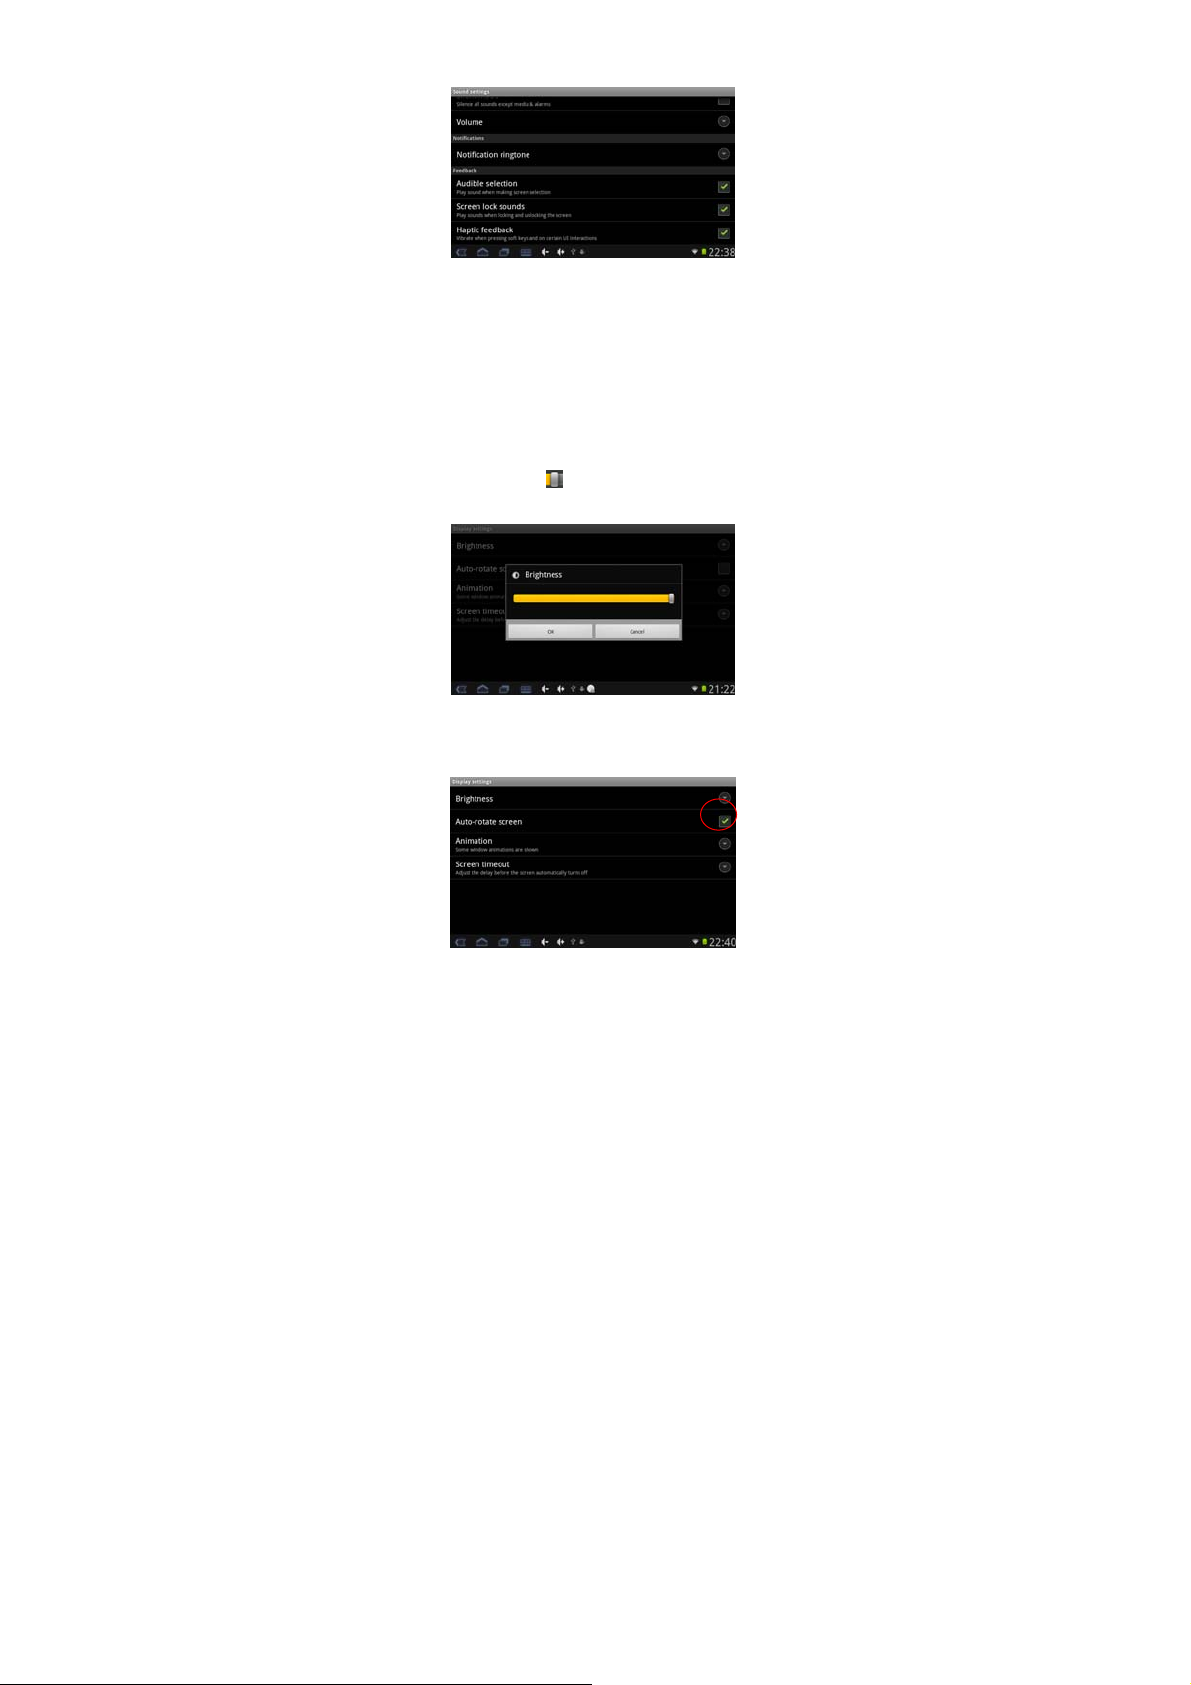
4) Feedback
- Audible selection: Select to play sound when making screen
selection.
- Screen lock sounds: Select to play sounds when locking and
unlocking the screen.
- Haptic feedback: Select to vibrate when pressing soft keys and on
certain UI interactions.
5.5.4.3 Display
Tap “Display “to enter the relevant settings interface.
1) Brightness
Tap “Brightness” and drag
to finish setting.
to adjust display brightness, tap “OK”
2) Auto-rotate screen
Tick the box behind the “Auto-rotate screen”, the display screen will
change the direction automatically when it is rotated.
29
Page 30
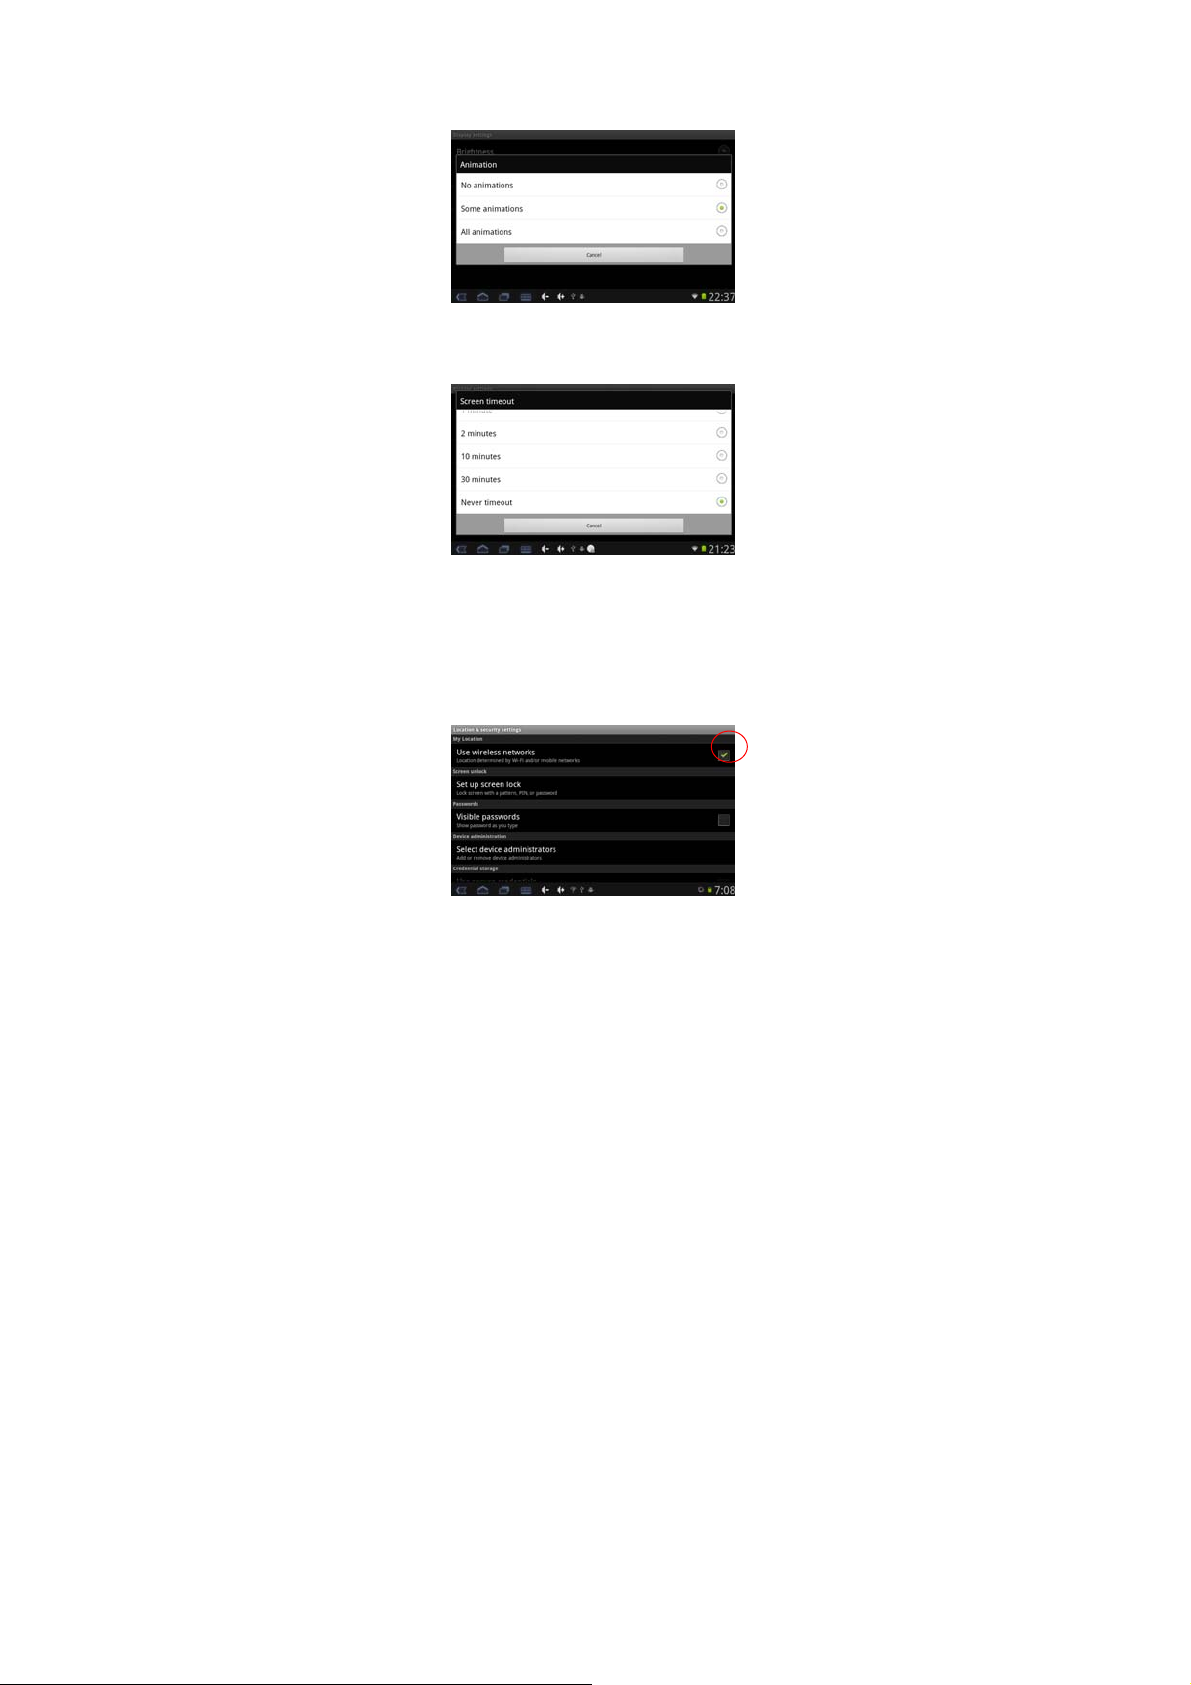
3) Animation
Tap to select display “No animation”. “Some animation”, “All
animation”.
4) Screen timeout
Tap to adjust the delay time before the screen automatically turns
off.
5.5.4.4 HD (optional)
For detail refer to Chapter4.7 HD Function
5.5.4.5 Location and security setting
Tap “Location and Security” to enter the relevant settings interface.
1) My Location
Tick the box behind the “Use wireless networks”, the location will be
determined by Wi-Fi and/or mobile networks.
2) Screen unlock
Tap “Set up screen lock” to select screen unlocked with none, a
30
Page 31
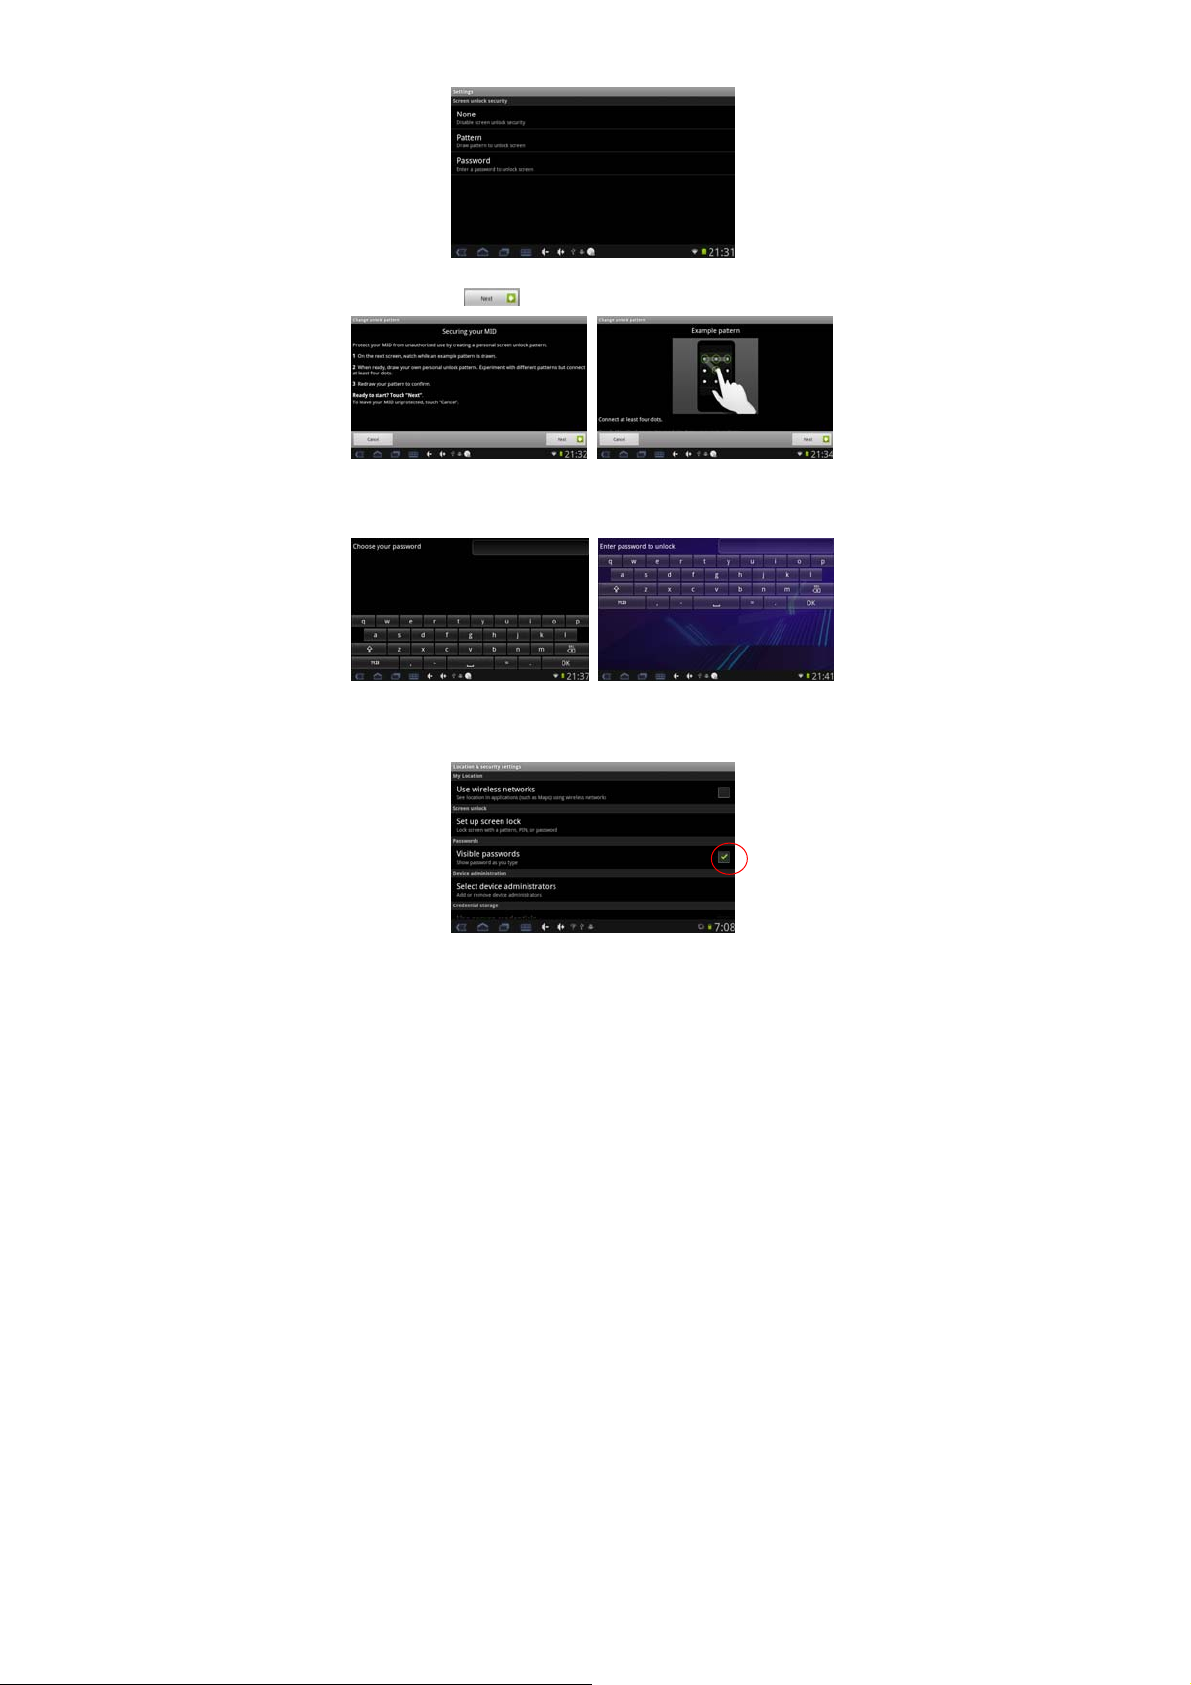
pattern, or password.
Unlock screen by a pattern: Draw the unlock pattern with a minimum
of 4 points, tap
to compete the setting.
Unlock screen by a password: Input a password with 4 characters,
tap “OK” to compete the setting. The device will prompt you to input
the correct password when unlocking.
3) Visible password
Tick the box behind the “Visible password”, the system will show the
all the passwords as you type.
31
Page 32
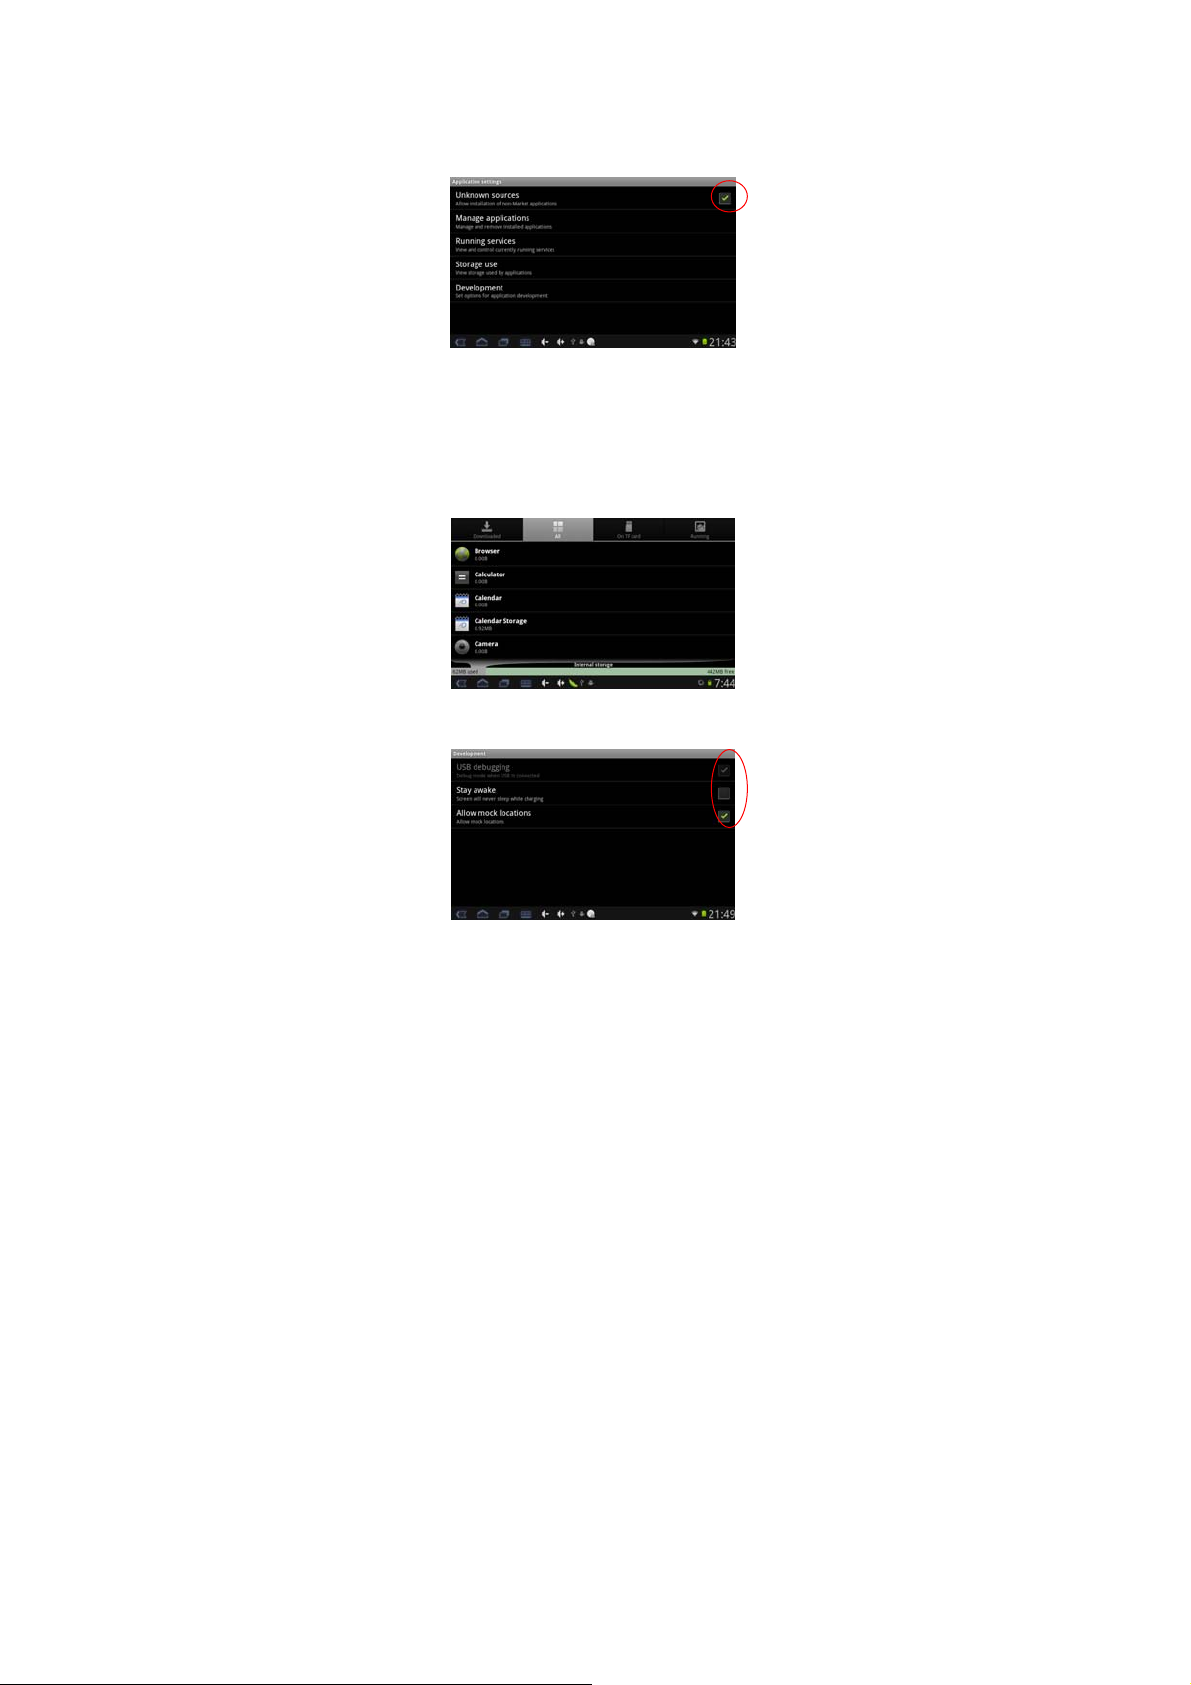
5.5.4.6 Application setting
Tap “Application“ to enter the relevant settings interface:
1) Unknown sources:
Tick the box behind the “Unknown sources”, the system will allow
installation of non-Market applications..
2) Manage applications
Tap “Manage applications“ to view and manage Downloaded, All and
On Micro sd Card and Running applications.
3) Running services
Tap “Running service“ to view and control the running services.
4) Storage use
Tap “Storage use” to view storage used by applications
4) Development
Tap to set USB debugging, Stay awake and Allow mock locations.
USB debugging: Tick the box behind it to set debug mode when
32
Page 33
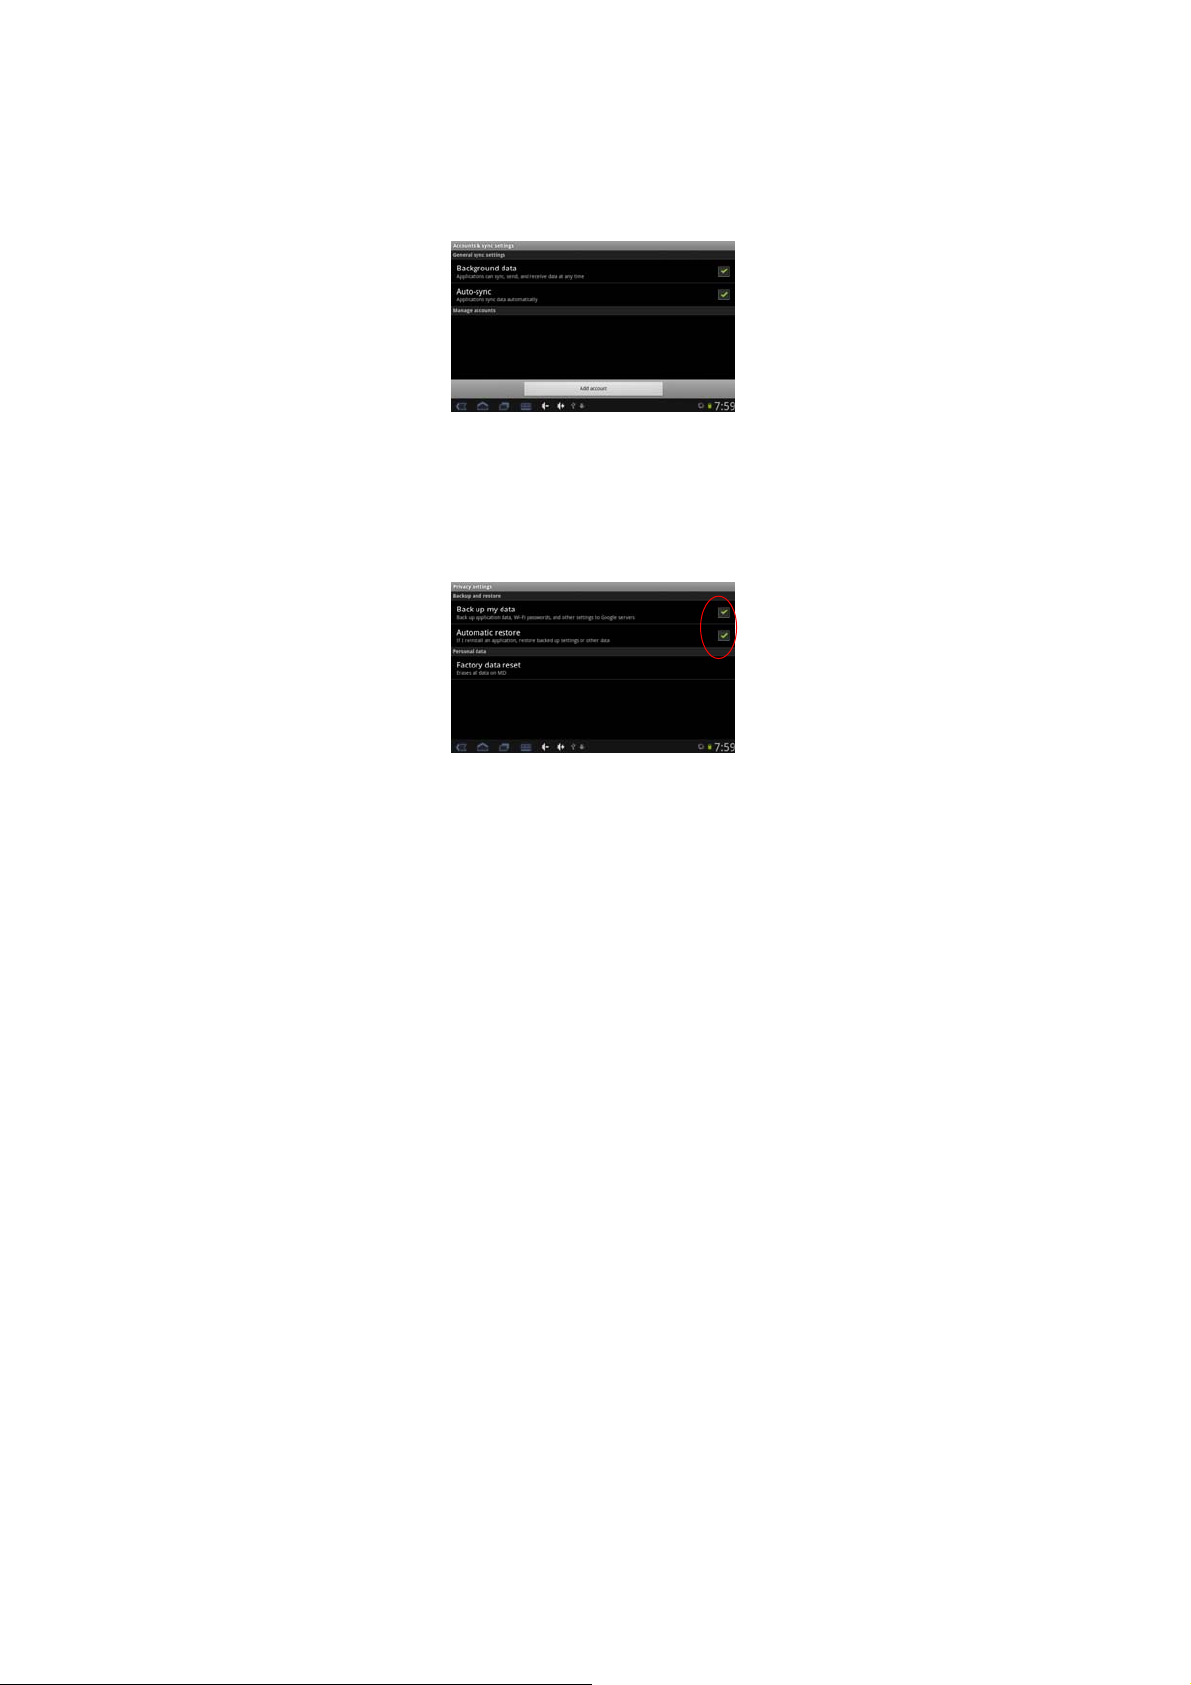
USB is connected.
Stay awake: Tick the box behind it to set the screen will never sleep
while charging.
Allow mock locations: Tick the box behind it to allow mock locations.
5.5.4.7 Accounts and sync
You are recommended to use factory defaults in the “Accounts and
sync” setting interface, or any change will make some functions not
available.
5.5.4.8 Privacy
Tap “Privacy” to enter into relevant setting interface.
1) Backup and restore
Tick the box behind the “back up my data” to back up application
data, Wi-Fi passwords, and other settings to Google servers.
Tick the box behind the “Automatic restore”, the system will restore
backed up settings or other data if it reinstalls an application.
2) Personal data
Tap “Factory data reset” to erases all data on the device.
The factory date reset password is 1954 .
33
Page 34
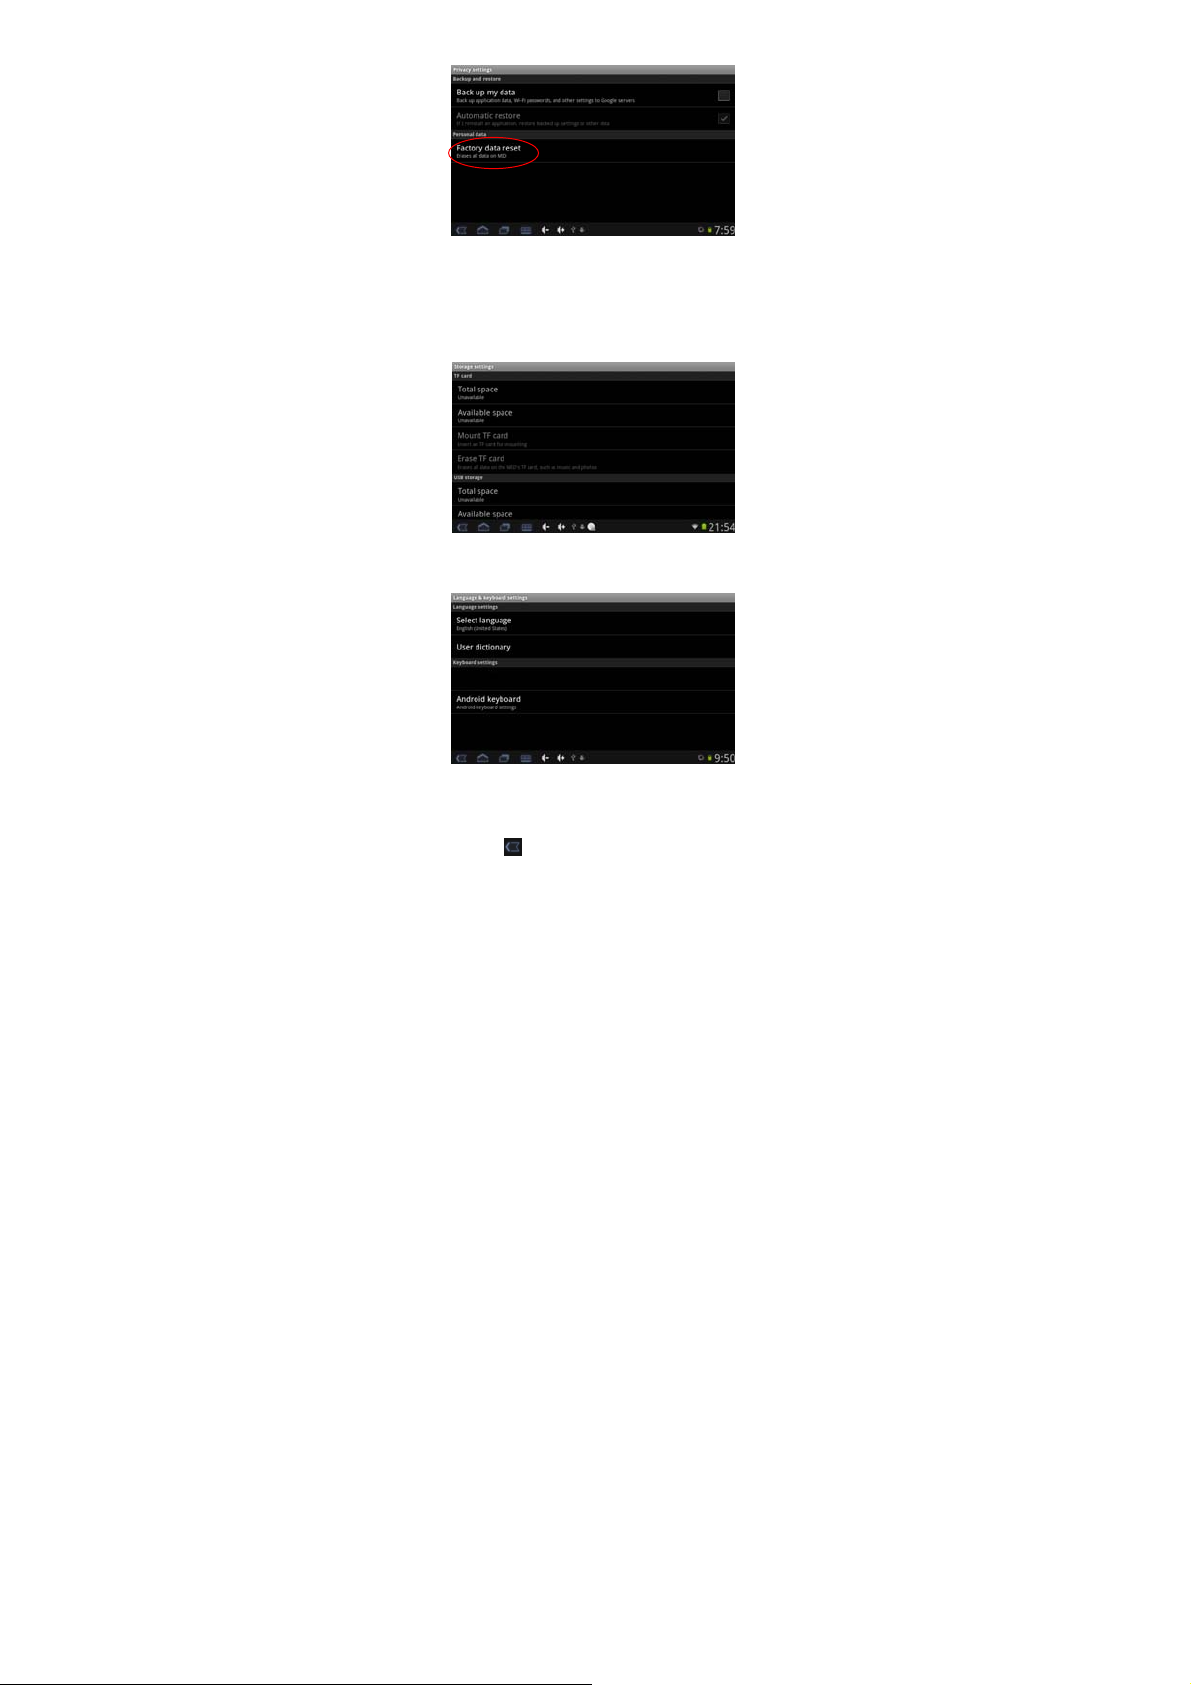
Note: Please back up all your data of the internal memory before
reset the device, or you will lose all the data.
5.5.4.9 Storage
Tap the “Storage” to check the status of Micro sd card, USB storage,
NAND flash and internal storage.
5.5.4.10 Language and keyboard
Tap “Language & Keyboard“ to enter the following settings interface:
1) Language settings
The device supports multi-languages. You can select an operation
interface of different languages according to your needs. Select a
language option, tap
to confirm and go back.
34
Page 35
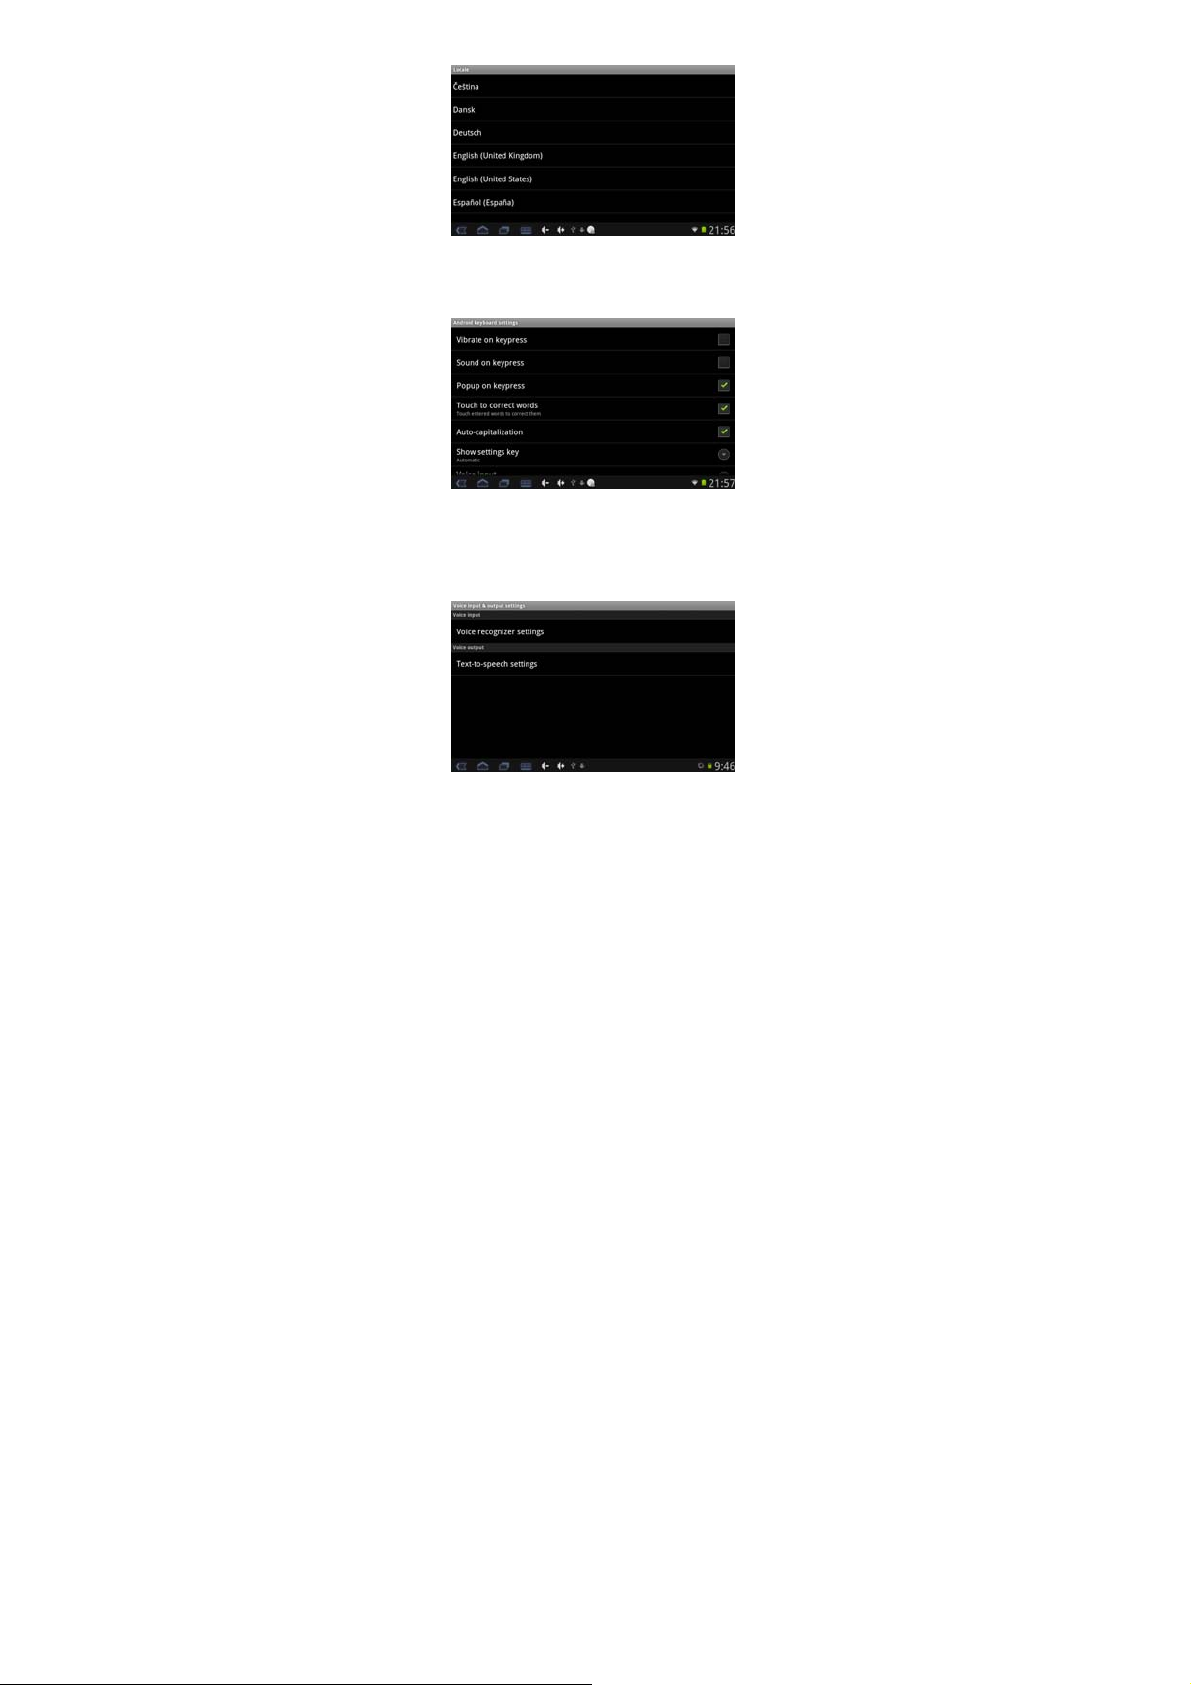
2) Keyboard settings
Tap “Android keyboard” to set up the onscreen keyboard input
method.
5.5.4.11 Voice input and output
Tap the “Voice input & output” to enter the following settings
interface, you can set up the voice recognizer and text-to-speech as
you need.
5.5.4.12 Date and time setting
Tap “Date & time” to enter the relevant setting interface:
1) Automatic
Select “Automatic” to set the date and time automatically by using
network-provided values.
35
Page 36
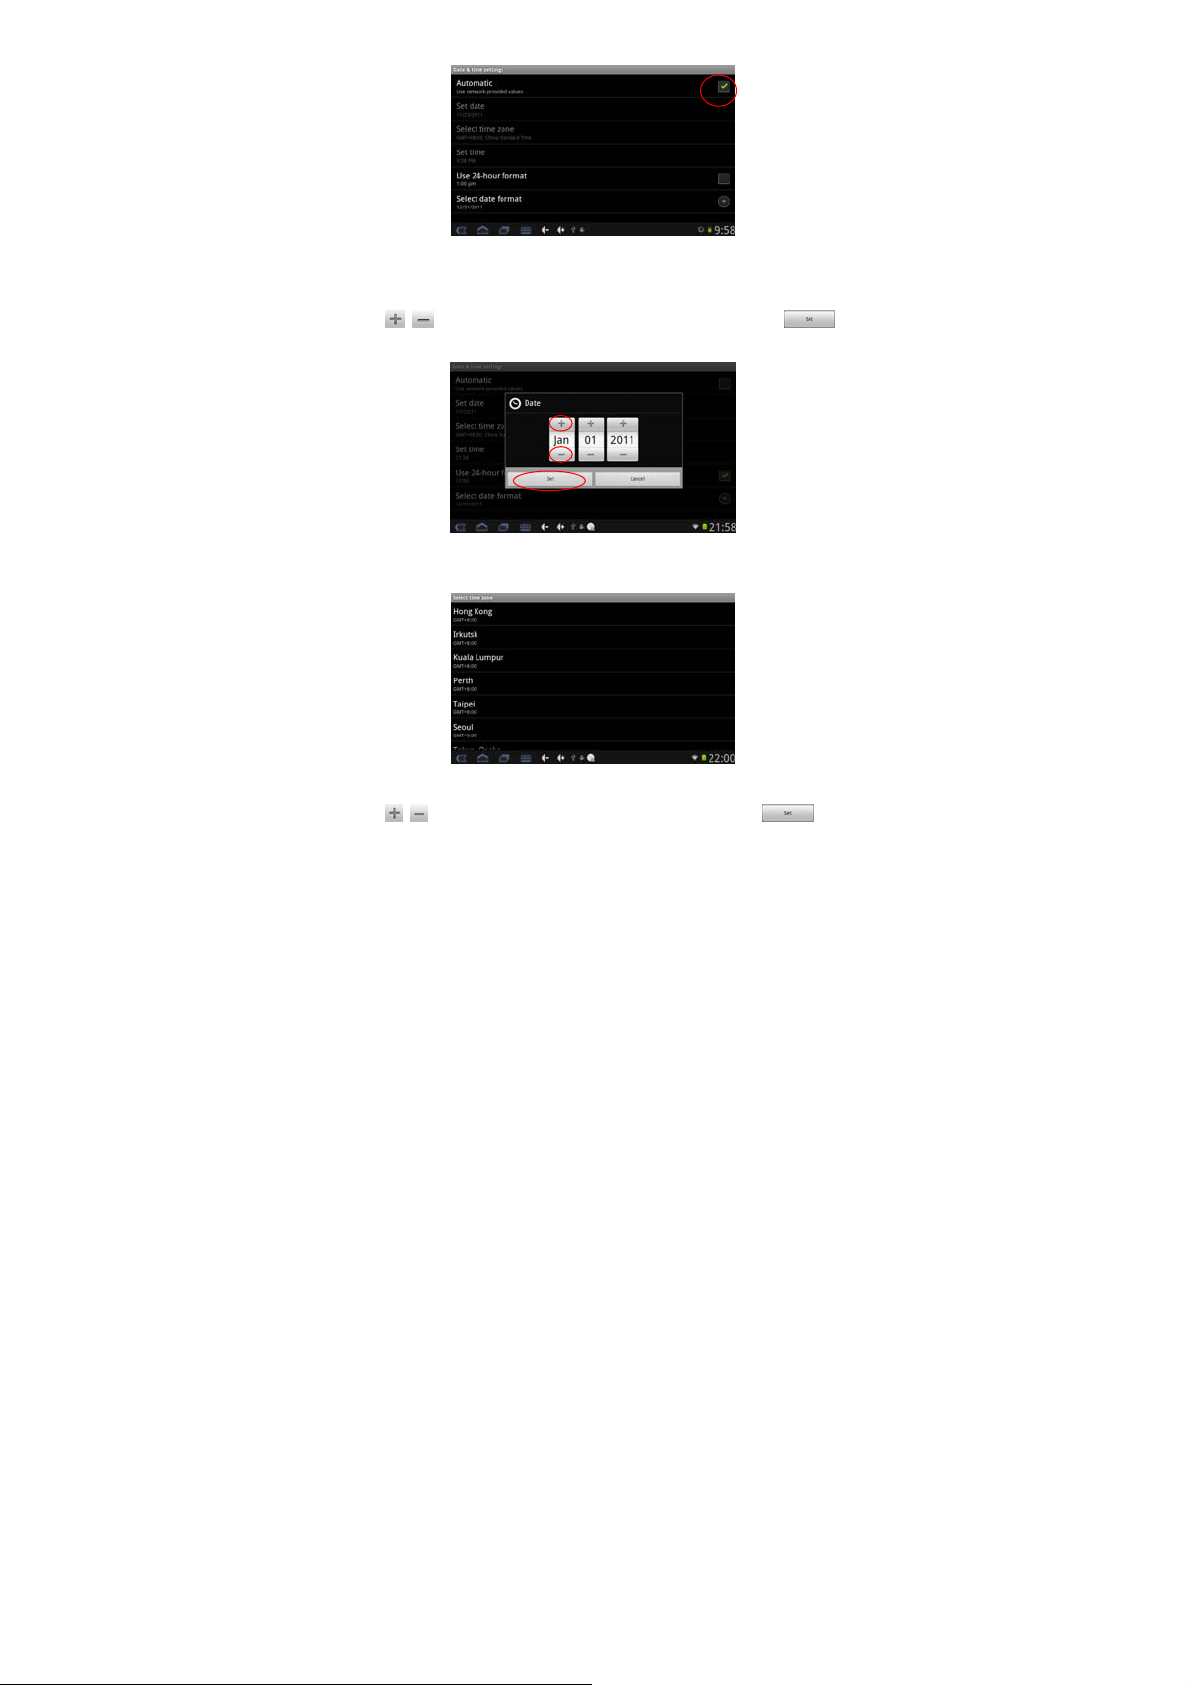
Untick the box behind the “Automatic” to modify the Date, Time Zone
& Time by manual.
2) Set date
Tap
to select Day, Month and Year, and tap the icon
to finish the setting.
3) Select time zone
Tap to select the time zone that you are in.
4) Set time
to select hours and minutes, and tap the icon to
Tap
finish the setting.
36
Page 37
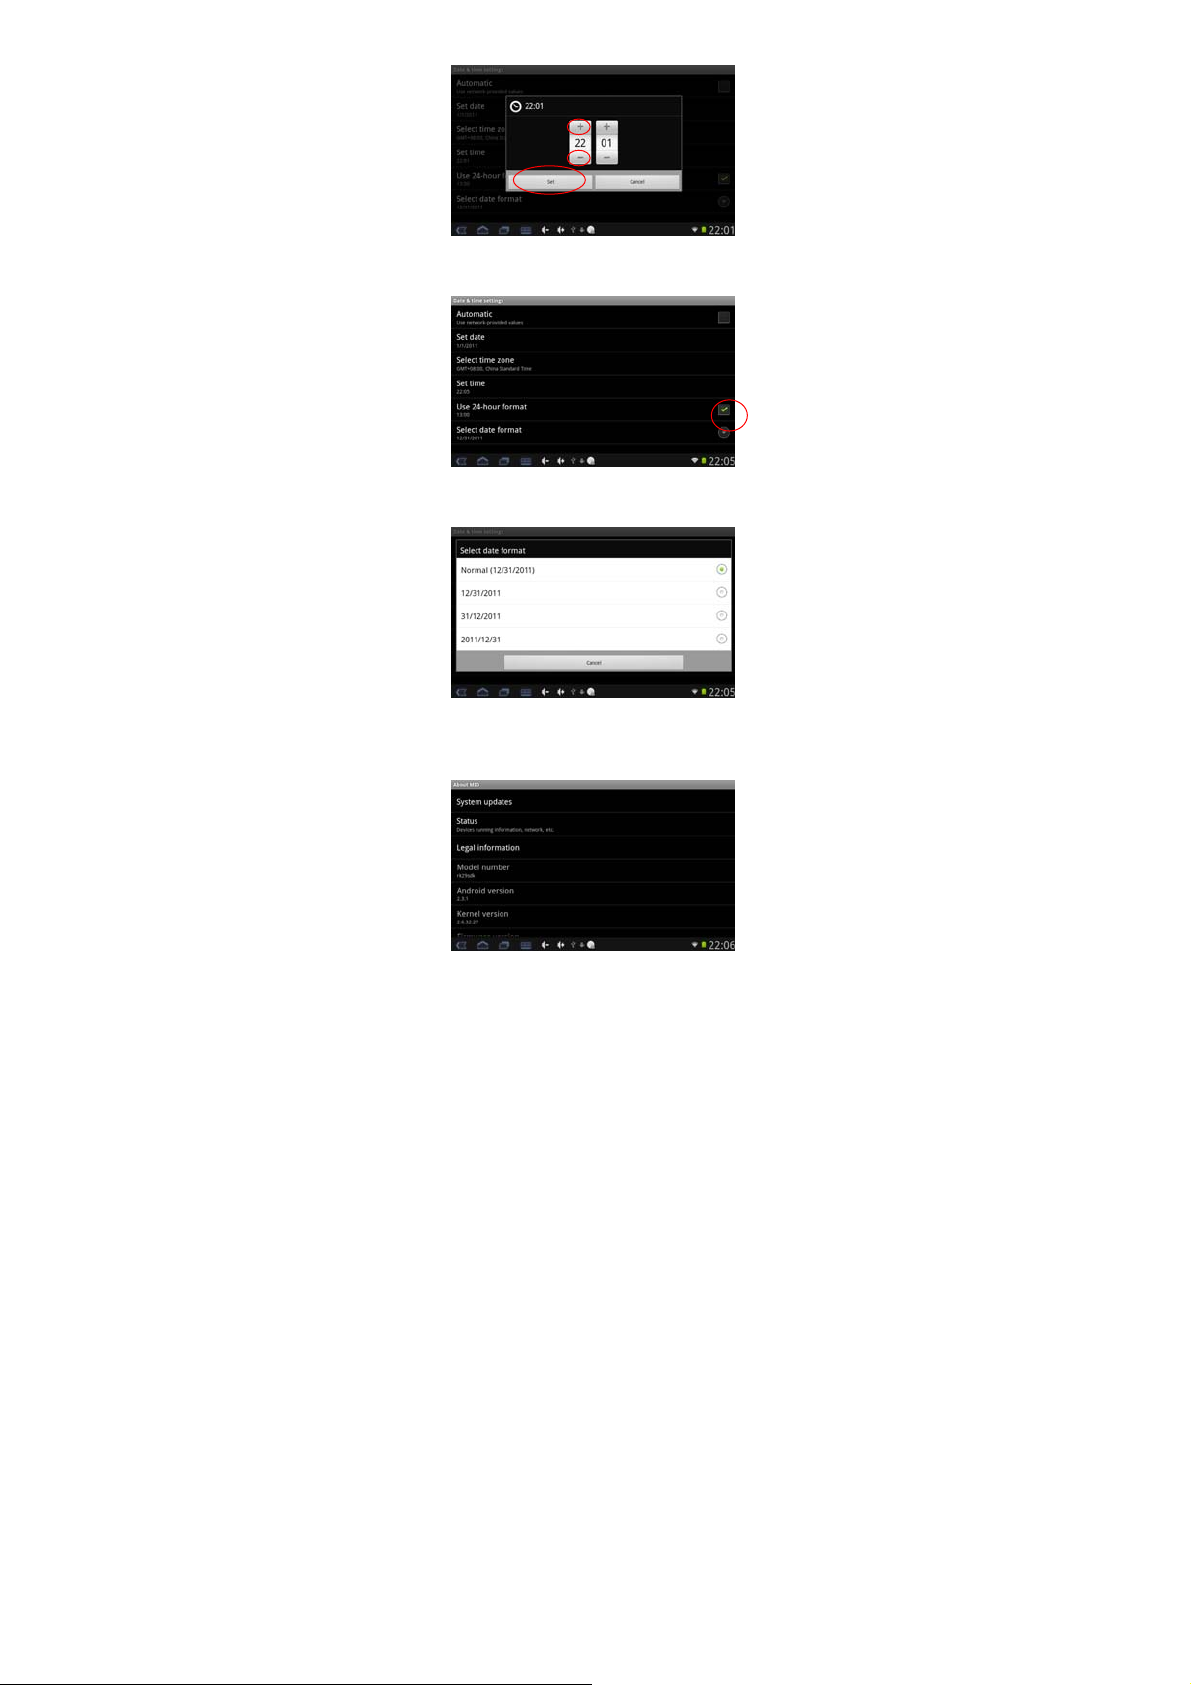
4) Use 24-hour format
Tap to set the system time showed by 24-hour format.
5) Select date format
Tap to select the date format.
5.5.4.13 About MID
Tap “About MID” to check System updates, Status and Legal
information as below:
37
Page 38
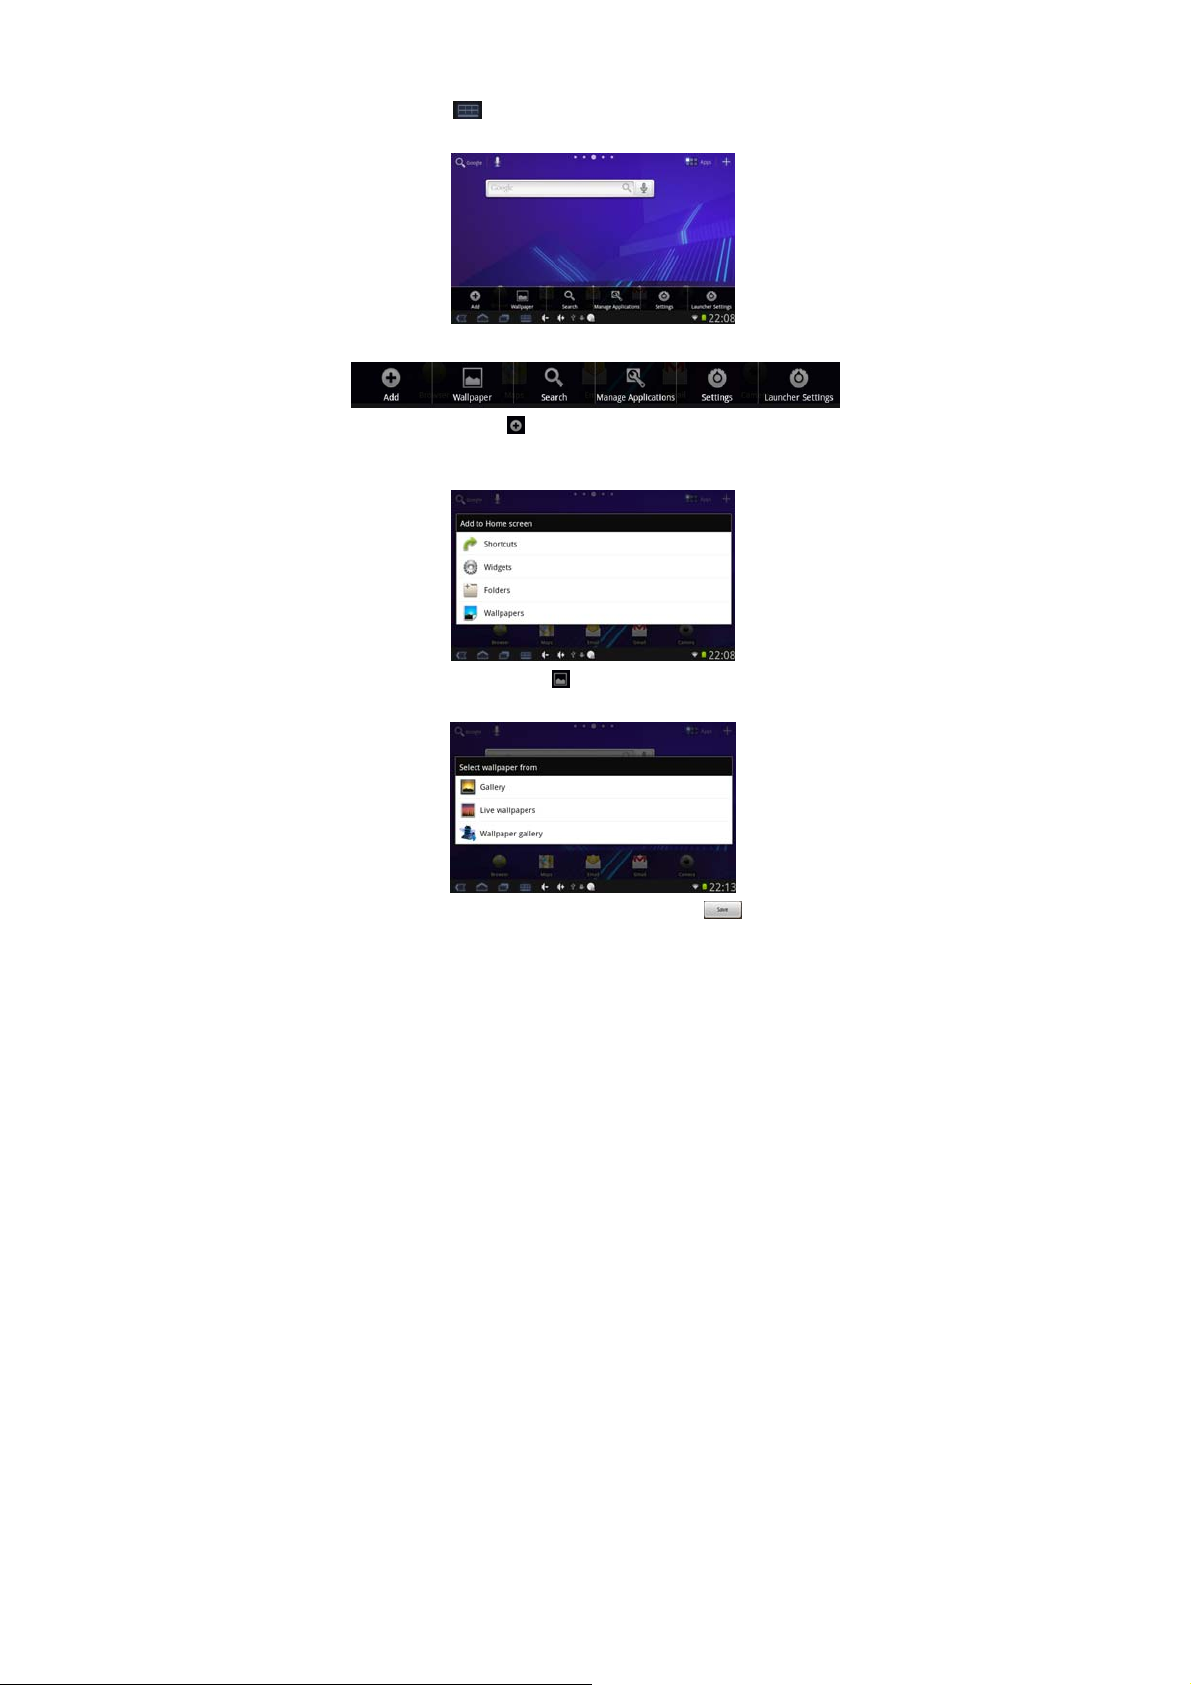
5.6 Desktop Function Icon and Setting
5.6.1 Desktop Function Icon
Tap the icon
desktop settings interface shown as below:
Shortcut Icons:
1) Add: Tap the icon
you can add the Shortcuts, Widgets, Folders or Wallpapers to the
home screen.
on the bottom of the screen to enter into the
to inter adding function interface as below,
2) Wallpaper: Tap the icon
Live wallpapers or Wallpaper gallery.
to select the wallpaper from Gallery,
Select the picture and the size as you want, tap to finish the
wallpaper setting.
38
Page 39
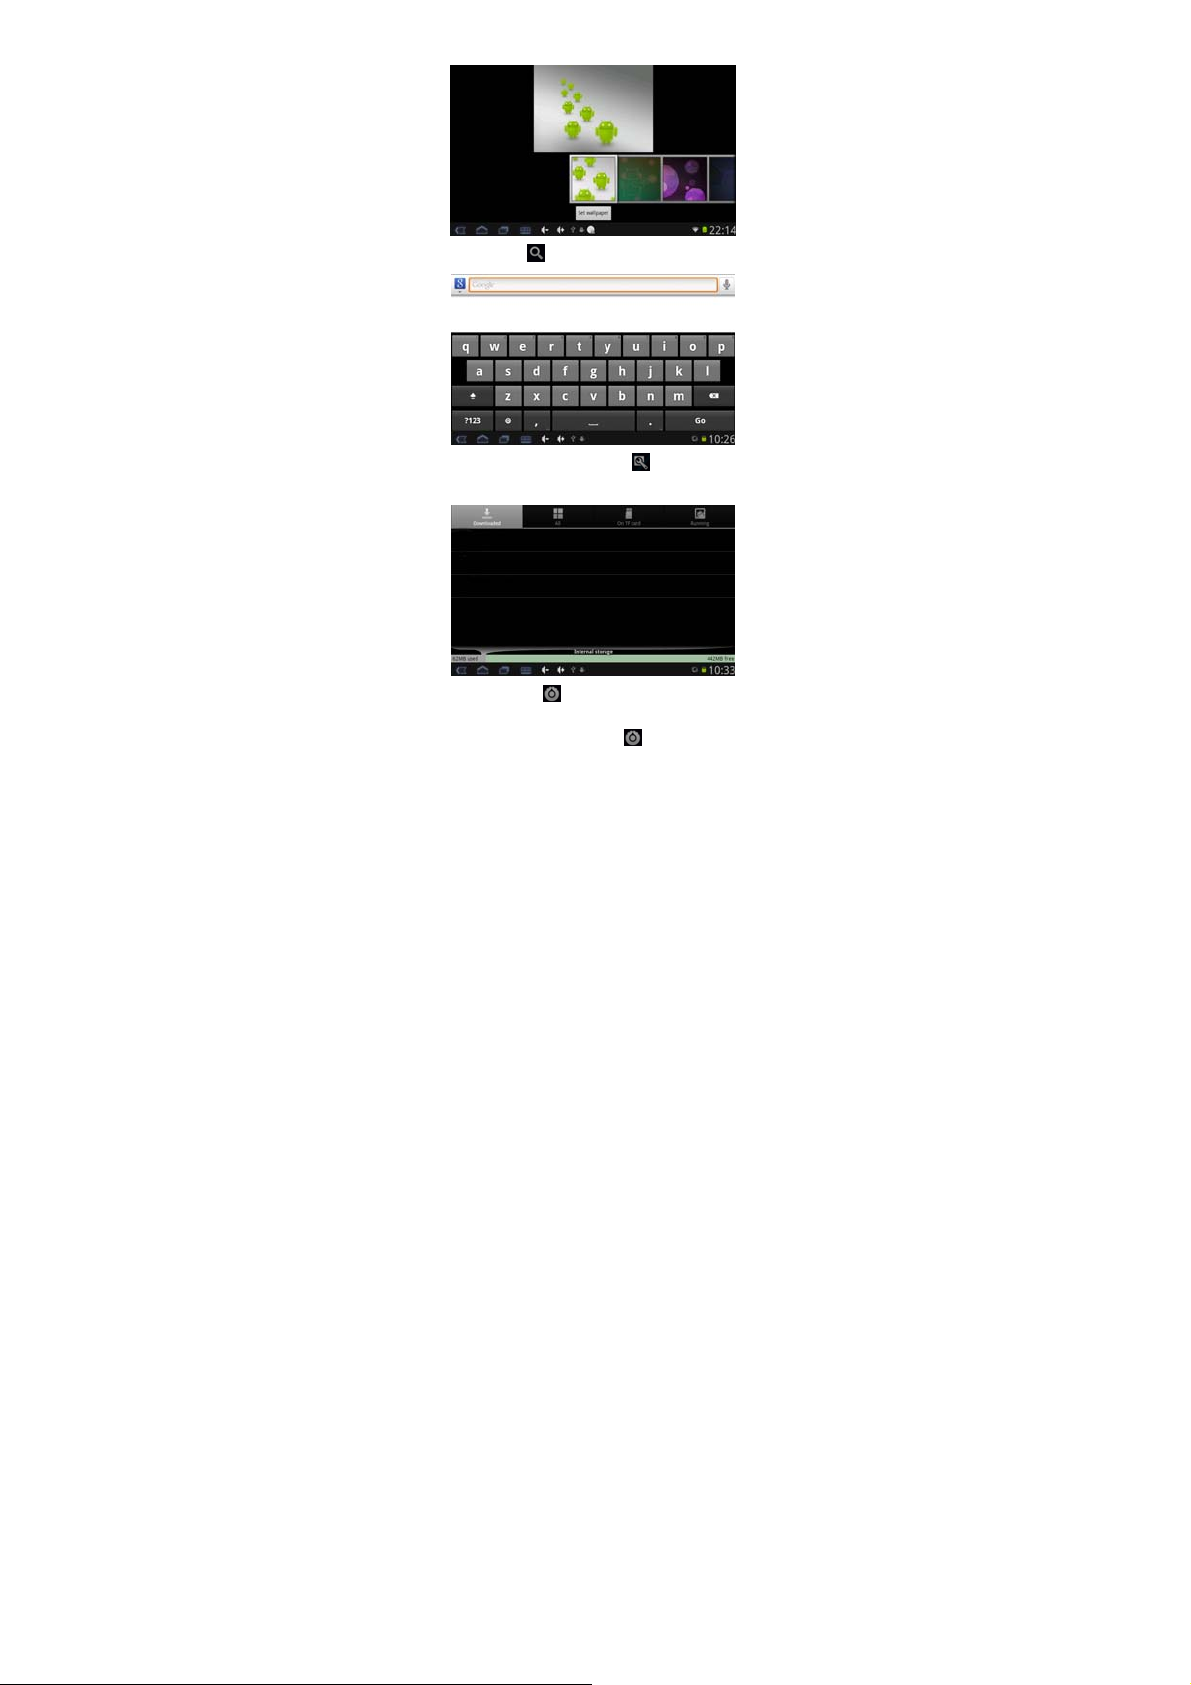
3) Search: Tap the icon
4) Manage Applications: T ap the icon
interface of the downloaded applications.
5) Settings: Tap the icon
for details refer to Chapter 5.5.4.
6) Launcher Settings: Tap the icon
settings interface as below. You are recommended to use factory
defaults in this setting, or any change will make some functions not
available.
to enter the Google Search.
to enter the management
to enter the system setting interface,
to enter the AlmostNexus
39
Page 40
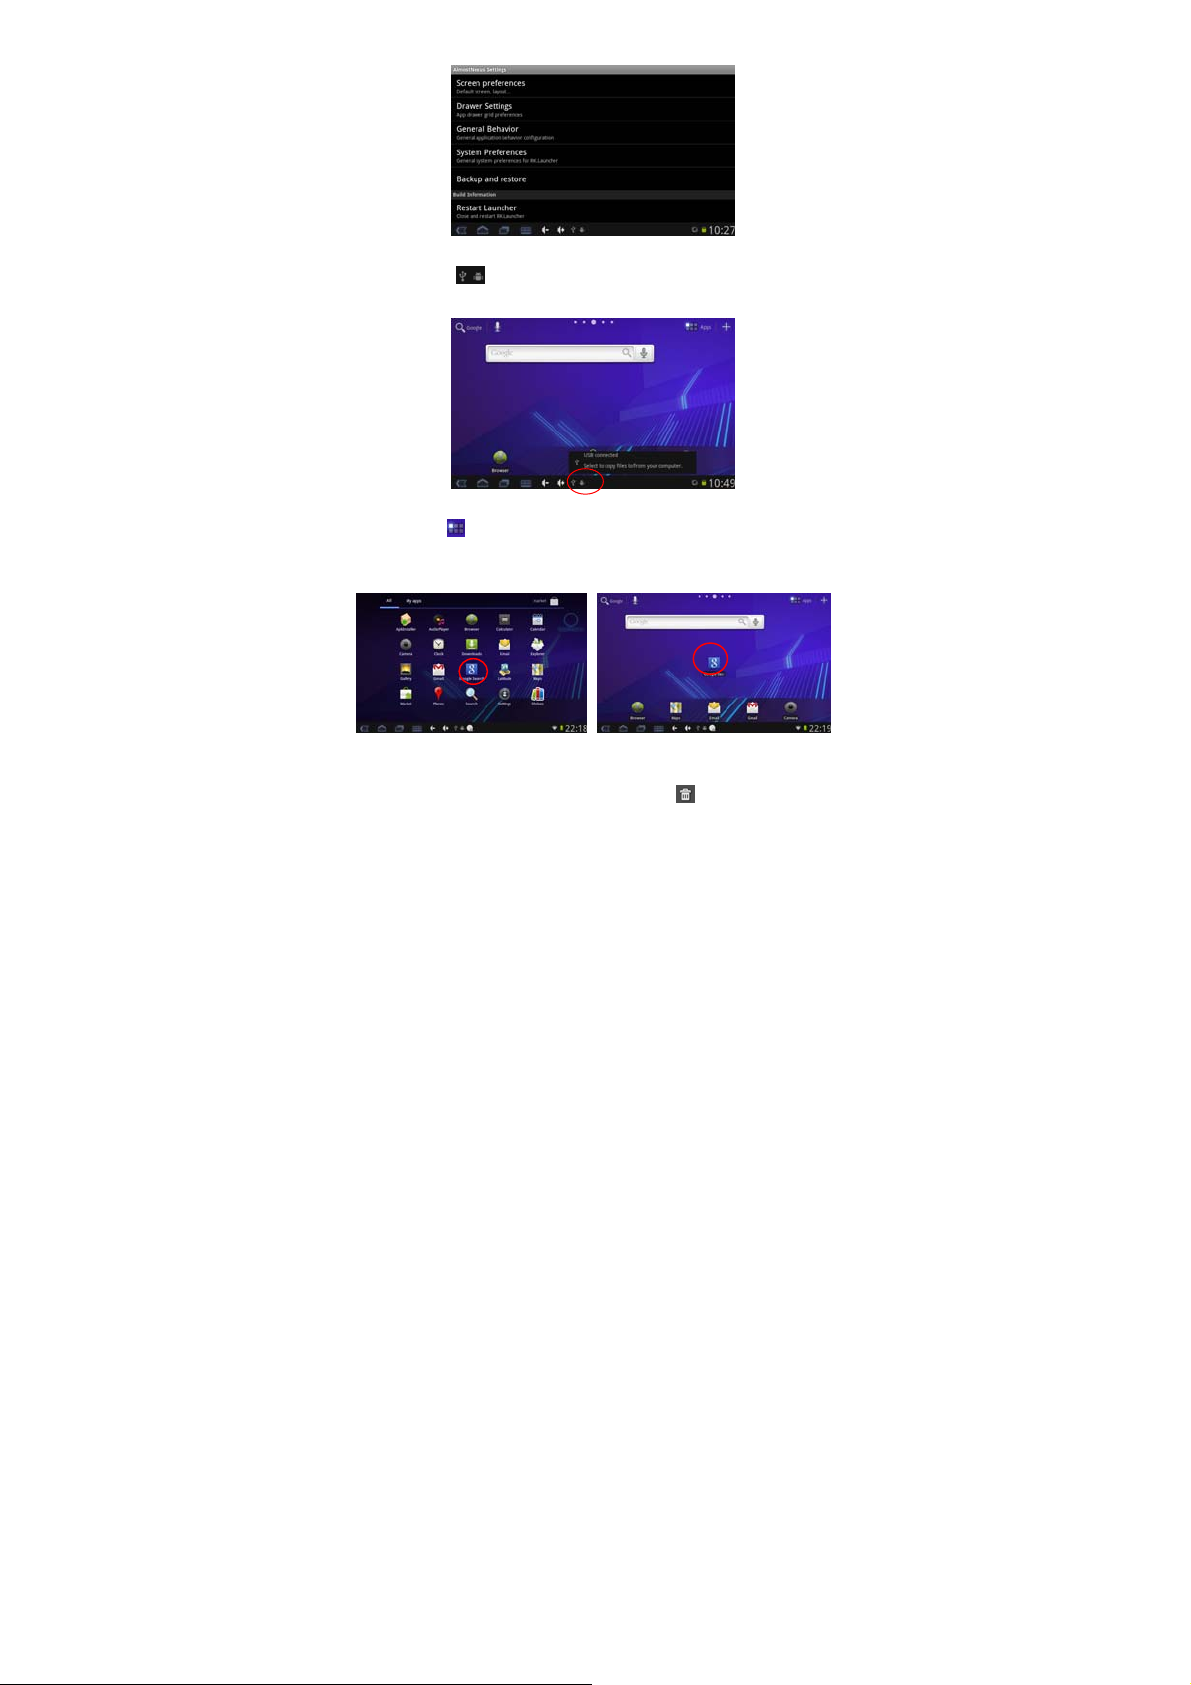
5.6.2 Desktop Notification
Tap the icons
the current notification status as below:
5.6.3 Add, Move, or Delete Desktop Icon
Tap the icon
drag the application icon to copy to the current desktop i.e. set the
shortcut on the desktop.
appeared on the bottom of the screen to check
on the desktop to enter the app menu list. Tap and
Long tap the application icon on the desktop to enter into
the editing mode and you can move the icon and set its location.
When you drag the icon to
the delete function, release the icon to delete it.
, it turns into
40
Page 41
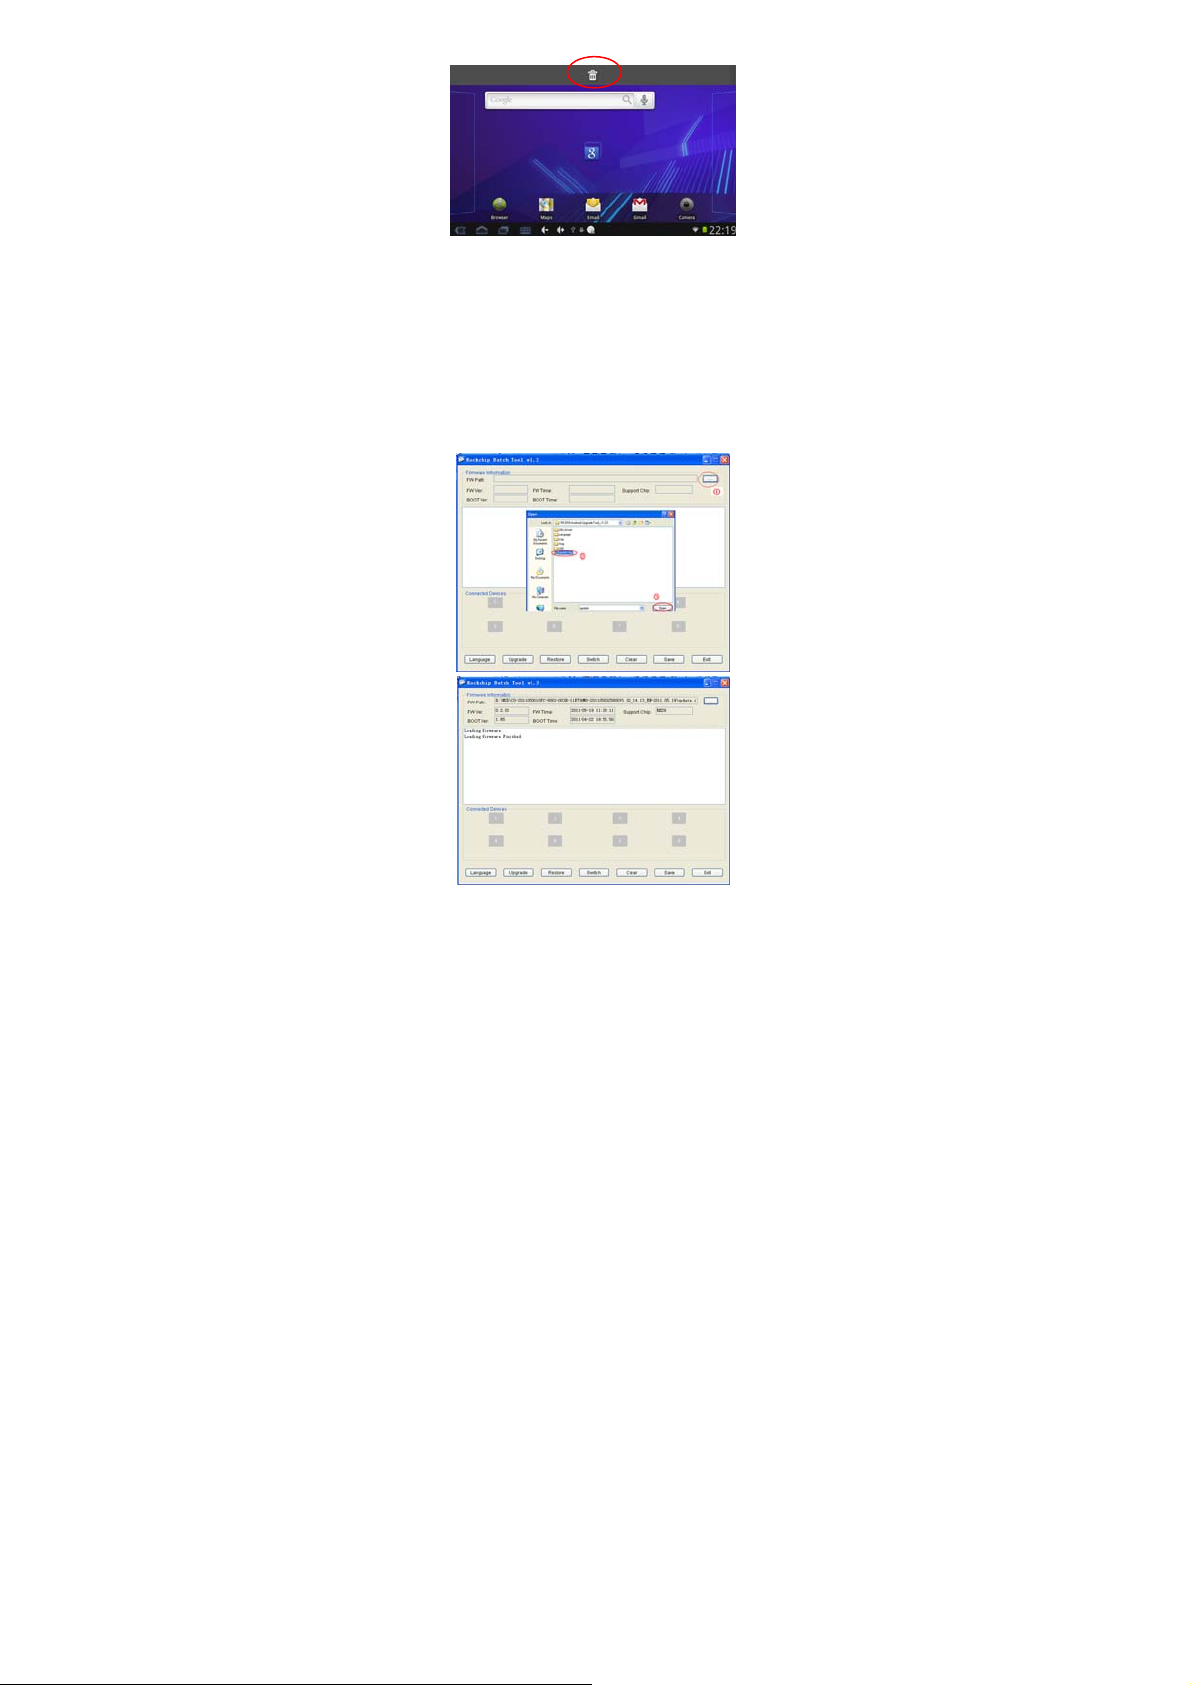
6. Firmware Update
Press the “Power” button to turn off the device before updating (Note:
Press and hold the “Power” button for at least 6 seconds if the
device can not be turned on normally).
Insert the Driver CD and copy the file named “RK2918 Android
Upgrade Tool” to your computer desktop (Note: The device can not
be updated directly from CD),Then Open file “RKBatchTool.exe” in
Folder “RK2918 Android Upgrade”, click the button ① in this current
window and choose “update.img” from the popup window, click open,
as shown in the picture below:
Hold down the MENU button on the device and without releasing it
after Device has been turned off; connect the device to the PC by the
USB cable supplied with the device.
41
Page 42
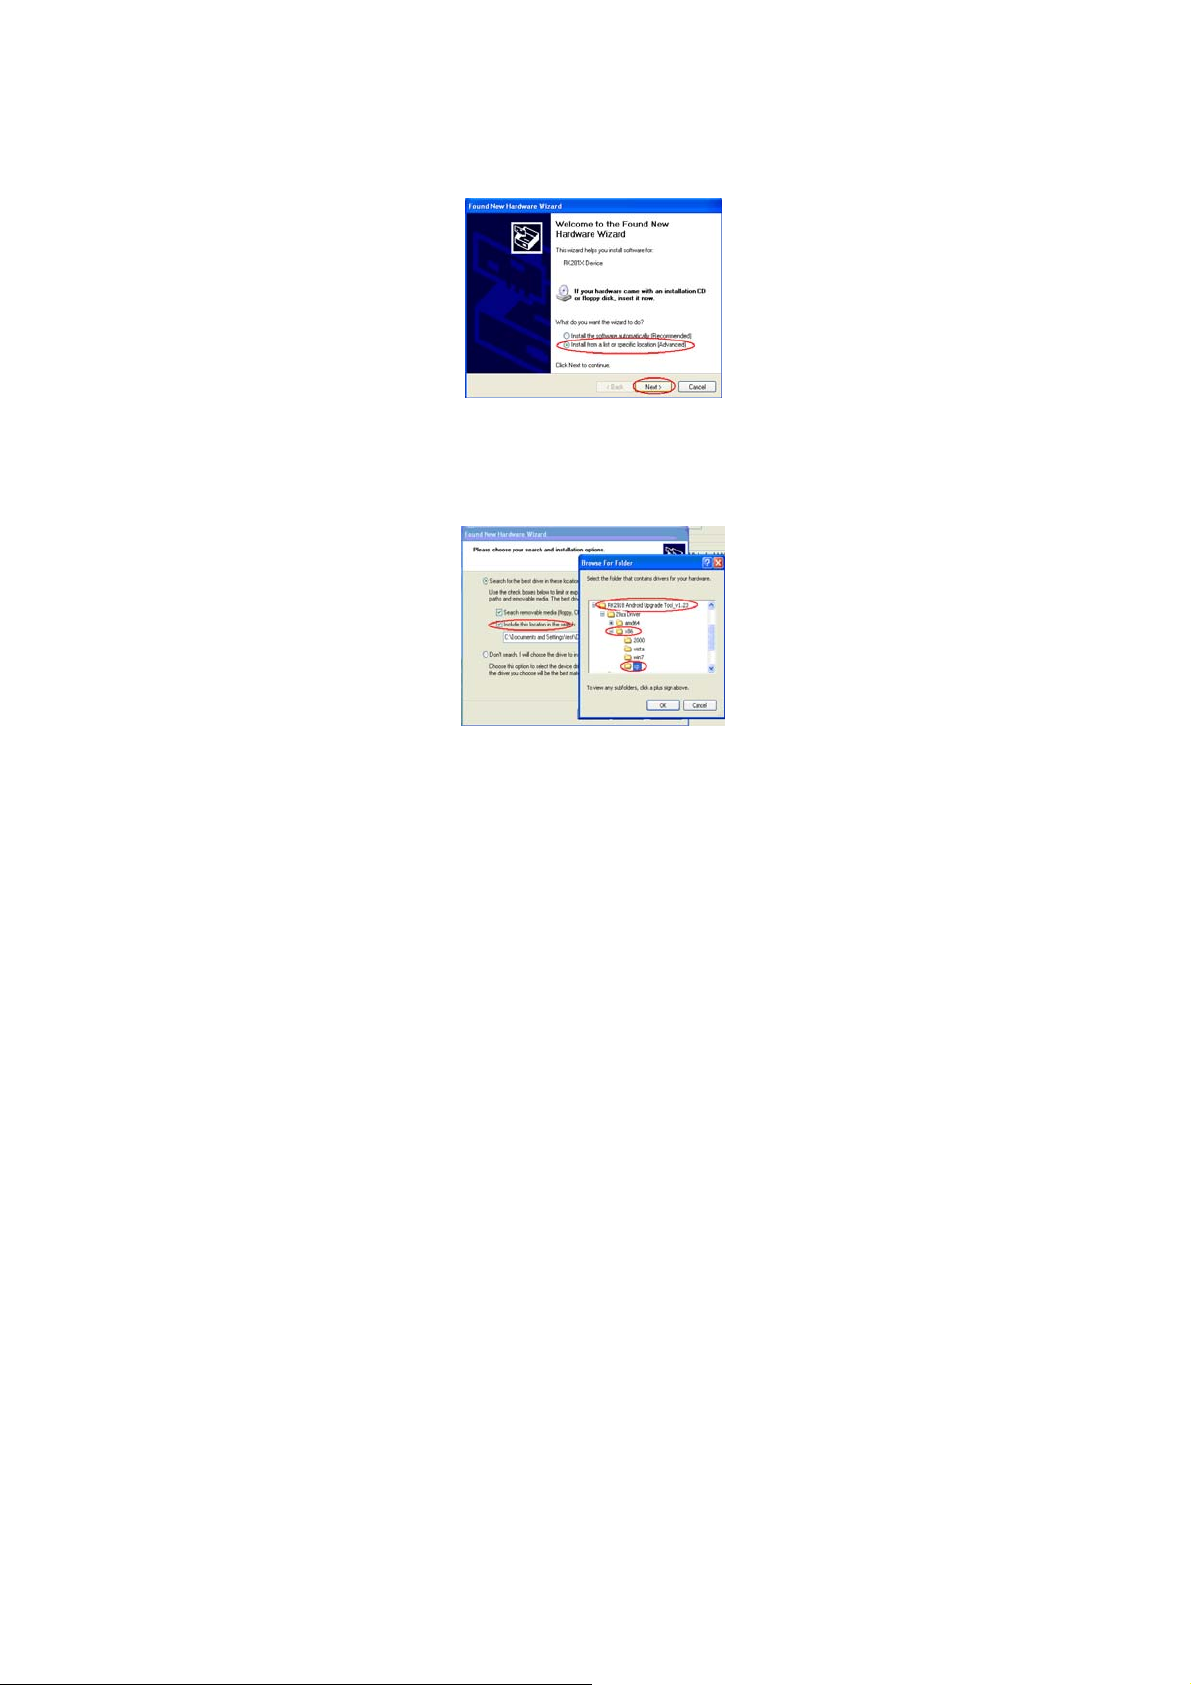
The “Found New Hardware Wizard” window will pop up on the
bottom right corner as shown below. Choose “Install from a list or
specific location (Advanced)”, and then click “Next” to install the USB
driver, see the picture below:
NOTE: The USB port of the PC must be USB2.0, or it cannot be
used to update the device.
Select “Include this location in the search”, and navigate to the
following folder “Update Software File” > “291xDriver” > “x86” > “XP”
on the CD ROM, then click “OK”. The system will detect and install
the driver automatically, finally click “Finish”, see the pictures as
below:
Click “Continue Anyway”.
42
Page 43
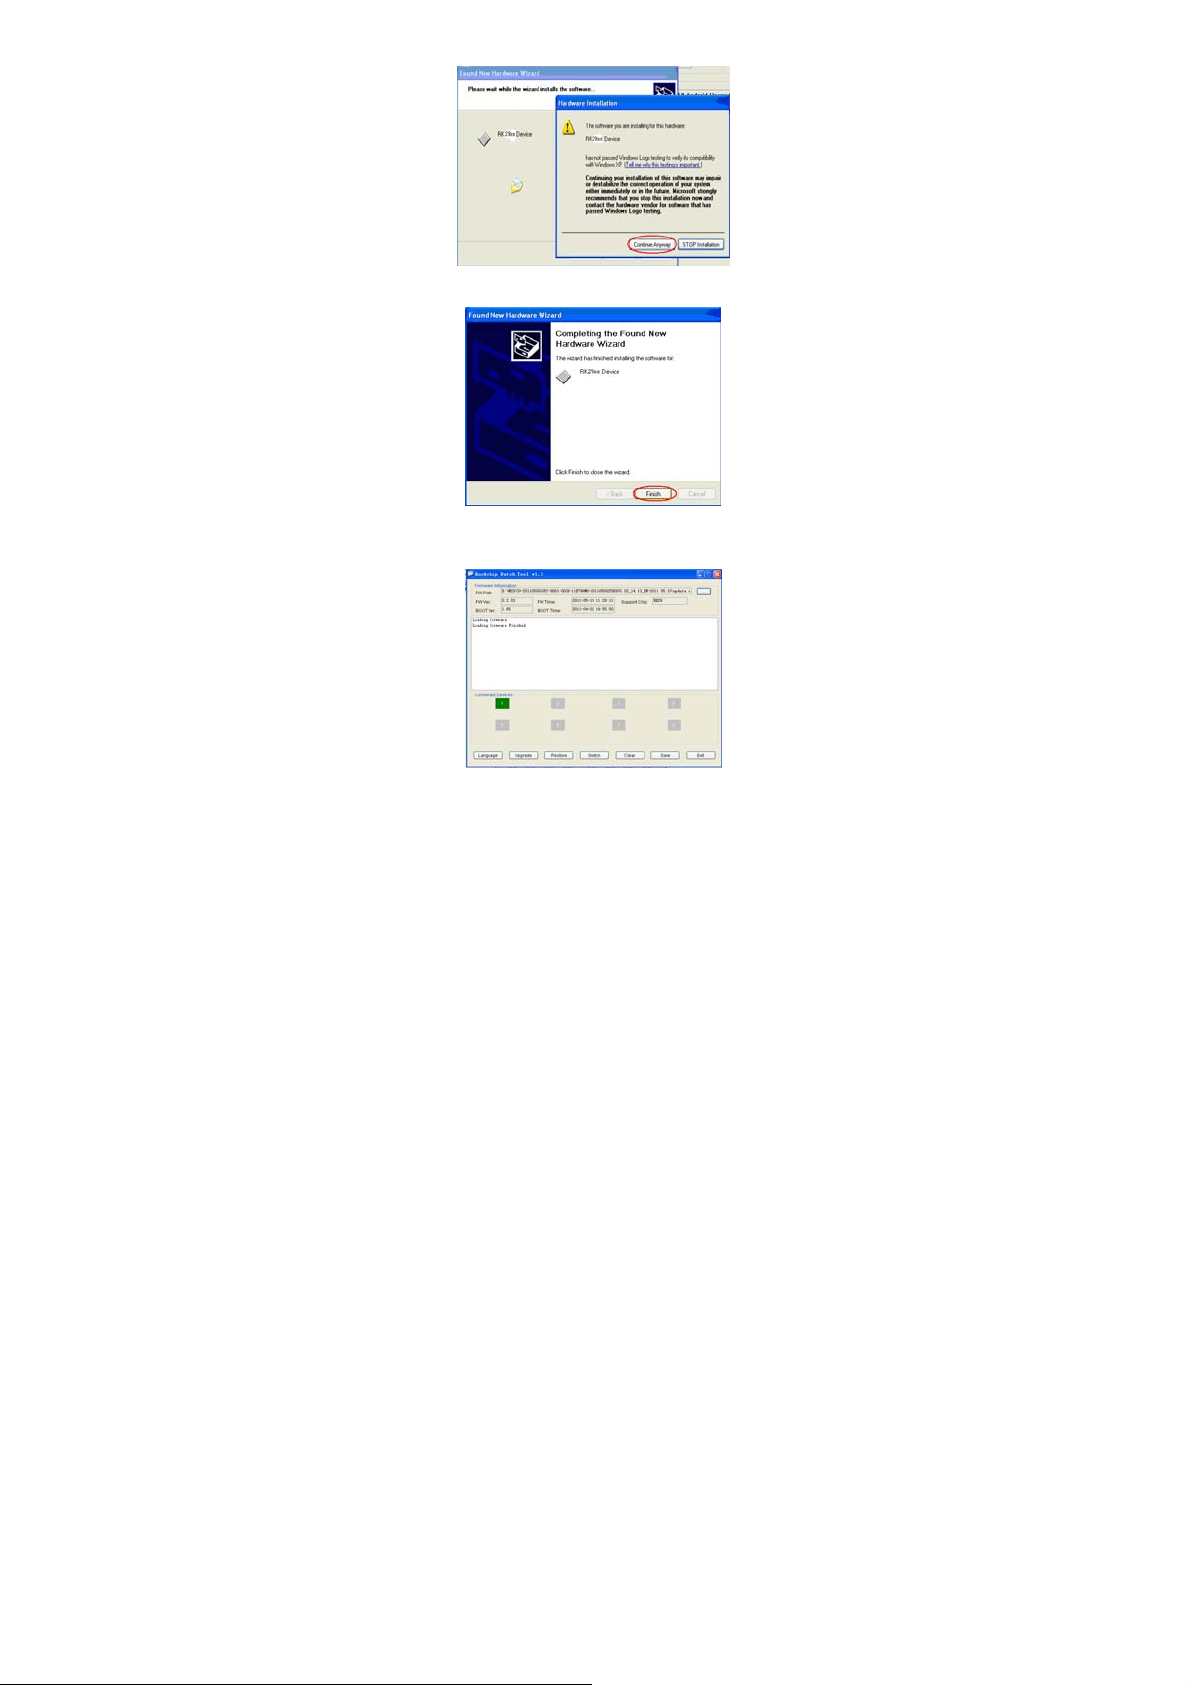
Click “Finish”.
Release the MENU button after icon labeled “1” has turned green,
see the picture as below:
Then click “Upgrade” to start the updating process. During this
process lots of information will be shown in the update status box as
shown in the image overleaf.
NOTE: While the system is being updated, the device must not be
operated in any way.
43
Page 44
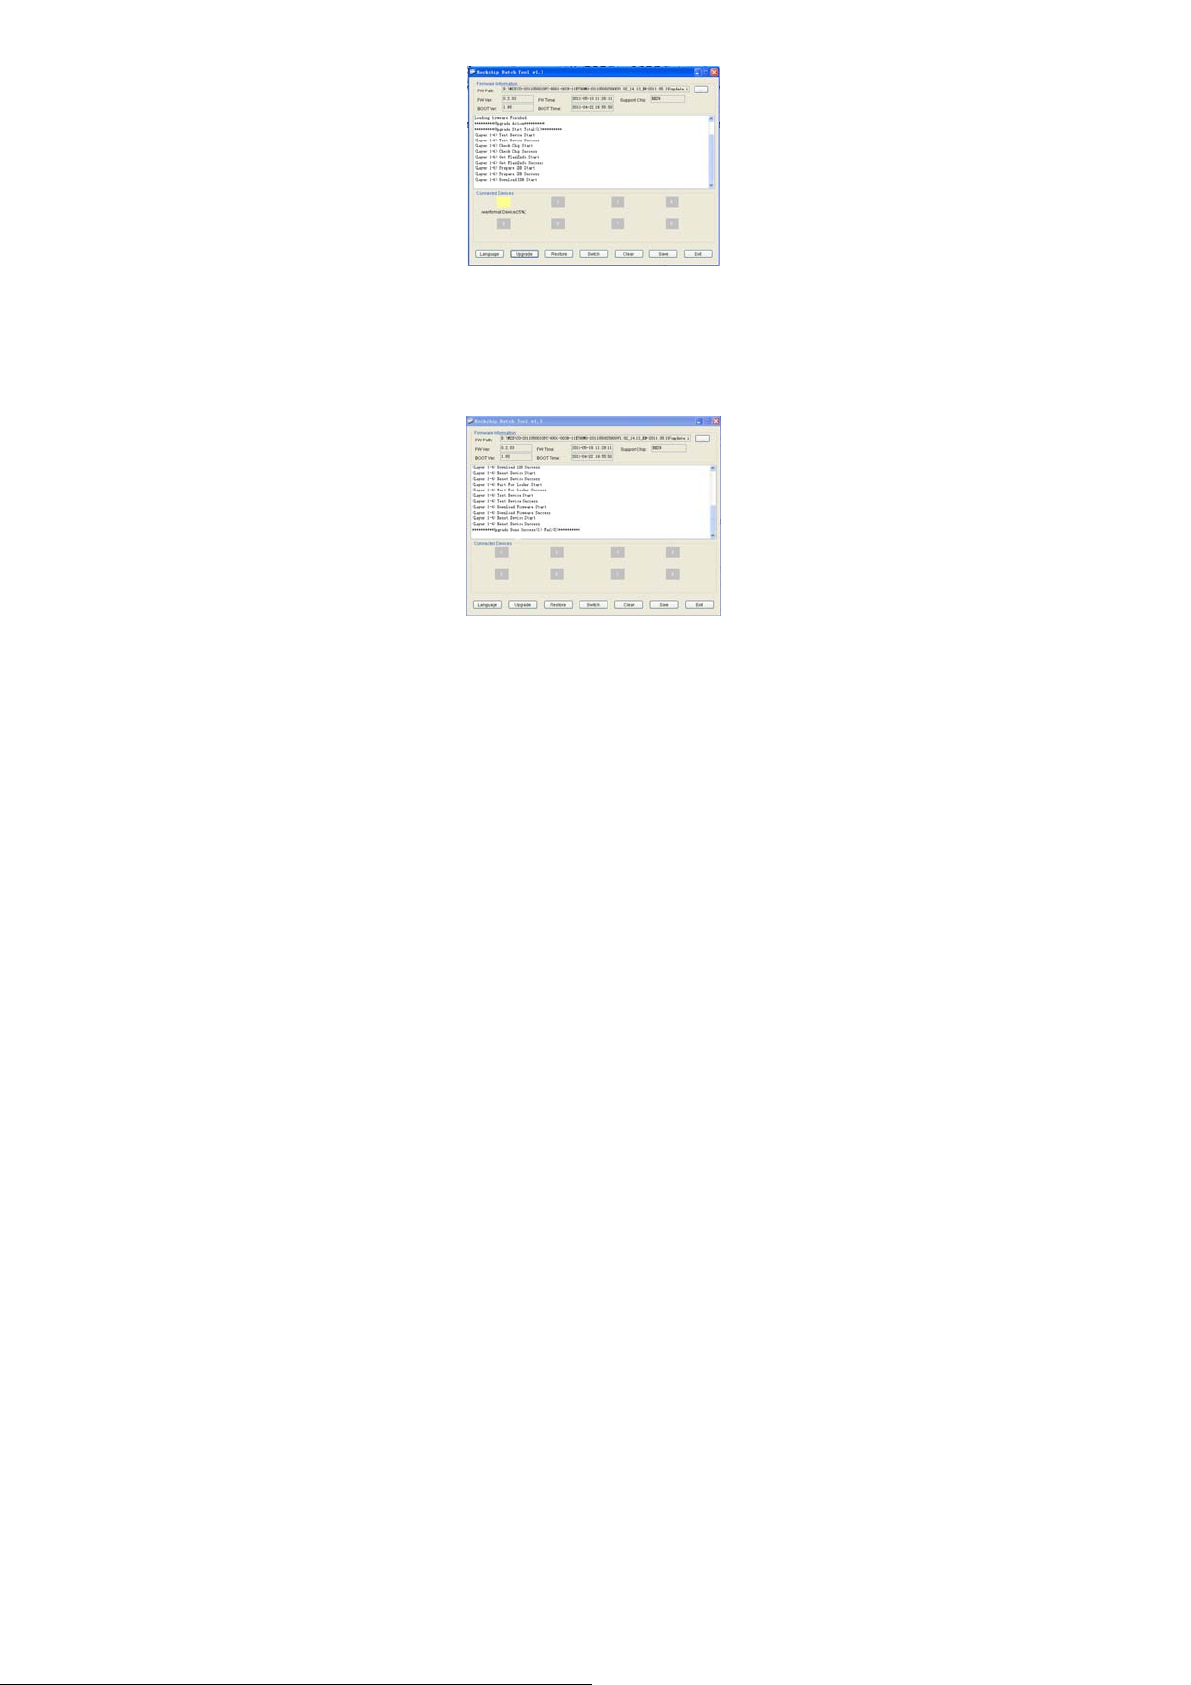
The system has been updated successfully when the “Upgrade Done
Success <1> Fail <0>” notice appears in the status bar as shown
below, and device will come to the main interface after run system.
NOTE: Please don’t disconnect the USB cable during the updating
process because this will cause update failure or possible system
failure of the device.
7. Troubleshooting
7.1 Device can not connect to Wi-Fi
1) Ensure the wireless network is working by testing it using another
wireless device.
2) Ensure the device and the wireless router is within the range of
the wireless network to be connected too. Walls or other
obstructions will reduce the possible distances between wireless
devices.
3) Ensure the security password being used is correct.
7.2 Device doesn’t turn on
1) You can not turn on the device when the battery charge is below
the critical level, please charge the battery.
2) Press the RESET button on the top of the device and check if it is
restarting is normally or not.
3) Check if the charger is connected correctly.
44
Page 45

7.3 Heat Issues
When running multiple applications, using the screen on its brightest
setting, or when being charged, this device can get quite hot. This is
normal and should not cause any inconvenience when in use.
7.4 System has anomalies and doesn’t work correctly
Installing some third-party applications may cause the system not to
operate correctly. Press the RESET button and perform a system
reset to resolve this issue.
7.5 Cannot set E-mail Account or registration application
1) Ensure that the MID is connected to a Wi-Fi network and can
connect to the Internet.
2) Ensure you E-mail settings have been entered correctly for the
account being accessed.
3) Make sure your system time and local time are correct.
7.6 Can not record
Press the RESET button on the top of the device, then check if the
record function works correctly.
7.7 The stand-by time of the device is too short
1) The duration of the lithium battery varies with environmental
temperature changes and the service conditions. If the environment
temperature is too low or too high, the duration of the battery will be
affected. It is recommended to use this device at normal
temperature.
2) Battery life is dependent on usage. High volume, WIFI, and the
frequent use may cause the battery to be drained at a higher rate.
7.8 No sound via earphone
1) Please check if the volume setting is 0.
2) Please check if audio file is broken, and try to play another audio
file to confirm. If the audio file is broken, it may cause severe noise
or static.
7.9 The color distortion of video or picture display
Press the RESET button on the top of the device to resolve this
issue.
7.10 Can not copy files
1) Please check if the device is connected to the computer correctly.
2) Please check if the memory space is full.
3) Please check if the USB cable is broken.
7.11 No sound or no image via HDMI Output.
1) Please check if the device is connected to HDMI cable correctly,
and the TV setting of HDMI port is correct.
45
Page 46

2) Please check if the HDMI cable is broken.
3) Press the RESET button on the top of the device, then check if the
HDMI output function works correctly.
7.12 Other troubles
Please follow up the steps as below to fix the other troubles before
you return the MID/Tablet PC to us:
1) Press the RESET button on the top of the device, then check if the
function works correctly;
2) Upgrade the firmware from the CD and restart the device and then
check if the function works correctly.
(All information is subject to change without pre-notice.)
FCC STATEMENT
This device complies with Part 15 of the FCC Rules.
1.
Operation is subject to the following two conditions:
(1) This device may not cause harmful interference, and
(2) This device must accept any interference
cause undesired operation.
Changes or modifications not expressly approved
2.
received, including interference that may
by the party responsible for compliance
could void the user’s authority
to operate the equipment.
NOTE: This equipment has been tested and found to comply with the limits for a
Class B digital device, pursuant to Part
designed to provide reasonable protection
residential installation. This equipment
15 of the FCC Rules. These limits are
against harmful interference in a
generates, uses and can radiate radio
frequency energy and, if not installed and used in accordance with the
instructions, may cause harmful interference
there is no guarantee that interference will
If this equipment does cause harmful interference
to radio communications. However,
not occur in a particular installation.
to radio or television reception,
which can be determined by turning the equipment off and on, the user is
encouraged to try to correct the interference
by one or more of the following
measures:
-- Reorient or relocate the receiving antenna.
-- Increase the separation between the equipment and receiver.
-- Connect the equipment into an outlet on a circuit different
from that to which the receiver is connected.
-- Consult the dealer or an experienced radio/TV technician for help.
FCC Radiation Exposure Statement:
The device has been evaluated to meet
The device can be used in portable e
general RF exposure requirement.
xposure condition without RF striction.
 Loading...