

Page 1

web'n'walk Stick
Quick start guide
Page 2
Getting Started…
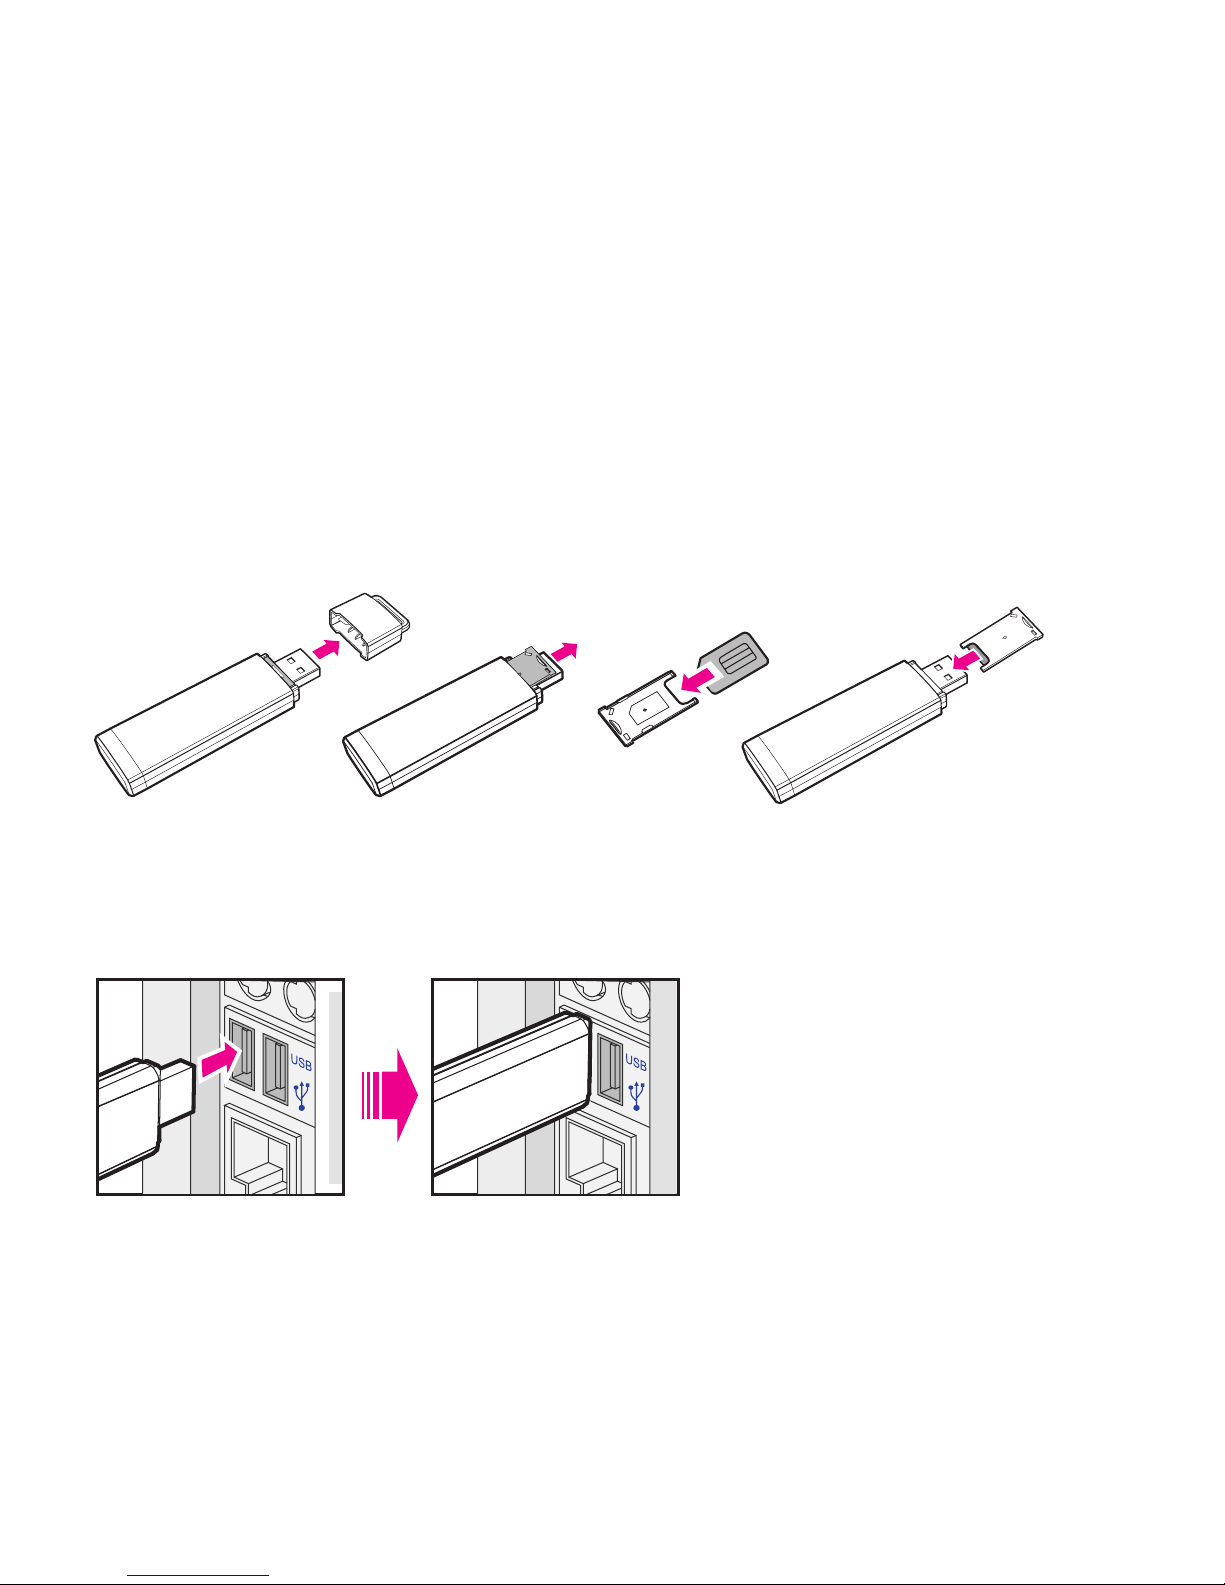
1 . Pull the cap off the web’n’walk Stick.
2 . Pull out the SIM card holder, and insert your SIM card, as shown below. Check that
the SIM card is correctly positioned.
3 . Slide the SIM card holder back into the web’n’walk Stick, as shown below.
4 . Turn your computer on before inserting the web’n’walk Stick.
5 . Insert the web’n’walk Stick into an available USB port on your computer (the
location of USB ports varies depending on the computer model).
If preferred, you can connect the web’n’walk Stick to your computer using the USB
cable provided.
Page 3

Next steps for Windows
6 . Your computer automatically detects the web’n’walk Stick as new hardware and
automatically starts the web’n’walk Stick Manager Setup Wizard.
If running Windows Vista you may need to click ‘Run AutoRun.exe’.
Note: If the Setup Wizard does not start automatically, go to ‘My Computer’ (if running
Windows 2000/XP) or ‘Computer’ (if running Windows Vista). Double-click web’n’walk
. Then double-click the AutoRun.exe file to launch the Setup Wizard.
7 . Select the installer language you want and click OK.
8 . Click Next to start installation.
Note: Do not disconnect the web‘n’walk Stick during the installation process.
9 . Select ‘T-Mobile UK’ and click Next.
1 0 . If you agree to the licence agreement terms, click I Agree.
1 1 . Choose to accept the default folder by clicking Next or change the location by
clicking Browse.
1 2 . Click Install.
1 3 . When installation is completed, click Finish.
Page 4

1 4 . After successful installation the web’n’walk Stick Manager short-cut icon will
appear on your desktop.
1 5 . Please wait a few moments for web’n’walk Stick Manager to start automatically.
If it does not start in 3 minutes double-click the web’n’walk Stick Manager icon on
your desktop.
Enter your SIM card PIN if prompted. This will have been provided with your SIM card.
1 6 . Click (this will become a button once you are connected).
1 7 . Click to open the web browser and start using the Internet!
Page 5

Next steps for Apple Mac
6 . Your computer will automatically detect the web’n’walk Stick, double-click the
web’n’walk Stick Manager icon.
7 . Click Continue to start installation.
8 . If you agree to the licence agreement terms, click Continue then Agree.
9 . Choose to accept the standard installation folder by clicking Install or change the
location by clicking Change Install Location.
1 0 . Enter your password, if prompted.
1 1 . When installation is completed, click Close.
1 2 . After successful installation web’n’walk Stick Manager will start automatically.
Enter your SIM card PIN if prompted. This will have been provided with your SIM card.
1 3 . Click the Connect button. The Connect button will become a Disconnect button
once you are connected.
You will be prompted to enter your password (you will only need to do this once).
1 4 . Open the web browser and start using the Internet!
Page 6

System requirements
Windows
Microsoft Windows Vista 32-bit and 64-bit (Business Edition, Enterprise Edition,
Ultimate Edition, Home Premium Edition, Home Basic Edition), Microsoft Windows
XP Professional (SP1, SP2), Microsoft Windows XP Home Edition (SP1, SP2),
Microsoft Windows XP Tablet PC Edition (SP1, SP2), Microsoft Windows XP Media
Center Edition (SP1, SP2), Microsoft Windows 2000 (SP4)
256 MB RAM or more
25 MB hard-disk drive space or more
Internet Explorer Version 5.5 or higher
USB 2.0 Port
Mac OS
Mac PowerBook
Mac OS X 10.3.7 or higher
5 MB hard-disk drive space or more
USB 2.0 Port
•
•
•
•
•
•
•
•
•
Page 7

Contact us
For technical help including FAQ’s, troubleshooting and downloads go to
www.t-mobile.co.uk/datacardhelp. If you can’t find what you’re looking for on the
website, then call us on 0845 412 2993 (charged at local rate).
If you have a more general enquiry then please call 150 free from your mobile or
0845 412 5000 (charged at local rate).
T-Mobile Customer Services is open from 7am to 10pm everyday.
Page 8

H/300108/01
 Loading...