

Page 1
T-Mobile Sidekick Owner’s Manual
Release 1.1
October 21, 2003
Confidential material of Danger, Inc., 124 University Avenue , Palo Alto, CA 94301
May not be duplicated or copied without the prior written consent of Danger, Inc.
Copyright © 2002-2003. Danger, Inc. All rights reserved.
Page 2

Page 3

T-Mobile Sidekick Owner’s Manual
Contents
1. Device Basics . . . . . . . . . . . . . . . . . . . . . . . . . . . . . . . . . . . . . . . . . . . . . . . . . . . . . . . . . . . . . . . . . . . . 10
Parts of Your T-Mobile Sid ekick . . . . . . . . . . . . . . . . . . . . . . . . . . . . . . . . . . . . . . . . . . . . . . . . 10
Device Display . . . . . . . . . . . . . . . . . . . . . . . . . . . . . . . . . . . . . . . . . . . . . . . . . . . . . . . . . . . . 10
Wireless Options . . . . . . . . . . . . . . . . . . . . . . . . . . . . . . . . . . . . . . . . . . . . . . . . . . . . . . . . . . 14
Sound Controls . . . . . . . . . . . . . . . . . . . . . . . . . . . . . . . . . . . . . . . . . . . . . . . . . . . . . . . . . . . 15
Keyboard . . . . . . . . . . . . . . . . . . . . . . . . . . . . . . . . . . . . . . . . . . . . . . . . . . . . . . . . . . . . . . . 15
Control Buttons . . . . . . . . . . . . . . . . . . . . . . . . . . . . . . . . . . . . . . . . . . . . . . . . . . . . . . . . . . . 16
Wheel . . . . . . . . . . . . . . . . . . . . . . . . . . . . . . . . . . . . . . . . . . . . . . . . . . . . . . . . . . . . . . . . 1 9
Terminology Used in This Manual . . . . . . . . . . . . . . . . . . . . . . . . . . . . . . . . . . . . . . . . . . . . . . 19
Headset/Camera Jack . . . . . . . . . . . . . . . . . . . . . . . . . . . . . . . . . . . . . . . . . . . . . . . . . . . . . . . 22
The Battery . . . . . . . . . . . . . . . . . . . . . . . . . . . . . . . . . . . . . . . . . . . . . . . . . . . . . . . . . . . . . . 22
Infrared Port . . . . . . . . . . . . . . . . . . . . . . . . . . . . . . . . . . . . . . . . . . . . . . . . . . . . . . . . . . . . . 24
USB Port . . . . . . . . . . . . . . . . . . . . . . . . . . . . . . . . . . . . . . . . . . . . . . . . . . . . . . . . . . . . . . . . 24
Typing and Navigating in Text Fields . . . . . . . . . . . . . . . . . . . . . . . . . . . . . . . . . . . . . . . . . . . . 24
Using the Carrying Case . . . . . . . . . . . . . . . . . . . . . . . . . . . . . . . . . . . . . . . . . . . . . . . . . . . . . 27
Use Your Device Safely . . . . . . . . . . . . . . . . . . . . . . . . . . . . . . . . . . . . . . . . . . . . . . . . . . . . . . 27
FCC Compliance . . . . . . . . . . . . . . . . . . . . . . . . . . . . . . . . . . . . . . . . . . . . . . . . . . . . . . . . . . . 28
2. About Your SIM Card . . . . . . . . . . . . . . . . . . . . . . . . . . . . . . . . . . . . . . . . . . . . . . . . . . . . . . . . . . . . . 29
What Is a SIM Card? . . . . . . . . . . . . . . . . . . . . . . . . . . . . . . . . . . . . . . . . . . . . . . . . . . . . . . . 29
Exactly What Information Is on My Device SI M? . . . . . . . . . . . . . . . . . . . . . . . . . . . . . . . . . . . . 29
My SIM Card Came Locked! How Do I Unlock It? . . . . . . . . . . . . . . . . . . . . . . . . . . . . . . . . . . . 30
Can I Remove My SIM? . . . . . . . . . . . . . . . . . . . . . . . . . . . . . . . . . . . . . . . . . . . . . . . . . . . . . 30
How Do I Handle My SIM? . . . . . . . . . . . . . . . . . . . . . . . . . . . . . . . . . . . . . . . . . . . . . . . . . . . 31
What Happens If I Lose My SIM? . . . . . . . . . . . . . . . . . . . . . . . . . . . . . . . . . . . . . . . . . . . . . . 31
What Happens If I Put A Different SIM in My Device? . . . . . . . . . . . . . . . . . . . . . . . . . . . . . . . . 31
3. Customizing Your Device. . . . . . . . . . . . . . . . . . . . . . . . . . . . . . . . . . . . . . . . . . . . . . . . . . . . . . . . . . 32
The Settings Screens . . . . . . . . . . . . . . . . . . . . . . . . . . . . . . . . . . . . . . . . . . . . . . . . . . . . . . . 32
System Info . . . . . . . . . . . . . . . . . . . . . . . . . . . . . . . . . . . . . . . . . . . . . . . . . . . . . . . . . . . . . 3 6
AutoText . . . . . . . . . . . . . . . . . . . . . . . . . . . . . . . . . . . . . . . . . . . . . . . . . . . . . . . . . . . . . . . . 36
Battery & Display . . . . . . . . . . . . . . . . . . . . . . . . . . . . . . . . . . . . . . . . . . . . . . . . . . . . . . . . . . 37
Date & Time . . . . . . . . . . . . . . . . . . . . . . . . . . . . . . . . . . . . . . . . . . . . . . . . . . . . . . . . . . . . . 39
Jump Shortcuts . . . . . . . . . . . . . . . . . . . . . . . . . . . . . . . . . . . . . . . . . . . . . . . . . . . . . . . . . . . 40
Key Guard & Security . . . . . . . . . . . . . . . . . . . . . . . . . . . . . . . . . . . . . . . . . . . . . . . . . . . . . . . 41
Keyboard . . . . . . . . . . . . . . . . . . . . . . . . . . . . . . . . . . . . . . . . . . . . . . . . . . . . . . . . . . . . . . . 45
Language . . . . . . . . . . . . . . . . . . . . . . . . . . . . . . . . . . . . . . . . . . . . . . . . . . . . . . . . . . . . . . . 46
Network . . . . . . . . . . . . . . . . . . . . . . . . . . . . . . . . . . . . . . . . . . . . . . . . . . . . . . . . . . . . . . . . 46
Sound Profiles . . . . . . . . . . . . . . . . . . . . . . . . . . . . . . . . . . . . . . . . . . . . . . . . . . . . . . . . . . . . 47
October 21, 2003 T-Mobile Sidekick Owner’s Manua l 3
Page 4

Contents
4. The Jump Screen. . . . . . . . . . . . . . . . . . . . . . . . . . . . . . . . . . . . . . . . . . . . . . . . . . . . . . . . . . . . . . . . . 51
About the Jump Screen . . . . . . . . . . . . . . . . . . . . . . . . . . . . . . . . . . . . . . . . . . . . . . . . . . . . . 51
How to Find the Jump Screen . . . . . . . . . . . . . . . . . . . . . . . . . . . . . . . . . . . . . . . . . . . . . . . . . 52
The Application Splash Screens . . . . . . . . . . . . . . . . . . . . . . . . . . . . . . . . . . . . . . . . . . . . . . . . 52
How to Select an Application . . . . . . . . . . . . . . . . . . . . . . . . . . . . . . . . . . . . . . . . . . . . . . . . . . 52
The Jump Screen Menu . . . . . . . . . . . . . . . . . . . . . . . . . . . . . . . . . . . . . . . . . . . . . . . . . . . . . 53
5. Browsing the Internet . . . . . . . . . . . . . . . . . . . . . . . . . . . . . . . . . . . . . . . . . . . . . . . . . . . . . . . . . . . . 54
Browser Splash Screen . . . . . . . . . . . . . . . . . . . . . . . . . . . . . . . . . . . . . . . . . . . . . . . . . . . . . . 54
Status Indicators . . . . . . . . . . . . . . . . . . . . . . . . . . . . . . . . . . . . . . . . . . . . . . . . . . . . . . . . . . 54
Keyboard Shortcuts . . . . . . . . . . . . . . . . . . . . . . . . . . . . . . . . . . . . . . . . . . . . . . . . . . . . . . . . 55
Navigation/View Shortcuts . . . . . . . . . . . . . . . . . . . . . . . . . . . . . . . . . . . . . . . . . . . . . . . . . . . 55
Go To a Web Page . . . . . . . . . . . . . . . . . . . . . . . . . . . . . . . . . . . . . . . . . . . . . . . . . . . . . . . . . 56
Go to Your Home Page . . . . . . . . . . . . . . . . . . . . . . . . . . . . . . . . . . . . . . . . . . . . . . . . . . . . . . 56
Search the Web . . . . . . . . . . . . . . . . . . . . . . . . . . . . . . . . . . . . . . . . . . . . . . . . . . . . . . . . . . . 57
Use Bookmarks . . . . . . . . . . . . . . . . . . . . . . . . . . . . . . . . . . . . . . . . . . . . . . . . . . . . . . . . . . . 57
See Recently-Viewed Web Pages . . . . . . . . . . . . . . . . . . . . . . . . . . . . . . . . . . . . . . . . . . . . . . . 5 9
View History . . . . . . . . . . . . . . . . . . . . . . . . . . . . . . . . . . . . . . . . . . . . . . . . . . . . . . . . . . . . . 59
View Page Info . . . . . . . . . . . . . . . . . . . . . . . . . . . . . . . . . . . . . . . . . . . . . . . . . . . . . . . . . . . 60
Refresh a Web Page . . . . . . . . . . . . . . . . . . . . . . . . . . . . . . . . . . . . . . . . . . . . . . . . . . . . . . . . 60
Stop a Web Page from Loading . . . . . . . . . . . . . . . . . . . . . . . . . . . . . . . . . . . . . . . . . . . . . . . . 60
Web Browser Settings . . . . . . . . . . . . . . . . . . . . . . . . . . . . . . . . . . . . . . . . . . . . . . . . . . . . . . 60
6. Making Phone Calls . . . . . . . . . . . . . . . . . . . . . . . . . . . . . . . . . . . . . . . . . . . . . . . . . . . . . . . . . . . . . . 63
Phone Splash Screen . . . . . . . . . . . . . . . . . . . . . . . . . . . . . . . . . . . . . . . . . . . . . . . . . . . . . . . 63
Keyboard Shortcuts . . . . . . . . . . . . . . . . . . . . . . . . . . . . . . . . . . . . . . . . . . . . . . . . . . . . . . . . 64
Title Bar Indicators . . . . . . . . . . . . . . . . . . . . . . . . . . . . . . . . . . . . . . . . . . . . . . . . . . . . . . . . 6 4
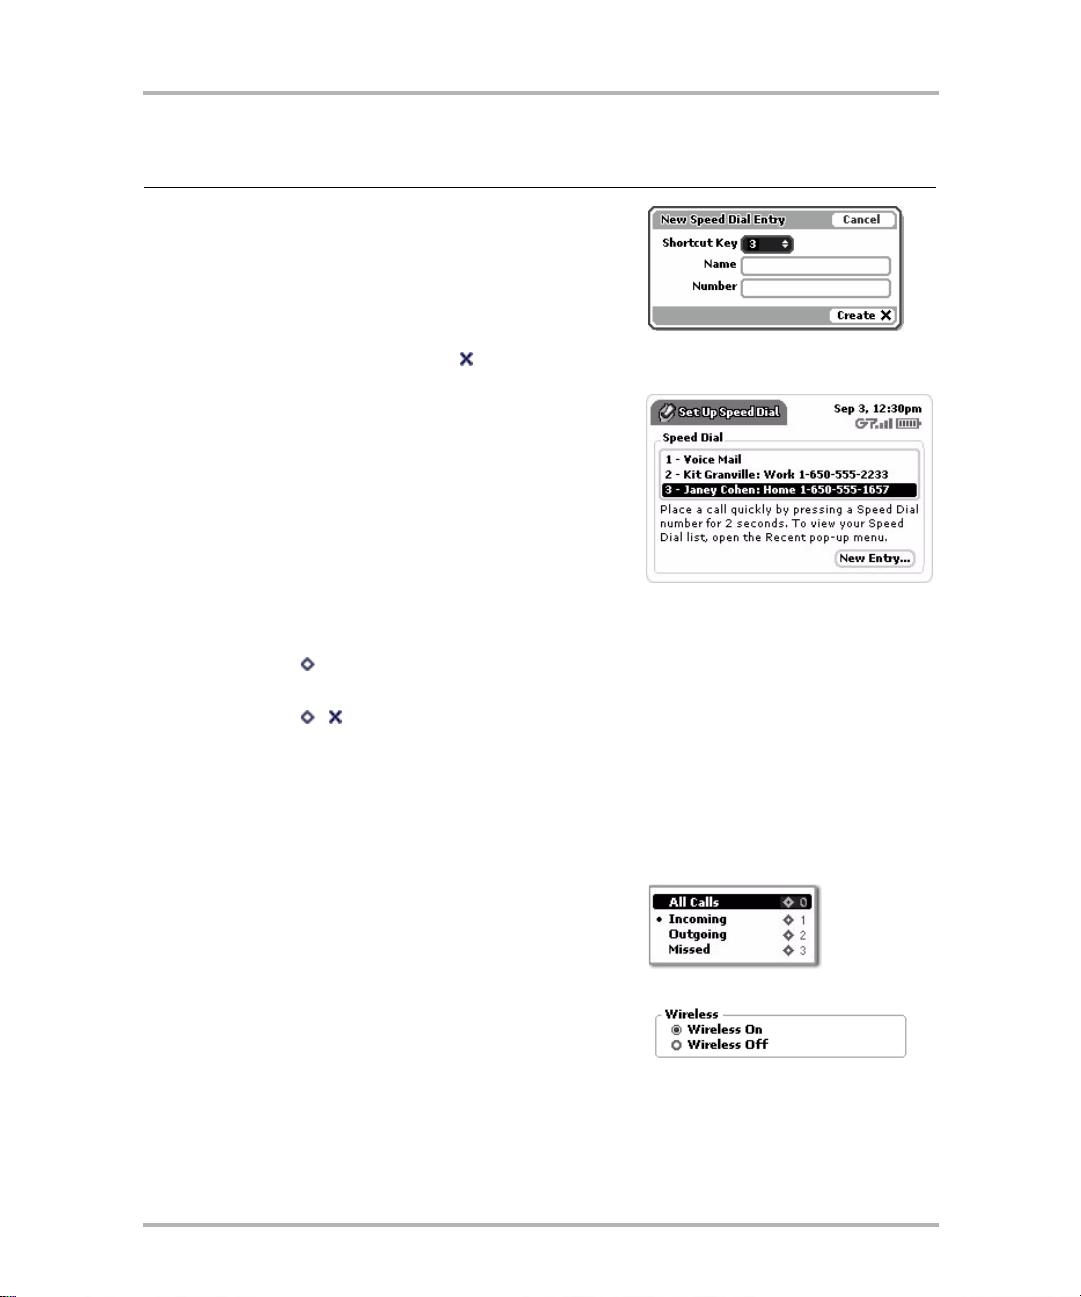
Manage Your Speed Dial List . . . . . . . . . . . . . . . . . . . . . . . . . . . . . . . . . . . . . . . . . . . . . . . . . . 64
Headset or Handset? . . . . . . . . . . . . . . . . . . . . . . . . . . . . . . . . . . . . . . . . . . . . . . . . . . . . . . . 66
Adjusting Volume . . . . . . . . . . . . . . . . . . . . . . . . . . . . . . . . . . . . . . . . . . . . . . . . . . . . . . . . . . 66
Place a Call . . . . . . . . . . . . . . . . . . . . . . . . . . . . . . . . . . . . . . . . . . . . . . . . . . . . . . . . . . . . . . 67
Features While on a Call . . . . . . . . . . . . . . . . . . . . . . . . . . . . . . . . . . . . . . . . . . . . . . . . . . . . . 70
Answer a Call . . . . . . . . . . . . . . . . . . . . . . . . . . . . . . . . . . . . . . . . . . . . . . . . . . . . . . . . . . . . 72
End a Call . . . . . . . . . . . . . . . . . . . . . . . . . . . . . . . . . . . . . . . . . . . . . . . . . . . . . . . . . . . . . . . 72
Your Call Log . . . . . . . . . . . . . . . . . . . . . . . . . . . . . . . . . . . . . . . . . . . . . . . . . . . . . . . . . . . . . 73
Listen to Voice Mail . . . . . . . . . . . . . . . . . . . . . . . . . . . . . . . . . . . . . . . . . . . . . . . . . . . . . . . . 75
Phone Settings . . . . . . . . . . . . . . . . . . . . . . . . . . . . . . . . . . . . . . . . . . . . . . . . . . . . . . . . . . . 75
7. Instant Messaging . . . . . . . . . . . . . . . . . . . . . . . . . . . . . . . . . . . . . . . . . . . . . . . . . . . . . . . . . . . . . . . 79
Instant Messaging Splash Screen . . . . . . . . . . . . . . . . . . . . . . . . . . . . . . . . . . . . . . . . . . . . . . 79
Keyboard Shortcuts . . . . . . . . . . . . . . . . . . . . . . . . . . . . . . . . . . . . . . . . . . . . . . . . . . . . . . . . 80
Add a Screen Name . . . . . . . . . . . . . . . . . . . . . . . . . . . . . . . . . . . . . . . . . . . . . . . . . . . . . . . . 80
Sign On . . . . . . . . . . . . . . . . . . . . . . . . . . . . . . . . . . . . . . . . . . . . . . . . . . . . . . . . . . . . . . . . 81
Sign Off . . . . . . . . . . . . . . . . . . . . . . . . . . . . . . . . . . . . . . . . . . . . . . . . . . . . . . . . . . . . . . . . 82
Switch Screen Names . . . . . . . . . . . . . . . . . . . . . . . . . . . . . . . . . . . . . . . . . . . . . . . . . . . . . . . 82
Remove Existing Screen Name . . . . . . . . . . . . . . . . . . . . . . . . . . . . . . . . . . . . . . . . . . . . . . . . 82
The Buddy List Screen . . . . . . . . . . . . . . . . . . . . . . . . . . . . . . . . . . . . . . . . . . . . . . . . . . . . . . 83
October 21, 2003 T-Mobile Sidekick Owner’s Manua l 4
Page 5

Contents
Manage Groups . . . . . . . . . . . . . . . . . . . . . . . . . . . . . . . . . . . . . . . . . . . . . . . . . . . . . . . . . . . 84
Manage Buddies . . . . . . . . . . . . . . . . . . . . . . . . . . . . . . . . . . . . . . . . . . . . . . . . . . . . . . . . . . 86
IM Conversations . . . . . . . . . . . . . . . . . . . . . . . . . . . . . . . . . . . . . . . . . . . . . . . . . . . . . . . . . . 89
:) Smileys . . . . . . . . . . . . . . . . . . . . . . . . . . . . . . . . . . . . . . . . . . . . . . . . . . . . . . . . . . . . . . . 91
Set an Away Message . . . . . . . . . . . . . . . . . . . . . . . . . . . . . . . . . . . . . . . . . . . . . . . . . . . . . . . 91
Instant Messaging Settings . . . . . . . . . . . . . . . . . . . . . . . . . . . . . . . . . . . . . . . . . . . . . . . . . . . 93
8. Email Messaging . . . . . . . . . . . . . . . . . . . . . . . . . . . . . . . . . . . . . . . . . . . . . . . . . . . . . . . . . . . . . . . . . 96
Email Splash Screen . . . . . . . . . . . . . . . . . . . . . . . . . . . . . . . . . . . . . . . . . . . . . . . . . . . . . . . . 96
Browse Email Screen . . . . . . . . . . . . . . . . . . . . . . . . . . . . . . . . . . . . . . . . . . . . . . . . . . . . . . . 97
Status Indicators . . . . . . . . . . . . . . . . . . . . . . . . . . . . . . . . . . . . . . . . . . . . . . . . . . . . . . . . . . 98
Keyboard Shortcuts . . . . . . . . . . . . . . . . . . . . . . . . . . . . . . . . . . . . . . . . . . . . . . . . . . . . . . . . 98
View Your Email . . . . . . . . . . . . . . . . . . . . . . . . . . . . . . . . . . . . . . . . . . . . . . . . . . . . . . . . . . 100
Move Messages to Folders . . . . . . . . . . . . . . . . . . . . . . . . . . . . . . . . . . . . . . . . . . . . . . . . . . 102
Send Messages . . . . . . . . . . . . . . . . . . . . . . . . . . . . . . . . . . . . . . . . . . . . . . . . . . . . . . . . . . 103
Add Email Senders to the Address B ook . . . . . . . . . . . . . . . . . . . . . . . . . . . . . . . . . . . . . . . . . 105
Add Email Recipients to the Address Book . . . . . . . . . . . . . . . . . . . . . . . . . . . . . . . . . . . . . . . 105
Discard Email Messages . . . . . . . . . . . . . . . . . . . . . . . . . . . . . . . . . . . . . . . . . . . . . . . . . . . . 106
Send a Photo . . . . . . . . . . . . . . . . . . . . . . . . . . . . . . . . . . . . . . . . . . . . . . . . . . . . . . . . . . . . 10 7
Manage Email Folders . . . . . . . . . . . . . . . . . . . . . . . . . . . . . . . . . . . . . . . . . . . . . . . . . . . . . 107
Manage Your Email Accounts . . . . . . . . . . . . . . . . . . . . . . . . . . . . . . . . . . . . . . . . . . . . . . . . 110
Email Settings . . . . . . . . . . . . . . . . . . . . . . . . . . . . . . . . . . . . . . . . . . . . . . . . . . . . . . . . . . . 114
Space Limitations . . . . . . . . . . . . . . . . . . . . . . . . . . . . . . . . . . . . . . . . . . . . . . . . . . . . . . . . . 117
9. Phone Messaging . . . . . . . . . . . . . . . . . . . . . . . . . . . . . . . . . . . . . . . . . . . . . . . . . . . . . . . . . . . . . . . 118
Phone Messages Splash Screen . . . . . . . . . . . . . . . . . . . . . . . . . . . . . . . . . . . . . . . . . . . . . . . 118
Browse Messages Screen . . . . . . . . . . . . . . . . . . . . . . . . . . . . . . . . . . . . . . . . . . . . . . . . . . . 119
Status Indicators . . . . . . . . . . . . . . . . . . . . . . . . . . . . . . . . . . . . . . . . . . . . . . . . . . . . . . . . . 12 0
Keyboard Shortcuts . . . . . . . . . . . . . . . . . . . . . . . . . . . . . . . . . . . . . . . . . . . . . . . . . . . . . . . 120
View Text Messages . . . . . . . . . . . . . . . . . . . . . . . . . . . . . . . . . . . . . . . . . . . . . . . . . . . . . . . 121
Sort Text Messages . . . . . . . . . . . . . . . . . . . . . . . . . . . . . . . . . . . . . . . . . . . . . . . . . . . . . . . 122
Send Text Messages . . . . . . . . . . . . . . . . . . . . . . . . . . . . . . . . . . . . . . . . . . . . . . . . . . . . . . . 122
Add Te xt Message Senders to the Address Book . . . . . . . . . . . . . . . . . . . . . . . . . . . . . . . . . . . 124
Call Back Sender of a Message . . . . . . . . . . . . . . . . . . . . . . . . . . . . . . . . . . . . . . . . . . . . . . . 124
Discard Messages . . . . . . . . . . . . . . . . . . . . . . . . . . . . . . . . . . . . . . . . . . . . . . . . . . . . . . . . 125
Retrieve Messages from the Trash . . . . . . . . . . . . . . . . . . . . . . . . . . . . . . . . . . . . . . . . . . . . . 125
Phone Messages Settings . . . . . . . . . . . . . . . . . . . . . . . . . . . . . . . . . . . . . . . . . . . . . . . . . . . 125
10. Keeping Contacts in the Address Book. . . . . . . . . . . . . . . . . . . . . . . . . . . . . . . . . . . . . . . . . . . . 127
Address Book Splash Screen . . . . . . . . . . . . . . . . . . . . . . . . . . . . . . . . . . . . . . . . . . . . . . . . . 127
How Much Information Can I Store? . . . . . . . . . . . . . . . . . . . . . . . . . . . . . . . . . . . . . . . . . . . 128
The Browse Contacts Screen . . . . . . . . . . . . . . . . . . . . . . . . . . . . . . . . . . . . . . . . . . . . . . . . . 128
T-Mobile Contact Information . . . . . . . . . . . . . . . . . . . . . . . . . . . . . . . . . . . . . . . . . . . . . . . . 128
Keyboard Shortcuts . . . . . . . . . . . . . . . . . . . . . . . . . . . . . . . . . . . . . . . . . . . . . . . . . . . . . . . 129
View Contacts by Category . . . . . . . . . . . . . . . . . . . . . . . . . . . . . . . . . . . . . . . . . . . . . . . . . . 130
Sort Contacts . . . . . . . . . . . . . . . . . . . . . . . . . . . . . . . . . . . . . . . . . . . . . . . . . . . . . . . . . . . 130
Create a Contact . . . . . . . . . . . . . . . . . . . . . . . . . . . . . . . . . . . . . . . . . . . . . . . . . . . . . . . . . 131
October 21, 2003 T-Mobile Sidekick Owner’s Manua l 5
Page 6

Contents
Edit a Contact . . . . . . . . . . . . . . . . . . . . . . . . . . . . . . . . . . . . . . . . . . . . . . . . . . . . . . . . . . . 13 2
Discard/Retrieve a Contact . . . . . . . . . . . . . . . . . . . . . . . . . . . . . . . . . . . . . . . . . . . . . . . . . . 133
Contact a Contact . . . . . . . . . . . . . . . . . . . . . . . . . . . . . . . . . . . . . . . . . . . . . . . . . . . . . . . . 13 3
Find a Contact . . . . . . . . . . . . . . . . . . . . . . . . . . . . . . . . . . . . . . . . . . . . . . . . . . . . . . . . . . . 134
Empty the Address Book Trash . . . . . . . . . . . . . . . . . . . . . . . . . . . . . . . . . . . . . . . . . . . . . . . 134
Address Book Settings . . . . . . . . . . . . . . . . . . . . . . . . . . . . . . . . . . . . . . . . . . . . . . . . . . . . . 134
11. Scheduling Events with Calendar . . . . . . . . . . . . . . . . . . . . . . . . . . . . . . . . . . . . . . . . . . . . . . . . 138
Calendar Splash Screen . . . . . . . . . . . . . . . . . . . . . . . . . . . . . . . . . . . . . . . . . . . . . . . . . . . . 138
Keyboard Shortcuts . . . . . . . . . . . . . . . . . . . . . . . . . . . . . . . . . . . . . . . . . . . . . . . . . . . . . . . 139
Create an Event . . . . . . . . . . . . . . . . . . . . . . . . . . . . . . . . . . . . . . . . . . . . . . . . . . . . . . . . . . 139
Edit an Event . . . . . . . . . . . . . . . . . . . . . . . . . . . . . . . . . . . . . . . . . . . . . . . . . . . . . . . . . . . . 143
Discard an Event . . . . . . . . . . . . . . . . . . . . . . . . . . . . . . . . . . . . . . . . . . . . . . . . . . . . . . . . . 143
Ways to View Your Events . . . . . . . . . . . . . . . . . . . . . . . . . . . . . . . . . . . . . . . . . . . . . . . . . . 143
Upcoming View . . . . . . . . . . . . . . . . . . . . . . . . . . . . . . . . . . . . . . . . . . . . . . . . . . . . . . . . . . 14 6
Day View . . . . . . . . . . . . . . . . . . . . . . . . . . . . . . . . . . . . . . . . . . . . . . . . . . . . . . . . . . . . . . 147
Week View . . . . . . . . . . . . . . . . . . . . . . . . . . . . . . . . . . . . . . . . . . . . . . . . . . . . . . . . . . . . . 148
Month View . . . . . . . . . . . . . . . . . . . . . . . . . . . . . . . . . . . . . . . . . . . . . . . . . . . . . . . . . . . . . 149
Year View . . . . . . . . . . . . . . . . . . . . . . . . . . . . . . . . . . . . . . . . . . . . . . . . . . . . . . . . . . . . . . 150
Trash View . . . . . . . . . . . . . . . . . . . . . . . . . . . . . . . . . . . . . . . . . . . . . . . . . . . . . . . . . . . . . 150
Go To a Specific Day . . . . . . . . . . . . . . . . . . . . . . . . . . . . . . . . . . . . . . . . . . . . . . . . . . . . . . 151
Calendar Settings . . . . . . . . . . . . . . . . . . . . . . . . . . . . . . . . . . . . . . . . . . . . . . . . . . . . . . . . . 151
12. Taking Photos . . . . . . . . . . . . . . . . . . . . . . . . . . . . . . . . . . . . . . . . . . . . . . . . . . . . . . . . . . . . . . . . . 153
Camera Splash Screen . . . . . . . . . . . . . . . . . . . . . . . . . . . . . . . . . . . . . . . . . . . . . . . . . . . . . 153
Keyboard Shortcuts . . . . . . . . . . . . . . . . . . . . . . . . . . . . . . . . . . . . . . . . . . . . . . . . . . . . . . . 154
Insert the Camera . . . . . . . . . . . . . . . . . . . . . . . . . . . . . . . . . . . . . . . . . . . . . . . . . . . . . . . . 154
About Capture Modes . . . . . . . . . . . . . . . . . . . . . . . . . . . . . . . . . . . . . . . . . . . . . . . . . . . . . . 155
Take a Ph oto . . . . . . . . . . . . . . . . . . . . . . . . . . . . . . . . . . . . . . . . . . . . . . . . . . . . . . . . . . . . 155
View Your Photo Gallery . . . . . . . . . . . . . . . . . . . . . . . . . . . . . . . . . . . . . . . . . . . . . . . . . . . . 156
Email Photos . . . . . . . . . . . . . . . . . . . . . . . . . . . . . . . . . . . . . . . . . . . . . . . . . . . . . . . . . . . . 158
Change the Name of a Photo . . . . . . . . . . . . . . . . . . . . . . . . . . . . . . . . . . . . . . . . . . . . . . . . 158
Sort Photos . . . . . . . . . . . . . . . . . . . . . . . . . . . . . . . . . . . . . . . . . . . . . . . . . . . . . . . . . . . . . 159
Discard Photos . . . . . . . . . . . . . . . . . . . . . . . . . . . . . . . . . . . . . . . . . . . . . . . . . . . . . . . . . . 159
13. Keeping T o Do Lists . . . . . . . . . . . . . . . . . . . . . . . . . . . . . . . . . . . . . . . . . . . . . . . . . . . . . . . . . . . . 160
To Do Sp la s h Sc reen . . . . . . . . . . . . . . . . . . . . . . . . . . . . . . . . . . . . . . . . . . . . . . . . . . . . . . 160
Keyboard Shortcuts . . . . . . . . . . . . . . . . . . . . . . . . . . . . . . . . . . . . . . . . . . . . . . . . . . . . . . . 161
The Browse Tasks Screen . . . . . . . . . . . . . . . . . . . . . . . . . . . . . . . . . . . . . . . . . . . . . . . . . . . 161
Task V iews . . . . . . . . . . . . . . . . . . . . . . . . . . . . . . . . . . . . . . . . . . . . . . . . . . . . . . . . . . . . . 162
Sort Tasks . . . . . . . . . . . . . . . . . . . . . . . . . . . . . . . . . . . . . . . . . . . . . . . . . . . . . . . . . . . . . . 16 2
Task Details Screen . . . . . . . . . . . . . . . . . . . . . . . . . . . . . . . . . . . . . . . . . . . . . . . . . . . . . . . 163
Create a New Task . . . . . . . . . . . . . . . . . . . . . . . . . . . . . . . . . . . . . . . . . . . . . . . . . . . . . . . . 163
Edit a Task . . . . . . . . . . . . . . . . . . . . . . . . . . . . . . . . . . . . . . . . . . . . . . . . . . . . . . . . . . . . . 164
Mark a Task Completed . . . . . . . . . . . . . . . . . . . . . . . . . . . . . . . . . . . . . . . . . . . . . . . . . . . . 165
Discard a Task . . . . . . . . . . . . . . . . . . . . . . . . . . . . . . . . . . . . . . . . . . . . . . . . . . . . . . . . . . . 165
Manage Your To Do Trash . . . . . . . . . . . . . . . . . . . . . . . . . . . . . . . . . . . . . . . . . . . . . . . . . . . 165
October 21, 2003 T-Mobile Sidekick Owner’s Manua l 6
Page 7

Contents
14. Keeping Notes. . . . . . . . . . . . . . . . . . . . . . . . . . . . . . . . . . . . . . . . . . . . . . . . . . . . . . . . . . . . . . . . . 167
Notes Splash Screen . . . . . . . . . . . . . . . . . . . . . . . . . . . . . . . . . . . . . . . . . . . . . . . . . . . . . . 167
Keyboard Shortcuts . . . . . . . . . . . . . . . . . . . . . . . . . . . . . . . . . . . . . . . . . . . . . . . . . . . . . . . 168
View Your Notes . . . . . . . . . . . . . . . . . . . . . . . . . . . . . . . . . . . . . . . . . . . . . . . . . . . . . . . . . 168
Sort Your Notes . . . . . . . . . . . . . . . . . . . . . . . . . . . . . . . . . . . . . . . . . . . . . . . . . . . . . . . . . . 169
Add a Note . . . . . . . . . . . . . . . . . . . . . . . . . . . . . . . . . . . . . . . . . . . . . . . . . . . . . . . . . . . . . 17 0
Edit a Note . . . . . . . . . . . . . . . . . . . . . . . . . . . . . . . . . . . . . . . . . . . . . . . . . . . . . . . . . . . . . 170
Discard a Note . . . . . . . . . . . . . . . . . . . . . . . . . . . . . . . . . . . . . . . . . . . . . . . . . . . . . . . . . . . 170
Manage Your Notes Trash . . . . . . . . . . . . . . . . . . . . . . . . . . . . . . . . . . . . . . . . . . . . . . . . . . . 171
15. Playing Rock & Rocket. . . . . . . . . . . . . . . . . . . . . . . . . . . . . . . . . . . . . . . . . . . . . . . . . . . . . . . . . . 172
Rock & Rocket Splash Screen . . . . . . . . . . . . . . . . . . . . . . . . . . . . . . . . . . . . . . . . . . . . . . . . 172
The Object . . . . . . . . . . . . . . . . . . . . . . . . . . . . . . . . . . . . . . . . . . . . . . . . . . . . . . . . . . . . . 172
What Happens . . . . . . . . . . . . . . . . . . . . . . . . . . . . . . . . . . . . . . . . . . . . . . . . . . . . . . . . . . . 173
Scoring . . . . . . . . . . . . . . . . . . . . . . . . . . . . . . . . . . . . . . . . . . . . . . . . . . . . . . . . . . . . . . . . 173
Hints . . . . . . . . . . . . . . . . . . . . . . . . . . . . . . . . . . . . . . . . . . . . . . . . . . . . . . . . . . . . . . . . . 173
Controls . . . . . . . . . . . . . . . . . . . . . . . . . . . . . . . . . . . . . . . . . . . . . . . . . . . . . . . . . . . . . . . 173
16. Playing UI Evolution Arcade Games . . . . . . . . . . . . . . . . . . . . . . . . . . . . . . . . . . . . . . . . . . . . . . 174
Arcade Splash Screen . . . . . . . . . . . . . . . . . . . . . . . . . . . . . . . . . . . . . . . . . . . . . . . . . . . . . . 174
Bubbles . . . . . . . . . . . . . . . . . . . . . . . . . . . . . . . . . . . . . . . . . . . . . . . . . . . . . . . . . . . . . . . 175
Code Monkey . . . . . . . . . . . . . . . . . . . . . . . . . . . . . . . . . . . . . . . . . . . . . . . . . . . . . . . . . . . 176
Shuffle . . . . . . . . . . . . . . . . . . . . . . . . . . . . . . . . . . . . . . . . . . . . . . . . . . . . . . . . . . . . . . . . 177
Lab Ratz . . . . . . . . . . . . . . . . . . . . . . . . . . . . . . . . . . . . . . . . . . . . . . . . . . . . . . . . . . . . . . . 178
17. The Catalog . . . . . . . . . . . . . . . . . . . . . . . . . . . . . . . . . . . . . . . . . . . . . . . . . . . . . . . . . . . . . . . . . . . 180
Catalog Splash Screens . . . . . . . . . . . . . . . . . . . . . . . . . . . . . . . . . . . . . . . . . . . . . . . . . . . . 180
Icon Legend . . . . . . . . . . . . . . . . . . . . . . . . . . . . . . . . . . . . . . . . . . . . . . . . . . . . . . . . . . . . 181
Purchase Limits - Slots and Bl ocks . . . . . . . . . . . . . . . . . . . . . . . . . . . . . . . . . . . . . . . . . . . . . 182
Browse the Catalog Contents . . . . . . . . . . . . . . . . . . . . . . . . . . . . . . . . . . . . . . . . . . . . . . . . 183
The Item Details Screens . . . . . . . . . . . . . . . . . . . . . . . . . . . . . . . . . . . . . . . . . . . . . . . . . . . 185
Purchase an Item . . . . . . . . . . . . . . . . . . . . . . . . . . . . . . . . . . . . . . . . . . . . . . . . . . . . . . . . 186
Application Installation . . . . . . . . . . . . . . . . . . . . . . . . . . . . . . . . . . . . . . . . . . . . . . . . . . . . . 188
Assign Ringtones to Appl ic a tion A lerts and Notifications . . . . . . . . . . . . . . . . . . . . . . . . . . . . . . 188
View Your Purchases . . . . . . . . . . . . . . . . . . . . . . . . . . . . . . . . . . . . . . . . . . . . . . . . . . . . . . 188
Reorder Downloaded Applications on the Jump Screen . . . . . . . . . . . . . . . . . . . . . . . . . . . . . . 189
Discard Purchased Items . . . . . . . . . . . . . . . . . . . . . . . . . . . . . . . . . . . . . . . . . . . . . . . . . . . 190
18. The Desktop Interface. . . . . . . . . . . . . . . . . . . . . . . . . . . . . . . . . . . . . . . . . . . . . . . . . . . . . . . . . . 191
Jump Page . . . . . . . . . . . . . . . . . . . . . . . . . . . . . . . . . . . . . . . . . . . . . . . . . . . . . . . . . . . . . 191
More About the Desktop Interface Applications . . . . . . . . . . . . . . . . . . . . . . . . . . . . . . . . . . . . 192
Signing Out . . . . . . . . . . . . . . . . . . . . . . . . . . . . . . . . . . . . . . . . . . . . . . . . . . . . . . . . . . . . . 192
19. Sending Email from the Web . . . . . . . . . . . . . . . . . . . . . . . . . . . . . . . . . . . . . . . . . . . . . . . . . . . . 193
Opening Email on the Web . . . . . . . . . . . . . . . . . . . . . . . . . . . . . . . . . . . . . . . . . . . . . . . . . . 193
Your Inbox . . . . . . . . . . . . . . . . . . . . . . . . . . . . . . . . . . . . . . . . . . . . . . . . . . . . . . . . . . . . . 194
View Your Email . . . . . . . . . . . . . . . . . . . . . . . . . . . . . . . . . . . . . . . . . . . . . . . . . . . . . . . . . . 195
October 21, 2003 T-Mobile Sidekick Owner’s Manua l 7
Page 8

Contents
Send a New Message . . . . . . . . . . . . . . . . . . . . . . . . . . . . . . . . . . . . . . . . . . . . . . . . . . . . . . 196
Attach Photos and Files to a Messa g e . . . . . . . . . . . . . . . . . . . . . . . . . . . . . . . . . . . . . . . . . . 197
Web Email Settings . . . . . . . . . . . . . . . . . . . . . . . . . . . . . . . . . . . . . . . . . . . . . . . . . . . . . . . 198
Accounts . . . . . . . . . . . . . . . . . . . . . . . . . . . . . . . . . . . . . . . . . . . . . . . . . . . . . . . . . . . . . . . 203
Collect Mail from an External Accoun t . . . . . . . . . . . . . . . . . . . . . . . . . . . . . . . . . . . . . . . . . . 205
Move Messages to Folders . . . . . . . . . . . . . . . . . . . . . . . . . . . . . . . . . . . . . . . . . . . . . . . . . . 206
Discard Email Messages . . . . . . . . . . . . . . . . . . . . . . . . . . . . . . . . . . . . . . . . . . . . . . . . . . . . 206
20. Using Address Book on the Web . . . . . . . . . . . . . . . . . . . . . . . . . . . . . . . . . . . . . . . . . . . . . . . . . 207
Opening Address Book on the Web . . . . . . . . . . . . . . . . . . . . . . . . . . . . . . . . . . . . . . . . . . . . 207
Browse Contacts . . . . . . . . . . . . . . . . . . . . . . . . . . . . . . . . . . . . . . . . . . . . . . . . . . . . . . . . . 208
How Many Contacts Can I Store? . . . . . . . . . . . . . . . . . . . . . . . . . . . . . . . . . . . . . . . . . . . . . 208
Browse Contacts Page . . . . . . . . . . . . . . . . . . . . . . . . . . . . . . . . . . . . . . . . . . . . . . . . . . . . . 208
Address Book Settings . . . . . . . . . . . . . . . . . . . . . . . . . . . . . . . . . . . . . . . . . . . . . . . . . . . . . 209
Add a Contact . . . . . . . . . . . . . . . . . . . . . . . . . . . . . . . . . . . . . . . . . . . . . . . . . . . . . . . . . . . . . . . . . . 212
Edit a Contact . . . . . . . . . . . . . . . . . . . . . . . . . . . . . . . . . . . . . . . . . . . . . . . . . . . . . . . . . . . 21 4
Discard/Retrieve a Contact . . . . . . . . . . . . . . . . . . . . . . . . . . . . . . . . . . . . . . . . . . . . . . . . . . 215
Import Contacts . . . . . . . . . . . . . . . . . . . . . . . . . . . . . . . . . . . . . . . . . . . . . . . . . . . . . . . . . . 21 6
Communicate with a Contact . . . . . . . . . . . . . . . . . . . . . . . . . . . . . . . . . . . . . . . . . . . . . . . . 217
Empty the Trash . . . . . . . . . . . . . . . . . . . . . . . . . . . . . . . . . . . . . . . . . . . . . . . . . . . . . . . . . 217
21. Using Calendar on the Web . . . . . . . . . . . . . . . . . . . . . . . . . . . . . . . . . . . . . . . . . . . . . . . . . . . . . 218
Opening Calendar on the Web . . . . . . . . . . . . . . . . . . . . . . . . . . . . . . . . . . . . . . . . . . . . . . . . 218
Settings . . . . . . . . . . . . . . . . . . . . . . . . . . . . . . . . . . . . . . . . . . . . . . . . . . . . . . . . . . . . . . . 220
View Events . . . . . . . . . . . . . . . . . . . . . . . . . . . . . . . . . . . . . . . . . . . . . . . . . . . . . . . . . . . . 221
View an Event . . . . . . . . . . . . . . . . . . . . . . . . . . . . . . . . . . . . . . . . . . . . . . . . . . . . . . . . . . . 223
Add an Event . . . . . . . . . . . . . . . . . . . . . . . . . . . . . . . . . . . . . . . . . . . . . . . . . . . . . . . . . . . . 223
Edit an Event . . . . . . . . . . . . . . . . . . . . . . . . . . . . . . . . . . . . . . . . . . . . . . . . . . . . . . . . . . . . 226
Discard an Event . . . . . . . . . . . . . . . . . . . . . . . . . . . . . . . . . . . . . . . . . . . . . . . . . . . . . . . . . 227
Manage Your Trash . . . . . . . . . . . . . . . . . . . . . . . . . . . . . . . . . . . . . . . . . . . . . . . . . . . . . . . 227
Import Contacts . . . . . . . . . . . . . . . . . . . . . . . . . . . . . . . . . . . . . . . . . . . . . . . . . . . . . . . . . . 22 8
22. Camera Gallery on the Web . . . . . . . . . . . . . . . . . . . . . . . . . . . . . . . . . . . . . . . . . . . . . . . . . . . . . 229
Opening Camera Gallery on the Web . . . . . . . . . . . . . . . . . . . . . . . . . . . . . . . . . . . . . . . . . . . 229
Sort Your Photos . . . . . . . . . . . . . . . . . . . . . . . . . . . . . . . . . . . . . . . . . . . . . . . . . . . . . . . . . 230
Full-Screen Photo View . . . . . . . . . . . . . . . . . . . . . . . . . . . . . . . . . . . . . . . . . . . . . . . . . . . . . 230
Rename Your Photos . . . . . . . . . . . . . . . . . . . . . . . . . . . . . . . . . . . . . . . . . . . . . . . . . . . . . . 231
Discard a Photo . . . . . . . . . . . . . . . . . . . . . . . . . . . . . . . . . . . . . . . . . . . . . . . . . . . . . . . . . . 23 1
Attach Photo(s) to an Email . . . . . . . . . . . . . . . . . . . . . . . . . . . . . . . . . . . . . . . . . . . . . . . . . 231
23. Keeping a To Do List on the Web. . . . . . . . . . . . . . . . . . . . . . . . . . . . . . . . . . . . . . . . . . . . . . . . . 232
Opening To Do on the Web . . . . . . . . . . . . . . . . . . . . . . . . . . . . . . . . . . . . . . . . . . . . . . . . . . 232
About To Do Items . . . . . . . . . . . . . . . . . . . . . . . . . . . . . . . . . . . . . . . . . . . . . . . . . . . . . . . . 233
Browse Tasks . . . . . . . . . . . . . . . . . . . . . . . . . . . . . . . . . . . . . . . . . . . . . . . . . . . . . . . . . . . 233
Add a New Task . . . . . . . . . . . . . . . . . . . . . . . . . . . . . . . . . . . . . . . . . . . . . . . . . . . . . . . . . . 234
Edit a Task . . . . . . . . . . . . . . . . . . . . . . . . . . . . . . . . . . . . . . . . . . . . . . . . . . . . . . . . . . . . . 234
Mark a Task as Complete . . . . . . . . . . . . . . . . . . . . . . . . . . . . . . . . . . . . . . . . . . . . . . . . . . . 235
October 21, 2003 T-Mobile Sidekick Owner’s Manua l 8
Page 9

Contents
Discard a Task . . . . . . . . . . . . . . . . . . . . . . . . . . . . . . . . . . . . . . . . . . . . . . . . . . . . . . . . . . . 235
Discard Completed Tasks . . . . . . . . . . . . . . . . . . . . . . . . . . . . . . . . . . . . . . . . . . . . . . . . . . . 235
Manage Trash . . . . . . . . . . . . . . . . . . . . . . . . . . . . . . . . . . . . . . . . . . . . . . . . . . . . . . . . . . . 235
24. Keeping Notes on the Web. . . . . . . . . . . . . . . . . . . . . . . . . . . . . . . . . . . . . . . . . . . . . . . . . . . . . . 236
Opening Notes on the Web . . . . . . . . . . . . . . . . . . . . . . . . . . . . . . . . . . . . . . . . . . . . . . . . . . 236
Browse Notes . . . . . . . . . . . . . . . . . . . . . . . . . . . . . . . . . . . . . . . . . . . . . . . . . . . . . . . . . . . 236
Add a Note . . . . . . . . . . . . . . . . . . . . . . . . . . . . . . . . . . . . . . . . . . . . . . . . . . . . . . . . . . . . . 23 7
Edit a Note . . . . . . . . . . . . . . . . . . . . . . . . . . . . . . . . . . . . . . . . . . . . . . . . . . . . . . . . . . . . . 237
Discard a Note . . . . . . . . . . . . . . . . . . . . . . . . . . . . . . . . . . . . . . . . . . . . . . . . . . . . . . . . . . . 237
Manage Your Trash . . . . . . . . . . . . . . . . . . . . . . . . . . . . . . . . . . . . . . . . . . . . . . . . . . . . . . . 238
25. Settings on the Web. . . . . . . . . . . . . . . . . . . . . . . . . . . . . . . . . . . . . . . . . . . . . . . . . . . . . . . . . . . . 239
Opening Settings on the Web . . . . . . . . . . . . . . . . . . . . . . . . . . . . . . . . . . . . . . . . . . . . . . . . 239
Account Information . . . . . . . . . . . . . . . . . . . . . . . . . . . . . . . . . . . . . . . . . . . . . . . . . . . . . . 240
System Information . . . . . . . . . . . . . . . . . . . . . . . . . . . . . . . . . . . . . . . . . . . . . . . . . . . . . . . 240
October 21, 2003 T-Mobile Sidekick Owner’s Manua l 9
Page 10
1. Device Basics
Read the topics in this chapter to get a quick understand ing of how your device operates:
• Parts of Your T-Mobile Sidekick on page
10
• Device Display on page 10
• Wireless Options on page 14
• Sound Controls on page 15
• Keyboard on page 15
• Control Buttons on page 16
• Wheel on page 19
• Terminology Used in This Manual on page
19
• Headset/Camera Jack on page 22
• The Battery on page 22
• Infrared Port on page 24
• USB Port on page 24
• Typing and Navigating in Te xt Fields on
page 24
• Using the Carrying Case on page 27
• Use Your Device Safely on page 27
• FCC Compliance on page 28
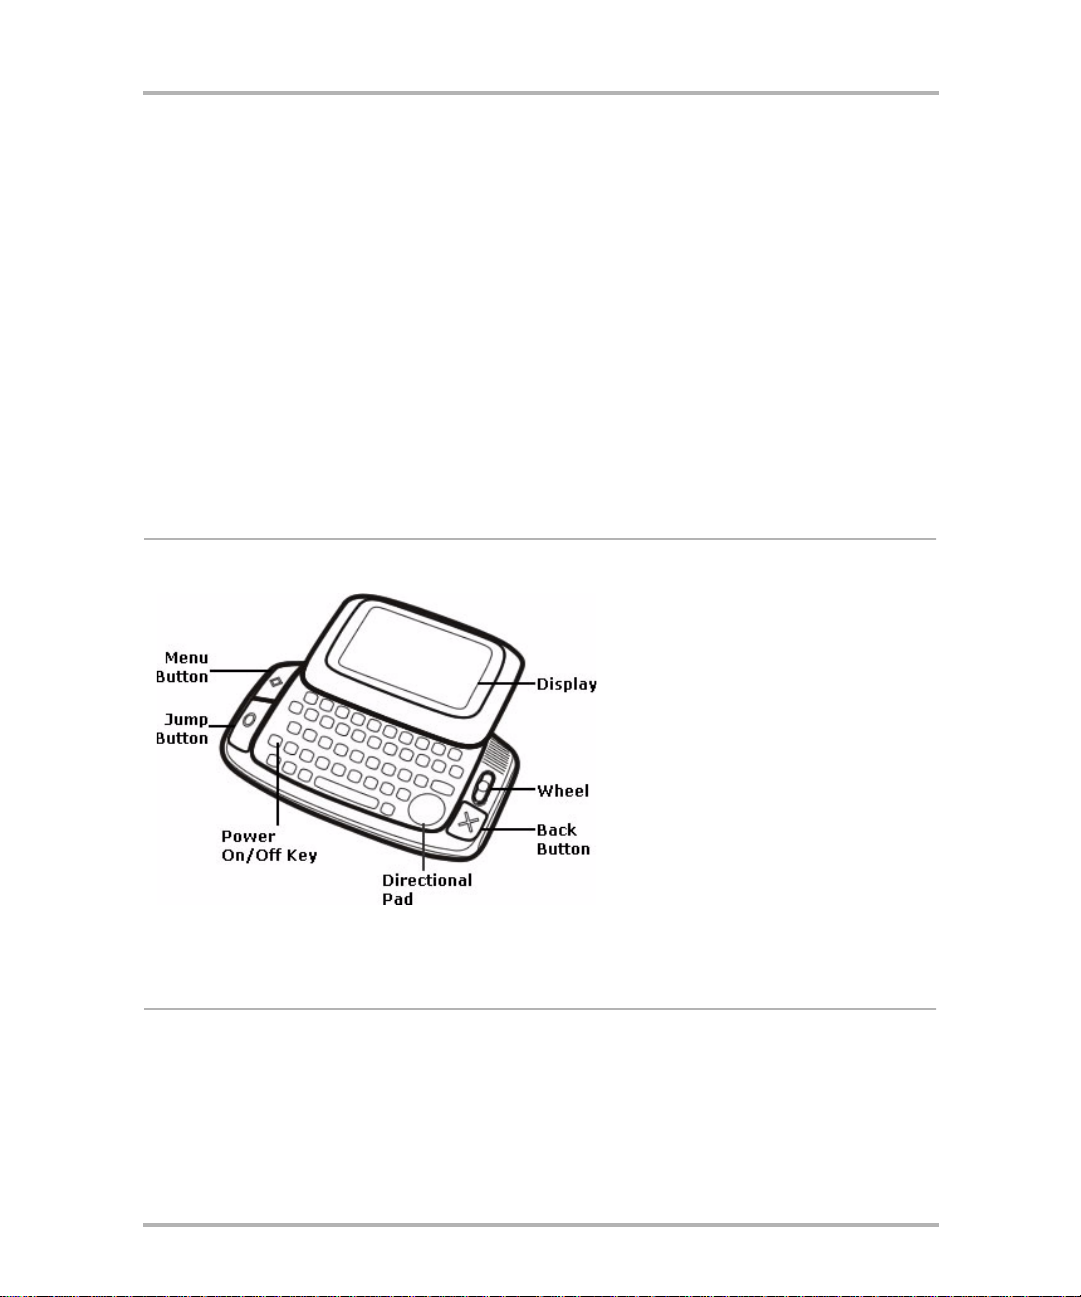
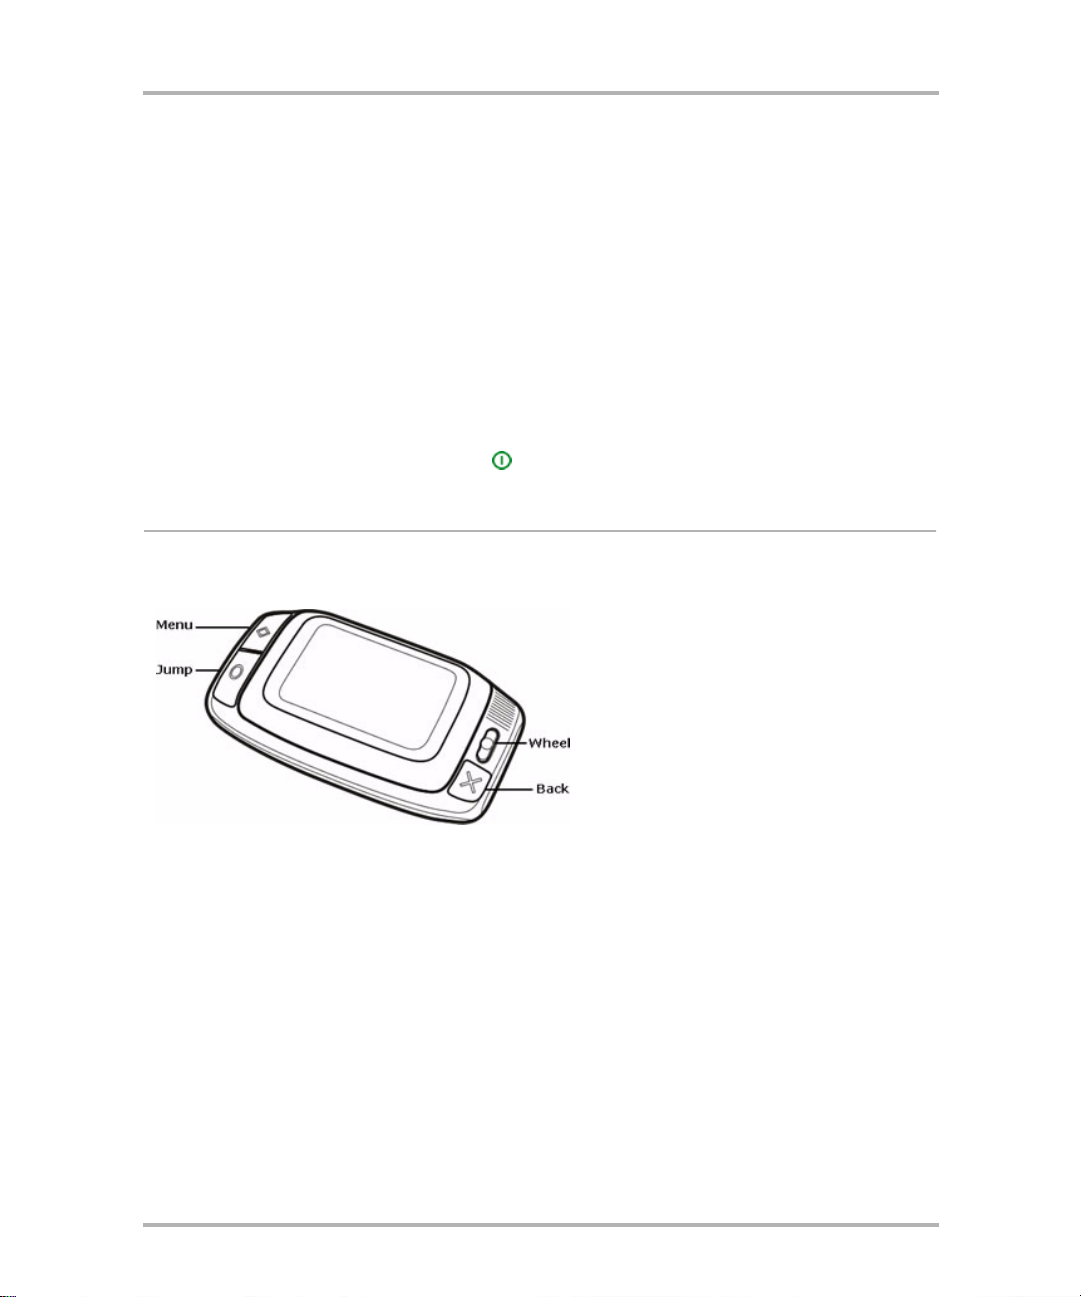
Parts of Your T-Mobile Sidekick
The illustration below identifies the basic parts of your device.
Each part is described in more detail in the topics below.
Device Display
Your device comes with a swivel display lid that covers the keyboard in the closed position. Even when closed,
the LCD faces up and the control buttons are exposed, so you can use your device. When you open the display
lid (by rotating it clockwise), the display automatically flips 180-degrees. Read more details below.
Warning! The hinge in the swivel display lid is assisted by a very strong magnet. Be careful to keep the device
away from magnetically sensitive items, such as credit cards and floppy disks.
October 21, 2003 T-Mobile Sidekick Owner’s Manua l 10
Page 11
Device Basics
Opening and Closing the Display
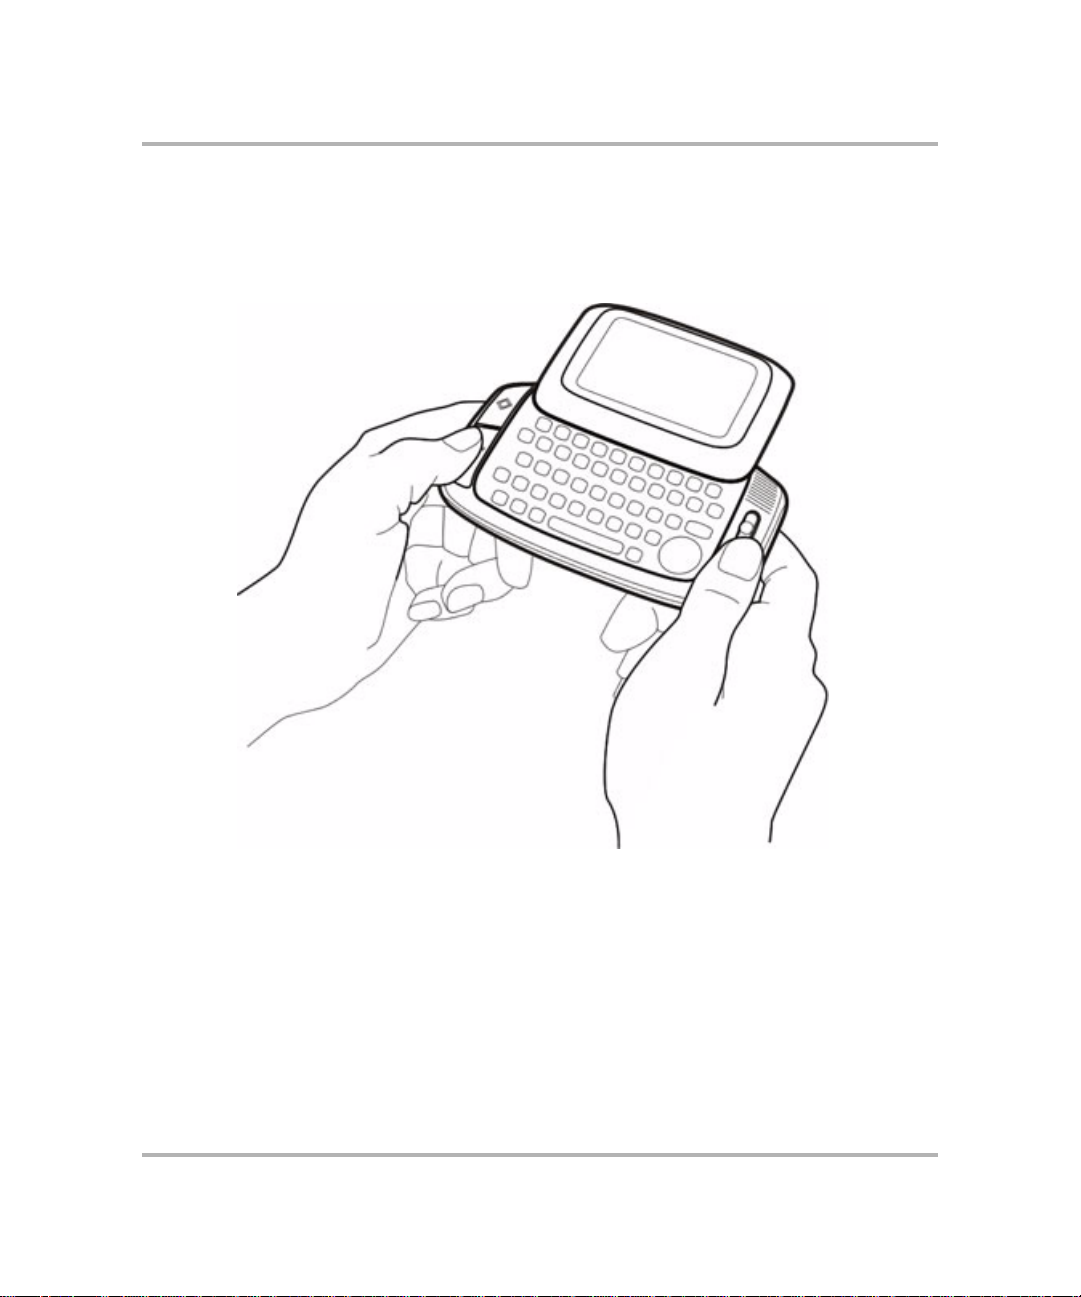
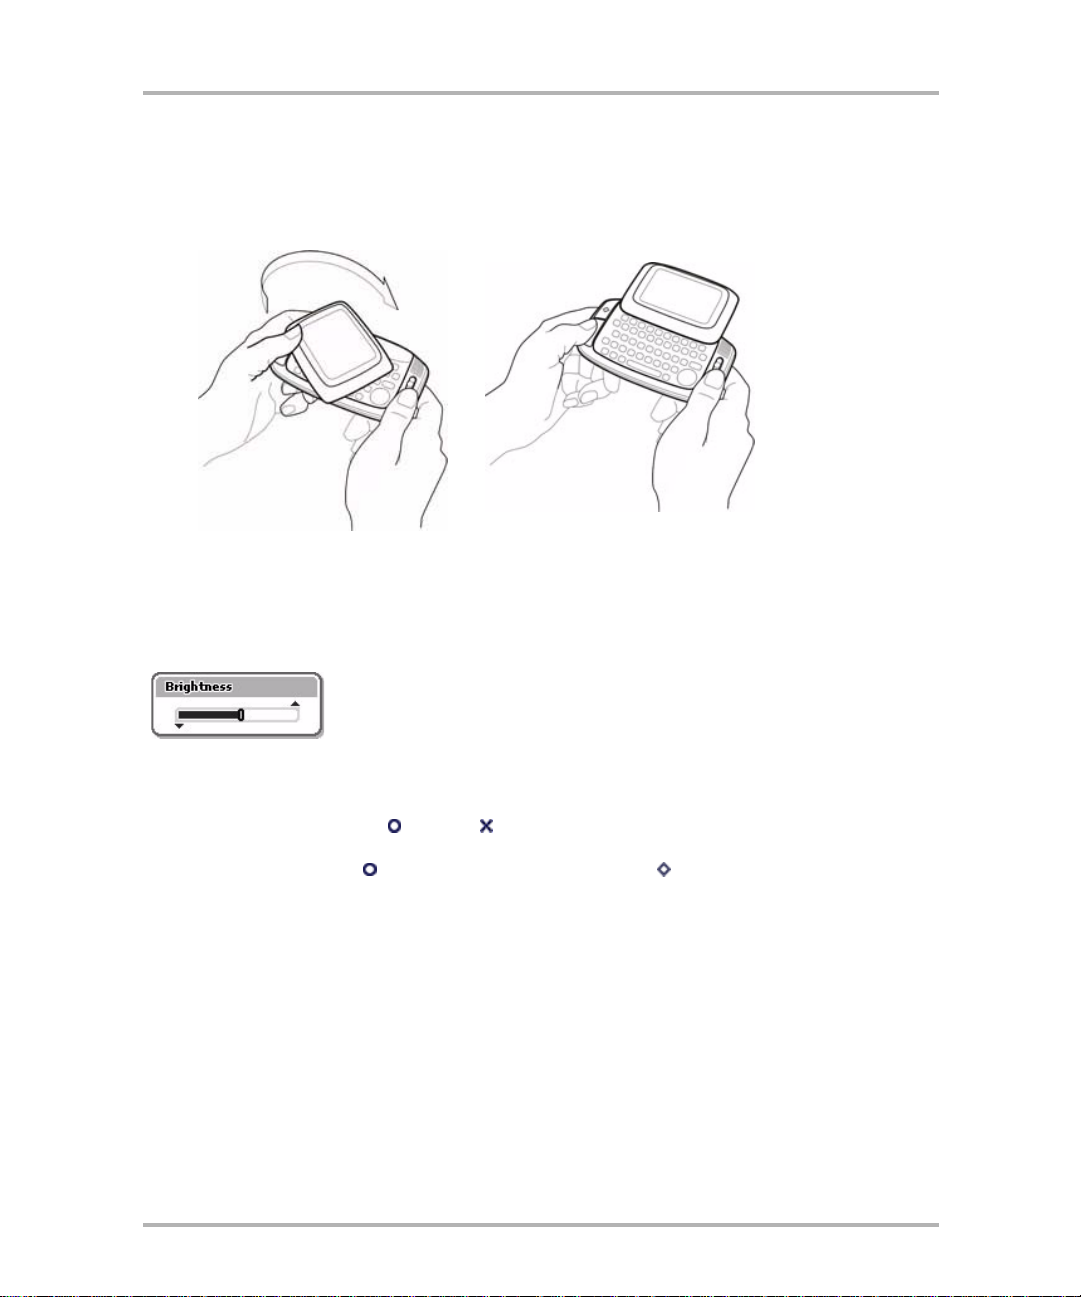
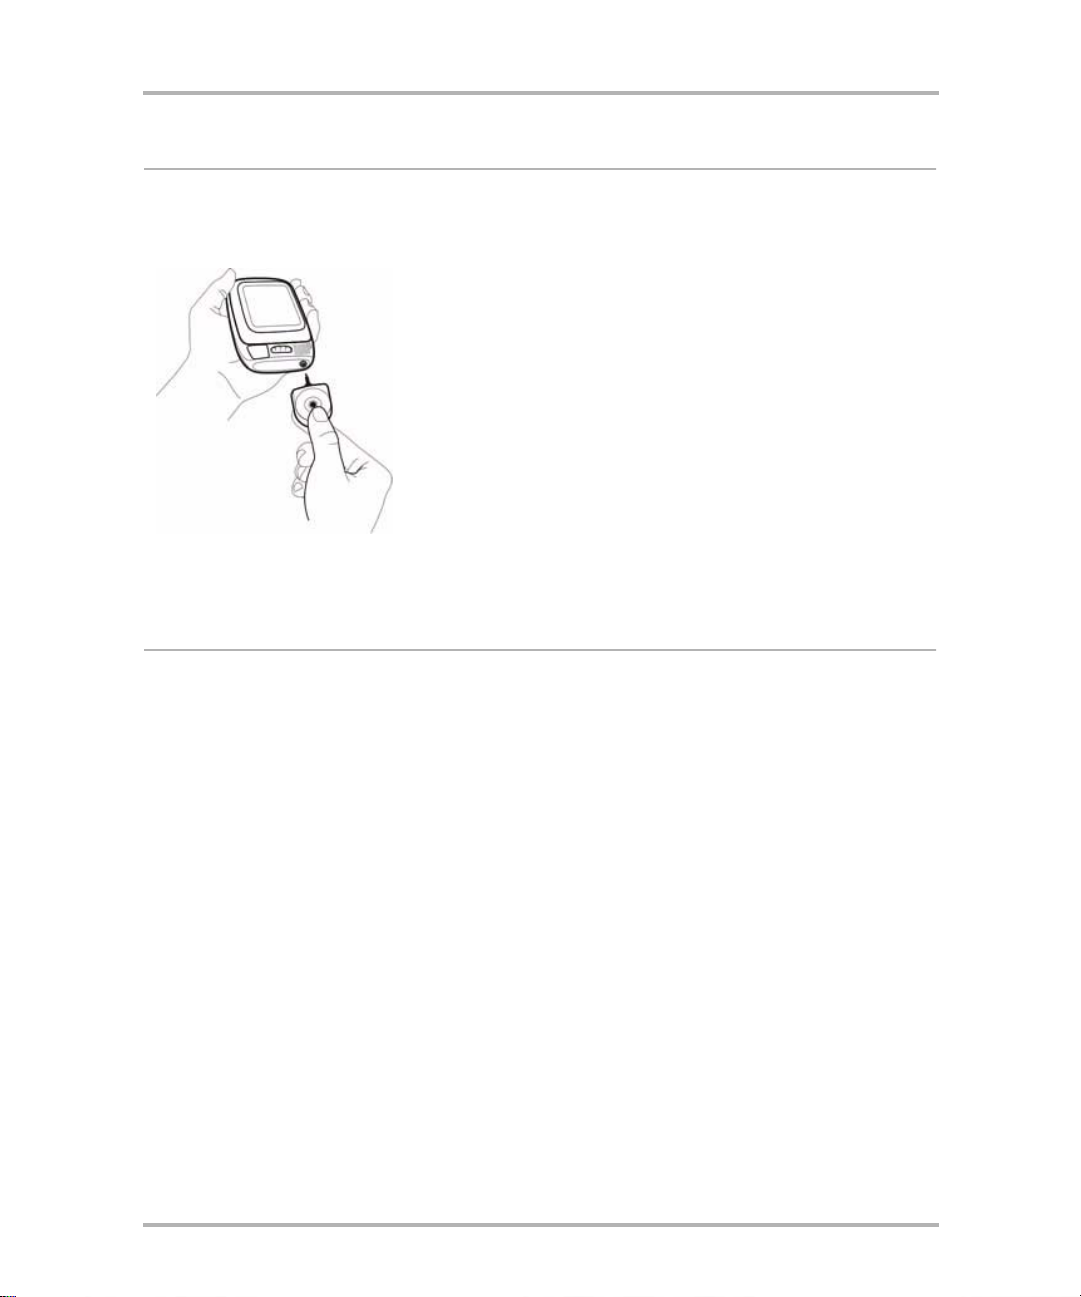
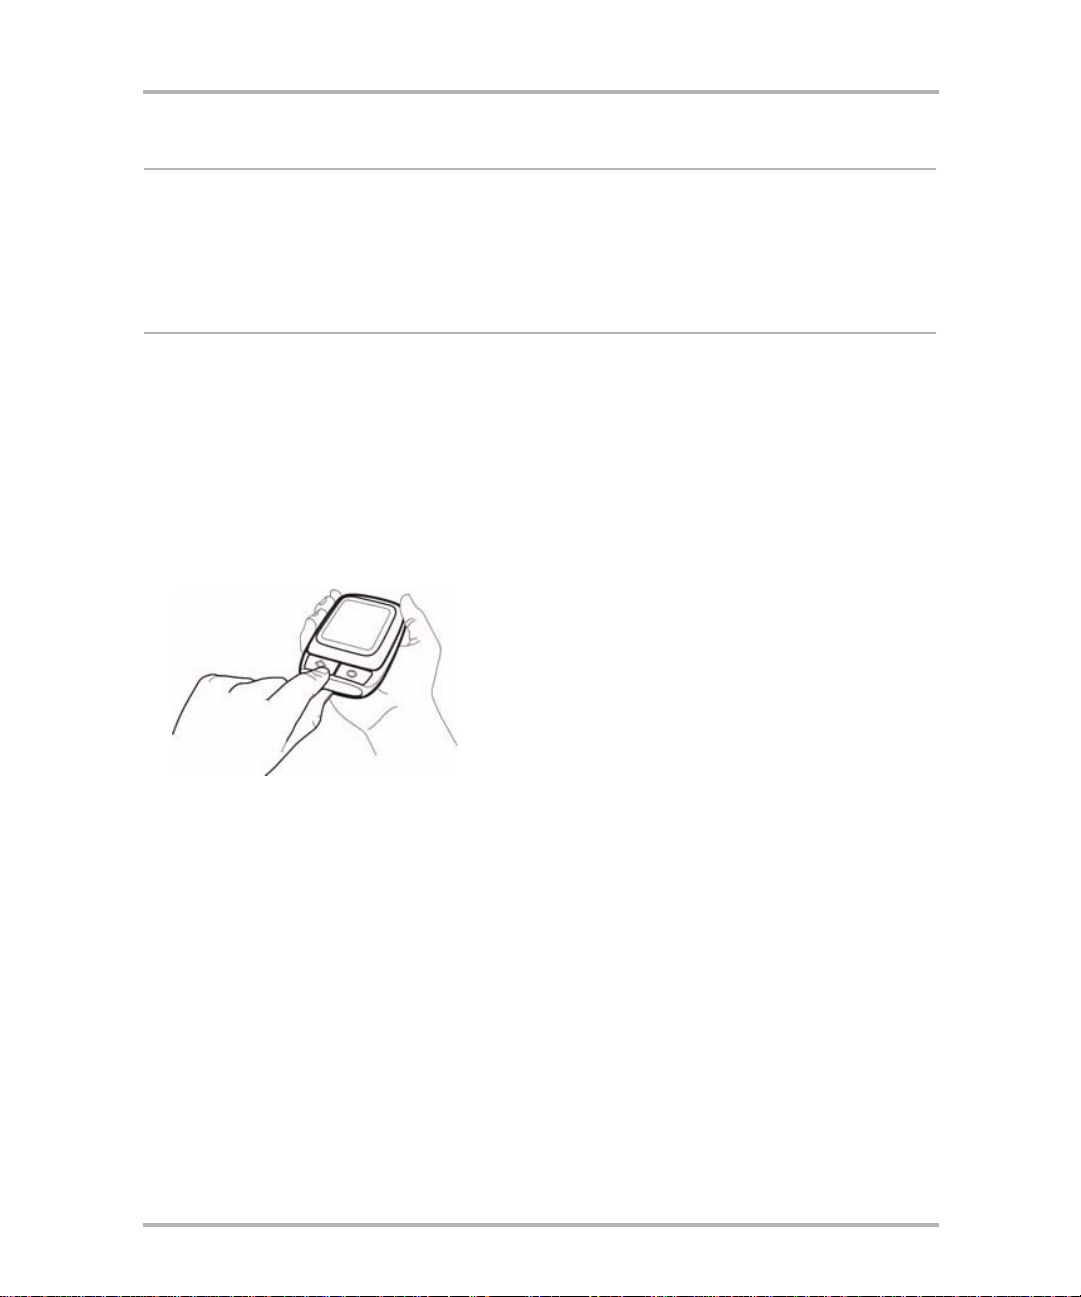
1 To open the display, place your left thumb on the lower-left corner and your right forefinger on the upper-
right corner of the display and gently push in a clockwise direction. The display will spring smoothly into
position:
2 To close the display, reverse the motion to pivot the lid counter-clockwise and lock it into the closed
position.
Display Control
The Display Control dialog box contains a slider that you use to adjust your device display at any time:
Note for grayscale devices: The slider controls contrast rather than brightness.
There are two ways you can open the Display Control:
• Method 1: Press the Jump and Back buttons together . You can use this method from any screen, in
any application, at any time.
• Method 2: Press Jump to open the Jump screen. Press Menu to open the Jump screen menu.
Select Controls > Display.
Adjust your display brightness/contrast to complement your current lighting environment. Rotate the wheel up to
increase brightness/contrast; rotate the wheel down to decrease brightness/contrast.
October 21, 2003 T-Mobile Sidekick Owner’s Manua l 11
Page 12
Device Basics
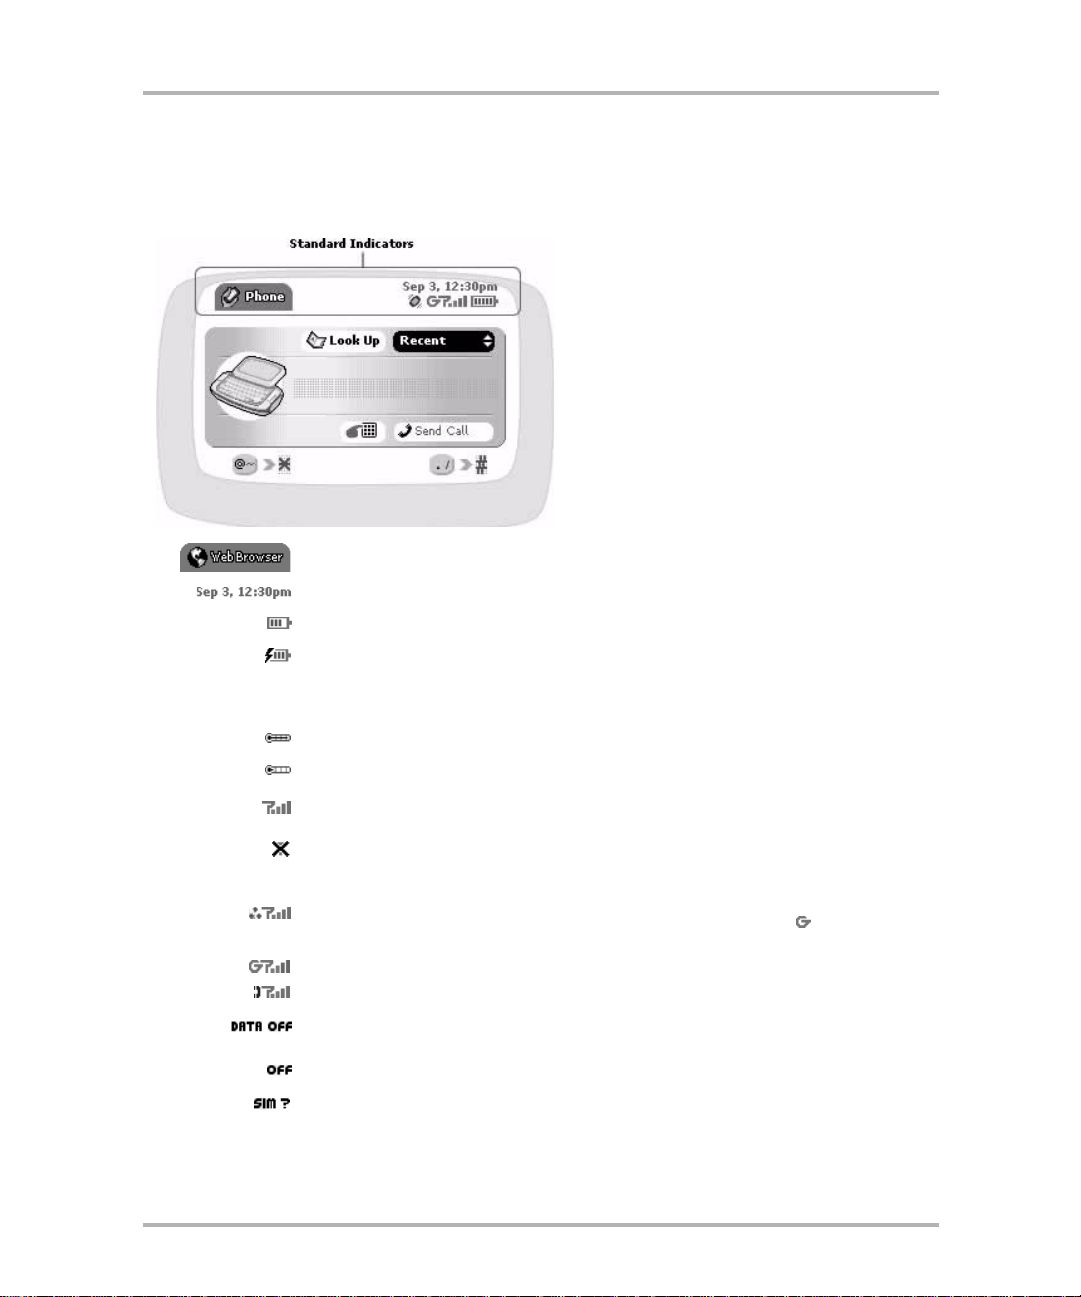
Standard Display Screen Indicators
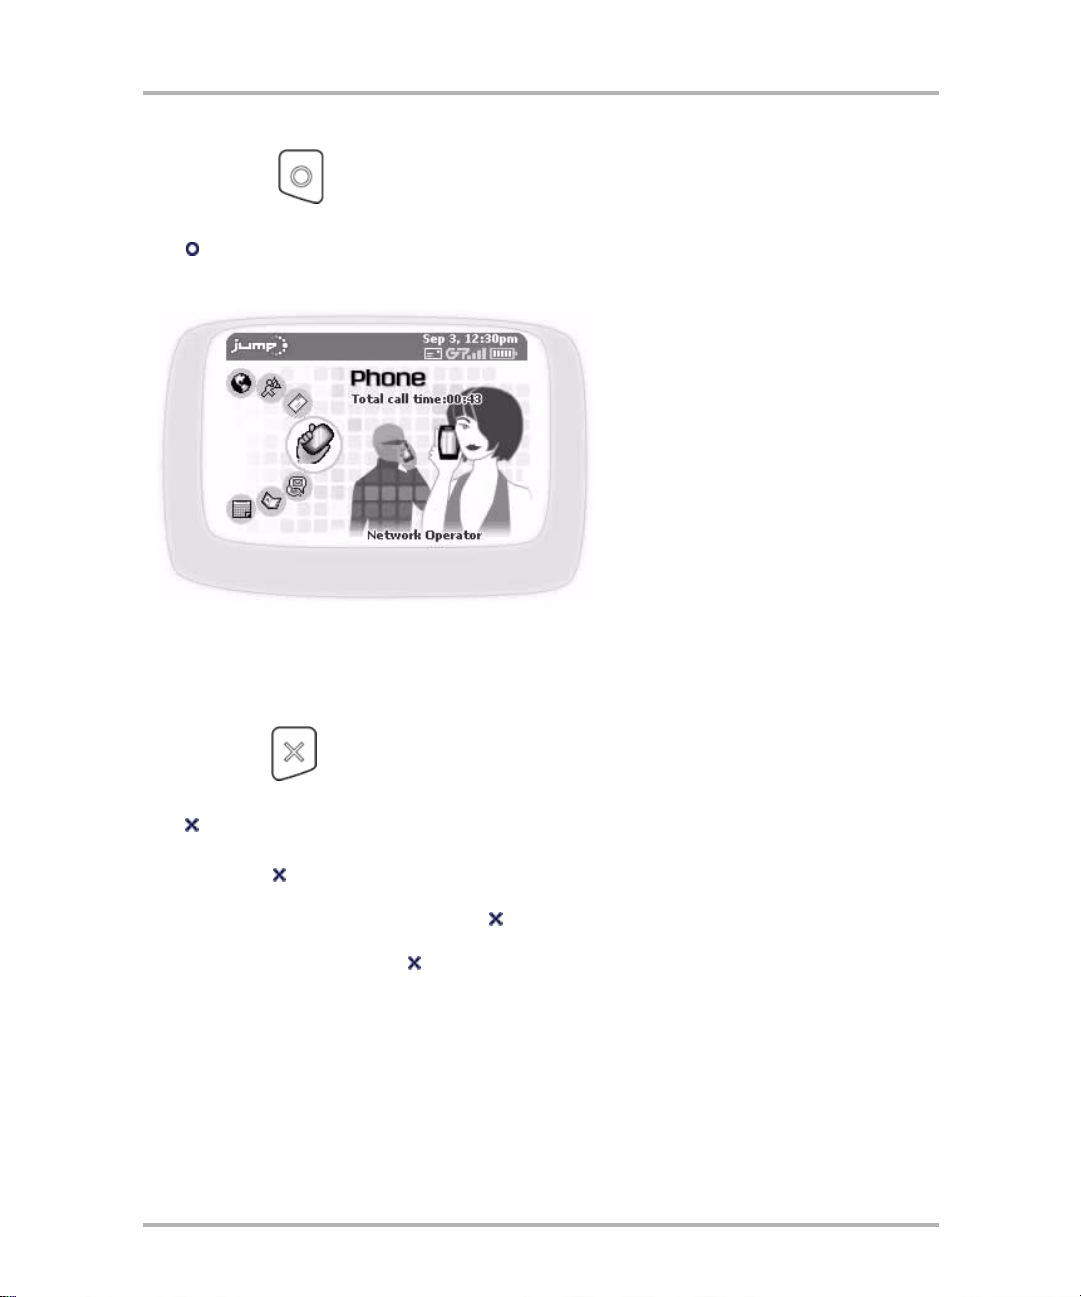
The display screen is your view into the T-M obile applications, so what you see on the screen depends on what
application you are using. However, there are some standard indicators that display on the screen at all times.
These indicators are located at the top of the screen in the area circled in the example below.
Screen identifier. Lets you know what application screen you are currently viewing.
Current date and time.
Battery charge. The more bars that fill the battery icon, the more power in the battery .
Battery charging. When your device is connected to the battery charger, a lightning
bolt icon displays over the battery icon and the bars in the battery move from left to
right. You’ll know the battery is full-charged when the lightning bold icon disappears
and the battery bars stay in the full position.
When your device is too hot, this thermometer ind ica tor flashes over the battery.
When your device is too cold, this thermom eter indicator flashes over the battery.
Wireless signal strength. The more signal bands showing, the stronger the signal
strength of the wireless connection at your current location.
No wireless connection. If you see this X over the radio tower icon, it means y ou ha ve
temporarily lost network connection.
Connectivity status indicators. Animated one dot = connected to the GPRS network,
trying to get IP address; animated two dots = obtained IP addr ess, co nnecting to data
server; animated three dots = connected to data server; signing in; = signed in and
connected to data service; ready to go!
Full data and voice service available.
Voice-only (GSM) service available.
You are roaming on wireless services but have GPRS data roaming turned off on the
Jump menu > Controls> Wireless...> Wireless Options screen.
You have turned off your wireless connection from the Jump menu > Controls> Wire-
less... > Wireless Options screen.
Your SIM card has a problem, which is prohibiting access to wireless services.
October 21, 2003 T-Mobile Sidekick Owner’s Manua l 12
Page 13

Device Basics
Sound Profile setting. When you have sound turned off (“Mute”), the title bar will indicate whether you have flash or vibration set. From left to right, the icons indicate: total
mute (no flash or vibrate), flash only (no vibrate), vibrate.
You can read about other indicators and icons in the chapters describing each application.
Notifications
When you receive a new email, text message, insta nt message, or voice mail message, the service will give you
a visual notification in the title bar, no matter what application you’re currently viewing. Here’s an example of a
new email notification:
The notice will appear in a balloon just once. But, until you r ead or l isten t o your new message, you’ll see a little
icon in the title bar, reminding you that there’s a message wa iting:
In the example above, there’s an email message waiting to be read. Other icons you might see notify you of the
following:
New email message waiting.
New text message waiting.
New instant message (IM) waiting.
New voice message waiting.
Web page has finished loading.
If you have more than one reminder, the relevant message icons will display in sequence.
You can also choose to be notified of new messages using ringtones. Read more about ringtone notifications in
the following topics:
• Set Web Page Load Complete Alert
• Set Phone Ringtones
•
Edit a Buddy
Set Buddy Alert Rings
•
(Use to specify buddy-specific IM rings.)
(Use to specify default IM rings.)
• Set Email Ringtones
• Set Phone Messages Ringtones
October 21, 2003 T-Mobile Sidekick Owner’s Manua l 13
Page 14
Device Basics
Turning on Backlighting
To help you use your devic e in a dark environment, enable the automatic backlighting feature:
1 From the Jump screen, press Menu then select Settings > Battery & Display .
2 In the Backlight section of the screen, select the Automatically turn on when using device check box.
Note for color devices: To use the device’s light meter while the backlight is on, select the Use back light
only when needed check box.
3 Select the length of time you want backlighting to stay on from th e Turn on after pop-up menu.
4 Press Jump to return to the Jump screen.
Now, when you press any button or key on your device, or flip open the screen, backlighting will turn on for the
set amount of time. Note that as long as you press a key or button before the set time elapses, the backlight will
stay on.
Tip: Even if you have not enabled automatic backlig hting, you can still quickly turn on backlight ing by pressing
Jump + Back , which opens the Display Control, or by pressing Menu + Jump . The backlight turns on
and remains on for the time specified in the Backlight pop-up menu.
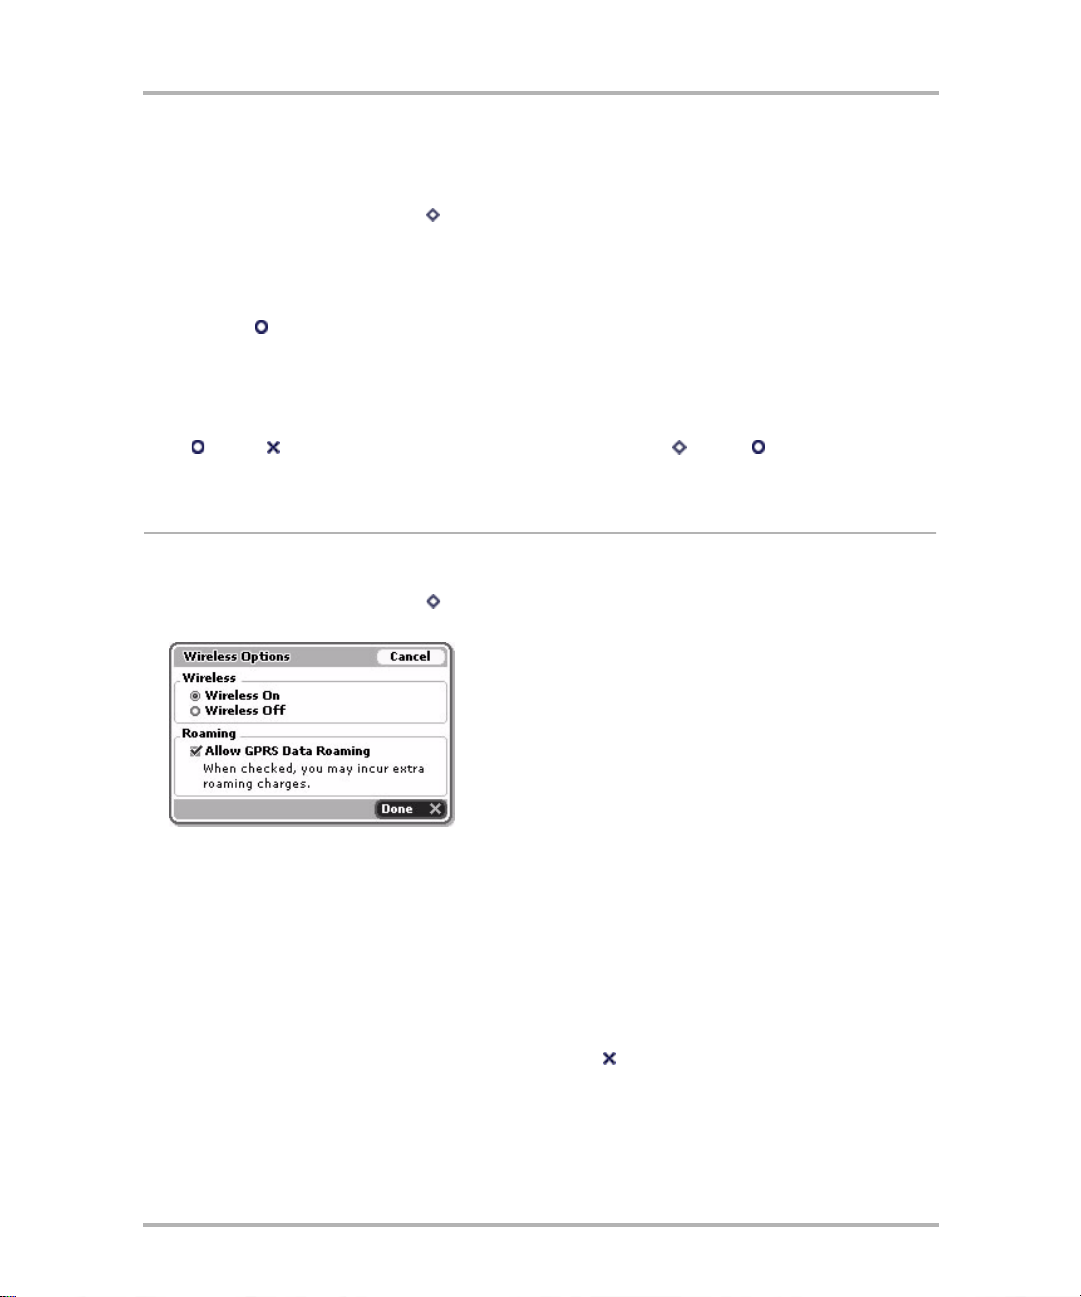
Wireless Options
If you want control over your wireless connectivity, you can do so from the Wireless Options dialog:
1 From the Jump screen, press Menu then select Controls > Wireless... to open the Wireless Option s
dialog box.
2 In the Wireless group box, use the option buttons to turn your wireless connection on/off. This is how you
turn off your wireless connection while on a plane or in a hospital, or anywhere where wireless connectivity
may interfere with the environment.
3 In the Roaming group box, select the Allow GPRS Data Roaming check box to allow GPRS dat a roaming;
clear the check box to disallow data roaming. Be aware that even if you have roaming turned on (box is
checked), your wireless carrier may have disabled roaming for the SIMs they distribute.
Note! When roaming outside the ho m e network, you may incur additional charges for data transfer with or
without taking any actions, such as receiving email messages. To avoid additional charges while roaming,
clear the Allow GPRS Data Roaming check box. If you do roam with GPRS Data Roaming not allowed, you
will still be able to make and receive voice calls.
4 Once yo u ’ve made you r wireless option choices, select Done .
October 21, 2003 T-Mobile Sidekick Owner’s Manua l 14
Page 15
Device Basics
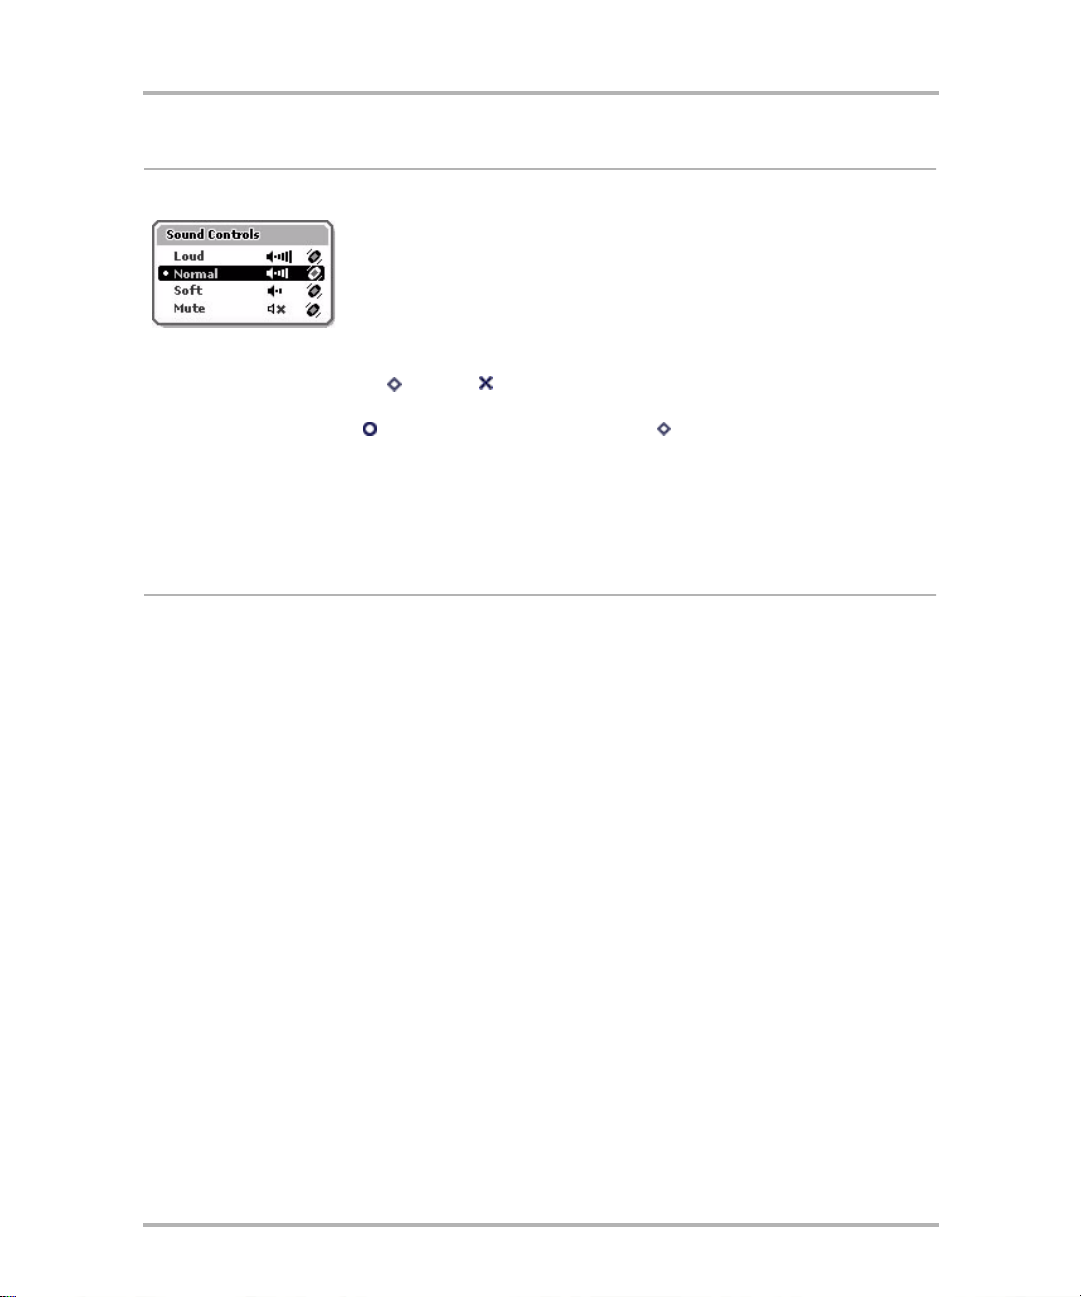
Sound Controls
The Sound Controls dialog box contains settings that you can open at any time, from any screen:
There are two ways you can open the Sound Controls:
• Method 1: Press the Menu and Back buttons together. Y ou can use this method from any screen, in
any application, at any time.
• Method 2: Press Jump to open the Jump screen. Press Menu to open the Jump screen menu.
Select Controls > Sound.
Select a sound profile from the Sound C ontrols d ia log box. Use the wheel to scroll through all availab le p r ofiles,
then press the wheel to select a profile and dismiss the dialog box.
For details about creating and editing sound profiles, read
Sound Profiles
on page 47.
Keyboard
Your device keyboard contains five rows of keys, including a key for the “at” symbol (@) and a Directional pad
(“D-pad”) that “rocks” into eight dif ferent directi ons or positions. The t opics below desc ribe the keyboard i n more
detail.
Directional Pad (D-Pad)
The D-pad is the round navigational device in the lower-right corner of the keypad that you can “rock” in eight
directions: up, down, left, right, plus the 4 corners (northwest, northeast, southwest, and southeast), which you
use by pressing two adjacent keys at the same time. You use the D-pad to navigate while playi ng games and to
navigate within
examples of text boxes:
• To, From, Subject fields in an email, IM, or text message
• Go To dialog box in th e Web Browser
Press the up/down and left/right arrows to m ove in thos e d irections among characters in a text box. Press the
corners of the D-pad (two adjacent arrows at the same time) to jump up/down one line and forward/backward
a character. Read more in
text boxes
. A text box is an area on the screen in which you can type characters. Here’s a couple
Typing and Navigating in Text Fields
on page 24.
ALT Key
You type special characters (shown in red on some of the keys) by first pressing the ALT key, then the key
showing the special character. For example, if you need to type a semicolon (;), you would first press the ALT
key, then t he J key. (This action is also represented in the user documentation as ALT, J.)
• Lock the ALT key to type a series of special characters by pressing the key twice.
• Unlock the ALT key by pressing it once again.
October 21, 2003 T-Mobile Sidekick Owner’s Manua l 15
Page 16
Device Basics
Note! You can also lock the Shift key by pressing it twice. Unlock by pressing once again.
Read about how text cursors change when using the ALT or Shift keys in
The Text Cursor
on page 25.
@ Key
When you type an email address, you use the “at” symbol (@) to separate the username from the domain; for
example, username@domain.com. Use the @ key (located in the bottom row of keys) to insert the @ symbol in
an email address easily.
On/Off Button
Power off the device to conserve the maximum amount of power. While the power is off, your device will not
receive messages or phone calls. Incoming calls are forwarded to voice mail.
To power your device on and off, use the On/Off button. It is located just to the left of the “Z” key on the
keyboard and is marked with the power symbol: .
Control Buttons
Your T-Mobile device comes with four main control buttons, which you can still use when the displa y lid is in t he
closed position, as shown below:
Read more details about the control buttons in the topics below.
October 21, 2003 T-Mobile Sidekick Owner’s Manua l 16
Page 17
Device Basics
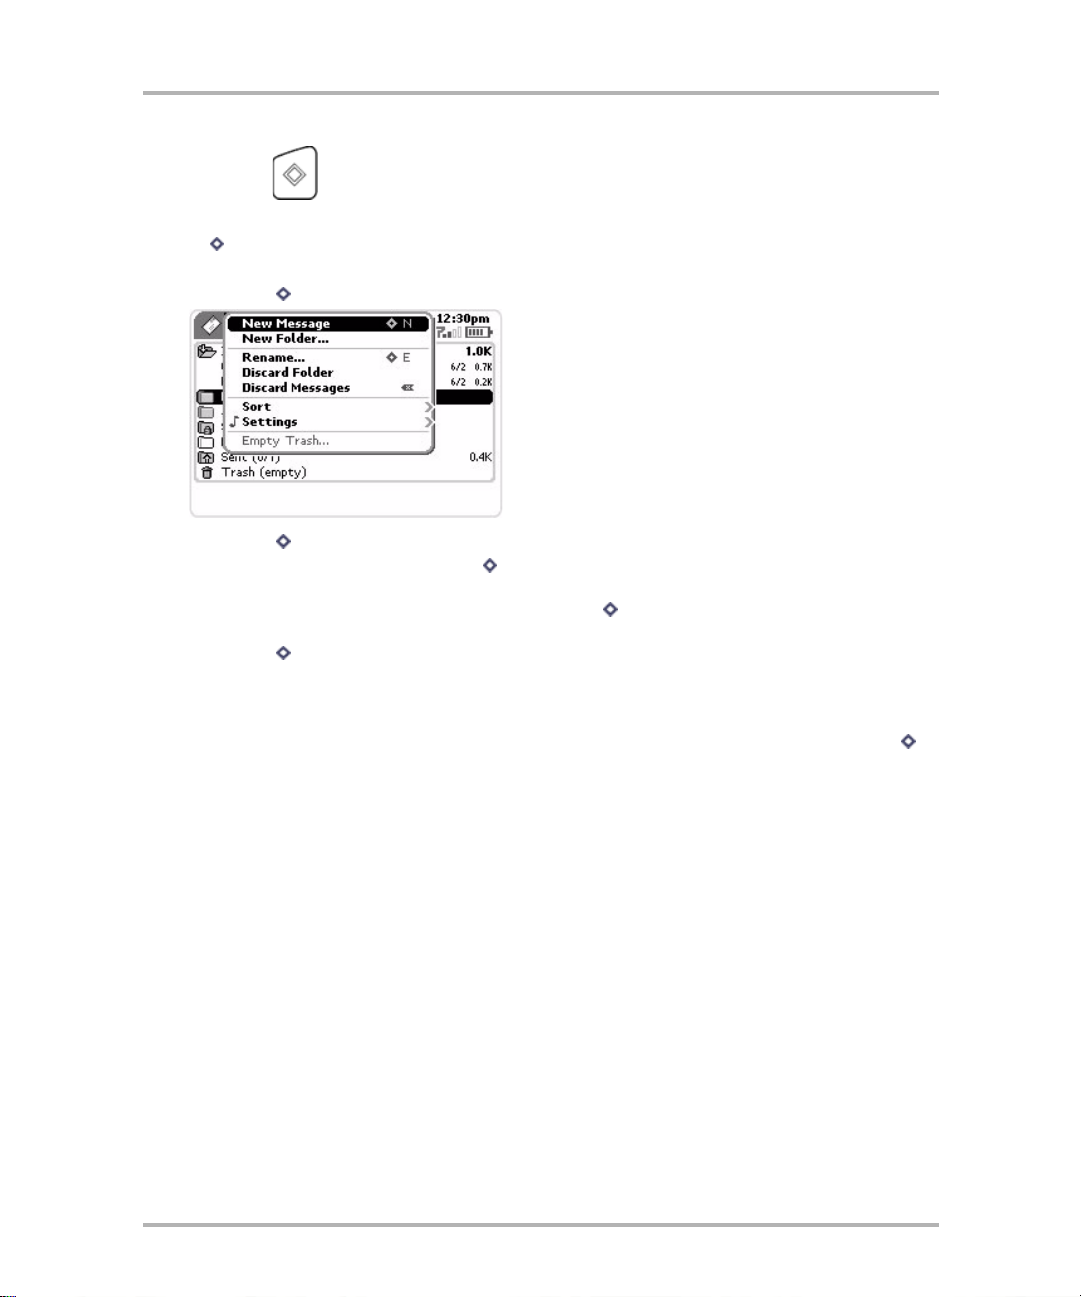
Menu Button
The Menu button is located in the upper-left corner of the device and is marked by a diamond. When you see the
diamond on the device screen or in the documentation, this refers to the Menu button. Use the Menu button
to do the following:
• Press Menu once to open a drop-down menu listing actions you can take from the current screen:
Press Menu again to close the drop-down menu.
• With a menu open, press and hold Menu while rotating the wheel one click down to jump to the last
menu item; rotate one click up to jum p to the top item.
• On any screen where you can scroll, press and hold Menu while rotating the wheel to scroll screen-byscreen, rather than line-by-line.
• Press Menu in combination with a shortcut key to perform an action. There are two types of shortcut
keys:
-User-definable - Read more in
- System-defined - You’ll find the system-defined shortcuts listed in the menus to the right of a given
option. For example, in the Email application, the shortcut for composing a new message is Menu +
N.
About Context Menus - The options that appear in any given menu are dependent on what screen you are
viewing. These types of menus are often referred to as “context menus”. For example, if you are viewing the
main screen of the Email application, the menu will list options such as “New Message” and “Check for New
Email” . However, if you are viewing the main screen in the Address Book, the menu will list options such as “New
Contact” , “Sort...” , and “My Info”. So the items that appear depend on the “context” (or screen) you are in when
you open the menu.
Jump Shortcuts
on page 40.
October 21, 2003 T-Mobile Sidekick Owner’s Manua l 17
Page 18
Device Basics
Jump Button
The Jump button is located in the lower-left corner of the device and is marked by a circle. When you see the
circle on the device screen or in the documentatio n, this refers to the Jump button. Use the Jump button to
open the Jump screen. No matter where you are in the applications--what screen you are viewing--if you press
the Jump button, you’ll return to the Jum p screen, with the Phone application highlighted:
Rotate the wheel to scroll through the applications. To go to an application you have highlighted, press the
wheel.
Read more in the
Wheel
on page 19 and
The Jump Screen
on page 51
.
Back Button
The Back button is located in the lower-right corner of the device and is marked by a cross. When you see the
cross on the device screen or in the documentation, this refers to the Back button. Use the Back button to do
the following:
• Press Back once to go back to the screen you were previously viewing; press twice to go back two
screens, and so on.
• In a dialog box or on a screen, press Back once to save any changes you’ve made to the information. If
you’ve made changes within a dialog box, the dialog box closes as well.
• If a menu is open, press Back once to close it.
October 21, 2003 T-Mobile Sidekick Owner’s Manua l 18
Page 19
Device Basics
Wheel
The wheel is located in the upper-right corner of your device. Y o u use it to highlight and press but tons or links on
the screen. Use your thumb to rotate the wheel away from you (up) or toward you (down), moving through
selectable items. You can also press the wheel down. More specifically, here’s how you can use the wheel:
• Rotate the wheel toward you to advance the current selection through all the “selectable” elements on
a screen and scroll down a Web page.
• Rotate the wheel away from you to revers e through all the “selectable” elements on a screen and to
scroll up a Web page.
• Press down on the wheel (as you would a mouse button) to select a highlighted item or open a pop-up
menu.
• Press and hold the wheel to open pop-up context menus.
Tip: T o turn on the “flashlight feature” (the wheel lights continuously), from the Jump screen press Menu + F
(simultaneously). To turn the light off, press Menu + F again.
Terminology Used in This Manual
The instructions in this manual use many terms that may be confusing. To help you understand exactly what the
instruction is telling you to do, we’ve included some definitions:
Term What It Means Example
Action button A button that contains a word or phrase
Check box A small box that is either checked or clear
Context menu A context menu contains only the actions
October 21, 2003 T-Mobile Sidekick Owner’s Manua l 19
describing what will happen if you select
(press) the button. Action buttons often contain the keyboard shortcut as well.
(does not contain a check mark). If you
check a check box, the action described next
to the box will turn “on”. Clearing the check
box will turn the action “off”.
that you can take on the item you are highlighting. In regular menus, the actions you
cannot take on the current screen are
dimmed, but in a context menu, these
actions don’t appear at all.
Page 20
Term What It Means Example
Device Basics
Dialog box A dialog box is a floating window that pre-
sents you with buttons and options that
allow you to make decisions and carry out
actions.
Some dialog boxes are self-dismissing; others you must select an action button. You
can dismiss a self-dismissing dialog box anytime by pressing Back .
Highlight This action is only applicable on your device.
All “selectable” elements can be highlighted
by rotating the wheel then stopping over the
item. Once highlighted, the element’s
appearance changes to reverse video.
In the example to the right, 3 - Janey is highlighted.
Keyboard shortcuts
Keyboard shortcuts are presented in the documentation as follows:
+ K = Press the Menu button and hold
while pressing the K key.
, = Press the Menu button first, then
the Back button (in suc cession).
So, if two keys or buttons are separ ated by a
plus sign (+), you press them simult aneously
to make the action occur; if they’re separated by a comma (,), then you press one
after the other.
Menu A floating window containing a list of actions
you can take on the screen. Press the Menu
button to open this list of actions.
Option (button) Choices presented to you, usually in a dialog
box. You can only select one of the options
and do so by pressing the wheel once the
option is highlighted. (Note: Sometimes
these are called “radio buttons”.)
October 21, 2003 T-Mobile Sidekick Owner’s Manua l 20
Page 21
Term What It Means Example
Device Basics
Pop-up menu A menu that pops open (“up”) when
selected. Once the menu is open, you can
rotate the wheel to highlight an item , then
press to select it. You can quickly highlight
an option by starting to type it.
Press T o press, you push down and quickly release
the wheel, key, or control button. It’s the
same action you take when you click a
mouse button while using your computer.
Before you can press an item on the screen
(such as an OK button, menu option, check
box, or list item) you must rotate the wheel
to “highlight” the item so it appears in
reverse video. Pressing the highlighted item
“selects” it.
Press & hold Push down on a key or control button and
hold it down for at least one second.
Rotate Used to describe the push wheel’s rotational
movement. You can rotate the push wheel
up (away from you) or down (toward you).
Select Refers to the action you take to take an
action on a screen element, such as selecting
an action button or option button, or p ressing a contact name to open it for edit.
Pop-up menu that’s closed:
Pop-up menu that’s open:
Slider bar A control that lets you set a value from a
continuous range of possible values, such as
screen contrast/brightness or sound volume.
Text field (or
text box)
A rectangular area in which you can type or
edit text. To make a text field editable, you
must first highlight the field b y ro tating the
wheel, then press to make it editable.
In the example to the right, the name of the
photo is in an editable text field.
October 21, 2003 T-Mobile Sidekick Owner’s Manua l 21
Page 22
Device Basics
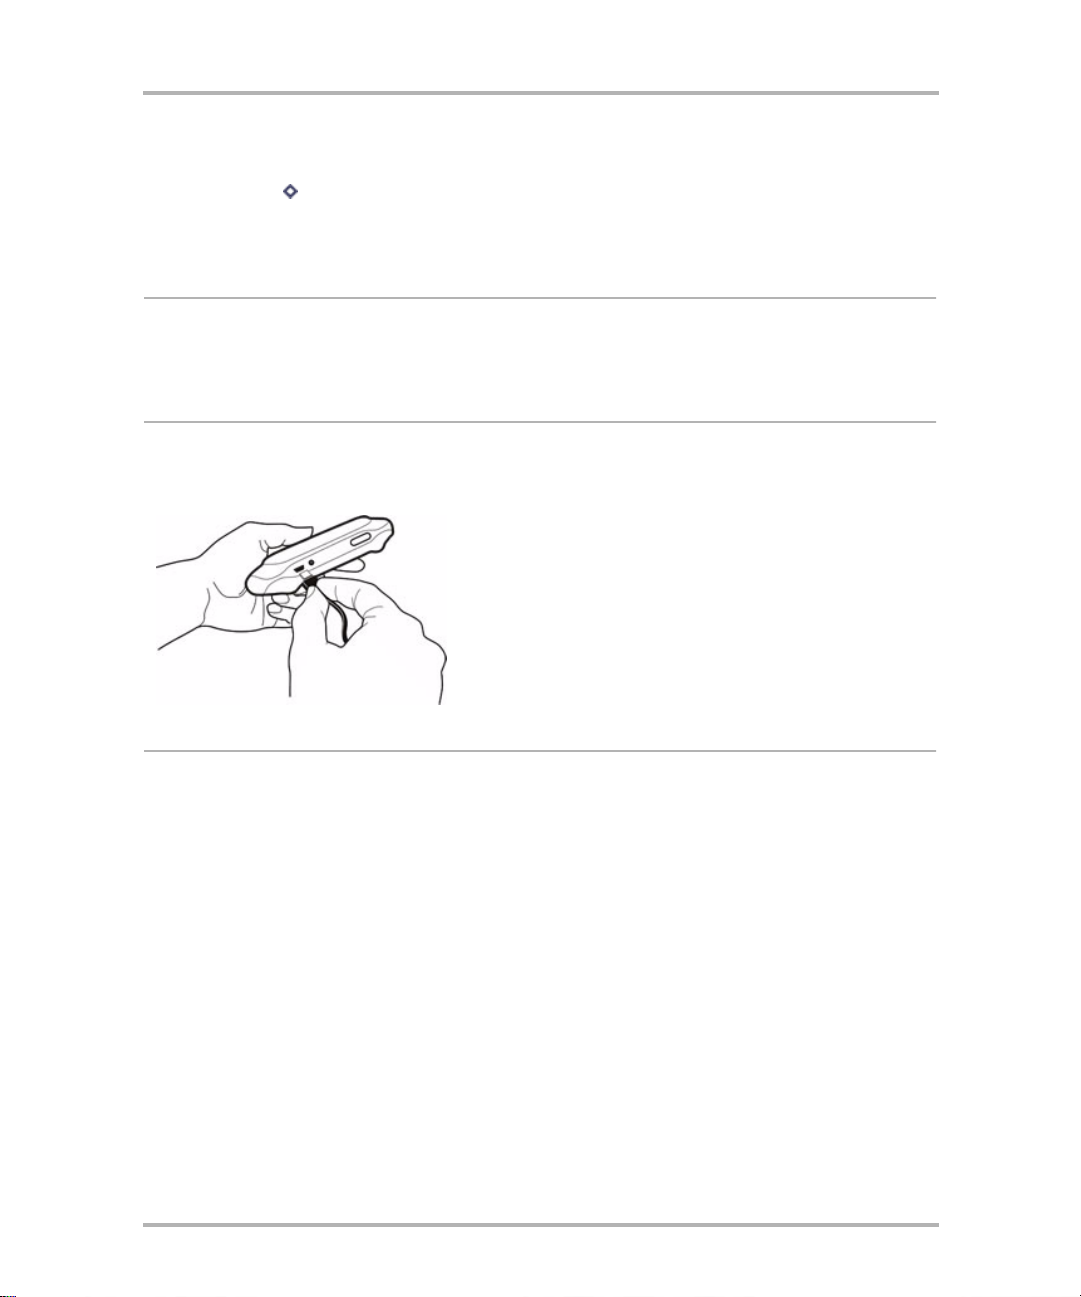
Headset/Camera Jack
The jack where you insert your headset or camera is located on the right side of the device. See illustration in
Parts of Yo ur T-Mobile Sidekick
connection:
Warning! Be sure to remove the camera from the jack when you’re not using it; especially when you’re storing
your device in a backpack, pocket, bag, or purse.
on page 10. Be sure to press the headset or camera lead in firmly to secure the
The Battery
When you first receive your device, the battery will be fully charged, but in deep sleep. To wake it, connect your
device to the charger.
Your device comes with a built-in rechargeable lithium ion (Li-Ion) battery. Note that you cannot access or
remove the battery from your device.
Read the following topics for more information about your device’s battery:
• Charging Your Device’s Battery
• Battery Charging Time
• Use and Standby Times
• Conserving Battery Power
Charging Your Device’s Battery
It is recommended that you charge your device every day . If the device is left without a sufficient battery charge
for a long period of time (i.e., a week), the information contained in the device’s memory (RAM) will no longer be
stored on the device. Once the device is re-connected to the charger, your stored information will automatically
be reloaded to the device via the service.* Note though, that if you’re disconnected from the service and then
the battery drains, any data you entered on the device previous to the battery’s draining and after you were
disconnected will be lost.
*Please be aware that if your monthly bill varies with the amount of data you use (that is, you have a “per
megabyte” rate plan), restoring your data to your devic e will count against your monthly quota, and may result
in extra charges.
October 21, 2003 T-Mobile Sidekick Owner’s Manua l 22
Page 23

Device Basics
To c ha rge the battery, do the following:
1 Attach the battery charger to your device.
Locate the battery charger that came with your device. Insert the charger lead (the small round end of the
adapter) into your device’s power jack (the small round hold located at the top of your device) and plug the
adapter cord into a standard electrical wall outlet.
While the charger is connected to your device, a l ig htning bolt will display over the battery icon in the title
bar.
2 Let the device charge for at least four (4) hours to ensure maximum battery life.
Rest the device in a safe place and let the battery charge for at least four hours, or overnight. As the device
is charging, you will see the bars in the battery icon fill repeatedly from l eft to right in an animated fashion.
When your device is fully-charged, the bars wil l st op moving in the full position: .
Note: If your battery is fully-charged and you unplug the battery charger then connect it to the charger
again, the bars in the battery icon will fil l fro m left to right for two hours, even though it is fully-charged.
Battery Charging Time
Initial charging time for your device’s lithium ion battery is approximately four hours. Recharging time is the
same, depending on how discharged the battery has become.
If your battery has become completely discharged, your device will turn off automatically. Once you connect the
device to the battery charger, give your device approximately 10 minutes to gain enough power to be turned on.
Use and Standby Times
With a fully-charged battery, you can use your device for one day. In power-saving (or even key guard) mode,
the battery should last seven days. These times are approximate however; battery operation times vary
according to how you use your device, signal conditions, and other network settings made by T-Mobile. To view
your battery consumption, from the Jump screen, press Menu then select Settings > Battery & Display.
Note that this reading is approximate. Re a d more in
Battery & Display
on page 37.
Conserving Battery Power
Your device has a power-sa ving fe ature that automaticall y reduces power to the device after a user-config urabl e
number of minutes of inactivity. In power-saving mode your device will s till recei ve messages and calls. To wake
the device, simply press any control button or key. Note that you must have enabled Key Guard before your
device will go into power-saving mode automatically. Read more in
October 21, 2003 T-Mobile Sidekick Owner’s Manua l 23
Battery & Display
on page 37.
Page 24
Device Basics
You can also conserve battery power by signing out of Instant Messaging when you are not using the
application. If you are really concerned about saving battery and can detach from the network, from the Jump
screen press Menu , then select Controls > Wireless... On the Wirel ess Options dialog box that opens, select
the Wireless Off option. Note too that removing your SIM card will cause the battery to drain faster than when
the SIM card is installed. Therefore, it’s recommended that you lea ve your SIM card ins talled at all times.
Infrared Port
You’ll find an infrared port on the back of your device, to the right of the power ja ck show n in the illustration
above. In a future release, the infrared port will be used for beaming information between devices.
USB Port
The USB port is located on the top of your device, just to the left of the power jack as shown in the illustration
below. If your devi ce should ever need reco very softwa re installed ( this would have been diagnosed by Custo mer
Care), you would need to connect your device to your desktop or laptop computer using a USB Mini-B type cable.
Typing and Navigating in Text Fields
Many of the applications have screens in which you type text, such as the Email Compose screen, the individual
Settings screens, the Browser’s Go To dialog box, etc. You will primarily use the keyboard to typ e tex t, which is
easy to use, but read the sections below for some hints to make typing, editing, and navigating in text fields
easier.
Navigating in Text Fields
Use the Directional Pad to navigate within a text box:
• Press the up/down and left/right arrows to move in those directions among characters in a text box.
• Press the ALT button while using the D-pad up and down arrows to jump to the top or bottom of a text
box.
• Press the ALT button while using the D-pad left and right arrows to jump to the beginning and end of a
line of text.
October 21, 2003 T-Mobile Sidekick Owner’s Manua l 24
Page 25
Device Basics
Cut, Copy, and Paste
To cut, copy, or paste text you have typed in any text box, follow these instructions:
1 Position your text cursor next to the text you want to cut or copy. (Use the D-pad’s arrows to position the text
cursor.)
2 Hold down the Shift key whil e pres s ing a D-p a d arrow. As you select text, it is shown highlighted. (To de-
select, release the Shift key and press a D-pad arrow.)
3 Press Menu and select Edit Text to open the Edit Text submenu. You can also open the Edit Text context
menu by pressing and holding the wheel. Select the operation you want to perform on the selected text. Note
the standard shortcuts:
Cut
Copy
Paste
Select All
4 You can paste text that you have copied to the device clipboard to any other text box in any application .
Simply position your cursor where you want to paste the text, then use the Paste shortcut Menu + V. (You
can also open the menu and select Edit Text > Paste.) Note that the device clipboard only stores one set of
copied or cut text at a t i me.
Menu + X
Menu + C
Menu + V
Menu + A
Deleting Text
• To de lete a c h aracter to the left of the cursor, press the DEL key .
• To delete a c ha racter to the right of the cursor, press SHIF T + .
Locking the Shift and ALT Keys
•To lock the SHIFT key, press SHIFT twice. To unlock, press SHIFT once again.
•To lock the ALT key, press ALT twice. To unlock, press ALT once again.
The Text Cursor
While you’re typing, the text cursor shape reflects your current “mode” of typing:
Regular typing mode
Shift key is held down
Shift key is locked down
Alt key is held down
Alt key is locked down
October 21, 2003 T-Mobile Sidekick Owner’s Manua l 25
Page 26
Device Basics
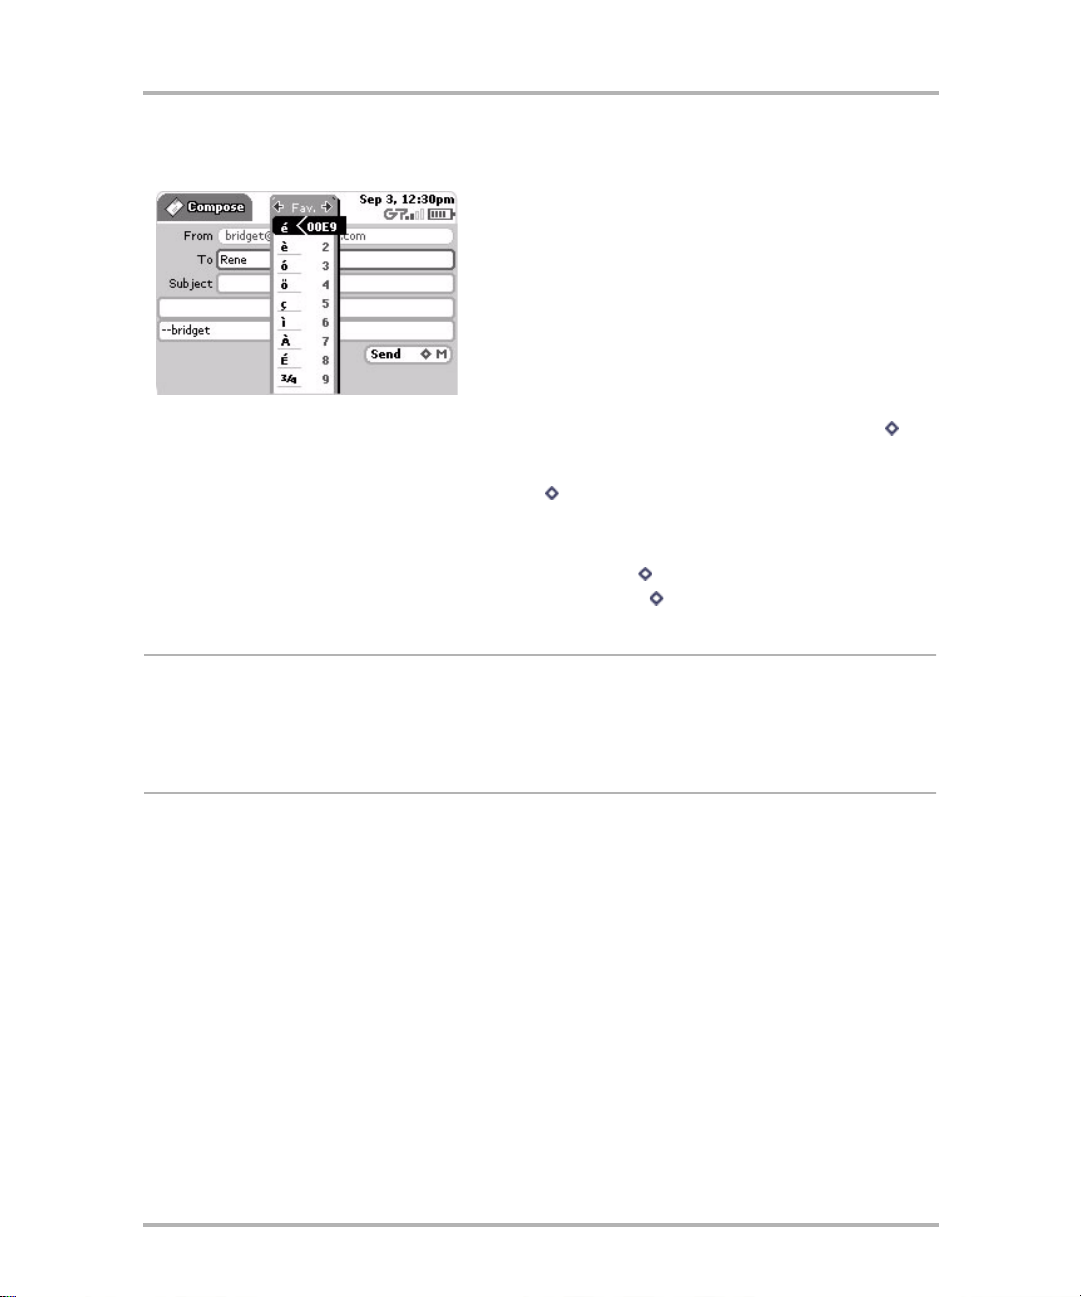
Entering Special Unicode Characters
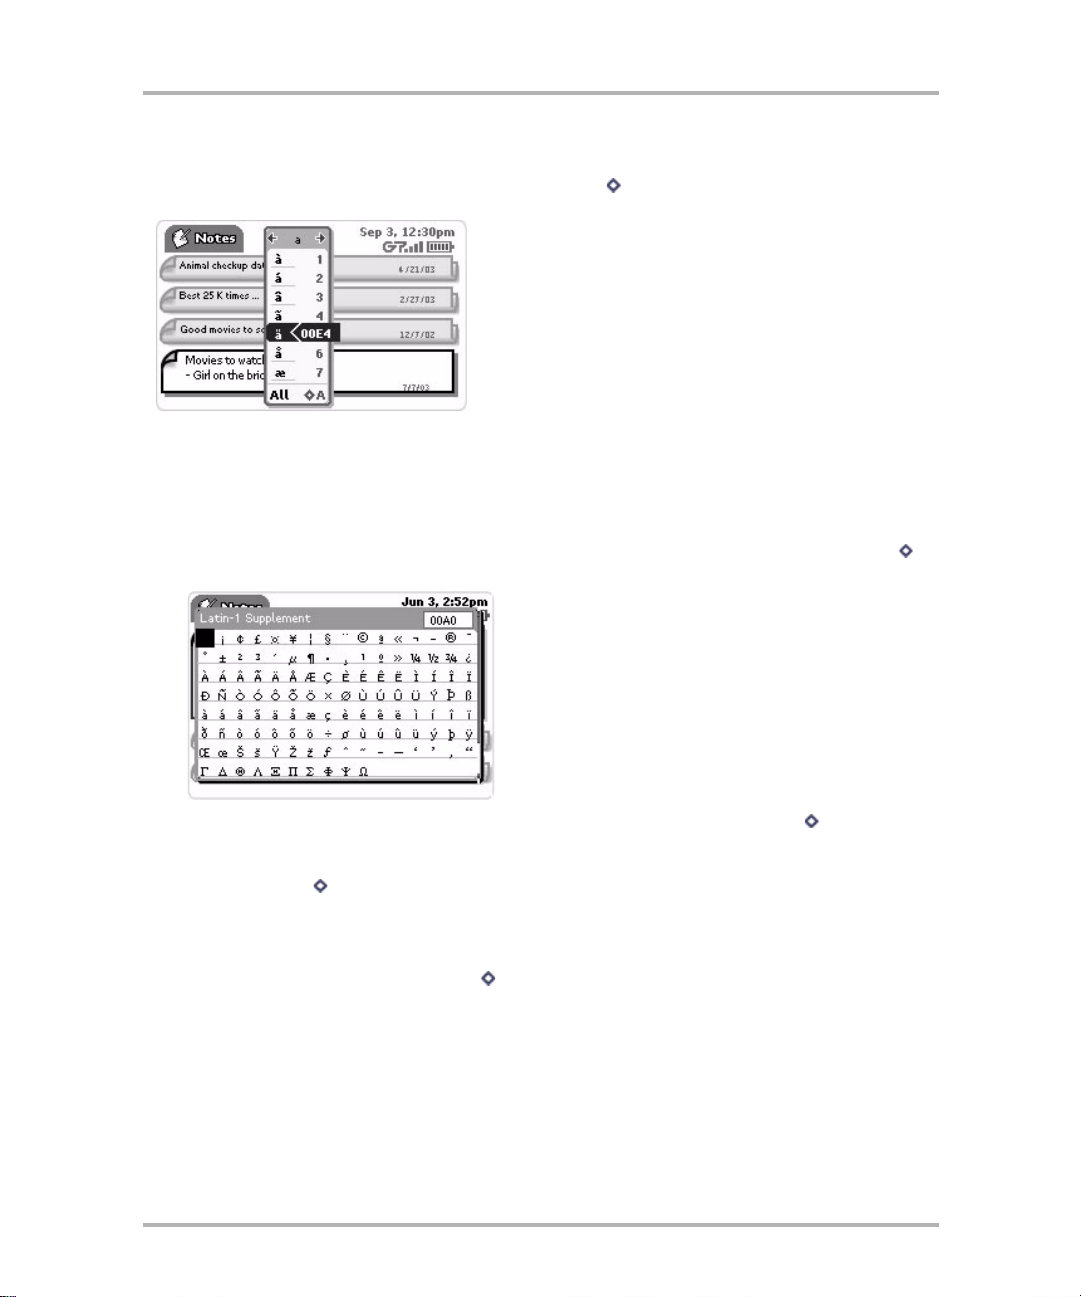
In any text box, to enter special Unicode characters, press Menu + Spacebar. The Special Character selec tor
opens, displaying special characters alphabetically.
Use the D-pad to navigate through the list: left-right to flip through the alphabet, symbol, and favorite sets; updown to select specific characters. Press the wheel to insert a highlighted character . Her e are some useful tips in
using the Special Character panel:
• With the panel open, you can show the same characters capitalized by pressing Shift + the character (like
“a”). Toggle back to lowercase by press the letter again.
• To see all special characters, select All (at the bottom of the panel) or use the menu shortcut Menu +
A, and the selector grid expands.
To navigate between character sets (Latin-1 Supplement is shown above), press Menu then select one
of the sets listed on the menu.
• T o s ee a specific character set, type the letter in the text box, select the letter (using Shift + D-pad arrow),
then press Menu + Spacebar.
• To typ e a cha racter us ing its Unicode value, press ALT + Spacebar, then type the 4-character Unicode
value. You can view the Unicode value of any character on the grid by doing any one of the following
- highlight a character for two seconds
- highlight a character then press Menu + I
- highlight a character then press and hold the wheel
October 21, 2003 T-Mobile Sidekick Owner’s Manua l 26
Page 27
Device Basics
Favorites List - You can save up to nine special characters in a “Favorites” list. You can view the Favorites list
by scrolling through the selector pane ls :
• T o add a char acter to your Favorites list, highlight a character in the selector grid, then press Menu + N.
The character is added to your list.
• T o enter a charact er that appears on your Favorites list, you can either open the Special Character selector
and select that character; or, you can press Menu + Spacebar, <favorite shortcut key>.
Recent List - The system will save the last 10 special characters you typed and display them in a “Recent” list.
You can view the Recent list by scrolling through the selector panels.
• To op en the Recent list directly, while in a text box press Menu + Spacebar, Spacebar.
• To enter the last special character you typed, simply press Menu + Spacebar, 0.
Using the Carrying Case
Use the carrying case included in your box to both protect the screen and carry your device securely.
Remember! The best way to protect the screen from scratches and other damage is to always carry the
device in the case.
Use Your Device Safely
While using your device, please remember to follow the safety rules listed below.
Do not use your device while driving a vehicle. If you must use your device, pull off the road
•
to a safe spot first.
Turn off your device while on an aircraft. Because wireless devices interfere with navigation
•
systems, FCC regulations prohibit use of your device in the air. Please follow airline rules and switch off
your device when directed.
Turn off your device while in a hospital. Adhere to posted signs in hospitals, where an active
•
wireless device could interfere with hospital equipment and pacemakers.
•
Use only approved device batteries and accessories. Please do not insert or connect
incompatible products to your device. Do not taunt your device.
Turn off your device while at a fueling station or near blasting. Do not use wireless
•
devices near fuel or other chemicals. Follow posted restrictions at these sites.
When traveling abroad, never plug the battery into a power source that does not correspond to
•
both the voltage and frequency specified on the charger.
October 21, 2003 T-Mobile Sidekick Owner’s Manua l 27
Page 28

Device Basics
• Always use the battery charger included with your device. Use of an unauthorized battery
charger may result in bodily injury or property damage.
Never dispose of your device by incineration.
•
• Never allow any metallic objects to become inserted into your device, su c h as staples
or paper clips.
Never use or store your device in the following locations:
•
- Anywhere it may be exposed to water (e.g., bathroom or sauna)
- Conditions of high humidity (e.g., rain or fog)
- Conditions of extreme high temperatures (e.g., near fire or in a sealed automobile)
- In direct sunlight
- Locations or sites subject to strong vibration
To turn off your device when required, press and hold the keyboard On/Off Power key for three seconds.
To turn off the radio, press the Jump button, then press Menu and select Controls > Wireless.... On the
Wireless Options dialog box that appears, select the Wireless Off option.
Warning! The hinge in the swivel display lid is assisted by a very strong magnet. Be careful to keep the device
away from magnetically sensitive items, such as credit cards and floppy disks.
FCC Compliance
TESTED TO COMPLY WITH FCC STANDARDS. FOR HOME OR OFFICE USE.
For body worn operation, this phone has been tested and meets the FCC RF exposure guidelines when used with
accessories supplied or designat ed for this product. Us e of other access ories may not ensure compliance with t he
FCC RF exposure guidelines.
October 21, 2003 T-Mobile Sidekick Owner’s Manua l 28
Page 29

2. About Your SIM Card
If you are unfamiliar with Smart Cards or SIM cards, you might be interested to learn more by reading the
following questions and answers:
• What Is a SIM Card? on page 29
• Exactly What Information Is on My Device SIM?
on page 29
• My SIM Card Came Locked! How Do I Unlock It?
on page 30
• Can I Remove My SIM? on page 30
• How Do I Handle My SIM? on page 31
• What Happens If I Lose My SIM? on
page 31
• What Happens If I Put A Different SIM
in My Device? on page 31
What Is a SIM Card?
A SIM (Subscriber Identification Module) card is distributed to you by your wireless carrier and comes packaged
in a plastic holder about the size of a credit card. After you carefully snap the SIM card from its plastic holder,
your SIM is ready to fit into a slot within your device. The SIM card contains a chip that holds information
required to operate a device. For more information about inserting your SIM card, read
on page 31.
How to Insert Your SIM
Exactly What Information Is on My Device SIM?
Your device SIM stores the following i nformation:
• International Mobile Subscriber Identity (IMSI) Number - Number that uniquely identifies you as a
subscriber on the network. The number is made up of three parts: a three-digit mobile country code, a
two-digit mobile network code, and a (up to) 10-digit mobile subscriber identify number.
• Mobile Subscriber ISDN (MSISDN) Number - Your mobile telephone number. (ISDN stands for
Integrated Services Digital Network.)
• SIM PIN - A Personal Identification Number (P I N) tha t you s et using the Jump Settings > Key Guard &
Security screen. This code protects your SIM from being used by another person in another device in the
event it is lost or stolen .
• Text Messages - Short Message Service messages that you receive and save. Text messages use the
Short Message Service. Note that outgoing messages (“sent”) are not saved to the SIM.
• Contact Information - Contact information (name:number) is only stored on your SIM if you’ve used
your SIM previously in a mobile phone and stored names and numbers in that phone.
Note that you can import previously-stored co nta c t info into your device Address Book by followin g the
instructions in
Import Contacts from SIM
on page 137.
October 21, 2003 T-Mobile Sidekick Owner’s Manua l 29
Page 30
About Your SIM Card
My SIM Card Came Locked! How Do I Unlock It?
When you receive your device, the SIM card may be locked by default. If this is the case, before you can connect
to the network or register your new device account, you’ll be prompted to enter a PIN. The default PIN is
provided by your wireless carrier. You can always change your SIM PIN using the Key Guard & Security screen.
Read more in
Lock Your SIM Card
on page 43.
Can I Remove My SIM?
Yes, you can; but we recommend you never remove the SIM from your device. Without a SIM card, you cannot
place phone calls to 611 (T-Mobile Customer Care), but you can call 911 (Emergency). You can only view data
that has been cached in the device memory
If you find you must remove your SIM, please follow the directions that follow.
How to Remove Your SIM
1 Turn off your device by pressing the power on/off key.
2 Your SIM card fits into a slot on the left side of your device behind the end cap. Remove the end cap using
the finger notch:
.
3 You will see the SIM card in its slot; press the end of the SIM in toward the device and release. The SIM
should spring gently out of its slot.
4 Remove the SIM carefully. Be sure to read
5 Replace the end cap by pressing the prongs in slightly and inserting the cap. Make sure the cap is flush with
the case.
6 Turn your device back on by pressing the power on/off key.
October 21, 2003 T-Mobile Sidekick Owner’s Manua l 30
How Do I Handle My SIM?
on page 31.
Page 31

About Your SIM Card
How to Insert Your SIM
1 Remove the end cap covering the SIM slot using the finger notch.
2 Press the SIM card into its slot with the gold contacts facing down and the cut corner going in first, beneath
the Menu button.
When you release the SIM make sure it is locked into position and it doesn’t spring out.
3 Replace the end cap by pressing the prongs in slightly and inserting the cap. Make sure the cap is flush with
the case.
How Do I Handle My SIM?
Handle your SIM card very carefully since the card and gold contacts can be easily damaged by scratches or
bends. Be sure to keep SIM cards out of reach of small children.
What Happens If I Lose My SIM?
Call your carrier’s Customer Care number. They will be able to assist yo u.
What Happens If I Put A Different SIM in My Device?
We do not recommend you insert a different SIM into your device. If you do, your device may or may
not function; and even if it does function, it will have limited functionality. Note that if you are going to import
contact information from another SIM, follow the instructions provided in
137.
October 21, 2003 T-Mobile Sidekick Owner’s Manua l 31
Import Contacts from SIM
on page
Page 32

3. Customizing Your Device
Your device is designed so you can set up many of its features to suit your preferences. Learn how in this
chapter:
• The Settings Screens on page 32
• AutoText on page 36
• Battery & Display on page 37
• Date & Time on page 39
• Jump Shortcuts on page 40
• Key Guard & Security on page 41
• Keyboard on page 45
• Language on page 46
• Network on page 46
• Sound Profiles on page 47
• System Info on page 36
The Settings Screens
You customize your device by selecting options listed on the settings screens. There are two types of settings
screens:
• Device-wide settings - From these screens you set device-wide preferences, such as application
shortcuts, sound profiles, key guard idle time, etc. T o open these screens, press Jump to go to the Jump
screen, then press Menu and select the Settings submenus.
• Application-specific settings - From these screens you set application-specific pref erences, such as call
forwarding options, browser home page, etc. To open these screens, press Jump to go to the Jump
screen, then select any application (Web Browser, Phone, Email, etc.). Once within an application, press
Menu and select Settings.
We recommend you step through the device Settings screens and then the application-specific Settings screens
to completely customize your device for your personal use. Use the tab les b elow to guide you through the
screens.
Device Settings
From the Jump screen, press Menu and select Settings to see the Settings submenus lis ted in the summary
table below. For more details on each Setting screen, follow the links in the first column.
October 21, 2003 T-Mobile Sidekick Owner’s Manua l 32
Page 33

Device Settings Screen Customizable Items and Options
Customizing Your Device
System Info
AutoText
on page 36 I n System Info you will find the following information about your account and
on page 36 • Capitalize new sentences check box
Battery & Display
Date & Time
on page 39 • Time Zone setting pop-up menu
Jump Shortcuts
device:
•Username
• Phone number
• SIM ID
• Device ID
• Device OS (operating system)
•Radio firmware (version)
• Recovery ROM (version)
•Library (version)
• Build Configuration
• Versions of firmware and applications
• Automatic Word Repl acement check box and list of r epl acement rules from
which you can add or delete
on page 37• Battery charge indicator
• Backlight settings
• Automatic backlight check box and pop-up menu from which you select
how long the backlight stays on
• Current date & time text fields
• Format pop-up menu (12- or 24-hour clock)
on page 40 • User-definable list of keyboard shortcuts to application screens. (Jump
shortcuts use the Jump button plus another key.)
Key Guar d & S ecurity
page 41
Keyboard
Language
Network
October 21, 2003 T-Mobile Sidekick Owner’s Manua l 33
on page 45 • Keyboard repeat delay slider bar
on page 46 • Language pop-up menu
on page 46 • Scan for other networks
on
• Automatic key guard setting and display message
• Privacy code setting (three-digit security code)
• Identification Tag text box
• SIM Card Lock settings
• Change SIM PIN (available when SIM card is locked)
• Keyboard repeat rate slider bar
• Change Network APN pop-up menu
Page 34

Device Settings Screen Customizable Items and Options
Customizing Your Device
Sound Profiles
on page 47 • Sound profile pop-up menu
• Edit/Discard/Reorder/Add sound profiles
• Pending message alert ringtone pop-up menu
• Schedule sound profiles settings
Application-Specific Settings
From the Jump screen, select any application (Web Browser, Instant Messenger, Email, etc.). Then open the
menu and select Settings to see these options. For more details on each Setting screen, follow the links in the
first column.
Application Settings
Screen
Web Browser Settings
page 60
on
Instant Messaging Settings
on page 93
• Home page URL text box and Use Current Page button
• Default search engine pop-up menu. Select from: Google, AltaVista,
Yahoo!, MSN, Excite, Lycos.
• Completed page load alert pop-up menu
• Show Pictures in Web pages check box
• Clear History, Clear Cache, Clear Cookies buttons
• Show graphical smileys check box
• Allow users to see when I’m idle check box
• Show Accept Message dialog box check box
• Play Buddy alerts pop-up menus:
- Ring when buddies sign on
- Ring when buddies sign off
- Ring when new message arrives
• Block User(s) List
Customizable Items and Options
October 21, 2003 T-Mobile Sidekick Owner’s Manua l 34
Page 35

Customizing Your Device
Application Settings
Screen
Email Settings
Phone Settings
on page 114 • Accounts
on page 75 • General
Customizable Items and Options
- New account
- Edit primary account
- Discard accounts
•General
- Show message count/size in folder view check box
- Include original message in reply check box
- New message alert pop-up menu
• Attachments
- Remove attachments larger than... pop-up menu
- Remove attachments of these types... check boxes
• Message Management
- Save outgoing email in Sent folder check box
- Empty Trash every night check box
- Auto-discard email when mailbox is full check box
- Only discard messages older than 7 days check box
- Y o ur device phone number
- Accumulated Call Time and Reset button
- Call volume slider bar
• Call Forwarding & Voice Mail set-up screen
• Ringtones set-up screen
• Speed Dial set-up screen
Phone Messages Settings
on page 125
Address Book Settings
page 134
October 21, 2003 T-Mobile Sidekick Owner’s Manua l 35
• Show message count/size in folder view check box
• New message alert check box
•Advanced
- Use custom service center number check box
- Message validity period pop-up menu
on
• Categories set-up screen. Use to create New Category, Edit Category, or
Discard Category.
• Labels set-up screen. Use to create New Label, Edit Label, or Discard Label.
•Import SIM Contacts
Page 36

Customizing Your Device
System Info
Use the System Info screen to look up information you may need when contacting Customer Care. You can also
look up your phone number from this screen, in case you ever forget it.
To open this screen, do the following:
1 From the Jump screen, press Menu then select Settings > System Info to open the System Info screen:
Use the wheel to scroll down the screen to read all the information. To dismiss the System Info screen, press
Back .
AutoText
T o help you type accurately, the AutoText screen includes rules that automatically correct common typing errors.
You can add to or discard rules that are included by default. To open the AutoText screen, do the following:
1 From the Jump screen, press Menu
2 If you want the first letter in new sentences to be capitalized automatically, rotate the wheel to highlight the
Capitalize first letter of sentences check box, then press the wheel to select it (a check will appear in the
box).
3 If you want the replacement rules listed on the screen to be in effect, use the wheel to highlight then select
the Automatic Word Replacement check box.
4 To discard any of the replacement rules, rotate the wheel to highlight the rule, press Menu then select
Discard [ ]. You are prompted to confirm that you really want to remove the rule. Select either Cancel or
Discard.
October 21, 2003 T-Mobile Sidekick Owner’s Manua l 36
then select Settings > AutoText to open the AutoText screen.
Page 37

Customizing Your Device
5 T o ad d a new repl acement rule, press Menu then select New Rule. The New Replacement Rule dialog box
opens:
T ype the word or phrase that you commonly misspell in the first text box, then type the correct spelling in the
second bo x. For example:
Select Done [ ] to save the replacement rule, or Cancel if you don’t want to save it after all.
6 To return all AutoText settings to those set when you first received your device, press Menu then select
Restore Defaults. You’ll be asked to confirm this decision.
Battery & Display
You can see how charged your battery is by checking the Battery & Display screen. You’ll also be able to set how
long backlighting stays on after you press one of the c o ntrol buttons or keyboard keys, or set it so that the
backlight never turns on (saving battery).
1 From the Jump screen, press Menu then select Settings > Battery & Display to open the Battery &
Display screen. Note that this screen will differ, depending on whether you’re using a grayscale or color
device:
Grayscale Battery & Display screen:
October 21, 2003 T-Mobile Sidekick Owner’s Manua l 37
Page 38

Customizing Your Device
1 Color Battery & Display screen:
2 In the first group box, Battery, you can observe the percentage of charge remaining in your battery (this
number is approximate). If your battery is connected to the charger, however, you’ ll see a lightning bolt on
top of the battery icon and the word “Charging” instead of the charge-remaining percentage.
Grayscale devices: In the Battery group box you can enable Power- Sa v ing Mode, which means your
screen will “blank” after a period of idle time has past. T o enable, you must check the box and setti ng an idle
time. (For color devices, power-saving mode is not available.) Select from the following idle times:
•5 minutes
• 10 minutes
• 30 minutes
•1 hour
•3 hours
Note! You must first set a Key Guard time in order for power-saving mode to work! For details, read
Guard & Security
Grayscale devices: If your device goes into power-saving mode (the screen blanks), the wheel will glow a
color, indicating the amount of charge left in the battery:
• Green glow = 100 - 50% charge
• Yellow glow = 50% charge
• Orange/red glow = 25 - 0% charge! Connect your charger immediately!
3 In the second group box, Backlight, you can set your backlighting options:
• If you want backlighting to turn on automatical ly after you p ress a control button or key, or open the
display, then select the Automatically turn on when in using device check box.
• Color devices: You can choose to have the built-in light meter automatically turn the backlight on when
required by light conditions. To choos e this option, select the Use backlight only when needed check
box. This option saves battery life.
• If you never want backlighting to turn on automatically, then make sure you haven’t select any automatic
backlight check box.
Note: You can always manually turn on backlighting by pressing Jump + Back , which opens the
Display Control, or by pressing Menu + Jump .
.
Key
October 21, 2003 T-Mobile Sidekick Owner’s Manua l 38
Page 39

Customizing Your Device
4 When backlighting turns on ( e ither automatically or if you turn it on manually), the backlight will stay on for
the amount selected in the Turn off after pop-up m enu. To open the pop-up menu, rotate the wheel to
highlight the menu, then press the wheel to open it. You can select from:
• 15 seconds
• 30 seconds
•1 minute
•2 minutes
•5 minutes
Scroll to highlight the time you want, then p r ess the wheel to select it.
Tip: As long as you press a key or button before the set time elapses, the backlight will stay on.
Date & Time
The T-Mobile service knows the Coordinated Universal Time, or UTC. (Note that UTC is also known as Greenwich
Mean Time, or GMT.) UTC reflects the mean solar time along the Earth's prime meridian. The prime meridian is
arbitrarily based on the meridian that runs through the Greenwich Observatory outside of London, where the
present system originated.
To set your device time correctly, you must select your time zone. Note that you cannot change the Date and
Time field settings unless you are disconnected from the network (read more in
on page 39).
Settings
1 From the Jump screen, press Menu then select Settings > Date & Time to open the Date & Time screen:
Override System Date & Time
2 T o open the Time Zone pop-up menu, rotate the wheel to highlight the menu, then press the wheel to open
it. Use the wheel to highlight the time zone you want your device to reflect, then press the wheel to select it.
3 Press Back to save your settings.
Override System Date & Time Settings
If you are not connected to the network, you can override the system-set date and time settings by doing the
following:
1 On the Date & Time Settings screen, highlight either the date or time box then press the wheel to activate
the pop-up date selector. The first selectable field expands into a pop-up:
October 21, 2003 T-Mobile Sidekick Owner’s Manua l 39
Page 40

Customizing Your Device
2 Rotate the wheel until you see the correct value, or simply type it.
3 To select the value, press the wheel. The date selector collapses.
4 Rotate the wheel to move to the next selectable field, then press to open the date selector:
5 Proceed until all fields are set as you wish.
6 Press Back to save your settings.
Jump Shortcuts
You can always press Jump to return to the Jump screen, where you can then select one of the applications.
However , if you want to jump to a specific application quickly, you can set a shortcut key . Y our device comes with
a default set of shortcut keys, but you can change them, as described below.
Change Default Shortcuts
1 From the Jump screen, press Menu then select Settings.
2 On the Settings menu, scroll to highlight Jump Shortcuts, then press the wheel to open the Jump Shortcuts
screen:
3 Scroll to highlight the application for which you want to change a Jump shortcut, then press the wheel. The
Key Mapping dialog box appears. In the illustration below, Address Book was highlighted when the Key
Assignment dialog box opened:
4 Press the key you want to use to jump to the application you’ve highlighted. The Key Mapping dialog box
disappears and your shortcut is saved.
5 Now, to use a Jump Shortcut from any screen at any time, press Jump plus the shortcut key to open that
application.
6 To delete a shortcut key mapping, s c roll the wheel to highlight the applica tion name, then press the Delete
key.
October 21, 2003 T-Mobile Sidekick Owner’s Manua l 40
Page 41

Customizing Your Device
Key Guard & Security
The device’s Key Guard and Security screen allows you to do the following:
•Set Up Key Guard
•Turn On/Off Privacy Lock
•Lock Your SIM Card
Set Up Key Guard
Key guard is a feature that allows you to protect the device’s control buttons from being pressed accidentally
while your device is in your pock et or bag. While in k ey guar d mode, your d evice is also in a po wer -saving mode,
so you save batt ery power.
Turn on Key Guard Manually
You can turn on key guard manually in two ways:
• Press and hold Back for three seconds.
• Press Jump to return to the Jump screen, then press Menu and select Key Guard.
Turn on Key Guard Automatically
You can set key guard to turn on automatically by doing the following:
1 From the Jump screen, press Menu then select Settings > Key Guard & Security to open the Key Guard
& Security screen:
2 In the Key Guard group box, rotate the wheel to highlight the pop-up menu, as shown above.
3 If you want to change the default setting, press the wheel to open the pop-up menu and reveal all the time-
idle choices:
• Guard after 2 minutes
• Guard after 5 minutes
• Guard after 15 minutes
• Guard after 30 minutes (color device only)
October 21, 2003 T-Mobile Sidekick Owner’s Manua l 41
Page 42

Customizing Your Device
• Guard after 1 hour (color device only)
• Guard after 2 hours (color device only)
• Never automatically guard (grayscale device only)
4 Rotate the wheel to select the option you want, then press the wheel to select it.
Color devices: To prevent device damage, after your device has been in key guard mode for 2 hours, a screen
saver will appear. The screen saver is a small image that moves To dismiss the screen saver, press any key or
open the device.
Unlock Your Device
To unlock your device (take it out of key guard mode), simply press Menu + Back .
Set a Key Guard Display Message
You can display a one-line personal message that displays on the screen while the device is in key guard mode:
1 From the Key Guard & Security screen, scroll to highlight the Key Guard Display Message text box.
2 Type your message. Your message must fit on one line, which is approximately 20-30 characters.
3 Your settings are saved as soon as you make them.
4 To remove your message, simply delete the text from the Key Guard Display Message box by pressing
ALT + .
About Privacy Lock and Key Guard
If you have set a privacy lock (as described below), then you will be prompted to enter your 3-digit code before
your device will unlock from key guard mode.
Turn On/Off Privacy Lock
If you want to secure your device from unauthorized access once your device has gone into key guard mode,
you will first need to set up a privacy code by following the instructions below.
1 From the Jump screen, press Menu then select Settings > Key Guard & Security to open the Key Guard
& Security screen.
2 Scroll down to the Privacy Lock group box:
3 Using the wheel, select the Turn On Privacy... button:
October 21, 2003 T-Mobile Sidekick Owner’s Manua l 42
Page 43

Customizing Your Device
The combination dialog box opens.
4 Enter a three-digit code using the keyboard or the dial. Aft er you do so , a Verify Your Combination dialog box
will appear.
5 Re-enter the three digits to verify.
6 A “new combination enabled” message appears. After reading the confirmation message, select OK.
7 You are returned to the Key Guard & Security screen with the Turn Off Privacy... button highlighted.
8 If you want to turn off Privacy Lock at any time, simp ly highlight then select this button.
9 At the prompt, enter your three-digit code using the keyboard or dial.
10 You are returned to the Key Guard & Security screen, where you can Turn On Privacy at any time.
Note: If you accidentally lock yourself out of your device, you can still make an emergency phone call by
pressing Menu + Jump .
Fill in Your Identification Tag
Use your device’s Identification Tag as a device identifier if someone types an incorrect privacy code when
attempting to unlock your device from key guard. This can be important if you lose your de vic e and another
person tries to use it. Your device may come with the ID Tag pre-filled in with information about contacting TMobile Customer Care if the device is found, but you can create your own message by doing the following:
1 From Key Guard & Security screen, scroll to the Identification Tag group box.
2 Use the wheel to highlight the Ident ific a tion Tag text box. If there is d e fault tex t, de lete it by pressing
ALT + repeatedly.
3 Type identifying information about yourself, such as:
Note that you can only type four lines in your Identification Tag.
4 If, for some reason, you do not want to display your Identification Tag, delete the text in the Identification
Tag box by pressing ALT + repeatedly.
5 Press Back to save your settings.
Lock Your SIM Card
By locking your SIM card, you ensure that no one except yourself can use your device while your SIM card is in
place (assuming you are the only person who knows the SIM PIN). Note that your SIM may be installed with a
default PIN (ask T-Mobile Customer Care if you don’t kno w the d e fau lt SIM PIN).
October 21, 2003 T-Mobile Sidekick Owner’s Manua l 43
Page 44

Customizing Your Device
To lock your SIM, do the following:
1 From the Jump screen, press Menu then select Settings > Key Guard & Security to open the Key Guard
& Security screen.
2 Scroll to the SIM Card Lock group box:
3 Highlight and press the Enable SIM Lock... button. The Enable SIM Lock dialog box appears:
4 Type your PIN and select Enable [ ]. You’ll receive a confirmation dialog box that your SIM card is now
locked. Now, you will be prompted to type your SIM PIN whenever you unlock key guard.
Unlock Your SIM Card
1 To unlock your SIM card, from the Key Guard & Security screen, press the Disable SIM Lock... button:
The Unlock SIM dialog box appears.
2 Type your PIN, then select OK. Your SIM card is unlocked.
Change Your SIM PIN
If you have SIM Lock enabled, then you can change your SIM PIN. (Check with T-Mobile Customer Care to
determine if there is a default SIM PIN.)
1 From the Key Guard & Security screen, scroll to the SIM Card Lock group box:
October 21, 2003 T-Mobile Sidekick Owner’s Manua l 44
Page 45

Customizing Your Device
2 Select the Change SIM PIN... button, as shown above. The Change SIM PIN dialog box opens:
3 In the text boxes, type your old PIN, the new PIN (4-8 digits), and then your new PIN again to confirm.
4 Select Submit to dismiss th e dialog box and sa ve you r new PIN . You will receive a confirmation dialog box
to let you know your PIN was changed successfully.
Keyboard
You can set how the keyboard responds to your touch:
• Keyboard repeat delay - If you hold down a key long enough, it will start repeating in your text box. This
setting determines how long you must hold down a key before it starts repeating.
• Keyboard repeat rate - Once you’ve held down a key long enough so it starts repeating, this setting
determines how fast the key repeats.
To set these preferences, do the following:
1 From the Jump screen, press Menu then select Set tings > Keyboard to open the Keyboard screen:
2 You set your keyboard preferences by using “slider bars”. Rotate the wheel to highlight the slider you want
adjust, then press the wheel to “open” the slider bar. An opened slider bar looks like this:
3 Rotate the wheel up to increase the setting; rotate the wheel down to decrease the setting. This means
that to:
• Increase the time you have to hold down a key before it starts to repeat, move the slider to the right.
• Increase how fast keys are repeated, once they start repeating, move the slider to the right.
4 When the slider is where you want it to be, press the wheel. The settings are saved as soon as you make
them.
October 21, 2003 T-Mobile Sidekick Owner’s Manua l 45
Page 46

Customizing Your Device
Language
If you must change the default language used on your device at any time, you can do so from the Languages
screen:
1 From the Jump screen, press Menu then select Settings > Language to open the Languages screen:
2 All available languages (locales) are listed in the Language pop-up menu. Select the language that you wish
to set as your default. If your pop-up menu is dimmed, then you have no other languages available.
Note! Your device will restart before a language change takes effect!
3 Press Back to save your setting.
Network
If you wish to change the network to which your device is connected, you can do this from the Networks screen.
(You can always tell what network you’re currently on by pressing Jump . The current network is shown at the
bottom of the Phone splash screen.)
Note: If you change your settings on the Network screen and want to restore them to factory default settings,
simply open the menu and select Restore Defaults.
Network Selection
You have two methods of selecting a network: automatic and manual. By defau lt, your device is set to select
a network automatically, but you can use the Network screen to select one manually:
1 From the Jump screen, press Menu then select Settings > Network to open the Network screen. Go to
the Network Selection group box:
2 The Scan and Select Manually button is highlighted by default. Simp ly press the wheel to start the scan.
October 21, 2003 T-Mobile Sidekick Owner’s Manua l 46
Page 47

Customizing Your Device
3 When the available network(s) have been located, you’ll see the Choose Network dialog box. Press the wheel
to open the pop-up menu:
Scroll to highlight the network you want to switch to, then press the wheel to select it. Select Done .
Note: It is also from this screen that you set your device to scan for networks automatically.
4 Once your device has connected to the network you selected, the Network screen will reflect your selection:
Sound Profiles
You control your device’s sound on the Sound Profiles screen. From this screen you can select and define the
sound profiles that govern the way system and application sounds are played, if at all. On this screen you can
also select a default pending message alert ringtone and schedule regular times when you want your device to
switch to a certain profile.
About Sound Profiles
Your device will make three categories of sounds in response to specific system or application events:
• Rings & Reminders - Phone calls and Calendar events
• Message Alerts - Email message, voice mail, text message, IM message, Web page loaded, etc.
• System Sounds - Empty Trash event, open display, open menu, send email message, press key, etc.
Your system comes with four default sound profiles. The profiles have editable names and settings for each of
the sound types:
Default Profile Rings & Reminders Message Alerts System Sounds Wheel Flash Vibration
Loud 100% volume 100% volume 66% volume Yes Yes
Normal 100% volume 50% volume 0% volume Yes Yes
Soft 30% volume 20% volume 0% volume Yes Yes
Mute 0% volume 0% volume 0% volume Yes Yes
You can add one more profile to make a total of five sound profiles.
October 21, 2003 T-Mobile Sidekick Owner’s Manua l 47
Page 48

Customizing Your Device
Select and Edit Sound Profiles
1 From the Jump screen, press Menu then select Se ttings > Sound Profiles to open the Sound Profiles
screen.
2 In the Sound profile currently active group box of the screen, you can see which profile is currently active.
To the ri ght of and just below the profile name, the attributes of the profile are represented by icons:
3 T o select a d ifferent profile, highlight the Sound Profile pop-up menu (it is highlighted in the example above)
then press the wheel to open the pop-up menu. Rotate the wheel and highlight the profile you want, then
press the wheel to select it.
To add a new profile, open the Sound Profile pop-up menu and select New Profile. The edit profile screen
will open. By default, all profile attributes are selected and the volume for all sounds is set to 100%. Make
your edits just as you would an existing profile.
4 To edit the profiles’ attributes , select the Edit button. The profile edit screen will open:
5 Select the profile you want to edit from the pop-up menu (highlighted in the illustration above). You can
change the following profile attributes:
• Name text box - Type the name you want to assign the profile.
• Flash Wheel check box - Select if you want to accompany your ringtone with a flashing wheel (note that
this only works if the ringtone yo u select has a flashin g component).
• Vibrate check box - Select if you want the device to vibrate whenever a ringtone plays.
• Volume sliders - For each type of sound, you can adjust the volume. Highlight the sound type then press
the wheel to open the slider:
Rotate the wheel up to increas e the sound; rotate the wheel down to de c r ease the sound. Press the
wheel to set the volume and close the slider.
October 21, 2003 T-Mobile Sidekick Owner’s Manua l 48
Page 49

Customizing Your Device
6 To change the order in which the profiles to display in the Sound Controls dialog box, sele c t the Reorder
button. The reorder dialog box looks like the following:
To use the reorder dialog box, first highlight the sound profile you want to move, then press the wheel and
release. Rotate the wheel to position the profile where you want it. Then press the wheel to lock its position.
7 To restore default settin g s for all s ound p ro files, press Menu then select Restore Default s.
8 To save your settings, press Back .
Select a Ringtone for Message Alerts
Your device will remind you if you have a pending message alert (for a new email message, voice mail message,
etc.) with a ringtone that you can select from the Sound Profiles screen.
1 From the Jump screen, press Menu then select Se ttings > Sound Profiles to open the Sound Profiles
screen. Scroll down to the Pending message alert group box:
2 Select a ringtone from the Play pop-up menu, then select how frequently you want the reminder to play from
the time pop-up menu. You can select from 2, 5, and 10 minutes.
3 Now when you receive a new message notification, until you check your m essage, a reminder ring wi ll play
every few minutes. If you don’t want to include an application’s message alerts in this reminder ring, then
you must set that application’s notification ringtone to “None”.
4 To save your settings, press Back .
October 21, 2003 T-Mobile Sidekick Owner’s Manua l 49
Page 50

Customizing Your Device
Schedule Sound Profiles
You can schedule your device to switch sound profiles at regu lar times, either on a daily or weekly basis, from
the Sound Profiles screen.
1 From the Jump screen, press Menu then select Se ttings > Sound Profiles to open the Sound Profiles
screen. Scroll down to the Schedule Sound Profile s group box:
2 Use the every day settings to reset your sound profiles up to twice each day. Use the every week settings to
change your sound profile at midnight every weekday or weekend day.
3 To save your settings, press Back .
October 21, 2003 T-Mobile Sidekick Owner’s Manua l 50
Page 51

4. The Jump Screen
In this chapter you can read all about your device’s “home base” -- the Jump screen:
• About the Jum p Sc r e en on page 51
• How to Find the Jump Screen on page 52
• The Application Splash Screens on page 52
• How to Select an Application on page 52
• The Jump Screen Menu on page 53
About the Jump Screen
The Jump screen is a view that displays all the applications you can use on your device in a ring of application
icons (on the left) and application “splash screens” (on the right). You use the Jump screen by scrolling through
the applications by rotating the wheel...until the application you want to open displays. Then press the wheel to
open the application.
The Jump screen is illustrated below, with the Phone application displayed:
Read more about spl ash screens in
October 21, 2003 T-Mobile Sidekick Owner’s Manua l 51
The Application Splash Screens
on page 52.
Page 52

The Jump Screen
How to Find the Jump Screen
Simply press the Jump button to view the Jump screen. You can “jump” to this view from any screen, in any
application, at any time, by pressing the Jump button.
When you go to the Jump screen by pressing the Jump button , the Phone application is highlighted by
default.
The Application Splash Screens
As you view the Jump screen and scroll through each application using the wheel, the splash screen applicable to
that application highlighted displays to the right of the Jump screen wheel.
Some splash screens contain application status information. For example, in the illustration of the Jump screen
above, the Phone splash screen shows the device owner that her total phone call time is 43 seconds.
Jump splash screens that contain timely user information are described in more detail in the following topics:
•
Phone Splash Screen
Instant Messaging Splash Screen
•
•
Email Splash Screen
Phone Messages Splash Screen
•
Calendar Splash Screen
•
To Do Splash Screen
•
Notes Splash Screen
•
Camera Splash Screen
•
on page 63
on page 79
on page 96
on page 118
on page 138
on page 160
on page 167
on page 153
How to Select an Application
1 Press Jump to open the Jump screen.
2 Scroll through the app lic a tions using the wheel. Stop when the a p p lication you want to use is highlighted .
3 Press the wheel to open the application.
October 21, 2003 T-Mobile Sidekick Owner’s Manua l 52
Page 53

The Jump Screen Menu
While on the Jump screen, press Menu to open the Jump screen menu:
Here’s what each menu option does:
• Settings - Opens the Settings hierarchical menu, from which you can make device-wide settings:
The Jump Screen
Read more in
• Controls... [ + ] - Opens th e Controls submenu:
Read more in
• Key Guard [Hold ] - Puts your device into key guard mode, which locks the keys and control buttons.
• Hints... - Opens a series of help screens.
• Network Status - Lists current network status details:
Press Menu + M to see more details.
• Power Off [ ] - Turns off your device. You’l l see a serie s of shut-down messages as the device powers
off.
3. Customizing Your Device
Sound Controls
on page 15.
on page 32.
October 21, 2003 T-Mobile Sidekick Owner’s Manua l 53
Page 54

5. Browsing the Internet
Get away from it all and still browse the Interne t! You’ll love the Web Browser applic a tion on your T-Mobile
device. To learn how to take advantage of all your Web Browser features, read the topics in this chapter:
• Browser Splash Screen on page 54
• Status Indicators on page 54
• Keyboard Shortcuts on page 55
• Navigation/View Shortcuts on page 55
• Go To a Web Page on page 56
• Go to Your Home Page on page 56
• Search the Web on page 57
• Use Bookmarks on page 57
• See Recently-Viewed Web Page s on
page 59
• View History on page 59
• View Page Info on page 60
• Refresh a Web Page on page 60
• Stop a Web Page from Loading on page
60
• Web Browser Settings on page 60
Browser Splash Screen
To open the Web Browser application, first press Jump , then scroll to highlight the Web Browser icon in the
left-hand “ring” of applications. You will see the Web Browser “splash” screen on the right side of the screen
when you’ve highlighted the Web Browser application icon:
Status Indicators
When a Web page is being loaded, you will see (at the bottom of your screen), the following status indicators:
The remote server is being contacted for the page you
requested.
The page you requested is being downloaded from the
remote server onto the service.
October 21, 2003 T-Mobile Sidekick Owner’s Manua l 54
Page 55

Browsing the Internet
The page you requested is being displayed to the device.
You may not see this indicator if the Web page displays
quickly.
If a Web page is longer than your displ ay, you will see a vertical scroll bar along the right of your screen. Use t he
wheel to scroll down the page, or use the shortcuts described in
If you leave the Web Browser application while a page is being loaded, you can set a preference so you will be
notified in the title bar when the Web page finishes loading.
Once the marquee notificatio n ha s f inis he d s crol ling, a little globe icon will remain in the title bar until you
view the page. Also, if you set a new message alert, a ringtone will sound when the page finishes loading. Read
more in
Set Web Page Load Complete Alert
If a Web page is longer than your displ ay, you will see a vertical scroll bar along the right of your screen. Use t he
wheel to scroll down the page, or use the shortcuts described in
on page 61.
Navigation/View Shortcuts
Navigation/View Shortcuts
below.
on page 55 below.
Keyboard Shortcuts
While you’re in the Web Browser, you can use the following shortcuts for Menu items:
Bookmarks
Add Bookmark...
Go To
Navigate >
Forward
Home
Recent Pages
Page Info
Refresh
Stop Loading
Mail URL
+ K
+ N
+ O
+
+ H
+ B
+ Q
+ R
+ .
+ M
Navigation/View Shortcuts
You can use the following shortcuts to navigate or change your view when using the Web Browser:
• Scroll down a page:
- Press down arrow on D-pad,
- Rotate wheel toward you,
- Hold down while rotating wheel (to scroll down screen-by-screen)
October 21, 2003 T-Mobile Sidekick Owner’s Manua l 55
or
or
Page 56

Browsing the Internet
• Scroll up a page:
- Press up key on D-pad,
- Rotate wheel away from you,
- Hold down while rotating wheel away from you (to scroll up screen-by-screen)
• Toggle to full scr een (hide title bar)
+ SHIFT + T
-Press
• Go Back to last-viewed Web page
- Press the Back button
or
or
Go To a Web Page
To open any Web page, do the following while you’re in the Web Browser application:
1 Start typing the address (URL) of the Web page you want to visit. The Go To dialog box opens automatically,
showing the address you are typing. Note! Y ou do not need to t ype the “www .” or “.com” portion of the Web
address. You can also open the Go To dialog box from the Web Browser menu.
2 Use the wheel to select a choice:
• If you highlight a matching URL then press the wheel, you will be taken directly to the URL selected.
However, if you want to paste the URL in the Go To dialog box then edit it, hold the Shift key down while
you press the wheel. The URL is pasted in the Go To dialog box and you can edit the Web address there.
• If one of the possible matches is an entry i n you r Bookmark list, then that match will be identified with a
bookmark icon: .
• If you highlight the Search for entry then press the wheel, a search for that entry will conducted by the
search engine you’ve specified in
•The Edit option only appears if the current page’s URL contains a match for your Go To entry. If you
highlight and select the Edit entry, the current page’s URL will appear in the Go To dialog box, ready for
you to edit. You can also edit the current page’s URL by pressing Menu then selecting Go T o [ + O].
Note: T o navigate back and f orward between W eb pages you’ ve visite d, press Menu then select Navigate to
open the Navigate submenu, which contains a Forward option and links to Web pages you’ve visited, and
History.
Set Your Search Engine
on page 61.
Go to Your Home Page
Your home page is set in t he Web Browser Settings screen as described in
can go to your home page in either of two ways while in the Web Browser:
• Press Menu then select Navigate > Home.
• Use the keyboard shortcut by pressing + H.
October 21, 2003 T-Mobile Sidekick Owner’s Manua l 56
Set Your Home P age
on page 61. You
Page 57

Browsing the Internet
Search the Web
To s e a rch the Web for keywords, do the following while you’re in the Web Browser application:
1 Start typing the word(s) you want to include in the se ar ch . T he Go To dialog box opens automatically,
showing the word(s) you are typing.
2 The Search option appears directly below the word(s) you are typing:
When you are finished typing your search words, use the wheel to scroll down to highlight the Search option
(as shown below), then press.
3 Your Web search is then conducted by the search engine you have specified in
page 61. Your search results display on the search engine’s Web page. Use the wheel to scroll to the result
you want to follow and press.
Set Your Search Engine
on
Use Bookmarks
A
bookmark
a particular Web page and want the ability to get back to it later quickly, create a bookmark for it. Y ou can create
up to 500 bookmarks on your device and up to 50 custom folders in which to organize them. (Read how in
Bookmarks
View Bookmarks
While in the Web Browser, you can see the bookmarks you have already set by doing either of the following:
The Bookmarks screen looks like the following:
is a saved link to a Web page that has been added to a list of saved links. When you are looking at
Add
on page 58.)
• Press Menu then select Bookmarks.
• Use the keyboard shortcut by pressing + K.
Notice, you can create folders to organize your bookmarks. “Expand” or “collapse” the bookmarks contained
within a given folder by highlighting the folder and pressing the wheel. Press to expand, press again to collapse
the list.
Read more about folders in
October 21, 2003 T-Mobile Sidekick Owner’s Manua l 57
Add/Edit/Delete Bookmark Folders
on page 58.
Page 58

Browsing the Internet
Add Bookmarks
To add a bookmark to your list of bookmarks, do the following while in the Web Browser:
1 Open the Web page you want to bookmark.
2 Press Menu then select Add Bookmark... [ + N].
3 The Add Bookmark screen opens with the Name and URL fields filled in:
The Folder pop-up menu is highlighted by default. Press the wheel to open the list of options. Scroll to
highlight the folder in which you want the bookmark to appear, then press the wheel to select it. If you select
New Folder, the New Folder dialog box will appear, asking you to name the folder.
4 When finished, press Done . Your bookmark is added.
Edit and Discard Bookmarks
You can change the address (URL), name, or folder of an existing bookmark, or discard a bookmark by doing the
following while in the Web Browser:
1 From the Web Browser, press Menu then select Bookmarks [ + K]. The Bookmarks screen opens.
2 Scroll to highlight the bookma rk you wish to modify.
3 Press Menu to open the Bookmarks menu, and then:
• To edit a bookmark name, select Edit [ + E] to open the Edit Bookmark dialog box. Change the
bookmark name, URL, or folder as you wish; then press Done .
• To discard a bookmark, select Discard [ ]. You will be asked to confirm your action before the
bookmark is actually removed.
Add/Edit/Delete Bookmark Folders
You can organize your bookmarks into folders that you name. To add, edit, or delete a bookmark folder, do the
following while in the Web Browser:
1 From the Web Browser screen, press Menu then select Bookmarks [ + K]. The Bookmarks screen
opens.
2 Scroll to highlight the folder you wish to modify. If you are adding a folder, don’t worry about what folder is
highlighted.
3 Press Menu to open the Bookmarks menu, and then:
• To edit a folder name, select Rename... [ + E] to open the Rename dialog box. Change the folder
name as you wish and press Done .
• To discard a folder, select Discard [ ]. You will be asked to confirm your action before the folder is
discarded.
• To add a folder, select New Folde r... The New Folder dialog box appears. Type the new folder name and
press Done .
October 21, 2003 T-Mobile Sidekick Owner’s Manua l 58
Page 59

Browsing the Internet
See Recently-Viewed Web Pages
To see a list of Web pages that you have visited recently, relative to the page you are currently viewing, use the
Recent Pages screen while in the Web Browser application:
1 From the Web Browser screen, press Menu , then select Navigate and press the wheel again to open the
submenu. Your recent l y-viewed pages are listed in the center of the submenu. You can also open the Recent
Pages dialog box by pressing [ + B]. On this dialog box, notice that the page you are currently viewing is
marked with a diamond and its listing is positioned relative to where you’ve been:
2 Scroll to highlight a page you wi sh to retu rn to, then p ress the wheel to go there.
By using Recent Pages, you can easily navigate forward and backward among pages you’ve visited.
You can clear your Recent Pages list from the Settings screen. Read more in
Clear History
on page 62.
View History
To see a chronological list of Web pages you have visited (up to 100), open the History screen while in the Web
Browser application:
1 From the Web Browser screen, press Menu then select History. The History screen opens:
2 To return to any of the pages listed, simply scr oll to highlight the URL, the press the wheel to selec t it.
You can clear your history from the Settings screen. Read more in
October 21, 2003 T-Mobile Sidekick Owner’s Manua l 59
Clear History
on page 62.
Page 60

Browsing the Internet
View Page Info
To view the current page’s URL and page title, press Menu then select Page Info [ + Q]. The Page Info
dialog box will open:
Refresh a Web Page
You can refresh (reload from the originating server) the Web page you are currently viewing in either of two
ways:
• Press Menu then select Refresh.
• Use the keyboard shortcut by pressing + R.
Stop a Web Page from Loading
You can stop a Web page from loading in either of two ways:
• Press Menu then select Stop Loading.
• Use the keyboard shortcut by pressing + ..
Web Browser Settings
You can customize a number of settings from the Web Browser Settings screen:
October 21, 2003 T-Mobile Sidekick Owner’s Manua l 60
Page 61

Browsing the Internet
Specifically, you can:
• Set Your Home Page
• Set Your Search Engine
• Set Web Page Load Complete Alert
• Show Pictures
•Clear History
•Clear Cache
• Clear Cookies
The secti ons below explain what each setting means.
Set Your Home Page
To set your Web home page (the page you want the browser to open by default), do the following while in the
Web Browser application:
1 From the Web Browser screen, press Menu then select Settings.
2 On the Settings screen, scroll to the Home Page text field and type the URL of your preferred home page.
Alternatively, you could select the Use Current Page button if you want to use the Web page that was
displayed on the screen before you opened the Settings screen.
3 Press Back to save your setting.
Set Your Search Engine
To s e t the search engine you want to use by default, do the following while in the Web Browser application :
1 From the Web Browser screen, press Menu then select Settings.
2 On the Settings screen, scroll to highlight the Search Engine pop-up menu.
3 Press the wheel to open the list of options.
4 Scroll to your preferred search engine and press the wheel to select it.
5 Press Back to save your setting.
Set Web Page Load Complete Alert
If you want an alert to sound when a Web page has finished loading (assuming you are in another application at
the time the page loads), then select a ring tone from this pop-up menu.
Show Pictures
You can decide if you w ant the W eb Browser to displ ay W eb pictures on your device by do ing the followi ng while
in the Web Browser application:
1 From the Web Browser screen, press Menu then select Settings.
2 On the Settings screen, scroll to highlight the Show Pictures in Web pages check box.
3 To have pictures display, press the wheel to select the check box; to prevent pictures from displaying, press
the wheel to clear the check box. Web pages should load faster if you clear this check box.
October 21, 2003 T-Mobile Sidekick Owner’s Manua l 61
Page 62

Browsing the Internet
Clear History
History contains a chronological list of Web pages you have visited (up to 100). To remove all Web pages from
the list, scroll to highlight the Clear History button, then press the wheel to select it. Note that when you clear
your history, you also clear your Recent Pages list.
Clear Cache
The device cache stores temporary Internet files such as Web pages and files (such as graphics). The device
allocates up to 800 KB for the cache. This speeds up the display of pages you frequently visit or have already
seen because the browser can open them from your device memory rather than the Web.
To clear your cache, scroll to highlight the Clear Cache button, then press the wheel to select it. Note that th is
may take a while. You’ll be notified when the cache has been cleared.
Clear Cookies
Many Web sites save information to your system (the Web proxy service in this case) so sites can “remember”
information you’ve entered (including whic h p ages you’ve visited within their site) for future reference. This
information is stored in a small text file, called a cookie. Know that only the information you type while visiting a
Web site can be st o red. Also, know that the presence of a cookie does not allow any external Web site access to
other information on your device. A Web site can only read the cookie that it created.
If you want to delete all the cookies stored for your account on the Web proxy service database, scroll to
highlight the Clear Cookies button, then press the wheel to select it.
October 21, 2003 T-Mobile Sidekick Owner’s Manua l 62
Page 63

6. Making Phone Calls
Your Phone application has many unique features that will make it easier than ever to stay connected! Read the
topics in this chapter to learn how to take advantage of al l the application has to offer:
• Phone Splash Screen on page 63
• Keyboard Shortcuts on page 64
• Title Bar In dicators on page 64
• Manage Your Speed Dial List on page 64
• Headset or Handset? on page 66
• Adjusting Volume on page 66
• Place a Call on page 67
• Features While on a Call on page 70
• Answer a Call on page 72
• End a Call on page 72
• Your Call Log on page 73
• Listen to Voice Mail on page 75
• Phone Settings on page 75
Phone Splash Screen
T o open the Phone application, first pr ess Jump , then scroll to highlight the Phone icon in the left-hand “ring”
of applications. You will see the Phone “splash” screen on the right side of the screen when you’ve highlighted
the Phone application icon:
The splash screen shows the total call time elapsed since you last reset the counter (read more in
Call Time and Reset
October 21, 2003 T-Mobile Sidekick Owner’s Manua l 63
on page 76) as well as the network operator to which your device is currently connected.
Accumulated
Page 64

Keyboard Shortcuts
While you’re in the Phone applica tion, you can use the following shortcuts for menu ite m s :
End Call
Dial with Wheel
Add Contact...
Edit Contact...
New Speed Dial...
Call Log
Second Call...
Mute/Un-mute Call
Note that while you’re on a phone call:
• Press @ (at sign) to create a * (star) tone.
• Press . (period) to create a # (pound) tone.
+ W
+ @
+ E
+ D
+ L
+ N
+ M
Title Bar Indicators
Your device title bar will show you the status of your Phone application; for example:
Making Phone Calls
The phone symbol shown above, plus others you might see at some time, are explained below:
You have one call active; time elapsed is 3 minutes, 40 seconds. Note that the
phone icon and the time display alternately. If you have two calls active, you’ll see
one phone icon blinking and the time displayed will be for the foreground call.
Call forwarding is turned on. Your phone will not ring.
You have unheard voice mail.
Manage Your Speed Dial List
You can store up to eight speed dial numbers for easy dialing. Note that shortcut #1 is reserved for your voice
mailbox number and cannot be reassigned.
Once you store a speed dial number, you can easily dial that number by pressing and holding the shortcut
number for at least two seconds. Very convenient! You can always check your Speed Dial list assignments by
opening the Recent pop-up menu on the main diali n g screen.
October 21, 2003 T-Mobile Sidekick Owner’s Manua l 64
Page 65

Making Phone Calls
You can add, edit, or delete speed di al numbers from the Settings > Speed Dial screen or from the New Speed
Dial menu item. Details follow.
Adding a Number to Your Speed Dial List
To add a number to your Speed Dial list, do the following while in the Phone application:
1 From the main Phone screen, press Menu then select New Speed Dial... [ + D]. The New Speed Dial
Entry dialog box opens:
2 The next-available shortcut number is selected by default in the pop-up menu. You can use this number or
any other number that isn’t already assigned.
3 Type the Name and Number of the contact. As you type the name, possible m atc hes from your Address
Book contacts will appear in a pop-up menu for easy selection.
4 Select Create . Your speed dial number is saved.
Editing an Existing Speed Dial Number
To edit an existing speed dial number, do the following while in the Phone application:
1 From the main Phone screen, press Menu then select Settings > Speed Dial. The Set Up Speed Dial
screen appears.
2 Scroll to highlight the entry you want to edit, then press the wheel. The Edit Speed Dial Entry dialog box
appears. Make your change to the shortcut key, name, or phone number . You can also discard the speed dial
entry from this dialog box.
3 When finished, select Done .
October 21, 2003 T-Mobile Sidekick Owner’s Manua l 65
Page 66

Making Phone Calls
Removing an Existing Speed Dial Num ber
To remove an existing speed dial number, do the following while in the Phone application:
1 From the main Phone screen, press Menu then select Settings > Speed Dial. The Set Up Speed Dial
screen appears.
2 Scroll to highlight the entry you want to remove.
3 Press the DEL key .
4 You’ll receive a confirmation dialog box; select Discard. The speed dial entry is removed.
Headset or Handset?
When making a phone call, you can use the device as a handset or use the headset.
• Handset - Make sure the display lid is in the closed position. Hold the phone as a receiver, speaking into
the microphone located between the Menu and Jump buttons.
Tip! The listening sound is best when you hold the phone tight against your ear and the “mouthpiece”
slightly away from your face, as shown in the illustration above. The microphone is sensitive enough to
pick up your voice even if you hold it at this angle (about 20-30 degrees relative to your face).
• Headset - Plug your headset lead into your device headset/camera jack as shown above.
Adjusting Volume
While you’re on an active call, you can adjust the speaker volume:
1 Scroll to highlight the speaker volume button , then press the wheel. The Volume control
opens:
2 Rotate the wheel to adjust the volume up or down: rotating up (away from you) increases volume; rotating
down (toward you) decreases volume.
October 21, 2003 T-Mobile Sidekick Owner’s Manua l 66
Page 67

Making Phone Calls
Place a Call
There are many ways you can “dial” a call with your device. This section describes all the methods. Pick the one
that suits you:
•
Keyboard Dialing
Keypad Dialing
•
Redialing a Number
•
Speed Dialing
•
Dialing Recent Numbers
•
•
Dialing Using Letters
Dialing from the Call Log
•
Dialing from the Look Up Screen
•
Dialing from Contact Information
•
Dialing Method Instructions
on page 67
on page 67
on page 68
on page 68
on page 68
on page 68
on page 68
on page 69
on page 69
Keyboard Dialing With the device display lid open, type the number using the number
Keypad Dialing Scroll to highlight the dial mode button:
keys.
Press Send Call to place the call.
Then press the wheel to open the on-screen keypad:
Scroll to highlight a number, then press the wheel to select it. Continue
until your number is complete. If you type an incorrect number by
mistake, use the Delete key to erase it.
Press Send Call to send the call.
October 21, 2003 T-Mobile Sidekick Owner’s Manua l 67
Page 68

Making Phone Calls
Dialing Method Instructions
Redialing a Number You can redial a number you just disco nnected by pressing the
button.
Speed Dialing You can place a call using an assigned speed dial number. Press and
Dialing Recent Numbers The Phone application stores a list of the last 10 numbers you’ve called,
Dialing Using Letters If you want to dial a phone number that appears as letters (such as 1-
hold the shortcut number key for at least two seconds to send the call.
Tip: If you’ve forgotten your speed dial number assignments, open the
pop-up menu on the main dialing screen. Yo ur Speed Dial
list is shown at the top.
received, or missed. To open this list, scroll to highlight ,
then press the wheel to open the pop-up menu:
Scroll to highlight the number you want to call, then press the wheel to
send the call.
The symbols to the left of the name/number tell you the “category” of
the recent call:
- Incoming
- Outgoing
- Missed
In addition, at the top of the recently-calle d list is a list of your stored
Speed Dial numbers.
800-FLOWERS), you can use the keyboard’s alpha keys to type the
number. The Phone application will “interpret” the letters and send the
numeric equivalent.
Dialing from the Call Log The Call Log is describe d in detail in
brief) here’s how to dial using the Call Log:
• Open the menu and select Call Log [ + L].
• Scroll to highlight the number you want to call, then press the wheel
to send the call.
October 21, 2003 T-Mobile Sidekick Owner’s Manua l 68
Your Call Log
on page 73, but (in
Page 69

Dialing Method Instructions
Making Phone Calls
Dialing from the Look Up
Screen
Dialing from Contact
Information
You can open a “Look Up” view into your Address Book that just lists
your contacts and phone numbers. To use this screen to dial a number:
• Scroll to highlight , then press the wheel to open the
Look Up screen.
• An abbreviated Browse Contacts screen appears, showing names
and phone numbers.
• T o find a contact quickly, start typing the name and the Match dialog
box will open, narrowing your search. Alternatively, you can scroll
through your contacts until you find the phone number you want to
call, then press the wheel to send the call.
• You return to the Phone application screen.
You can call a contact stored in your Address Book directly from their
contact information:
• From the Jump screen select Address Book.
• Open the information for the contact you want to call.
• Scroll to highlight the phone number of interest.
• Either press and hold the wheel to open the context menu and select
Call or press Menu and select Call.
• You return to the Phone application as the call is sent.
Dialing Pauses
You can embed pauses into a phone number you dial by inserting either the comma (,) or semicolon (;) in the
number sequence. Each behaves a little differently:
• comma (,) - When a comma is reached in the sequence, a three-second pause is inserted before the next
number is dialed.
• semicolon (;) - When a semicolon is reached in the sequence, a dialog box opens, prompting you to select
OK if you want the next number in sequence dialed.
So, if you want to dial a number that will then ask you to select an option (e.g., “Press 1 to contact Sales; press
2 to contact Customer Support; press 3 to contact Techni cal Support.”), and then another option (e.g., “Press 1
to leave a message; press 2 to hold for a representative.”), you could type:
1-800-555-4488,2,2
In the example above, you would be placed on hold to wait for a representative without having to listen through
and select the options. If you used semicolons (;) instead of commas (,) in the sequence above, you would need
to watch the display of your device and respond to the dialog box prompts to dial the option numbers.
October 21, 2003 T-Mobile Sidekick Owner’s Manua l 69
Page 70

Making Phone Calls
Features While on a Call
While you’re on a call, you can:
• Enter Additional Numbers
• Mute Your Call
• Make a New Call
• Make a Conference Call
Enter Additional Numbers
Sometimes after connecting to a phone number, you’ll need to enter additional numbers (such as menu item
choices or your voice mailbox security code). You can enter these numbers by using either of these two
methods:
• Method 1 - Use the keyboard. Note that you can press @ (at sign) to create a * (star) tone, and press
. (period) to create a # (pound) tone.
• Method 2 - Select to open the on-screen keypad. Scroll to highlight the number or symbol you
want, then press the wheel to select it. Repeat for each character you need to enter. Press Back to
dismiss the keypad when finished.
Mute Y ou r Call
During an active call you can mute your side of the conversation by opening the menu and selecting Mute Call
[ + M]. To open your side of the call to the listener again, open the menu and select Un-mute Call [ +M].
Make a New Call
While on an active call, you can place another call:
1 With your current call active, let the person you’re speak ing to know you’re about to put them on hold.
2 Press Menu then select New Call... [ + N]. The active call is placed on hold automatically.
3 Place your second call number using one of the dialing methods described in
4 Your first call still appears on your screen, in the lower panel:
5 To switch between caller s, select the button, h ig hlig hted by default in the lower panel. After you
select this button, the active caller is put on hold and their call is shown in the lower panel.
October 21, 2003 T-Mobile Sidekick Owner’s Manua l 70
Place a Call
on page 67.
Page 71

Making Phone Calls
6 To end either call, select End Call while the call is active. To end the call on hold without resuming it,
scroll to hi g hlight the End Call button, then press the wheel. To end both calls at once, press Menu then
select End All Calls.
Make a Conference Call
You can make up to a five-way conference call using your device (plus have one caller on hold). To do this, first
you need to have one caller on the line. Then:
1 Press Menu then select New Call... [ + N]. Your foreground call is put on hold.
2 Call your second party (using any of the dialing methods). When that party answers, press Menu then
select Conference. Your conference call displays as follows:
3 To add another party to the conference call, press Menu then select New Call.. . [ + N ] again. Your
conference call is placed on hold.
4 Call (using any of the dialing methods) your third party. When that party answers, press Menu then select
Add to Conference.
5 You can continue selecting New Call... [ + N] from the menu until you have five callers on th e conference
call. Note: You can call a sixth party , but either the conference call will need to be placed on hold or the sixth
party. From that state you can “switch” calls between the sixth party and the conference call.
6 From the conference call screen you can highlight an individual caller and press the wheel to open a context
menu that offers the following actions:
• Hold Other Callers - To leave the caller you have highlighted in the foreground call, but put all the other
callers in the conference on hold. select this option.
• Disconnect Caller - To drop the highlighted caller from the conference call, select this option. The other
parties on the conference call remain.
7 T o end the conference cal l, select End Call . If you also have a call on hold and want to end all calls, press
Menu then select End All Calls.
October 21, 2003 T-Mobile Sidekick Owner’s Manua l 71
Page 72

Making Phone Calls
Answer a Call
When you receive a new incoming phone call, you will see a notification screen like the following:
Since the Answer button is highlighted by default, all you have to do is press the wheel to answer the call.
To send the call directly to voice mail, highlight and select the Forward to Voice Mail button, or simply
press Back .
There are a couple of special cases you should know about:
• If your device is locked when a call comes in press the wheel to answer the call. Once you’re on the
call, the phone screen will include a button that allows you to the device so you can use the
Menu, Back, and Jump buttons.
• If you are already in a call when another call comes in (call waiting), the notification screen will
include a button to Switch Calls. If you press this button, the firs t call will be put on hold. Alternatively,
you can pre ss the Forward to Voice Mail button to send the incoming call straight to voice mail.
About Caller ID
If your caller does not have Caller ID blocked on their phone account, then the incoming call notification screen
will include the caller information. In addition, if you have the caller in your Address Book, the notification screen
will be further personalized with the label on the phone number and an ident ity icon, if you have stored this
information.
For example, in the case that the caller does not have Caller ID blocked and you have the caller in your Address
Book, you could get a notification screen that looks like the one in the illustration above for caller Gloria Grant.
End a Call
There are a few ways you can end your phone call:
• If you are in the Phone application, select the button.
• If you are in an application other than Phone, press Menu then select End Call.
• Regardless of where you are, press Back .
October 21, 2003 T-Mobile Sidekick Owner’s Manua l 72
Page 73

Making Phone Calls
Your Call Log
Your Call Log lists the cal l s that you have either:
• received (“incoming”),
• placed (“outgoing”), or
• didn’t pick up (“missed”)
The Log stores up to 10 calls in each of the three categories (Incoming, Outgoing, or Missed), for a total of 30
calls. When you reach the maximum limit in one of the categories, the oldest call is removed from the Log to
make room for the new call. You can also clear your Log at any time (read more in
75).
Views of Your Call Log
The Log is convenient because you can view your calls by category if you want. Your Call Log holds a history of
your last 100 calls (first in-first out method of storing). Here’s how you can set your Log view:
1 Press Menu then select Call Log [ + L]. The Log opens in either the default view (All Calls), or in the
view you last selecte d.
2 From the Call Log screen, press Menu then View to open the submenu view options:
• All Calls - [ + 0]
•Incoming - [ + 1]
• Outgoing - [ + 2]
• Missed - [ + 3]
If you don’t have any calls in the category you selected, the screen will display the message “No calls in Call
Log”.
3 The view you select “sticks” until you change it from the menu. Note that your currently-selected view is
indicated by a bullet in the m enu (“Incoming” in the example b e low):
Clear Your Call Log
on page
An example Call Log is shown below, with the view set to All Calls:
October 21, 2003 T-Mobile Sidekick Owner’s Manua l 73
Page 74

Making Phone Calls
Note the call category icon s:
- Incoming
- Outgoing
- Missed
Place a Call From the Log
You can use your Call Log to return or make calls. Here’s how:
1 Press Menu then select Call Log [ + L]. Your Call Log appears.
2 Scroll to highlight the number you want to call, then press the wheel. Your call is placed.
Add/Edit Speed Dial from the Log
If one of your Log entries is also on your Speed Dial list, you can easily edit this entry from the Log. If an entry
in your Log is not on your Speed Dial list, you can easily a d d the number to your Speed Dial list from the Log:
1 Press Menu then select Call Log [ + L]. Your Call Log appears.
2 Scroll to highlight the number you want to call, then press Menu and select New Speed Dial... [ + N] or
Edit Speed Dial... (the appropriate entry will appear).
3 Either the Edit Speed Dial Entry or New Speed Dial Entry dialog box appears, as appropriate.
4 Type or edit the Shortcut Key, Name, and Number information.
5 Select Create or Done to dismiss the dialog box and save the changes.
Add Contact List from the Log
If one of your Log entries is also in your Address Book, you can easily edit this entry from the Log. If an entry in
your Log is not in your Address Book, you can easily add that contact to your Address Book from the Log:
1 Press Menu then select Call Log [ + L]. Your Call Log appears.
2 Scroll to highlight the name/number you want to add or edit, then press Menu and select Add Contact...
[ + @] or Edit Contact... [ + E] (the appropriate entry will appear).
3 Either the Add Contact or Edit Contact dialog box appears, as appropriate, with the caller’s existing
information filled in, or (if a new conta ct ) the caller’s name and number filled in--if tha t inform ation is
available. The Add Contact dialog box l ook like the following:
4 Complete or edit the fields, as you wish. When finished, select Add or Edit (as appropriate).
5 The contact information is saved and you are returned to the Phone application.
October 21, 2003 T-Mobile Sidekick Owner’s Manua l 74
Page 75

Making Phone Calls
Clear Your Call Log
To remove all entries in all three Call Log categories (incoming, outgoing, and missed), do the following while in
the Phone application:
1 Press Menu then select Call Log [ + L]. Your Call Log appears.
2 Press Menu then select Clear Log.... You’ll receive a confirmation dialog. Select Clear Log to have all
calls disappear and your screen will report “No calls in Call Log”. Select Cancel if you don’t want to clear
your Log after all.
Listen to Voice Mail
There are several ways you can call your voice mailbox to retrieve your voice mail.
• From a land line, call your voice mailbox numb e r.
• Using your device keyboard, press and hold the #1 key for at least two seconds (this is the sp eed dia l
shortcut to voice mail). The ca ll to your voice mailbox is placed.
Phone Settings
You can set a variety of preferences from your Phone Settings screen. T o open the Phone Settings screen, do the
following while in the Ph one a pplication:
From the main Phone screen, press Menu then select Settings to open the Settings submenu. You can select
from the following settings screens:
General Settings
•
•
Call Forwarding & Voice Mail
•
Set Phone Ringtones
•
Set Speed Dial Shortcuts
Each settings screen is described in the sections below.
General Settings
To reach the General settings screen, press Menu then select Settings > Gene ra l. The Settings screen
opens:
October 21, 2003 T-Mobile Sidekick Owner’s Manua l 75
Page 76

Making Phone Calls
• My Phone Number
Just in case you forget your device’s phone number, it’s shown on this screen. If, for s om e reaso n, your
phone number does not appear, you can manually enter it by selecti ng the Enter Numbe r button. Note
that entering a number on this screen does not actually change your phone number. If you need to change
your phone number, contact T-Mobile.
• Accumulated Call Time and Reset
If you are keeping track of your calling time and need to reset the time to zero, select the Reset button. If,
for some reason your phone number is not read from your SIM card, then you can enter it manually by
selecting Enter Number. In the normal course of events, this should not be necessary.
• Phone Volume
Select the Phone Volume button to open the slider. Rotate the wheel up to increase volume; rotate the
wheel down to decrease volume.
Call Forwarding & Voice Mail
If you don’t want to answer your phone for some reason and want the call to forward to another number (voice
mail or somewhere else), you set this up by doing the following while in the Phone application:
1 From the main Phone screen, press Menu then select Settings > Call Forwarding & Voice Mail. The Set
Up Forwarding screen appears.
2 In the Settings section, scroll to highlight Call Forwarding & Voice Mail, then press the wheel. The Set Up
Forwarding screen opens. The currently-selected (active) forwarding option is the one selected on the pop-up
menu.
3 You have the following forwarding options:
• Forward to Voice Mail
• Forward All Calls
October 21, 2003 T-Mobile Sidekick Owner’s Manua l 76
Page 77

Making Phone Calls
You can choose to forward to Voice Mail or Other... If you select Other..., a dialog box opens in which you
must type the other number:
• Forward to Custom Number
For each call situation (Busy, Unanswered, or Out-of-range), you can select a forwarding number. Again,
you can cho ose from Voice Mail, Other..., or Disable (to disable forwarding). If you select Other..., then
the Forwarding dialog box opens, in which you must type the other number.
To turn off forwarding altogether, select the Disable option for each call situation.
Set Phone Ringtones
You can set up your device so that you’re notified of an incoming call or new voice mail by a ringtone you select.
You do this from the Phone Settings screen:
1 From the main Phone screen, press Menu then select Settings > Ringtones. The Set Up Ringtones
screen appears.
2 In the first group box you can open the Sound Controls by selecting that button.
October 21, 2003 T-Mobile Sidekick Owner’s Manua l 77
Page 78

Making Phone Calls
3 In the second group box, you can set your I nc om ing phone call ring. Select the pop-up menu to open it
and see all the possible rings you can select:
4 If you do not want to be notified of a new incoming call or voice mail, select None.
5 If you do want to be notified of a new incoming call or voice mail, then select from one of the possible
ringtone categories. To view the songs for a particular category, press the wheel. In the example above, all
the songs in the Chimes category are shown. To dismiss any of the submenus, press Back .
Note that the category and song currently in effect are highlighted.
6 To select one of the songs for your ringtone, press the wheel when the song is highlighted and marked with
a bullet.
7 Press Back to save your settings.
Set Speed Dial Shortcuts
You can store up to eight speed dial numbers (#2 - #9). Shortcut #1 is permanently reserved for voice mail.
You can add new or edit existing speed dial numbers from the Settings > Speed Dial screen. Read details in
Manage Your Speed Dial List
on page 64.
October 21, 2003 T-Mobile Sidekick Owner’s Manua l 78
Page 79

7. Instant Messaging
What could be more fun than sending instant messages while you’re on the go? Not much! Read all about how
to use the AOL Instant Messenger
• Instant Messaging Splash Screen on page
79
• Keyboard Shortcuts on page 80
• Add a Screen Name on page 80
• Sign On on page 81
• Sign Off on page 82
• Switch Screen Names on page 82
TM
service in this chapter:
• The Buddy List Screen on page 83
• Manage Groups on page 84
• Manage Buddies on page 86
• IM Conversations on page 89
• :) Smileys on page 91
• Set an Away Message on page 91
• Instant Messaging Settings on page 93
Instant Messaging Splash Screen
To open the Instant Messaging application, first press Jump , then scroll to highlight the AIM® icon in the lefthand “ring” of applications. You will see the AOL Instant Messenger
screen when you’ve highlighted the AIM
®
application icon:
TM
“splash” screen on the right side of the
The splash screen lists all your active conversations along with the buddy screen name and the conversation
number. The screen also tells you how many of your buddies are online at the time and the screen name you’re
currently using. You can use the conversation shortcuts ( ) to jump to a conversation from the Jump screen.
If you are out-of-network and therefore unable to connect to AIM, you will see an X in the radio signal area of
the notifications bar:
If you have been disconnected from the IM server, you will see this icon in the notifications bar:
October 21, 2003 T-Mobile Sidekick Owner’s Manua l 79
Page 80

Instant Messaging
Keyboard Shortcuts
While using AIM, you can use the following keyboard shortcuts for menu items:
Send IM...
New Buddy...
New Group...
Edit Buddy
Discard...
Move
End Conversation
End All Conversations Shift +
Smileys
Away Messages
Open a particular
conversation
+ M
+ N
+ N
+ E
+ O
+ .
+ Y
+ W
+ <conversation number>
Note that the shortcut keys to conversations work while in
the AIM application and from the Jump screen.
Add a Screen Name
Before you can use AIM on your device, you must have an AOL Instant Messenger account. If you don’t
already have an AOL or AIM account, no problem! Just follow the instructions below.
1 From the AOL Instant Messenger sign on screen, select New User from the Screen Name pop-up, then
select the Sign On button.
2 The New User dialog box opens:
Select the Create New Screen Name button; you’ll be taken to the new A IM Registration page via the
device Web Browser.
October 21, 2003 T-Mobile Sidekick Owner’s Manua l 80
Page 81

Instant Messaging
3 Complete the online forms that appear on your screen. When you’re done, you’ll be returned to the AIM Sign
On screen, with your new screen name showing as one of the options in the Screen Name pop-up menu:
Sign On
Once you have at least one screen name, you’re ready to sign on!
Signing On for the First Time
1 From the Jump screen, select AOL Instant Messenger. The Sign On screen appears.
2 T ype your Screen Name and Password in the fields. To save y ourself the trouble of typing these agai n, sel ect
the Save Password check box.
3 Scroll to highlight the Sign On button, then press the wheel.
4 This screen name will now appear in the Screen Name pop-up menu.
Signing On After the First Time
1 From the Jump screen, select AOL Instant Messenger. The Sign On screen appears.
2 The last screen name you used to sign on appears pre-populated in the Screen Name field. If you’ve selected
the Save Password check box, then your password is also pre-populated. If you want to use this screen
name, select the Sign On button.
3 If you want to use a different screen name to sign on, either type a screen name and password directly in the
fields, or use the Screen Name pop-up menu.This menu lists all the screen names that have been used to
sign on to AIM from your device.
Note that if this is the first time you’ve signed on to AIM using your device, there will be no entries in the
pop-up menu (except New User and Remove Name...).
October 21, 2003 T-Mobile Sidekick Owner’s Manua l 81
Page 82

Instant Messaging
4 To open the pop-up menu, scroll to highlight , then press the wheel. The pop-up appears:
Scroll to highlight the screen name you want to use to sign on, then press the wheel.
5 Type your password. Again, if you want the device to remember this screen name/password combination,
select the Save Password check box.
6 Select the Sign On button. You’re in.
7 If you want to add an existing AOL screen name to the list, or remove a screen name, read
on page 80 and
Name
Remove Existing Screen Name
on page 82.
Add a Screen
Sign Off
To s ig n off from AI M a t any time, press Menu and select Sign Off.
Switch Screen Names
You can switch screen names at any time:
1 From any of the AIM screens, press Menu th en select Sign Off. The Sign On screen appears.
2 From the Screen Name pop-up menu, scroll to highlight the screen name you want to use to sign on, then
press the wheel.
3 Select the Sign On b utton.
Remove Existing Screen Name
You can remove one or more names from your Screen Name pop-up menu. Note that if you do this, you will
not be deleting either your AIM or AOL account, you will just be removing the screen name from the list.
You can always add the name back in later by typing it in Screen Name/Password fields and then signing on.
October 21, 2003 T-Mobile Sidekick Owner’s Manua l 82
Page 83

Instant Messaging
It’s easy to remove a name. Note that you must be signed off to remove a screen name.
1 From the Sign On screen, open the Screen Name pop-up menu and select Remove Name. The Remove
Screen Name(s) dialog appears:
2 Scroll to highlight the pop-up menu and press the wheel to open it:
Scroll to highlight the name you wish t o remove.
3 Scroll to highlight the Remove button, then press the wheel.
4 To remove more names, select another name from the pop-up menu, then select Remove.
5 Continuing removing until finished, then select Done . Now, the name(s) you’ve removed will not appear
on the Screen name pop-up menu.
Tip: T o put a removed screen name back on the Screen Names pop-up menu, simply sign on using that screen
name by typing the Screen Name and Password manually on the Sign On screen.
The Buddy List Screen
The Buddy List screen is your main view into the AOL Instant Messaging service. The screen shows a grouped
listing of all your buddies:
At the very top of the screen in the title bar you’ll see your screen name.
Next, all the groups you have created are listed and marked with a group icons, with the buddies in collapsible
lists.
October 21, 2003 T-Mobile Sidekick Owner’s Manua l 83
Page 84

Instant Messaging
• To open (expand) a group’s list, scroll to highlight the group name, then press the wheel. The group icon
“opens”: .
• To collapse the list, press again: the buddy names disappear and the group icon “closes”: .
With the group contents expanded, to the far left of each buddy screen name you’ll see their open conversation
number (if you have a conversation open with them), and to the left there is an availability/status icon, if
applicable. Here’s what the icons mean:
Buddy is away (start a conversation to view their away message).
You’ve blocked this “buddy”.
The buddy is idle.
You have a new message from this buddy.
The buddy has signed on (icon displays only a few seconds).
The buddy has signed off (icon displays only a few seconds).
Buddy is signed on from a Sidekick. Their idle state is shown on the right.
Buddy i s signed on fr om a wirel ess device. Their idle state is shown on the right.
Buddies who are “offline” are shown in the Offline folder in italic font.
Running vertically down the right side of the screen, all the conversations with unread messages are symbolized
by little balloons, with the conversation number in the balloon. Note also that if you have an unread message,
you will see the AIM icon in the title bar:
Manage Groups
You use “groups” to or ganize your buddies, much like you use fol ders to organize y our email and text messages.
You can create new groups, rename existing groups, move groups, and discard existing groups. Note, however,
that you cannot discard the “system” group, Offline.
Add a Group
To add a new group to your Buddy List, do the following while in the IM application:
1 If your Buddy List isn’t displayed, press Back until your Buddy List displays.
2 Scroll to highlight one of the existing groups, then press Menu and select New > Group...[ + N]. T h e
New Group dialog box opens:
3 Type the new group in the Name box.
October 21, 2003 T-Mobile Sidekick Owner’s Manua l 84
Page 85

Instant Messaging
4 Select Done . The group is added to your list.
Rename a Group
Once you’ve created a group, you can change the group’s name:
1 If your Buddy List isn’t displayed, press Back until your Buddy List displays.
2 Scroll to highlight one of the existing groups, then press Menu and select Rename... [ + E]. The
Rename Group dialog box opens:
3 Edit the new group Name.
4 Select Done . The group is displayed with its new name on your Buddy List.
Move a Group
You can rearrange the order in which groups appear in your Buddy List:
1 If your Buddy List isn’t displayed, press Back until your Buddy List displays.
2 Scroll to highlight the gro up you wis h to m ove.
3 Press Menu then select Move [ + O] to enter “move mode”. The group you are moving is shown
focused within a dotted line:
4 Rotate the wheel to position the group where you want in your Buddy List. Press the wheel to place the
group and exit move mo de.
Discard a Group
You can discard any of the groups you’ve created (along with the Buddies in that group). You cannot, however,
discard the Offline group, which has a special status as a “system group”.
1 If your Buddy List isn’t displayed, press Back until your Buddy List displays.
2 Scroll to highlight the gro u p you wis h to discard.
3 Press Menu then select Discard [ ]. A confirmation dialog opens.
October 21, 2003 T-Mobile Sidekick Owner’s Manua l 85
Page 86

Instant Messaging
4 If you’re sure you want to remove this group and all its contents (buddies), select Discard. Note that if you
discard the buddies, they will be removed from your Buddy List altogether.
To cancel the action and keep the buddy on your list, press Cancel .
Manage Buddies
You can add Instant Messaging buddies, change their group assignment, remove and move them.
Add a Buddy
To add a buddy to your list, follow the steps below:
1 If your Buddy List isn’t displayed, press Back until your Buddy List displays.
2 Press Menu then select New > Buddy.... The New Buddy dialog box appears:
3 Type the Screen Name, and in the File in pop-up menu, select the group in which you want to file the
buddy.
4 Select Done . The buddy is added to your list!
Tip: If you’re having a conversation with a person not on your Buddy List, you can add them to your list quickly
by pressing Menu then selecting New > Buddy.... Their screen name is pre-populated in the New Buddy
dialog box.
Edit a Buddy
Once you’ve added a buddy, you can change what group the buddy is in, and how you’re notified when the
buddy signs on/off or sends you a message. To edit a buddy, do the following while in the IM application:
1 If your Buddy List isn’t displayed, press Back until your Buddy List displays.
October 21, 2003 T-Mobile Sidekick Owner’s Manua l 86
Page 87

Instant Messaging
2 Press Menu then select Edit... [ + E]. The Edit Buddy screen displays:
3 From this screen you can:
• Change the group in which you’ve filed the buddy.
• Set alerts (notifications) for when your buddy signs on, signs off, or sends you a new message.
4 After making your edits, press Menu then:
• Select Cancel [ + .] to cancel all changes.
• Select Done to save your changes.
Move Buddies
You can move buddies within a group and to a different group without opening the Edit Buddy screen:
1 If your Buddy List isn’t displayed, press Back until your Buddy List displays.
2 Scroll to highlight the screen name of the b ud d y you wish to m ove.
3 Press Menu then select Move [ + O] to enter “move mode”. The buddy you are moving is shown
focused in a dotted line:
Note: If the buddy you are moving is offline, once you select Move, the buddy is shifts from the Offline
group to the group in which they would appear if online.
4 Rotate the wheel to position the buddy in the group you want. (The buddy moves in real time.) Press the
wheel to place the buddy and exit move mode.
October 21, 2003 T-Mobile Sidekick Owner’s Manua l 87
Page 88

Instant Messaging
Note: If the buddy you were moving was offline, once you press the wheel to place them in a new group,
they will return to the Offline folder (until they sign on again).
Discard a Buddy
To remove a buddy from your list, do the following while in the I M a p pl ic a tion:
1 If your Buddy List isn’t displayed, press Back until your Buddy List displays.
2 Scroll to highlight the screen name of the buddy you wish to discard.
3 Press Menu then select Discard [ ]. A confirmation dialog opens.
4 If you’re sure you want to remove this buddy, select Discard. Otherwise, to cancel the action and keep the
buddy on your list, press Cancel .
Block/Unblock Buddies
If you want to block messages from a particular buddy, you can easily do so while in the IM application:
1 If your Buddy List isn’t displayed, press Back until your Buddy List displays.
2 Scroll to highlight the screen name of the buddy you want to block.
3 Press Menu then select Block.
4 The buddy’s screen name still appears on your Buddy List, but now it’s in the Offline group and the
“forbidden” icon appears to next to the buddy’s name:
5 To unblock messages from this bud d y, highlight their screen name in the O ffline group and select Unblock
from the menu. The screen name moves under the group you had previously assigned to them and you will
start receiving messages from this buddy again.
You can also unblock one or more buddies from the Settings screen, as described in
on page 95.
List
October 21, 2003 T-Mobile Sidekick Owner’s Manua l 88
Manage Blocked Users
Page 89

Instant Messaging
IM Conversations
Conversations are one-on-one chat sessions you have with your online buddies. With AIM, you can have up to 10
online conversations going at the same time. Thi s section explains how to st art and end conversation s, as well as
how to keep track of all the conversations you have going at one time!
Start/End an IM Conver sati on
To send a message to one of your buddies, follow the instructions below.
1 From the Jump screen, select AOL Instant Messenger. The Sign On screen appears.
2 Sign on to AIM using the instructions in either:
•
Signing On for the First Time
Signing On After the First Time
•
3 If your Buddy List doesn’t display, press Next [ ] until your Buddy List appears.
4 From the Buddy List screen, you can start a conversation screen in either of two ways:
• Method 1: Scroll to highlight the screen name of the buddy with whom you want to message, then press
the wheel. A conversation screen opens.
Tip: If you have a long Buddy List, to find a buddy’s screen name quickly, start typing the first few
characters of the buddy’s screen name and the auto-find feature will highlight the closest matching screen
name.
• Method 2: Press Menu then select Send IM... [ + M]. The Send Instant Message dialog box opens:
on page 81
on page 81
In the Send to text box, type the screen name of the buddy you want to message. You can also open the
pop-up menu and select a screen name (all your buddies are listed there). Select Start Conversation
(or press Return). A convers ation screen with this buddy opens w ith your initial message showing.
5 You use the lower panel to type your messages. Here’s an example of a conversation-in-progress:
Note! If you send a message and it appears in the top panel in
temporarily disconnected from the IM service. You will be reconnected automatically as soon as possible, at
which time your message will app ea r in re g u lar font, not italic.
6 To end a conversation, press Menu then select E n d Conversation [ + .].
Tip: If you want to Sign Off and end all your conversations at once, simply ret urn to the Buddy List screen, press
Menu then select Sign Off.
October 21, 2003 T-Mobile Sidekick Owner’s Manua l 89
italic
, this indicates that you’ve been
Page 90

Instant Messaging
IM Conversation Indicators
Most every screen you view within Instant Messaging, including the splash screen, contains balloon indicators
, one for each active conversation in which you have an unread message.
In addition, each open conversation is numbered and usually displays to the right of the buddy name in any of
the lists . If you’re in the AIM application or on the AIM Jump screen and you press Menu +
<conversation number>, you will be taken to that conversation screen.
Switch Between IM Conversations
The easiest way to switch between conversations is to press Menu + <conversation number>. You can also
press Menu and select IM Conversations [ + D] to open a submenu of all your active conversations. From
this list, select the conversation you want to make active.
Open Links Embedded in Conversations
If a buddy sends you an email address, URL, or phone number in a conversation, y ou can t ake an action on that
item from the menu, as shown in the example below, using the URL embedded link:
If the conversation contains an embedded email address or phone number too, the menu options will appear as
follows:
Simply select the appropriate menu option from the open c onversati on window to:
• go to the URL via the Web Browser application
• compose an email via the Email application
• place a phone call via the Phone application
Note that your conversation will stay open while you use another application to take one of these actions.
October 21, 2003 T-Mobile Sidekick Owner’s Manua l 90
Page 91

Instant Messaging
:) Smileys
While you’re in a conversation you can add smileys (emoticons) to your message. To add a smiley, do the
following:
1 With an open IM conversation on your screen, press Menu then select Smileys [ + Y] to open the
submenu:
2 Scroll to highlight the smiley you want to insert int o you r conversati on, then p ress the wheel to place it. You
can also insert a smiley by typing the ASCII equivalent (the center column in the menu).
Note: On devices that do not support the graphi cal smil eys, the ASCII version of t he smiley will be disp layed.
Set an Away Message
Tip: T o cr eate new custom away mess age categories, you must go to y our W eb browser client on your compu ter
and edit or create them there.
To set an away message you must first be signed on to AIM (read more in
signed on:
1 If your Buddy List isn’t displayed, press Menu then select Buddy List .
2 Press Menu then select Away Messages [ + W] to open the submenu. The default categories are
shown in the example below. (You can create new categories only from the AIM Web browser client on your
computer.)
3 Scroll to highlight the away message you want to select, then press the wheel.
October 21, 2003 T-Mobile Sidekick Owner’s Manua l 91
Sign On
on page 81). Once you’re
Page 92

Instant Messaging
4 If you select I’m Away..., then a new dialog box will open in which you can type the message that will be sent
to the sender while you’re away:
After you type your I’m Away message and press Set, the I’m Away dialog box will stay open until you return
and select the I’m Back button:
5 If you select one of the other unavailable messages, The I’m Away dialog box opens with a standard (but
appropriate) message. This dialog box will remain on your screen in Instant Messaging until you press the
I’m Back button.
6 While you’re away, other device users will see the Away icon next to your name in their Buddy List. If you
have any open conversations when you set an away message, your away message will appear in your
buddy’s conversation screen.
7 To change your status from away to available, select the I’m Back button.
October 21, 2003 T-Mobile Sidekick Owner’s Manua l 92
Page 93

Instant Messaging
Instant Messaging Settings
You can set many preferences from the Settings screen. To open this screen, do the following while in th e IM
application:
From either the IM Sign On screen or the Buddy List screen, press Menu then select Settings. The Settings
screen appears:
From this screen you can:
Show Graphical Smileys
•
Set Up Accept Messages
•
•
Set Buddy Alert Rings
Manage Blocked Users List
•
on page 93
on page 94
on page 94
on page 94
Show Graphical Smileys
You can choose to display graphical smileys in your IM conversations, or not. Scroll to highlight the check box,
then press the wheel to select it if you want to display smileys. Press the wheel again to clear the check box if
you want to suppress the graphical smileys. If you do not select this option, then if you insert smileys in your
message, the ASCII version will d is p la y.
Expose Idle State
If you want users who have you on their Buddy List to see when you’re “idle”, th en scroll to highl ight the Allow
users to see when I’m idle check box, then press the wheel to select it. If you leave this check box unchecked,
then the idle icon will not appear next to your screen name on other’s Buddy Lists when you’ve been idle for 10
minutes or more.
October 21, 2003 T-Mobile Sidekick Owner’s Manua l 93
Page 94

Instant Messaging
Set Up Accept Messages
You can set up AIM so that if someone not on your Buddy List sends you an instant message, you will first see
an alert asking you if you want to accept the mess a g e . To set this up, do the following:
1 From the Buddy List screen, press Menu then se lect Settings. The Settings screen appears.
2 Look at the Show “Accept Message” dialog box check box. If you want to see the dialog box when
someone not on your Buddy List sends yo u a message, scroll to highlight the check box, then pr ess the wheel
to select it. If you want to turn off Accept Message, clear the check box by highlighting the check box, then
press the wheel to clear it.
3 With Accept Message checked, when y ou receiv e a message f rom someo ne not on y our Buddy Li st, yo u’ll get
an alert like the following:
4 Choose from the following courses of action:
• Block User - The sender of the message will be blocked from sending you any messages, including the
one they’re trying to send. You won’t see any more Accept Message dialog boxes for this sender, until you
“unblock” them. (Read more in
• Decline - The sender of the message will be blocked from sending you any messages, including the one
they’re trying to send, for as long as you are signed in. The next time you sign on, if this person sends you
another message, you’ll receive the Accept Message dialog box again.
• Accept - You will see the message from the sender.
Block/Unblock Buddies
on page 88.)
Set Buddy Alert Rings
In order for Buddy Alert Rings to work, you must enable these alerts from the Settings screen.
1 From the Buddy List screen, press Menu then se lect Settings. The Settings screen appears.
2 Look at the Play buddy alerts group box:
To enable buddy alerts, scroll to highlight the Play buddy alert s check box, then press the wheel to select
it. (To disable buddy alerts, select the check box again to clear it.)
October 21, 2003 T-Mobile Sidekick Owner’s Manua l 94
Page 95

Instant Messaging
3 Once you enable buddy alerts, you can select different alert rings for the following events:
• Sign On - Ring sounds when a buddy signs on .
• Sign Off - Ring sounds w hen a buddy signs off.
• New Message - Ring sounds when you receive a new instant message.
To p ick a n a lert, firs t sele ct a ring tone “ c ateg ory” from th e pop-up menu on the left, then select a
corresponding “sound” from the submenus.
4 Your changes are saved as soon as you make them.
You can override these settings for individual buddies on the Edit buddy screens. Read more in
page 86.
Edit a Buddy
on
Manage Blocked Users List
If you do not want to receive messages from an individual on your Buddy List, you can “block” messages from
them. The instructions for doing this, and unblocking a buddy’s messages, are in
88. You can also unblock buddies from the Settings screen, as described below.
1 From the Buddy List screen, press Menu then se lect Settings. The Settings screen appears.
2 Scroll down to the bottom of the screen to the Blocked User(s) List group box:
Block/Unblock Buddies
on page
3 T o unblock any of the users in your list, scroll to highlight the screen name of the buddy you want to unblock,
then press the wheel to select it. The Blocked User dialog box opens:
4 The Unblock button is selected by default. Press the wheel to sele ct it and unblock the budd y. (T o cancel
your action and keep your buddy on the blocked list, select the Cancel button.)
5 Once you unblock a buddy, their screen name appears again under the assigned group name on the Buddy
List screen.
October 21, 2003 T-Mobile Sidekick Owner’s Manua l 95
Page 96

8. Email Messaging
The Email application on your device is easy to use and rich in features. Not only do you get your own device
email account, but you can also pull in other email from up to three of your external email accounts. Read the
topics in this chapter to take full advantage of this flexible application.
• Email Splash Screen on page 96
• Browse Email Screen o n page 97
• Status Indicators on page 98
• Keyboard Shortcuts on page 98
• View Your Email on page 100
• Move Messages to Folder s on page
102
• Send Messages on page 103
• Add Email Senders to the Address Book on page 105
• Add Email Recipients to the Address Book on page
105
• Discard Email Messages on page 106
• Manage Email Folders on page 107
• Manage Your Email Accounts on page 110
• Email Settings on page 114
• Space Limitations on page 117
Email Splash Screen
To op e n the Email application, first press Jump , then scroll to highlight the Em a il icon in the left-hand “ring”
of applications. You will see the Email “splash” screen on the right side of the screen when you’ve highlighted the
Email application icon:
The spla sh screen is h andy becaus e it shows all your unread messages, sorted first by folder then order
received (newest message first). If you have unread messages in more than one folder, the folder will also
display on the splash screen, as shown above.
October 21, 2003 T-Mobile Sidekick Owner’s Manua l 96
Page 97

Email Messaging
Browse Email Screen
The Browse Email screen is your main vi e w into the Email application:
The Browse Email screen lists all your emails, gr ouped into fo lders, ordered by date. (Read more about ordering
this list in
In the illustration above you’ll see the “system folders”-- Inbox, Saved, Sent, Drafts, a nd Trash -- plus all the
folders you have created to organize your emails, identified by a folder-type icon:
To the ri ght of the folder name, if it has unread messages, the number of unread messages is shown in
parentheses. In the example above, Inbox (1 ) contai ns one unread message. The Inbox is shown in “expanded”
view (its list of emails is showing), with the first message in bold, indicating it is “unread”. The Saved folder is
shown collapsed. The Sent folder contents are collapsed, as are the Drafts folder contents (empty folders are
always shown collapsed, of course). The Trash folder is shown in expanded view and contains two emails.
As shown in the illustration above, individual emails are grouped in collapsible folder lists. To open (expand) a
folder’s list of emails, scroll to highlight the folder name, then press the wheel. To collapse the list, press again.
Press again to expand, etc.
Tip: To scroll quickly between folders, press the ALT key while using the D-pad up and down arrows. To scroll
quickly between unread messages, hold the SHIFT key while using the D-pad up and down arrows.
T o open an individual email, scroll to highlight the email, then press the wheel. To learn more about reading your
email, read
107.
T o the left of items in the Browse Email screen, there could be an icon that indicates the status of a message. To
interpret these icons, as well as understand the folder icons, read
Sort Email Messages
View Your Email
on page 100. To learn about adding folders, read
on page 102.)
Manage Email Folders
Status Indicators
on page
on page 98.
October 21, 2003 T-Mobile Sidekick Owner’s Manua l 97
Page 98

Email Messaging
Status Indicators
From the Browse Email screen, in the title bar, you’ll always see how full your mailbox is, by percentage and
megabyte (MB).
Icons shown the to left of each folder name or email message tell you their status. Plus, all unread messages
are shown in bold. Here’s what the icons mean:
You have replied to this mes s a g e .
You forwarded this message.
This email has an attachment.
There was an error when sending this email. A few errors include: the message was not
sent at all, the message was sent but could not be saved to the Sent folder because you
reached your mailbox quota, the message was sent but without the forwarded attachment
because the original messag e no long er ex is ts, and so on. You will only see this status
indicator next to messages in the Sent fold er.
This email is wa iting to be sent. You will see this status indicator next to messages in the
Sent and Drafts folders.
This email is being sent. You will see this status indicator next to messages in the Sent
and Drafts folders.
Icons identifying the Inbox folder, with contents collapsed/expanded.
Icons identifying the Sent folder, with contents collapsed/expanded.
Icons identifying the Saved folder , with contents collapsed/expanded.
Icons identifying the Drafts fol de r, with contents collapsed/expanded.
Icons identifying a user-defined folder, with contents collapsed/expanded.
Icons identifying the Tras h fo l d er, with contents collapsed/expanded.
Keyboard Shortcuts
While using the Email applic a tion, you can use keyboard shortcuts to open option s from the following Email
menus:
• Browse Email Menu Shortcut s (wit h m e ssage highl ighted)
• Browse Email Menu Shortcuts (with folder highlighted )
• Compose Menu Shortcuts
• Settings Shortcuts
• Settings> Accounts Menu Shortcuts
Each menu’s shortcuts are listed in the tables below.
October 21, 2003 T-Mobile Sidekick Owner’s Manua l 98
Page 99

Browse Email Menu Shortcuts (with message highlighted)
New Message...
Reply...
Reply All...
Forward...
Add Contact...
Move...
Discard
Check for New Email
Mark Read/Unread
+ N
+ R
+ L
+ J
+ @
+ O
+ U
+ K
More options in Email Read view:
Next
Previous
Browse Email Menu Shortcuts (with folder highlighted)
New Message
Rename... (folder)
Discard Message
Mark all msgs (in
folder) as read
+ N
+ E
+ K
Email Messaging
Compose Menu Shortc uts
Send
Save as Draft
Add CC
Add BCC
Attach Photo...
Cancel Message
Settings Shortcuts
Done
Cancel
Settings> Accounts Menu Shortcuts
Done
New Account
Discard
Cancel
October 21, 2003 T-Mobile Sidekick Owner’s Manua l 99
+ M
+ G
+ H
+ P
+ .
+ .
+ N
+
+ .
Page 100

Email Messaging
View Your Email
To view a list of all your email messages, use the Browse Email screen. You can get to this screen via the Jump
screen after selecting Email. If you are already in one of the Email screens, press Back until the Browse Email
screen appears:
Read more in
Browse Email Screen
on page 97.
Read an Email
To op e n a n individual email for reading, do the following while in the Email application:
1 From the Browse Email screen, make sure the folder in which you’ve stored the email is shown in expanded
view. (Scroll to highlight the folder name, then press the wheel to expand/collapse the emails contained in
the folder.)
2 Scroll to highlight the message you want to read, then press the wheel to open it. Your email contents display
in the screen.
3 To dismiss the email and return to the Browse Email screen, press Back .
Open an Attachment
You know an email has an attachment if there is a paperc lip icon ( ) just to the left of the message, as
displayed in the Browse Email screen. Attachments that are supported include other emails and files of the
following formats:
•.gif
• .jpg, .jpeg
•.png
•.bmp
•.doc (Word)
• .pdf (Adobe Acrobat)
To open a supported attachment, first open the email, then use the wheel to scroll to the bottom of the email
message where the attachment will appear.
October 21, 2003 T-Mobile Sidekick Owner’s Manu al 100
 Loading...