

Page 1

USER MANUAL
Page 2

About this Manual .............................................
Table of Contents
Thank you for choosing the REVVL® 4+. In order to maintain your device in optimal condition, please read
this manual and keep it for future reference.
About this Manual .................................................................................................. 1
1 Getting Started ................................................................................................. 4
1.1 Overview .......................................................................................................................................4
1.2 Setup ............................................................................................................................................7
1.3 Home Screen ................................................................................................................................8
1.4 Status Bar .....................................................................................................................................9
2 About Your Phone ........................................................................................... 10
2.1 Power On/Off .............................................................................................................................10
2.2 Battery ........................................................................................................................................11
3 Personalize Your Phone ................................................................................... 12
3.1 Language ...................................................................................................................................12
3.2 Date & Time ................................................................................................................................12
3.3 NFC ............................................................................................................................................13
3.4 Display ........................................................................................................................................13
3.5 Sound .........................................................................................................................................14
3.6 Digital Wellbeing & Parental Controls .........................................................................................15
4 Application .................................................................................................... 16
4.1 Call .............................................................................................................................................16
4.2 Contacts .....................................................................................................................................19
4.3 Messages ...................................................................................................................................22
4.4 Gmail ..........................................................................................................................................24
4.5 Chrome .......................................................................................................................................26
4.6 Calendar .....................................................................................................................................27
4.7 Camera .......................................................................................................................................29
4.8 Photos ........................................................................................................................................31
4.9 Clock ..........................................................................................................................................33
1 2
Page 3

5 Google Applications ........................................................................................ 35
6 Security ......................................................................................................... 38
6.1 Screen Lock ...............................................................................................................................38
6.2 SIM Card Lock............................................................................................................................38
6.3 Lock Screen Preferences ............................................................................................................38
6.4 Fingerprint Sensor ......................................................................................................................38
6.5 Face Key .....................................................................................................................................39
6.6 Smart Lock .................................................................................................................................39
6.7 Encryption & Credentials ............................................................................................................39
7 Account ........................................................................................................ 40
7.1 Account Information ...................................................................................................................40
7.2 Software Update .........................................................................................................................40
8 Safety and Regulatory Information .................................................................... 41
9 Troubleshooting .............................................................................................. 48
Getting Started ...........................................
1
1.1 Overview
Headset connector
Microphone
Front camera
Microphone
USB Type-C
3 4
Speaker
Page 4

Back camera
Volume
keys
Power
key
Fingerprint sensor
Flash
SIM and
microSD
tray
Recent Apps button
• Touch to open a card view of applications you've worked with recently. Swipe up on the screen
to remove a specific thumbnail from the list, or touch CLEAR ALL to remove all thumbnails from
the list.
Home button
• From any application or screen, touch to return to the Home screen.
TM
• Touch and hold to open Google Assistant. Through this function, you can search for
information online, open apps on your phone, send messages, etc.
Back button
• Touch to go back to the previous screen, or close a dialog box, options menu, the Notification
panel, etc.
Power key
• Press: Lock the screen/Light up the screen.
• Press and hold: Show the popup menu to select from Power off, Restart or Screenshot.
• Press and hold the Power key and Volume down key to take a screenshot and save it.
• Press and hold the Power key for at least 10 seconds to force reboot.
Volume Keys
• Adjust the call volume during a phone call.
• Adjust the media volume while listening to music, watching a video, or streaming content.
• Adjust the ringtone volume.
• Mutes the ringtone of an incoming call.
• While using the Camera, press the Volume up or down key to take a photo, or touch and hold
to take several photos.
5 6
Page 5

1.2 Setup
Inserting Nano SIM card
You must insert your Nano SIM card to make phone calls using your network.
Your phone only supports Nano SIM cards. In order to avoid damaging your phone, do not attempt
to insert other SIM types, such as Mini or Micro cards.
Note: Even if no SIM card is installed, your phone will still power on and you will be able to connect to a
Wi-Fi network and use some of the phone's features.
Setup your phone for the first time
The first time you power on the phone, you should set the following options:
• Touch to select the phone's language, then touch .
• Select an available Wi-Fi network, then touch Next, otherwise touch Skip and CONTINUE
• Copy your app & data from another device or touch Don't copy to continue.
• Set PIN for a screen lock, otherwise touch Skip to continue.
• Set up Face key to unlock screen by touching Add face data, otherwise touch Skip.
• Touch SETUP TIME and then Set install time to update your device to the latest version, at a set time,
whenever a system update is available.
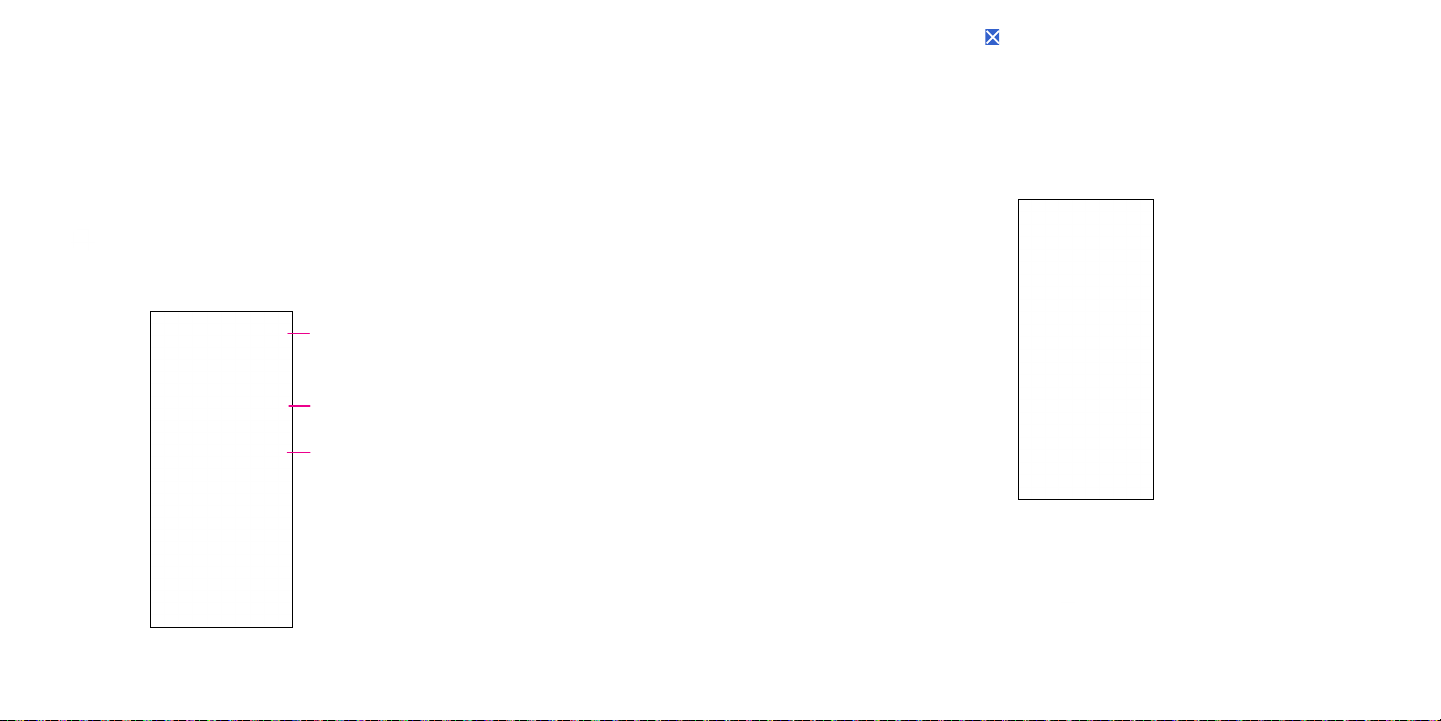
1.3 Home Screen
You can bring all of the items that you use most frequently (applications, shortcuts, widgets, folders) to your
Home screen for quick access. Touch the Home button to switch to the Home screen.
Status bar
•Status/Notification indicators
•Swipe down to open the Notification panel
Swipe left or right to view more screens
Touch to open an application, folder, etc.
Favorite apps tray
•Touch to open the application.
•Touch and hold to move or change applications
Search bar
Enter text search screen.
Enter voice search screen.
7 8
Page 6
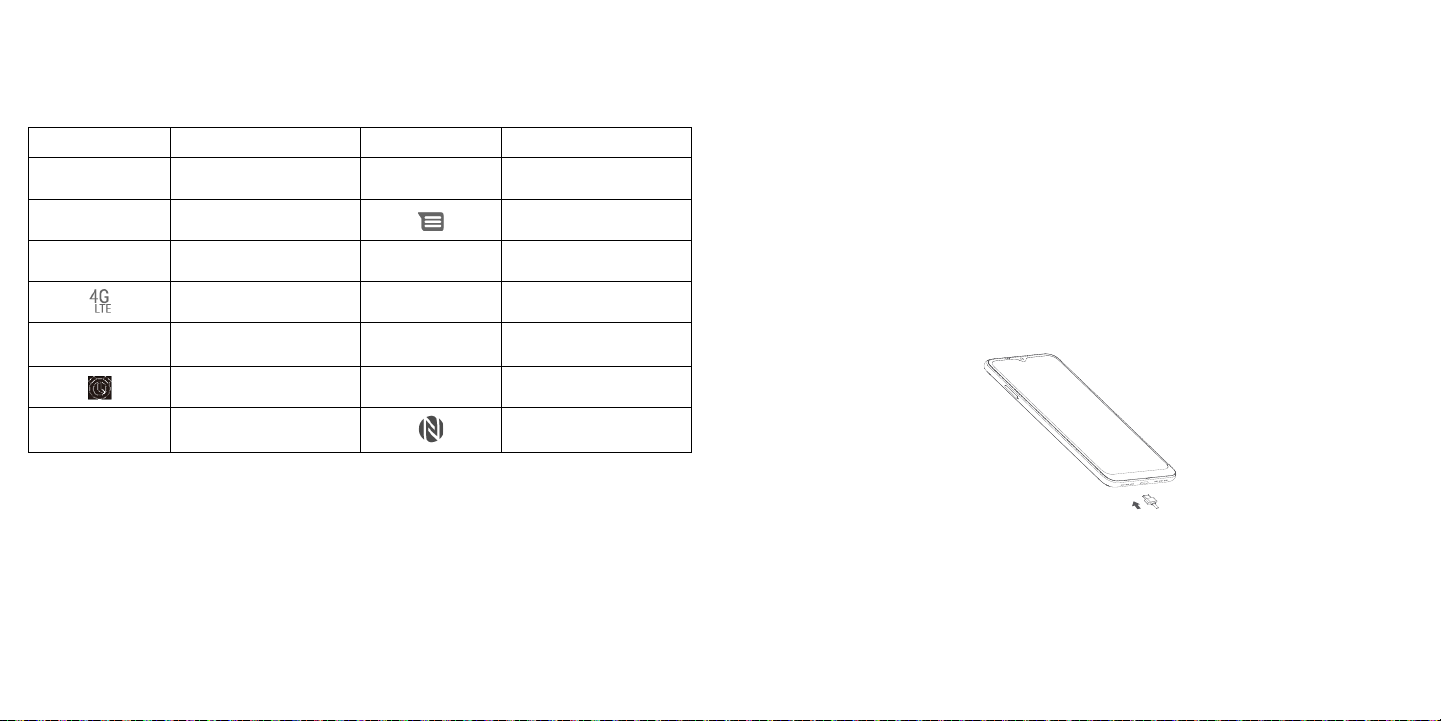
1.4 Status Bar
The Status bar appears at the top of your Home screen. Icons indicating your phone's status and new
notification alerts appear in the Status bar.
Icon Status Icon Status
Bluetooth® active Battery (fully charged)
Wi-Fi® active New message
Network (full signal) Vibrate mode
About Your Phone .......................................
2
2.1 Power On/Off
Hold down the Power key until the phone powers on, unlock your phone (Swipe, Pattern, PIN, Password or
Fingerprint) if necessary, once unlocked, Home screen is displayed.
If you don't know your PIN code or if you have forgotten it, contact Customer Care. For Safety, please do
not store PIN code in your phone.
Press and hold the Power key until options appear, then select Power off.
4G LTE data service Screenshot captured
Airplane mode Connected via USB cable
Alarm set
Battery (charging) NFC is on
9 10
New Gmail message
Charging
Insert the small end of the charging cable into the charge port and plug the charger into an electrical outlet.
Page 7

2.2 Battery
To optimize your battery life, you may do the following:
Turn on power saving mode
• Go to Settings > Battery > Battery saver
• Touch TURN ON NOW to activate the battery saving mode.
Lower screen brightness
• Go to Settings > Display > Brightness level
• Lower the brightness by sliding to the left.
Screen timeout
• Go to Settings > Display > Advanced > Screen timeout
• Select the screen timeout duration.
Personalize Your Phone................................
3
3.1 Language
Your device supports multiple languages. You can change your phone language by:
• Go to Settings > System > Languages & input > Languages.
• Touch + Add a language to select a language from the language list.
• Touch and hold next to your desired language and drag it to the top of the list.
3.2 Date & Time
Go to Settings > System > Date & time.
Use network-provided time
Turn on to enable the network-provided time.
Use network-provided time zone
Turn on to enable the network-provided time zone.
If Use network-provided time is turned off, you will have the following two options to manually set the date
and time:
• Setdate
Touch to open a dialog in which you can manually set the date.
• Settime
Touch to open a dialog in which you can manually set the time.
11 12
Page 8

If Use network-provided time zone is turned off, you will have the following option to manually set the
time zone:
• Timezone
You can select the time zone and region manually.
• Timeformat
You can also set the time format as locale default or 24-hour format.
3.4.3 Reading mode
Reading mode tints your screen amber to imitate physical books and protect your eyes. You can
also specify some apps to operate in this mode.
3.4.4 Auto-rotate screen
Select whether the screen rotates automatically or not.
3.3 NFC
Go to Settings > Connected devices > Connection preferences > NFC.
NFC allows data exchange when the phone touches another device.
3.4 Display
3.4.1 Dark theme
Your screen will become black in this mode, which makes it easier to look at your screen or
read in dim light.
3.4.2 Eye comfort mode
Eye comfort mode can effectively reduce blue light radiation and adjust the color temperature
to relieve eye fatigue. You can also create a custom schedule to turn it on.
Note: Using your device in landscape mode with polarized sunglasses on may cut light from the screen.
Take your polarized sunglasses off or use your device in portrait orientation to continue use.
13 14
3.4.5 Wallpaper
Adjusting Wallpapers
• Go to Settings > Display > Wallpaper.
• Touch Wallpapers to select from pre-loaded wallpapers.
• Touch Photos to select from images that are stored on your device.
3.5 Sound
Adjusting volume:
• Press the volume keys that are located on the right side of the device to adjust the Ringtone &
Notification volume.
• You can also go to Settings > Sound to adjust the volume for media, call, ring and alarm.
Adjusting tones
• Go to Settings > Sound > Phone ringtone.
• You may select ringtones for phone, notification, alarm as well as other sounds.
Page 9

Adjusting other sounds
All other sounds that are related to Dial Pad, Screen locking and Charging can be adjusted to by doing the
following:
• Go to Settings > Sound > Advanced > Other Sounds and vibrates.
3.6 Digital Wellbeing & Parental Controls
Use this menu to find out how much time you have spent on the phone and even on each app. You can customize
the time limit for using the phone.
In addition, parents can restrict their children's usage time and manage their browsing habits.
Application .................................................
4
4.1 Call ...........................................................................................
Making a call
To make a call, touch .
Touch to send a
message, block
the number or
view call details
Show the dial pad
Suggested numbers are displayed as you enter numbers on the dial pad.
15 16
Page 10

Touch and
hold to access
voicemail
Answering or rejecting a call
Enter the desired number from the dial pad and touch to place the call. You can also select a contact
from Favorites , Recents or Contacts by touching the tabs.
The number you entered can be saved to Contacts by touching Create new contact.
If you make a mistake, you can delete the incorrect digits by touching .
To hang up a call, touch .
International call
To make an international call, touch and hold to enter “+”, then enter the international country prefix
followed by the full phone number and touch .
Emergency call
If your phone has network coverage, dial the emergency number and touch to make an emergency call.
This works even without a SIM card and without typing the PIN code.
17 18
When you receive a call:
• Slide up to answer;
• Slide down to reject;
• Touch to reject the call by sending a preset message.
To mute the ringtone of an incoming call, press the Volume key.
Voicemail
Your voicemail is provided to avoid missing calls. It works like an answering machine that you can consult
at any time.
To access your voicemail, touch and hold .
To set your voicemail number: touch Phone and go to menu > Settings > Voicemail > Advanced
Settings > Setup > Voicemail number.
Page 11
If you receive a voicemail, appears in the Status bar. Open the Notification panel and touch Voicemail.
4.2 Contacts ...................................................................................
Contacts enables quick and easy access to the contact you want to reach.
You can view and create contacts on your phone and synchronize them with your Gmail contacts or other
applications on the web or on your phone.
Adding a contact
Touch in the contact list to create a new contact.
Enter the contact's name and other contact information. By scrolling the screen up and down, you can
move from one field to another
When finished, touch SAVE to save
Select a picture or take a
photo for the contact
Touch to open available labels
When finished, touch SAVE to save.
19 20
To exit without saving, you can touch and then touch DISCARD.
Editing your contacts
Touch in the contact details screen to edit. When finished, touch SAVE to save.
Add to/remove from Favorites
Touch a contact to view details then touch to add the contact to favorites.
Touch the star to remove a contact from favorites.
(1)
Deleting a contact
From the contact list screen:
• Touch and hold the contact you want to delete, then touch and confirm to delete.
• Mark the checkbox of all contacts, then touch and confirm to delete all contacts.
From the contact details screen:
• Touch then select Delete. Select DELETE when prompted to confirm.
(1)
Only phone contacts can be added to Favorites.
Page 12

The contact you have deleted will also be removed from other applications on the phone or web the
next time you synchronize your phone.
Sharing a contact
You can share a single contact with others by sending the contact's vCard to them via Email, Messages,
and Bluetooth. Select a contact you want to share, touch and then select Share.
Available options
From the contact list, you may also make further settings by touching .
Settings
• My info Touch to set up your profile
• Accounts Touch to add account and configure related info.
• Default account for
new contacts
• Contacts to display Choose contacts to display.
• Sort by Touch to sort the list by the first name or last name.
Touch to choose the default place to save a new contact.
4.3 Messages ...........................................................................................
Use the messaging app to send and receive text (SMS) and multimedia (MMS) messages.
Creating a message
On the Messaging list screen, touch to write text/multimedia messages.
Add recipients
Type the text message
• Name format Touch to choose whether to display first name first, or last name first.
• Phonetic name Touch to choose display or hide phonetic name.
• Import/Export Import or export contacts between phone, SIM card, microSD card and phone
storage, etc.
• Block numbers Add numbers here so that you won't receive the calls or texts from them.
• About Contacts Touch to view the build version, open source licenses and so on.
21 22
Insert emoticons
Sending a text message
• Enter the name or the phone number of the recipient in the To bar or touch to add recipients.
• Touch the Add text bar to enter the text of the message.
• Touch to insert emoticons.
• When finished, touch to send the text message.
An SMS message of more than 160 characters will be charged as several SMS. A counter will be on the right
of the text box to remind you how many characters can be entered in one message.
Page 13

Specific letters (accented) will also increase the size of the SMS, this may cause multiple SMS to
be sent to your recipient.
Sending a multimedia message
MMS enables you to send video clips, images, audios and Vcard to other compatible mobiles and e-mail
addresses.
• Enter the recipient's phone number in the To bar.
• Touch the Add text bar to enter the text of the message.
• Touch to attach a picture, video, audio or contact.
• When finished, touch to send the multimedia message.
Managing messages
When receiving a message, will appear in the Status bar as a notification. Drag down the Status bar to
open the Notification panel, touch the new message to open and read it. You can also access the Messaging
application and touch the message to open it.
Messages are displayed as a conversation.
Touch a message to enter the message composing screen:
• Touch to call the number.
• Touch to save the number to contacts or view the contact details if the number has been saved.
• To reply to a message, enter the text. When finished, touch .
• If you touch and hold a message, the following options will be available: delete , turn off notification
, archive , etc. Touch to add contact.
23 24
4.4 Gmail ........................................................................................
Setting up Gmail
To set up your email account, swipe up from the Home screen, then select Gmail .
Select to add an email address.
An email setup process will guide you through the steps to set up an email account.
• Select the type of email account that you have and enter the email address and password of the account
you want to set up.
• If the account you entered is not provided by your service provider in the device, touch Other and
then MANUAL SETUP after entering the email address, select an account type and enter password
of your email, then correctly fill in server and port in both Incoming server settings and Outgoing
server settings interfaces. Finally, touch FINISH to complete setup.
• To add another email account, you can touch on the upper left corner, select Settings, and then
touch Add account. Or you can touch the account name on the upper right corner and select Add
another account to implement this function.
Sending an email
• Touch from the Inbox screen.
• Enter recipient(s) email address(es) in the To field.
• If necessary, touch > Cc/Bcc to add a copy or a blind carbon copy to the message.
Page 14

• Enter the subject and the content of the message.
• Touch to add an attachment.
• If you do not want to send the mail right away, you can touch and Save draft or touch the Back key
to save a copy.
• Touch to send.
If you do not want to send or save the email, you can touch and then select Discard.
To add a signature that will appear on all of your emails, touch and select Settings, then choose the
account that you want to create or modify the signature, touch Mobile Signature to edit.
Note: If you are seeing a “password incorrect” error when setting up your Gmail Account in the Gmail
app, please review the following options:
Option 1: Generate an App password
An App password is a 16-digit passcode that gives an app or device permission to access your Google
Account. If you use 2-Step-Verification and are seeing a “password incorrect” error when trying to access
your Google Account, an App password may solve the problem.
Steps to generate an App password:
• Visit your App passwords page https://myaccount.google.com/security/signinoptions/two-step-verification.
You may be asked to sign in to your Google Account.
• At the bottom, click Select app and choose the app you’re using.
• Click Select device and choose the device you’re using.
• Select Generate.
• Follow the instructions to enter the App password (the 16-character code in the yellow bar) on your device.
• Select Done.
• Once you are finished, you won’t see that App password code again. However, you will see a list of apps
and devices you’ve created App passwords for.
If generate an app password does not fix the “Password incorrect” issue, please proceed to Option 2 or
Option 3.
Option 2: Change your settings to allow less secure apps
• Go to the "Less secure apps" https://www.google.com/settings/security/lesssecureapps section in My
Account.
• Next to "Access for less secure apps," select Turn on.
• You can now setup your email using your username and password. If you continue to see a “password
incorrect” error, please proceed to Option 3.
Option 3: Access Gmail through browser
If you don’t want to change your security settings, please follow these steps to access your Gmail:
• From the home page, press the OK button and press on the Browser.
Enter https://www.google.com/gmail/ on the browser URL tab.
• Enter your username and password to log in.
4.5 Chrome.....................................................................................
Using the Chrome browser, you can enjoy surfing the Web.
To access this function, touch Chrome from the Home screen.
25 26
Page 15

4.6 Calendar .................................................................................
You can use Calendar to keep track of important meetings, appointments, etc.
To access the function, swipe up from the Home screen, then touch Calendar.
Viewing calendars
You can display the Calendar in Schedule, Day, 3 days, Week or Month view. Touch and select your
desired calendar view.
Schedule view
Day view
3-day view
Week view
Month view
Creating a new event
You can add new events from any Calendar view.
• Touch .
• Fill in all required information for this new event. If it is a whole-day event, you can turn on next
to All-day.
• Invite guests to the event. Enter the email addresses of the guests you want to invite with commas to
separate. The guests will receive an invitation from Calendar and Email.
• When finished, touch Save from the top of the screen.
To quickly create an event from the Day, 3 Day, or Week views, touch an empty spot to select a target area
which will then turn into , and touch the icon to create the new event.
Deleting or editing an event
• To delete or edit an event, touch the event to enter its details screen, touch to edit the event.
• Touch and Delete to remove the event.
Event reminder
If a reminder is set for an event, the upcoming event icon will appear in the Status bar as a notification
when the reminder time arrives.
• Touch and drag down the Status bar to open the Notification panel.
• Touch an event name to view the Calendar notification list.
27 28
Page 16
4.7 Camera .....................................................................................
Accessing the camera
From the Home screen, touch Camera. If the phone is locked, double-press the Power key to open the
camera.
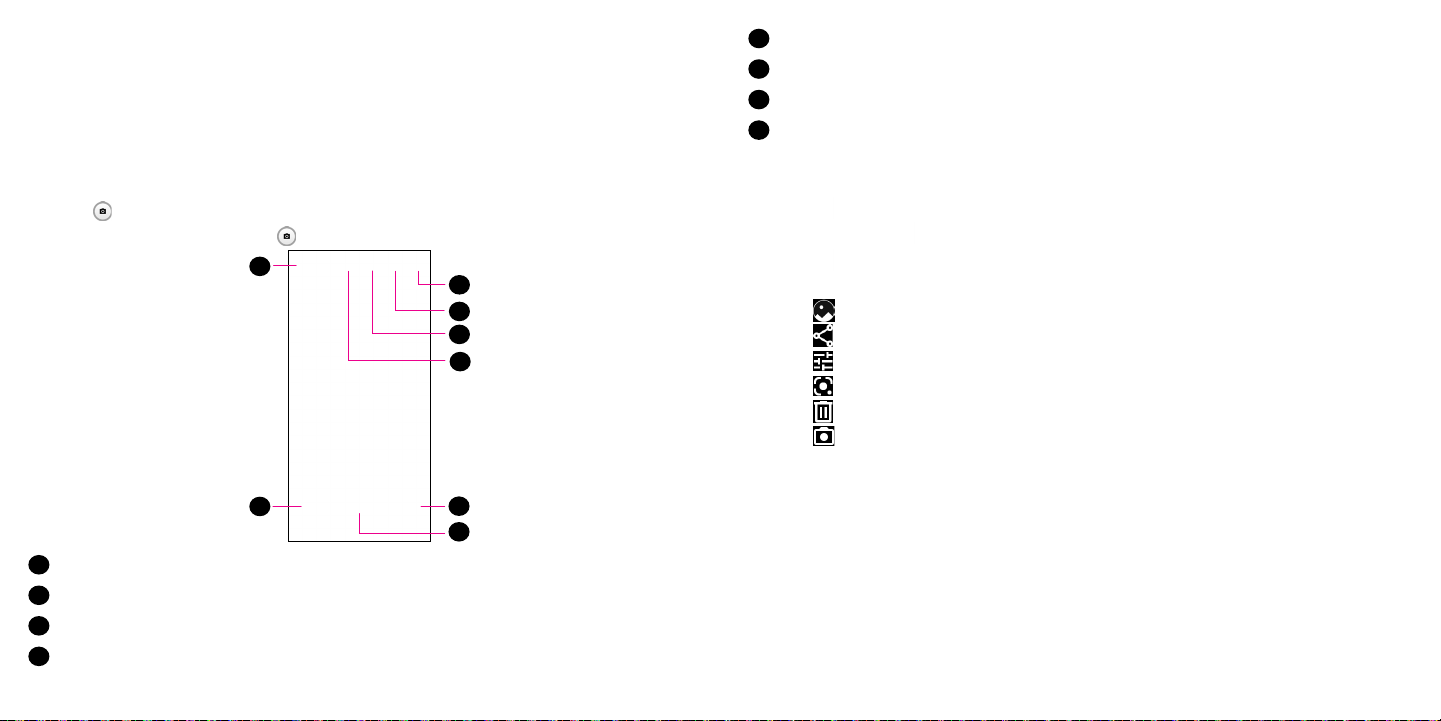
Taking a picture
• Position the object or landscape in the viewfinder, touch the screen to focus if necessary
• Touch to take the picture which will be automatically saved.
• To take burst shots, touch and hold or the Volume key.
7
1
2
3
4
Touch to access more options
5
Switch between front/back camera
6
Touch to take a photo
7
Touch to view photos or videos you have taken
8
Making a video
• Touch VIDEO to enter the Video mode.
• Touch in the center of the screen to start video recording.
• You can also touch to take a picture during video recording.
• Touch to stop recording. The video will be automatically saved.
Further operations when viewing a picture/video you have taken
• Touch from camera screen to view the photos or videos you have taken.
• Touch then Gmail, Bluetooth, MMS, etc. to share the photo or video.
• Touch to edit.
• Touch enable the Google Lens function.
• Touch to delete.
• Touch to go back to Camera mode
8
Touch to select a filter
1
Touch to select flash mode or turn camera flash on/off
2
Touch to set countdown seconds
3
Touch to turn HDR on/off
4
5
6
29 30
Page 17

4.8 Photos ......................................................................................
Photos acts as a media player for you to view photos and play videos.
Pictures and videos are displayed by moments and albums in Photos.
• Touch the picture/video directly to view or play.
• Slide left/right to view previous or next pictures/videos.
Working with photos
You can work with pictures by rotating or cropping them, sharing them with friends, setting them as a
contact photo or wallpaper, etc.
• Locate the picture you want to work on and touch the picture in the full-screen picture view.
• Touch to share the picture, or touch to delete the picture. Touch and select Use as to set the
picture as Contact photo or Wallpaper.
31 32
Find the picture you want to work on and tap the picture in the full screen view. Tap to edit.
Set effects such as Auto, West, Palma, Metro, etc.
Adjust the picture color.
Straighten or Rotate the picture.
Personalize your picture by drawing on it or adding words to it.
Crop the picture.
Page 18

4.9 Clock .......................................................................................
To access clock, swipe up from the Home screen, then touch Clock.
Setting world clocks
Touch on the clock screen.
Touch to add a time zone.
Setting alarms
Touch on the clock screen.
Turn on to enable existing alarm, or touch to add a new alarm. The following options will appear:
•
• Repeat
•
• Vibrate
• Label Touch to set a name for the alarm.
• Delete
•
Touch the clock to set the desired time for the alarm.
Mark the repeat checkbox, then select the days when you want to set.
Touch to select a ringtone for the alarm.
Mark the checkbox to activate vibration.
Touch to delete the alarm.
Touch to add the alarm to Google Assistant Routine.
Setting timer
Touch on the clock screen.
• Enter time in the sequence of hours, minutes, and seconds.
• Touch to activate Countdown.
• Touch Add timer to add another timer in panel.
• Touch to deactivate Countdown.
• Touch Delete to delete current countdown timer.
Setting stopwatch
Touch on the clock screen.
• Touch to start the timer.
• Touch Lap to show a list of records according to the updated time.
• Touch to halt the total and lap times.
• Touch Reset to start a new timer.
33 34
Page 19

Google Applications ....................................
5
Google apps are preinstalled on your phone to improve work efficiency and help you enjoy life.
This manual briefly introduces the apps. For detailed features and user guides, refer to related websites or the
introduction provided in the apps.
You are recommended to register with a Google Account to enjoy full functionality.
Drive
A file storage and synchronization service created by Google, which allows users to store files in the cloud,
share and edit files. Files in Drive are kept secure and can be accessed from any device by logging in to
your Google Account. Files or folders can be shared privately with other Google Account users.
Play Movies & TV
Google Play Movies & TV allows you to watch movies and TV shows purchased or rented on Google Play.
Google
Your bookmarks, browsing history, and settings across all devices on which the browser is installed can
be synchronized with your Google Account.
Gmail
As Google's web-based email service, Gmail is configured when you first set up your phone. With this
application, you can send and receive emails, manage emails by labels, archive them, etc. Emails can be
automatically synchronized with your Gmail account.
Maps
Google Maps offers satellite imagery, street maps, 360° panoramic views of streets, real-time traffic
conditions, and route planning for travelling by foot, car, or public transportation. By using this
application, you can find your own location, search for a place, and get suggested route planning for
your trips.
YouTube
YouTube is an online video-sharing application where users can upload, view, and share videos. Available
content includes video clips, TV clips, music videos, and other content such as video blogging, short
original videos, and educational videos. It supports a streaming function that allows you to start watching
videos almost as soon as they begin downloading from the internet.
35 36
Play Store
Ser ves as the official app store for the Android operating system, allowing users to browse and download
applications and games. Applications are either free of charge or at a cost.
In Play Store, search for the app you need, download it and then follow the installation guide to install the
app. You can also uninstall, update an app, and manage your downloads.
Duo
This is a video chat mobile app that allows users to make video calls to people in their contact list once
their phone numbers are verified.
Photos
Google Photos stores and backs up your photos and videos. It also automatically analyzes photos and
organizes them into groups, so that you can quickly find the photos you need.
Page 20

Keep notes
You can insert images, lists, and make voice recordings in your notes. You can also set time or
location-based reminders for notes. Google Keep allows you to categorize notes by labels, and notes are
searchable based on their color, whether they have reminders, audio, images, or lists.
Files
Files displays all data stored on the phone, including both external SD card and internal storage, such as
applications, media files downloaded from Google Play Store, YouTube or other locations; Videos, pictures
or audios you have captured; other data transferred via Bluetooth, USB cable, etc.
Security .....................................................
6
6.1 Screen Lock
From the Home screen, touch > Settings > Security > Screen lock
Screen lock allows you to set a screen lock option to secure your phone from being used by others without
your permission, activate the following security options: Pattern, PIN, Password or Fingerprint. Whoever
turns on your phone will be required to unlock the screen in order to access your device. Your device can
be unlocked by anyone if you select None or Swipe.
6.2 SIM Card Lock
A SIM PIN prevents access to the cellular data networks. When it's enabled, any device containing the SIM
card will request the PIN upon restart. A SIM PIN is not the same as the lock code used to unlock the device.
6.3 Lock Screen Preferences
Customize what displays on your lock screen.
6.4 Fingerprint Sensor
Use your Fingerprint to unlock the screen or clear notifications, take a photo/video, pick up a call, etc.
Access Settings > Security > Fingerprint to activate these functions.
37 38
Page 21

6.5 Face Key
Face key allows you to unlock your device with your facial data. Set it according to the on-screen steps.
Ensure that you are facing the phone screen when using face recognition.
NOTE: you need to set a pattern, PIN, or password before using face key.
6.6 Smart Lock
This function is inactive by default. You need to set a screen lock to activate this function. If Smart lock is
turned on, your device remains unlocked when it is safe with you.
Account ....................................................
7
7.1 Account Information
Be sure to access your account at My.T-Mobile.com to check your minutes, pay your bill, upgrade your
phone, change your rate plan, and contact customer service.
You can also access this account information from your phone using the T-Mobile app .
Touch the T-Mobile folder from the Home screen and then touch the T-Mobile app .
6.7 Encryption & Credentials
Touch to view your device encryption status and the credentials items. You can modify and clear all of the
stored credentials.
39 40
7.2 Software Update
To access Software Updates, follow the steps below:
• Connect your device to a Wi-Fi network and make sure it has a strong data connection.
• Ensure your battery is fully charged before starting the software update. Your device’s current battery
level can be found on your device under Settings > Battery.
• Go to Settings > System > Advanced > System update.
• If you want to update the system, tap
phone will have the latest version of the software.
CHECK FOR UPDATES NOW
and when that’s finished, your
Page 22

Safety and Regulatory Information .................
8
SAFETY AND USE
We recommend that you read this chapter carefully before using your mobile device. The manufacturer
disclaims any liability for damage, which may result as a consequence of improper use or use contrary to
the instructions contained herein. Use of connected devices subject to T-Mobile’s Terms and Conditions.
TrafcSafety
Always obey the local laws and regulations addressing the use of wireless mobile devices and their
accessories in the areas where you drive. The use of mobile devices while driving may be prohibited or
restricted in certain areas.
Conditions of Use
Remember to abide by local authority rules of mobile device use on aircrafts.
Operational Warnings: Only use your mobile device in accordance with local laws and regulations and
obey all posted notices in public areas.
Read and follow the directions from the manufacturer of your implantable medical device. If you have any
questions about using your mobile device with your implantable medical device, consult your healthcare
provider.
It is recommended to have proper supervision while small children use your mobile device.
Do not attempt to disassemble your mobile device. If you disassemble your mobile device, the warranty
will not apply.
Always handle your mobile device with care and keep it in a clean and dust-free place.
Do not allow your mobile device to be exposed to adverse weather or environmental conditions (moisture,
humidity, rain, inltration of liquids, dust, sea air, etc.). The manufacturer’s recommended operating
temperature range is 0°C (32°F) to +50°C (122°F)
Note: The max value depends on the device condition, materials around it and the housing paint and
texture.
Over 40°C (104°F) the legibility of the mobile device’s display may be impaired, though this is temporary
and not serious.
Do not open or attempt to paint or repair your mobile device.
Do not drop, throw or try to bend your mobile device.
Do not use the mobile device if the screen is damaged, cracked or broken to avoid any injury.
Use only batteries, battery chargers, and accessories which are recommended by Device manufacturer
anditsafliatesandarecompatiblewithyourmobiledevicemodel.Devicemanufacturerandits afliates
disclaim any liability for damage caused by the use of other chargers or batteries.
Please check local laws and regulations in your jurisdiction to learn how to best dispose of your mobile
device.
PROTECT YOUR HEARING
To prevent possible hearing damage, do not listen at high volume levels for long periods.
Exercise caution when holding your device near your ear while the loudspeaker is in use.
PRIVACY
Please note that you must respect the laws and regulations of your jurisdiction or other jurisdiction(s)
where you will use your mobile device regarding taking photographs and recording sounds with your
mobile device. Pursuant to such laws and regulations, it may be strictly forbidden to take photographs
and/or to record the voices of other people or any of their personal attributes, and reproduce or distribute
them, as this may be considered to be an invasion of privacy.
41 42
Page 23

It is the user’s sole responsibility to ensure that prior authorization be obtained, if necessary, in order to
recordprivateorcondentialconversationsortakeaphotographofanotherperson;themanufacturer,the
seller or vendor of your mobile device (including the operator) disclaim any liability which may result from
the improper use of the mobile device.
LEGAL INFORMATION
In order to provide you with better access to this important information, we've made the materials
accessible from the phone's Settings menu. Review these materials prior to using your mobile device. To
access the materials on your mobile device, swipe up from the home screen, and tap Settings > About
phone > Legal information, and select a topic.
REGULATORY INFORMATION (E-LABEL)
Your mobile device uses an electronic label (e-label) that provides regulatory information about your
device. To view the regulatory information (such as FCC ID) for this device, on the device, swipe up from
the home screen, then tap Settings > About phone > Regulatory & safety.
FCC COMPLIANCE
Any changes or modifications not expressly approved by the party responsible for compliance of this
device voids the user's authority to operate this device.
This device complies with Part 15 of the FCC Rules. Operation is subject to the following two conditions:
(1) This device may not cause harmful interference
(2) This device must accept any interference received, including interference that may cause undesired
operation.
This equipment has been tested and found to comply with the limits for a Class B digital device, pursuant
to Part 15 of the FCC Rules. These limits are designed to provide reasonable protection against harmful
interference in a residential installation. This equipment generates, uses and can radiate radio frequency
energy and, if not installed and used in accordance with the instructions, may cause harmful interference
to radio communications. However, there is no guarantee that interference will not occur in a particular
installation. If this equipment does cause harmful interference to radio or television reception, which
can be determined by turning the equipment off and on, the user is encouraged to try to correct the
interference by one or more of the following measures:
• Reorient or relocate the receiving antenna.
• Increase the separation between the equipment and receiver.
• Connect the equipment into an outlet on a circuit different from that to which the receiver is connected.
• Consult the dealer or an experienced radio/TV technician for help.
HEARING AID COMPATIBILITY (HAC)
The FCC has established requirements for digital wireless mobile devices to be compatible with hearing
aids and other assistive hearing devices.
When wireless devices are used near hearing devices (such as hearing aids and cochlear implants), users
may detect a buzzing, humming, or whining noise. Some hearing devices are more immune than others
to this interference, and wireless devices also vary in the amount of interference that they generate.
The wireless telephone industry has developed ratings to assist hearing device users in finding wireless
devices that may be compatible with their hearing devices. Not all wireless devices have been rated.
Wireless devices that are rated will have the rating displayed on the box together with other relevant
approval markings.
The ratings are not guarantees. Results will vary depending on the user’s hearing device and hearing
loss. If your hearing device is vulnerable to interference, you may not be able to use a rated wireless
device successfully. Consulting with your hearing health professional and testing the wireless device with
your hearing device is the best way to evaluate it for your personal needs.
43 44
Page 24

This smartphone has been tested and rated for use with hearing aids for some of the wireless
technologies that the smartphone uses. However, other wireless technologies may be used in this
smartphone that have not been tested for use with hearing aids. It is important to try the different features
of your smartphone thoroughly and in different locations to determine if you hear any interfering noise
when using this smartphone with your hearing aid or cochlear implant. Consult your wireless service
provider about its return and exchange policies, and for information about hearing aid compatibility.
Your device includes a radio transmitter and receiver. It is designed and manufactured not
to exceed the exposure limits for Radio Frequency (RF) set by the Federal Communications
Commission (FCC). The RF exposure limits set by the FCC for wireless mobile devices utilize a
unit of measurement referred to as Specific Absorption Rate (SAR), which is a measure of the
amount of RF energy absorbed by the body when using a mobile device. The FCC requires
mobile device manufacturers to ensure that their mobile devices comply with these objective
limits for safe exposure. The FCC SAR limit incorporates a substantial margin of safety to give
additional protection to the public and to account for any variations in measurements. The
FCC limit for public exposure from cellular telephones is a SAR level of 16 watts per kilogram
(1.6 W/kg).
This device complies with FCC radiation exposure limits set forth for an uncontrolled
environment. To ensure compliance with the RF exposure guidelines, the device must be
used at least 15mm from your body.
SAR information for this device can be found on the FCC website at www.fcc.gov/oet/ea/.
Follow the instructions on the website to use the FCC ID for this device to find SAR values for
the device.
To view additional SAR information on your phone, swipe up from the home screen, then tap
Settings > About phone > Legal information > RF Exposure.
Battery and Accessories
Observe the following precautions for battery use:
• Do not attempt to open the battery (due to the risk of toxic fumes and burns).
• Do not disassemble or cause a short-circuit in the battery.
• Do not burn or dispose of a used battery in household garbage or store it at temperatures above 60ºC.
• Do not disassemble or open, crush, bend or deform, puncture or shred.
• Do not modify or remanufacture, attempt to insert foreign objects into the battery, immerse or expose to
water or other liquids, expose to fire, explosion or other hazards.
Products that have the below symbol must be taken to collection points at the end of their life:
• Municipal waste disposal centers with specific bins for these items of equipment.
• Collection bins at points of sale.
You can learn more about how to recycle your mobile device by visiting the CTIA website at
www.ctia.org/news/how-to-recycle-your-mobile-device
CAUTION: IF BATTERY IS REPLACED BY AN INCORRECT TYPE, DEVICE MIGHT EXPLODE. DISPOSE OF USED
BATTERIES ACCORDING TO THE INSTRUCTION.
WARNING: Cancer and Reproductive Harm - www.P65Warnings.ca.gov
RECYCLING INFORMATION
Call Recycle Customer Support at 1-855-368-0829 for recycling instructions.
45 46
Page 25

CHARGERS
Home A.C./Travel chargers will operate within the temperature range of: 0°C (32°F) to 45°C (113°F).
The chargers designed for your mobile device meet with the standard for safety of information technology
equipmentand ofce equipment use.Duetodifferent applicable electricalspecications,achargeryou
purchased in one jurisdiction may not work in another jurisdiction.
LICENSES
microSD logo is a trademark of SD-3C, LLC.
The Bluetooth® word mark and logos are owned by the Bluetooth SIG, Inc. and any use of
such marks by Device Manufacturer and its affiliates is under license. Other trademarks and
trade names are those of their respective owners.
The Wi-Fi Logo is a certification mark of the Wi-Fi Alliance.
Troubleshooting ..........................................
9
Before contacting the service center, you are advised to follow the instructions below:
•Tohaveoptimaloperation,fullychargethebattery.
•Toimprovethephone’sperformance,removeunnecessaryfilesorappsonyourphone.
•Toupdateyoursystemsoftware,usetheSystem update command in your phone’s settings.
•Tosetyourphonetofactorydefault,use theReset options in the phone’s settings. All your phone data
will be lost permanently. It is strongly advised to fully back up your phone before resetting.
My phone can't be switched on
• If the phone can't be switched on, charge for at least 10 minutes to ensure the minimum battery
power needed. Then switch it on again.
My phone has not responded for several minutes
• If your phone doesn’t respond, turn off your phone by pressing and holding the Power key until it
turns off and then restart it again.
My phone turns off by itself
• If your phone turns off by itself, make sure that the Power key is not accidentally pressed.
• Check the battery charge level.
• If it still doesn't work, Factory reset the phone via the Reset options in the phone’s Settings. Make
sure you have backed up your data.
My phone can't charge properly
• Make sure that you are using the proper charger that comes with the phone.
• Make sure that your battery is not completely discharged; if the battery power has been discharged
for a long time, it may take around 10 minutes to display the battery charging indicator on the screen.
• Make sure that charging is carried out under normal conditions (0°C (32°F) to 55°C (131°F)).
• When abroad, check that the voltage input is compatible.
• Check that the charging port is secured or it’s not damaged.
47 48
Page 26

My phone can't connect to a network or "No service" is displayed
• Try connecting to the network by moving to another physical location.
• Verify the network coverage in your current area.
• Check that your SIM card is valid.
• Make sure your phone’s setting is not in airplane mode.
• If you are away from your T-Mobile network, you may need to enable roaming in the phone’s settings
to connect to another network. Roaming charges may apply.
My phone can't connect to the internet
• Make sure that Cellular Data internet service is available in your wireless service plan.
• Check your phone's settings. Make sure Cellular Data is enabled or Wi-Fi connected.
• Make sure that you are in a place with network coverage for cellular data or Wi-Fi internet connection.
• Try connecting at a later time or from another location.
Invalid SIM card
• Make sure that the SIM card has been correctly inserted (see "Inserting Nano SIM card").
• Make sure that the chip on your SIM card is not damaged.
• Make sure that the service of your SIM card matches the network you’re on.
My phone can't make outgoing calls
• Make sure that you have dialed a valid number and have touched Call on your phone.
• For international calls, check the country and area codes.
• Make sure that your phone is connected to a network, and the network is not overloaded or
unavailable.
• Check your subscription status.
• Make sure that you have not barred outgoing calls.
• Make sure that your phone is not in airplane mode.
My phone can't receive incoming calls
• Make sure that your phone is switched on and connected to a network.
• Check for overloaded or unavailable network.
• Check your subscription status.
• Make sure that you have not forwarded incoming calls.
• Make sure that you have not barred certain calls.
• Make sure that your phone is not in airplane mode.
The caller’s name/number doesn't appear when a call is received
• If the caller is not in your contact list, you have the option to subscribe to NameID
• Your caller may have concealed his name or number.
I can't find my contacts
• Make sure that your SIM card is not broken.
• Make sure that your SIM card is inserted properly.
• Import all contacts stored in SIM card to phone.
The sound quality of the calls is poor
• Adjust the volume during a call by pressing the Volume key.
• Check the network strength. Move to a location with stronger signal strength.
• Make sure that the receiver, connector or speaker on your phone is clean.
I can't use the features described in the manual
• Check to make sure that your subscription includes this service.
• Make sure that this feature doesn't require any additional accessory.
When I select a number from my contacts, the number can't be dialed
• Make sure that you have correctly recorded the number in your file.
• Make sure that you have selected the country code when calling an international number.
I can't add a contact
• Make sure that your SIM card contact list are not full; delete some files or save the files to the phone.
My callers can't leave messages on my voicemail
• Contact your network carrier to check service availability.
• Set up your voicemail, so that your caller can leave a message.
I can't access my voicemail
• Make sure that T-Mobile's voicemail number is correctly entered in "Voicemail number".
• Try later if the network is busy.
I can't send and receive MMS
• Check your phone storage as it might be full.
• Contact customer care to check service availability and MMS parameters.
• Verify the server center number or your MMS profile with customer care.
• The server center may be swamped. Try again later.
49 50
Page 27

• Start a new Messaging string. Your messaging string may have reached its limit.
SIM card PIN locked
• Contact customer care to obtain the PUK (Personal Unblocking Key) code.
I can't connect my phone to my computer
• Install Smart Suite.
• Check that your USB driver is installed properly.
• Open the Notification panel to check if the Smart Suite Agent has been activated.
• Check that you have marked the USB debugging checkbox.
• Check that your computer meets the requirements for Smart Suite installation.
• Make sure that you’re using the right cable from the box.
I can't download new files
• Make sure that there is enough phone storage space for your download.
• Select the microSD card as the location to store downloaded files.
• Check your subscription status.
The phone can't be detected by others via Bluetooth
• Make sure that Bluetooth is turned on and your phone is visible to other users.
• Make sure that the two devices are within Bluetooth’s detection range.
The battery drains too fast
• Make sure that you follow the complete charge time (minimum 2.3 hours).
• After a partial charge, the battery level indicator may not be exact.
• Wait for at least 10 minutes after removing the charger to obtain an exact indication.
• Adjust the brightness of screen as appropriate.
• Extend the email auto-check interval for as long as possible.
• Update news and weather information manually or increase their auto-check interval.
• Exit background-running applications if they are not being used for extended periods of time.
• Deactivate Bluetooth, Wi-Fi, or GPS when not in use.
The phone becomes warm following prolonged calls, game playing, internet surfing or running other
complex applications
• This heating is a normal consequence of the CPU handling excessive data. Ending the above actions
will make your phone return to normal temperature.
51 52
After Factory data reset is performed, I can't use my phone without entering Google Account
credentials
• After reset is performed, you must enter the original Google Account credentials that were used on
this phone.
• If you don’t remember your Google Account credentials, complete Google Account recovery
procedures.
The phone doesn't ring when a call or message arrives
• Make sure that Do Not Disturb mode (go to Settings > Sound > Do Not Disturb) is not activated.
• Press the Volume key to adjust volume.
English - CJA2FF0TBAAA
 Loading...